
This page applies to developers and data stewards. It describes how to perform common data preparations for process analysis.
OverviewCopy link to clipboard
There are some data preparations that developers or data stewards will commonly want to perform. From standardizing event values, to hiding sensitive data, these common data preparations are easy to perform and require minimal effort.
This page describes how developers and data stewards can accomplish common data preparations.
For more advanced data preparations, like merging multiple event tables together or separating a single event table into multiple, consider creating a records-backed record type.
Developer preparationsCopy link to clipboard
As the developer, you are responsible for connecting to process data and preparing that data so it can be accessed and used in process insights. This means that you must ensure that record types containing process data all have data sync enabled and include the required relationships and fields.
To meet these requirements, you may need to perform the following data preparations:
- Keep data under the synced row limit
- Remove ad hoc events
- Standardize timestamps
- Standardize activities (or event types)
- Extract text from a field
- Standardize automation type
Keep data under the synced row limitCopy link to clipboard
By default, each record type with data sync enabled can sync up to 4 million rows of data from a source.
For large or a growing data source, you should configure different sync options to keep the data under the synced row limit.
As a best practice, Appian recommends enabling the Keep data available at high volumes sync option on event history record types since they typically accumulate large quantities of data.
For example, let's say the Order Event History record type currently has 3.6 million rows of data, and your company expects an influx of orders over the holiday season. Since there will be more orders and an event is created each time an order is submitted, reviewed, approved, or shipped, you should enable the Keep data available at high volumes option on the Order Event History record type. Enabling this option will dynamically sync the most recent order events, preventing the record type from exceeding the synced row limit.
Remove ad hoc eventsCopy link to clipboard
Ad hoc events, like "John Doe commented on an order" or "Jane Smith updated an employee," are typically not useful when analyzing how the process itself is doing. As a result, ad hoc events should be excluded from event history record types that will be used in process insights.
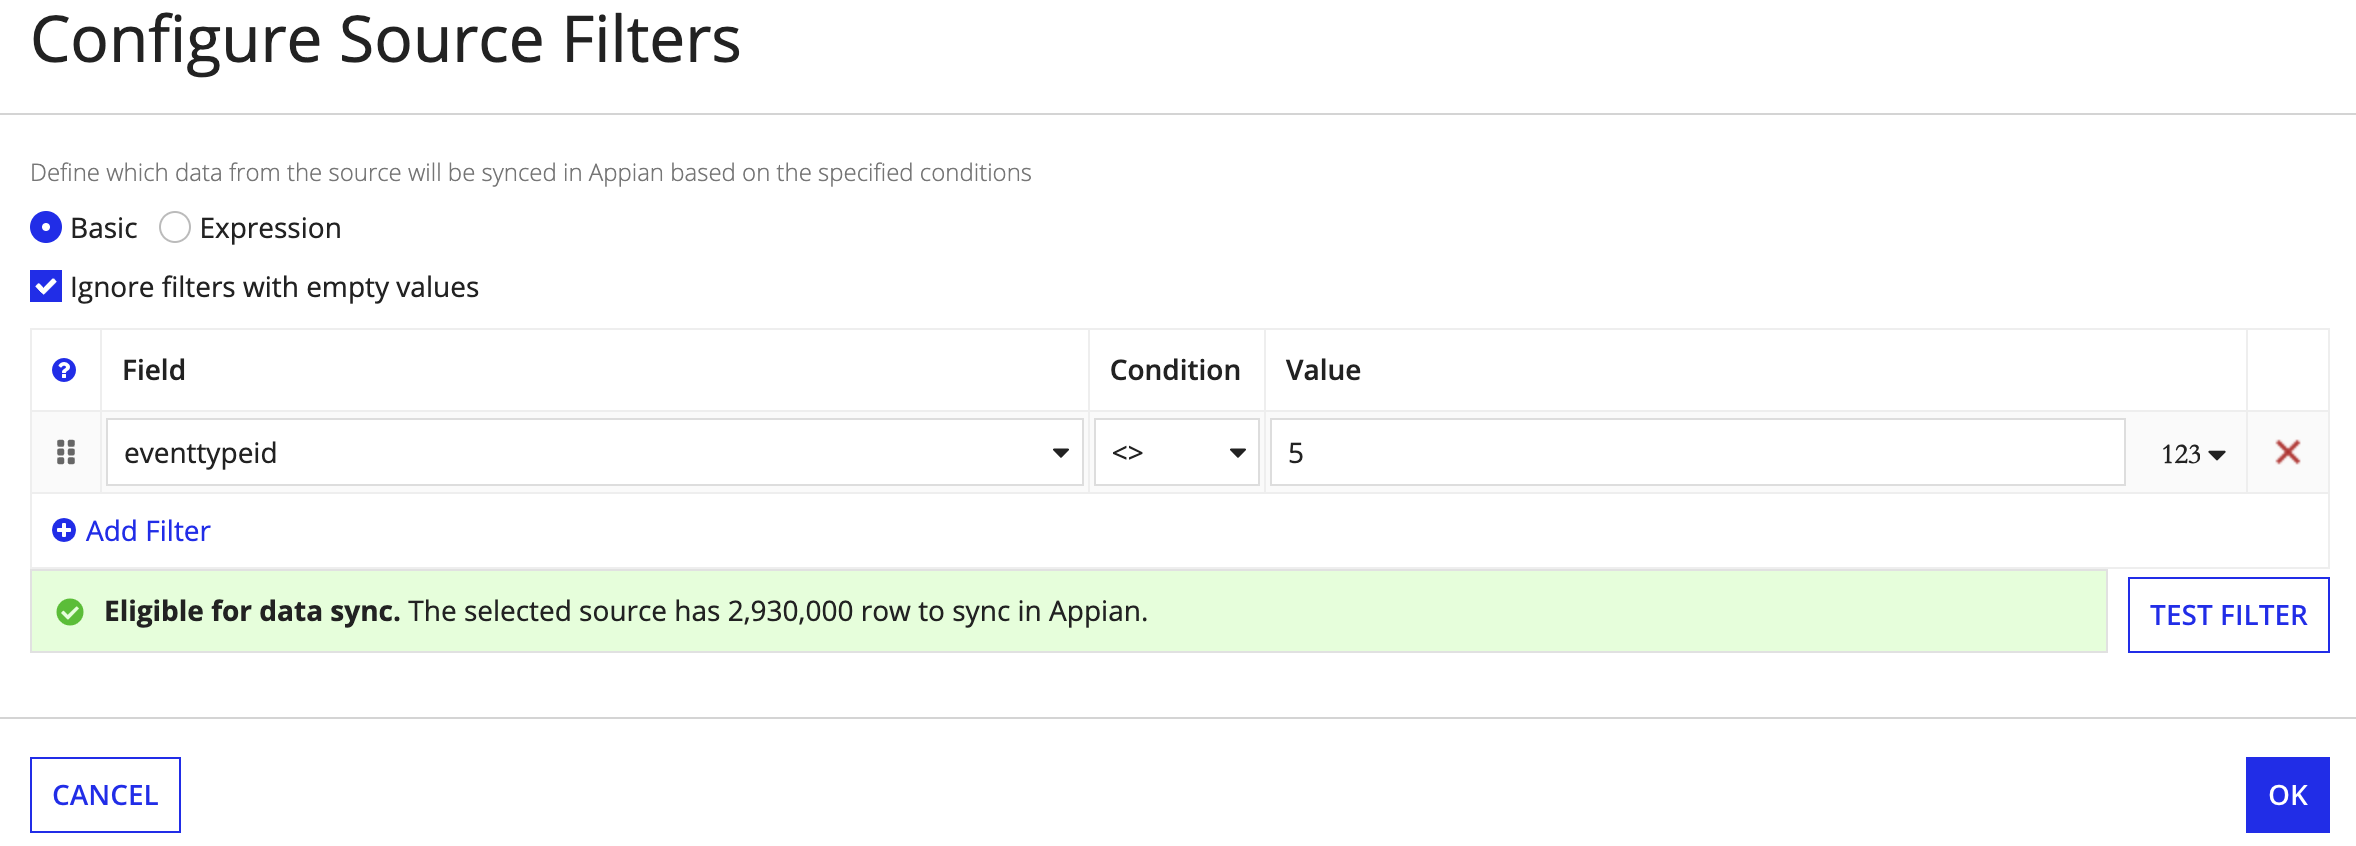
To exclude ad hoc events, add a source filter to the event history record type and use filter operators like <> or not in to omit certain events from the record type.
For example, let's say the Invoice Event History record type captures an event whenever a user comments on an event history list component. Since comments are considered an ad hoc event, you should add a source filter on the record type like the one below. This example is filtering out any events that have an eventtypeid value of 5, which is the lookup value for the Commented on Invoice event name in the Event Type Lookup record type.

In some scenarios, you may want to keep ad hoc events in your event history record type. For example, you might want to create an activity log in your applications. In these scenarios, you can create a new Event History record type that points to the same data source as the existing event history record type. Then, you can apply source filters to the new record type so it can be used in process insights.
Using the example above, you could keep ad hoc events in the Invoice Event History record type and use the following steps to create a new event history record type to use in process insights:
- Create a new record type called Invoice Event History (Process Insights).
- Configure the data source to be the same as the existing Invoice Event History record type.
- Add a source filter to remove events with the
Commented on Invoiceevent type. - On the case record type, create a one-to-many relationship to the Invoice Event History (Process Insights) record type.
Then, when the application is deployed to production, the new record type can be accessed in process insights.
Standardize timestampsCopy link to clipboard
One of the required fields on an event history record type is a timestamp field of type Date and Time. This field captures when an event started or ended, and it can have any date and time formatting, so long as it's consistent across all events.
If your timestamp field is a different data type (like Text), or the date formatting is inconsistent across events, you can create a sync-time custom record field to standardize the format and change the field's data type.
For example, let's say an Event History record type has a timestamp field formatted like "2022-05-25 00:07:10". While the format of the field is fine, the field’s data type is type Text so it cannot be analyzed in process insights.
To convert the field’s data type, you can create a sync-time custom record field to display the same timestamp values and set the data type to Date and Time.
To create the custom record field in this example:
- In the record type, click NEW CUSTOM RECORD FIELD.
- Select Write Your Own Expression and keep Sync-Time Evaluation selected.
- Click NEXT.
-
In the EXPRESSION box, write an expression that returns the timestamp in the data format you need.
In this example, we want to keep the same timestamp format, so we’ll use the left() and mid() functions to extract the corresponding values needed in the datetime() function.
1
2
3
4
5
6
7
8
9
10
11
12
 if(
   a!isNotNullOrEmpty(rv!record[recordType!Event History.fields.startTime]),
   datetime(
      year: left(rv!record[recordType!Event History.fields.startTime], 4),
      month: mid(rv!record[recordType!Event History.fields.startTime], 6, 2),
      day: mid(rv!record[recordType!Event History.fields.startTime], 9, 2),
      hour: mid(rv!record[recordType!Event History.fields.startTime], 12, 2),
      minute: mid(rv!record[recordType!Event History.fields.startTime], 15, 2),
      second: mid(rv!record[recordType!Event History.fields.startTime], 18, 2)
    ),
   null()
 )
Copy - Click NEXT.
-
Configure the following field properties:
Property Action Record Field Name Enter a name for the field, like structuredTimestamp.Record Field Type Select Date and Time. Display Name (Optional) Enter a user-friendly field name for Process HQ users, like Event Timestamp.Description (Optional) Enter a helpful description about the field, like The timestamp structured in a way that is compatible with process insights. - Click CREATE.
Standardize activities (or event types)Copy link to clipboard
Another required field in the event history record type is an activity field. This field must either store the activity that occurred, or store a number that references the activity in a lookup record type.
Activities should have short, human-readable names. They should not include dynamic details about the event, like the user who completed the activity or the time it was completed—this type of information should be stored in separate fields, like user and timestamp.
If your activities contain dynamic values or have varying degrees of specificity, you can create a sync-time custom record field to standardize the values in your activity field.
For example, let's say an Event History record type includes a field for activityName, which stores the different types of activities that can occur. However, there are some values in this field that are too detailed for meaningful use in process insights. Some example values in this field include:
- Submitted by jane.smith
- Completed Document Review
- Approved
To standardize the activities for process insights, you can create a sync-time custom record field that replaces certain values with new ones.
Tip: Need to replace all of the values in the existing field? Check out Extract text from a field to learn how.
To create the custom record field in this example:
- In the record type, click NEW CUSTOM RECORD FIELD.
- Select Write Your Own Expression and keep Sync-Time Evaluation selected.
- Click NEXT.
-
In the EXPRESSION box, write an expression that replaces certain field values with new, simplified values. Otherwise, keep the existing field values.
In this example, we'll use the a!match() function to replace values in the
activityNamefield. This expression states that: if a field value contains "Submitted", replace it with "Submitted Document". If a field value contains "Approved", then replace it with "Approved Document". Otherwise, display the same field value that is already in theactivityNamefield.1 2 3 4 5 6 7 8
a!match( value: rv!record[recordType!Event History.fields.activityName], whenTrue: search("Submitted", fv!value) > 0, then: "Submitted Document", whenTrue: search("Approved", fv!value) > 0, then: "Approved Document", default: rv!record[recordType!Event History.fields.activityName] )
Copy - Click NEXT.
-
Configure the following field properties:
Property Action Record Field Name Enter a name for the field, like processActivities.Record Field Type Select Text. Display Name (Optional) Enter a user-friendly field name for Process HQ users, like Standardized Activity Name.Description (Optional) Enter a helpful description about the field, like A standardized list of activities. - Click CREATE.
Now, the new processActivities field contains a standard set of activities that can be used in process analysis, like:
- Submitted Document
- Completed Document Review
- Approved Document
Extract text from a fieldCopy link to clipboard
Your case or event history record type may have a field that stores freeform text that's manually entered by users. This freeform text may explain why a support case was closed or why an order was canceled, which is important information to consider when investigating the efficiency of your business process. But as unstandardized, freeform text, this information can't be effectively analyzed in process insights.
To allow process insights to analyze this information, you can create a sync-time custom record field to extract values with certain keywords and transform them into new, standardized values.
For example, let's say the Quote record type (a case record type) has the field voidReason, which stores freeform text about why a quote was voided.
To standardize the void reasons so they can be analyzed by process insights, you can create a sync-time custom record field that extracts values from the voidReason field that have certain keywords, like price, cost, or pricing, and then group those values in a single, standardized value, like "Pricing Issues."
To create the custom record field in this example:
- In the record type, click NEW CUSTOM RECORD FIELD.
- Select Write Your Own Expression and keep Sync-Time Evaluation selected.
- Click NEXT.
-
In the EXPRESSION box, write an expression that replaces all existing field values with new, simplified values.
This example expression is similar to the one used in the standardize activities example. The only difference here is that we are using a!match() to replace all existing field values with new ones, whereas the other example only replaced certain field values.
This expression states that: if a field value contains any of the following words, replace it with a new term. If a field value doesn't match any of the terms, replace it with the value "Other".
1
2
3
4
5
6
7
8
9
10
 a!match(
   value: rv!record[recordType!Quote.fields.voidReason],
   whenTrue: or(search({"price", "pricing", "cost"}, fv!value) > 0),
   then: "Pricing Issue",
   whenTrue: or(search({"contract", "legal", "regulations"}, fv!value) > 0),
   then: "Contract Issue",
   whenTrue: or(search({"no response", "unresponsive", "did not respond"}, fv!value) > 0),
   then: "Unresponsive",
   default: "Other"
 )
Copy - Click NEXT.
-
Configure the following properties:
Property Action Record Field Name Enter a name for the field, like standardVoidReason.Record Field Type Select Text. Display Name (Optional) Enter a user-friendly field name for Process HQ users, like Void Reason.Description (Optional) Enter a helpful description about the field, like A standardized list of reasons why a quote was voided. - Click CREATE.
Tip: Another way to extract text from a field is using the custom record field template Groups Based on Text Values. This template is best when your extraction logic isn't very complex.
Standardize automation typeCopy link to clipboard
Process insights can quickly analyze how automated your process is, so you can identify more opportunities for automation or explore an automation that may not perform as efficiently.
To support this capability:
- The event history record type must include a Number (Integer) field that stores the automation identifier of a standard automation type.
- If you've configured record events, this field (
automationTypeId) is automatically included in the generated Event History record type. Then, you'll use the Write Records smart services to capture automation types. - If you've created your own event history record type to connect to an existing database or external system, you will likely need to add a new field for this purpose.
- If you've configured record events, this field (
- The data steward must map the automation ID field as an Automation attribute when they add the process.
Once your process includes an Automation attribute, automation statistics are automatically generated in the Executive Dashboard tab of any view. You can also take advantage of the Automation attribute to configure your own custom KPI.
Data steward preparationsCopy link to clipboard
As a data steward, you are responsible for choosing what data to include for process analysis, and ensuring that data is secure and understandable to business users.
When you add or edit a process, you can perform the following data preparations to simplify and secure data:
- Provide user-friendly attribute names
- Hide sensitive data
- Group the difference between two dates
- Use data from a one-to-many relationship
Provide user-friendly attribute namesCopy link to clipboard
User-friendly attribute names allow business users to easily understand what data is included in a process.
By default, attribute names reflect the record field names or the display names configured on the record type. However, data stewards and analysts may want to rename attributes since they typically have the most business context.
Data stewards can rename an attribute while configuring process data, while analysts can rename attributes as they explore the process.
For example, you may want to rename a field like annualContractValue to Annual Contract Value (ACV). Or, you may want to completely change a field name, like firstAndLastName to Display Name.
Hide sensitive dataCopy link to clipboard
Process insights relies on a comprehensive view of your process data to give you accurate and valuable insights. To get this holistic view of your process, record type object security and record-level security are not applied in process insights.
As a data steward, you're responsible for balancing the utility of your process data with your own data security policies. This means that you should omit personal identifiable information, personal health information, financial information, or other sensitive data from a process.
Sometimes, however, a record type includes data you want to be analyzed by process insights, but that data is too sensitive to expose in its raw form.
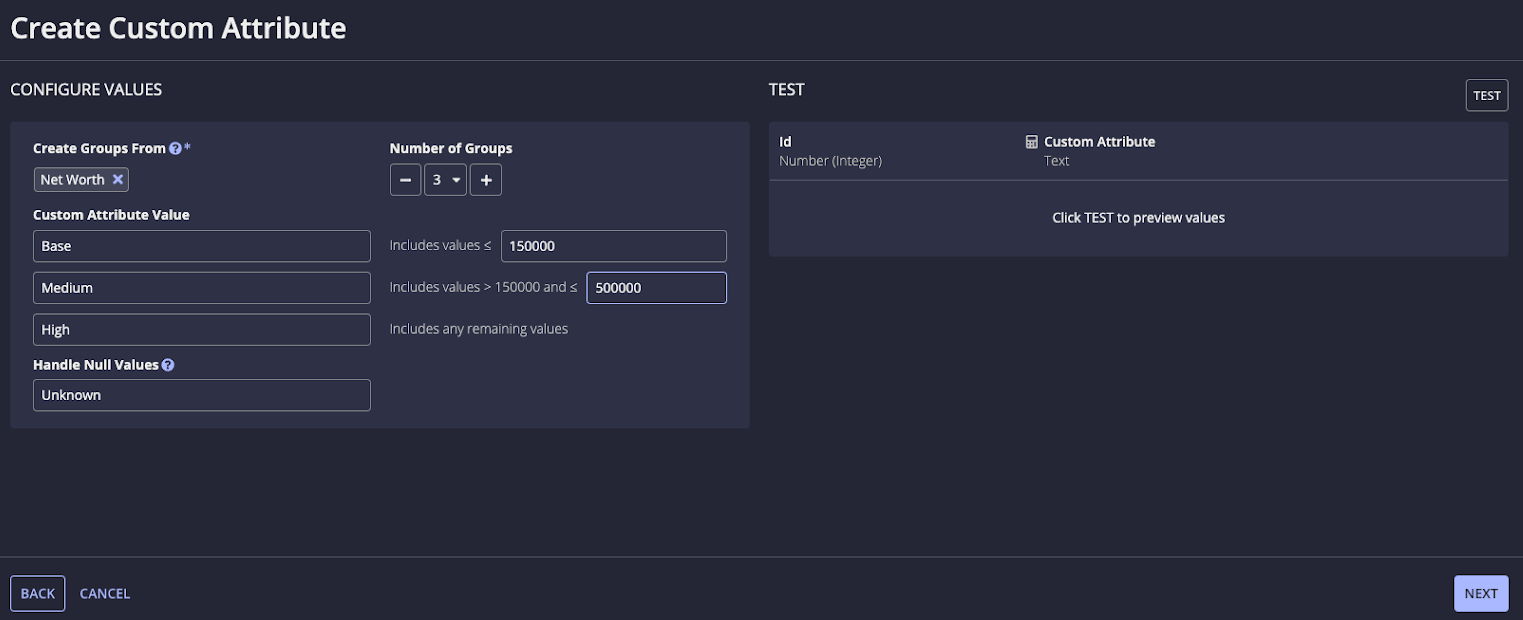
For example, let's say the Customer record type (a case record type) contains a field for Net Worth. Net worth likely contains sensitive information that should not be exposed to analysts; however, the data in an obfuscated form could be a valuable attribute to explore in a process.
To allow process insights to analyze this data without exposing the raw data to analysts, you can create a custom attribute to group the different net worth values into larger buckets. This way, process insights can analyze customer net worth without actually displaying the raw numbers.
To create the custom attribute in this example:
- While adding or editing a process, click ADD CUSTOM ATTRIBUTE.
- Select Groups Based on a Range.
- Click NEXT.
- For Create Groups From, select the Net Worth field.
- For Number of Groups, set the value to 3.
-
For Custom Attribute Value, enter the value to return based on the specified range.
In this example, any customers with a net worth less than or equal to 150,000 will have a custom attribute value of "Base". Customers with a net worth between 150,000 and 500,000 will have a custom attribute value of "Medium", and customers with a net worth greater than 500,000 will have a custom attribute of "High". If a customer does not have a value in the net worth field, then they will have a custom attribute value of "Unknown".
- Click NEXT.
- Enter a Name for the custom attribute.
- Click CREATE.
Now that you've created the custom attribute to hide this sensitive field, you can remove the Net Worth field with the raw data from the process without removing any potential value from insights.
Group the difference between two datesCopy link to clipboard
You may want to assess how long certain activities took to complete in your business process. However, it may not be as simple as just understanding how long it took, you may also need to know if the amount of time it took is good or bad. For example, if a support case takes three days to complete, is that inline with the company's standard-level agreement (SLA) or does it exceed it?
If your record type has separate timestamp fields to calculate when something started versus when it ended, you can create a custom attribute to get the difference between these two times and then group the results into specific categories.
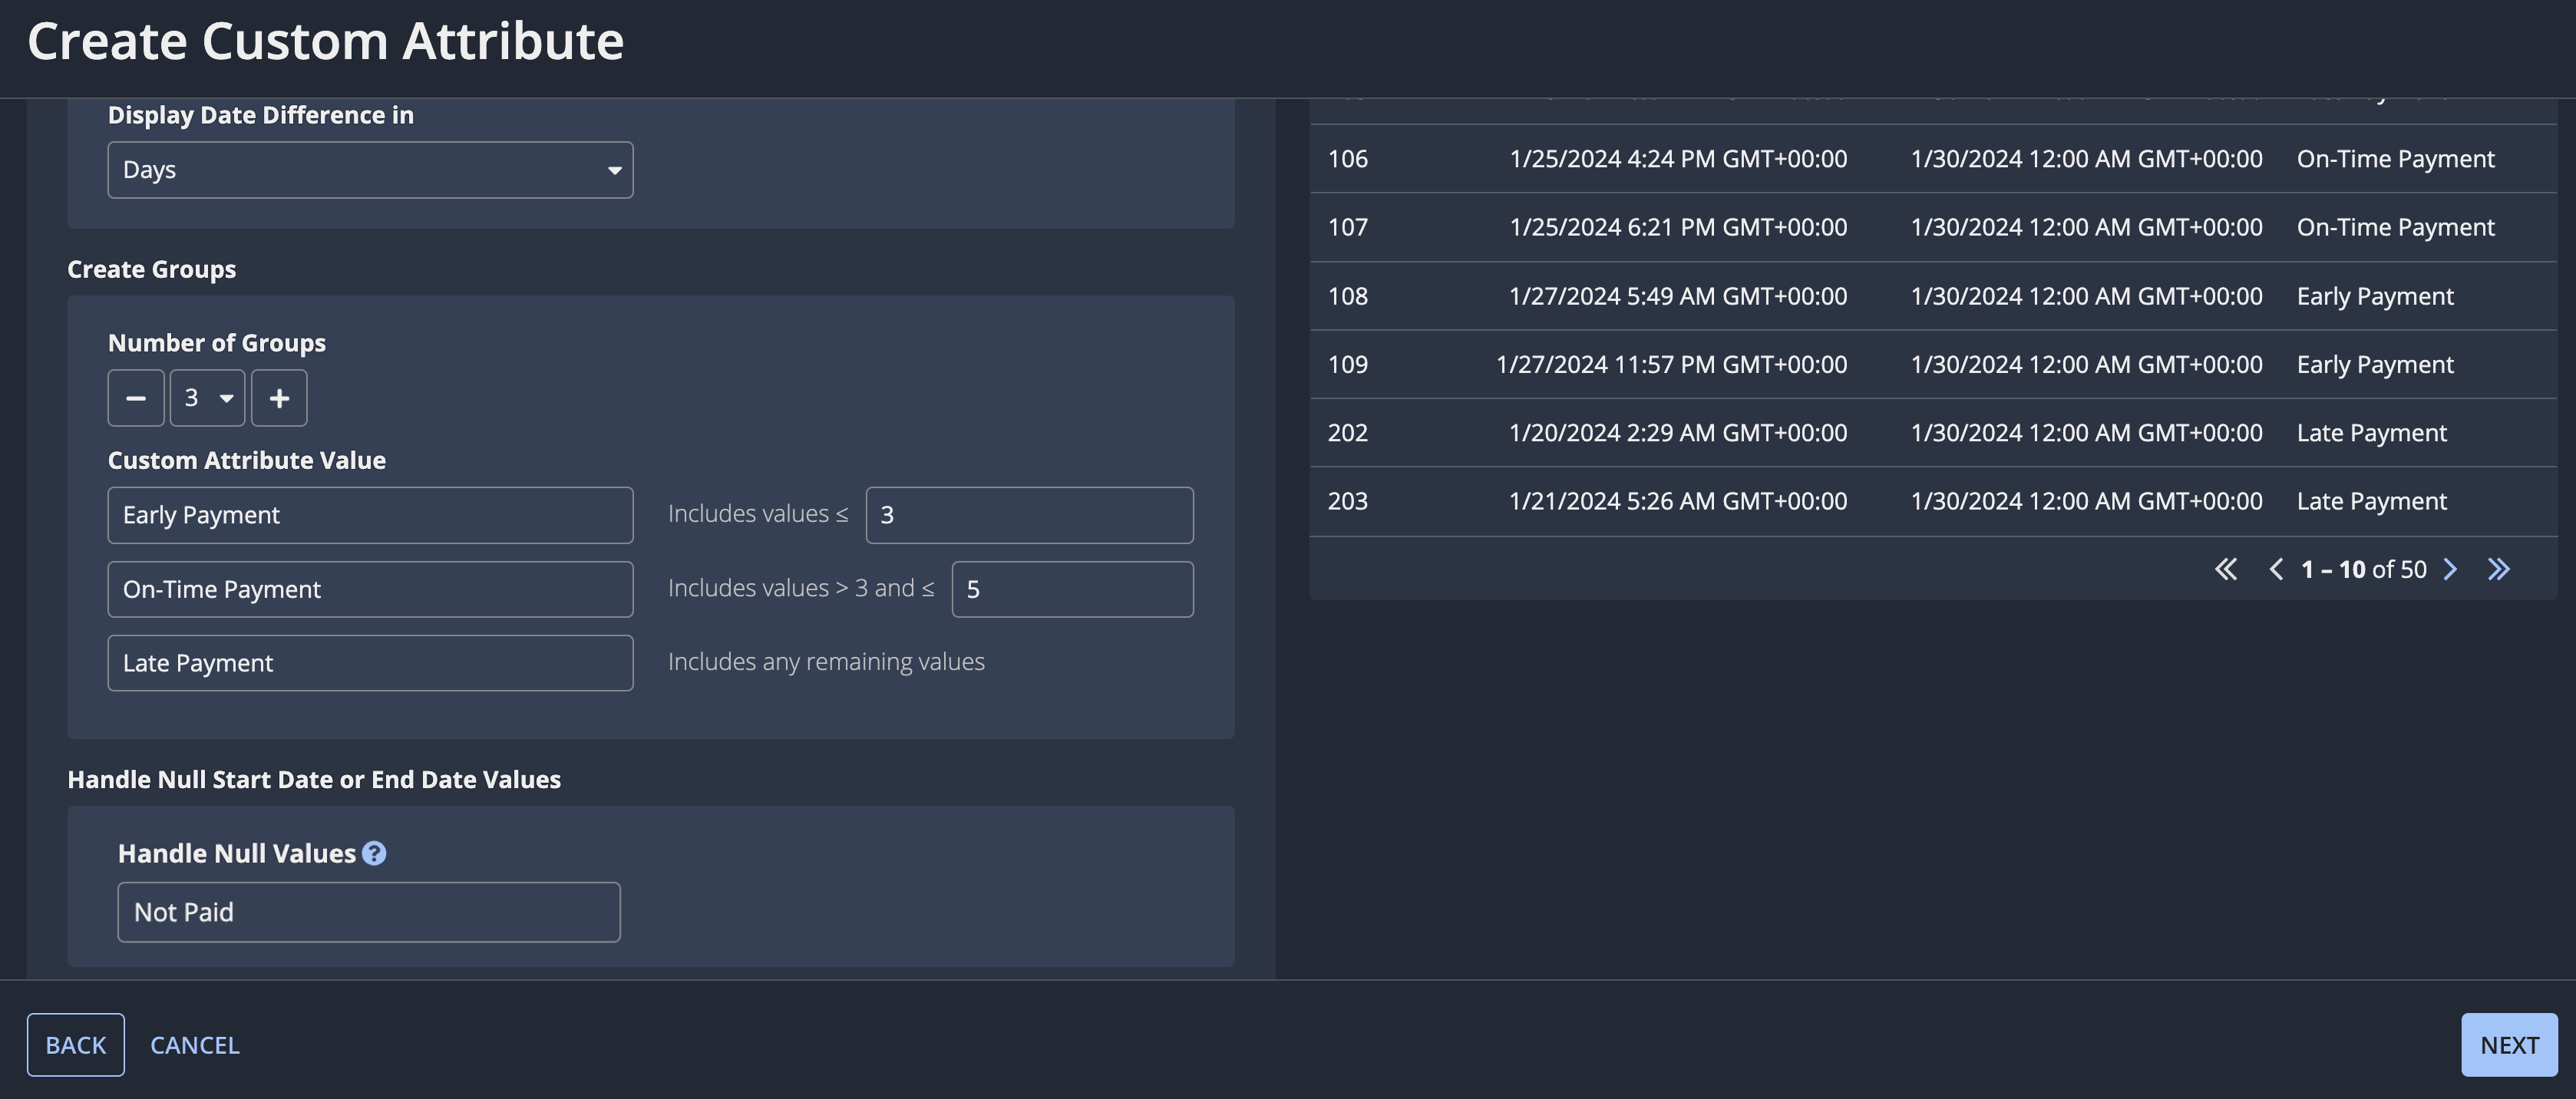
For example, let's say you want to assess how long it takes customers to pay their invoices. To more easily understand whether the amount of time it takes is good or bad, you need to know if customers are paying the invoices on time, early, or late.
Since the Invoice record type (a case record type) has the fields Payment Due Date and Amount Received Date, you can create a custom attribute to get the difference between these dates and then group the results into "Early Payment", "On-Time Payment", or "Late Payment".
To create the custom attribute in this example:
- While adding or editing a process, click ADD CUSTOM ATTRIBUTE.
- Select Groups Based on a Date Difference.
- Click NEXT.
- For Select Dates:
- Choose Payment Due Date as the Start Date.
- Choose Amount Received Date as the End Date.
- For Select Interval, keep Day selected.
- For Create Groups:
- Set the Number of Groups to 3.
- Configure the Custom Attribute Values so certain date differences fall into early, on-time, or late.
- Set Handle Null Values to Not Paid to account for when an invoice hasn't been paid yet, so it doesn't have an end date.
- Click NEXT.
- Enter a Name for the custom attribute.
- Click CREATE.
Use data from a one-to-many relationshipCopy link to clipboard
When you add or edit a process, you can select fields from the case record type, the event history record type, and any one-to-one or many-to-one relationships configured on those record types to include in your process.
You can't include fields from a one-to-many relationship within a process. However, if there is useful process data stored in a one-to-many relationship, you can still access that data by creating a custom attribute on the case or event history record type.
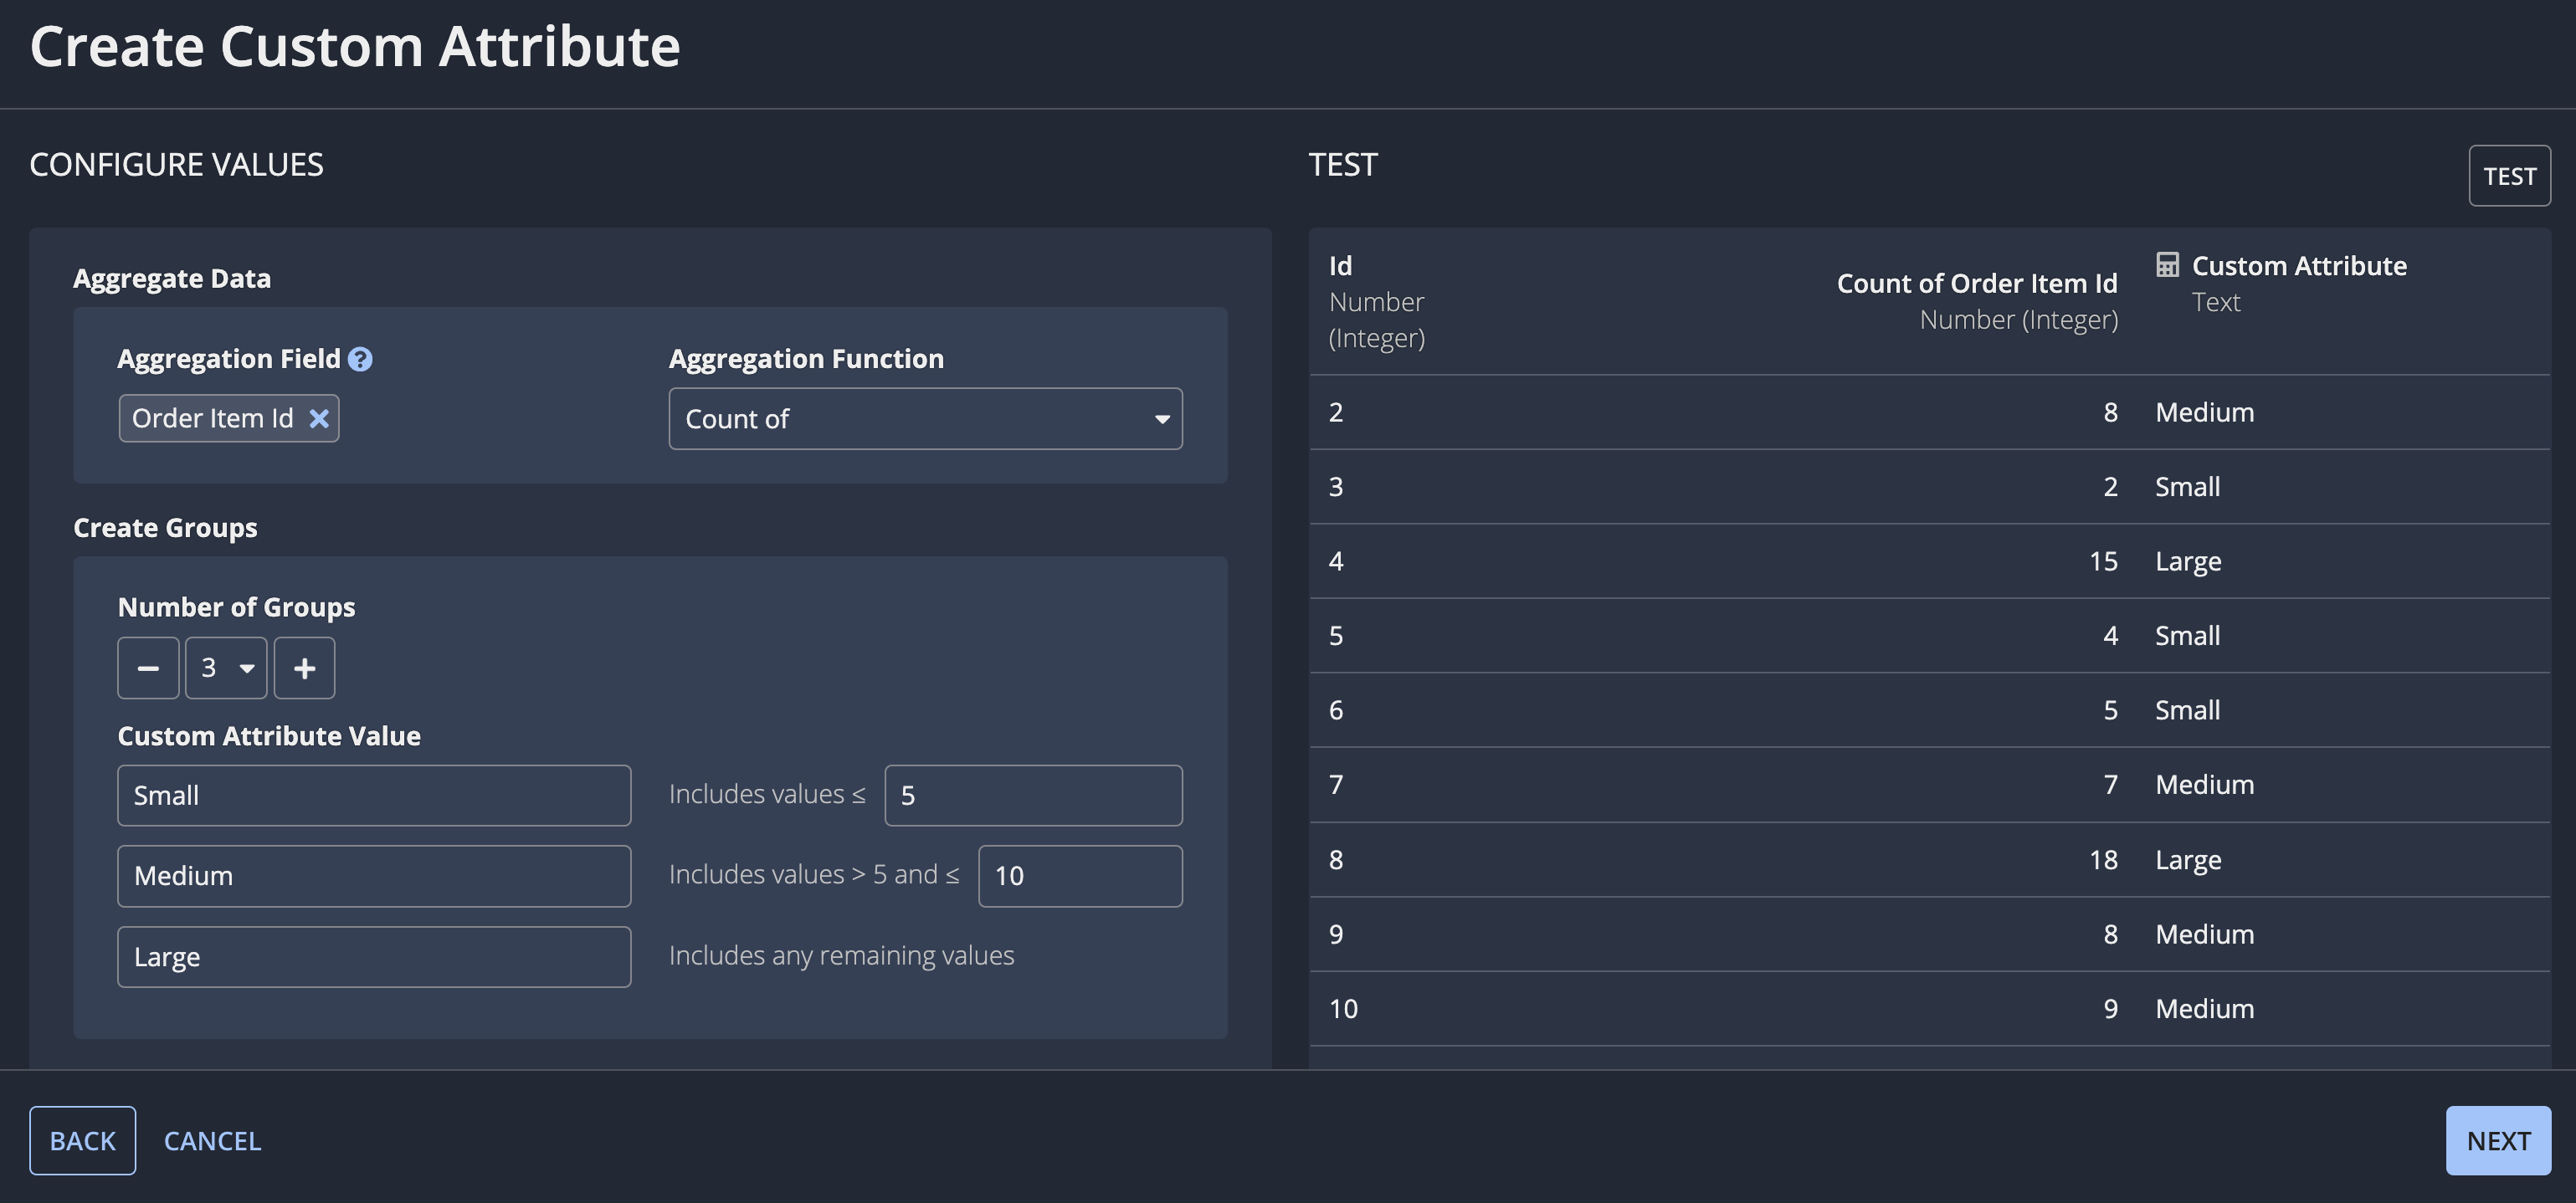
For example, let's say the Order record type (a case record type) has a one-to-many relationship to the Order Items record type. You may want to explore whether the number of items in an order is impacting how quickly an order is shipped. To access order item data, you can create a custom attribute on the Order record type to get the count of items for each order. Then, you can group the results into "Small", "Medium", or "Large" item amounts.
To create the custom attribute in this example:
- While adding or editing a process, click ADD CUSTOM ATTRIBUTE.
- Select Groups Based on Aggregations.
- Click NEXT.
- For Aggregate Data:
- Select the Id field from the Order Item record type as the Aggregation Field.
- Select Count as the Aggregation Function.
- For Create Groups:
- Set the Number of Groups to 3.
- Configure the Custom Attribute Values so a certain number of items is grouped as small, medium, or large.
- Click NEXT.
- Enter a Name for the custom attribute.
- Click CREATE.