This page explains how to configure a synced or unsynced record type to connect to an existing data source.
Don't have an existing data source? Learn how to generate a new database table to use as the source of your record type.
OverviewCopy link to clipboard
Using data modeling concepts and a guided experience, the record type object makes it easy to connect to the data you need so you can build applications that simplify and streamline your business processes.
You can create a record type with data sync enabled (a synced record type) or a record type without data sync enabled (an unsynced record type). These record types allow you to connect to any of the following data sources:
Note: If you're preparing data for process insights and need to perform complex data transformations, you can create a records-backed record type.
Review when to enable data sync to see if your business scenario is a good fit for data sync.
When you enable data sync on your record type, you unlock a set of powerful data fabric features that make it easy to relate, transform, and secure your enterprise data. However, there are some data structures and business scenarios that are better fit for data sync than others.
Connect to a databaseCopy link to clipboard
If your data lives in a relational database, you can connect to that database using a synced record type or unsynced record type.
Using a synced record type to connect to a database is the easiest and most common configuration. If you create an unsynced record type, you will need to create additional objects to connect to your database.
Tip: See the Record Type Tutorial (Database) for a step-by-step example configuring a synced record type that connects to a database table.
Using a synced record typeCopy link to clipboard
You can configure a synced record type to connect to a database table.
To create a synced record type to connect to a database:
- Create a new record type.
- On the Data Model, click Tell Us About Your Data.
- Select Database.
- Click NEXT.
- For Data Sync, keep the default option to Build Apps Faster with Data Fabric.
- Click NEXT.
- For Choose Database Table, select the database table or table synonym to connect to.
- Click NEXT.
- For Configure Source Filters, add a source filter:
- Click + Add Filter.
- Configure the following properties:
Property Action Field Select a source field to filter by. Only source types that can be converted to Appian types appear in the dropdown. Condition Select the operator to apply to the filter. Value Use the context menu next to the field to select how you want to pass the value into the filter. The options in this menu change based on the data type of the field selected. You can enter a static value or enter an expression. - Click TEST FILTER to validate the filter conditions.
- Click NEXT.
-
For Map source fields to record fields, configure the following field properties:
Property Action Source Field Name Use the checkbox next to a Source Field Name to add or remove a field from your record type. You can have up to 100 fields.
Certain SQL data types cannot be used in synced record types. See a list of unsupported data types.Record Field Name Enter the name for the record field. This is the name that will be used to reference the field in Appian Designer. Record Field Type Use the dropdown to select the data types for the record fields.
We automatically suggest types based on the data type in the source.
We recommend at least the following changes:Display Name Enter a user-friendly field name to display to business users in Process HQ. Use title case formatting and spaces in the display name so it's easy for users to read. For example, Year-to-Date.
When this field is blank, the Record Field Name is displayed in Process HQ using title case formatting.Description Enter a description of the field to display to business users in Process HQ. - Drag and drop the rows to change the order in which the record fields are displayed.
- Click FINISH.
- Click SAVE CHANGES to sync your data.
Using an unsynced record typeCopy link to clipboard
You can configure an unsynced record type to connect to a database table or a database view.
To create an unsynced record type to connect to a database:
- Create a custom data type (CDT) that reflects the fields in your database table or views. The CDT must contain a primary key.
- Create a data store entity (DSE) to specify the database and entity to connect to.
- Create a new record type.
- On the Data Model, click Tell Us About Your Data.
- Select Database.
- Click NEXT.
- For Data Sync, choose Disable sync and related features.
- Click NEXT.
- For Choose Data Store and Entity, select a data store for your record type.
- Select an entity from the selected data store.
- Click FINISH.
- Click SAVE CHANGES.
Connect to a web serviceCopy link to clipboard
To create a record type that connects to a web service:
- Create an integration.
- Create a record data source.
- Create either a synced record type or unsynced record type. Unsynced record types will require additional objects and setup to allow for paging, searching, and filtering data.
Create an integrationCopy link to clipboard
Before connecting a web source, you must configure a connected system and an integration object to authenticate and connect to your external system.
Create a record data sourceCopy link to clipboard
Once you've created your integration, you'll need to create a record data source to allow the record type to access data from the web service. The record data source is an expression rule that calls an integration and returns data from the response body. Within the expression, you can add rule inputs to configure additional record type behavior.
To create a record data source, create a new expression rule that meets the following requirements:
- Integration response requirements:
- The expression calls the necessary integration. This could be in the form of a local variable, like
local!integrationResponse: rule!AR_getIntegrationData. - The response body must cast to a List of Map, List of Dictionary, or a List of CDT, and it must have at least one Number (Integer) field that's non-null for every entry to act as the primary key for the record type.
- The expression calls the necessary integration. This could be in the form of a local variable, like
- Function requirements:
- The expression does not use plug-ins or any of the following functions:
a!query,a!queryEntity,a!queryProcessAnalytics,a!queryRecordType.
- The expression does not use plug-ins or any of the following functions:
- Rule input requirements (synced record types):
- The expression has exactly one rule input of type Number (Integer) to allow Appian to sync data in batches.
- If there is no rule input, the record type will be limited to syncing 1,000 records from the web service.
- The underlying integration must also references the rule input from the record data source expression. This allows the record data source expression to execute multiple times with sequential values
{1,2,3...}being passed to the rule input. If you do not modify your underlying integration, sequential calls will just pull back the same data and the sync will fail.
Note: If the underlying API requires a Start Index, you can calculate the index with the formula
1 + ((batchNumber - 1) * batchSize) = startIndex. For example, if you have a batch size of 1,000, batch1would have a start index of1 + ((1 - 1) * 1000) = 1. Then, batch2would have a start index of1 + ((2 - 1) * 1000) = 1001. - Rule input requirements (unsynced record types):
- The expression has a rule input of type PagingInfo to allow for paging and sorting of records.
- The expression has a rule input of type Text to allow users to search for records.
Using a synced record typeCopy link to clipboard
To create a synced record type to connect to a web service:
- Create a new record type.
- On the Data Model, click Tell Us About Your Data.
- Select Web Service.
- Click NEXT.
- For Data Sync, keep the default option to Build Apps Faster with Data Fabric.
- Click NEXT.
- For Record Data Source:
- If you have an existing expression rule for your record data source, select it from the list.
- If you do not have an existing expression rule, click Create Record Data Source to create one. As you create the record data source, ensure you enable syncing in batches to allow the record type to sync more than 1,000 rows from the web service.
- Click NEXT.
-
For Map source fields to record fields, configure the following field properties:
Property Action Primary Key Select a Number (Integer) field to be the primary key. Source Field Name Use the checkbox next to a Source Field Name to add or remove a field from your record type. You can have up to 100 fields. Record Field Name Enter the name for the record field. This is the name that will be used to reference the field in Appian Designer. Record Field Type Use the dropdown to select the data types for the record fields.
We automatically suggest types based on the data type in the source.
We recommend at least the following changes:Display Name Enter a user-friendly field name to display to business users in Process HQ. Use title case formatting and spaces in the display name so it's easy for users to read. For example, Year-to-Date.
When this field is blank, the Record Field Name is displayed in Process HQ using title case formatting.Description Enter a description of the field to display to business users in Process HQ. - Drag and drop the rows to change the order in which the record fields are displayed.
- Click FINISH.
- Click SAVE CHANGES to sync your data.
Using an unsynced record typeCopy link to clipboard
To create an unsynced record type to connect to a web service:
- Create a custom data type (CDT) that defines the output of the integration's expected response.
- Create a new record type.
- On the Data Model, click Tell Us About Your Data.
- Select Web Service.
- Click NEXT.
- For Data Sync, choose Disable sync and related features.
- Click NEXT.
- For Record Data Source:
- If you have an existing expression rule for your record data source, select it from the list.
- If you do not have an existing expression rule, click Create Record Data Source to create one.
- Click NEXT.
- For Data Type, select the CDT that matches the output of the integration's expected response.
- Click FINISH.
- Enable paging and searching.
- Enable user filters.
- Configure a single record source.
- Test the configurations.
Connect to SalesforceCopy link to clipboard
You can use a synced record type or an unsynced record type to connect to a Salesforce connected system. If you create an unsynced record type, you will need to create additional objects to connect to Salesforce.
Using a synced record typeCopy link to clipboard
To create a synced record type to connect to a Salesforce:
- Ensure your Salesforce instance is large enough to sync the data you need. Learn more about the API limit for syncing data from Salesforce.
- Create a new record type.
- On the Data Model, click Tell Us About Your Data.
- Select Salesforce.
- Click NEXT.
- For Data Sync, keep the default option to Build Apps Faster with Data Fabric.
- Click NEXT.
- For Choose Salesforce Object:
- If you have an existing Salesforce connected system, select it from the list.
- If you do not have a Salesforce connected system yet, click New Connected System to create one.
- Click NEXT.
- For Configure Source Filters, add a source filter:
- Click + Add Filter.
- Configure the following properties:
Property Action Field Select a source field to filter by. Only source types that can be converted to Appian types appear in the dropdown. Condition Select the operator to apply to the filter. Value Use the context menu next to the field to select how you want to pass the value into the filter. The options in this menu change based on the data type of the field selected. You can enter a static value or enter an expression. - Click TEST FILTER to validate the filter conditions.
- Click NEXT.
-
For Map source fields to record fields, configure the following field properties:
Property Action Source Field Name Use the checkbox next to a Source Field Name to add or remove a field from your record type. You can have up to 100 fields. Record Field Name Enter the name for the record field. This is the name that will be used to reference the field in Appian Designer. Record Field Type Use the dropdown to select the data types for the record fields.
We automatically suggest types based on the data type in the source.
We recommend at least the following changes:Display Name Enter a user-friendly field name to display to business users in Process HQ. Use title case formatting and spaces in the display name so it's easy for users to read. For example, Year-to-Date.
When this field is blank, the Record Field Name is displayed in Process HQ using title case formatting.Description Enter a description of the field to display to business users in Process HQ. - Drag and drop the rows to change the order in which the record fields are displayed.
- Click FINISH.
- Click SAVE CHANGES to sync your data.
Using an unsynced record typeCopy link to clipboard
Creating an unsynced record type that connects to Salesforce is the same as creating an unsynced record type that connects to a web service.
Connect to a process modelCopy link to clipboard
You can use any process model as the source for a record type. Each running instance of that process model will be treated as an individual record of your record type.
This configuration is less common, and can only be done using an unsynced record type.
Using an unsynced record typeCopy link to clipboard
To create an unsynced record type that connects to a process model:
- Create a new record type.
- On the Data Model page, click Tell Us About Your Data.
- For your source type, select Process.
- Click NEXT.
- For Choose Process Model, select a process model.
- Click FINISH.
Now, each active (unarchived) process instance will appear as a record.
Modify the data model on a synced record typeCopy link to clipboard
After you’ve connected to the source of your record type, you may want to later update the data model to fit your business needs. For example, if you didn’t add a source filter when creating the record type, you can add one later.
The modifications you can make depend on your data source.
Change record field names and data typesCopy link to clipboard
Relevant to: All synced record types.
If you need to change the name of a record field, or you want to change a field like username from type Text to User, you can easily change your record field configuration.
Tip: If the source of your record type is a database, Appian recommends using codeless data modeling to modify record field names and data types since those changes will also be saved and reflected in your source.
To change a record field name or data type:
- Go to Data Model.
- Click MAP RECORD FIELDS.
- In Record Field Name, enter the name for the record field. This is the name that will be used to reference the field in Appian.
-
In Record Field Type, use the dropdown to select the data types for the record fields.
We automatically suggest types based on the data type in the source. We recommend at least the following changes:
- Click FINISH.
- Click SAVE CHANGES.
If you change the record field type, you will need to update any existing references to the field. See the Health Dashboard to quickly find all invalid field references.
Add field display names and descriptionsCopy link to clipboard
Relevant to: All synced record types.
If your record type will be available in Process HQ, consider adding display names and descriptions on your record fields.
By default, record fields names appear in title case formatting to users in Process HQ. However, if a record field name contains an acronym or it's not easily understood by business users, you can configure a field display name and description to appear to users in Process HQ.
For example, let's say you have a record field called elapsedTime. To ensure users understand the purpose of this field, you can configure a display name of Duration and add a description about how the duration is calculated.
To add field display names and descriptions:
- Go to Data Model.
- Click MAP RECORD FIELDS.
- In Display Name, enter a user-friendly field name in title case format. The display name will appear to users throughout Process HQ.
- In Description, enter a description of the field. The field description will only appear in the Process Insights page of Process HQ.
- Click FINISH.
- Click SAVE CHANGES.
Add or remove record fieldsCopy link to clipboard
Relevant to: All synced record types.
If a new field is added to your source data, you'll also need to add that new field in your record type. Similarly, if a field is removed from your source data, you'll want to remove it from the record type as well.
To add or remove record fields from the record type:
- Go to Data Model.
- Click MAP RECORD FIELDS.
- In the Map Record Fields dialog, select or deselect the checkbox next to any record field.
- Click FINISH.
- Click SAVE CHANGES.
Configure the primary key field to use a sequenceCopy link to clipboard
Relevant to: Synced record types that connect to a database.
If you connected to a database table, you can select a sequence to generate primary key values for records created by Appian.
A sequence is a value-generating object created in your database. Appian can reference a sequence when creating new records to set the primary key's value. For instance, when one of your app's processes uses the Write Records smart service, the smart service uses the primary key configuration to add a new record. If you've selected a sequence, it will be used to create the record's primary key.
Note: Appian only supports sequences for MariaDB and Oracle databases.
To select the sequence:
- On the Data Model page, click next to the primary key field.
- On the Edit Record Field dialog, enable Use a sequence to generate values for the primary key.
- For Sequence Name, select the sequence for Appian to use when writing new data to the source.
- Click OK.
- Click SAVE CHANGES.
Modify source filtersCopy link to clipboard
Relevant to: Synced record types that connect to a database or Salesforce.
If you didn't add source filters during the original record type configuration, or perhaps you need to update or remove your source filters, you can add or edit your source filters.
To add source filters after configuring the source of your record type, see source filters.
Configure a sync expressionCopy link to clipboard
Relevant to: Synced record types that connect to a web service.
Once you configure the source of your record type, you can keep your synced data up to date with the data in your web service using different sync options. When you trigger a full sync, Appian will use the record data source expression to fetch and sync all of your data.
If you want to sync data more frequently, you can configure a sync expression so that you can leverage the Sync Records smart service to sync changed data from a web service.
A sync expression is similar to a record data source expression; the only difference is that you pass individual record identifiers to your sync expression to fetch and return a row or set of rows from the web service. This enables Appian to sync specific rows of data from the web service when you use the Sync Records smart service.
You can generate and configure a sync expression directly from the record type. Learn how to generate a Sync Expression.
Modify the data model on an unsynced record typeCopy link to clipboard
After you've created an unsynced record type that connects to a web service, you'll need to configure additional settings to enable paging, searching, filtering, and displaying information in a record view.
Enable paging and searchingCopy link to clipboard
Relevant to: Unsynced record types that connect to a web service.
You can enable paging and search for your record list and read-only grids by mapping the rule inputs in your record data source expression to the Paging Info and Search Text fields on the record type.
If you did not add rule inputs for paging and search when you created the record data source, add the rule inputs to your expression before updating the data model.
To enable paging and search:
- In the record type, go to Data Model.
- For Paging Info, select a rule input of type PagingInfo.
-
For Search Text, select a rule of type Text.


- Click SAVE CHANGES.
Enable user filtersCopy link to clipboard
Relevant to: Unsynced record types that connect to a web service.
To allow users to filter the record list and read-only grids powered by your record type, you must add a rule input for each user filter in the record data source expression and in the integration for your connected system.
Each rule input should correspond to the type that will be returned by the associated user filter dropdown. The selected value will then be passed to the record data source, where the developer can apply it to the integration.
Configure a single record sourceCopy link to clipboard
Relevant to: Unsynced record types that connect to a web service.
To display data in a record view, you must configure a single record source.
A single record source is an expression rule that calls an integration that pulls in data for a single record. You'll use this expression to define the data to return in a record view on your record type.
To create a single record source, create a new expression rule that meets the following requirements:
- Integration response requirements:
- The expression calls an integration that returns a single object that maps to the data types in the record type. The integration can be called using a local variable, like
local!integrationResponse: rule!AR_getSingleRecord.
- The expression calls an integration that returns a single object that maps to the data types in the record type. The integration can be called using a local variable, like
- Function requirements:
- The expression does not use plug-ins or any of the following functions:
a!query,a!queryEntity,a!queryProcessAnalytics,a!queryRecordType.
- The expression does not use plug-ins or any of the following functions:
- Rule input requirements:
- The expression contains a rule input of type Number (Integer) that identifies the record identifier to return from the integration.
To configure a single record source in your record type:
- In the record type, go to Data Model.
- Under Single Record Source, for Data:
- If you have an existing expression rule for your single record source, select it from the list.
- If you do not have an existing expression rule, click Create Single Record Source to create one. You can create a new integration object during this workflow.
- For Record Identifier, select the rule input used in the expression.
- Click SAVE CHANGES.
Test unsynced web service configurationsCopy link to clipboard
Relevant to: Unsynced record types that connect to a web service.
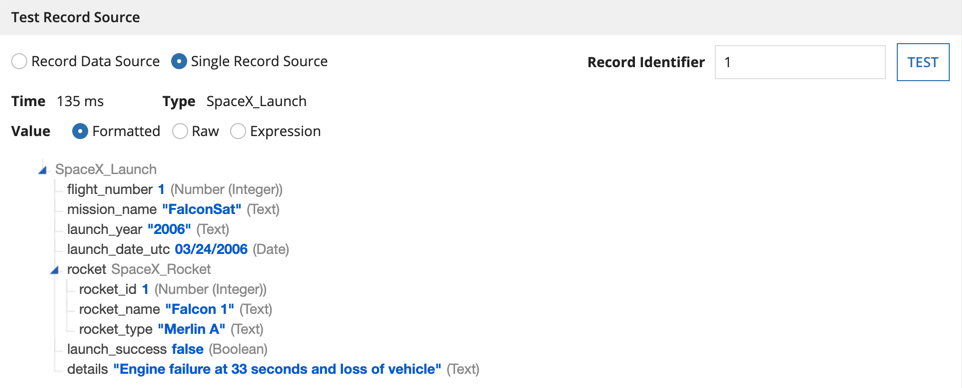
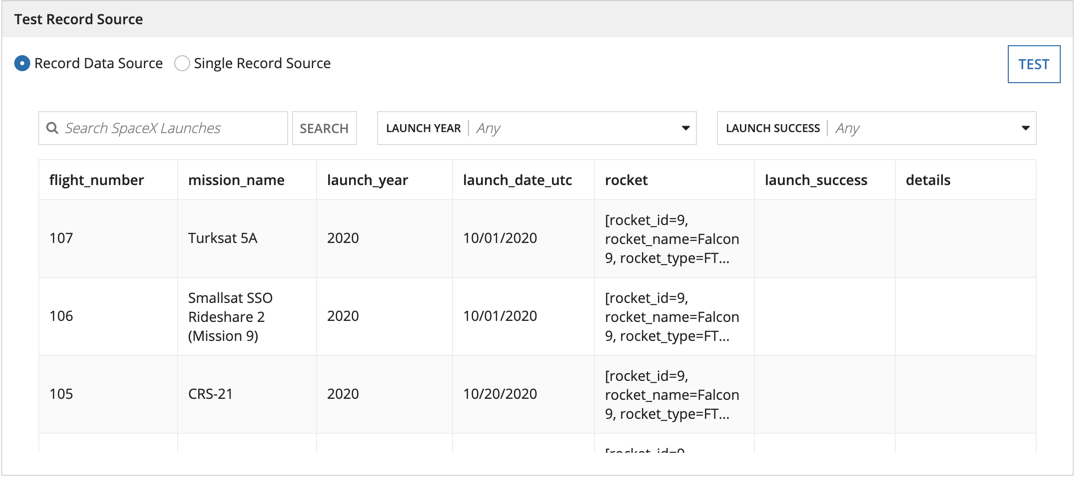
After enabling paging, search, and filters, and configuring a single record source, you can use the Test Record Source section to verify that the data results returned for your record data source expression and single record data expression are correct.
To test your configurations:
- In the record type, go to Data Model.
- In the Test Record Source section, select one of the expressions to test: Record Data Source or Single Record Source.
- Click TEST. The first 100 records of the DataSubset are returned.
When you test the Record Data Source, the expression will be cast to the data type you selected for your record type, and displayed in a grid. This will show you all of the fields on the data type that correspond to the record type. These record fields can be used as inputs when configuring your applications. You can also use this view to evaluate your rule inputs for paging, searching, and filtering.
When you test the Single Record Source, you will see the expression output cast to your selected data type. This displays all of the fields and values available for a single record. You can also choose how you want these record fields and values displayed in the view.