
This page applies to business users. It describes how to create and manage KPIs in a process view.
OverviewCopy link to clipboard
A key performance indicator (KPI) allows you to track a specific aspect of your process to measure success, like how many contracts are closed. A KPI can enable you to tell, at a glance, if a process is performing to your expectations.
Process insights starts you off with system-provided KPIs, which are available in all views of all processes. These KPIs include the following:
- Average Case Duration: The average duration of cases in the view that occur in the selected date range.
- Median Case Duration: The median duration of cases in the view that occur in the selected date range.
- Automation Rate: The percentage of activities in the view that were performed by an automation in the selected date range. This calculation is based on the number of events with an Automation attribute. This KPI is only present if your process data includes events with an Automation attribute.
You can also create your own KPIs based on your understanding of your business process. These KPIs are known as user-created KPIs.
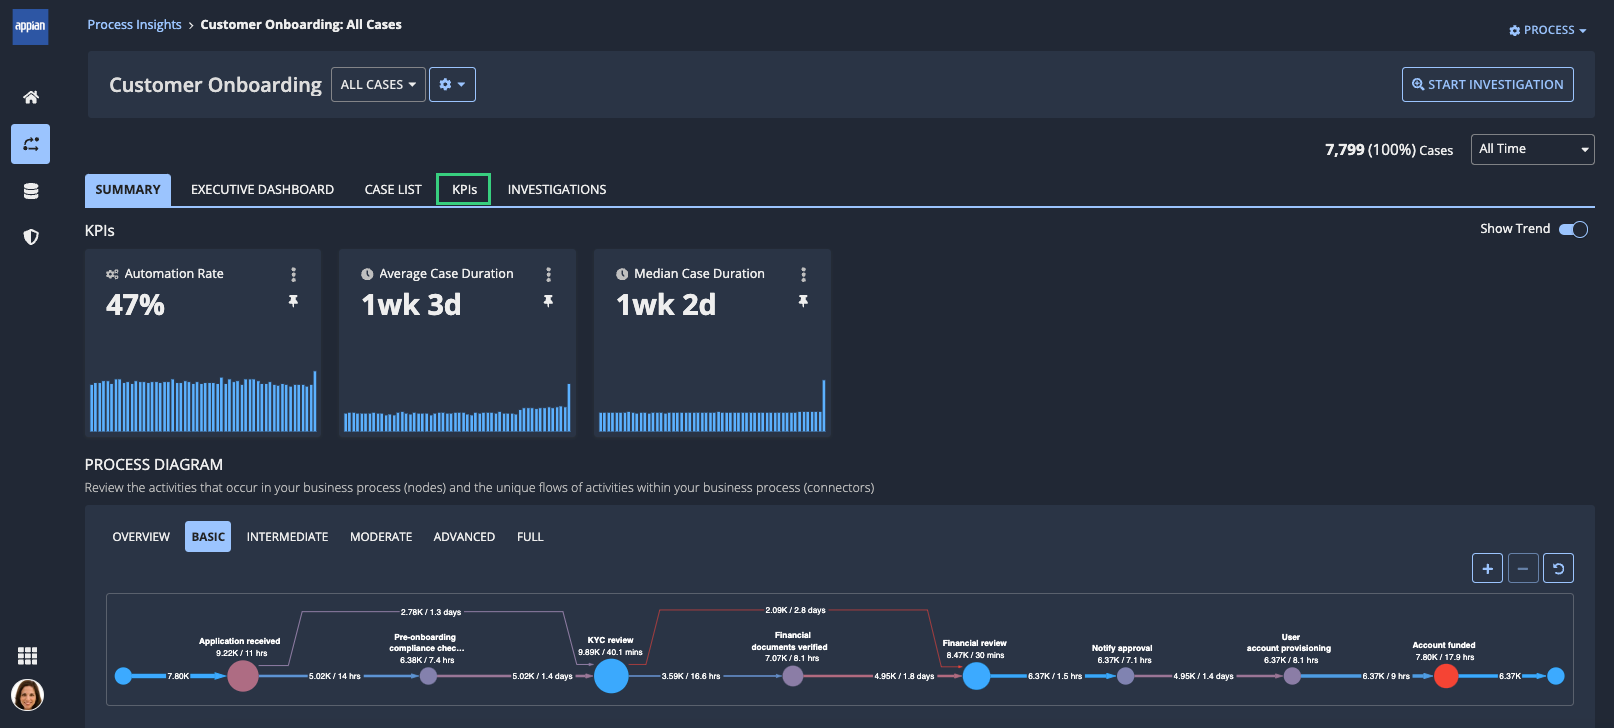
You can pin KPIs to the Summary tab of a process view, so they display from the moment you open the view.
You can view all KPIs for an individual process view in the KPIs tab of that view.
Once you create a KPI, you can reuse it across all your views. As you're curating your KPIs, you can also remove KPIs from individual views or delete KPIs from all views in the process.
KPI permissionsCopy link to clipboard
You can manage KPIs based on process permissions and whether the KPI is system-provided or user-created, as follows:
Process Analyst |
Process Viewer |
||
|---|---|---|---|
System-provided |
User-created |
Any |
|
View a KPI |
|||
View KPI properties |
|||
View KPI definition |
|||
When to create a KPICopy link to clipboard
KPIs can help you measure the success of your process and track the indicators most relevant to your business.
There are four different KPIs that can be used to display the data you need:
- Count: Shows the total number of activities, sequences, or attributes.
- Duration: Shows how long cases, activities, or sequences are taking.
- SLA: Shows the fulfillment of Service Level Agreement (SLA), indicating either compliance or violation of the process, specified sequence, or specified activity.
- Aggregation: Shows an aggregated value based on a selected column that refers to a numeric attribute.
Common KPI use casesCopy link to clipboard
Each of the user-created KPIs should be used and configured to address a certain use case. Some examples of common use cases for the different KPI types can include, but are not limited to the following.
| Track | Example | KPI |
|---|---|---|
| How many times a certain activity, sequence, or attribute occurs. | View the amount of review repetitions (review to review). | Count KPI |
| How many cases have an occurrence of a certain activity, sequence, or attribute. | View the percentage of cases with manual activities. | Count KPI |
| Different SLAs for sequences and repetitions. | Keep track of support tickets for different customer tiers. "Premium" support might only have 1 day of initial response time whereas you have 3 days time to respond to customers in the "Standard" support tier. | SLA KPI |
| The percentage of conforming or violating executions. | Show the total percentage of contracts that are violating the SLA. | SLA KPI |
| The average or median duration of cases in the process. | See that the mean and median case durations are less than 1 week. | Duration KPI |
| The average, median, or total duration of an activity. | See that reviews take an average of 3 hours. | Duration KPI |
| The average, median, or total duration of a sequence. | See that there are an average of 83 days and 13 hours between RFIs. | Duration KPI |
| The minimum value for an attribute in the process. | Calculate the minimum height of a set of products. | Aggregation KPI |
| The average value for an attribute in the process. | Calculate the average deal size. | Aggregation KPI |
| The max value for an attribute in the process. | Calculate the maximum length of pipes produced. | Aggregation KPI |
| The total value for an attribute in the process. | Calculate the total amount of shipping costs. | Aggregation KPI |
Create a KPICopy link to clipboard
Tip: Once you create a KPI, you can reuse that KPI across the views in the same process. Learn more about reusing KPIs.
To create a KPI:
-
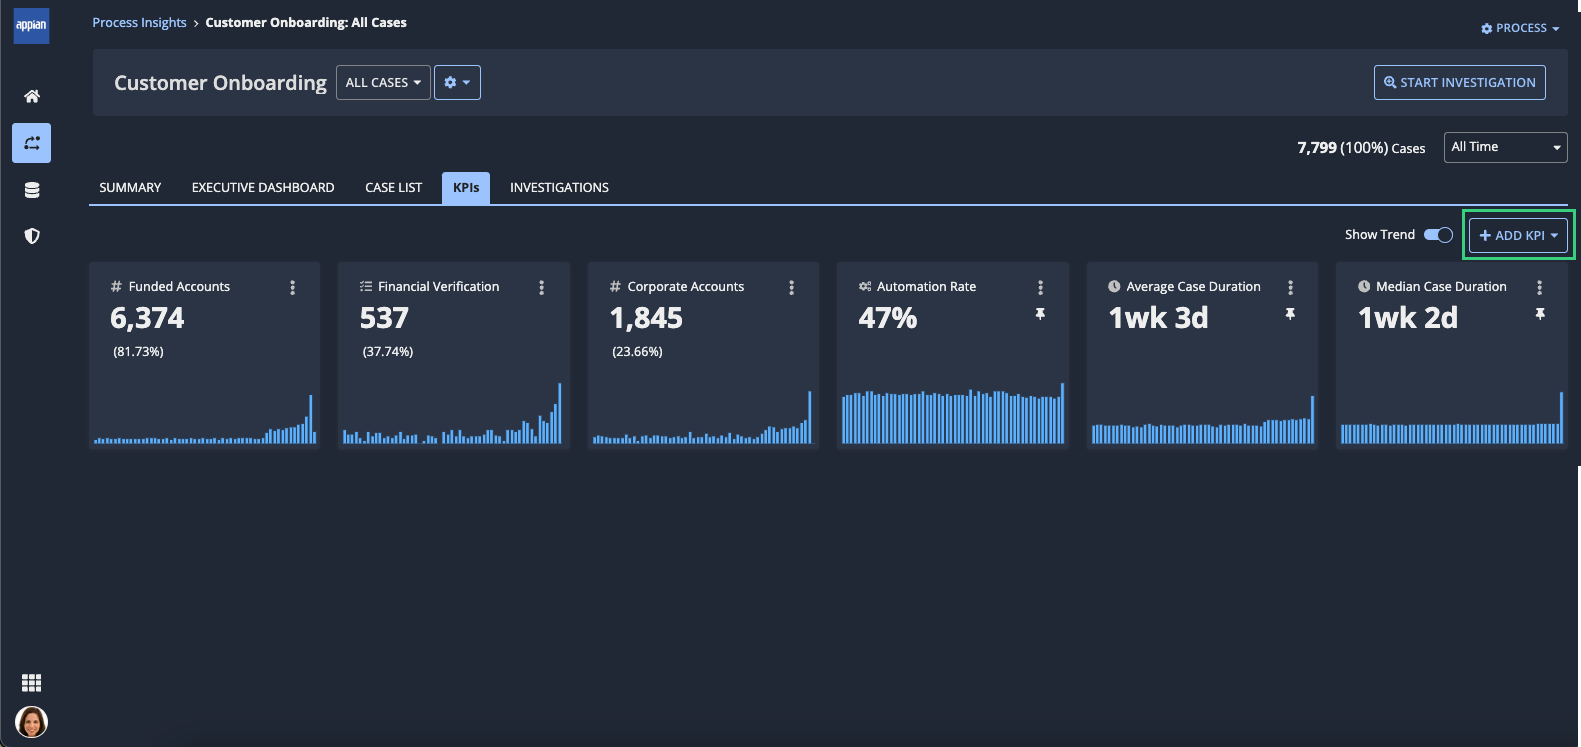
Go to the KPIs tab in a process view.

-
Click ADD KPI.
- Select Create New KPI. The Create New KPI dialog displays.
-
Select a KPI type:
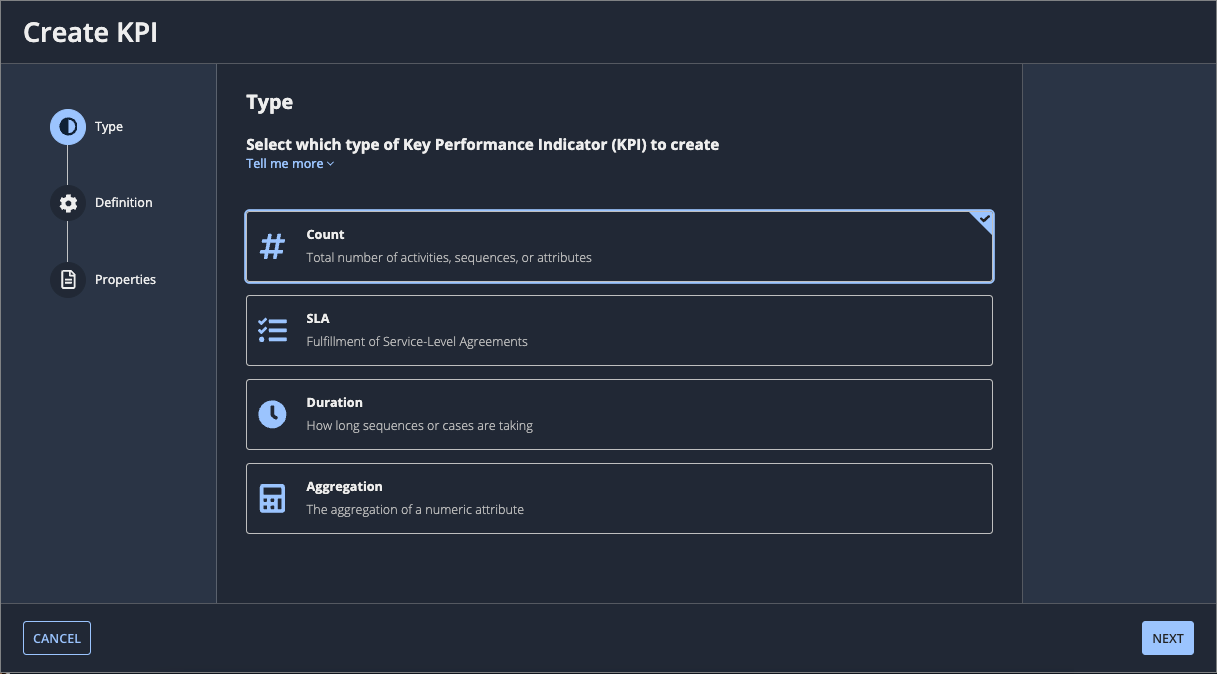
Note: The Aggregation KPI is only available if your process contains a numeric attribute.
- Click NEXT.
- Define the calculation parameters for each KPI type:
As you define the KPI parameters, the KPI preview allows you to see how the system would calculate the KPI in the context of the current view.
- For Display as, select either Number or Percentage.
- Click NEXT.
-
Configure the properties for the KPI:
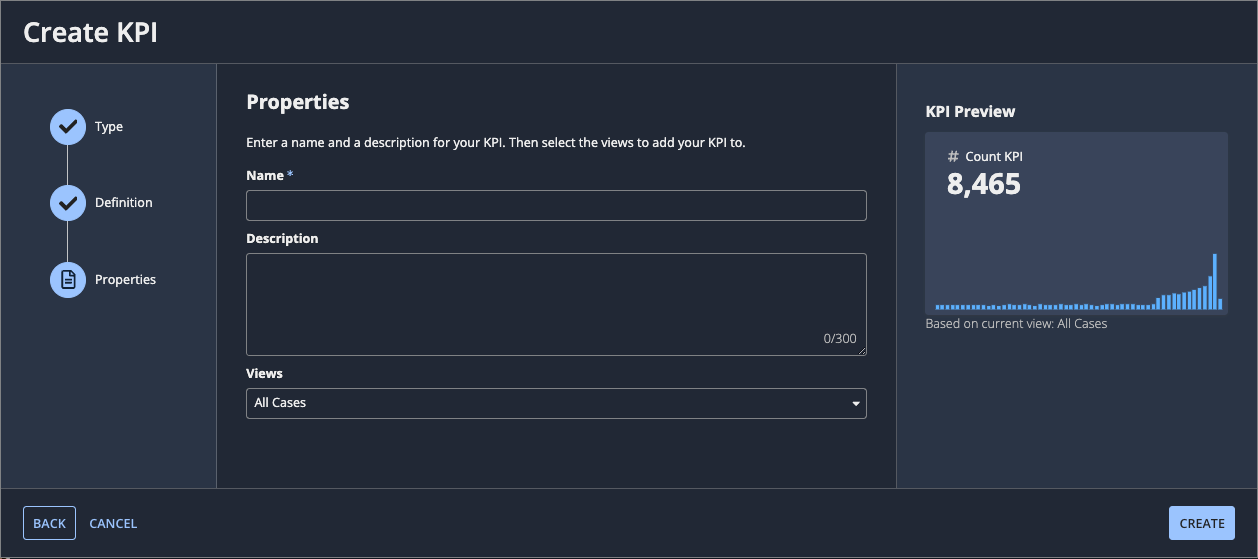
- Enter a name and description for the KPI.
- Select the views to which you want to add the KPI.
- Click CREATE.
Define the count KPICopy link to clipboard
To define the count KPI, you must select what you want to count, select the kind of count KPI to create, and make the specific configurations for each.
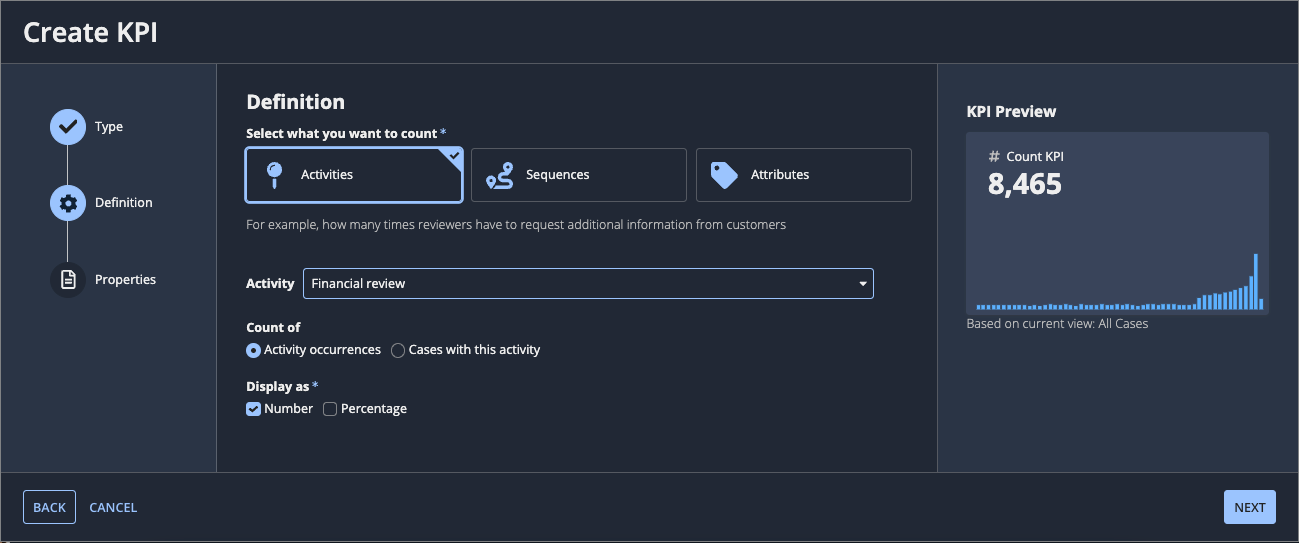
To count activities:
- For Select what you want to count, select Activities.
- For Activity, select an activity in your process that you want to count.
- For Count of, select either:
- Activity occurrences to count the number of occurrences of the activity.
- Cases with this activity to count the number of cases with that activity.
- Continue on with step 6 in the Create a KPI section.
To count sequences:
- For Select what you want to count, select Sequences.
- For Sequence Type, select either Direct Sequence or Indirect Sequence.
- For Start Activity, select an activity.
- For End Activity, select an activity.
- For Count of, select either:
- Sequence occurrences to show the number of occurrences of the sequence.
- Cases with sequence to show the number of cases with that sequence.
- Continue on with step 6 in the Create a KPI section.
To count attributes:
- For Select what you want to count, select Attributes.
- For Cases with Attributes, select an attribute value to count and optionally select a related attribute.
- You can select multiple values within an attribute or use the filter to count any of these values.
- Continue on with step 6 in the Create a KPI section.
Define the SLA KPICopy link to clipboard
To define the SLA KPI, select what to track and make the specific configurations.
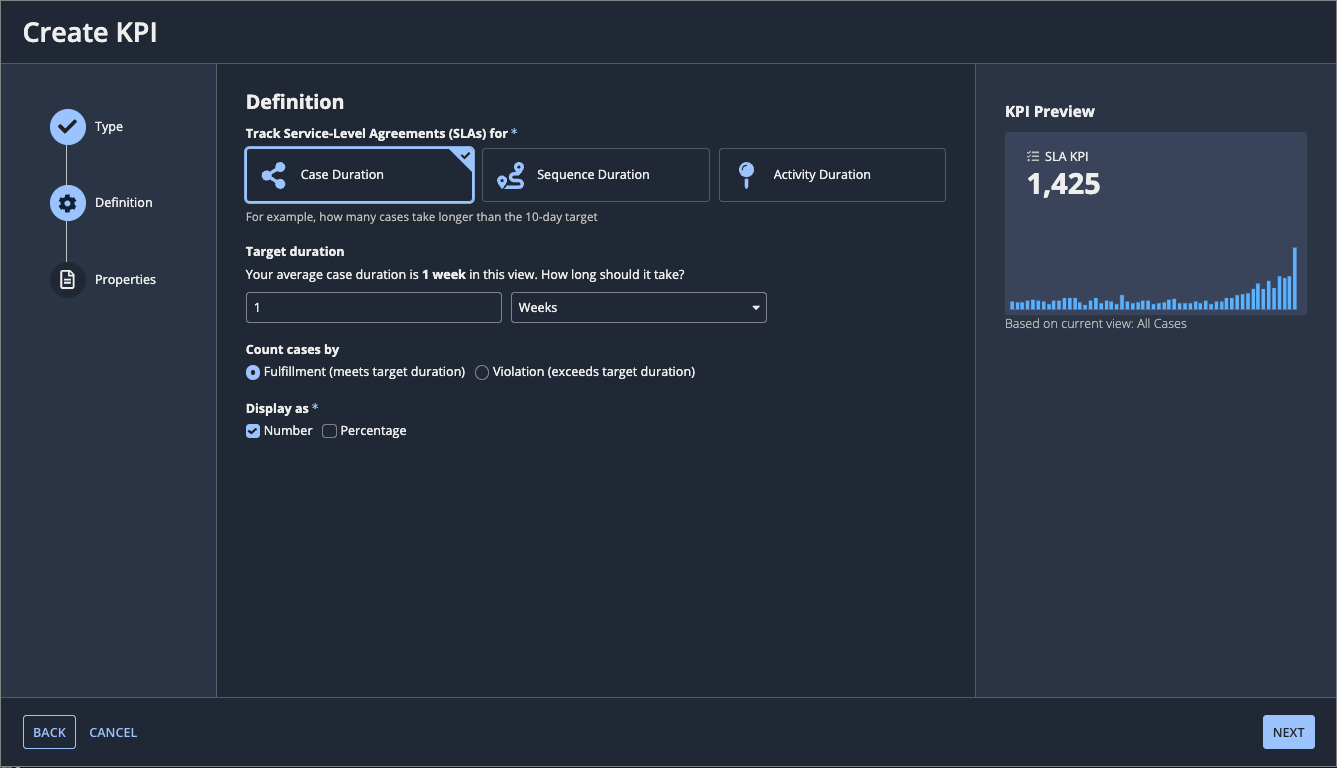
To define an SLA KPI for case duration:
- For Track Service-Level Agreements (SLAs) for, select Case duration.
- For Target duration, enter the numeric value and select the unit of time for the maximum case duration allowed by the SLA. For example, if the SLA specifies that cases be resolved in 15 days, enter
15and selectDays. - For Count cases by, select either:
- Fulfillment (meets target duration): Shows the number or percentage of cases that are within the set time-frame for the SLA.
- Violation (exceeds target duration): Shows the number or percentage of cases that are not within the set time-frame for the SLA.
- Continue on with step 6 in the Create a KPI section.
To define an SLA KPI for sequence duration:
- For Track Service-Level Agreements (SLAs) for, select Sequence Duration
- This only supports direct sequences.
- For Start Activity, select one start activity.
- For End Activity, select one end activity.
- For Target duration, enter the numeric value and select the unit of time for the maximum duration that the SLA allows this sequence. For example, if the SLA specifies that this sequence must be completed in 3 days, enter
3and selectDays. - For Count occurrences by, select either:
- Fulfillment (meets target duration): Shows the number or percentage of cases that are within the set time-frame for the SLA.
- Violation (exceeds target duration): Shows the number or percentage of cases that are not within the set time-frame for the SLA.
- Continue on with step 6 in the Create a KPI section.
To define an SLA KPI for activity duration:
- For Track Service-Level Agreements (SLAs) for, select Activity duration.
- For Activity, select one start activity.
- For Target duration, enter the numeric value and select the unit of time for the maximum duration that the SLA allows this activity. For example, if the SLA specifies that this sequence must be completed in 8 hours, enter
8and selectHours. - For Count occurrences by, select either:
- Fulfillment (meets target duration): Shows the number or percentage of cases that are within the set time-frame for the SLA.
- Violation (exceeds target duration): Shows the number or percentage of cases that are not within the set time-frame for the SLA.
- Continue on with step 6 in the Create a KPI section.
Note: The SLA KPI configuration to track activity duration is only available if you have both a start and end timestamp configured for your activities.
Define the duration KPICopy link to clipboard
To define the duration KPI, select the duration to track and make the specific configurations.
To track case duration:
- For Select which duration you want to track, select Case Duration.
- For Aggregation, select either Median or Sum.
- For Unit, select one of the following:
- Detect Automatically (default)
- Years + Months
- Months + Weeks
- Weeks + Days
- Days + Hours
- Hours + Minutes
- Minutes + Seconds
- Continue on with step 6 in the Create a KPI section.
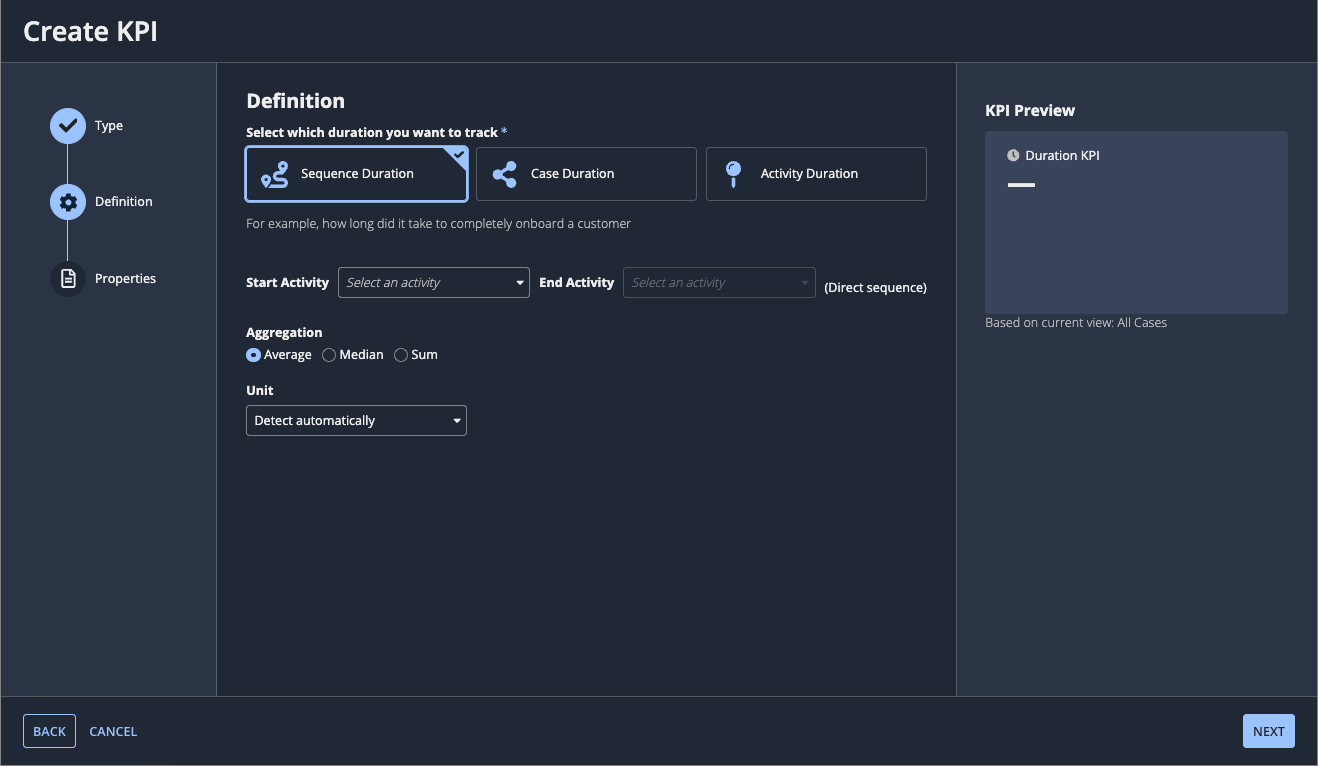
To track sequence duration:
- For Select which duration you want to track, select Sequence Duration.
- For Start Activity, select one start activity.
- For End Activity, select one end activity.
- For Aggregation, select:
- Average
- Median
- Sum.
- For Unit, select one of the following:
- Detect Automatically (default)
- Years + Months
- Months + Weeks
- Weeks + Days
- Days + Hours
- Hours + Minutes
- Minutes + Seconds
- Continue on with step 6 in the Create a KPI section.
To track activity duration:
- For Select which duration you want to track, select Activity Duration.
- For Activity, select one start activity.
- For Aggregation, select:
- Average
- Median
- Sum.
- For Unit, select one of the following:
- Detect Automatically (default)
- Years + Months
- Months + Weeks
- Weeks + Days
- Days + Hours
- Hours + Minutes
- Minutes + Seconds
- Continue on with step 6 in the Create a KPI section.
Note: The Duration KPI configuration to track activity duration is only available if you have both a start and end timestamp configured for your activities.
Define the aggregation KPICopy link to clipboard
Note: The aggregation KPI is only available if your process contains a numeric attribute.
To define an aggregation KPI, specify what you want to aggregate and how you want to aggregate it.
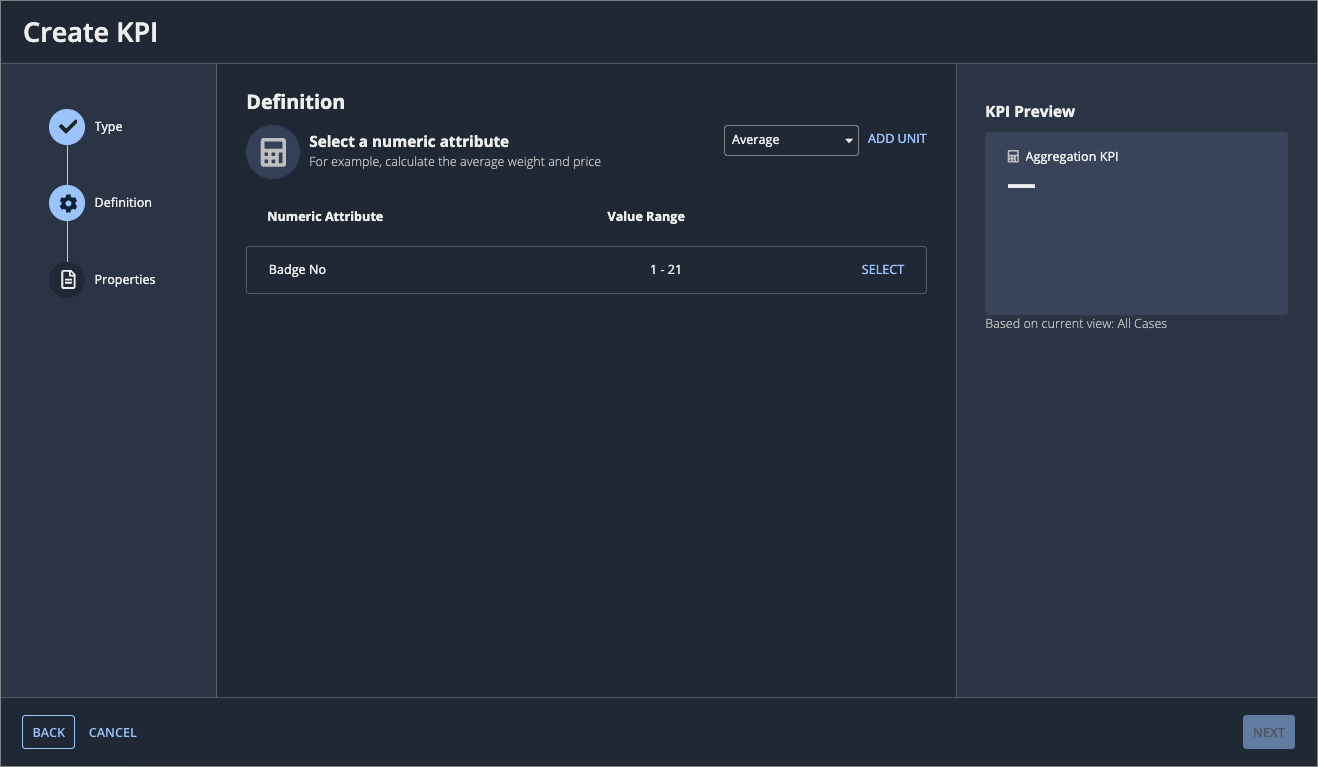
To define an aggregation KPI:
- For Select a numeric attribute, select one of the following ways to aggregate the numerical attribute:
- Minimum
- Maximum
- Median
- Average
- Total
- Click ADD UNIT to enter a unit.
- For Numeric Attribute, click SELECT to choose the numeric attribute to aggregate.
- Continue on with step 7 in the Create a KPI section.
Reuse KPIsCopy link to clipboard
After creating a KPI in an individual view, you can reuse the KPI in other views of the same process.
KPIs calculate and display process data within the context of the view that you are currently in. This allows you to use the same KPI to focus on different aspects of the data depending on the view you're in.
For example, you could use the same KPI to track manual tasks or repetitions in both open and closed cases. Just reuse the KPI on two separate views; one for open cases and one for closed cases. The same KPI will calculate and display the data for the manual tasks and repetitions associated with open cases on one view, and closed cases on the other.
Once you've created a KPI, you can continue to reuse it even if you remove the KPI from the view where you originally created it.
To add an existing KPI to a view:
- Go to the KPIs tab of the view.
- Click Add KPI.
-
Select Add Existing KPI. A list of the KPIs displays.
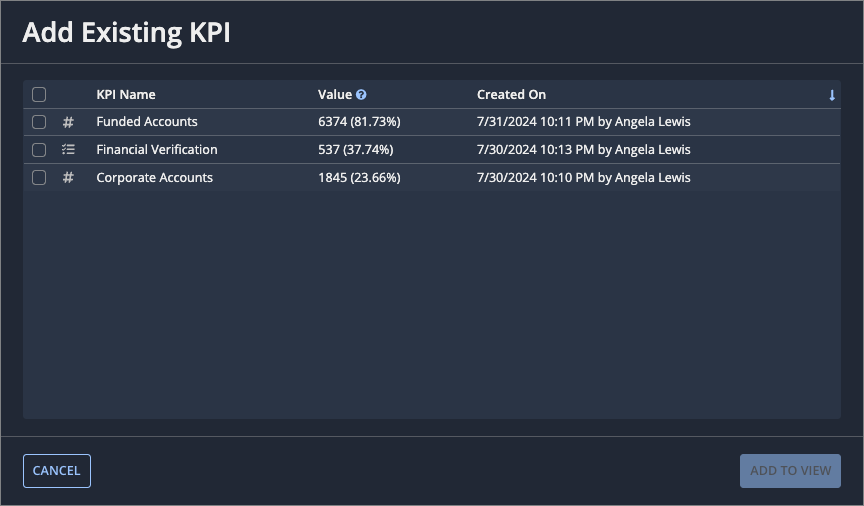
This list consists of KPIs that have been created for the process, but have not yet been added to the current view. The Value calculation reflects cases in the current view. If the current view filters out attributes, sequences, or activities needed for the KPI, this column is empty.
- Select one or more existing KPIs to add to the view.
- Click ADD TO VIEW.
To see or edit where a KPI is used:
- Go to the Summary or KPIs tab of a view.
- Click the three-dot menu in the KPI.
- Click Edit Properties.
-
Under Views, use the dropdown list to see which views are selected to display the KPI.
For example:
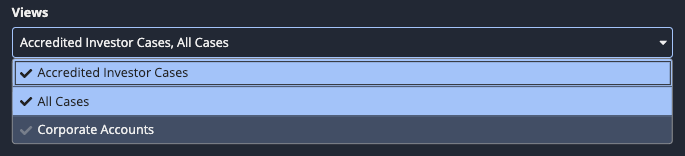
In this example, the All Cases and Accredited Investor Cases views are selected, while the Corporate Accounts view is unselected.
-
(Optional) Click a view in the list to select or unselect it.
- If you've made any changes, click UPDATE. If not, click CANCEL.
Edit KPI propertiesCopy link to clipboard
Note: Any edit to a KPI will appear in every view that uses the KPI.
Users with Analyst permissions for a process can edit properties for user-created KPIs. Analysts can view but not edit the properties for system-provided KPIs.
Users with Viewer permissions for a process can view but not edit any KPI properties.
To edit KPI properties:
- Go to the Summary or KPIs tab of a view.
- Click the three-dot menu in the KPI.
-
Select Edit Properties. The Edit Properties dialog displays.
For example:
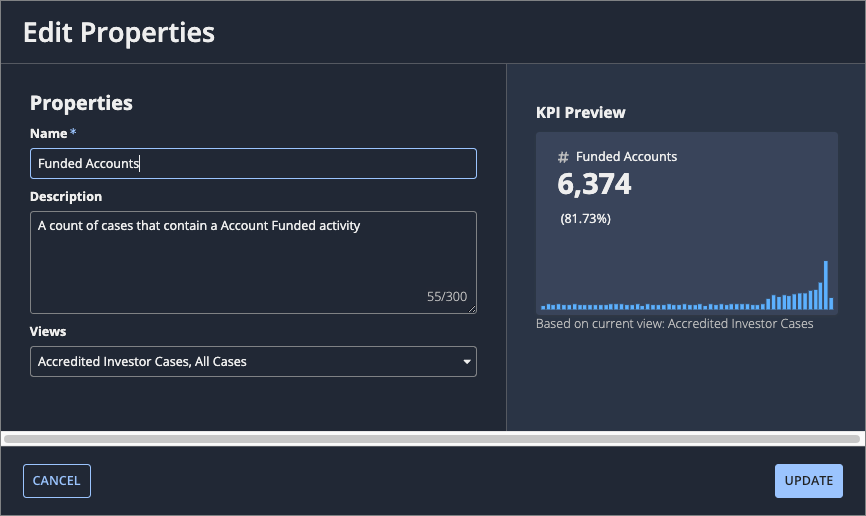
- Configure the following properties:
- Name: Edit the KPI name.
- Description: Edit the KPI description.
- Views: Select which views reuse the KPI.
- Click UPDATE.
Edit KPI definitionCopy link to clipboard
Note: Any edit to a KPI will appear in every view that uses the KPI.
Users with Analyst permissions for a process can edit the definitions of user-created KPIs. Analysts can view but not edit the definitions of system-provided KPIs.
Users with Viewer permissions for a process can view but not edit any KPI definition.
To edit a KPI definition:
- Go to the Summary or KPIs tab of a view.
- Click the three-dot menu in the KPI.
-
Select Edit Definition. The Edit Definition dialog displays.
For example:

- Edit the definition, as appropriate to the KPI type:
- Click UPDATE.
Show/hide trend graphsCopy link to clipboard
By default, a trend graph displays as part of each KPI. This graph shows changes in the indicator over the selected date range for the view.
For example:
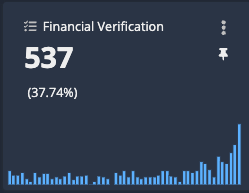
You can hover over the bars of the trend graph to see monthly statistics.
You can also hide trend graphs for all KPIs in the Summary and/or KPIs tabs for the current session.
For example:
To hide trend graphs:
- Go to the Summary or KPIs tab.
- Click Show Trend.
Pin and unpin KPIsCopy link to clipboard
Pinning KPIs to the Summary tab of a view enables you to quickly see the most relevant or frequently used KPIs whenever you open the view.
Pinned KPIs are listed in the Summary tab in order of creation date.
System-provided KPIs are pinned to the Summary tab by default. You can unpin them as needed.
To pin a KPI to the Summary tab of a view:
- Go to the KPIs tab of the view. This tab lists KPIs for the current view in order of creation date, with system-provided KPIs displaying last.
- Click the three-dot menu in the KPI you want to pin.
- Click Pin to Summary.
To unpin a KPI, click Unpin from Summary.
Remove a KPICopy link to clipboard
You can remove any user-created KPI from a view.
When you remove a KPI from an individual view, the KPI no longer appears in either the Summary or KPIs tab of that view. However, the KPI continues to be reusable across any view in the process.
To remove a KPI from a view:
- Go to the Summary or KPIs tab.
- Click the three-dot menu in the KPI you want to remove.
- Click Remove from View. A confirmation dialog displays.
- Click REMOVE.
Delete a KPICopy link to clipboard
You can delete any user-created KPI from a process.
When you delete a KPI, you erase the definition of that KPI for the process, so the KPI is automatically removed from all views where it is used.
To delete a KPI:
- Go to the Summary or KPIs tab of any view where the KPI is used.
- Click the three-dot menu in the KPI.
- Click Delete KPI. A confirmation dialog displays.
- Click DELETE.