| This content applies solely to Connected Claims, which must be purchased separately from the Appian base platform. This content was written for Appian 24.2 and may not reflect the interfaces or functionality of other Appian versions. |
Getting startedCopy link to clipboard
New claims involve a number of tasks, from investigation, inspection, document verification, and payment. If you are a claims adjuster or have a team of claims adjusters, you need the Operations & Settlement module within the Connected Claims solution to streamline your claims management and settlement tasks. This module has all of the data views, workflows, and tasks you need to investigate a claim and quickly work through any settlement tasks in one centralized location. This reduces time to close as you work through the claims lifecycle.
This quick start guide is designed to quickly get you started with the Operations & Settlement module of your Connected Claims solution. Learn the basic views, tasks, and actions you will perform as you move a claim through the settlement phase, including verifying documents, reviewing related contacts, entering payment amounts and methods, and settling a claim.
Note that your specific implementation of the Connected Claims solution may have more automation and customization to meet your business and process needs.
Use case: time to settleCopy link to clipboard
The How to Process a Claim quick start guide walked you through the basic steps for reporting Maria Garcia's car insurance claim, which is now in the hands of Anthony Hill, the claims adjuster. Anthony is tasked with reviewing the claim details, creating a new inspection, reviewing any documents associated with Maria's claim, completing any claims enrichment tasks, and examining the financial data to determine if there are payment actions he needs to complete to continue the claims process or settle the claim.
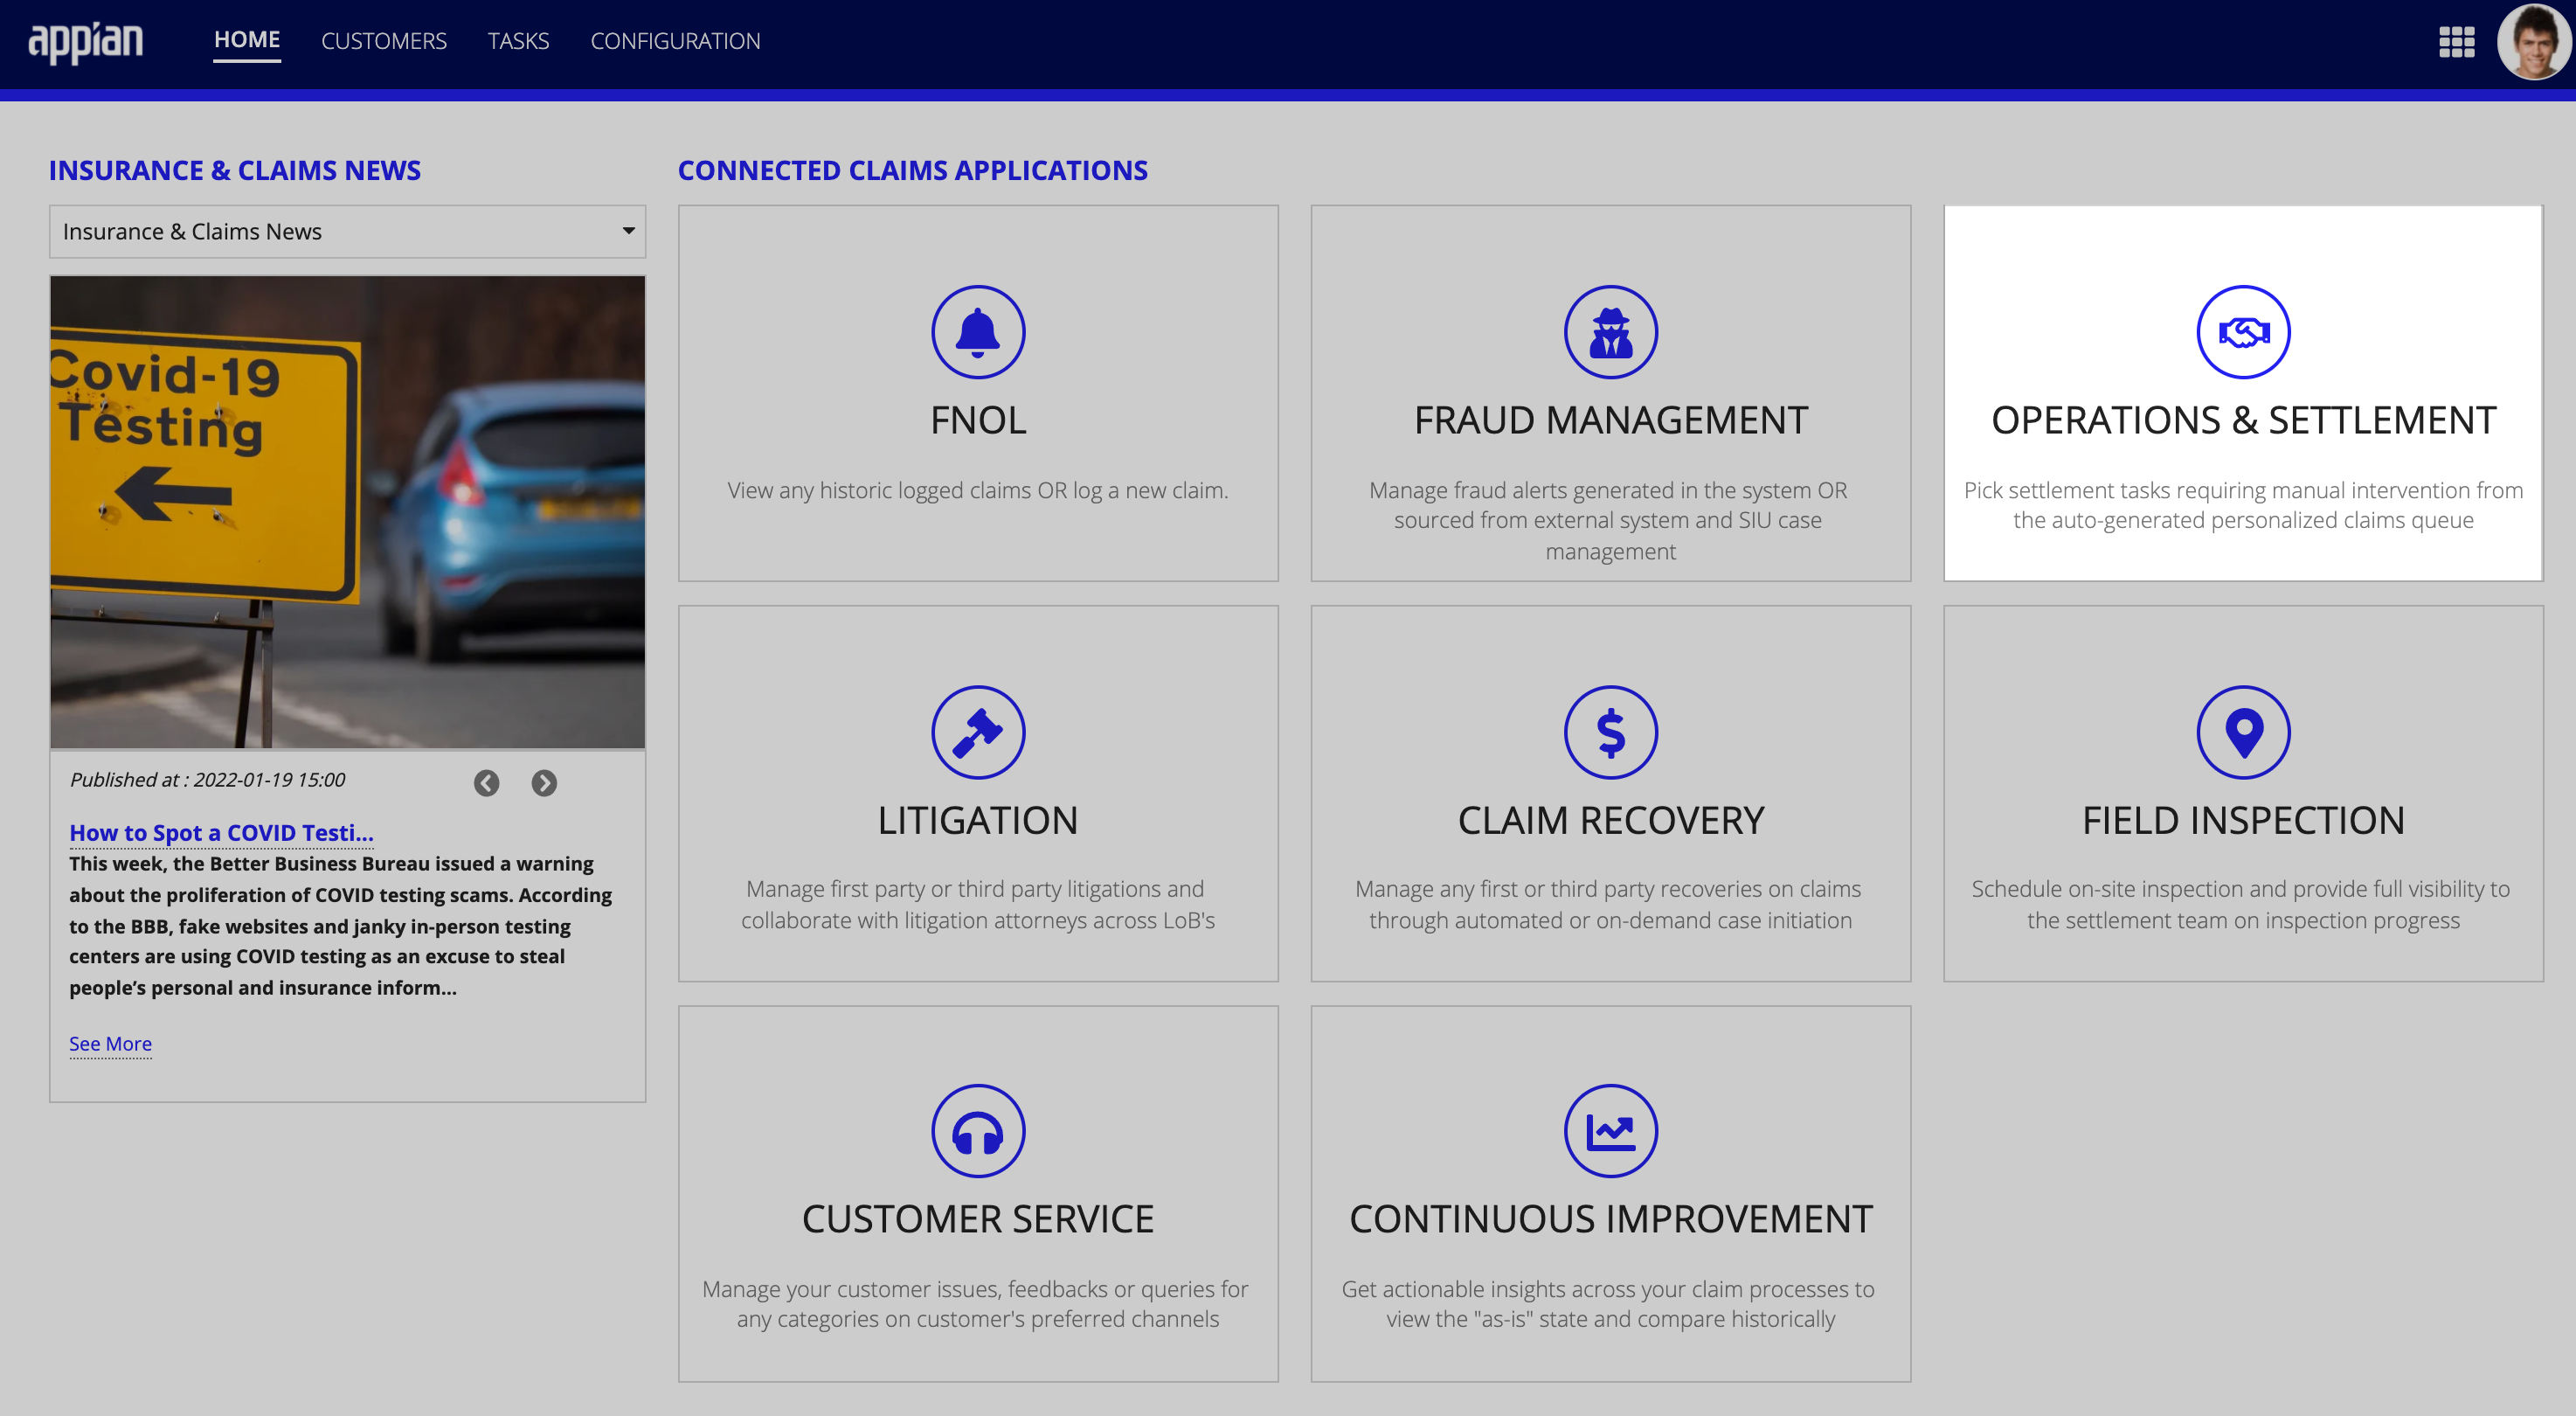
With Connected Claims, Anthony can use the Operations & Settlement module to gain visibility into all the data views and workflows he needs to make the right decisions about whether or not to settle Maria's claim. He logs in to the solution where he sees the Operations & Settlement module on the HOME page, and with one click of the module, Anthony is ready to get started reviewing Maria's claim.
Viewing claims and key dataCopy link to clipboard
Like the FNOL module, the Operations & Settlement module defaults to the CLAIMS page when opened. From here, Anthony can see the claims dashboard, which shows key metrics at the top of the page that indicate how many active claims are currently in the pipeline. Relevant KPIs provide a summary of all claims, including the total number of open and overdue claims, as well a daily total of reported claims, the highest percentage of claims by line of business, and the US state that has the maximum number of claims. These KPIs provide Anthony with a clear snapshot of the overall process health for all claims in the pipeline.
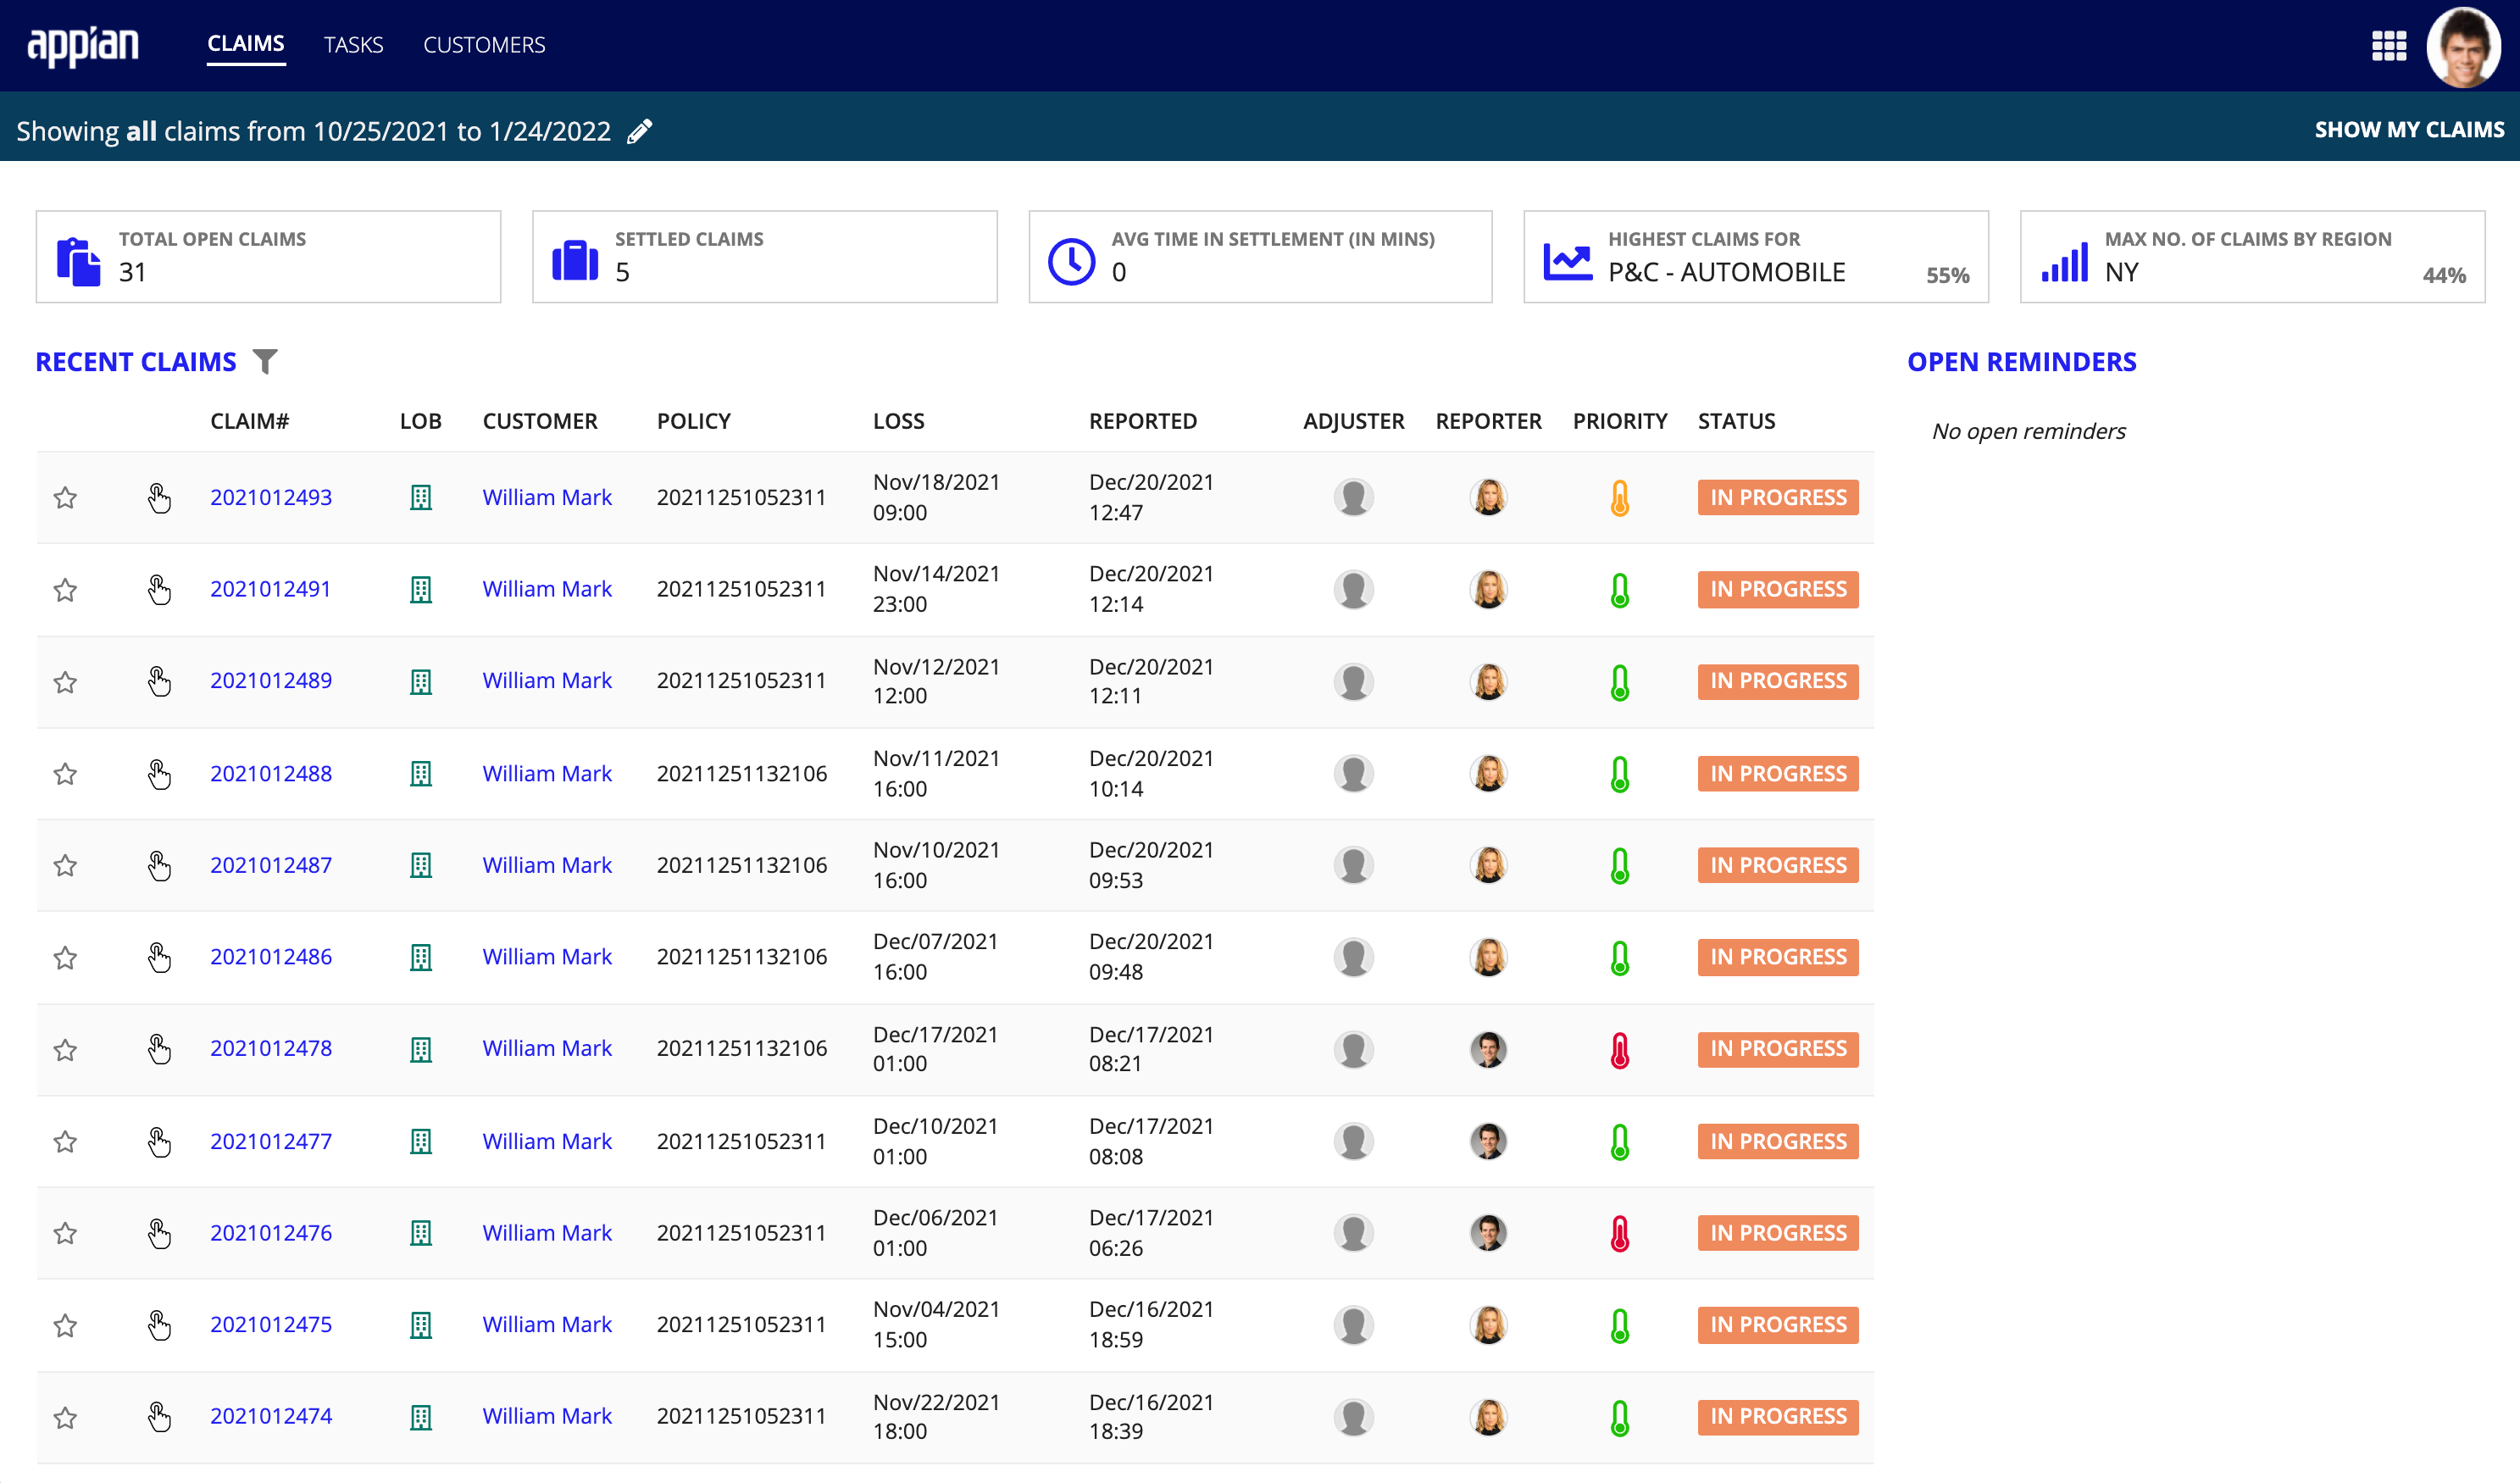
Anthony can also see a complete list of all recent claims, including open and settled claims and their priority. This will allow him to effectively prioritize his work and work on the most important claim tasks first.
The Claims dashboard has search fields and filters that give Anthony greater control over the claims list. When he clicks the filter icon and enters the data available to him, like the claim number, policy number, customer name, or claim status, Connected Claims returns only the claim records he wants to see.

For Maria's claim, Anthony needs to complete any open data enrichment and settlement tasks so he enters her claim number into the Claim Number Search field and clicks Apply Filter to locate her claim in the list. Clicking on the claim number allows him to drill down into Maria's claim and see the claim details.
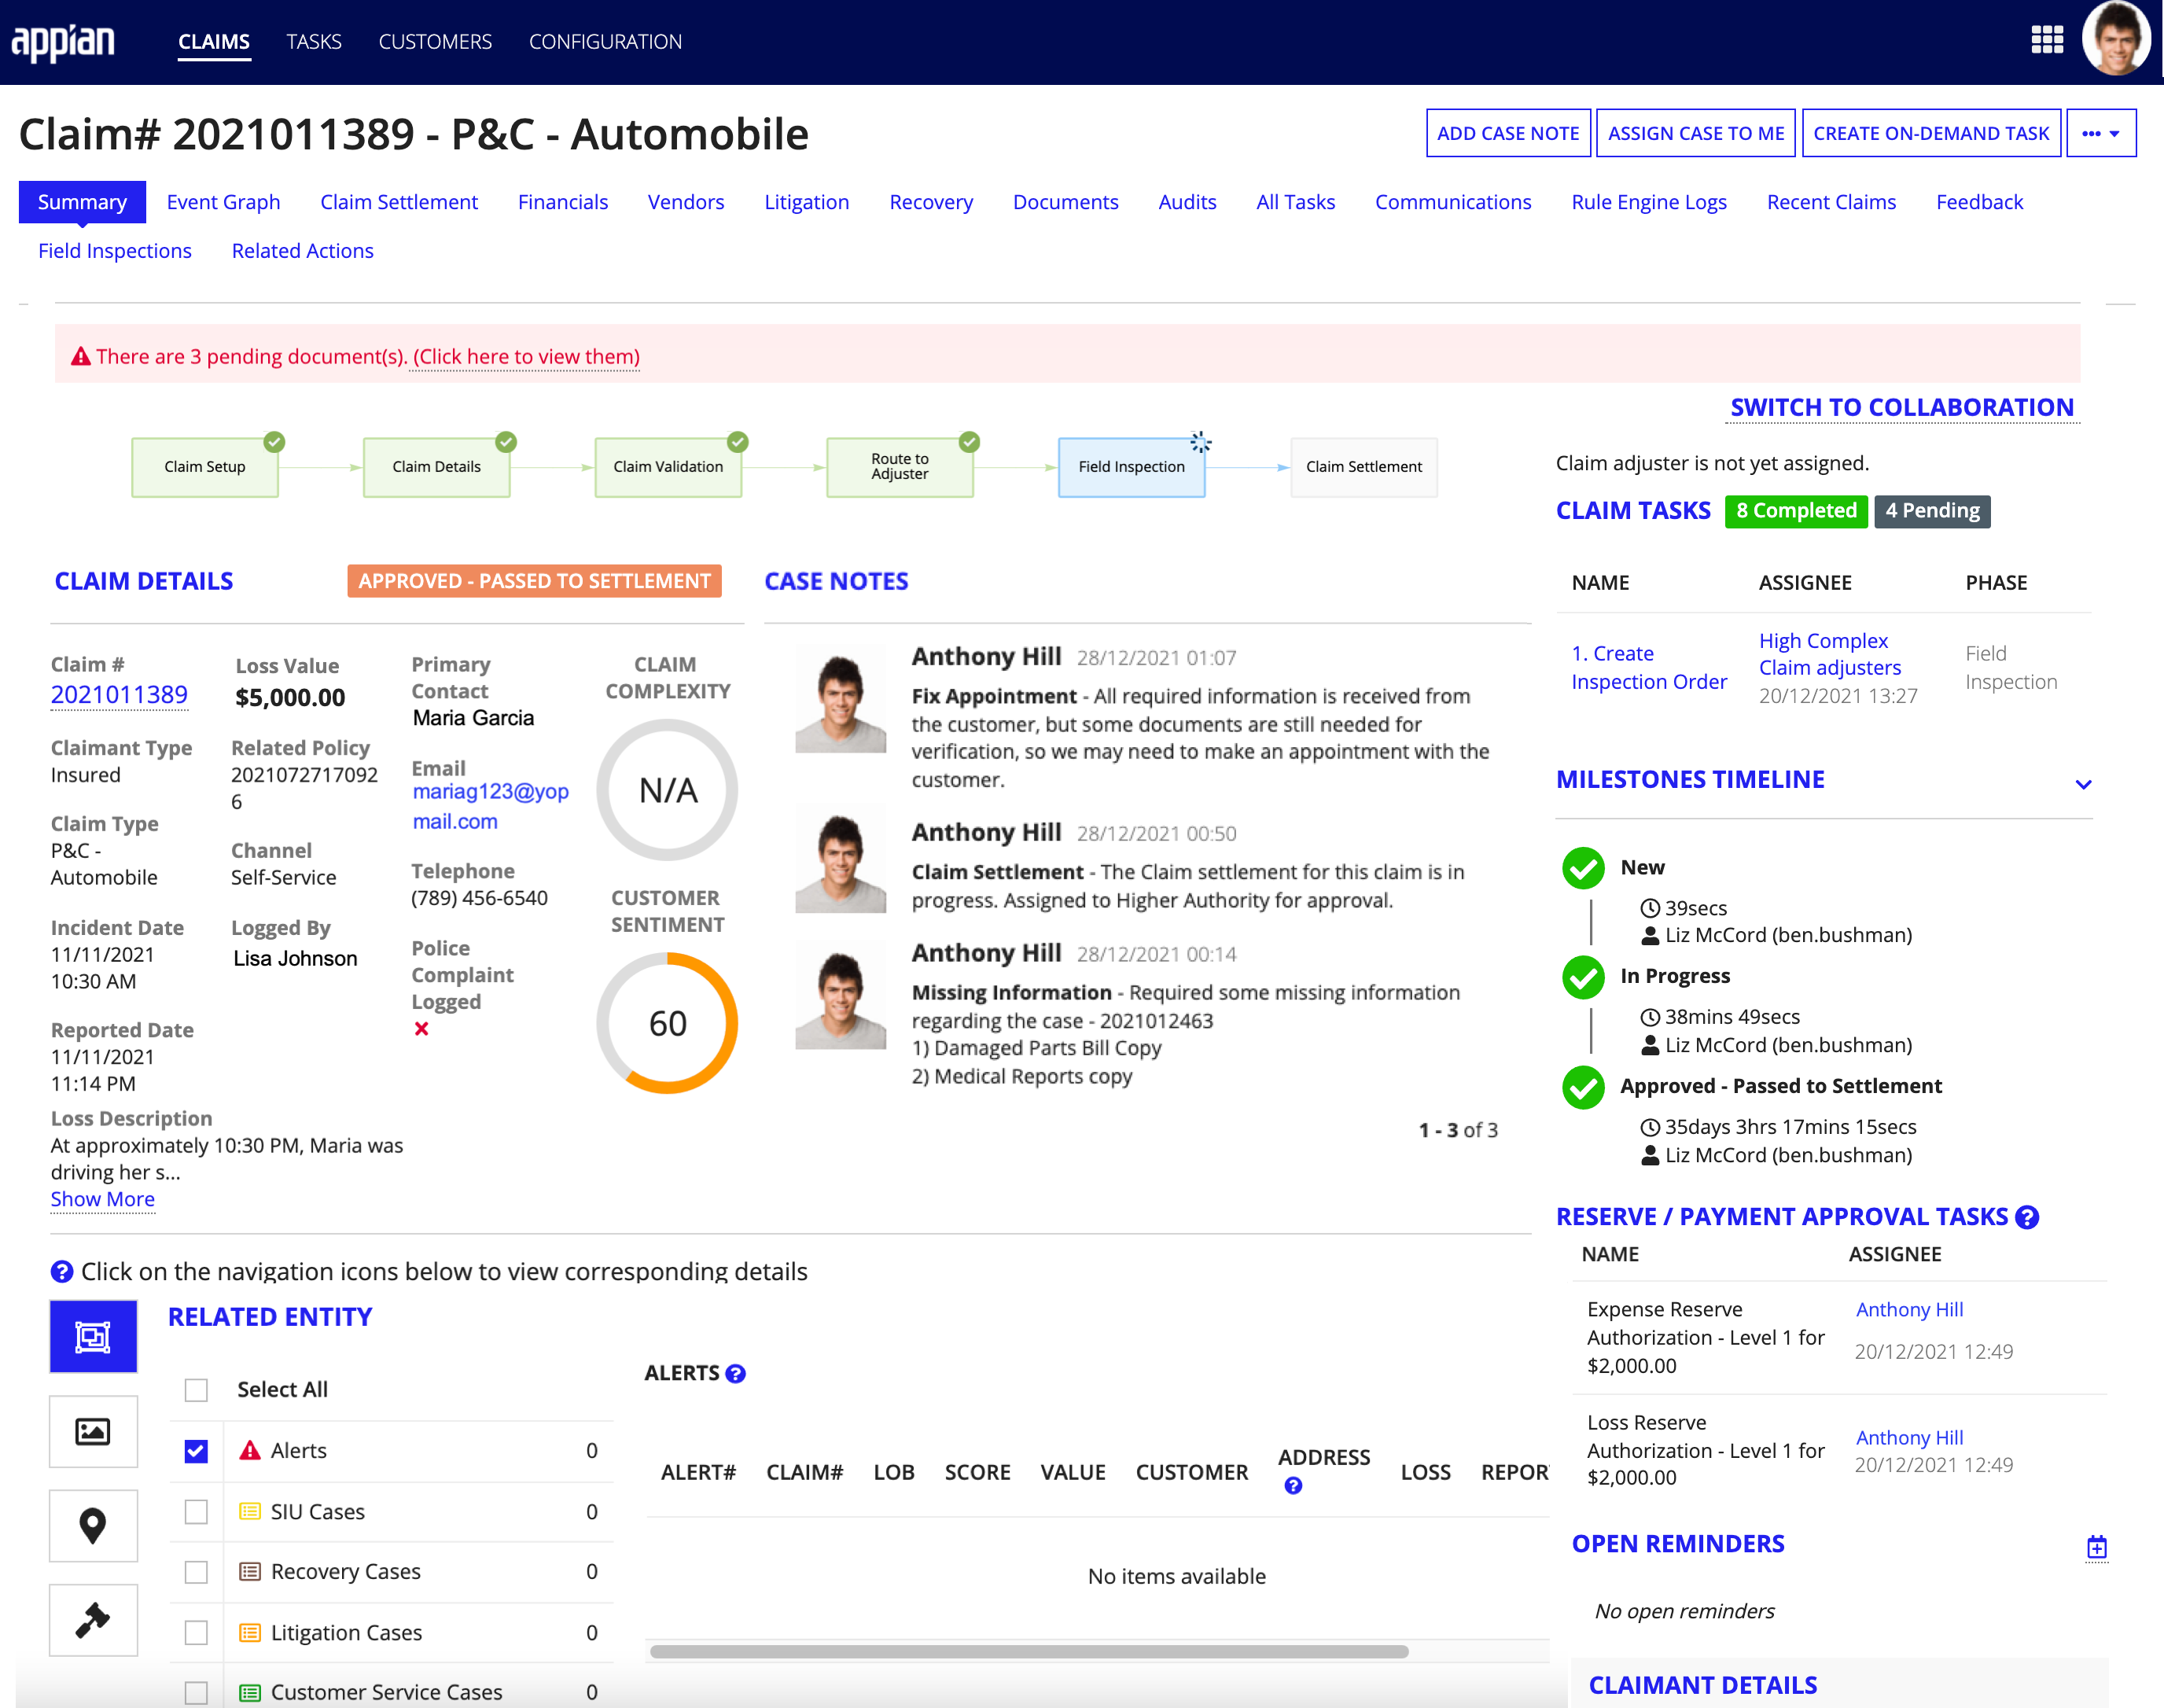
The Summary view opens, which displays a workflow visual of where the claim is in the process. Anthony can see the claim details and that it has worked its way to the settlement phase. He can also see a workflow timeline showing exactly where the claim is in the claims lifecycle, pending documents he needs to review, any Completed and Pending tasks associated with the claim, a milestone timeline of claim activities by user, details about any related entities, and so much more. Instead of going to different, disparate systems to view all of this information, Connected Claims provides Anthony with a single, unified view of the claim data.
With all of this data at his fingertips, Anthony is ready to proceed to the claim tasks assigned to him.
Viewing and completing claim tasksCopy link to clipboard
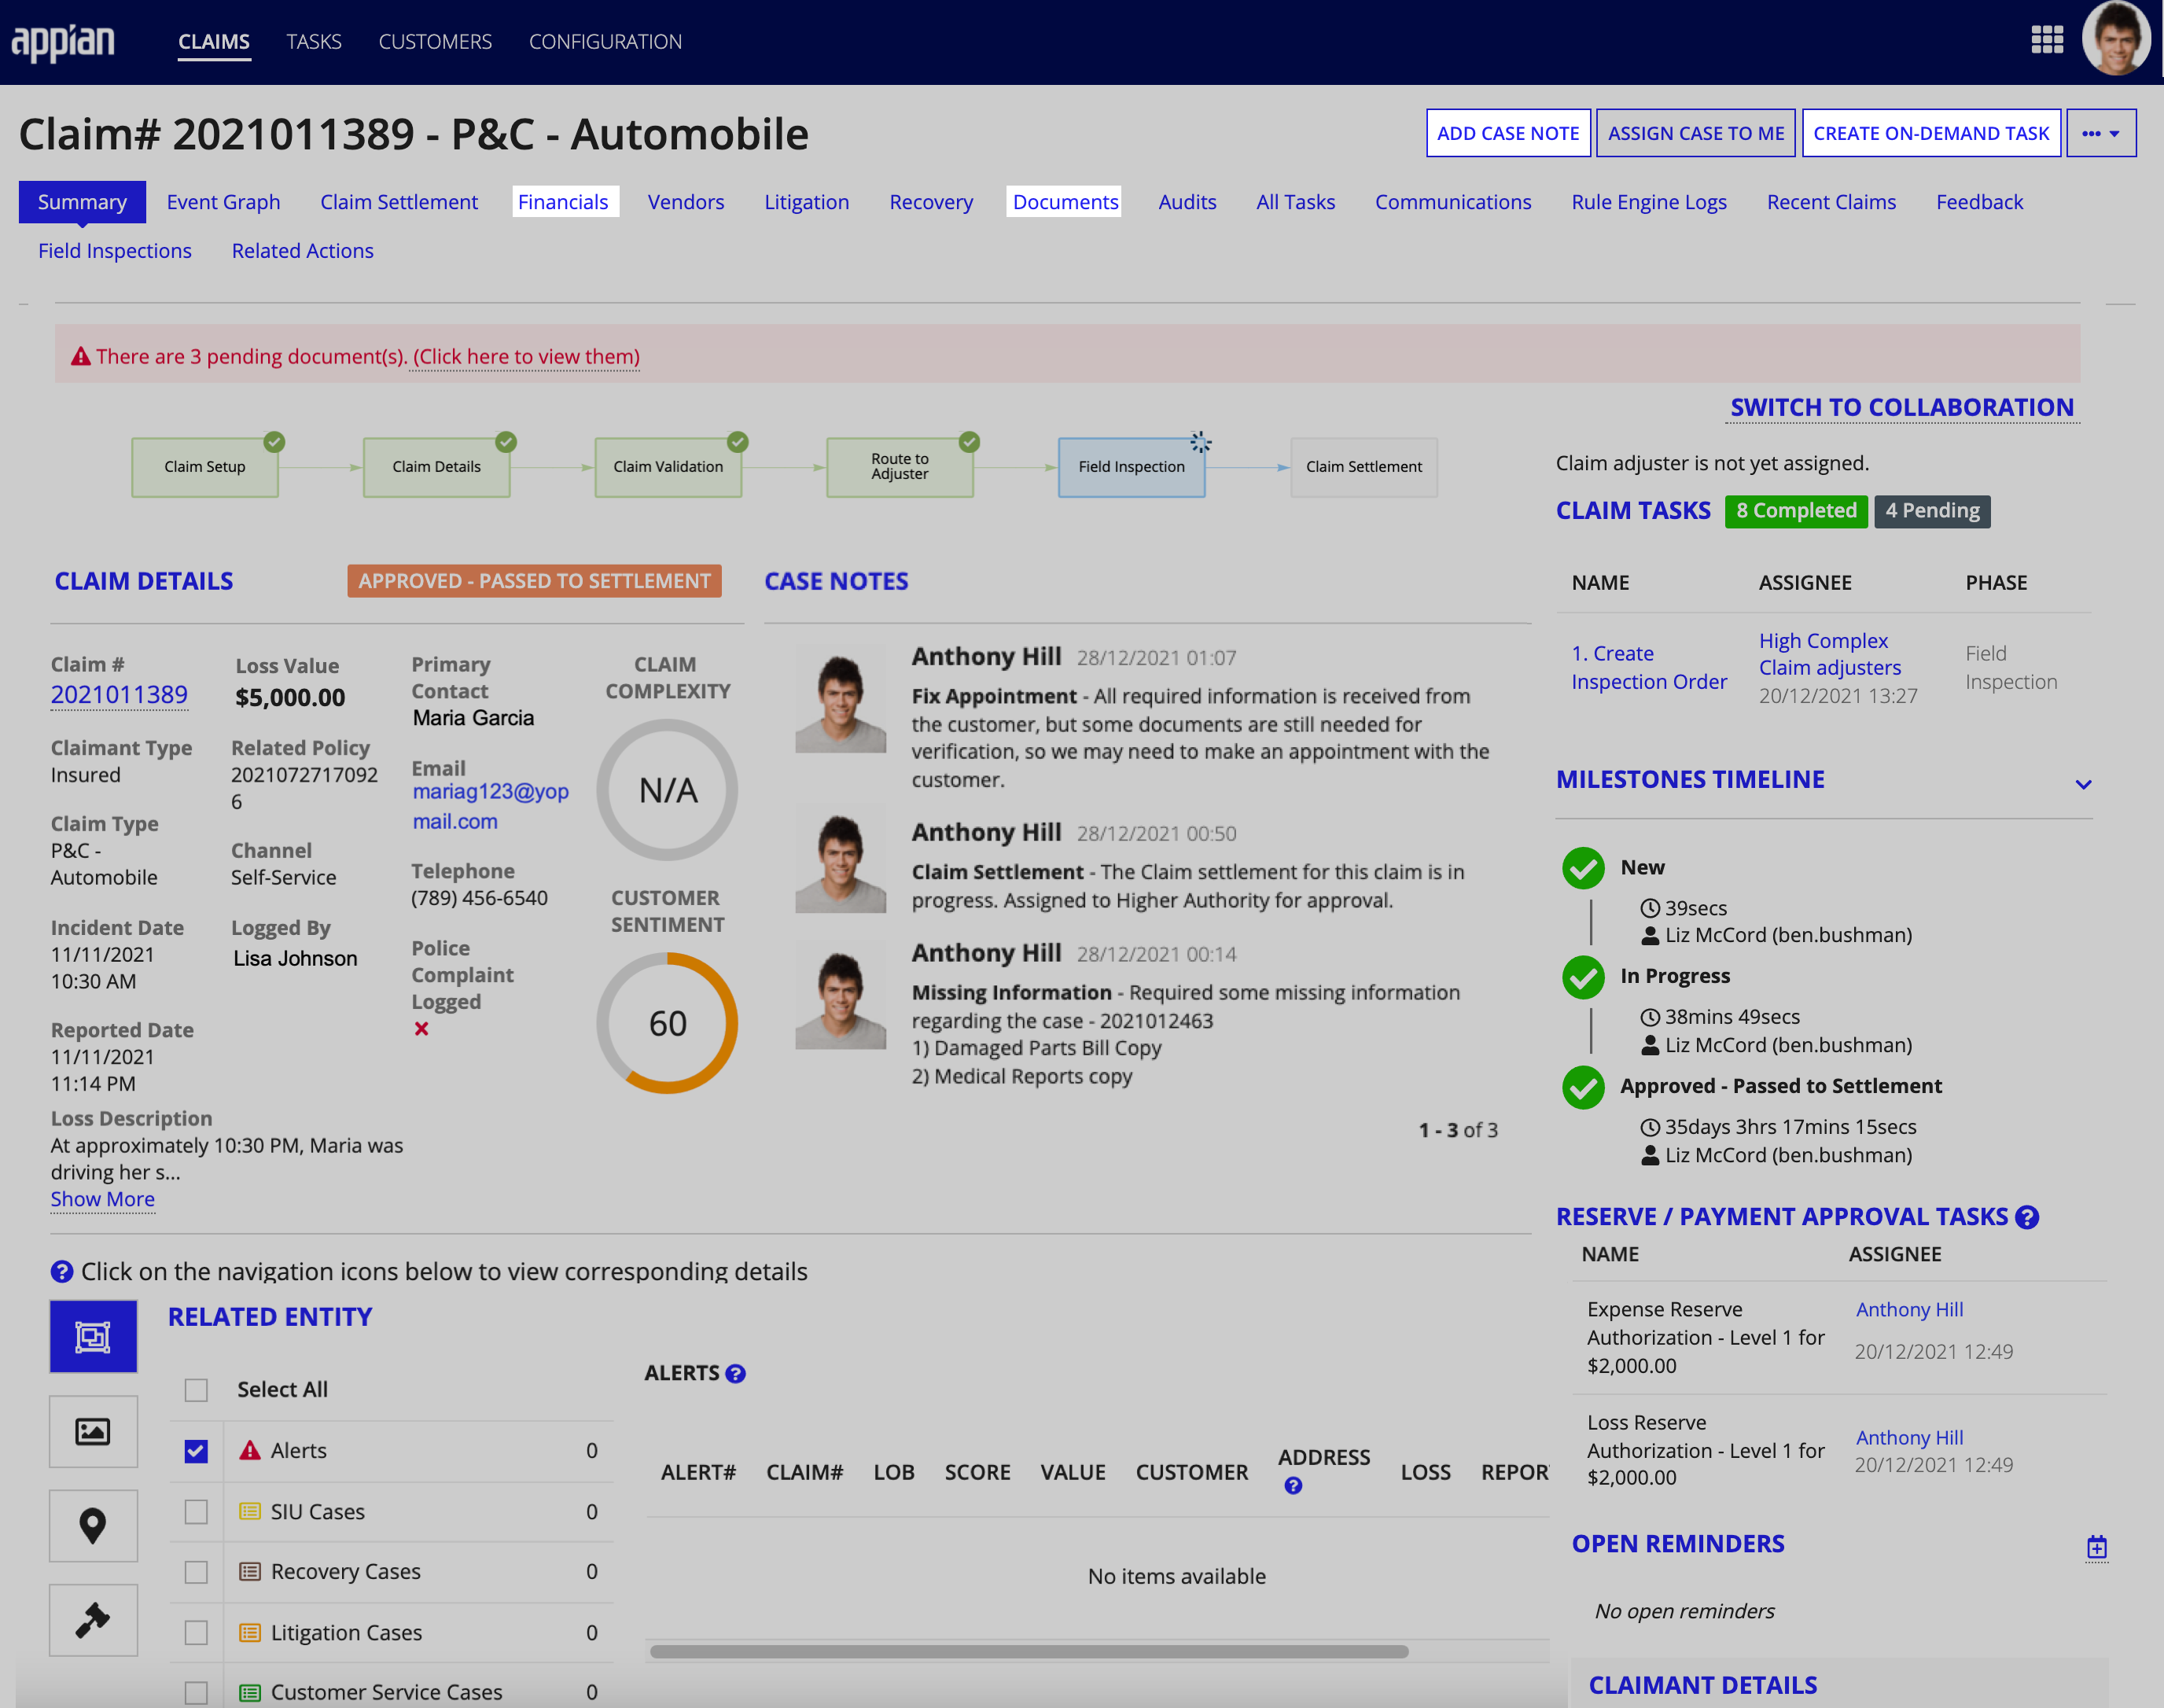
In addition to centralizing the claim details in a single record, Connected Claims also allows Anthony to access the data and actions he needs to complete important claims tasks directly from the claim record. This makes it easy for him to perform actions like adding case notes, creating on-demand tasks, managing documents, completing payment tasks, and reopening the claim from one central view without having to navigate to multiple pages or different systems.
Adding case notesCopy link to clipboard
Case notes allow you to keep a log of all of the interactions you have with a customer and any important notes that you want to track as the claim moves through each step in the claims life cycle.
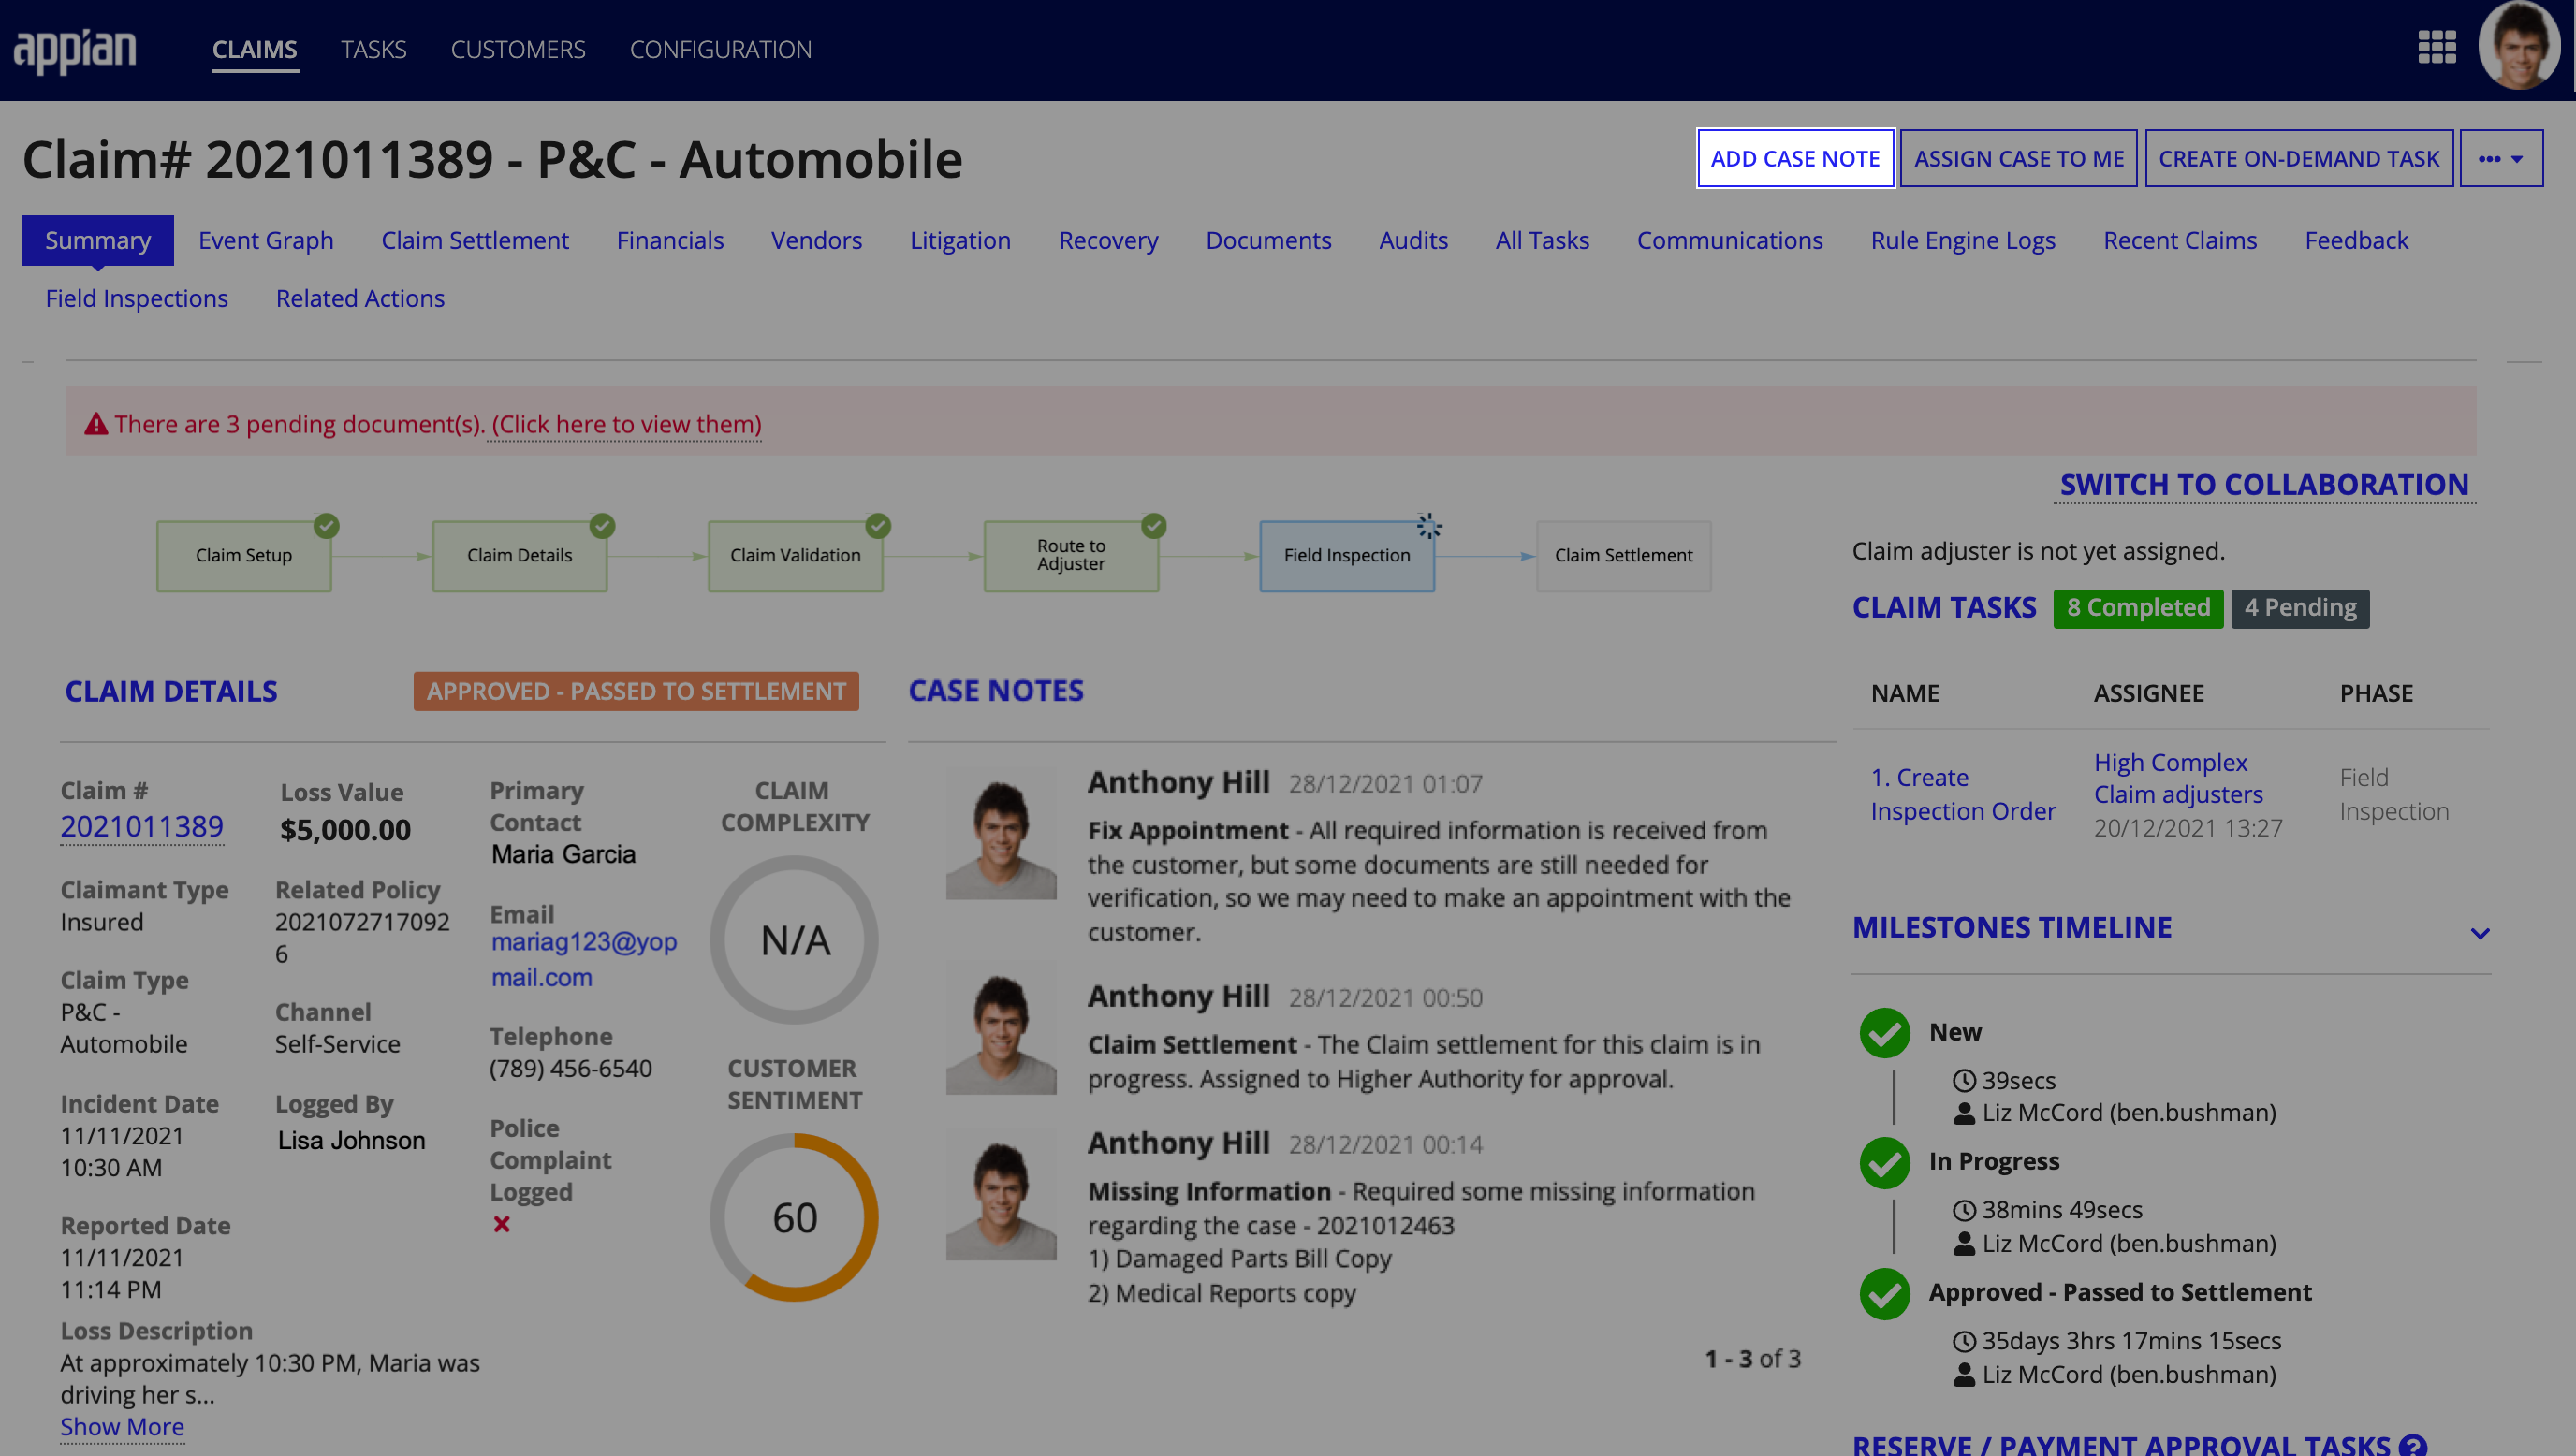
To add a new case note:
- Click ADD CASE NOTE in the claim summary view.
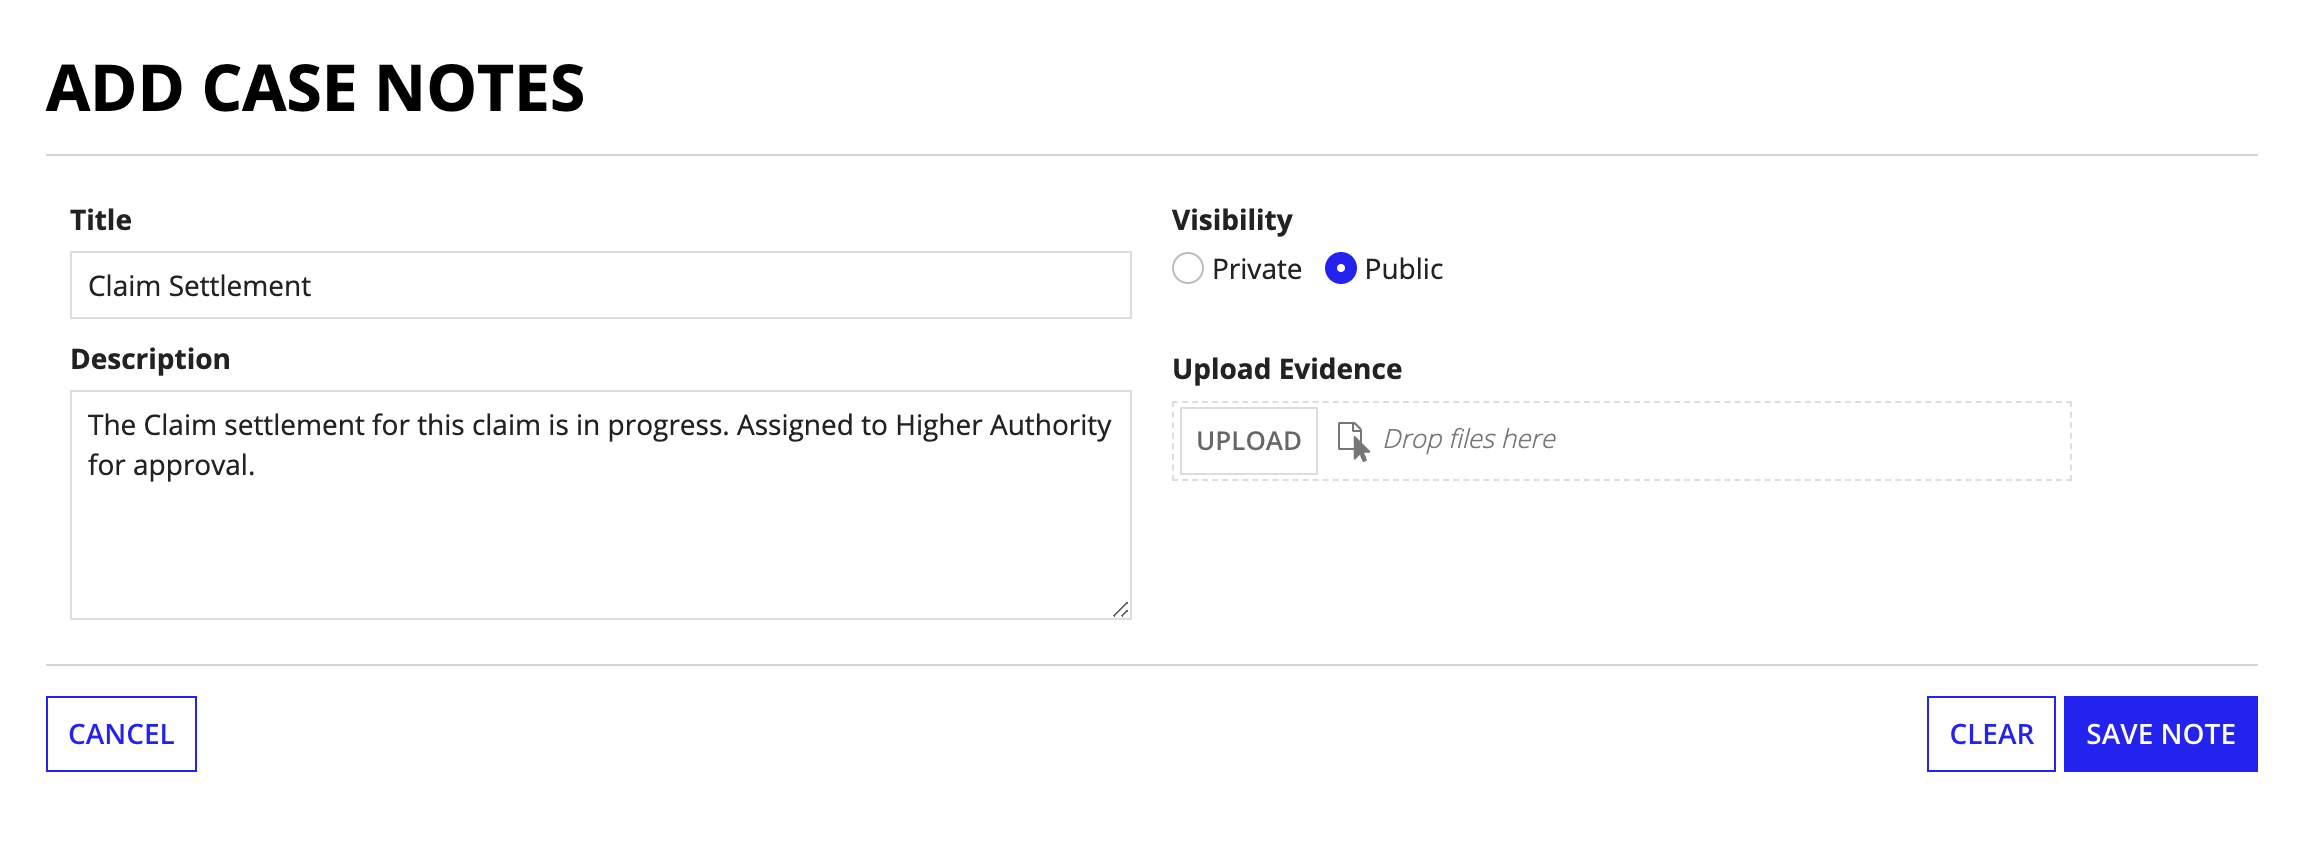
- Enter the following information in the form (all fields are optional):
- Title: A unique title for the case note.
- Description: The case note.
- Visibility: Select the visibility (Private or Public) that you want to assign to the case note. Public case notes are visible to everyone and private case notes are visible to only users with permission to view them.
- Upload: A document or image file that you want to attach as evidence on the case note.
- Click SAVE NOTE. The note will now appear under the CASE NOTES section in the claim summary view.
Creating On-Demand tasksCopy link to clipboard
As a claim moves through the claims journey, you may need to create and assign additional tasks and activity reminders that are not already part of the workflow but are required to move the claim through the claims process. You can create and schedule an On-Demand task for this type of activity.
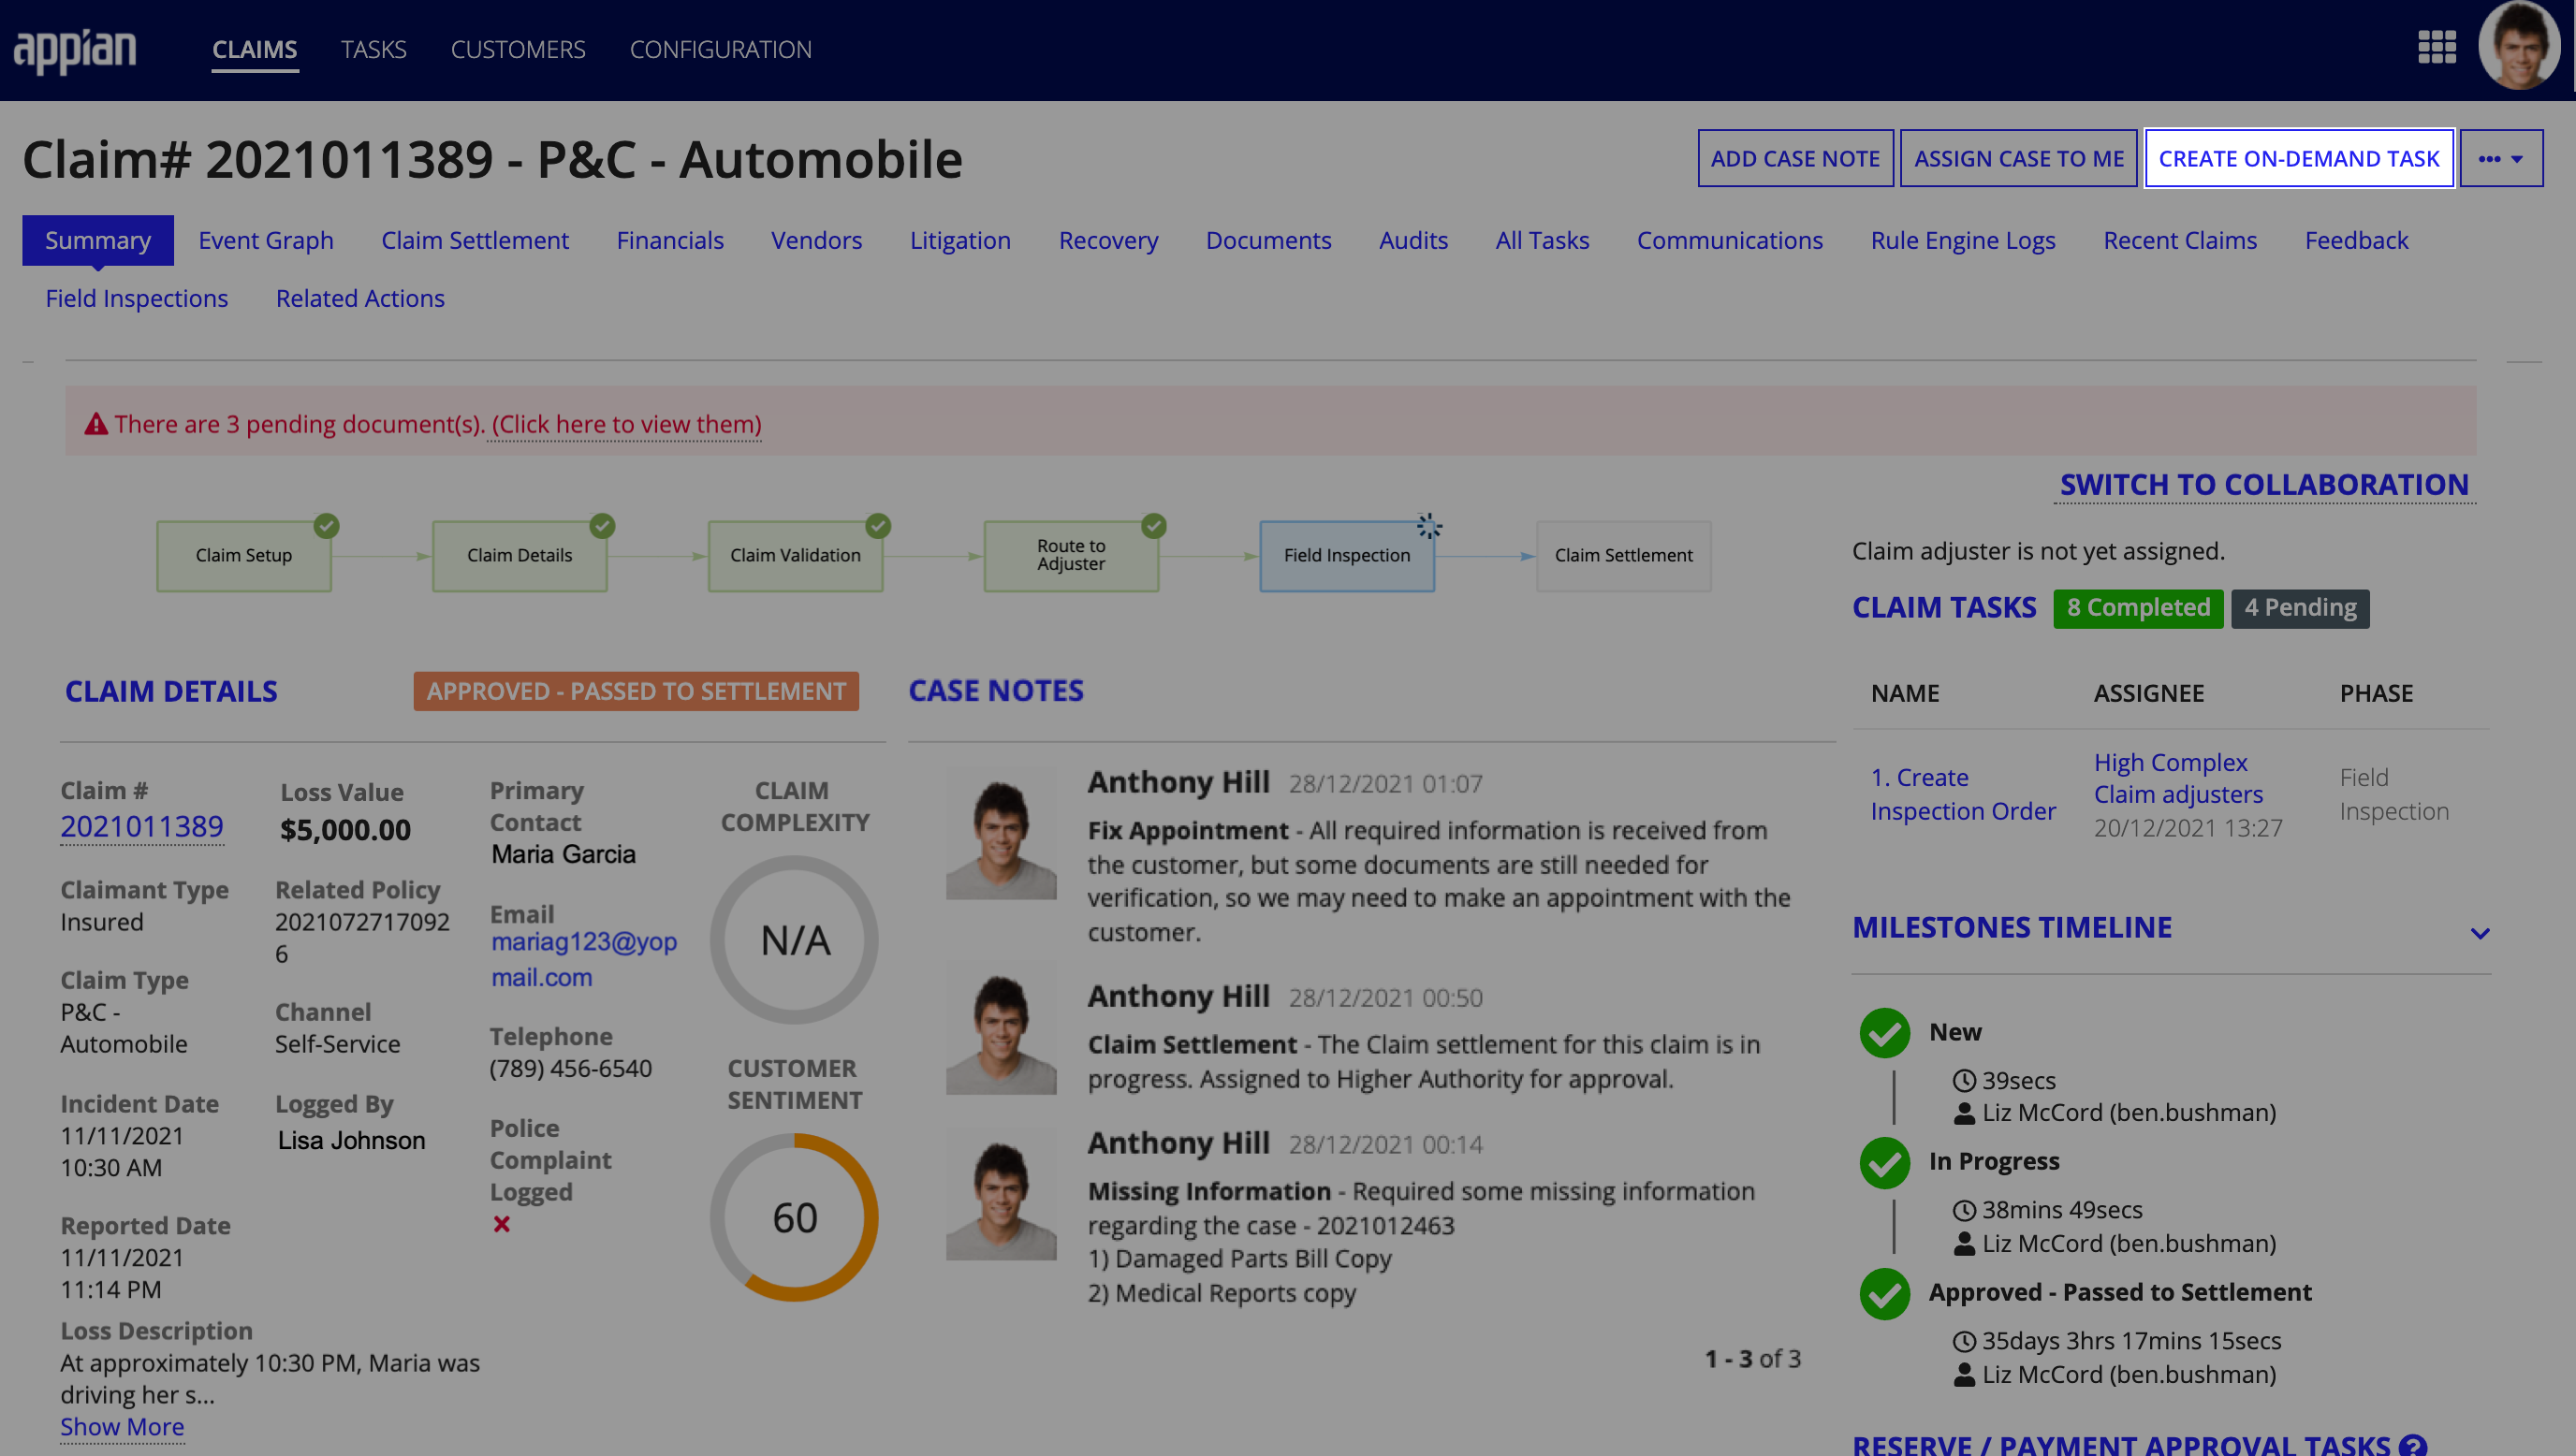
When Anthony called Maria to give her an update on the claim he was unable to reach her. The CREATE ON-DEMAND TASK action allows him to create a reminder to contact Maria again at a future date.
To create an on-demand task:
- Click CREATE ON-DEMAND TASK in the Claim summary view.
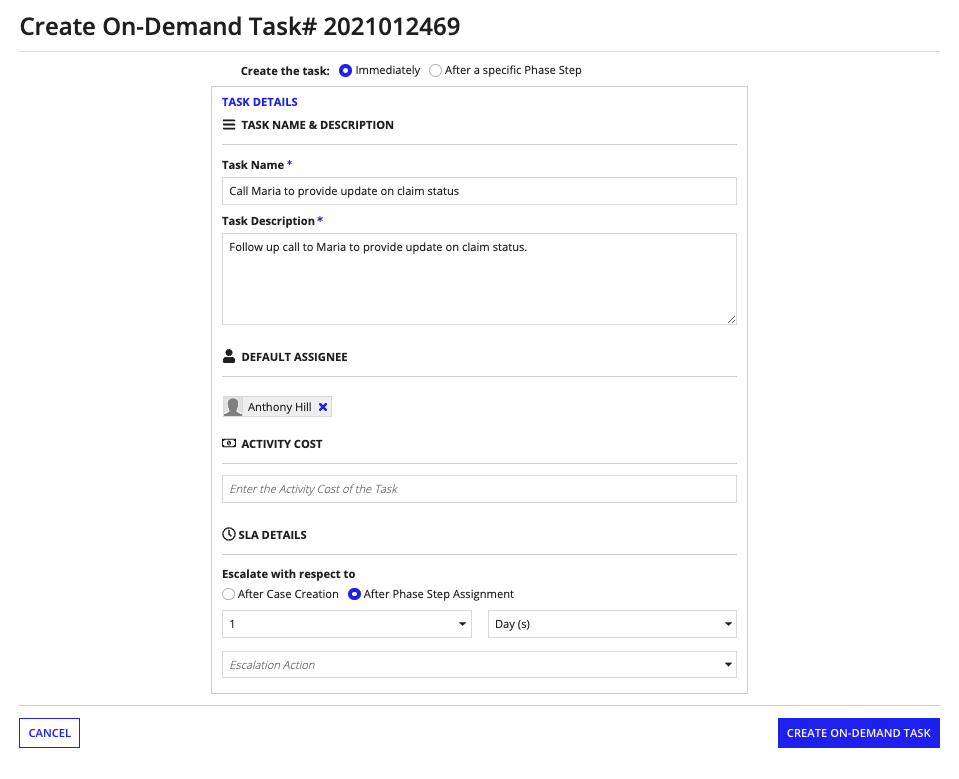
- Enter the following information in the form:
- Task Name: A unique title for the task.
- Task Description: The description of the task.
- Default assignee: Who the task will be assigned to once it is created.
- Activity cost: The cost of the task.
- Escalate with respect to: How long to wait before escalating the task to a supervisor or other user, and what to base duration off of.
- After Case Creation: Base the duration before escalation off the case start date.
- After Phase Step Assignment: Base the duration before escalation of the task assigned date.
- Add the duration of time to wait before escalation. The duration can be in hours, days, or weeks.
- Click CREATE ON-DEMAND TASK. The task should appear under the Claim summary view as well as under the All Tasks tab.
Managing documentsCopy link to clipboard
New P&C claims usually involve a lot of documentation, which could increase the time to close if Anthony were using separate systems to manage the claim documents. Connected Claims simplifies document management by allowing Anthony to view a list of all pending__ and _existing documents for each claim, add new documents, and edit existing documents all from a single interface in the claim record.
In this next section, we will examine how Anthony manages the required documents for Maria's insurance claim.
Yesterday, Anthony reached out to Maria and requested that she submit the following documentation so that he could continue to process her claim:
- Proof of Address
- Driver's License
- Rental Car Receipt
Maria followed up right away and sent her documents to Anthony via email. After downloading and verifying the documents, Anthony is ready to upload them to Connected Claims.
From the Claim summary, he will click the Documents tab to view the list of PENDING DOCUMENTS he needs to collect, verify, and upload before he can proceed to his settlement tasks.

There are five pending documents required to process Maria's insurance claim. Let's walk through the steps for uploading Maria's lease agreement to verify proof of address.
To upload a document:
- From the claim record, click the Documents tab.
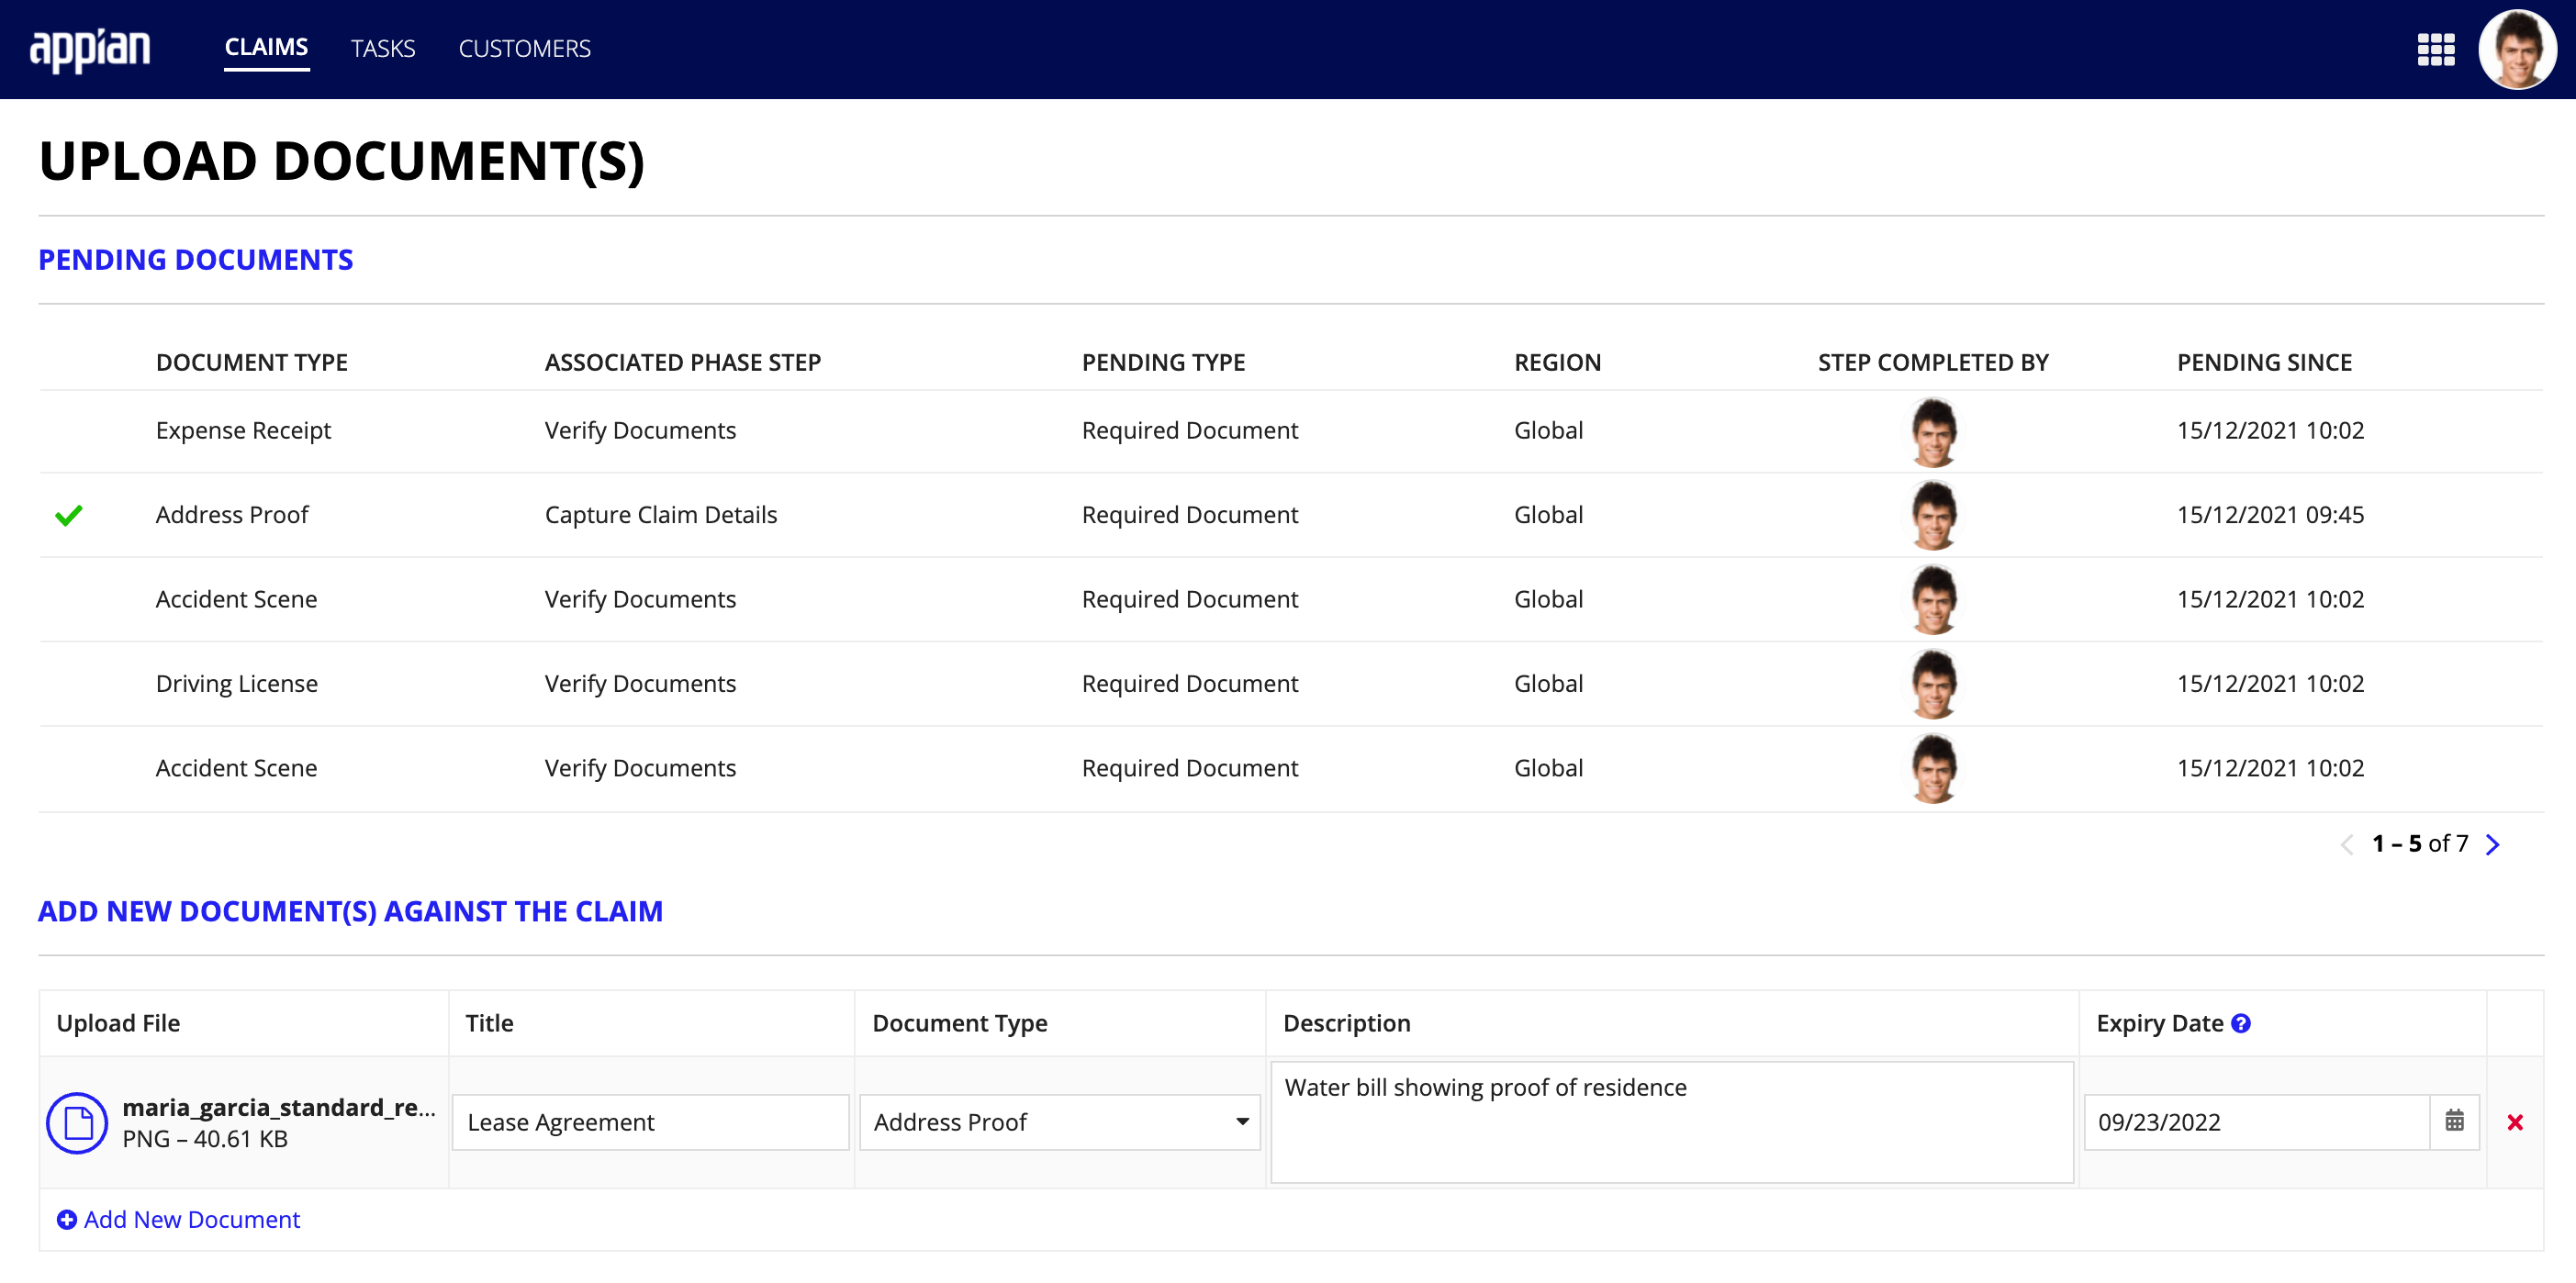
- Click MANAGE DOCUMENTS to access the the UPLOAD DOCUMENT(S) form.
- In the ADD NEW DOCUMENT(S) AGAINST THE CLAIM section, click Add New Document to access the following fields:
- Upload File
- Title
- Document Type
- Description
- Expiry Date Note: The expiration duration is calculated according to the selected document type. You can change it manually.
- Click UPLOAD, locate and select the proof of address file, and click Open.
- In the Title field, enter a file title.
- From the Document Type dropdown, select Address Proof.
-
In the appropriate fields, enter a description and a document expiration date.
- Click Add New Document and repeat steps 2-5 for any additional documentation you need to attach to the claim.
- Click SAVE DOCUMENTS.
- Select YES to confirm you want to upload or update the documents.
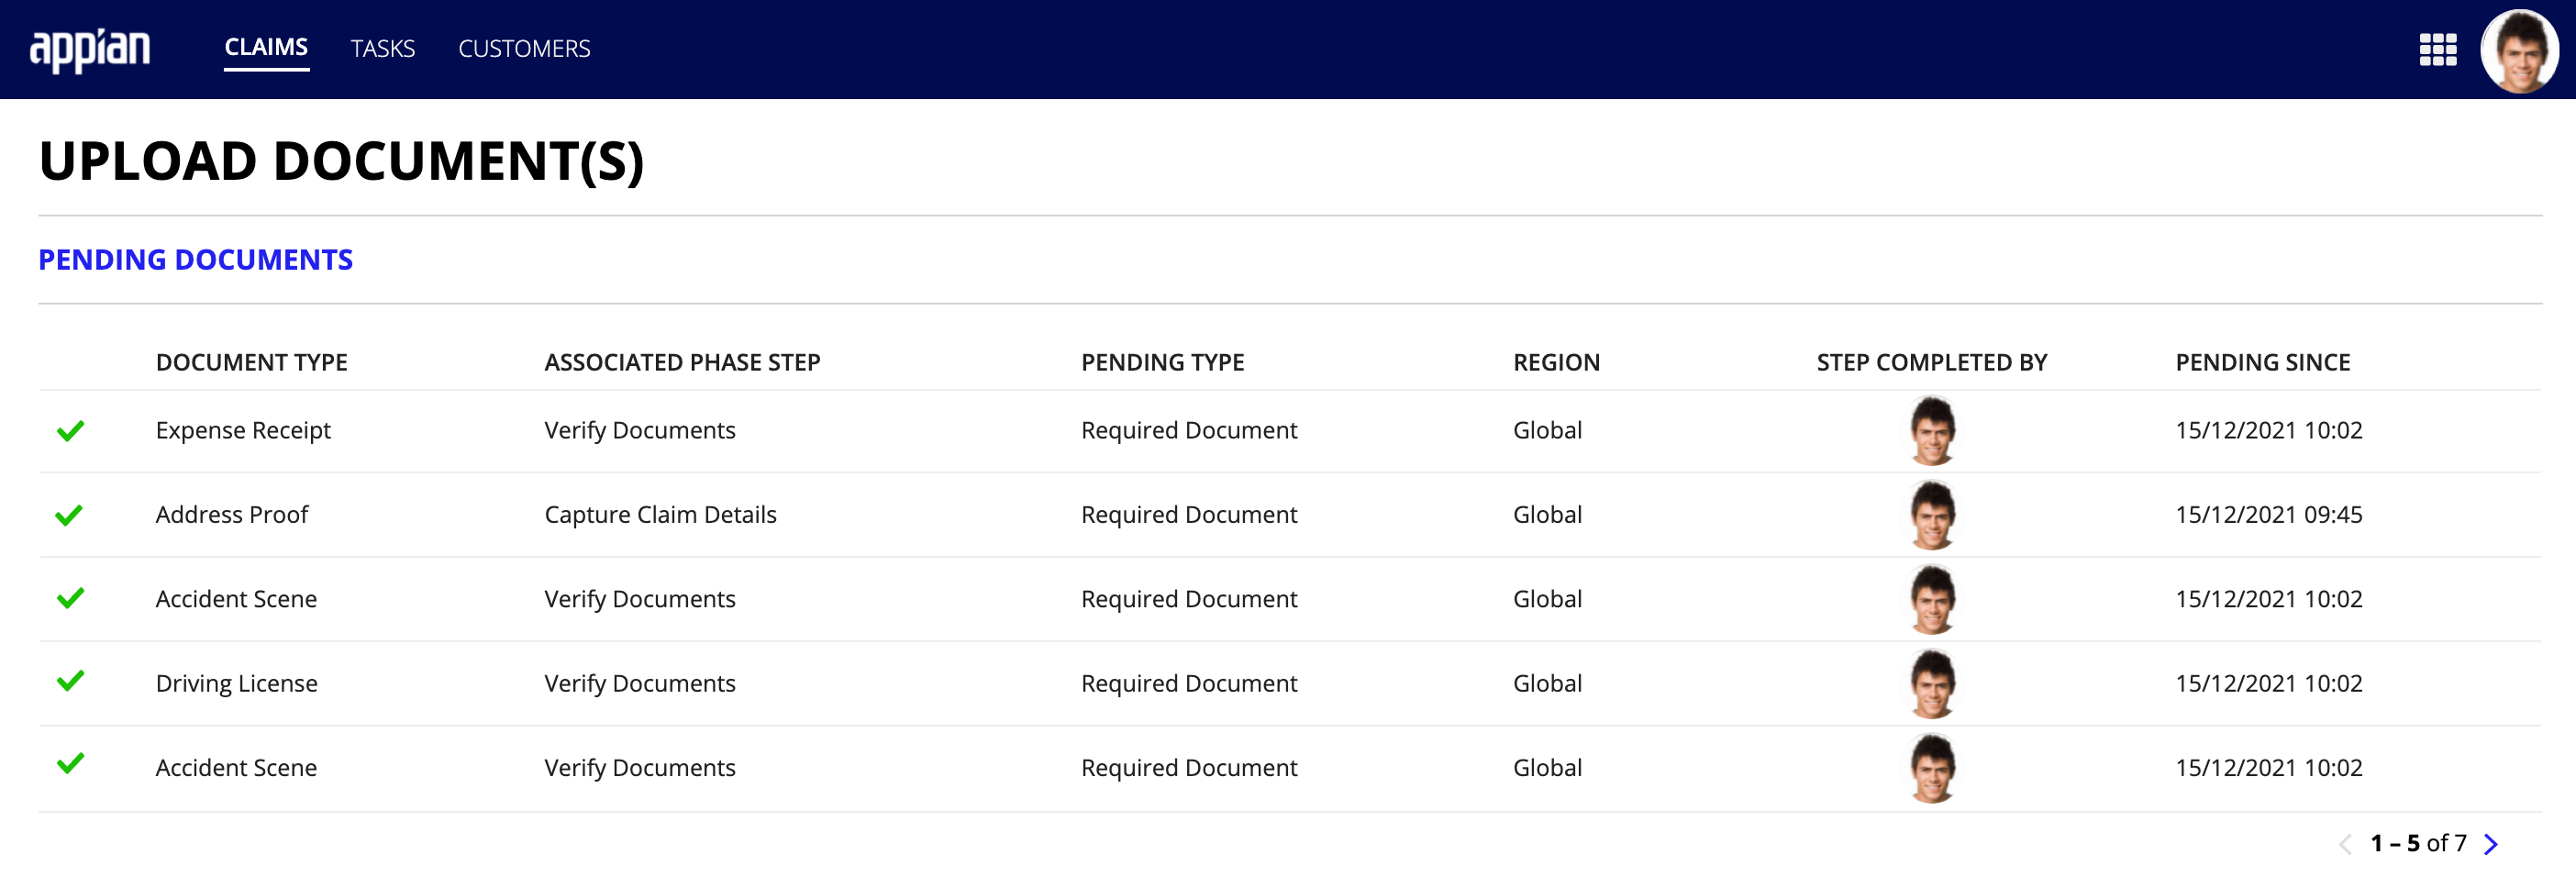
After Anthony uploads Maria's documents to her claim record, Connected Claim adds a green checkmark next to each document indicating that it has been verified and attached.
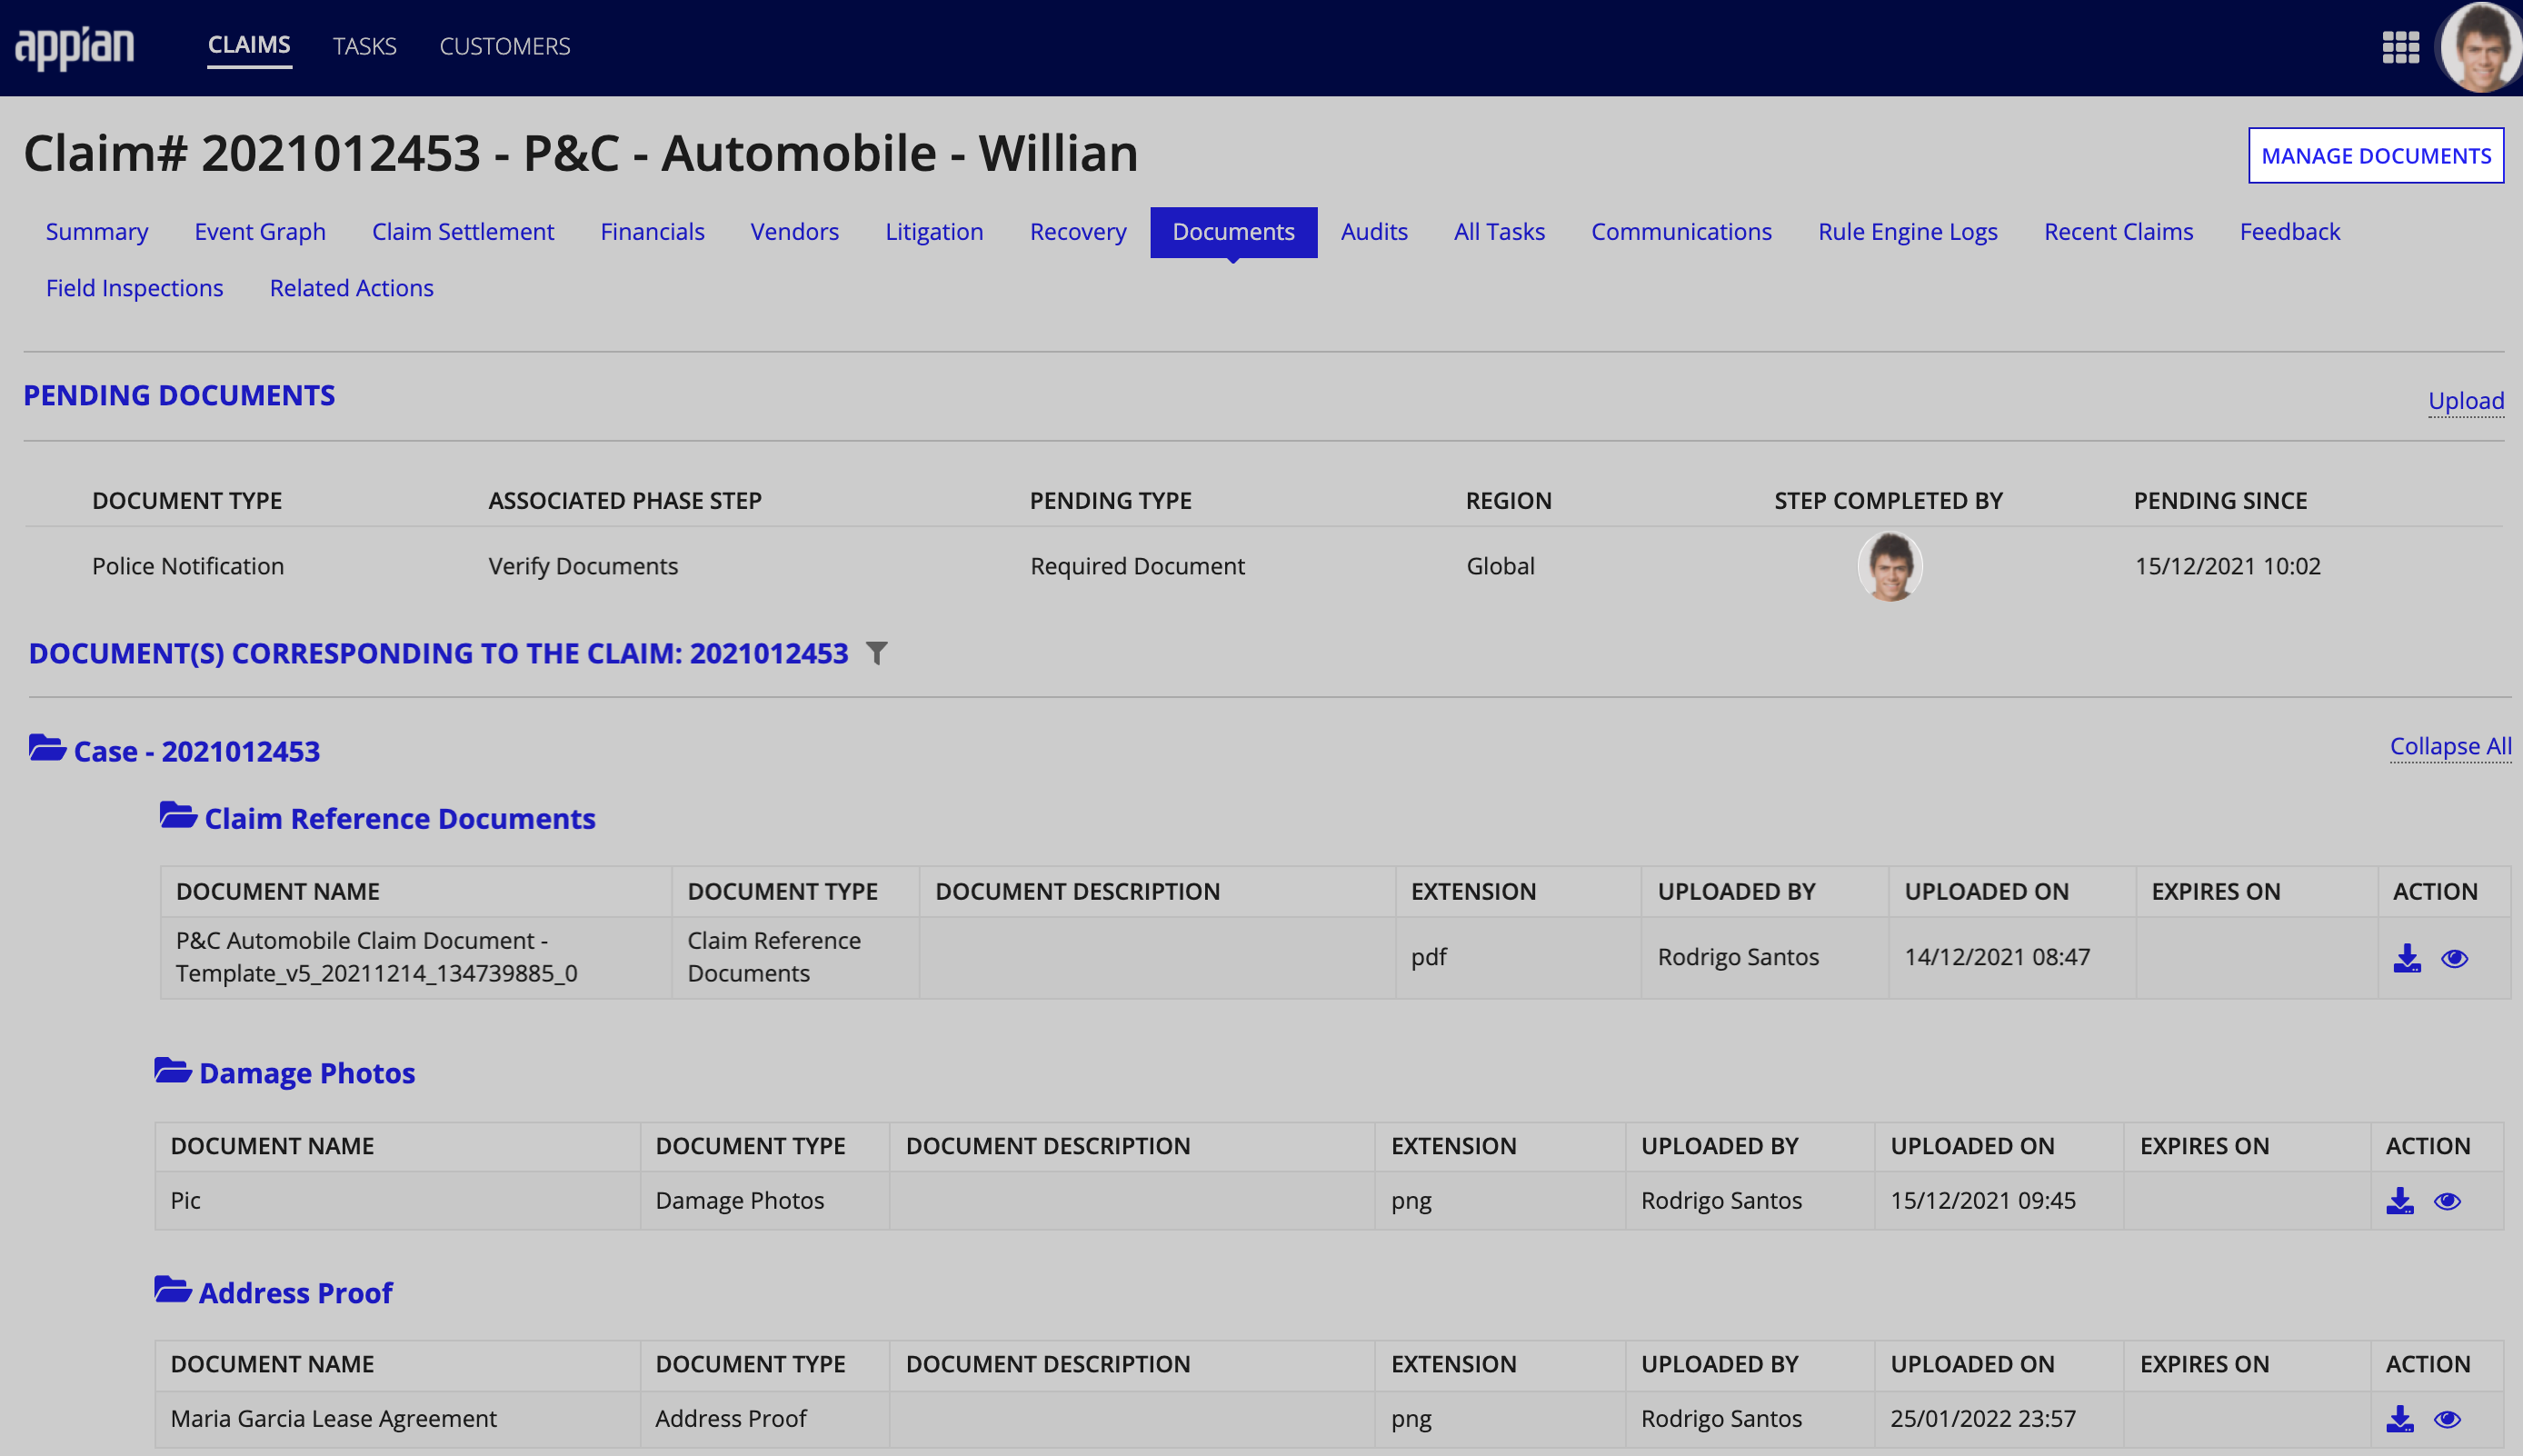
At any point in the claims process, Anthony can drill down into a specific claim record, click the Documents tab and MANAGE DOCUMENTS to view all pending documents, view and download existing documents, add new documents, or edit the details for any existing document.
Now Anthony is ready to view all of the financial data associated with Maria's claim and complete any open payment tasks.
Managing financial dataCopy link to clipboard
Connected Claims makes it easy for you to view and track all of the financial data for any claim in your pipeline, including the following insurance payment types:

Take the stress out of managing your claims financials with a unified view of all your payment transactions and activities that Connected Claims provides.
Viewing financial dataCopy link to clipboard
From the Claim record, Anthony can click the Financials tab to see a breakdown of all expenses, completed and scheduled payments, and payment recoveries at the top of the page.
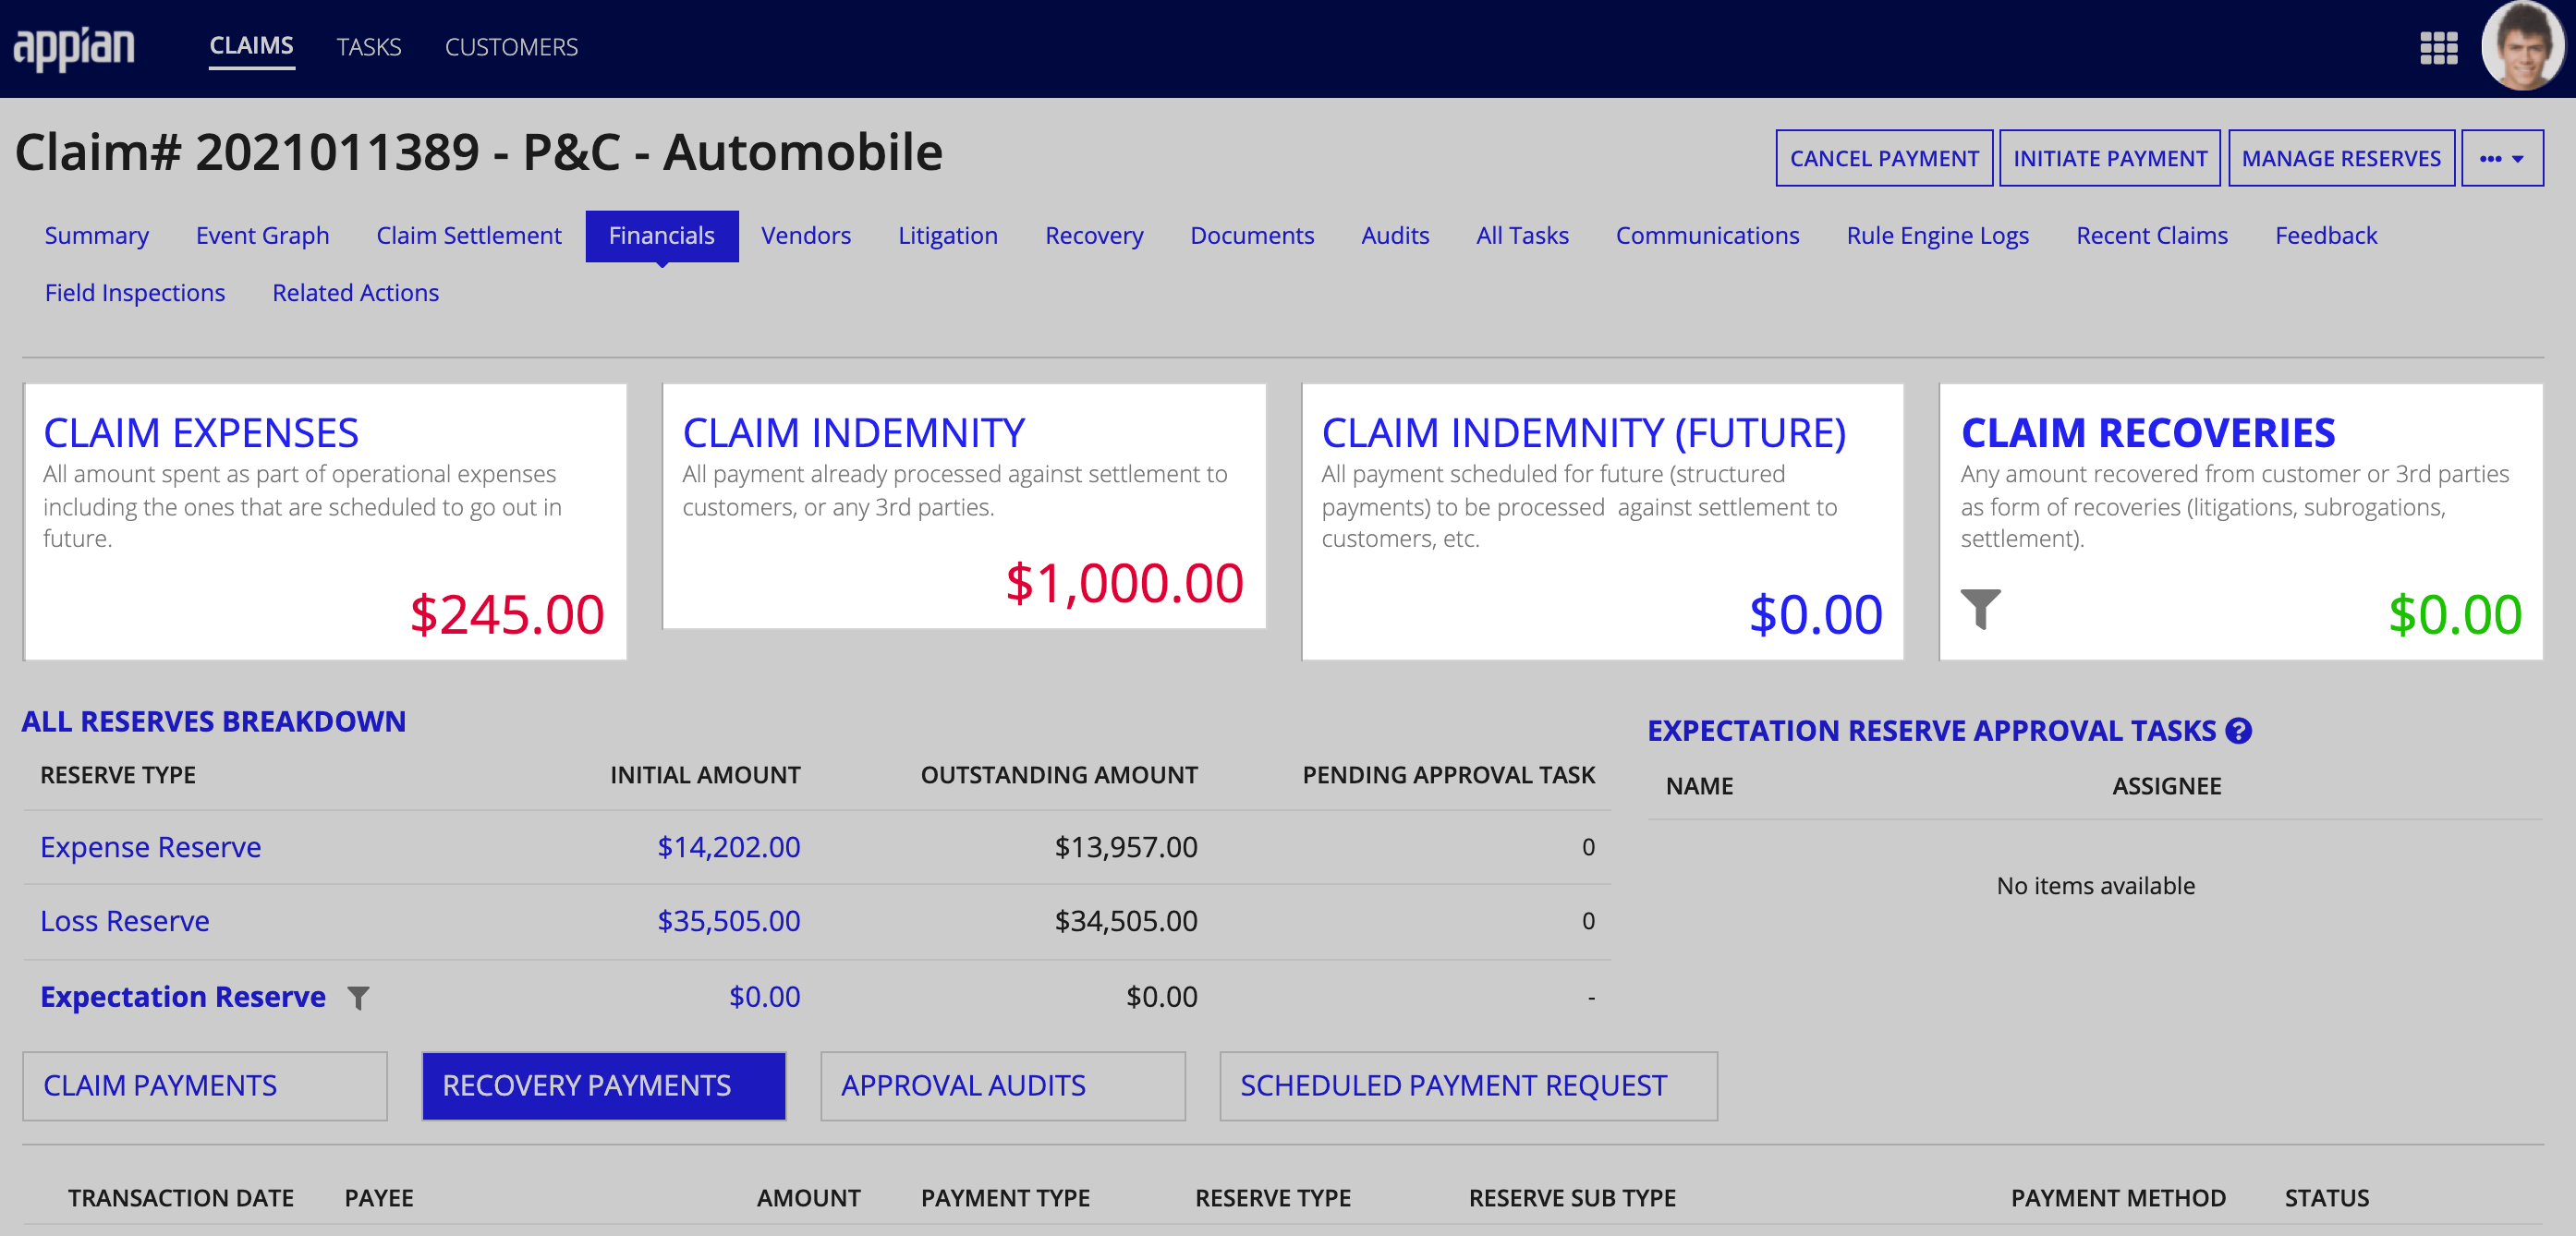
Clicking CLAIM INDEMNITY allows Anthony to filter the payments list so it displays only the payments that match this payment type. If he has questions about a specific payment transaction associated with Maria's claim, he doesn't have to hunt around in separate systems or interfaces to find what he's looking for. The payments list displays all the pertinent information he needs to know about a specific payment, including the transaction date, payment type, source, payment method, and more.

Managing payment transactionsCopy link to clipboard
Anthony can also perform specific payment actions, including initiating or scheduling a payment against Maria's claim, managing reserves, or canceling a scheduled payment.
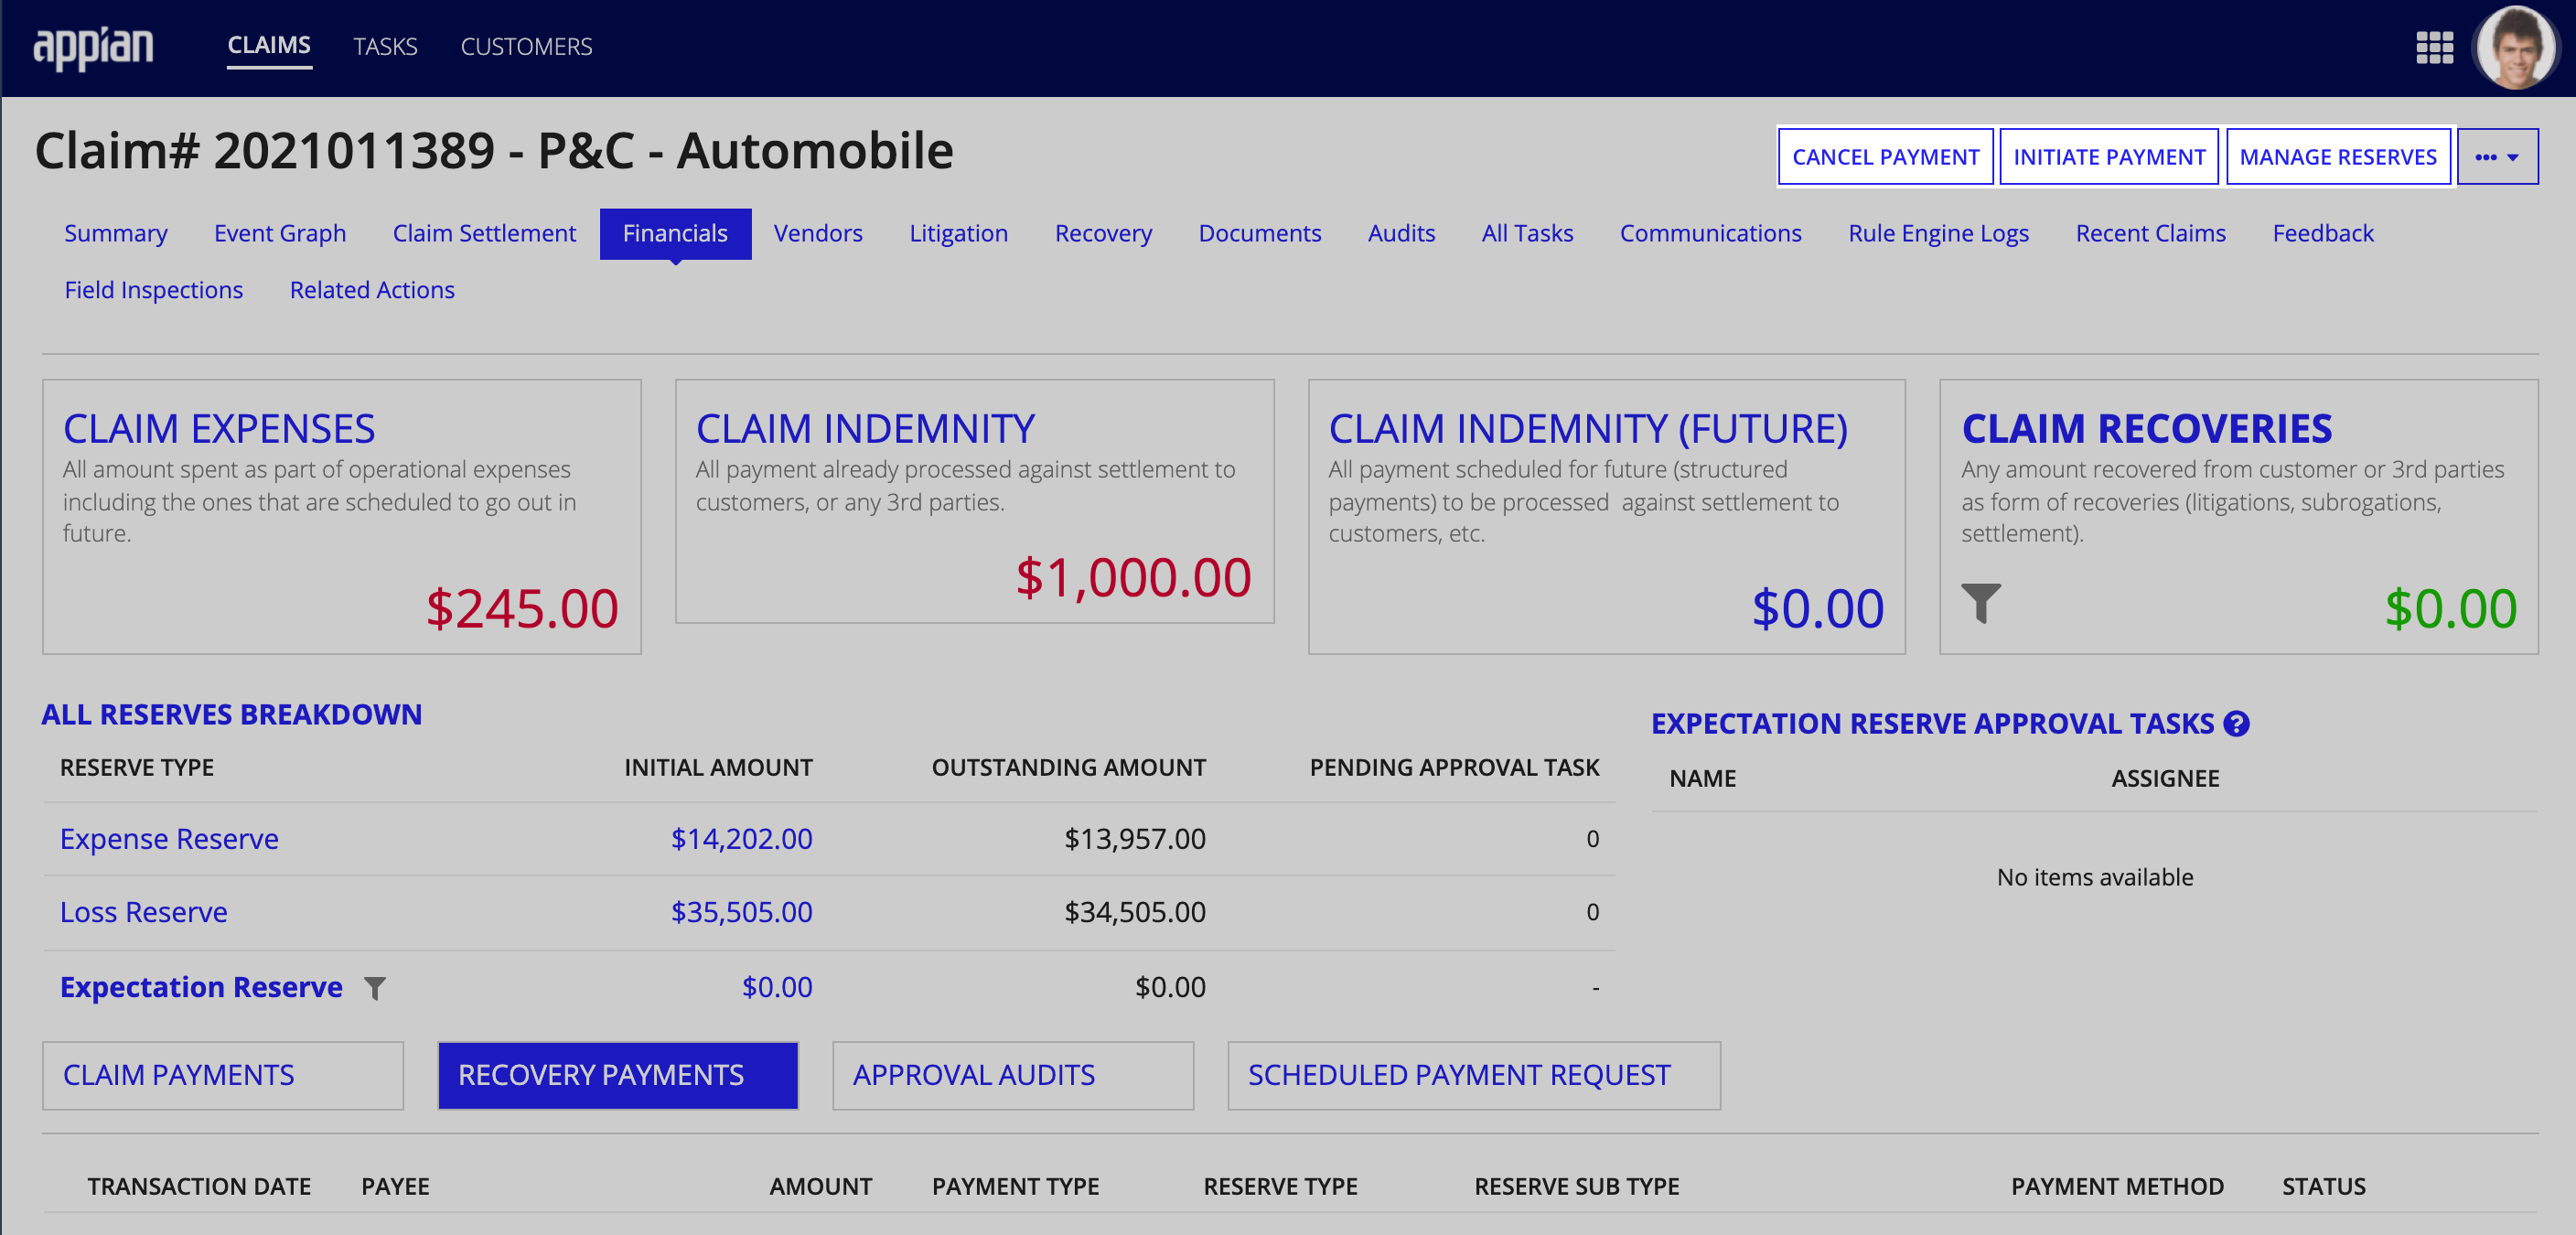
To initiate or schedule a claim payment:

- From the claim record, click the Financials tab.
- Click INITIATE PAYMENT to go to theINITIATE PAYMENT form.
- In the PAYMENT DETAILS section, indicate if this is a single or scheduled payment by using the Payment Type dropdown to select the payment type.
- Indicate if this payment should be taken out of the expense reserve or loss reserve by using the Reserve Type dropdown to select the reserve type.
- Expense Payment: A one-time payment for the expenses associated with claims handling (attorney fees, appraisal expenses, etc.).
- Loss Payment: A one-time payment to reimburse the policyholder for a loss associated with the claim such as, auto and home repairs.
- Recurring Loss Payment: Scheduling multiple future payments.
- From the Reserve Sub Type dropdown, select the expense type.
- Note: For this P&C claim, expense type options include Transportation, Investigation - Expense Reserve, and Police Investigation
- Use the Coverages dropdown to select the policy coverage you want to initiate the payment transaction against.
- For single payments, you will need to complete the following payment fields in the SINGLE PAYMENT DETAILS section:
- Payee Type: Customer, vendor, or 3rd party
- Payee Name: Name of the payment recipient
- Payment Mode: Bank transfer or check
- Amount: Payment amount
- For scheduled payments, you will need to complete the following payment fields in the SCHEDULE PAYMENT DETAILS section:
- Payee Type: Customer, vendor, or 3rd party
- Payee Name: Name of the payment recipient
- Schedule Type: One time or recurring
- Interval: Daily, weekly, monthly, or yearly
- Start From: Date when the first payment should be initiated
- Duration: How long the scheduled payment should continue
- Duration Metrics: Month, year, installment
- Amount: Payment amount
- Payment Mode: Bank transfer or check
- For single payments, you will need to complete the following payment fields in the SINGLE PAYMENT DETAILS section:
- Based on your Payment Type, click MAKE PAYMENT or SCHEDULE PAYMENT.
After investigating Maria's claim, Anthony discovered a discrepancy in the $1000 payment that was previously made to Maria against her loss reserve. Before he can correct the payment error, he needs to cancel this payment. Let's walk through the steps with him.

To cancel a payment:
- From the claim record, click the Financials tab.
- Click CANCEL PAYMENT to go to theCANCEL PAYMENT form.
- Select the row associated with the payment you want to cancel.
- In the example shown, there is only one payment transaction made against Maria's claim. In your implementation of Connected Claims, you may see multiple payment transactions listed for a single claim.
- In the Cancellation Reason box, enter a detailed reason for canceling this payment. This is required.
- Click CANCEL PAYMENT.
Anthony can also manage the Expense and Loss reserves for Maria's claim from the Financials tab. This gives him the option to add or modify the reserve amount as the Maria's claim moves through the claims lifecycle.
Note that he can only request a raise for one reserve at a time so if he needs to increase both reserves, he will have to initiate two separate requests.

To increase the amount of a claim reserve:
- From the claim record, click the Financials tab.
- Click MANAGE RESERVE.
- Select the reserve you want to increase and enter the amount you want to add in the ADD TO RESERVE field.
- Click ADD RESERVE.
Now that Anthony has completed all of his data enrichment and payment tasks, Connected Claims will move Maria's claim into the settled phase.
Reopening a claimCopy link to clipboard
After the claim is settled, Maria may reach out to Anthony with additional documentation or accident details and request that he re-open her claim.
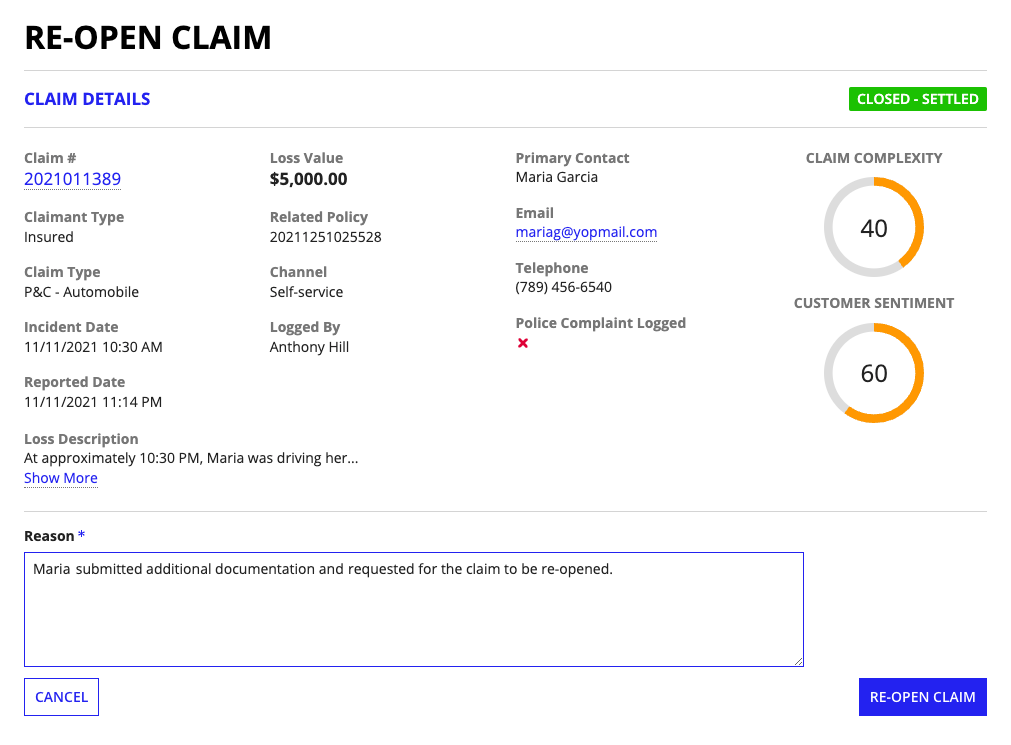
You can reopen a closed claim quickly and easily from the claim summary view by clicking RE-OPEN CLAIM. After entering the reason for re-opening the claim, click RE-OPEN CLAIM to move the claim back into the claims workflow.

Ready to startCopy link to clipboard
Now that you have walked through this simple workflow for settling a car insurance claim and understand some of the basic features and views of the Operations & Settlement module, you can start using Connected Claims to process and settle your insurance claims.
