
IntroductionCopy link to clipboard
After installing the Case Document Summary module, you need to set it up before using it with the Case Management Studio Base application. This guide walks you through the setup steps, which include:
- Update the CMGT_Document_Create process model.
- Update the Submit Case process model.
- Update the CMGT_Task_Complete process model.
- Update the CMGT_Document_Delete process model.
- Update the CMGT_Case_RecordView_Documents interface.
Step 1: Update the CMGT_Document_Create process modelCopy link to clipboard
To set up the Case Document Summary module with Case Management Studio you need to first update the process model to automate the creation of a document summary when a document is uploaded to a case.
To update the process model:
- Login to the target environment.
- Navigate to the Appian Designer.
- Navigate to the Case Management Studio Base application.
- Search for and open the CMGT_Document_Create process model.
- Add a subprocess node after the Move Documents node and name it
Summarize with AI.- Note: The incoming path should be chained, but the outgoing path should not be chained.
- In the new subprocess node, go to Properties.
-
Navigate to the Setup tab and select the following settings:

- In the Subprocess Setup section:
- Select Synchronously and the Enable activity chaining into all initial nodes in the subprocess checkbox in The subprocess will run section.
- In the Run this process model section:
- Select CMGT_DOC_AI_CaseDocumentSummary_Update as the process to run.
- Select the Reporting checkbox to include data from this subprocess in the parent process model reports.
-
In the Input Variables section, click the Expression Editor for the document variable and paste the following code snippet.
1
pv!documents[tp!instanceindex]
Copy
- In the Subprocess Setup section:
-
In the new subprocess node, go to Properties > Other and select the following settings:
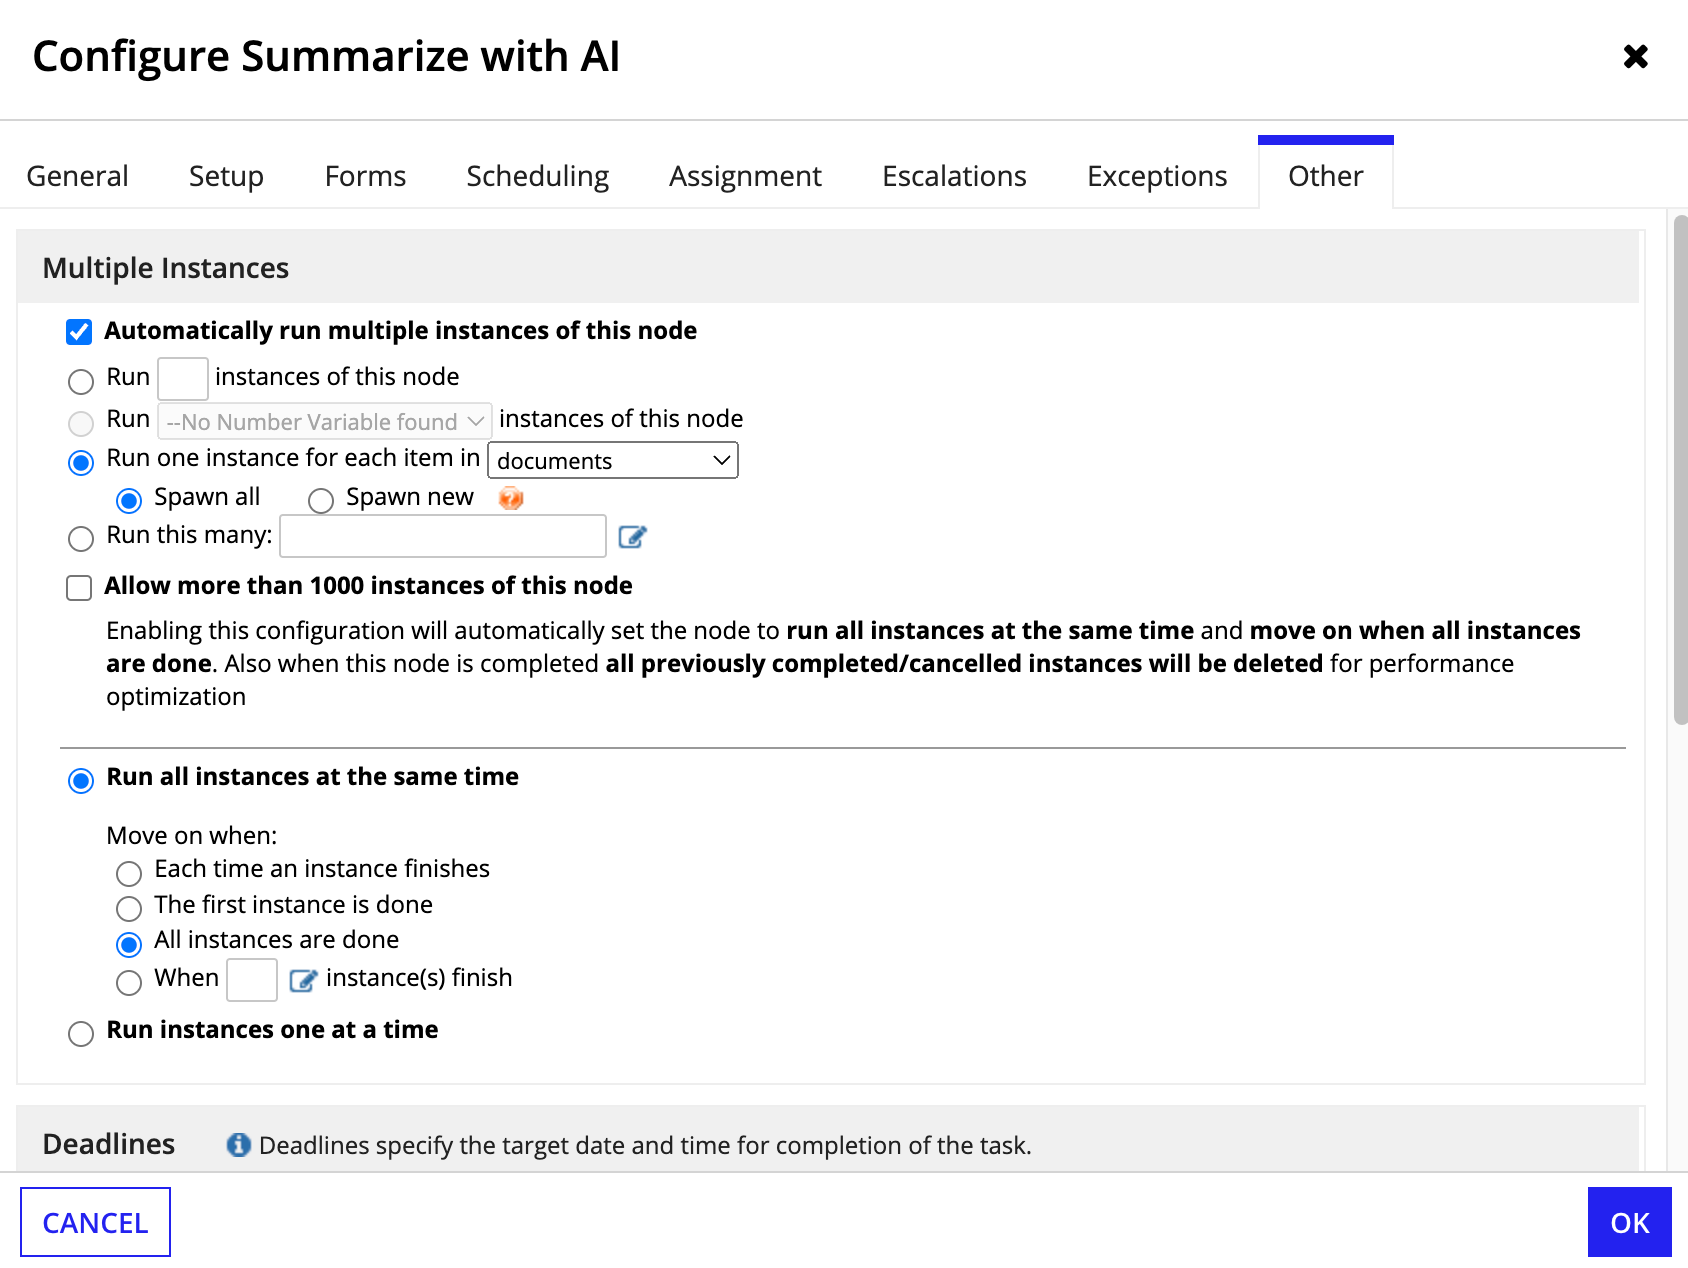
- Select the Automatically run multiple instances of this node checkbox.
- Select Run one instance for each item in and Documents in the dropdown.
- Select All instances are done to move on when done.
- Click OK.
- From the File menu, click Save & Publish, then Exit.
Step 2: Update the Submit Case process modelCopy link to clipboard
Next, you need to update the Submit Case process model to generate a summary for a document added during case creation.
- Login to the target environment.
- Navigate to the Appian Designer.
- Navigate to the Case Management Studio Base application.
- Search for and open the Submit Case process model.
- After the Set Case Document Security node, add a subprocess node and name it
Summarize Docs with AI. - In the new subprocess node, go to Properties.
-
Navigate to the Setup tab and select the following settings:
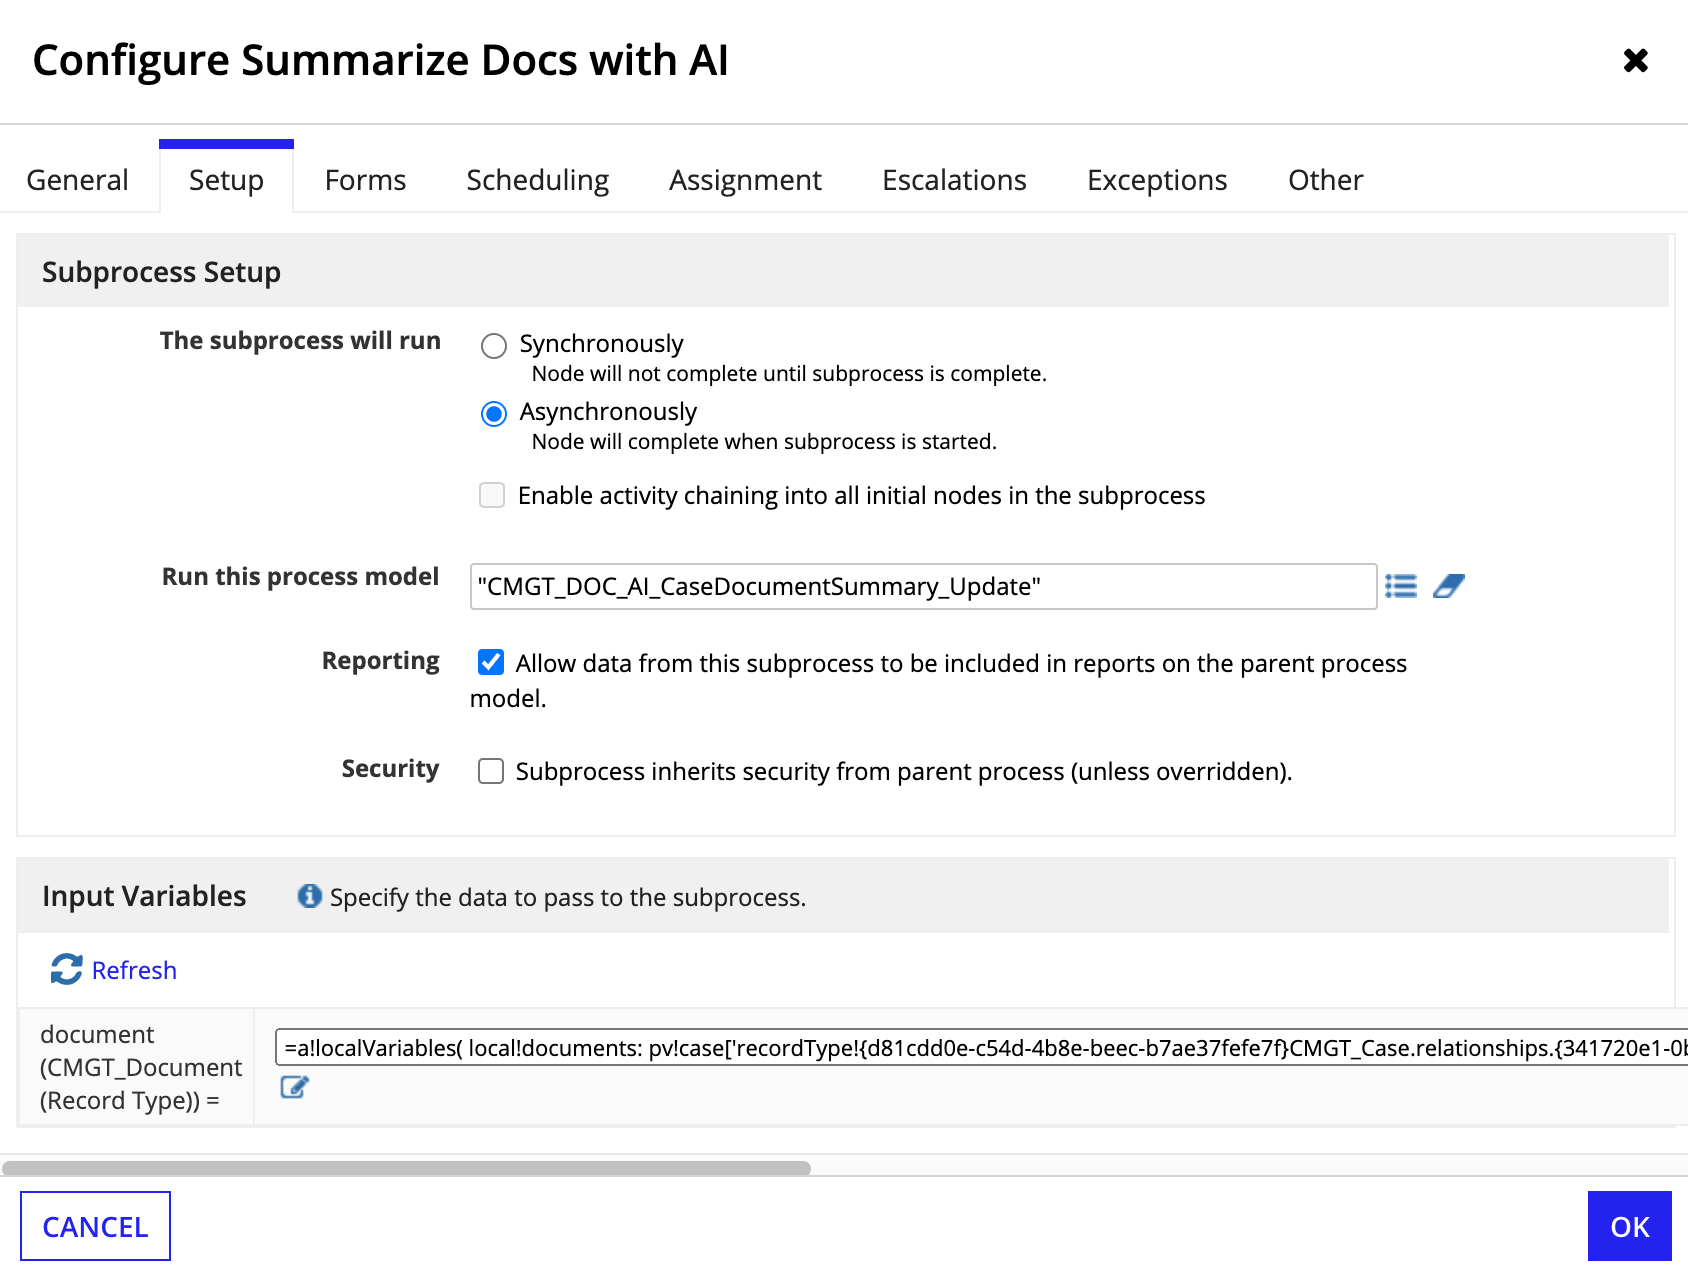
- In the Subprocess Setup section:
- Select Asynchronously.
- In the Run this process model section:
- Select CMGT_DOC_AI_CaseDocumentSummary_Update as the process to run.
-
In the Input Variables section, click into the Expression Editor for the document variable and paste the following code snippet:
1
2
3
4
5
6
7
8
9
a!localVariables(
local!documents: pv!case['recordType!{d81cdd0e-c54d-4b8e-beec-b7ae37fefe7f}CMGT_Case.relationships.{341720e1-0b79-4f0c-ac48-789ee3fbeae3}documents'],
if(
a!isNullOrEmpty(local!documents),
local!documents,
/*can't index if the documents is null*/
local!documents[tp!instanceindex]
)
)
Copy
- In the Subprocess Setup section:
-
In the Properties of the new subprocess node, navigate to the Other tab and select the following settings:
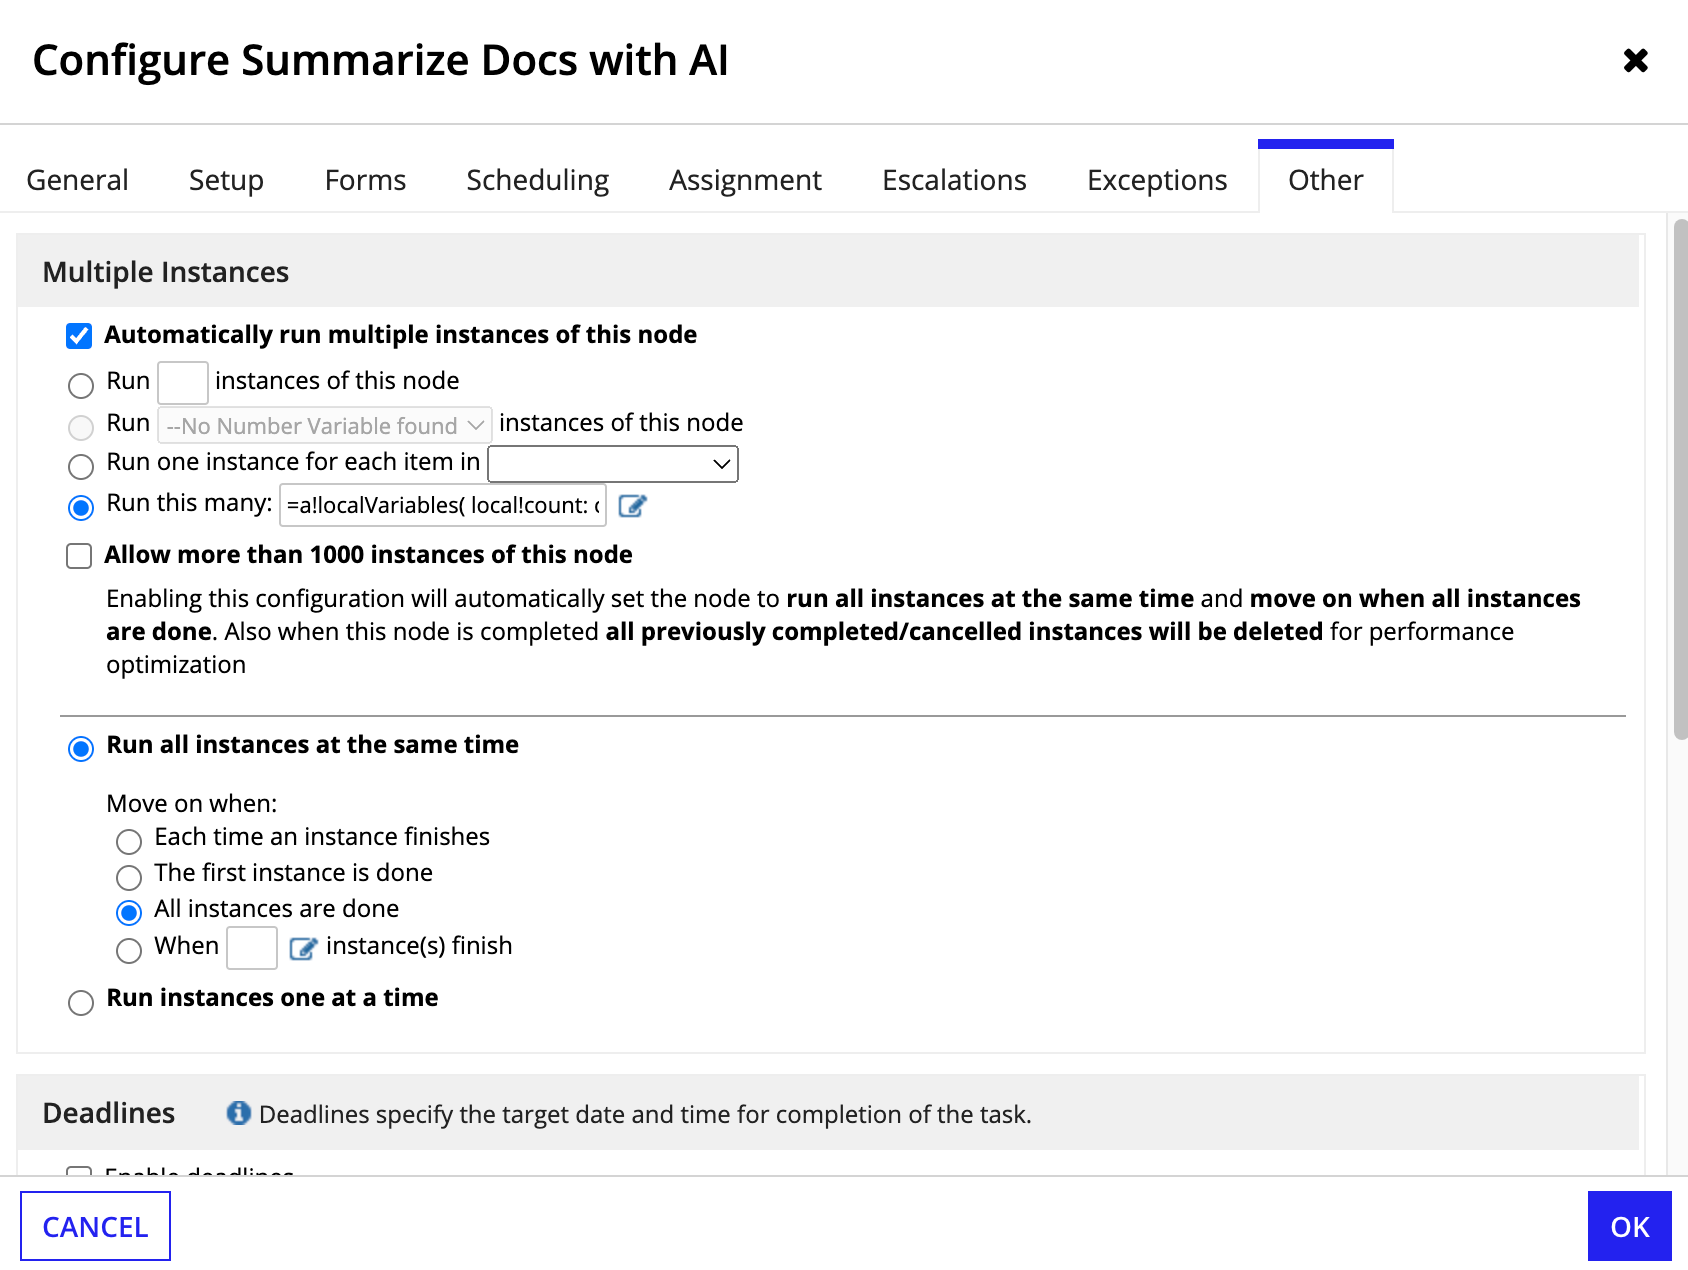
- Select the Automatically run multiple instances of this node checkbox.
- Select Run this many and click the adjacent icon link to open the Expression Editor.
-
Paste the following code snippet:
1
2
3
4
5
6
a!localVariables(
local!count: count(
pv!case['recordType!{d81cdd0e-c54d-4b8e-beec-b7ae37fefe7f}CMGT_Case.relationships.{341720e1-0b79-4f0c-ac48-789ee3fbeae3}documents']
),
/*the model errors out if the count is zero*/if(tointeger(local!count) = 0, 1, local!count)
)
Copy- Select All instances are done to move on when done.
- Click OK.
- From the File menu, click Save & Publish, then Exit.
Step 3: Update the CMGT_Task_Complete process modelCopy link to clipboard
For this step, you must update the CMGT_Task_Complete process model to generate a summary for a document uploaded to a task.
- Login to the target environment.
- Navigate to the Appian Designer.
- Navigate to the Case Management Studio Base application.
- Search for and open the CMGT_Task_Complete process model.
- After the Open next tasks node, add a subprocess node and name it
Summarize Docs with AI.- Note: The incoming path should be chained, but the outgoing path should not be chained.
- In the new subprocess node, go to Properties.
-
Navigate to the Setup tab and select the following settings:
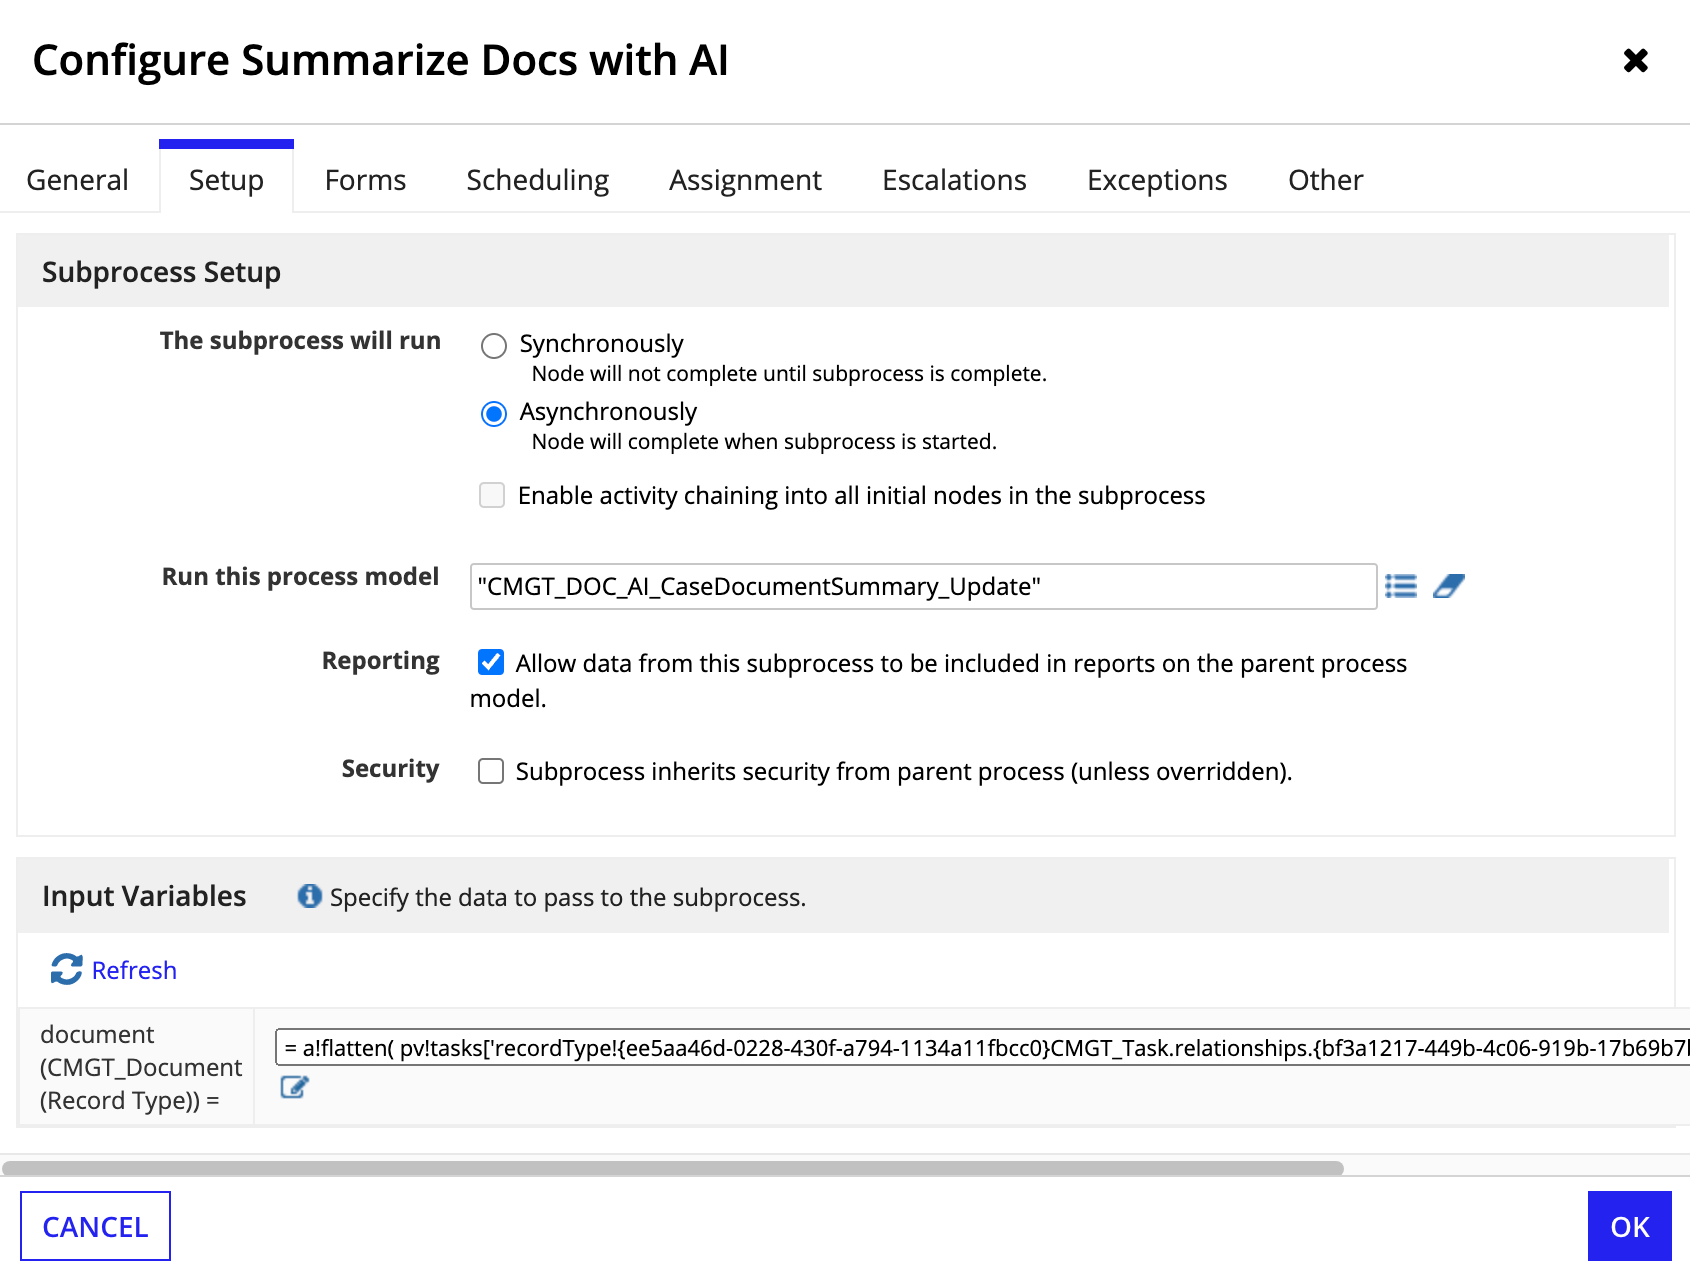
- In the Subprocess Setup section:
- Select Asynchronously.
- Select CMGT_DOC_AI_CaseDocumentSummary_Update as the process to run.
-
In the Input Variables section, click into the Expression Editor for the document variable and paste the following code snippet:
1
2
a!flatten( pv!tasks['recordType!{ee5aa46d-0228-430f-a794-1134a11fbcc0}CMGT_Task.relationships.{bf3a1217-449b-4c06-919b-17b69b7be94d}documents']
)[tp!instanceindex]
Copy
- In the Subprocess Setup section:
-
In the Properties of the new subprocess node, navigate to the Other tab and select the following settings:

- Select the Automatically run multiple instances of this node checkbox.
- Select Run this many and click the adjacent icon link to open the Expression Editor.
-
Paste the following code snippet:
1
2
3
4
5
count(
a!flatten(
pv!tasks['recordType!{ee5aa46d-0228-430f-a794-1134a11fbcc0}CMGT_Task.relationships.{bf3a1217-449b-4c06-919b-17b69b7be94d}documents']
)
)
Copy
- Select All instances are done to move on when done.
- Click OK.
- From the File menu, click Save & Publish, then Exit.
Step 4: Update the CMGT_Document_Delete process modelCopy link to clipboard
For this step, you need to update the process model to automatically delete the document summary associated with a deleted document.
- Login to the target environment.
- Navigate to the Appian Designer.
- Navigate to the Case Management Studio Base application.
- Search for and open the CMGT_Document_Delete process model.
- After the Write Documents node and before the XOR node, add a Delete Records node.
- Note: Make sure the incoming path and outgoing path are chained.
- In the new node, go to Properties.
- Navigate to the Data tab, and select the Records node input.
-
In the Field Properties box, click into the Expression Editor for the value, and paste the following code snippet.
1
2
3
4
rule!CMGT_DOC_AI_QR_GetDocumentSummary(
documentId: pv!documents['recordType!{4fcbf8d2-f6f9-4a38-bbf1-d2722635282a}CMGT_Document.fields.{11173308-3bb1-43ad-b63a-4ff680227037}documentId'],
returnType: "SINGLE_OBJECT"
)
Copy- Note: The code snippet uses CMGT_DOC_AI_QR_GetDocumentSummary to query for the document summaries of the documents that are being deleted.
- Click OK.
- From the File menu, click Save & Publish, then Exit.
Step 5: Update the CMGT_Case_RecordView_Documents interfaceCopy link to clipboard
Finally, you need to update the CMGT_Case_RecordView_Documents interface to display document summaries on the Document tab.
- Login to the target environment.
- Navigate to the Appian Designer.
- Navigate to the Case Management Studio Base application.
- Search for and open the CMGT_Case_RecordView_Documents interface.
- In Expression Mode, find the section layout that contains CMGT_UTIL_DocumentViewer.
-
In the contents of the section layout, paste the following code snippet directly above CMGT_UTIL_DocumentViewer as shown.
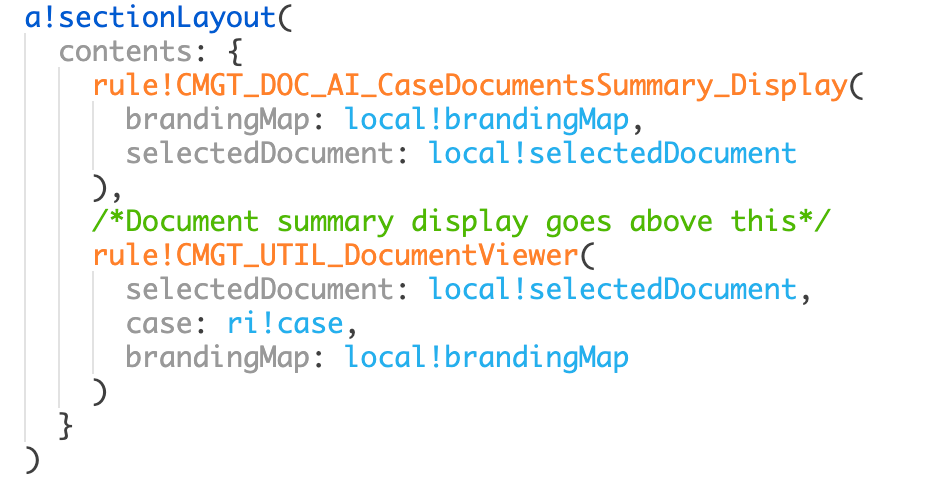
1
2
3
4
rule!CMGT_DOC_AI_CaseDocumentsSummary_Display(
brandingMap: local!brandingMap,
selectedDocument: local!selectedDocument
),
Copy - Click SAVE.