
IntroductionCopy link to clipboard
After installing the Public Portal, you need to set it up before using it with Case Management Studio. This guide walks you through the recommended setup steps, which include:
- Setting up the Public Portal site.
- Collecting portal case contacts.
- Displaying the case type on the Case Creation form.
- Sending Case Creation emails.
- Updating portal case contacts.
- Removing Google reCAPTCHA.
- Managing file uploads.
- Renaming the portal service account.
- Translating the application.
- Monitoring your portal.
Step 1: Set up the Portal siteCopy link to clipboard
This is a required step.
- Log in to the target environment.
- Navigate to the Admin Console.
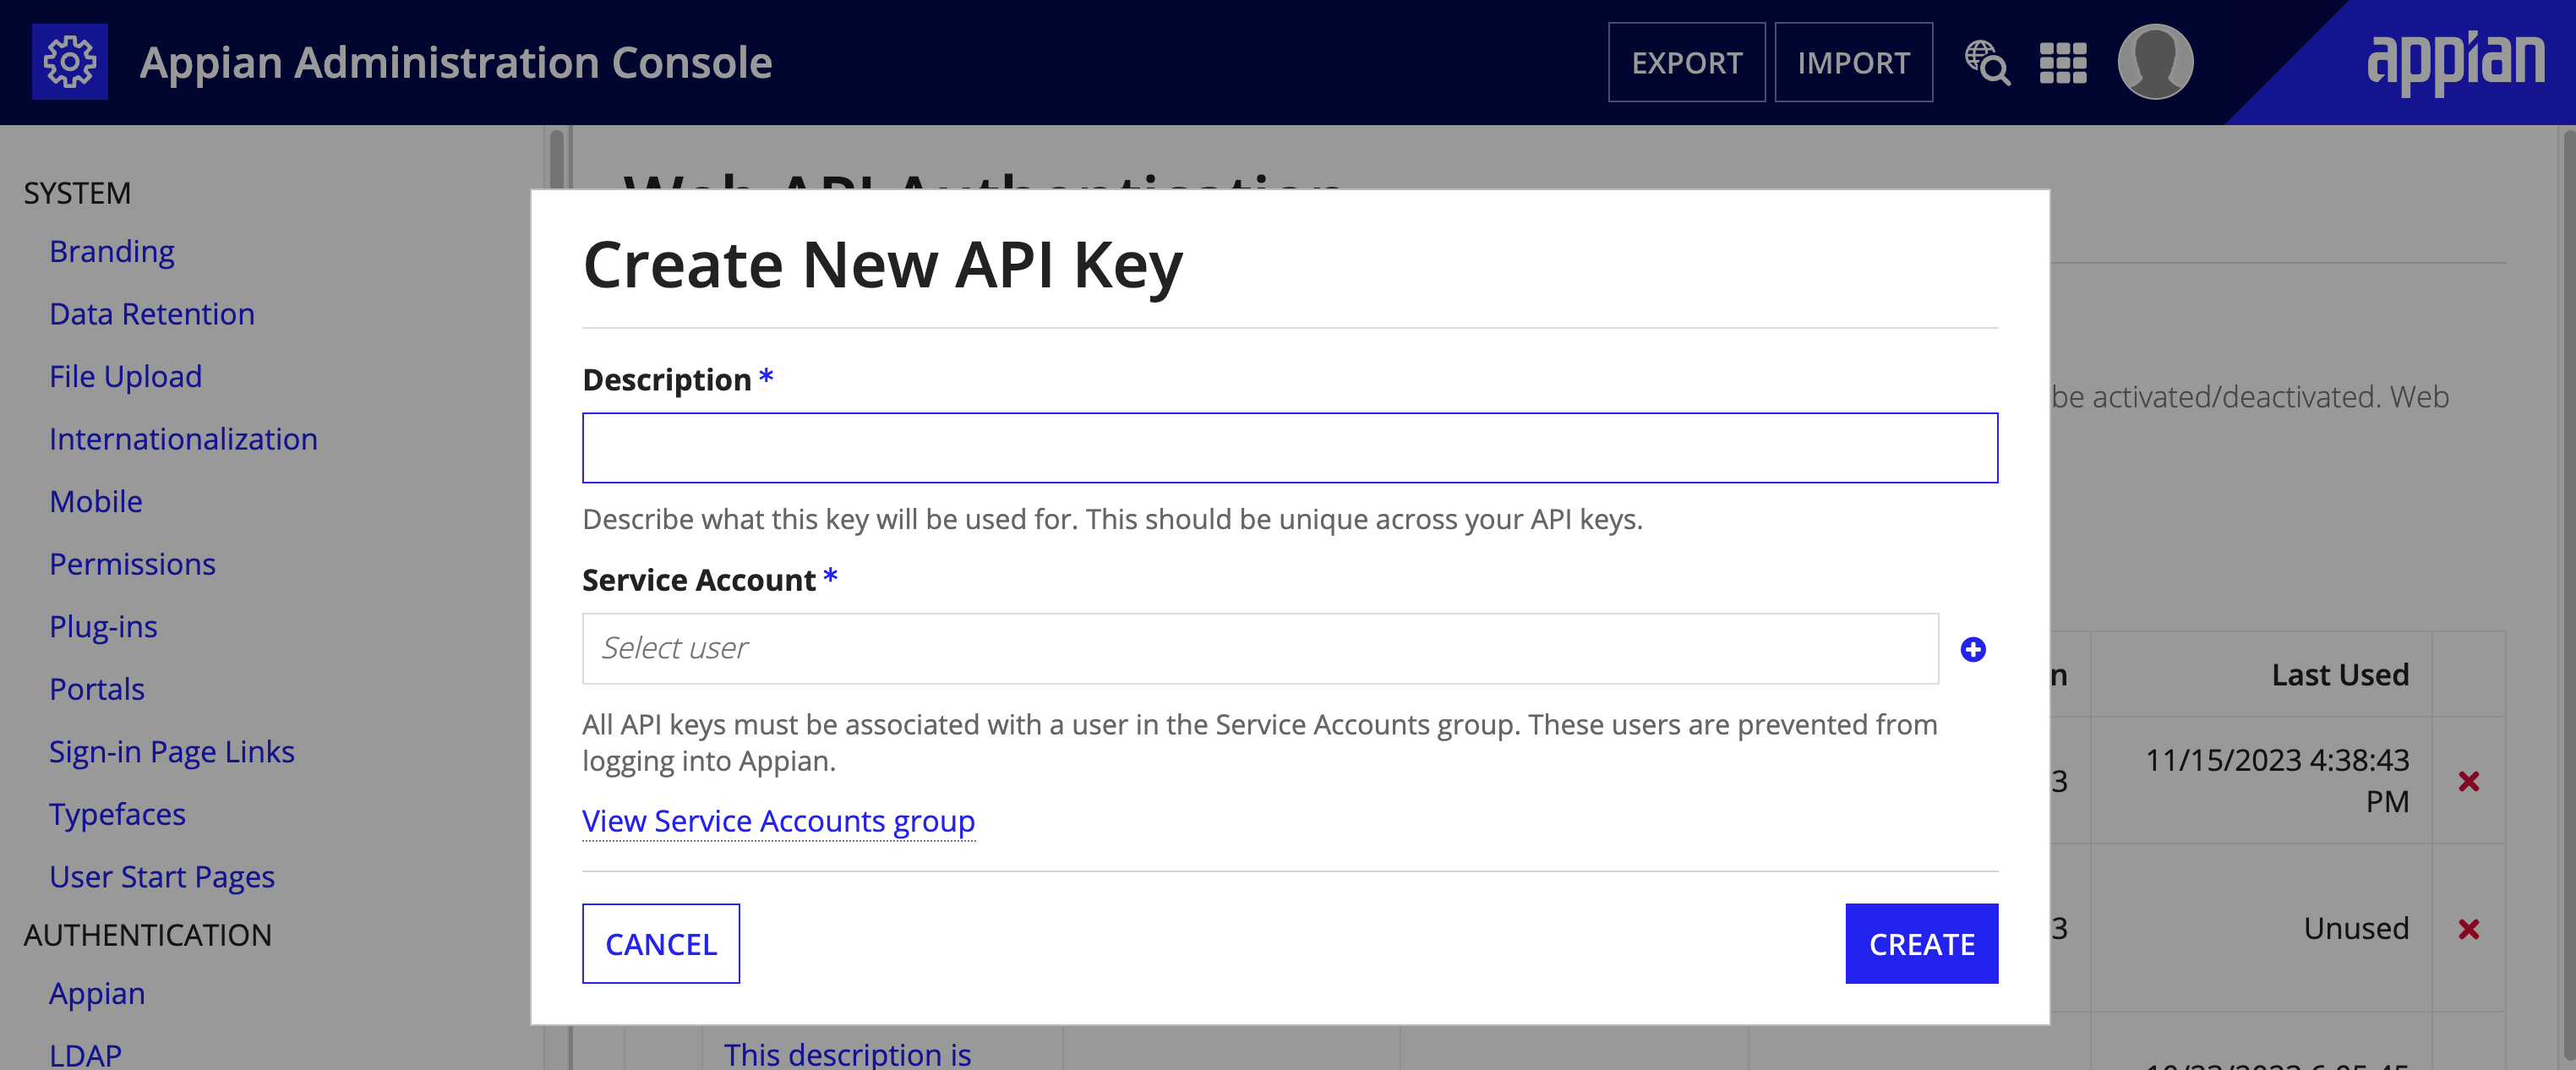
- Navigate to Web API Authentication:
- Create a service account.
- Create an API Key for this service account.
-
Copy the API key for later use.
- In Appian Designer, go to the CMGT Case Management Studio Base application.
- Search for and open the CMGT Service Accounts group.
- Add the service account to the group.
- In Appian Designer, go to the CMGT Portal Module application.
- Search for and open CMGT Portal Connected System.
- Update the Base URL to your environment's Web API URL. The URL should end in
/webapi/. - Add the API key you created in Step 3.
- Update the Base URL to your environment's Web API URL. The URL should end in
- In Appian Designer, go to the CMGT Studio Module application.
- Search for and open CMGT CB Portal Connected System.
- Update the Base URL to your environment's Web API URL. The URL should end in
/webapi/. - Add the API key created in Step 3.
- Update the Base URL to your environment's Web API URL. The URL should end in
- Search for CMGT Google ReCAPTCHA.
- Note: Appian considers reCAPTCHA services essential for unauthenticated Appian Portals usage. To use Google reCAPTCHA, update the Google reCAPTCHA Project ID, Site Key, and API Key with your Google reCAPTCHA credentials. If you decide not to use Google reCAPTCHA, skip this step and see Removing Google reCAPTCHA.
- Search for
CMGT_Portal:- Add your service account to the Service Account field.
- Note the Portal UUID.
- Search for and update
CMGT_PORTAL_TXT_URL_UUIDwith Portal UUID. - Toggle the Published field on and save changes.
- Note: Ignore any design guidance warnings due to shared interface objects. These warnings will not impact the portal publishing or functionality.
- Verify the Public Portal is working as expected.
Step 2: Collect the Portal Case ContactsCopy link to clipboard
This is a required step to capture case contact information.
- In Appian Designer, go to the CMGT Case Management Studio Base application.
- Search for and open the
CMGT_Caserecord type. - In the Data Model section, click Add Relationship.
- Select the
CMGT_Portal_CaseContactrecord type. - Enter a Relationship Name such as
portalCaseContact. - Select One to Many for the Relationship Type.
- Select
caseIdfor the common record fields. -
In the Write and Delete Related Records section, select Write or delete CMGT_Portal_CaseContacts when modifying Cases.
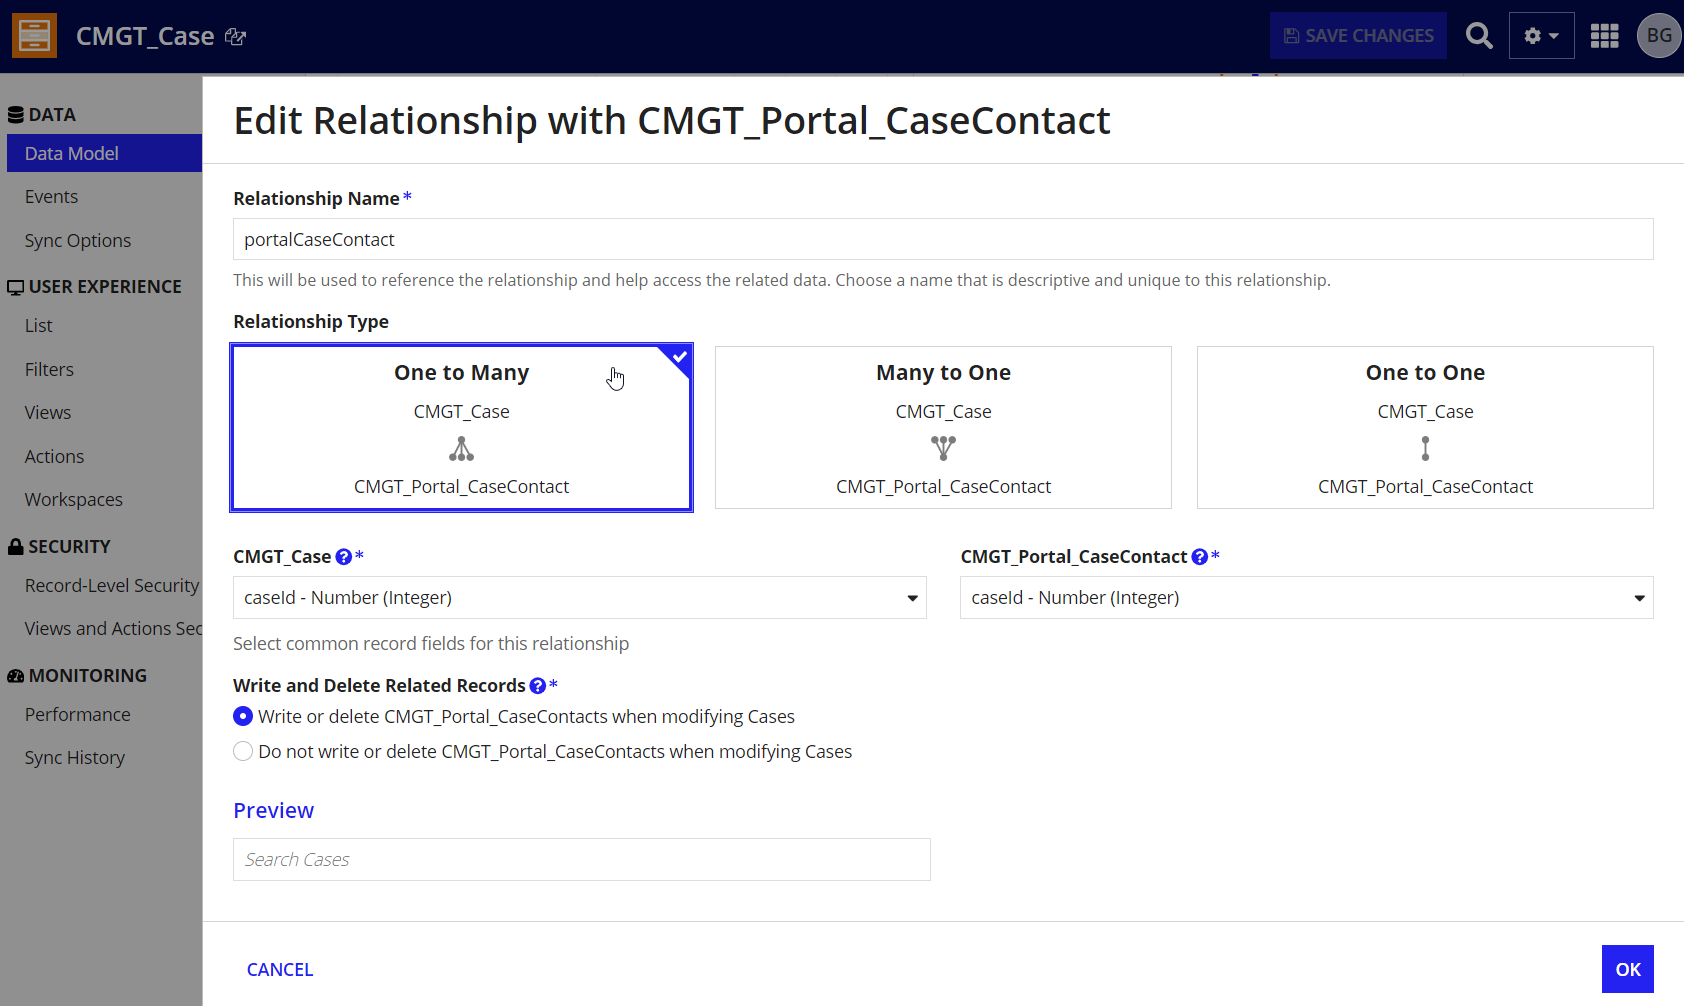
- Select the
- Search for and open the
CMGT_Case_SetMetaDataexpression rule.-
Add the following map statement below the last map in the
childRelationshipsarray:1 2 3 4 5 6 7
a!map( field: recordType!CMGT_Case.relationships.portalCaseContact, value: rule!CMGT_Portal_CaseContact_SetMetaData( portalCaseContacts: fv!item[recordType!CMGT_Case.relationships.portalCaseContact], initiator: ri!initiator ) )
CopyNote: Record type field references are specific to each record type and environment. This means that you need to reference the record type fields from your own environment whenever you copy and paste a record type reference from outside the application.
-
- Search for and open the
CMGT_Case_Sub_Createinterface.-
Below the case details section layout, call the interface
CMGT_Portal_CreateCase_CaseContactsSectionas follows:1 2 3 4
rule!CMGT_Portal_CreateCase_CaseContactsSection( caseContact: ri!case[recordType!CMGT_Case.relationships.portalCaseContact], brandingMap: ri!brandingMap ),
Copy
-
- Search for and open the
CMGT_Case_CaseSummaryinterface.-
Above the Studio Fields section, call the interface
CMGT_Portal_CaseSummary_PortalFieldsas follows:1 2 3 4
rule!CMGT_Portal_CaseSummary_PortalFields( caseContact: ri!case[recordType!CMGT_Case.relationships.portalCaseContact], brandingMap: ri!brandingMap ),
Copy
-
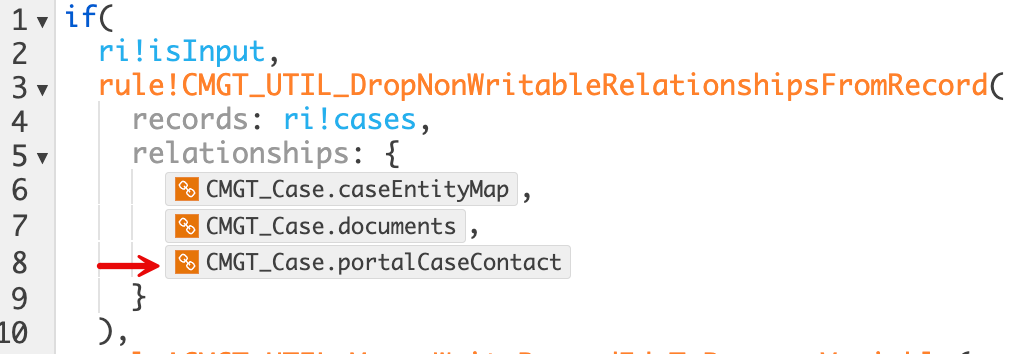
- Search for and open the
CMGT_CB_Case_WriteRecordsPropertiesexpression rule.-
Add the portal case contact relationship after the documents relationship as shown.
-
Click SAVE CHANGES and close the expression rule.
-
- Search for and open the
CMGT_EventHistory_Case_FormatDetailsexpression rule.-
Add another condition to the
match()statement for formatting audits related to the case contact by copying the code snippet and pasting as shown.1 2 3 4 5 6 7 8 9 10 11 12 13 14 15 16 17 18 19 20 21 22 23 24 25 26 27 28 29 30 31 32 33 34 35 36 37
whenTrue: fv!value = cons!CMGT_PORTAL_REFID_EVENT_TYPE_UPDATE_CASE_CONTACT, then: joinarray( rule!CMGT_UTIL_RejectBlank( array: { if( rule!CMGT_UTIL_IsBlank( local!details.firstName ), null, 'translation!{3901b96b-7990-4002-b073-5b601b7d9be9}CMGT_Portal_Translations.{91fffdbd-a177-4f4f-b0e0-769b9475604b}First Name: {value}'( 'translation!{3901b96b-7990-4002-b073-5b601b7d9be9}CMGT_Portal_Translations.{91fffdbd-a177-4f4f-b0e0-769b9475604b}First Name: {value}.translationvariables.{e6f9ee42-d08f-46cd-90ce-29e1ce3a8e07}value': local!details.firstName ) ), if( rule!CMGT_UTIL_IsBlank( local!details.lastName ), null, 'translation!{3901b96b-7990-4002-b073-5b601b7d9be9}CMGT_Portal_Translations.{33ebde45-da93-4bff-813c-aafee5c65dd6}Last Name: {value}'( 'translation!{3901b96b-7990-4002-b073-5b601b7d9be9}CMGT_Portal_Translations.{33ebde45-da93-4bff-813c-aafee5c65dd6}Last Name: {value}.translationvariables.{d44e0b68-4130-4944-a35b-19ac9d247a9d}value': local!details.lastName ) ), if( rule!CMGT_UTIL_IsBlank( local!details.email ), null, 'translation!{3901b96b-7990-4002-b073-5b601b7d9be9}CMGT_Portal_Translations.{8a2f3918-6edc-4aef-b7eb-eb84fd4d95ac}Email: {value}'( 'translation!{3901b96b-7990-4002-b073-5b601b7d9be9}CMGT_Portal_Translations.{8a2f3918-6edc-4aef-b7eb-eb84fd4d95ac}Email: {value}.translationvariables.{325eca9c-740e-49e3-9a9f-6541520f32f8}value': local!details.email ) ) } ), char( 10 ) ),
Copy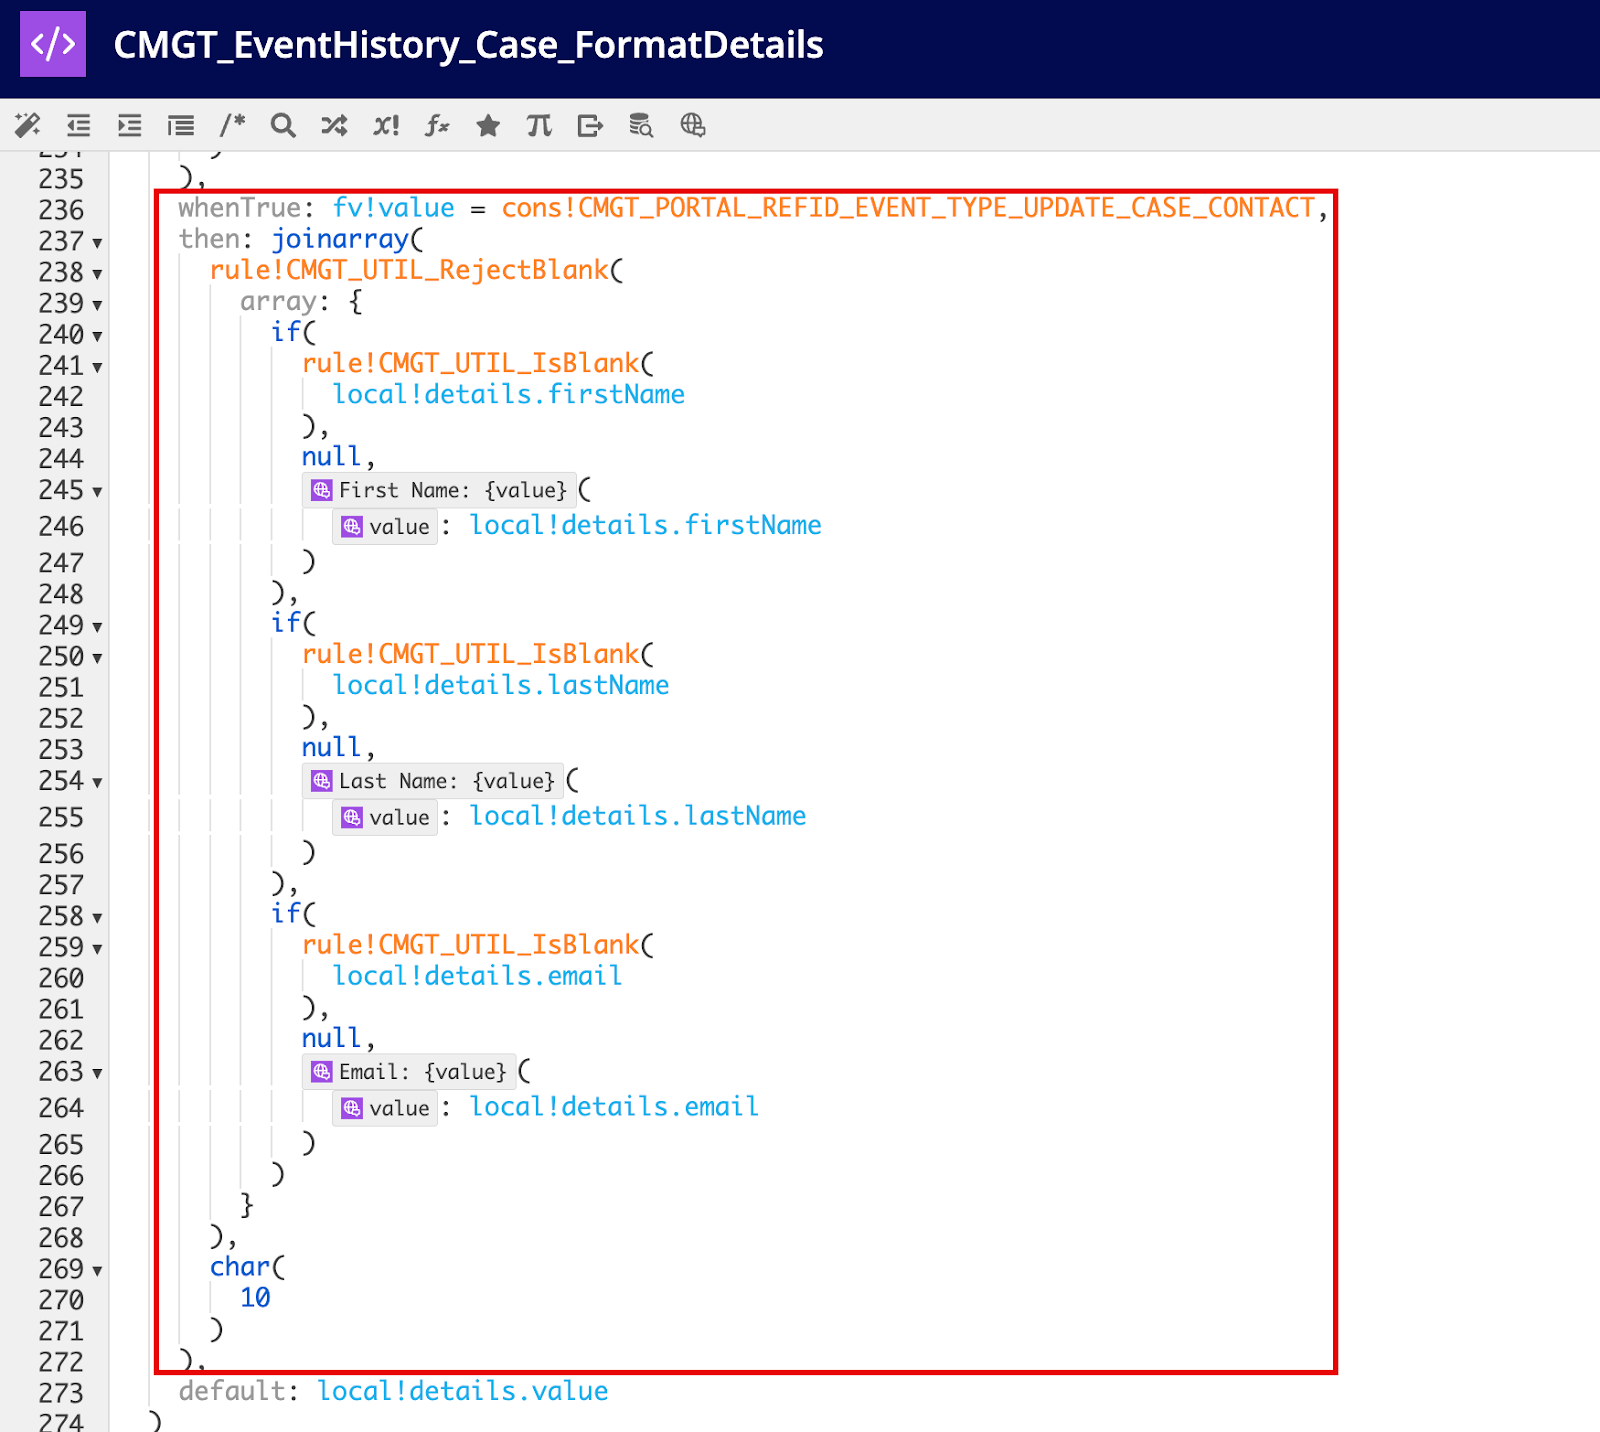
-
Click SAVE CHANGES and close the expression rule.
-
Step 3: Display the case type on Case Creation formCopy link to clipboard
Complete the steps in this section to display the selected case type on the Case Creation form on the portal.
To update the Case Creation form:
- In Appian Designer, go to the CMGT Case Management Studio Base application.
- Search for and open the
CMGT_Case_Sub_Createinterface.-
Add the following code above the section layout that contains the
CMGT_Case_CaseTypeinterface.1 2 3
rule!CMGT_Portal_CreateCase_SelectedCaseTypeDisplay( selectedCaseType: ri!case['recordType!{d81cdd0e-c54d-4b8e-beec-b7ae37fefe7f}CMGT_Case.relationships.{8beba714-f253-41d2-9232-e0c0f51bed2e}caseType'] ),
Copy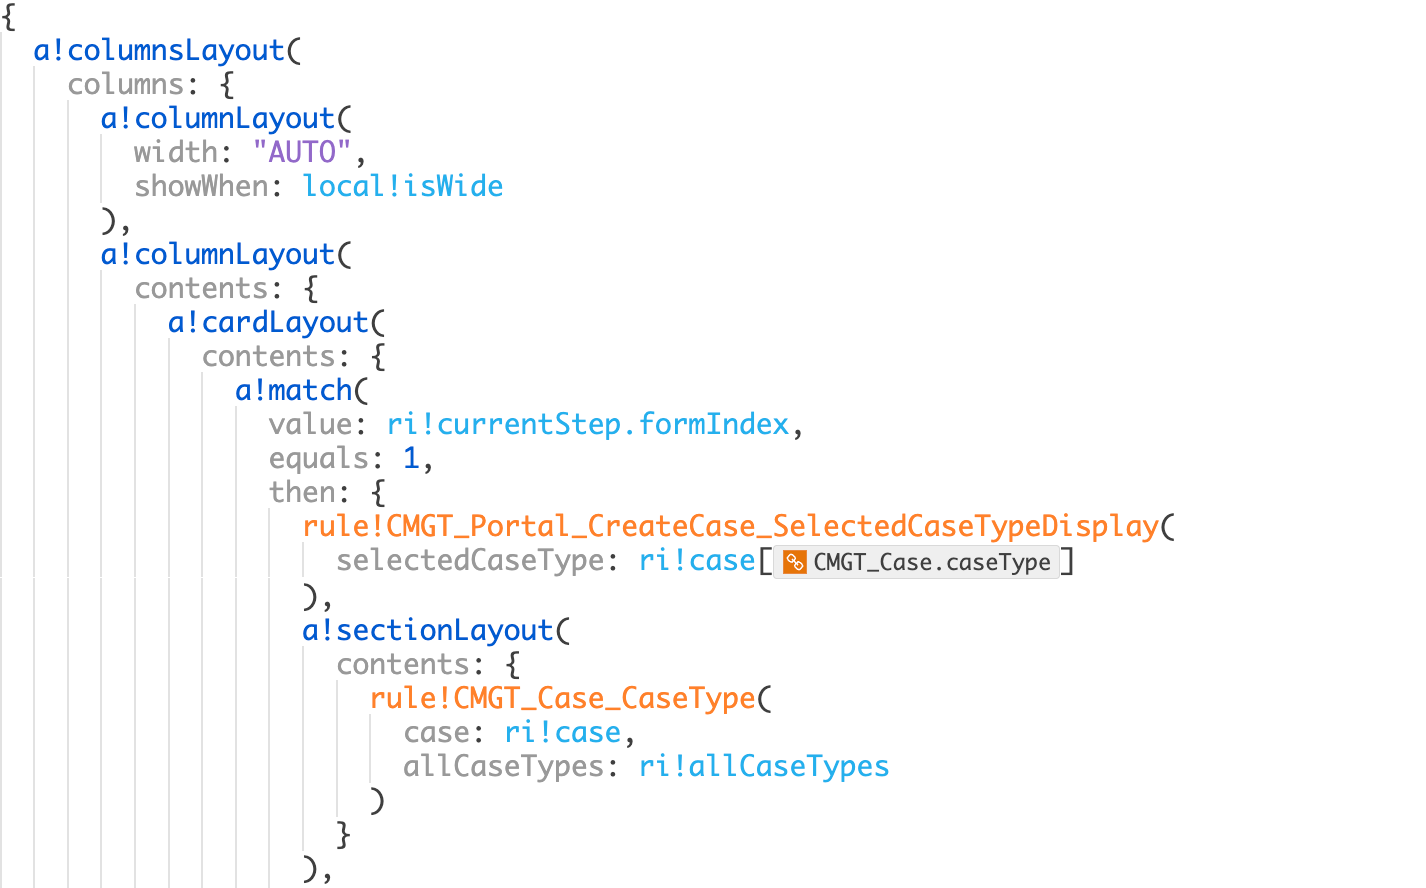
-
Click SAVE CHANGES and close the interface.
-
Step 4: Send case creation emailsCopy link to clipboard
This is an optional step. Complete the following steps to send case creation emails to the contact provided in the portal case submission:
- In Appian Designer, go to the CMGT Case Management Studio Base application.
- Search for and open the
CMGT_Email_CaseCreationEmailsexpression rule.-
Add the following to the existing array of email creation rules.
1
2
3
rule!CMGT_Portal_Email_EmailSettingMap_CreateCase(
case:ri!case
)
Copy -
Click SAVE CHANGES.
-
- Search for and open the
CMGT_Portal_Email_EmailSettingMap_CreateCaseexpression rule.-
Locate the
recipientEmailAddressparameter in themap()function on line 4 of your expression and enter the following:1 2 3 4 5 6
toemailaddress( rule!CMGT_QR_GetPortalCaseContact( caseId: ri!case[recordType!CMGT_Case.fields.caseId], fields: recordType!CMGT_Portal_CaseContact.fields.email )[recordType!CMGT_Portal_CaseContact.fields.email] ),
Copy -
Click SAVE CHANGES.
-
- Verify the portal case contact receives a case confirmation email.
Step 5: Update the portal case contactCopy link to clipboard
Follow the steps in this section to allow case workers to update the portal case contact.
- In Appian Designer, go to the CMGT Case Management Studio Base application.
- Search for and open the
CMGT_Caserecord type.- Navigate to the Actions tab on the record type.
- Click CONFIGURE ACTION MANUALLY under the Related Actions section.
- In the Create New Related Action dialog, select Use Expression for the Display Name field.
- In the expression editor, use the translation string for
Update Contactfrom theCMGT_Portal_Translationstranslation set. -
Complete the remaining fields in the Create New Action dialog, as follows:
- Key: updateContact
- Icon: pencil-square-o
- Dialog Box Size: Small
- Process Model:
CMGT_Portal_Case_UpdateContact -
Context: Copy and paste the following code snippet:
1
2
3
4
5
{
caseContacts: rule!CMGT_QR_GetPortalCaseContact(
  caseId: rv!identifier,
)
}
Copy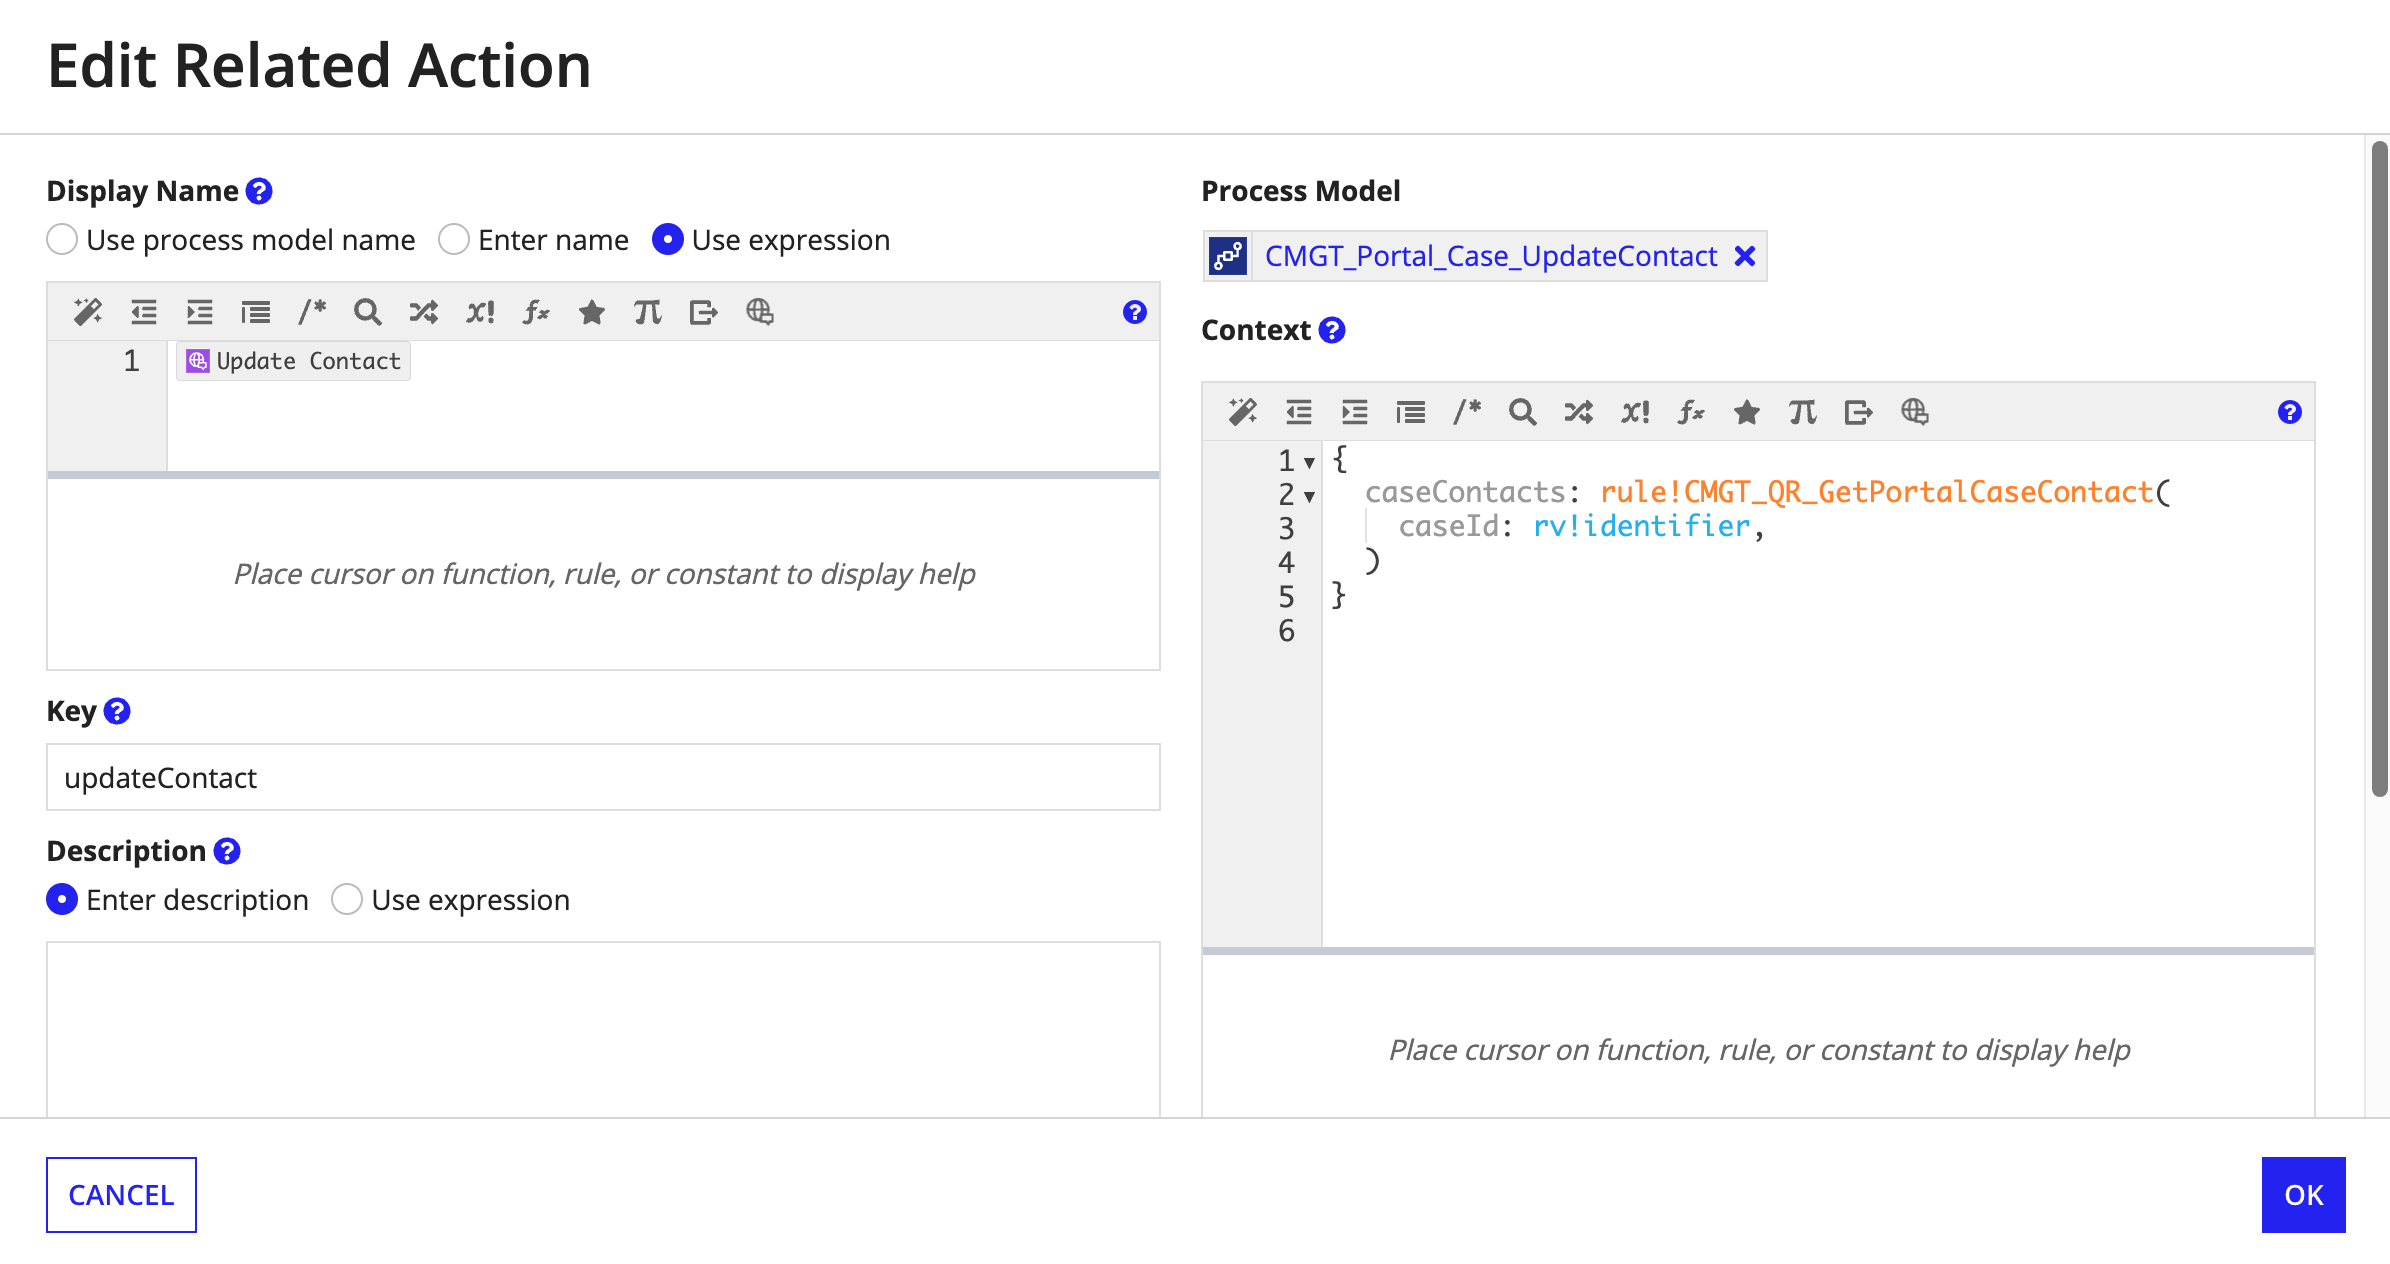
- Click OK.
- Click CONFIGURE ACTION MANUALLY under the Related Actions section.
- On the record type, navigate to the Views and Actions Security tab.
- Click the Actions sub-tab.
- Locate the Update Contact action and click the edit icon.
- For Who can see this action?, select All users who can see the record.
- For When can they see this action?, select Only when….
-
Enter
source = CMGT_TXT_SOURCE_PORTALas shown:
-
- Click OK and SAVE CHANGES to save the record type.
- Navigate to the Actions tab on the record type.
- Search for and open the
CMGT_Case_CaseSummaryinterface.-
Add the Update Contact action below the Update Additional Details action in the record action field as shown.
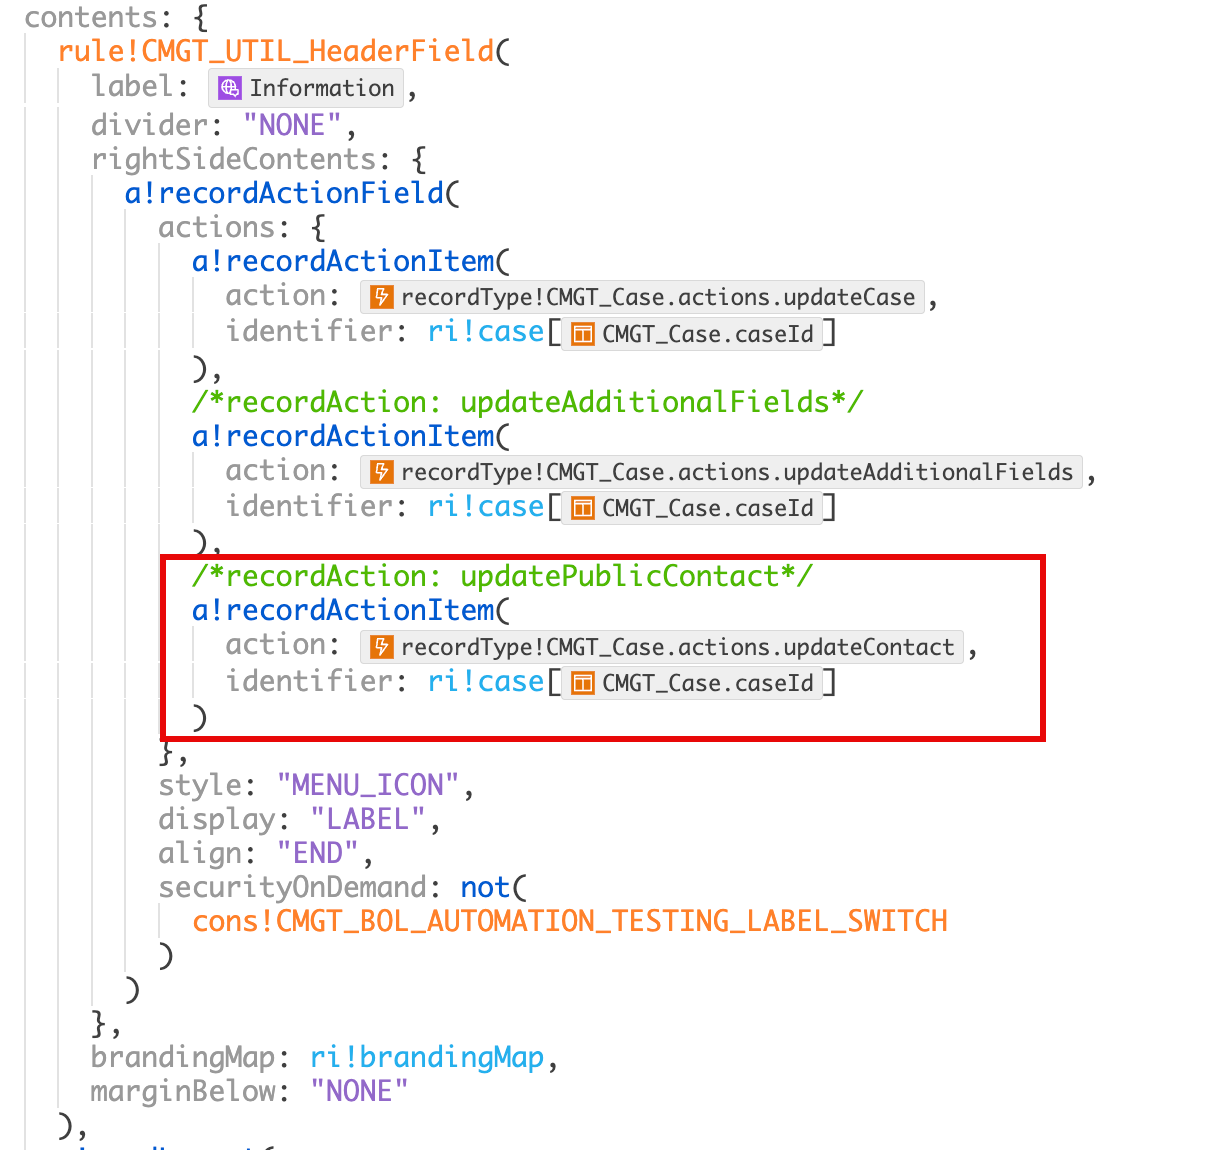
-
Click SAVE CHANGES.
-
Step 6: Remove Google reCAPTCHACopy link to clipboard
By default, the portal ships with Google reCAPTCHA enabled. Appian considers reCAPTCHA services essential for unauthenticated Appian Portals usage. See Google reCAPTCHA to learn more about Google reCAPTCHA.
If you wish to remove Google reCAPTCHA, complete the following steps:
- In Appian Designer, go to the CMGT Portal Module application.
- Search for and open
CMGT_Portalportal object.- In the Service Access section, remove the connected system in the Google reCAPTCHA field.
- Click SAVE CHANGES.
- Note: A design guidance warning about missing Google reCAPTCHA configuration will appear.
- Verify the Public Portal is working as expected.
If this is a permanent removal of reCAPTCHA, navigate to the interfaces specified in the design guidance warning that calls a!verifyRecaptcha(). Follow the inline comments in each interface to remove the a!verifyRecaptcha() call.
- Note: This is not a necessary step but will clean up design guidance warnings and make the code cleaner.
Step 7: Manage files uploaded to PortalCopy link to clipboard
Note: If uploaded documents are expected to contain sensitive information (e.g., PII, financial, medical, etc.), we recommend Appian HIPAA Cloud to ensure potential sensitive user data is protected.
Appian recommends that customers restrict the Portal-exposed file upload fields to a set of permitted file extensions. This is configurable via the admin console.
Portals natively have a file size restriction per document upload.
Step 8: Rename the Portal service accountCopy link to clipboard
This is an optional step that allows the portal service account to reflect a user-friendly name on the front end.
- In Appian Designer, go to the Objects tab.
- Search for the
CMGT_TXT_AUTOMATED_SYSTEMconstant.- Update the constant to match the text you want displayed for the service account in the front end.
Step 9: Translate the applicationCopy link to clipboard
This is an optional step. Refer to Exporting translation strings for translation for information on translating the Public Portal module to other languages.
Step 10: Monitor your PortalCopy link to clipboard
Portals are publicly accessible to users on the open internet. Appian recommends actively monitoring your Portal to prevent cyber attacks, like a flood of fake submissions. See Appian Portals for more details and recommendations on using Appian Portals.