| This content applies solely to Workforce Safety, which must be purchased separately from the Appian base platform. This content was written for Appian 21.4 and may not reflect the interfaces or functionality of other Appian versions. |
In order to keep employees safe and healthy, you need to collect information from them, like:
But there's a problem—communicating with a large number of people is incredibly difficult. Workforce Safety makes it easier for individuals to communicate with their organization.
This guide instructs users on how to use the Workforce Safety HOME page to stay informed and communicate with their organization.
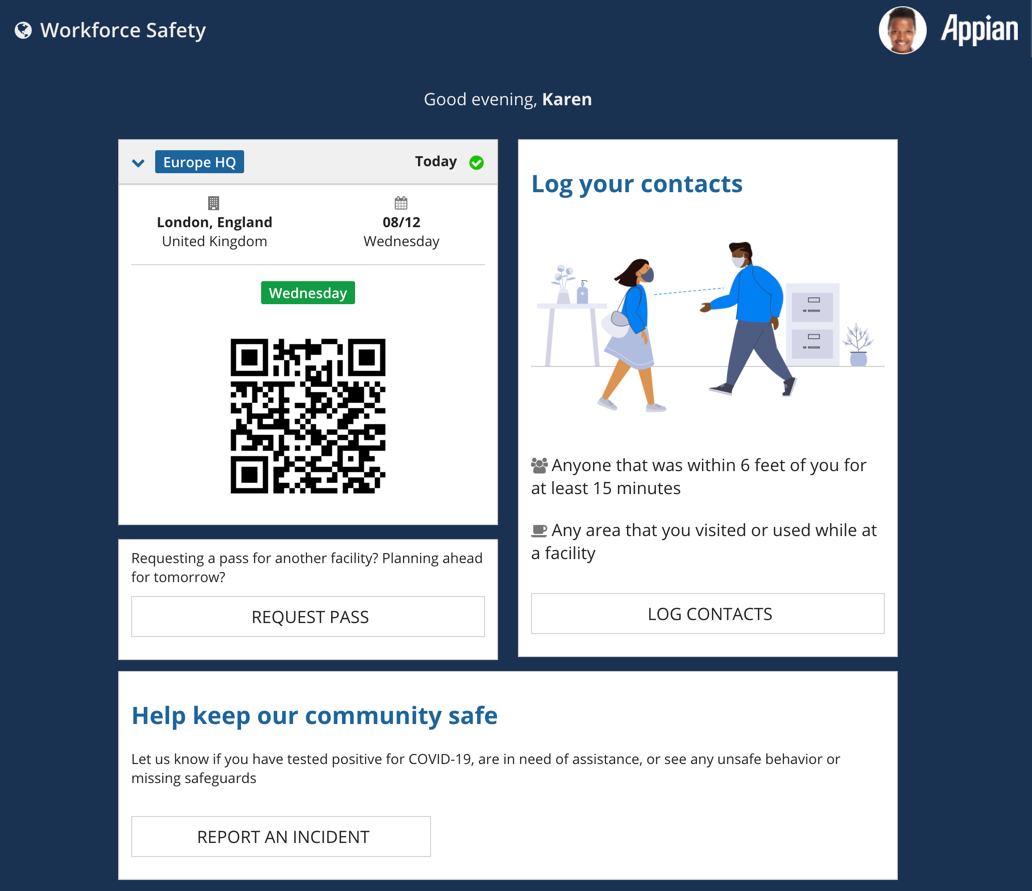
Workforce Safety contains a Home page where users can:
Only the information that a user can act on will display on their Home page. For example, if a response manager has not requested test results from a user, the Please take a COVID-19 test section will not display.
The first time users log in to the Workforce Safety solution, they see a Welcome screen. Clicking the GET STARTED button will allow users to provide their profile information.
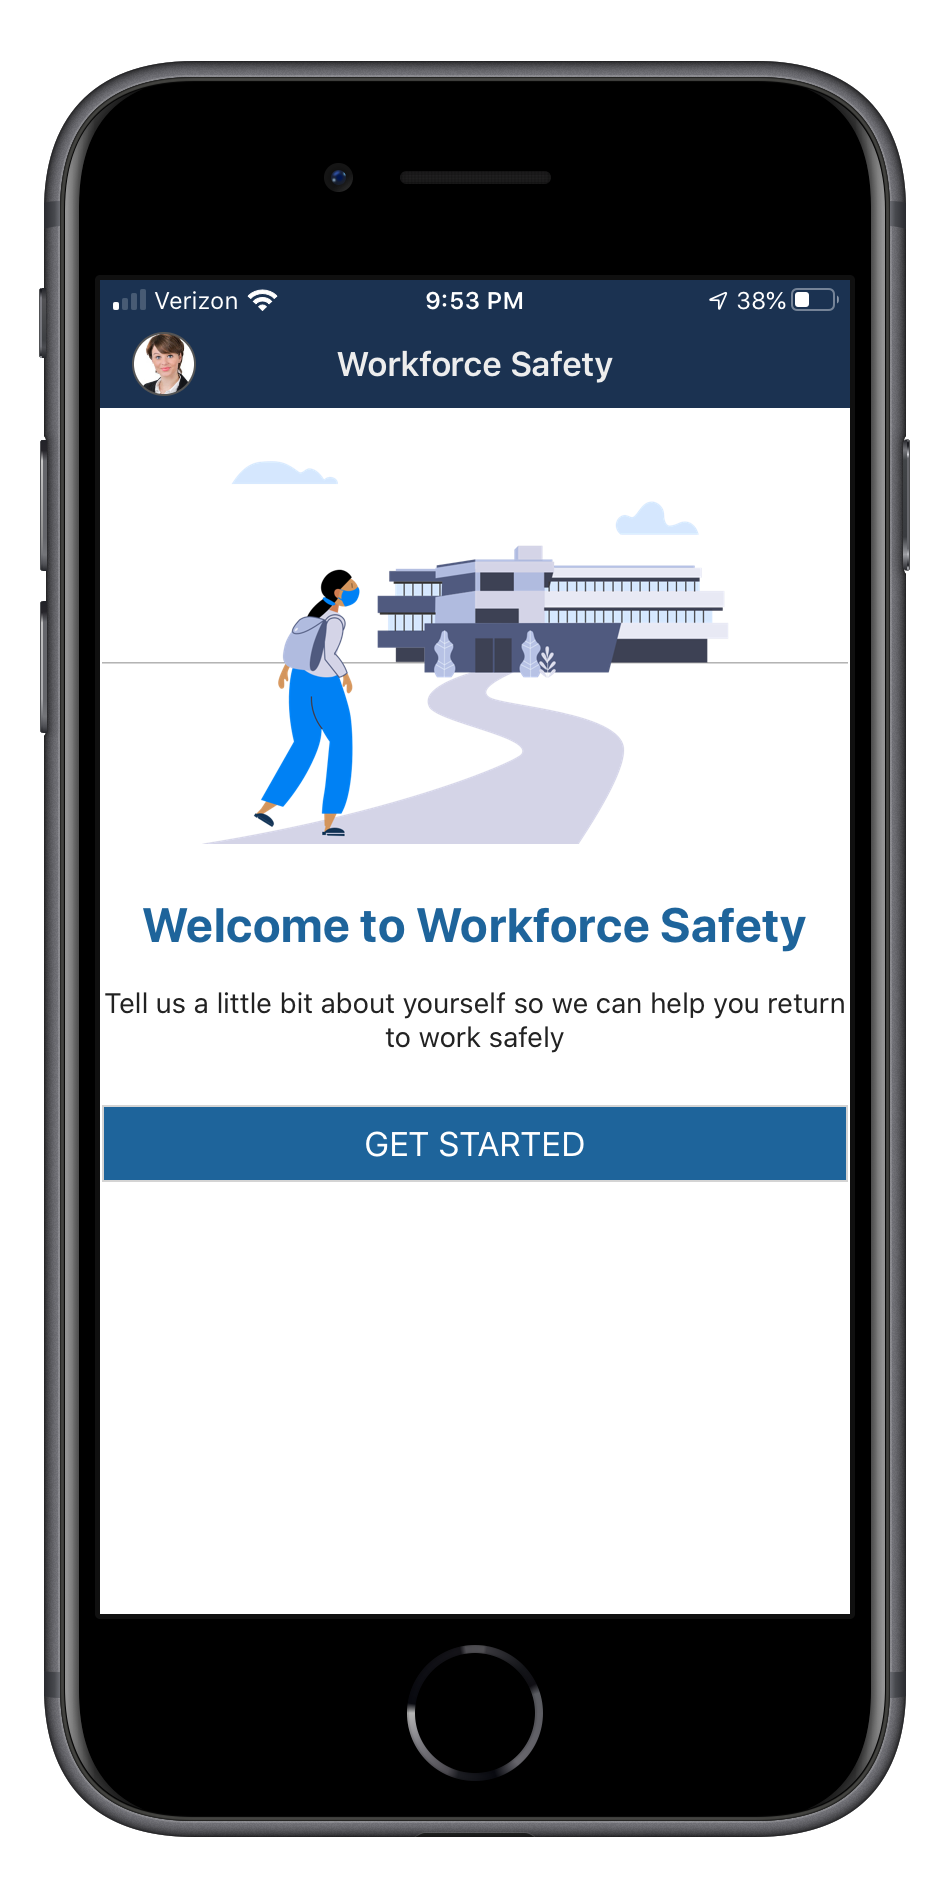
Users can click DO LATER to skip this step and go straight to the Workforce Safety Home page.
If they skip this step, they can still:
Until they provide their profile information, they cannot:
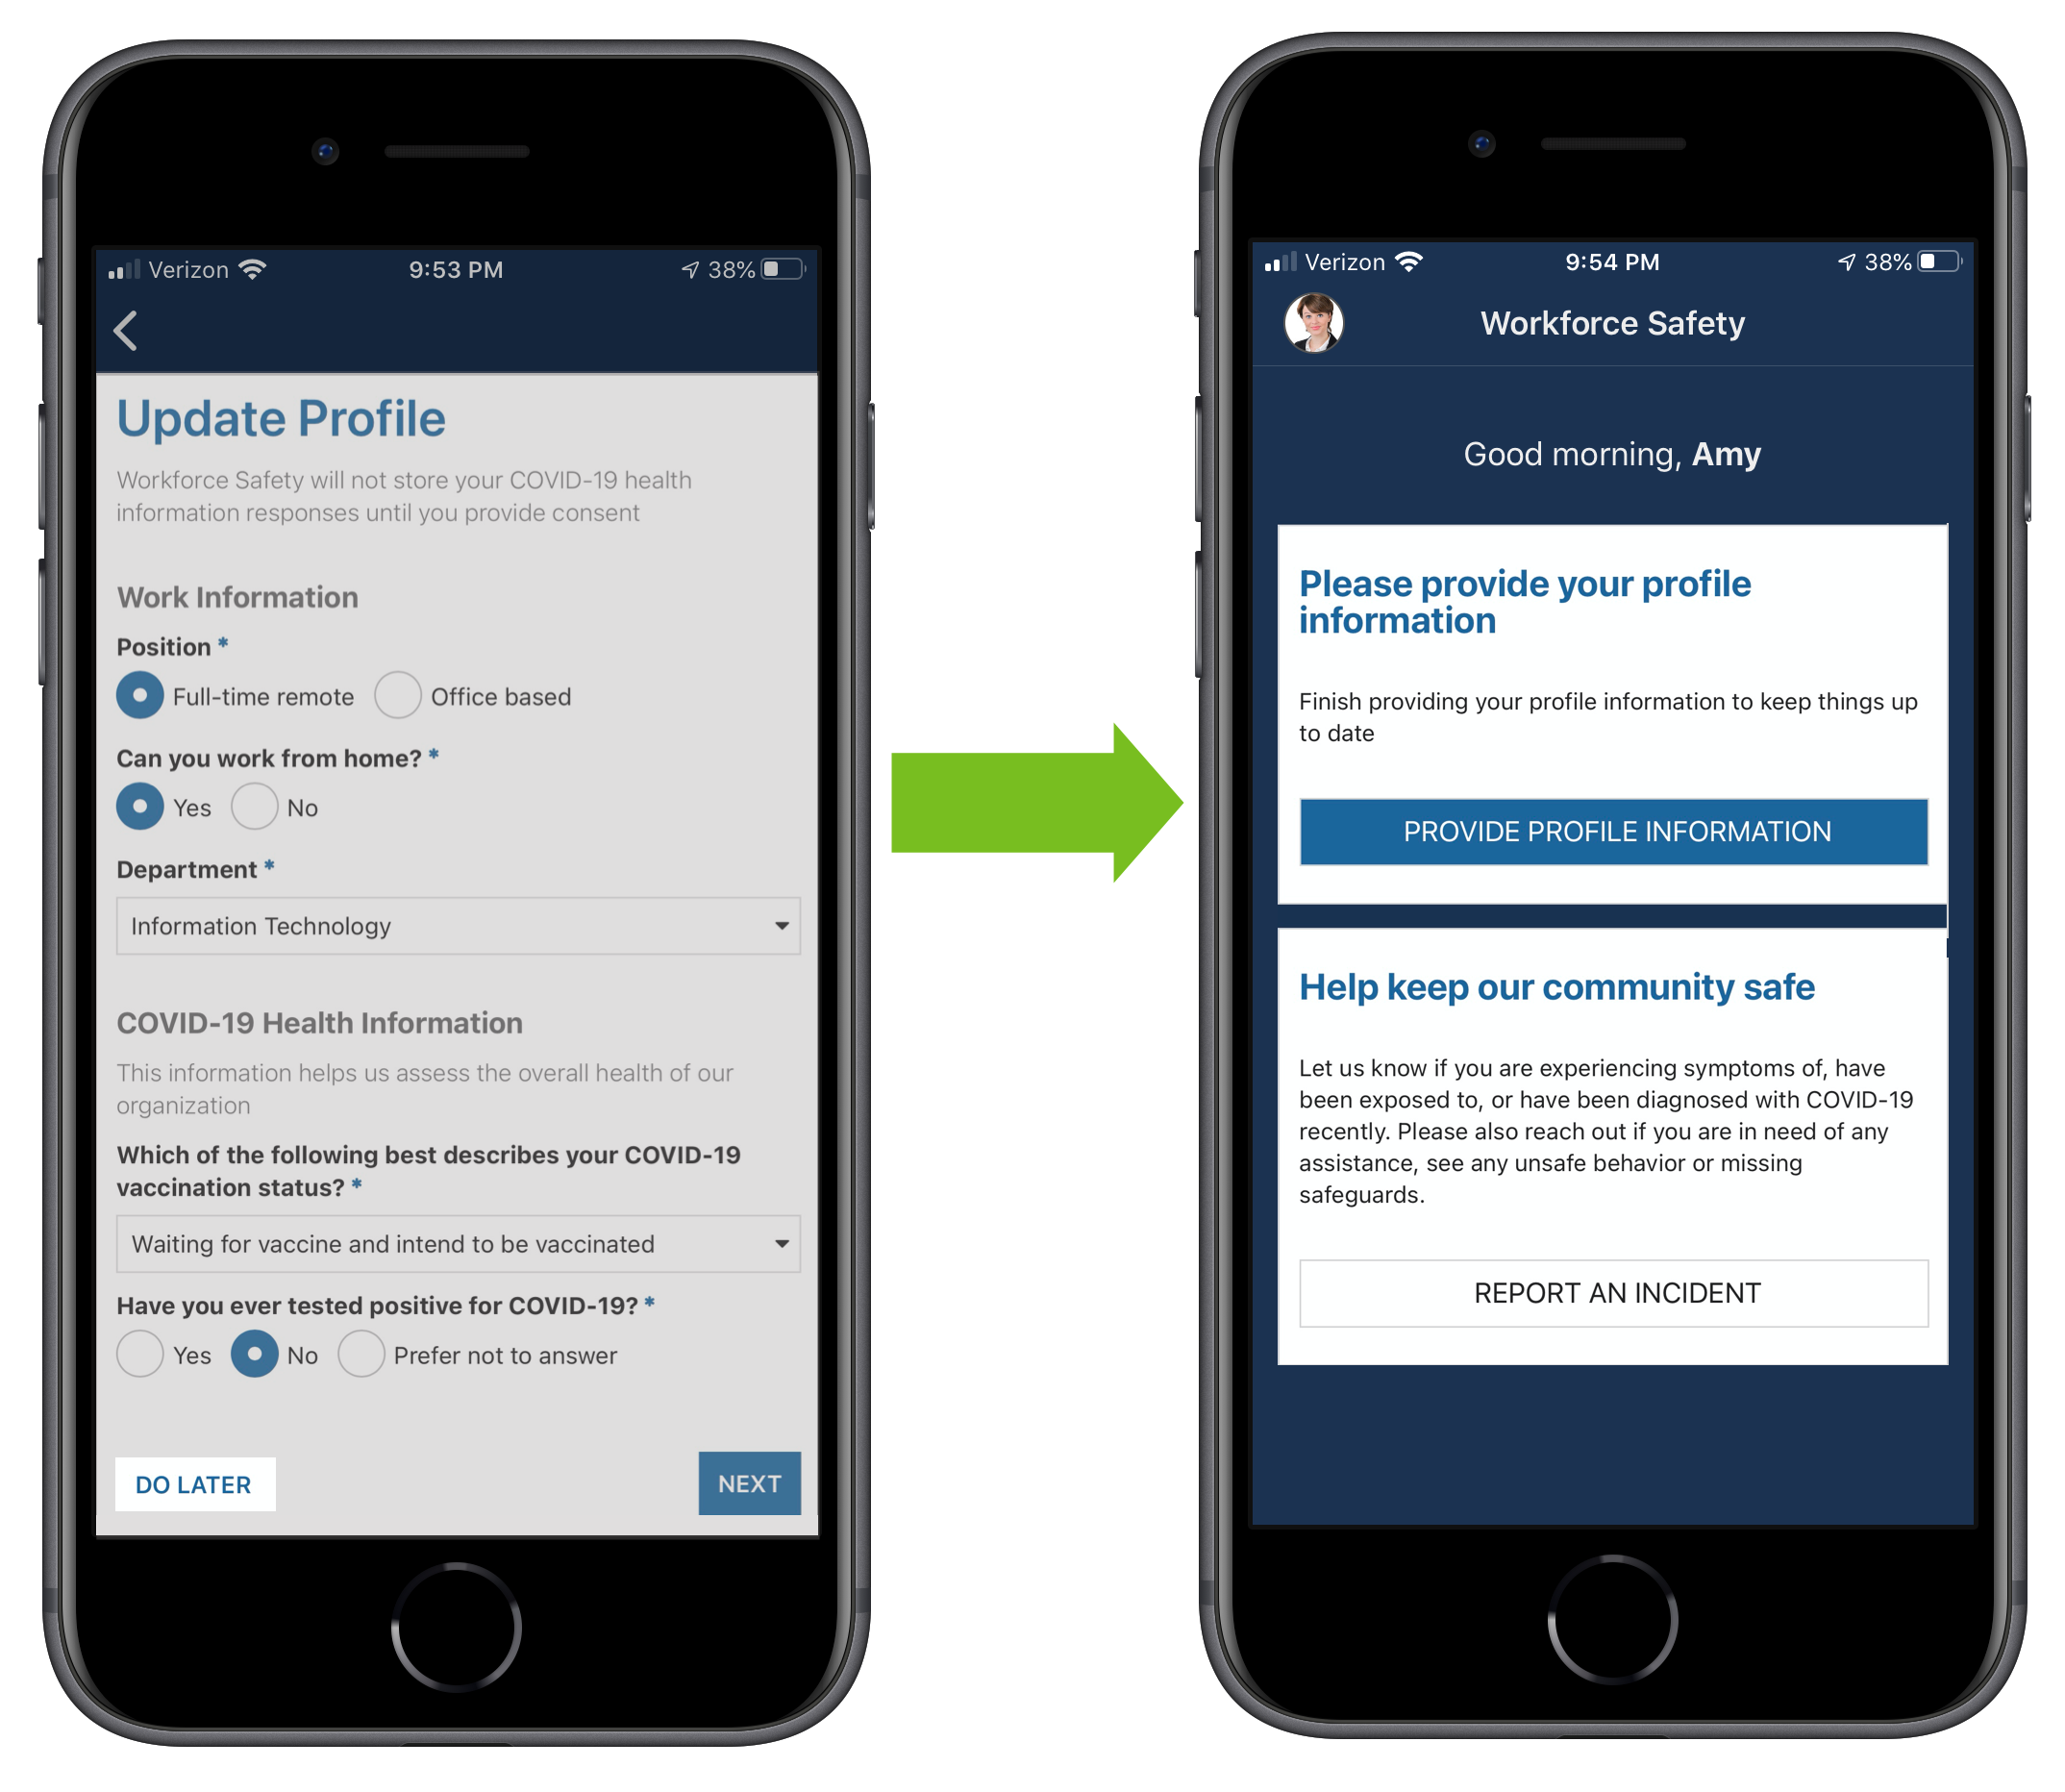
Users can update their profile information at any time by clicking the Profile icon at the bottom of the home page.
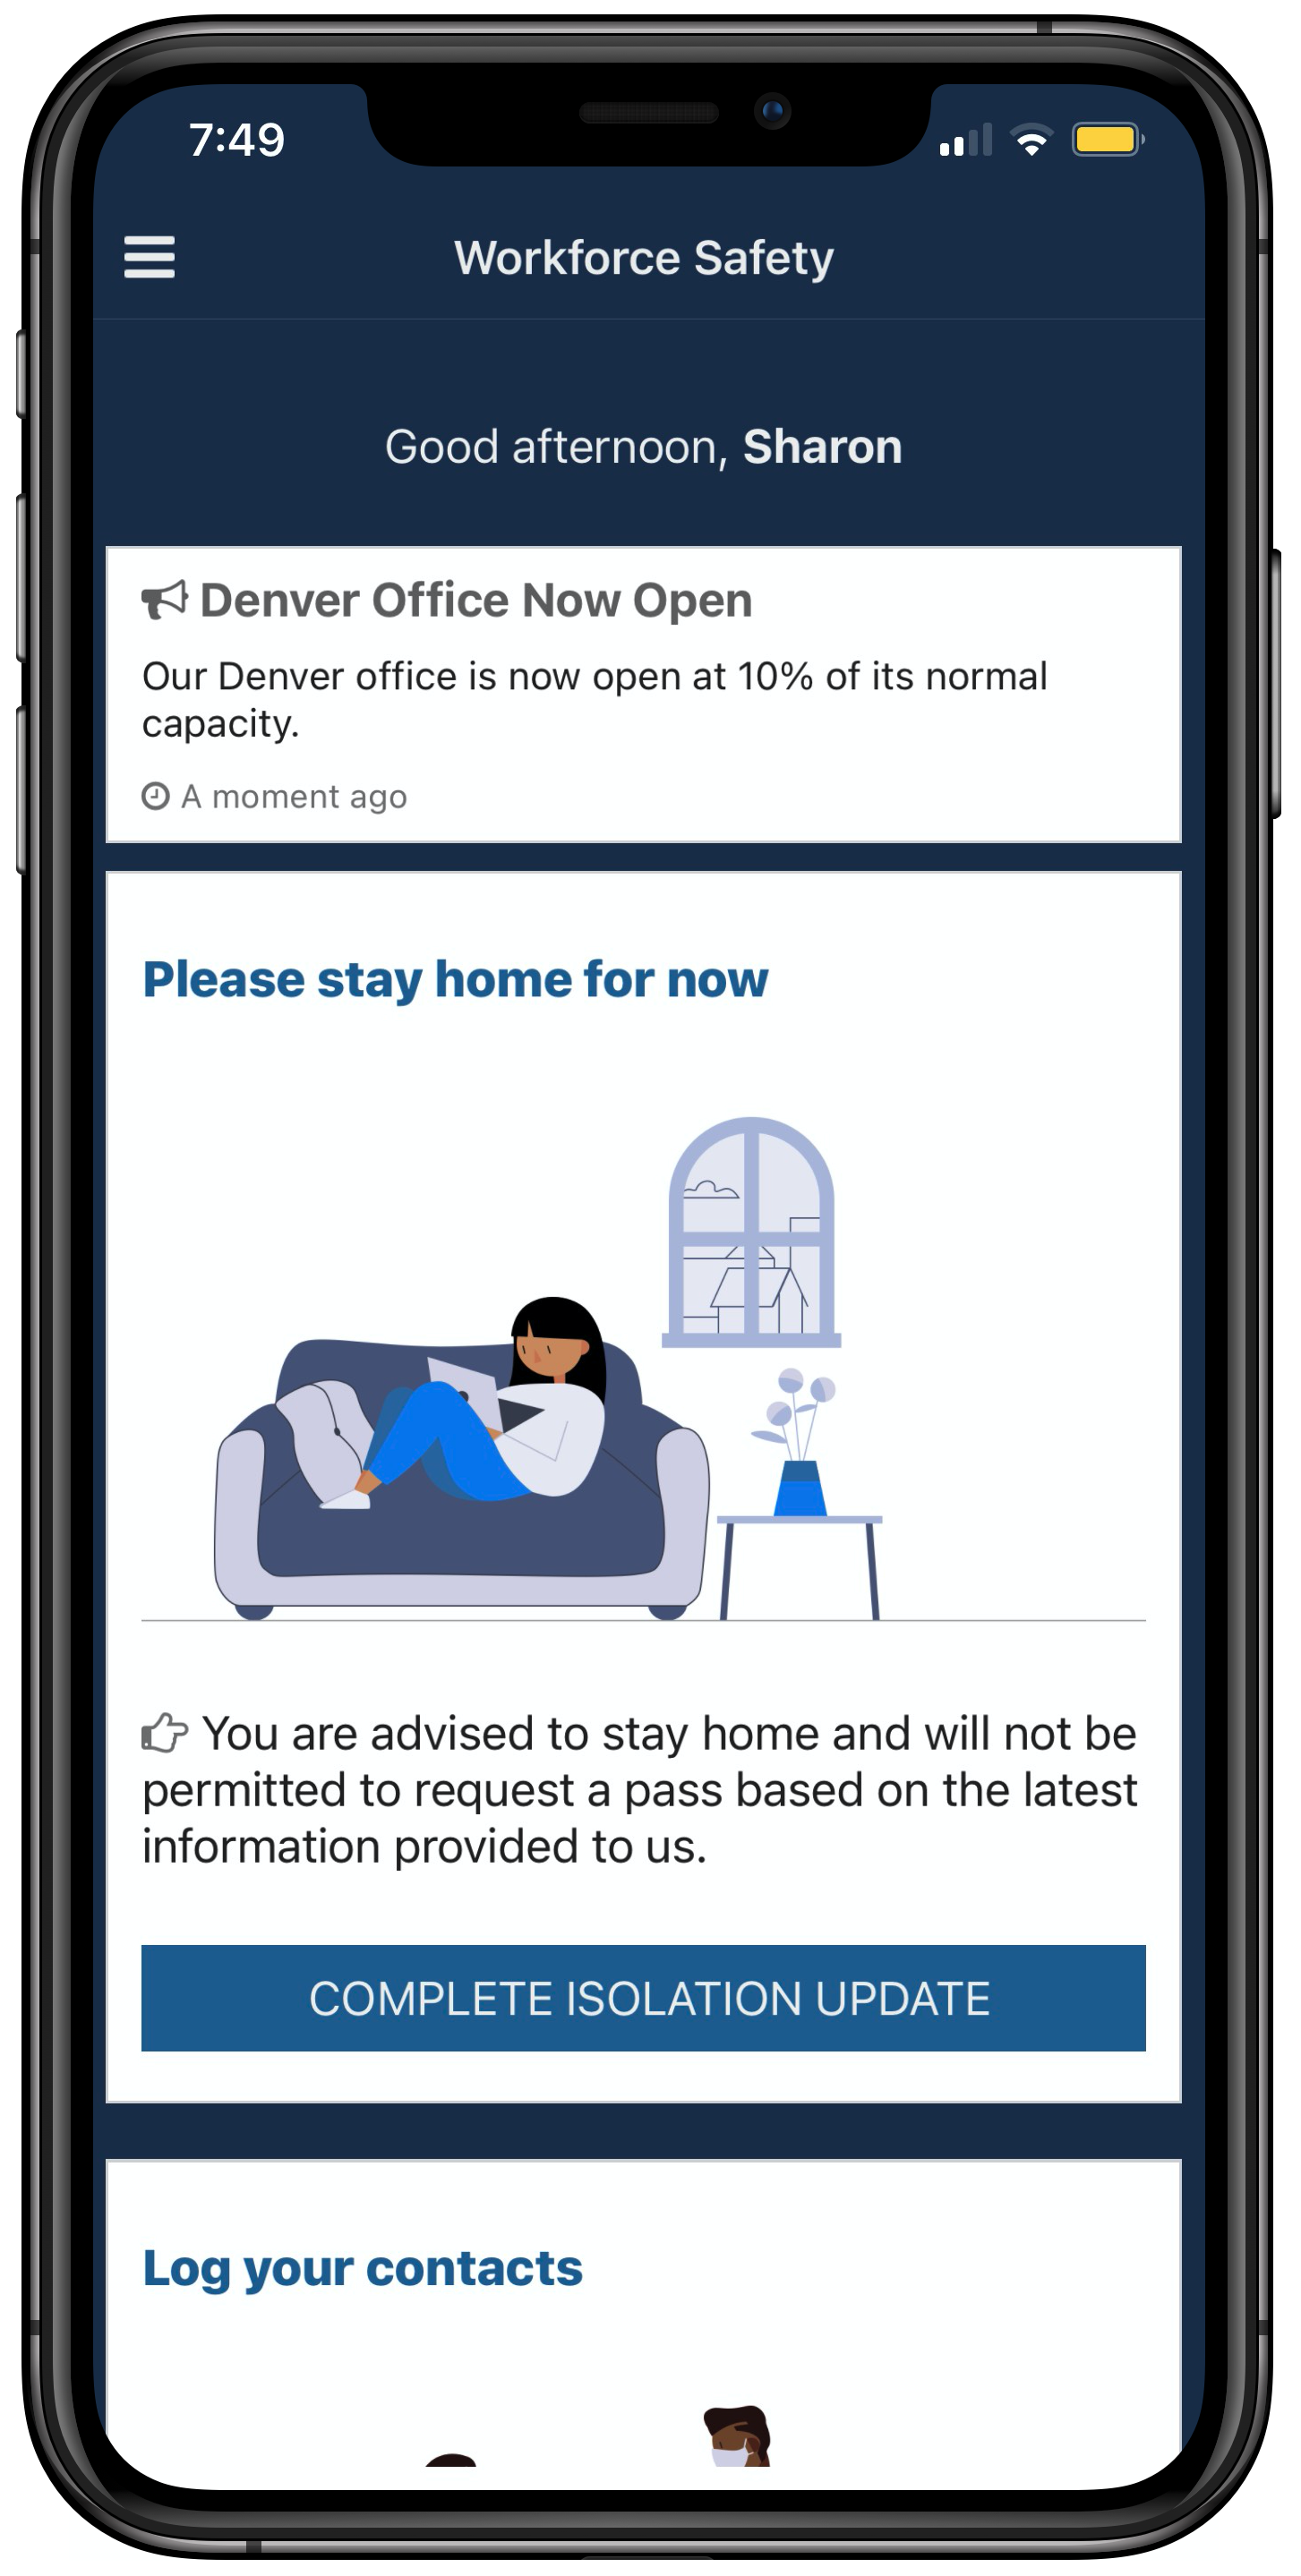
Users can also view target announcements from the Home page. For example, a response manager can send an announcement to let users know when a facility is closed or reopened.
Workforce Safety allows response managers to create a new announcement to send to all users or users in specific departments and facilities only. Users in the selected groups are the only ones who will receive an email and push notification on their mobile device when the announcement is sent. They are also the only ones who can view the announcement on their landing page.
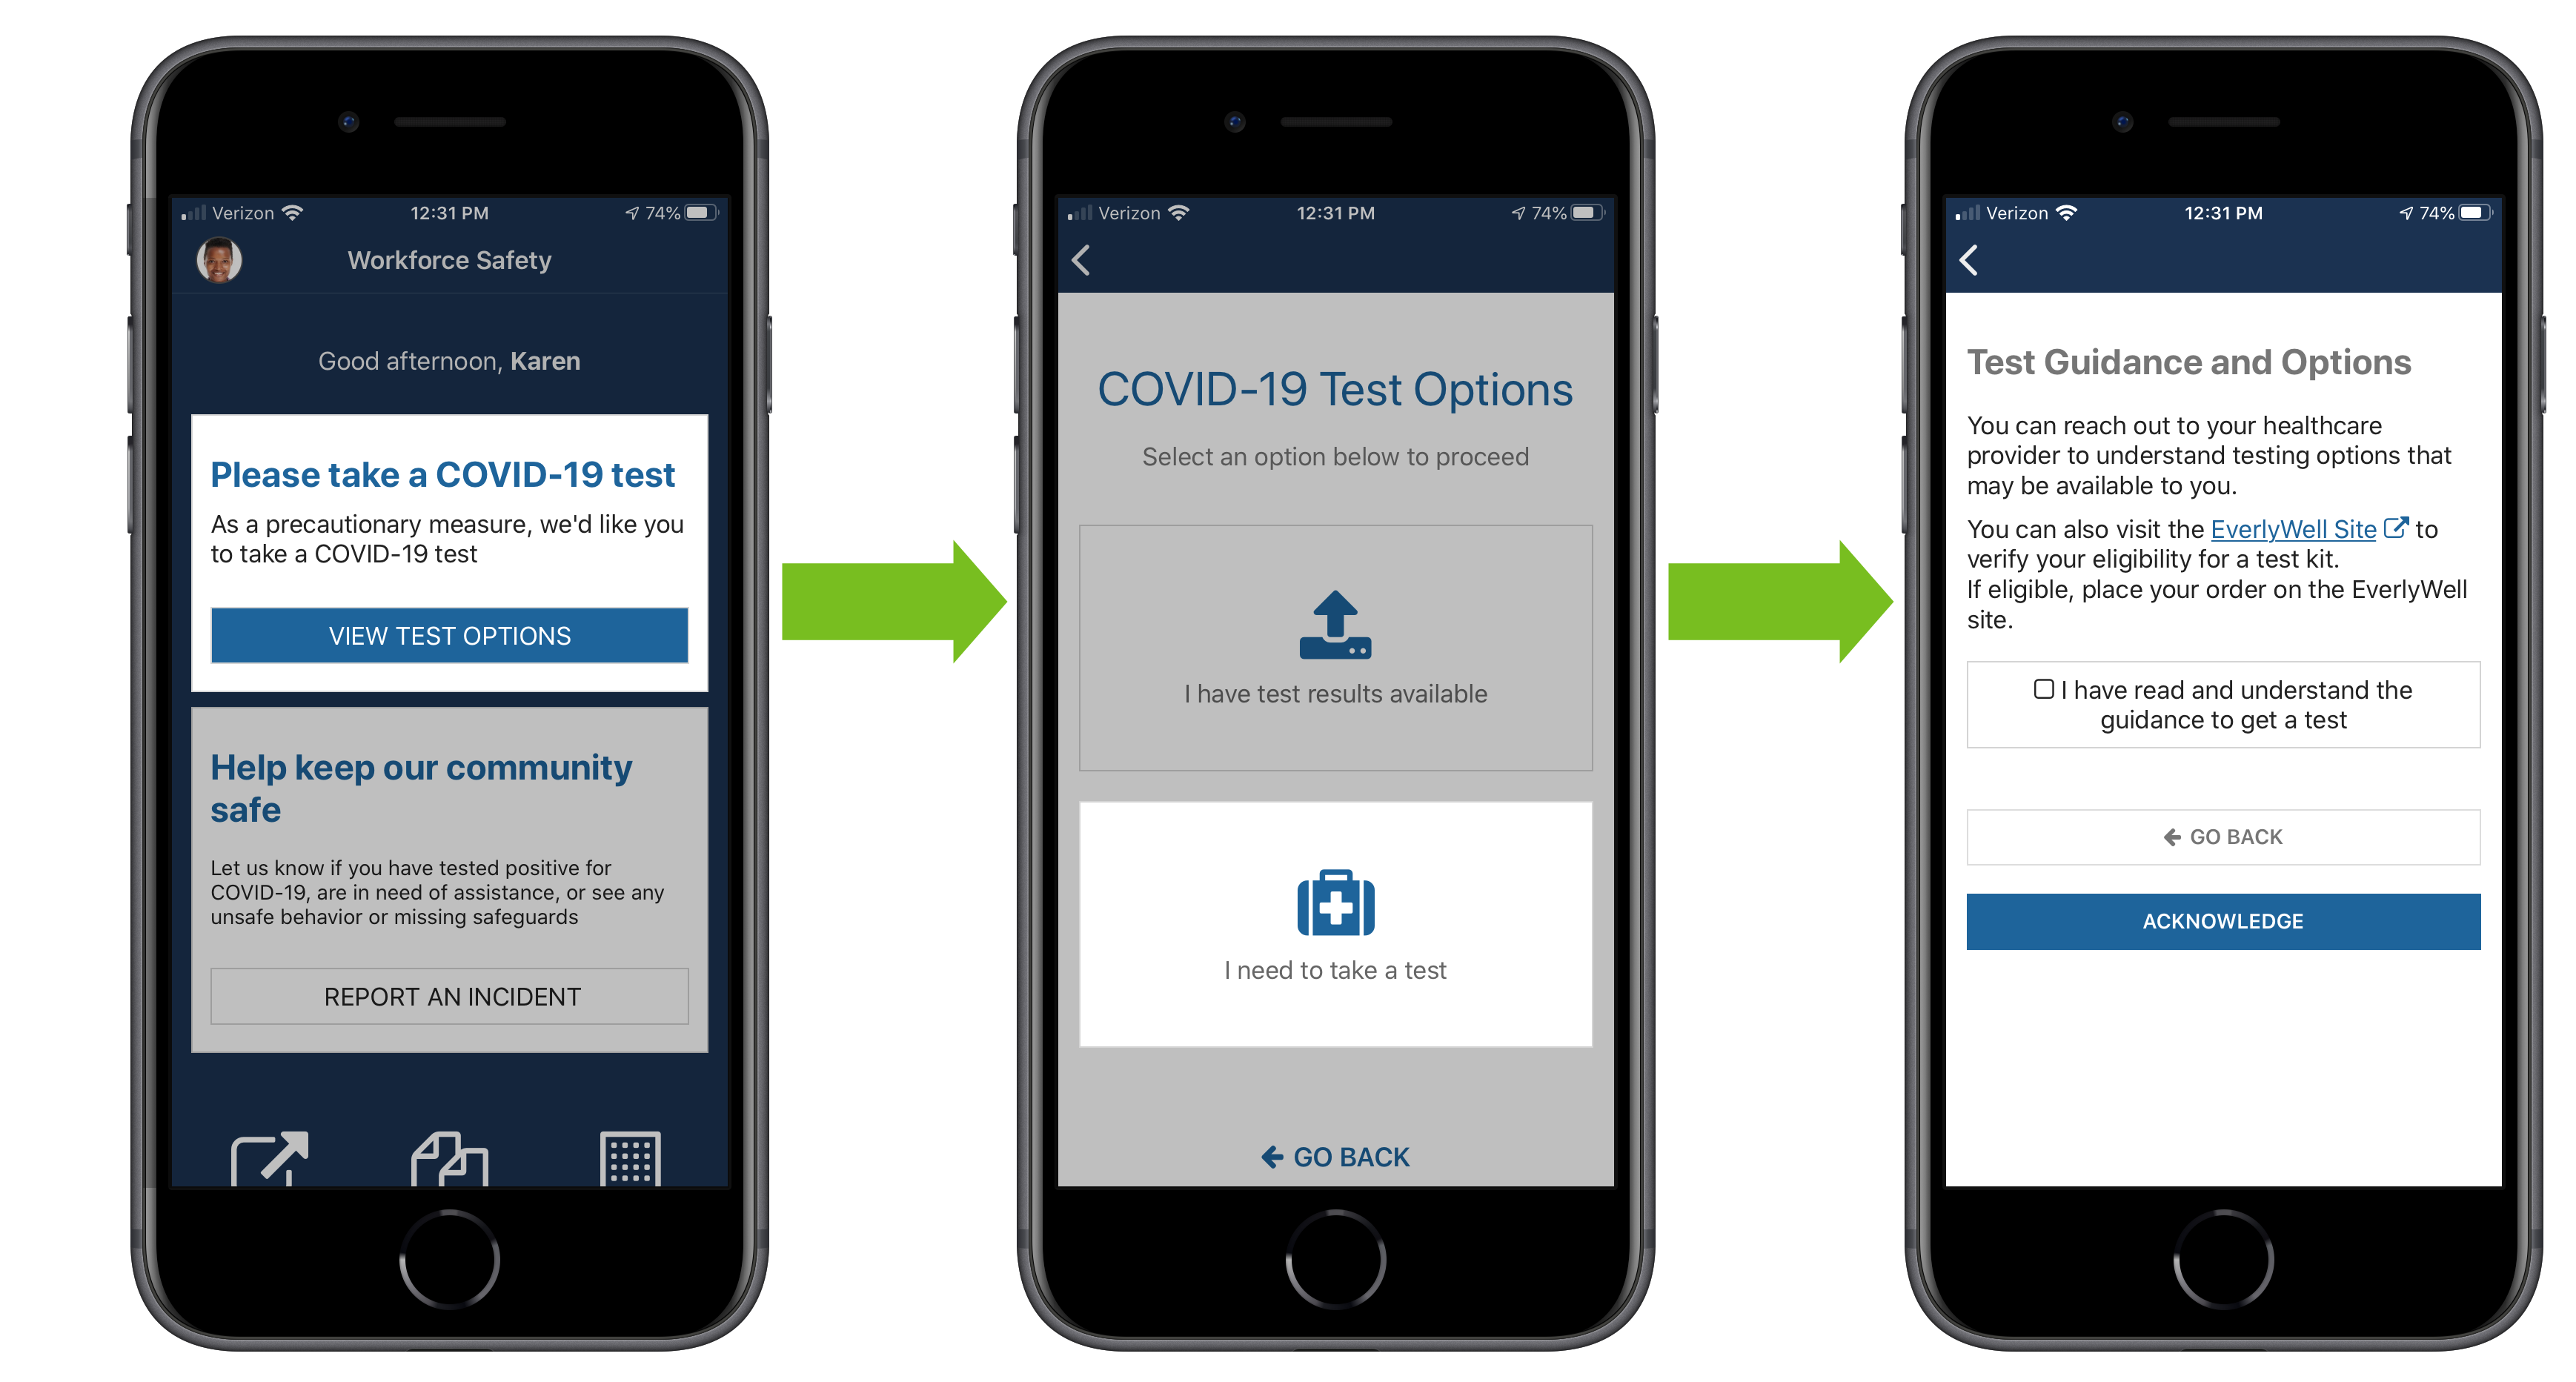
If a response manager has requested a test from a user, the user will not be able to request a pass or update the survey until they have acknowledged the test request.
To acknowledge the test request:
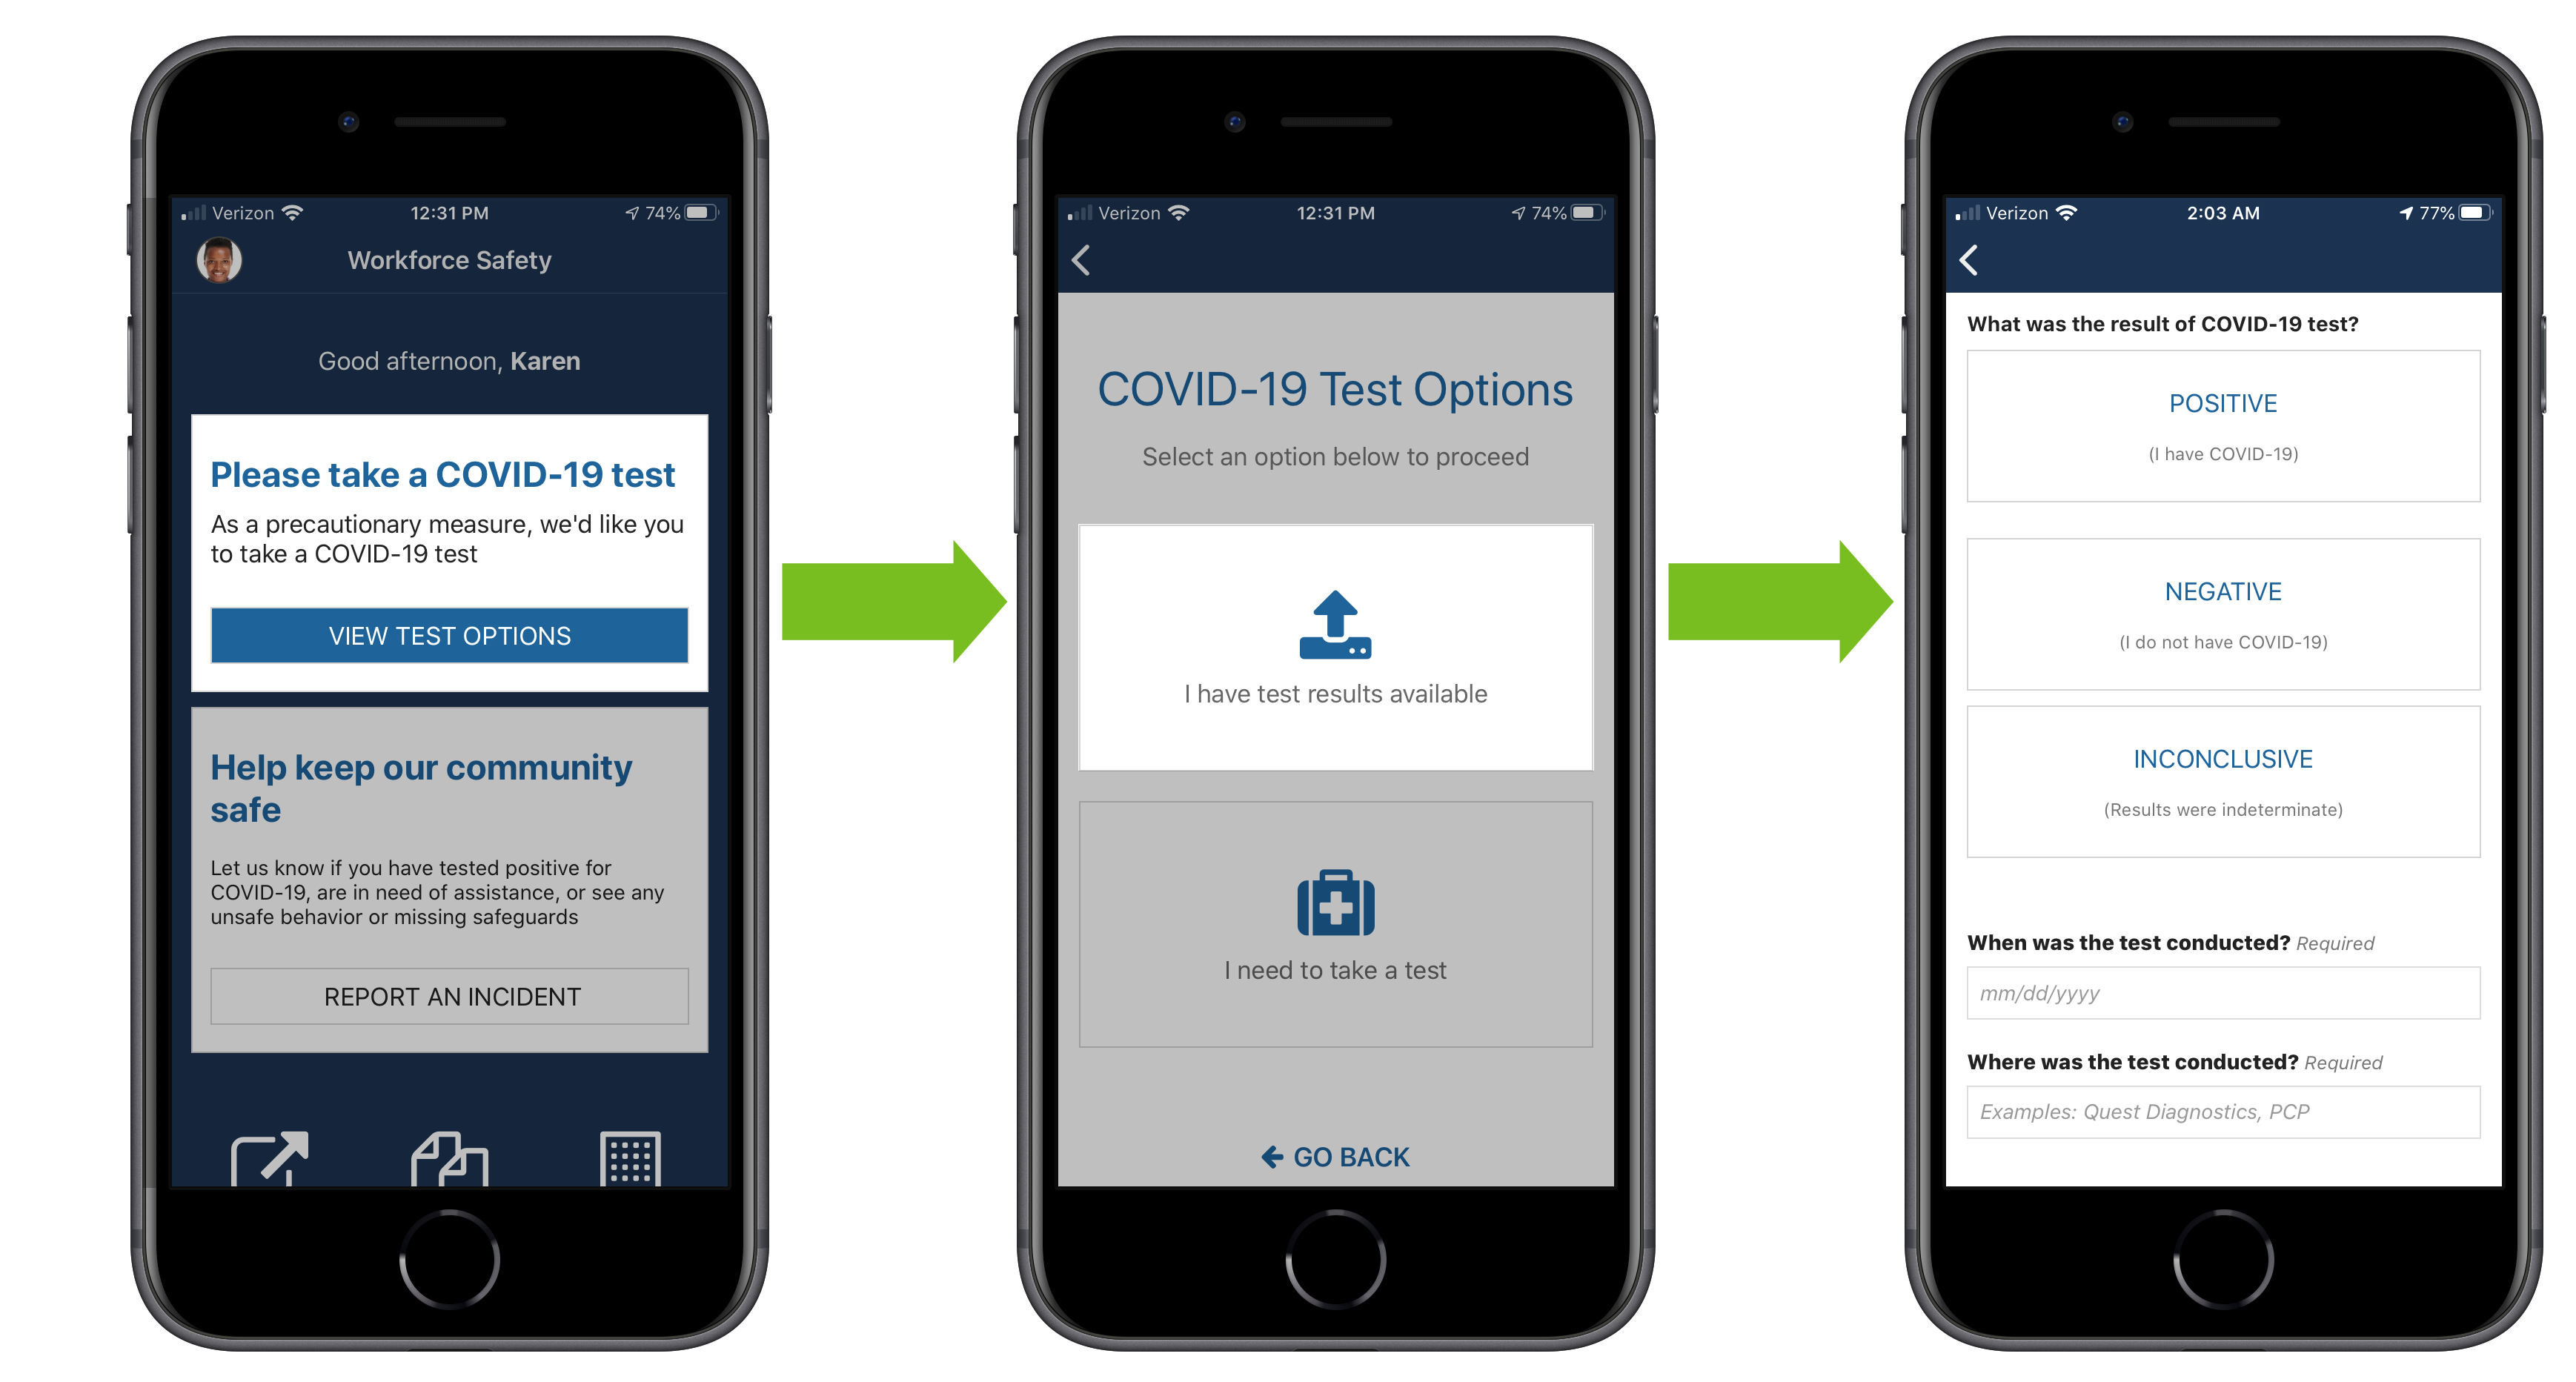
To submit test results:
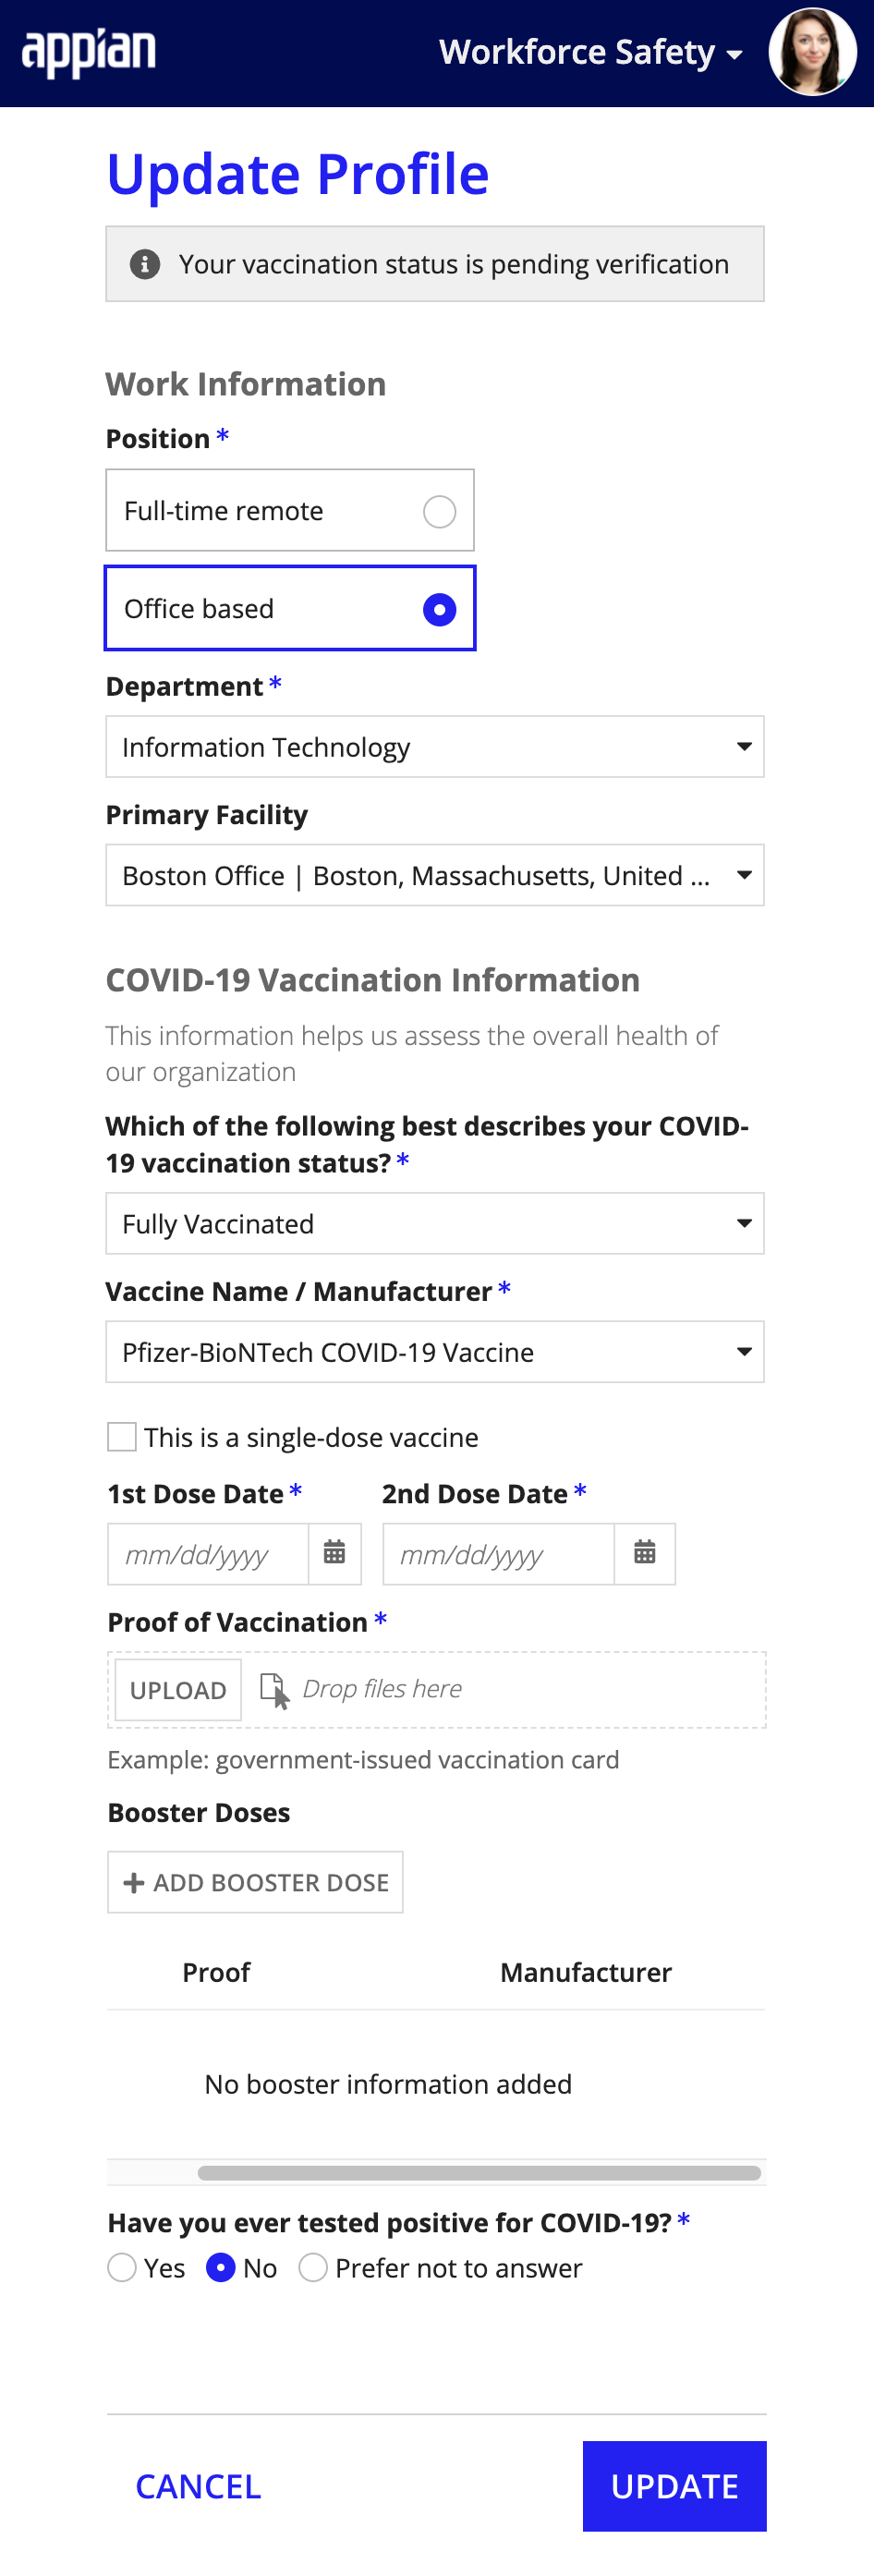
If Workforce Safety is configured to collect Vaccination Insights, users can update their profile with COVID-19 health information via their Profile form. You can configure this setting to include questions about a user's vaccination status, booster doses, and COVID-19 positivity history. From their Profile form, users can update their:
COVID-19 test history
Note the if the Ask for user consent setting in the Vaccination Insights the configuration section is toggled on, users are required to provide consent before they submit any vaccination information, including photos or files showing proof of vaccination.
When completing or updating this section, if a user indicates that they are waiting to receive the COVID-19 vaccine or that they are partially vaccinated, Workforce Safety reminds them to update their vaccination status after 28 days. If the vaccination status question is configured to require further explanation when a user indicates they do not intend to be vaccinated, they will need to provide a reason why.
If a user indicates that they are partially or fully vaccinated, they can enter information about any 1 or 2-dose series they received.
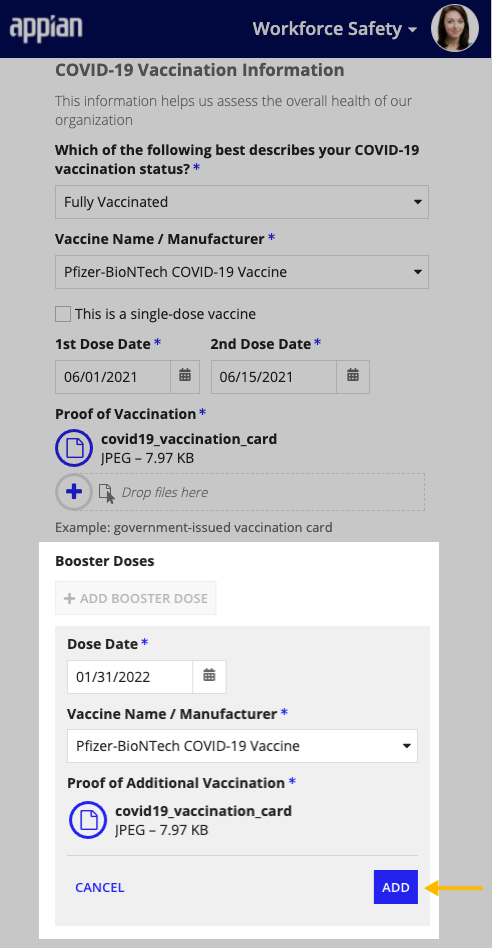
If the Booster Doses setting is enabled, your Partially Vaccinated and Fully Vaccinated employees can report when they have received additional doses, beyond the 1 or 2-dose series, of the COVID-19 vaccination by updating their user profile. Workforce Safety makes reporting additional booster doses fast and easy from the user's mobile device.
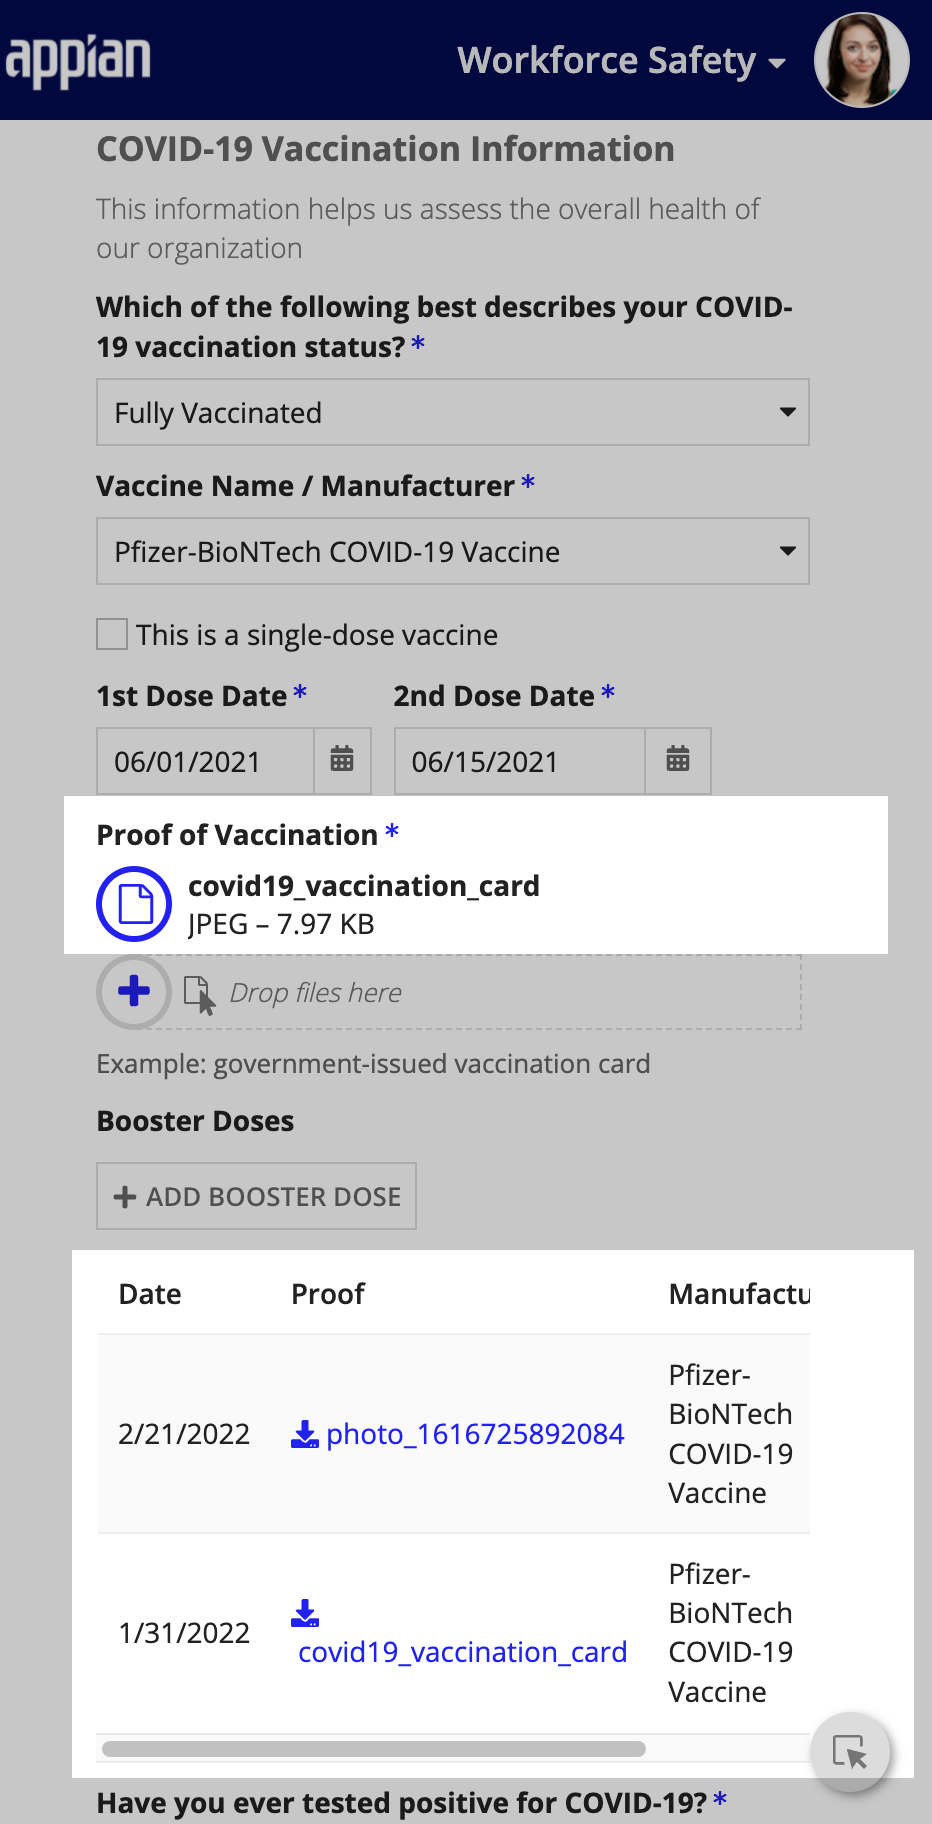
In the Booster Doses section, employees can simply click ADD BOOSTER DOSE to enter information about any booster shots they received, including the vaccine name and manufacturer, dose date, and proof of vaccination.
After adding all of the required information, your employees can see the vaccination history in their user profile. The booster dose history grid displays information for each booster dose a user entered. From the history grid, employees can also download any vaccination documentation they uploaded as proof of a booster dose, edit an existing booster dose, and delete a booster dose record.
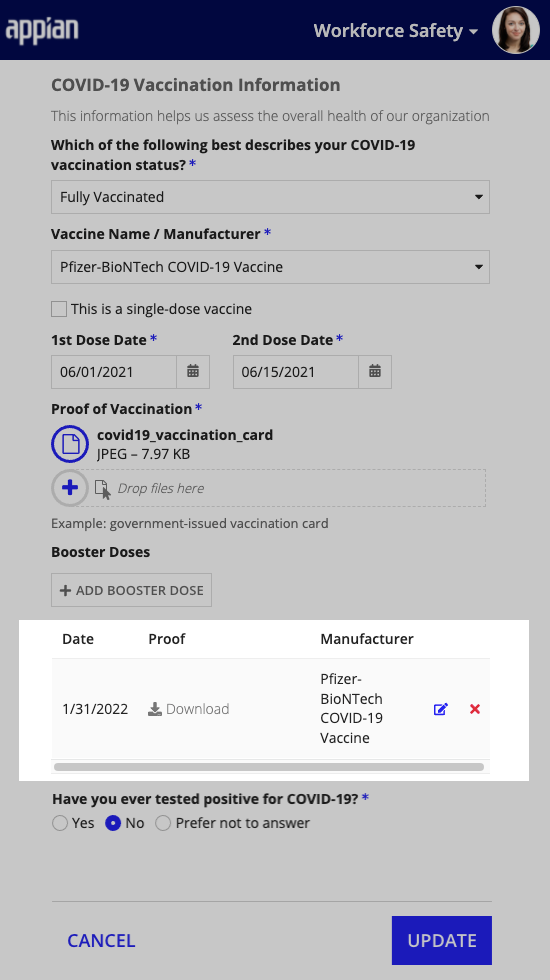
For each booster dose the employee enters, Workforce Safety collects the required information, including:
In addition, Workforce Safety makes it easy for users that have a positive COVID-19 test result already saved in the system. The solution auto-populates the user's previously recorded information in the COVID-19 Health Information section of their profile form.
When completing or updating their COVID-19 health data, any user that reports a COVID-19 positive test result is also required to provide the date of their last positive test.
When the Require Proof of Vaccination Verification setting is toggled on, users who report they are partially or fully vaccinated must provide proof of vaccination by uploading related documentation to their Profile form. . Note that if the Booster Doses setting is also enabled, users must provide proof of vaccination when updating their profile with any booster doses they received.
If the Require Proof of Vaccination Verification setting is toggled off, fully and partially vaccinated users are not required to submit their vaccination documentation. Note that no action is required by the user until they indicate they're fully or partially vaccinated.
When a user is ready to provide their proof of vaccination, they can navigate to the the Proof of Vaccination field in their Profile form and simply tap Upload.
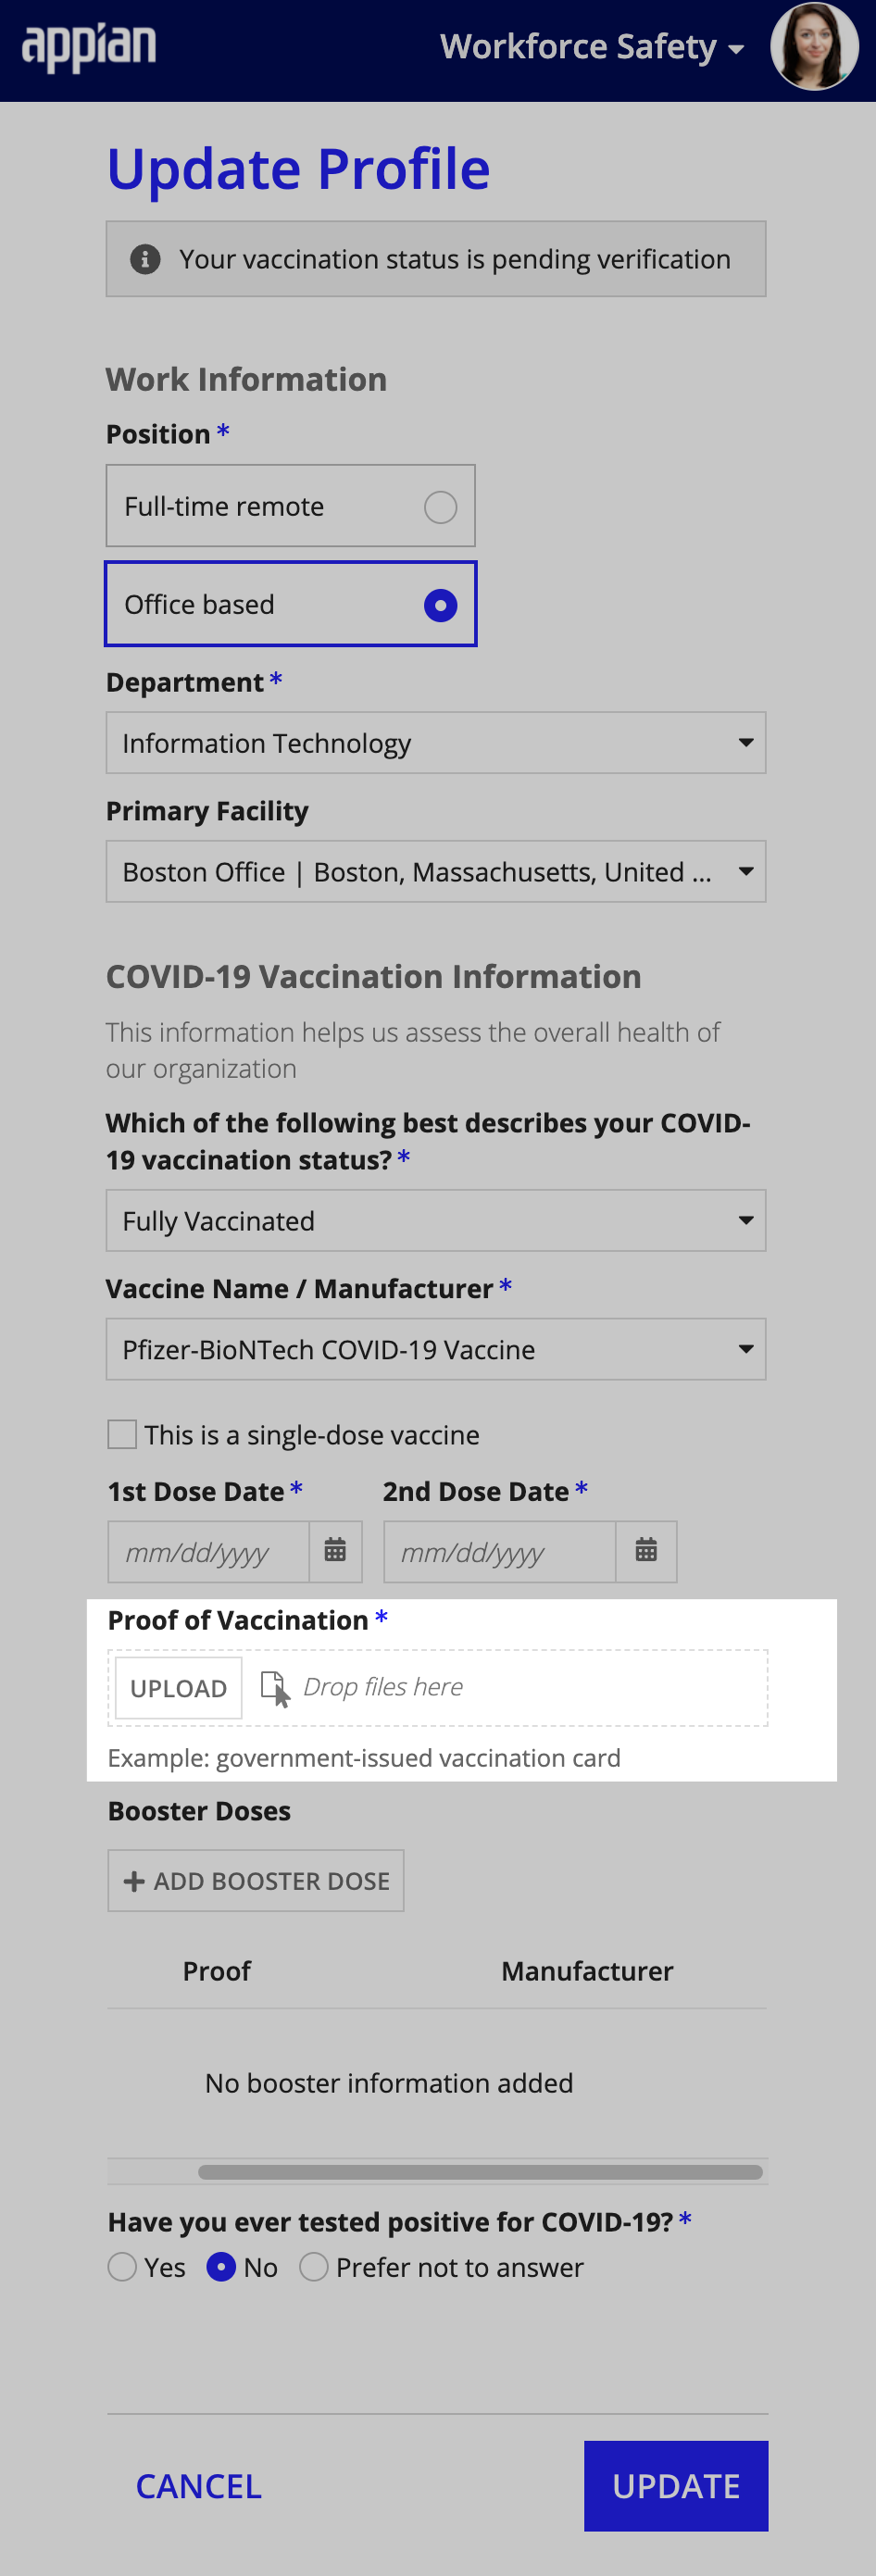
This allows them to use their mobile device to capture one or more photos or videos of their vaccination proof, upload one or more files confirming vaccination, or upload a combination of visual media and files.
To upload proof of vaccination:
Before they are verified, these users are classified as Fully Vaccinated (Unverified). Users who report being fully vaccinated before this setting is toggled on are also classified as Fully Vaccinated (Unverified). After a response manager verifies a user’s vaccination documentation, the user's vaccination status will change to Fully Vaccinated (Verified).
For all users that are designated as fully or partially vaccinated prior to upgrading to the latest version of Workforce Safety and have uploaded documents to the Related documentation field, nothing is required. The solution will automatically migrate their files to the Proof of Vaccination field.
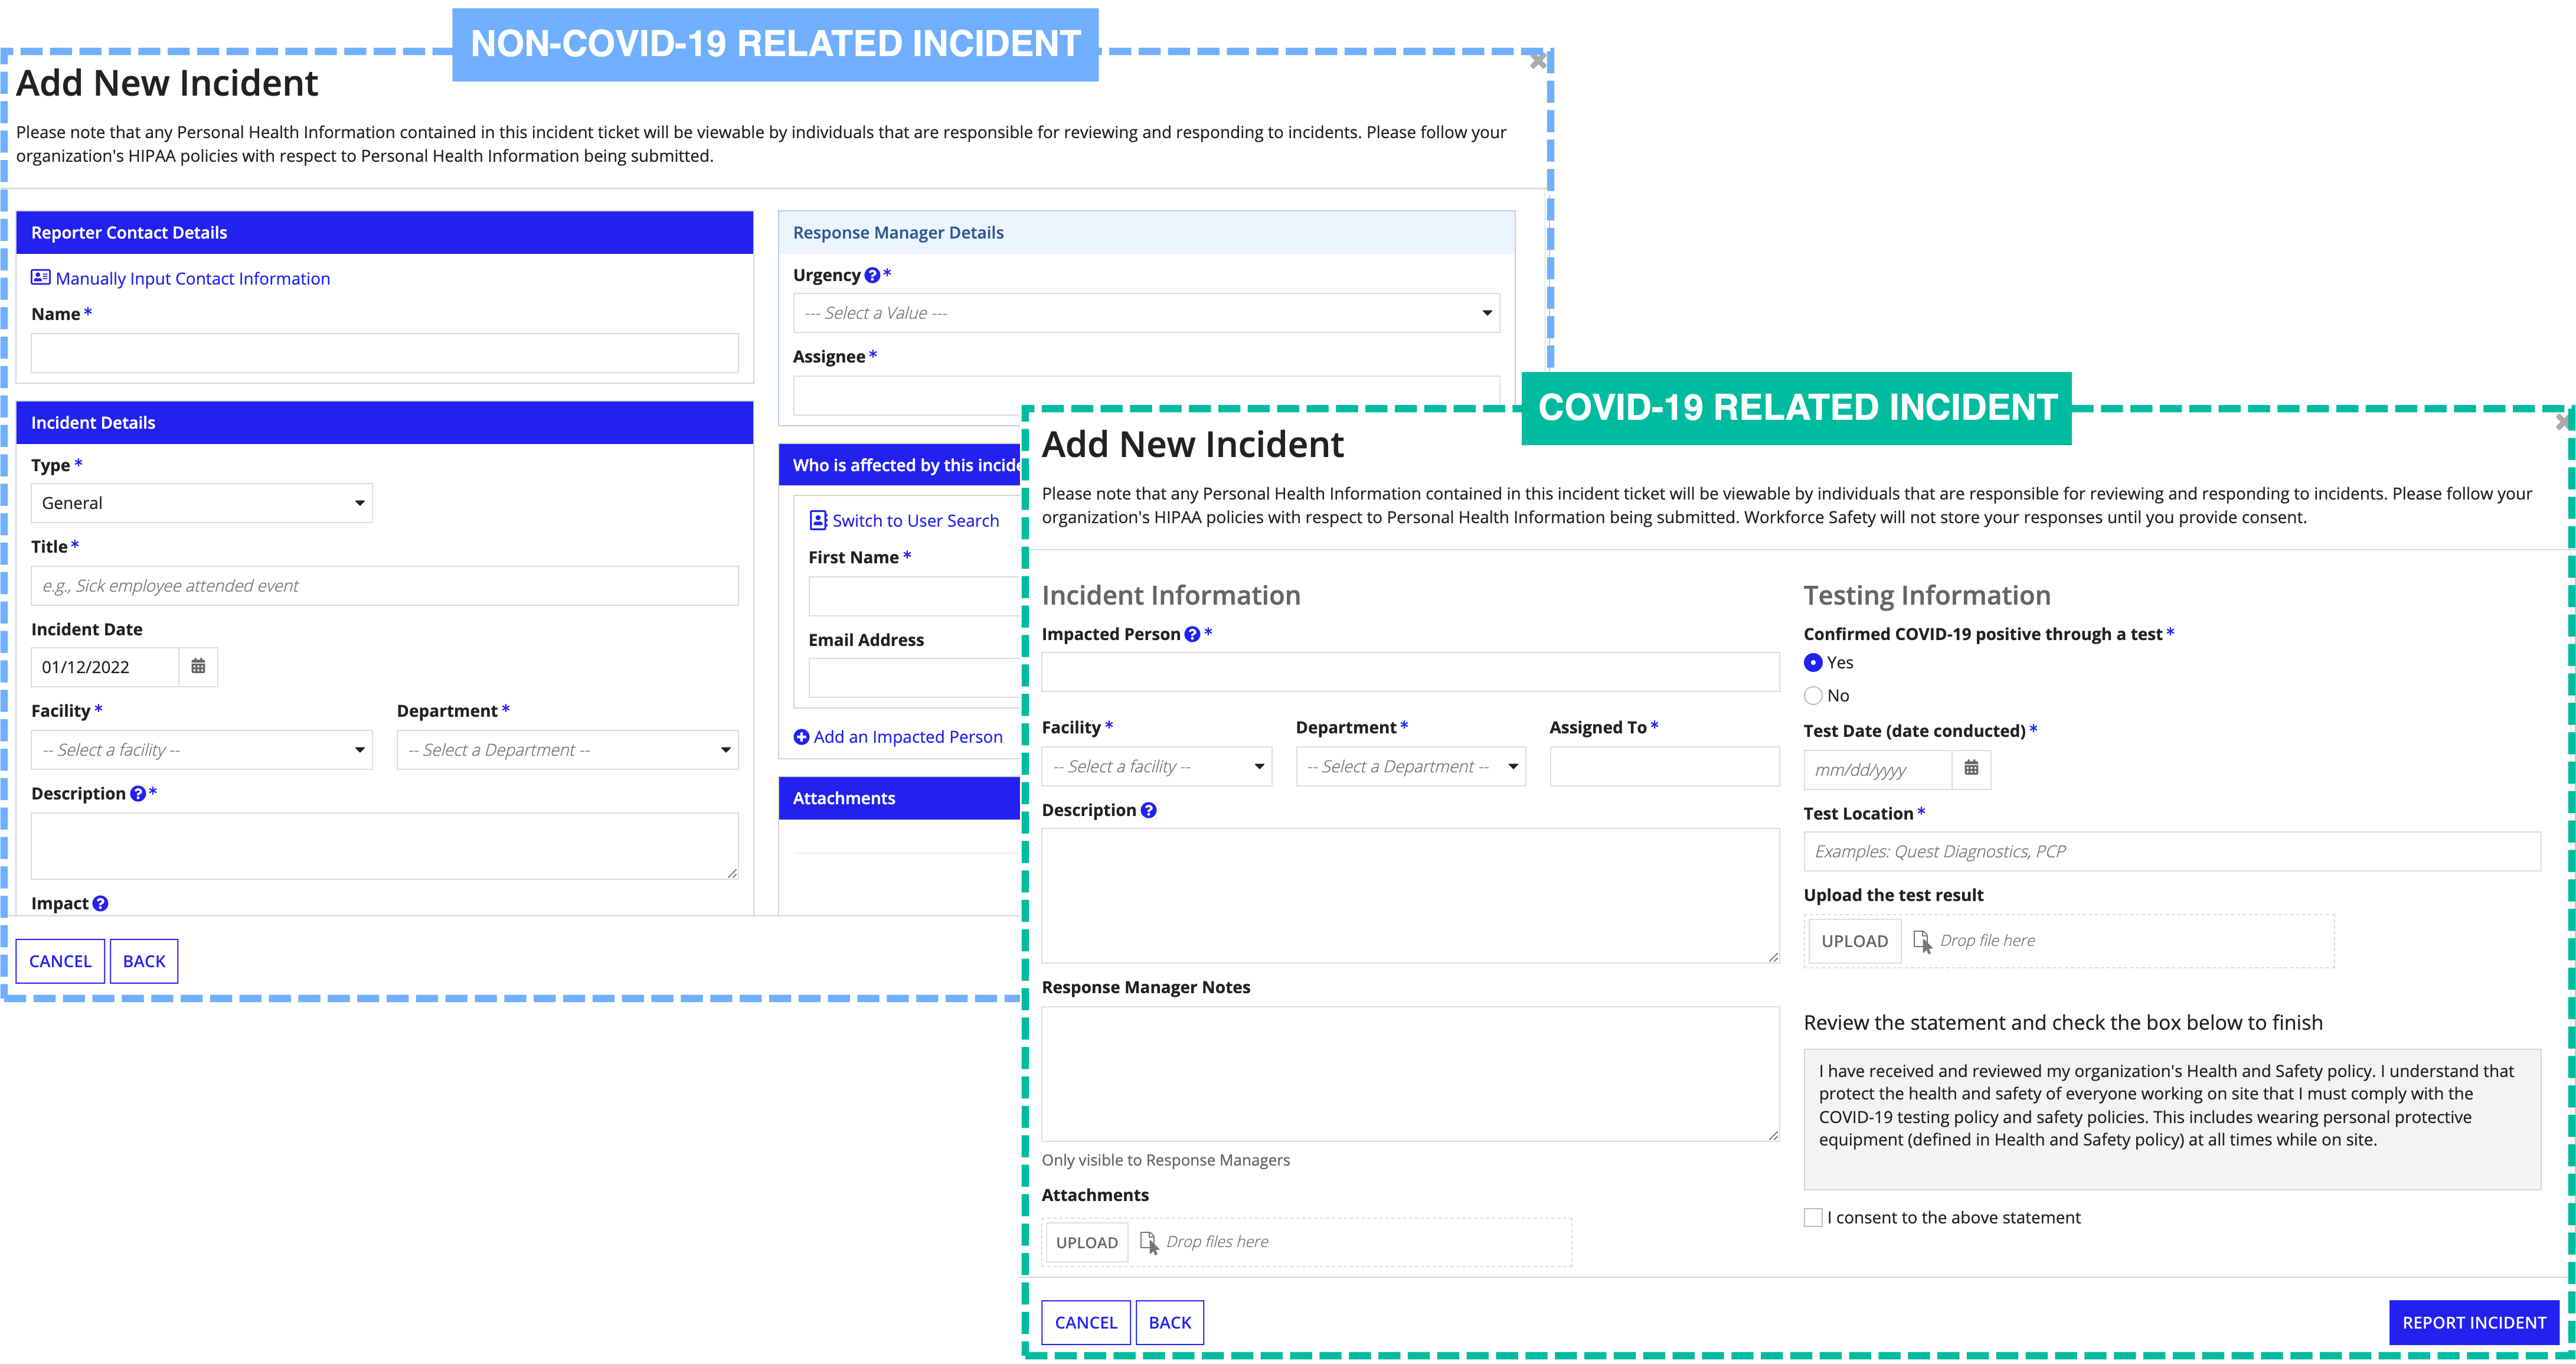
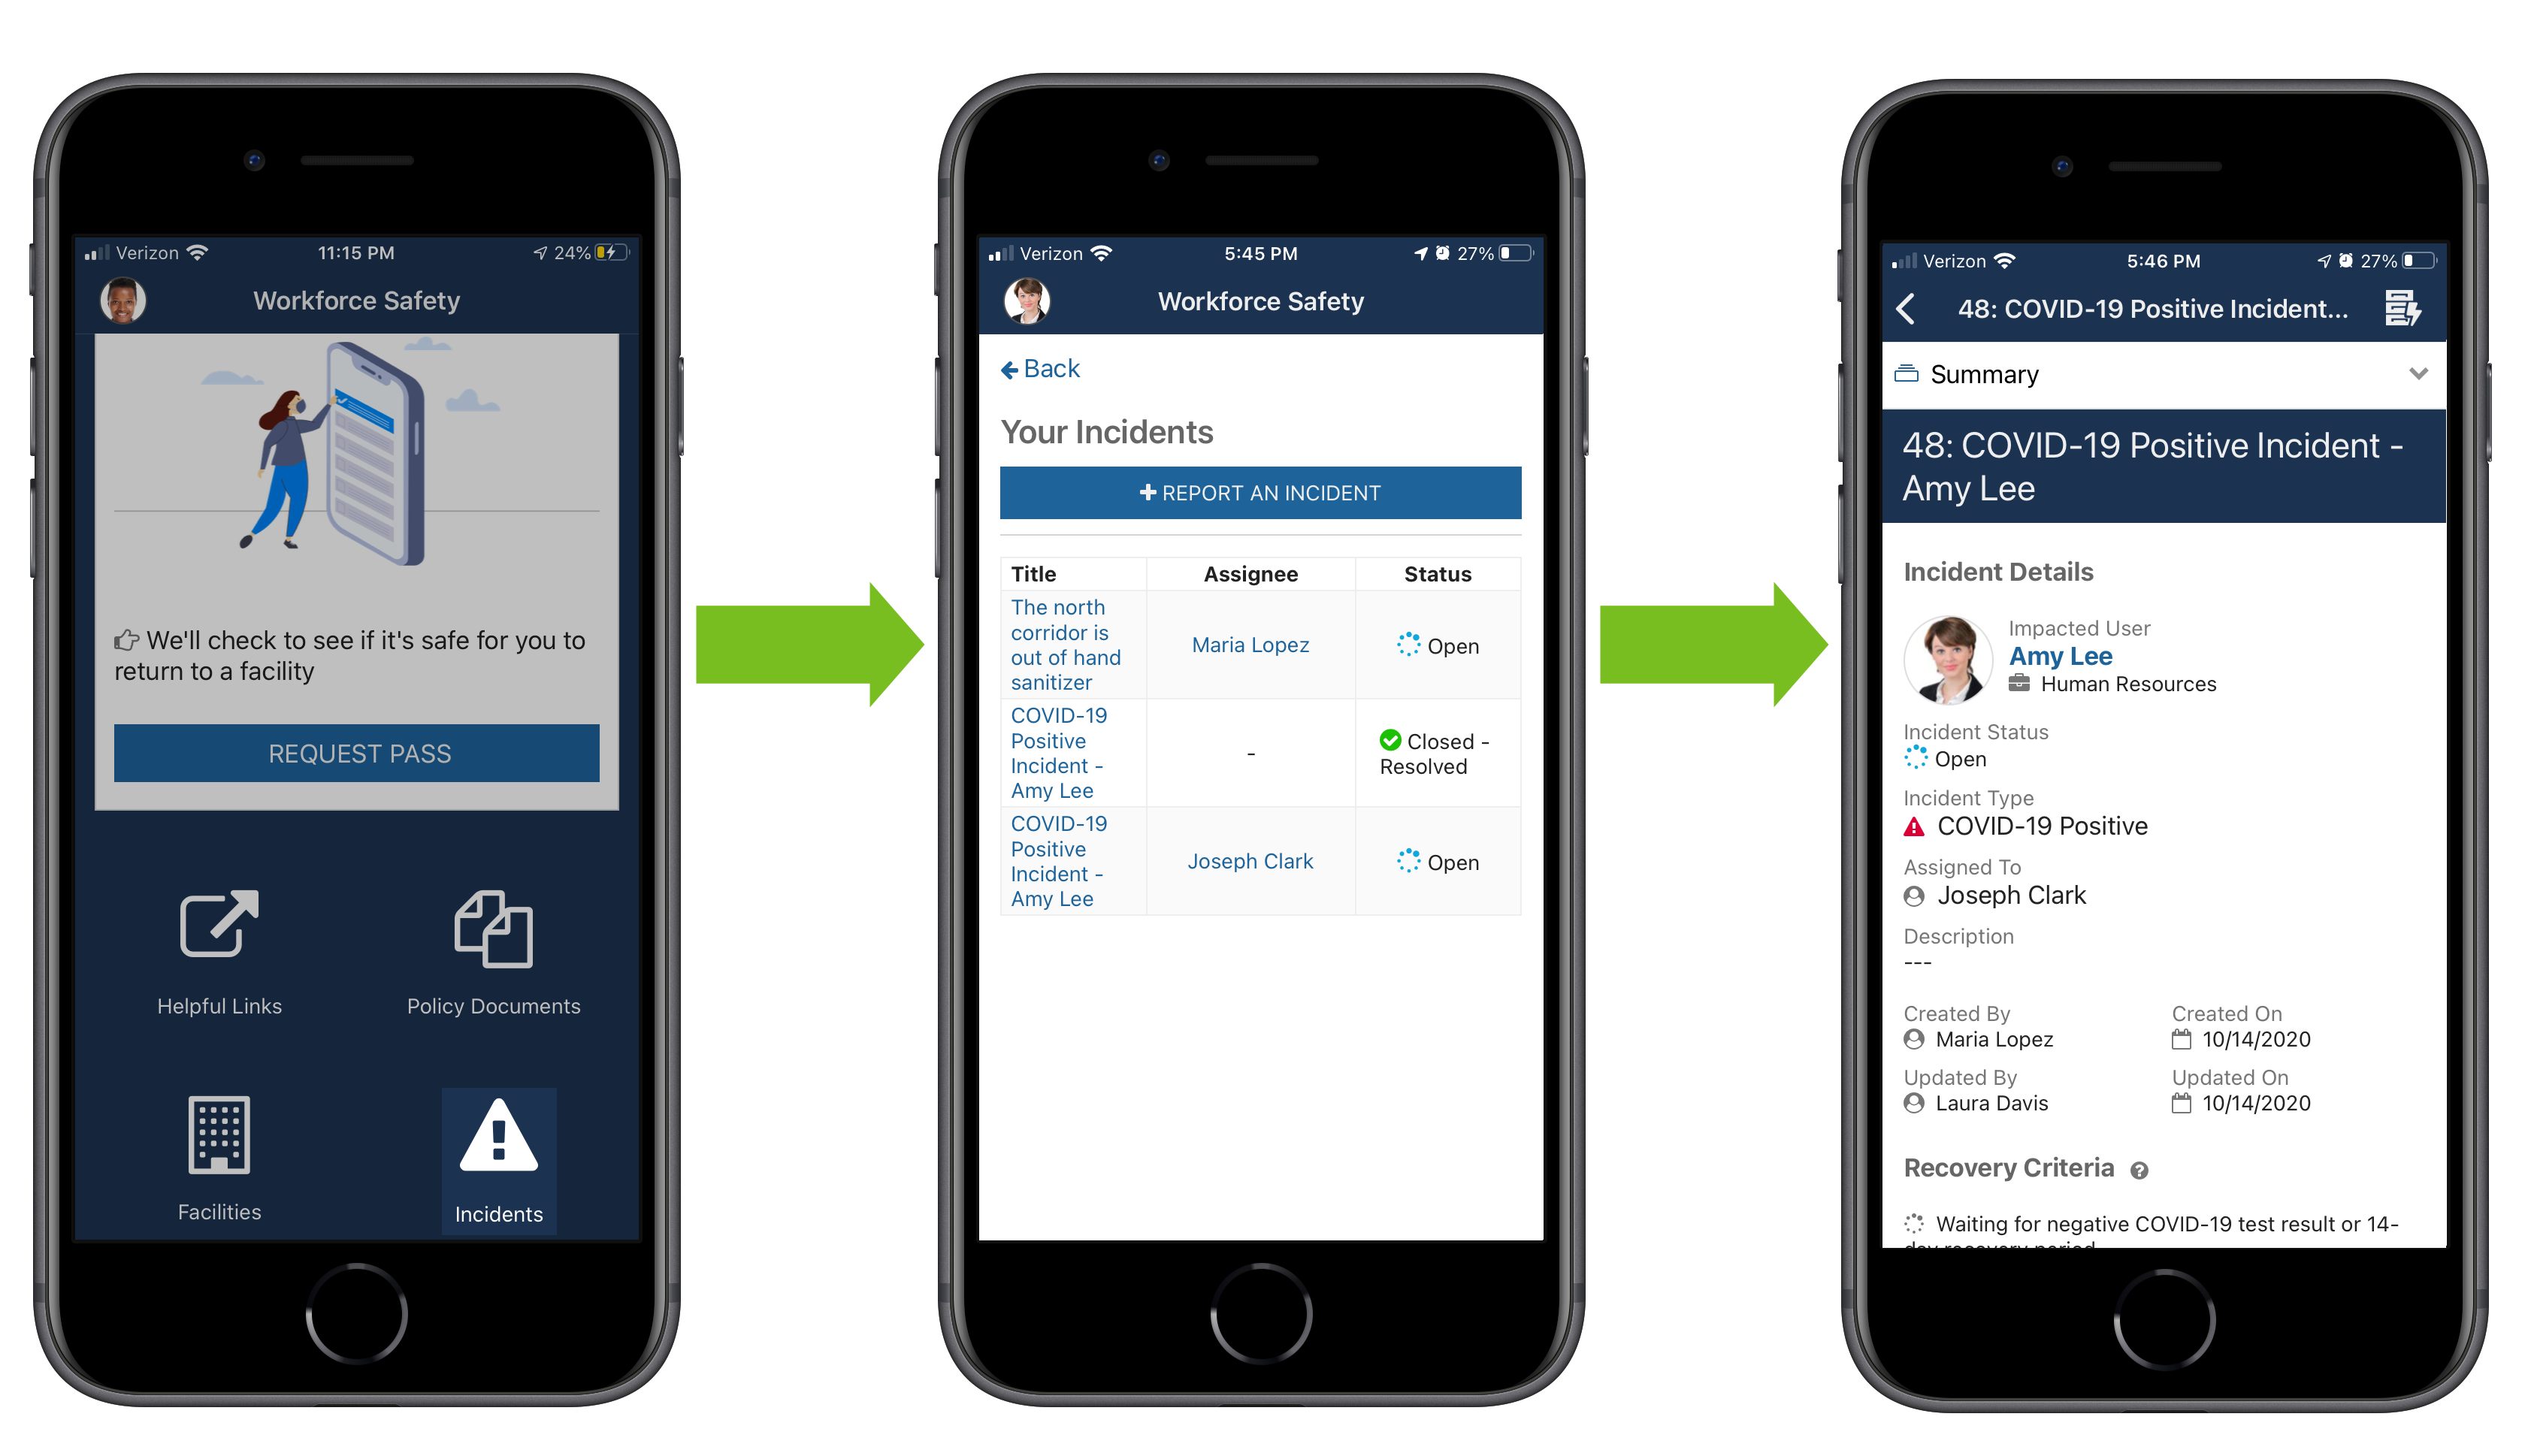
If the User Incident Creation feature toggle is active, users can report an incident to response managers. Incidents can be used to report things such as unsafe conditions, COVID-19 positive diagnoses, or exposure to or symptoms of COVID-19.
To report an incident:
From the Workforce Safety home page, click REPORT AN INCIDENT.
If a COVID-19 isolation incident was created, the user will be automatically placed into isolation. Users can only have one open COVID-19 isolation incident at a time.
To view incidents, scroll to the bottom of the home page and click Incidents.
Only the following incidents display:
Non-COVID-19 isolation incidents that were automatically created based on a positive test or questionnaire response don't typically display to end users. However, if a response manager comments on an automatically-created incident, that incident will display to the user so that they can comment back.
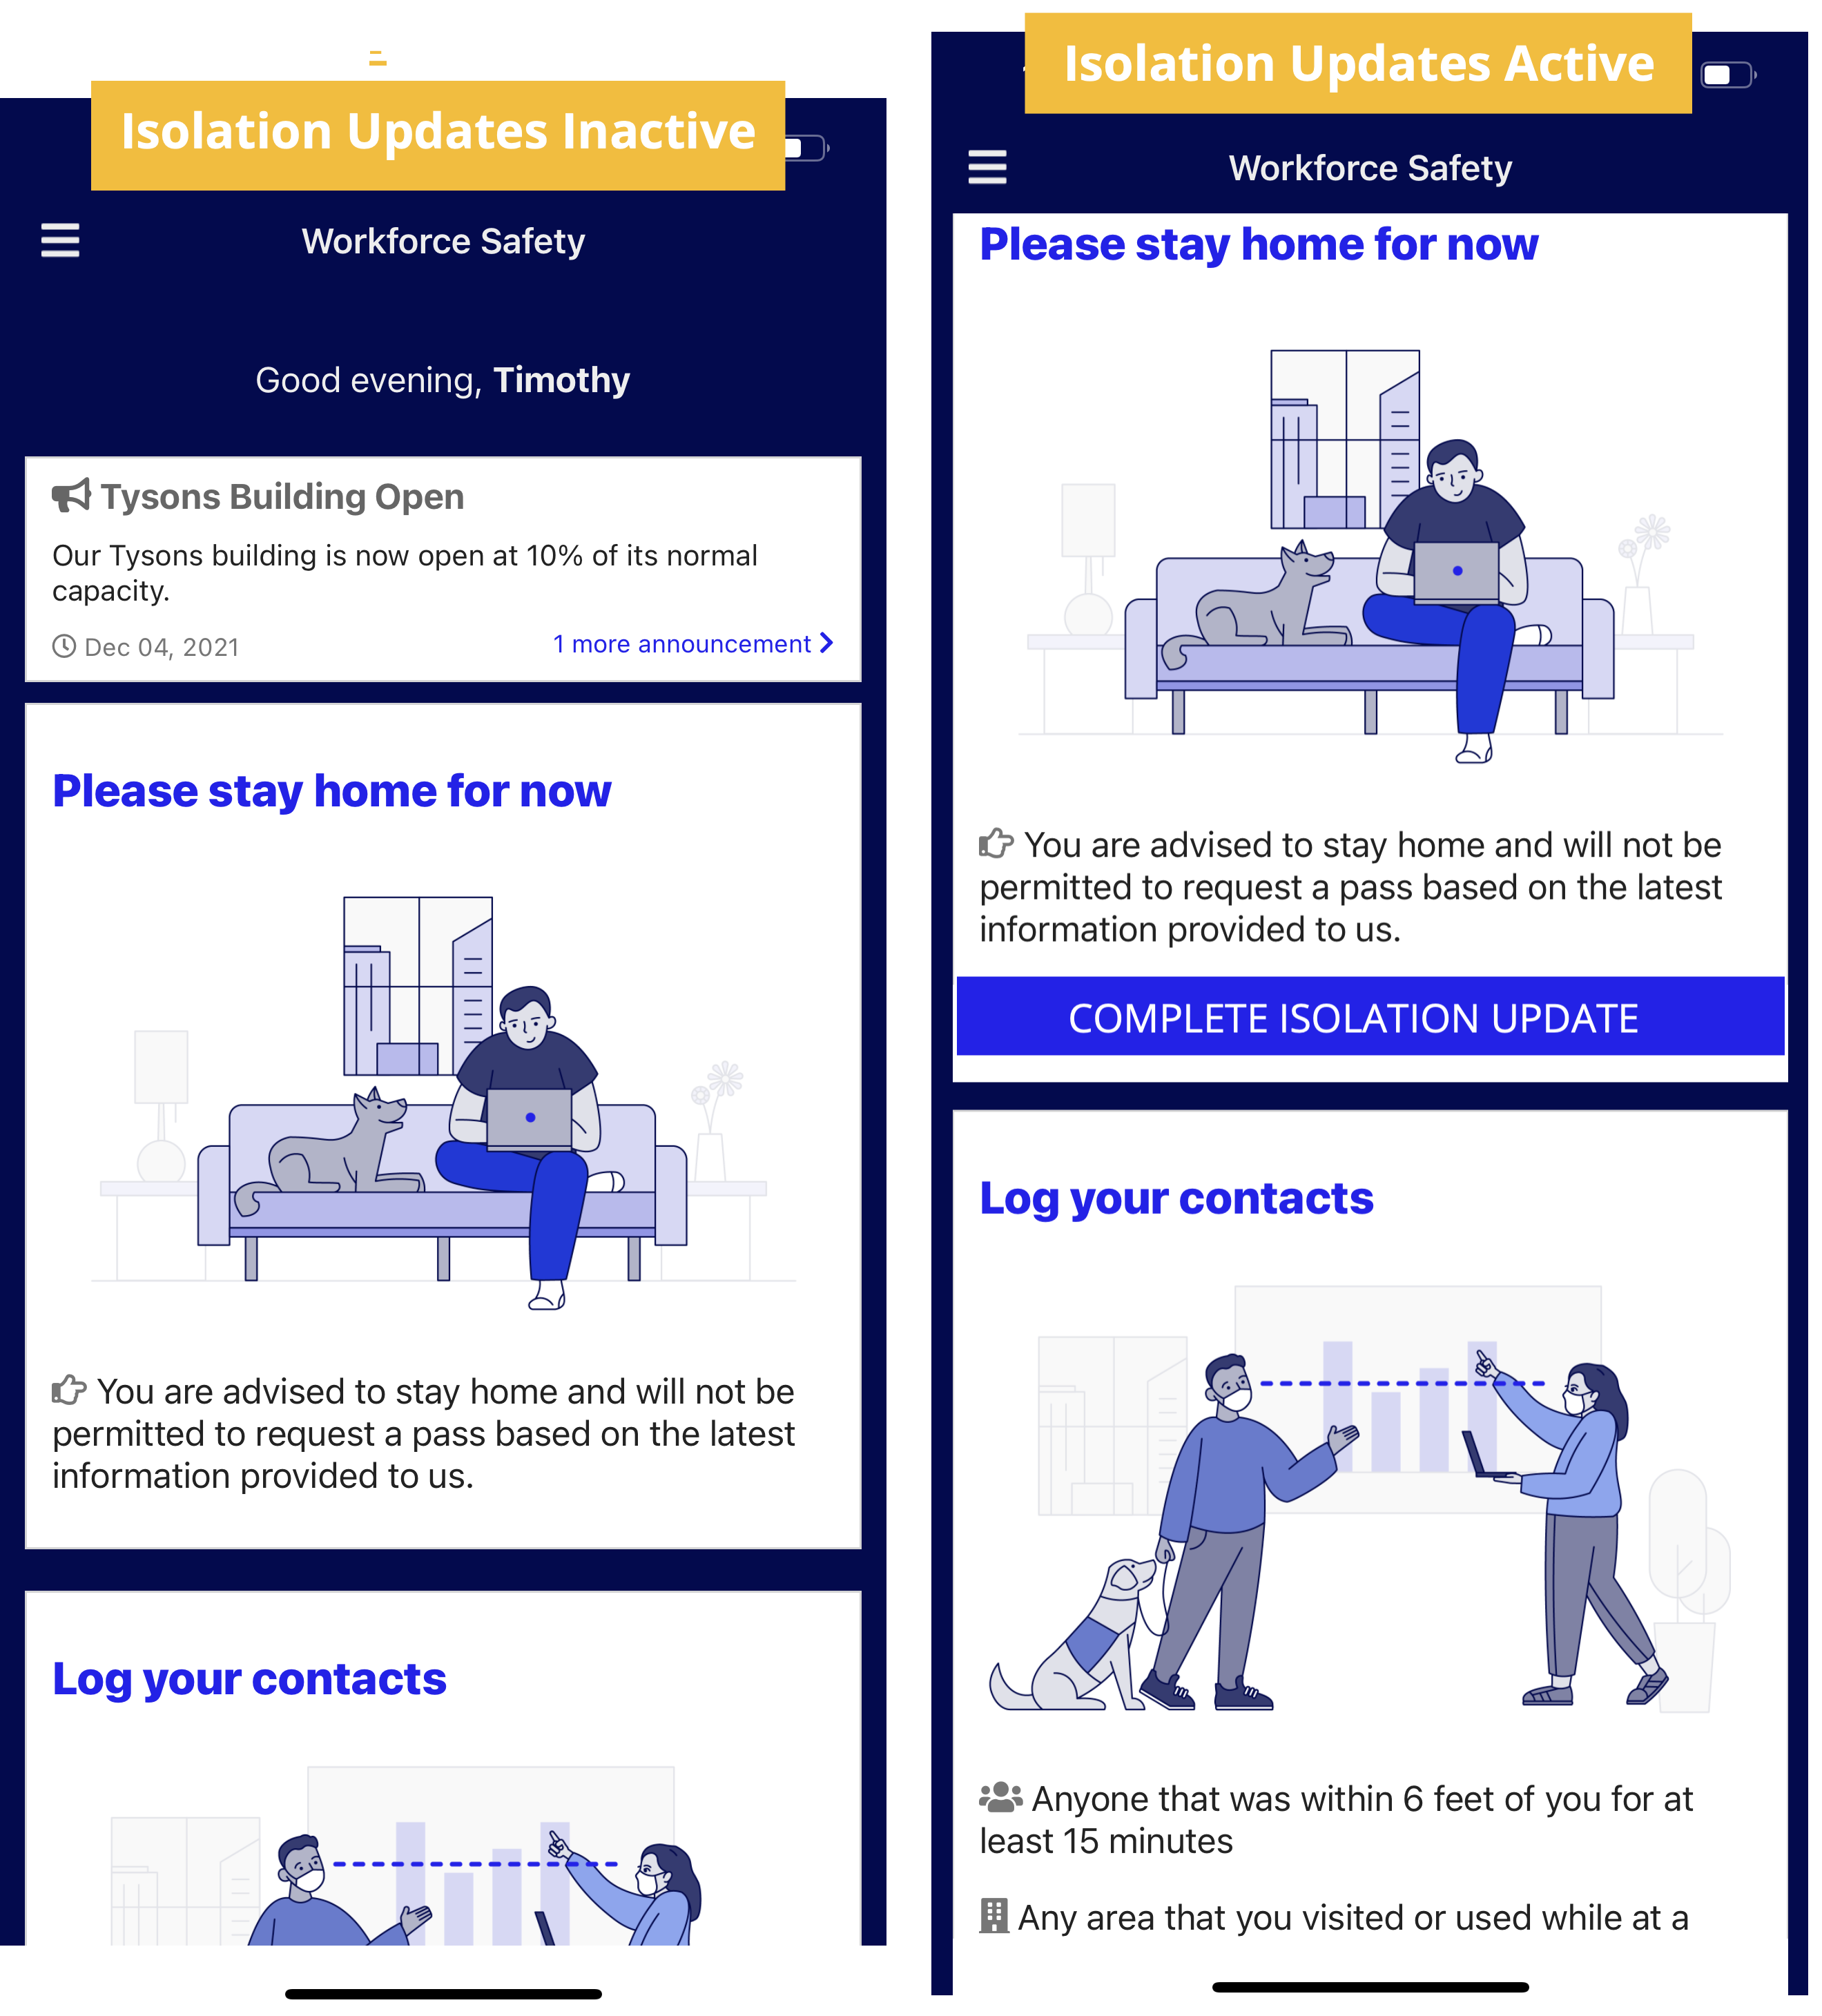
Users can be placed into isolation manually by response managers, or automatically if they report that they have been diagnosed as COVID-19 positive, are showing symptoms, or came in contact with someone who tested positive for COVID-19. While users are isolated, they cannot complete a survey or request a pass, but they can perform all other actions on the site. As soon as a user is placed into isolation any active passes they have will be revoked.
When users are in isolation, instead of a pass request section, they will see an isolation section on their home page. If Isolation Updates are active, and the visibility for at least one isolation question is applicable to a user, that user will be asked to complete an isolation update.
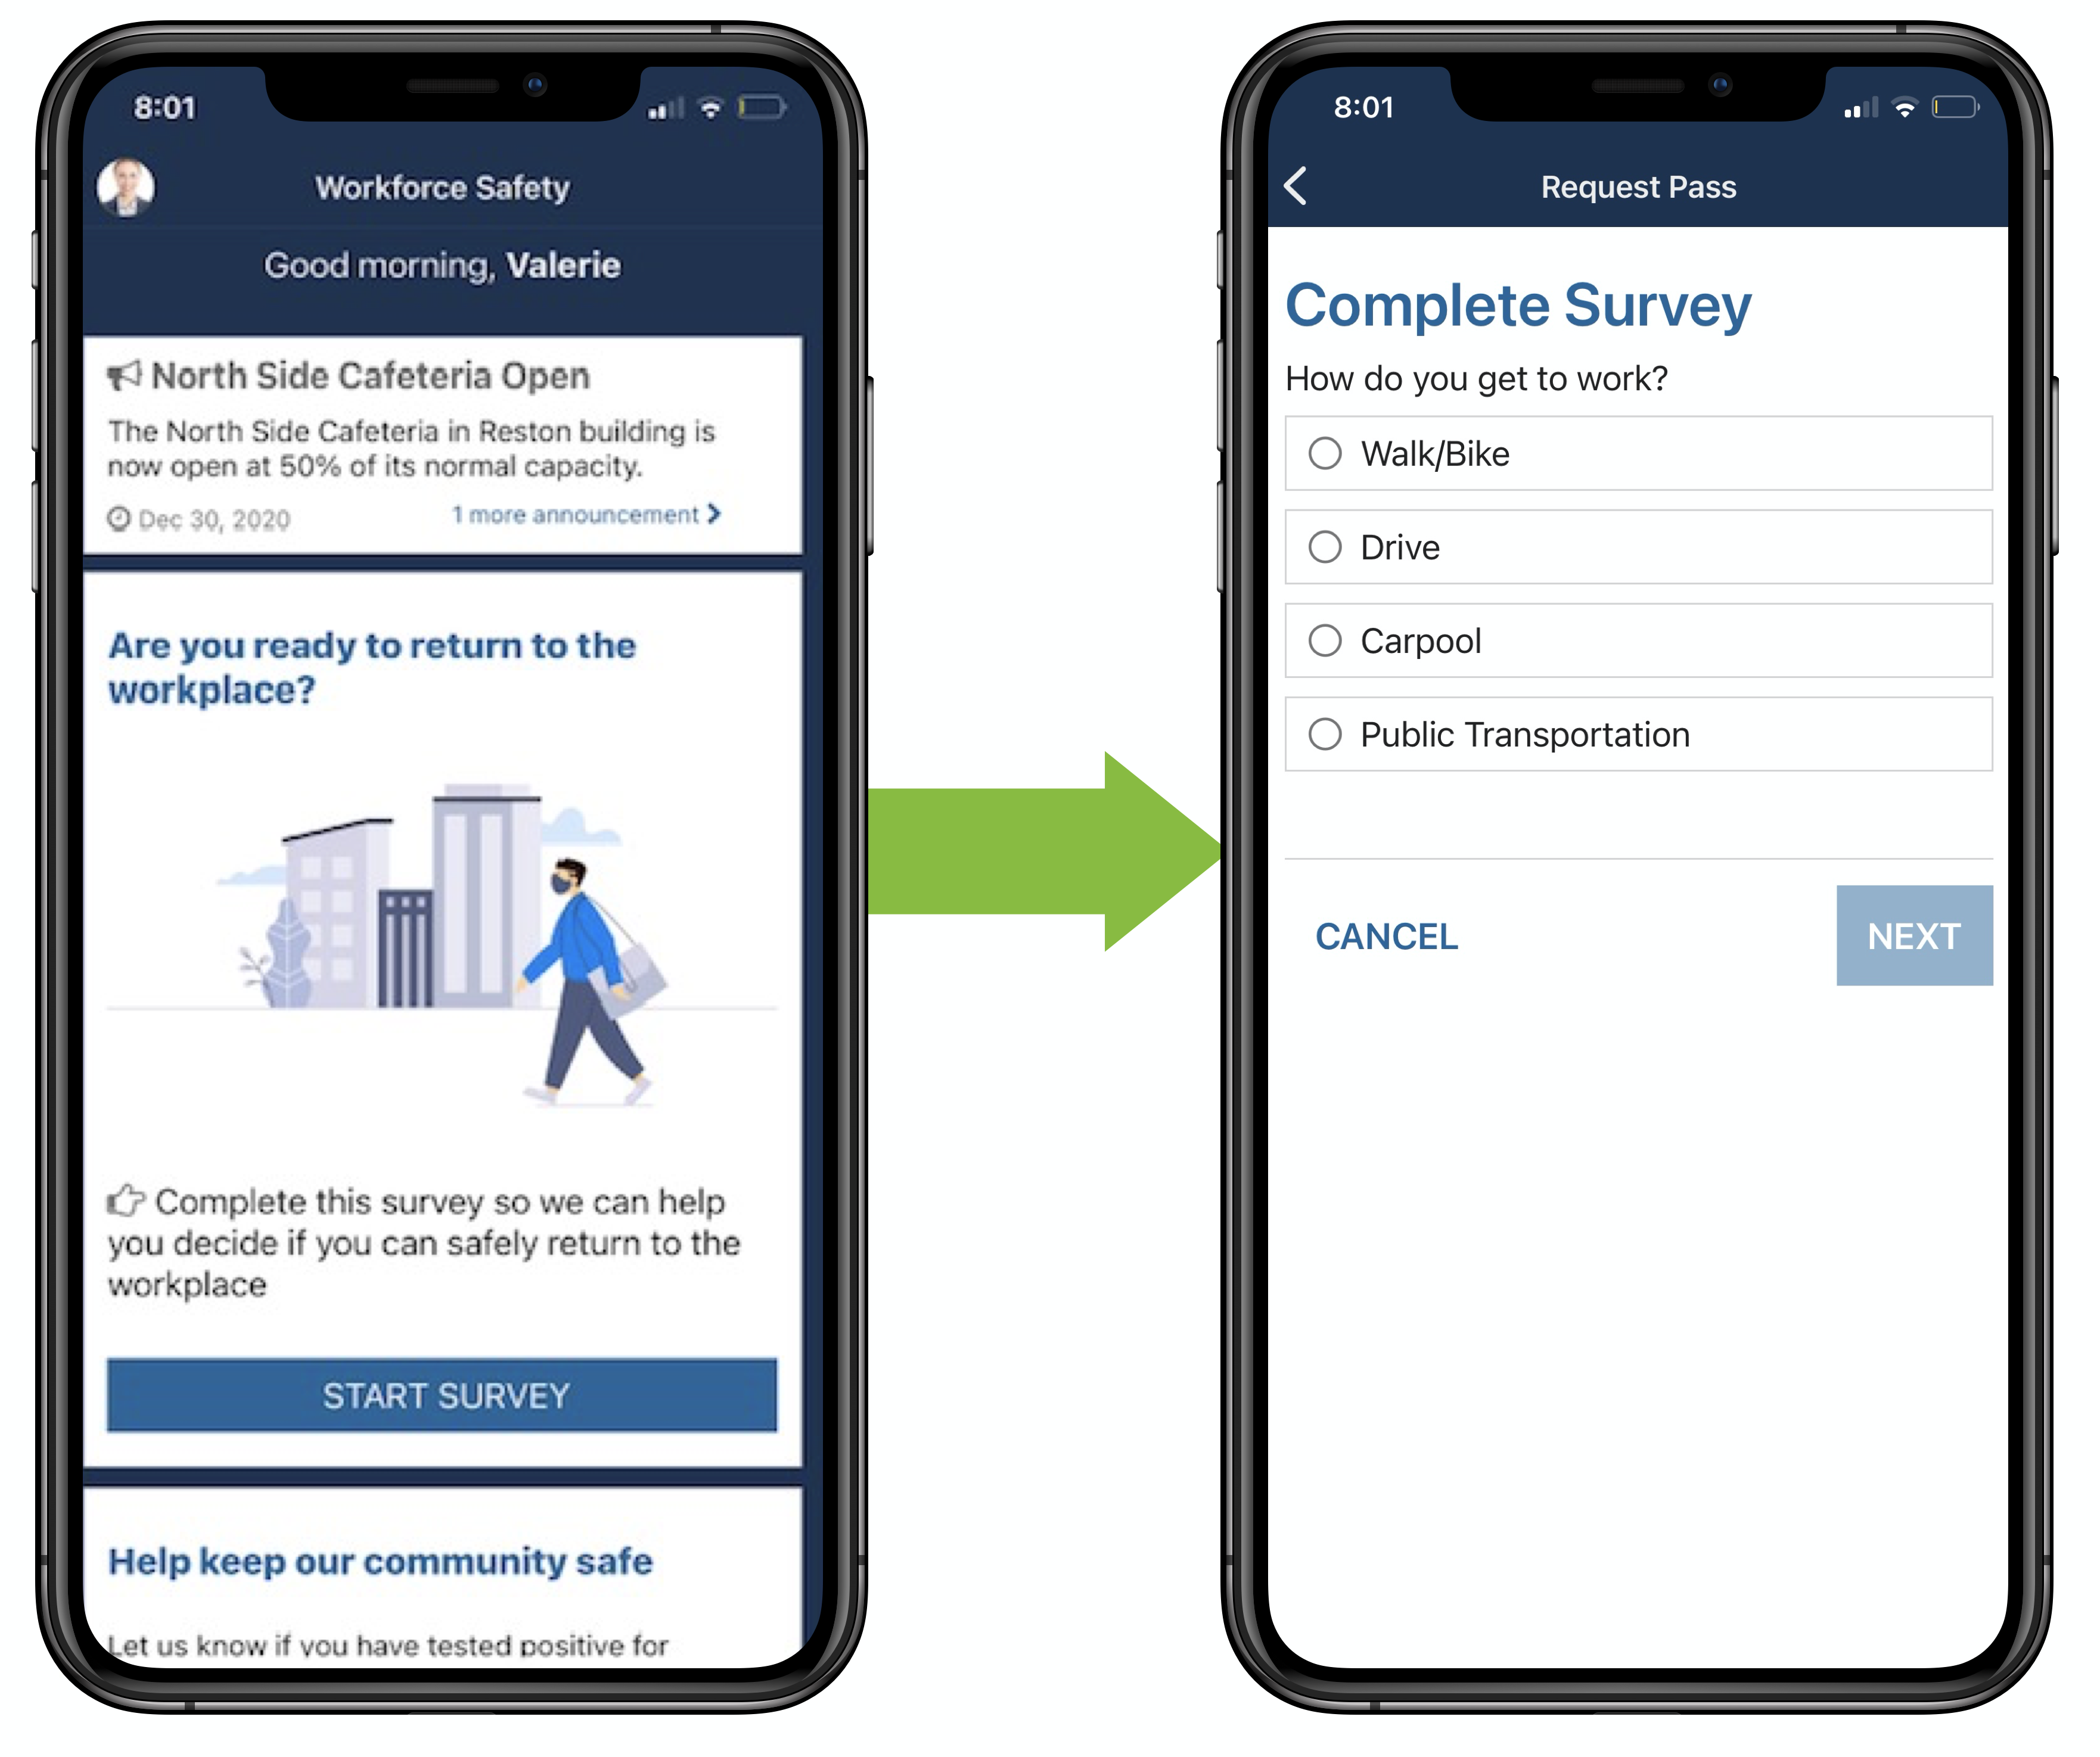
A survey is a set of questions that can be sent to users before they start requesting passes. You can use this to gauge interest and ability to return to the workplace.
When the survey is active, on the Workforce Safety home page users will see an option to complete the survey. If they complete the survey with no disqualifying answers, they will be able to start requesting passes to determine their ability to return to the workplace.
If the Pass Requests Disabled by Active Survey Incidents feature toggle is turned on and an incident is created based on a user's response to a survey question, they will not be able to request a pass until a response manager closes the incident. If they update their survey, a comment will be added to the incident, but it will not automatically allow them to request passes, even if they respond with answers that are not disqualifying.
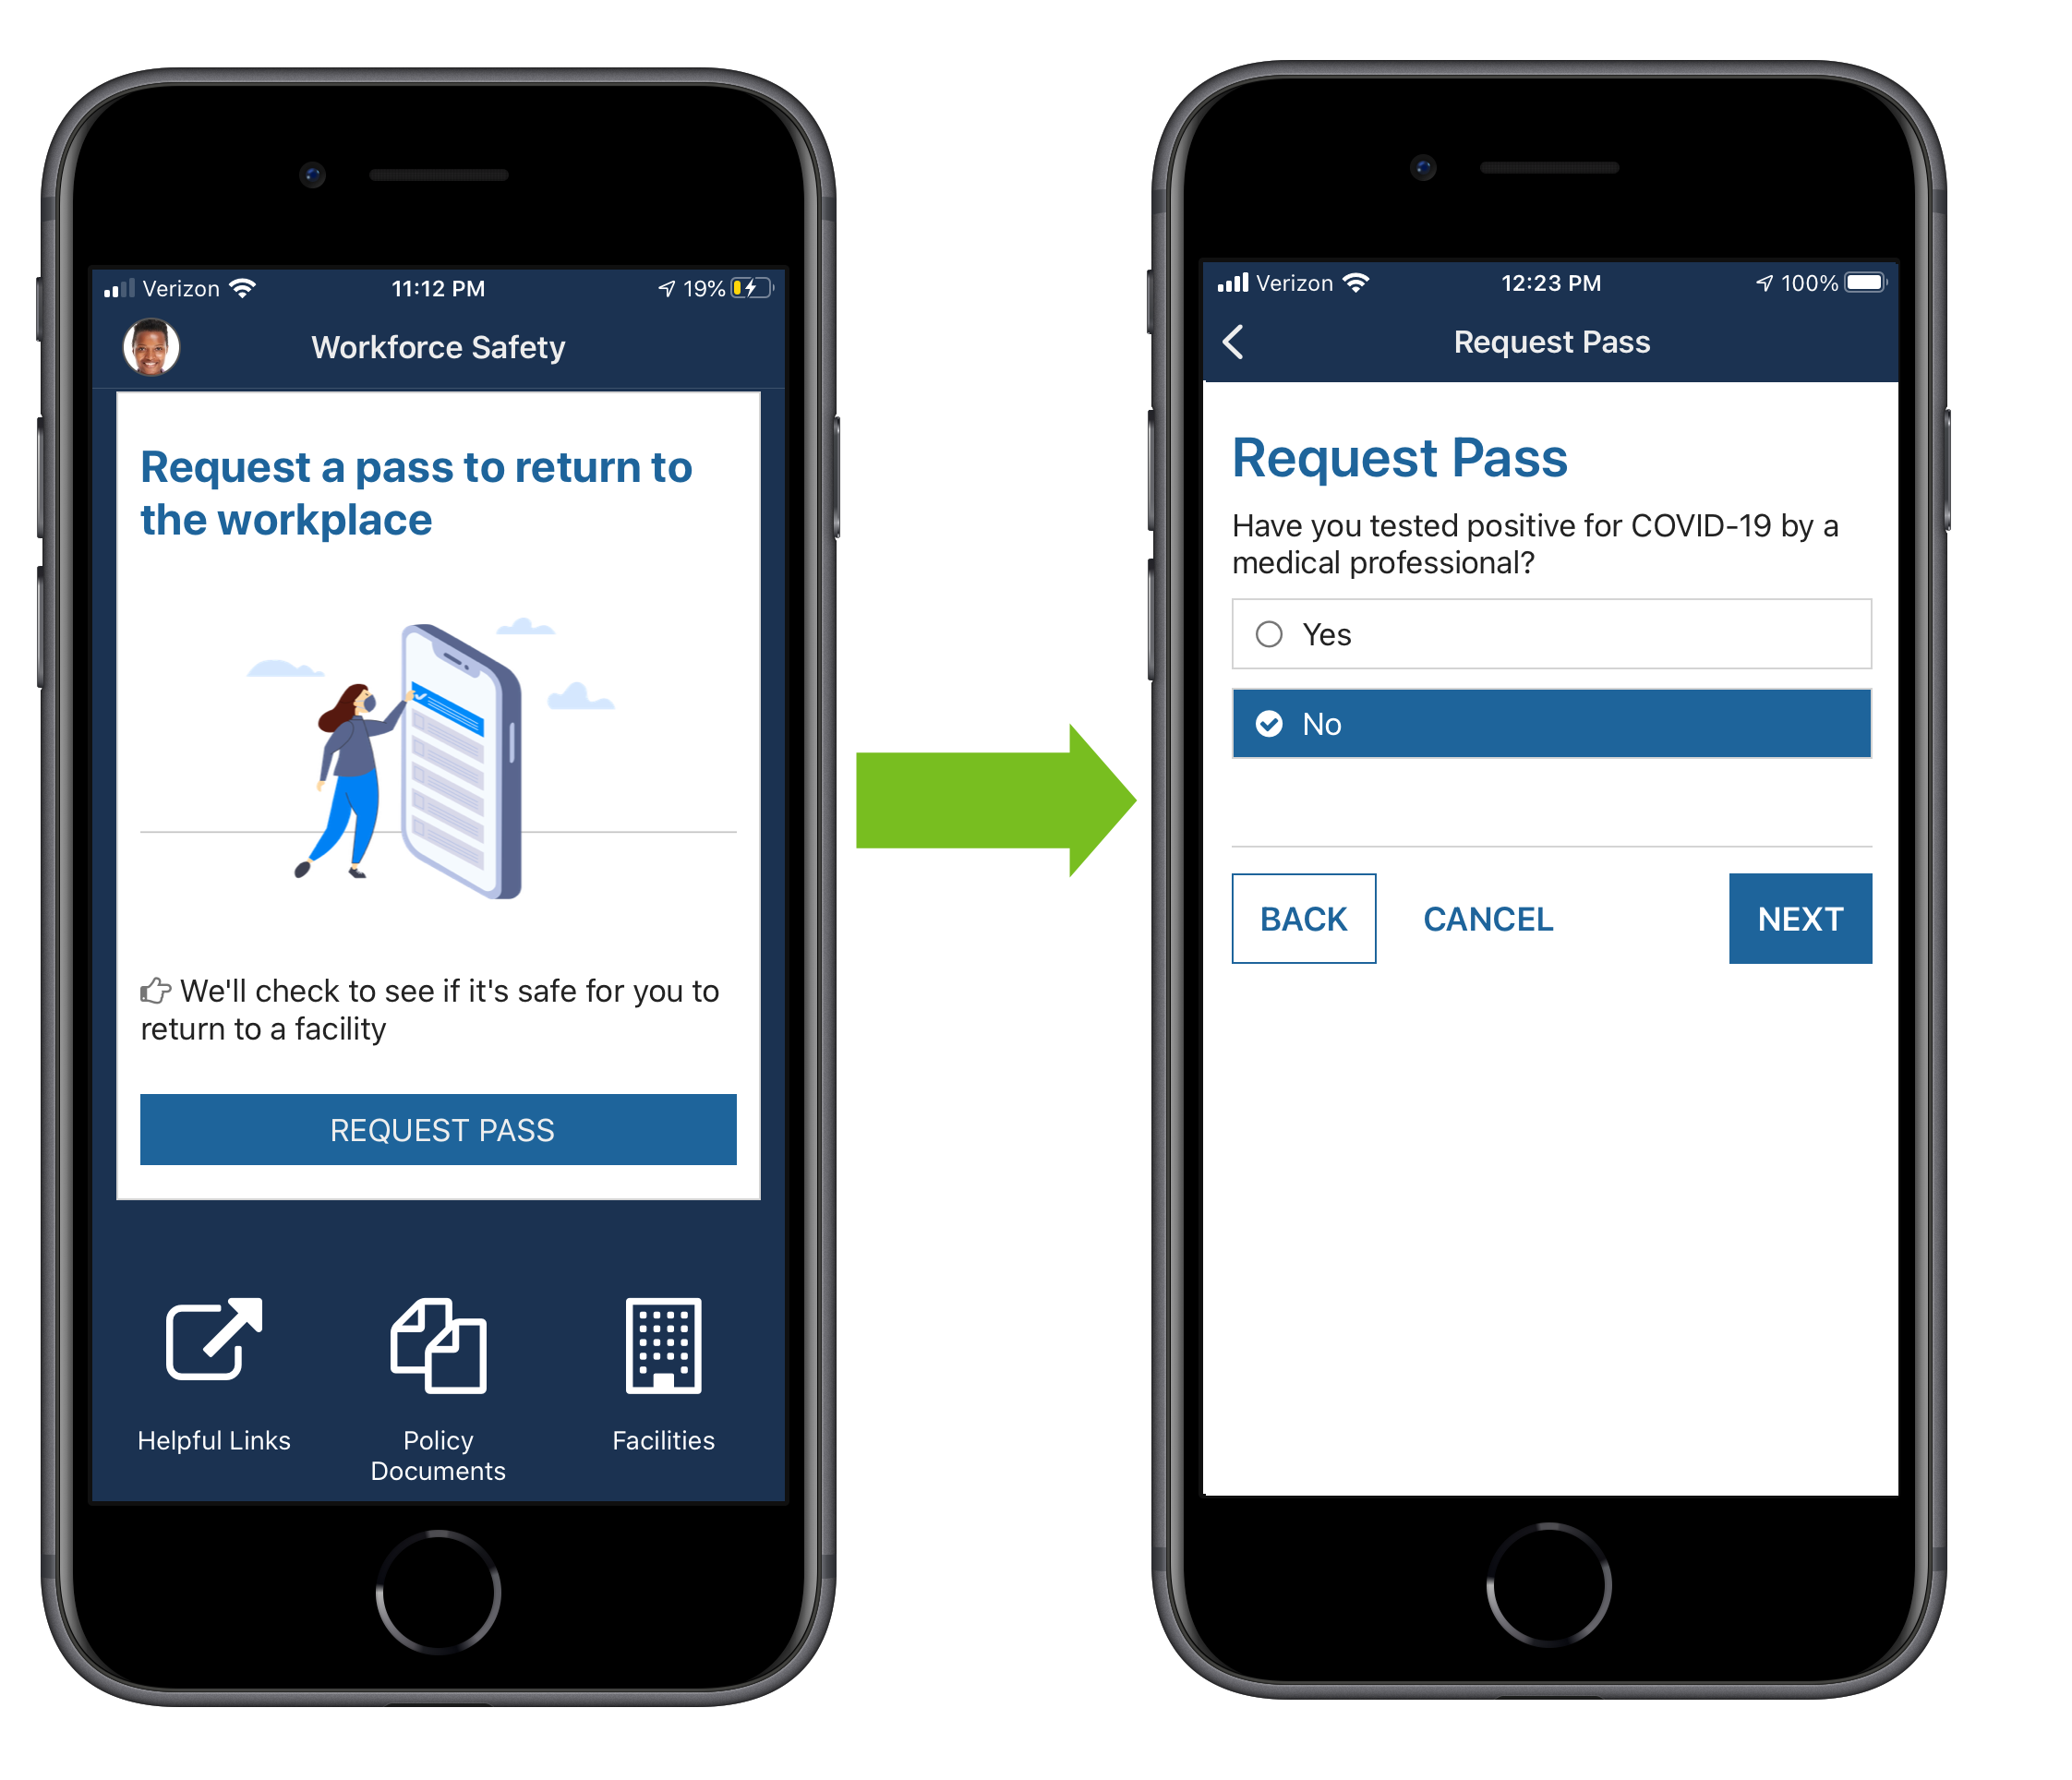
If users are eligible to request a pass, they will see the request pass section on their Workforce Safety home page. Note that if the Block Pass Request feature is enabled, and Collect Vaccination Information feature is turned on, users may be ineligible to request a pass when they match all criteria set in the Block Pass Request feature.
Requesting a pass helps users determine their fitness to return to the workplace. All questions are required and the information will go to the response managers reporting dashboard.
Users can request passes for multiple facilities. If the Next Day Pass Requests feature is toggled on, they can also plan ahead by requesting a pass for the next day.
If Enforce Area Capacity Restrictions is toggled on, users can select an area when requesting a pass. These areas are limited to a certain capacity. Areas that have reached their capacity limit cannot be selected. If the user doesn't select an area, they will be assigned to the area with the most available capacity.
If Cohort Management is toggled on, users will see which days their department can request a pass for. They can also only request a pass for days that are assigned to their cohort.
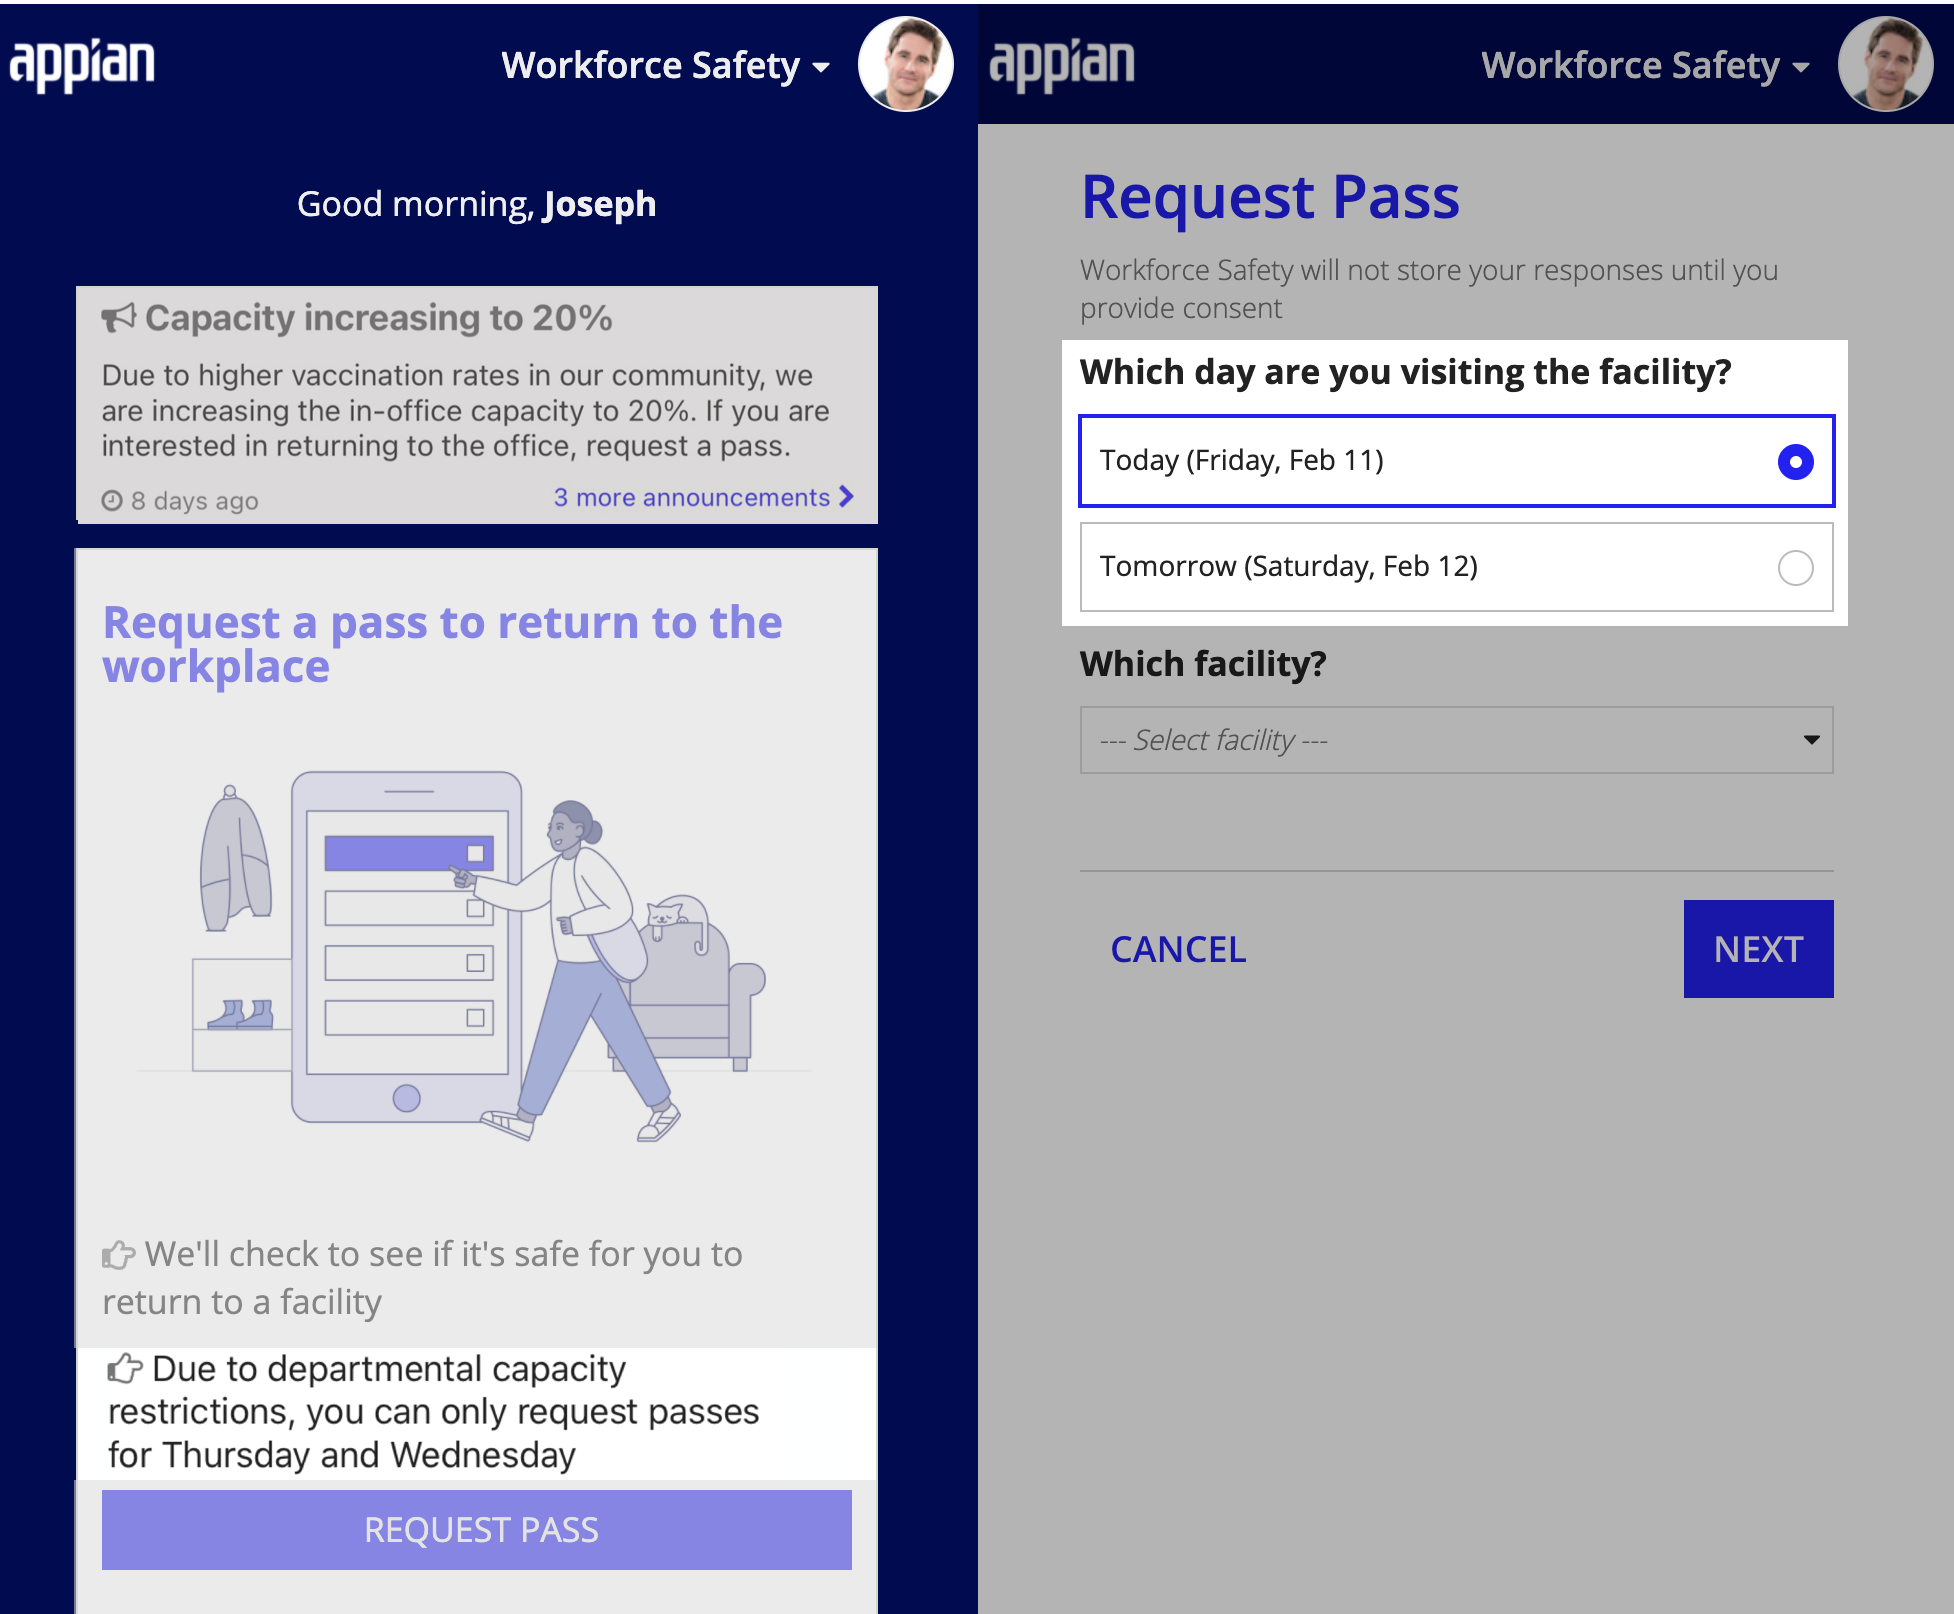
The pass is valid for one day. After the pass expires, the user will need to request a pass again to receive another one.
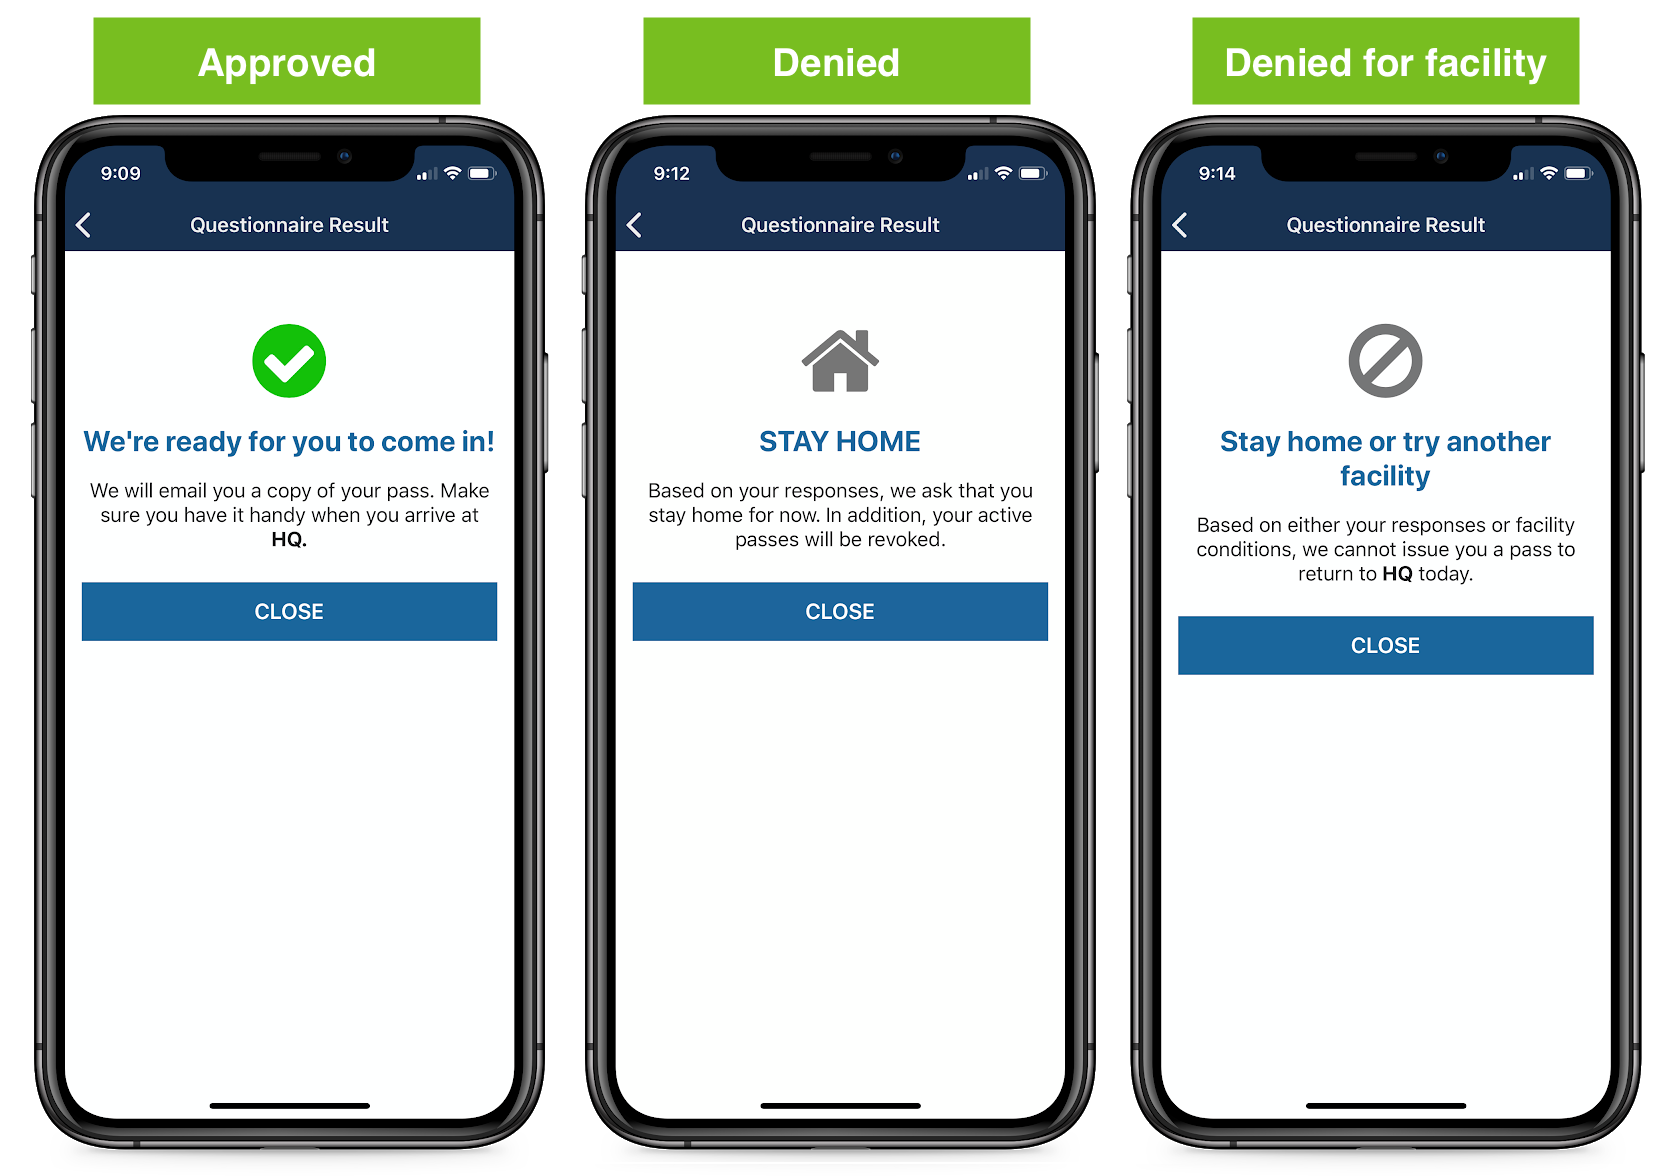
After a user submits their request, the result of their request displays. The possible results are: Approved, denied, or denied for facility.
Note that a user may be blocked from requesting a pass if they match the negative test result or vaccination status filters configured in the Block Pass Request feature.
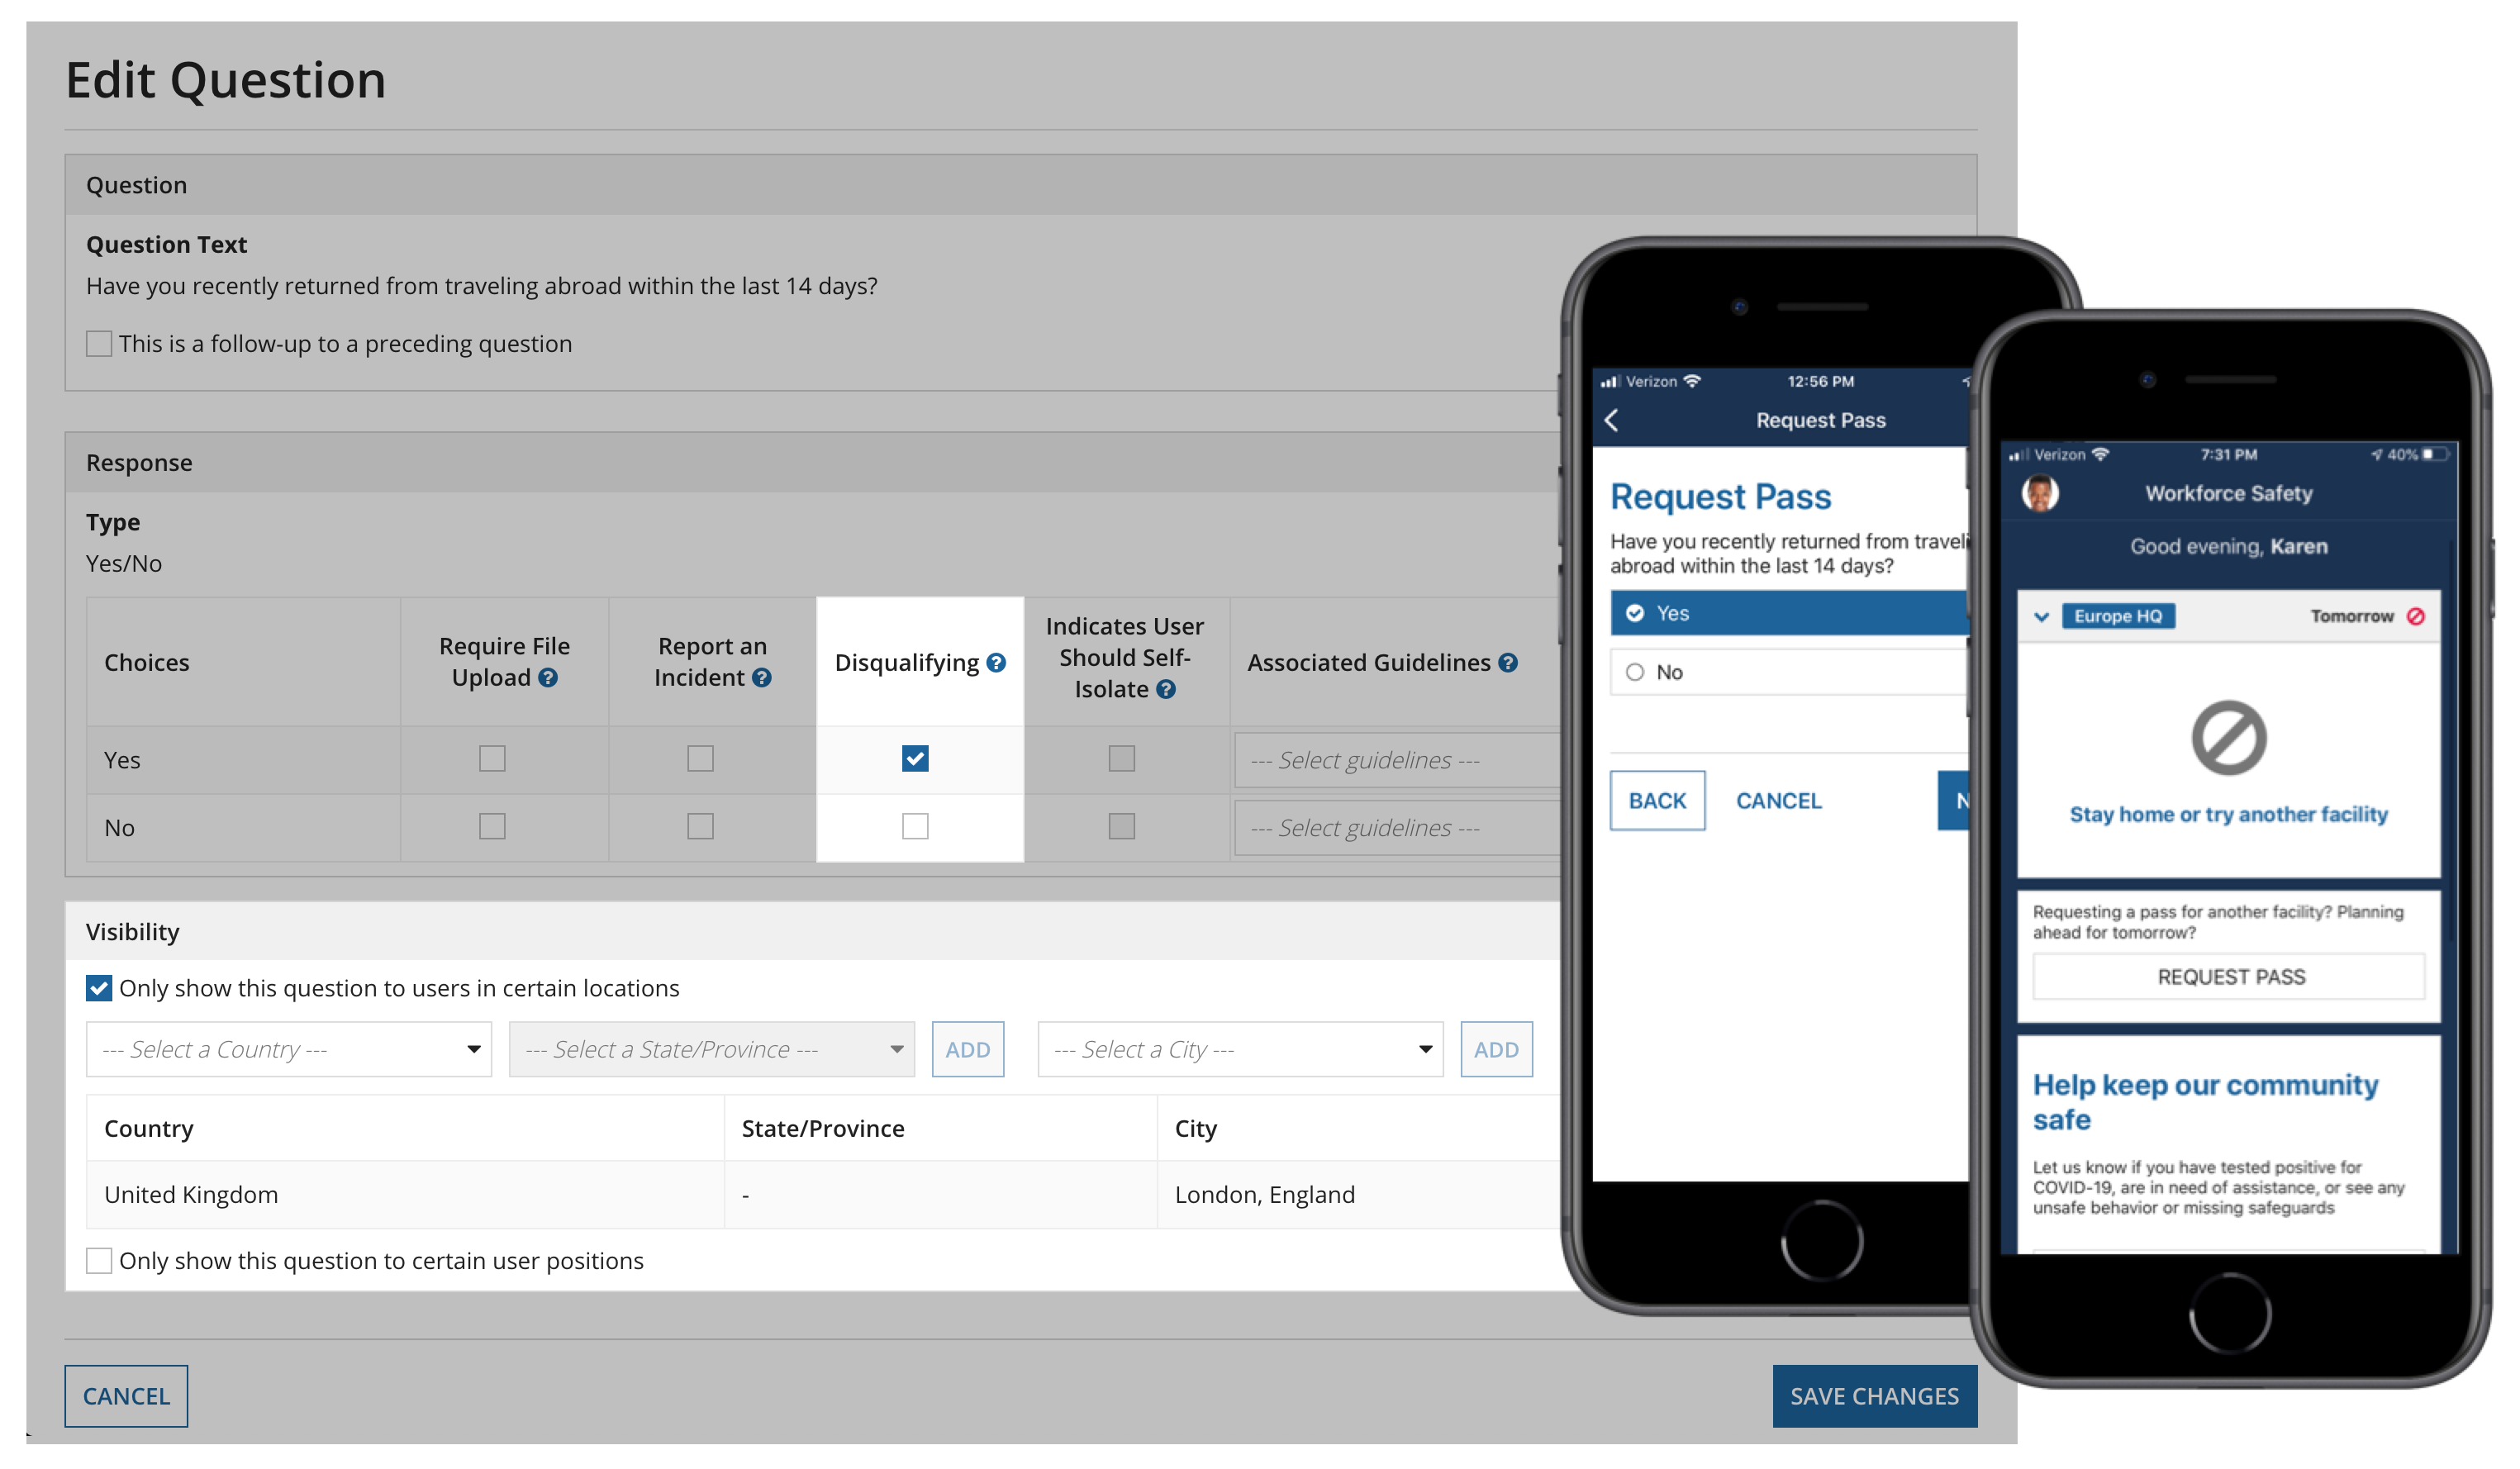
Some pass request questions are only for specific locations. When the questions are being configured, these questions have Only show this question to users in certain locations selected for visibility. If a user chooses a response that disqualifies them on a location-specific question, they will not be given a pass for that facility. Additionally, if they already have a valid pass for that facility, it will be revoked. They can still request a pass for other facilities.

Note that if the question is also configured to report an incident and the Pass Requests Disabled by Active Pass Request Response Incidents feature is active, they will not be able to request a pass for any facility, and their active passes will be revoked.
Pass Requests Disabled by Active Pass Request Response Incidents

For questions that aren't specific to a certain location, if a user responds with an answer that disqualifies them, any passes that they have been issued will be revoked and a message will display asking them to stay home.
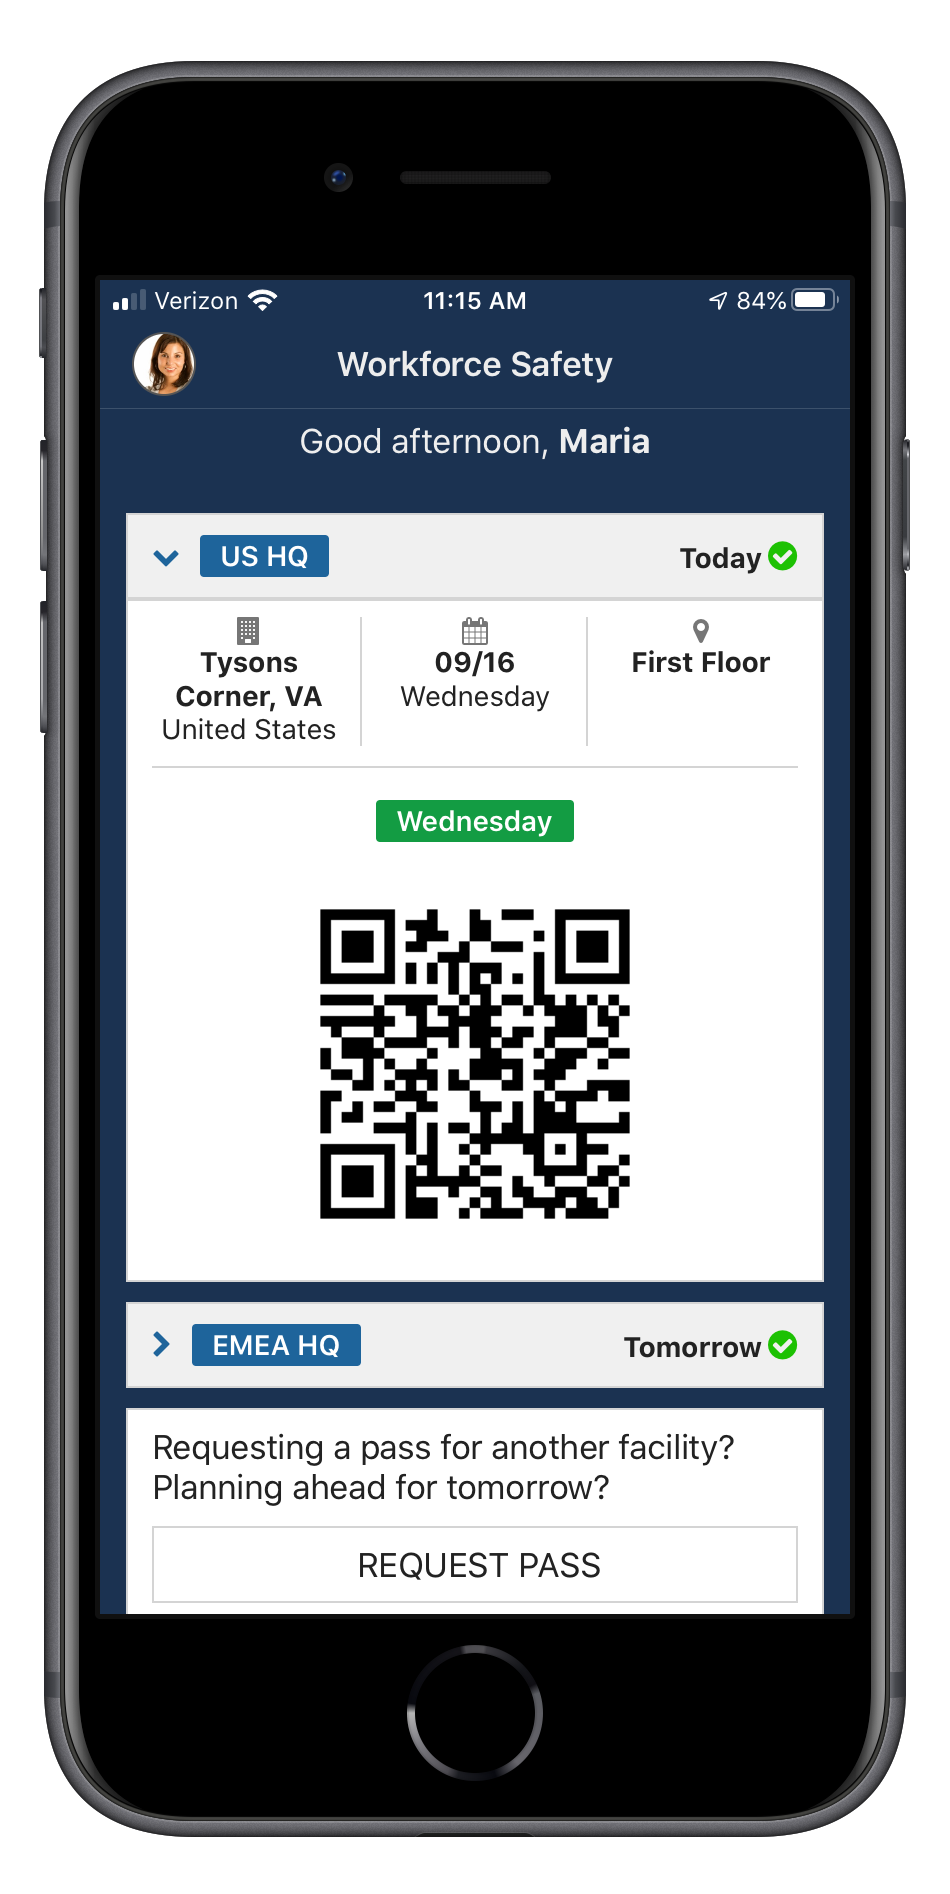
If a user is eligible for a pass for the day and facility that they are requesting, the pass displays on their home page.
The pass contains the following:
Users can display this pass in the Appian application or from an email that is automatically sent to the user.
Additionally, the active passes for each day, facility, and area that was requested displays.
After a user receives a valid pass, a Log your contacts section will display on their home page. Clicking LOG CONTACTS will allow them to log the people and areas that they had contact with while they were onsite.

Workforce Safety makes it easy for users to log contacts by automatically logging area contacts the user received a pass for and suggesting up to 20 people contacts based on data the solution collects. Users can simply click on a suggested contact to add it to their contact log.
Users are encouraged to log their contacts after each onsite visit in order to keep an accurate account of their close contacts in case they are diagnosed with COVID-19. If the user submits a COVID-19 isolation incident, the information they input here will display to response managers on the related incident.
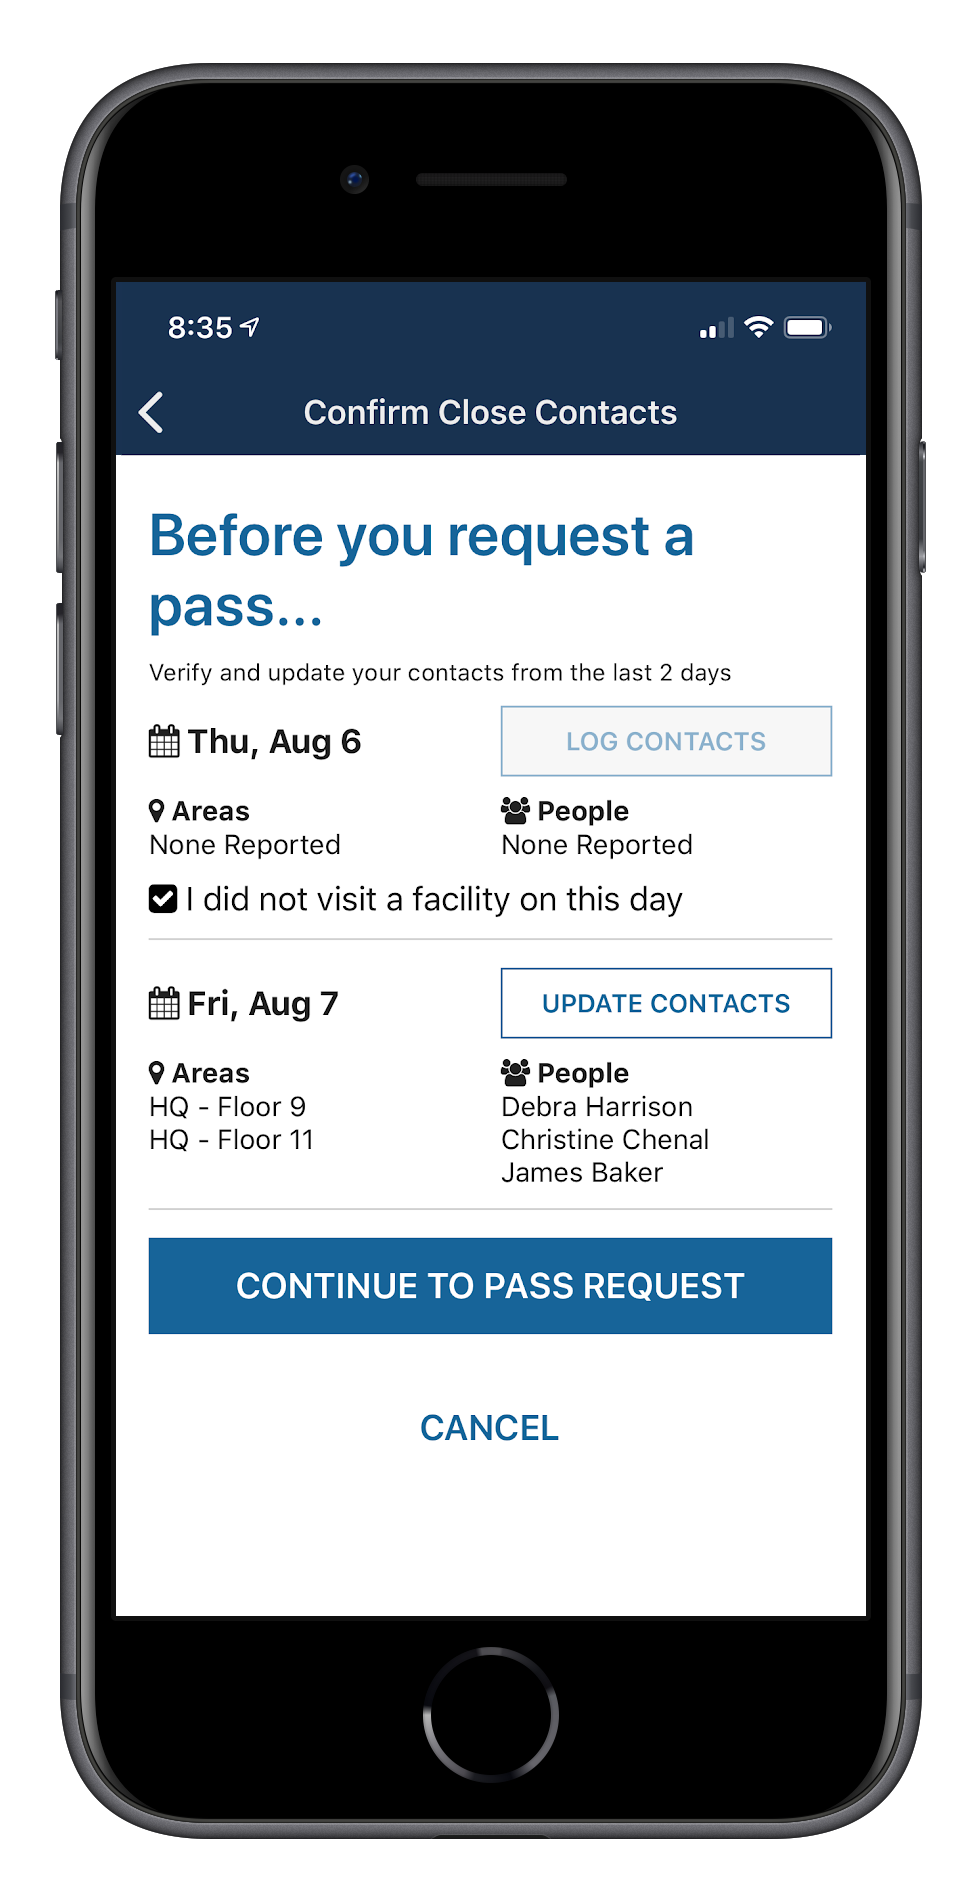
If the Contact Reporting When Requesting a Pass feature is toggled on, users will be asked to review any contacts they have logged for their last two visits, or log their contacts if they haven't already done so.
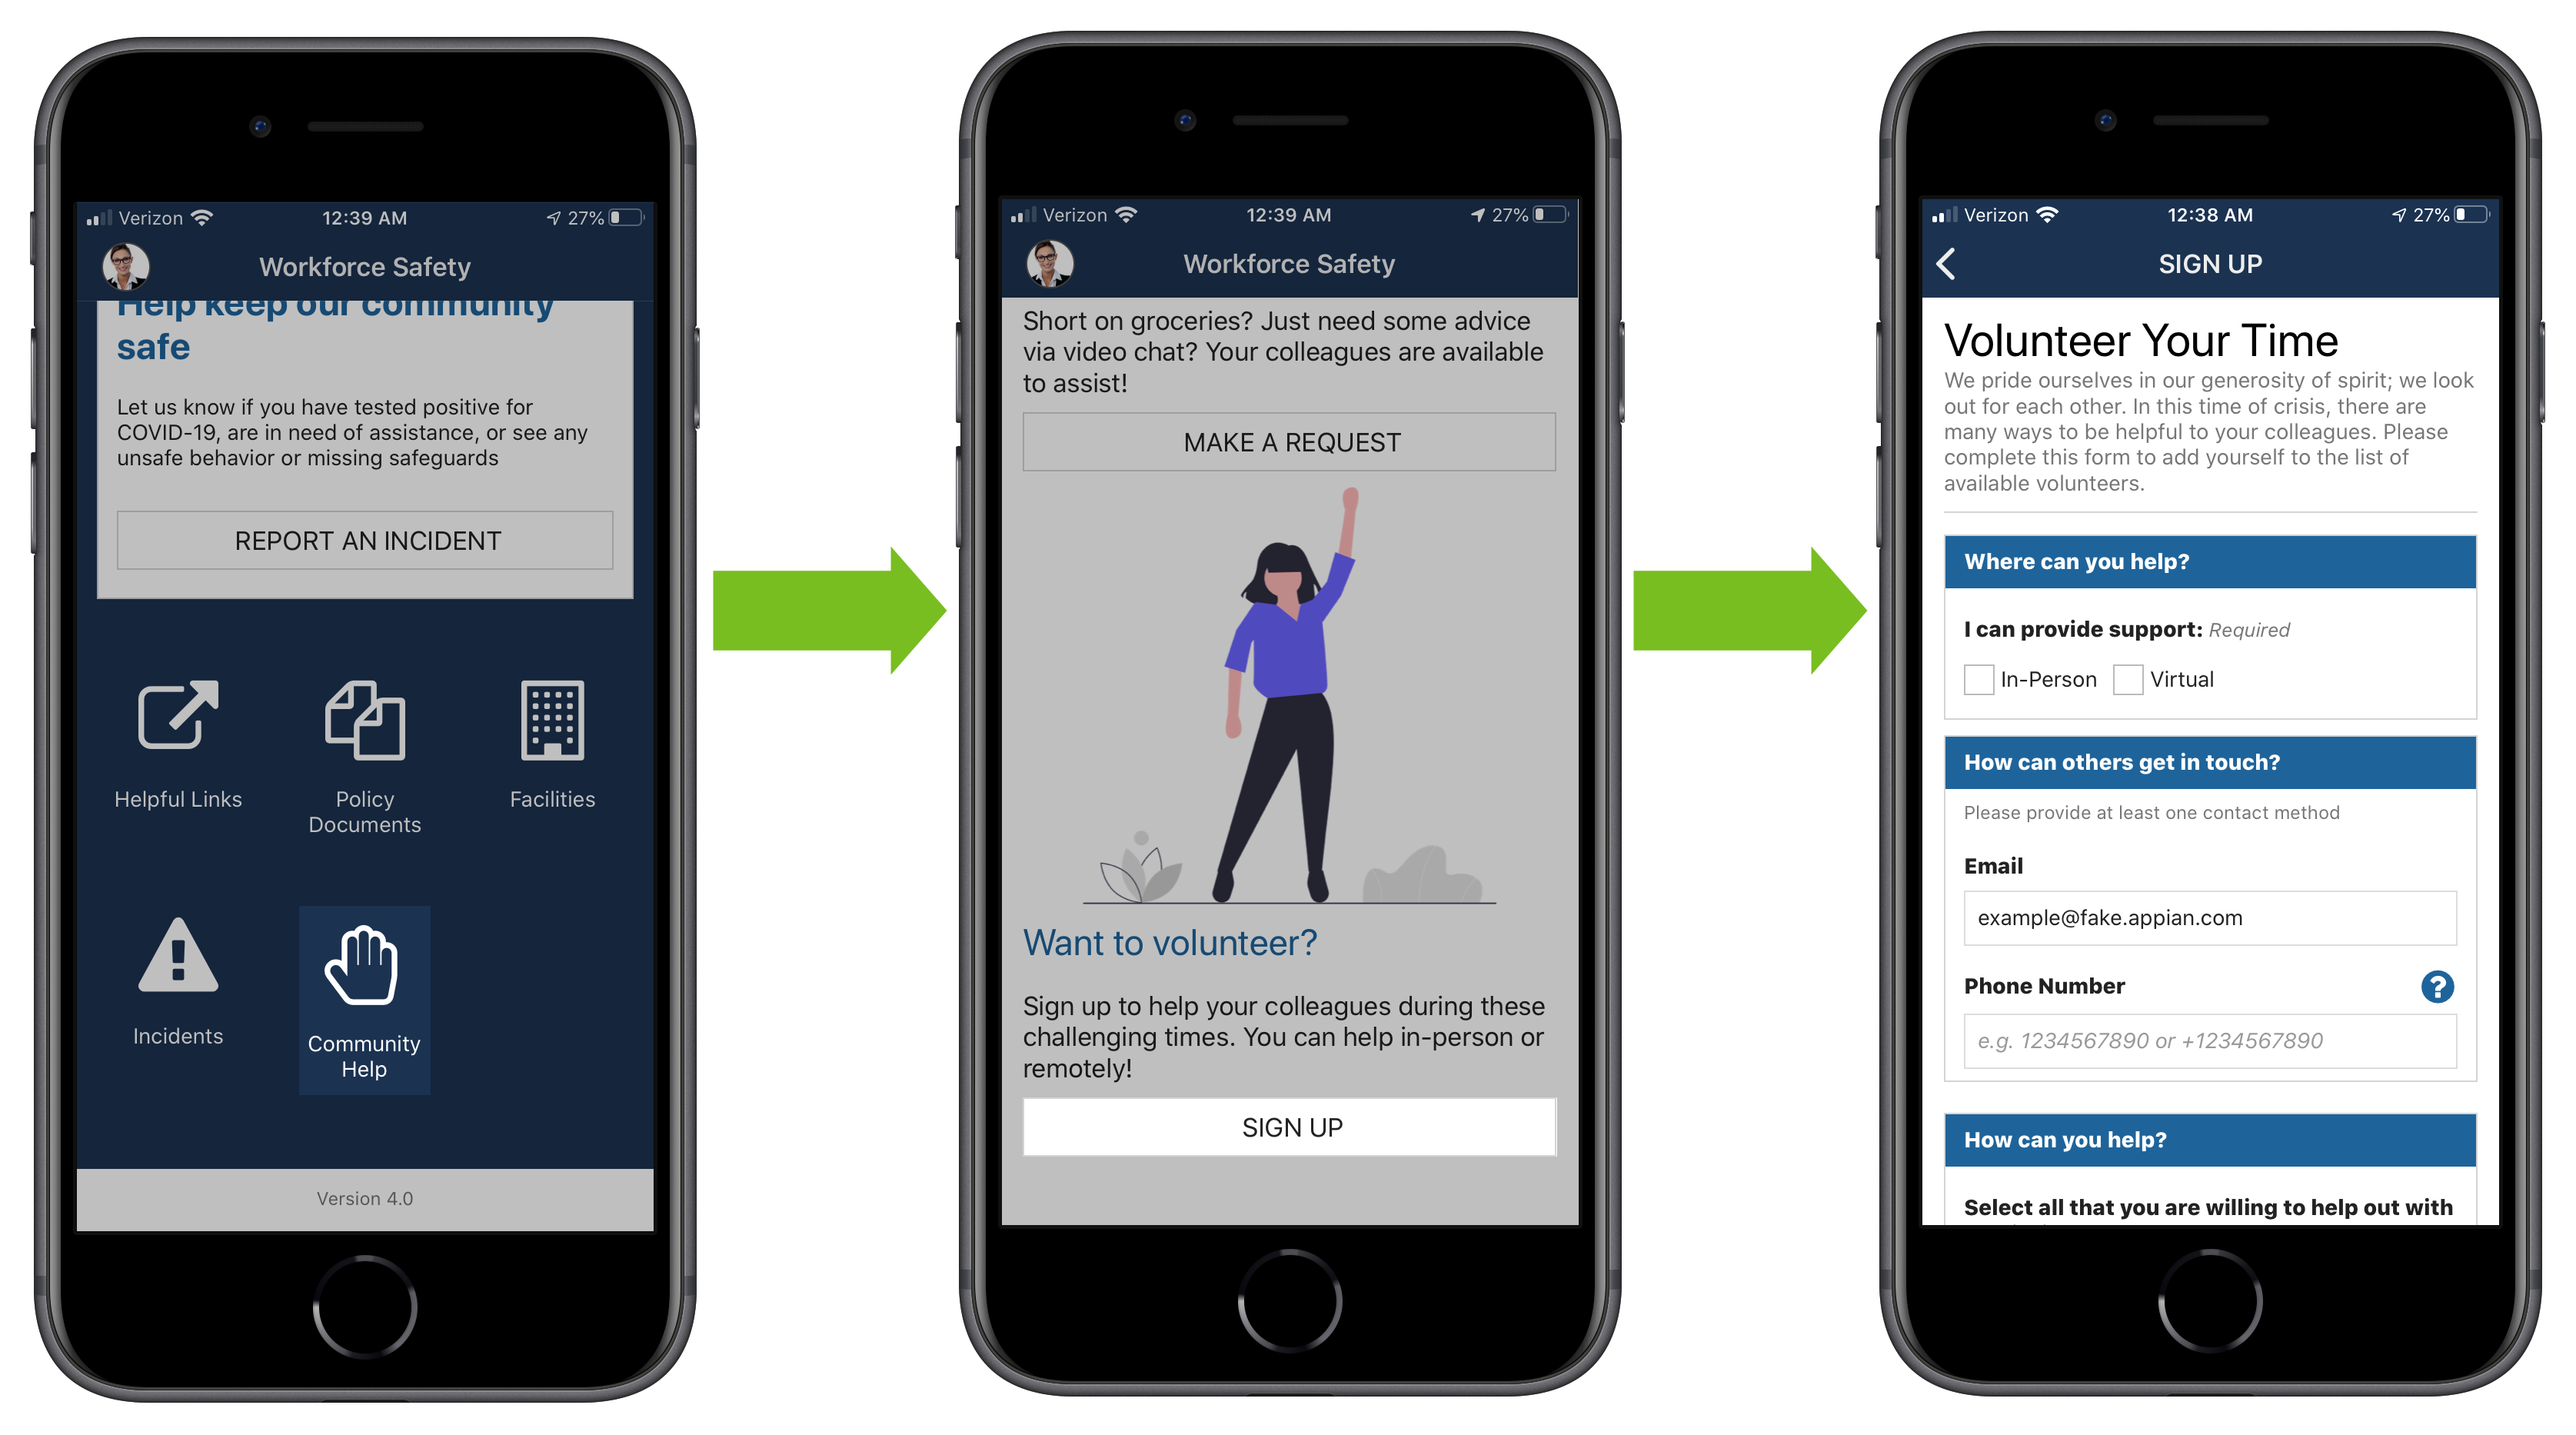
If the Community Volunteering and Help Requests feature toggle is turned on, a Community Help icon will display on the home page. Clicking this will allow users to request help or sign up to volunteer.
If a user needs assistance from a member of the workplace community, they can submit a help request which can be addressed by a volunteer.

If the Community Volunteering and Help Requests feature toggle is active, for users wishing to volunteer, a simple form is provided for them to fill out. Based on their responses, they can be matched with incoming assistance requests to provide the help needed.

If the Community Volunteering and Help Requests feature toggle is active and users have signed up to be a volunteer, they can click View Assigned Requests to see a grid of help requests assigned to them. When they select a request from the grid, they are taken to the summary view. This view provides information on the status and details of the request, contact information of the requester, and the request location. Requesters may close and cancel requests and assigned volunteers can close requests and decline assignments.
Resources are available under the Helpful Links, Policy Documents, and Facilities links. These sections contain links to external resources, documents uploaded by your organization and information on your organization's facilities.
Users can be given access to host visitors. Hosting consists of scheduling visits for visitors and adding new visitors. Hosts can also cancel visits that they have scheduled.
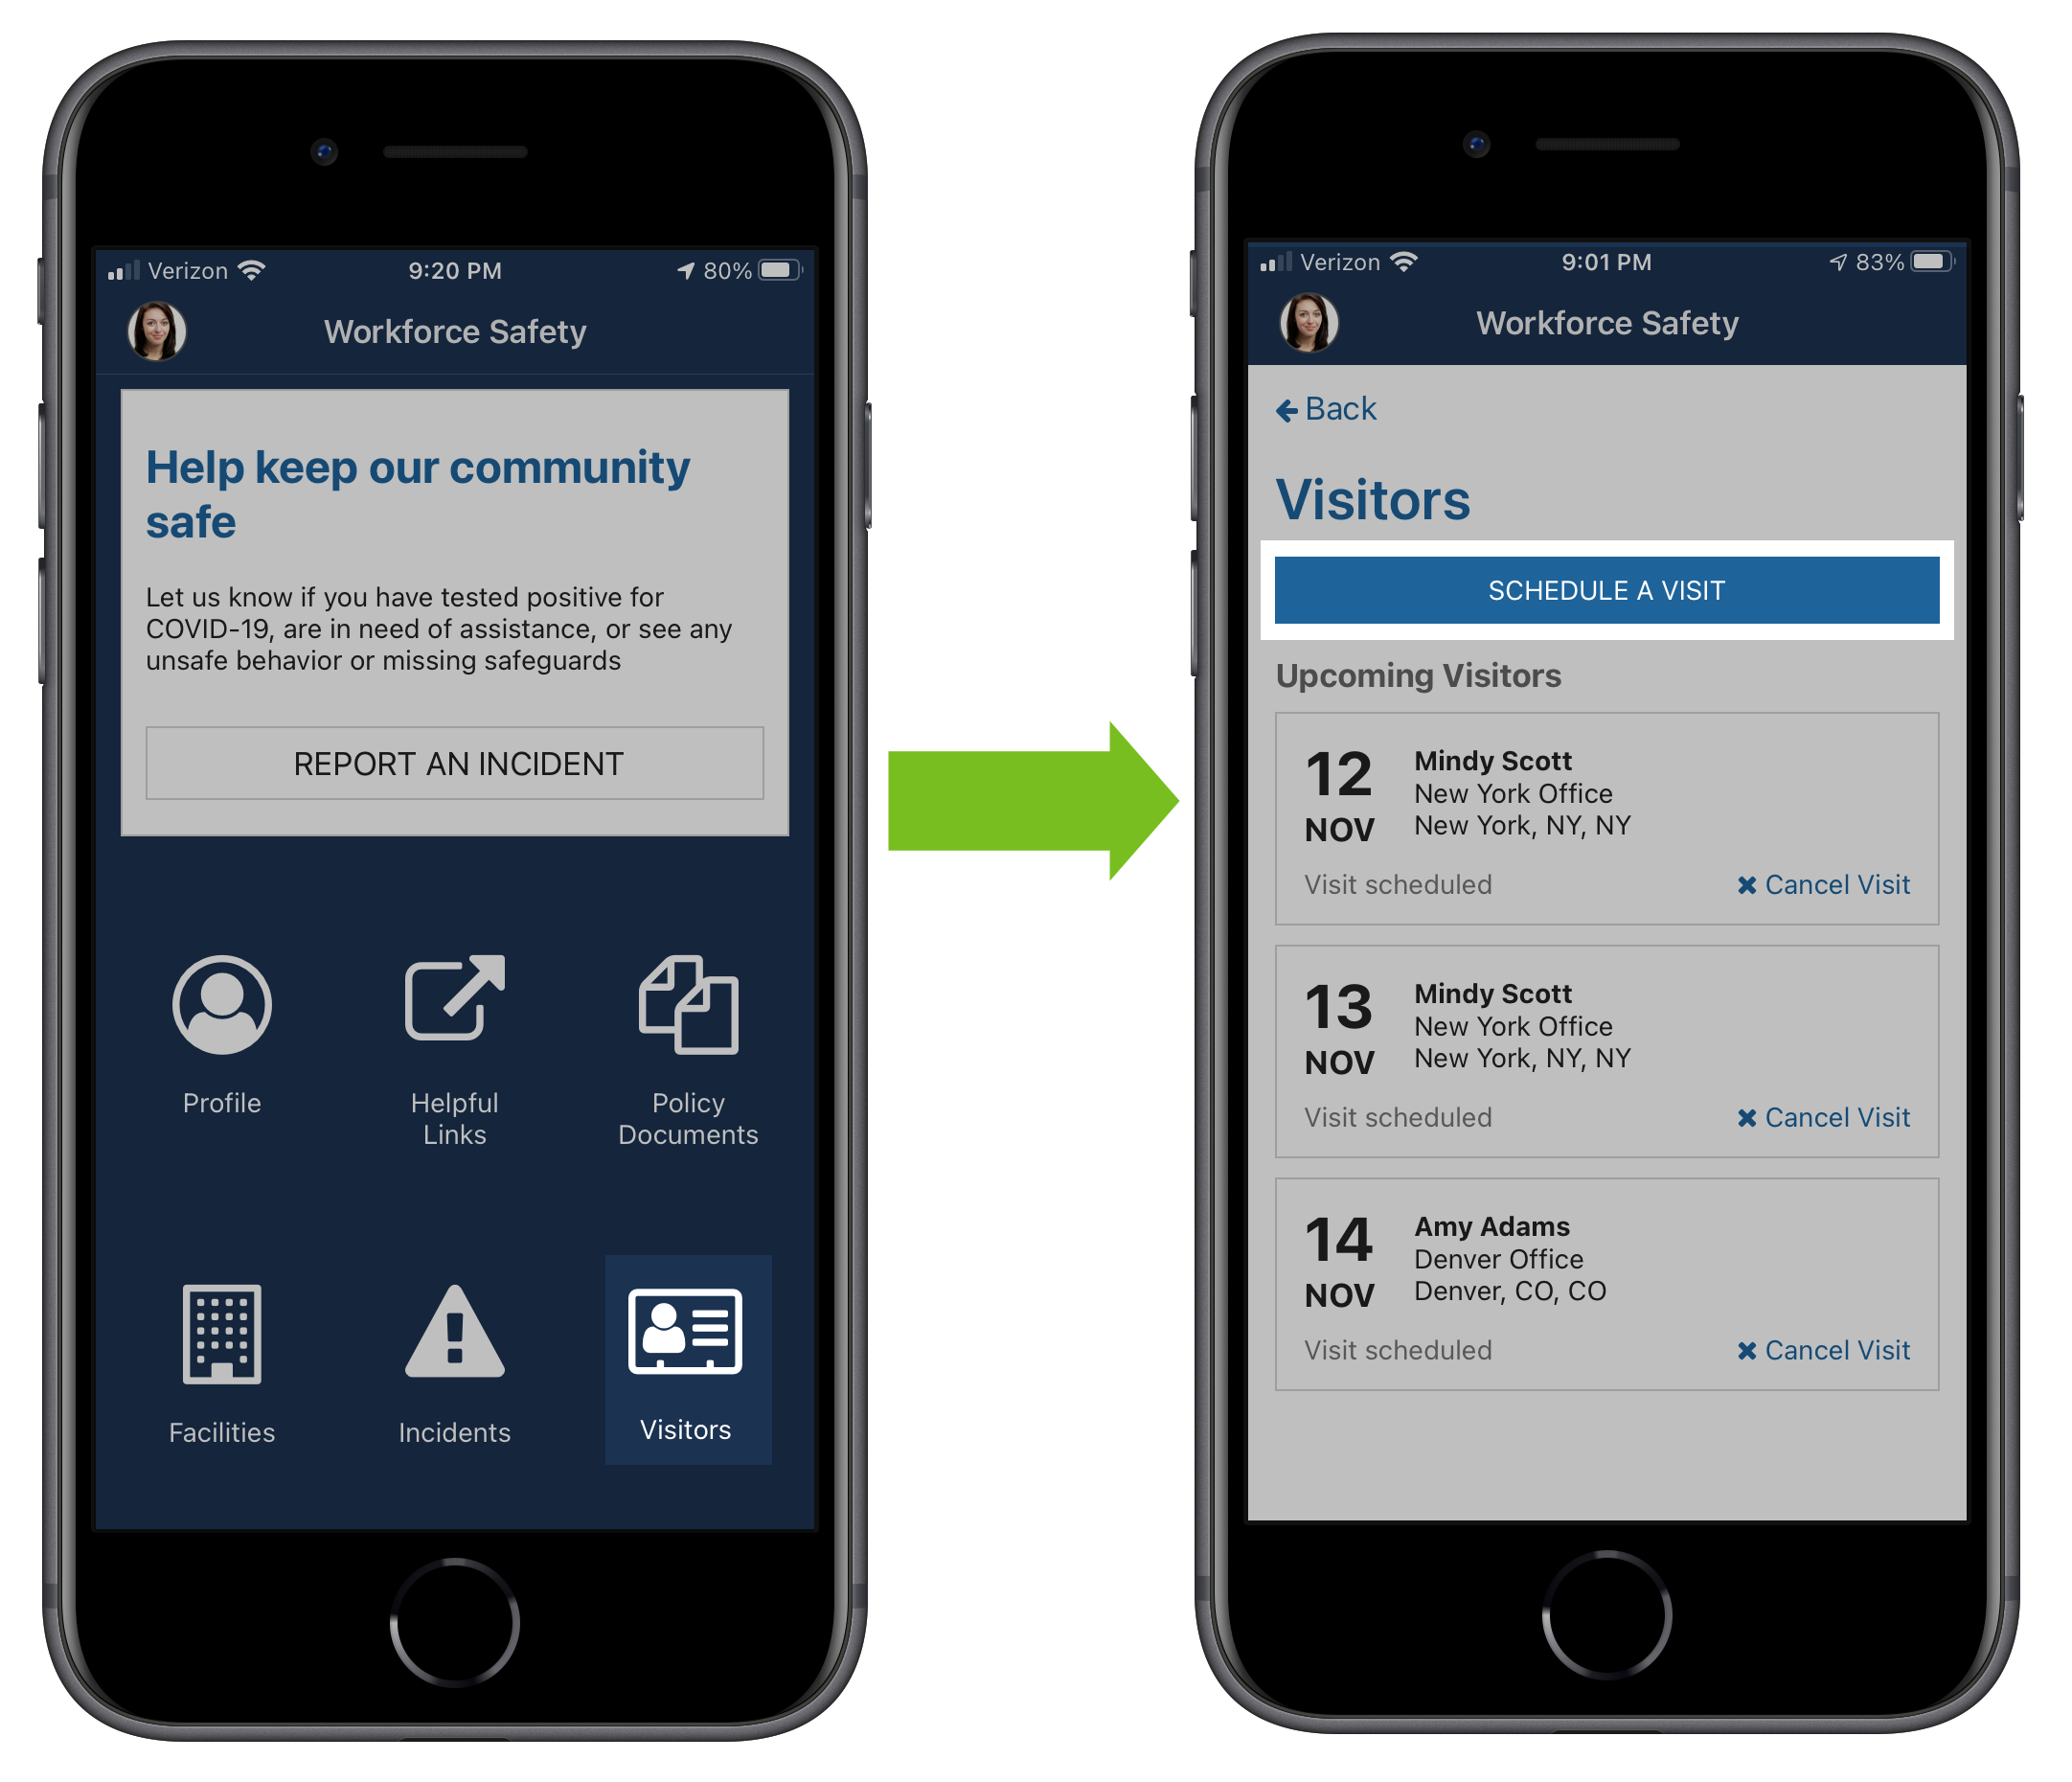
Before a visitor can come on site, they must have a visit scheduled by someone who has been given access to host visitors. All hosts can access this action from the Workforce Safety home page, but screeners and response managers can schedule visits from the Response Hub as well.
To schedule a visit:
Click SCHEDULE A VISIT.
Click Finish.
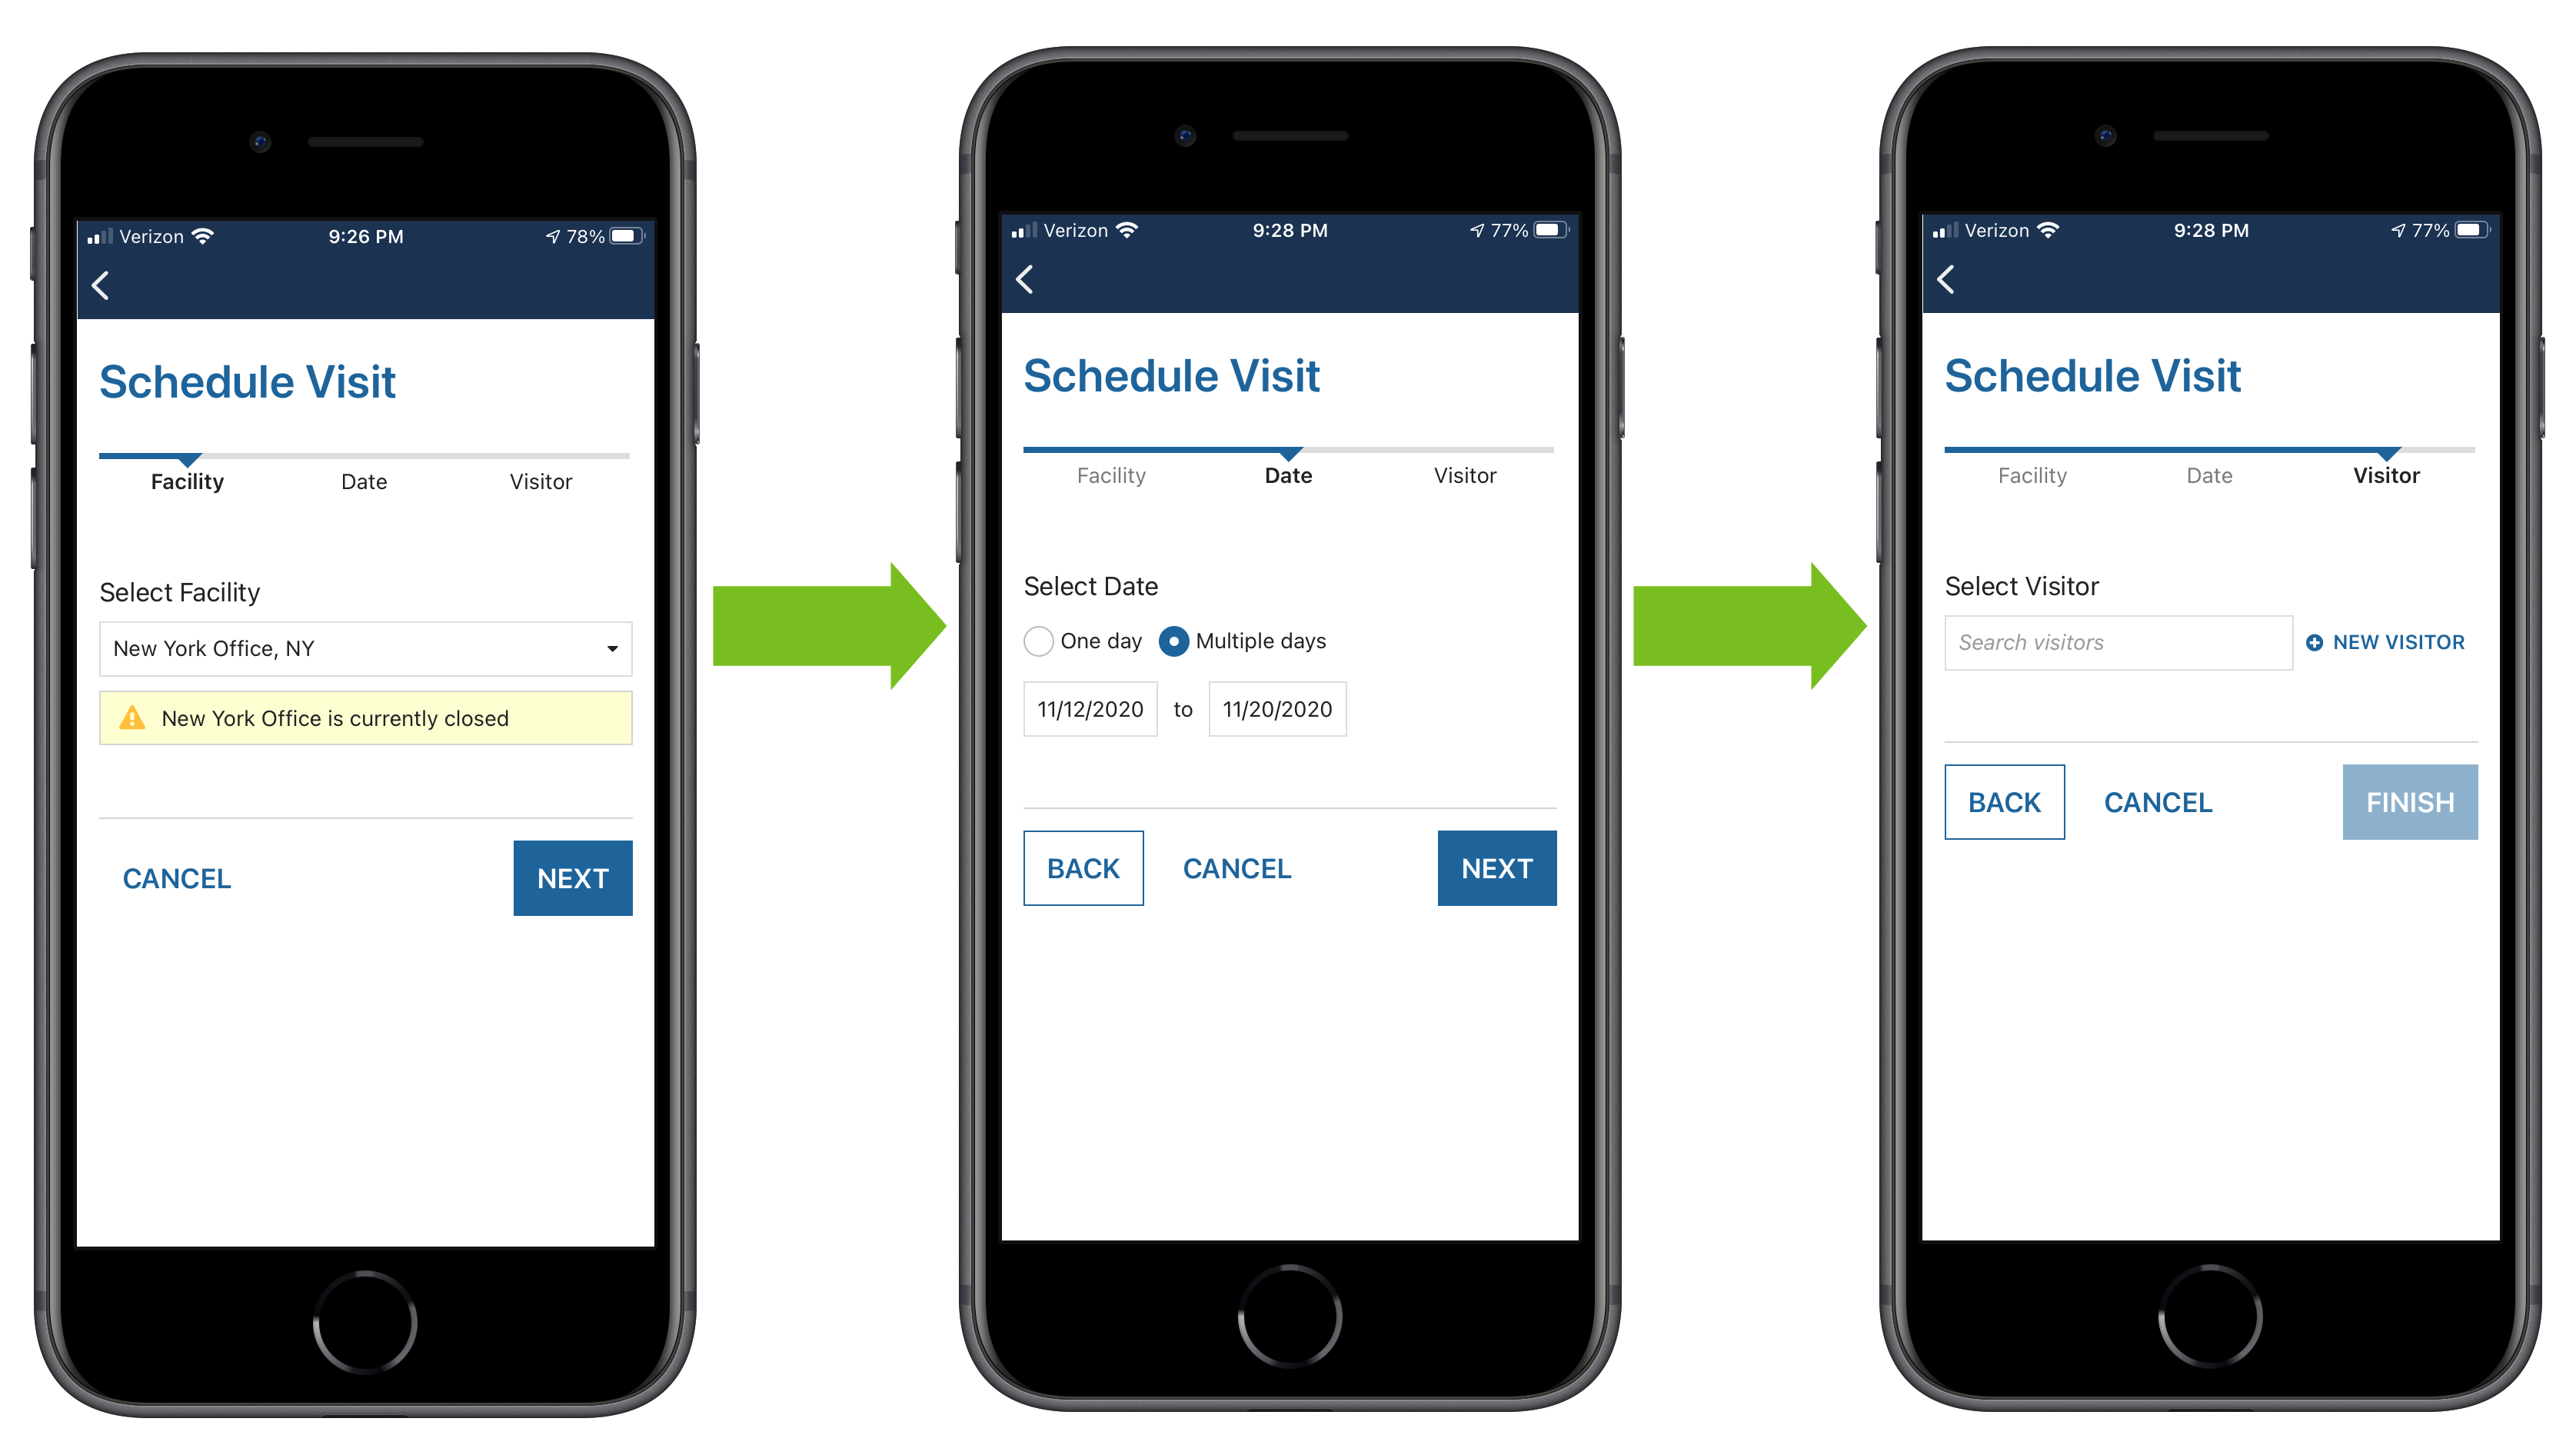
The visitor will need to complete a pass request in order to visit the facility. If they are not eligible to visit based on their responses, the host will receive an email.
After you schedule a visit for a visitor, it will display when you click the Visitors icon. Here, you can see the status of the visit, such as if the visitor has received a pass to visit the facility. You can also cancel an upcoming visit, if necessary.
To cancel a visit:
After a visit is canceled, any active passes that the visitor had will be revoked and the visitor will be sent an email letting them know that the visit was canceled.
