| This content applies solely to Connected Underwriting, which must be purchased separately from the Appian base platform. This content was written for Appian 24.2 and may not reflect the interfaces or functionality of other Appian versions. |
IntroductionCopy link to clipboard
After installing the Automated Routing module, you need to set it up before using it with the Connected Underwriting P&C Base application. This guide walks you through the required incorporation steps.
- Add the Assignment Rules tab to the Settings Site.
- Enable automatic case assignment for manual submission creation.
- Enable automatic case assignment for submission creation via email.
- Remove assignment from manual submission creation.
- Remove existing assignment from Submission processing completion rule.
Step 1: Add the Assignment Rules tab to the Settings SiteCopy link to clipboard
To set up the Automated Routing add-on with Connected Underwriting P&C, you first need to add the Assignment Rules tab to Connected Underwriting Settings Site.
To add the Assignment Rules tab:
- Login to the target environment.
- Navigate to the Appian Designer.
- Navigate to Connected Underwriting (ISU) and open the application.
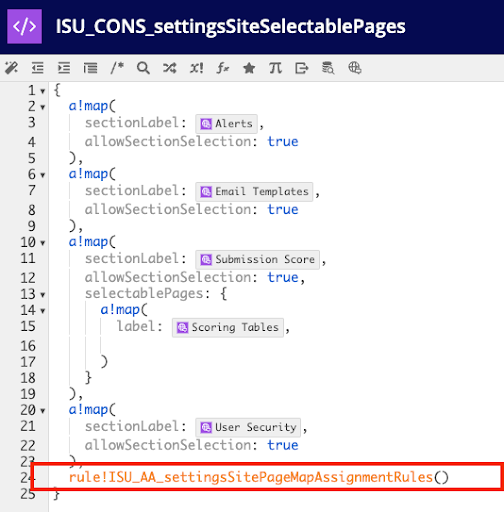
- Search for and open the ISU_CONS_settingsSiteSelectablePages expression rule.
- Append the ISU_AA_settingsSitePageMapAssignmentRules expression rule to the end of the existing array, as shown.
- Open the ISU_configurationSitePage interface.
-
In the existing
a!match()function that selects the interface for the selected tab in the side navigation, add a new condition to match on the newly-added Assignment Rules tab. Be sure to use the same Assignment Rules translation set string contained in the ISU_AA_settingsSitePageMapAssignmentRules expression rule as shown: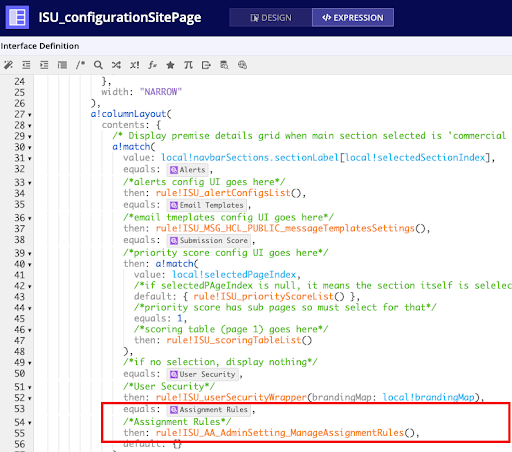
- Click SAVE.
Step 2: Enable automatic case assignment for manual submission creationCopy link to clipboard
Next, you will need to you enable automatic case assignment when users manually create a submission.
To enable case assignment:
- Navigate to Appian Designer.
- Go to Connected Underwriting (ISU) and open the application.
- Search for and open the ISU Create New Submission process model.
-
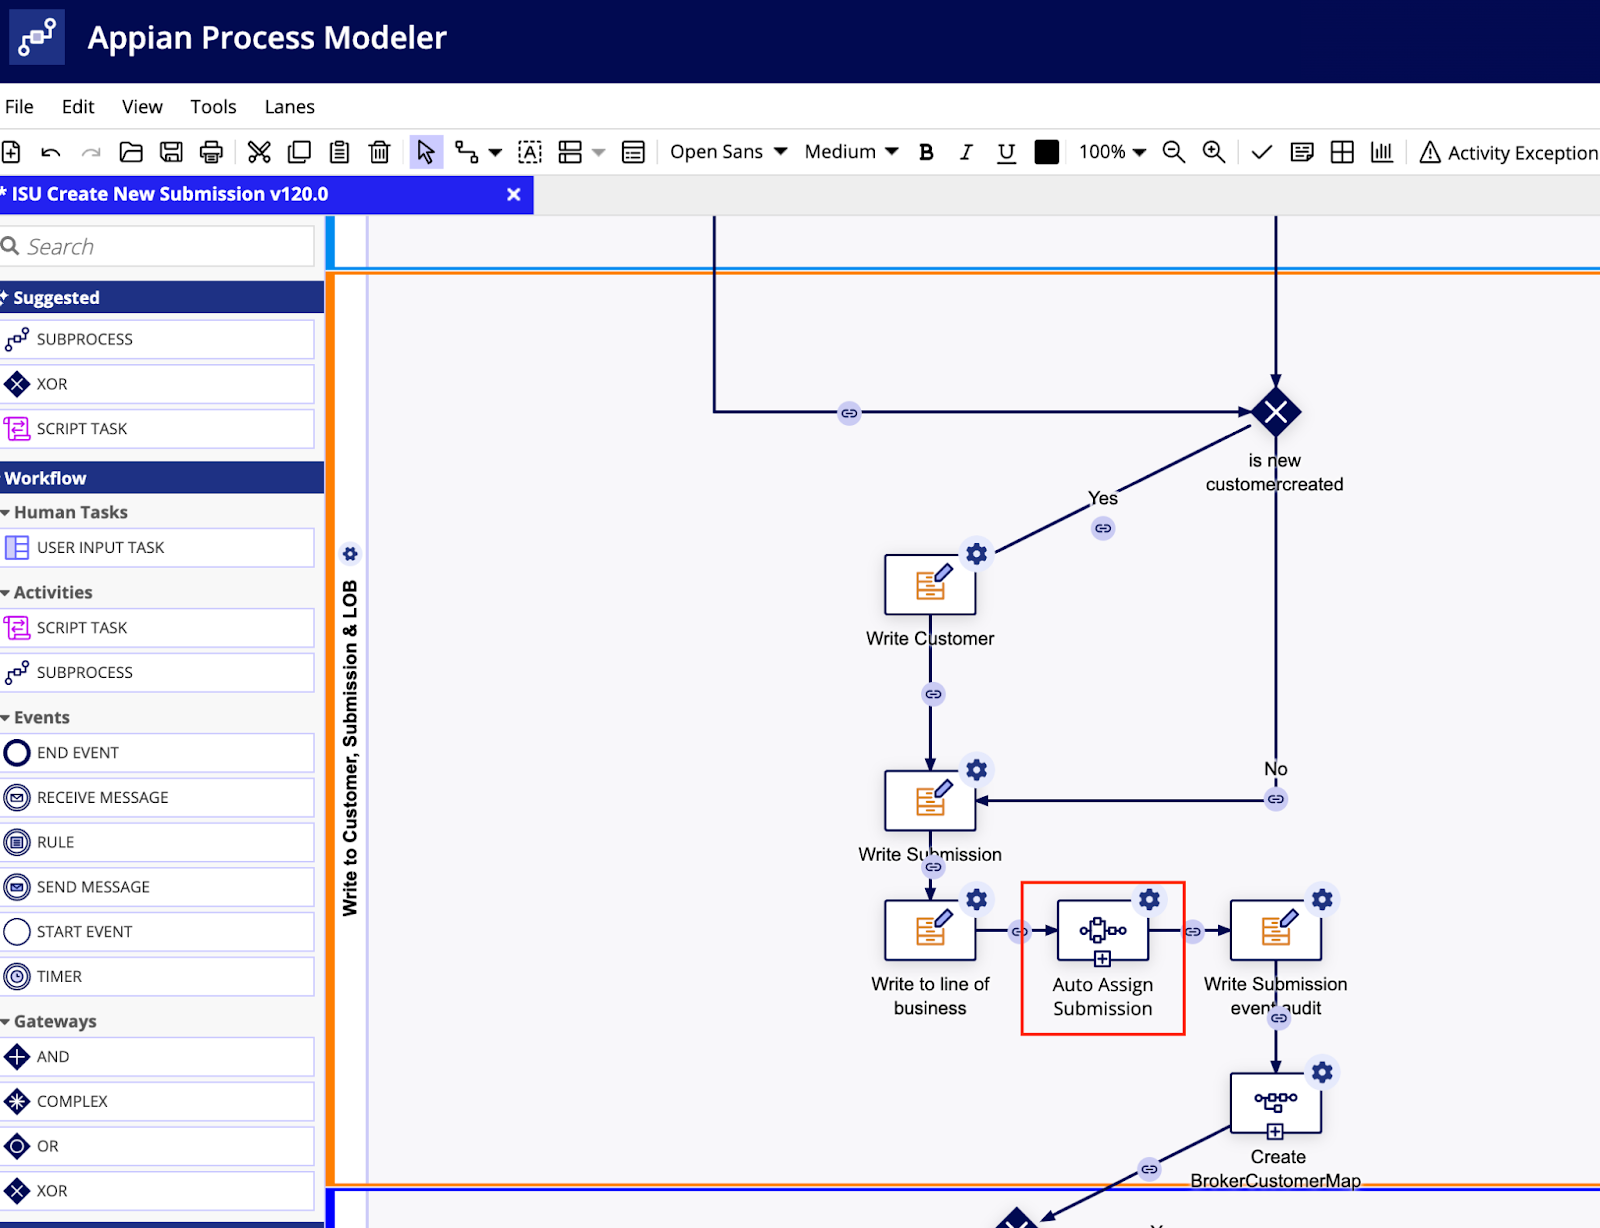
Add a new synchronous subprocess node called Configure Auto Assign Submission in between the Write Line of Business Write Records node and the Write Submission Event Audit Write Records node. Be sure to continue activity chaining through this node:
-
In the new subprocess node, go to the Setup tab and select the following settings:
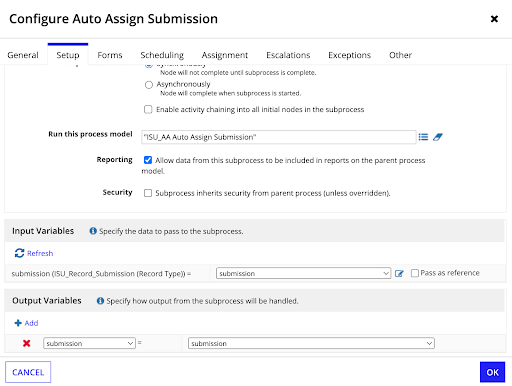
- In the Subprocess Setup section, select Synchronously.
- In the Run this process model section, select ISU_AA Auto Assign Submission as the process to run.
- Select the Reporting checkbox to include data from this subprocess in the parent process model reports.
- In the Input Variables section, pass submission into the ISU_Record_Submission record type.
- In the Output Variables section, click Add.
- In the Pick a process variable drop down, select Submission.
- In the Pick a subprocess variable.. drop down, select submission.
- Click OK.
- From the File menu, click Save & Publish, then Exit.
Step 3: Enable automatic case assignment for submission creation via emailCopy link to clipboard
You will also need to enable case assignment automation on submissions created via email by updating the ISU Complete Submission Processing** process model.
To update the ISU Complete Submission Processing** process model:
- Navigate to the Appian Designer.
- Navigate to Connected Underwriting (ISU) and open the application.
- Search for and open the ISU Complete Submission Processing process model.
-
Add a new synchronous subprocess node called Auto Assign Submission in between the Change Occurred? XOR node and the Write to Submission Write Records node.
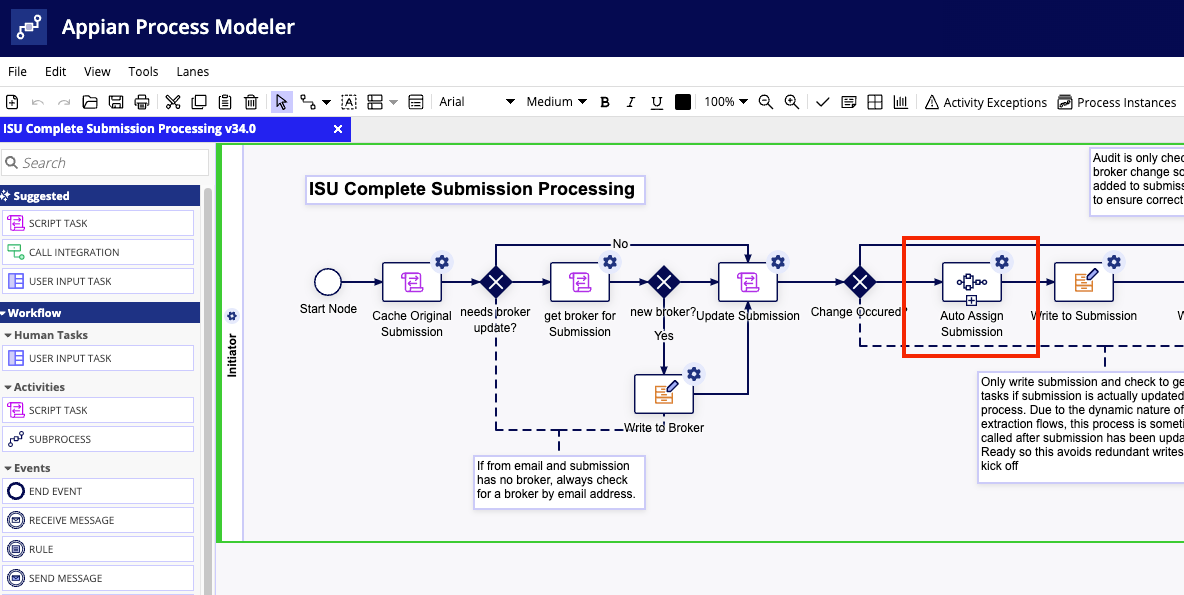
-
-
In the new subprocess node, go to the Setup tab and select the following settings:
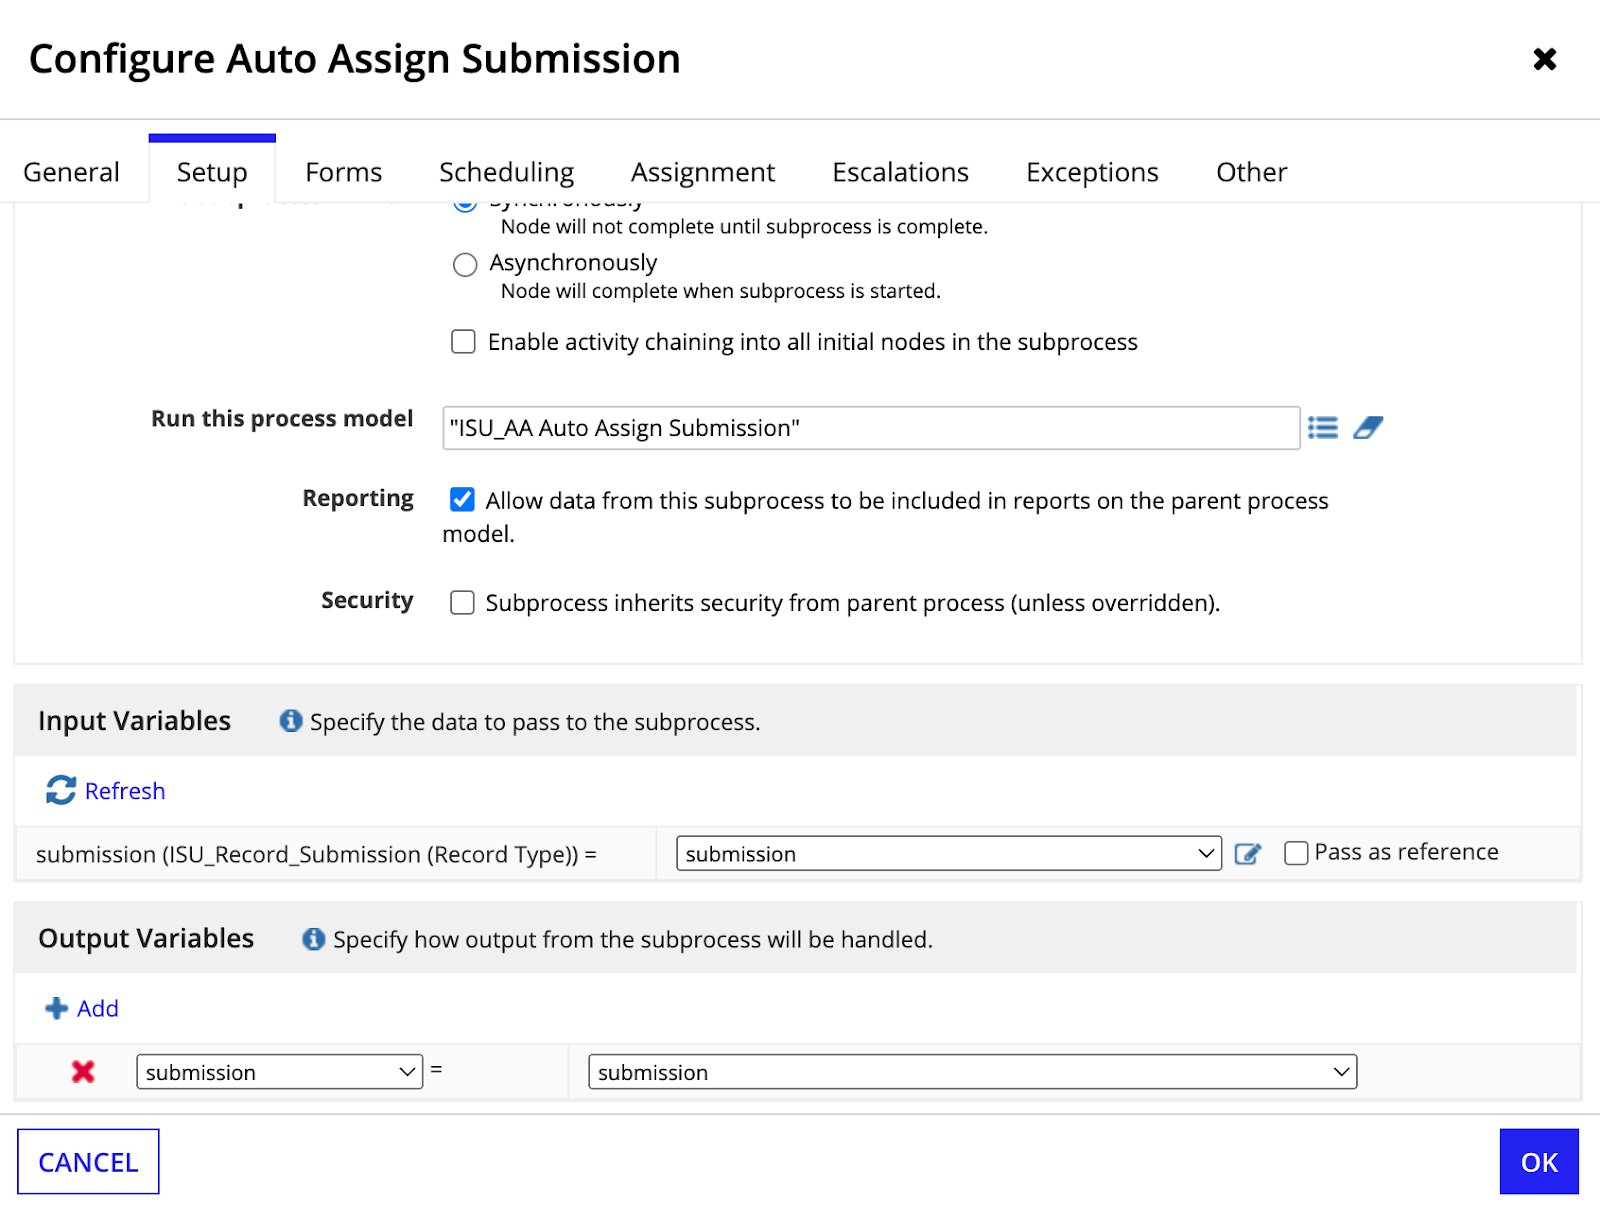
- In the Subprocess Setup section, select Synchronously.
- In the Run this process model section, select ISU_AA Auto Assign Submission as the process to run.
- Select the Reporting checkbox to include data from this subprocess in the parent process model reports.
- In the Input Variables section, pass submission into the ISU_Record_Submission record type.
- In the Output Variables section, click Add.
- In the Pick a process variable drop down, select Submission.
- In the Pick a subprocess variable.. drop down, select submission.
- Click OK.
- From the File menu, click Save & Publish, then Exit.
Step 4: Remove assignment from manual submission creationCopy link to clipboard
The next step involves removing the Assignment from the manual submission creation process so the Automated Routing add-on can manage this step.
To remove the Assignment rule input:
- Navigate to the Appian Designer.
- Navigate to Connected Underwriting (ISU) and open the application.
- Search for and open the ISU_createSubmission interface object.
- In expression mode, where ISU_submissionGeneralInformation is called, pass in false for the
showWhenAssigneerule input.
- In expression mode, where ISU_submissionGeneralInformation is called, pass in false for the
Step 5: Remove existing assignment from Submission processing completion ruleCopy link to clipboard
Finally, you will need to remove the existing assignment from the Submission processing completion rule.
To update the expression rule:
- Navigate to the Appian Designer.
- Navigate to Connected Underwriting (ISU) and open the application.
- Search for and open the ISU_updateSubmissionOnProcessingComplete expression rule.
-
Remove the
local!assigneeUpdateand thelocal!assigneeUpdatevariables, as shown: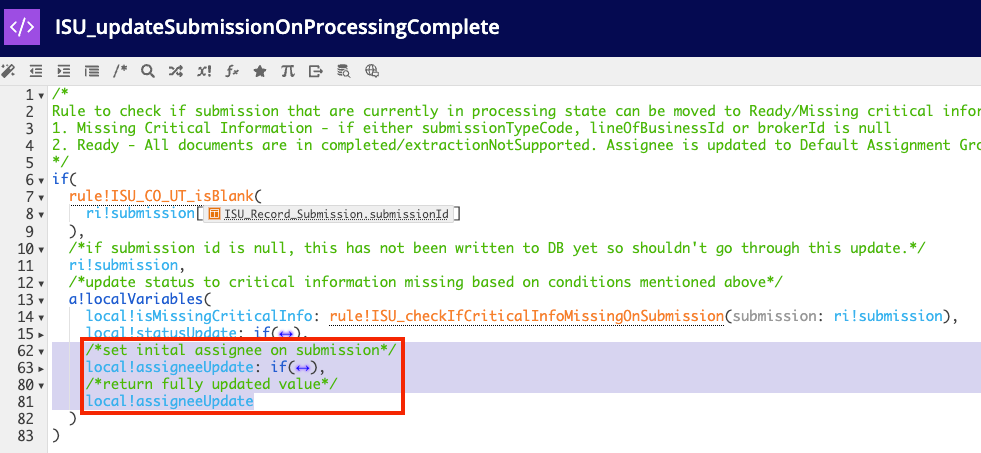
-
Return
local!statusUpdateas shown: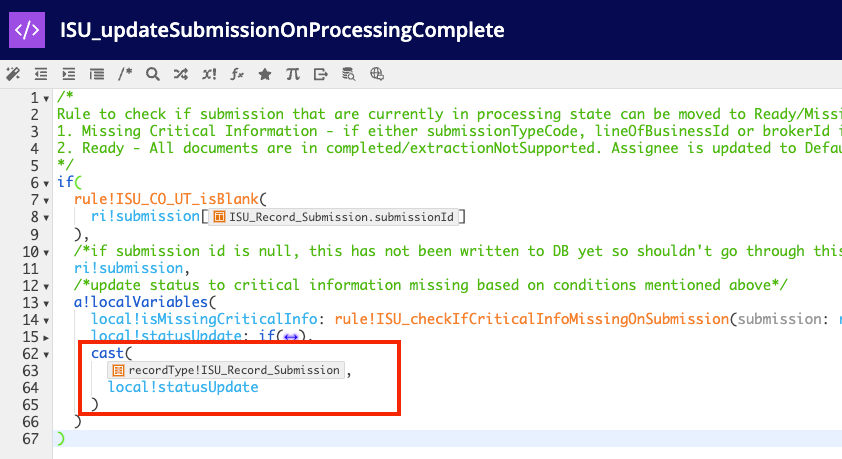
-
