| The RWM application was deprecated with Appian 24.1. The application will no longer be updated or pre-installed for new Appian Cloud sites with Appian RPA enabled. RWM will be removed in a future release and we encourage customers to use the Operations Console to manage robots instead. |
IntroductionCopy link to clipboard
The Control Center provides useful statistics about your digital workforce and orchestrates your robotic and business process management (BPM) operations. It displays information such as how many processes were automated in a certain period and how many resources and queues are deployed.
The page provides an overview of the different Control Center pages, including:
AutomationCopy link to clipboard
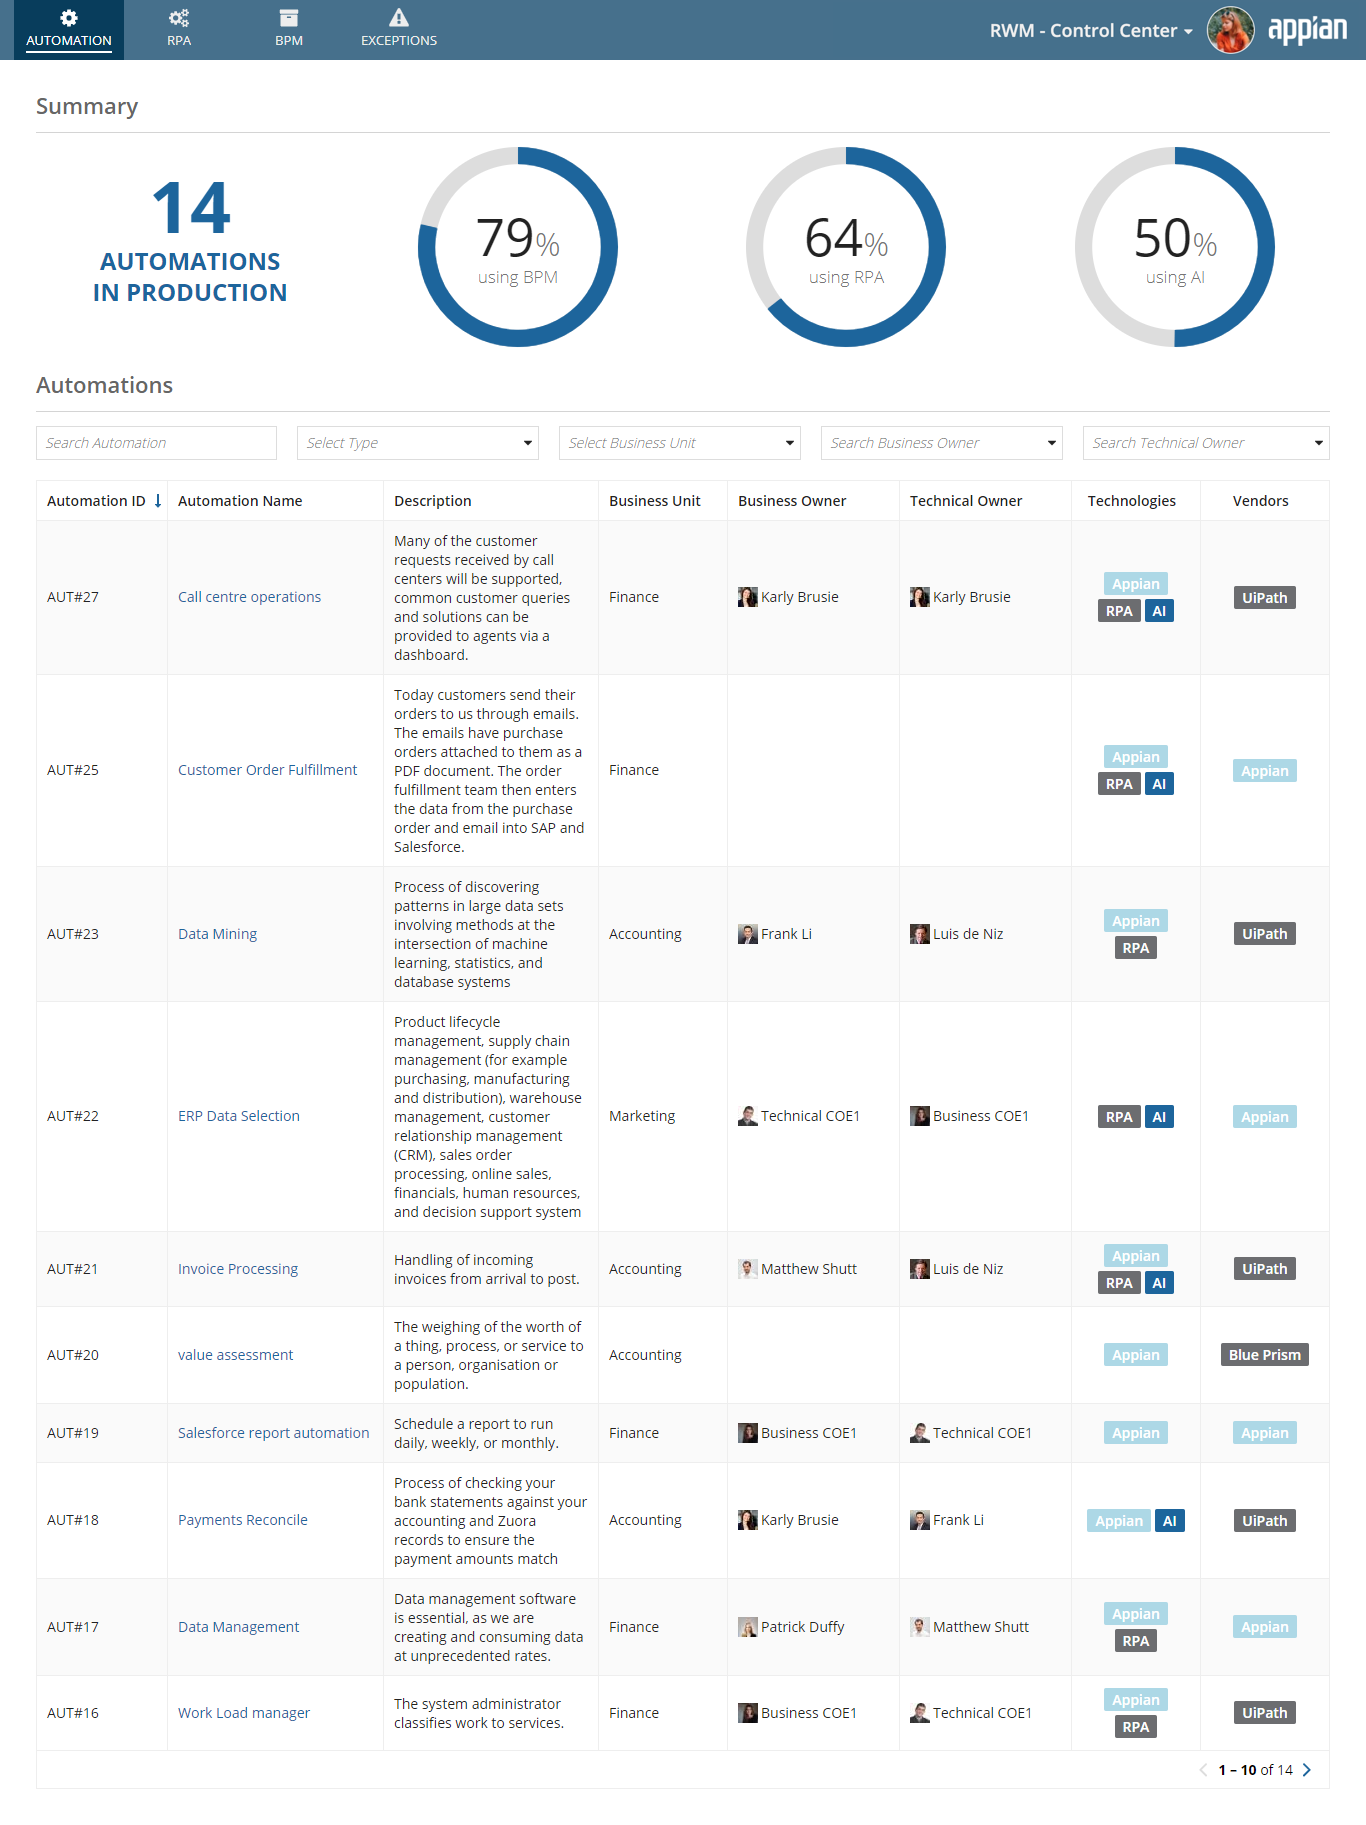
You see the Automation page when you open the Control Center. This page provides the list of automations in production.
Click on an Automation Name to get further statistics about the automation on the Automation Details page.
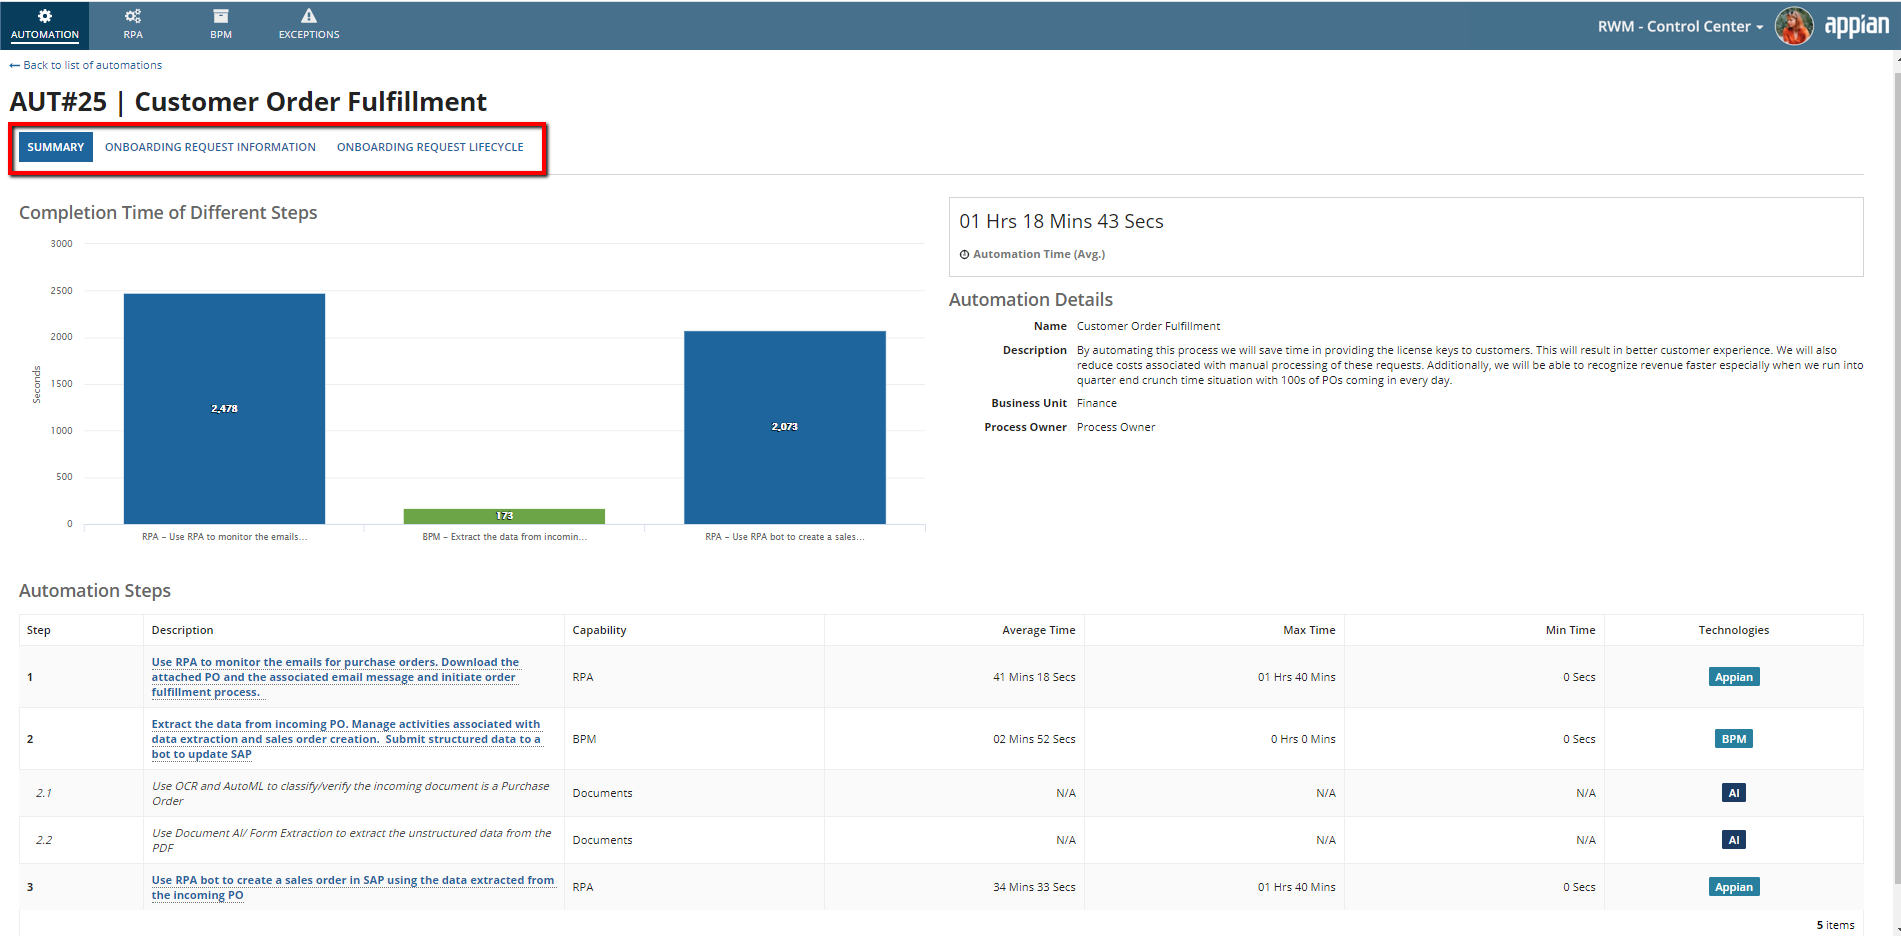
The Automation Details page consists of three views - Summary, Onboarding Request Information, and Onboarding Request Lifecycle.
The Summary view provides the Automation Steps details and Average Completion time of different steps.
Users can click on each step in the Description column to see detailed information about that step. If that step is BPM or RPA, then users can see the detailed information about the BPM Process or RPA Process respectively. For AI related capabilities, there is no deep-dive navigation.
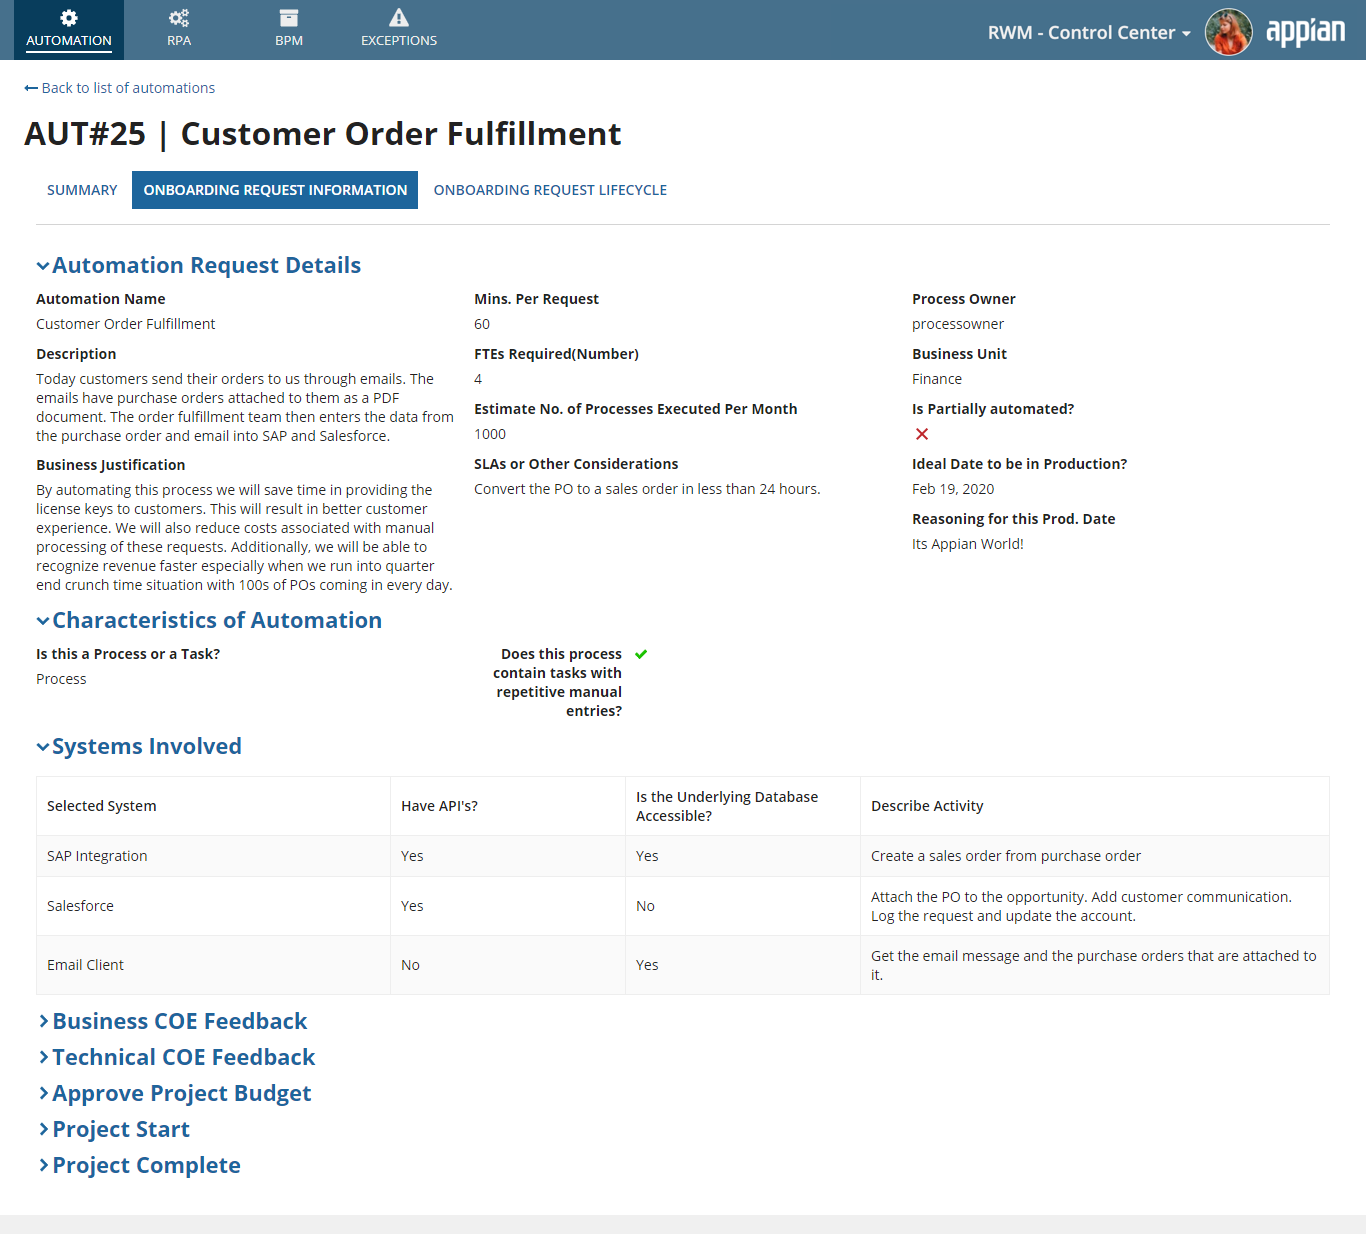
The Onboarding Request Information view provides the details of every stage of approval for automation.
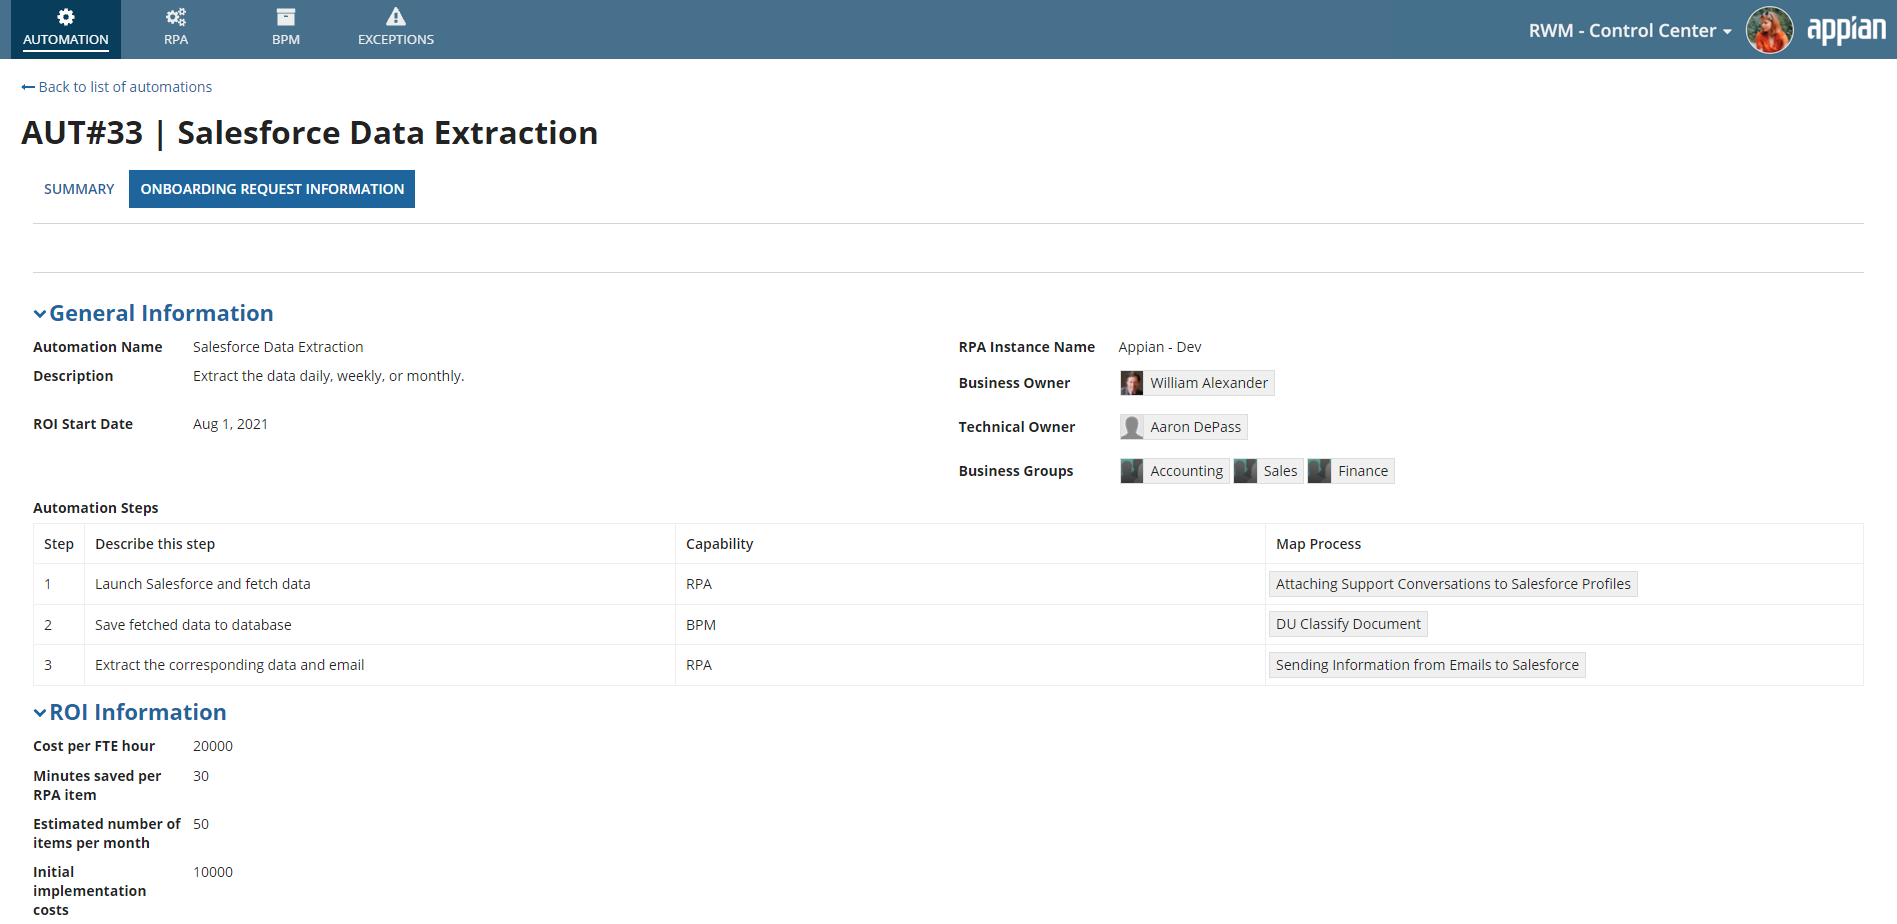
If the automation was added as an existing automation, different information appears on this screen, as shown below.
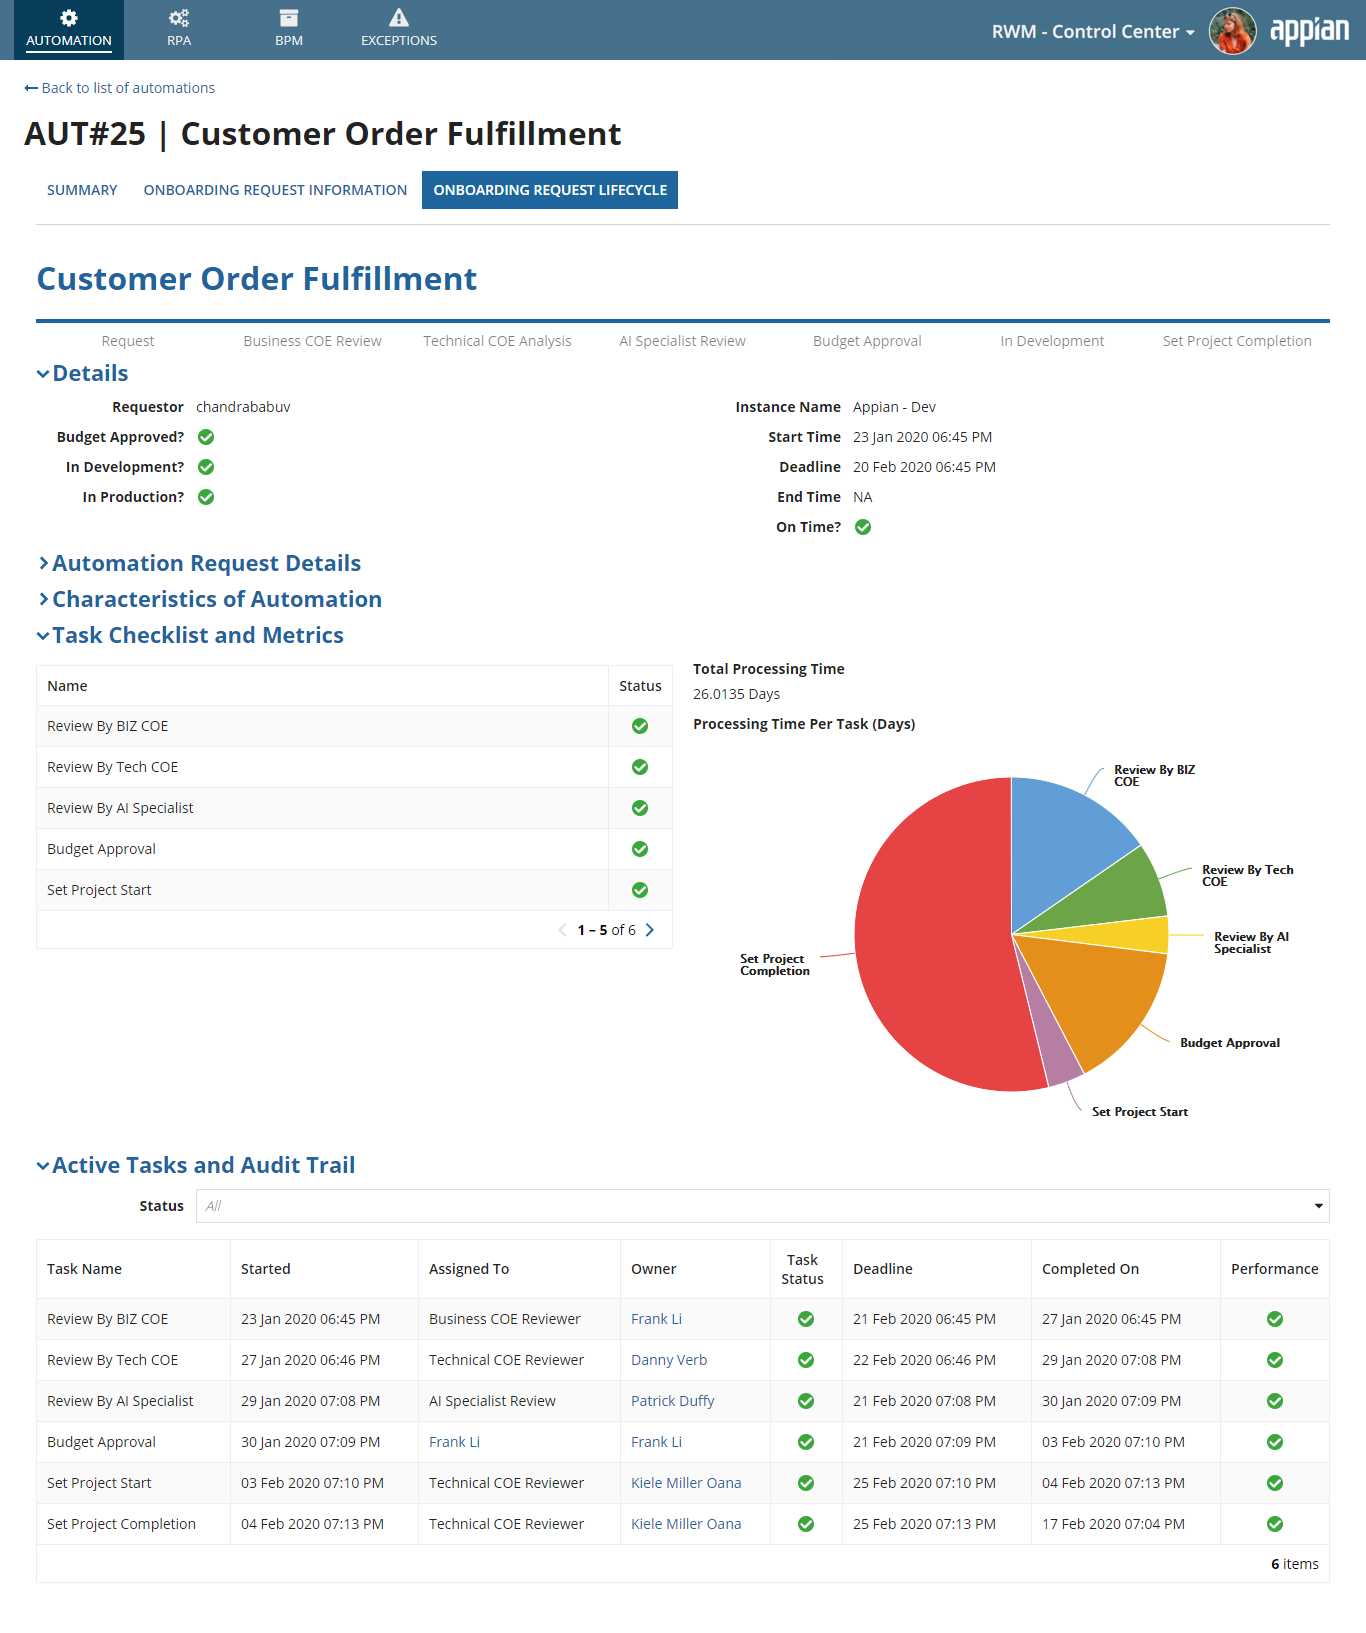
The Onboarding Request Lifecycle view provides the collective information of the automation request and will give information regarding all the approval stages.
RPACopy link to clipboard
This page provides useful statistics about the digital workforce and can be considered the orchestrator of your robotic process automation (RPA).
The RPA page consists of six key tabs:
ProcessCopy link to clipboard
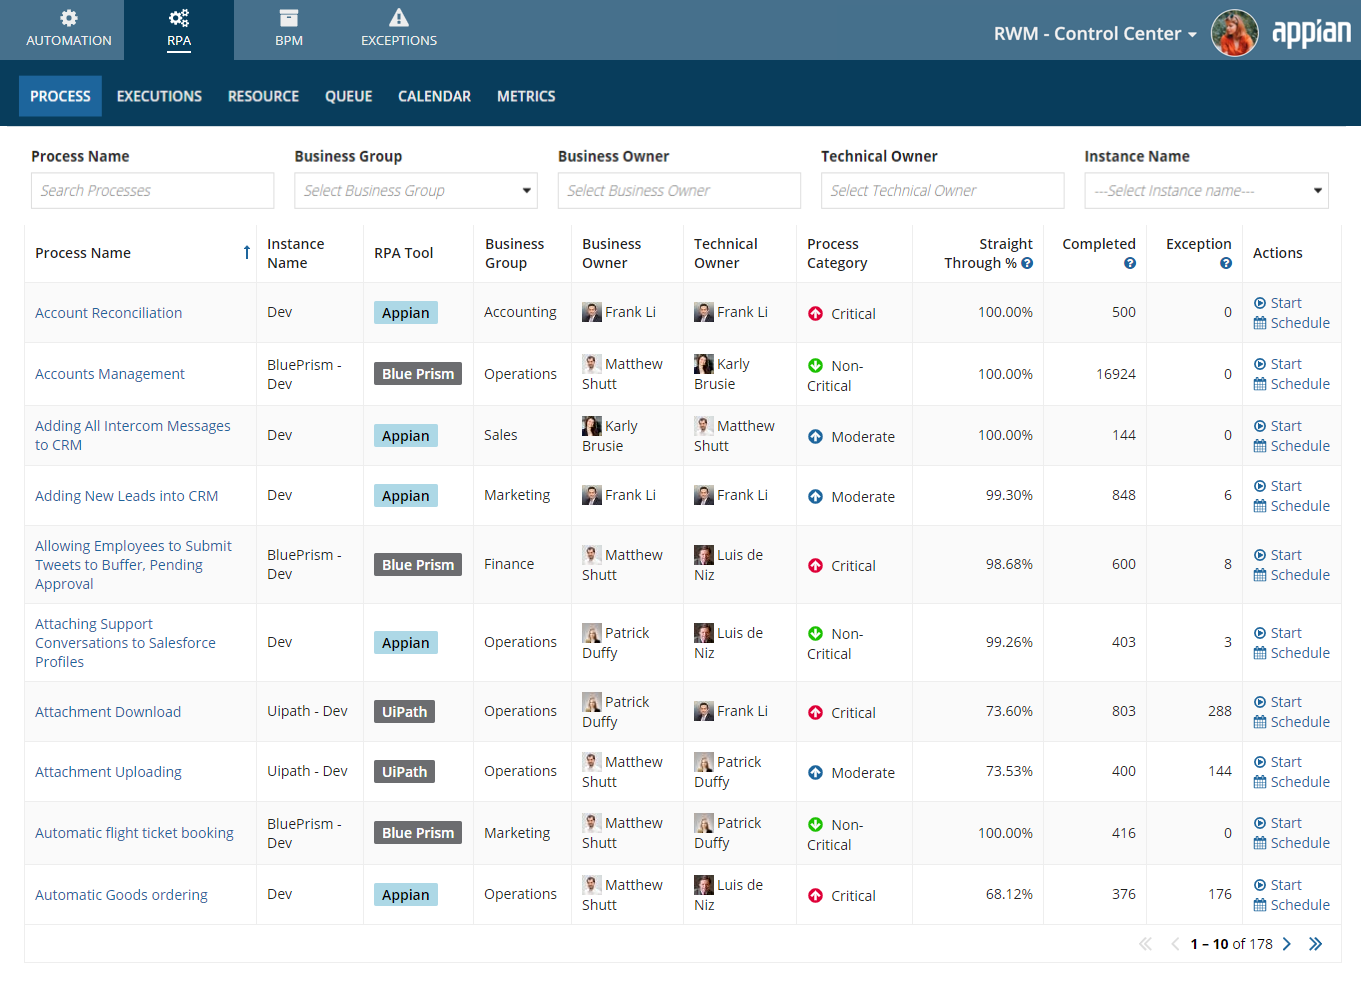
The Process tab provides a bird's eye view of all processes such as the Process Name, the Business Owner and Technical Owner. This screen also allows the users to either start or schedule robotic processes from Appian on a real-time basis.
Users can click on the Process Name to get further statistics about the process.
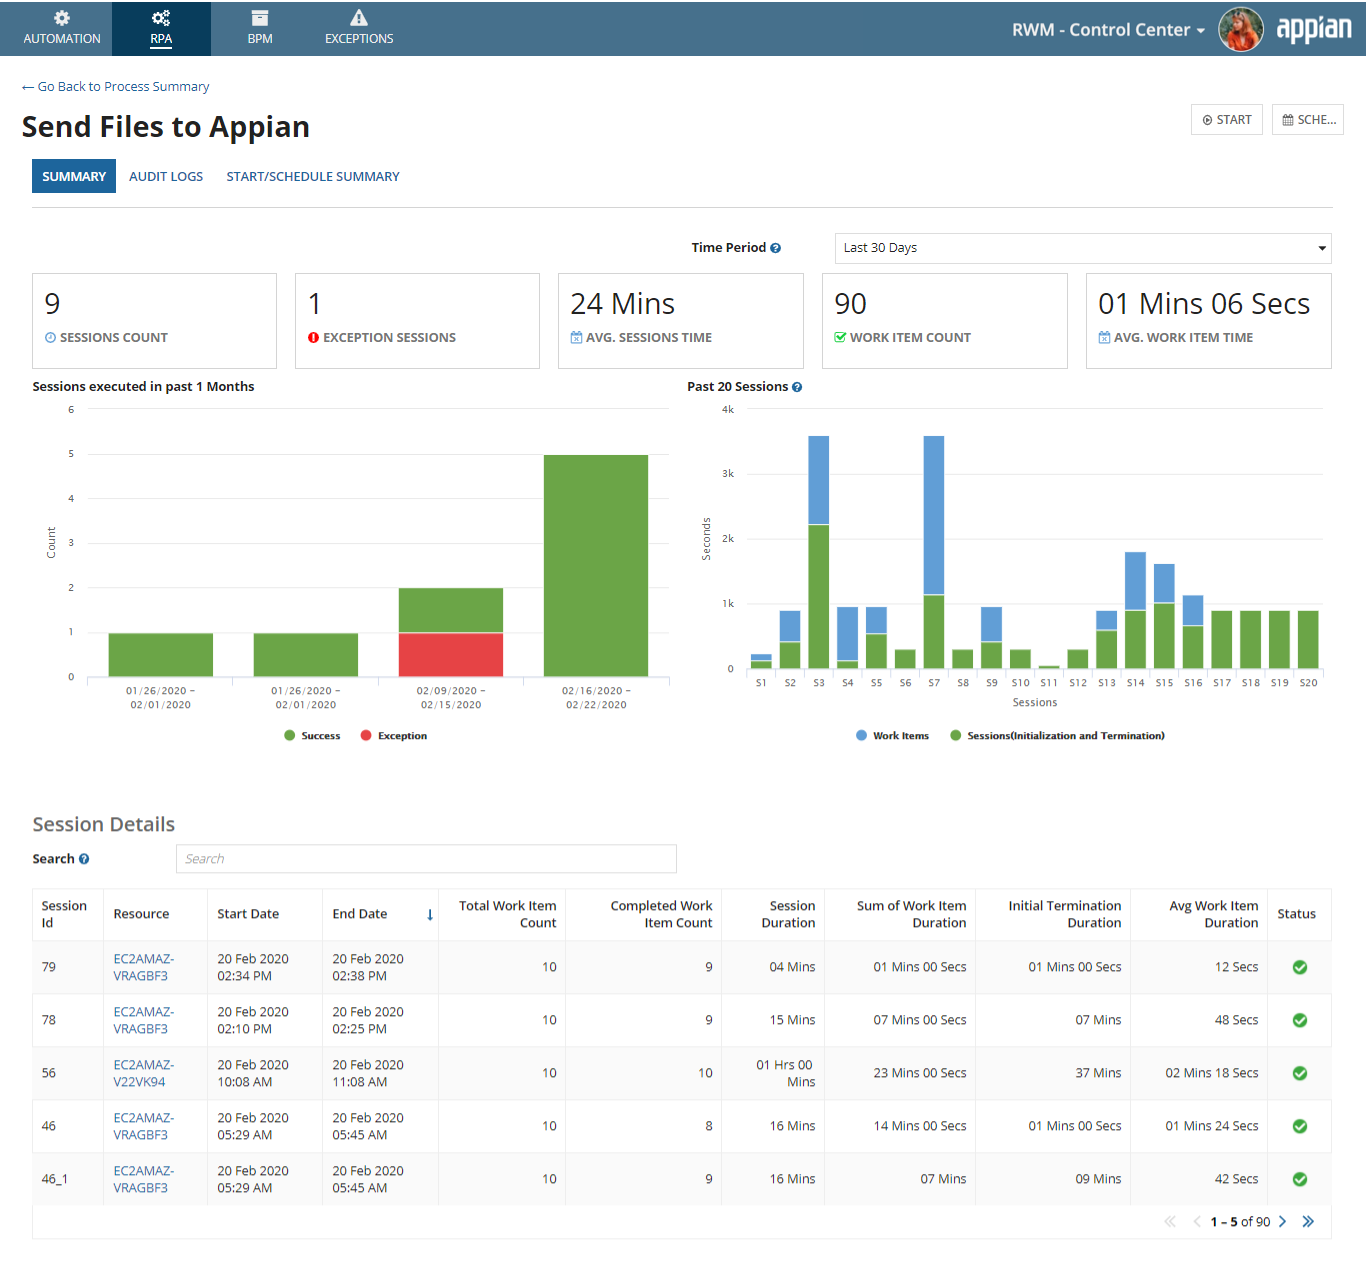
The RPA Process Details page consists of three views - Summary, Audit Logs, and Start/Schedule Summary. The Summary view provides information pertaining to the process sessions, KPIs for sessions count, exception sessions, and avg. session time.
Note: If there are no work items across any of your sessions, you won't see tabs, metrics, or columns related to work items.
Start and schedule an RPA processCopy link to clipboard
Note: While starting or scheduling a process from Appian, users cannot pass collections and complex data types.
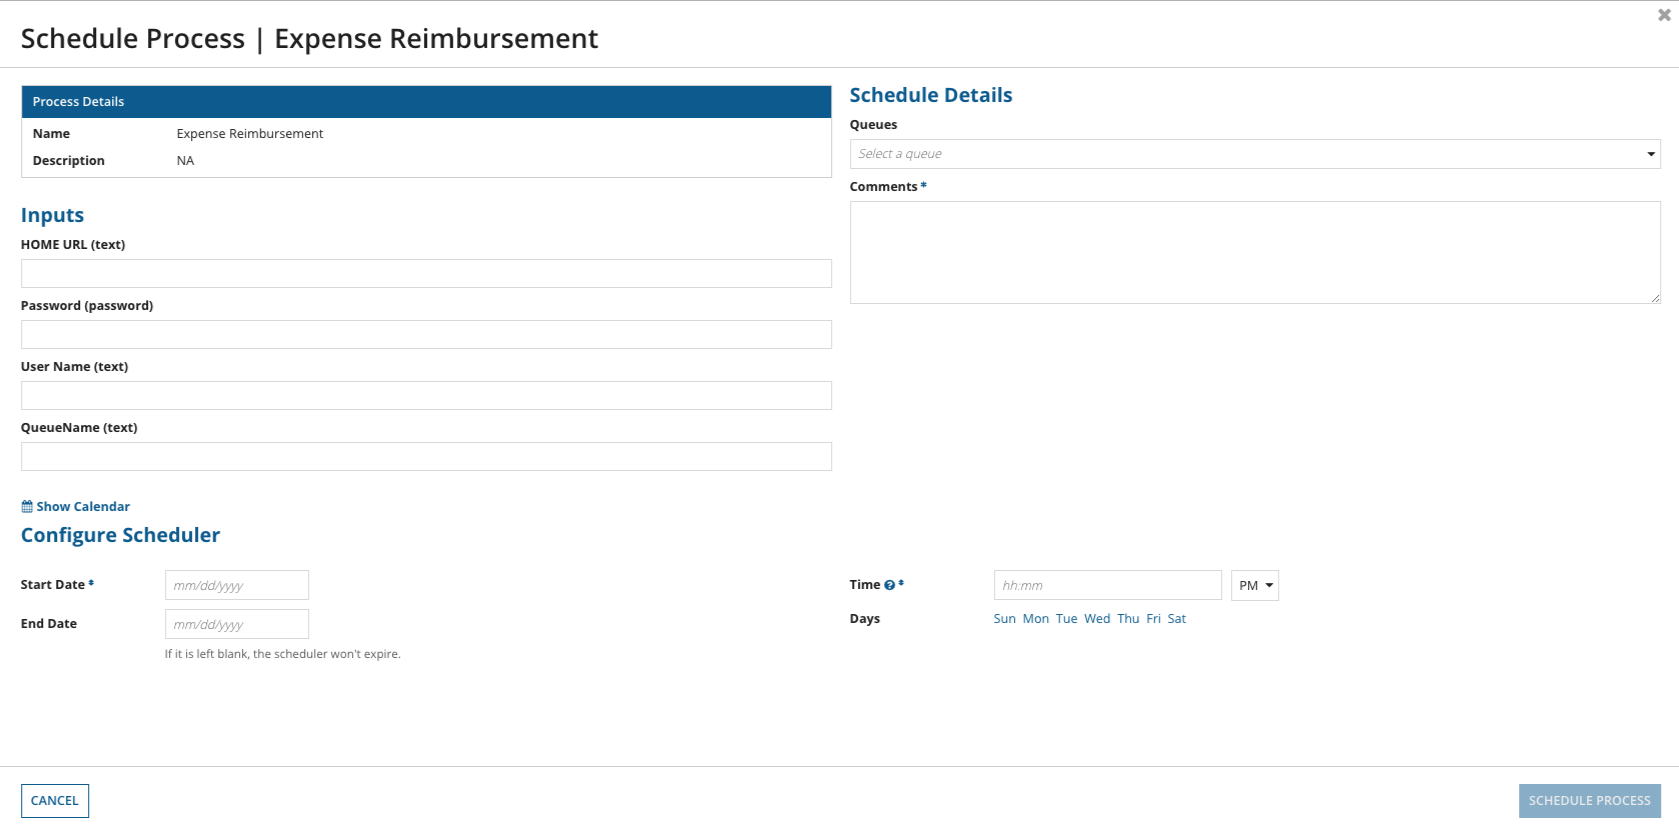
Users can also start or schedule a process right from the process dashboard.
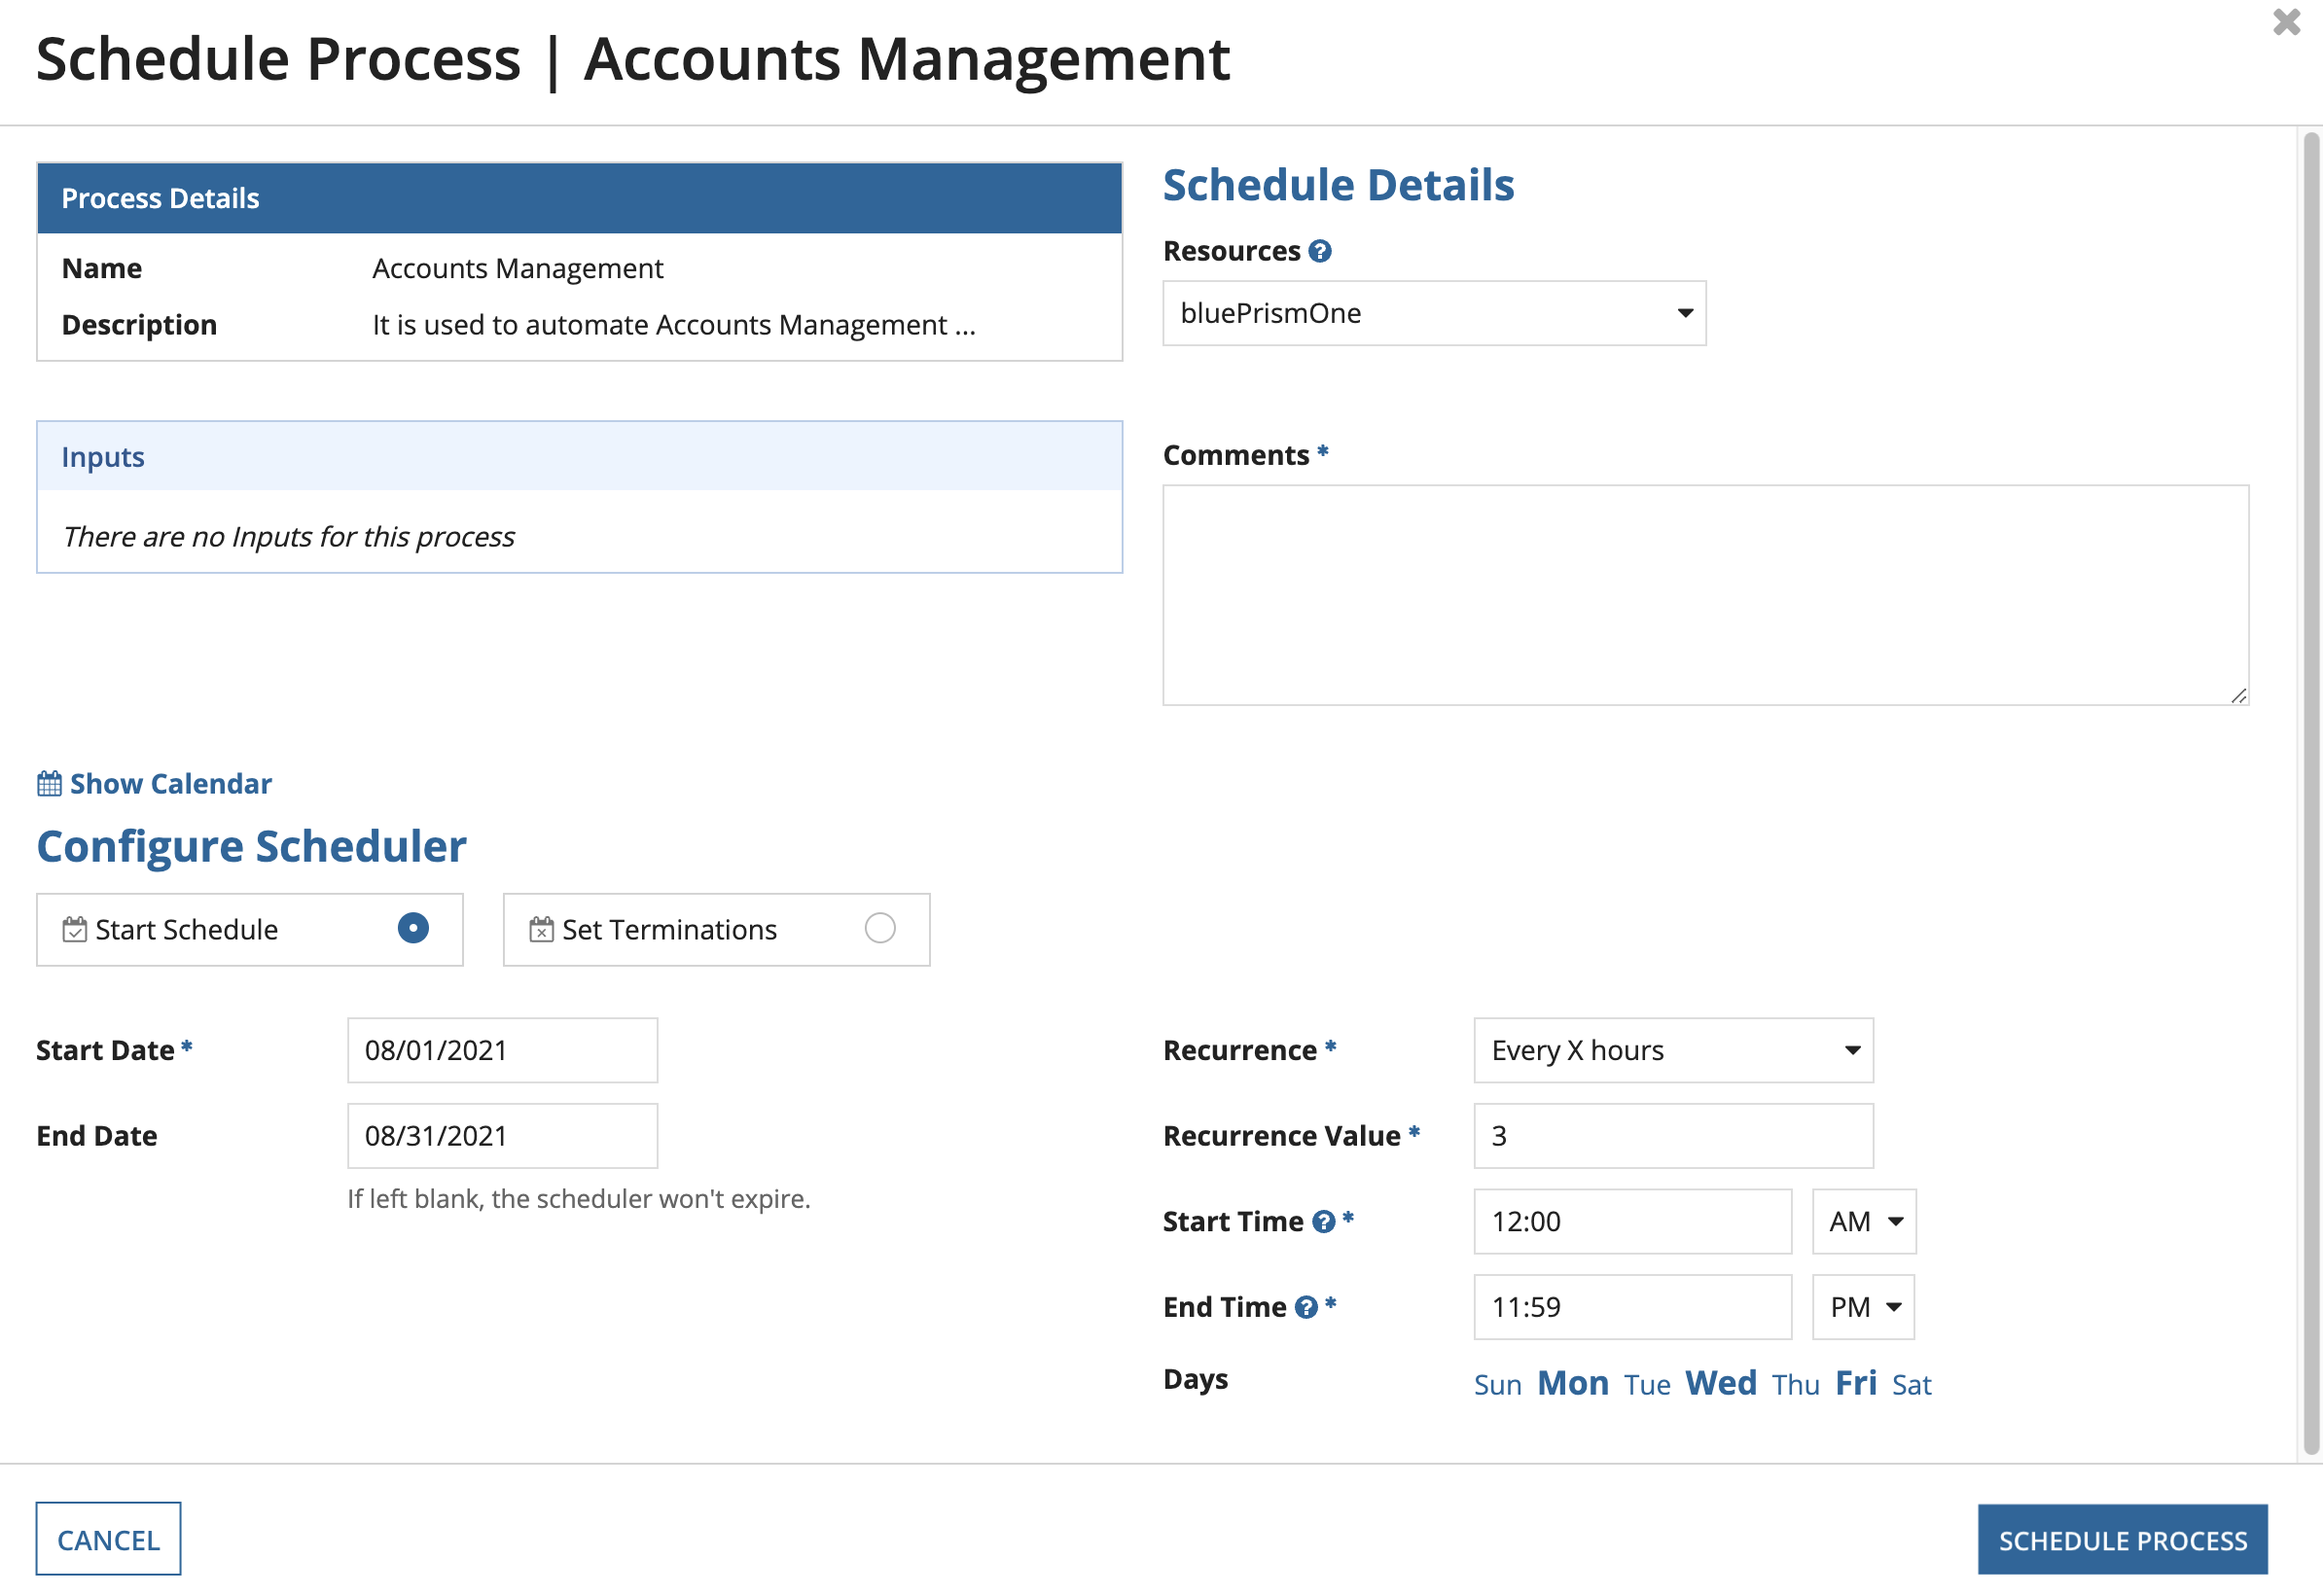
The start and schedule action appears as shown above. Displayed at the top right is the list of inputs for which the user specifies the values. For the schedule, there is a section in the middle called Configure Scheduler where the user enters the start date, end date, time of schedule, and the days at which it needs to be scheduled.
There are two places where a user could start a process:
- Navigate to the Process tab.
- In the Action column, click Start or Schedule for the process.
Or
- Navigate to the Process tab.
- Click a process in the Process Name column.
- At the top right, there are related actions to start or schedule the process.
Configure Blue Prism schedulesCopy link to clipboard
Note: Blue Prism integration isn't supported for new RWM installations after RWM 5.6. This information applies to customers who used Blue Prism with RWM 5.5 or earlier, and upgraded to RWM 5.6 or later.
If you're using Blue Prism as your RPA vendor, you can use RWM to configure specific schedules for process executions. The schedule appears in the Calendar, where you can cancel the schedule.
Note: Schedule options reflect your user account's chosen time zone.
To create a new schedule for a Blue Prism process:
- Go to RPA > Process.
- Find the process you want to schedule. Begin configuring the schedule one of two ways:
- Click Schedule in the Actions column in the Process list. OR
- Click a process in the Process Name column and click the SCHEDULE related action.
- Select Start Schedule.
- Configure the following fields:
- Start Date: Set the schedule's start date.
- End Date: Set the schedule's end date. If you leave this field empty, the schedule won't end or expire.
- Recurrence: Choose whether the process execution should be repeated during the scheduled period. Options include:
- Only Once: The process execution should occur only once for this scheduled period.
- Every X minutes: The process execution should occur at a regular interval based on a defined number of minutes during this schedule.
- Recurrence value: Enter the number of minutes to define the time interval. For example, enter
90to initiate a process execution every 90 minutes. The minimum value for this field is5to ensure performance.
- Recurrence value: Enter the number of minutes to define the time interval. For example, enter
- Every X hours: The process execution should occur at a regular interval based on a defined number of hours during this schedule.
- Recurrence value: Enter the number of hours to define the time interval. For example, enter
2to initiate a process execution every 2 hours.
- Recurrence value: Enter the number of hours to define the time interval. For example, enter
- Every X days: The process execution should occur at a regular interval based on a defined number of days during this schedule.
- Recurrence value: Enter the number of days to define the time interval. For example, enter
3to initiate a process execution every 3 days.
- Recurrence value: Enter the number of days to define the time interval. For example, enter
- Start Time: Select the time the process should start execution. This field uses the format
HH:MMwhere HH is the hour (0-12) and MM is minutes (0-59). Select AM or PM. This value must be at least 10 minutes in the future. - End Time: Select the time the process should end execution. This field uses the format
HH:MMwhere HH is the hour (0-12) and MM is minutes (0-59). Select AM or PM. This field appears when you select Every X minutes or Every X hours for the Recurrence. - Days: Select the days of the week the execution should occur. If you selected
Every X daysfor the recurrence, consider that interval when configuring which days you choose here. The schedule will run the process when the interval and selectedDaysoverlap. For example, if you configure the schedule to run a process every3days, but you selectMon,Tues,Weds, andThursforDays, the schedule will run onMonandThursfor that week.
- Click SCHEDULE PROCESS.
Note: The Blue Prism scheduling feature uses constants to determine time intervals for process executions. These values are configured to ensure performance, so we recommend testing any changes you make to the following constants:
RWM_SCH_TIME_CONSTRAINT: Determines the minimum amount of minutes for schedules configured to run using theEvery X minutesrecurrence. Default value:5.RWM_BP_SCHEDULE_INTERVAL: Determines the interval at which the RWM background process starts the scheduled Blue Prism processes. Default value:3.RWM_SCH_START_TIME_CONSTRAINT: Determines the minimum amount of time, from the user's current time, for newly created or canceled scheduled processes to take effect. Default value:10.
Users can navigate to the Start/Schedule Summary view:
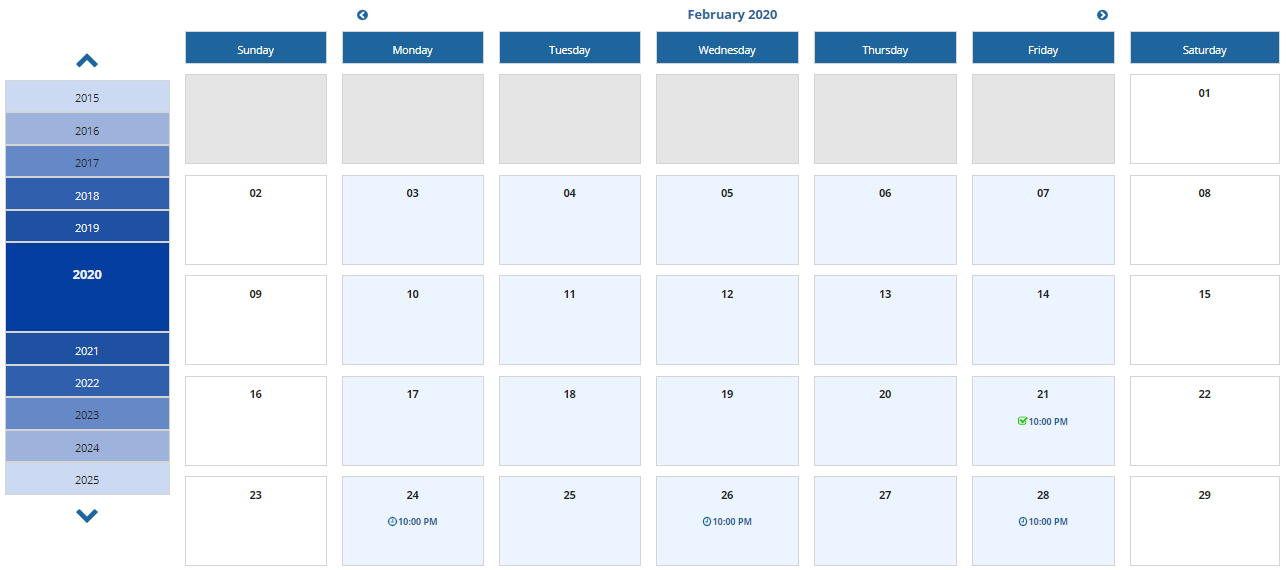
This opens up the RPA schedule calendar against the selected process. The calendar shows the various times at which the process is scheduled to run during that month.
A table appears at the bottom of the page that shows the list of processes triggered by Appian (for the current day). The Start History table displays five columns: Started By, Started At, Inputs, Comments, and Status.
Audit logCopy link to clipboard
The Audit log gives information about the processes that are changed on the RPA vendor side.
ExecutionsCopy link to clipboard
Note: If there are no work items across any of your sessions, you won't see tabs, metrics, or columns related to work items.
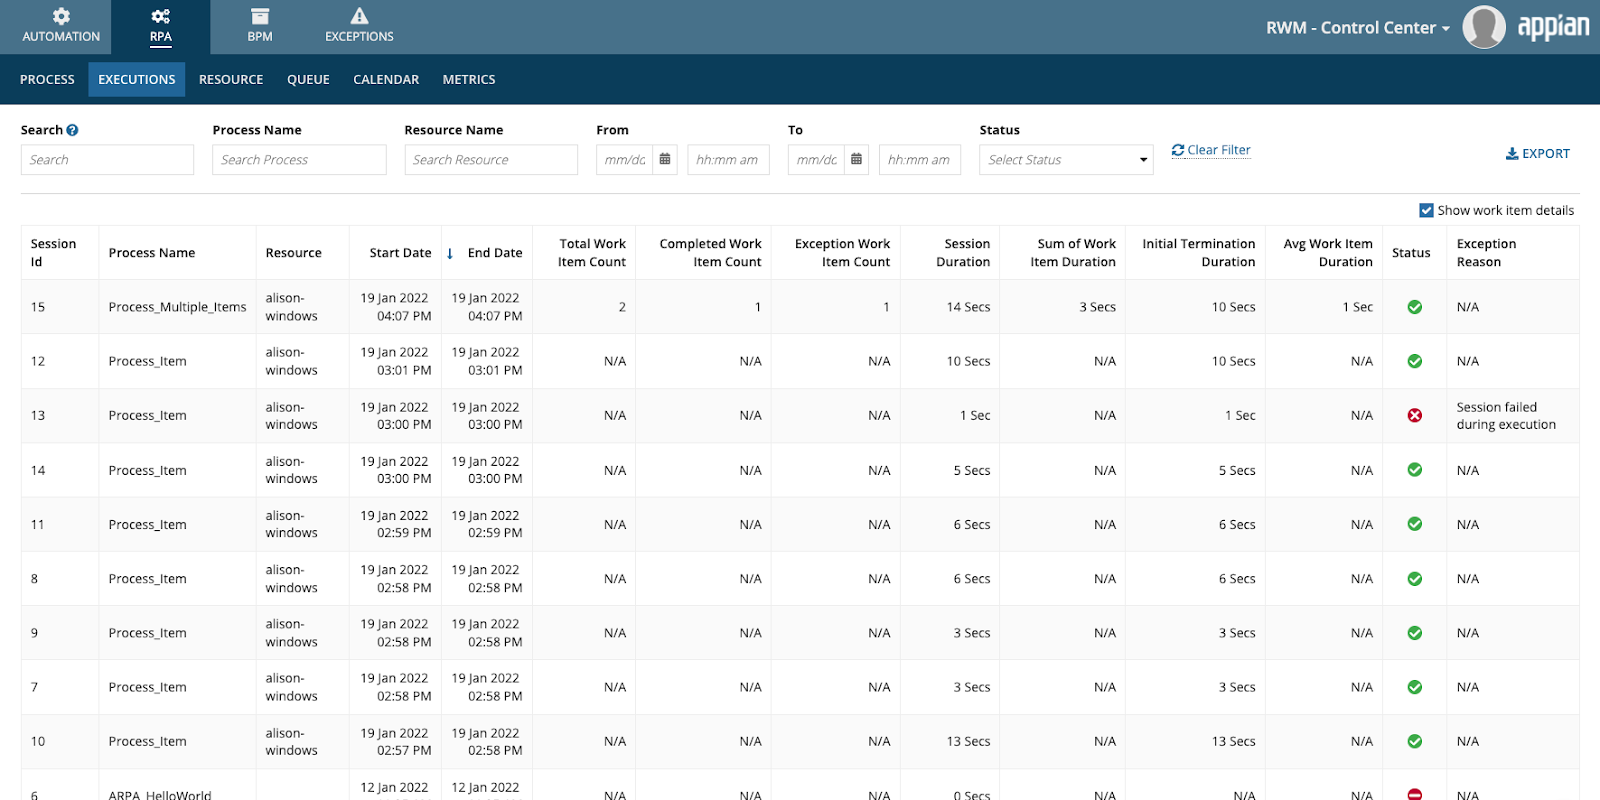
Click on the Execution tab to view sessions for completed robotic processes.
The Executions tab includes two views: Executions and Active Sessions:
- Use the Executions view for a comprehensive list of past process executions. The table includes details about the instance, process name, start and end dates, work items processed, and the time it took to process those items. You can also see the overall result (SUCCESS, FAILURE, or ABORTED) and whether exceptions occurred.
- In the Active Sessions view, you can view sessions in progress on a connected Blue Prism server. The table includes details about the session Id, start date, the active process, and the resource where the process is running. You can terminate a session in the Actions column. You can also configure resource details.
View logs from Blue PrismCopy link to clipboard
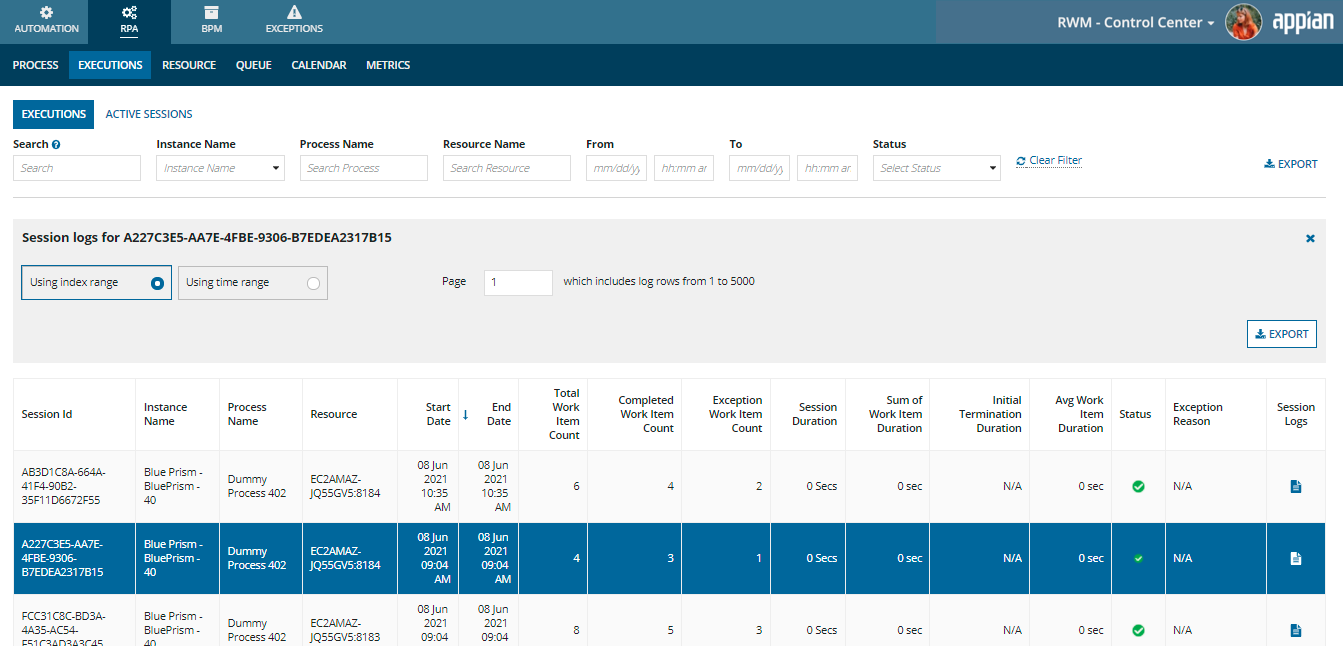
On the Executions tab, you can retrieve session logs from Blue Prism. You can also access Blue Prism logs for an individual exception through the Exceptions tab.
- In the Executions grid, find the session that contains data you want to retrieve. You can use the filters to narrow the list of entries.
- Click the file icon in the Session Logs column.
- In the Session logs banner, choose how to refine the results:
- Select Using index range to choose a subset of results based on the page. Enter a page number to see which items are included in the export. Each page contains up to 5000 entries. You can configure the page size using the
RWM_LOGS_MAXLOGSIZEconstant. - Select Using time range to choose a subset of results based on date and time. Enter the date and time boundaries for the items to include in the export.
- Select Using index range to choose a subset of results based on the page. Enter a page number to see which items are included in the export. Each page contains up to 5000 entries. You can configure the page size using the
- Click RETRIEVE DATA to retrieve the data from Blue Prism. Depending on how many items RWM needs to retrieve, this step may take a few seconds.
- Click EXPORT to generate the document containing the retrieved data. The file is in
.XLSXformat. - Click Download to save the file to your computer.
- When you're finished, click the X icon to hide the Session logs banner.
ResourceCopy link to clipboard
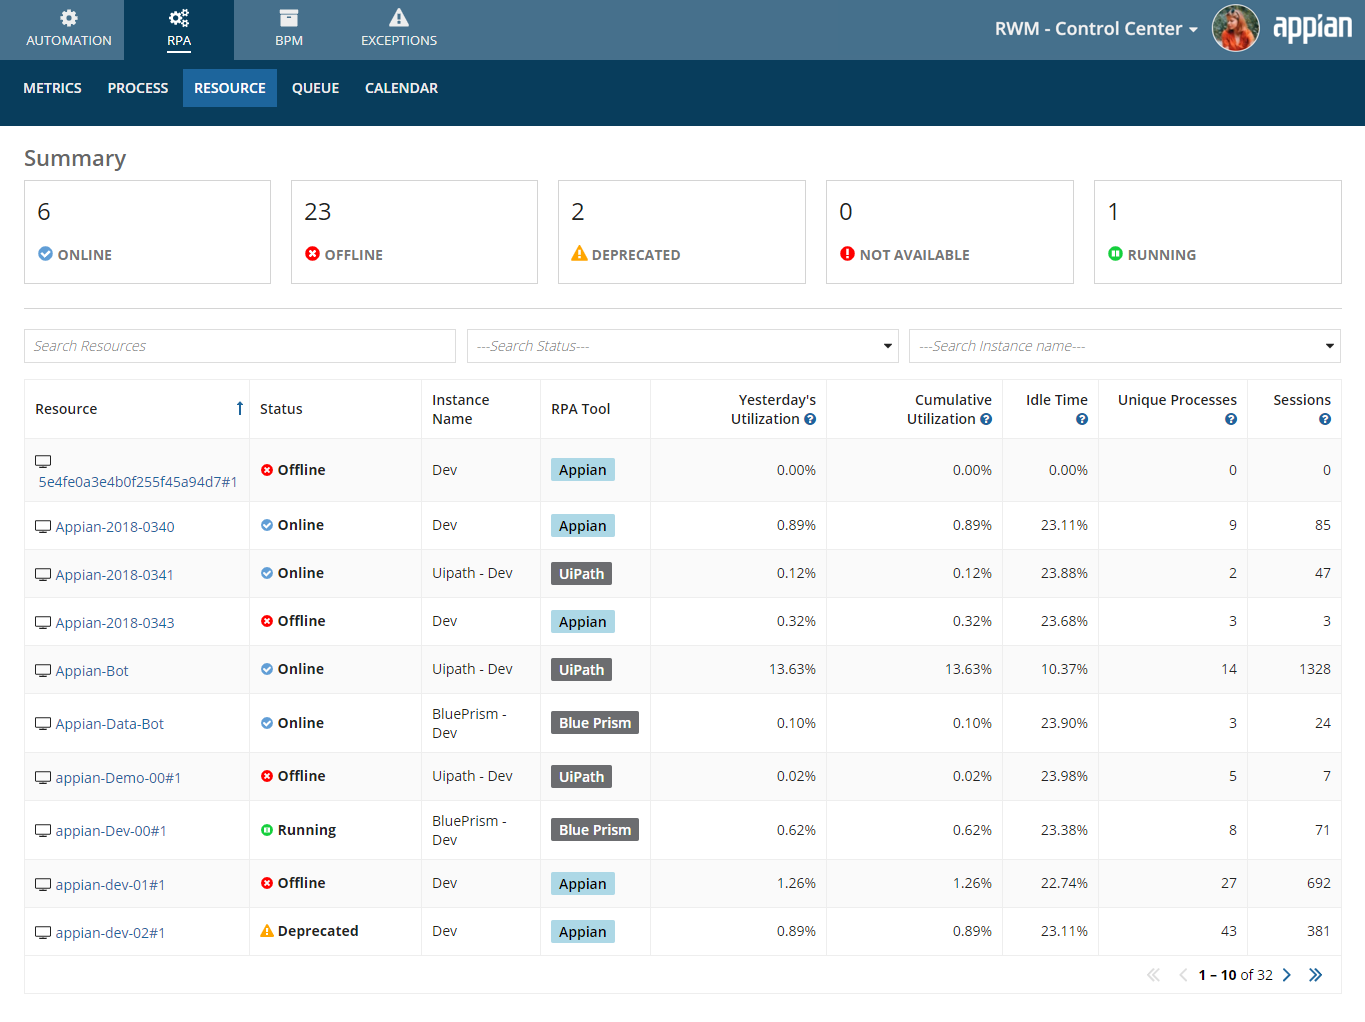
The Resource tab provides an overview of all the resources (typically runtime machines) along with its current status (active, offline, etc). It also gives statistics about usage. Add and configure resources through your RPA vendor. RWM shows resource information on this tab. If you're using Blue Prism, you can terminate active sessions directly from RWM.
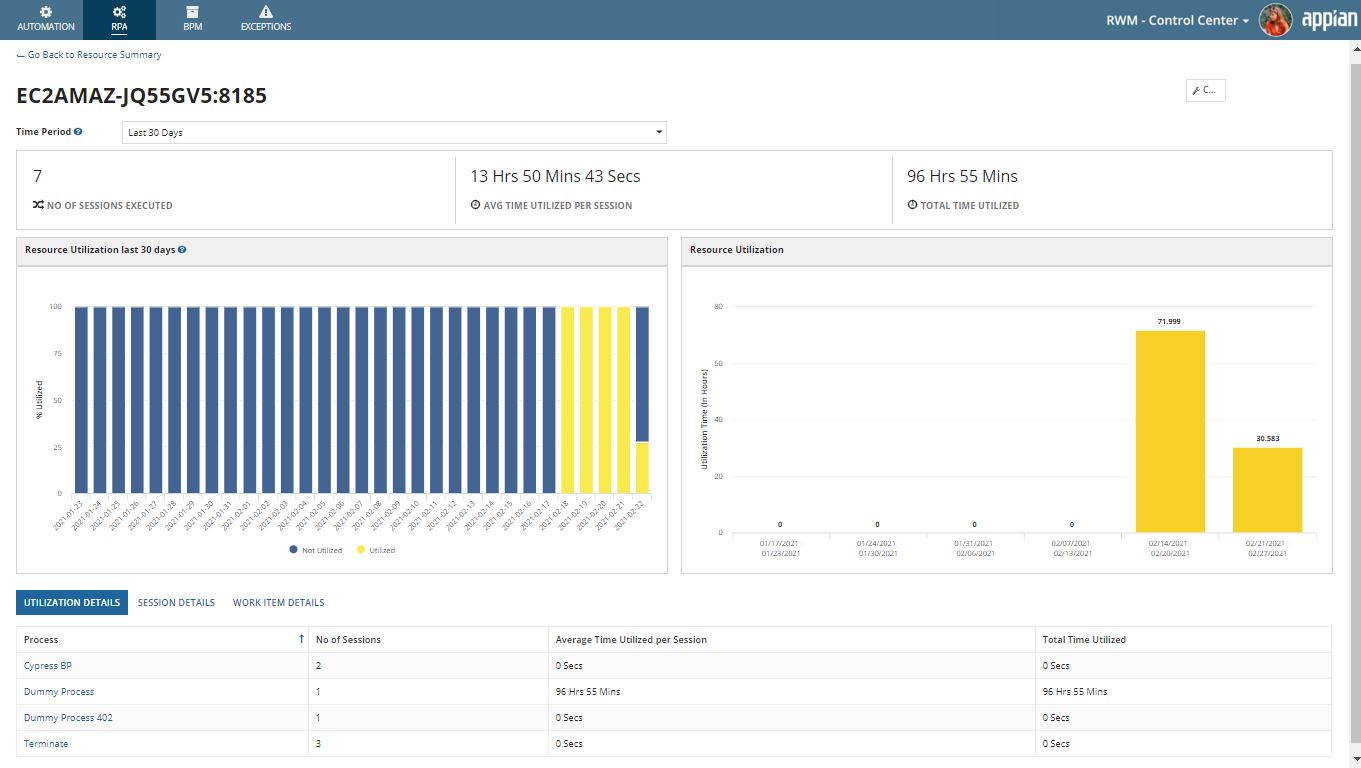
Click a resource to see further information, such as a total number of sessions executed, the total number of processes executed, and the percentage of utilization of the resource in a given period. The percentage utilization of the resource may be an interesting metric for the operations, business, and the IT teams to plan capacity utilization. If utilization at runtime is high, then capacity may have to expand to accommodate future RPA automation requests.
In the Utilization Details table, you can see a breakdown of all the processes that have been executed on the resource in the given time period.
Note: If there are no work items across any of your sessions, you won't see the Work Item Details tab.
QueueCopy link to clipboard
Note: This tab only appears if you have queues created on the RPA vendor side.
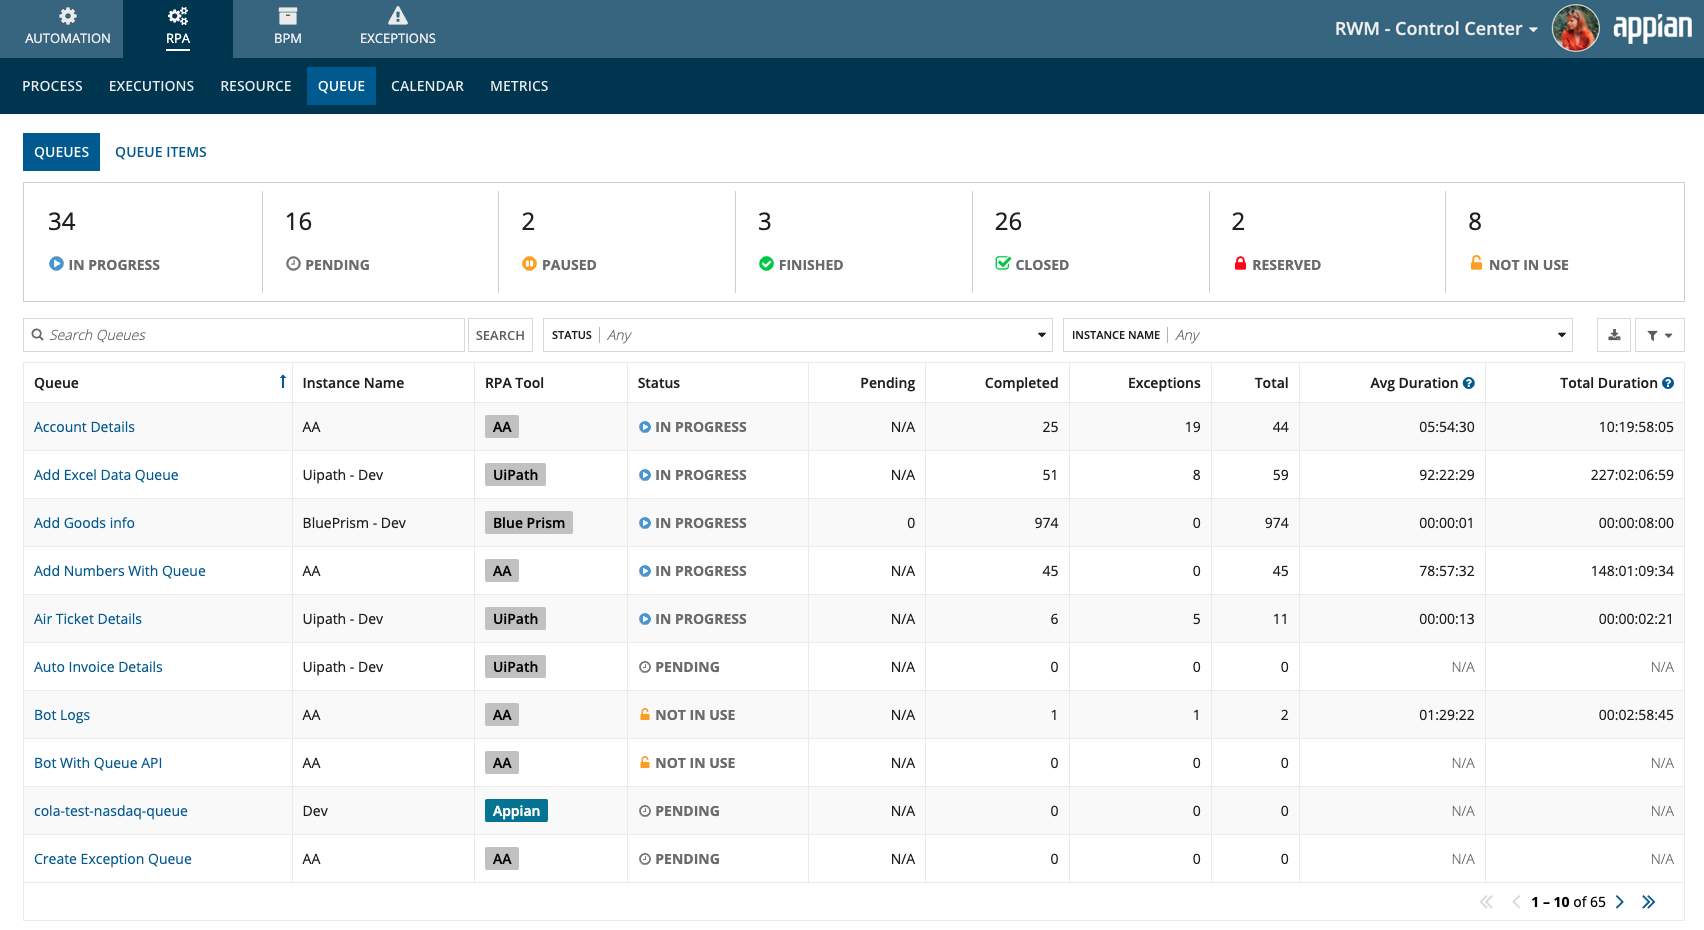
The Queue tab provides details about your RPA vendor queues. It provides basic information such as the name of the queue, the number of work items in the queue, the status of each work item (completed or pending, etc), and the amount of time taken for each work item in the queue.
The top of the tab shows aggregated data about the queues in each status:
- In Progress: At least one robot is currently processing the queue.
- Pending: No robot has processed the queue yet.
- Paused: A robot isn't processing the queue, but the queue isn't accepting new items.
- Finished: All items in the queue have been processed, or the status has been manually set. Queues with this status won't be processed further, even if some items are pending.
- Closed: All items in the queue have been processed and the queue is not expected to be processed again.
- Reserved: A robot has claimed the queue and no other robot can access it.
- Not in Use: The queue is not pending or expected to be processed again.
Click Export to Excel to download queue information in an .xlsx file. Refer to Optimizing the Excel Export to ensure the queue data displayed here meets the requirements and follows additional recommendations for export.
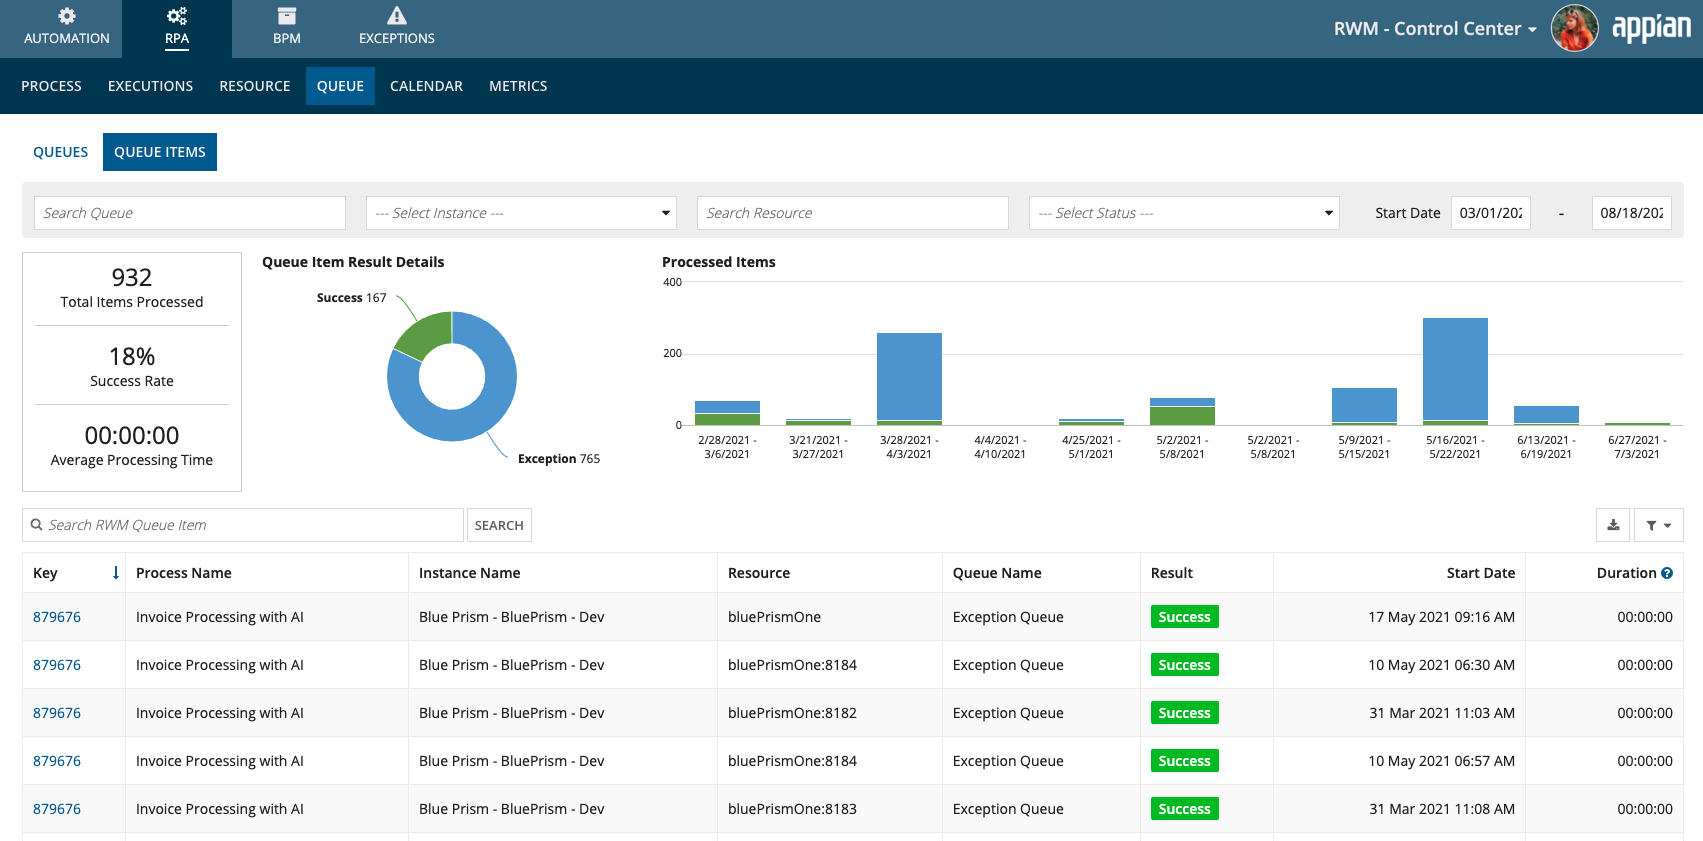
Click a queue to see more information about each item it contains, such as the resource that executed the work item, and the status of each work item. Use the filters at the top of the page to narrow the data displayed. The dashboard shows data for queue items started in the last month by default.
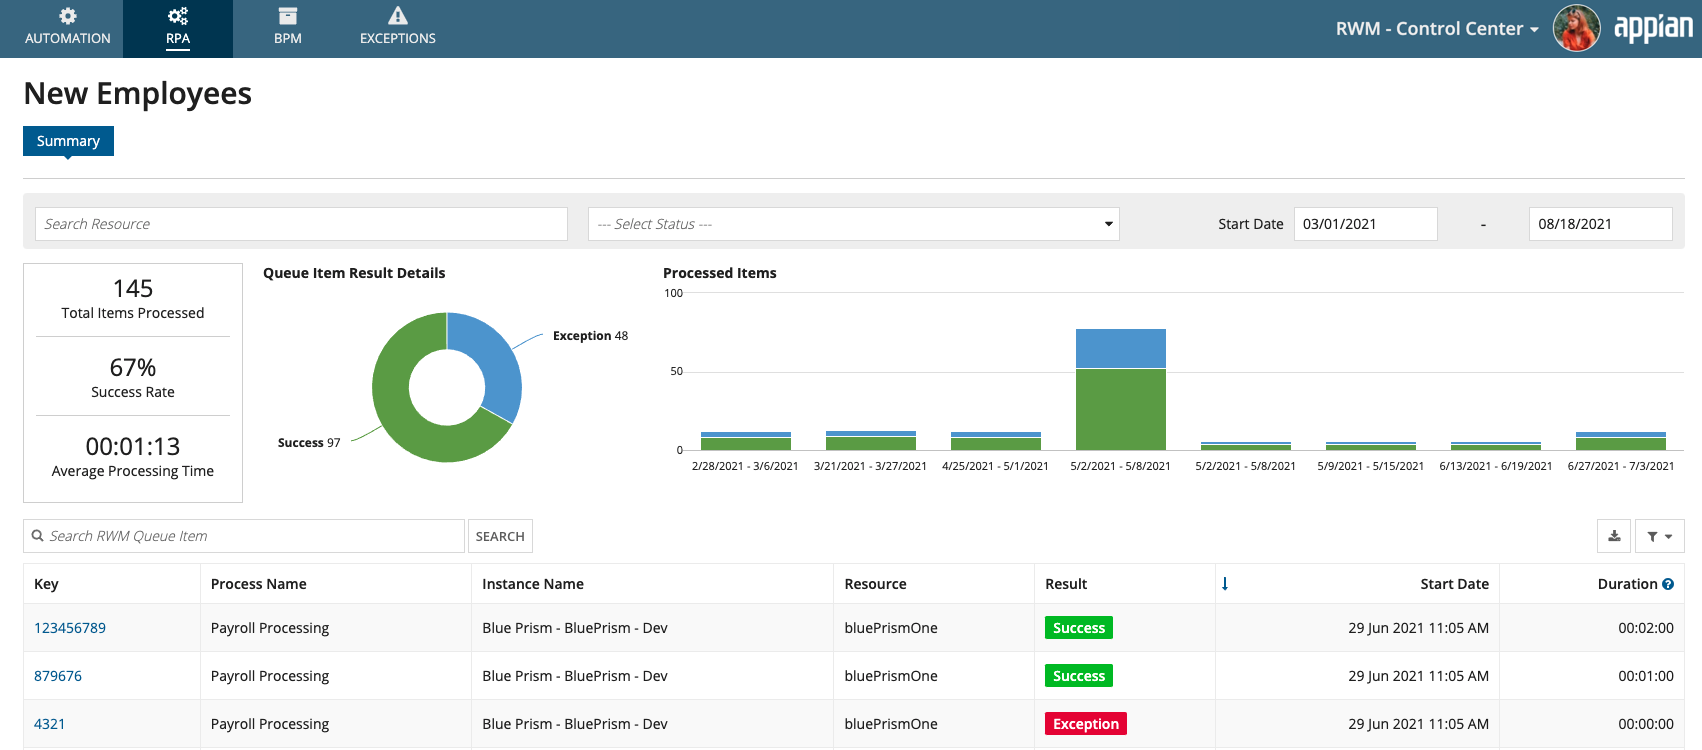
The Queue Items tab shows aggregate queue item data at the top, and specific item data below in a grid. The dashboard shows data for queue items started in the last month by default.
Summary data is calculated as follows:
- Total Items Processed: Number of items in this queue that have been processed.
- Success Rate: Number of items processed successfully, divided by the total number of items processed.
- Average Processing Time: Average duration for processed items in the queue, shown in
HH:MM:SSformat. - Queue Item Result Details: Pie chart showing the count of items in the queue by status.
- Processed Items: Stacked column chart showing the number of items processed in the given date range. The column segments show the number of items by status.
Click Export to Excel to download queue item information in an .xlsx file. Refer to Optimizing the Excel Export to ensure the queue item data displayed here meets the requirements and follows additional recommendations for export.
To view all information for a specific item, including its functional data, click the item's Key in the grid.
CalendarCopy link to clipboard
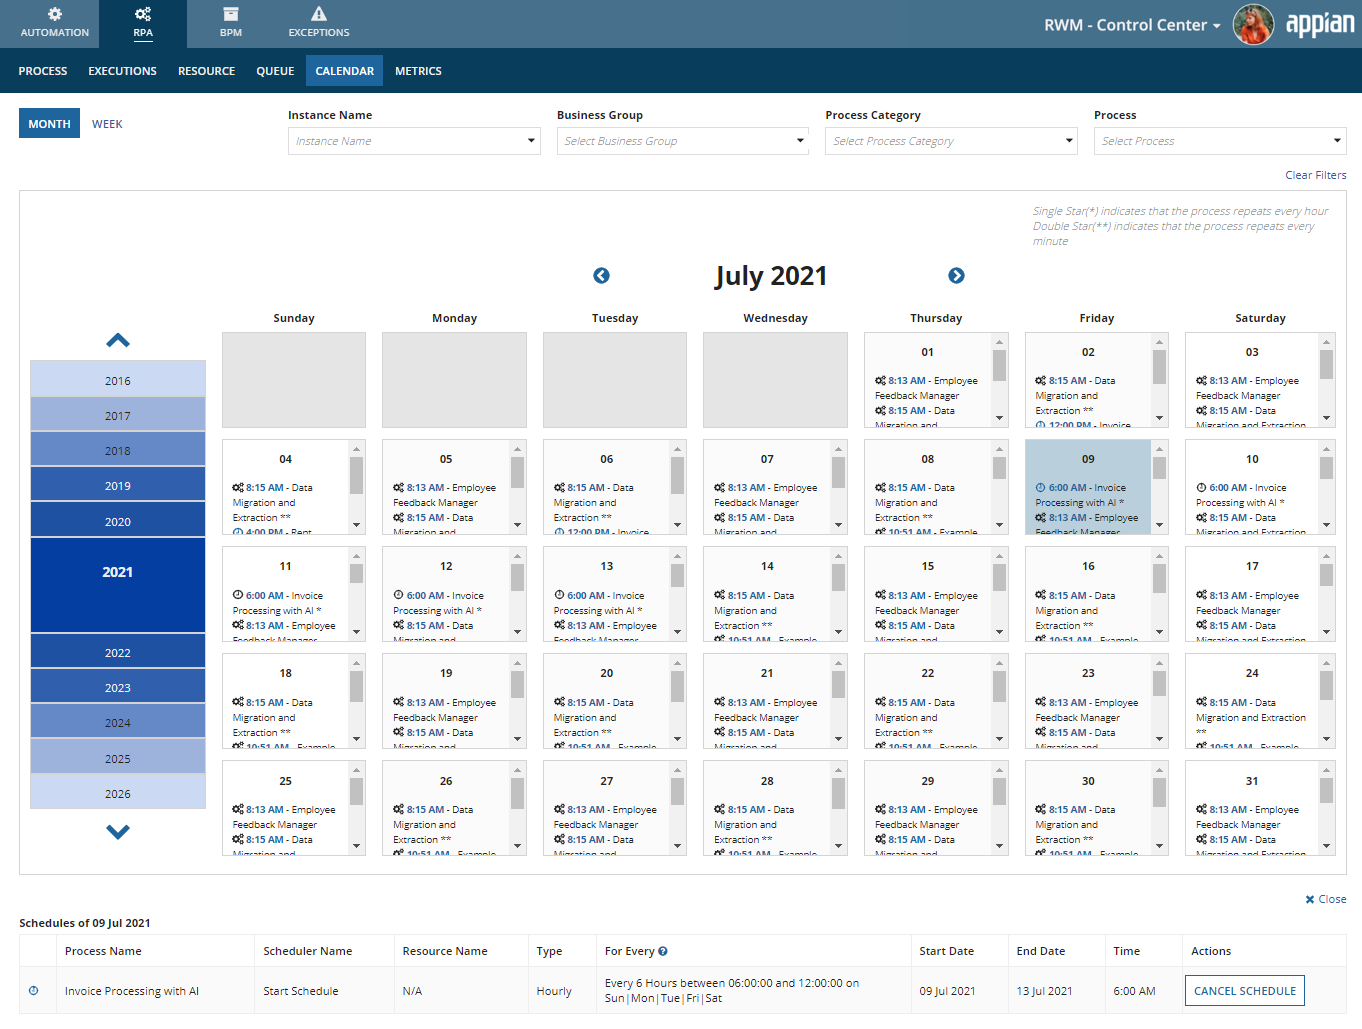
The calendar shows you a list of all the processes that have been scheduled in Appian as well as in your RPA vendor. You can filter based on the process categories and the process names. Companies that work across different time zones can toggle between their timezone and the GMT for comparison.
Click on a timestamp in the calendar to see additional details. The scheduled occurrence details appear below the calendar. Your options to act on the schedule appear in the Actions column.
The calendar uses icons to display the real-time status of the schedules:
| Icon | Description |
|---|---|
| The process is scheduled on the RPA vendor side. | |
| The process is scheduled in Appian and waiting to be executed. | |
| The process was scheduled in Appian and executed successfully. | |
| The process was scheduled in Appian and the execution failed. | |
| The process was scheduled in Appian and canceled. | |
| * | Indicates that the schedule runs every hour. The time listed here indicates the first occurrence of the schedule. |
| ** | Indicates that the schedule runs every minute. The time listed here indicates the first occurrence of the schedule. |
Cancel a Blue Prism scheduleCopy link to clipboard
To cancel a schedule from the calendar:
- Click the scheduled Blue Prism process in the calendar.
- In the grid that appears below the calendar, click CANCEL SCHEDULE in the Actions column.
- In the confirmation window, click REMOVE SCHEDULE.
MetricsCopy link to clipboard
Note: If there are no work items across any of your sessions, you won't see tabs, metrics, or columns related to work items.
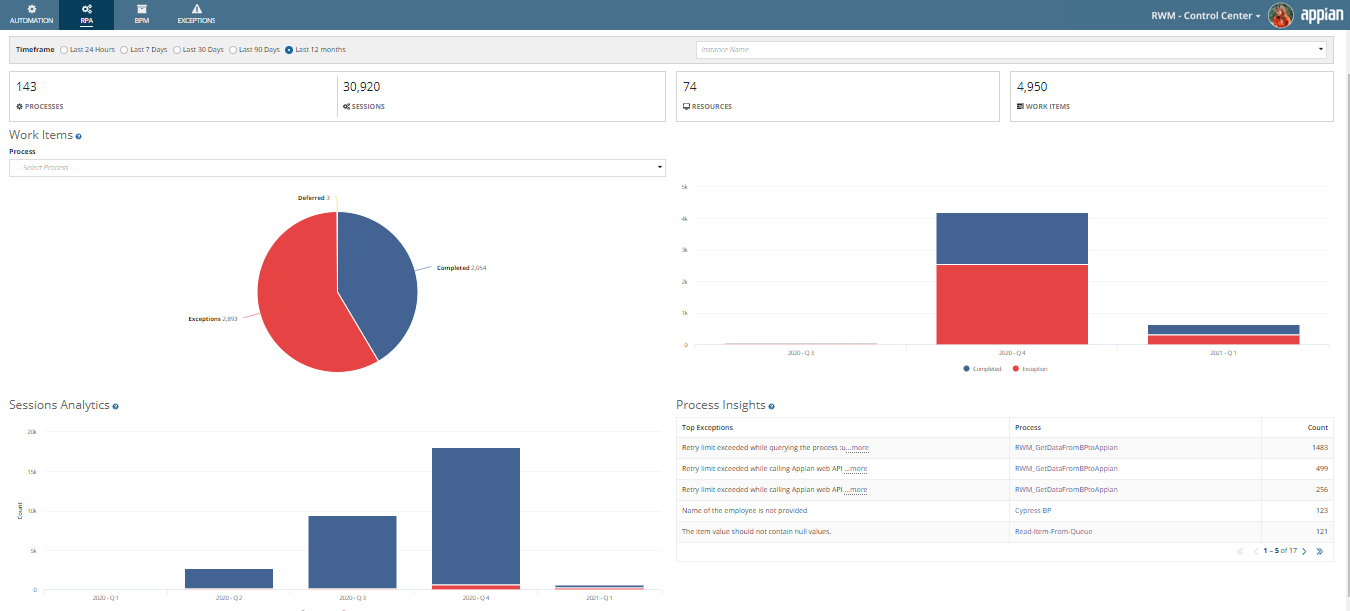
This tab shows the following insights:
- Key Performance Indicators (KPIs) - Count of total processes, resources, sessions, and work items.
- Process Insights - Top exceptions and top time saved of RPA processes.
- Sessions Analytics - Total number of sessions that have occurred on each quarter, month, and week.
- Work Items - Total number of work items that have been processed each quarter, month, and week. This value can be compared against the total work items completed and deferred, as well as exceptions. This can be further drilled down at the process level.
BPMCopy link to clipboard
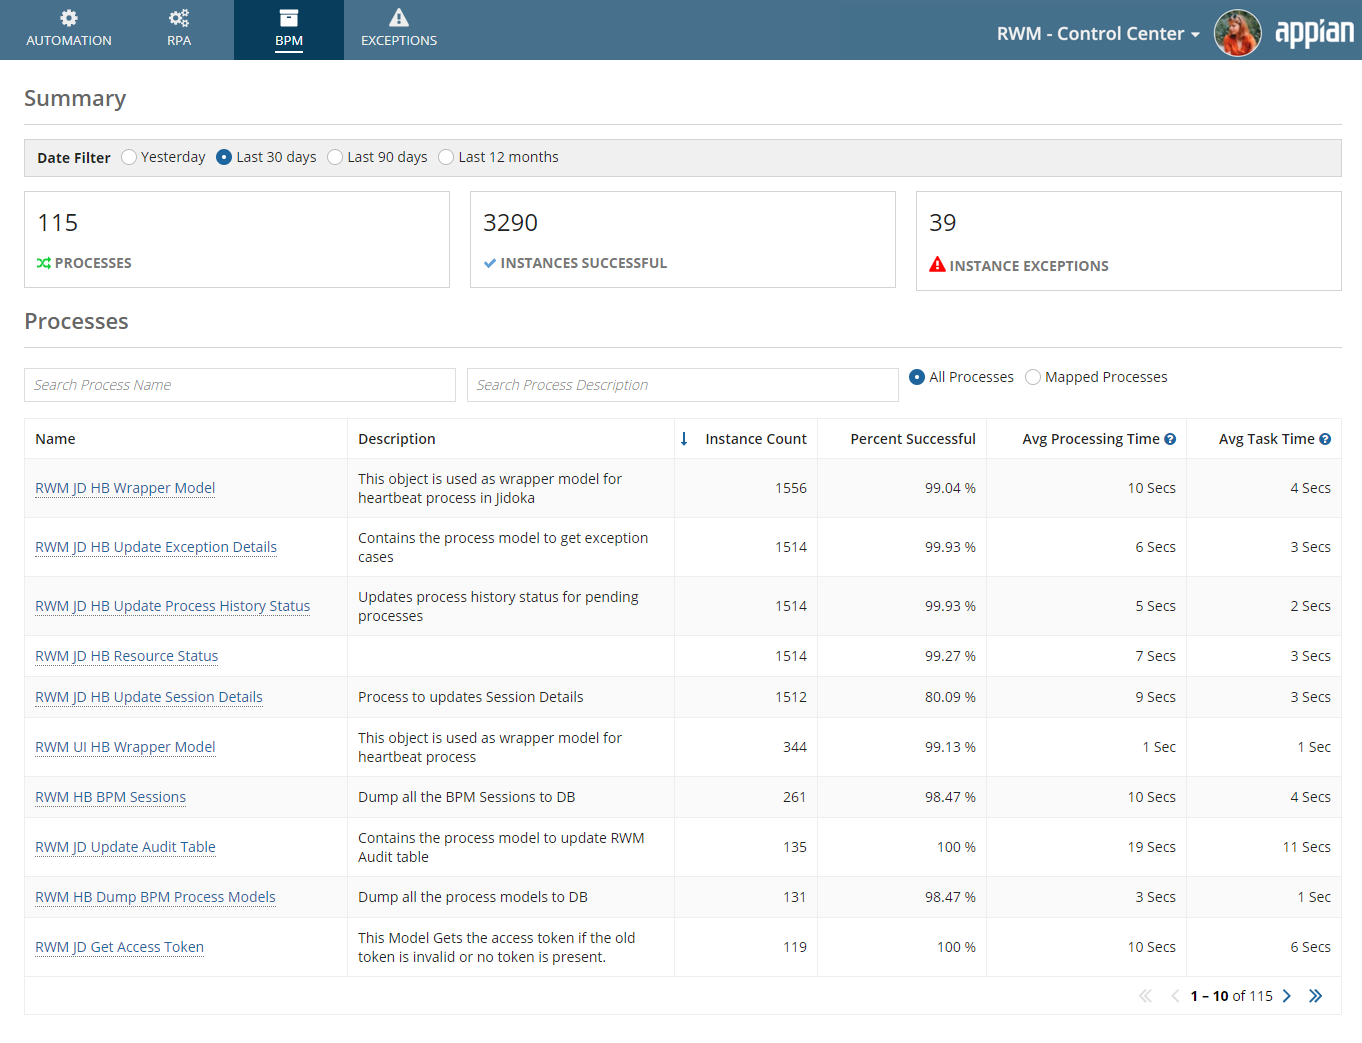
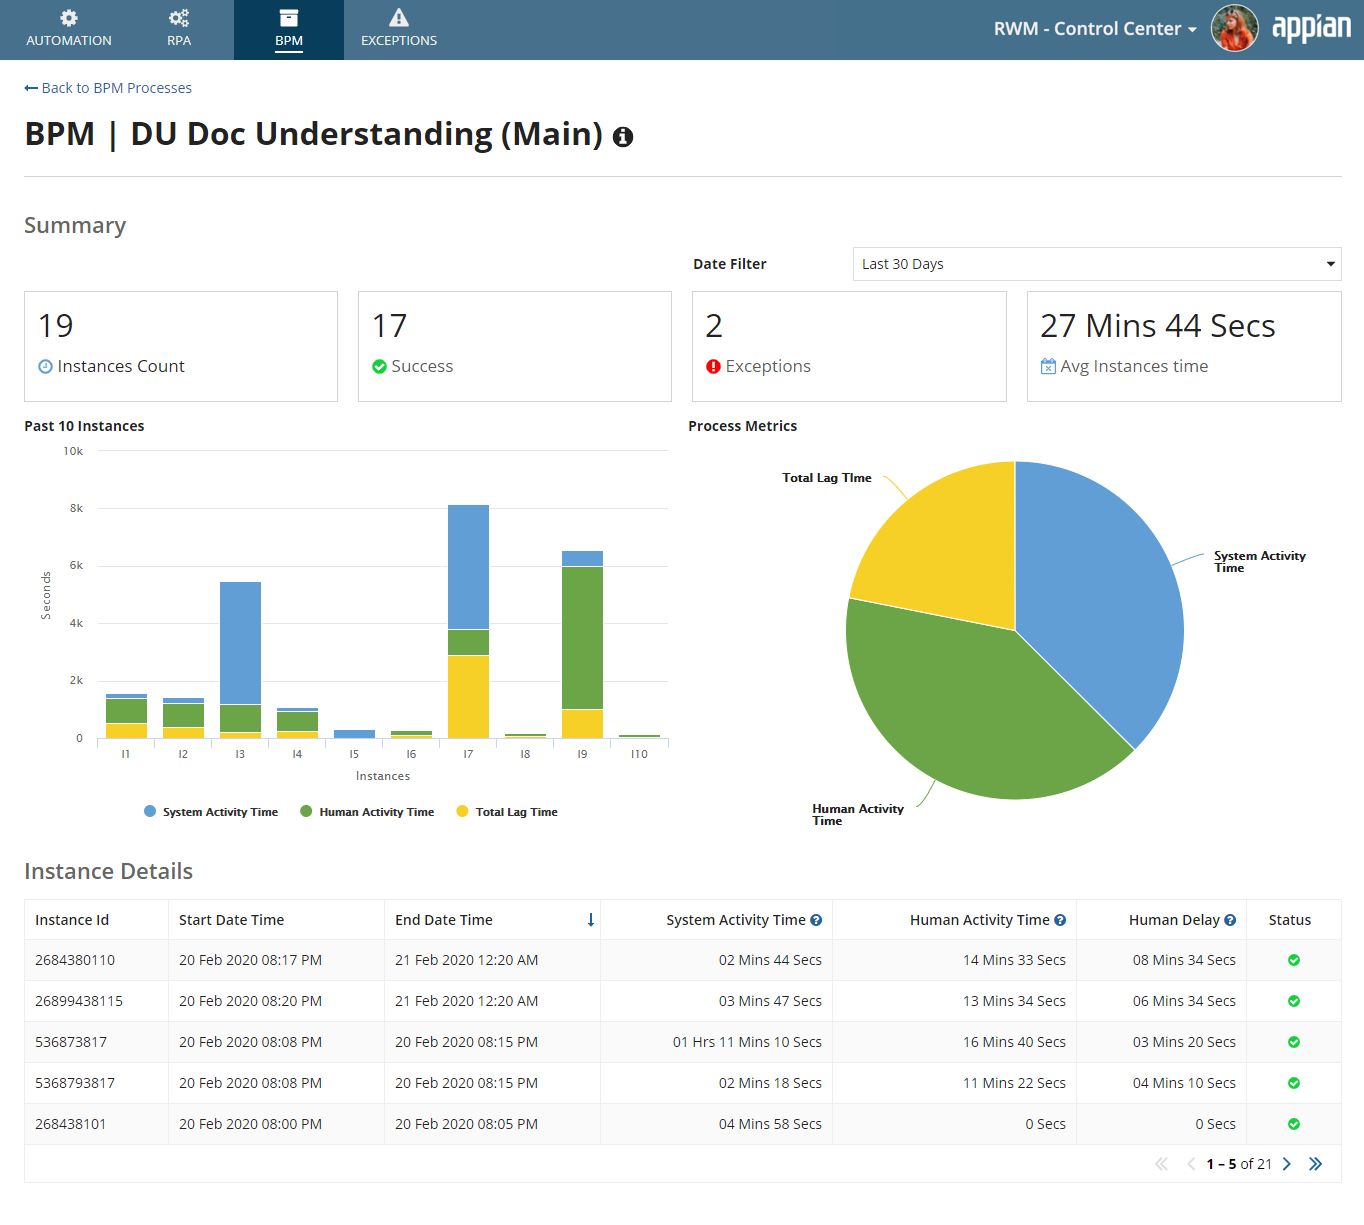
The BPM page provides a bird's eye view of the BPM process and information such as the process Name, Description, Instance Count, Percent Successful, Avg Processing Time, and Avg Task Time.
Click a BPM process name to get further statistics about the process.
ExceptionsCopy link to clipboard
All robotic processes in production have exceptions that occur from robots and humans working together. The Exceptions page can be used to track all work item exceptions, as well as resource, schedule, and session alerts that occur within robotic process executions.
When alerts and exceptions occur, use the Exceptions page to:
- View all exceptions in a centralized repository.
- Automatically add exceptions to a case and have a holistic view.
- Triage exceptions and assign them to a specific user.
- View the history and action items for individual exceptions.
- View the number of open, in-progress, closed cases, etc., instead of dealing with cases ad-hoc.
Note: If you're using Appian RPA, exceptions appear automatically in RWM only for robotic processes that take data from a queue as input.
Exception typesCopy link to clipboard
Exceptions fall under either System Exceptions, Alerts or Business Exceptions.
System exceptionsCopy link to clipboard
There are four types of system exceptions that need to be addressed:
- Work item exceptions
- Resource alerts
- Session alerts
- Schedule alerts
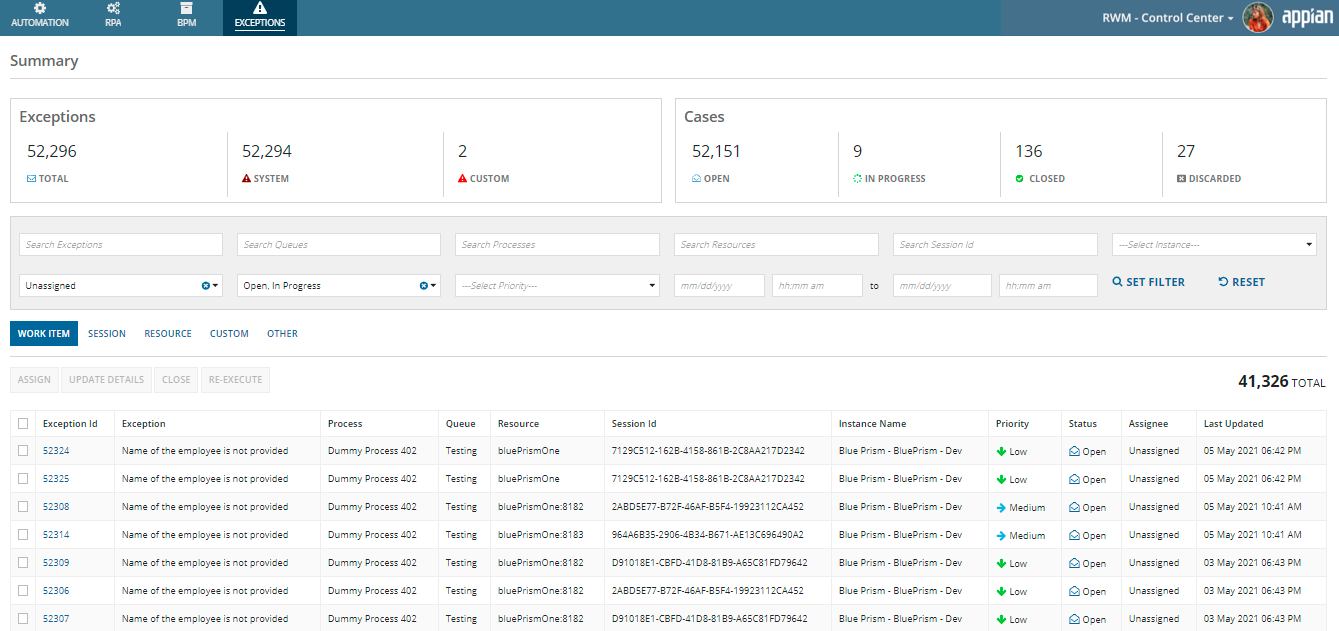
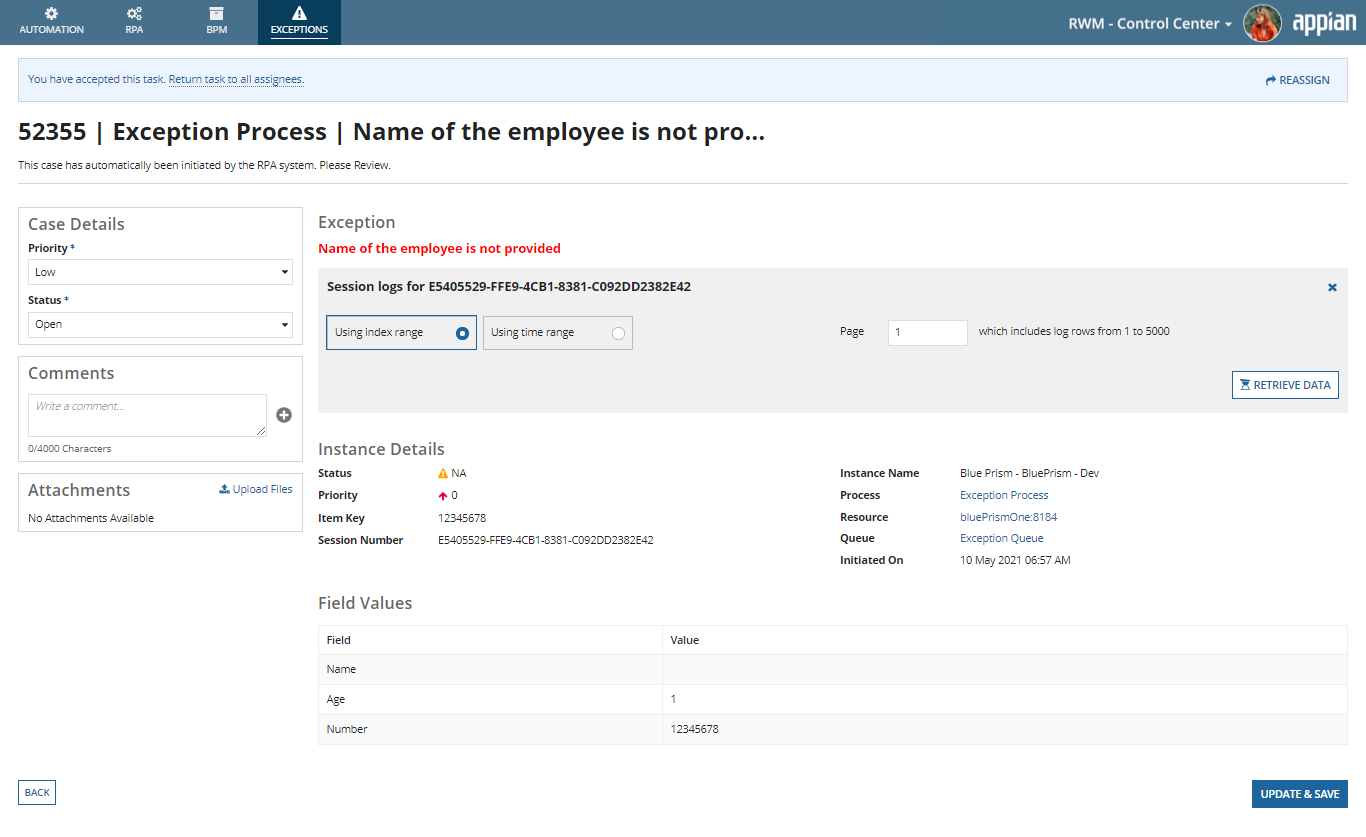
These are automated exceptions that originate from any available RPA vendor configured to work with your environment. These exceptions can include technical issues that a robotic process has encountered. These exceptions do not require additional configuration to receive in RWM. On the Exceptions tab, you can view all types of exceptions: WORK ITEM, SESSION, RESOURCE, CUSTOM, or OTHER. Click a category to view a list of those exceptions.
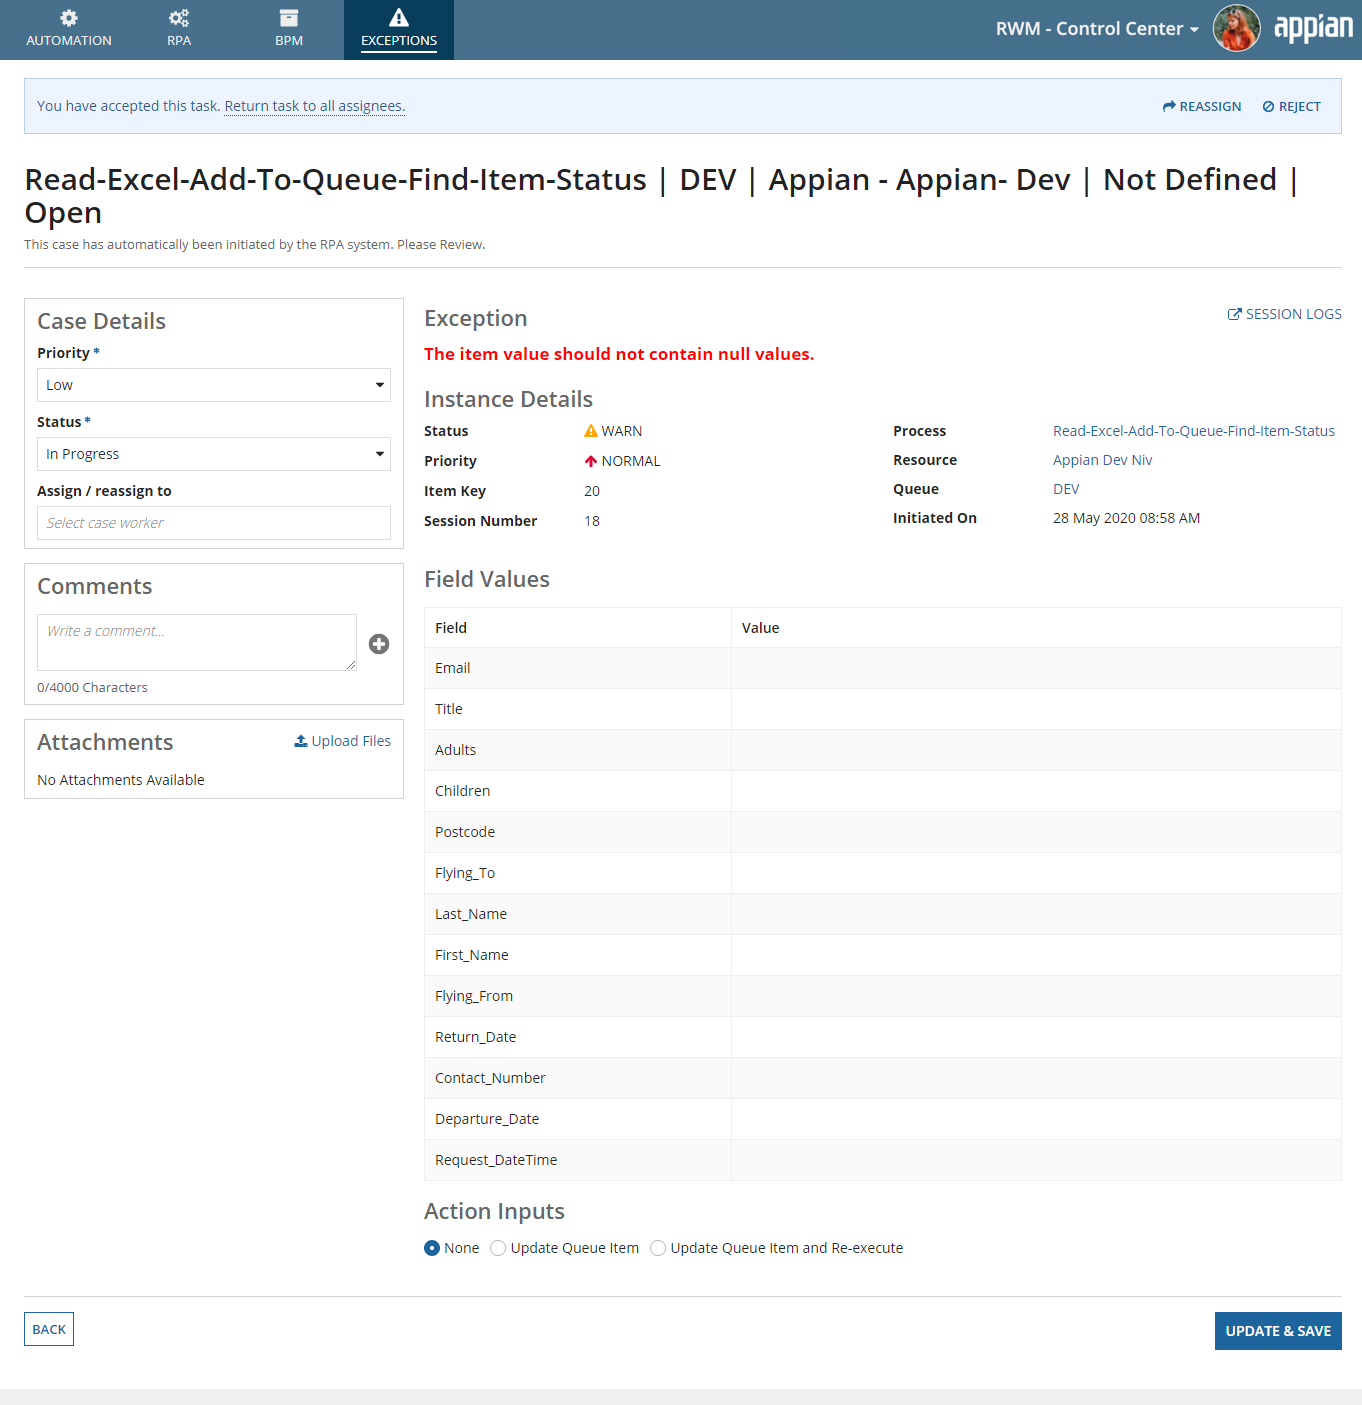
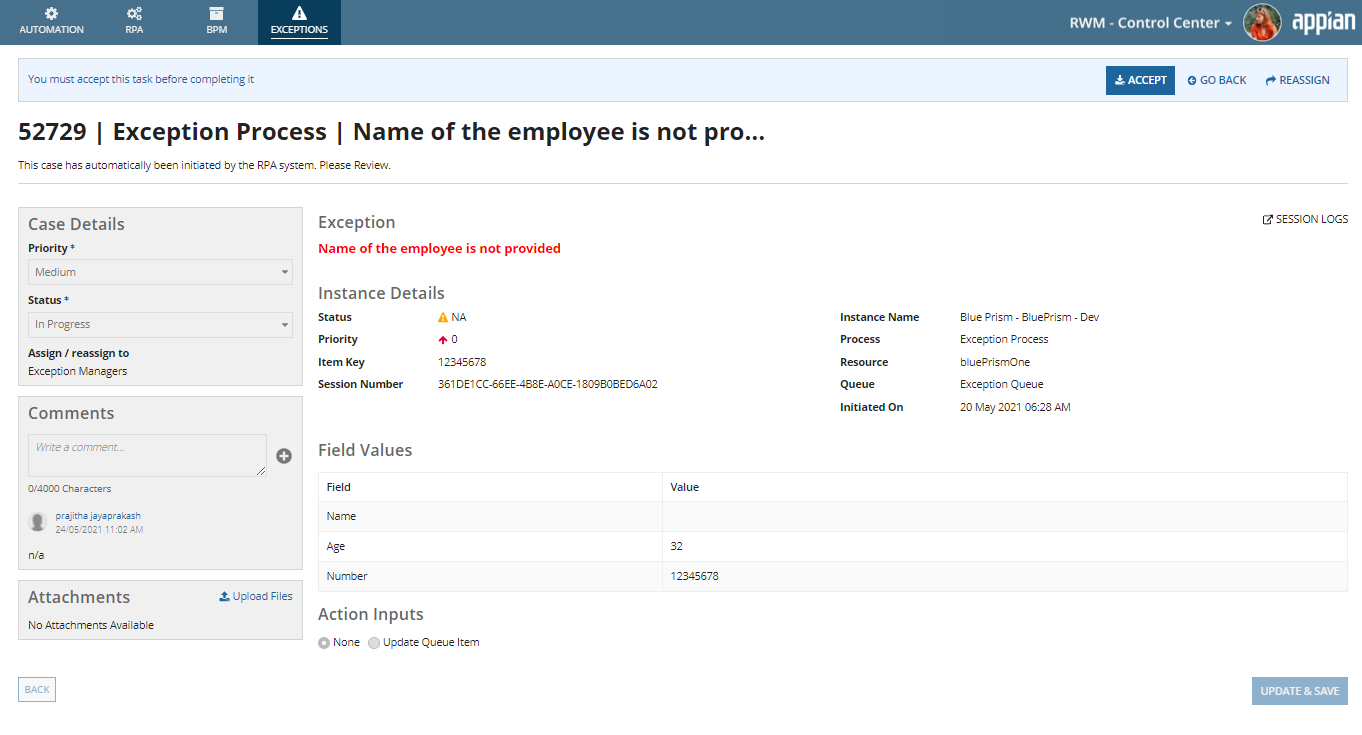
Click the Exception Id in the table to view details for an individual exception. On this page, a user can:
- Look at the case details
- Add comments
- Edit the business data
- Reassign the case
- Resubmit the case back to the RPA vendor to continue the processing of that case
- View session logs (Blue Prism only)
Note: Appian RPA processes can only be re-added to a queue and re-executed with work item exceptions if the process doesn't have data type parameters, which were introduced in 20.4. If the process contains data type parameters, this functionality is only available if the parameters contain null values.
For automatic case routing, the current version of RWM supports exceptions that are triggered within each work item in a queue. The application does not support exceptions that are triggered at the session level in this release.
View a session log from Blue PrismCopy link to clipboard
You can access Blue Prism logs for an individual exception. Session logs are only available for work item and session exceptions.
- Go to the Exceptions page.
- In the grid, find the work item or session that contains data you want to retrieve. You can use the filters to narrow the list of entries.
- Click the Exception Id in the table to view details for an individual exception.
- Click SESSION LOGS to view session data related to the exception.
- In the Session logs banner, choose how to refine the results:
- Select Using index range to choose a subset of results based on the page. Enter a page number to see which items are included in the export. Each page contains up to 5000 entries. You can configure the page size using the
RWM_LOGS_MAXLOGSIZEconstant. - Select Using time range to choose a subset of results based on date and time. Enter the date and time boundaries for the items to include in the export.
- Select Using index range to choose a subset of results based on the page. Enter a page number to see which items are included in the export. Each page contains up to 5000 entries. You can configure the page size using the
- Click RETRIEVE DATA to retrieve the data from Blue Prism. Depending on how many items RWM needs to retrieve, this step may take a few seconds.
- Click EXPORT to generate the document containing the retrieved data. The file is in
.XLSXformat. - Click Download to save the file to your computer.
- When you're finished, click the X icon to hide the Session logs banner.
AlertsCopy link to clipboard
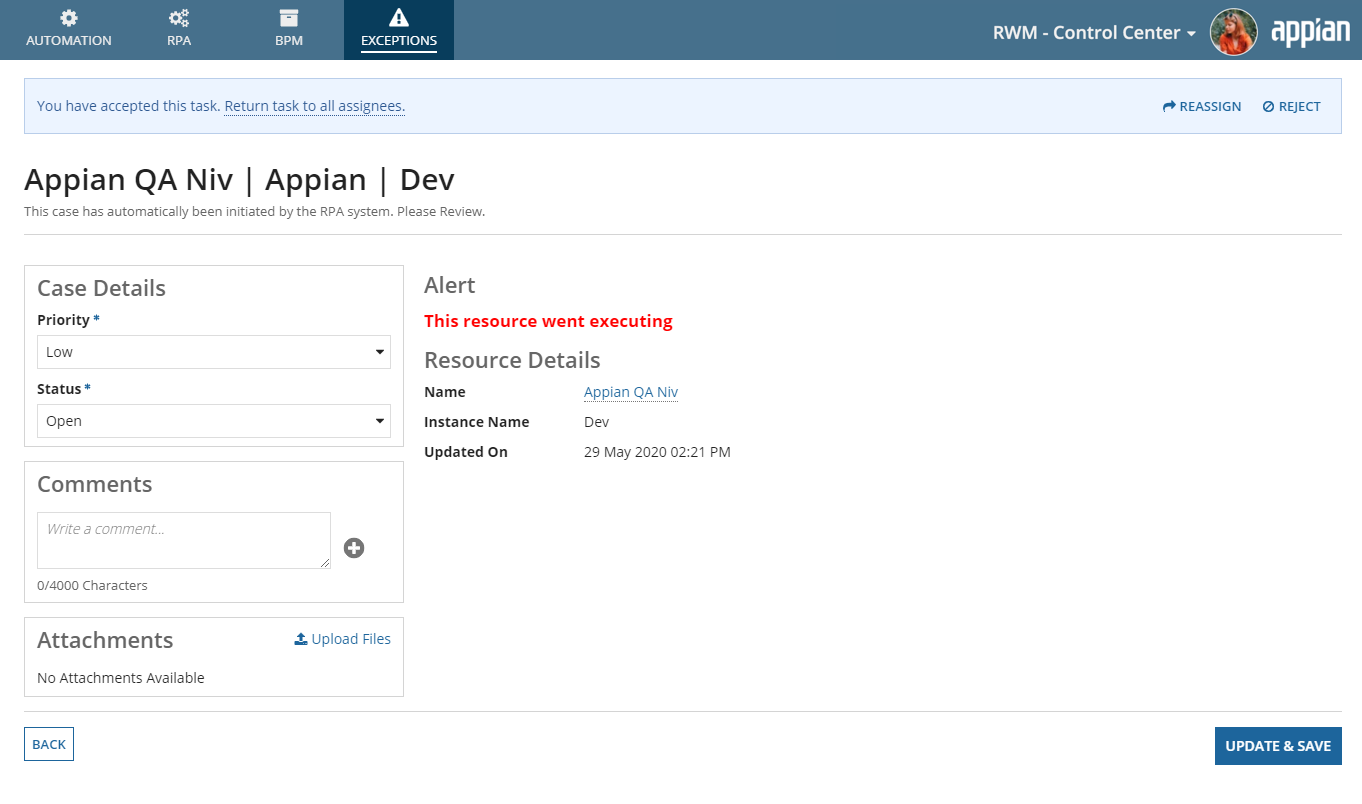
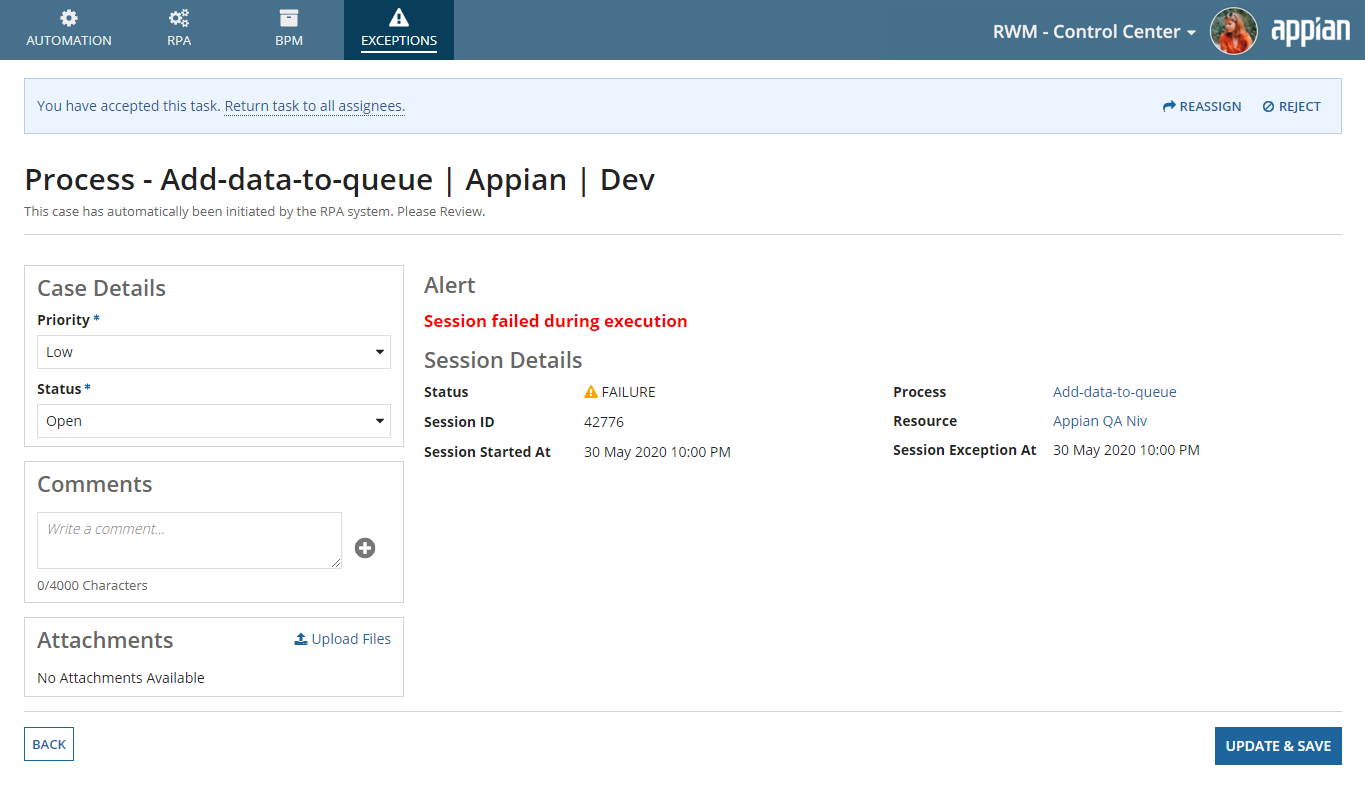
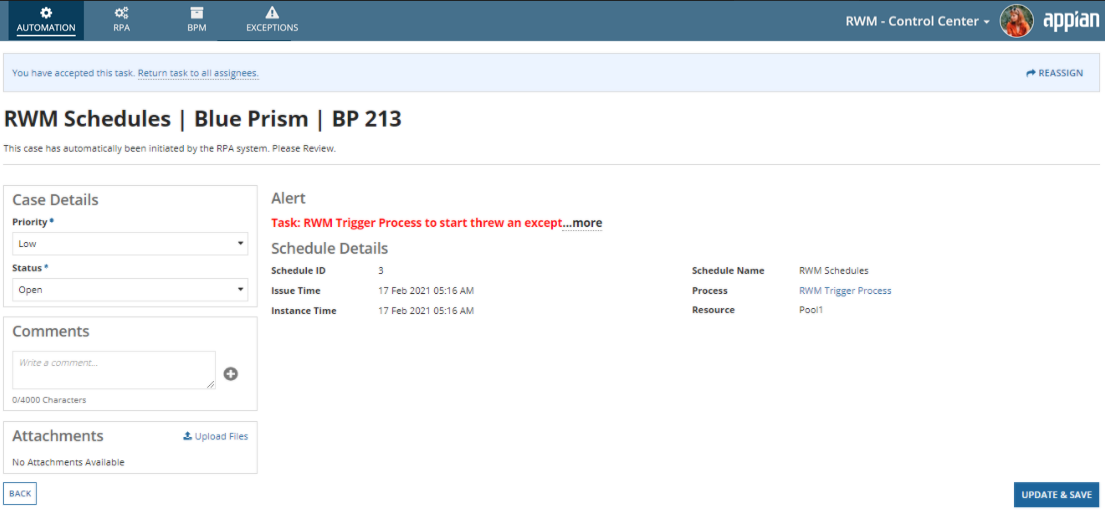
You can also find alerts related to resources, sessions, and schedules in the Exceptions page. These tasks are assigned to the RWM Exception Managers by default, whenever the status of a resource is changed from Active or Running to either Missing or Offline (for resources). For sessions, you'll see an alert when the executing session fails. For Blue Prism customers using schedules, you'll see an alert when an execution doesn't occur as scheduled.
Examples are shown below:
For Blue Prism session alerts, there is also an option to restart the process.
Business exceptionsCopy link to clipboard
Business exceptions are exceptions and alerts that result from the activities in Appian business processes used as part of automations occurring in the application. These business processes can be designed to capture the range of business relevant activities that fall outside of the capabilities of robotic processes, but are possible within Appian BPM. This includes pulling various users in the organization into the process for comments, reviews, approvals, reconciliation of inconsistent data, as well as automated activities and integrations with external systems. All of these BPM and RPA processes can be seamlessly connected to create an end-to-end automation workflow.
To see your Appian BPM processes appear in the business exceptions list, follow the customization instructions.
Handling exceptionsCopy link to clipboard
When an exception occurs, the exceptions are added to a case and assigned to the user automatically, based on the RWM_caseManagementRoutingDetails decision table, which can be found in Appian Designer. The format of the decision routing table is shown below.
Note: The last empty entry should not be removed as that's the condition at which the unmatched cases get assigned to the Exception Manager.
You can manually assign different exception types from the Exceptions page. Select WORK ITEM, SESSION, RESOURCE, CUSTOM, or OTHER to view a list of those exceptions. The instructions below apply to all exception types.
Note: Appian RPA is the only vendor supported to use with RWM's bulk exception handling. You can manage individual exceptions originating from other RPA vendors in RWM.
Assign casesCopy link to clipboard
Exceptions created on the RPA vendor side by default are assigned to the Exception Manager if they do not have any assignee configured in the decision table as shown above. The Exception Case Manager can select assignees from this screen. Assignees are then able to work on the exceptions.
You can assign one exception at a time, or assign multiple exceptions in one step.
To assign exceptions:
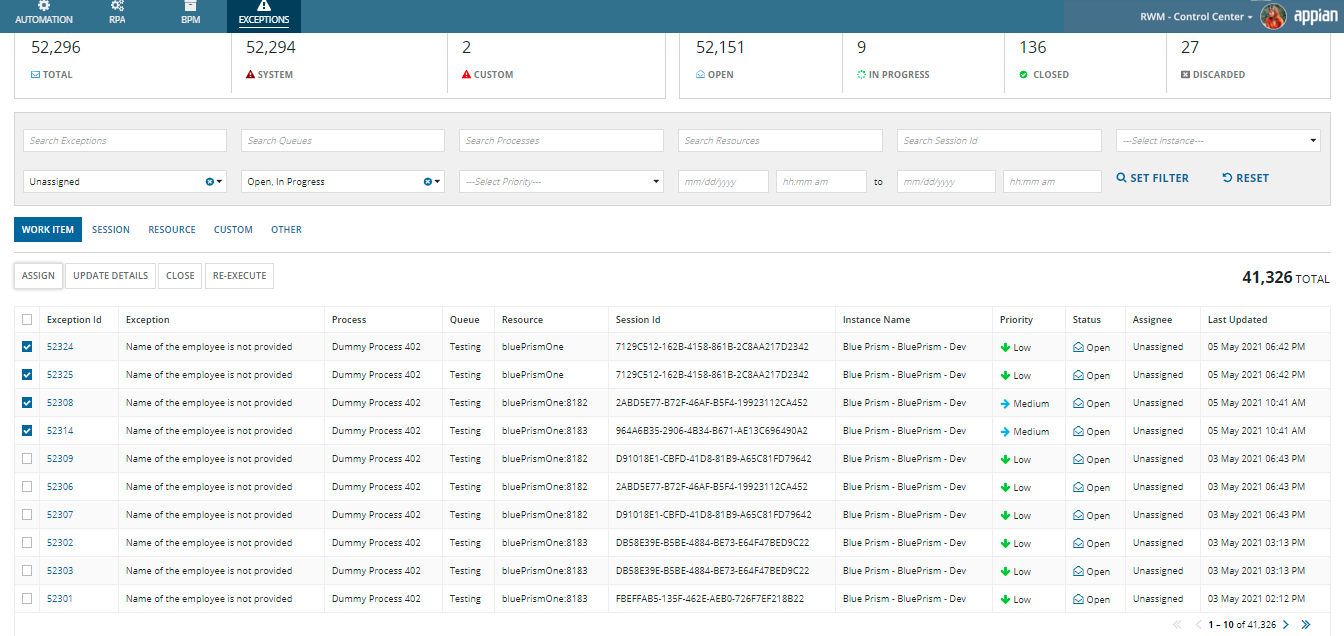
- Go to the Exceptions page in the Control Center.
- Use the filter options to narrow the list of exceptions.
- Click SET FILTER.
-
In the list, check the box next to each exception you want to assign.
Tip: You can select up to 100 exceptions by default. This limit can be configured using the
RWM_EXCEPTIONS_BULK_ACTION_MAX_SELECTIONobject. If you change this value, test how these changes impact performance in your RWM environment. -
Click ASSIGN.
- The Assign Cases page displays the selected exceptions in a grid. In the picker, search for a user to assign these exceptions.
-
After you search for the user, click ASSIGN ALL to assign these exceptions to the selected user.
- Alternatively, click Assign all to me to assign the exceptions to yourself.
Update detailsCopy link to clipboard
You can update an exception's Priority and Status in the Exceptions tab.
- Go to the Exceptions page in the Control Center.
- Use the filter options to narrow the list of exceptions.
- Click SET FILTER.
-
In the list, check the box next to each exception you want to update.
Tip: You can select up to 100 exceptions by default. This limit can be configured using the
RWM_EXCEPTIONS_BULK_ACTION_MAX_SELECTIONobject. If you change this value, test how these changes impact performance in your RWM environment. - Click UPDATE DETAILS.
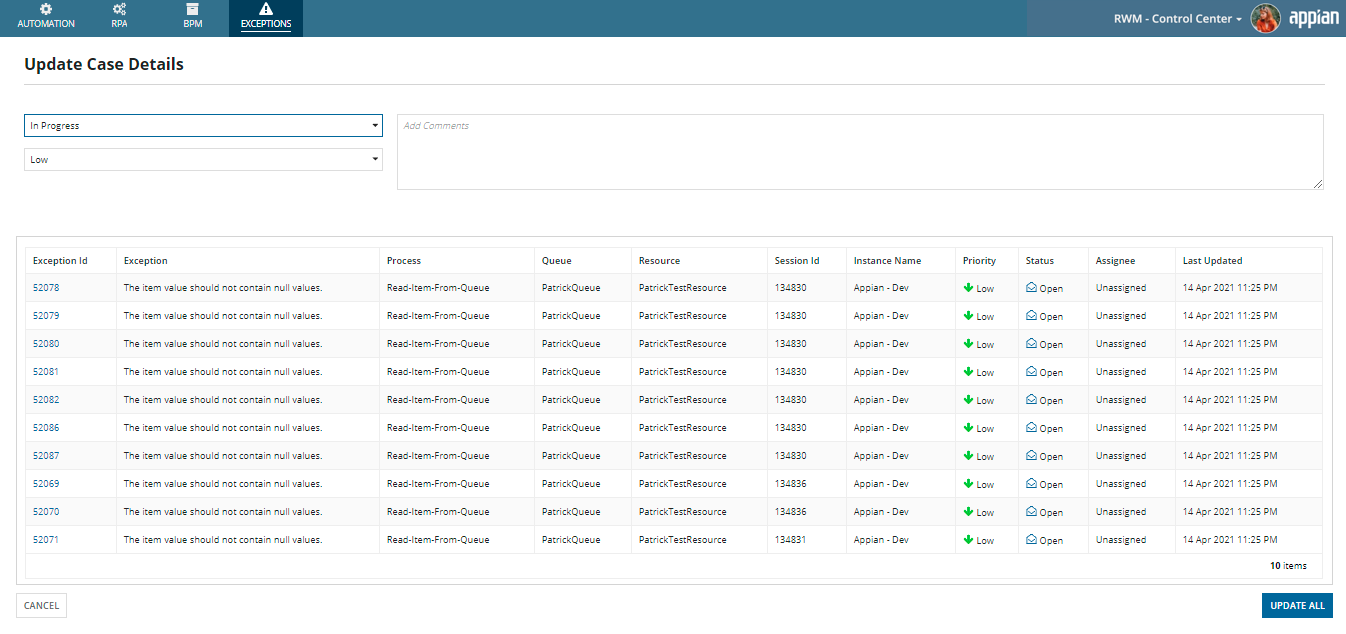
- The Update Case Details page displays the selected exceptions in a grid. Under Case Details, you can select a Status and Priority to assign to all of the selected exceptions. You can also Add Comments for the exceptions.
-
Click UPDATE ALL to save your changes.
Close exceptionsCopy link to clipboard
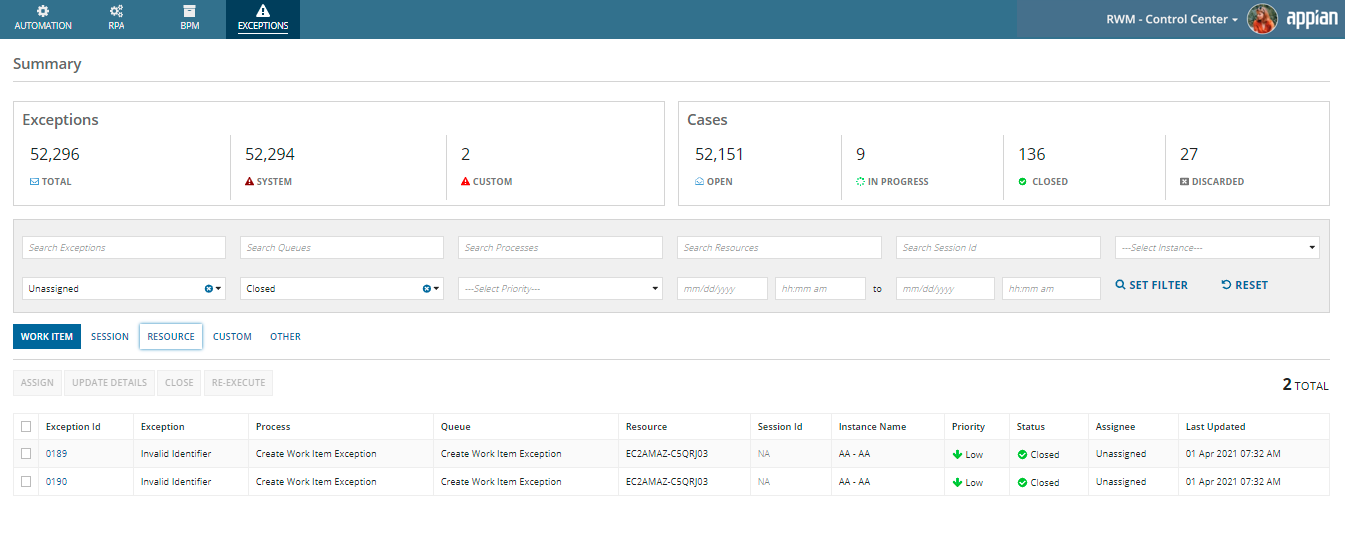
You can view closed exceptions from the Exceptions page as well. In the filter options, select Closed to see the exception and alerts that are closed.
To close an exception:
- Go to the Exceptions page in the Control Center.
- Use the filter options to narrow the list of exceptions.
- Click SET FILTER.
-
In the list, check the box next to each exception you want to close.
Tip: You can select up to 100 exceptions by default. This limit can be configured using the
RWM_EXCEPTIONS_BULK_ACTION_MAX_SELECTIONobject. If you change this value, test how these changes impact performance in your RWM environment. - Click CLOSE OR DISCARD.
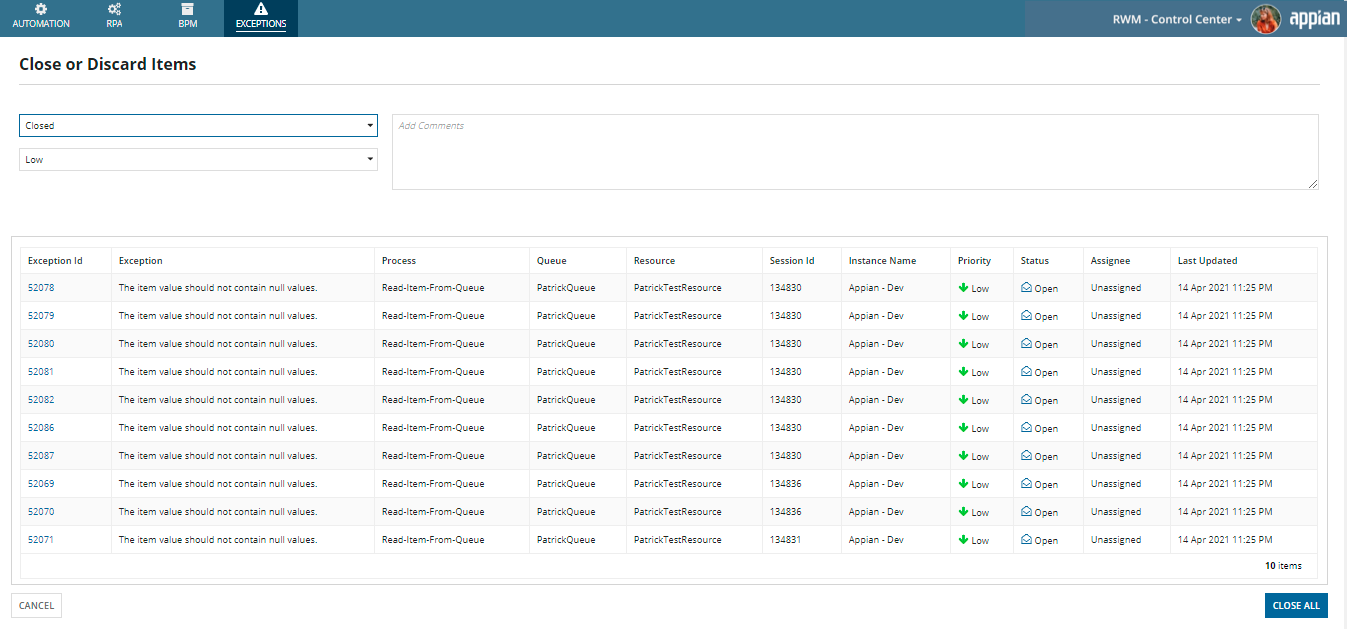
- The Close or Discard Items page displays the selected exceptions in a grid. Under Case Details, you can select a Status (Closed or Discarded) and Priority to give to all of the selected exceptions. You can also Add Comments for the exceptions.
-
Click CLOSE ALL to save your changes.
Re-execute exceptionsCopy link to clipboard
You can re-execute a robotic process from the Exceptions tab. This option is useful after the exception is addressed. The re-execute workflow lets you re-execute the process that encountered an exception, and then close that exception all in one step.
Note: Appian RPA is the only vendor supported to use with RWM's bulk exception handling. If you're using more than one RPA vendor with RWM, you will only be able to re-execute multiple exceptions that originate from the same vendor (Appian RPA).
- Go to the Exceptions page in the Control Center.
- Use the filter options to narrow the list of exceptions.
- Click SET FILTER.
-
In the list, check the box next to each exception you want to update and re-execute.
Tip: You can select up to 30 exceptions by default. This limit can be configured using the
RWM_EXCEPTIONS_BULK_REEXECUTE_MAX_SELECTIONobject. If you change this value, test how these changes impact performance in your RWM environment. - Click UPDATE INPUTS AND RE-EXECUTE.
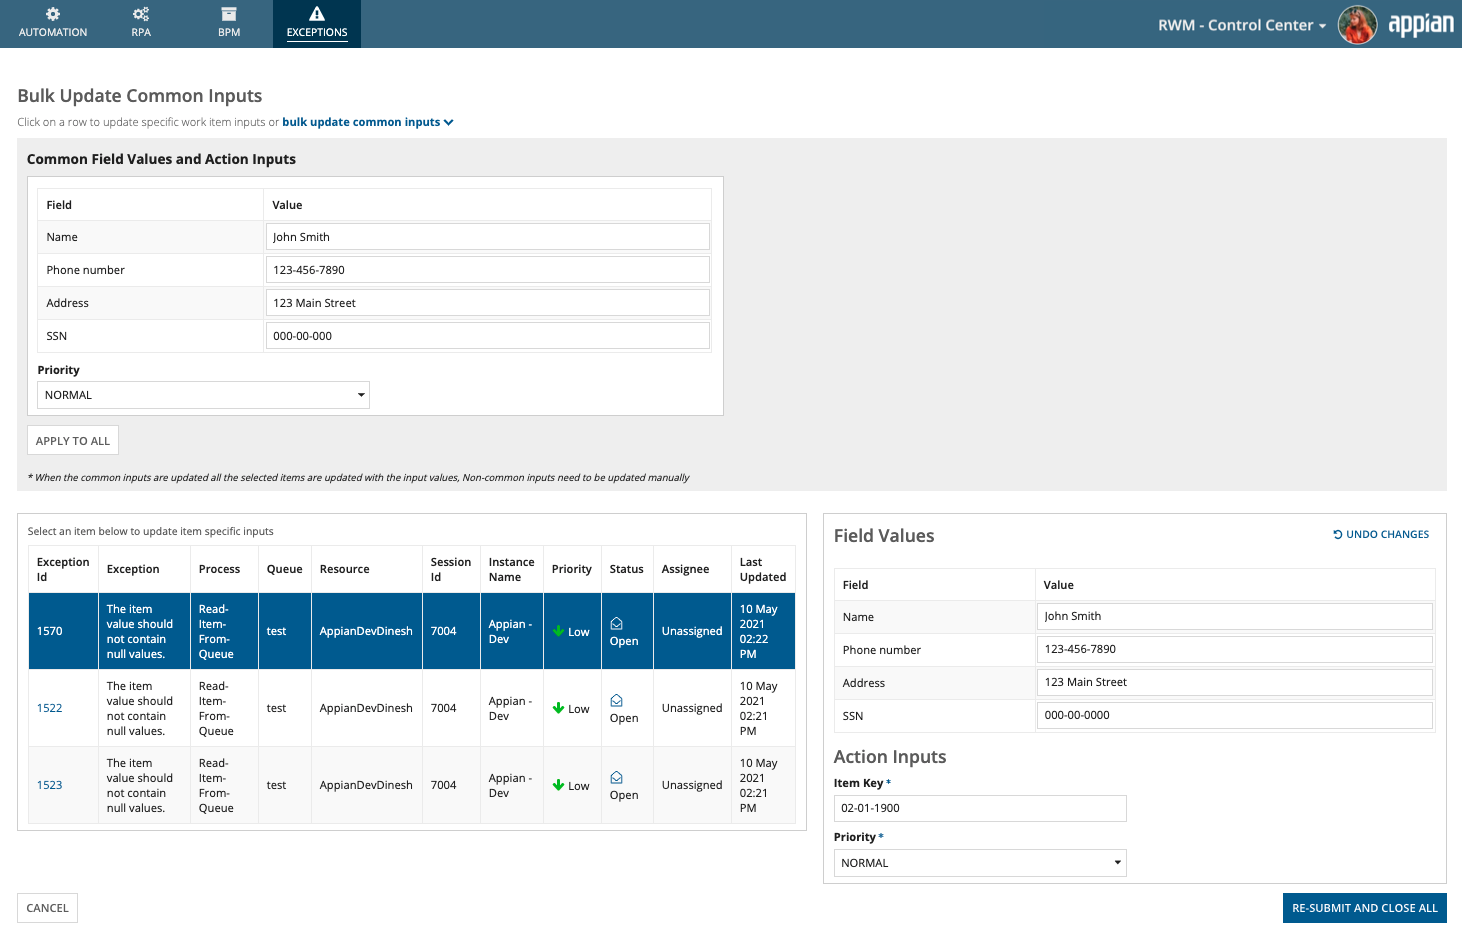
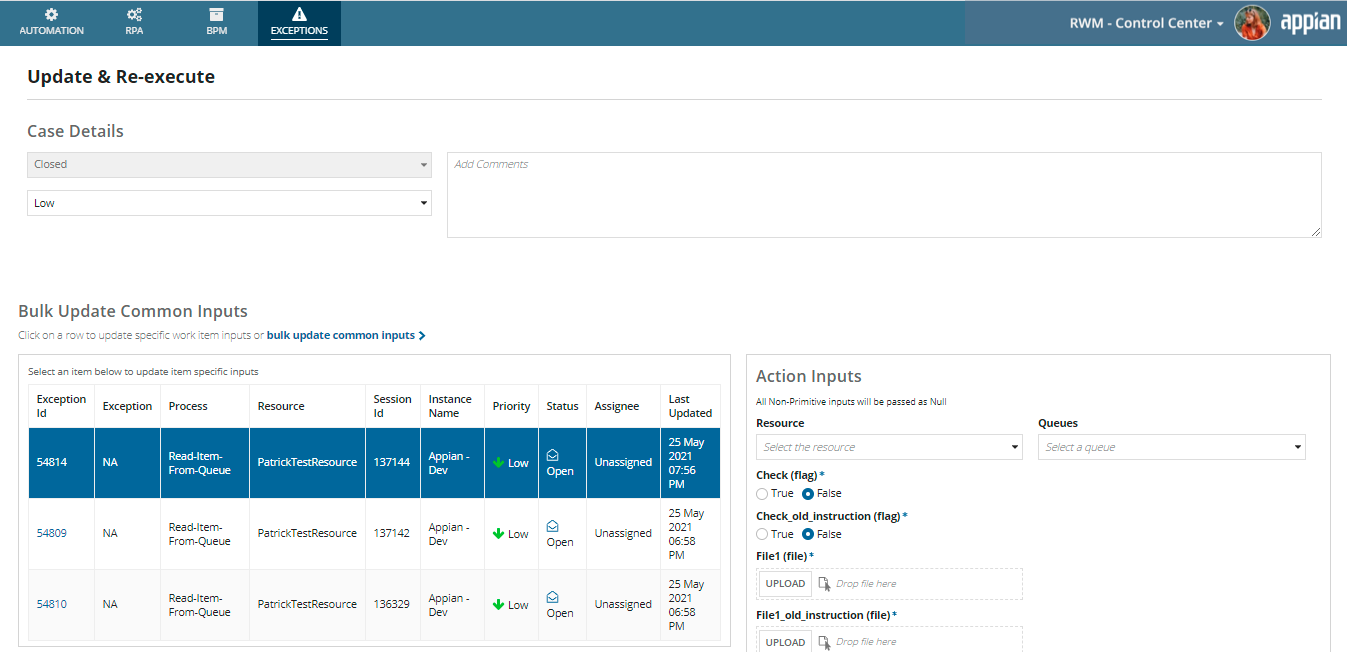
The configuration options you see on the Update & Re-execute page vary, based on the exception type.
The following options appear for WORK ITEM exceptions:
- Case Details: Choose the exception's Priority and Add Comments if you'd like.
- Actions: Choose how to re-execute the exception:
- Add all to queue: This option updates the queue items with the changes you make on this page, adds those items back to the queue, and waits for the next time the queue executes.
- Add to queue & re-execute all: This option updates the queue items with the changes you make on this page, adds those items back to the queue, and executes the queue.
- Bulk Update Common Inputs: This section appears if you selected two or more work item exceptions to update. Click bulk update common inputs to reveal fields the work items have in common. Only fields in common among the selected items appear here. Input new values and click APPLY TO ALL to use these values for all of the work items you selected, which appear in the table.
- Field Values: Enter unique values for a single work item exception. Select the exception in the table to populate its values and edit as you like.
- Action Inputs: This section displays metadata related to the work item, which is displayed in the RPA vendor's user interface. Select the exception in the table to populate its inputs and edit as you like.
Click RE-SUBMIT AND CLOSE ALL to trigger the re-execution and close the exceptions.
The following options appear for SESSION exceptions:
- Case Details: Choose the exception's Priority and Add Comments if you'd like.
- Bulk Update Common Inputs: This section appears if you selected two or more session exceptions to update. If the selected sessions have any fields in common, you can add that information in this section. Only fields in common among the selected sessions appear here. Click bulk update common inputs to reveal the fields and input values. Click APPLY TO ALL to use these values for all of the sessions you selected, which appear in the table.
- Action Inputs: Select the Resource and Queues to use with this execution. You can also update values for the respective process inputs.
Click RE-RUN AND CLOSE ALL to trigger the re-execution and close the exceptions.
Note: The UPDATE INPUTS AND RE-EXECUTE option isn't available for RESOURCE exceptions.

