| The RWM application was deprecated with Appian 24.1. The application will no longer be updated or pre-installed for new Appian Cloud sites with Appian RPA enabled. RWM will be removed in a future release and we encourage customers to use the Operations Console to manage robots instead. |
PrerequisitesCopy link to clipboard
The environment must be an Appian Cloud site configured to have Appian RPA.
Setup new cloud sites with Appian RPACopy link to clipboard
Note: Robotic Workforce Manager (RWM) is pre-installed in new Appian Cloud sites with Appian RPA enabled. You won't need to import any package, but some setup is required.
Configure Appian RPA connected systemCopy link to clipboard
-
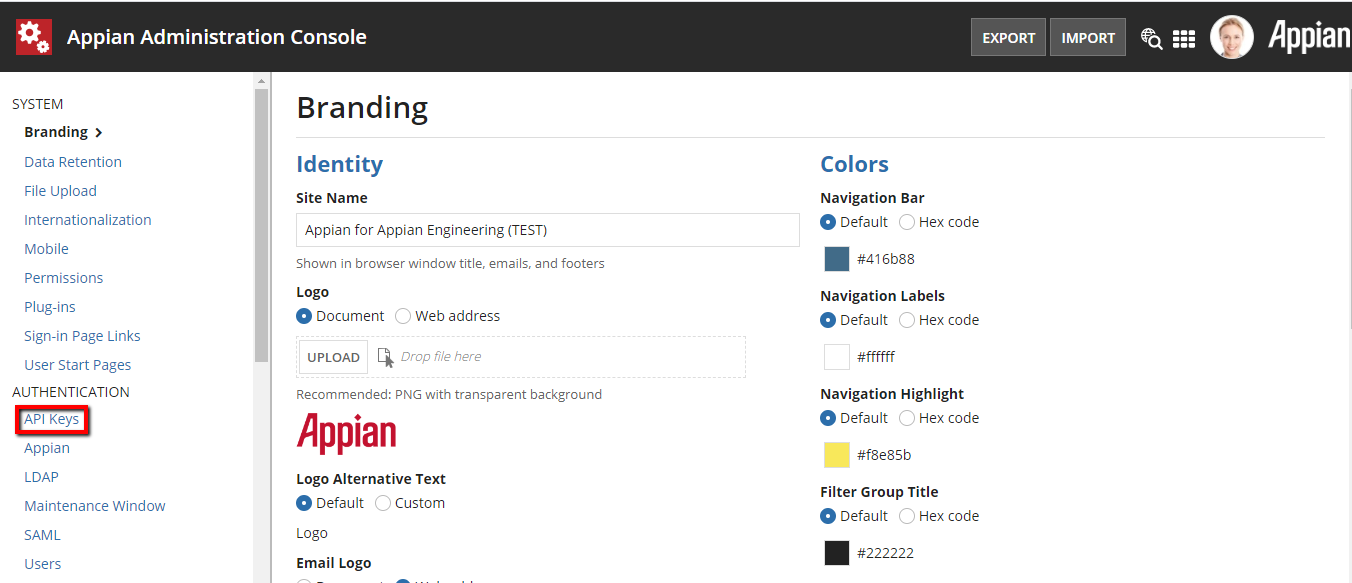
Go to the Admin Console.
-
Click API Keys in the menu to the left.
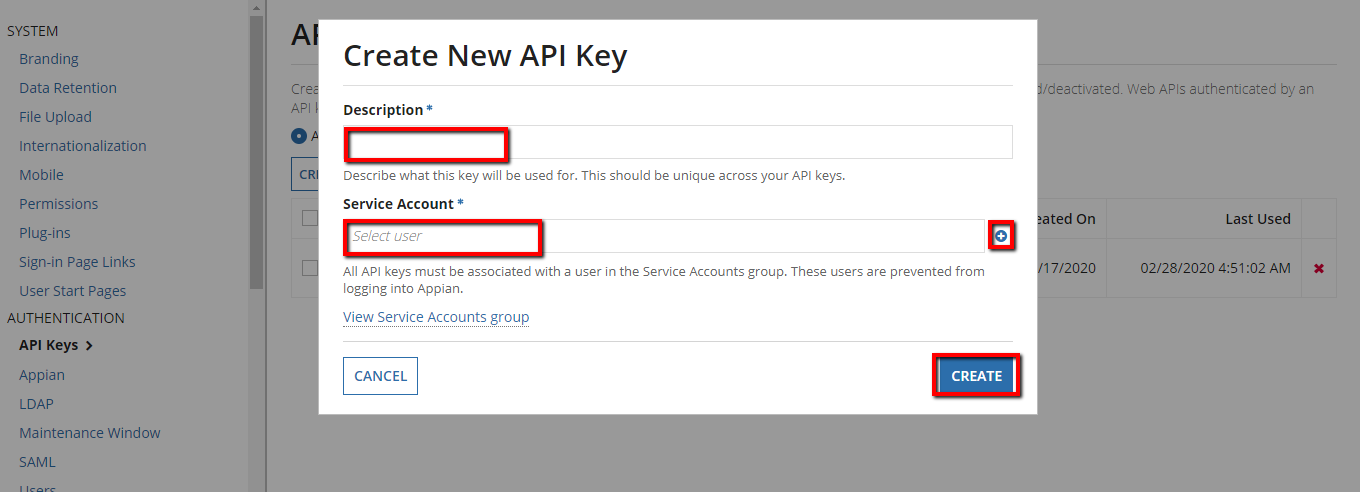
- Click Create in the API Key window.
- Add a description and select the service account. If a service account is not available, you can create one. The service account must have administrator access. To do this:
- In Admin Console, click Users tab in the menu to the left.
- Click on the service account and toggle between Basic User to System Administrator in the Security section.
- After you save changes, the service account will have Administrator access.
-
Click Create to complete adding a new API key.
-
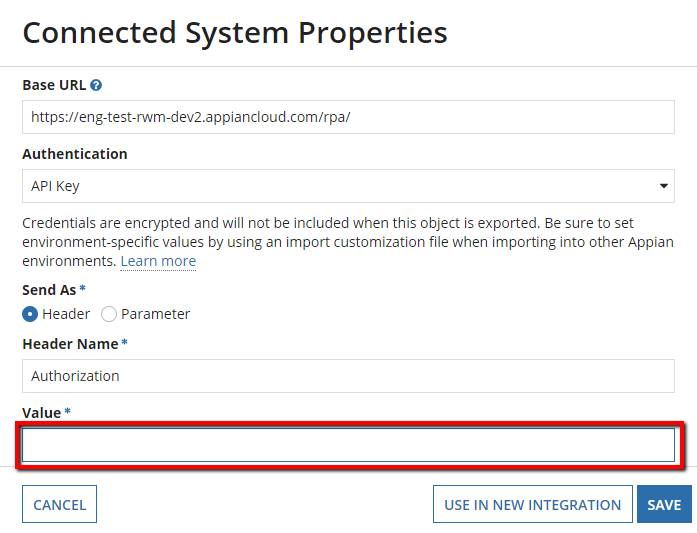
Copy the API Key and open a connected system object called
RWM_AppianRPAin the Robotic Workforce Manager application. The connected system object is shown below: - Paste the API key in the Value field of the connected system properties using this format:
Bearer <APIKey>and click Save.
Populate RPA vendor detailsCopy link to clipboard
To configure the vendor details, the user should be a member of the RWM_Admin group.
- Go to Tempo from the navigation menu and click on Actions.
- Click the Configure Environment and Instance Details action. The below interface appears. Manage all vendor details here.
-
Click Add New Environment and enter the details. Disabled fields are not required.
- Vendor Name: Select Appian.
- Environment Name: Enter the environment server name.
- Is Active: Check the checkbox to make the environment active.
- Click Submit when you're finished.
To add the instance details:
- Go to Tempo from the navigation menu and click Actions.
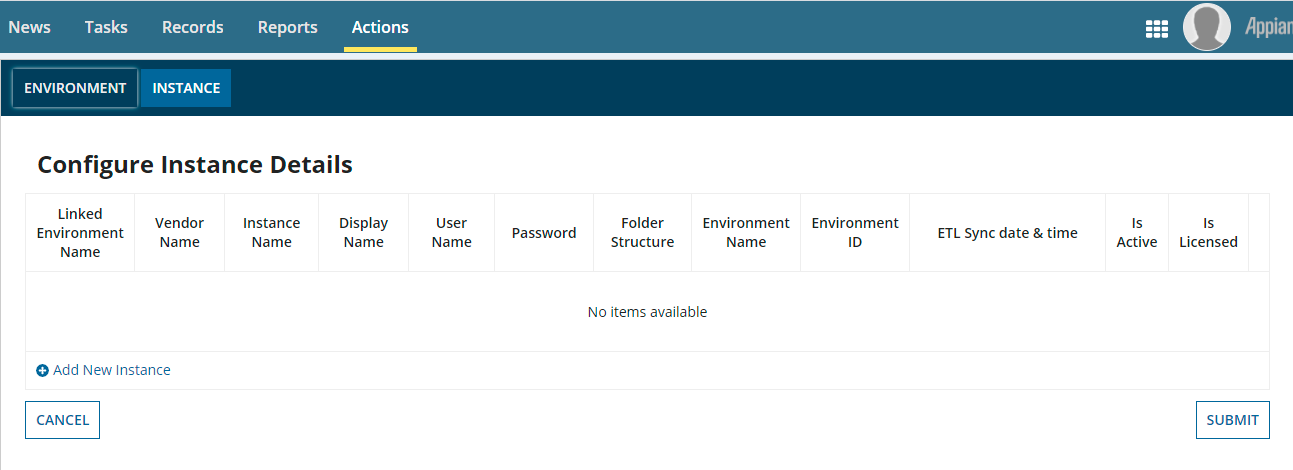
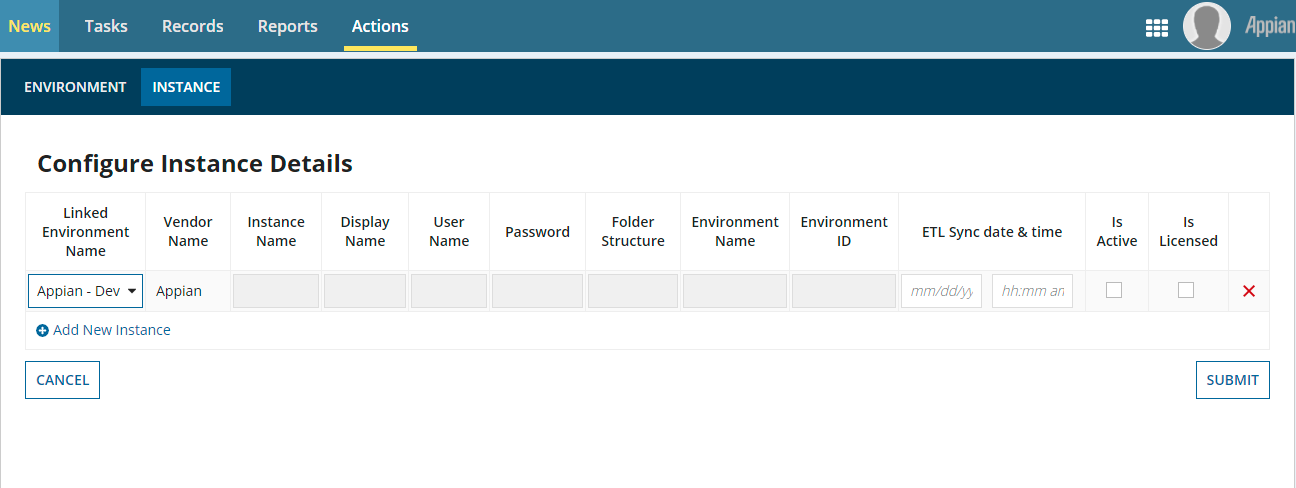
- Click the Configure Environment and Instance Details action and navigate to the Instance Tab, which appears below.
-
On this tab, click Add New Instance to add the Instance Details in accordance with vendor details. Disabled fields are not required.
- Linked Environment Name: Select the environment name that was given in Vendor Details.
- ETL Process Date & Time: Insert the date and time for the ETL process to run. A past date and time is recommended.
- Is Active: Click the checkbox to make the instance active.
- Is Licensed: Click the checkbox to indicate the instance is licensed.
- Click Submit when you're finished.
Data loadCopy link to clipboard
The following constant values must be configured on the Appian side to load historical data:
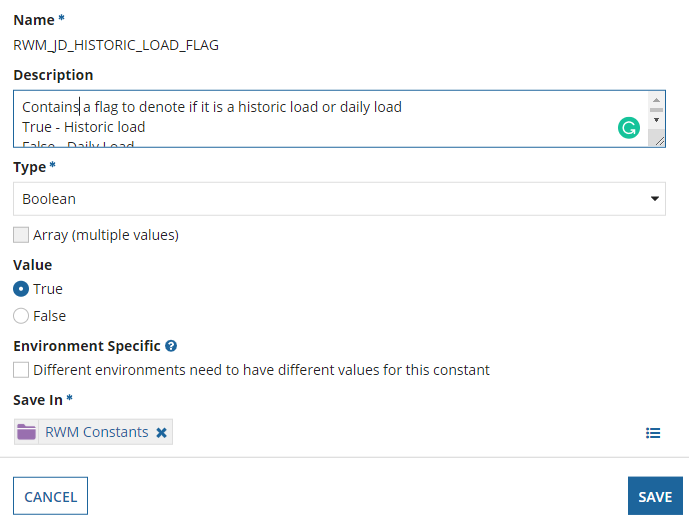
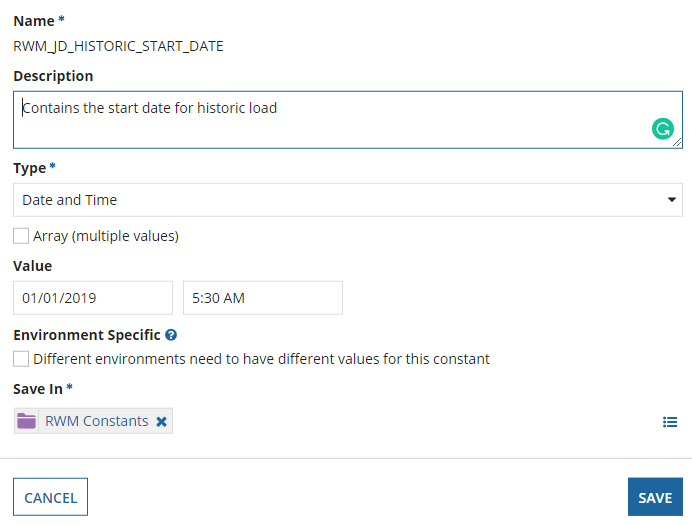
RWM_JD_HISTORIC_LOAD_FLAG- set to True.RWM_JD_HISTORIC_START_DATE- Beginning date the data should be fetched from Appian RPA.RWM_JD_HISTORIC_END_DATE- End date the data should be fetched from Appian RPA.
Identify constant objects in AppianCopy link to clipboard
-
Navigate to the Appian Designer to see all available applications.
-
Open the Robotic Workforce Manager application to see all objects related to the RWM application.
-
Select the Constants checkbox on the left side to filter the list. You can also type in the constant name in the search text box.
-
Click on the constant object you want to edit from the filtered objects.
-
Select true/false in the Value radio box for
RWM_JD_HISTORIC_LOAD_FLAGconstant and click Save. -
Select the appropriate date in the value text box for
RWM_JD_HISTORIC_START_DATEand click Save.
-
Daily update configurationCopy link to clipboard
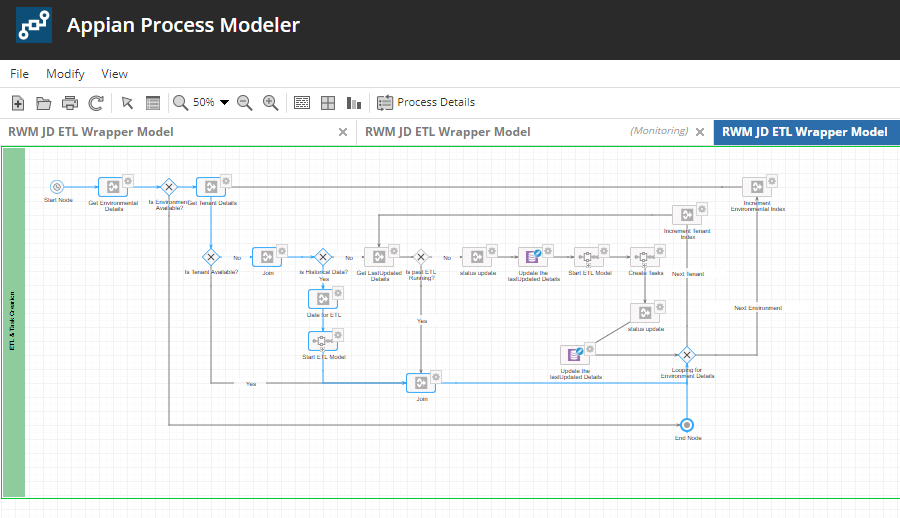
The RWM JD ETL Wrapper Model process is scheduled to run every day (configured for 1 A.M. GMT nightly) on the Appian side to collect Appian RPA statistics and load it to Appian via web services.
NOTE:
- Please make sure that the constant variable
RWM_JD_HISTORIC_LOAD_FLAGis set to False for daily load once the historic load is complete. - Please make sure that the constant variable
RWM_JD_FLAG_PROCESSis set to True for the ETL process to run on its scheduled interval..
Run the ETL processCopy link to clipboard
-
Navigate to the Appian Designer to see all available applications.
-
Open the Robotic Workforce Manager application to see all objects related to the RWM application.
-
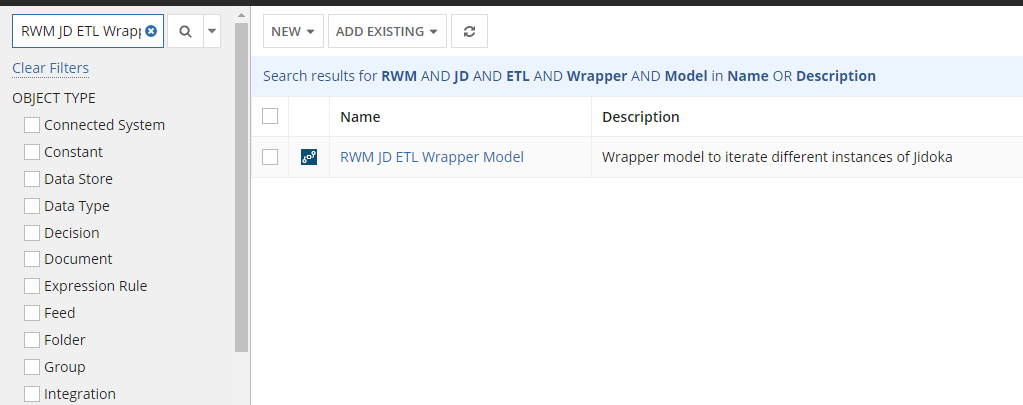
To find the ETL process model, select Process Model on the left side to filter the list of objects and search for
RWM JD ETL Wrapper ModelThe process model object appears in the list. -
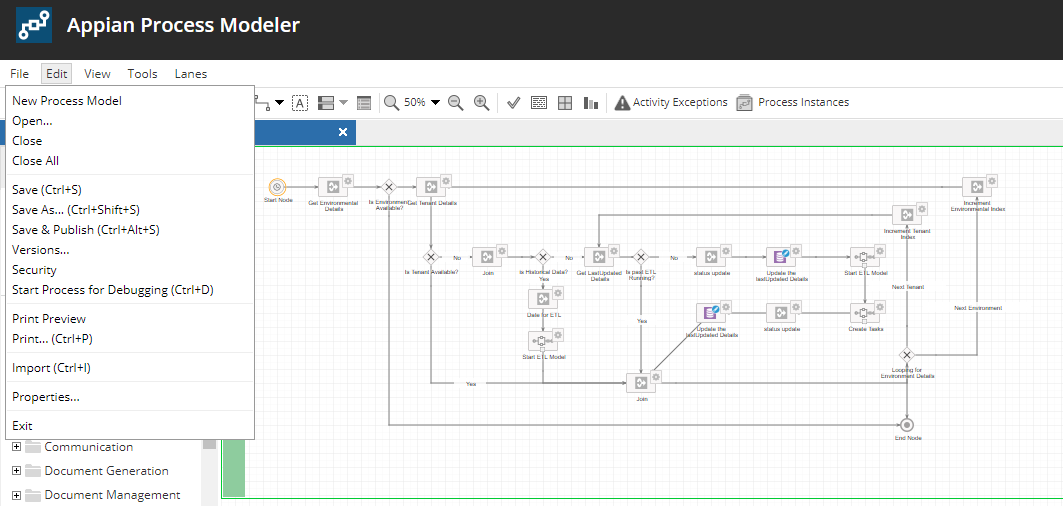
Open the process model and select the Designer View. Click File and select the Start Process for Debugging to start the ETL process.
- Once the process has started, you can click the refresh icon in the process model to see the progress as it continues to run. The End node will turn blue after the process completes.
-
Once the process is completed successfully, it should appear as follows:
ArchitectureCopy link to clipboard
Updating data from Appian RPA to AppianCopy link to clipboard
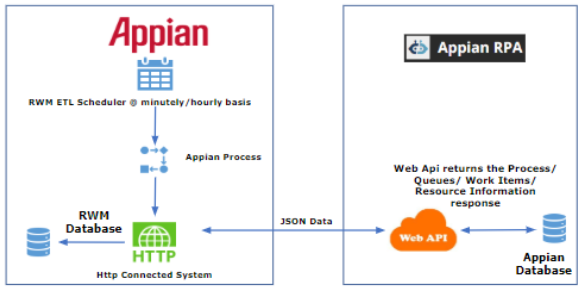
Data regarding process, resource information, and other metrics are transported from Appian RPA to Appian on the set scheduled time interval. A scheduler invokes Appian to execute a process that runs several APIs on the Appian RPA side. The response is then moved to the Appian database.
Start / schedule a moduleCopy link to clipboard
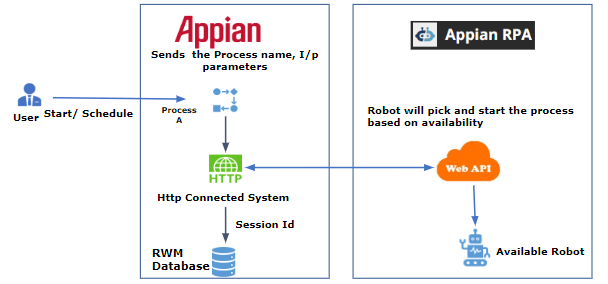
Once users start or schedule a process, the process name and its input parameters are sent to Appian RPA via the Appian RPA HTTP connected system. The Appian RPA connected system returns the unique session id for the started/scheduled process, which is saved in the RWM database.
Real-time status extractionCopy link to clipboard
Currently, the near real-time extraction of the Process (Start/Schedule execution), Resource Status from Appian RPA. For this, there is a process in Appian that will run after the ETL process to update the status.This response will be updated in Appian.
Exception managementCopy link to clipboard
Currently, the exception management reference app has been developed in Appian and Appian RPA, where Appian is used as a tool to manage the exceptions raised from Appian RPA. This module automatically pulls exception work items from data which is pulled by ETL process, where these exceptions will be assigned to a specific user/group based on the routing logic (configurable) in Appian. If a match in the routing module is not found, the exceptions are sent to the Exception Manager for assignment.
LimitationsCopy link to clipboard
- RWM supports files as an input to the RPA process. The file size must be less than 10MB.
- Exceptions appear automatically in RWM only for robotic processes that take data from a queue as input.
Setup existing cloud sites with Appian RPACopy link to clipboard
Below is the recommended way of setting up the application.
Set up Appian application packageCopy link to clipboard
The zip file has the following Appian components:
- Prerequisites - List of plugins that should be added in the Admin console.
- Appian Application Package -
Robotic Workforce Manager<version>.zip. - Appian Customization File -
Robotic Workforce Manager<version>.properties. - Scripts - Available in the folder for tables, views, stored procedures & functions.
Appian Application Package Setup requires three steps:
- Set up SQL scripts in database
- Import the Package in Appian
- Populate Vendor details
Set up SQL scripts in databaseCopy link to clipboard
Run the SQL scripts with tables, views, functions, and procedure queries as described below:
-
Use the Cloud Database site, shown in the image below.
- Select the Appian database.
-
Click Import (shown below) on the top right and upload the files one by one in the order below, clicking Go to run each script.
Customers with self-managed environments or in-house database users can execute the SQL scripts one by one.
Next, import the MySQL scripts in the order below. You can find the scripts in the folder Scripts.
Functions.sqlTables_Views.sqlStoredProcedures.sql
Import the package in AppianCopy link to clipboard
You can find the list of plugins from Prerequisites document. To add the plugins:
-
When logging into Appian as an Administrator, a screen similar to the below image will open. Open the menu and click the Admin Console.
-
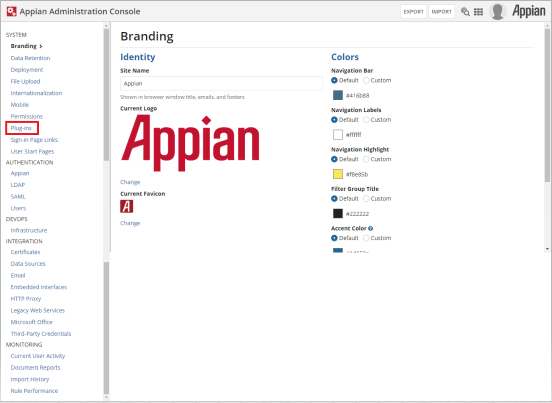
Click Plug-ins in the left-hand menu of the Admin Console.
-
Click Deploy New Plug-ins and a pop-up window with a search bar appears.
-
Search for the given plug-ins in the
prerequisite.txtfile, click on them, and deploy each plug-in.
Note: To successfully import an application package, the service account user who deploys the application package must be in the GMT time zone and must not be changed.
-
Navigate to the Appian Designer.
-
Click Import.
- Generate an API Key for Appian RPA, described earlier.
- Once you copy the API key, use it in
Robotic Workforce Manager.propertiesfor the Appian RPA connected system. The connected system object name isRWM_AppianRPA. - Set the API key value as:
apiKeyValue="Bearer <apiKeyValue>"
- Once you copy the API key, use it in
-
Upload the
Robotic Workforce Manager<version>.zipfile to the Package (ZIP) section. Make changes to theRobotic Workforce Manager.propertiesas mentioned below.Robotic Workforce Manager.properties
1 2 3 4 5 6 7 8 9 10 11 12 13 14 15 16 17 18 19 20 21 22 23 24 25 26 27 28 29 30 31 32 33 34 35 36 37 38 39
Provide the database vendor, ex: MYSQL or MSSQL ## Constant: RWM_DB_VENDOR ## Type: Text ## ## Text values will be displayed in Appian exactly as they are ## specified here. No spaces are trimmed. Values do not need to be ## encased in quotation marks. content._a-0000e49f-ec1b-8000-9bc3-011c48011c48_1126829.VALUE=@@DATABASE_VENDOR@@ Provide the Appian environment URL ex:https://xyz.appiancloud.com ## Constant: RWM_VAL_APPIAN_DOMAIN_NAME ## Type: Text ## ## Text values will be displayed in Appian exactly as they are ## specified here. No spaces are trimmed. Values do not need to be ## encased in quotation marks. content._a-0000e23d-7780-8000-9ba2-011c48011c48_64089.VALUE= [http(s)]://[Appian URL] Appian business database name ex:jdbc/Appian ## Constant: RWM_VAL_COMMON_DATA_STORE_APPIAN ## Type: Text ## ## Text values will be displayed in Appian exactly as they are ## specified here. No spaces are trimmed. Values do not need to be ## encased in quotation marks. content._a-0000e23d-7780-8000-9ba2-011c48011c48_69762.VALUE=jdbc/[Database Name] The following are details specific to the UiPath connected system. No modifications are needed; these details are configured directly from the database. ## Connected System: RWM_UIPath_CSP connectedSystem._a-0000e2f2-a540-8000-e99f-01ef9001ef90_314069.host=http(s)://<UIPath_Orchestrator_URL> connectedSystem._a-0000e2f2-a540-8000-e99f-01ef9001ef90_314069.port=<Port_Number to access UIPath Orchestrator> connectedSystem._a-0000e2f2-a540-8000-e99f-01ef9001ef90_314069.tenant=<Host_Name to access UIPath Orchestrator> connectedSystem._a-0000e2f2-a540-8000-e99f-01ef9001ef90_314069.userName=<Username to access UIPath Orchestrator> connectedSystem._a-0000e2f2-a540-8000-e99f-01ef9001ef90_314069.password=<password> The following are specific to the Appian RPA HTTP connected system. For API Key Value, use the format "Bearer <apiKeyValue>". The API Key must be related to a service account in Admin Console. The service account should have System Administrator access. ## Connected System: RWM_AppianRPA connectedSystem._a-0000e3be-674f-8000-9ba5-011c48011c48_30431.baseUrl=[http(s)]://[Appian URL]/rpa/ connectedSystem._a-0000e3be-674f-8000-9ba5-011c48011c48_30431.apiKeyValue=Bearer <apiKeyValue>Copy -
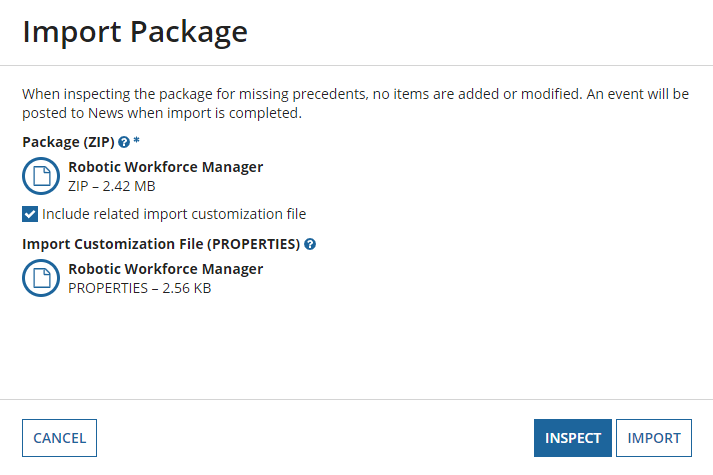
Click the Include related import customization file checkbox and upload
Robotic Workforce Manager<version>.zipto the Import Customization File (PROPERTIES) section. -
Click INSPECT. If the inspection returns no warnings or conflicts, then you are ready to move on to the next step of importing. If you're shown unexpected warnings or conflicts, please contact the support team.
- Click IMPORT. Due to the size of this application, it may take a while to import, at which point the screen may time out. This is expected, and the import is still occurring in the background.


