| The capabilities described on this page are included in Appian's advanced and premium capability tiers. Usage limits may apply. |
OverviewCopy link to clipboard
Cases are a vital part of case management applications and represent a series of tasks to complete or a multi-step problem to solve. Once a case is created by a user, the new case kicks off a workflow, which is a process with numerous case workers and tasks involved in resolving an issue or completing a process. Case Management Studio allows you to manage both the cases and workflow in a centralized place.
An individual case is made up of data submitted by a user about an issue or request and provides case workers with the information they need to complete the case. In Case Management Studio, there are two main containers for cases that allow you to define exactly the data you and your users need, as well as configure how it is captured and displayed: case categories and case types.
This page will provide a brief overview of what case categories and case types are and how to configure them.
What are case categories and case types?Copy link to clipboard
In case management apps, case categories and types work together to create data structures that are both simple to understand and allow you to efficiently reuse data fields throughout your app. A case category is a container used to organize similar or related case types and share common data fields across them, allowing you to easily organize case types based on your own set of criteria. A case type is a smaller container within a case category that holds the case specific data, tasks, automations, and workflow for a specific kind of case, as well as the individual cases in the case type.
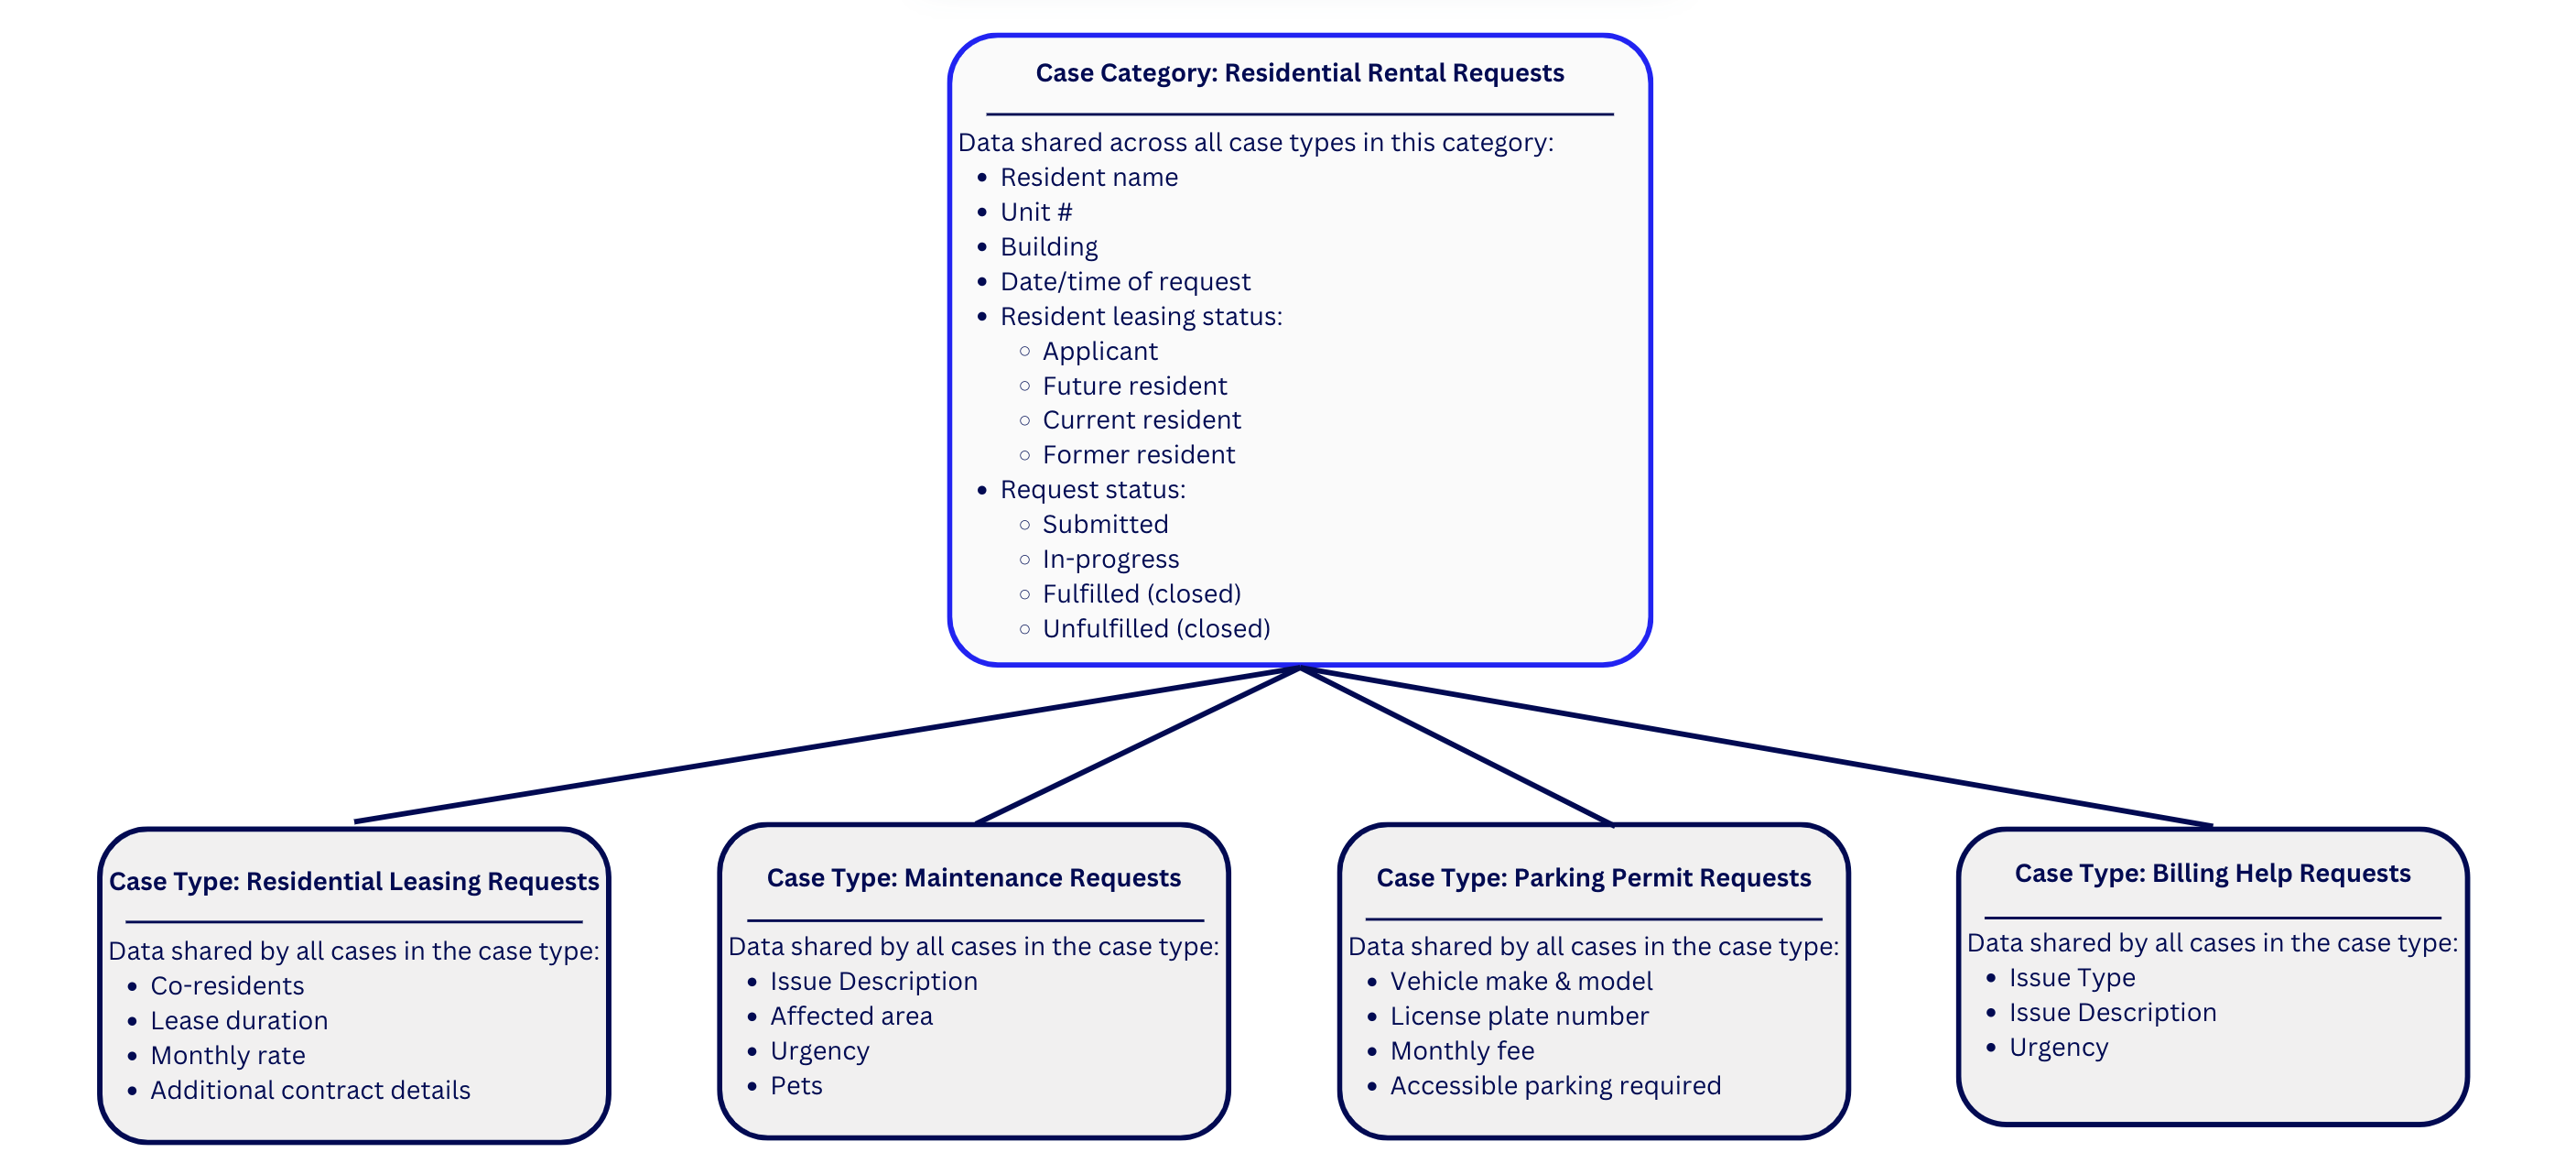
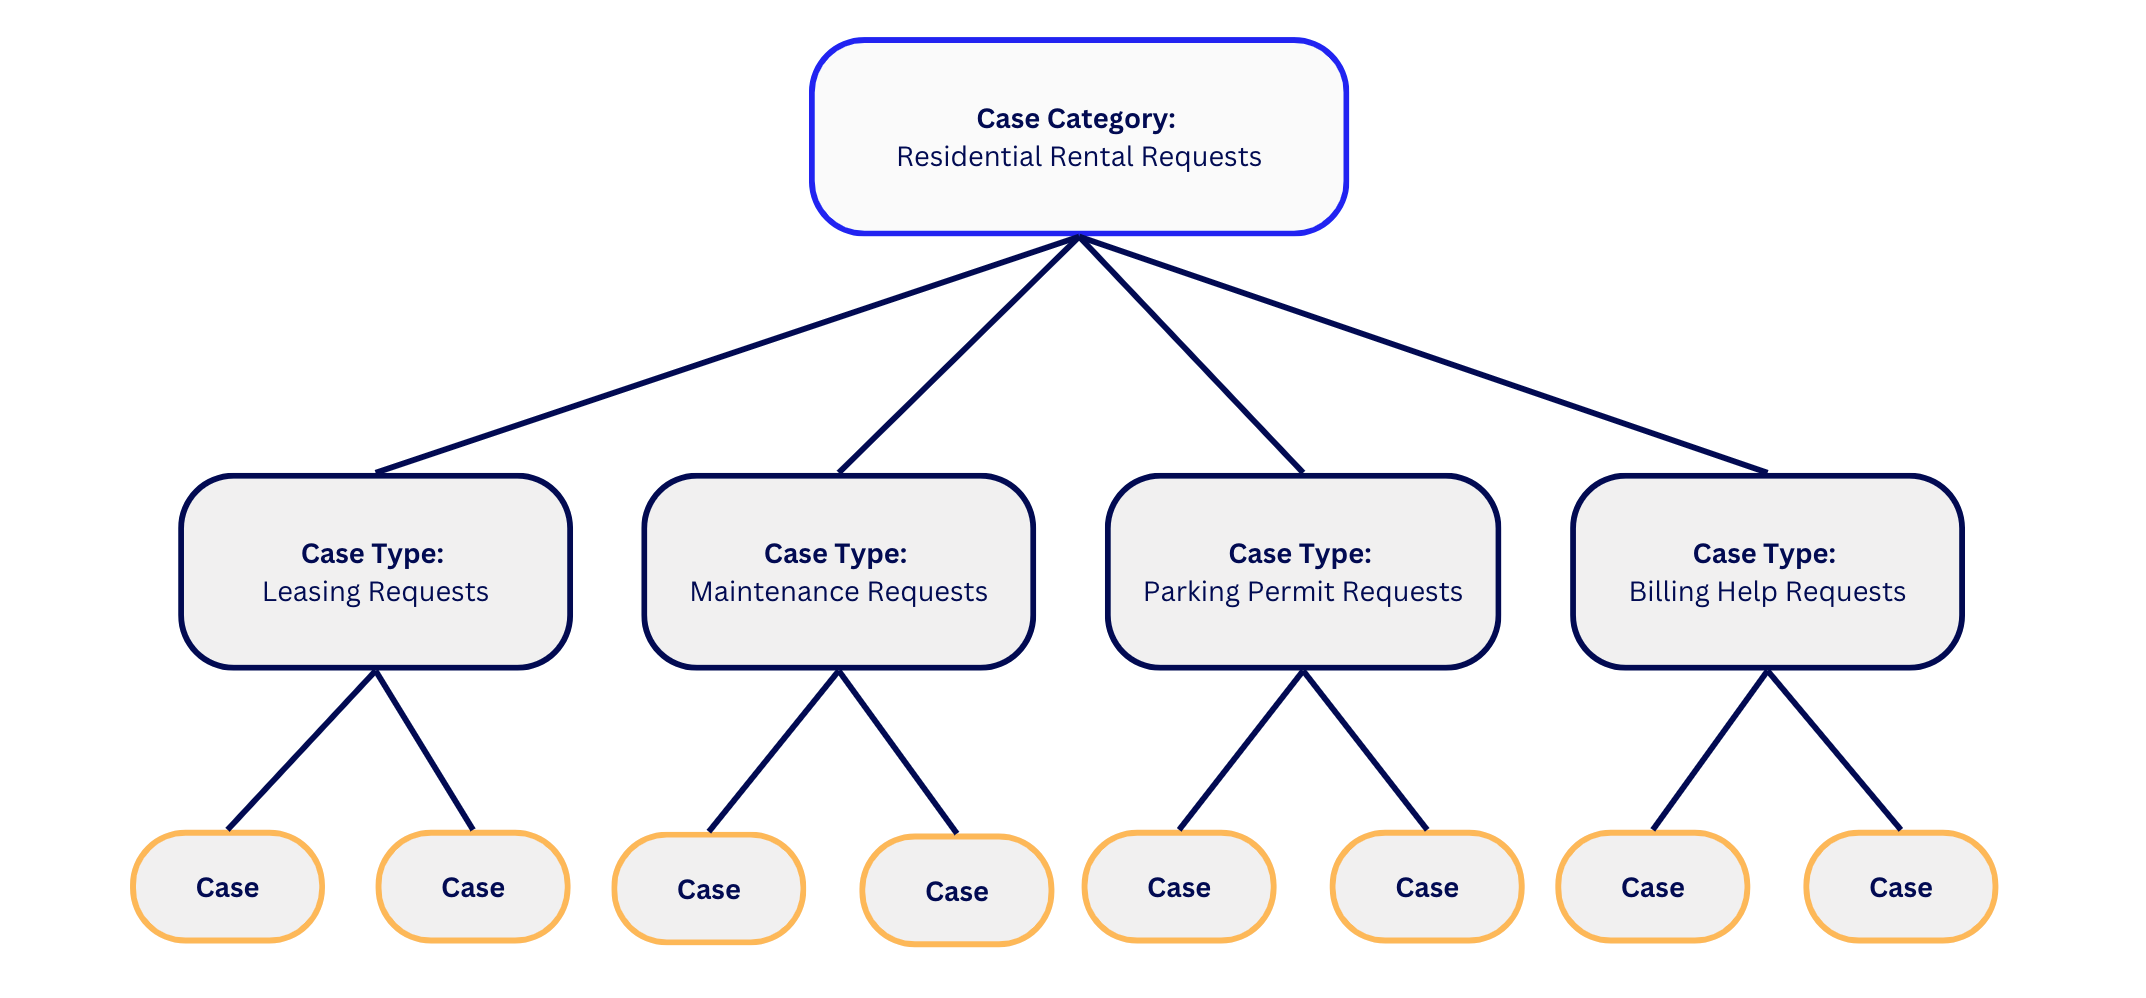
You can configure case categories and case types to fit the overall organizational and data needs for your use case. For example, a case management app for a real-estate company might have a case category for all cases and requests related to their residential rental buildings. The case types in this case category might be maintenance request, leasing and application requests, resident parking permits requests, etc.
The following diagram shows the relationship between case categories, case types, and cases:
The parts of case categories and case typesCopy link to clipboard
Case categories consist of two tabs:
Case types consist of five tabs:
Creating a case category and case typeCopy link to clipboard
Before you can create case types and workflows for your case management app, you first need to create case categories.
To create a case category:
- If there are no case categories in your app, click CREATE CATEGORY on the Studio landing page.
- If there are already case categories in your app, click CASE TYPES in the navigation bar.
- Click + Create Category.
- Enter a name, and optionally add a description or background image for the category.
Details tab in case categories and case typesCopy link to clipboard
Once you've created a case category, you can open it and view the case category details on the Details tab. Both case categories and case types use the Details tabs as their default landing pages.
Details tab in a case categoryCopy link to clipboard
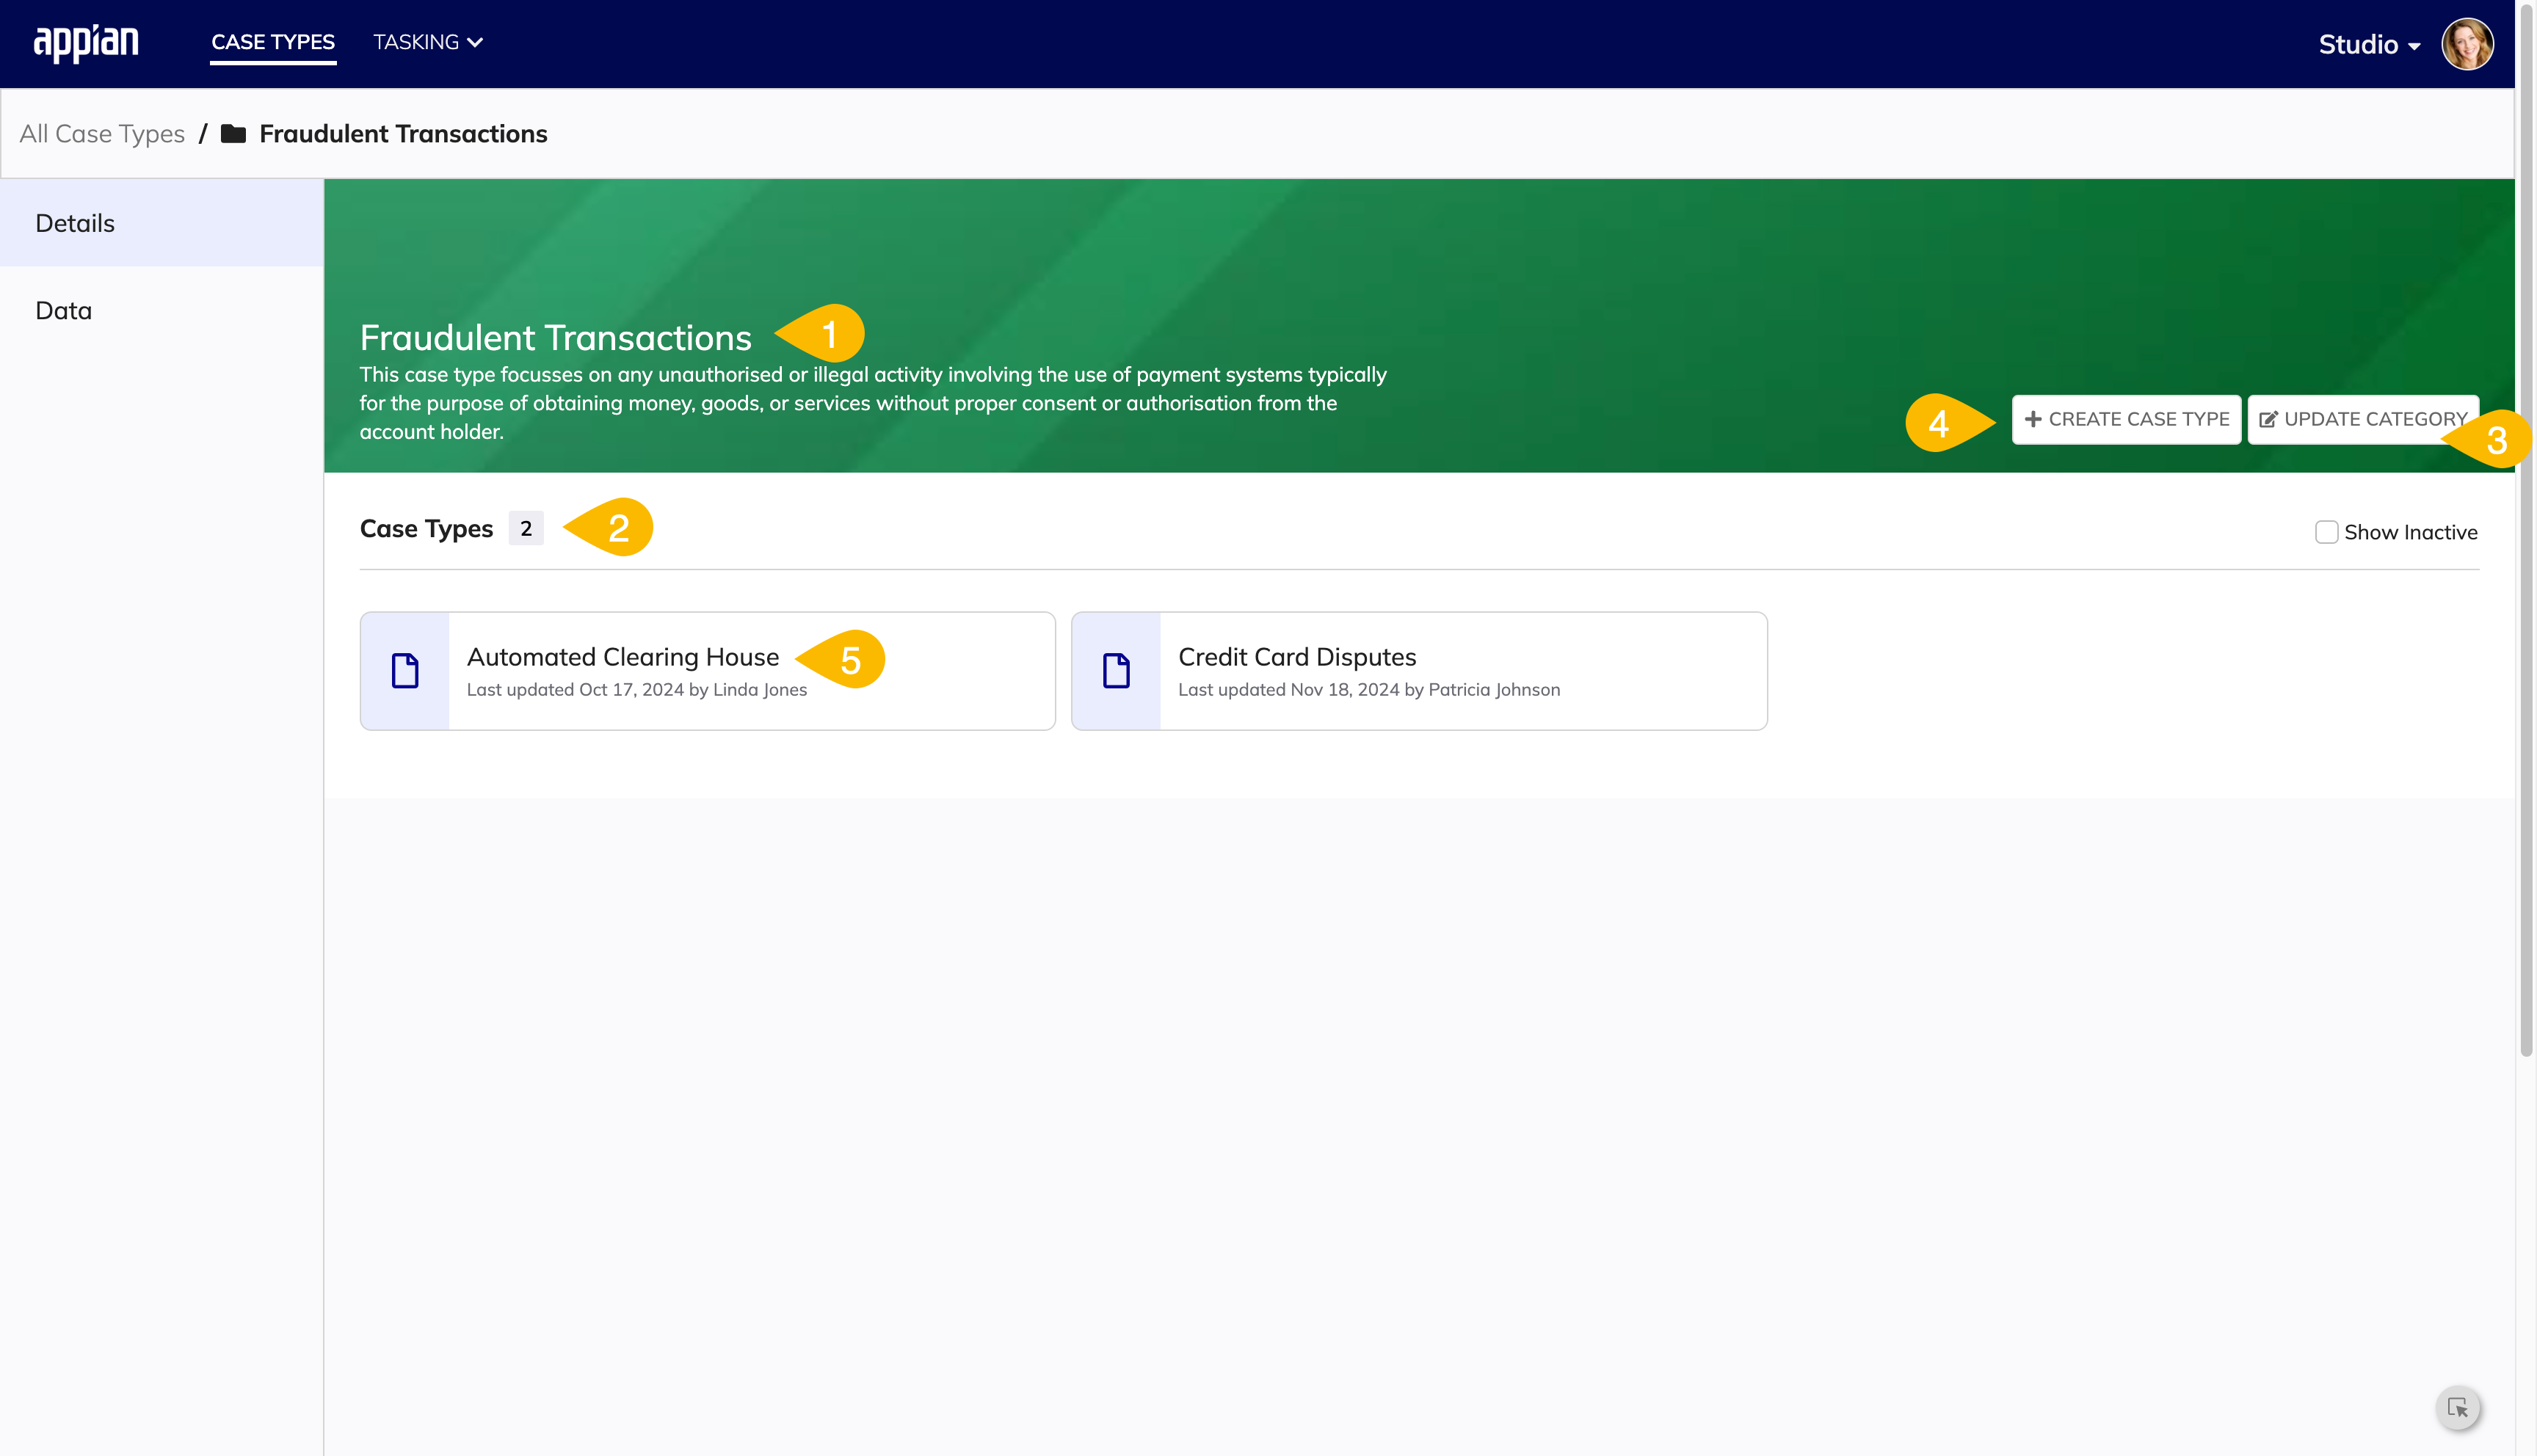
The following image highlights the actions you can do in the Details tab in a case category:
| # | Action |
|---|---|
| 1 | View the case category name and description. |
| 2 | View all case types in the category. |
| 3 | Edit the case category. |
| 4 | Create new case types. |
| 5 | Drill into existing case types. |
Create a case typeCopy link to clipboard
From within a case category, you can create a new case type.
- From the Details tab of a case category, click + Create Case Type.
-
Enter the following case type settings:
Field Required Description Category Yes The case category that the case type is contained in. Name Yes The name of the case type. Prefix Yes The case type prefix. This helps to distinguish your case type from others with similar names. Description No Context about your case type. Default SLA No The service level agreement to apply to your case type. Default priority Yes The priority to apply to all cases in this case type, unless otherwise specified. Default Assigned Group No The group that will handle all cases in this case type, unless otherwise specified.
You can also create a new case type from the All Case Types page by clicking CREATE CASE TYPE in the case category card.
Details tab in a case typeCopy link to clipboard
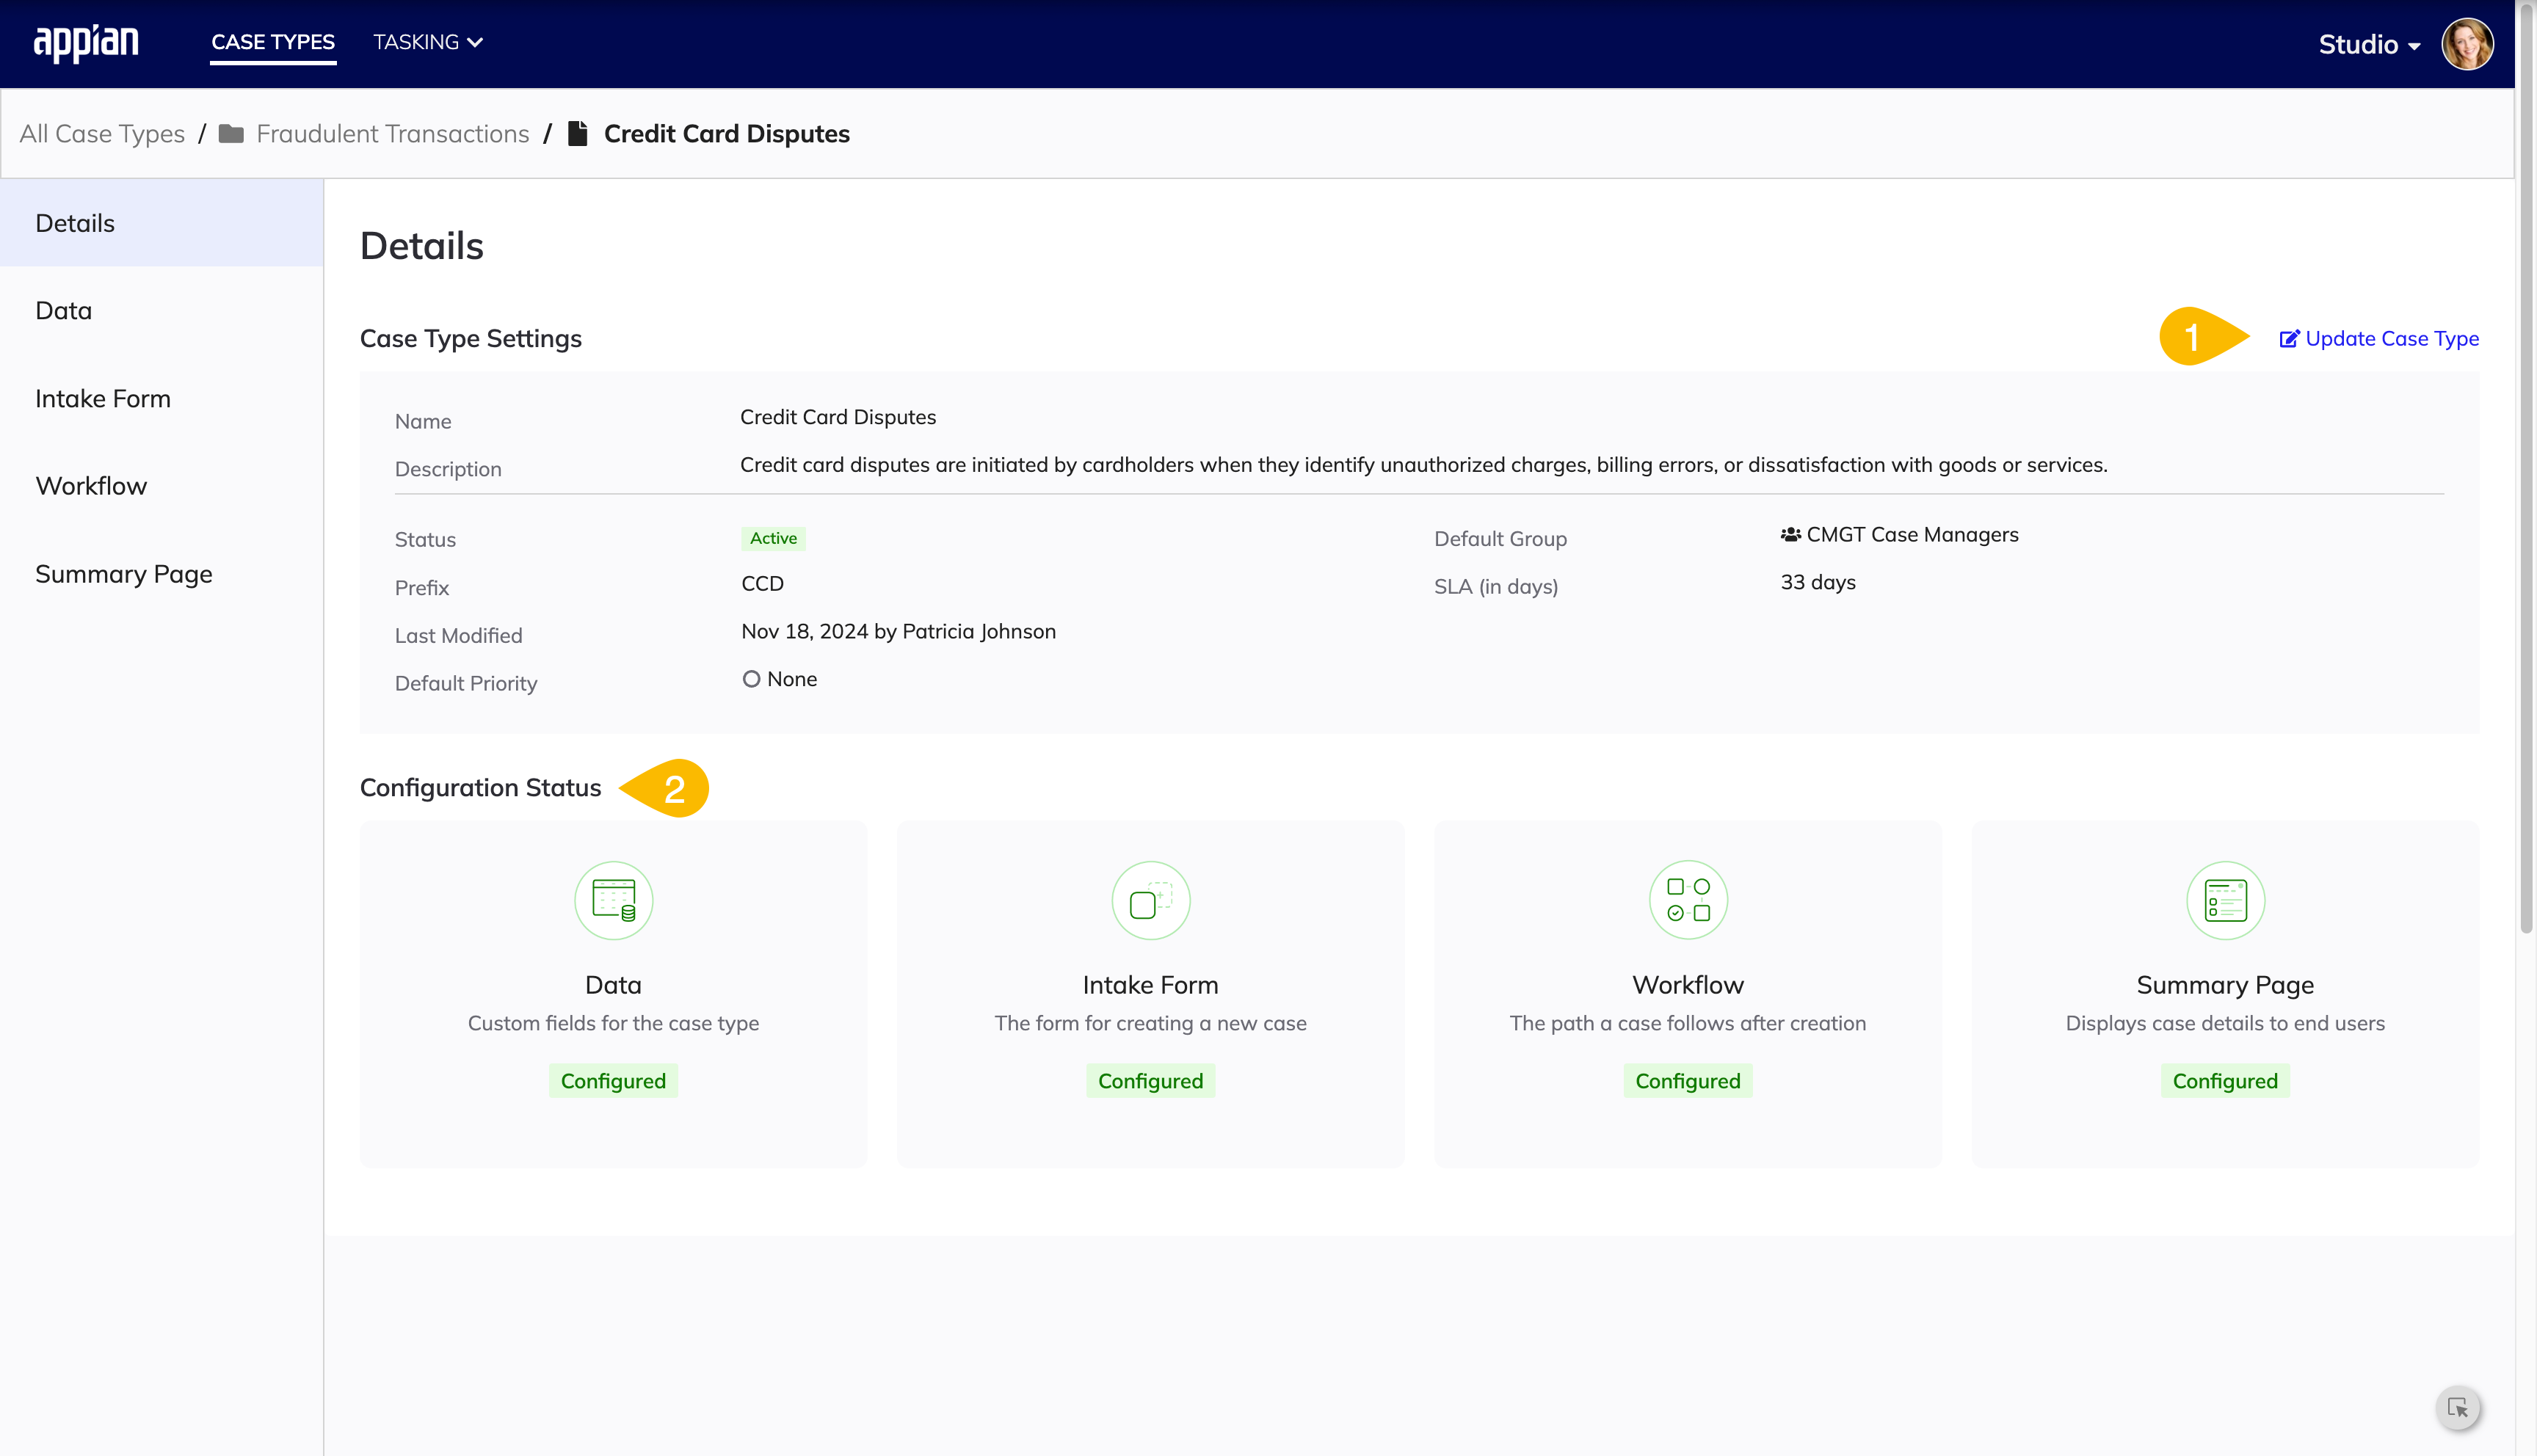
The following image highlights the actions you can do in the Details tab in a case type:
| # | Action |
|---|---|
| 1 | View and edit the case type settings displays. |
| 2 | View the configuration status for the case type, which shows how many case type pages are configured. |
DataCopy link to clipboard
Both case categories and case types have Data tabs, where you can view the the data fields associated with the case category, case type, and all cases respectively.
Note: You can also view all of the data fields common to all case types in your app and the structural data hierarchy in the Data tab of the All Cases page.
Data tab in a case categoryCopy link to clipboard
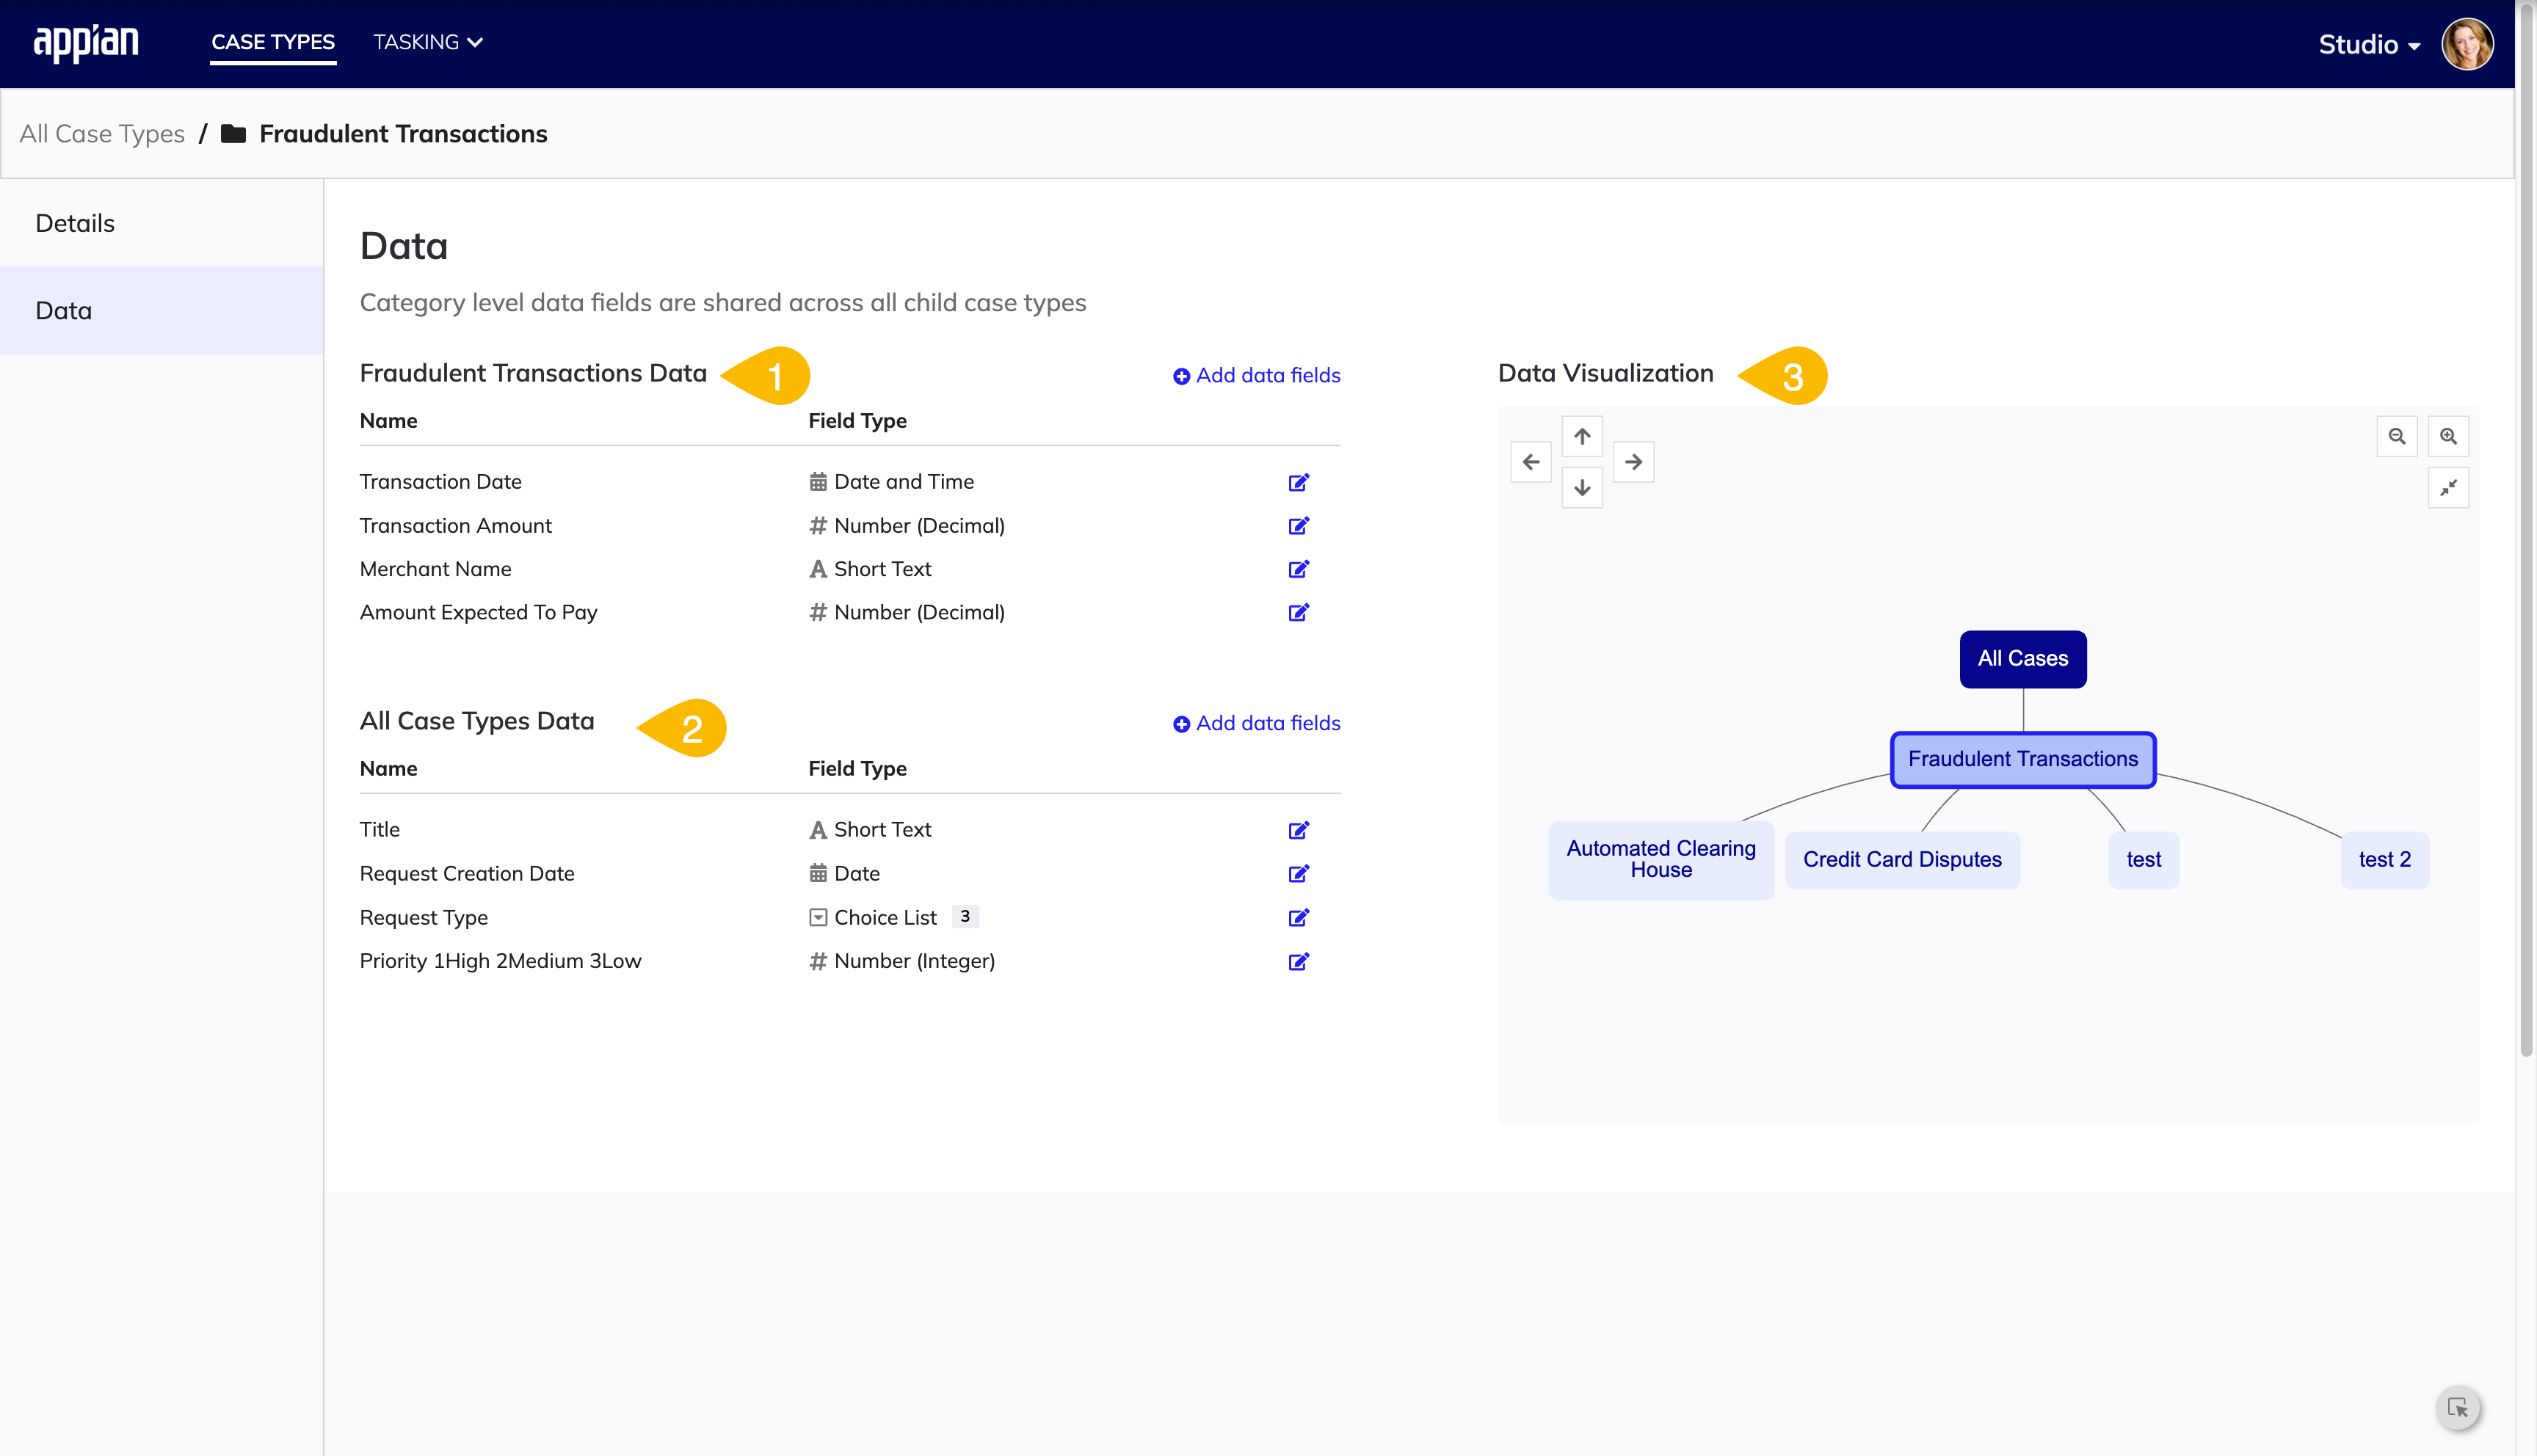
The following image highlights the actions you can do in the Data tab in a case category:
| # | Action |
|---|---|
| 1 | View, edit, and create new common data fields for all case types in the case category. |
| 2 | View, edit, and create new common data fields for all case types in the app. |
| 3 | View a visualization of the case type and category hierarchy. |
Data tab in a case typeCopy link to clipboard
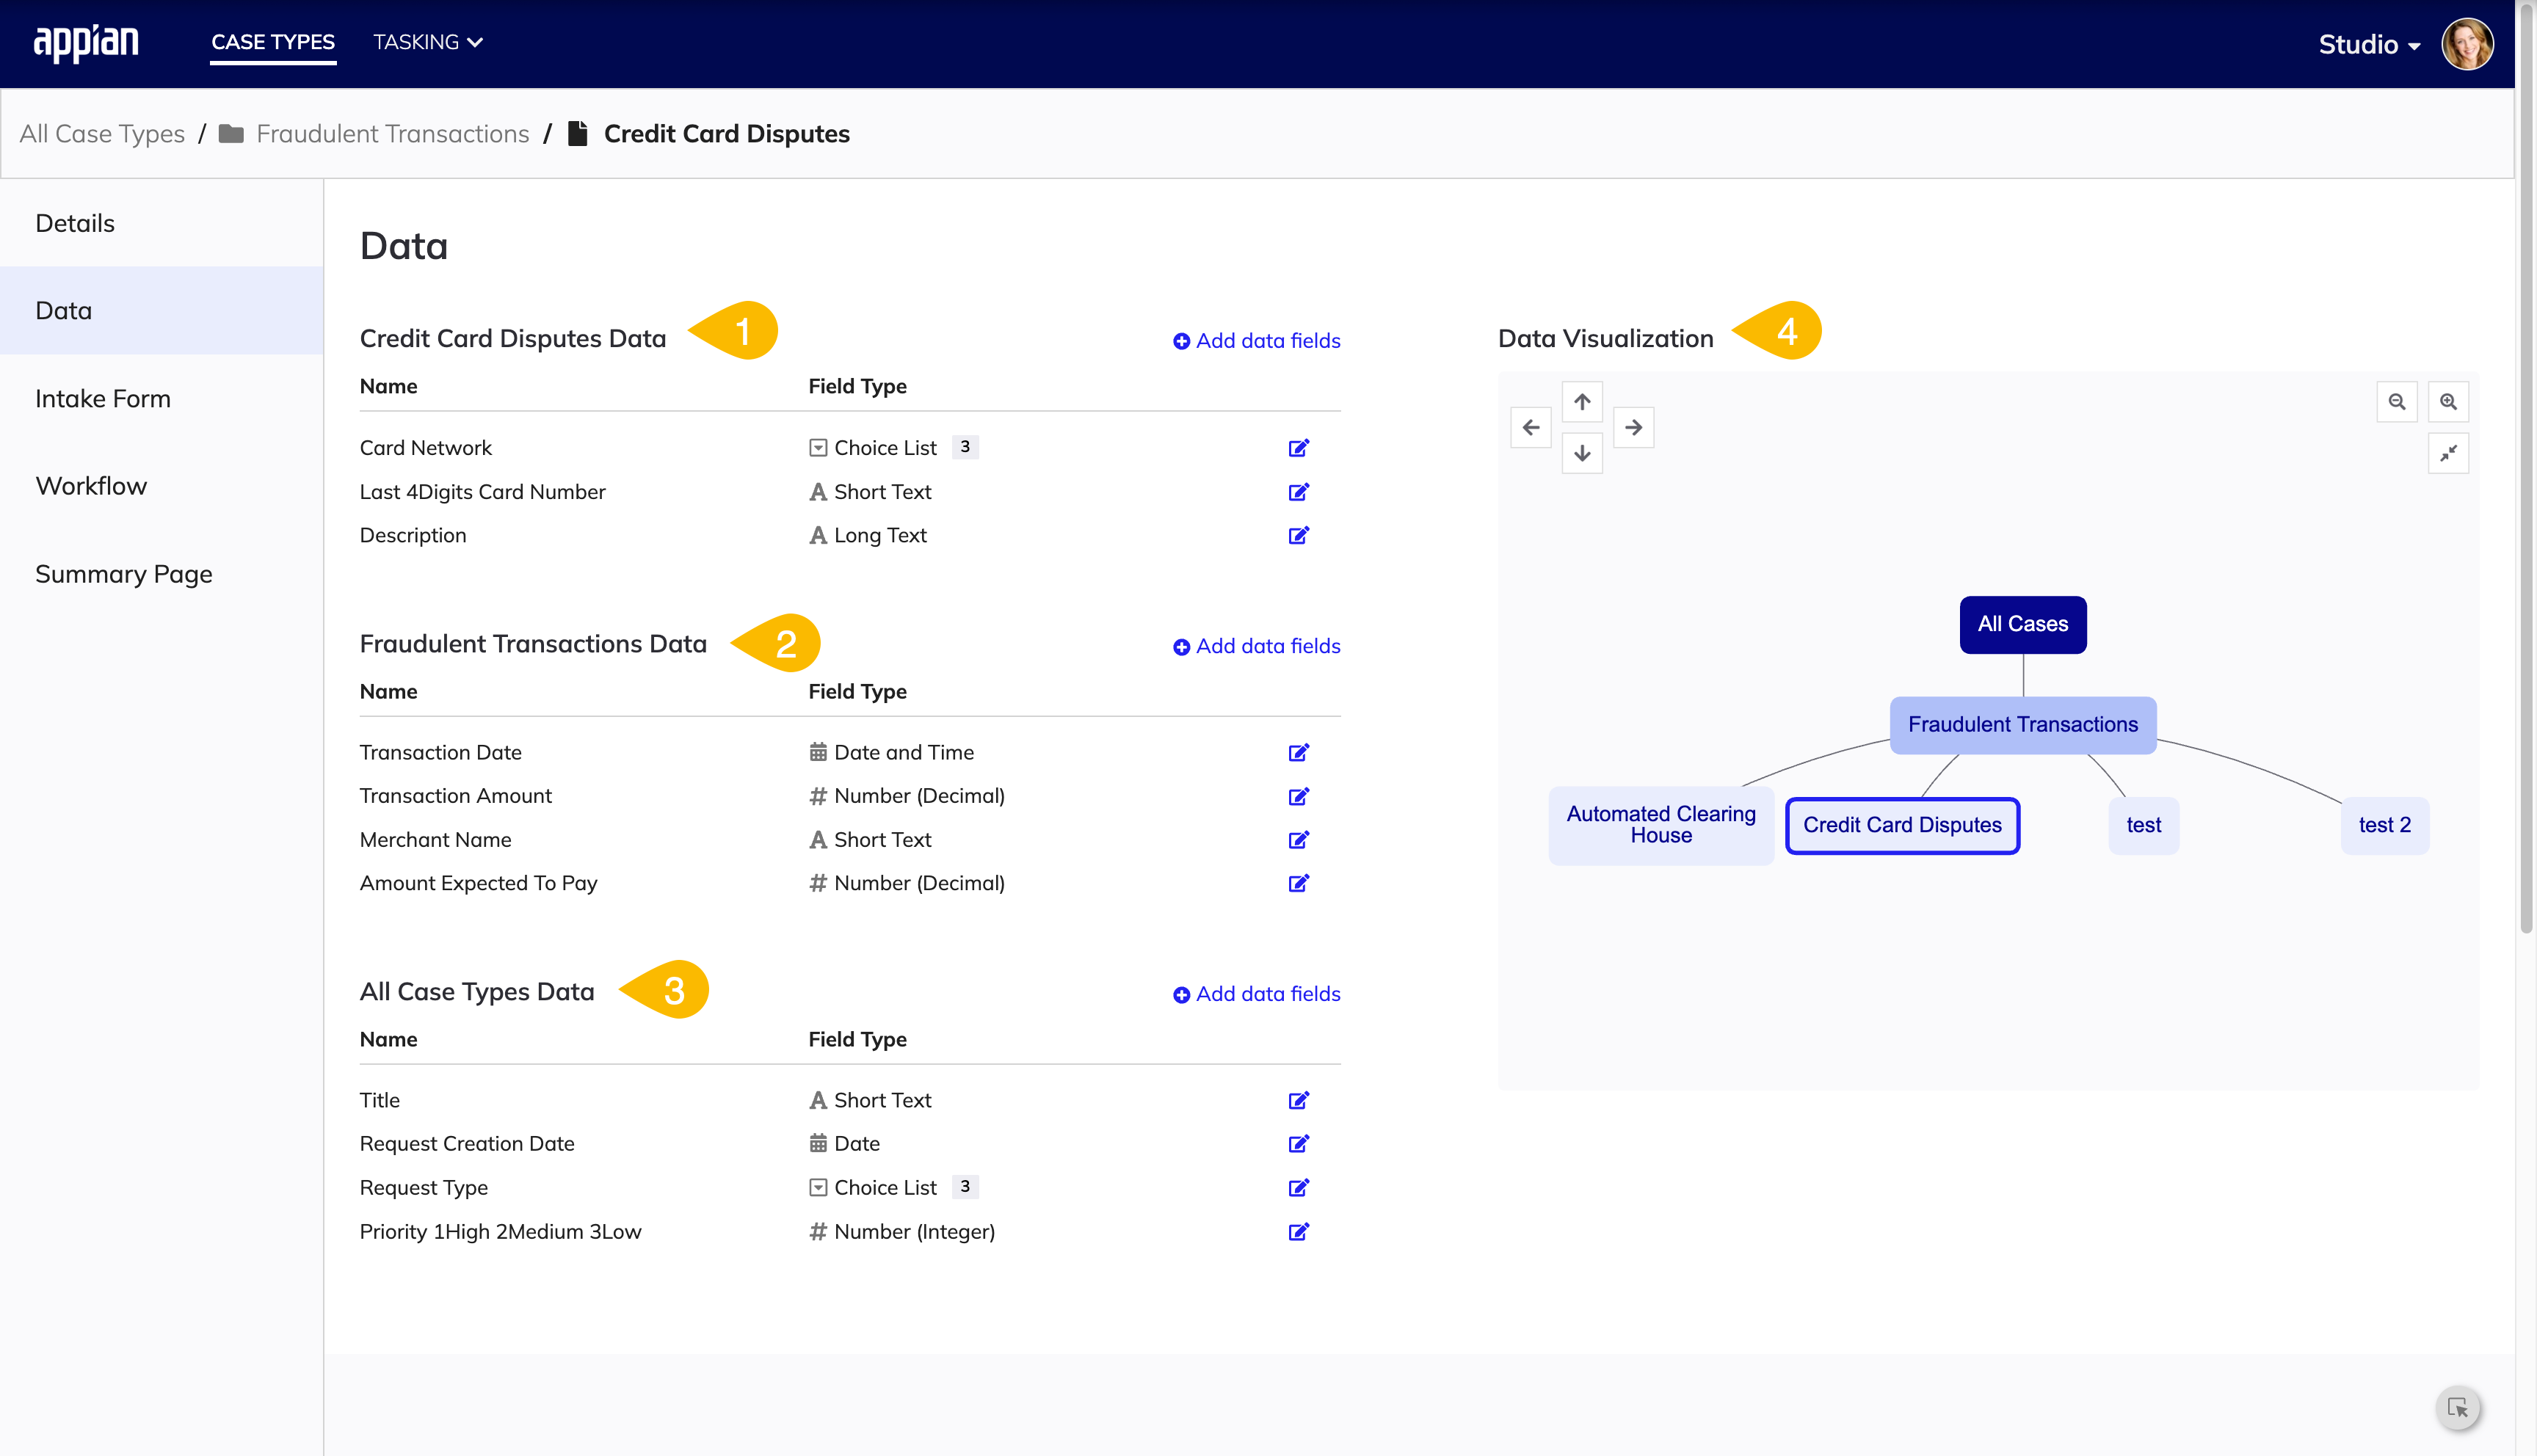
The following image highlights the actions you can do in the Data tab in a case type:
| # | Action |
|---|---|
| 1 | View, edit, and create new data fields specific to the case type. |
| 2 | View, edit, and create new common data fields for all case types in the case category. |
| 3 | View, edit, and create new common data fields for all case types in the app. |
| 4 | View a visualization of the case type and category hierarchy. |
Data fieldsCopy link to clipboard
Data fields are the types of data you can include and configure in your case categories and case types to get the information that you need to complete tasks and resolve cases.
Data fields can be specific to a case type, shared by all case types in a case category, or shared by all case types in the app.
Using a combination of both shared and specific data fields not only allows you to easily set up data fields once and use them across your app without having to recreate the field, but it also allows you to hone in on the specific data needed for a case type without having to apply the unnecessary data fields elsewhere.
The diagram below shows the relationship between data fields in a case category and data fields in a case type.
Adding and configuring data fieldsCopy link to clipboard
When you create a case category, add data fields to it that will be common to all case types in the category.
To add data fields to a case category:
- From the Data tab of a case category, click ADD CUSTOM FIELDS, then + ADD DATA FIELDS.
- Enter a Name for the data field.
- Select a Type for the data field that matches the kind of data you want to capture in this field.
- Click CREATE.
Note: You can also add data fields to all cases or a case category from the Data tab in a case type.
Once you've added data fields to your case category, you can add data fields to your case type.
To add data fields to your case type:
- From the Data tab of a case type, click ADD DATA FIELDS, then + ADD DATA FIELDS.
- Enter a Name for the data field.
- Select a Type for the data field that matches the kind of data you want to capture in this field.
- Click CREATE.
You can also add multiple new data fields at the same time, for both case categories and case types.
Note: Note that Appian enforces a data modeling best practice that allows you to only have two Long Text data fields shared across all cases, two Long Text data fields in each case category, and two Long Text data fields in each case type.
Choosing the right type of data fields for your casesCopy link to clipboard
When creating data fields, it is important for the overall health and performance of your application to choose the data type that best matches the kind of data you need from each data field.
There are 7 data types to choose from:
- Short text
- Long text
- Number (integer)
- Number (decimal)
- Date
- Date and time
- Boolean
- Choice list
Here are some examples of common data field and data type pairings:
| Example of data to enter | Type of data field |
|---|---|
| Short written response | Short text |
| Phone number or any series of numbers that uses formatting | Short text |
| Written response of a paragraph or more | Long text |
| A numerical total, measurement, or any number you could perform a calculation on | Number (integer) or number (decimal) |
| Month, day, and year only | Date |
| Time of day, plus the month, day, year | Date and time |
| True/false or yes/no responses | Boolean |
| Reference or lookup data used in dropdowns, like statuses | Choice list |
Creating a well-defined architecture for your data is called data modeling. In case management apps, a data model is a representation of all of the information available in the case categories and case types for your application. To learn more about data modeling throughout Appian, check out Data Modeling with records.
If you're unsure about where and how to start creating data fields, we can suggest names and data types for you.
To generate suggested names and data types for new data fields:
- From the Data page of a case category or case type, click Add Data Field.
- In the Create Data Field dialog under the Tell us what information to capture heading, enter a prompt that tells us the kind of data you want to get for each data field.
- For example, to add data fields for a rental application case, you might have a prompt that says: "Add fields for first name, last name, date of birth, and other common fields for rental applications".
- Click GENERATE.
- Once generated, the suggested name and data type for the new data field are populated below. Hover over the sparkles beside the new data field to see our reasoning for the suggested name and data type. You can edit the suggested field names and data types, as well as modify the prompt and regenerate suggestions. Note that if you modify the prompt and click GENERATE again, the previously suggested names and data types will be overwritten.
- Once you've reviewed and/or edited the suggested names and data fields, click CREATE.
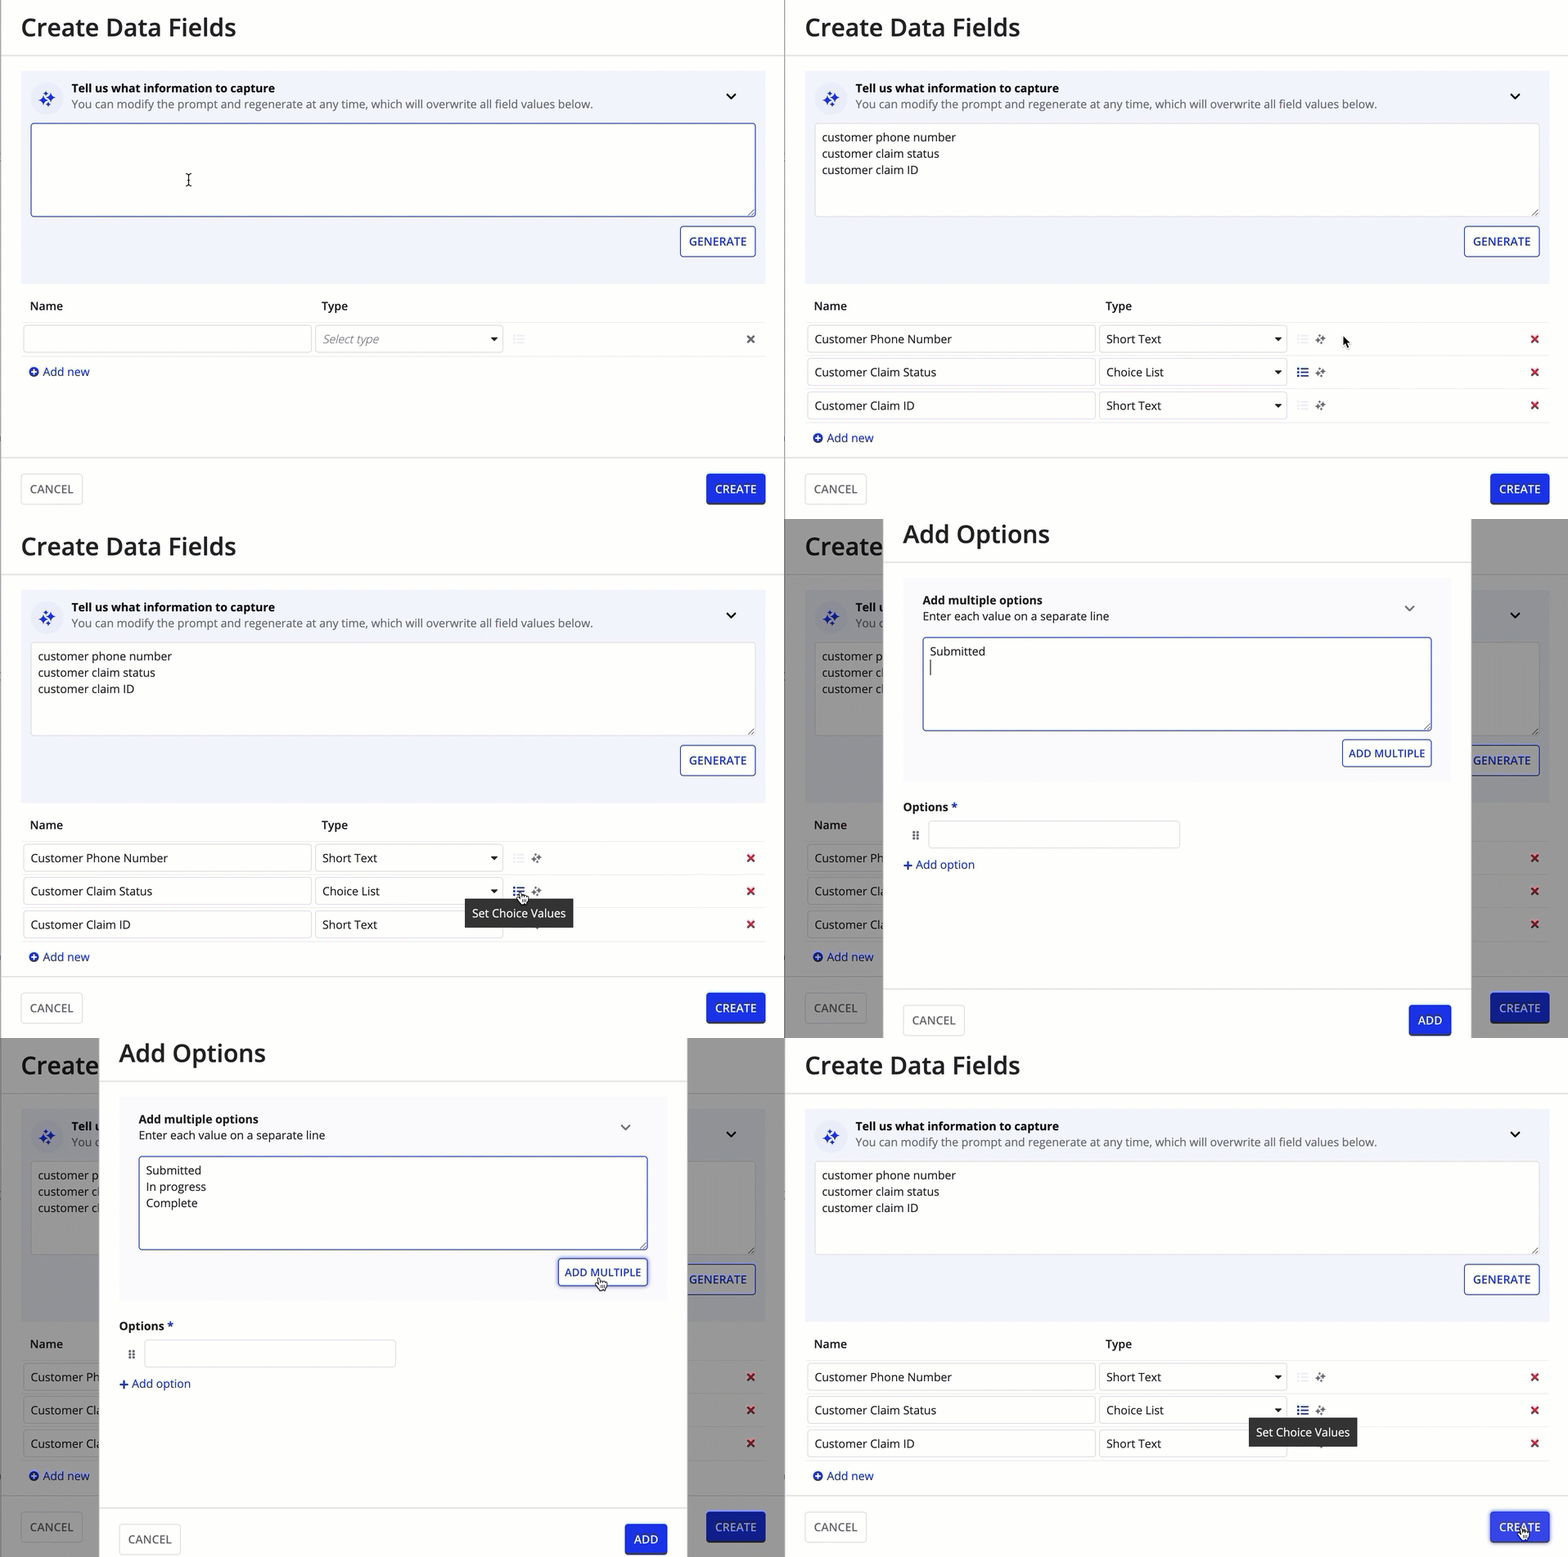
Tip: If a generated data type for a field is a choice list field, you'll need to add the choice list options before finishing creating the data fields.
Intake Form tab in case typesCopy link to clipboard
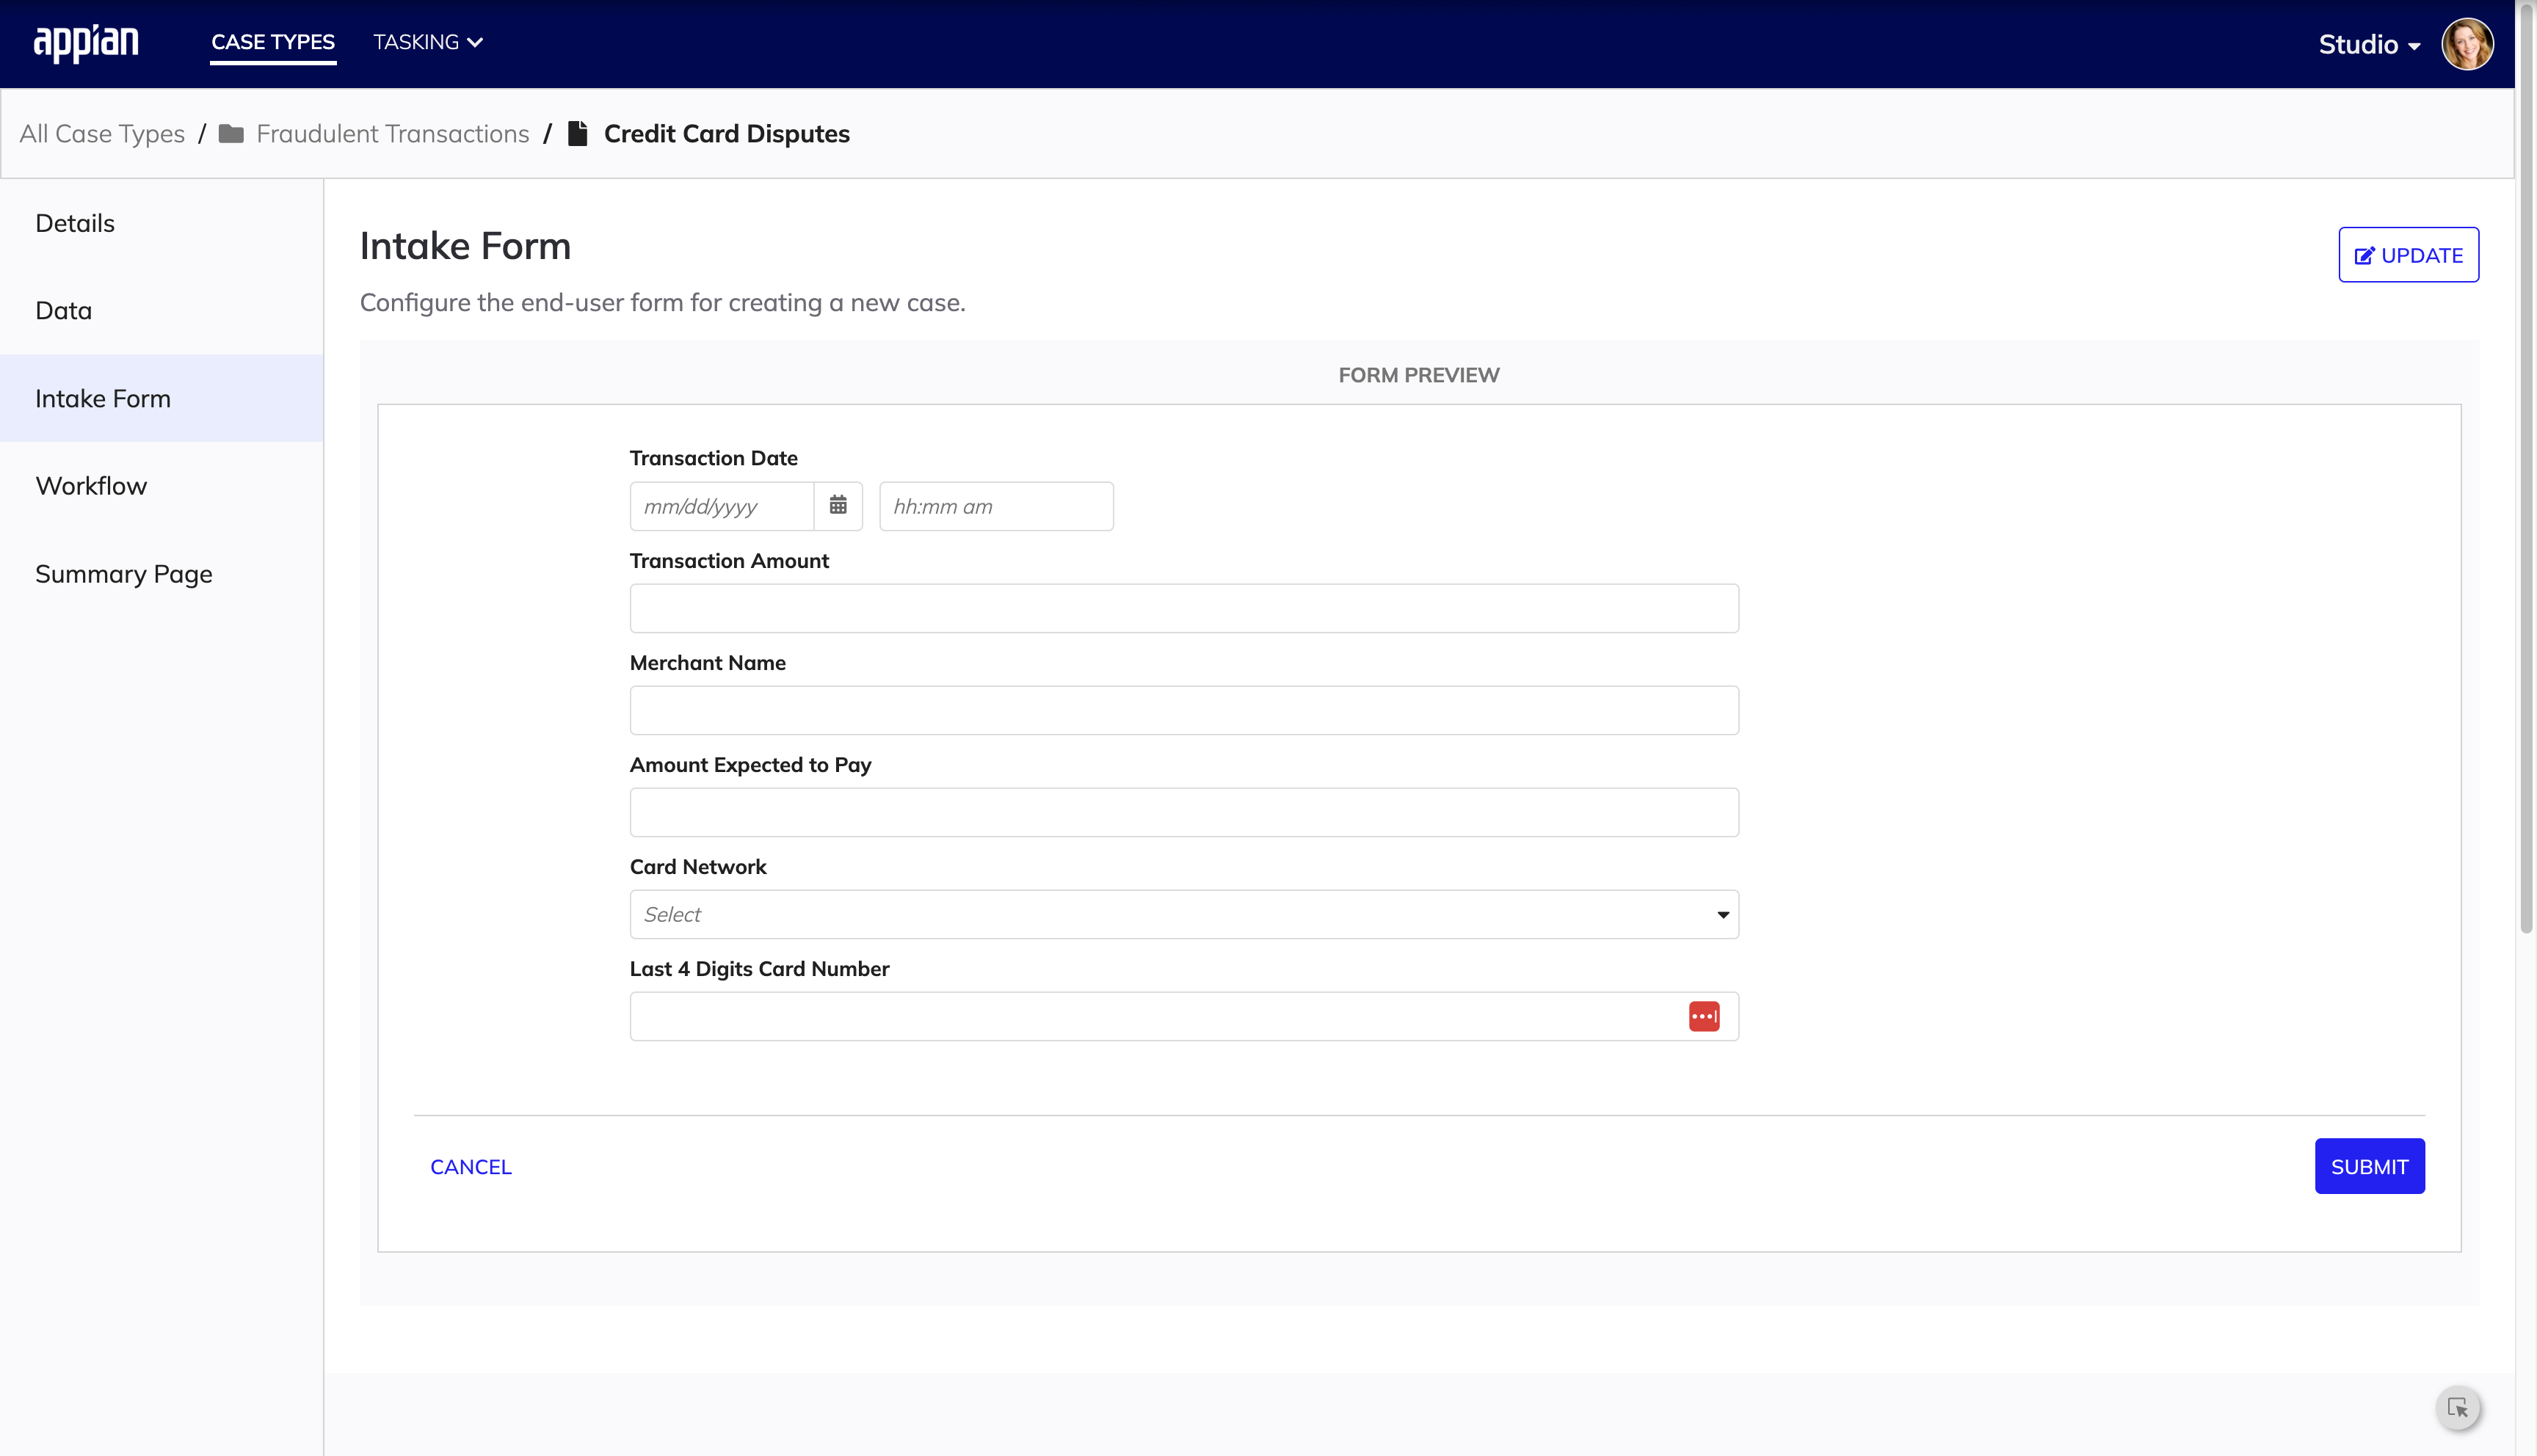
The Intake Form tab is only in case types and allows you to create, edit, and preview an intake form that end-users of your process will use to initiate case creation.
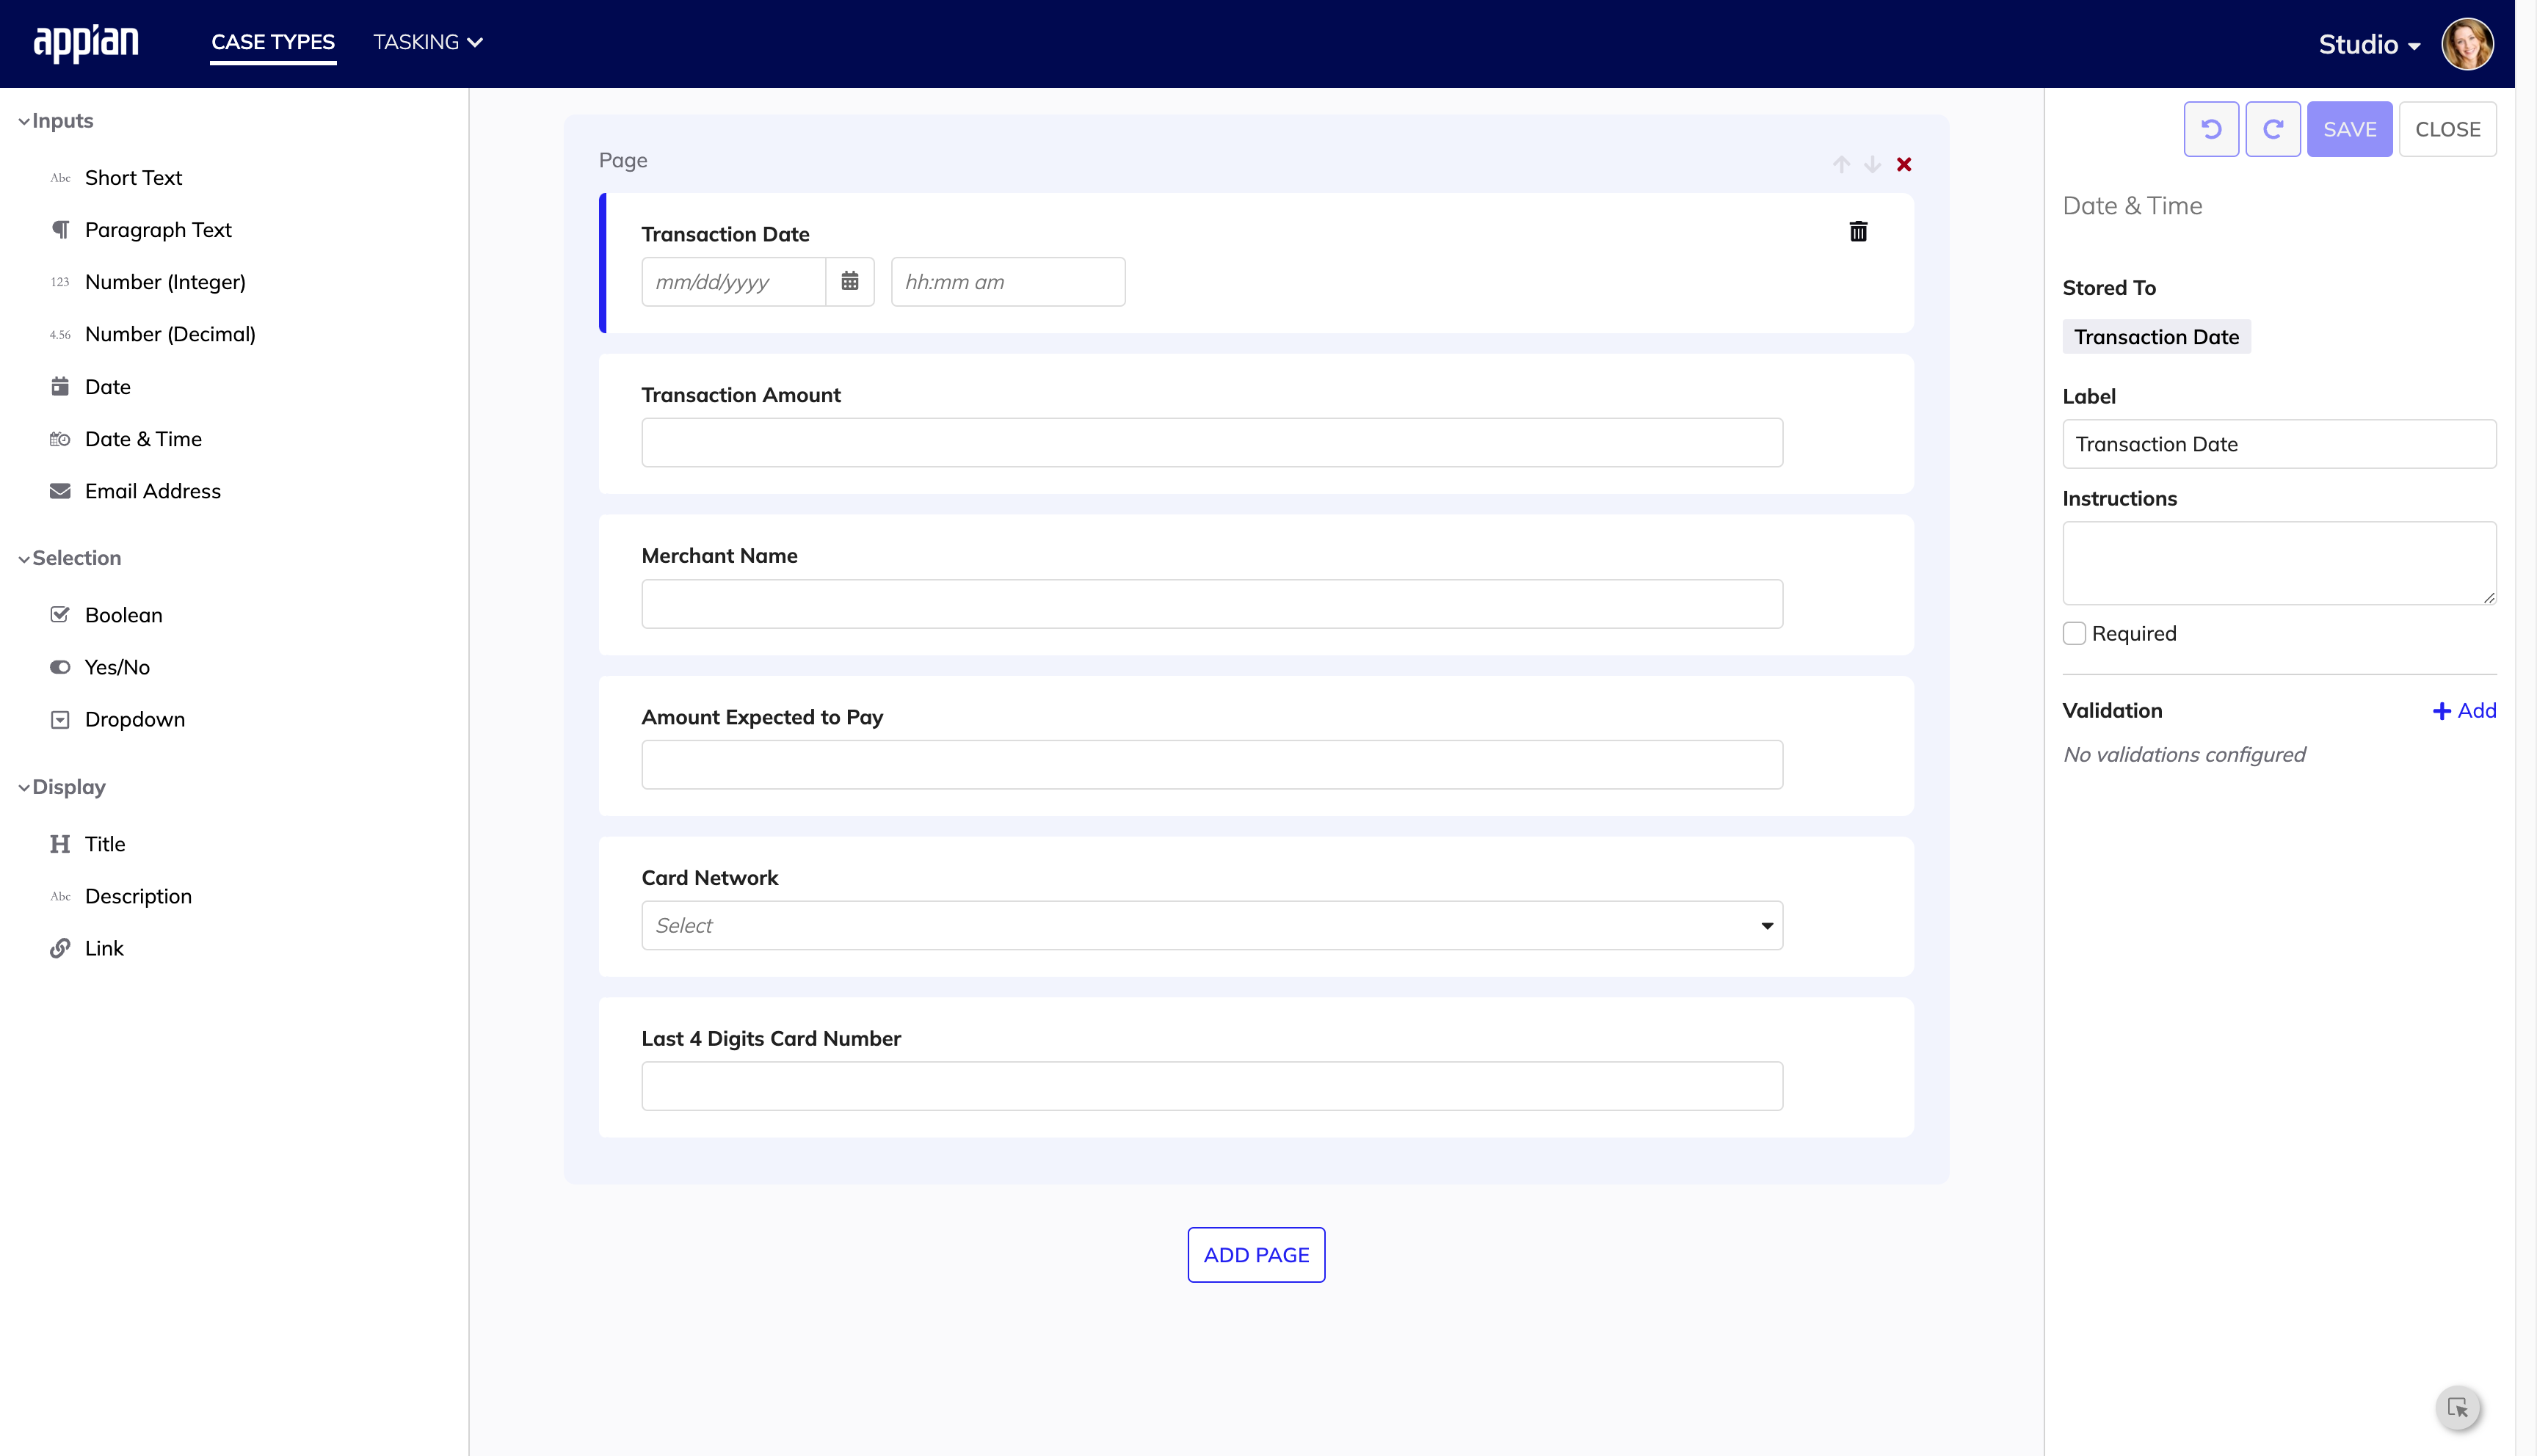
In the Intake Form tab, you can use the form builder to create and edit an entire form without using any code.
Configuring intake forms with the form builderCopy link to clipboard
To create and configure a new intake form using the form builder:
- From the Intake Form tab, click Create Intake Form.
- Select START FROM SCRATCH.
- In the Label field in the right pane, add a title to the first page of your form.
- Drag and drop fields from the left pane onto the page.
- In the right pane, enter a Label for each field.
- (Optionally) Enter Instructions to help your users understand the purpose of the field.
- Select the Required checkbox to make a form field required for submission.
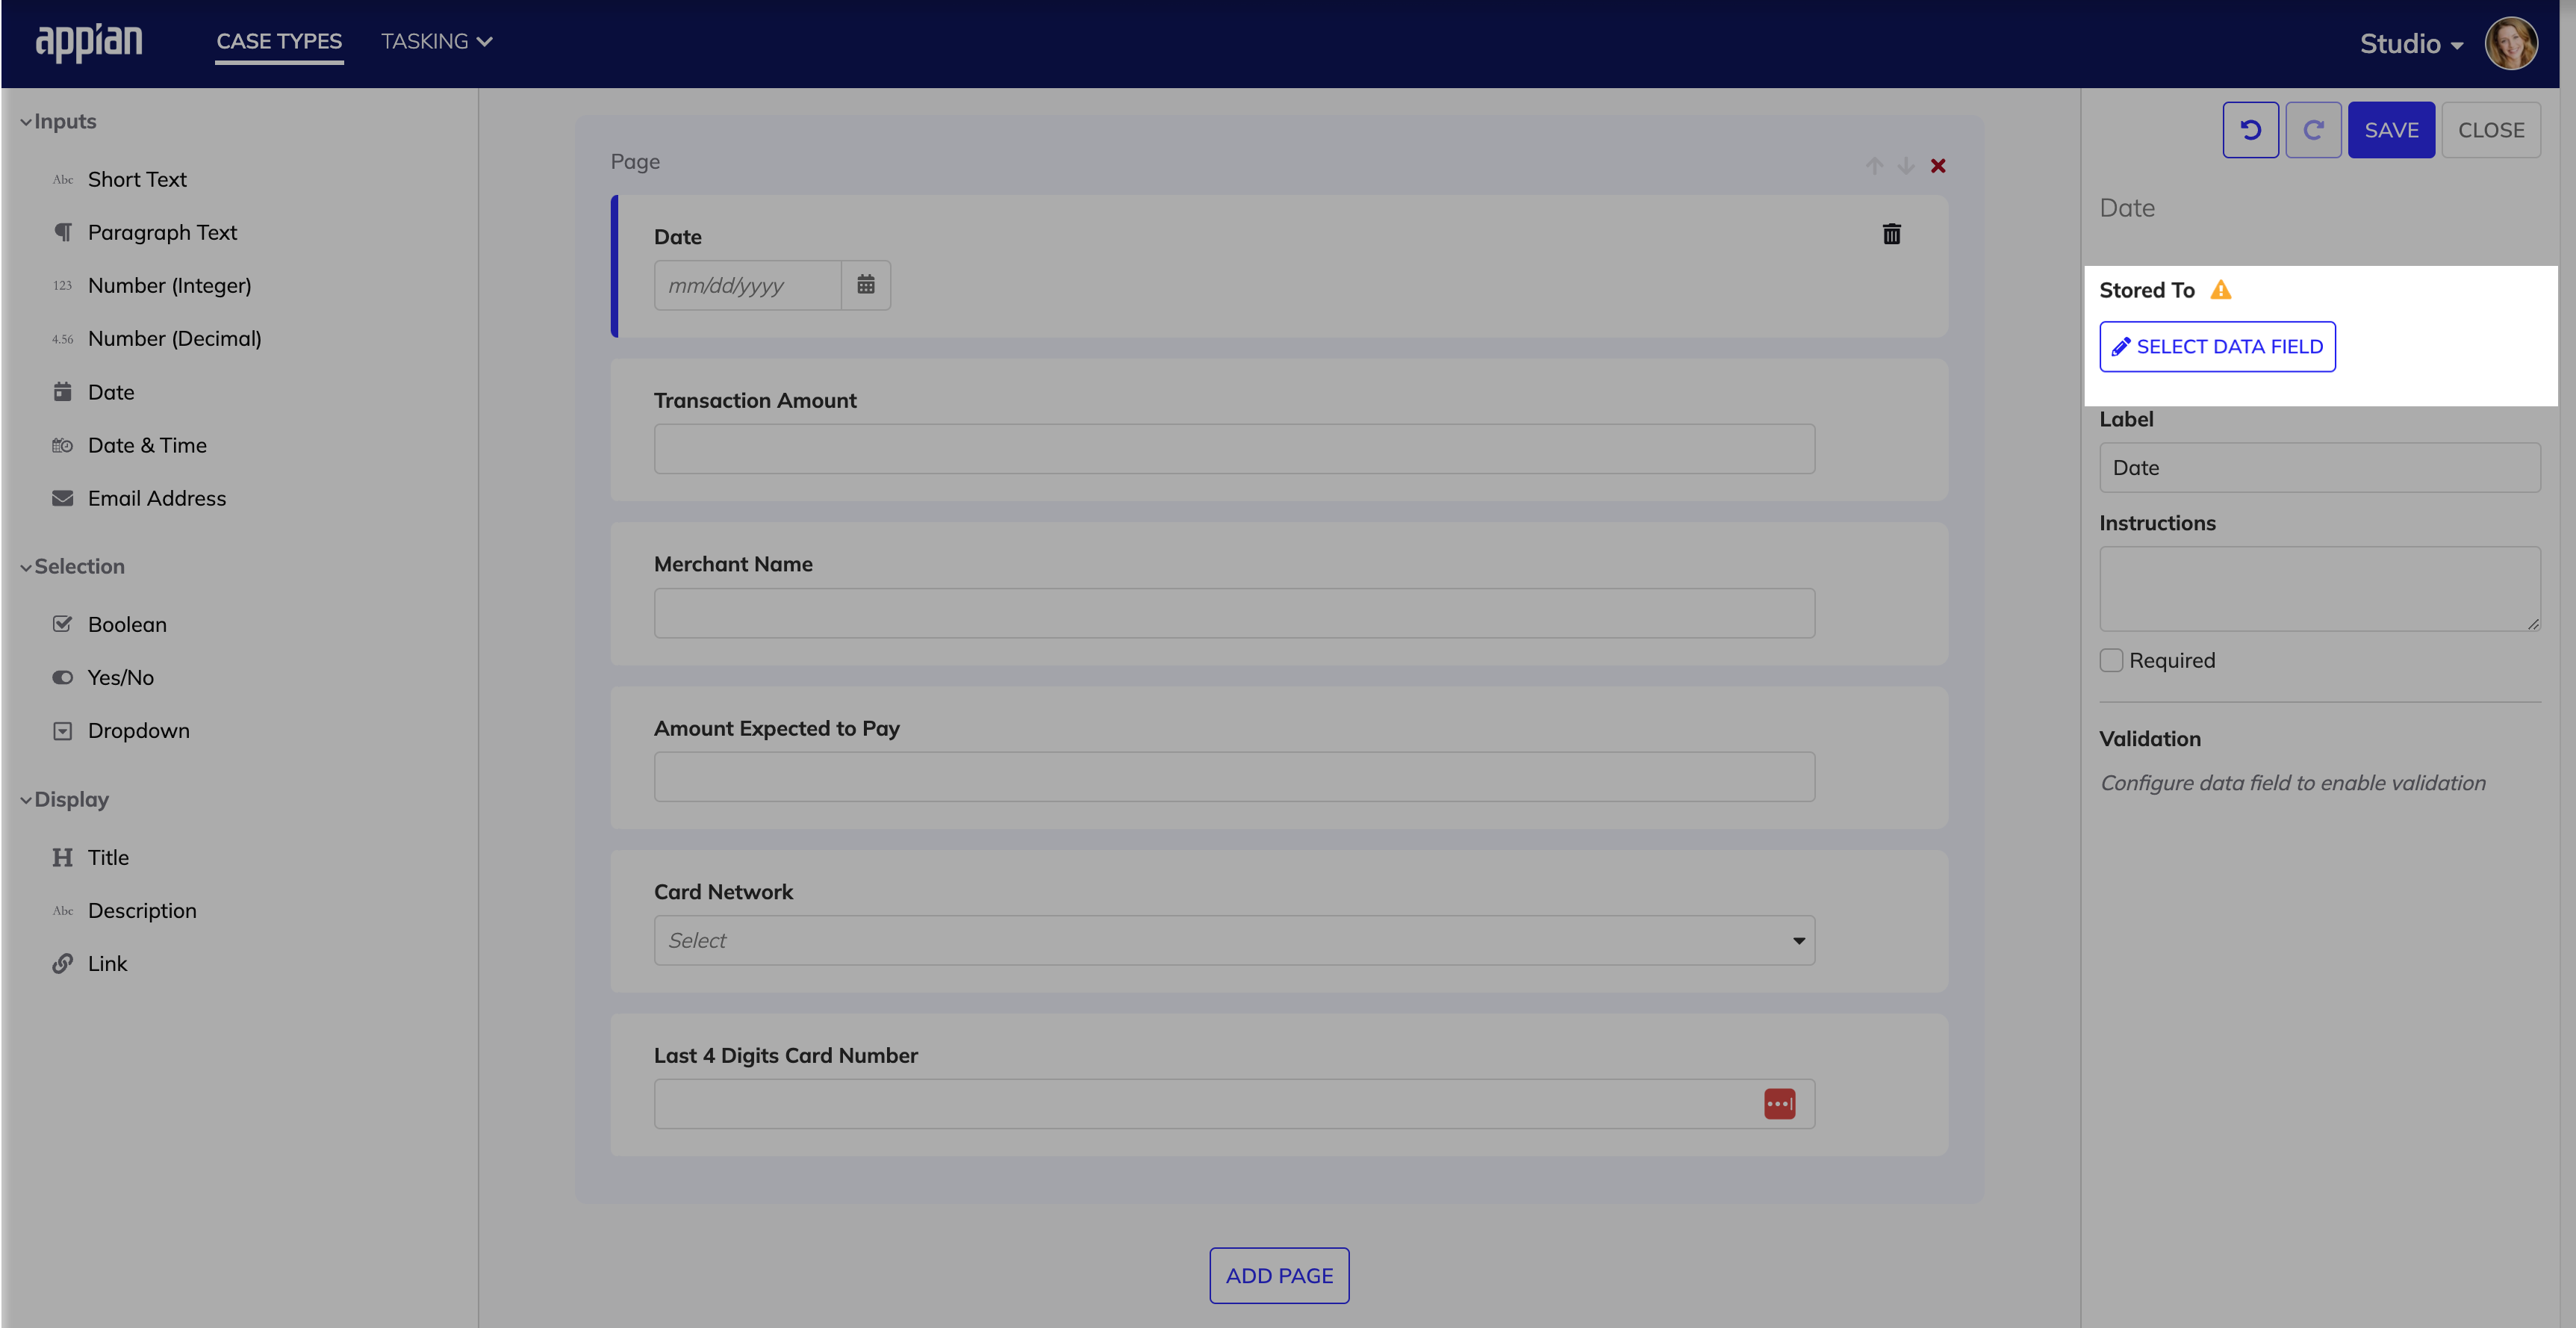
- Under Stored To, click SELECT DATA FIELD.
- To store data from the form field to an existing data field in your case type, case category, or all cases select Use Existing Field.
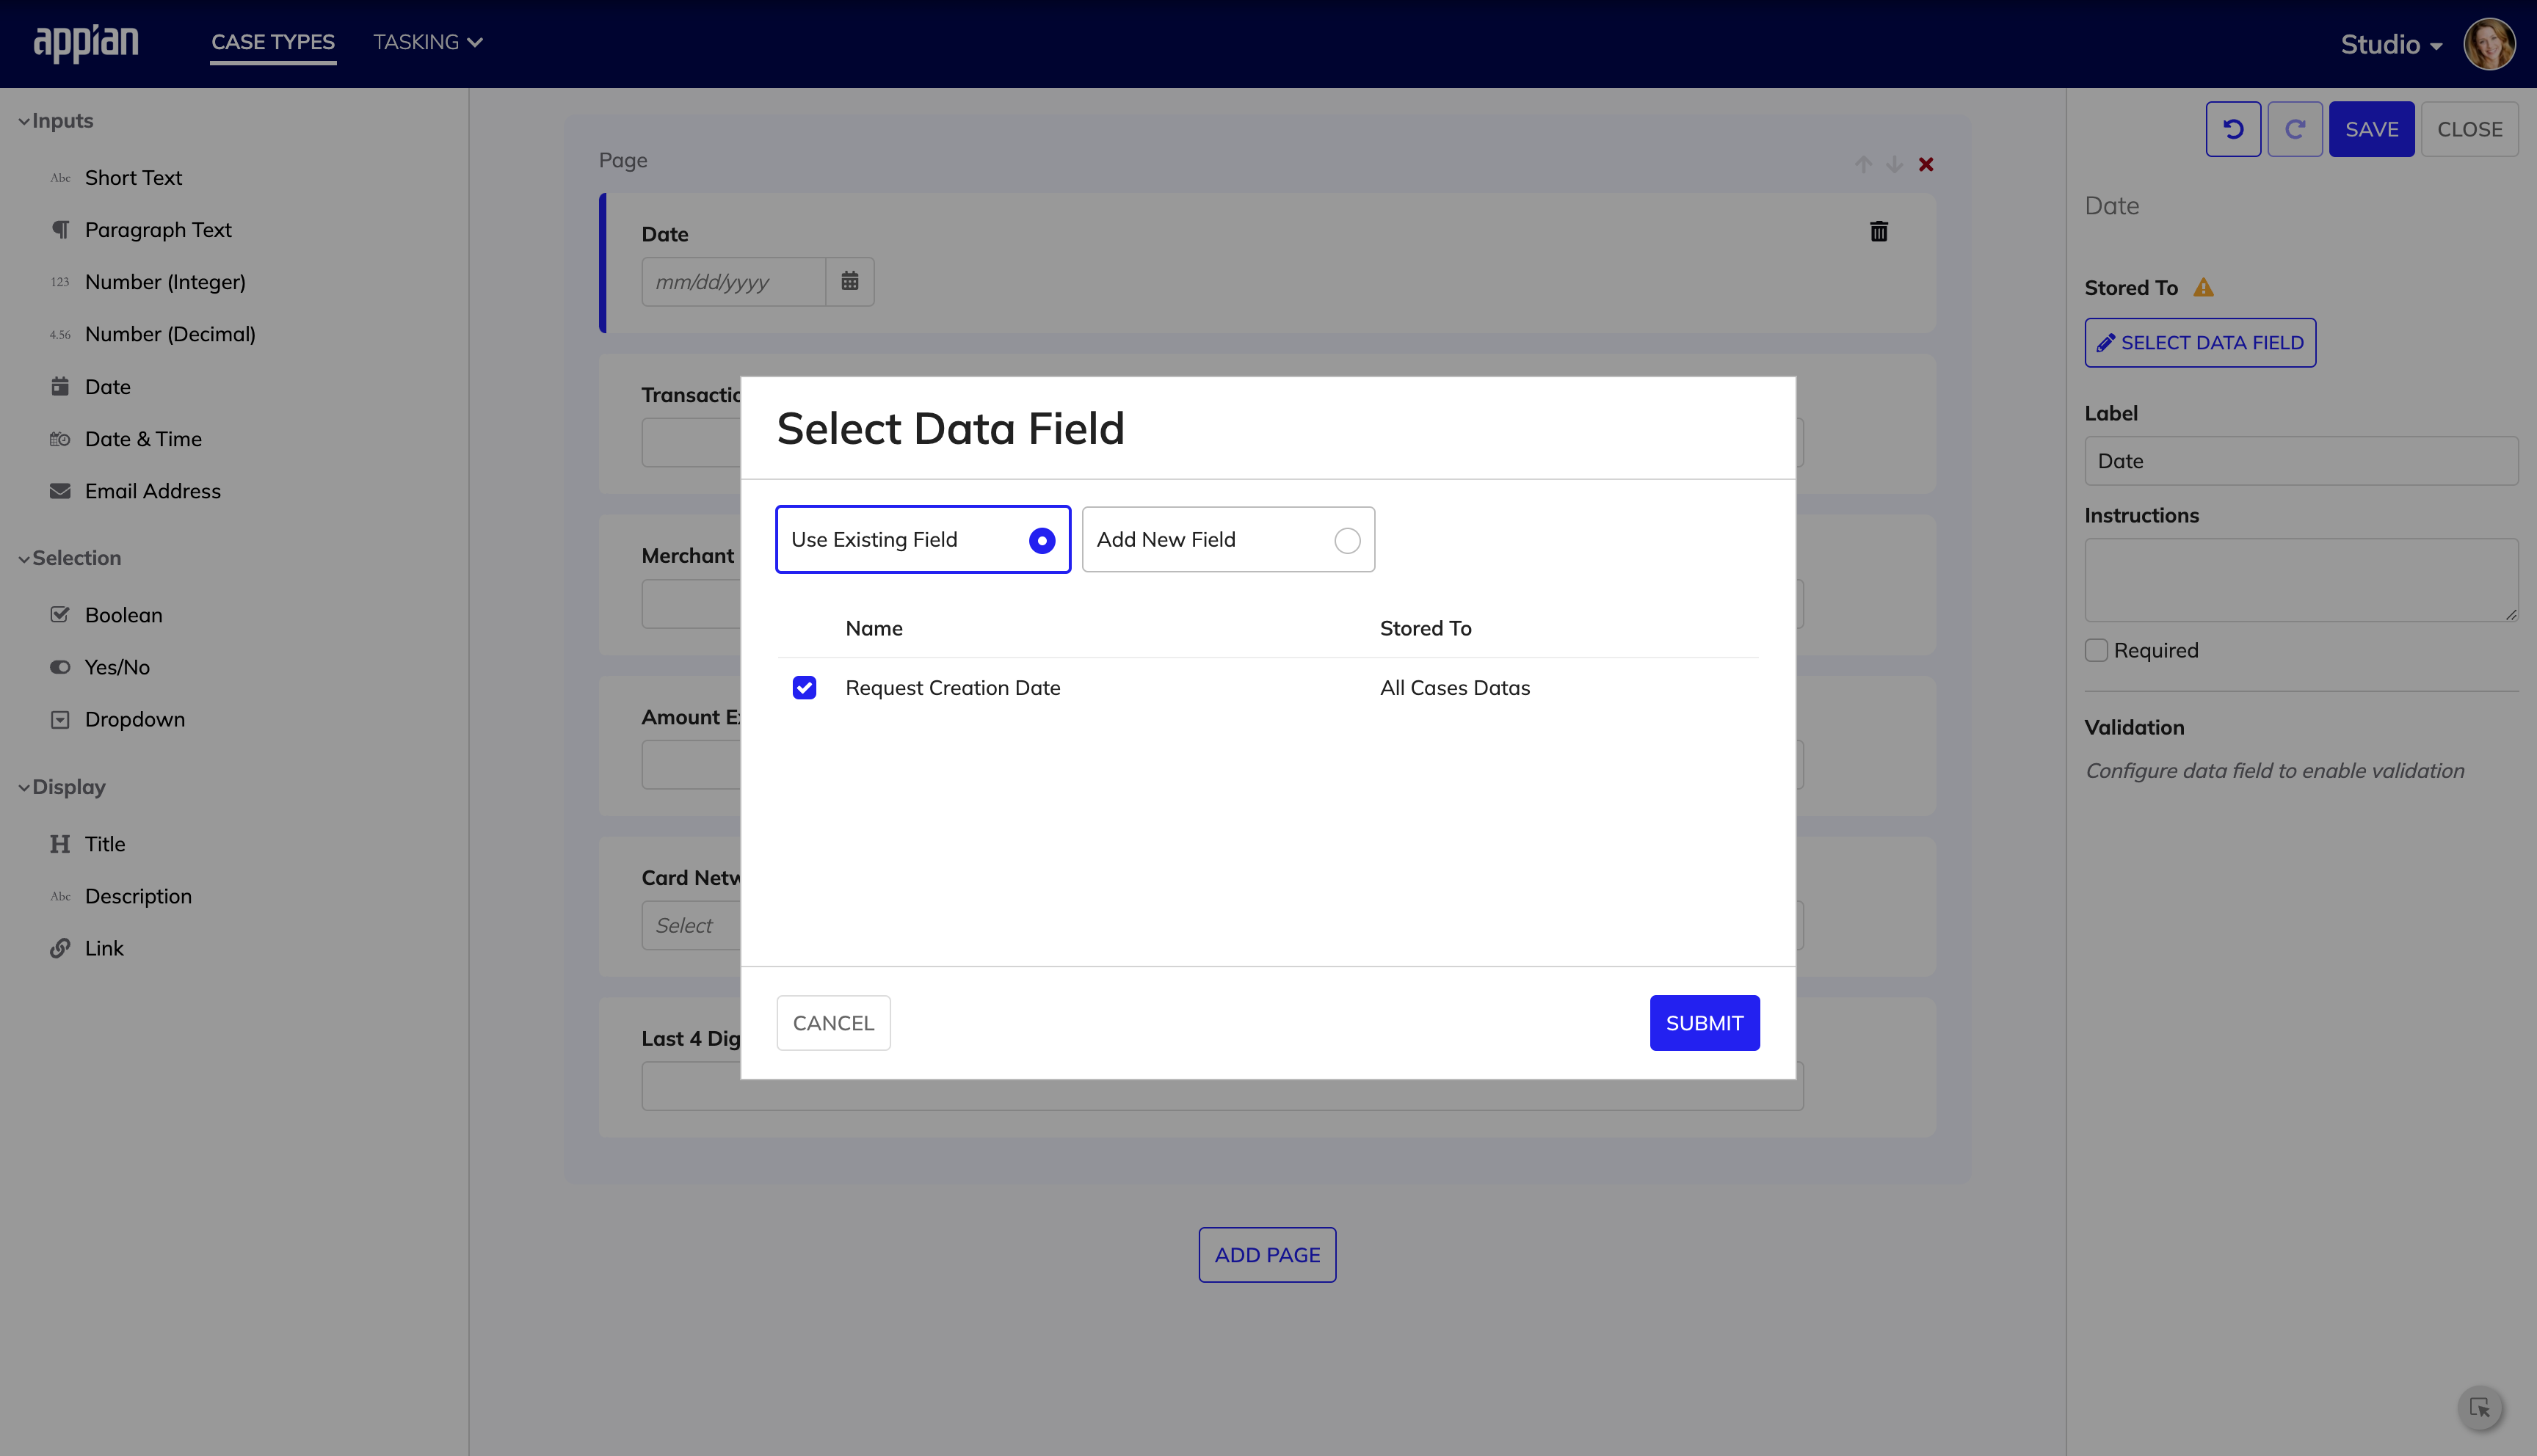
- Select an existing data field to store the form field data.
- Click SUBMIT.
- To store the data from the form field in a new data field, select Add New Field
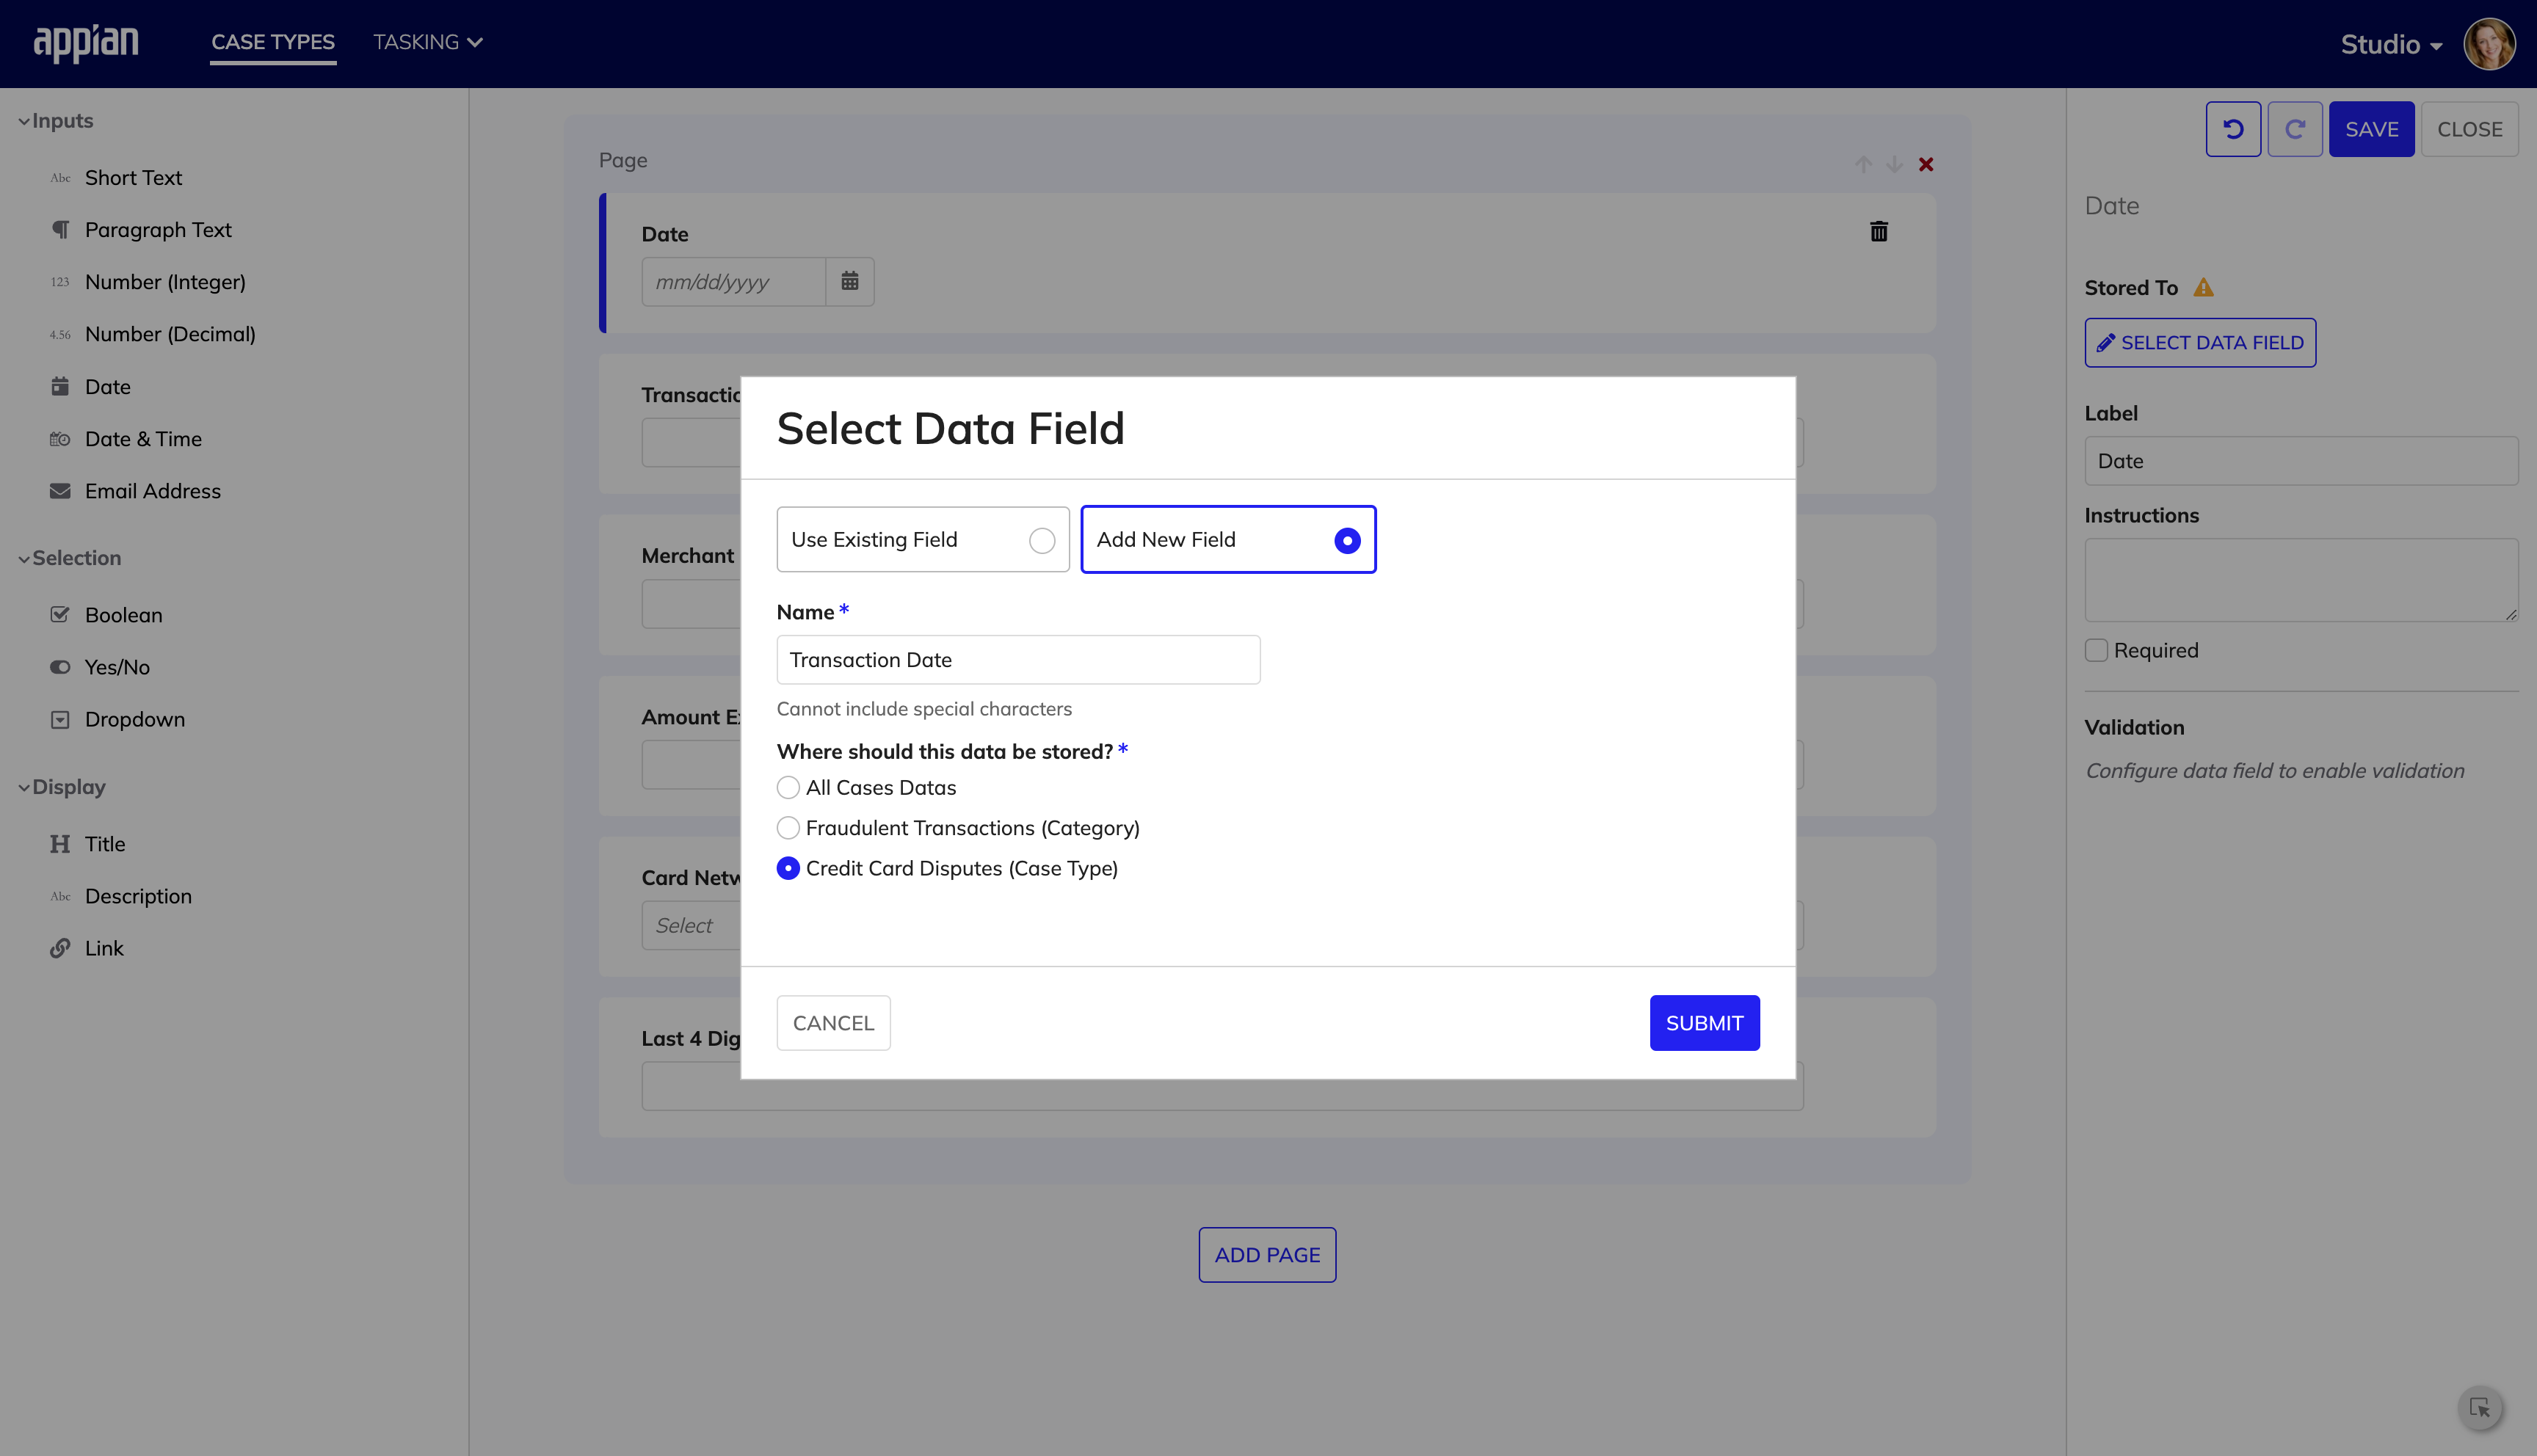
- Enter a Name for your new field and choose to add the data field to all cases, the case category, or the case type.
- Click SUBMIT.
- Under Validations, click + Add to add validations to your form field.
- For Criteria, select the validation to apply to the form field, such as a max character count. Fill out any additional information required for the validation.
- Click SUBMIT.
- To add a new page to your form, click ADD PAGE in the center pane. You can reorder pages using the arrows.
- When you're finished configuring your form, click SAVE.
- Click CLOSE to exit the form builder.
Forms built in the form builder can be further customized and configured by a low-code developer in Appian Designer. These customizations can include anything from adding components not offered in the form builder to allowing users to as save drafts of forms. To learn more, see Configuring forms as interfaces.
Workflow tab in case typesCopy link to clipboard
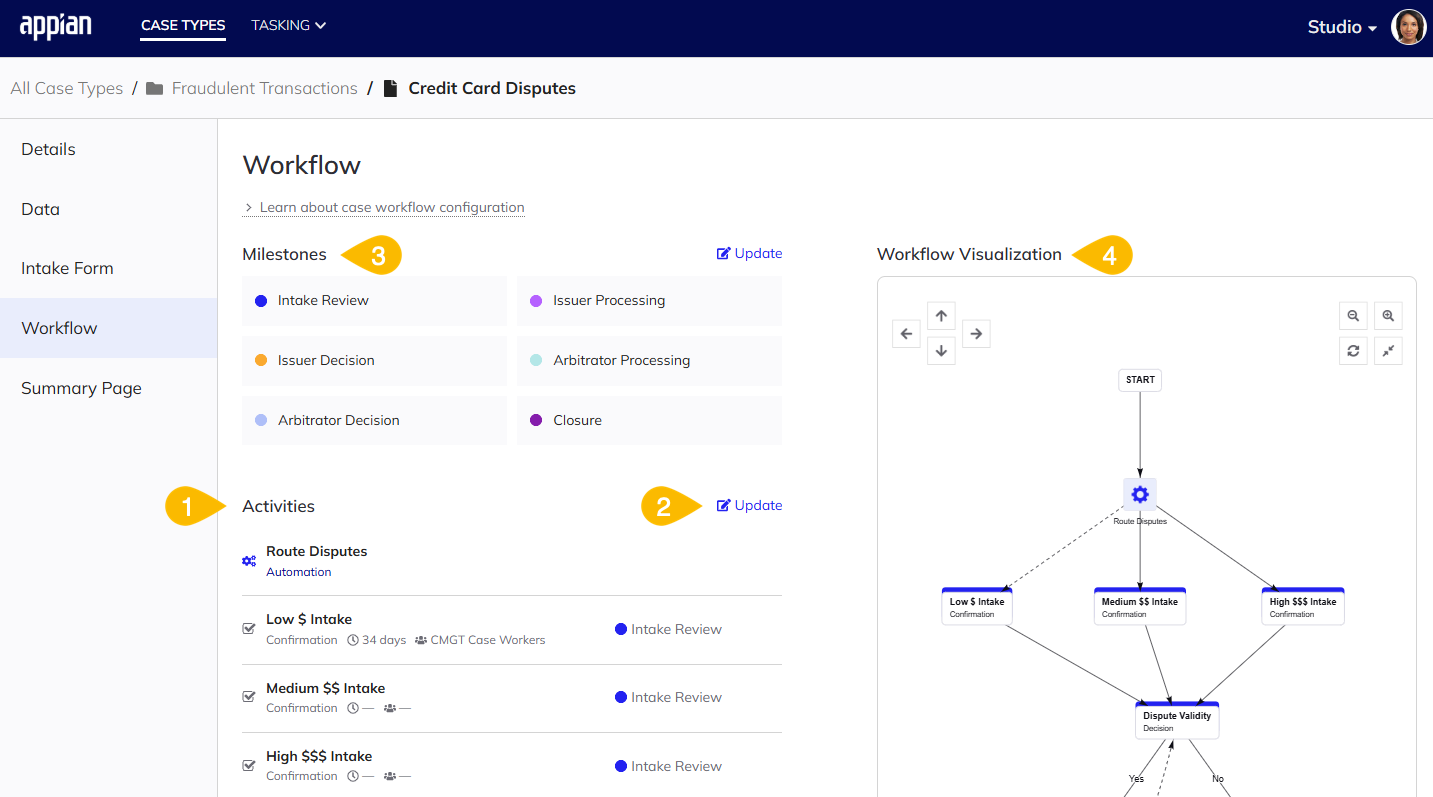
The following image highlights the actions you can do in the Workflow tab in a case type:
| # | Action |
|---|---|
| 1 | Configure the case type workflow and activities. |
| 2 | Create, edit, and organize tasks, automations, and milestones. |
| 3 | View milestones and activities for the case type. |
| 4 | View a visualization of how activities connect together to form the case type workflow. |
Tasks are configurable activities that represent the actions and steps taken by users in order to complete the case workflow.
Milestones are color-coded categories for your tasks that you can optionally create to help visually organize and easily distinguish different tasks. Milestones are case type specific and tasks can only have one milestone assigned to them.
Workflow automations are configurable activities that are completed by the system without human intervention. Like tasks, workflow automations allow you to easily define rules and conditions that specify how to move forward in a workflow. Unlike tasks, these activities don't have to be done by a user. Workflow automations are case type specific and can only be created and used in one case type.
You can edit workflows by modifying the flow and order of activities, as well as adding tasks, task blocks, and automations at any time, even for in-progress cases. This allows for flexible and resilient workflows that can adapt as your case management process evolves.
Configuring tasksCopy link to clipboard
To configure the workflow for your case type, start with adding tasks:
- From the Workflow tab, click CONFIGURE WORKFLOW.
- Click ADD TASKS.
- From the Add Tasks dialog, click Add Task.
-
In the Create Task dialog, configure the following task properties.
Property Description Name The name of the task. Task Type The kind of activity the task represents. There are three task types: confirmation, decision, and document upload. Default Assigned Group The group that has permission to perform this task, unless otherwise specified. Default SLA The service level agreement to apply to the task, calculated in business (working) days. Question The question for your users to answer. Questions are required for the Decision task type. Response Options The optional responses for your users to choose from. Response options are required for the Decision task type. Description Description of the task. This text box contains many text formatting options, so you can write the best description of the task, including instructions, for your users. - When you're done adding tasks, click ADD.
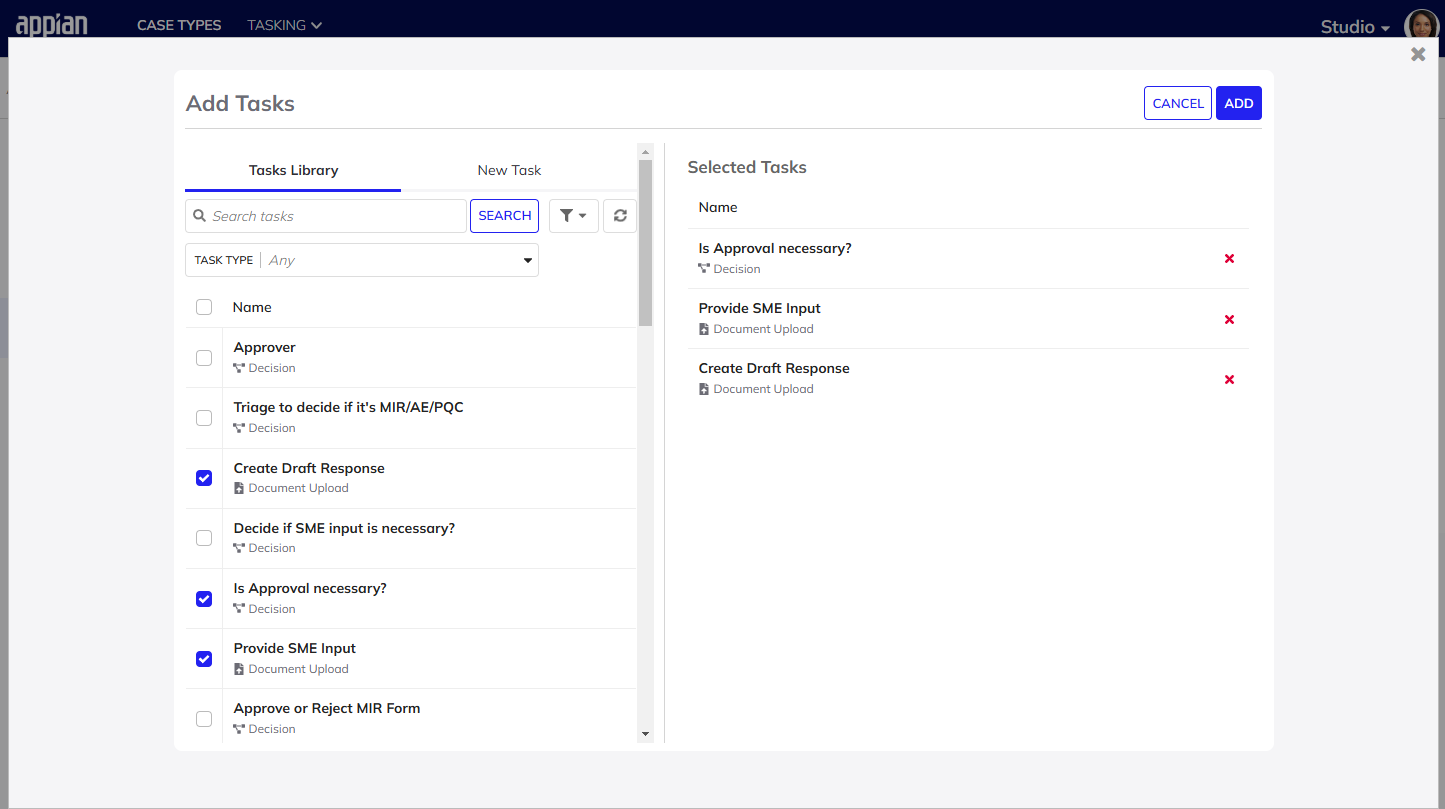
Once you have created tasks you can add them to your case type workflow. To add these new tasks or previously existing tasks to your workflow:
- From the Configure Workflow page, click ADD TASKS.
- In the Add Tasks dialog, select the tasks you want and click ADD.
- (Optional) To set dependents (tasks that comes directly after and rely on this task), click +ADD DEPENDENT and select a task.
- Click UPDATE.
Configuring milestonesCopy link to clipboard
Once you've created and added tasks to your workflow, you can now add milestones to help visually organize your tasks. Milestones can only be used with tasks, are specific to the case type in which they are created, and can only be added or edited in the Workflow page of that case type.
To add a milestone:
- Beside Milestones, click Update.
- Click ADD MILESTONE.
- Add a name for the milestone and either add another by clicking + ADD MILESTONE or finish by clicking UPDATE.
To add a milestone to a task:
- Beside Activities, click Update.
- Click a task.
- For Milestone, select a milestone from the dropdown.
- Click UPDATE.
Once you have milestones created, you can add a milestone to a task directly from the Add Tasks dialog.
Adding task blocks to case typesCopy link to clipboard
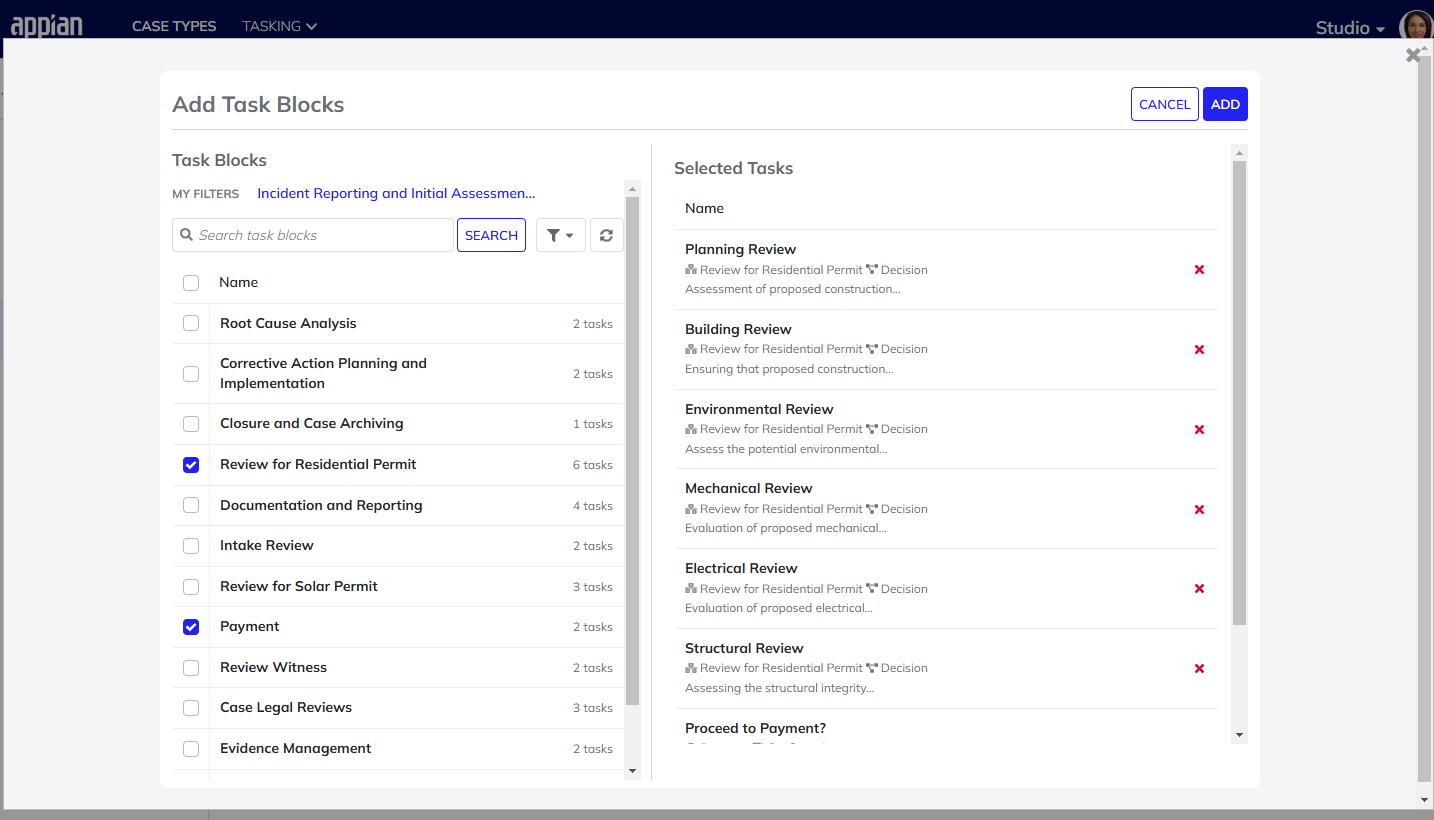
Task blocks are groups of tasks that are chained together to create flexible pathways within a workflow. Task blocks aren't specific to a case type and can be reused across all case types.
You can view and add relevant task blocks to your workflow from the Add Tasks dialog, but you can't create or edit task blocks within a case type. For instructions on creating a task block, check out How to Create Tasks and Task Blocks.
To add an existing task block to your case type workflow:
- From the Configure workflow dialog, click Add Task Blocks.
- Select the task block.
- (Optional) Select a milestone for each task in the task block.
- Click ADD, then click UPDATE.
Adding workflow automations to case typesCopy link to clipboard
If there are any activities in your workflow that don't require user action, you can represent those activities in your workflow with an automation.
A workflow automation consists of automation rules and conditions.
- An automation rule is one or more conditions grouped together and routed to the same activity.
- Conditions are individually configurable logical statements that, when combined into automation rules, allow your workflow to branch off into multiple separate paths depending on the result of the automation.
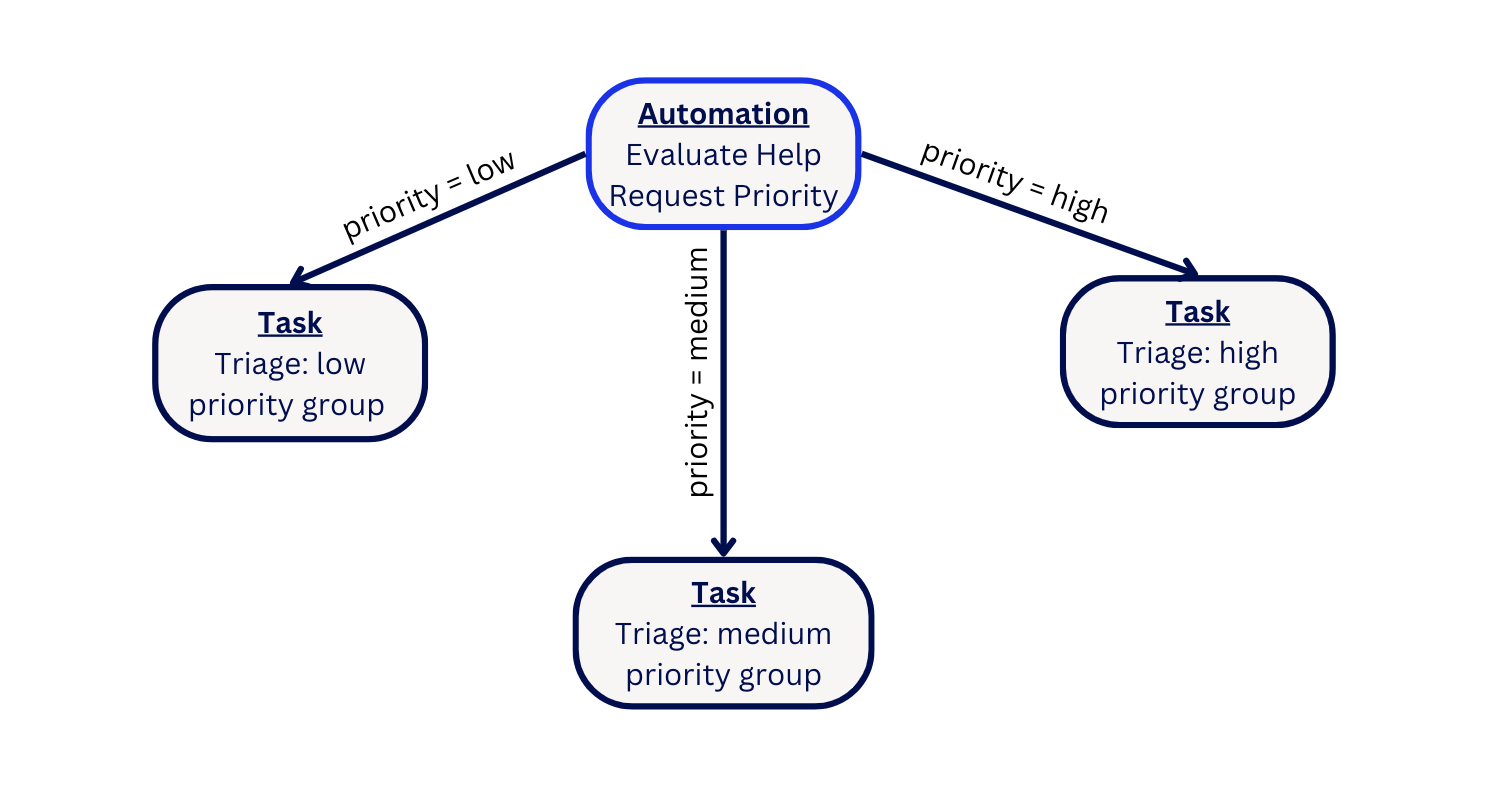
For example, you could create a workflow automation that automatically routes a help request to different groups of case workers depending on the priority of the request. To easily do this, you could configure a workflow automation with three automation rules (one for each priority status: high, medium, and low) that each contain only one condition.
For the condition in the automation rule for the high priority routing, you would configure the Field, Operator, and Value to say "priority is equal to high". You would then set the Go To field to route to the task assigned to the case worker group for high priority requests.
You'd then make the same configurations for the medium and low priority routing but switch out the relevant values in the conditions and route them the rule to the correct group.
To add an automation to your workflow:
- From the Configure Workflow page, click ADD AUTOMATION.
- In Name, enter a name for the automation.
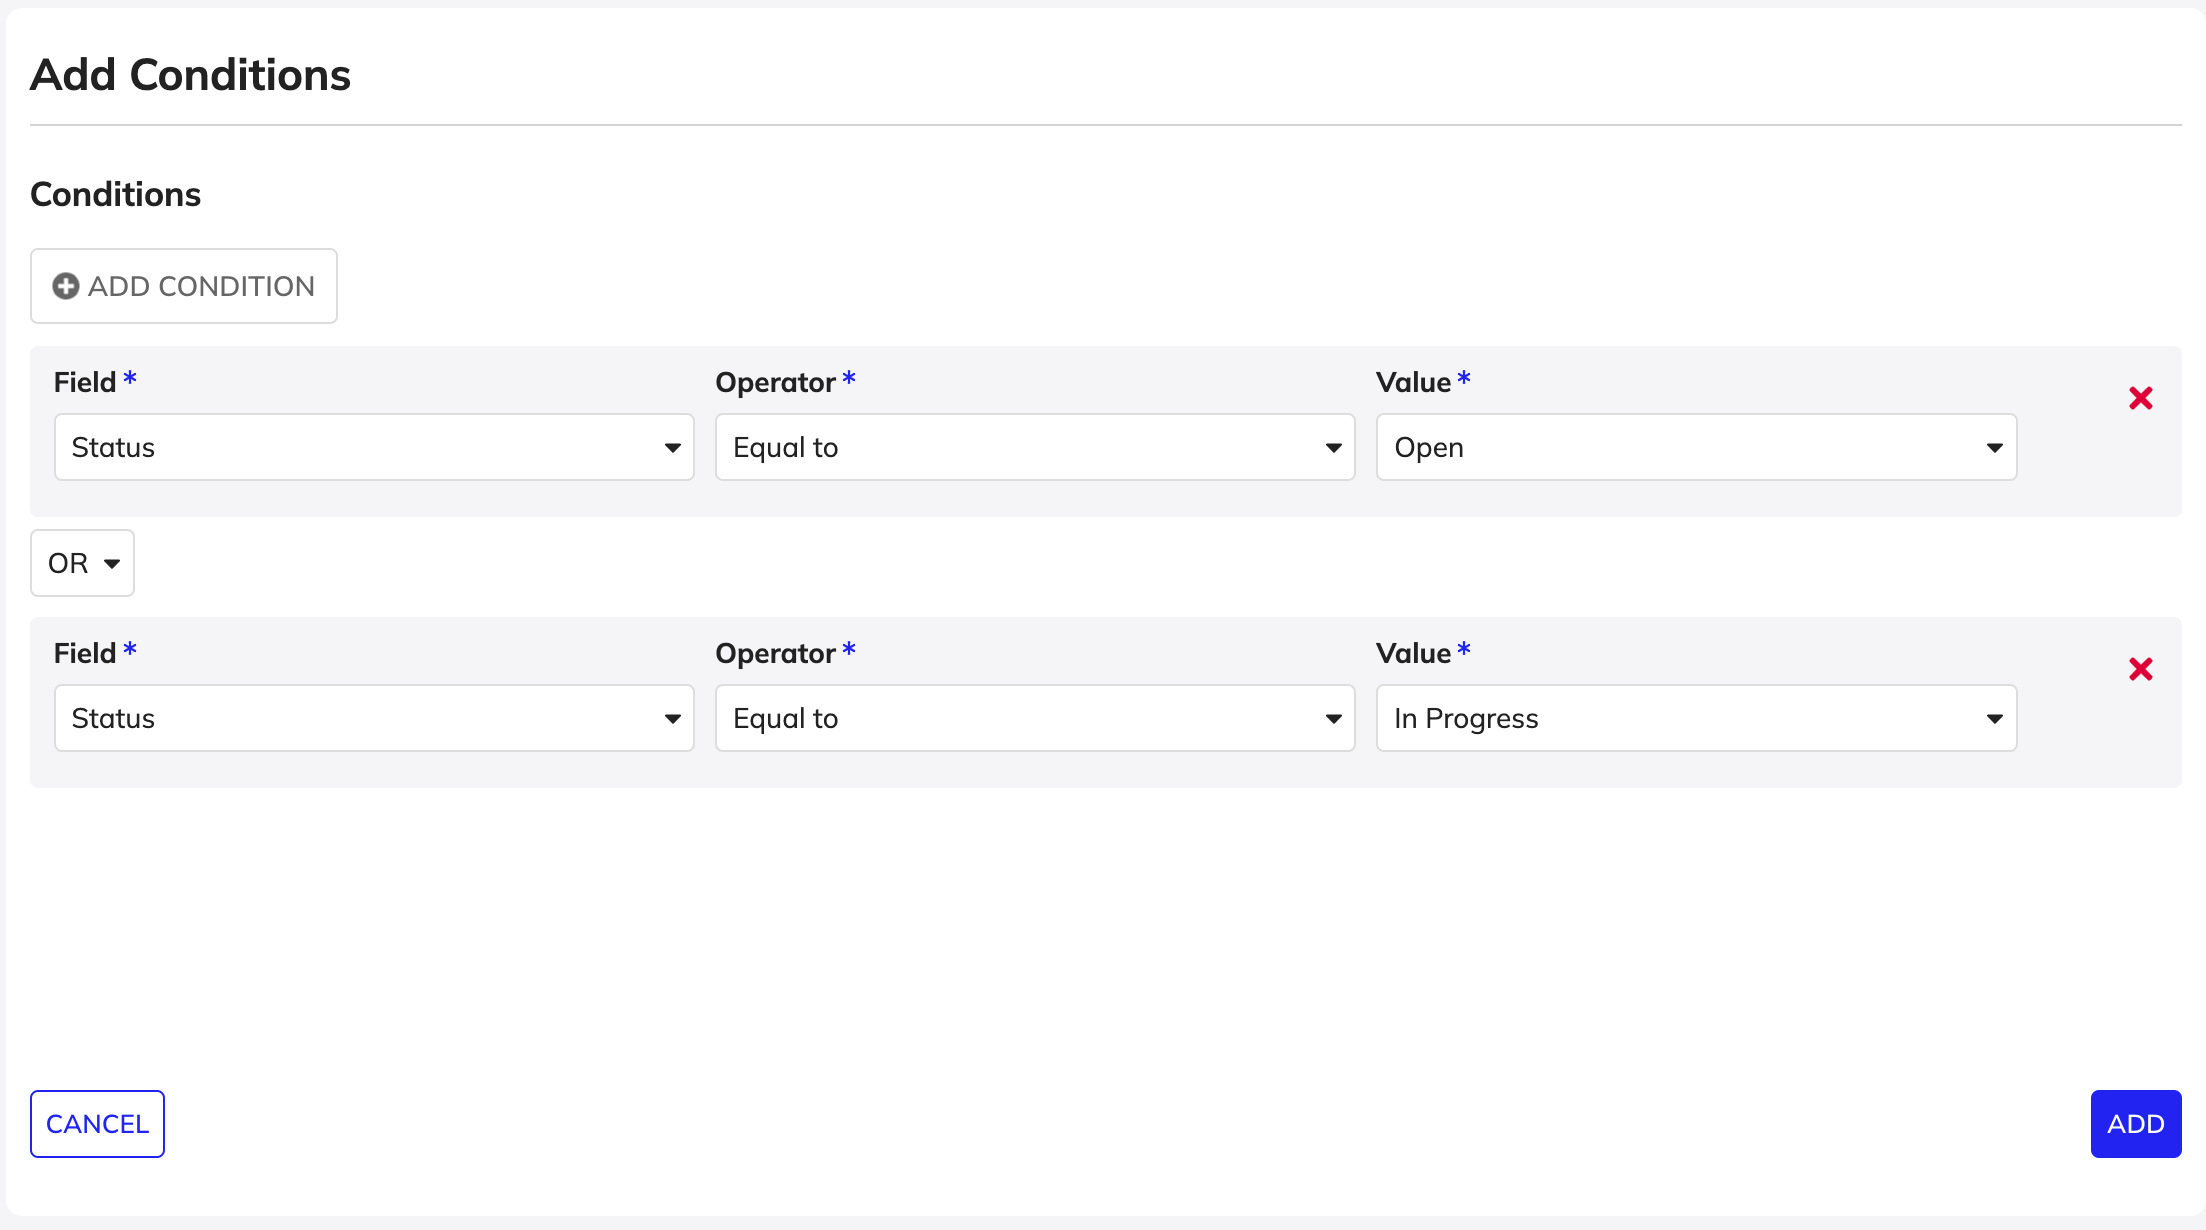
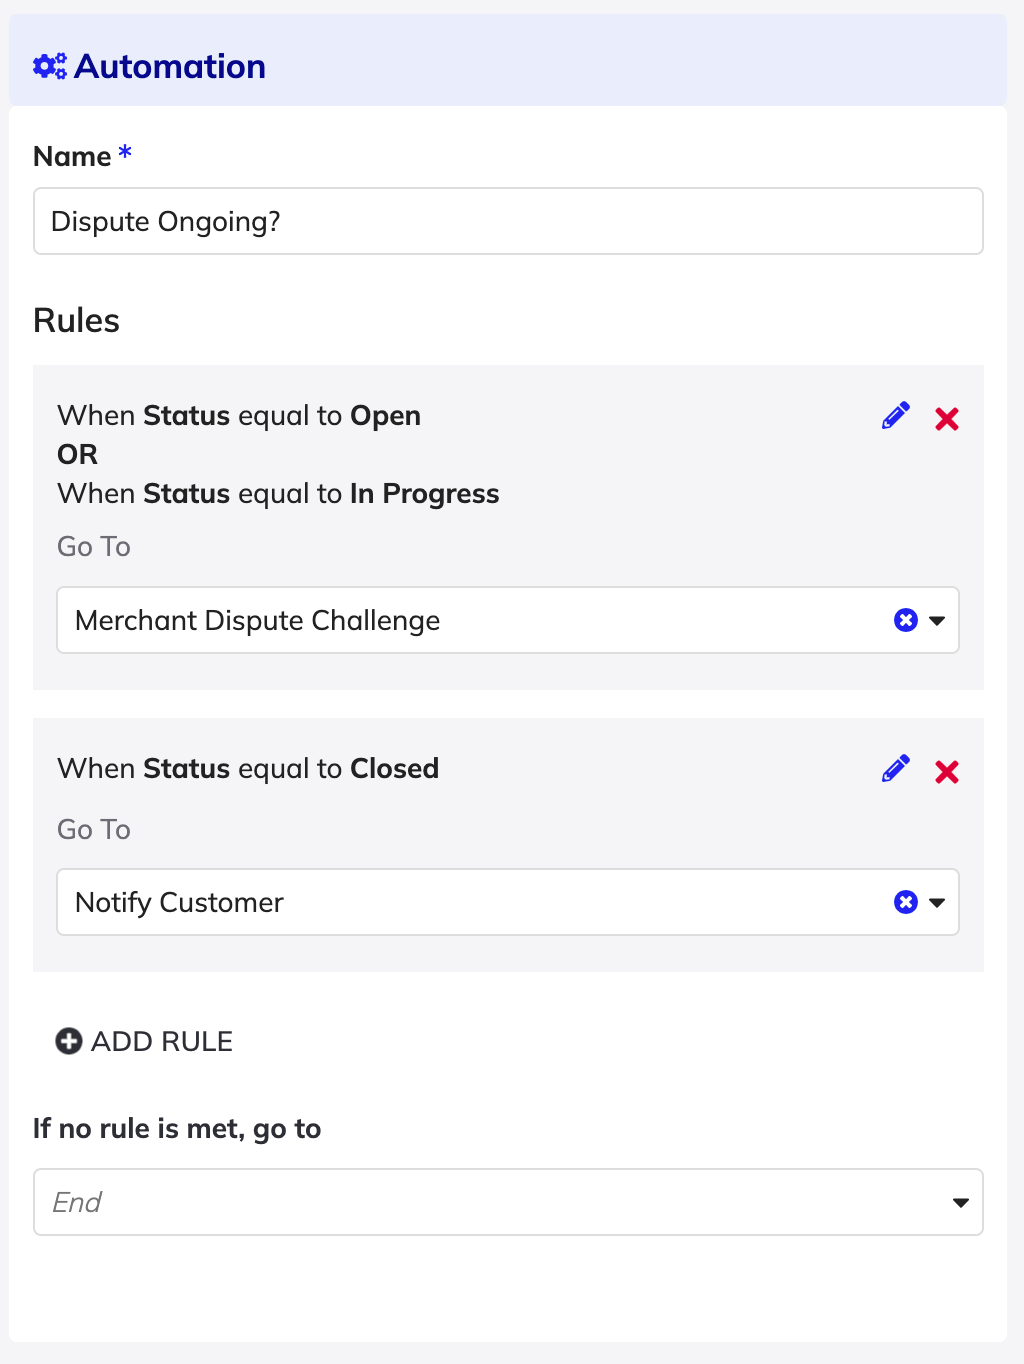
- In the Rules section, click ADD CONDITION to define the conditional logic for branching.
-
Configure the following properties for the condition:
Property Description Field Select a data field from your case type to evaluate in the condition. Operator Select the operator to apply to the condition. Value Select or enter a value for the condition to evaluate against. The options in this menu change based on the data type of the data field selected. - To add another condition to the rule, click ADD CONDITION.
- Select either AND or OR as the operator between the two conditions. This operator will be used between all conditions in this automation rule.
- When you're done adding and configuring conditions, click ADD.
- For Go To, select the task or automation in the workflow to route to if the condition is met.
- (Optional) Click ADD RULE to add more sets of conditions to your automation.
- For If no rule is met, go to, select the activity to go to if the condition is not met.
Note: Each workflow automation can contain up to 5 automation rules and each automation rule can contain up to 5 conditions.
Summary page tab in case typesCopy link to clipboard
The Summary Page tab is only in case types and allows you to configure the summary page in Workspace that users will see when they view any case in the case type.
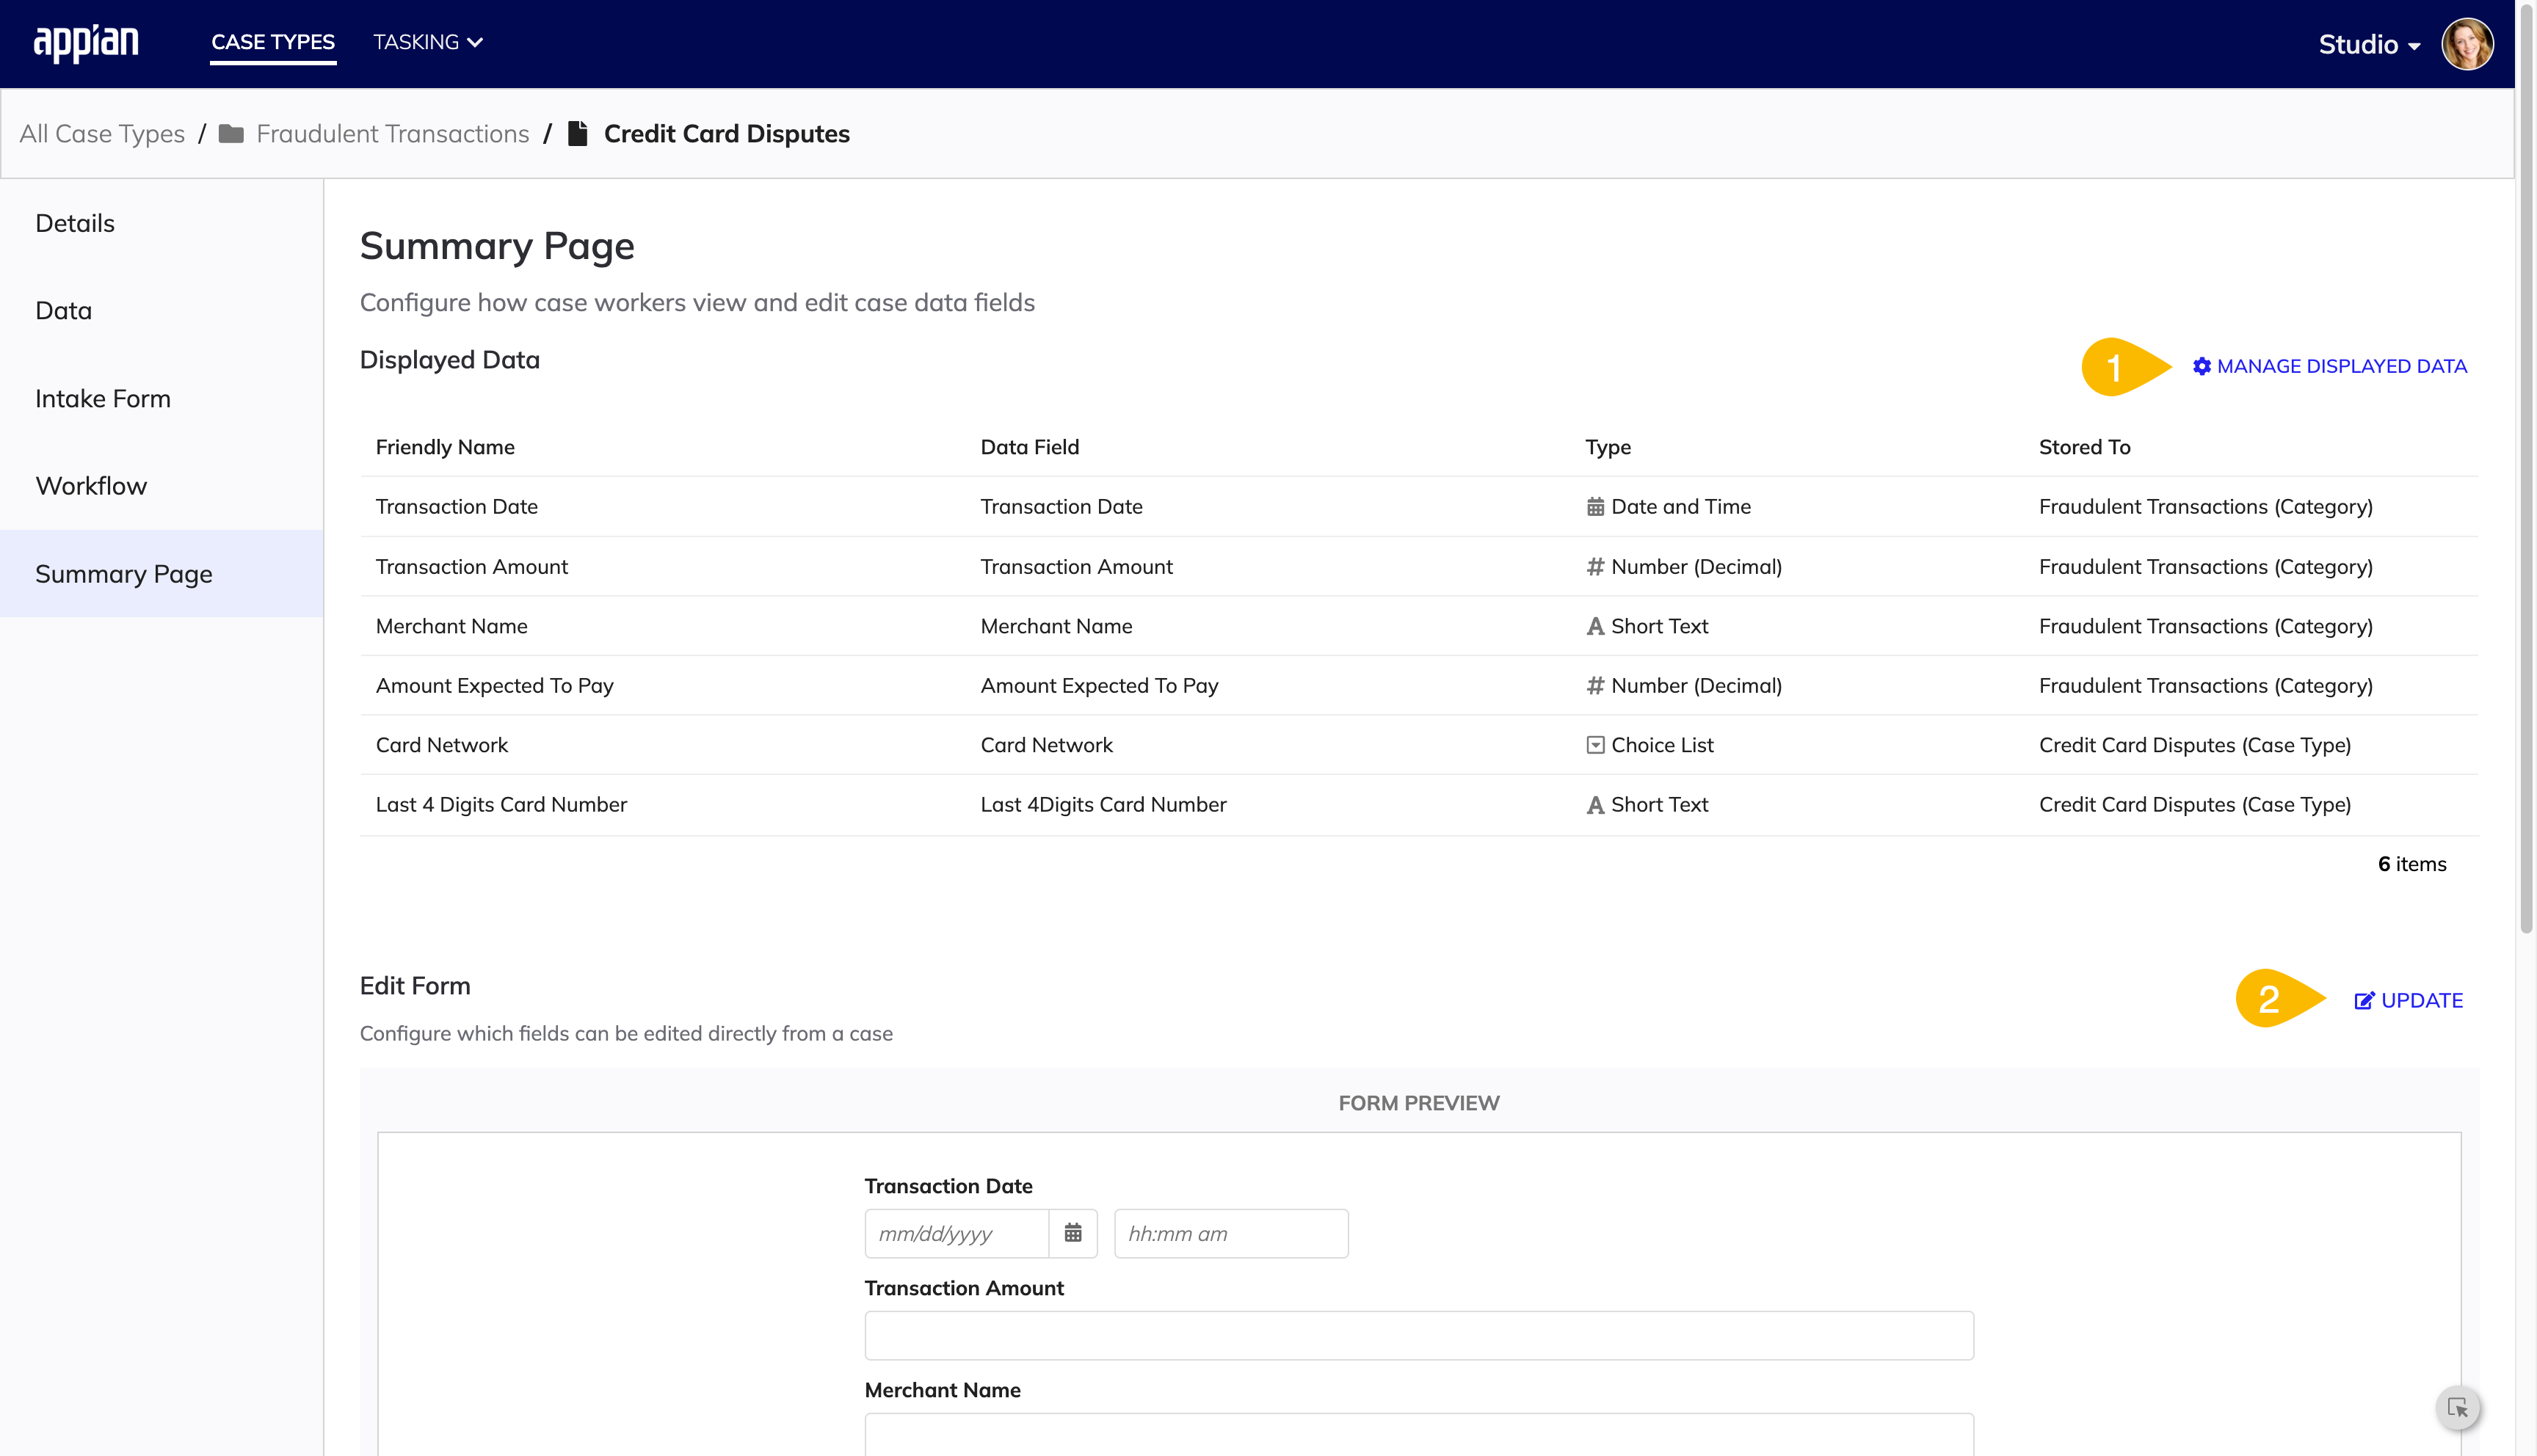
The following image highlights the actions you can do in the Summary page tab in a case type:
| # | Action |
|---|---|
| 1 | Add and update the data to display on the summary page for each case. |
| 2 | Create an edit form to allow users to update the cases. |
Configuring displayed data fieldsCopy link to clipboard
The Displayed Data section of the summary page allows you to choose the specific data to show users.
To select data fields to display:
- In the Displayed Data section, click MANAGE DISPLAYED DATA.
- Click the arrows beside each data field to add display in the summary page or click ADD ALL to display all data fields.
- (Optional) Edit the friendly name to help users better understand the purpose of the data field.
- Click SUBMIT.
Configuring edit formsCopy link to clipboard
Edit forms allow users update case data. These forms are created using the form builder, the same no-code tool that's used to create intake forms. To create an edit form, you can either copy the case type's intake form or make a new edit form from scratch.
To create an edit form based on the intake form:
- In the Edit Form section, click CREATE EDIT FORM.
- Click COPY EXISTING FORM. The case type's intake form is selected by default.
- Make changes to the form as needed and click SAVE.
- Click CLOSE.
To create an edit form form scratch:
- In the Edit Form section, click CREATE EDIT FORM.
- Click START FROM SCRATCH.
- Follow the steps to configure forms in the Configuring Intake Forms section.
Wrap upCopy link to clipboard
Congratulations, you've finished setting up your case type!
Hop over to the Details page to see your completed Configuration Status. Or check out visualizations and previews of your data and configurations on the Data, Intake Form, Workflow, and Summary Page tabs of your case type.
If you need to make changes to your case category, case type, or forms, you can either edit them in Studio or make further configurations to their corresponding objects in Appian Designer.

