| This content applies solely to Vendor Management, which must be purchased separately from the Appian base platform. |
IntroductionCopy link to clipboard
Installing Vendor Management (VM) consists of five main steps:
- Download the software package.
- Deploy VM plug-ins to the Appian environment.
- Create the database objects in the business data source.
- Import the VM application into the Appian environment.
- Install Portals.
- Set up VM and configure integrations.
Before starting the installation process, review the System Requirements to make sure all minimum requirements are met.
System requirementsCopy link to clipboard
This section details the minimum requirements your system must meet to run VM 1.6:
- Appian version 24.2.
- A supported business data source.
- A supported web browser.
Note: Instructions below are tailored for MariaDB or Oracle databases. For use with other databases, the SQL scripts used in Step 3 will need to be modified.
Step 1: Download software packageCopy link to clipboard
To install VM, you'll need to download the software package that contains the following files you'll use in the remaining set up steps.
- scripts/1.VendorManagementv1.6.0.sql: SQL script for creating the database objects needed for the VM application.
- VendorManagementv1.6.0.zip: Application package to import into Appian.
- VendorManagementv1.6.0.properties: Import customization file for configuring the application package.
To download the software package:
- Go to the SUPPORT tab on My Appian.
- Click the DOWNLOADS tab.
- Click SOLUTIONS.
- Find and open Vendor Management v24.2.1.6.
- In Downloads, click the Vendor Management Installer link.
- Click PROCEED to agree to the License Agreement.
- Choose your Relational Database Management System.
- Click Continue.
- Click Vendor Management Installer v24.2.1.6 to download the ZIP file.
- Unzip
VendorManagementv1.6.0.zipto access the software installation files.
Step 2: Deploy plug-insCopy link to clipboard
For the VM application to work, you must deploy certain plug-ins. The steps for deploying plug-ins differ depending on whether you have an Appian Cloud or a self-managed environment.
To download the necessary plug-ins and deploy them to your environments, follow the steps that match your environment setup.
Appian Cloud environmentsCopy link to clipboard
To deploy the plug-ins for an Appian Cloud environment:
- In the target environment, log in as the deployment user.
- Navigate to the Admin Console.
- On the left side of the console, click Plug-ins.
- Click ADD NEW PLUG-INS.
- Search for and click Appian Solutions Plugin.
- Click DEPLOY.
- Repeat the above steps for each of the following:
Appian Regular Expression FunctionsAzureOpenAIContent ToolsHTML to PDF ConversionLog MessageSimilarityRich Text
Self-Managed environmentsCopy link to clipboard
To deploy the plug-ins for a self-managed environment:
- Download the following plug-ins directly from the Appian AppMarket:
- Follow the Deploying Plug-ins instructions to deploy.
Step 3: Create database objectsCopy link to clipboard
To create the structure for the database tables, views, and other objects that are a part of the VM application, you will need to run a DDL script in your database.
To create the database objects:
- In your database, run the
VendorManagementv1.6.0.sqlDDL file that was downloaded in Step 1.
Step 4: Import the applicationCopy link to clipboard
The next step needed is to install the VM application by importing the application files into the target environment.
To import the application:
- In the target environment, log in as the deployment user.
- Navigate to the Appian Designer.
- Click IMPORT.
- Click UPLOAD and choose the
VendorManagementv1.6.0.zipfile that was downloaded in Step 1. - Select Include related import customization file.
- Click UPLOAD. Select the
VendorManagementv1.6.0.propertiesfile that was downloaded in Step 1. - Click INSPECT.
- Review the inspection results. If there are no issues, click IMPORT PACKAGE.
- NOTE: The portal will not be published on import because there is no service account configured. This is by design, and is to prevent an import from failing due to the account not existing. This will be resolved in the next step, after import. If there are no issues, click IMPORT PACKAGE.
- NOTE: The import may time out due to file size, but import will continue in the background.
Note: If the business database is not called Appian, a warning will occur when importing the data stores. To fix this, after the import is complete, open each data store object and update the Data Source dropdown list.
Step 5: Install PortalsCopy link to clipboard
Once you have finished installing the Vendor Management solution, you can install portals.
To install portals for VM:
-
In the target environment, log in as the deployment user.
-
Navigate to the Admin Console and select the Web API Authentication.
-
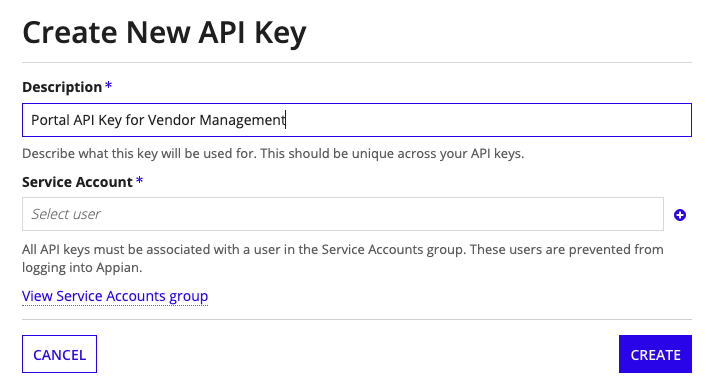
From the API Key tab, click CREATE.
-
In the Description field, add a unique description for the API key.

-
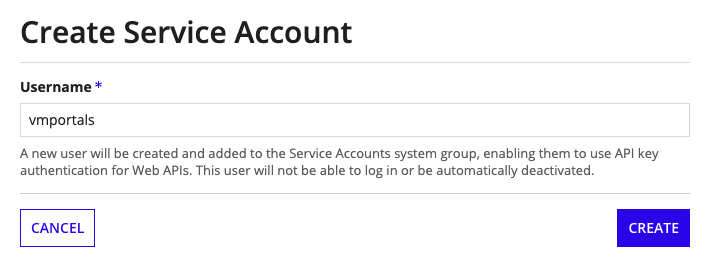
Click the icon next to the Service Account field to create a new service account.
-
Enter
vmportalsin the Username field.
-
In the Groups field, enter
AS VM Portals Service Accountto add it to the appropriate group. -
Click CREATE to apply the new service account to the API key.
-
Click CREATE to create the new API key. Copy the API key and save it securely for use in the next step.
-
Update the
AS VM CS Portals Connected System.- Base URL:
site url+/suite/webapi/. Example: https://examplesite.appiancloud.com/suite/webapi/. - API Key Value: API key saved above.
- Base URL:
-
Open the
AS_VM_PortalPortal Object in Designer. -
Configure and Publish the Portal. Refer to the Portal Object documentation for assistance.
- If reCAPTCHA is needed, see Setting up Google reCAPTCHA.
- If reCAPTCHA is not needed,
AS_VM_TOGGLE_VENDOR_PORTAL_RECAPTCHA_ENABLEDshould be set toFALSE. - The service account should be set to the one created in Step 6.
Step 6: Set up VM and configure integrationsCopy link to clipboard
Vendor Management is a flexible solution that can be customized to fit your organization's needs. VM also comes with integrations with Azure OpenAI, SAM.gov, Award Management, and Google reCAPTCHA.
Caution: By default, the feature toggles for Azure OpenAI, SAM.gov, Award Management, and Google reCAPTCHA are set to true. Complete the setup for each of these integrations if you intend to use them, otherwise you must set the feature toggle value for each integration to false.
View the following pages to customize your solution and configure each integration in your environment:
