
This page applies to developers. It describes how to prepare record data for data fabric insights.
OverviewCopy link to clipboard
Data fabric insights empowers business users to explore synced record types as datasets. Each dataset will reflect the name, description, fields, and relationships configured on the record type.
To provide users with the best experience, you should review the following elements of your record type since they will be visible to business users:
Create synced record types to use in data fabric insightsCopy link to clipboard
In Process HQ, business users can only access record types with data sync enabled. These are often called synced record types.
If your applications are built using CDTs and DSEs, or even record types without data sync enabled (unsynced record types), you can create new synced record types for the purpose of data fabric insights.
Configuration is simple:
- Create a synced record type and use your existing data source as the source of the new record type.
- Configure record type object security and record-level security to easily determine who can see what data.
- Show the record type in the Data Catalog of Process HQ.
- Deploy the record type to production.
That’s it! Your data can now be safely explored in data fabric insights with just a few steps. As you add and update data using Appian smart services, that data will be automatically synced in the record type—empowering business users to build reports with the latest data.
Review the other data preparation below to ensure that it's easily accessible to business users.
Record type display namesCopy link to clipboard
Each dataset is labeled with the Display Name (Plural) value from the record type.
Review the record type's display name to ensure that it does not include an application prefix and that it can be easily understood by business users.
To edit the record type’s display name:
- In your record type, go to Settings > Properties.
- Update the Display Name (Properties) as needed.
- Click SAVE CHANGES.
Record type descriptionsCopy link to clipboard
When a user hovers over a dataset, they will see the record type's description.
Review the record type's description to ensure it does not include any developer terminology (like "record type" or "data sync enabled"), and that it is useful to a business user. The description should help users understand whether or not this is the information they're looking for.
To edit the record type’s description:
- In your record type, go to Settings > Properties.
- Update the Description as needed.
- Click SAVE CHANGES to close the dialog.
- Click SAVE CHANGES to save the record type.
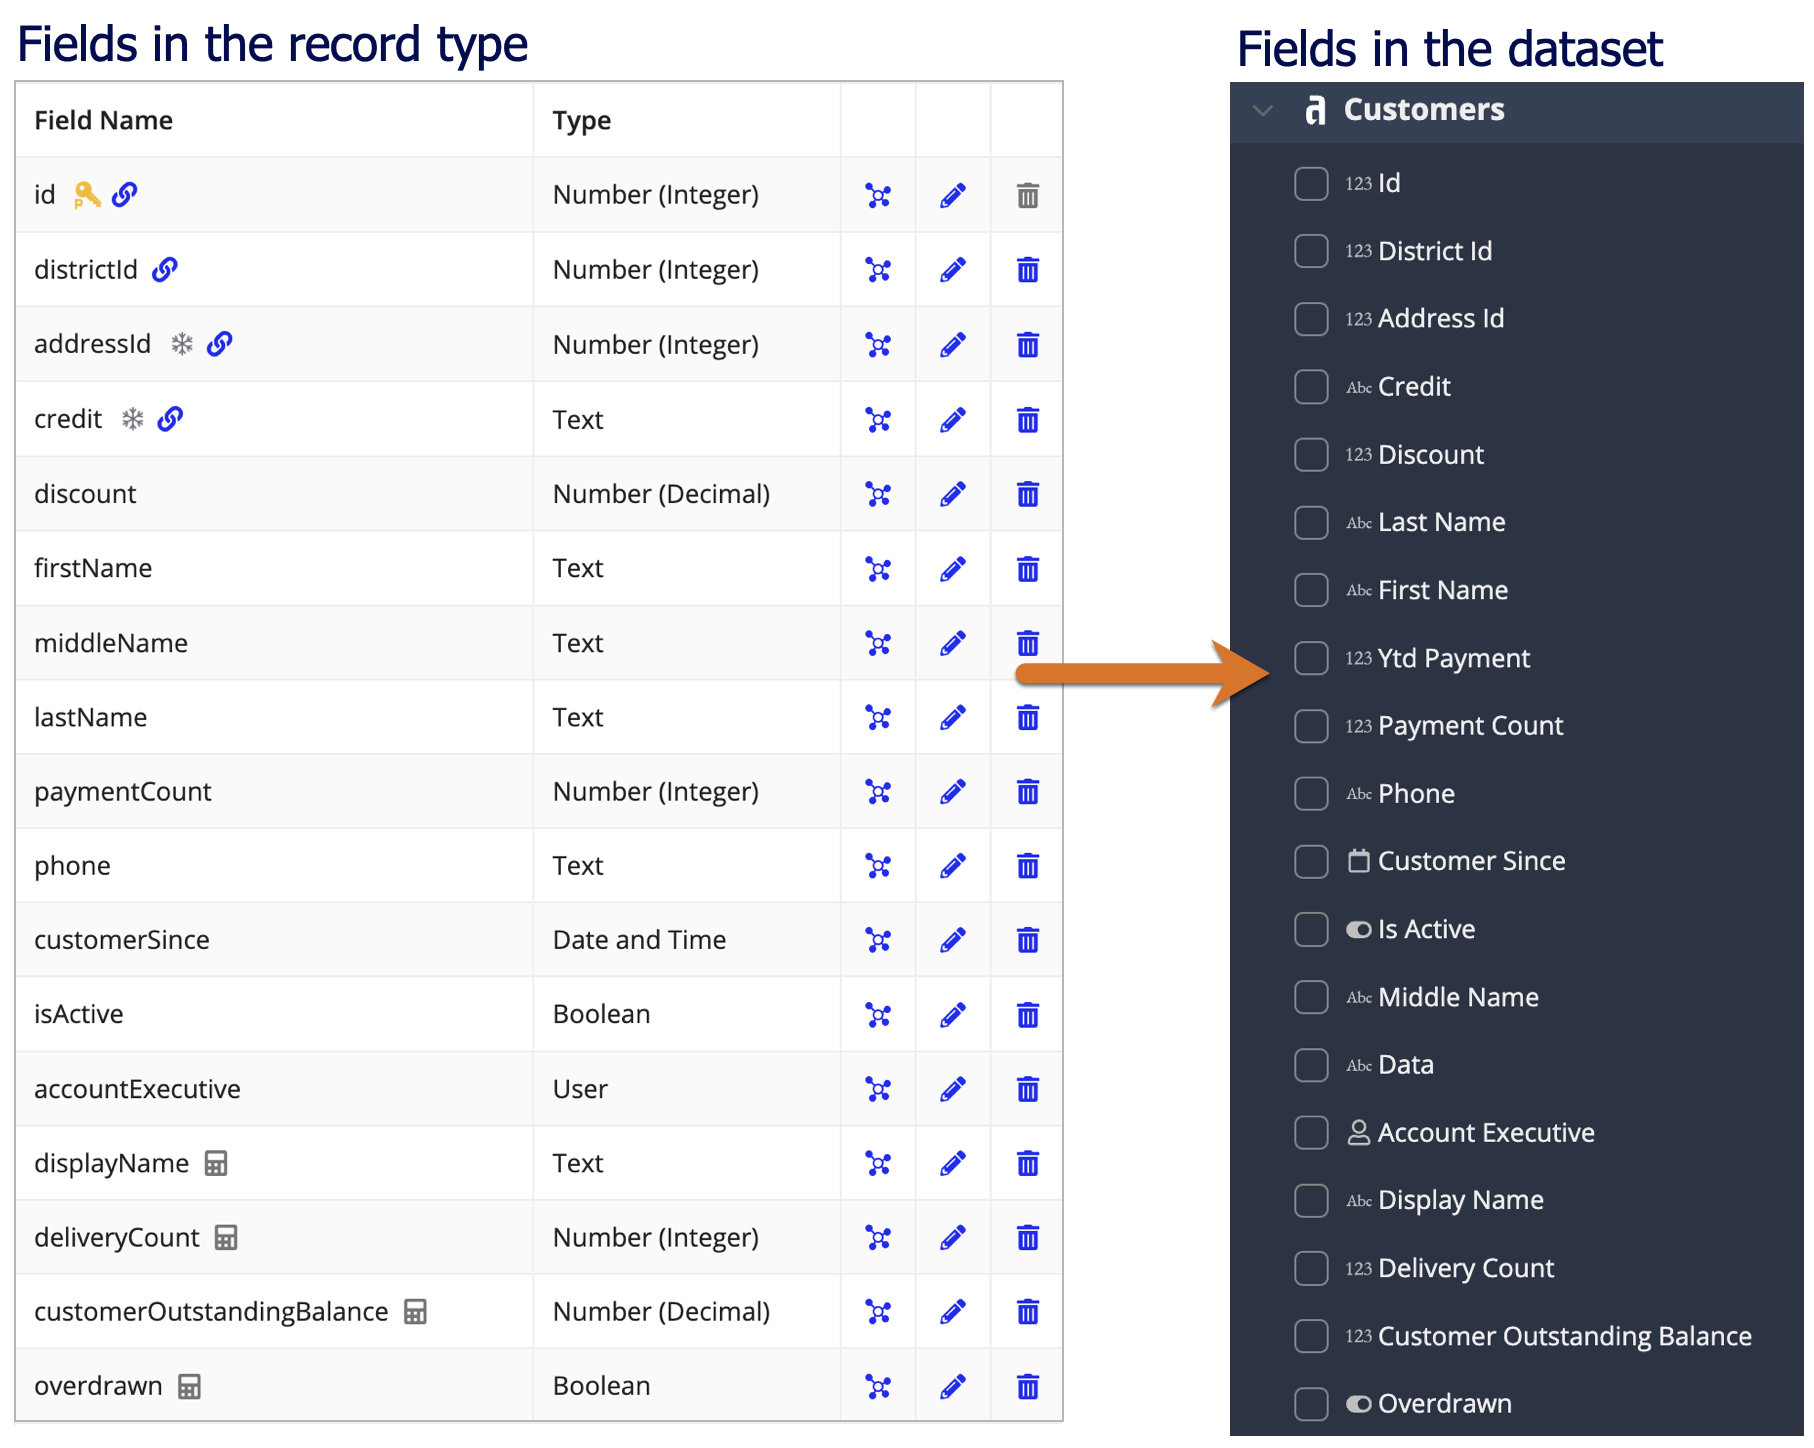
Field namesCopy link to clipboard
When a user selects a dataset, they will see a list of fields from the base record type and any one-to-one and many-to-one related record types. They can use these fields to build a grid, chart, or KPI.
To ensure users can easily find the fields they need:
-
Use camel case formatting for record field names. A dataset will automatically convert any camel case field names to title case field names so they're easier to read. For example, if you have a record field called
lastName, it would convert toLast Namein the dataset. -
Add field display names. If your record field names contain acronyms or they are not easily understood by business users, you can configure display names on your record fields. Display names allow you to provide users with friendly field names in Process HQ. For example, if you have a record field called
YTDSales, you can configure a display name ofYear-to-Date Salesso business users can see an easily understand the field name and purpose. -
Logically group record fields together. The fields in a dataset will appear in the same order as the fields in the record type. Ensure that fields like
firstNameandlastName, oraddressandzipCodeare grouped together in the record type's data structure. This will ensure that the fields appear next to each other when a user selects fields for their report.
The image below illustrates how the fields in the Customer record type appear to business users in a dataset:

To modify fields and the order they appear to business users:
- In your record type, go to Data Model.
- Click MAP RECORD FIELDS.
- Edit the Record Field Name to rename a field.
- Enter a Display Name to provide a user-friendly field name to business users in Process HQ. When this field is blank, the Record Field Name is displayed in the dataset using title case format.
- Click
 Drag to reorder and place the field in the proper order.
 - Click FINISH.
- Click next to a custom record field to add a display name and description. You cannot reorder custom record fields.
- Click SAVE CHANGES.
Relationship namesCopy link to clipboard
When a user selects a dataset, the data from any one-to-one or many-to-one relationships will appear under the relationship name. For example, the image below displays the Customers dataset, where the related data appears under the relationship names.
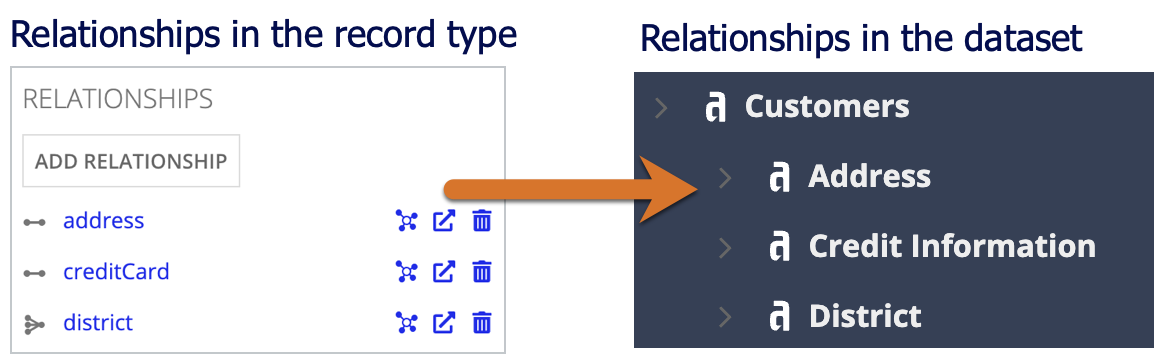
Review your relationship names to ensure that they are easily understandable and do not include an application prefix. For example, if you have a relationship name like ARregion, you should update the name to region so it displays as Region in a dataset.
To edit a relationship name:
- In your record type, go to Data Model.
- Under RELATIONSHIPS, click the relationship name you want to edit.
- Update the Relationship Name as needed.
- Click OK.
- Click SAVE CHANGES.
Data source logosCopy link to clipboard
Each dataset will display the data source of the base record type and its related record types using vendor logos. The vendor logos that appear on a dataset are the same as the logos that appear in the record type relationship diagram.
A dataset will automatically display the logos for any Appian supported databases and certain connected systems.
The following connected systems will not automatically display a vendor logo, but you can manually configure a logo to display:
To display a vendor logo for these connected systems, select an image for the System Logo in the connected system's properties.