
| This content applies solely to Connected Servicing, which must be purchased separately from the Appian base platform. This content was written for Appian 23.3 and may not reflect the interfaces or functionality of other Appian versions. |
IntroductionCopy link to clipboard
After you have created a new service request in Appian Connected Servicing, you will need to view and maintain that information. Enabled by Appian's powerful records, after a request is created, end users can view and maintain this information from simple, informative record interfaces.
This page provides a description of information available in the service request lists and the tabs of a service request record and instructions for updating service requests.
Viewing Service RequestsCopy link to clipboard
There are two main pages that show a list of service requests, the HOME page and the SERVICE REQUESTS page.
From the HOME page, when you select Service Requests, a list of open, at-risk service requests displays. This view is intended to show service requests that may need the attention of the logged in viewer. See Home Page Overview for more information about the information available on the Connected Servicing Home page.
Clicking SERVICE REQUESTS displays a list of service request records. This view is intended to show all service requests. You can search the list, as well as filter it by Type, Sub-type, Status, and Target Completion Date.

On both lists, clicking a service request name displays the record for that service request. The record displays all of the pertinent information for a particular service request. This information is split into several different tabs, which are outlined in the following sections.
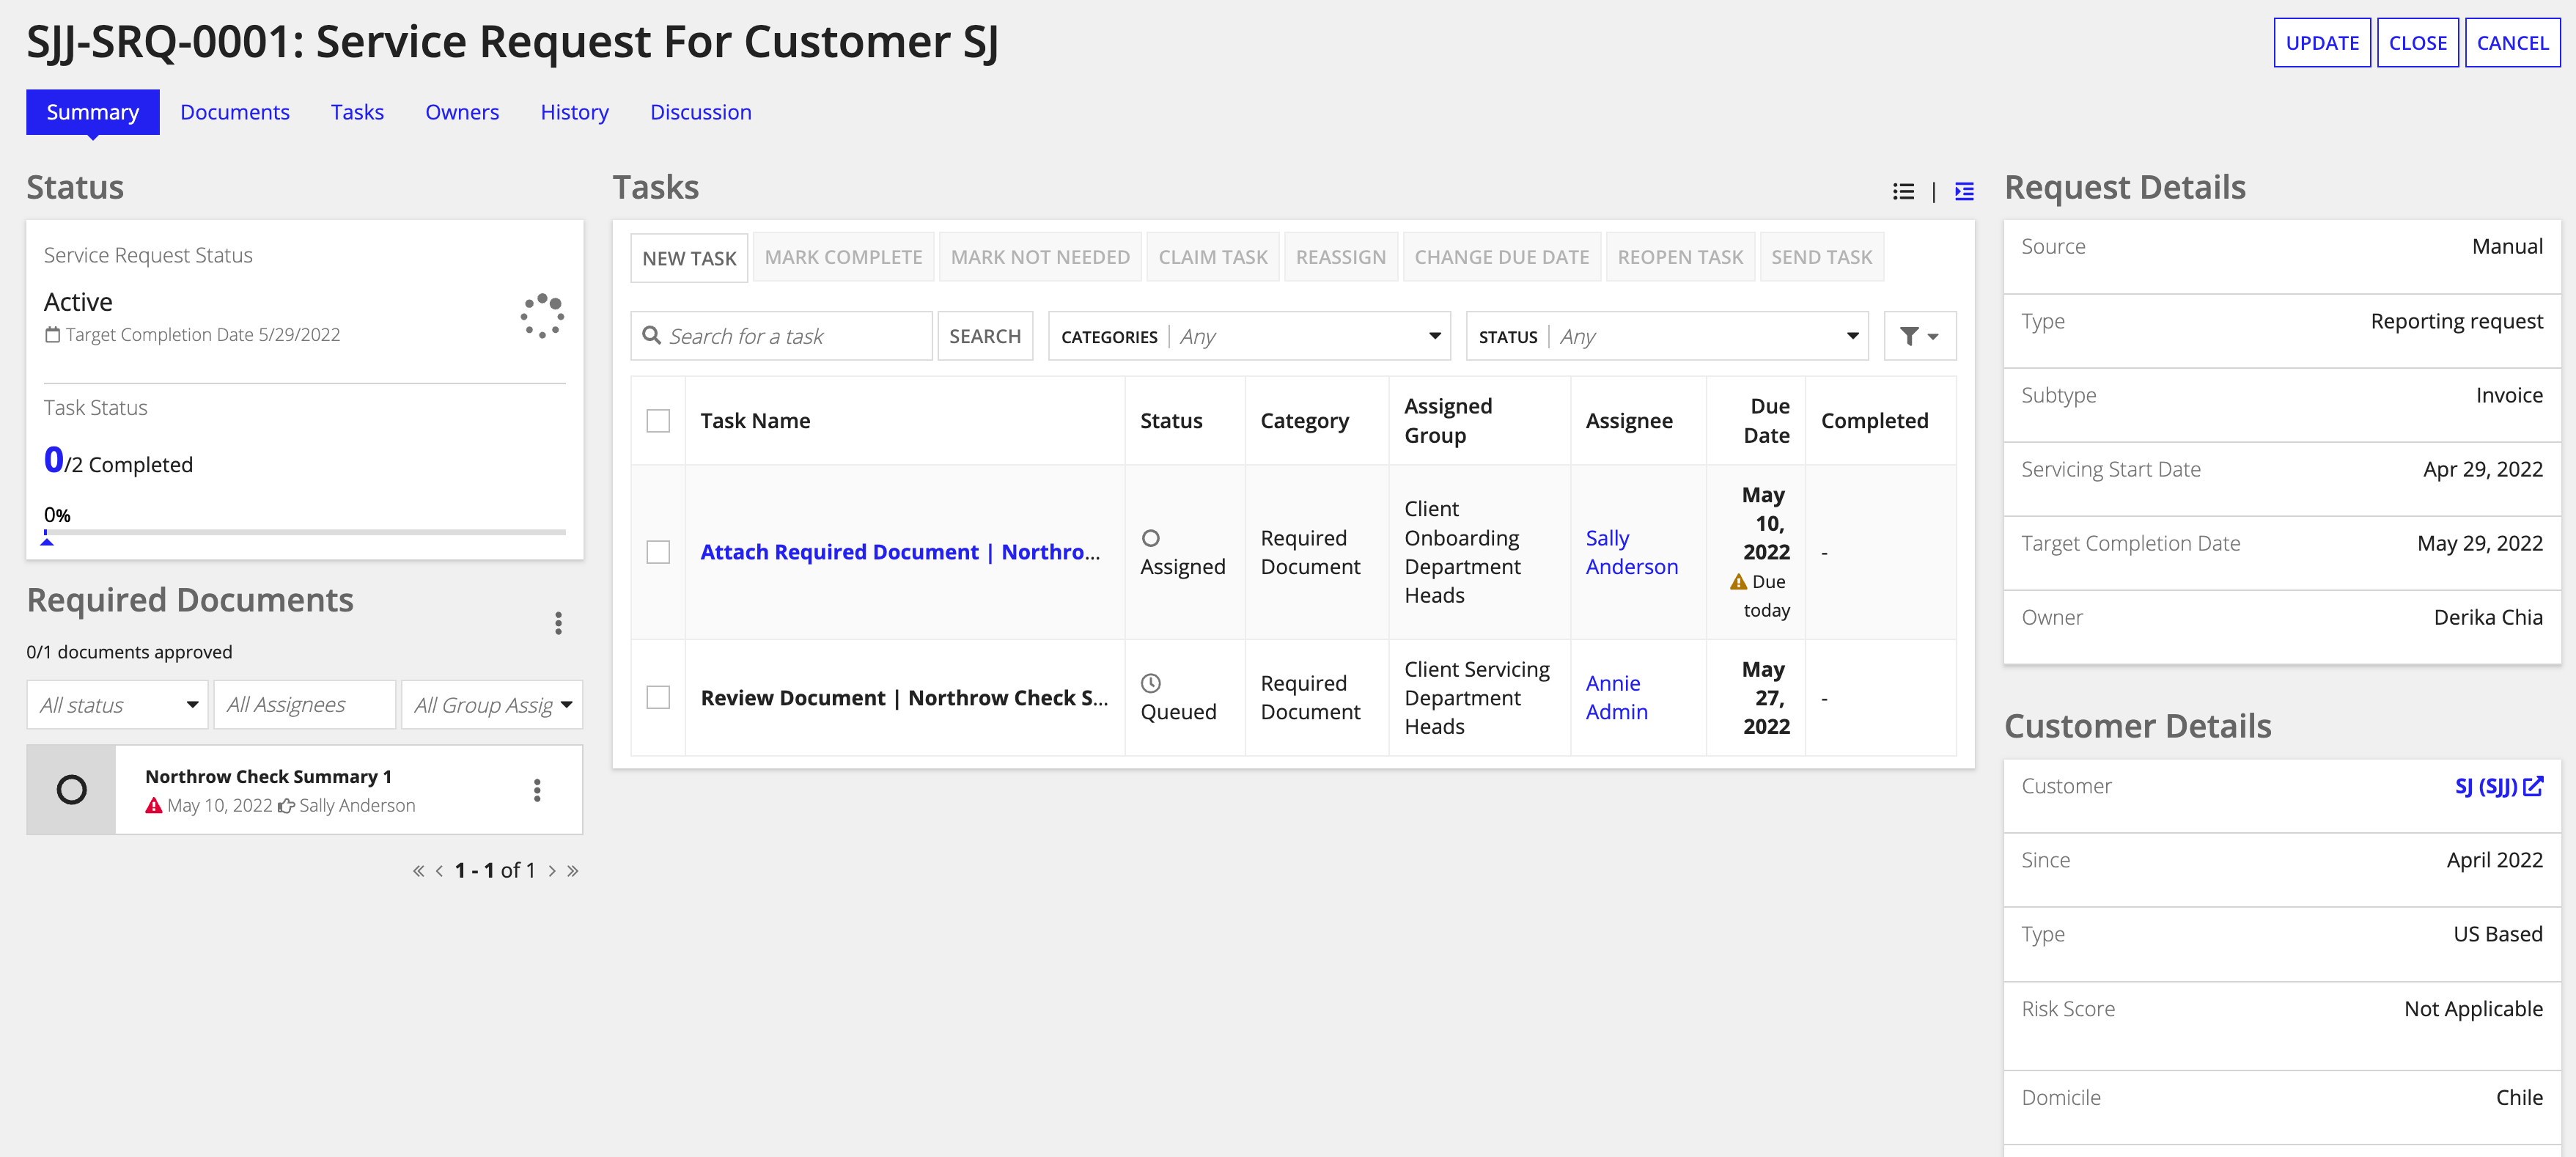
Summary tabCopy link to clipboard
The Summary tab lists the important information about a service request.
The following service request information is listed on this page:
- Service Request Details - This section lists helpful information about a service request, including:
- Source
- Type
- Sub-type
- Target Completion Date
- Service Requests at risk of missing their estimated funding date will have an at risk icon displayed.
- Owner
- Tasks - A list of the tasks display in the center of the page. You can filter the list, bulk select tasks to perform actions on them, and open tasks to complete them.
- See Home Page Overview for more information on working with tasks.
- Customer Details - This section lists the specifics of the customer including any open flags.
- Required Documents - If the service request has documents that are required, they display in this section. A status icon shows if they are outstanding, pending review or accepted. To download a document, click the document link.
- See Upload document and Update document status on the managing documents page for more information on working with documents.
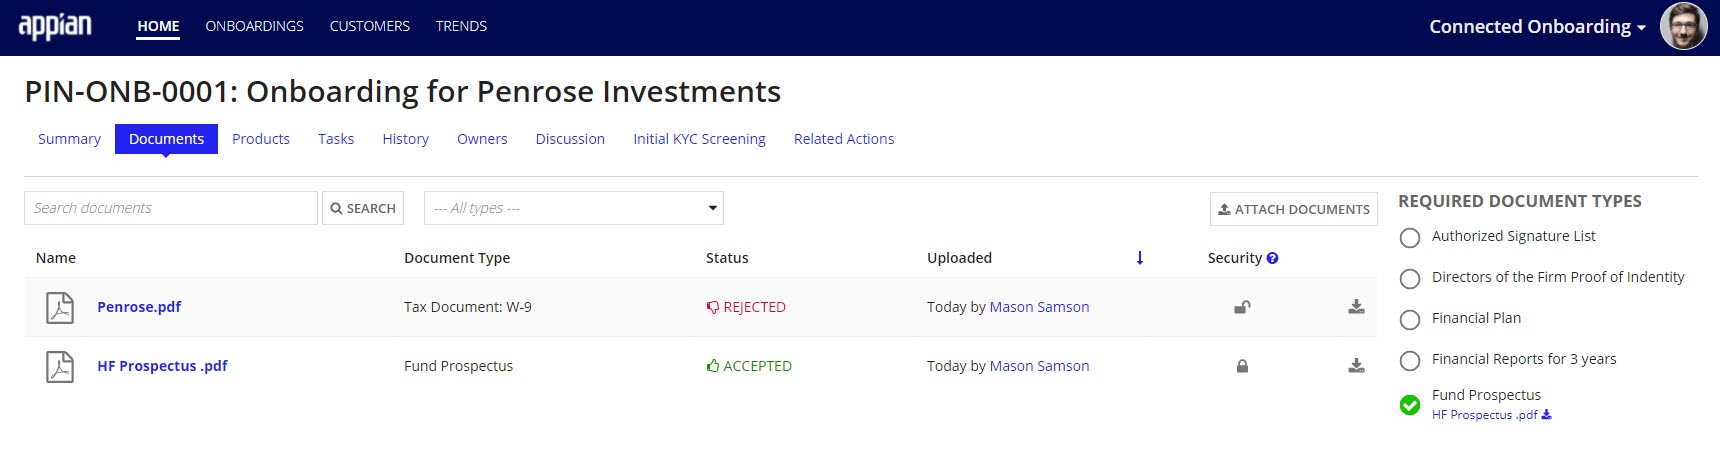
Documents tabCopy link to clipboard
The Documents tab lists all of the documents related to a service request. You can see the status of your attached documents.
The possible statuses for a document are:
- Approved: the document has been reviewed and approved. The document requirement has been fulfilled.
- Rejected: the document was reviewed and rejected. The document requirement is still outstanding.
- Pending review: the document has been uploaded, the document type has been verified by IDP, and has yet to be reviewed by a user.
- Awaiting classification: the document has been uploaded and is awaiting IDP to verify the document type.
- Pending reconciliation: the document was uploaded and IDP could not verify the document type.
- Missing: the document has not been uploaded.
- Secondary: the document is not a required document type and therefore, did not go through review and approval process.
You can learn more about updating a document's status on the Managing Documents page.
Document listCopy link to clipboard
On this page you can:
- Attach a document.
- Search for a particular document by name.
- Filter by document type.
- Review the Required Document Types and their status.
- Preview uploaded documents.
- Click the document link to preview uploaded documents, view details about them, and update their status.
-
Download uploaded documents.
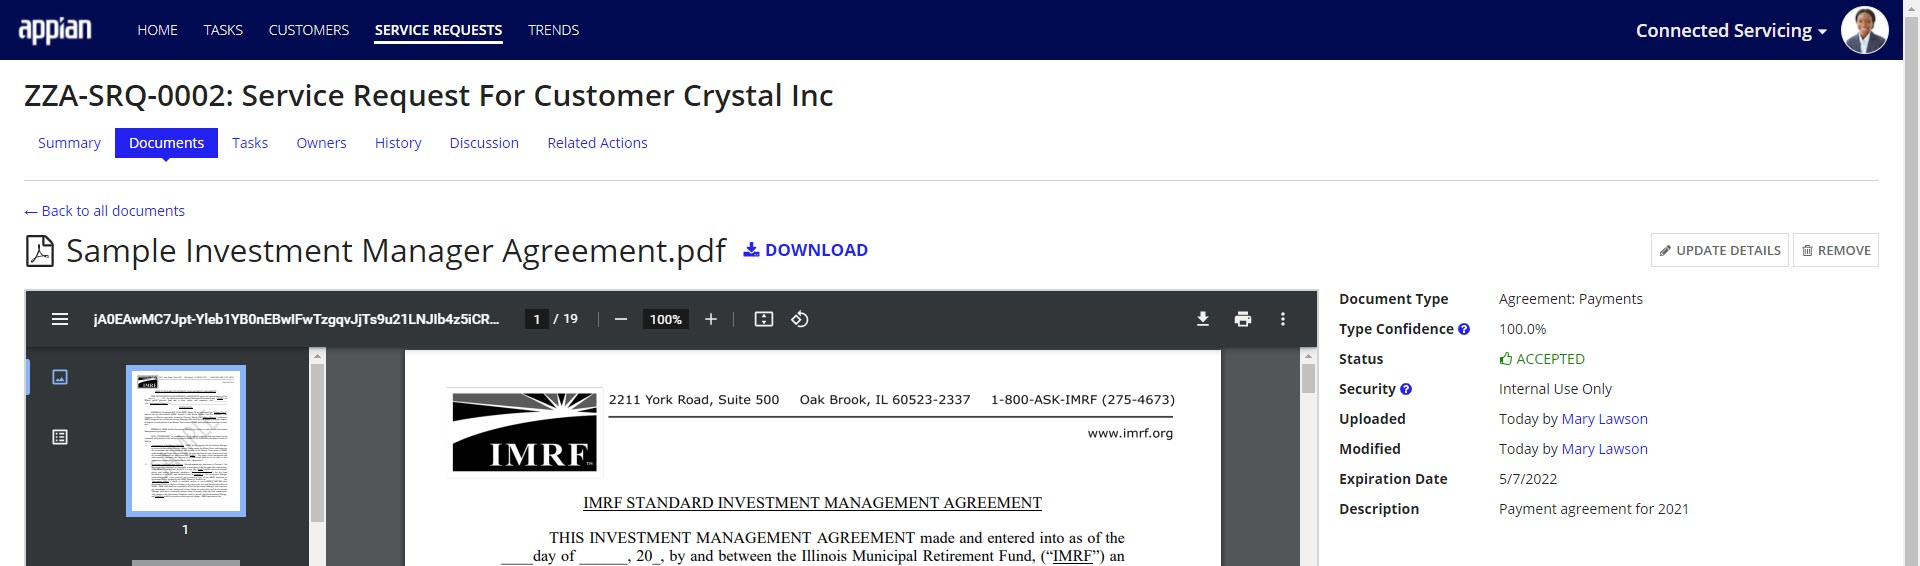
Document previewCopy link to clipboard
When you click a document's name in the document list, a preview of that document displays and shows:
- Document type.
- Type confidence.
- NOTE: this field will only be displayed when Intelligent Document Processing (IDP) is enabled.
- Status of the document.
- Security of the document.
- When the document was uploaded and who uploaded it.
- When the document was last modified and who modified it.
- When the document expires.
- A description of the document.
You can also download the document from this page.
Additionally, you can update the document's details, including the Document Type, Status, Security, Expiration Date, and Description. You can learn more about updating a document's details on the Managing Documents page. Updated document details will display in the document list or the document details page.
Tasks tabCopy link to clipboard
The Tasks tab lists all of the tasks for a service request.
On this page you can:
- Add a new task.
- View all tasks and see how many outstanding tasks remain for that service request.
- View tasks by task type, which you can expand or collapse.
- View a task's status.
- Send out a queued task to be kicked off.
- Reopen a closed task.
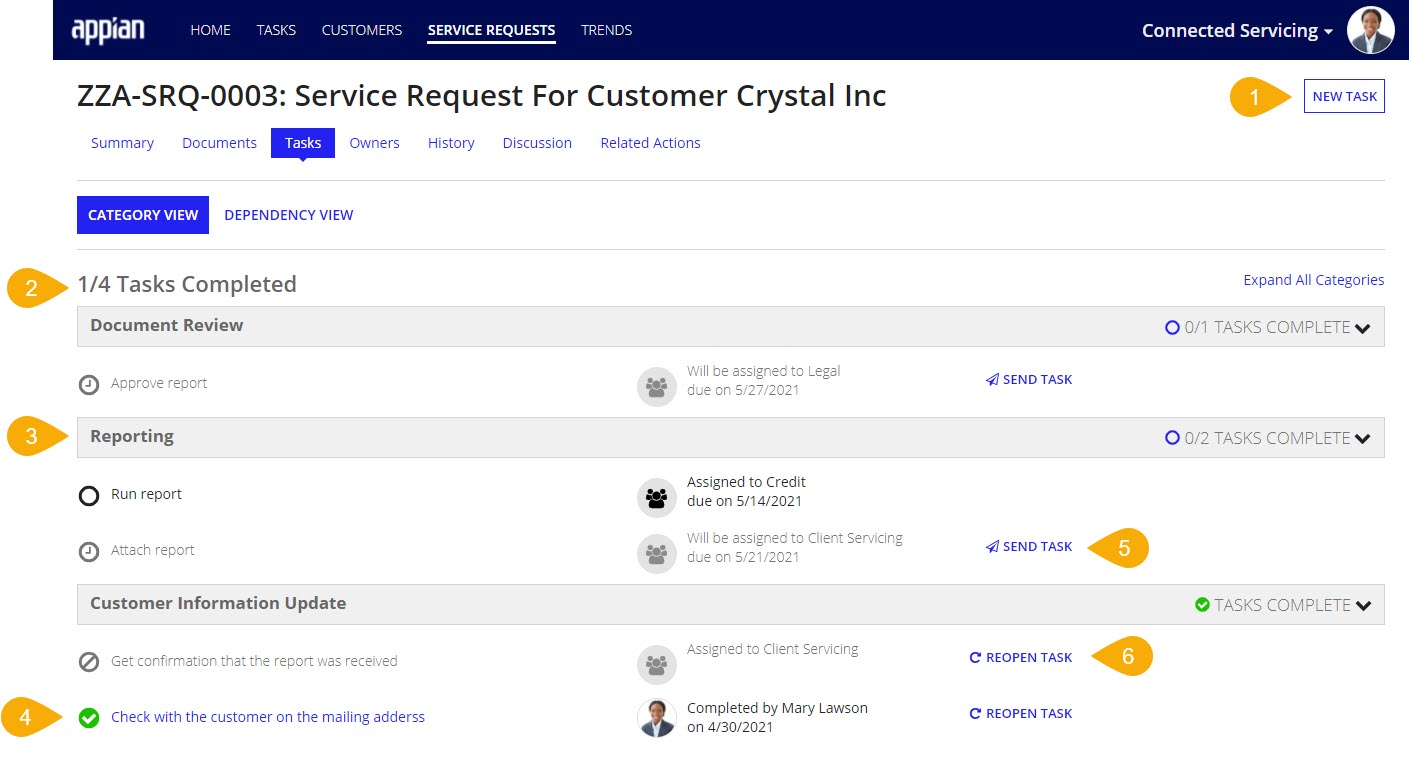

For tasks that are queued, you can kick them off without completing their precedent tasks by clicking the blue paper plane send task icon  . This will bypass any precedents and assign the task to the default group.
You can resend Completed and Not Needed tasks by clicking the blue reopen task icon 
Dependency viewCopy link to clipboard
You can also view tasks from the DEPENDENCY VIEW on the tasks tab.
The tasks are displayed so that a user can see a specific open task and all of its dependent tasks in a cascading list.
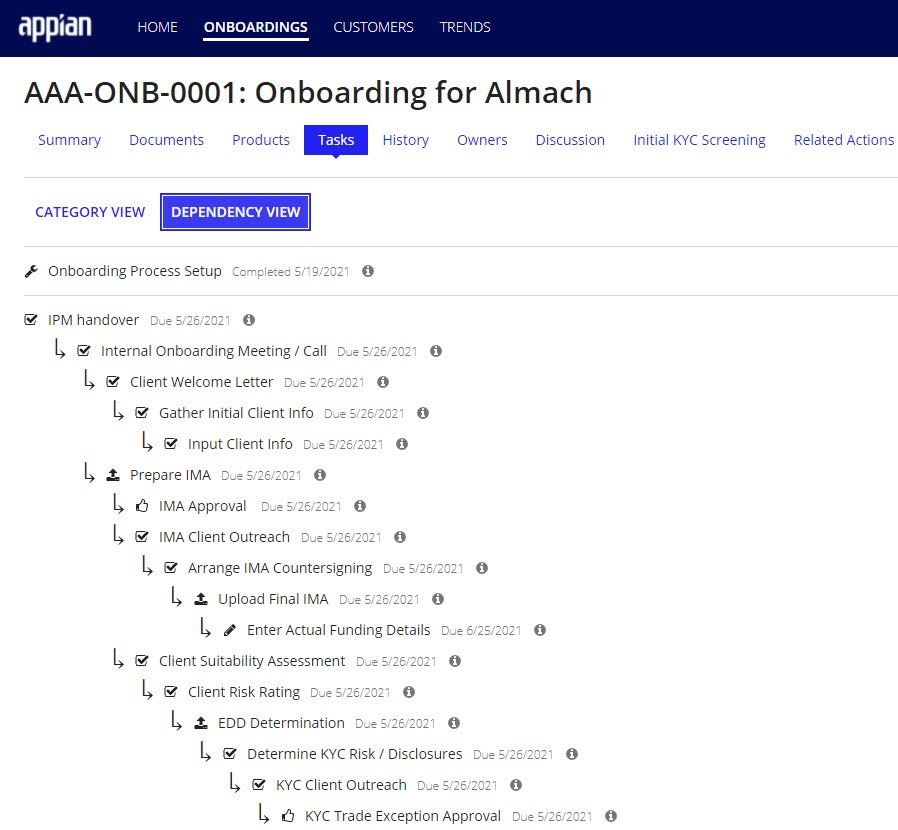
Task statusCopy link to clipboard
See the following table for information on the icon that displays for each task status.
| Status | Icon | Related Actions |
|---|---|---|
| Assigned | - | |
| Queued | Bypass precedents to kick off task. |
|
| Completed | Reopen task. |
|
| Not Needed | Reopen task. |
History tabCopy link to clipboard
The History tab shows the actions that have been taken on the tasks for a service request. This information acts as an audit trail for tasks.
On this page you can:
- Search the history by user.
- View the user who changed the service request data.
- View details about the modification made.
- View the date and time the modification was made.
Owners tabCopy link to clipboard
The Owners tab displays the owners of a service request. See Update service request owner for instructions on how to edit this information.
On this page you can:
- Add owners, remove owners, or make primary owners.
- View the primary owner of the service request.
- Select an owner to remove or make primary.
Discussion tabCopy link to clipboard
For open service requests, you can add a comment to a service request on the DISCUSSION tab.
There are two types of discussion threads: internal and external. The internal discussion will only be visible to internal users with access to the service request. The external discussion will be visible on the secure Customer Site, if installed, for customer users to view and respond.
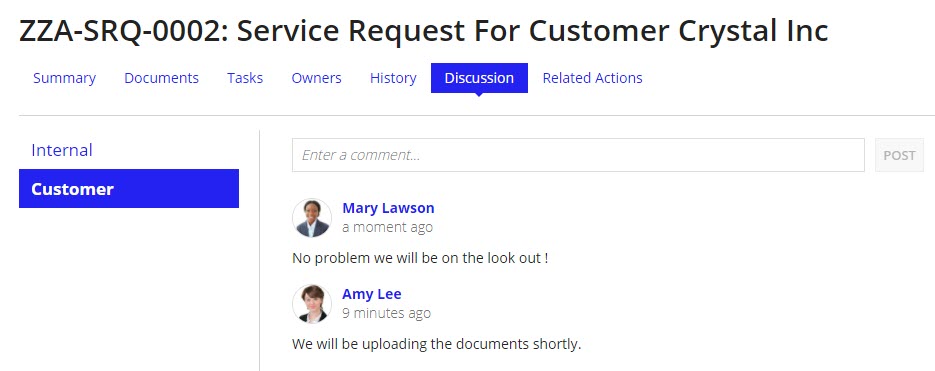
To add a discussion post:
- On the DISCUSSION tab, select Internal or Customer.
- Enter a comment.
- Click POST.
Updating Service RequestsCopy link to clipboard
Service requests are updated throughout the service request process by users completing tasks. These updates can usually be made through the task itself. However, there are also various ways to update a service request from the service request record. These include:
- Updating a target completion date.
- Updating service request owners.
- Updating discussions.
- Canceling or completing a service request.
You can also add custom tasks and update documents.
The actions related to updating a service request are controlled by business and security groups. Because of this, not all users will see the same related actions. See Actions users can perform based on their group membership on the Groups Reference Page for an explanation of which groups control access to these actions.
Service request status lifecycleCopy link to clipboard
A service request goes through several statuses throughout its life cycle, defined by certain events.
The events and statuses are:
- If a user schedules a service request for a customer, it will appear as Scheduled.
- After a scheduled service request is kicked off automatically, the status is set to Pending.
- If a user directly creates a service request or completes the Confirm Service Request Details task, the status updates to Active.
- If a user completes the Cancel related action, the status updates to Canceled.
- After a user completes the Complete related action, the status updates to Complete.
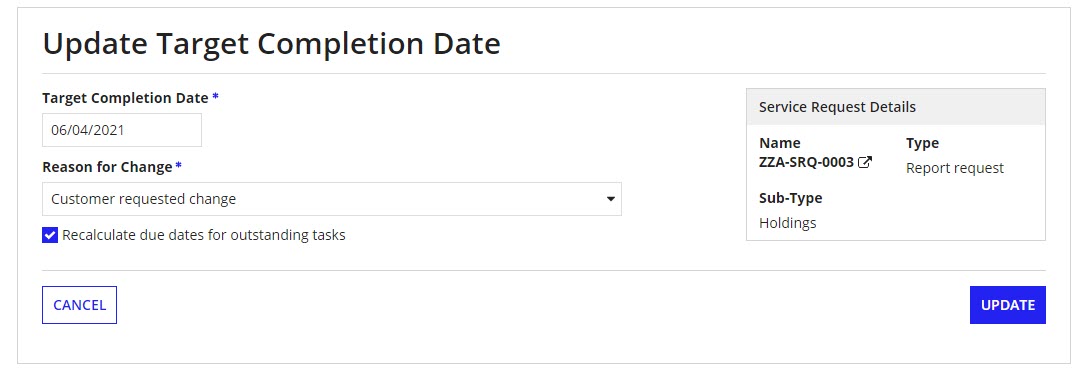
Updating the target completion dateCopy link to clipboard
For Pending or Active service requests, the target completion date that was entered during creation can be updated.
The target completion date can be updated from the UPDATE button at the top of the Summary page.
To update the target completion date for a service request:
- Update the Target Completion Date.
- Provide a Reason for Change from the dropdown.
- (Optional) Recalculate due dates for outstanding tasks.
- All current task due dates shift accordingly with the new target completion date date.
-
Click UPDATE.
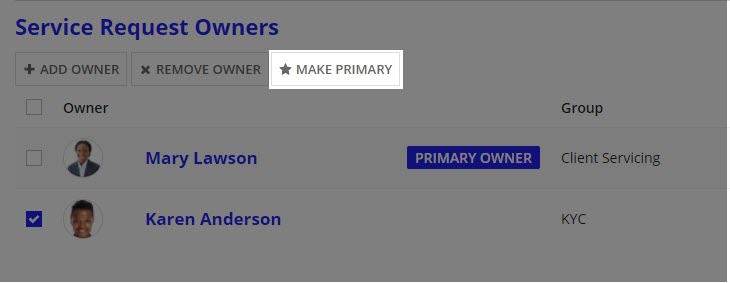
Updating the service request ownerCopy link to clipboard
For Pending and Active service requests, you can add, remove, and make primary service request owners in the Owners tab.
To add a new owner:
- In the Owners tab, click Add Owner.
- Use the picker to select the user that you are assigning as owner.
- (Optional) Designate the user as a primary owner.
- Note: A primary owner oversees all tasks associated with that service request. You can make an owner a primary owner in two ways. If there is already a primary owner for a service request, they will be replaced by the new primary owner. The primary owner is defaulted to the user who created the service request.
- If you need to add more than one owner, click Add Owner again.
To remove an owner:
- In the Owners tab, select the checkbox next to the owner you would like to remove.
- Click REMOVE OWNER.
To make an owner the primary owner:
- If the owner is already added, select the checkbox next to the owner you want to make a primary owner.
-
Click MAKE PRIMARY.
- If the owner is new, on the Owners tab, click Add Owner.
- Use the picker to select the user that you are assigning as owner.
-
Select the checkbox to designate the user as a primary owner.

Updating the service request discussionCopy link to clipboard
For Pending and Active service requests, you can add a comment to a service request on the DISCUSSION tab.
There are two types of discussion threads: internal and external. The internal discussion will only be visible to internal users with access to the service request. The external discussion will be visible on the secure Customer Site, if installed, for customer users to view and respond.
To add a discussion post:
- On the DISCUSSION tab, select Internal or Customer.
- Enter a comment.
- Click POST.
Canceling a service requestCopy link to clipboard
For Pending and Active service requests, you can cancel a service request from the Summary tab.
To cancel a service request:
- From the Summary page, click CANCEL.
- Enter a Reason for the cancellation, then click SUBMIT.
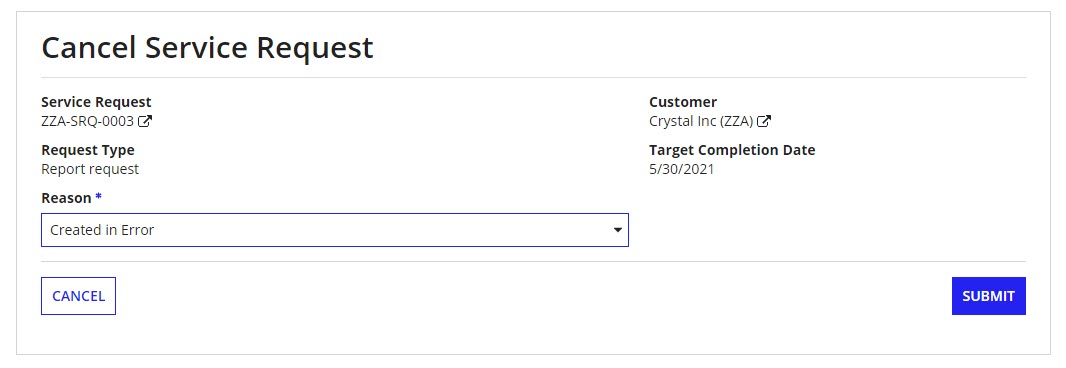
All outstanding tasks will be canceled. A canceled service request cannot be reopened, but all of the data will remain in the solution.
Completing a service requestCopy link to clipboard
For Pending and Active service requests, after you are ready to complete a service request, you can do so manually in the Related Actions tab or the system will automatically update the status to completed after the final task is done.
To complete a service request manually:
- In the Related Actions tab for the service request, click CLOSE.
- Enter the Completion Date for the service request, then click SUBMIT.

If there are any outstanding tasks, they will be canceled. A completed service request cannot be reopened, but all of the data will remain in the solution.
Adding a new service request typeCopy link to clipboard
There are several different types of service request that a user can select from when creating a new service request. The selected service request will ultimately determine the type of information that the user will need to change and subsequently, which tasks and documents are required.
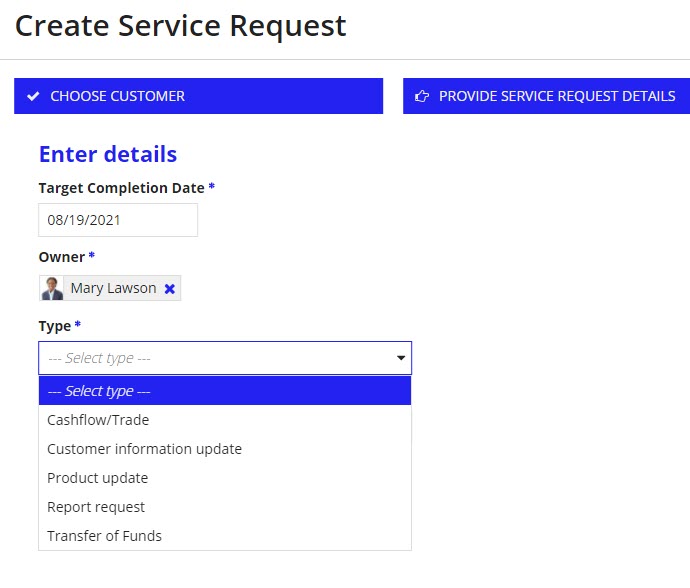
This page provides how-to instructions for adding a new service request type.
Step 1 : Create a service request type in the databaseCopy link to clipboard
Run an insert statement to add the new service request type to the database.
1
2
INSERT INTO AS_SRQ_R_SERVICE_REQUEST_TYPE (SERVICE_REQUEST_TYPE_ID , SERVICE_REQUEST_TYPE_CODE, LABEL,  IS_ACTIVE,  CREATED_BY , CREATED_DATETIME, MODIFIED_BY,  MODIFIED_DATETIME) VALUES
(NULL,  SERVICE_REQUEST_TYPE_<TYPE_CODE> ,  AS.SRQ.ServiceRequestType.<label>, 1, <CREATED_BY_USER>, CURRENT_TIMESTAMP, <CREATED_BY_USER>, CURRENT_TIMESTAMP);
Copy
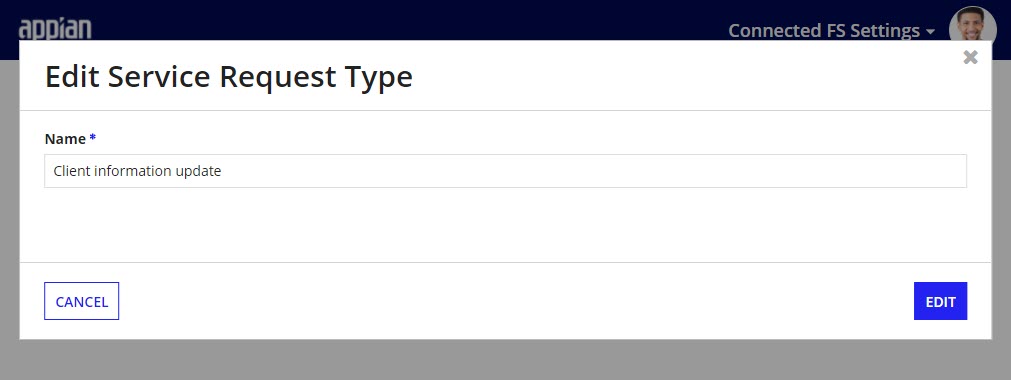
Step 2: Update service request type labelCopy link to clipboard
In order to ensure that users see the correct name of the service request type for all languages that you have enabled, you must update the service request type name in the Connected FS Settings site.
- From the Connected FS Settings site, click Configure.
- Click Service Request Types.
- Click the card with the label you entered from step 1.
-
Click Edit.
- Update the label to the correct name.
-
Click EDIT.
Step 3: Create a constant for the service request typeCopy link to clipboard
- From Appian Designer, create a new constant named,
AS_SRQ_REF_CODE_SERVICE_REQUEST_TYPE_<NEW TYPE>. - Enter the Description:
Value: SERVICE_REQUEST_TYPE_<NEW_TYPE>. - Select the Type:
Text. - Enter the Value:
SERVICE_REQUEST_TYPE_<NEW_TYPE>.
Step 4: Determine and set the behavior for the service requestCopy link to clipboard
First you will need to determine the intended behavior for the service request and which data entity will be modified as a part of it. Then follow the patterns of the existing service request to determine which objects you need to update.
For example, if you are adding a service request type at a point in the process where you need the user to select a product, search for AS_SRQ_REF_CODE_SERVICE_REQUEST_TYPE_TRANSFER_OF_FUNDS and mimic the behavior of that service request type.
To add a service request type for selecting a product:
- From Appian Designer, search for
AS_SRQ_REF_CODE_SERVICE_REQUEST_TYPE_TRANSFER_OF_FUNDS. - Select the checkbox next to the constant.
- From the menu, click DEPENDENTS.
- Duplicate the behavior from the dependents shown by adding the new
AS_SRQ_REF_CODE_SERVICE_REQUEST_TYPE_<NEW TYPE>constant to the array where theAS_SRQ_REF_CODE_SERVICE_REQUEST_TYPE_TRANSFER_OF_FUNDSconstant is located.AS_SRQ_CPS_customerProductUpdateAS_SRQ_CPS_reviewServiceRequestDetailsAS_SRQ_CONS_PRODUCT_DEPENDENT_SERVICE_REQUEST_TYPES
After adding this behavior, this service request will be available for use in Connected Servicing.