
| This content applies solely to Connected Servicing, which must be purchased separately from the Appian base platform. This content was written for Appian 23.3 and may not reflect the interfaces or functionality of other Appian versions. |
IntroductionCopy link to clipboard
Appian Connected Onboarding includes field validations in order to prevent users from entering bad data during the onboarding process.
This has several important benefits:
- It can ensure the Write to Data Store nodes in the process models do not break due to length restrictions of the database.
- It keeps data properly structured.
- It enforces data requirements.
This document describes the underlying validation structure for the Create Onboarding form. It also explains how to add to and edit the default validations.
Types of validation messagesCopy link to clipboard
There are two types of validation messages that the user sees on the Create Onboarding form:
-
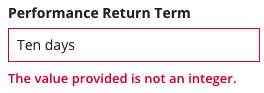
Field validation: Appears under certain fields after invalid data is entered in the field.
-
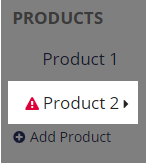
Product validations: Appear on the Add Products page of the create onboarding wizard. They display as:
-
An indicator next to the product name with an issue. As soon as the user fixes all of the errors for that product, the indicator disappears.
-
A message on the bottom of the page after the next button is clicked. This tells the user which product the error is in and prevents the form from being submitted. As soon as the user fixes all of the errors for that product, the validation message disappears.

-
Default validationsCopy link to clipboard
The types of default validations that are set up for the Create Onboarding form are:
Maximum length validationsCopy link to clipboard
For every field that allows free text entry, there is a maximum length validation. If the user enters data that exceeds the maximum length allowed by the field, it will be outlined in red and the user sees a message that states the maximum amount of characters.

Required field validationsCopy link to clipboard
By default, there are several required fields that must be filled out before submitting the form. These fields are denoted with an asterisk (*).
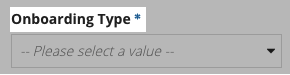
Out of the box, the following fields are always required:
- Customer
- Onboarding type
- Estimated funding value
- Currency of estimated funding value
- Estimated funding date
- At least one product
The following fields are only required if the parent field is added:
- Fund
- Name
- Account
- Account name
- Product
- Product name
- Required Document
- Type
- If a New or Existing is selected, a document must be uploaded
Invalid type validationsCopy link to clipboard
Connected Onboarding uses the standard Appian restrictions on fields to validate invalid data types. The user sees a message on fields where an improper type has been entered.
For example, if the field is an integer data type, entering text will cause a validation error.

Changing product field validationsCopy link to clipboard
To change the default validations for product fields, you will need to update two places:
- The field level validation rules.
- The form level validation rules.
Changing default maximum lengthCopy link to clipboard
Most of the length validations on the field are set by constants.
The constants for the length validations are:
AS_IO_CO_ENUM_TEXT_LENGTH_SHORT: 20 characters for text fieldsAS_IO_CO_ENUM_TEXT_LENGTH_MEDIUM: 50 characters for text fieldsAS_IO_CO_ENUM_TEXT_LENGTH_LONG: 255 characters for text fieldsAS_IO_CO_ENUM_PARAGRAPH_LENGTH_SHORT: 255 characters for paragraph fieldsAS_IO_CO_ENUM_PARAGRAPH_LENGTH_MEDIUM: 1000 characters for paragraph fieldsAS_IO_CO_ENUM_PARAGRAPH_LENGTH_LONG: 4000 characters for paragraph fields
These constants are used in many places, so their values should not be changed. If you want to use a different max field length than those here for any field, you can create a new constant and use it to control the field length more specifically.
Use a naming convention such as AS_IO_INT_<CDT NAME>_<FIELD NAME>_LENGTH for setting a specific field length to make identification easy.
When increasing the maximum length validation on a field, you also need to update the length of the field in the database to accommodate for the longest possible string of text.
Changing validations on the fieldCopy link to clipboard
The first step to changing a validation is updating the field that requires the change.
To change the validation on a field:
- Open the interface with the field that you want to modify the validation for.
- To change the validations for maximum length of a text based field, update the
maxLengthparameter as described above- If you are increasing the maximum length of a field, remember to increase the size of the corresponding column in the database to accommodate text of that size.
- To add a new type of validation, update the
validationsparameter.
Changing what values are valid for a fieldCopy link to clipboard
Once you have changed the field level validations above, you will need to mirror any change in the corresponding form level validations. This paradigm is used because some fields may be hidden during the course of a user’s interaction with the form. For example, when the user switches which product they are updating.
If a field level validation is added and the corresponding form level validation is not automatically included, end users will not be warned that their data is incorrect. Similarly, if a field level validation is removed without the corresponding form level validation being removed, the user will be unable to move forward because the form level validation message will still appear even though the field level validation is not showing.
Any logic that is added to the field validation will need to be mirrored in the corresponding isValid metadata rule for the field. The logic found in the isValid rule should be made to return false when the validation is triggered, and true when it is not. Null should be returned if no product is passed, to avoid unnecessary computation, which is especially relevant if a query or more complex logic is involved in the validation.
Example: Adding an additional custom validation for Account NameCopy link to clipboard
The fields for Accounts are found in the rule AS_IO_CPS_OnboardingRequestProducts_AccountsSection. By default, the account number and account name have length validations of AS_CO_ENUM_TEXT_LENGTH_MEDIUM and must be unique.
This example shows how to add another validation to Account, which would require the account number needed to start with the letter A.
- Open up the expression rule
AS_IO_CPS_OnboardingRequestProducts_AccountsSectionand find where the where the account number validations are found (line 176 in the rule as shipped). - Add a new validation message with code in the corresponding internationalization bundle file.
-
Add in the logic for the validation requirement.
1
2
3
4
5
6
7
8
9
10
11
12
13
14
15
16
17
18
19
20
21
validations: {
    if(
        rule!AS_CO_UT_checkIfDuplicateExistsInArrayByIndex(
            array: ri!product.accounts.accountNumber,
            index: fv!index
        ),
        rule!AS_CO_I18N_UT_displayLabel(
            i18nData: ri!i18nData,
            bundleKey: "ProductField.vld_DuplicateAccountNumber"
        ),
        null
!   ),
!   if(
!       index(code(fv!item.accountNumber), 1, null) <> code("A")[1],
!       rule!AS_CO_I18N_UT_displayLabel(
!           i18nData: ri!i18nData,
!           bundleKey: "ProductField.vld_AccountNameMustStartWithA"
!       ),
!       null
!   )
}
Copy - Open up the expression rule
AS_IO_REF_PRODUCT_FIELDS_ACCOUNTS. - Find where isValid is defined for the account name field.
-
Add the same logic to ensure that even if the field is hidden, the validation is triggered.
1
2
3
4
5
6
7
8
9
10
11
12
13
isValid: if(
    rule!AS_CO_UT_isBlank(ri!product),
    null,
    and(
        a!forEach(
            items: ri!product.accounts,
!           expression: and(
!               len(fv!item.name) < cons!AS_CO_ENUM_TEXT_LENGTH_MEDIUM,
!               index(code(fv!item.name), 1, null) = code(“A”)[1]
!           )
        )
    )
)
Copy