
| This content applies solely to Connected Servicing, which must be purchased separately from the Appian base platform. This content was written for Appian 23.3 and may not reflect the interfaces or functionality of other Appian versions. |
What's New?Copy link to clipboard
The Connected Servicing 2.6 release notes provide an overview of the latest changes and improvements to the Connected Servicing Solution. These new features and improved capabilities were designed with best practices in mind.
Service request Details ViewCopy link to clipboard
This release of Connected Servicing introduces a new view that allows you to see service request related details, making it easier for you to understand the requested changes needed to appropriately fulfill the service request when processing. The view can be accessed by selecting the View link in the Request Details section on a service request summary page.
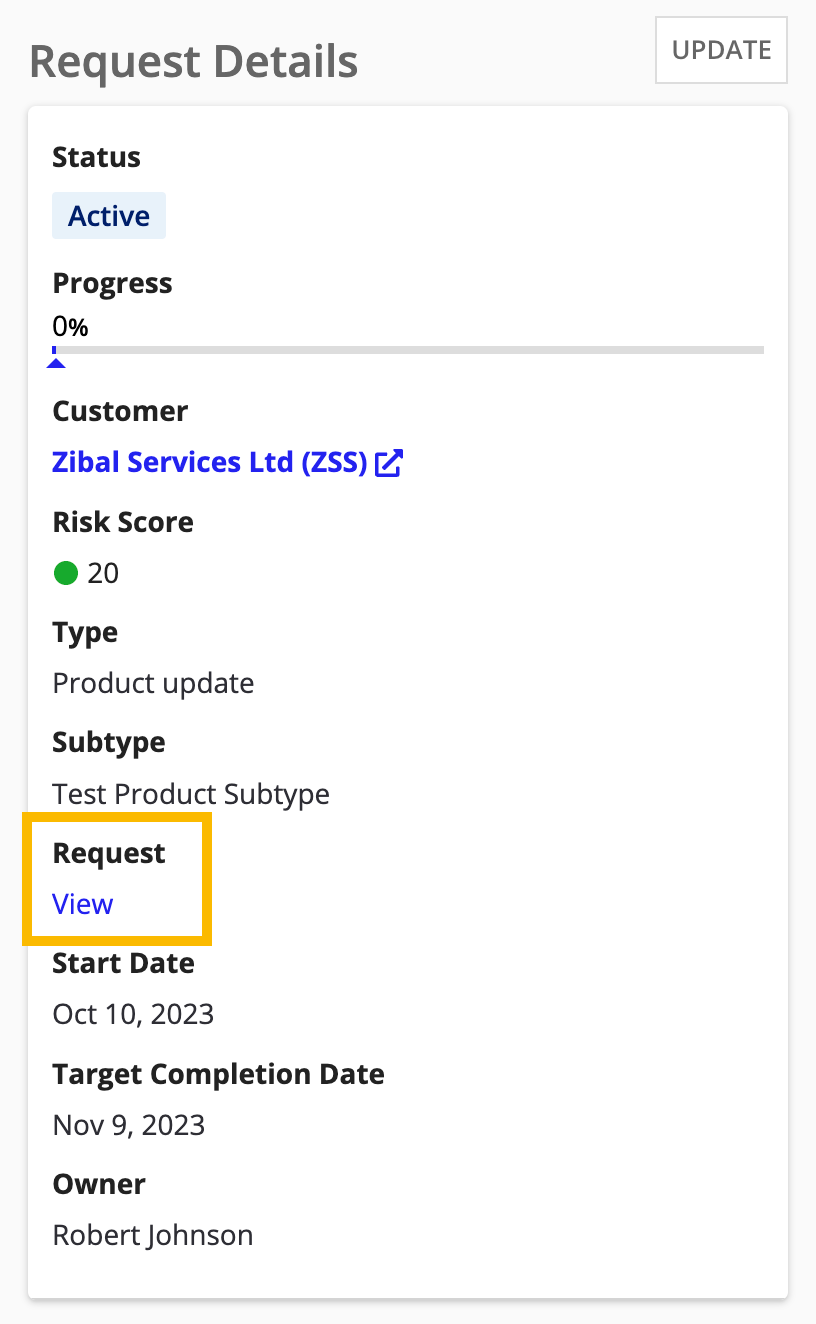
This view makes it easy for users processing the service request to understand to the specific changes requested to appropriately fulfill the service request.
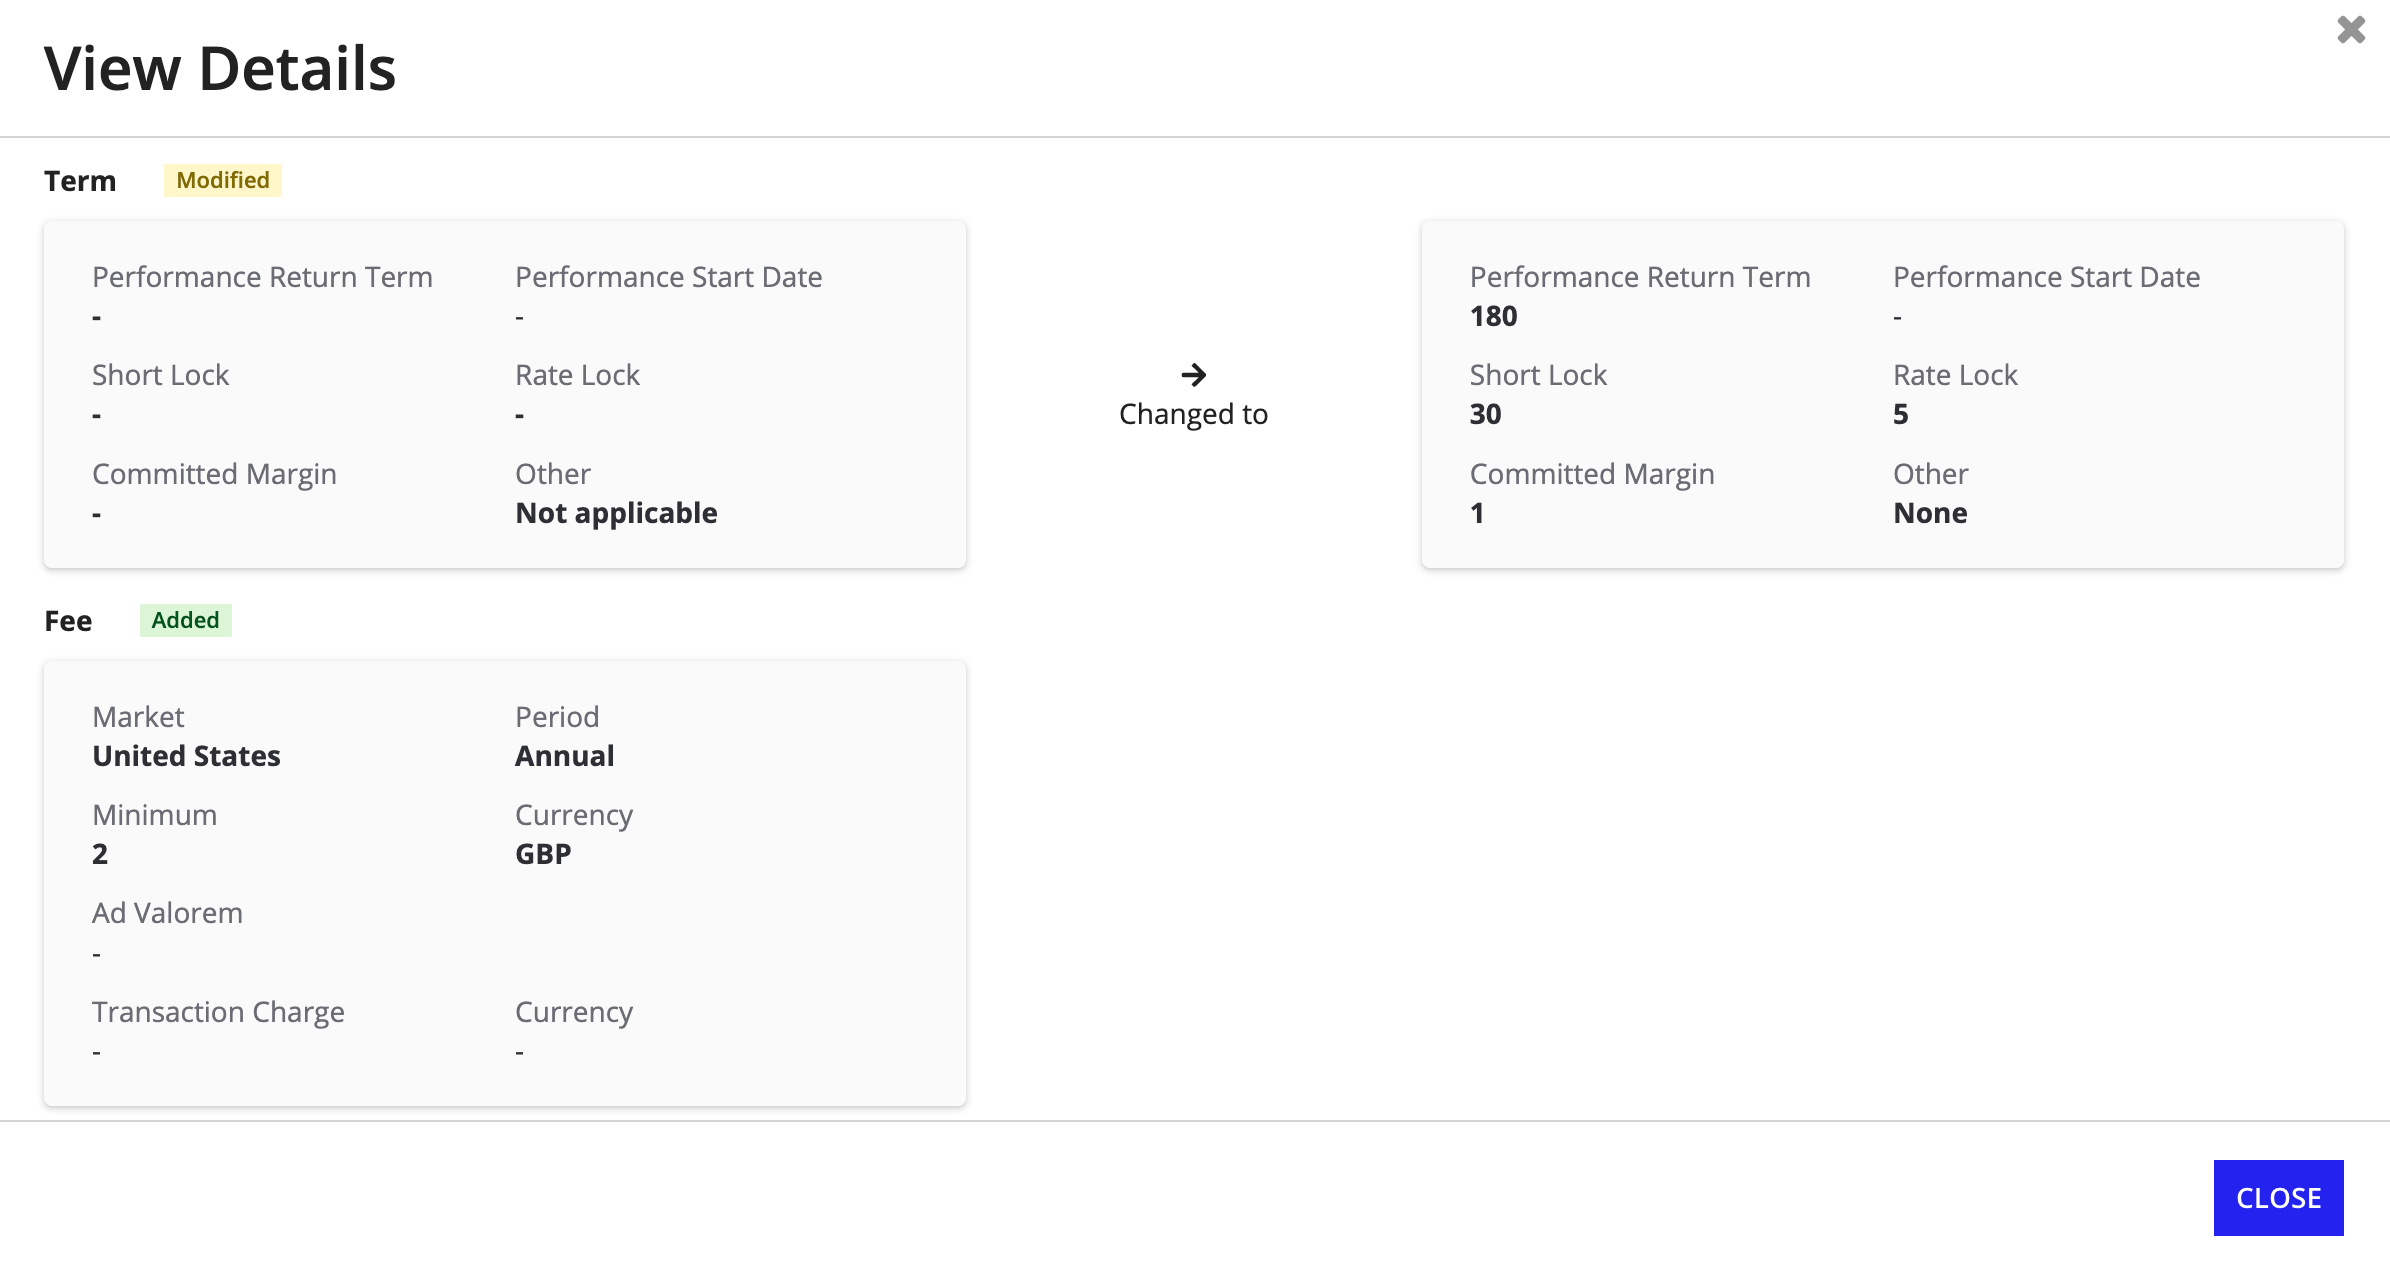
When a change is requested to a section of existing information, now Connected Servicing displays the Modified tag and highlights changed fields with bold font.
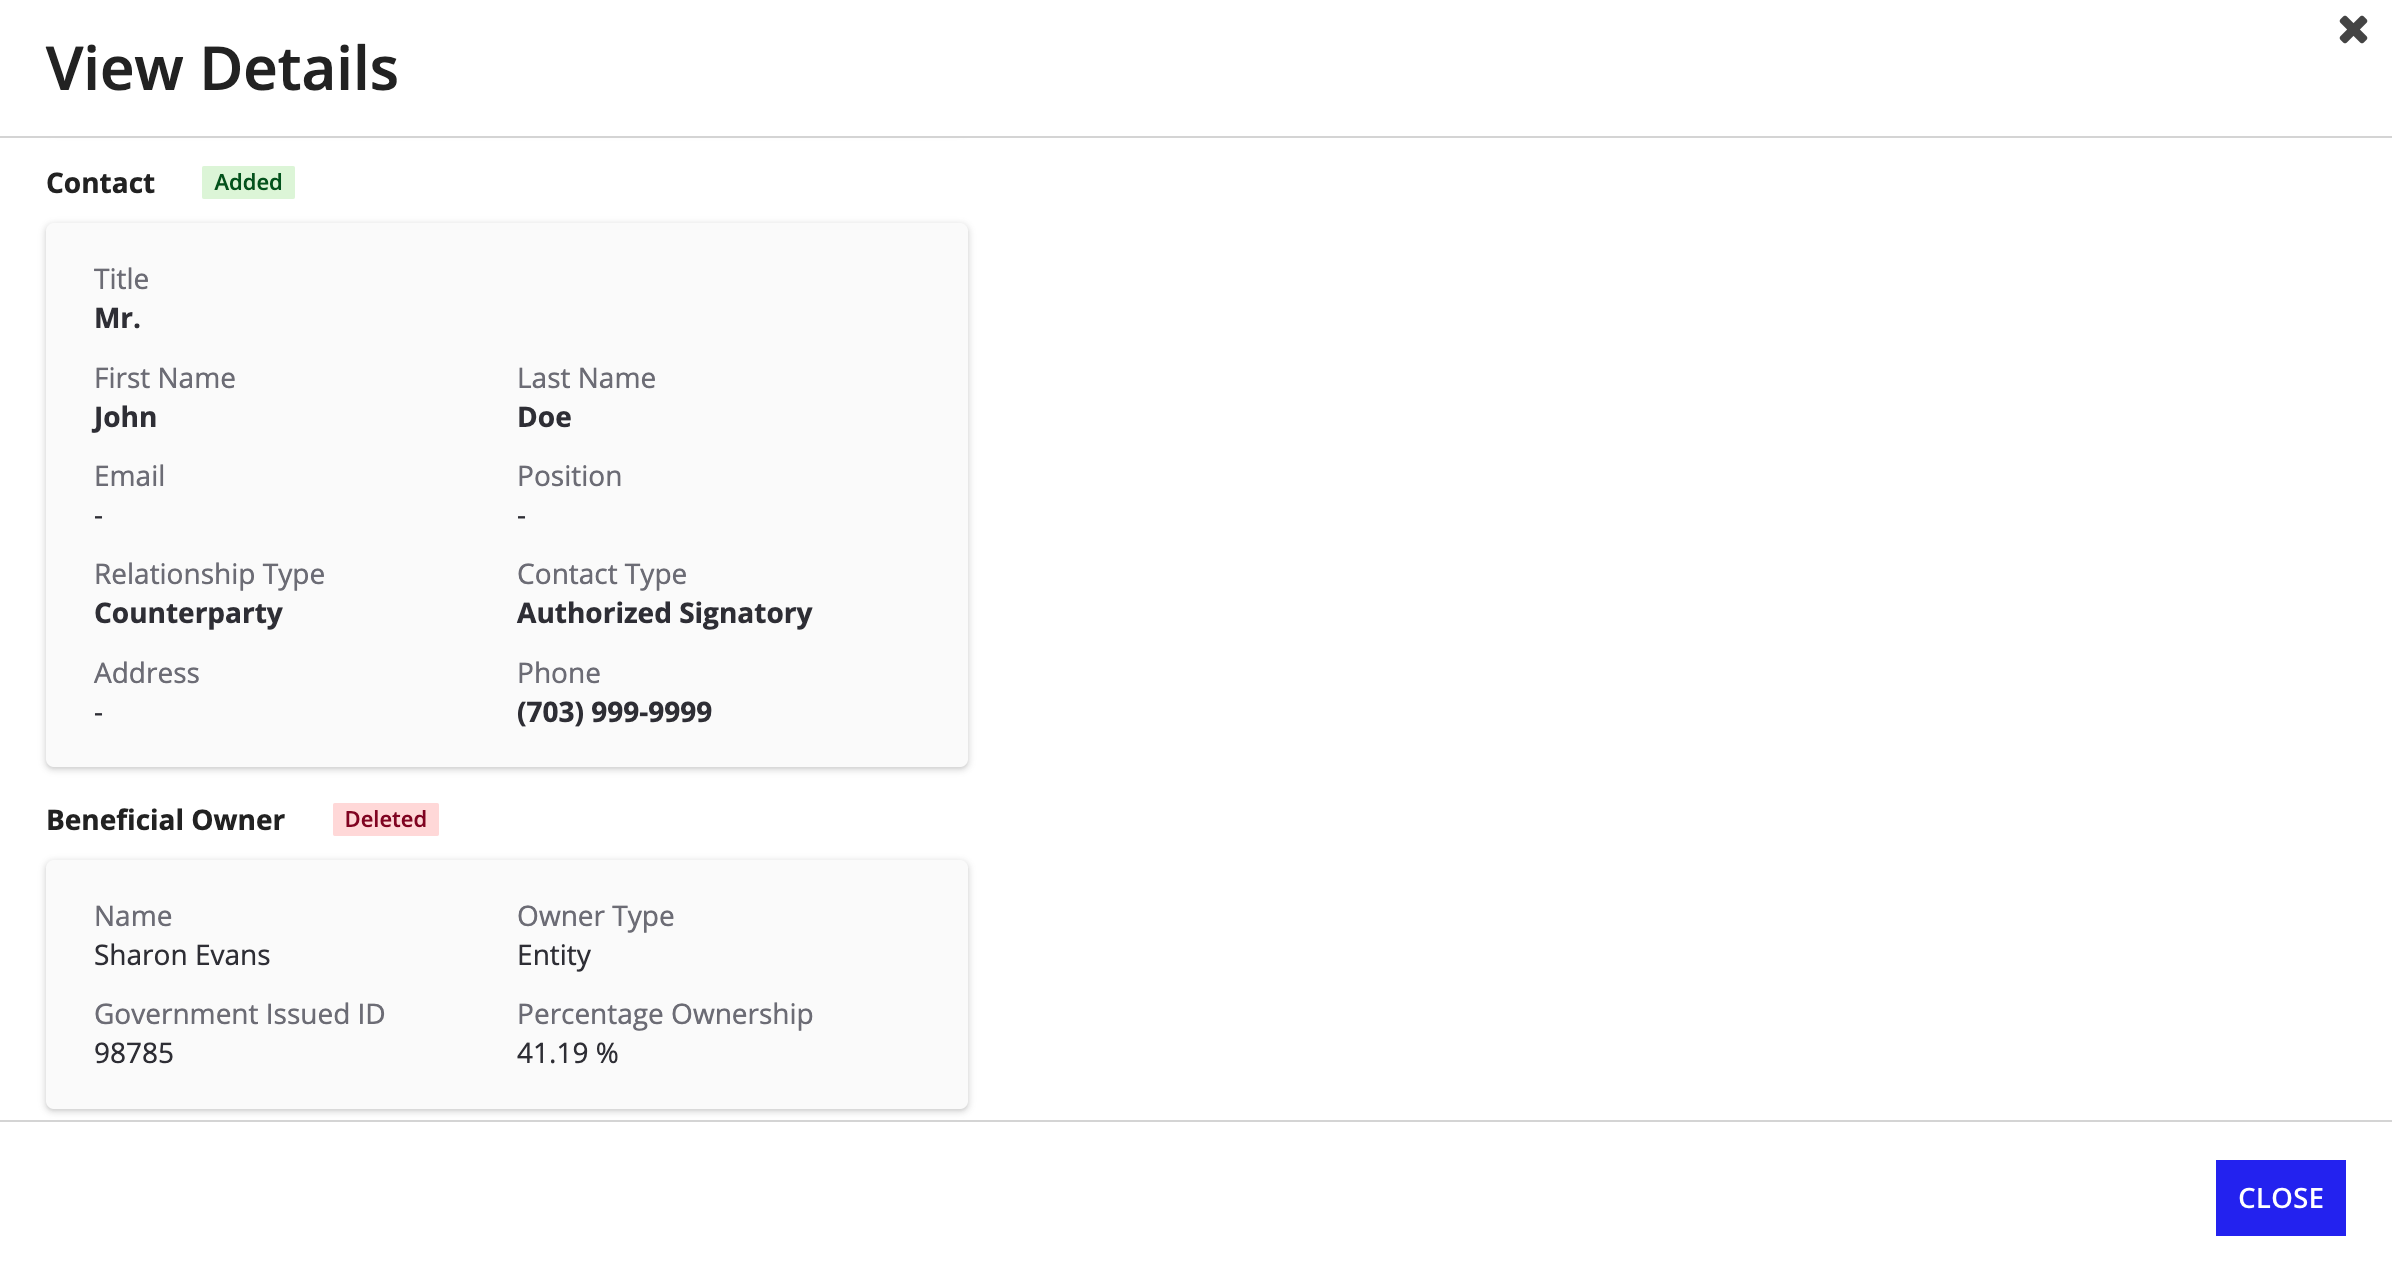
The Added tag is displayed when a new entry, such as a new contact, beneficial owner, address, fee, or threshold, is submitted as part of the request.
Lastly, Connected Servicing displays the Deleted tag when an existing entry is deleted.
Note: The details view is not available for service request types that do not collect additional information, including: Reporting Request, Transfer of Funds, Subaccount Creation, and Cashflow.
Service request Task Dependency ViewCopy link to clipboard
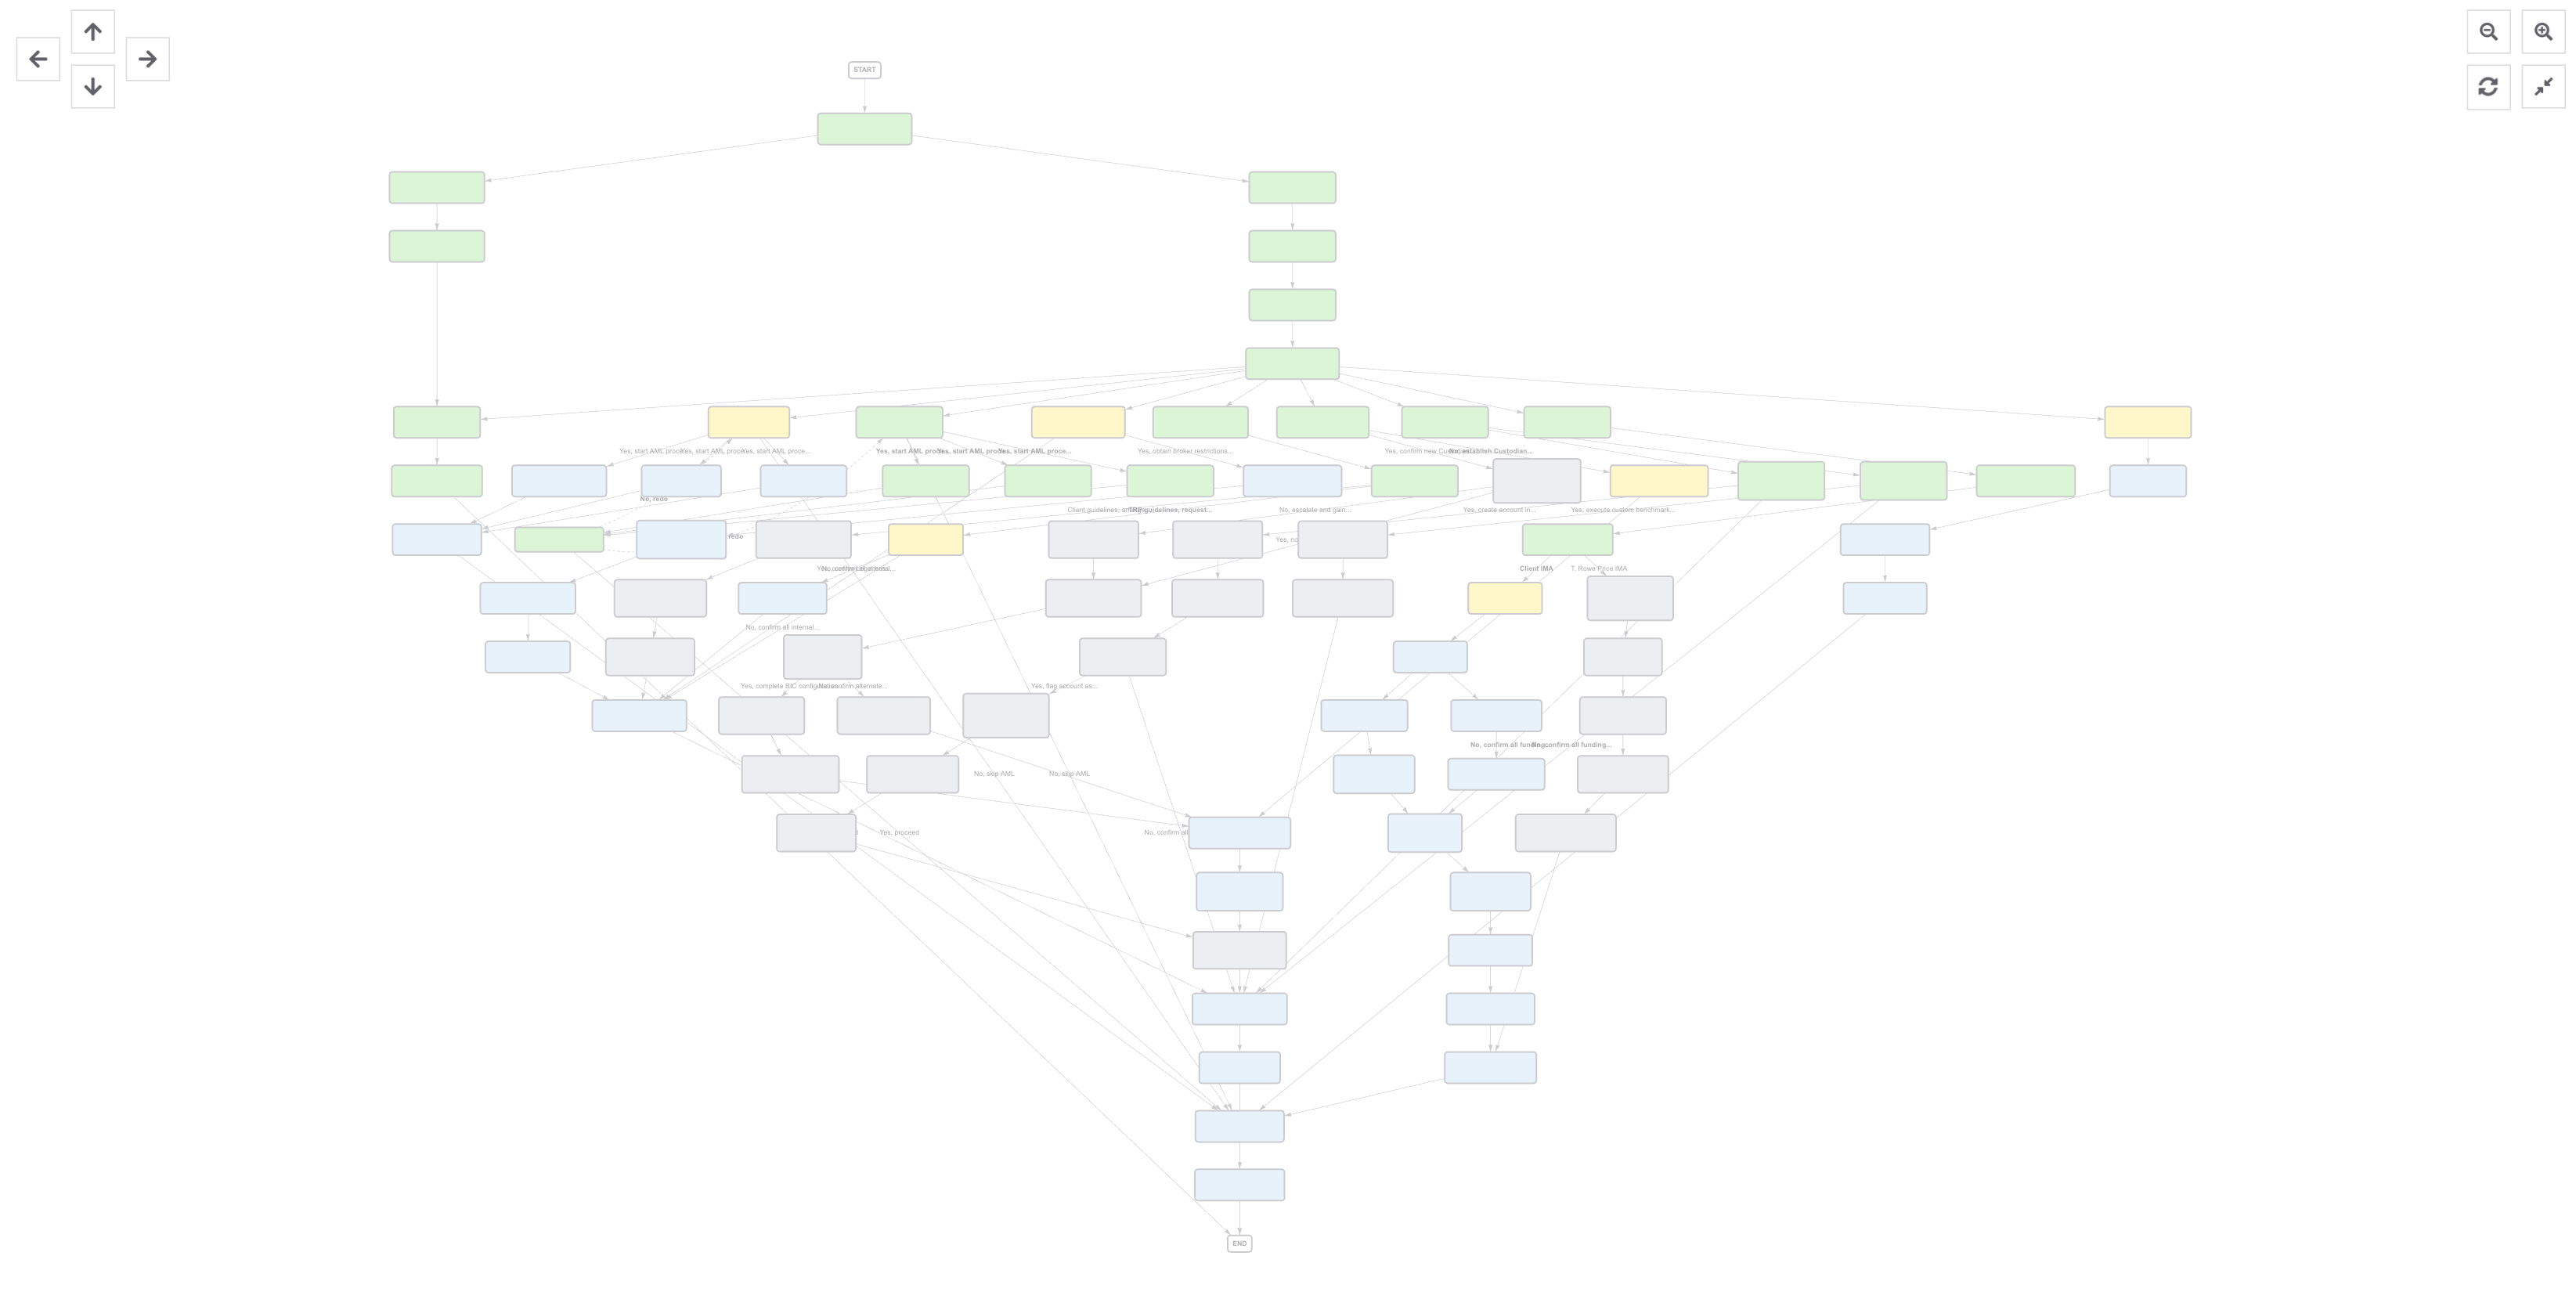
The task Dependency View provides a visual representation of the service request's tasks, including their status and relationships to other tasks, which significantly benefits service request workflows with many tasks and complex task relationships.
Accessing the Dependency ViewCopy link to clipboard
To access the Dependency View:
- Go to a service request.
- Select the Tasks tab. The category view displays by default, which provides a list of all tasks in the service request grouped by category.
- Select the Dependency View icon above the category view on the right side.
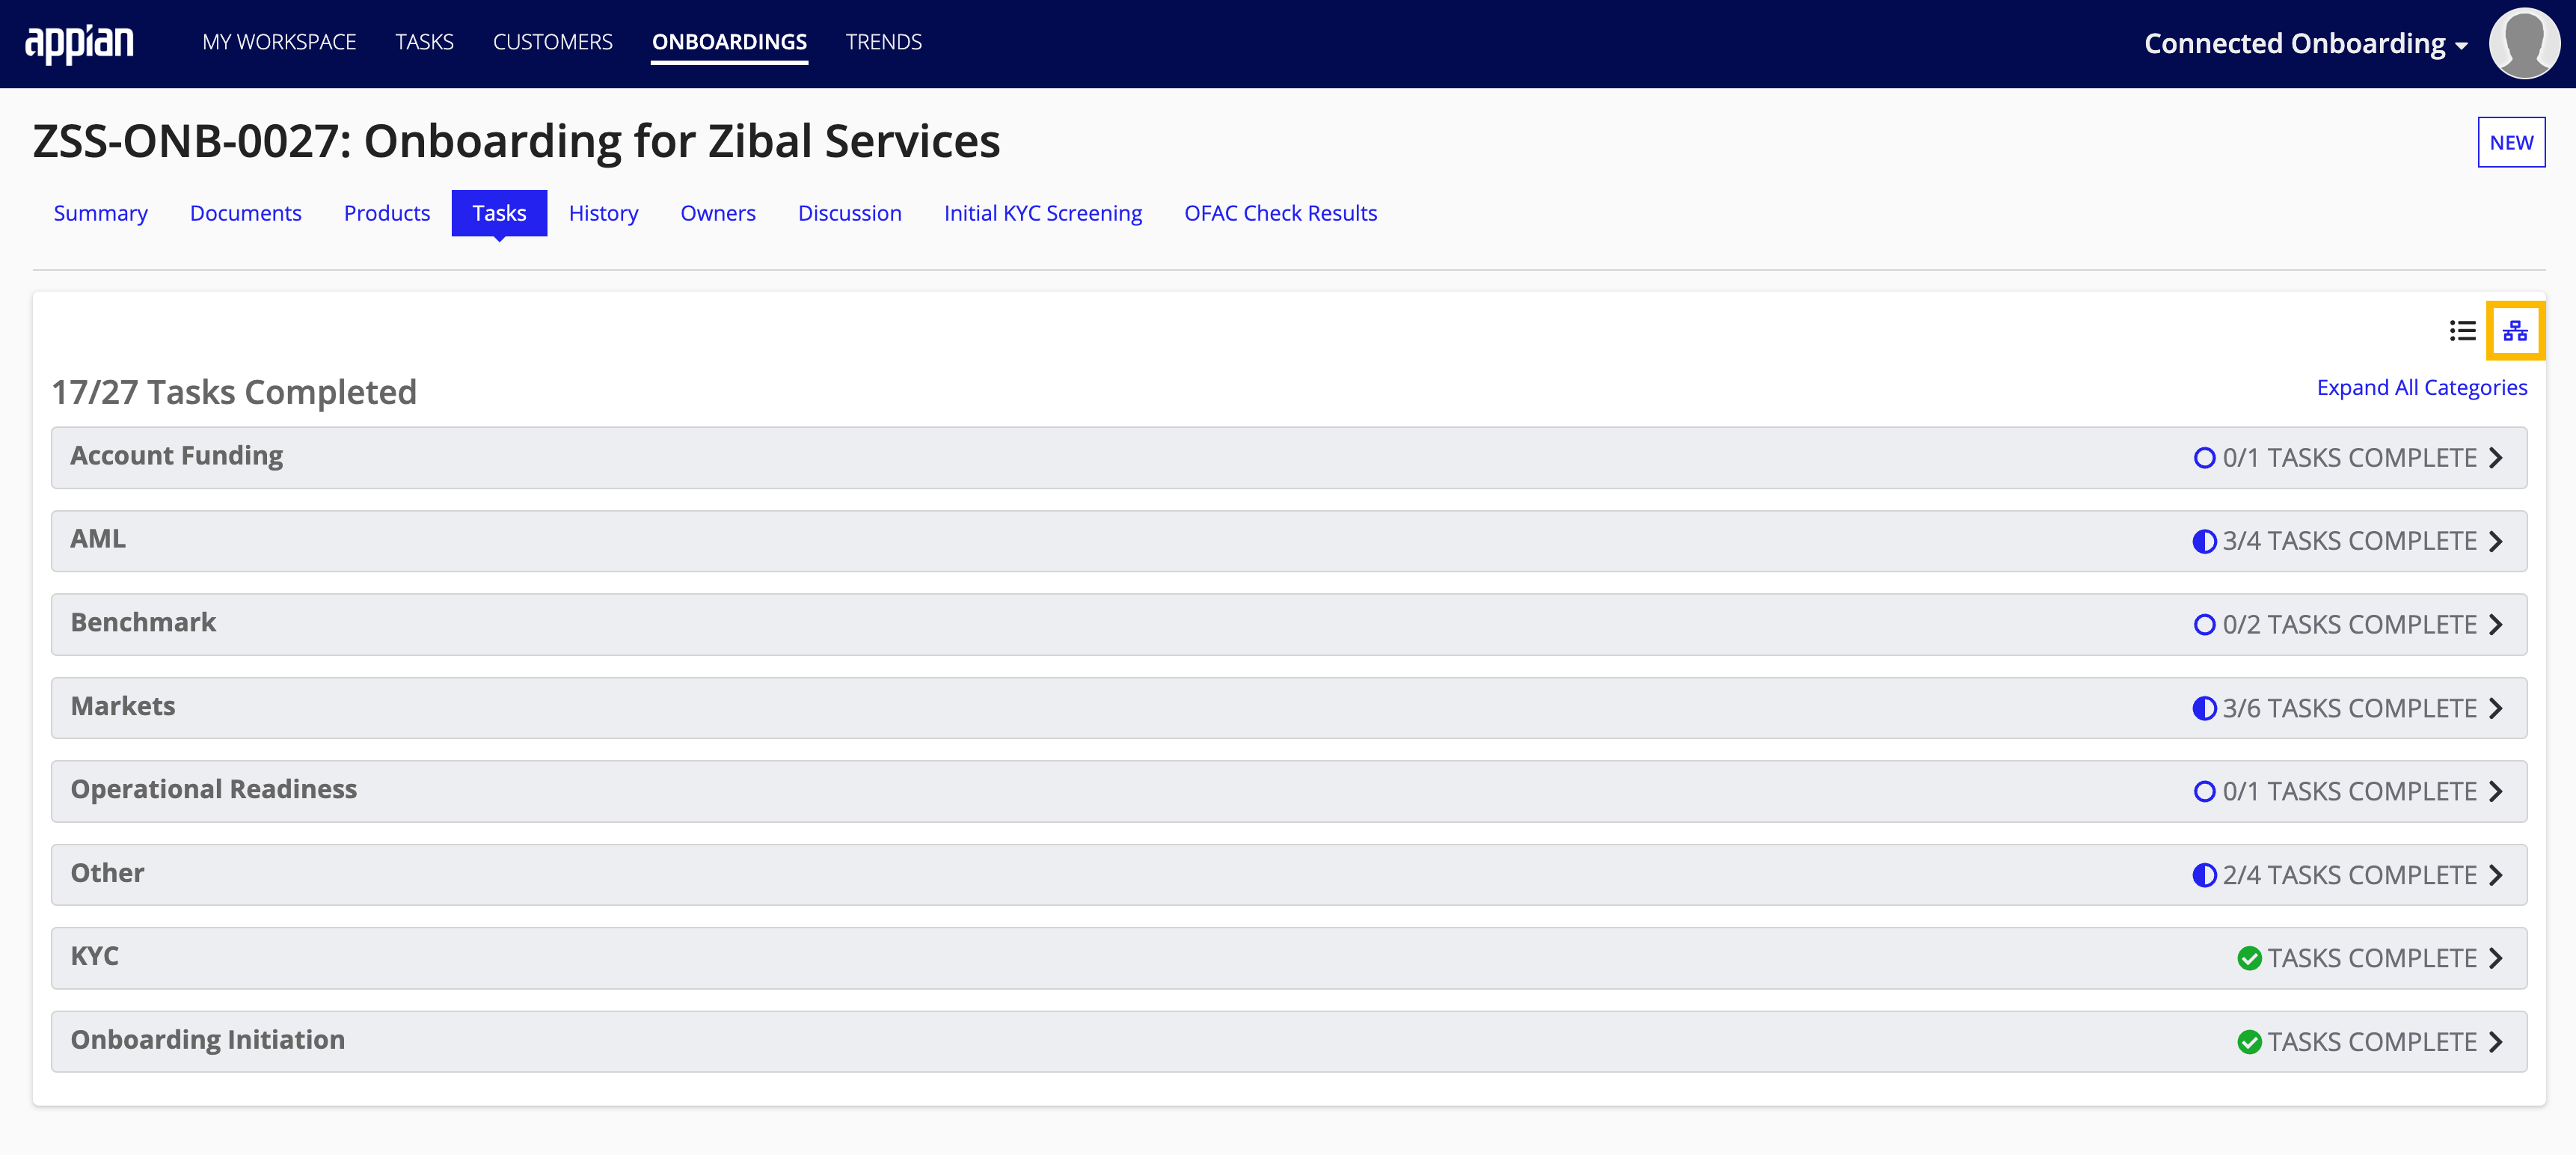

When you access the task Dependency View, the complete workflow will be visible.
Navigating the Dependency ViewCopy link to clipboard
Buttons are provided in the upper left and right corners of the Dependency View to allow users to interact with the view.
The four directional arrows allow users to move the workflow visualization in the direction of the selected arrow. You can also move the workflow by clicking, holding, and dragging an area of white space.
Three buttons in the upper right support distinct zoom functions.
- To zoom out, click the button with a magnifying glass and a minus sign.
- To zoom in, click the button with a magnifying glass icon and a plus sign.
- To zoom to fit the entire workflow, click the button with the arrows pointing to one another.

Task details and colorsCopy link to clipboard
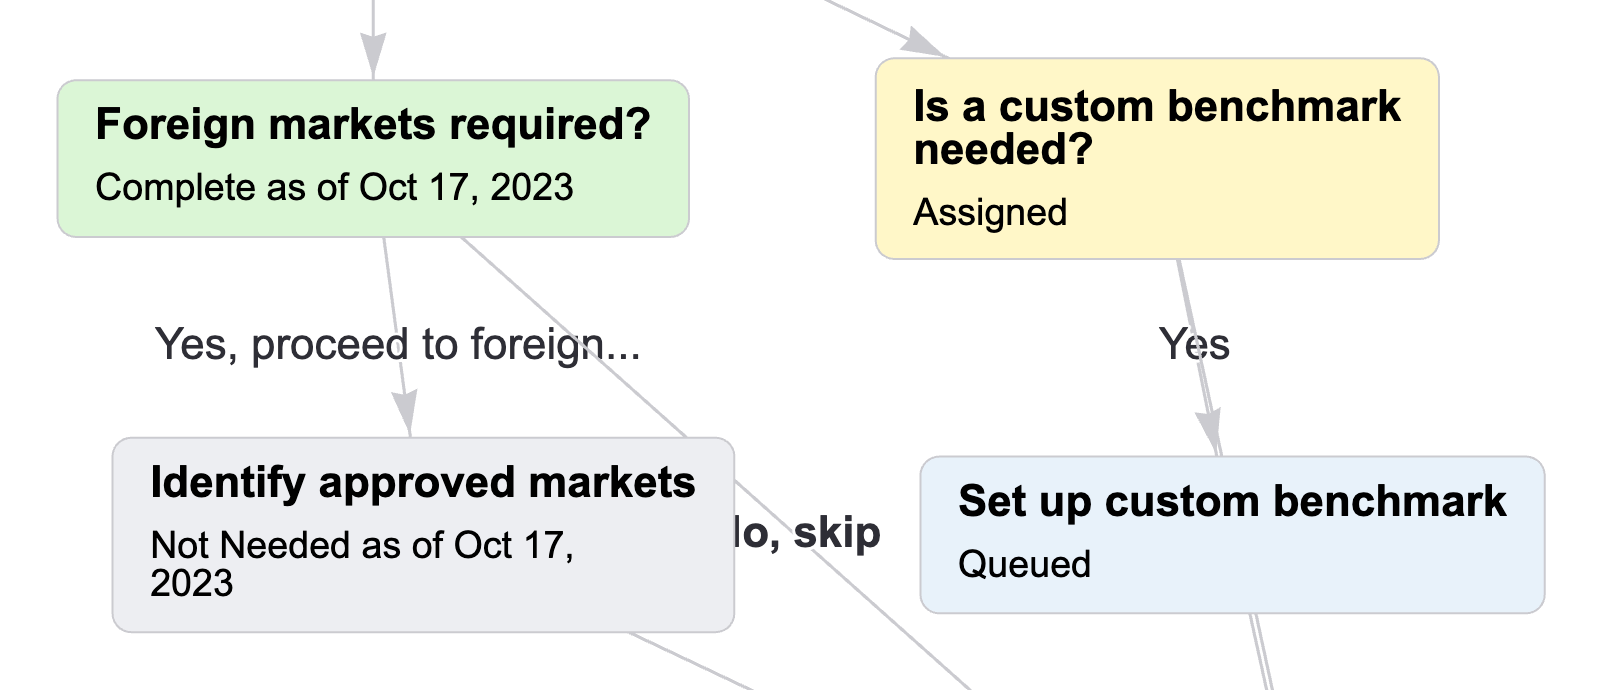
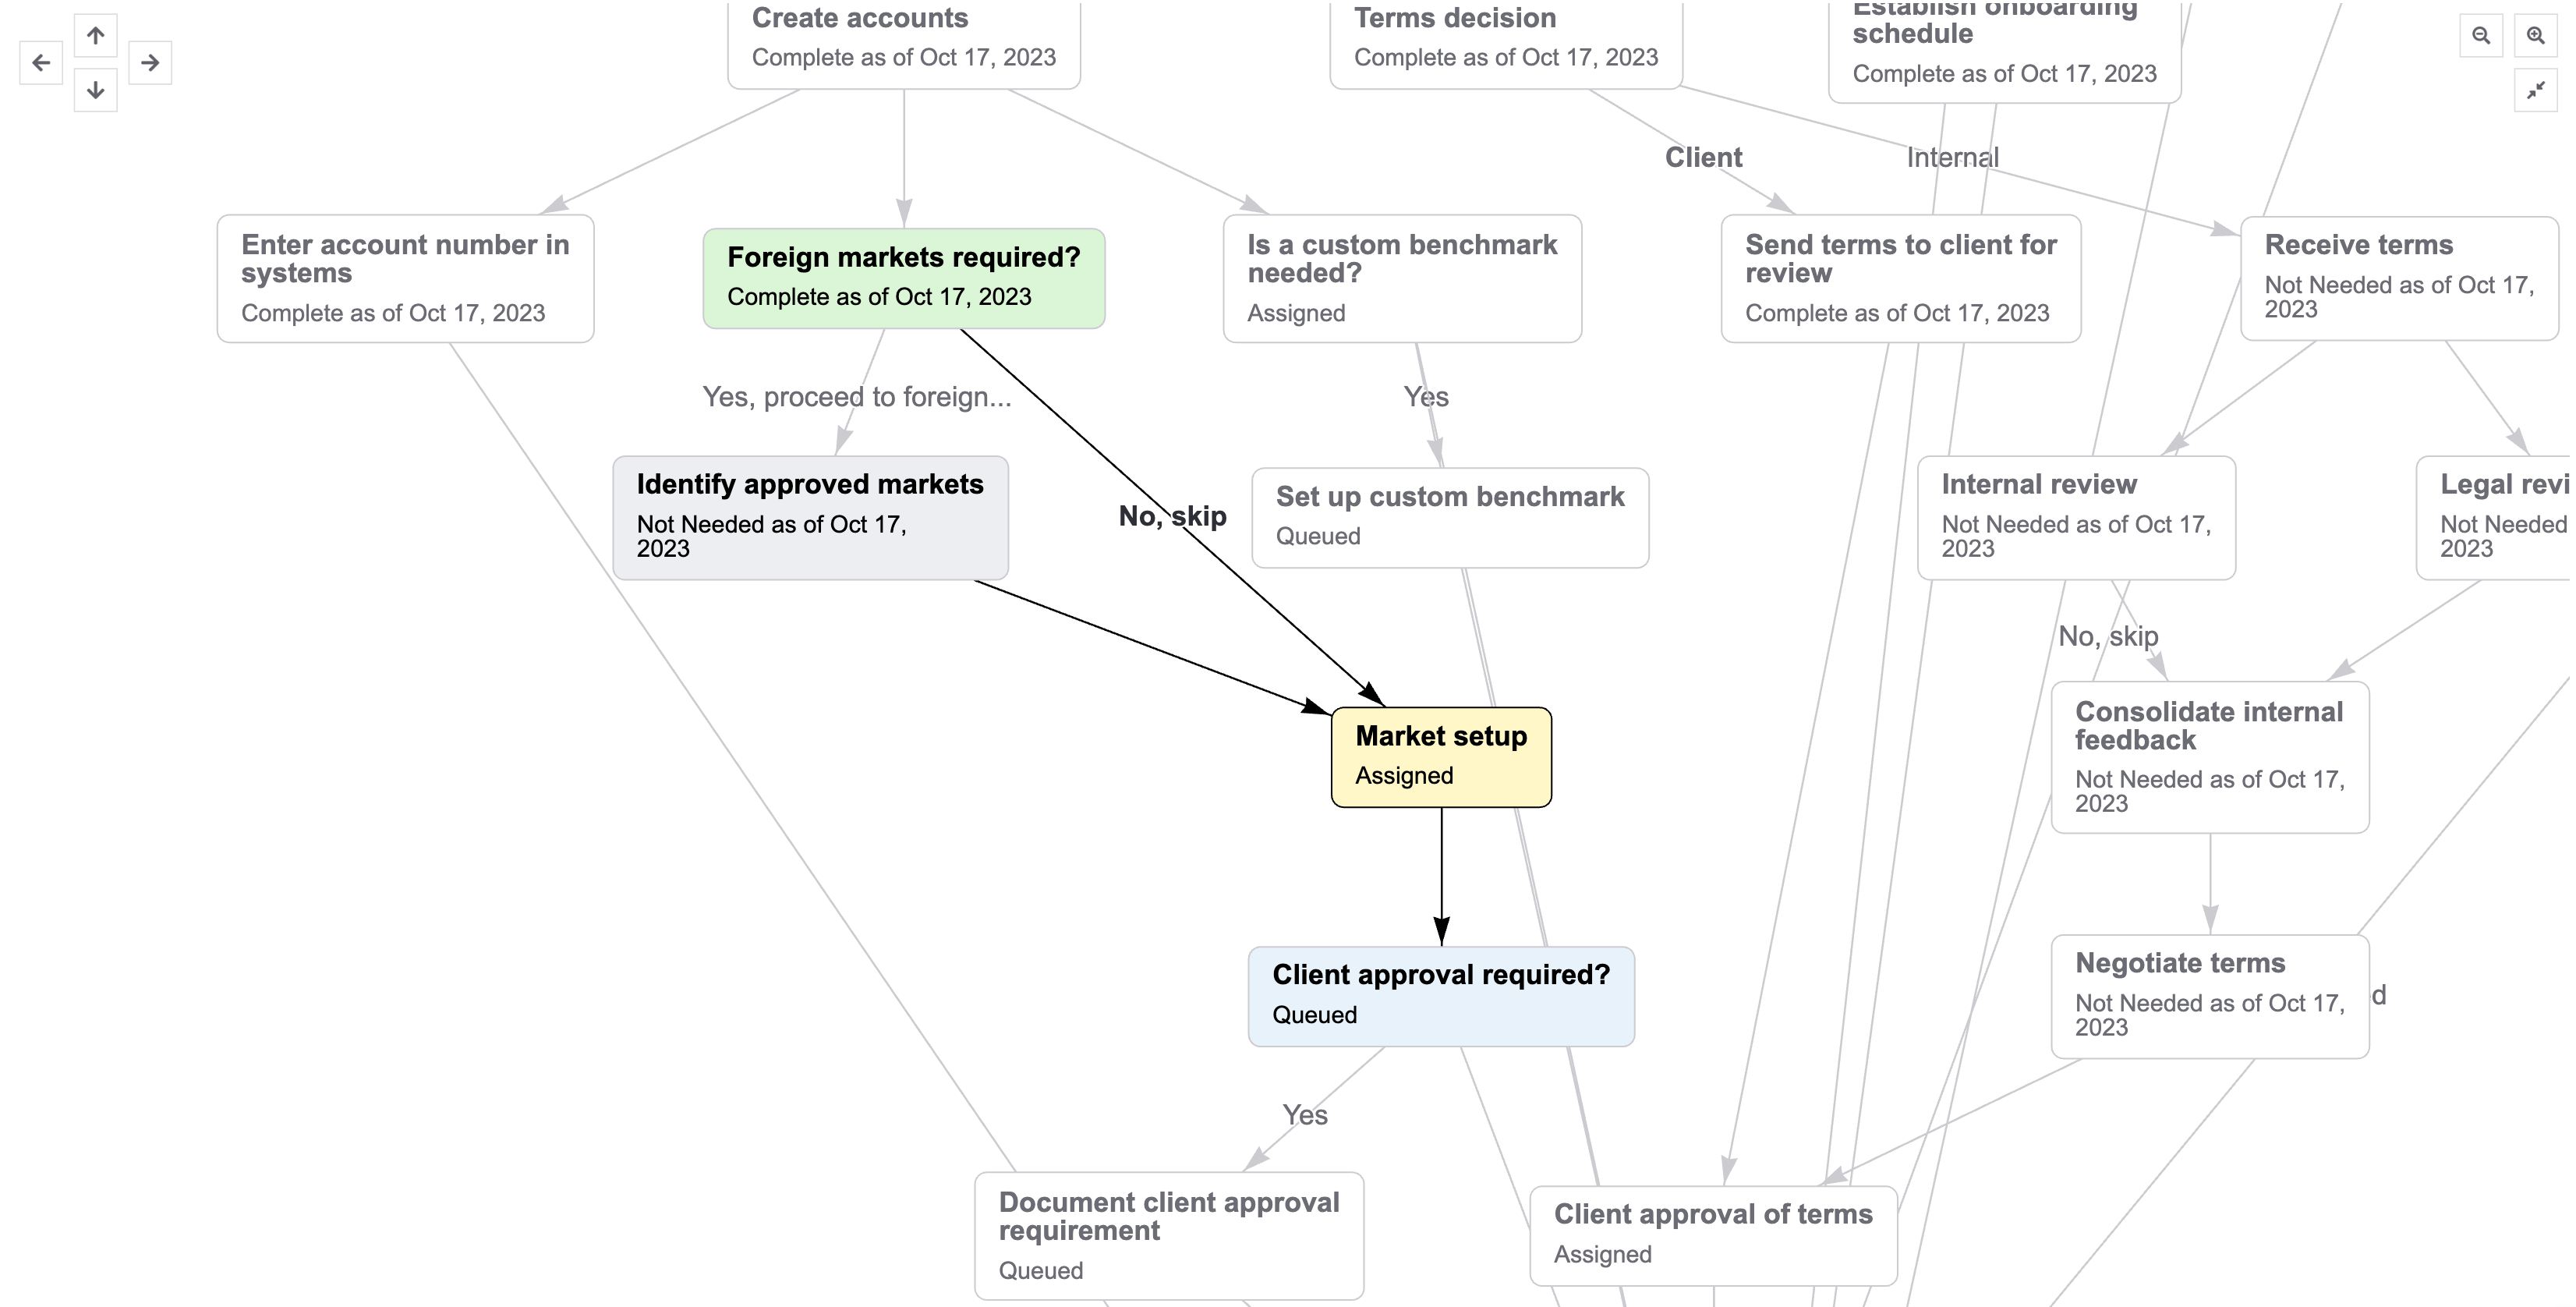
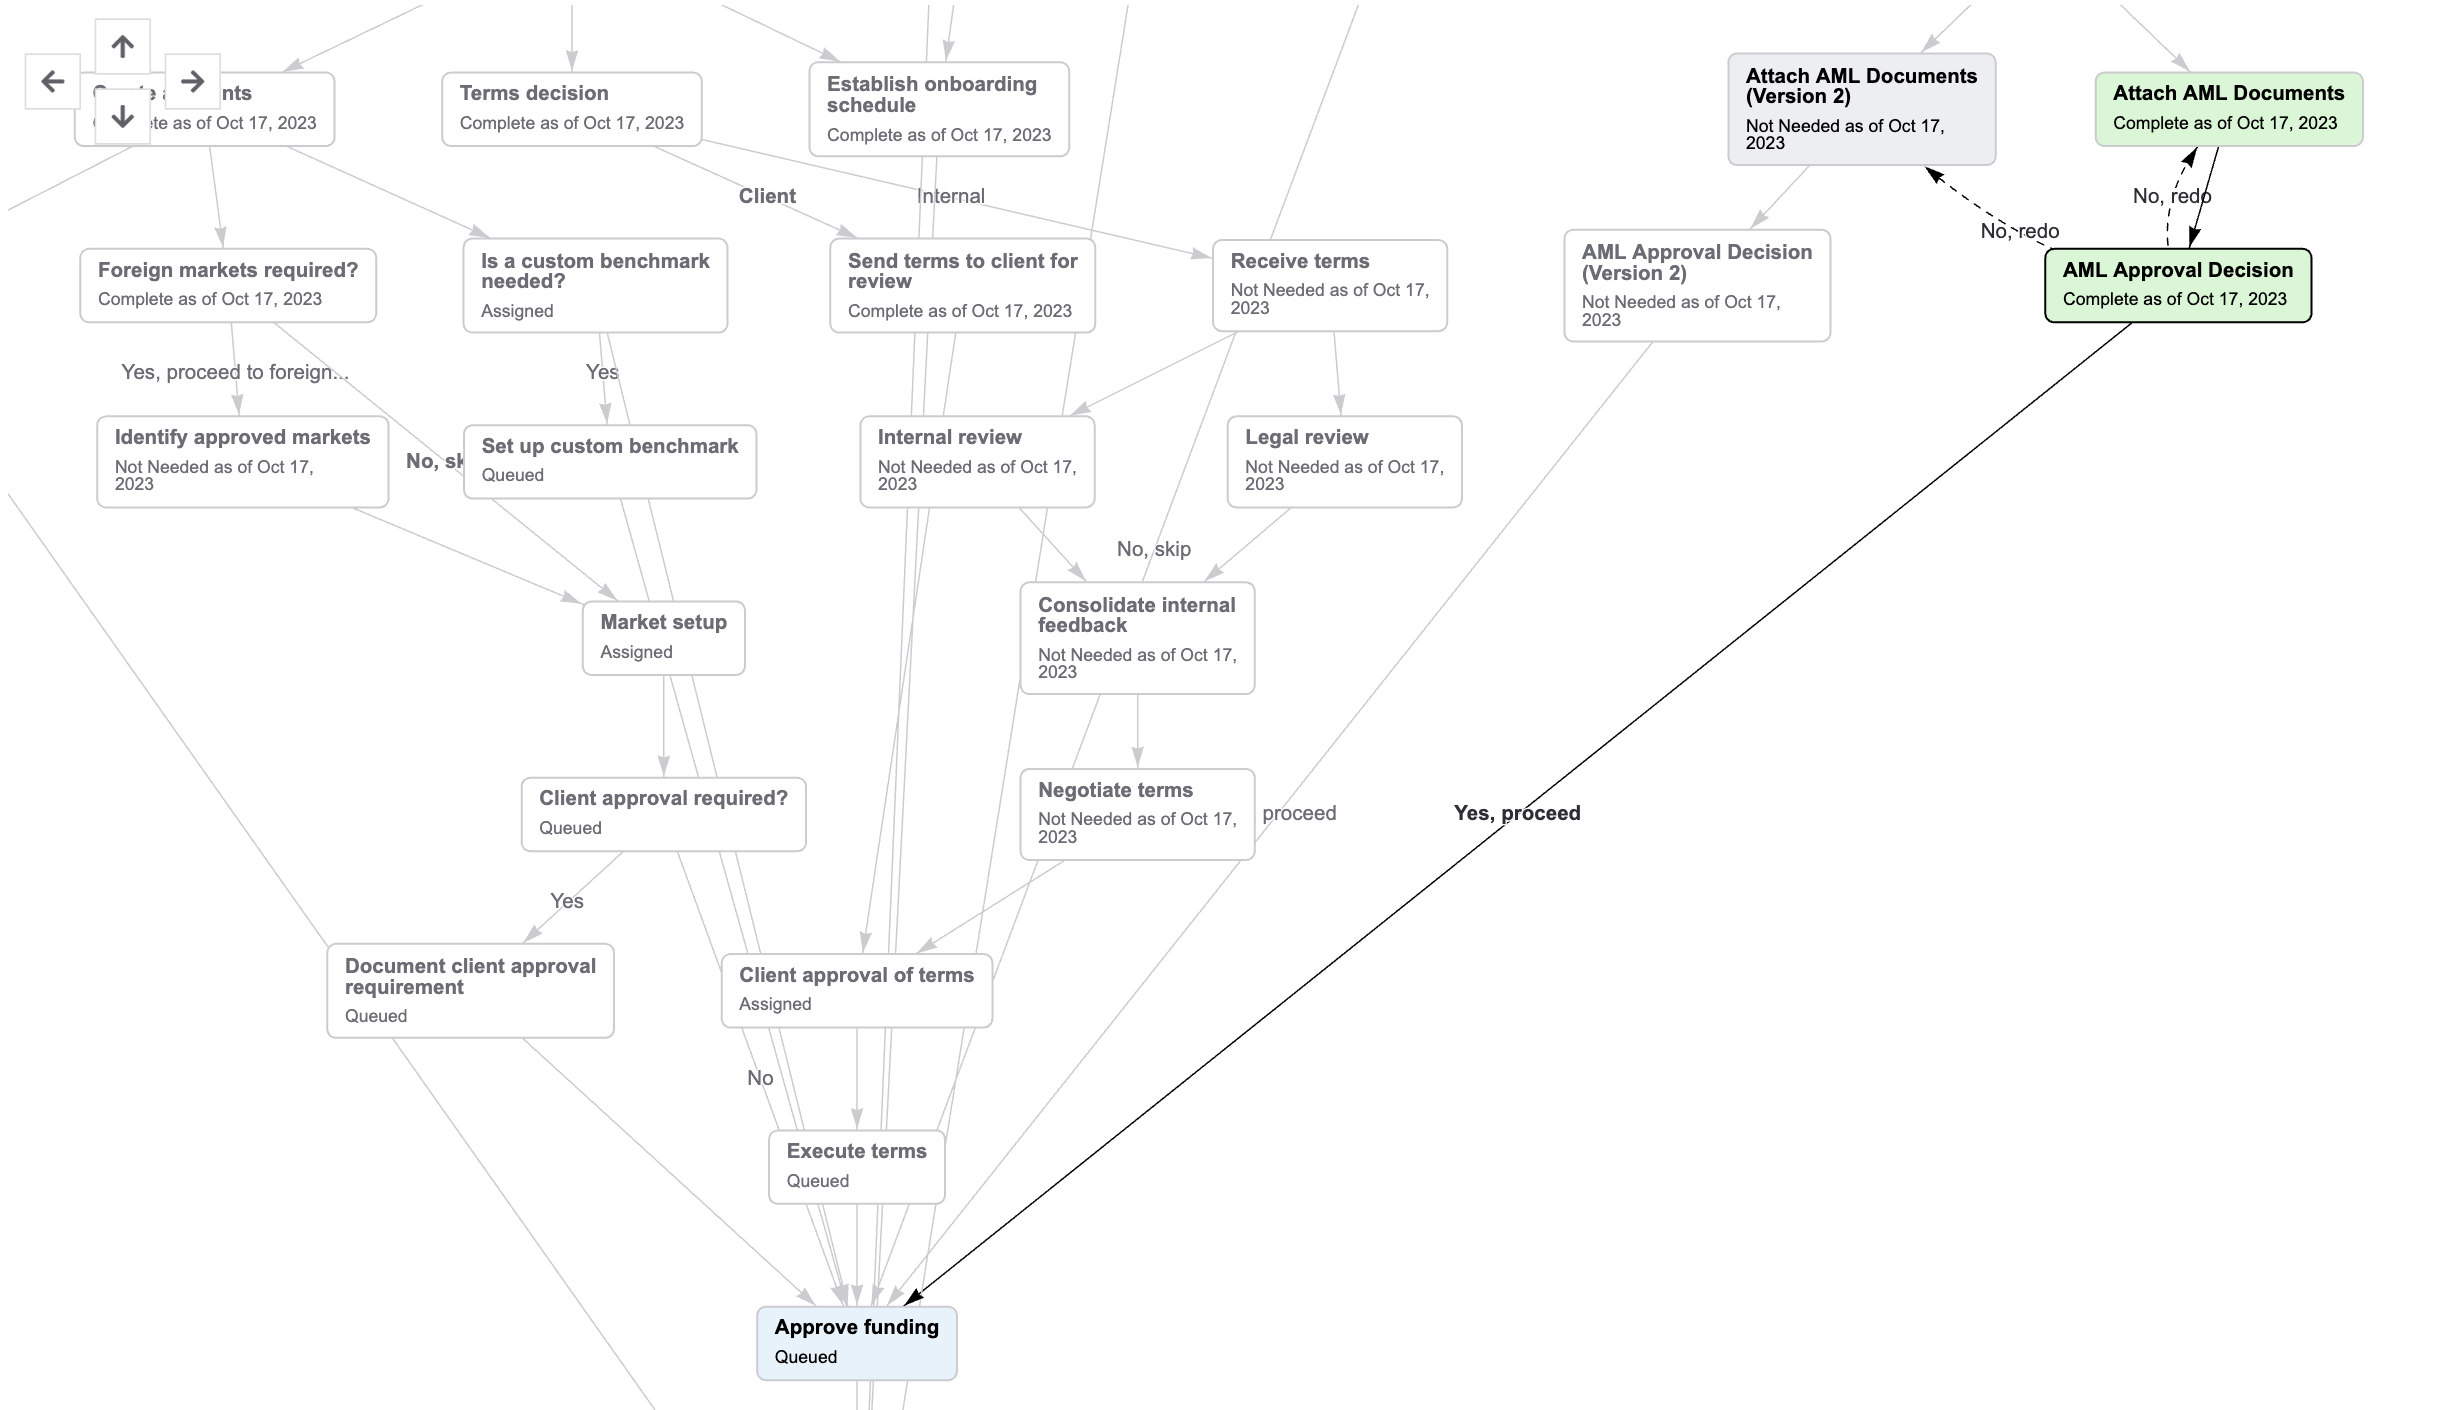
Each task in the Dependency View includes the task name and status. The task background color changes depending on the status of the task. Complete and Not Needed tasks also include the date on which the task was completed or marked not needed.
By default, the background colors correspond to the following statuses:
| Task Color | Status |
|---|---|
| Green | Complete |
| Yellow | Assigned |
| Blue | Queued |
| Grey | Not Needed |
Understanding task relationshipsCopy link to clipboard
Arrows connect tasks with relationships to each other. This feature lets you easily understand which tasks will be assigned upon completion of a particular task. You will also be able to see incomplete task precedents, preventing a specific task from being assigned. To quickly understand the status of a task's preceding tasks, read about the Preceding Tasks section of task summary views.
The style of the arrow connecting tasks indicates the relationship type.
- A straight solid arrow connecting two tasks indicates a standard precedent-dependent task relationship.
- A curved dashed arrow pointing from a task to an earlier task indicates a precedent-dependent task relationship where a conditional task is configured with an option to have a previously completed task completed again.
Each arrow from a conditional task displays the response option text.

To quickly see a task's relationships to other tasks in the workflow and their statuses, click on a task in the Dependency view.
Note: When a task is selected, the view will automatically zoom to fit the complete workflow.
Selected tasks are highlighted with a black border with black relationship arrows. All other tasks in the workflow that do not have a direct relationship to the selected task will have a white background and secondary text color.
To reset the task highlighting and coloring, click the selected task again, or click the button in the upper right with revolving arrows.
New Task Capabilities and Task Summary ViewsCopy link to clipboard
The latest version of Connected Servicing introduces new task capabilities that are made possible by task summary views. Prior to this release, limited task details were visible from various task grids, and selecting links on task names presented the task's completion interface to the user. Now, links on task names throughout Connected Servicing will take you to the task's summary view, where you can see all the details and actions relevant to a task.

Completion informationCopy link to clipboard
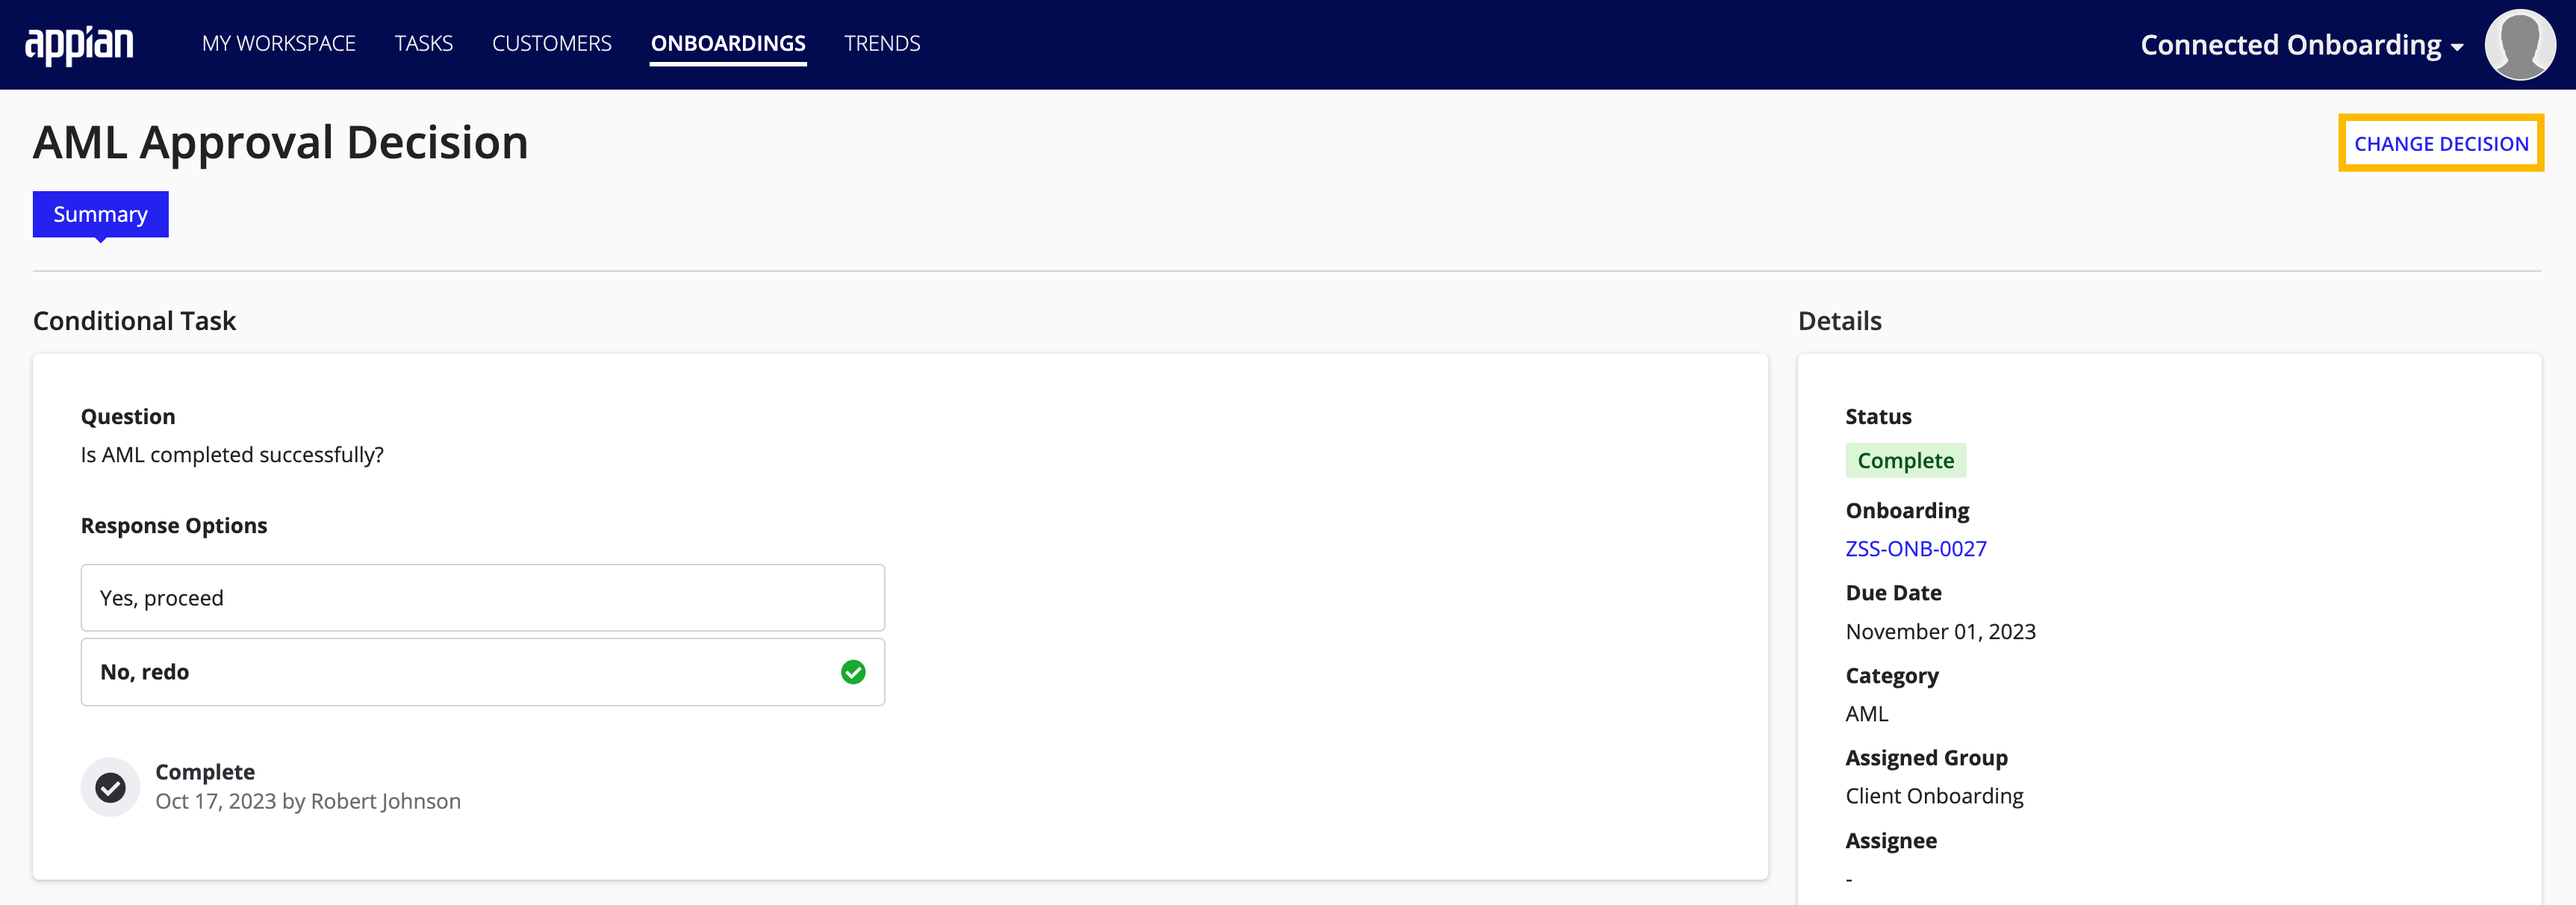
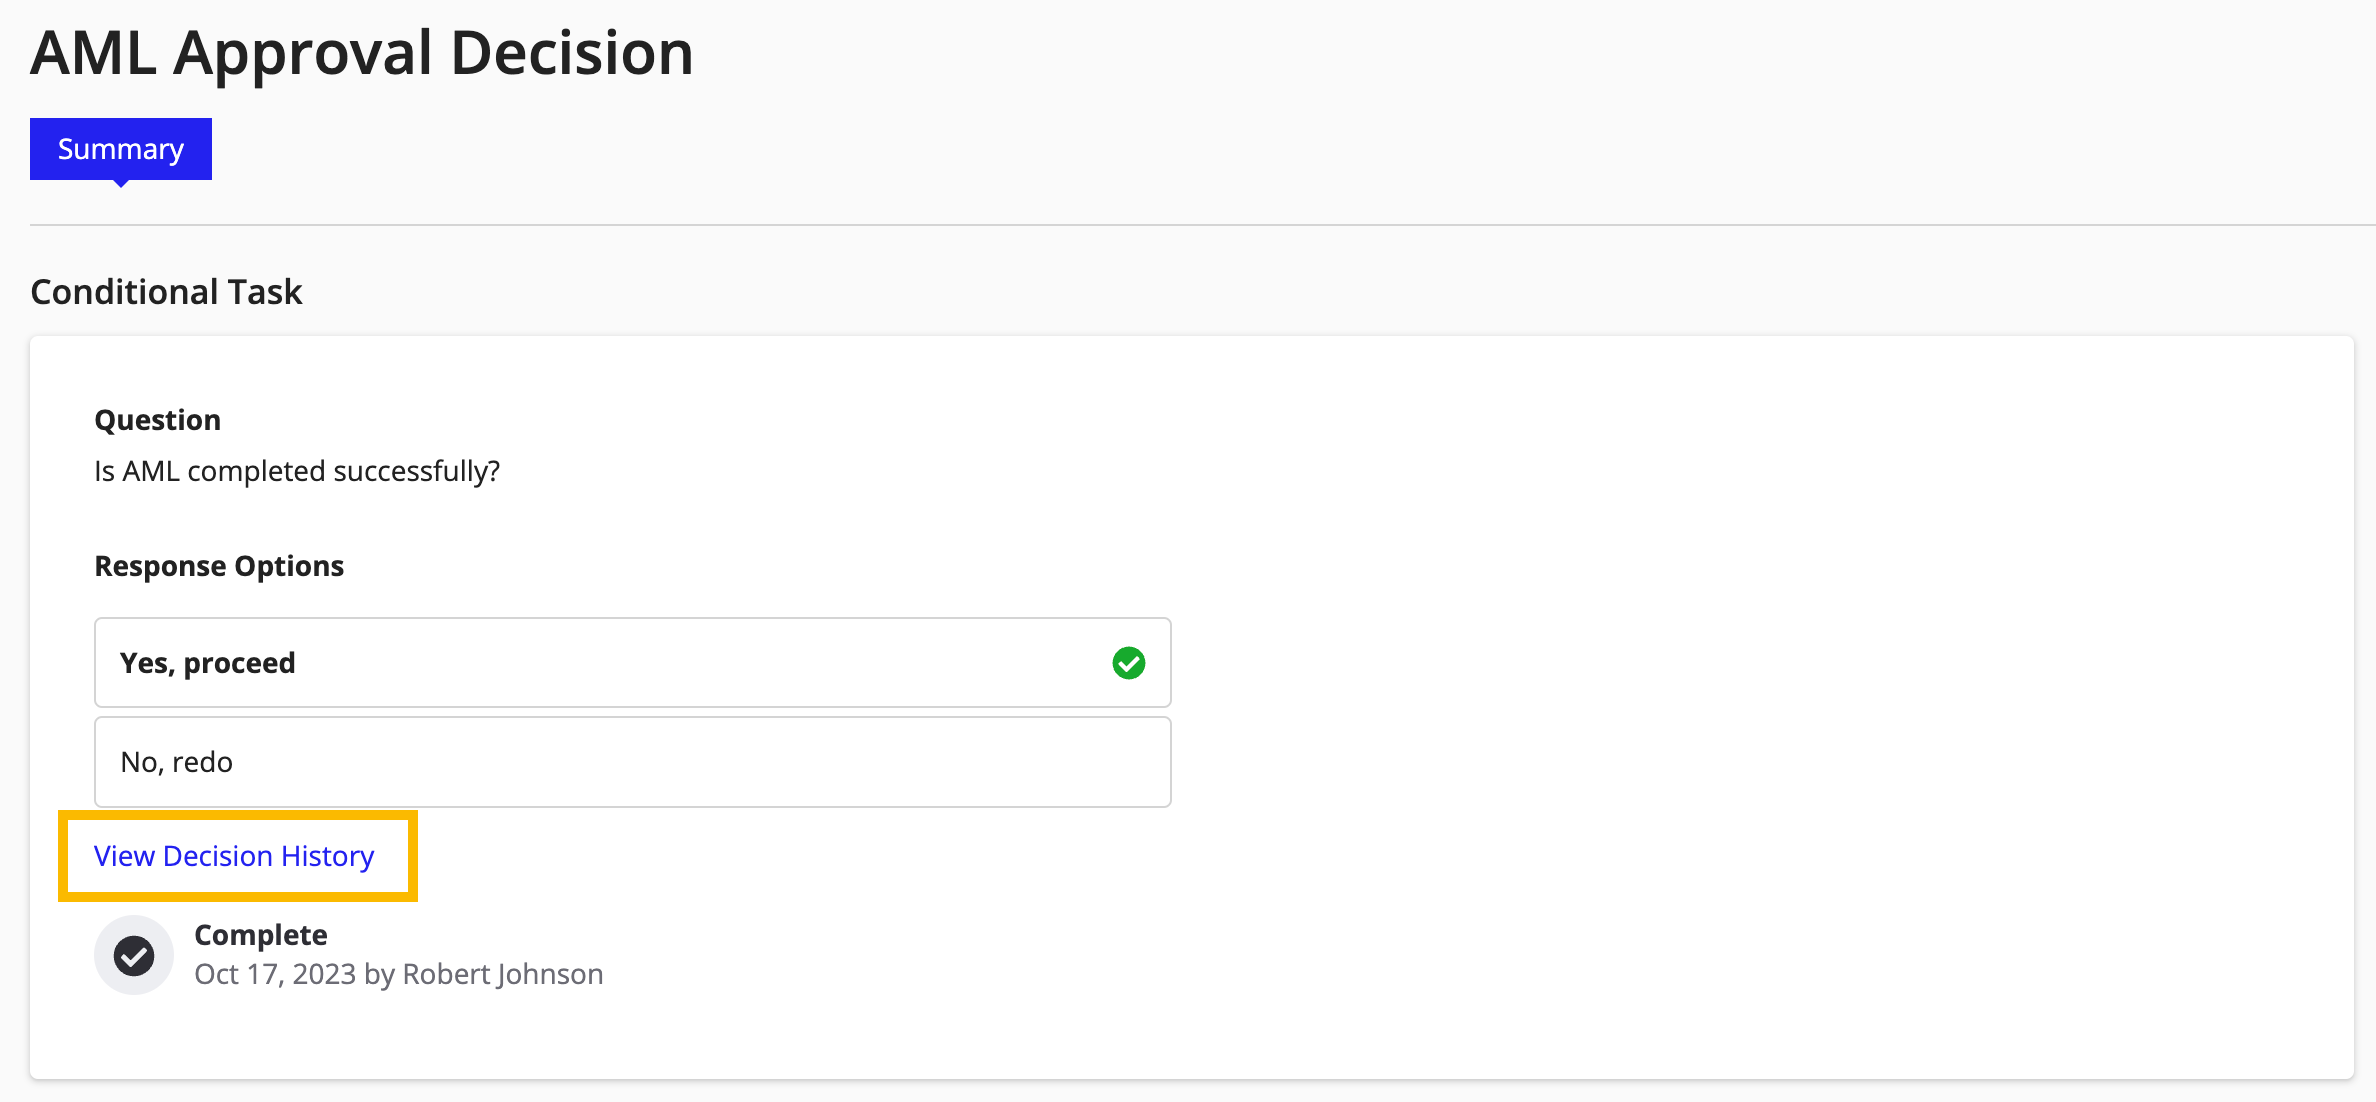
The first section of the task summary view displays meaningful information about how the task was completed, when, and by whom. The section header shows the task type.
Different task types will display different information in this section. For Attach Documents tasks, you will see previews for all linked or attached documents. Conditional tasks will show the task question, all response options, and the selected response in bold with a green check icon.

DetailsCopy link to clipboard
In the Details section of the task summary view, you can see key attributes and actions related to the task, including its status, service request name, due date, assigned group, assignee, and description.
In this section, you can change the tasks's due date or reassign the task.
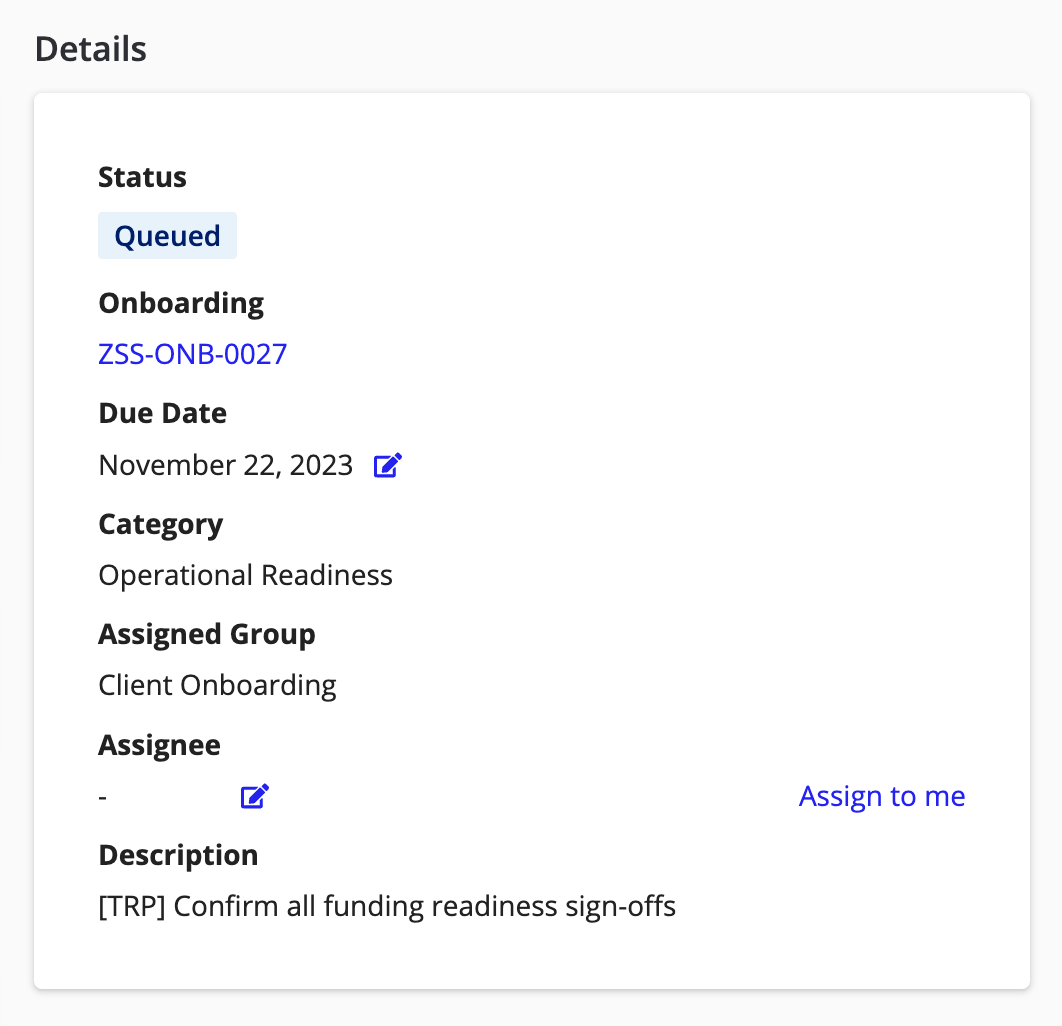
Note: If the task status is Complete or Not Needed, you won't have the ability to change the due date or reassign the task.
Supporting DocumentsCopy link to clipboard
The Supporting Documents section allows users to upload or link to existing documents relevant to the task.
For example, you may have a service request process with a task to review the AML process, and multiple documents and preceding tasks must be reviewed for completion before proceeding. Suppose a document is deemed insufficient (for example, the provided identification is only partially visible). In that case, the user completing the task can link to the existing document as evidence of their decision.
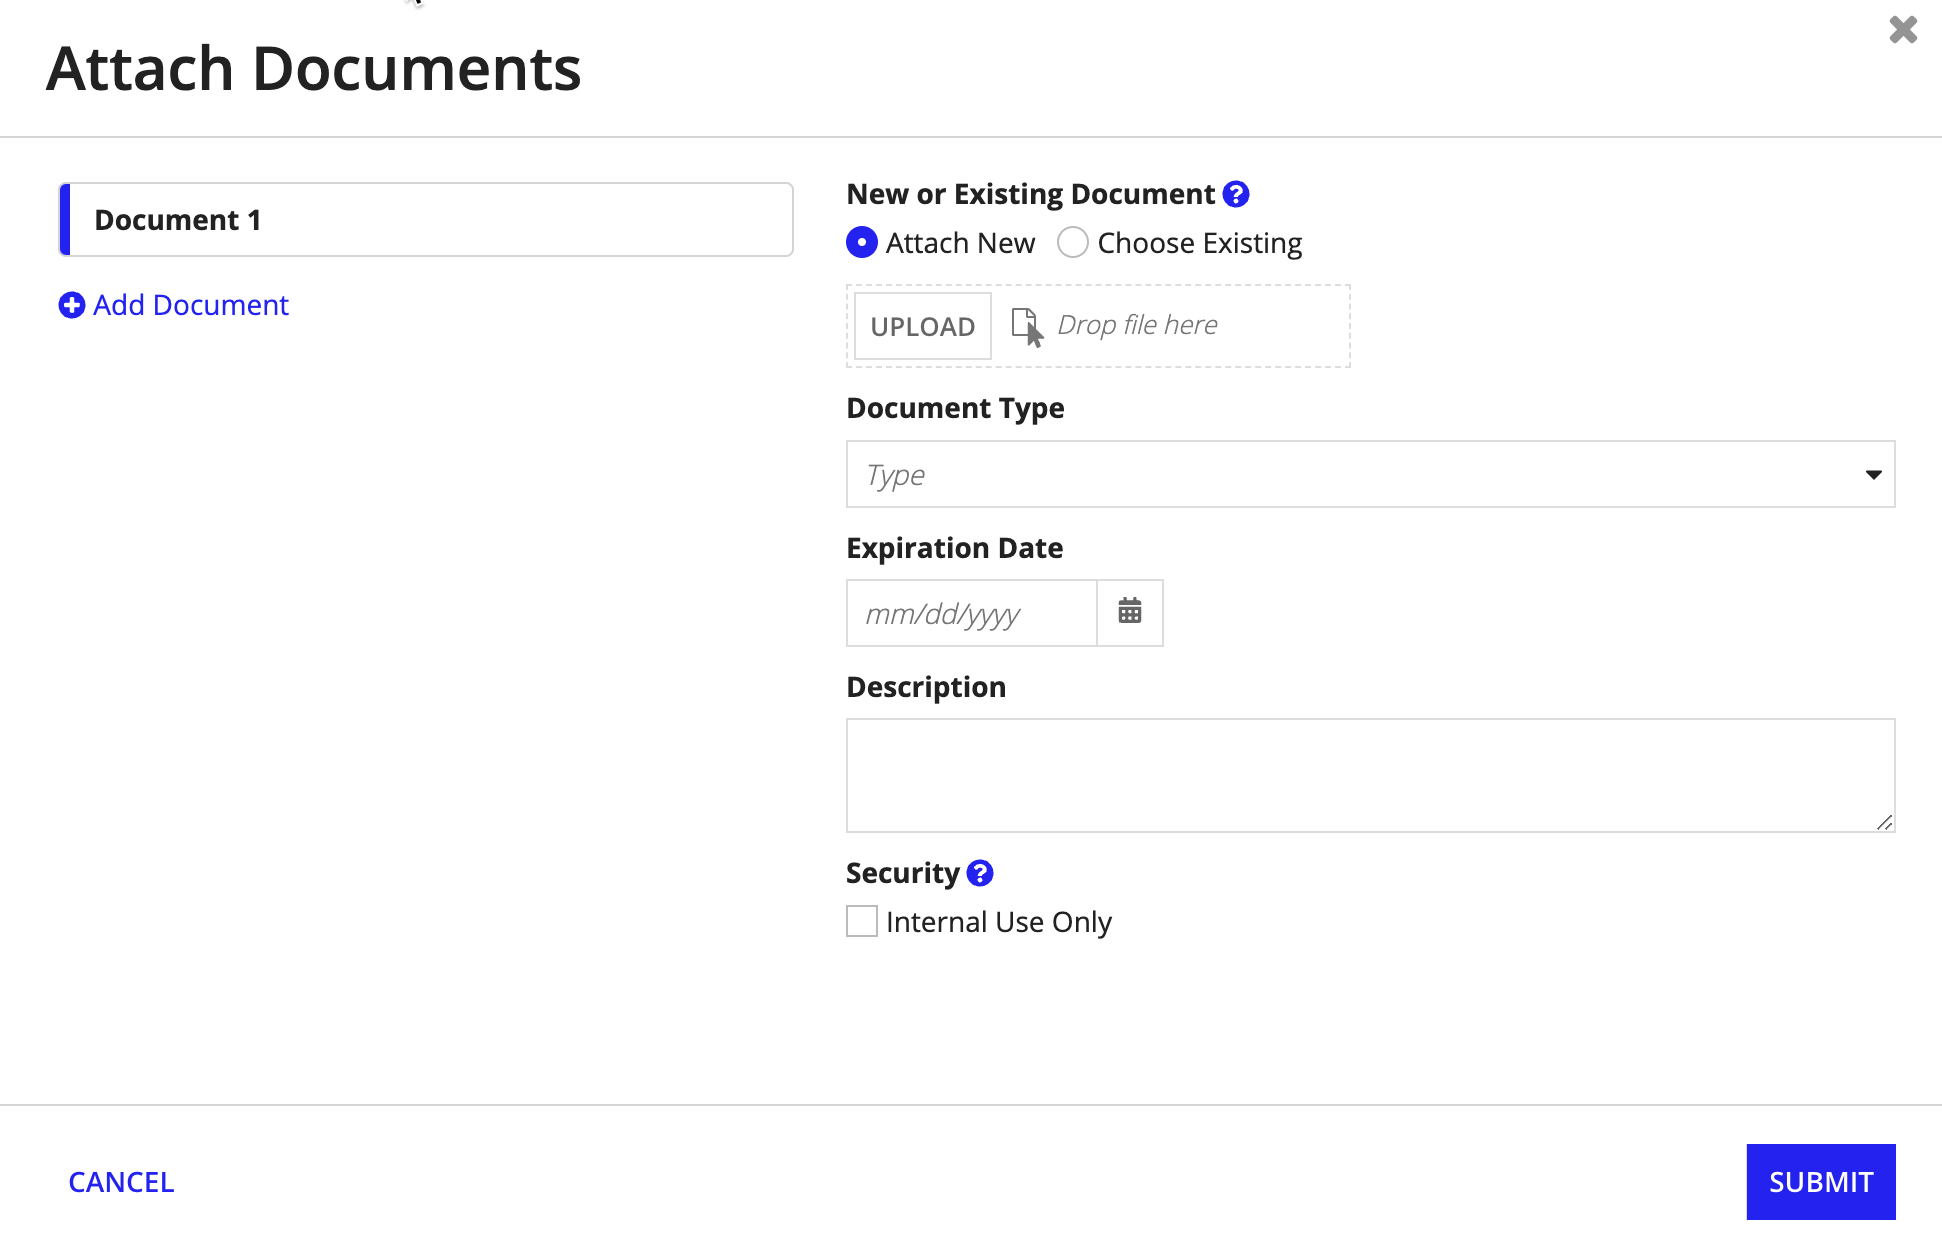
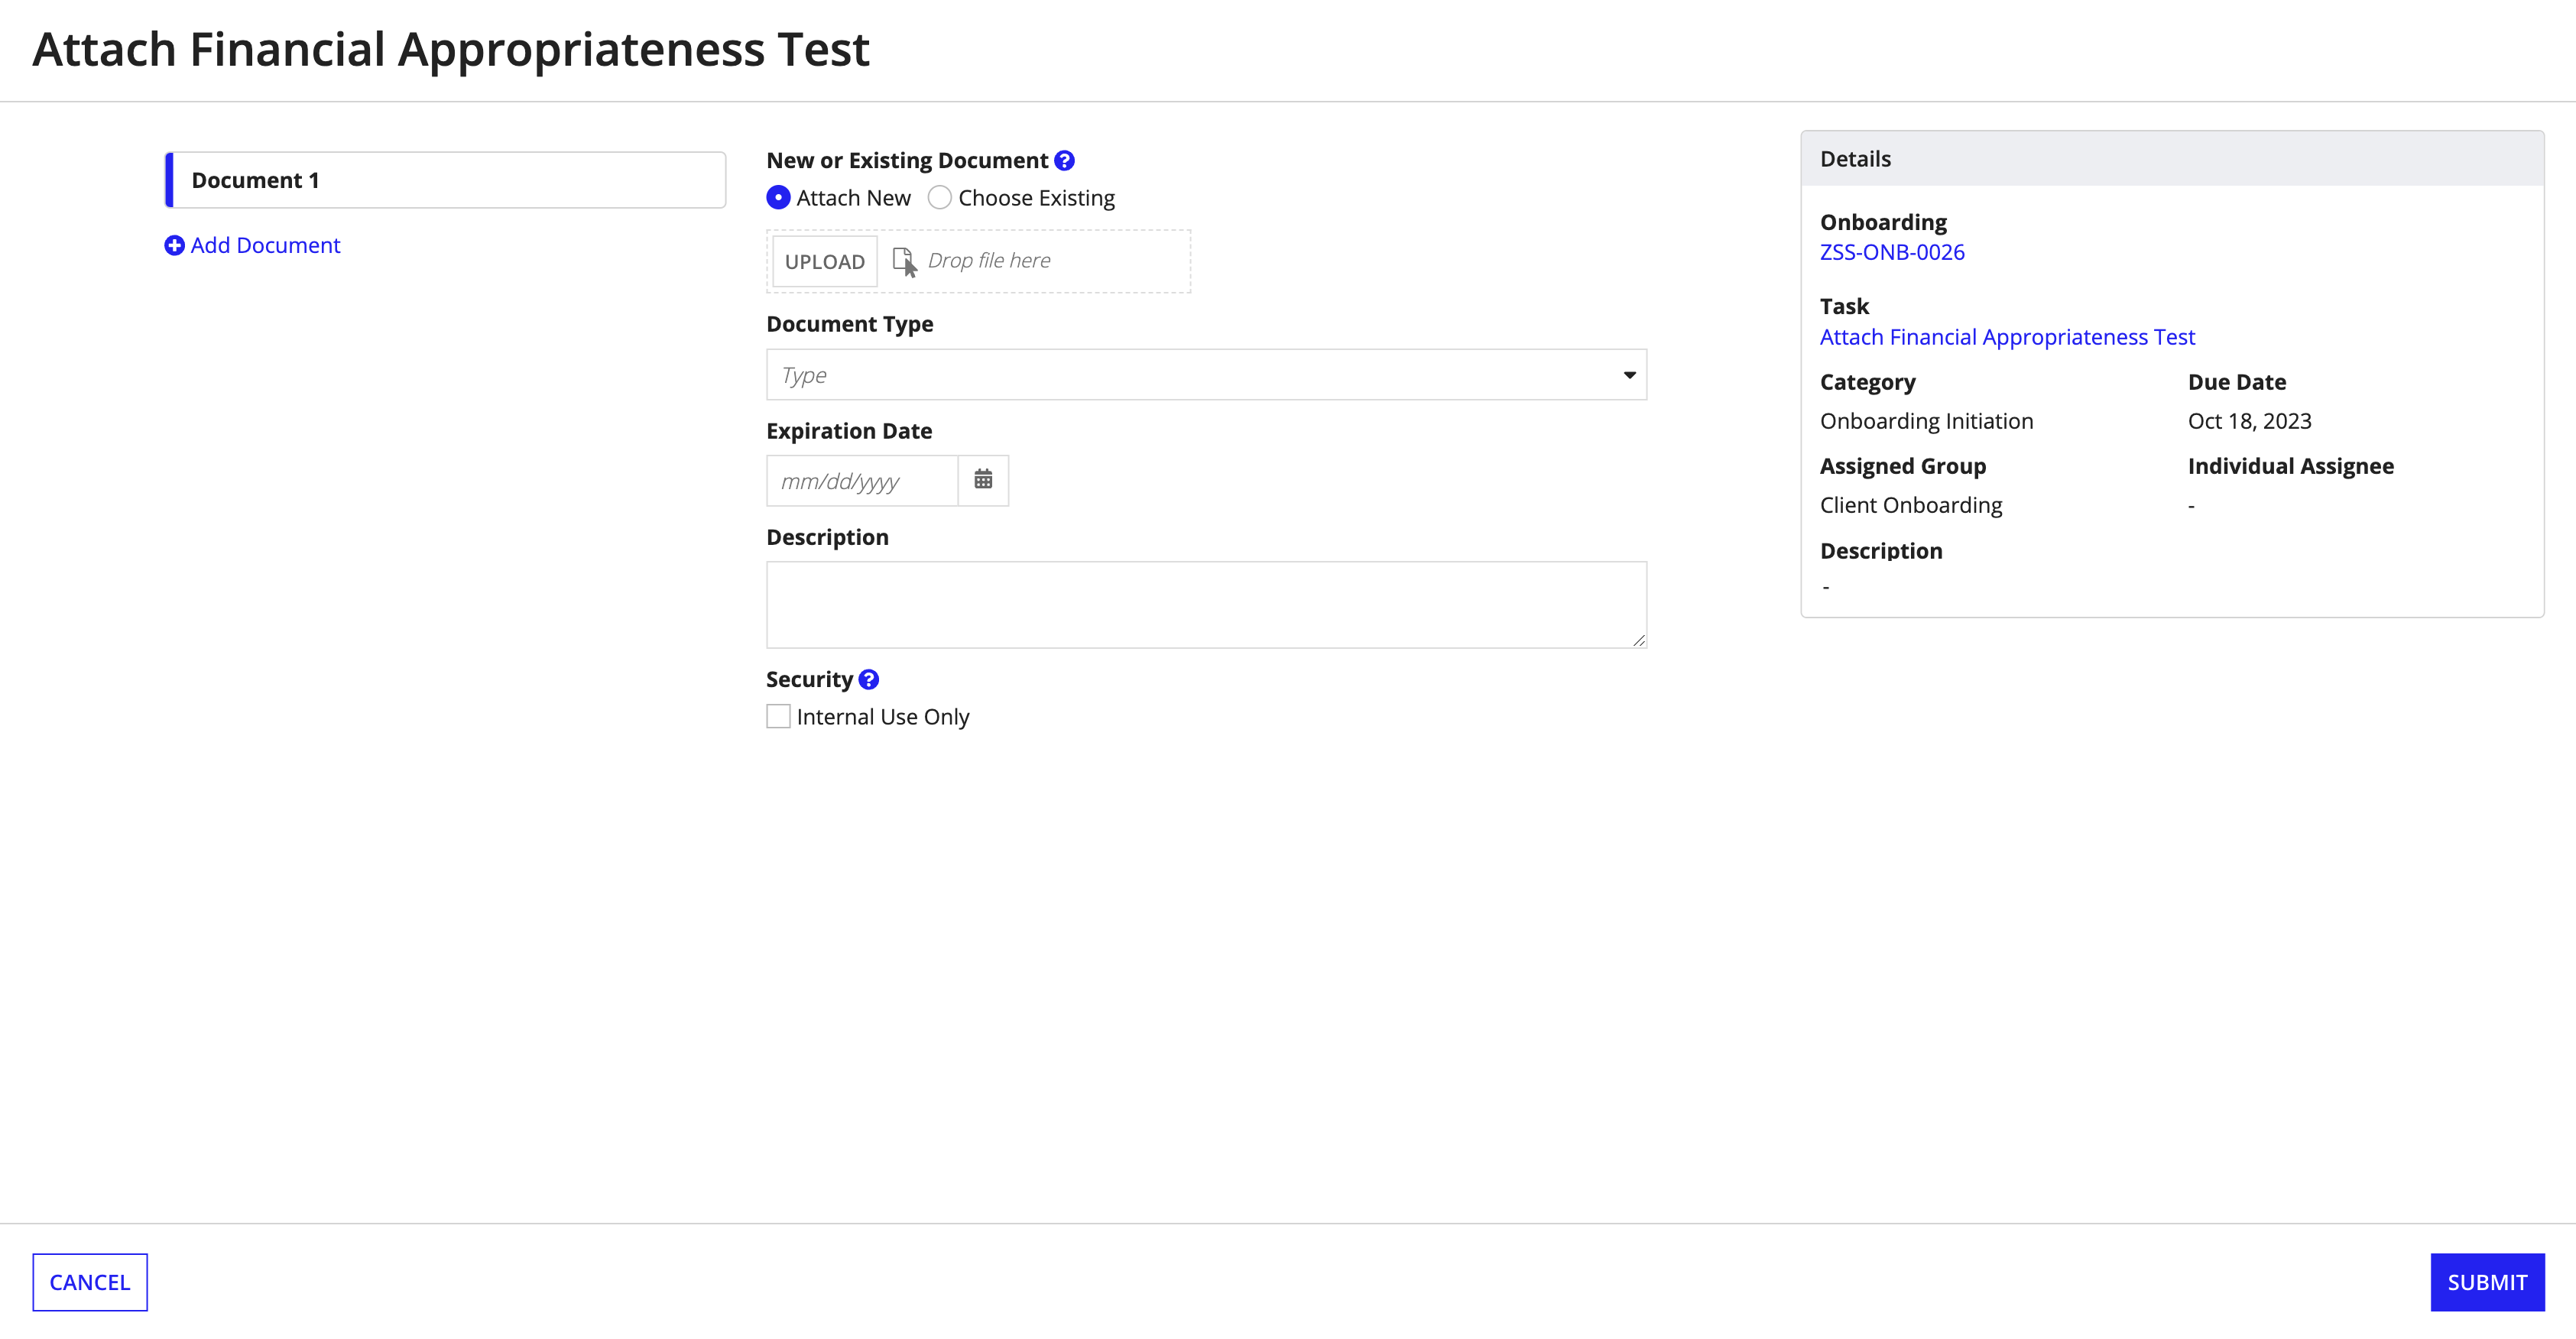
To add supporting documents to a task, click Add Documents.

To attach a new document, click Attach New, then click UPLOAD to select the document. You can also set the document type, expiration date, and description.
By default, uploaded documents will be visible to users with access to the service request and the customer. To secure the document so it's only visible to internal users with access to the service request, select Internal Use Only.
To link an existing document in the solution, click Choose Existing, then select the document you want to link. You can't edit the document attributes when you select an existing document.
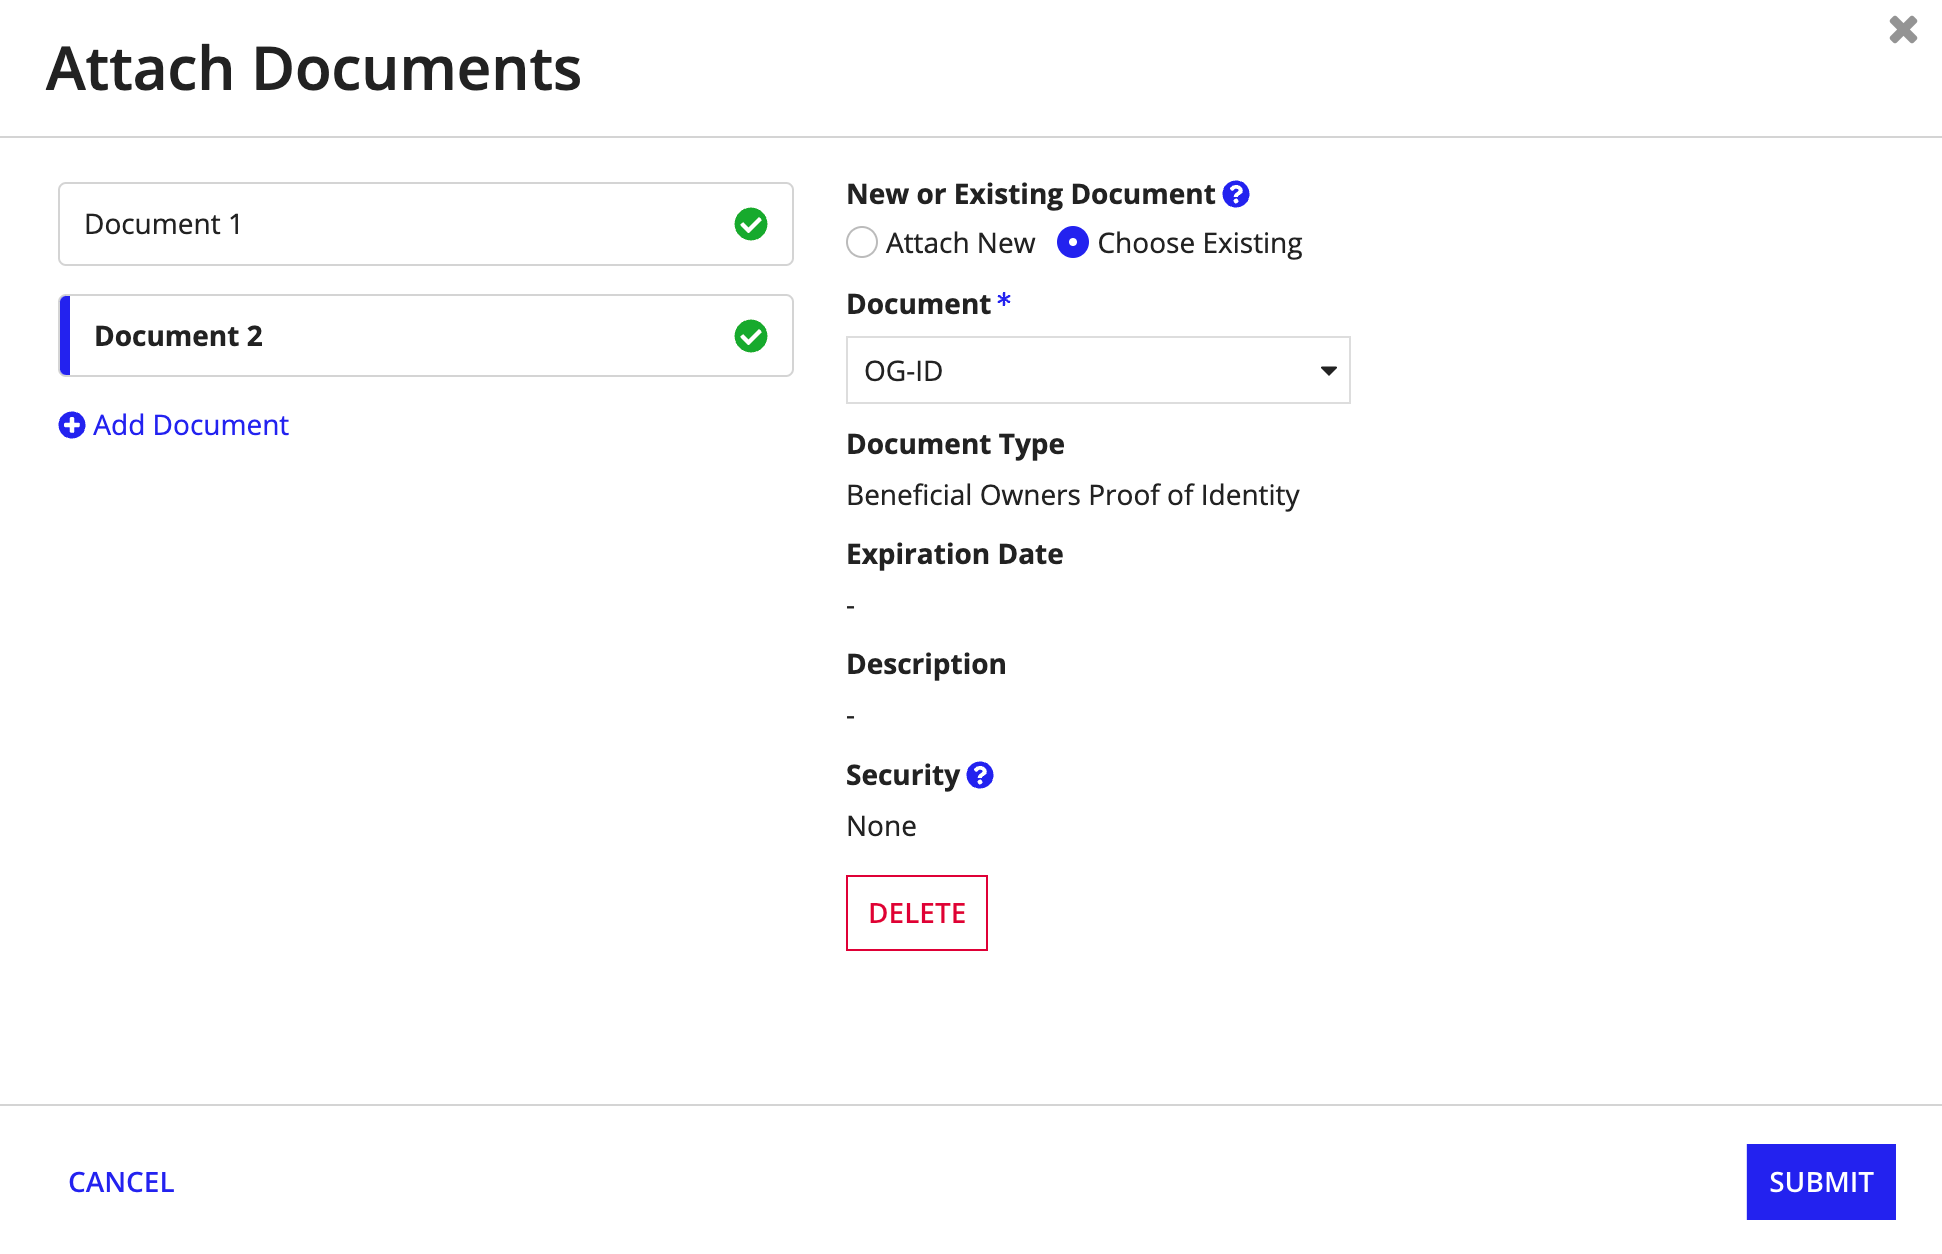
Click Add Document to upload or link to additional documents. If you add multiple documents simultaneously, click DELETE to remove any unwanted documents before submitting the form.
Note: The supporting documents section is not available for Attach Documents tasks.
CommentsCopy link to clipboard
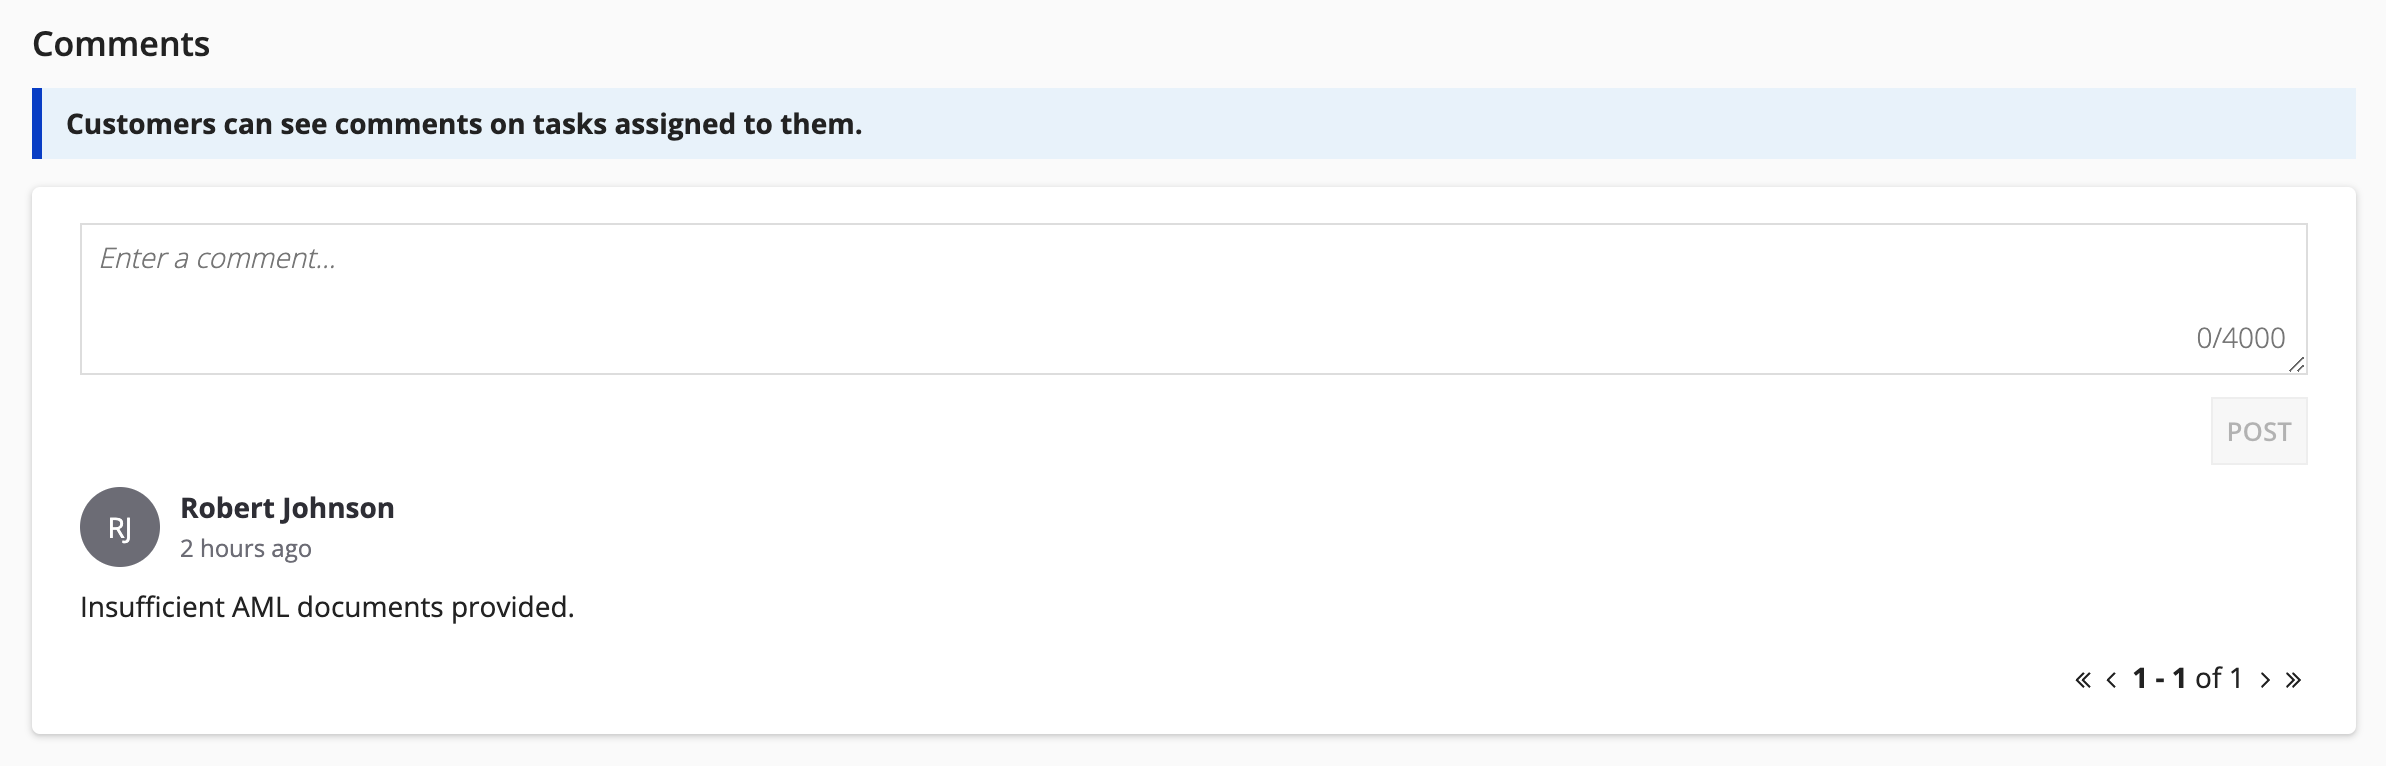
The Comments section allows all users with access to the service request to leave notes or discuss a task. As a result, task comments have many valuable applications.
For example, on a task intended to review satisfactory completion of other preceding tasks, a user may leave a comment explaining their review decision so other users understand the decision reasoning when they reference the task.
In other cases, a task may be used to prompt and track completion of a process in a separate system. The task assignee may choose to leave a comment describing their progress for themselves and other stakeholders with access to the service request. This way, other users with access to the service request can quickly resume progress on its tasks as needed, because they will know exactly where their colleague left off.
To save a comment to a task, write a comment in the comment field and click POST.
Note: Once a comment is posted, it cannot be deleted.
Preceding TasksCopy link to clipboard
The Preceding Tasks section provides visibility and access to the tasks directly preceding the currently viewed task. This access helps users understand the relationships between tasks in a service request and ensure successful completion of preceding tasks.
For each preceding task, users can quickly view the task name, status, and type.
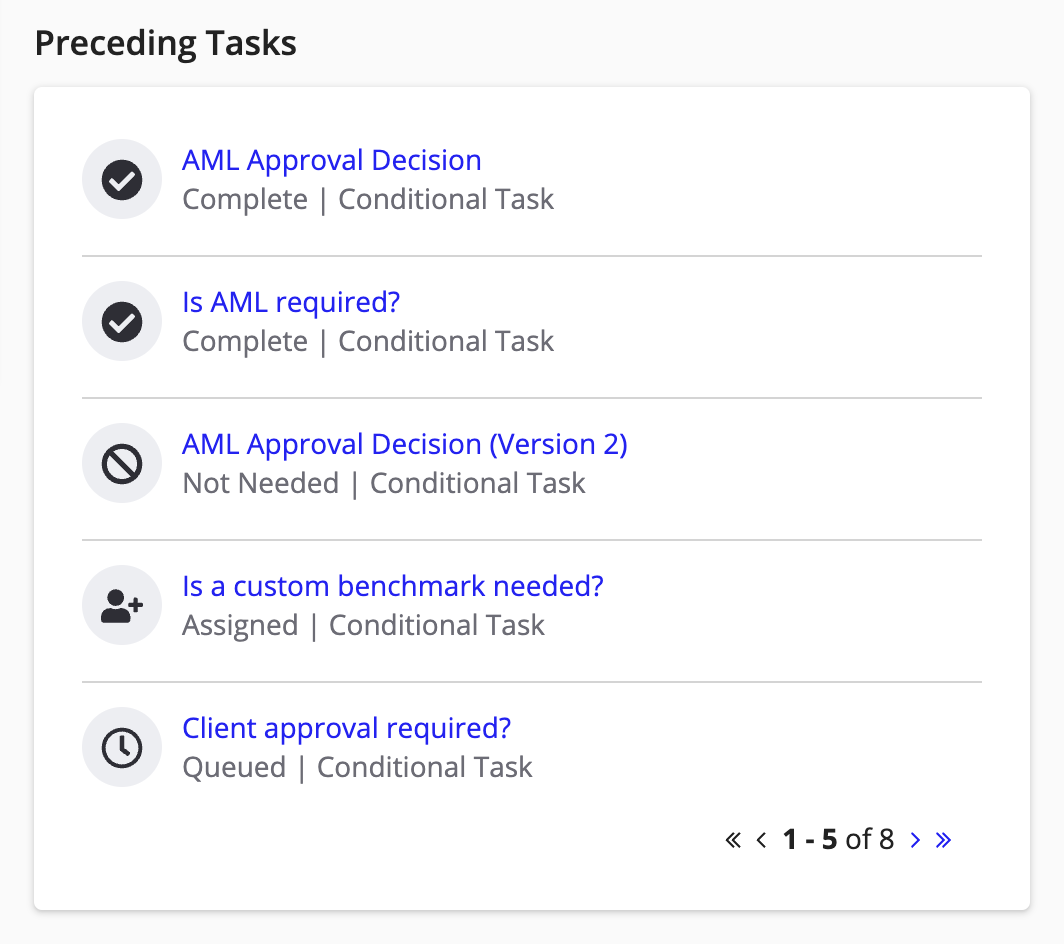
Users can click the task name to go to the preceding task's summary view for more information. This section can be particularly useful on conditional tasks used to review other tasks, or any task that has multiple precedents.
Change Decision Action and Decision History on Conditional TasksCopy link to clipboard
Conditional tasks enable users to configure service request workflows with decision points that designate tasks as required or not needed. However, sometimes these decisions change and the service request process needs to adjust accordingly. This release introduces the change decision action for conditional tasks to support this need.
To change a decision for a completed conditional task, go to the task's summary view and click CHANGE DECISION.
You can also change a decision from the service request summary.
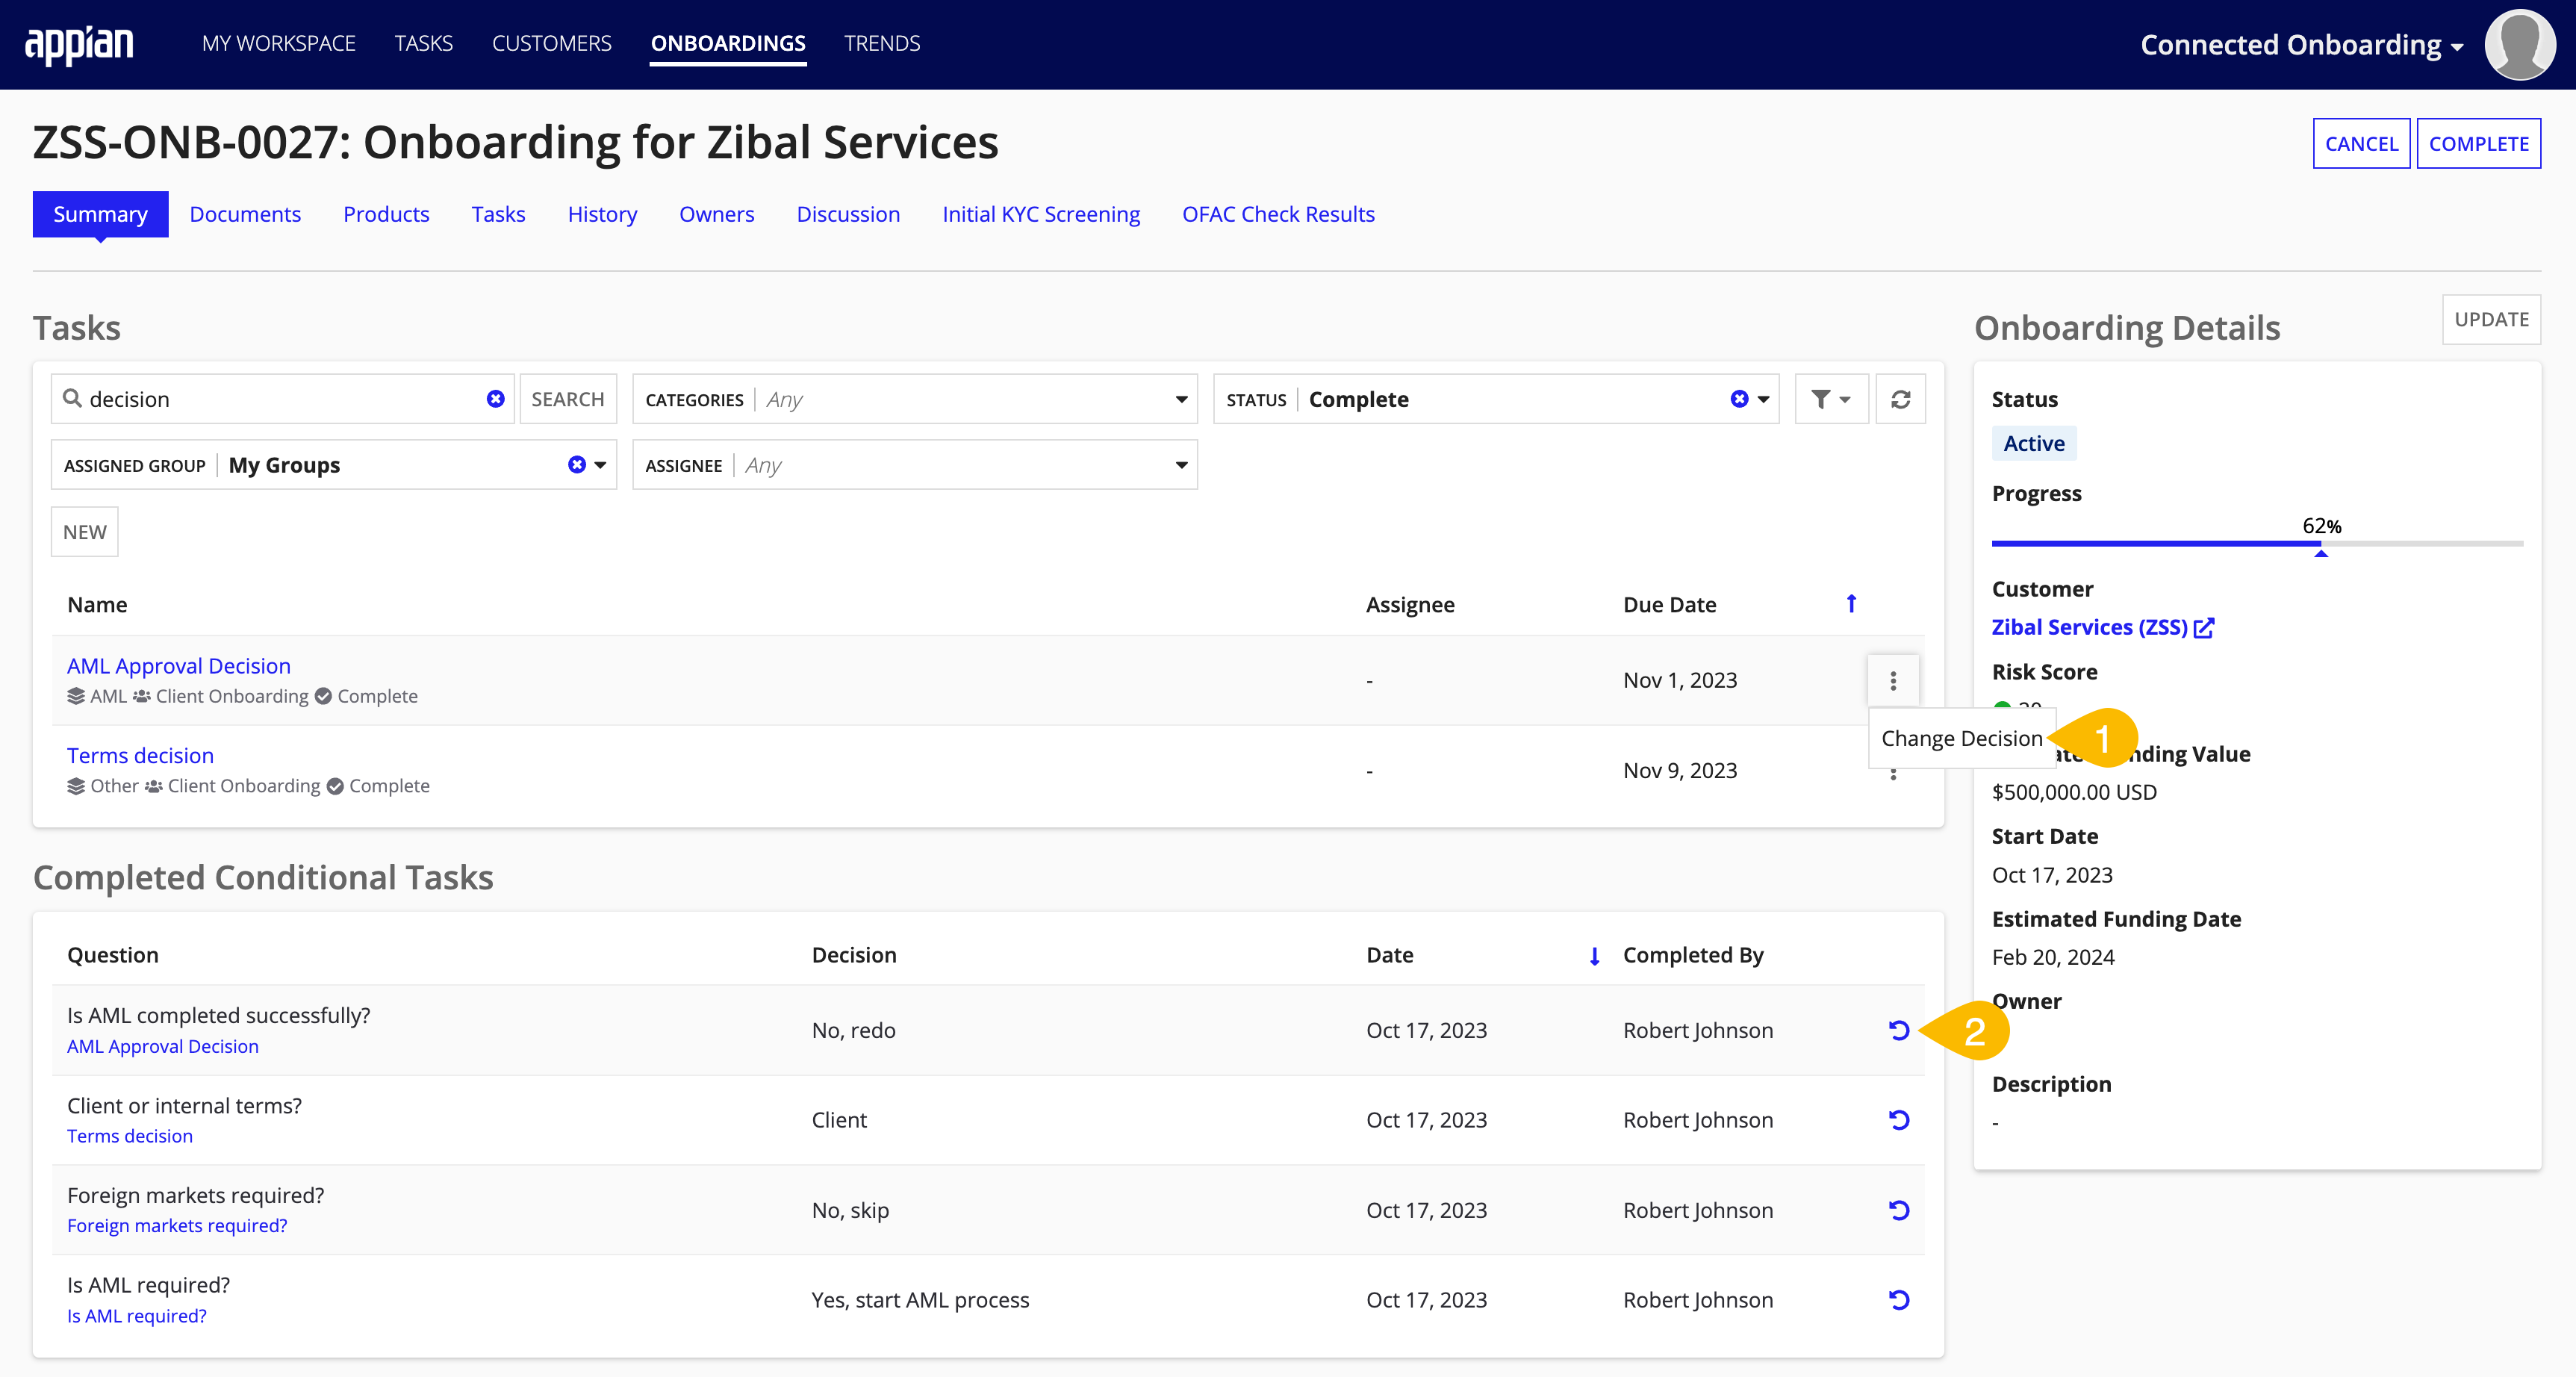
- Click CHANGE DECISION from the menu icon in the Tasks grid for a completed conditional task.
- Click the change decision icon in the Completed Conditional Tasks grid.
Note: The change decision action is only available for the latest version of each completed conditional task.
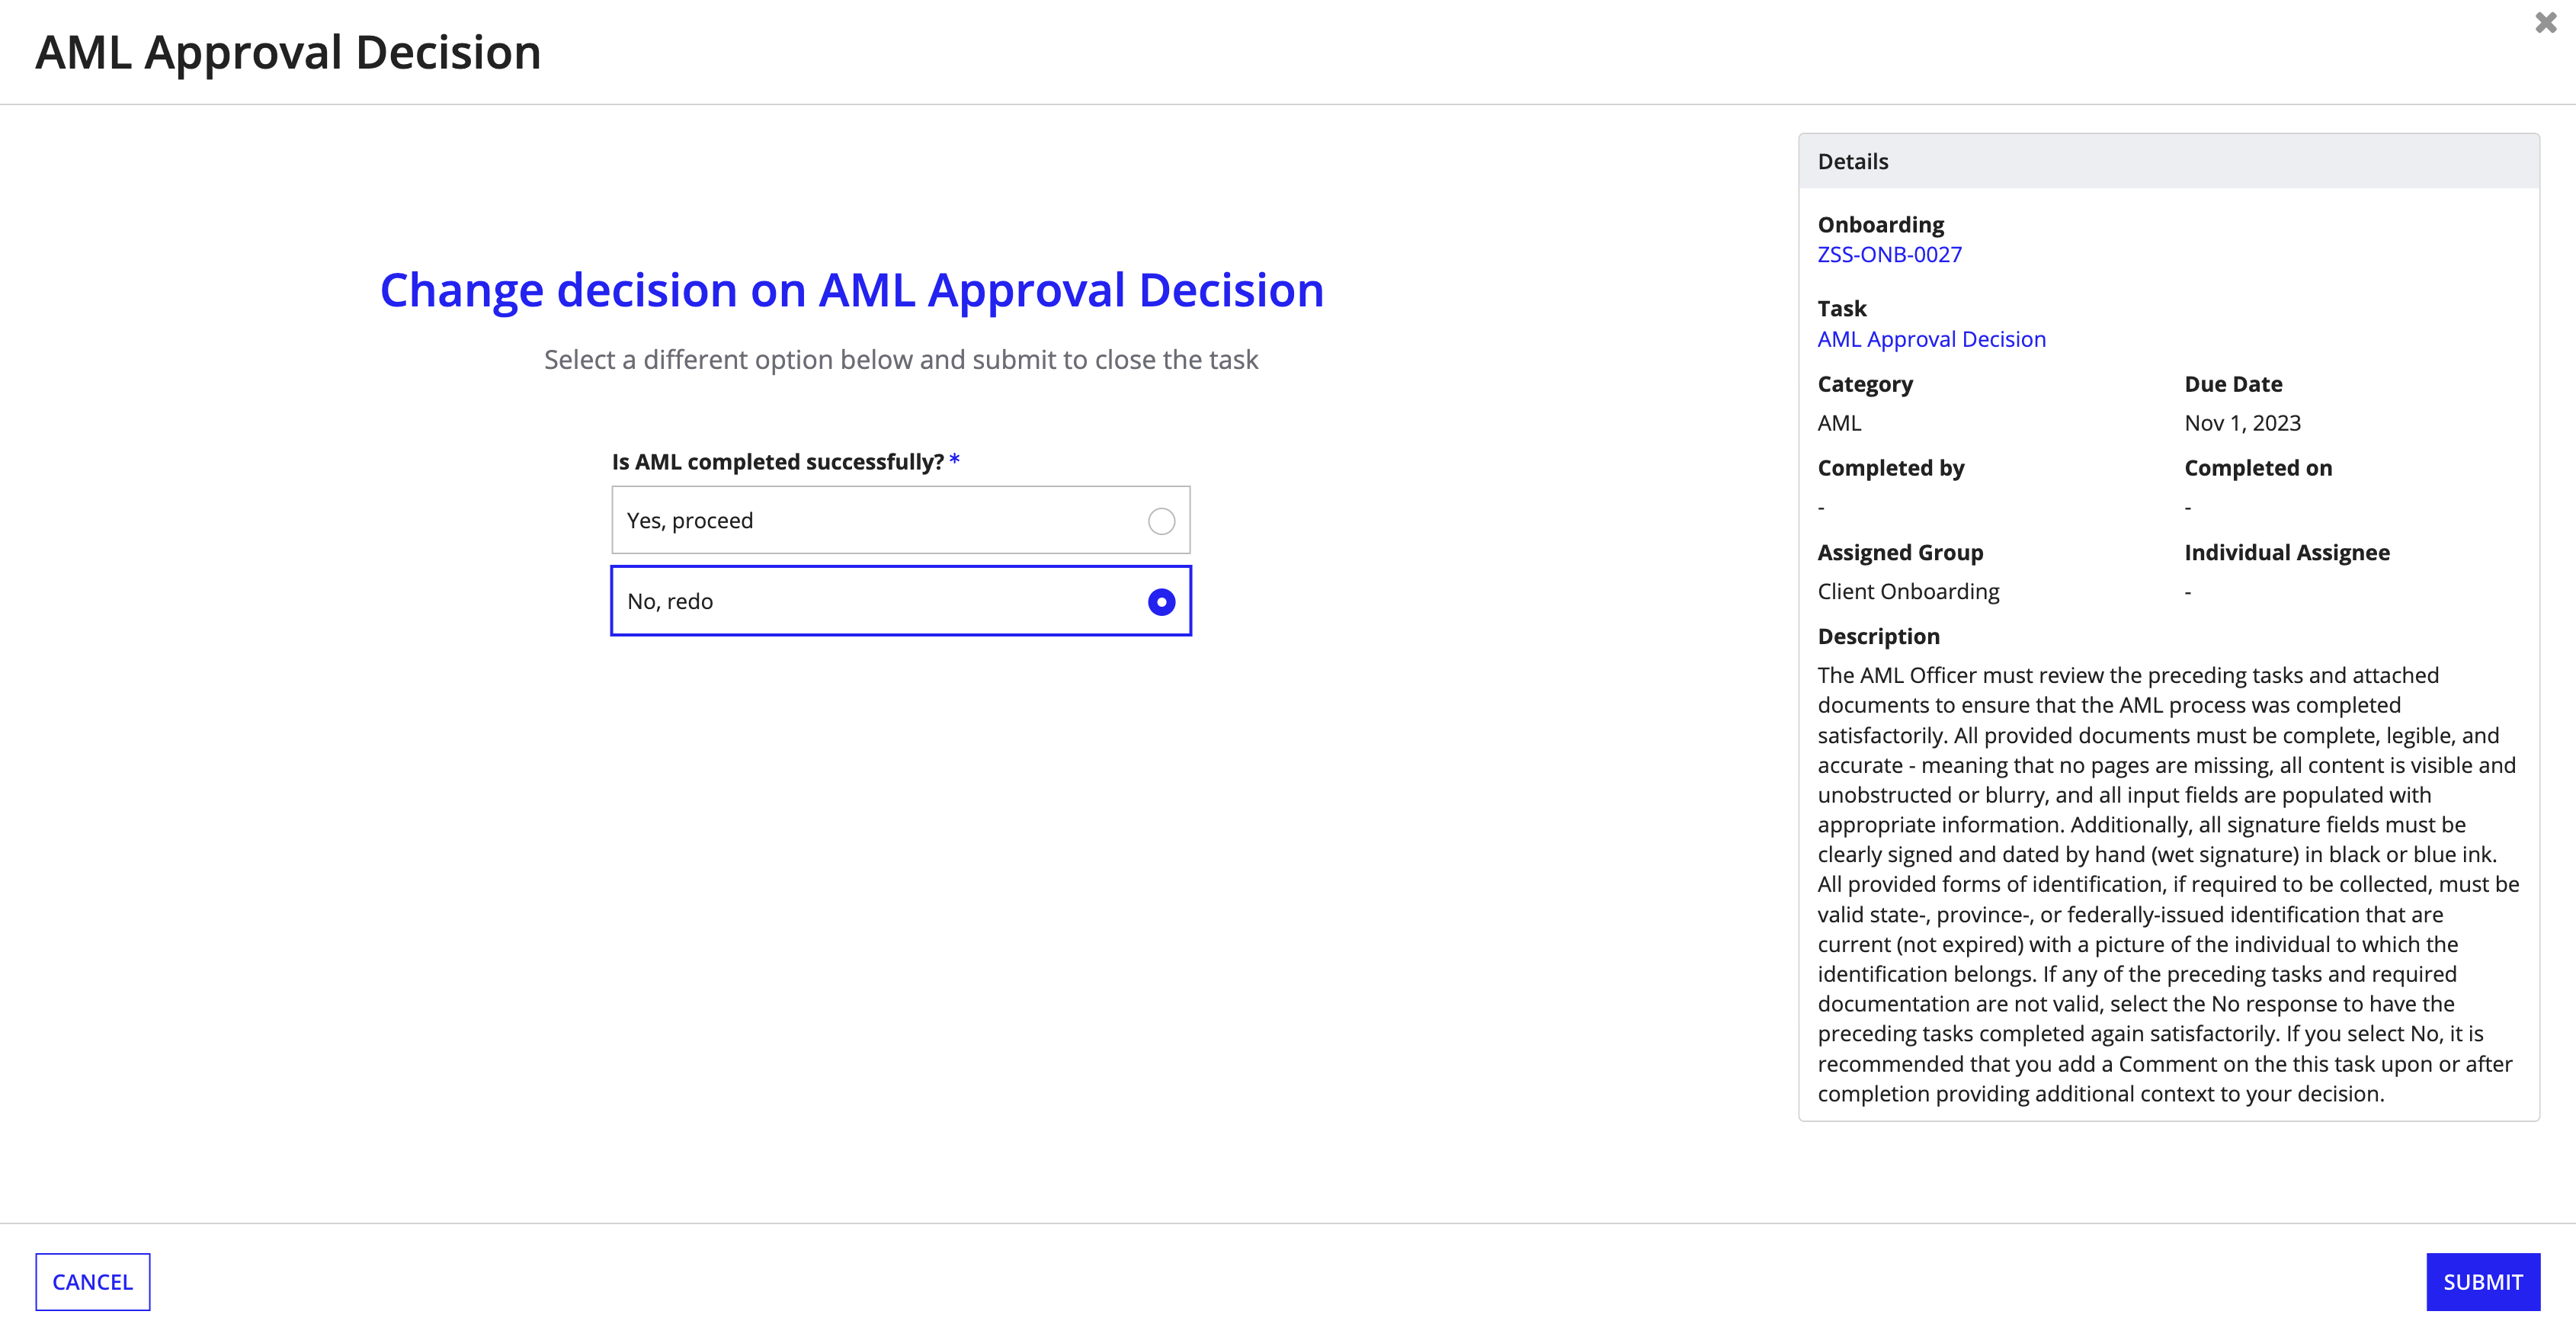
When you select the change decision action, Connected Servicing displays the completion interface for the conditional task with instructions advising you to select a different option and the previously submitted response option preselected. The solution requires you to select a different response option to submit the change.
When you submit a new response, incomplete tasks mapped to the prior decision are automatically updated to the status, Not Needed, while the tasks mapped to the new decision will automatically be updated to the status, Assigned or Queued.
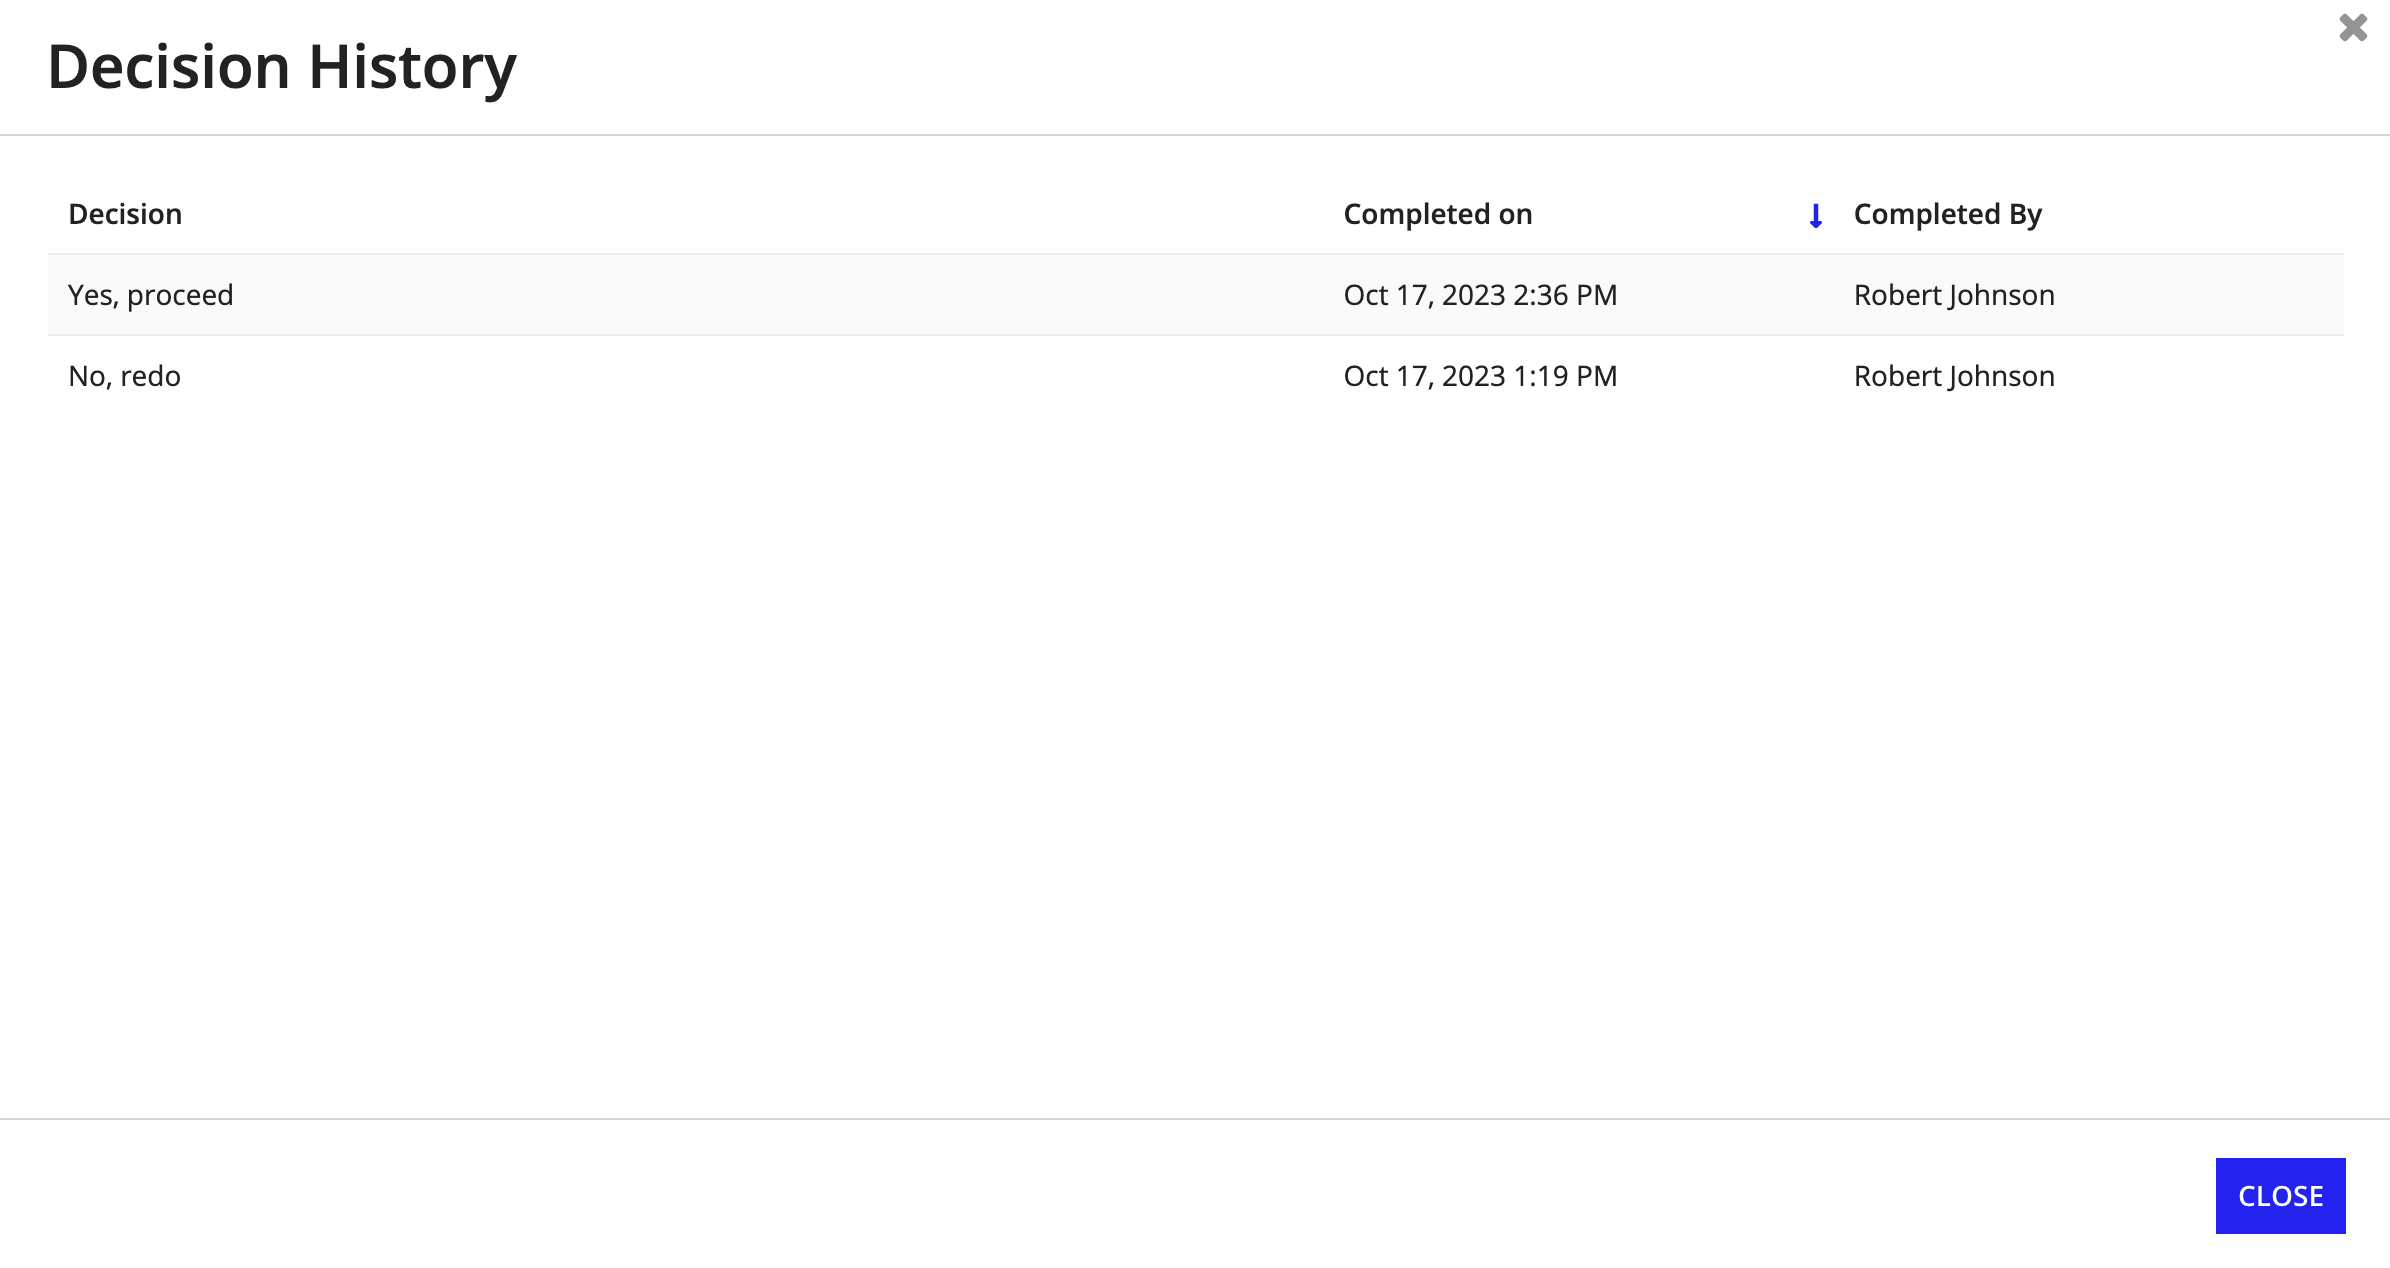
After a decision is changed on a completed conditional task, the task summary view for the conditional task will display a View Decision History link.
After selecting this link, a modal displaying the current and past decisions submitted in order from newest to oldest and who submitted each appears.
Improved Document Collection FlexibilityCopy link to clipboard
Collecting documents is a common part of the servicing process for financial institutions. However, the types and quantities of documents that need to be collected can vary from one service request to another. The latest release introduces an Attach Documents task type, which greatly improves the flexibility of document collection in service request processing.
Collect multiple documents in one taskCopy link to clipboard
Before this release, you needed to know how many of each document had to be collected when creating service requests. With the ability to upload or link to multiple documents in one task, you now have the flexibility to collect documents.
Each Attach Documents task can be used to collect up to 25 documents.
Only collect documents when necessaryCopy link to clipboard
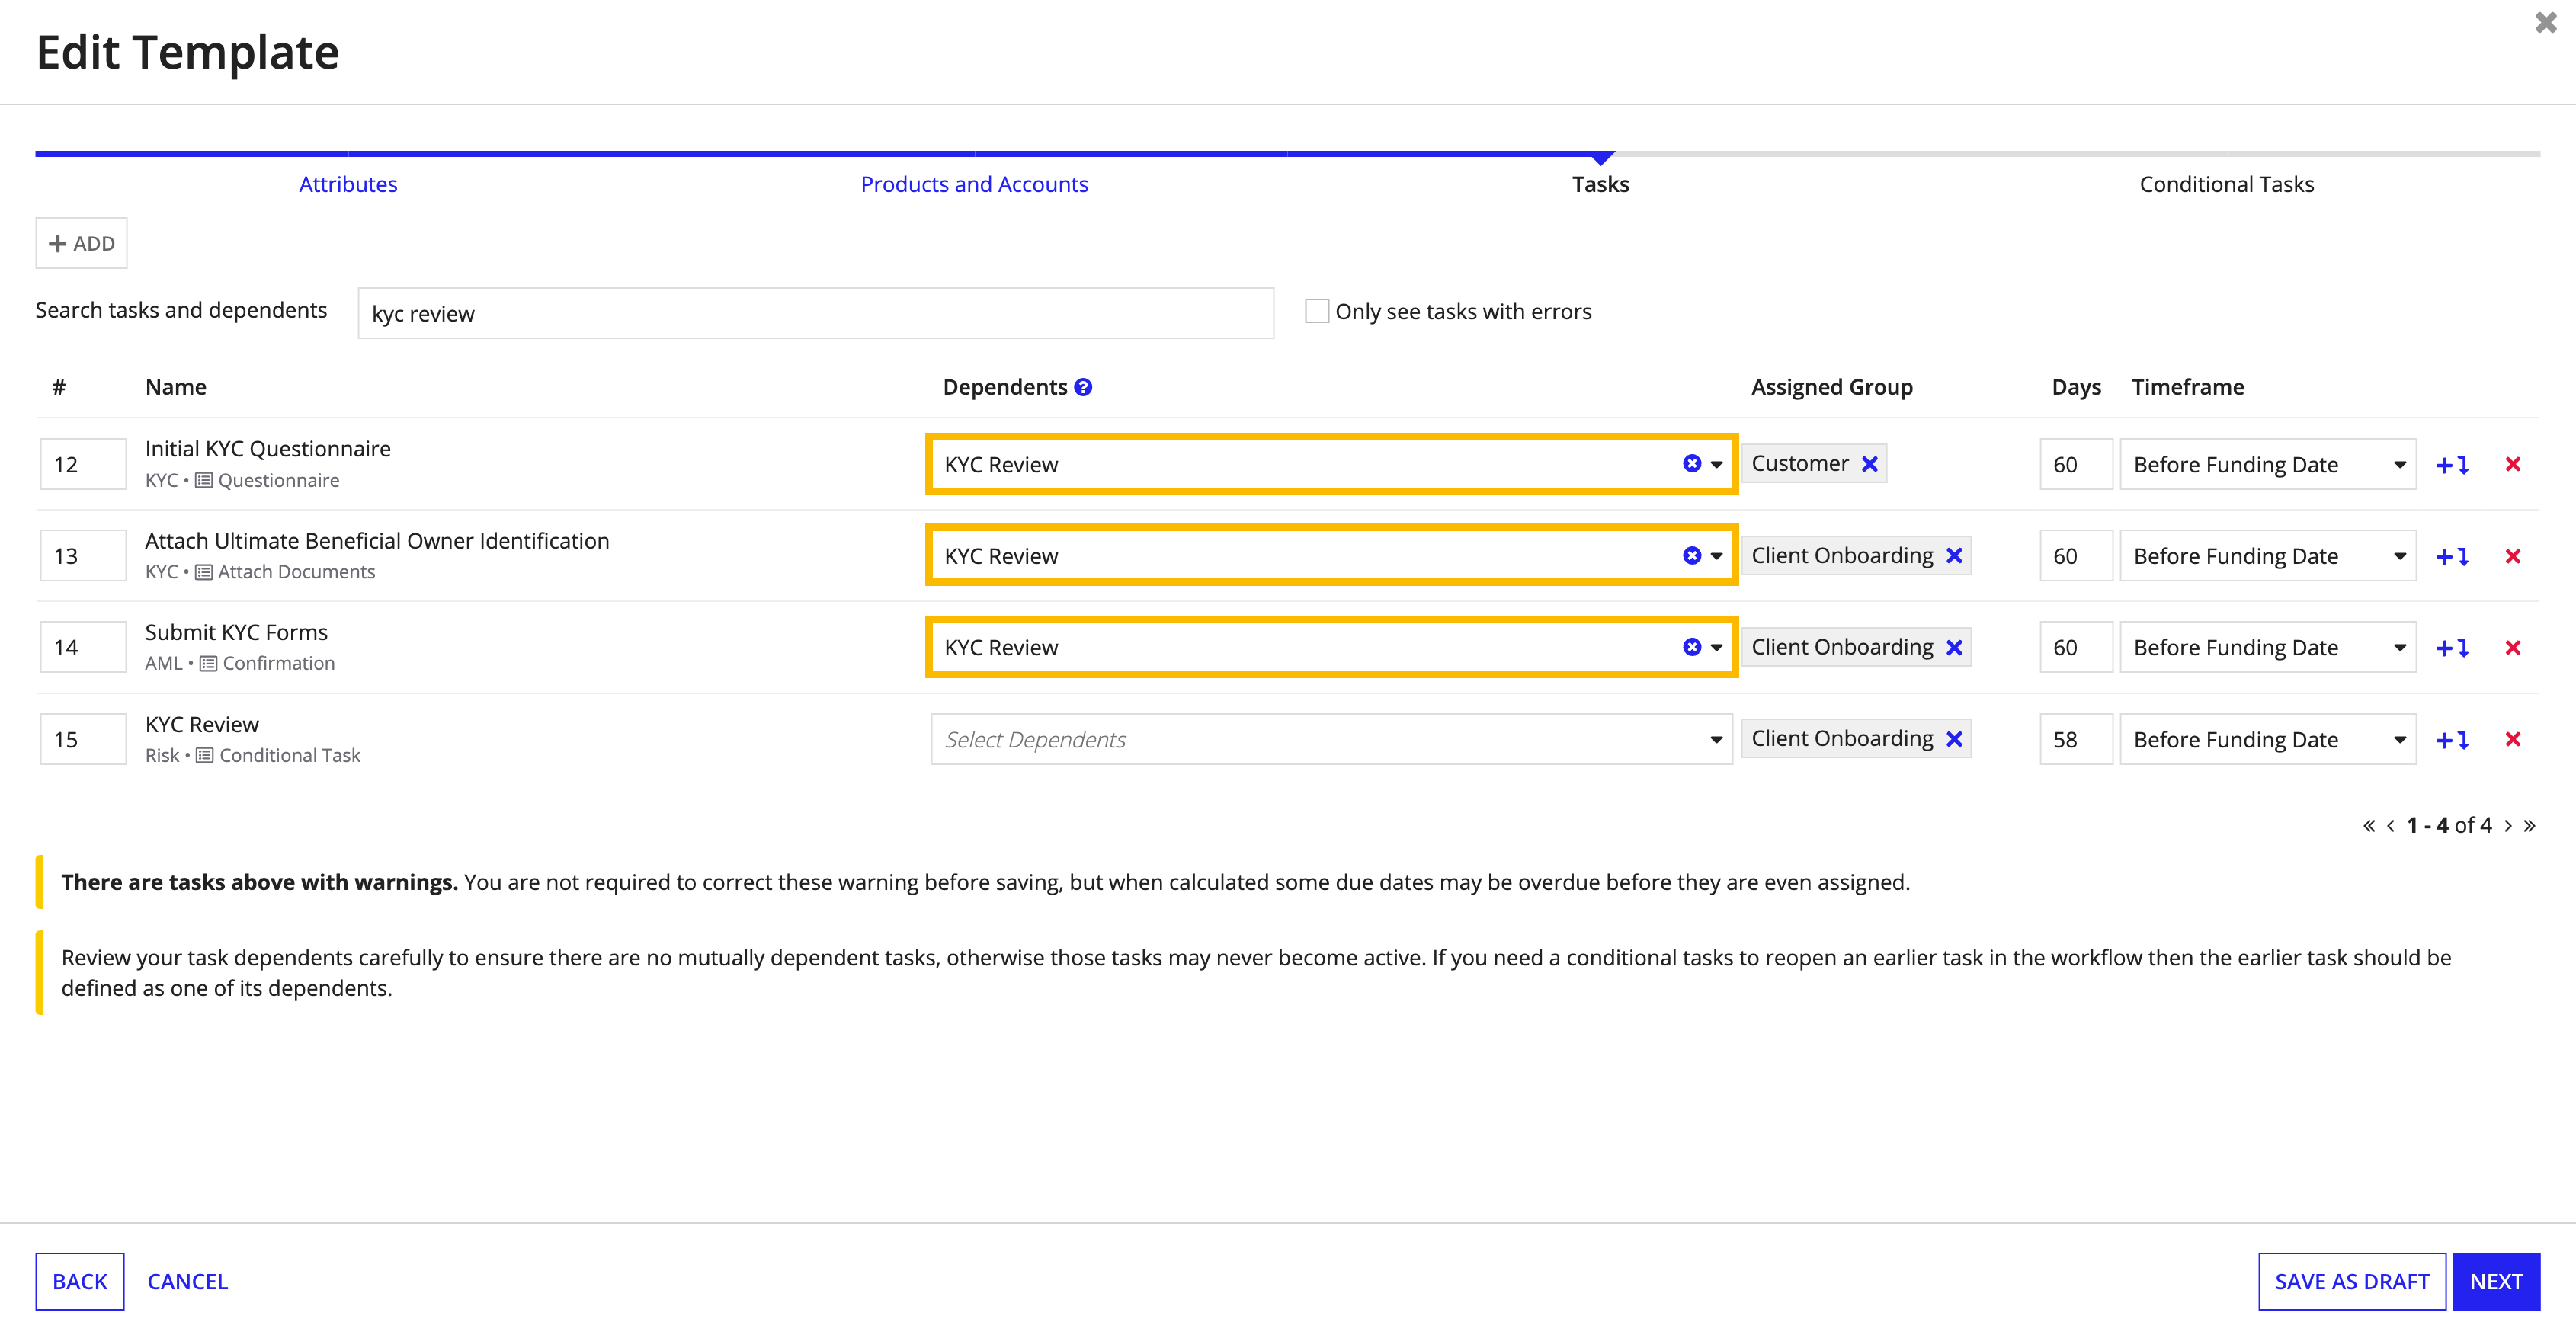
Like other task types, Attach Documents tasks can be configured as dependents of other tasks in the workflow. As a result, you can configure Attach Documents tasks to be assigned only after their defined preceding tasks are all completed. Also, thanks to conditional tasks, Attach Documents tasks on bypassed workflow paths are automatically marked Not Needed. As a result, documents are only collected if they are actually necessary.
To review or not to review?Copy link to clipboard
Does your desired service request process dictate that certain documents should be reviewed while others should not? Like other task types, Attach Documents tasks also allow you to define dependent tasks. If you want to have Attach Documents tasks reviewed, configure each task with the same conditional task as their dependent.
In this scenario, the Preceding Tasks section of the conditional task makes it easy to navigate to each task and their documents to make a quick review decision.
Define and track new document collection requirements mid-flightCopy link to clipboard
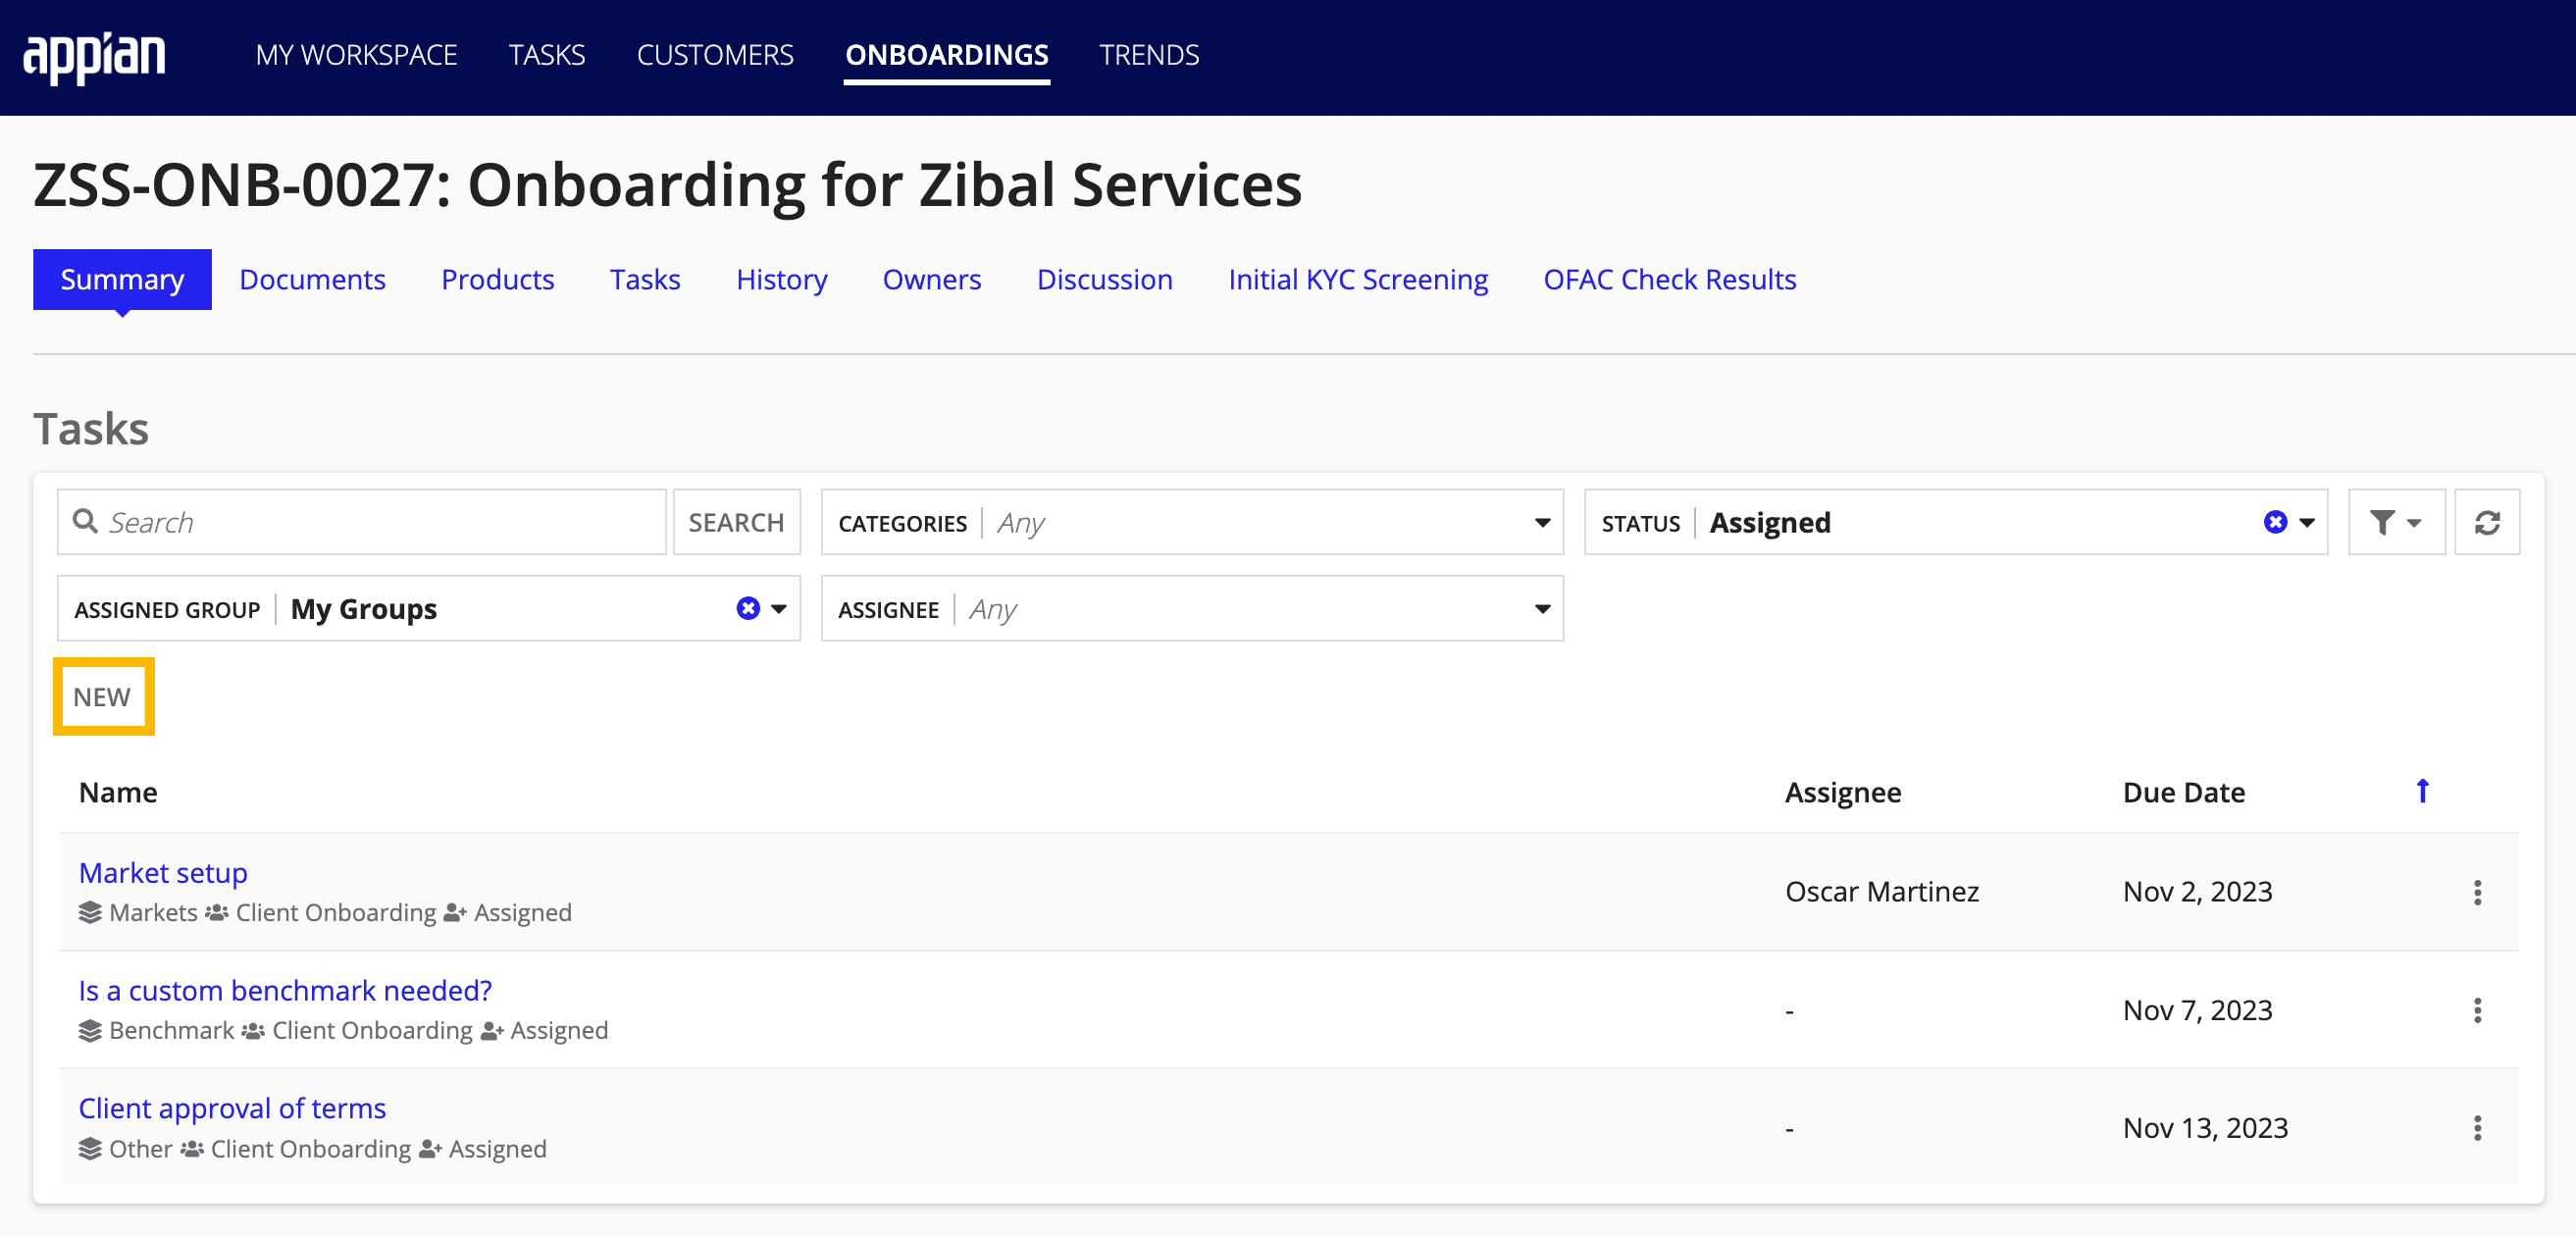
Sometimes unique document collection requirements reveal themselves after the service request is already created and in progress. That's okay! Single-use Attach Documents tasks can be created from the service request summary. To do this, click NEW above the Tasks grid, then select the Task Type option Attach Documents.
Start using Attach Documents tasksCopy link to clipboard
To create Attach Documents tasks for use in workflow templates:
- Go to Connected FS Settings.
- Click the Tasks tab.
- Under CONNECTED SERVICING, click Tasks.
- Click NEW TASK.
- In the Create Task form, select the Type option, Attach Documents, then complete all required fields.
- Click CREATE TASK.

Updated Service request Documents Tab and Document Summary ViewsCopy link to clipboard
The service request Documents tab provides a centralized location for viewing all documents uploaded to a service request. This release provides an updated documents grid and document summary view to make it easier to locate and view documents related to service requests.
The Documents tab grid displays the following information about each document:
| Document Details | Description |
|---|---|
| Name | The document name is provided first with a link to the document summary view. Underneath the name is an icon and text indicating whether the document is visible by internal staff users only (Internal Use Only) or also visible to the customer to which they belong (None). |
| Type | Indicates the document type designated on the document. |
| Attached | Indicates when the document was uploaded or related to the service requests and who did it. |
Click the link on the document name to open the document summary view. Each document's summary view has its own distinct web address. You can easily share the web address of a document summary view with the customer or with other staff responsible for the service request.
Document summary views are organized into the following sections:
| Document Section | Description |
|---|---|
| Document Viewer | Displays supported document types, such as PNG and PDF. For unsupported document types, like Excel, users can select the Download link to download and view the document. |
| Details | Reports pertinent information about the document. The edit icon above this section allows for certain attributes to be edited as needed. |
| Related Tasks | When a document is uploaded or linked in fulfillment of an Attach Documents task or as a supplemental document for a task in the service request, the task name and completion date are listed in the related tasks section. Clicking the link on the task name will direct users to the task's summary view. |
Bulk task reassignmentCopy link to clipboard
Service requests still need to be processed when a staff member changes positions or goes on leave. Managers need to be able to easily identify and reassign tasks assigned to staff members who become unavailable. Now, managers can easily reassign multiple tasks to a different team member at once.
From the Tasks page in Connected Servicing, use the filters to identify the tasks that need to be reassigned. Some important filters for task reassignment are:
- Assignee: Select a staff member to see all the tasks currently assigned to that user. To assign tasks that are not yet assigned to a staff member, select Unassigned instead.
- Status: By default, the Tasks page is filtered to tasks with the Assigned status. Select the Queued status as well to ensure that all incomplete tasks assigned to the unavailable staff member are reassigned.
- Service request: If the staff member is assigned a large number of tasks that need to be reassigned it can be helpful to reassign their work to different staff members by service request. Use this filter to enter in and select one or multiple service requests to redistribute the work evenly across the manager's staff.
- Due Date: If the staff member is going to be on leave for a defined time period, it may only be necessary to redistribute their work for the time they plan to be on leave. The due date filter allows managers to easily define a start and end date to identify tasks that will be due when the staff member is out.
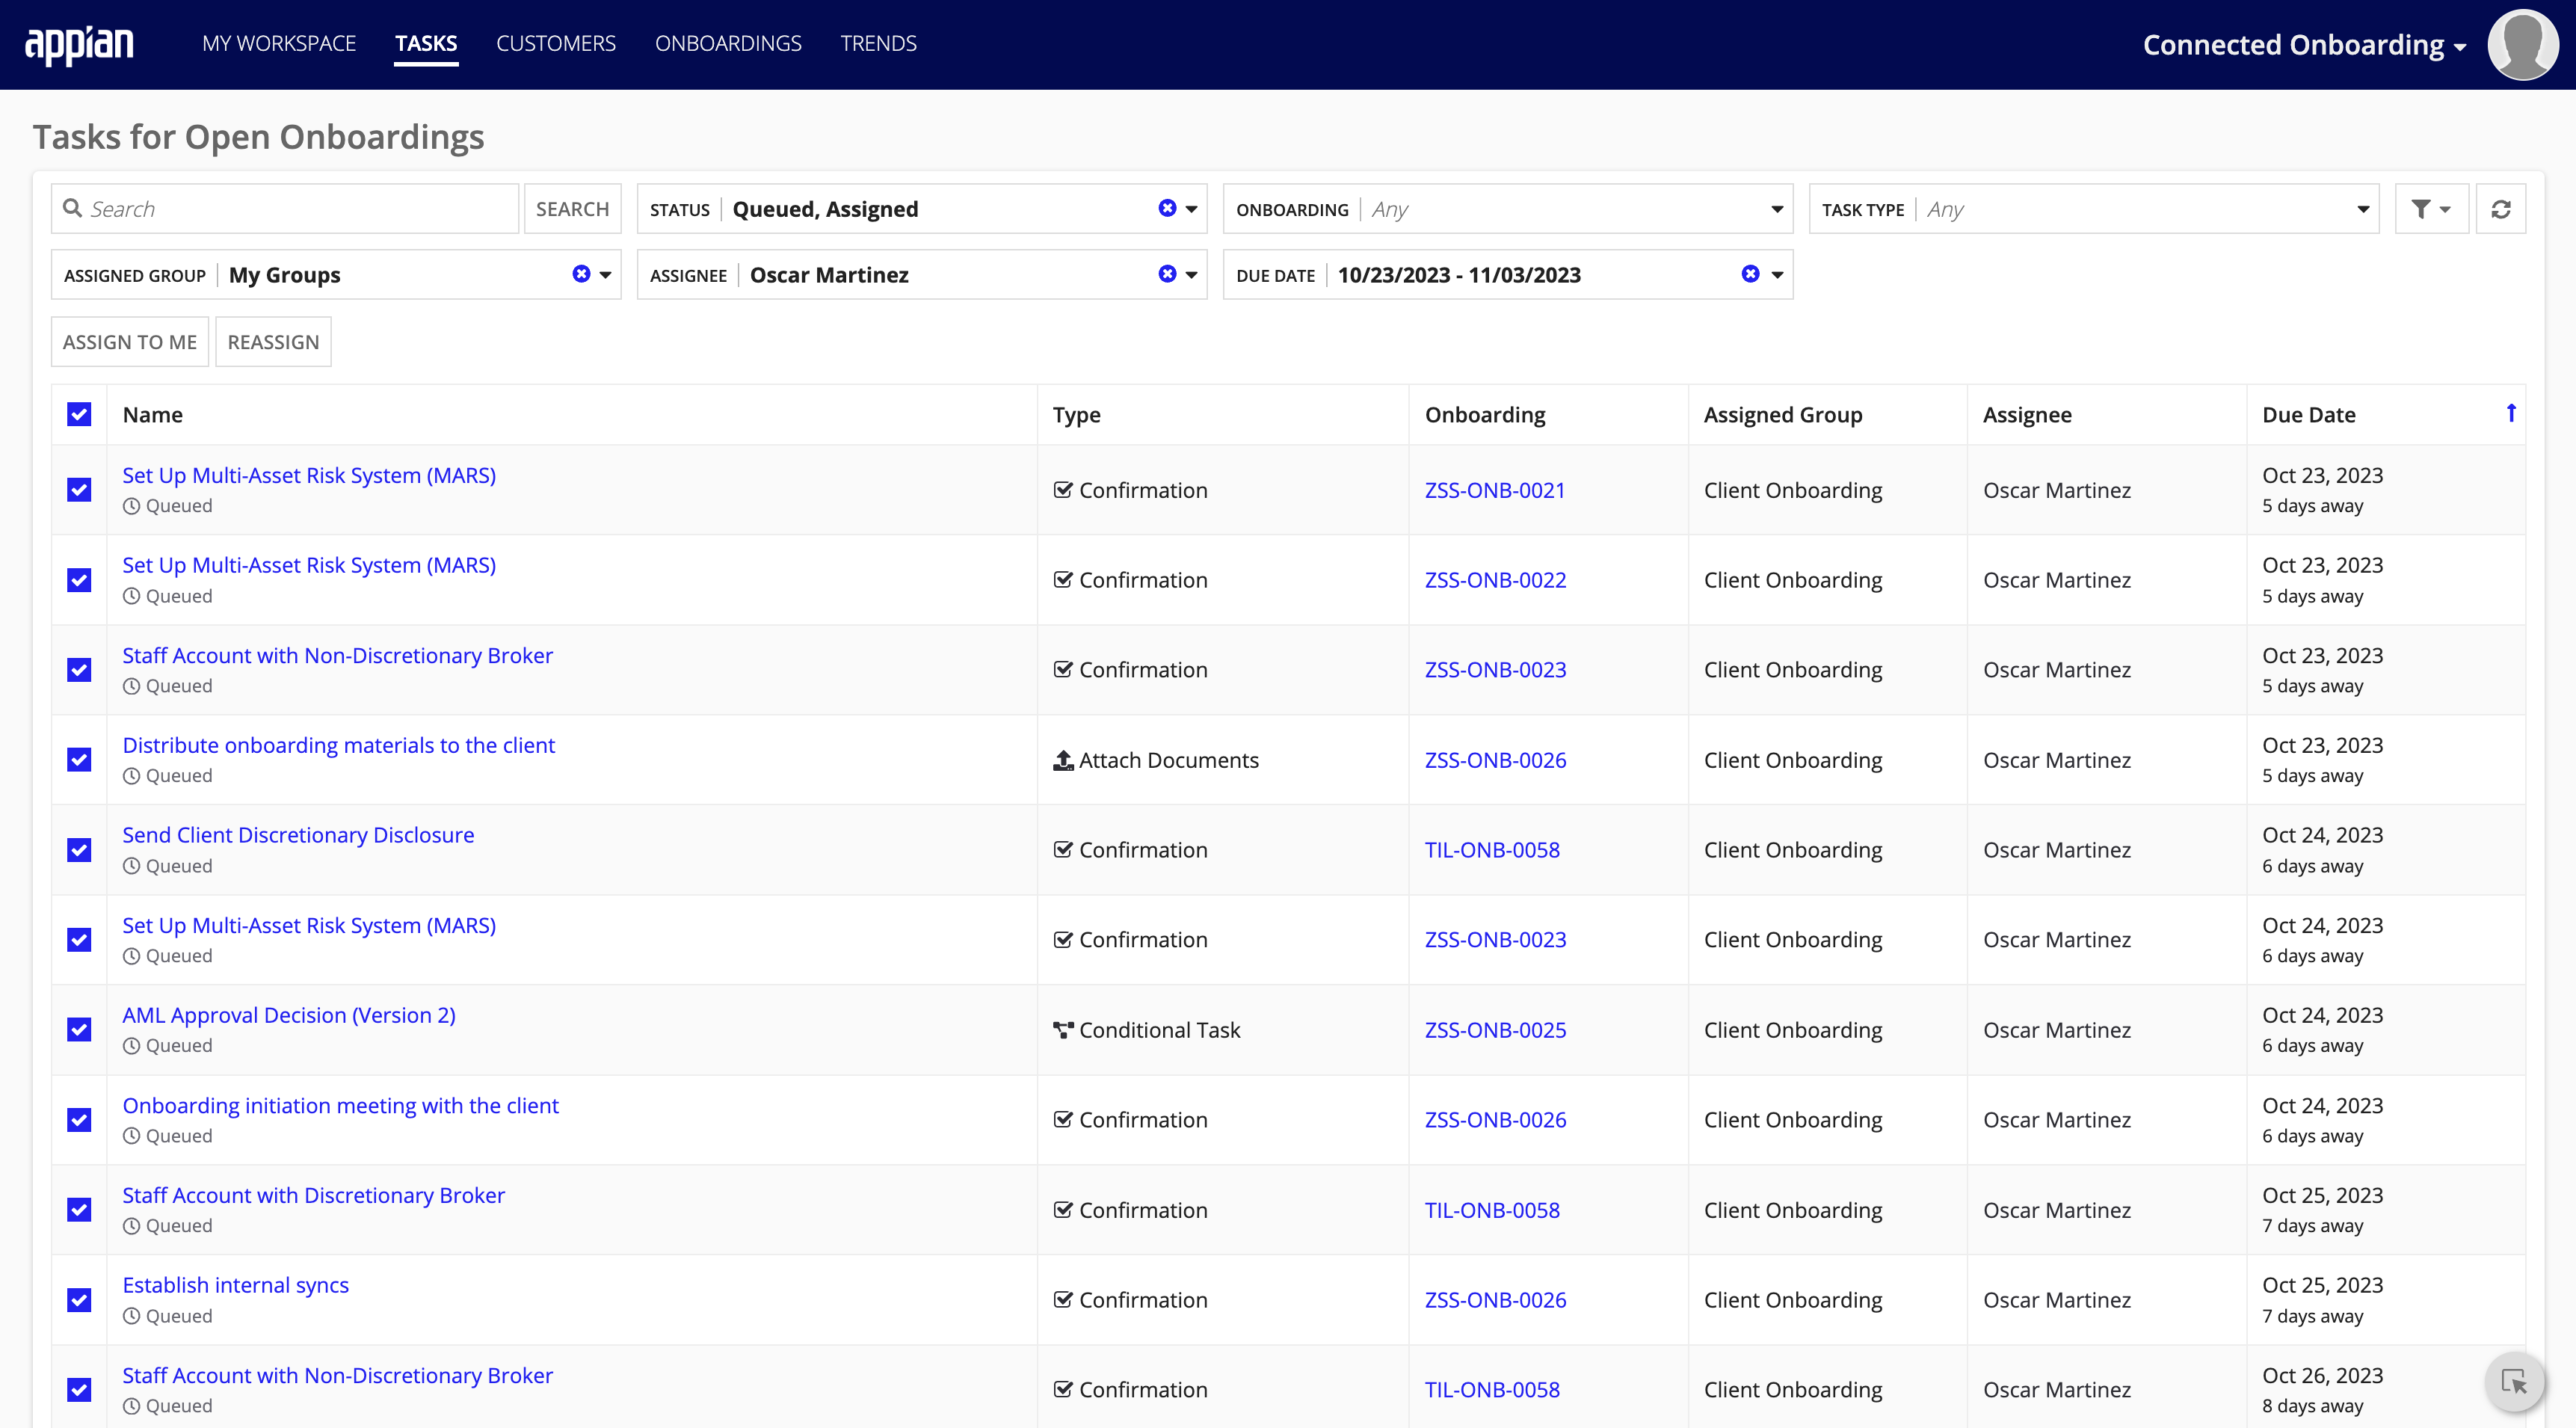
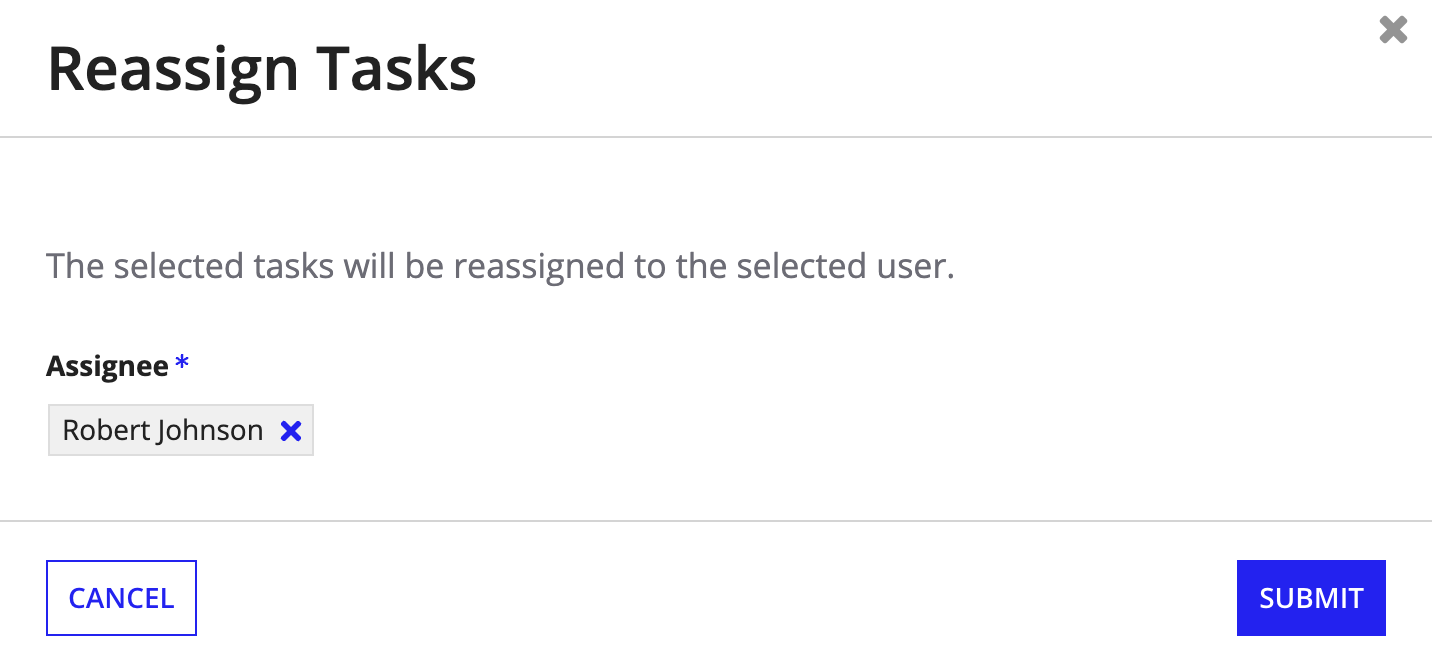
After filtering for tasks that need to be reassigned to another staff member, select the checkbox at the top of the grid to select all tasks shown on the current page, or individually select the checkbox for each task to reassign. Then, click REASSIGN above the grid, select a different staff member from the user list, and click SUBMIT.
Get started nowCopy link to clipboard
Ready to get started? Check out Installing and Upgrading Connected Servicing.