OverviewCopy link to clipboard
This page provides detailed information about how Appian can connect to systems that use the OAuth 2.0 Authorization Code grant. You can configure these integrations using HTTP and OpenAPI connected systems.
- To learn about connected system objects, see Connected System Object.
- To learn about the Client Credentials grant, see OAuth 2.0: Client Credentials Grant.
- To learn how to set up and integrate using the Authorization Code grant, see Setting Up a Connected System with the OAuth 2.0 Authorization Code Grant.
- To learn about how the OAuth 2.0 Client Credentials Grant can be used to invoke an Appian web API, see Web API Authentication
Token request sequenceCopy link to clipboard
The OAuth 2.0 framework is defined by the IETF RFC 6749 standard.
Note: Appian supports the authorization code and client credentials grant types.
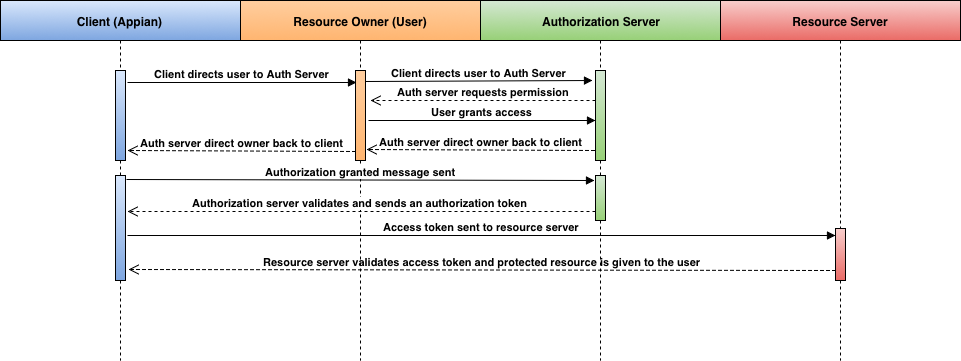
This standard lays out the sequence of steps involved with the Authorization Code grant. There are four main roles in this sequence:
- Client: The system initiating the resource request. In this case, Appian.
- Resource Owner: The user requesting the resource (for example, third-party data or files).
- Authorization Server: The server that is ensuring the user can and wants to permit resources to be shared.
- Resource Server: The server that holds the desired resources.
The following sequence diagram describes the steps involved in a successful authorization, with a resource returned to the client.

The first part of the authorization process involves the client initiating a request to the authorization server on behalf of the user. When the authorization server receives this, it will ask the user if they grant permission for this request.
This is probably the most recognized step in the Authorization Code sequence as granting permission is the only step that involves user input. Most people are familiar with an alert from their phones or a browser asking to allow or deny access to an application.
The client will get the authorization code and send out a token request. The authorization server will send back an access token. This access token will allow the client to request whatever resources were approved by the user. If the system supports refresh tokens, it will send that back during this step as well.
Access token expirationCopy link to clipboard
Once someone has an access token, future requests will be granted until (1) the user revokes permission, or (2) the access token expires.
Appian considers an access token to be revoked or expired when it's used to call an integration and the integration returns a status code of 401, 403, or 404. At that point, if Appian has a refresh token, it will automatically call the Token Request Endpoint to fetch another access token. If that call is successful, Appian will use the new access token to automatically retry the integration call. If the token refresh fails, or if no refresh token was provided, you will need to manually reauthorize the client before Appian can access the specified resource.
Important design considerationsCopy link to clipboard
There are several important design considerations when using OAuth 2.0.
Note: It is very important to review and understand the requirements in the third-party system for a successful OAuth connection.
Registration in the third-party systemCopy link to clipboard
In order for Appian to successfully connect to the desired resources, you will have to register the connection in the third-party system. This is typically done under a third party system's Developer UI. The terminology varies, but registration usually requires creating an application or project in that system.
When registering an app or project in a third-party system a few things need to be considered:
- Access to the third-party application or project: Because the OAuth 2.0 application or project in the third-party system will contain a client secret, essentially the password for the OAuth connection, an appropriate user should be selected to register the application or project.
- One registration per environment: For every instance of Appian, like dev, test, and production, there should be a single registration. Some third-party systems prevent multiple environments using the same application registrations by default.
- Determine where scope should be defined: A registered application's scope may need to be configured in Appian or in the registered application. Be sure to refer to the other system's documentation to know where to define scope.
Setting the propertiesCopy link to clipboard
A successful connection using the Authorization Code grant requires that configuration parameters are both set in an Appian connected system and the third-party-system.
Parameters set in the other systemCopy link to clipboard
A callback URL, also known as a redirect URL, needs to be provided to the third-party system. The connected system will provide this URL to paste into the registered application or project in the other system.
| Field | Description |
|---|---|
| Callback URI | Required (in the other system). This URI is provided within the instructions. Follows the format: http://<domain>/suite/oauth/callback. This value should be entered into the third-party system's callback url field. |
Parameters set in the connected systemCopy link to clipboard
The following parameters from the third-party system will need to be entered into the connected system. Refer to the third-party's documentation for more information.
| Field | Description |
|---|---|
| Authorization Endpoint* | Required. The third-party system's endpoint that will present the user with an authorization screen. This value can typically be found in the third-party's documentation. |
| Client ID* | Required/Sensitive. ID provided by the third-party system during the registration process. |
| Client Secret* | Required/Sensitive. The password provided by the third-party system during the registration process. This field is masked to prevent unauthorized users from seeing and should be treated as a password. |
| Scope | Defines what resources need to be accessed from the resource server. Depending on what system Appian is connecting to, scope may be set from the connected system or within the third-party system directly. Multiple scope values are typically space-delimited. |
| Token Request Endpoint* | Required. The endpoint that provided the access token for the specified resources. This value can typically be found in the third-party's documentation. |
* This value is included in an import customization file so that you can specify a different value for each environment. Sensitive values will not be exported in the import customization file and must be added manually. Required fields must have a value upon import or else import will fail. For more information on import/export behavior, see the Connected Systems Object page.
Providing users a way to authorizeCopy link to clipboard
Because access tokens are per user, developers need to consider how users will grant access to a protected resource.
A user needs to grant Appian access to the other system so that Appian can obtain an access token. To achieve this, developers must use an a!authorizationLink() on the relevant interface.
How the link is presented to the user is up to the Designer, however, a few basic principles should apply:
- The authorization link is only needed for a failed attempt due to the system not having a valid access token for the user.
- This state occurs when the user first accesses the protected system, the user revokes access, or if their access token expires.
- The authorization link does not need to be visible if the integration's request was successful.
- You can use the
connectedSystemfield returned in the integration response to build the authorization link.
Returning an authorization link on a read-based integration requestCopy link to clipboard
For integrations that query data from another system, dot notation is used to get the connected system. The interface example below shows this in the authorization link using local!integrationResult.connectedSystem to generate the appropriate authorization link.
1
2
3
4
5
6
7
8
9
10
11
12
13
14
15
16
17
18
19
20
21
22
23
24
25
26
27
28
29
30
31
32
33
34
35
36
37
38
39
40
41
42
43
44
45
46
47
48
49
50
51
52
53
54
55
a!localVariables(
  local!integrationResult: rule!EXAMPLE_OAuthIntegration(),
  {
    a!sectionLayout(
      contents:{
      /* Interface components would go here to show data from integration results */
      },
      showWhen: local!integrationResult.success
    ),
    a!boxLayout(
      label: "Some information cannot be displayed until you authorize with LinkedIn",
!      showWhen: contains({401, 403}, local!integrationResult.statusCode),
      style: "WARN",
      contents: {
        a!columnsLayout(
          columns:{
            a!columnLayout(
              contents:{
                a!richTextDisplayField(
                  value: {
                    a!richTextItem(
                      text: "To view this information, go to "
                    ),
                    a!richTextItem(
                      text: "LinkedIn",
 !                    link: a!authorizationLink(
 !                      label: "Authorize",
 !                      connectedSystem: local!integrationResult.connectedSystem
                      )
                    ),
                    a!richTextItem(
                      text: " to allow access. When done, click refresh to reload the page."
                    )
                  }
                )
              }
            ),
            a!columnLayout(
              a!buttonLayout(
                primaryButtons:{
                  a!buttonWidget(
                    label:"Reload",
                    saveInto:{
                      a!save(local!integrationResult, rule!EXAMPLE_OAuthIntegration())
                    }
                  )
                }
              )
            )
          }
        )
      }
    )
  }
)
Copy
This example calls the integration first and then determines whether the desired UI is displayed or further action is required before showing a user data from another system.

Returning an authorization link on a write-based integration requestCopy link to clipboard
Tip: It's important to note that write-based errors that warrant authorization links have a much lower likelihood of occurring. Because interfaces that write data to another system typically query data as well, the initial query-based integration call would pick up the authorization issue first. However, it's still useful to create a write-based authorization link to ensure the data submitted by the user makes it to the other system.
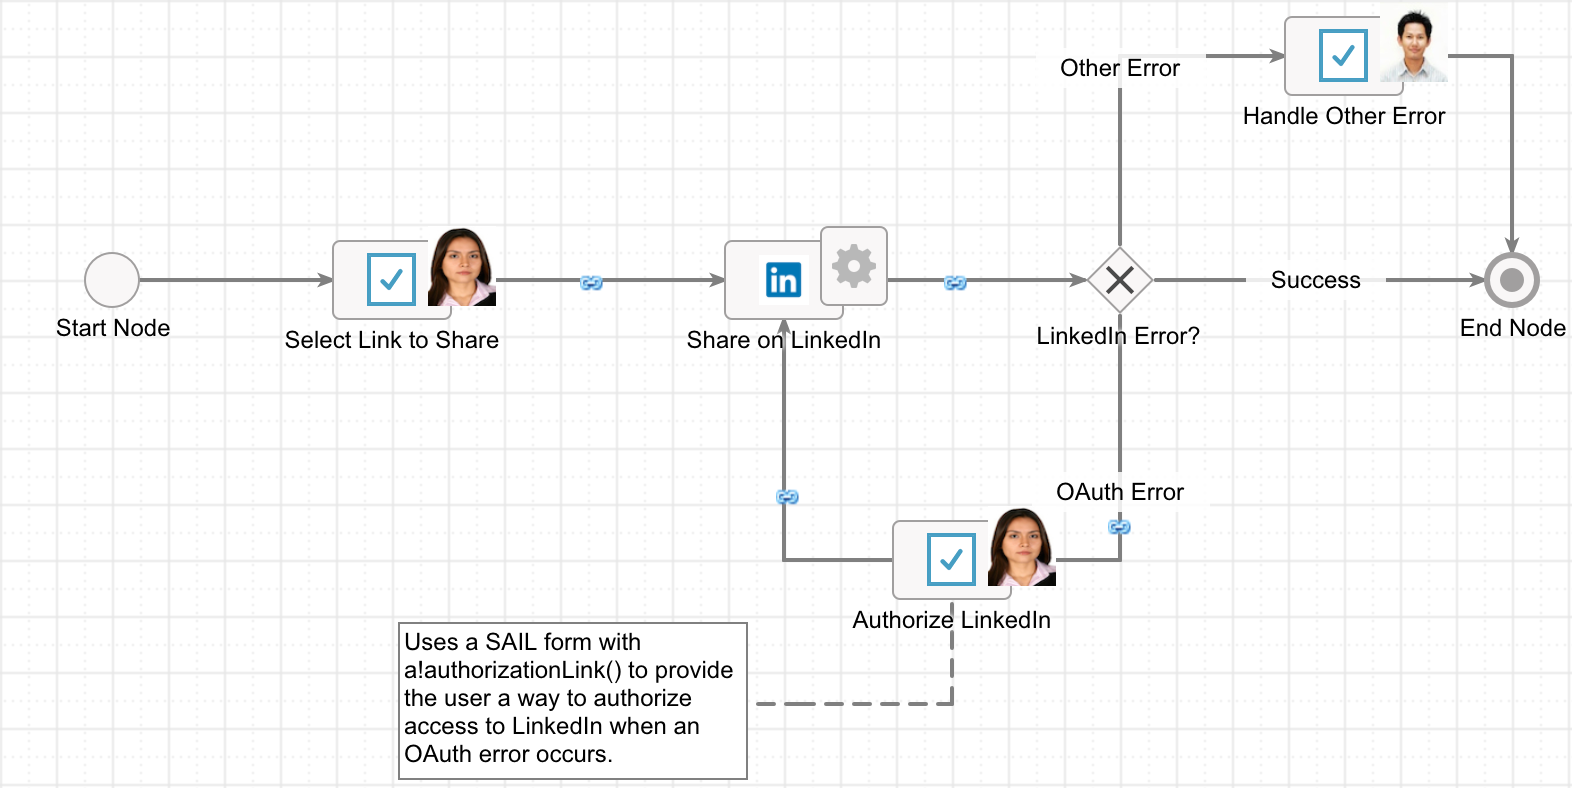
For integrations that write data, error handling is best handled in process. Instead of calling the integration on a form submission, use the call integration smart service and pass in form data. Store the connected system result into a process variable and handle errors in a gateway.

An interface expression, like the example below, would then be used to let the user authorize properly before submission.
1
2
3
4
5
6
7
8
9
10
11
12
13
14
15
16
17
18
19
20
21
22
23
24
25
26
27
28
29
30
31
32
33
34
35
36
37
38
39
40
41
42
43
44
45
46
47
48
49
50
51
52
53
54
55
56
57
58
59
60
61
62
63
a!localVariables(
  local!verified,
  a!formLayout(
    label: "Share URL on LinkedIn",
    contents: {
      a!sectionLayout(
        contents: {
          a!boxLayout(
            label: "Problem with update. You need to authorize access with LinkedIn.",
            style: "ERROR",
            showWhen: isnull(local!verified),
            contents: {
              a!richTextDisplayField(
                value: {
                  a!richTextItem(
                    text: "Before you can save this information, you must sign in to "
                  ),
                  a!richTextItem(
                    text: "LinkedIn",
                    link: a!authorizationLink(
                      label: "Authorize",
                      connectedSystem: ri!connectedSystem
                    )
                  ),
                  a!richTextItem(
                    text: " and grant permission. When done, return here and try again."
                  ),
                  a!richTextItem(
                    text: char(10) & char(10)
                  )
                }
              ),
              a!buttonLayout(
                primaryButtons: {
                  a!buttonWidget(
                    size: "SMALL",
                    label: "Submit Again",
                    style: "SOLID",
                    submit: true
                  )
                },
                secondaryButtons: {
                  a!buttonWidget(
                    size: "SMALL",
                    label: "Go Back",
                    style: "OUTLINE",
                    color: "SECONDARY",
                    value: true,
                    saveInto: a!save(
                      local!verified,
                      null
                    )
                  )
                }
              )
            }
          )
          /* Previous form content would go here if user wanted to edit their changes */
        }
      )
    }
  )
)
Copy

