| The capabilities described on this page are included in Appian's standard capability tier. Usage limits may apply. |
Note: The Advanced Configuration tab is only available in the Appian RPA console. If you are using Appian 23.3 or later and RPA 9.3 or later, see the Configure Run-Time Settings and Configure Technical Information pages instead.
Required role: Developer or Administrator
In the Advanced Configuration tab of the robotic task configuration page, you can configure the following settings:
In this section, you can choose how this robotic task behaves when executions are launched consecutively from an Appian process model. Options include:
If the robotic task doesn't require a robot to be reset before the next execution occurs, you can choose Skip setup and clean up for consecutive executions. This option speeds up each execution, and the compounded time savings can make the overall set of consecutive executions much faster.
Learn more about the Setup and Clean Up sections.
In some scenarios, setup and cleanup sections are still run even if you choose to skip them for consecutive executions. These sections run when the:
Certain components of the robotic task configuration may behave differently when setup and clean up are skipped:
Tip: If you choose to skip setup and clean up for consecutive executions, be sure to design the robotic task workflow in the main section so it executes reliably in this manner. For example, if the robotic task is meant to submit a form multiple times with different data, be sure to add an action toward the end of the workflow for the robotic task to navigate back to the starting form. This way, each consecutive execution occurs smoothly and predictably.

You can define environment variables, which are sent to the robot as "key-value" pairs. The difference is that they are sent in all the executions but they are not requested in each execution. To modify them, it is necessary to modify robot settings. This facilitates having different configurations in different robot environments (for example, development and production).
To add an environment variable:
Configure the following fields:
| Field | Description |
|---|---|
| Name | The name that serves as the key in the key-value pair. |
| Value | The value for the environment variable. |
To edit an environment variable:
To delete an environment variable:
 in the variable row.
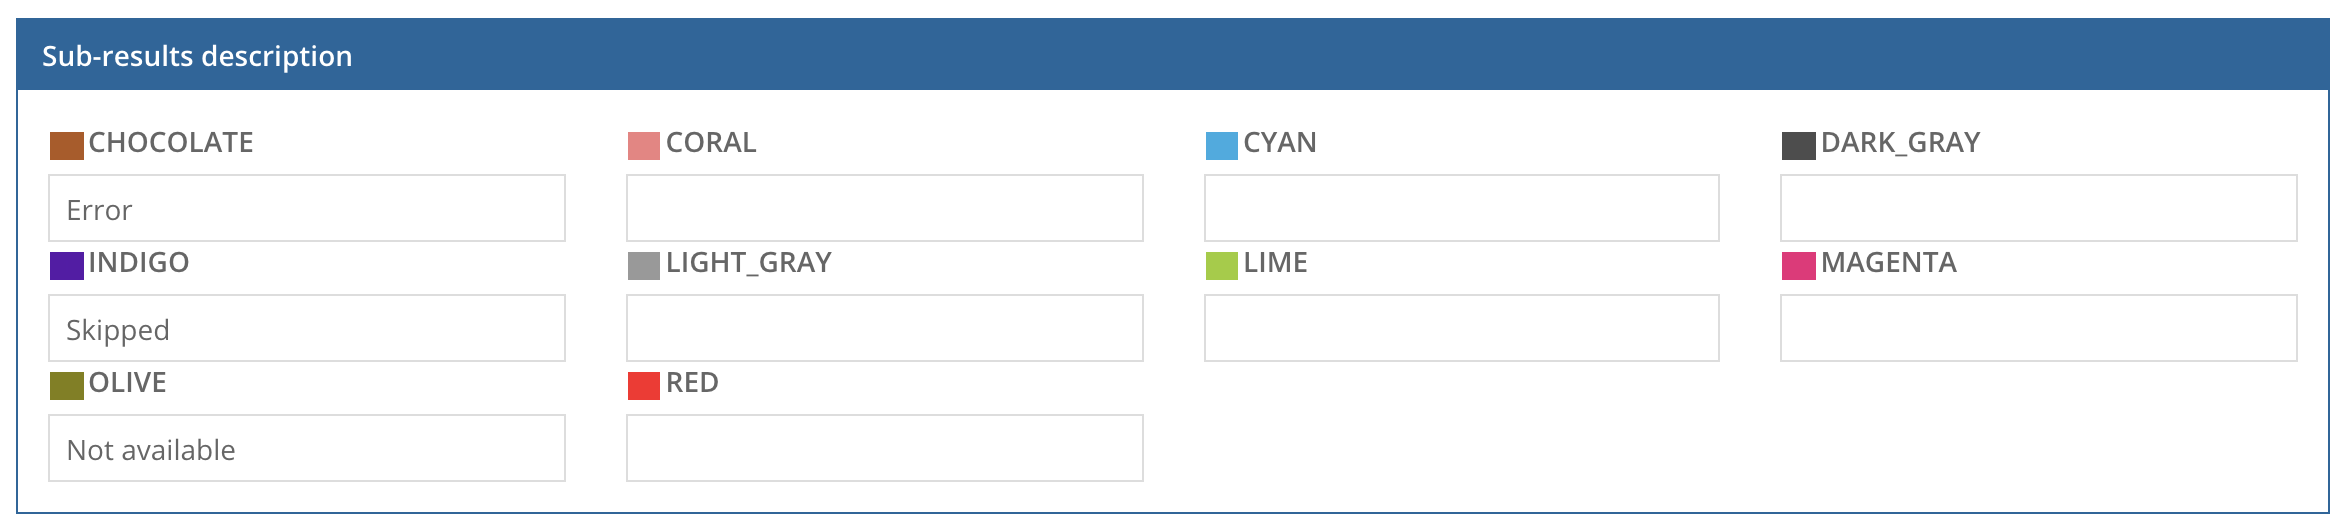
Sub-results are used to categorize the items results, making it possible to differentiate items already classified as OK or WARNING. The colors and statuses appear in the results column on the list of executions.
This items categorization is shown in the following table:
| Icon | Color name |
|---|---|
 |
CHOCOLATE |
 |
CORAL |
 |
CYAN |
 |
DARK_GRAY |
 |
INDIGO |
 |
LIGHT_GRAY |
 |
LIME |
 |
MAGENTA |
 |
OLIVE |
 |
RED |
For example, for a specific WARNING, you could assign a sub-result color to indicate different causes such as technical problems (sub-result CORAL) or data problems (sub-result CYAN).
Support files help you avoid having to add files in a robotic task's code, so the code is leaner and deploys much faster. Working this way also allows you to change the files' content (neither adding nor removing them) without affecting the robotic task's deployment.
In the Support files area of the configuration, you can upload support files to be used by this robotic task only or shared globally among your robotic tasks.
If you upload a ZIP containing an internal folder structure of support files and enable the Unzip on server option, Appian automatically creates the corresponding folder structure on the server. If you don't immediately see the unzipped contents of the file, but instead see the name of the ZIP file in the Root tree, refresh your browser.
To support methods in the Browser low-code module, the browser driver files must be stored in a specifically named folder in the Root tree. You must manually add this folder, and then unzip the driver files into that folder. For more information, see Using the Browser Module.
To manage support files to be used by this robotic task only, use the following icons within the Support files area:
| Icon | Description |
|---|---|
| Preview the image support files. | |
| Upload a new file to the server. | |
 |
Download the file or folder from the server. When downloading a folder, Appian RPA creates a ZIP file for the folder and its contents. |
| Rename a file/folder on the server. | |
 |
Create a new folder on the server. |
 |
Delete a file or folder on the server. |
In addition, by dragging and dropping any folder or file, you can move the folder or file across different locations in the folder structure on the server.
When you upload a ZIP file, you can specify if you want it to unzip on the server, thus creating the corresponding folder structure it contains upon upload completion.
If you want to share files between different robotic tasks, you can use global support files. Global support files make it easier to manage things on a large scale. To navigate to the global support files, click the Support files icon  located in the Support files toolbar in the Appian RPA console.
Essentially, this window is the same window that displays in the support files area and contains the folder structure and files robotic tasks can use. Files and folders display in alphabetic order. The folders are sorted first and then the files. The way you upload, download, move and rename files and folders is very similar. The difference lies in how you define which robotic tasks can access which files.
To give a robotic task access to a global support file, the robotic task should have a permission tag with the same name as the folder it is trying to access.
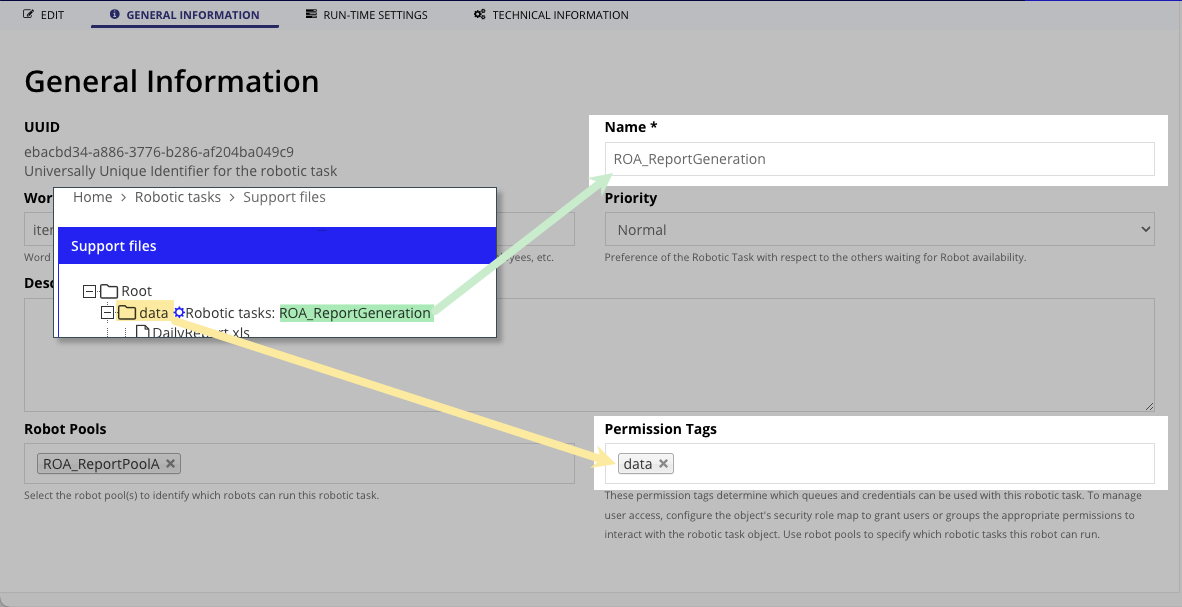
Tip: Administrators can see support files for all robotic tasks. Developers can only see files for robotic tasks they're permitted to access.
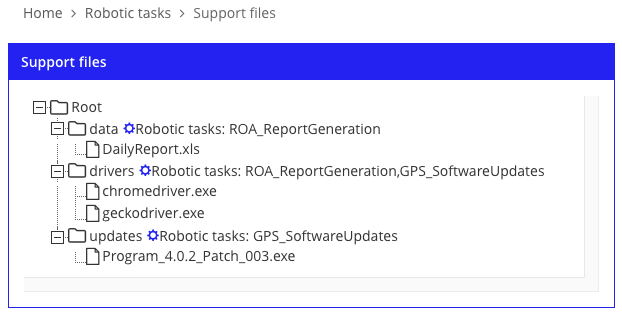
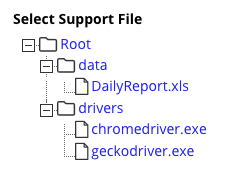
The table below shows robotic tasks, their permissions, and the folders and files they can access, according to the previous picture. Both robotic tasks can access the drivers folder since both robotic tasks have the drivers permission tag.
| Folder/Permission Tag | Robotic Tasks | Support Files |
|---|---|---|
| data | ROA_ReportGeneration | DailyReport.xls |
| drivers | ROA_ReportGeneration GPS_SoftwareUpdates |
chromedriver.exe geckodriver.exe |
| updates | GPS_SoftwareUpdates | Program_4.0.2_Patch_003.exe |
The following shows an example of how we could obtain the path to access a file uploaded in this section.
1
2
3
4
5
Path path = Paths.get(
    server.getCurrentDir(),
    "folder",
    FILE_NAME).
        toRealPath(LinkOption.NOFOLLOW_LINKS);
In the previous code snippet, we assume that we have a folder called "folder", and a file whose name is defined in the constant FILE_NAME.
Note: This section is relevant to custom code development only. If you're using low-code modules, you can ignore this section.
At the end of the page, you can see the definition of the repository where the project has been automatically deployed. To make this link work properly, it is necessary to have previously deployed the robot binaries in the defined Maven repository. This is done using the following instruction:
mvn clean deploy
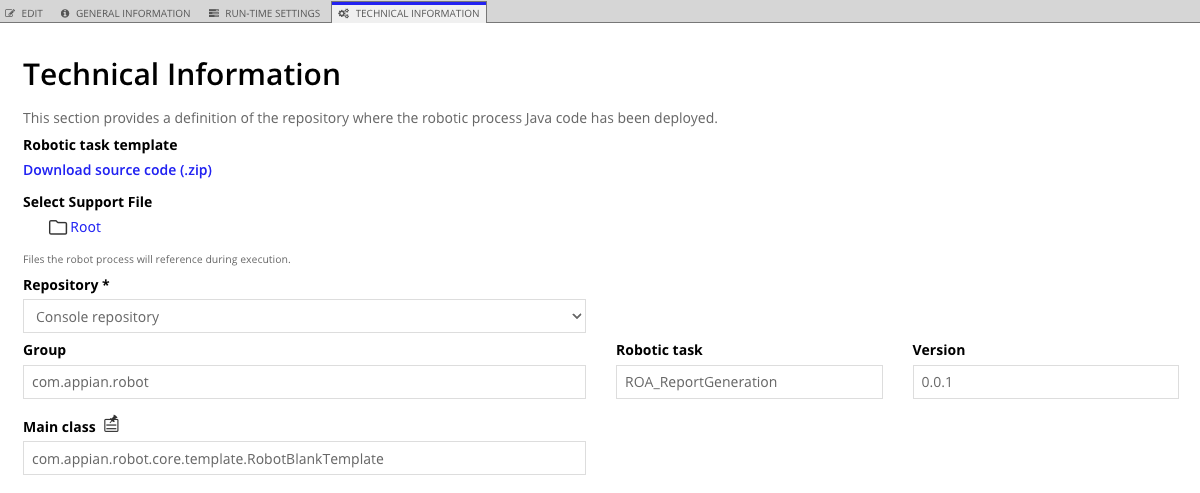
In this section, you can find the technical information contained in the robot setup:
It is possible to select the robot's main class if the Maven artifact's information has been setup properly. To do so, click on the Select main class
icon  and select the main class from the list of all classes available in the Maven artifact.
In case some of the fields of the Maven coordinates associated with the artifact are not correct, an error message will show up as a warning. If no classes are shown, check that the artifacts successfully deployed to Maven, as well as the Maven configuration is correct.
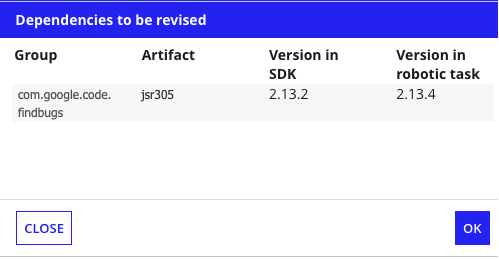
Use the Check dependencies ![]() button to validate that the configuration of the robot is correct in terms of dependencies and the versions of these dependencies. A window appears that shows the artifacts that have a different
version in the robot and in the agent.
button to validate that the configuration of the robot is correct in terms of dependencies and the versions of these dependencies. A window appears that shows the artifacts that have a different
version in the robot and in the agent.