This page describes the different methods you can use to execute a robotic task.
To extend automation, robotic tasks can be triggered to execute automatically in multiple ways. The method you use to execute a robotic task depends on its purpose and context. Choose one of the following options that describes your use case:
Execute a robotic task in a process model
Call an RPA robotic task using the Execute Robotic Task Process smart service from your process model to execute synchronously. Synchronous execution is useful if you want to return data from the robotic task execution and use it in subsequent nodes in the same process model.
To execute a robotic task in Appian RPA asynchronously, you can call the integration using the Call Integration smart service. When the robotic task is executed asynchronously, the process model moves to the next node whether or not the robotic task is complete, and the results aren't automatically returned.
To use a robotic task in your application, complete the following steps.
- Create or update a process model.
- View the results.
- Deploy the robotic task
Create or update a process model
- Create a process model object or find and open an existing process model.
- In the Process Modeler, drag the Execute Robotic Process smart service to the Process Model canvas.
- Open the smart service to configure it.
- Click the Setup tab and choose the integration you set up earlier.
- Click the Data tab to configure the input and output:
- If the integration uses rule inputs, configure the smart service inputs to pass the appropriate value for each rule input.
- The smart service lists
variables as an output. If a robotic task variable is a CDT, you can reference a specific field using dot notation.
- Click OK to save the smart service configuration.
- Continue designing or updating the process model. If you're using the robotic task results in other nodes, be sure to update those properties appropriately.
- To save the robotic task results in your Appian datastore, add and configure a write to data store node.
- Publish the process model.
View the results
Finally, you'll want to consider how to display or use the results of the robotic task. How you display the results is determined by your goal. If you're sharing a set of this information with others, an Appian record in your application could be a good option. Alternatively, if you're looking to troubleshoot or optimize your robotic task (notably in the development phases), you might want to take a look at the Execution Details in the Appian RPA console.
This section describes both approaches. Learn how to create a record type and populate it with details from a CDT, and how to create a record-powered grid.
Create a record
Appian records aggregate and display your data to provide users with information they need, whether to act or be informed. When a robotic task execution concludes and sends information back to Appian, it's time to use it in your application.
See Create a Record Type to learn how to display robotic task results alongside your other Appian data.
View the execution details
Sometimes it's more helpful to view all information about a robotic task, including metadata about the execution. All of these details are available in the Appian RPA console.
To view execution details:
- Go to the Robotic tasks tab in the Appian RPA console.
- Click the robotic task you're interested in.
- On the List of executions, click an execution to view its details.
- Three tabs appear:
- Workflow: This tab shows you the actions the robotic task went through. The robotic task definition appears just as it does in the robotic task configuration. See the Robotic Task Definition for more information about how to set this up.
- Results: If your robotic task acts on items, the results tab displays information about each execution cycle, as well as a summary of the robotic task overall. This tab uses color-coding to show items by their status.
- Execution log: This tab shows the most technical information for the robotic task. Each time the robotic task starts or completes an action, or encounters an issue, it sends a message to this log with a timestamp. The execution log is valuable for troubleshooting and debugging. You can configure your robotic task to send custom messages to the log as well.
Deploy a robotic task or robot
Deploying a robotic task between environments is an essential piece of the development lifecycle. During testing, the robotic task might access other testing environments so it doesn't manipulate production data or interact with live systems. Appian uses an import customization file to help you update certain values quickly and easily when deploying to another environment.
When deploying a robotic task, the ICF may need to include values for new or updated credentials that the robotic task references.
When you're ready to deploy robots and robotic tasks to another Appian environment, you'll include the design objects in your deployment package.
You may need to complete the following manual configurations in the target environment if your robotic task uses these options:
- Queues: If your robotic task is designed to process work items from a queue, configure the queues for the robotic task.
- Schedules: If your robotic task is designed to execute on a schedule, configure the schedule for the robotic task.
- Global support files: If your robotic task relies on global support files, make sure that the files exist in the environment.
Execute a robotic task from an interface
You can adapt the Refresh Data After Executing a Smart Service recipe to execute a robotic task and retrieve results in an interface.
Note that this recipe needs some modification to work for this purpose:
- Call a Process Model: Start by calling a process model. This model will kick off the robotic task and give you back an execution ID.
- Generate a Process Report: Create a process report. This report should display the execution ID, the current status, and relevant output variables.
- Set Up a Reevaluation Variable: Establish a variable for periodic checks. Use this variable to repeatedly query the process report, filtering by the execution ID, to keep track of the status and show the results.
Be aware that with this method, you won't have access to the running robotic task's details, which is a limitation you need to consider. This process differs from some existing mechanisms that might provide more in-task details.
Execute a robotic task manually in the Appian RPA console
You can manually execute a robotic task within the Appian RPA console. Open the robotic task's configuration and click the Execute icon. This option also appears in the Actions column in the List of robotic tasks. The Execute robotic task dialog appears:
Before you click Execute  , fill in all required fields.
A warning message appears if the robotic task has any restrictions to keep it from executing, such as new executions are disabled in the console or the maximum number of simultaneous executions has been reached.
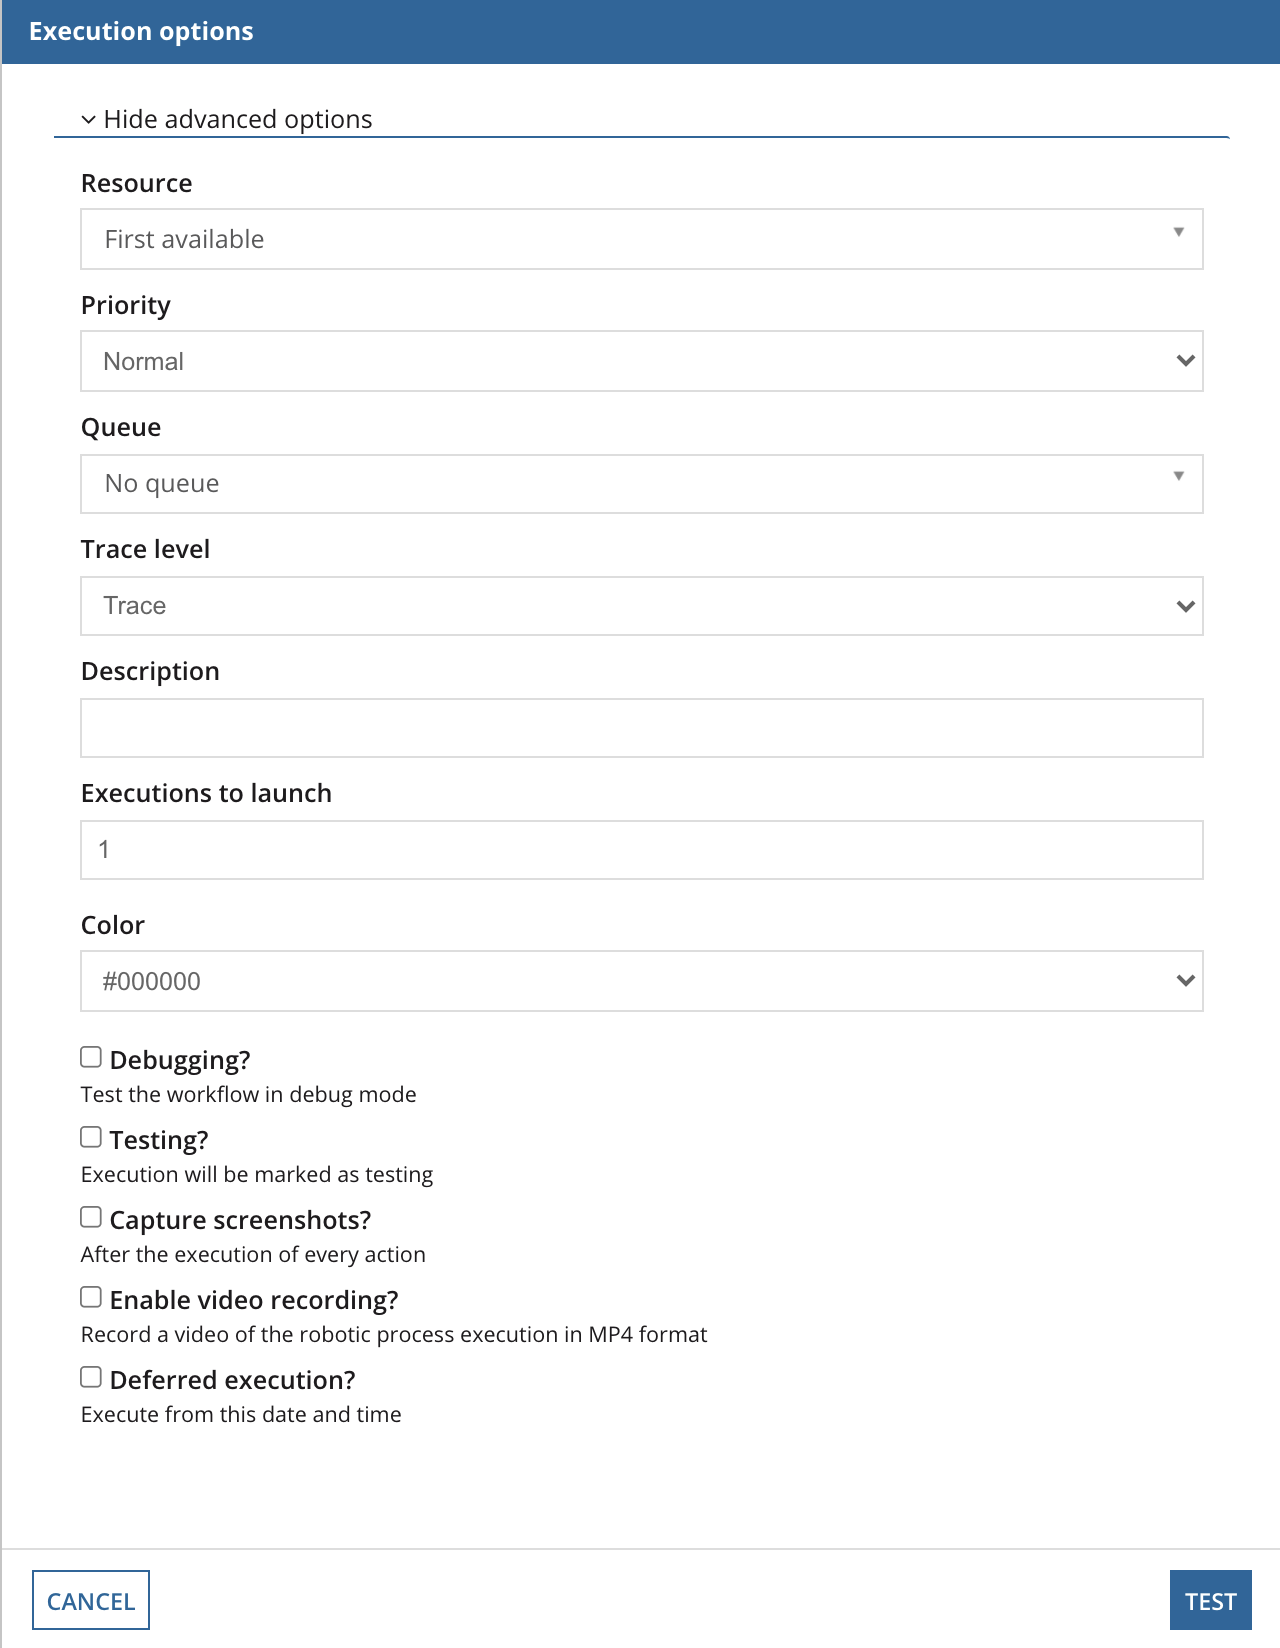
If the robotic task requires any input parameters, these appear at the top of the Execution options window. Other execution options appear below:
- Robot: Select a robot for the execution to occur. The options include robots where the robotic task has permissions to execute. By default, the first available robot is selected. The robotic task will run on the first connected robot for which it has permissions to run. This list also shows robots that are Unconnected and Connected but incompatible due to mismatched permission tags.
- Priority: If desired, change the execution priority defined in the robotic task configuration.
- Queue: If the robotic task works with a process queue, assign it manually using this field.
- Trace level: Depending on the trace level selected, information written in the Execution log will be higher or lower.
- Description: Add an optional short description of the process or execution.
- Executions to launch: Specify how many executions to launch.
- Color: If desired, change the default color for the execution, defined in the robotic task configuration.
- Debugging?: Select this checkbox to begin a debugging execution. You can debug in RPA to walk you through the workflow action-by-action and isolate where issues might arise.
- Testing?: Select this checkbox to specify that the execution is a test. This option will highlight this execution on the lists where executions are displayed.
- Capture screenshots?: Select this checkbox to capture images of the robot screen at the beginning and the end of each action.
- Enable video recording?: Select this checkbox to record a video of the execution with additional options.
- Deferred execution?: Select this checkbox to defer the execution to the chosen date and time.
After the execution finishes, see the execution details for more information.
