Overview
The Browser actions empower a robotic task to open and interact with web browsers. Through these actions, you can navigate to a URL and interact with the web page just as a human would: click on the page controls, select options, enter values in text fields, retrieve HTML items, and more.
This page describes how to integrate Browser actions into your robotic task, which provide an easier and more robust development experience.
If you need to extend Appian RPA capabilities, you can use Java to create workflow libraries for robotic tasks.
Tip: To make robotic task development even faster, you can use Appian RPA's task recorder to record common browser actions and automatically add them to the workflow.
Browser actions architecture
Browser actions require Selenium to work properly and interact with browsers.
Automatically update web drivers
Note: Appian can only update web drivers automatically when the robotic task uses Chrome, Firefox, or Edge. If using Edge (IE Mode) or Opera, you need to add and maintain the web driver support file manually.
Instead of having to manually download and add web drivers to your support files, Appian can automatically maintain Selenium web drivers for you. This option is turned off by default.
When you select this option, Appian automatically provides the necessary web drivers for the browser you are using in your robotic tasks and the task recorder. When you allow Appian to add and update web drivers automatically, you avoid the common problem of having a web driver go out of date when the corresponding browser updates.
To allow Appian to automatically provide web drivers:
- Go to the Settings tab.
- In the Configuration tab, go to Security policies.
- Select Allow Appian to provide selenium web drivers.
- Click Save security policies.
That's it! With this option selected, there isn't anything else to configure.
Components
This area describes each of the components needed to work with the Appian RPA Browser actions:
The following image shows how all these components are connected:
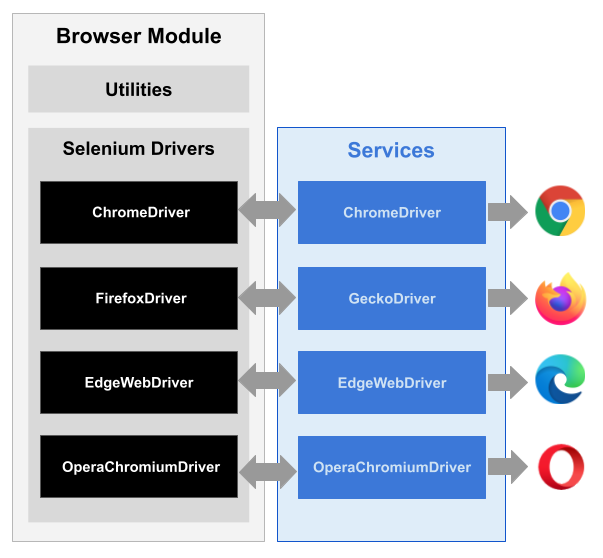
Note: Edge (IE mode) requires the Internet Explorer driver support file.
Different servers available for each supported browser:
Tip: If you are not allowing Appian to provide drivers automatically, you must add the downloaded driver to the robotic task definition as Support Files. You must put the driver into a folder that you create with a specific name, depending on the operating system and browser, as shown below. Usually, a robotic task will only have to interact with one browser, so you don't need to upload all the files shown in the image.
Here is what the support file structure looks like for the various host machine types:
Windows:
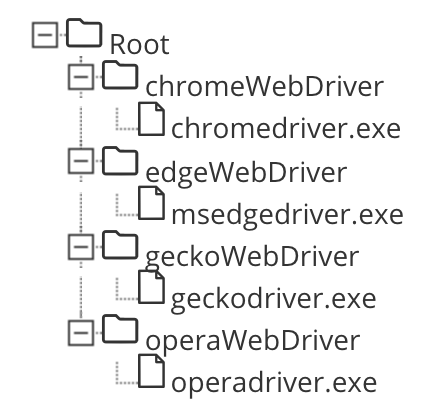
Driver paths for Windows are case insensitive. The path can begin with an upper or lowercase letter (ChromeWebDriver or chromeWebDriver)and the robotic task will reference either with the same result.
Mac:
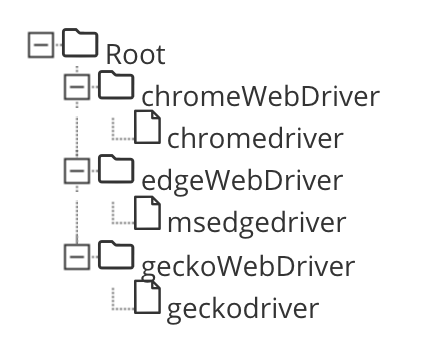
Driver paths for Mac are case insensitive. The path can begin with an upper or lowercase letter (ChromeWebDriver or chromeWebDriver) and the robotic task will reference either with the same result.
Linux:
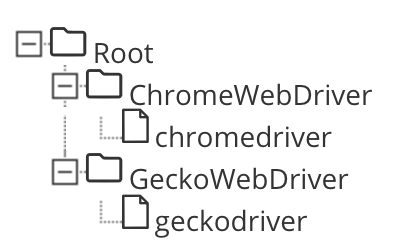
Driver paths for Linux are case sensitive and must begin with an uppercase letter, for example: ChromeWebDriver. If the path doesn't begin with an uppercase letter, the robotic task won't be able to reference the support file.
Compatibility between components
Not all versions of each component are compatible with each other. We recommend that you always work with the most recent versions of the browsers and their bridge servers. In all cases, they must be compatible with the Selenium version integrated into the Appian RPA Browser actions. Visit the links below for each web browser to know what versions are supported for the rest of the components:
Using Browser actions
The Browser module lets you configure how the robotic task opens and interacts with a web browser. Browser actions are listed in the Browser area of the palette.
Close browser
This action closes the browser on the host machine.
You can configure CONFIGURATION and AFTER COMPLETION parameters for this action.
Configuration
In the CONFIGURATION section of the action pane, configure the following parameters:
- Close: Choose which browser to close:
- Active browser: Close the active browser on the host machine. If you use this action in the middle of the workflow, be sure to add an action to switch to another browser to continue browser automations. Otherwise, the robotic task won't know which browser to use after you close the active one.
- Specific browser: Close a browser by specifying its type.
- Browser type: Specify the browser type using a dropdown menu. Options include Google Chrome, Firefox, Edge, and Opera.
- All browsers opened by robot: Close all browsers that the robot opened during this execution.
After completion
In the AFTER COMPLETION area of the action pane, configure the following parameters:
- Wait before executing next action: Enter the number of seconds the robotic task waits before it continues to the next action in the robotic task definition.
- Take a screenshot: If you select this option, the robotic task takes a screenshot of the host machine immediately after the action completes successfully.
Does browser alert exist?
Browser alerts may interrupt your robot and prevent it from completing its tasks. To avoid this issue, you can use this action to identify whether there is a browser alert, then use the Interact with browser alerts action to interact with the alert if one is discovered.
This action checks if an alert exists on the active browser tab. If an alert exists, the robotic task performs the actions in the Yes workflow. If an alert does not exist, the robotic task performs the actions in the No workflow. If either workflow (Yes or No) is left blank and the action returns Yes or No, the robotic task will skip that workflow and proceed to the next action since neither workflow is required.
Configuration
In the CONFIGURATION section of the action pane, configure the following parameters:
- Wait time: Lets you specify the maximum amount of time the robotic task should wait for a browser alert. If a browser alert is found before the defined time, the robotic task will continue with the Yes workflow. If a browser alert is not found within the defined time, the robotic task continues with the No workflow. Choose from these options:
- Use default max wait time: When selected, the robotic task waits for the default wait time of 30 seconds.
- Enter max wait time: When selected, you can enter the maximum time (in seconds) the robotic task should wait. This number must be greater than zero. This field lets you enter a text string, choose a variable, or use the expression editor.
- Don't wait: When selected, the robotic task does not wait and immediately continues the action.
After completion
- Wait before executing next action: Enter the number of seconds the robotic task waits before it continues to the next action in the robotic task definition.
- Take a screenshot: If you select this option, the robotic task takes a screenshot of the host machine immediately after the action completes successfully.
Get attribute
This action lets you find the attribute value of one or more elements on the web page.
You can configure CONFIGURATION, OUTPUTS, and AFTER COMPLETION parameters for this action.
Configuration
In the CONFIGURATION area of the action pane, configure the following parameters:
Output
This action returns a list. Each index in the list corresponds to the attribute value of one element. If the attribute for any element isn't found, the value at that index is null.
In the OUTPUTS area of the action pane, configure the following parameters to store this result:
- Operator: Select an option to store the result as a single-value variable (
is stored as) or add the result as a multiple-value variable (is appended to).
- Target: Enter the name of the robotic task variable where you want to store or append the result. If your variable is type CDT, you can specify which field of a CDT to store the result into using dot notation.
After completion
In the AFTER COMPLETION area of the action pane, configure the following parameters:
- Wait before executing next action: Enter the number of seconds the robotic task waits before it continues to the next action in the robotic task definition.
- Take a screenshot: If you select this option, the robotic task takes a screenshot of the host machine immediately after the action completes successfully.
Get browser alert text
This action returns the text displayed in the active browser alert.
Configuration
In the CONFIGURATION area of the action pane, configure the following parameters:
- Operator: Select an option to store the result as a single-value variable (
is stored as) or add the result as a multiple-value variable (is appended to).
- Target: Enter the name of the robotic task variable where you want to store or append the result. If your variable is type CDT, you can specify which field of a CDT to store the result into using dot notation.
- Fail if: Determines the condition under which the action should fail. There is one available option:
- Alert not found: When this checkbox is marked, the action fails if a browser alert is not found. Use this parameter if a browser alert must be found for the robotic task to continue.
After completion
In the AFTER COMPLETION area of the action pane, configure the following parameters:
- Wait before executing next action: Enter the number of seconds the robotic task waits before it continues to the next action in the robotic task definition.
- Take a screenshot: If you select this option, the robotic task takes a screenshot of the host machine immediately after the action completes successfully.
Get table values
This action retrieves data out of an HTML formatted table, making it easy to extract information from large complex tables and tables that span multiple pages. The data you retrieve can then be used in Appian or written into other applications like Microsoft Excel.
Note: This action only supports browser tables with an HTML table structure.
Configuration
In the CONFIGURATION area of the action pane, configure the following parameters:
- Table selector: Lets you identify the table on the web page based on a Selenium By class and matching value. The action selectors include:
- Class Name
- CSS Selector
- ID
- Link Text
- Name
- Partial Link Text
- Tag Name
- XPath
- Next page selector: This is the pagination control that the web page is using to navigate to the next set of data in the table. This is usually a button or a link and is based on a Selenium By class and matching value. This parameter uses the same action options as the Table selector.
Output
This action returns the table data in a map array.
In the OUTPUTS area of the action pane, configure the following parameters to store this result:
- Operator: Select an option to store the result as a single-value variable (
is stored as) or add the result as a multiple-value variable (is appended to).
- Target: Enter the name of the robotic task variable where you want to store or append the result. If your variable is type CDT, you can specify which field of a CDT to store the result into using dot notation.
After completion
- Wait before executing next action: Enter the number of seconds the robotic task waits before it continues to the next action in the robotic task definition.
- Take a screenshot: If you select this option, the robotic task takes a screenshot of the host machine immediately after the action completes successfully.
Usage considerations
- This action does not work when unusual data, such as images, or merged cells are present in the fields. For example, if the number of columns in a row differs from the number of headers, an empty table displays.
- The action does not work if it has double headers; e.g.,
<th> elements in both the top row and first column, or if header names are duplicated.
- This action works with any header configuration. If
<th> elements are present but empty, placeholder headers (Header N) are generated alongside the remaining data. Without <th> elements, the first row becomes the header.
This action returns the table data in a map array.
Example
| H1 |
H2 |
H3 |
| Data1 |
Data2 |
Data3 |
| Data4 |
Data5 |
Data6 |
This example table returns the following map array:
[H1:Data1,H2:Data2,H3:Data3]; [H1:Data4,H2:Data5,H3:Data6].
Interact with browser alerts
Browser alerts may interrupt your robot and prevent it from completing its tasks. To avoid this issue, you can set up your robotic task to identify whether there is a browser alert then use this action to interact with the alert if one is discovered.
Configuration
In the CONFIGURATION section of the action pane, configure the following parameters:
- Interaction: Lets you specify what you want the robotic task to do with a browser alert. Choose from these options:
- Accept: This option acknowledges the information provided in the alert and agrees to proceed with the action that triggered the alert. For example, an alert may notify a user that a website is requesting access to their location, and accepting the alert allows the website to access the user's location data.
- Dismiss: This option acknowledges the information provided in the alert but chooses not to proceed with the action that triggered the alert. For example, an alert may notify you that a website is attempting to download a file, and dismissing the alert prevents the download from occurring. Dismissing an alert can prevent a robotic task from proceeding, and you may need to initiate a new action so that the robotic task can continue.
- Type Text: When selected, you can enter text that the robotic task should enter on the browser alert. For example, some websites use alerts that require input. One common type of alert is a confirmation message that asks for a response of
yes or no to complete an action. This helps prevent accidental or unwanted actions on the website. Another type of alert you may see is a search prompt.
Some websites display search alerts to help you find what you're looking for quickly. These prompts typically ask you to enter a keyword to search. This field lets you enter a text string, choose a variable, or use the expression editor.
After completion
- Wait before executing next action: Enter the number of seconds the robotic task waits before it continues to the next action in the robotic task definition.
- Take a screenshot: If you select this option, the robotic task takes a screenshot of the host machine immediately after the action completes successfully.
Interact with element
This browser action lets you interact with elements on the screen, based on the selection and configurations you specify.
You can configure CONFIGURATION and AFTER COMPLETION parameters for this action.
Configuration
In the CONFIGURATION area of the action pane, configure the following parameters:
- Selector: Lets you identify an element on the web page based on a Selenium By class and matching value. The options include:
- ID
- Link Text
- Partial Link Text
- Name
- Tag Name
- XPath
- Class Name
- CSS Selector
- Wait for element: Lets you specify the maximum amount of time the robotic task should wait for the element before moving on. If the element is found before the defined time, it will continue as soon as the element is found. Choose from these options:
- Use default max wait time: When selected, the robotic task waits for the time you set in the Set timeout in seconds action. If this time elapses without finding the element, the action completes.
- Enter explicit wait time: When selected, you can enter the maximum time (in seconds) the robotic task should wait. This number must be greater than zero. If this time elapses without finding the element, the action completes.
- Don't wait: If the element isn't found, the action completes without waiting.
- Interaction: Contains multiple options:
- Click on element
- Double-click on element
- Right click on element
- Select dropdown choice by index: Value input must be greater than zero.
- Select dropdown choice by visible text: When you select this option, specify the visible text to find.
- Select dropdown choice by value: When you select this option, specify the value to find.
- Select checkbox (if not already selected)
- Deselect dropdown choice by index: Value input must be greater than zero.
- Deselect dropdown choice by visible text: When you select this option, specify the visible text to find.
- Deselect dropdown choice by value: When you select this option, specify the value to find.
- Deselect checkbox (if already selected)
- Toggle checkbox
- Update value: When you select this option, specify the new value.
- Update value with a document: Select the document you wish to upload using a parameter or constant through the expression editor.
- Update value with username: Select a username associated with a credential entry. To start, choose the selection method for the credential:
- Selection method: Choose whether to use any available credential for an application, or a specific credential entry. Additional options appear based on your selection.
- Any available credential: When selected, a Select application dropdown menu appears for you to select the application to use. The robotic task uses any available credential's username for the selected application.
- Specific credential: When selected, a Select credential dropdown menu appears for you to select a credential entry to use. Each entry shows the credential's application name and username. The robotic task will use the username associated with the credential.
- Reserved credential: Choose a reserved credential. This option applies only when you're using the current robotic task as a robotic subtask. You can select a credential that was reserved and saved to a variable in the parent robotic task.
- Update value with password: Select a password associated with a credential entry. To start, choose the selection method for the credential:
- Selection method: Choose whether to use a password associated with a previously referenced credential, or a specific credential entry. Additional options appear based on your selection.
- Previously referenced credential: When selected, a Select application dropdown menu appears for you to select the application associated with a credential referenced previously in the robot's workflow. The robotic task uses the password associated the selected application and previously referenced credential. Note that the robotic task execution will fail if it attempts to use a password based on a previously referenced credential and no credential was added earlier in the robotic task. First input the username, and then use this option to input the related password.
- Specific credential: When selected, a Select credential dropdown menu appears for you to select a credential entry to use. Each entry shows the credential's application name and username. The robotic task will use the password associated with the credential.
- Clear value
- Scroll to element before interaction: Choose whether to scroll on the browser so the element is in view before the robotic task interacts with it. This can be helpful if you're using screen recordings or screenshots and want the element to be visible.
- Fail if…: Determines the condition under which the action should fail. Available options are:
- Element not found: After the configured wait time, the element still does not exist on the web page. Use this if the element must be found for the robotic task to continue.
- More than one element is found: Multiple elements on the page matched the selection criteria as defined in Selector. Use this if you only expected to find one element.
- Interaction is invalid: The selected interaction can't be executed. Examples of this include attempting to click on a disabled element, attempting to select a dropdown choice from an element that isn't a dropdown, etc. Use this when this interaction is required for the robotic process to continue.
After completion
In the AFTER COMPLETION area of the action pane, configure the following parameters:
- Wait before executing next action: Enter the number of seconds the robotic task waits before it continues to the next action in the robotic task definition.
- Take a screenshot: If you select this option, the robotic task takes a screenshot of the host machine immediately after the action completes successfully.
Navigate to URL
This action opens the browser and navigates to the specified URL. If there is a browser already open, this action will open a window/tab inside it.
You can configure CONFIGURATION and AFTER COMPLETION parameters for this action.
Configuration
In the CONFIGURATION area of the action pane, configure the following parameter:
- URL: Enter the URL to which you want the robotic task to navigate. This URL must be complete, that is, it must contain the protocol, domain name, and path.
After completion
In the AFTER COMPLETION area of the action pane, configure the following parameters:
- Wait before executing next action: Enter the number of seconds the robotic task waits before it continues to the next action in the robotic task definition.
- Take a screenshot: If you select this option, the robotic task takes a screenshot of the host machine immediately after the action completes successfully.
Open browser
This browser action lets you initialize the browser of your choice and navigate to a URL. If a browser window is already open, this action opens a new tab in the existing window.
Note: To open a browser window, the robotic task needs to have the corresponding browser driver as a support file.
You can use this action multiple times in a robotic task. The most recently opened browser is considered the active browser in the context of actions like Switch tab or browser.
You can configure CONFIGURATION and AFTER COMPLETION parameters for this action.
Configuration
In the CONFIGURATION area of the action pane, configure the following parameters:
- Type of Browser: Set the browser type using a dropdown menu. The default is Google Chrome. Additional browsers include Firefox, Edge, Edge (IE Mode), and Opera.
- If a Chrome, Firefox, Edge, or Opera browser window is already open on the host machine, this action opens a new tab in that window.
- If using Edge (IE Mode), this should be the first browser open in the robotic task. You'll also need to use the Internet Explorer driver as the support file.
- URL: Enter the URL to navigate to once the browser opens.
- Set download directory: When you mark this checkbox, the Path to folder field displays and you can predefine the location to the download folder. Always use the full path for best results. This field only displays if you are using Chrome or Firefox.
- Disable notifications: When this checkbox is marked, Appian stops the browser from showing pop-up messages and alerts. This checkbox only displays if the browser is Chrome or Firefox.
After completion
In the AFTER COMPLETION area of the action pane, configure the following parameters:
- Wait before executing next action: Enter the number of seconds the robotic task waits before it continues to the next action in the robotic task definition.
- Take a screenshot: If you select this option, the robotic task takes a screenshot of the host machine immediately after the action completes successfully.
Usage considerations
- If you have a robotic task that includes more than one Open Browser action, the Set download directory and Disable notifications parameters must be configured in the first Open Browser action. These parameters apply to all browser tabs that the robotic task opens during an execution.
- Chrome doesn't let you download files to some places, like the desktop or the home folder. To be safe, pick a simple folder without system importance.
- ChromeDriver won't automatically wait for downloads to finish. If you quit too early by calling driver.quit() too soon, downloads might get cut off.
- Avoid using relative paths because they can be unreliable. Always use the full path for best results.
Return tab value
This action returns information about the browser tab such as the URL, the tab title, the handle ID and the page source HTML. This capability is especially useful if you want to use the handle ID with the Switch tab or browser low-code action.
Configuration
In the CONFIGURATION area of the action pane, configure the following parameters:
- Value to return: Select the type of information that you want to return. Options include URL, Title, Page Source, or Handle ID. If you select Handle ID an additional parameter called Tab type displays.
- Tab type: Select whether you want to return the handle ID for the Active tab or All tabs that are open in the browser.
Output
This action returns a text value.
In the OUTPUTS area of the action pane, configure the following parameters to store this result:
- Operator: Select an option to store the result as a single-value variable (
is stored as) or add the result as a multiple-value variable (is appended to).
- Target: Enter the name of the robotic task variable where you want to store or append the result. If your variable is type CDT, you can specify which field of a CDT to store the result into using dot notation.
After completion
- Wait before executing next action: Enter the number of seconds the robotic task waits before it continues to the next action in the robotic task definition.
- Take a screenshot: If you select this option, the robotic task takes a screenshot of the host machine immediately after the action completes successfully.
Return window title
This action returns the title of the current window.
You can configure OUTPUTS and AFTER COMPLETION parameters for this action.
Output
This action returns a text value.
In the OUTPUTS area of the action pane, configure the following parameters to store this result:
- Operator: Select an option to store the result as a single-value variable (
is stored as) or add the result as a multiple-value variable (is appended to).
- Target: Enter the name of the robotic task variable where you want to store or append the result. If your variable is type CDT, you can specify which field of a CDT to store the result into using dot notation.
After completion
In the AFTER COMPLETION area of the action pane, configure the following parameters:
- Wait before executing next action: Enter the number of seconds the robotic task waits before it continues to the next action in the robotic task definition.
- Take a screenshot: If you select this option, the robotic task takes a screenshot of the host machine immediately after the action completes successfully.
Select frame
This action lets you switch the context for the web page if frames or iframes are present. Use this action to switch to the frame or iframe or navigate out of it. Note that all following actions within the browser will use the frame selected by this action.
You can configure the CONFIGURATION and AFTER COMPLETION parameters for this action.
Configuration
In the CONFIGURATION area of the action pane, configure the following parameters:
- Switch to: Choose the frame to use as the context: Frame, Parent Frame, or Top-most Frame. If you select Frame, use the Selector configuration to choose how to identify it. A parent frame is the frame immediately above the currently selected frame. The top-most frame is the frame that contains all other frames on the page. There can be more than one parent frame on a page, but there is only one top-most frame in a page. This action makes no changes if the top-most frame on the page is already selected and you choose either Parent Frame or Top-most Frame.
- Selector: Lets you identify the frame on the web page based on a Selenium By class and matching value. This option only appears when Frame is selected in the Switch to option. The options include:
- ID
- Link Text
- Partial Link Text
- Name
- Tag Name
- XPath
- Class Name
- CSS Selector
- Index
- Wait for element: Lets you specify the maximum amount of time the robotic task should wait for the element before moving on. If the element is found before the defined time, it will continue as soon as the element is found. This option only appears when Frame is selected in the Switch to option. The action won't wait when other options are selected. Choose from these options:
- Use default max wait time: When selected, the robotic task waits for the time you set in the Set timeout in seconds action. If this time elapses without finding the element, the action completes.
- Enter explicit wait time: When selected, you can enter the maximum time (in seconds) the robotic task should wait. This number must be greater than zero. If this time elapses without finding the element, the action completes.
- Don't wait: If the element isn't found, the action completes without waiting.
- Fail if…: Determines the condition under which the action should fail. This option only appears when Frame is selected in the Switch to option. Available options are:
- Element not found: After the configured wait time, the element still does not exist on the web page. Use this if the element must be found for the robotic task to continue.
- Interaction is invalid: The selected interaction can't be executed. Examples of this include finding an element that isn't a frame or iframe. Use this when this interaction is required for the robotic process to continue.
After completion
In the AFTER COMPLETION area of the action pane, configure the following parameters:
- Wait before executing next action: Enter the number of seconds the robotic task waits before it continues to the next action in the robotic task definition.
- Take a screenshot: If you select this option, the robotic task takes a screenshot of the host machine immediately after the action completes successfully.
Set timeout in seconds
This action sets the browser timeout in seconds.
You can configure CONFIGURATION and AFTER COMPLETION parameters for this action.
Configuration
In the CONFIGURATION area of the action pane, configure the following parameter:
- Timeout seconds: Enter the number of seconds you want the robotic task to wait on the web page before it times out.
After completion
In the AFTER COMPLETION area of the action pane, configure the following parameters:
- Wait before executing next action: Enter the number of seconds the robotic task waits before it continues to the next action in the robotic task definition.
- Take a screenshot: If you select this option, the robotic task takes a screenshot of the host machine immediately after the action completes successfully.
Switch tab or browser
This action lets you switch to a new tab in the current browser or a new browser before proceeding. If you use a browser without tabs, this action will always open a new window. In this action, the active browser is the most recently used or opened browser. Similarly, the active tab is the most recently used tab in an open browser window.
You can configure CONFIGURATION and AFTER COMPLETION parameters for this action.
Configuration
In the CONFIGURATION area of the action pane, configure the following parameter:
After completion
In the AFTER COMPLETION area of the action pane, configure the following parameters:
- Wait before executing next action: Enter the number of seconds the robotic task waits before it continues to the next action in the robotic task definition.
- Take a screenshot: If you select this option, the robotic task takes a screenshot of the host machine immediately after the action completes successfully.
