| The capabilities described on this page are included in Appian's standard capability tier. Usage limits may apply. |
Required role: Developer or Administrator
This page describes how to configure a robotic task. Robotic task configuration is organized into three tabs:
You configure these settings when you create a robotic task. You can change these settings at any time.
To configure a robotic task:
The following image highlights the interface elements that you use to set up a robotic task definition:
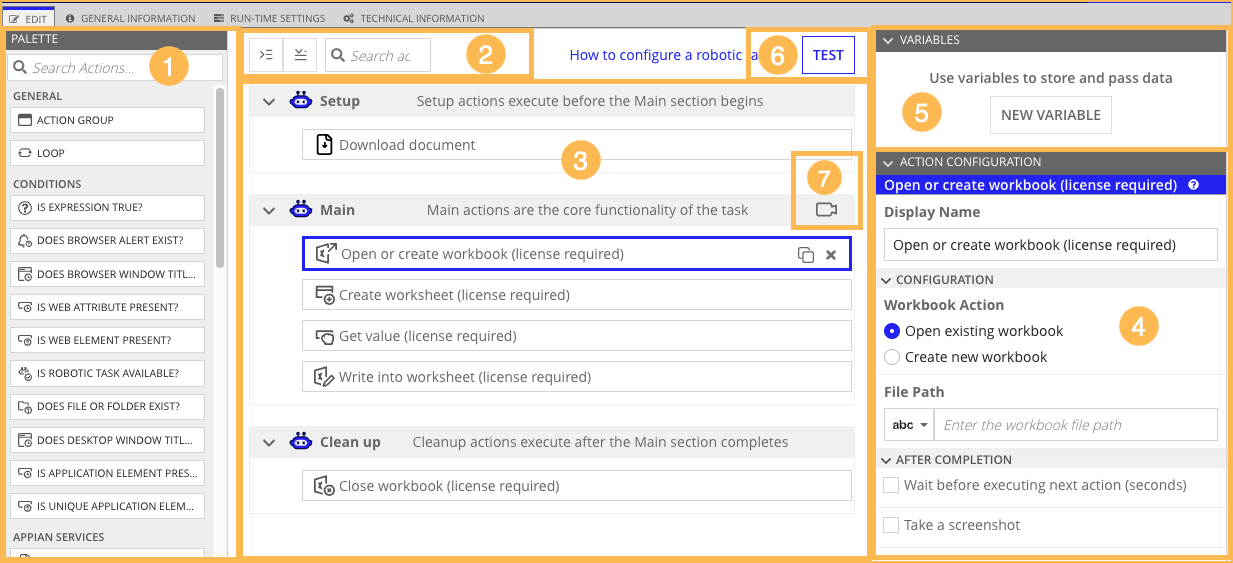

Similar to the Interface Designer, the Palette shows you the actions that are available to add to the robotic task. Use the search bar to quickly find an action by name, or browse the list of actions within each low-code module.
The Action Group action is part of the General module and can help you organize actions that work together to achieve a desired outcome. For example, you may want to organize your robotic task definition so that login actions are contained in an action group. To add an action group to the robotic task definition, click and drag Action Group from the Palette to a section.
Tip: As a best practice, limit each action in your robotic task to 12 or fewer nested actions. Having more than 12 nested actions can lead to performance problems. Instead, split the robotic task into smaller robotic subtasks to prevent problems from occurring.
At the top of the robotic task definition, you'll find options to help you find what you're looking for:

By default, every robotic task definition has a Setup, Main, and a Clean up section. Click the arrow in the section's toolbar to expand or collapse that section.
Within each section, you can drag and drop actions to new positions or delete an action by hovering over the action and clicking Delete action.
Setup section: Certain tasks may need to be completed to prepare the robot for an item execution. You can define those actions in the setup section of the robotic task definition. If you use credentials in a setup section, the credentials are reserved and won't be released until the clean up section successfully completes. This may impact credential availability if the setup and clean up sections are skipped for consecutive executions. See Execution Settings to learn more about how the robotic task behaves when the setup and clean up sections are skipped for consecutive executions.
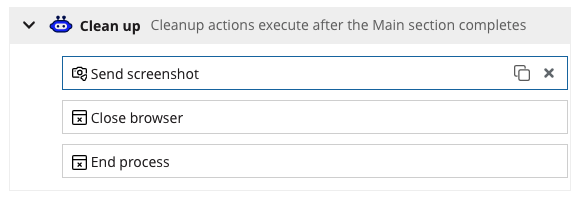
Clean up section: Whether the robotic task ended successfully or not, the end of an execution is a good moment to close the applications that the robotic task has opened or send the files generated during execution to the server. It's important to reset the robot to its previous conditions so subsequent robotic tasks can execute successfully. Without consistent starting conditions, other robotic tasks may not be able to start or complete. Remember that the steps you configure in this section only apply to the robotic task you're currently configuring. You don't need to add the clean up section to your main robotic task definition. The robotic task will always execute the clean up actions.
Tip: If the same robotic task executes multiple times consecutively, you have the option to skip the setup and clean up sections for faster executions.
When you add an action to the robotic task definition, the configuration options appear in the Action Configuration pane. The configuration options vary based on the action you're adding.
See the action documentation for details on each action's configuration options:
You can use robotic task variables to pass data between robotic task definition actions and other design objects like process models and interfaces. The robotic Variable grid should look familiar if you've worked with rule inputs in the Expression Editor or Interface Designer.
It's simple to reference your variables in a robotic task. Text fields that are found in the configuration options for robotic task actions allow you to select from a variable picker. Use the variable picker to choose a variable as a value for your robotic task. What's more, when you rename variables, Appian automatically updates their names throughout your entire robotic task.
See the Robotic Task Variables topic for more detailed information.
To create a variable in a robotic task:
Credential type is used to reserve credentials for use in robotic subtasks.
Dropdown. The default value of the variable at the start of the task.Password and Dropdown. Indicates if the variable can pass values to the robotic task before it executes. Before the robotic task executes, the user will be prompted to provide an input.The Test button launches the debugging tool to where you can go through the robotic task definition action-by-action and isolate where issues might arise. See the Troubleshoot Appian RPA topic for detailed information about the debugging process.
The robotic task definition supports the task recorder tool. The task recorder can automatically record your browser interactions and translate them into robotic task actions. You can start a recording from a section, action group, or conditional flow path.
To start a recording:
