This page describes how to configure record events, capture event data, and use that data to monitor and improve your business processes.
Your enterprise is built on key business processes. Whether it's logging support cases, completing orders, or managing employees, keeping track of who does what and when can help you better understand your business and improve how it operates.
Record events allow you to seamlessly track what happens in your applications and when, with minimal configuration on your part.
Once you start tracking event data, you can use that data to:
Display an activity log: You can provide application users with a timeline of events so they can monitor and respond to those events.
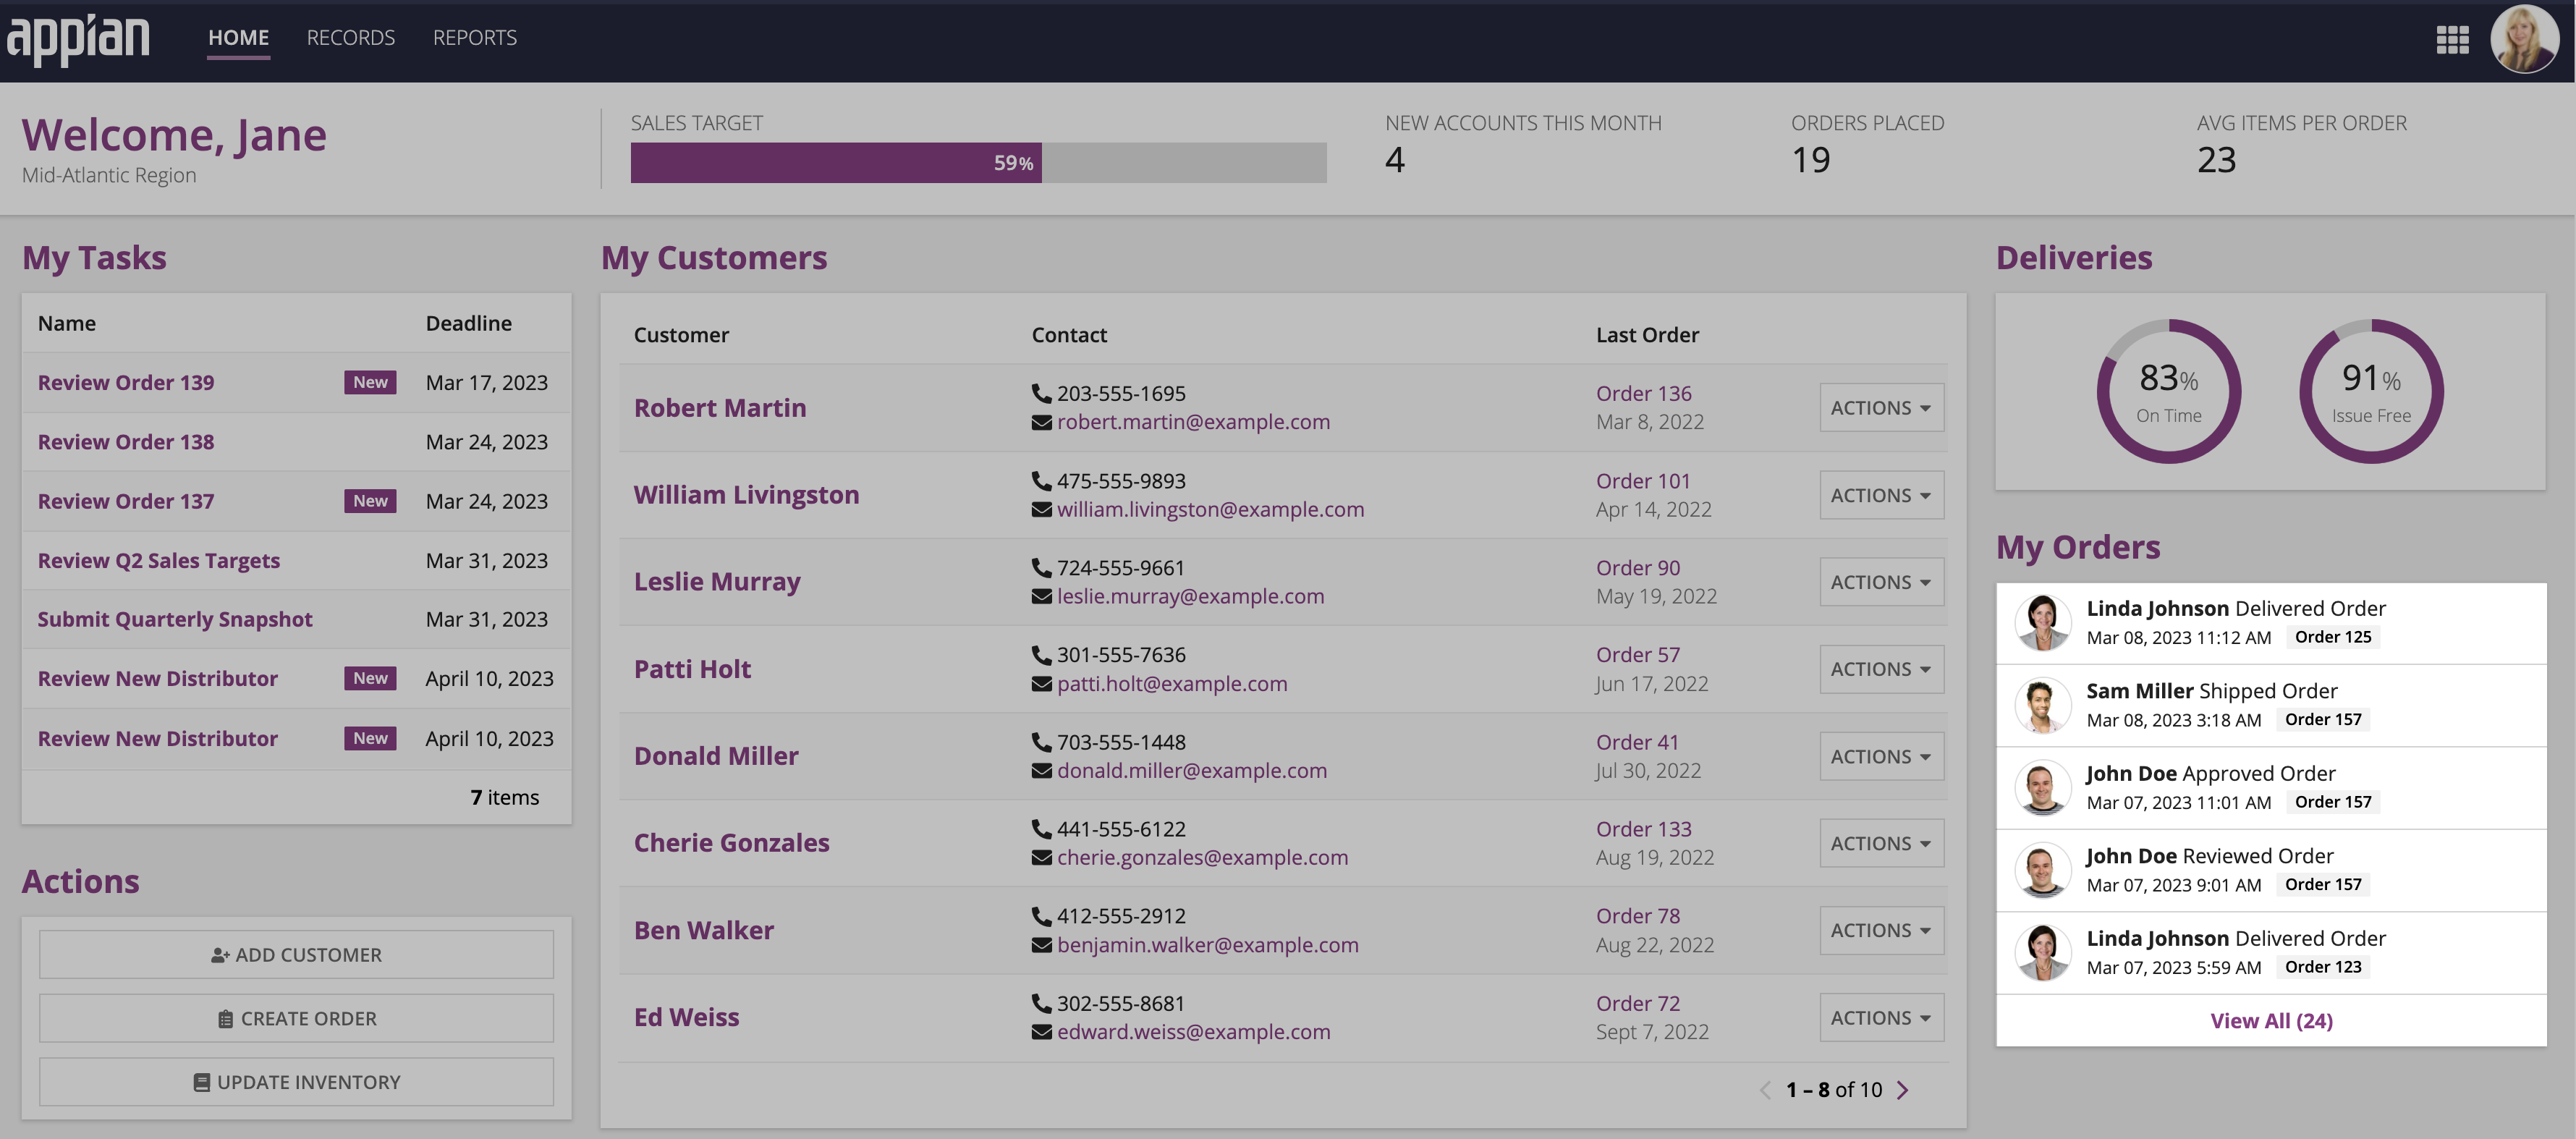
For example, in a Financial Onboarding app, an account manager could see at-a-glance the latest activities that took place on a client's request for a new account, so they can decide if they need to follow up on an internal review step that's taking longer than expected.
Improve business processes: You can analyze the larger behavior of a business process, so your organization can identify opportunities to improve that process.
For example, in the same Financial Onboarding app, the information you gather about activities taking place during the account evaluation could be used to determine how long on average the full evaluation takes or how long a particular sequence of activities in an evaluation takes. With this information, your organization can begin to identify trouble spots in the process itself. Even better, you can mine your event data using Appian's process mining capabilities to find new ways to optimize your business processes.
Configuring record events is straightforward, once you've made a few decisions about what events you'll track and when. This section provides guidelines to help with those decisions.
While you can configure record events on any synced record type, we recommend that you only configure it on record types that represent your major business concepts or processes. You should not configure record events on record types that contain lookup data.
For example, in a Financial Onboarding app, you may have the following record types:
Depending on how you want to use your event data, you could configure record events on the Account record type to track changes that occur in the account management process.
You could also configure record events on the Customer and Employee record types to create an activity log of customer changes (like new zip codes or a change in licensing status) or employee changes (like promotions or departure dates).
It's unlikely, however, that you would need to configure record events on the Region record type, since this record type stores lookup data that is unlikely to change.
The types of events (or event types) you track should be meaningful and comprehensive to ensure you get a complete picture of your business operations.
Event types should focus solely on the activity that occurs during the event. Avoid using the event type to capture dynamic details about the event. Instead, capture those details in additional event history fields. For example, instead of creating an event type called "Financial Review Completed by Angela Lewis," create an event type called "Financial Review Completed". Then, at the time of the event, write the employee who completed the review to the user field of the event history record.
Let's look at an example of event types for a Financial Onboarding app. In this app, you would want to track when a customer applies for an account and each action your employees take to evaluate that account before creating it. To do so, you would configure the following event types:
These event types represent all possible activities that could occur in the process. Ideally, each event occurs only once and in a specific order. A process improvement analysis can then focus on those times when events are skipped, occur more than once, or occur in an unexpected order. Tracking only these events leads to optimal data for analysis.
However, if you're using event data in an activity log, you may also decide to track events that are expected to occur more than once and at any time during the process. We call these ad hoc events.
For example, in a Financial Onboarding app, an employee might update the customer's contact information at any time (Updated), or a reviewer might add a comment on the account with a question that needs to be answered (Commented). These kinds of events are useful in the context of an activity log, but they're not very useful when analyzing how the evaluation process itself is doing. If you're tracking events to improve your processes, you'll want exclude ad hoc events from any process analysis.
To support process analysis, you'll want to consistently configure when you write record events, so that the analysis can include accurate calculations of activity duration.
At the end of an event (Required): When using out-of-the-box record events, you'll need to configure your Write Records nodes to write a record event when the event is complete. For example, in a Financial Onboarding app, you would write an event when financial document verification is done, with an event type of "Financial Document Verification Completed".
This approach captures an end timestamp for each event. With this timestamp for each event, you can calculate the duration of an activity by measuring the time between consecutive events. For example, to determine the duration of a financial review, you could calculate the time between the end of the previous activity (the Financial Document Verification timestamp) and the end of the Financial Review activity (the Financial Review timestamp).
At the start and end of an event: With additional configuration, you can use record events to track start and end timestamps for events, so you can calculate a waiting time between activities. To follow this approach:
start).start field when the event starts and the default timestamp field when the event ends.Then, to determine the activity duration, you can calculate the time between the start timestamp (start) and the end timestamp (timestamp) of the event. Or to determine the waiting time between activities, you can calculate the time between the end timestamp of one event and the start timestamp of the next event. For example, between timestamp for Financial Document Verification and start for Financial Review.
Record events can be used to track which user or automation takes action on your records, so you can measure how automated a given process is. Use the standard automation types when configuring how your process model writes events, and configure the Event History List component to display either the username or automation type for each event.
To configure and use events in your applications:
You can configure record events on any record type that uses a database as the source and has data sync enabled.
To configure record events, you will specify two record types to store your event information:
Event History: The record type used to store who completed an event and when. For example, John Smith created order SO1234 on February 28, 2023.
Event Type Lookup: The record type used to store the different types of events that can occur in your business processes. For example, Created Order, Updated Order, Reviewed Order, Shipped Order. This data is static and allows you to consistently reference the types of events that can occur. In a database, this would be considered a lookup table.
If you're tracking events for the first time or you want to standardize your event data, you can generate these two new record types. Alternatively, if you have record types that already store this data, you can use those existing record types as your Event History and Event Type Lookup record types.
Tip: If you haven't tracked business events before, check out the following considerations before getting started.
When you generate new record types to store your event data, Appian will also generate the underlying database tables for the new record types. The new tables will always be written to the same source used for the base record type. This source must be a MariaDB, MySQL, Oracle, SQL Server, PostgreSQL, or Aurora MySQL database.
To generate new record types:
Under Types of Events, specify the types of events that can occur in your business processes. The event types will be written as values in the generated Event Type Lookup record type.
| Option | Action |
|---|---|
| Include Common Event Types | Keep the Created records, Updated records checkbox selected to capture events for creating and updating records in the base record type. This will automatically configure any generated Create or Update record actions to write records and events. If you've already configured or generated record actions before you configured record events, you will need to manually update your Write Records nodes in your process models to also write events. Learn more. |
| Other Event Types | Enter any additional event types that you'd like to capture. If you included common event types, they will be automatically included with any other event types you enter. Enter each additional event type on a separate line and format them in the past tense. For example: Reviewed OrderApproved OrderCanceled OrderShipped OrderDelivered Order
|
Event History: By default, this value is the base record type's name appended with Event History. For example, Order Event History. Keep the default or update as necessary.
Event Type Lookup: By default, this value is the base record type's name appended with Event Type. For example, Order Event Type. Keep the default or update as necessary.
Keep the Download database script checkbox selected to download an auto-generated database script when you click GENERATE. This script contains the SQL commands that Appian will use to create database tables for the two new record types.
Caution: The auto-generated database script is not saved in Appian, so we strongly recommend downloading the script now and storing it locally.
The generated Event History record type has the following configurations:
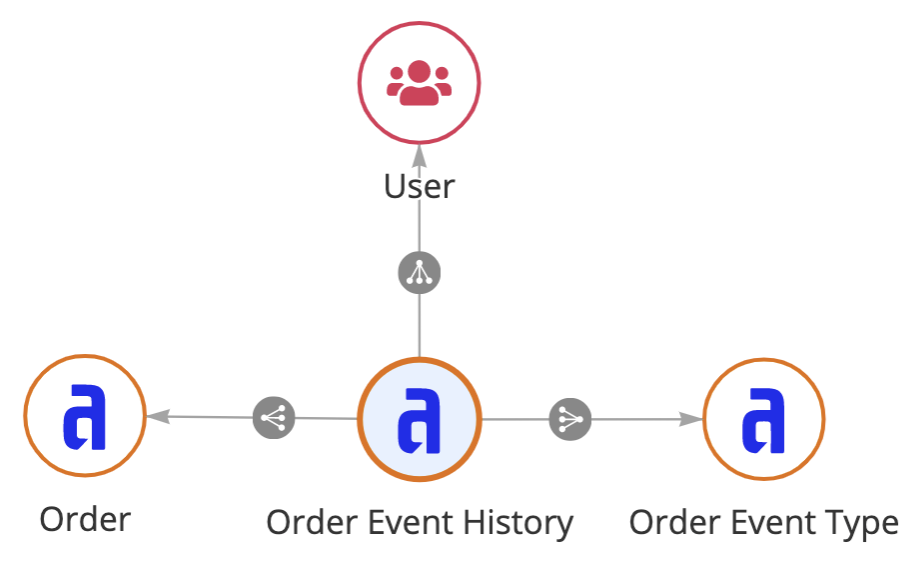
Relationships: Relationships for the generated record type include:
| Base record Type | Relationship | Related Record Type | Purpose | Example |
|---|---|---|---|---|
| Where you're configuring record events | One-to-many | Event History | Allows you to reference the different events associated with each record. | The Order record type has a one-to-many relationship with the Order Event History record type. |
| Event History | Many-to-one | Where you're configuring record events | Allows you to reference the record associated with each event. | The Order Event History record type has a many-to-one relationship with the Order record type. |
| Event History | Many-to-one | Event Type Lookup | Allows you to reference the types of events that can occur. | The Order Event History record type has a many-to-one relationship with the Order Event Type record type. |
| Event History | Many-to-one | User | Allows you to reference the user who completes an event. | The Order Event History record type has a many-to-one relationship to the User record type. |

Fields: The Event History record type contains six required fields by default:
| Default Field | Data Type | Description |
|---|---|---|
Id |
Number (Integer) | This is the primary key field, which is the unique identifier for each event. |
recordId |
Number (Integer) | The common field that establishes a relationship between the Event History record type and the base record type. This field has a foreign key constraint in the generated database table. |
eventTypeId |
Number (Integer) | The common field that establishes a relationship between the Event History record type and the Event Type Lookup record type. This field has a foreign key constraint in the generated database table. |
user |
User | The user who completed the event. If this value is null, Appian assumes the event occurred due to an automated activity in the process model. |
automationTypeId |
Number (Integer) | The type of automation that completed the event. |
timestamp |
Date and Time | The date and time when the event occurred. |
Note: You can modify the generated Event History record type to meet any additional business requirements.
The generated Event Type Lookup record type has the following configurations:
Fields: The Event Type Lookup record type contains two fields by default. Appian does not recommend adding fields to this record type, because it's meant to serve as a lookup table for the Event History record type.
| Default Field | Data Type | Description |
|---|---|---|
Id |
Number (Integer) | This is the primary key field, which is the unique identifier for each activity. This field is also the common field that establishes the relationship between the Event History record type and the Event Type Lookup record type. |
name |
Text | The name of the event that occurred. |
You may already have record types that store your event history and event types. If so, you can easily configure record events using those existing record types.
To use existing record types for this purpose, the base record type must have a one-to-many relationship to the related record type, and the relationship must allow Appian to write related records.
When selecting an existing record type to store your event history, it must have fields that represent the following items:
If you want to capture the type of automation that completes an event, the existing record type must also have fields that represent the following items:
Once you choose your record types, you'll need to specify the fields to use for the User, Timestamp, Automation Type ID, and Event Name. These field mappings will allow you to write events from the Write Records smart service.
To use existing record types:
Configure the following properties:
| Property | Value |
|---|---|
| Event History | Select a related record type to store all event data. The base record type must have a one-to-many relationship to this record type. |
| User Field | Select a field of type User from the selected Event History record type. This field will store the users who complete each event. |
| Automation Identifier Field | Select a field of type Number (Integer) from the selected Event History record type. This field will store the event's automation type. Make sure any existing data in this field corresponds to the list of supported automation identifers. |
| Timestamp Field | Select a field of type Date and Time from the selected Event History record type. This field will store the date and time when each event occurred. |
| Event Type Lookup | Select a related record type to store the different types of events. The Event History record type must have a many-to-one relationship to this record type. |
| Event Name Field | Select a field of type Text from the selected Event Type Lookup record type. This field will store the names of the different event types. |
You can modify an Event History record type to meet any additional business requirements.
For example, you can add fields, like description, to collect more information about an event. Any fields you add to the record type will appear in the Write Records smart service so you can specify the values to write for the event.
You may also want to configure the following options as well:
Appian recommends enabling the Keep data available at high volumes sync option on the generated Event History record type. Since an event can be logged whenever a record is added or changed, this can result in a large quantity of event data.
To ensure you have consistent and reliable access to your growing data source, you should enable the Keep data available at high volumes sync option on the Event History record type. This option will dynamically sync the latest 4 million rows of data whenever a full sync occurs. This will also prevent the record type from exceeding the synced row limit.
Note: You must have a scheduled full sync configured to enable this option.
To keep data available at high volumes:
Select the primary key field or a field of type Date or Date and Time to sort by the latest data. Appian will sort by this field in descending order.
Tip: To ensure that your data continues to sync quickly, the selected field should have an index configured on your database table. If the field does not have an index, you can generate a database index directly from the record type.
You may have already configured record events, then decide you want to start capturing the type of automation that completes each event in your business process. You can easily include the automation type in your event data by adding the automationId field to the Event History record type and updating your record events configuration.
To add the automationId field to the Event History record type:
automationTypeId. This field is created automatically if you generate new record types.To update your record events configuration:
Once you've updated your Event History record type and your record events configuration to store the automation type, you'll need to update any existing process models so the Write Records smart services will write the correct automation type in the record. Follow the steps below to set the Automation Type you want to capture when writing events.
Once you configure record events, you can incorporate event tracking into your new and existing process models using the Write Records smart service. When you configure the smart service to write records, you can also specify what events to write, when to write them, and how the events are completed.
Note: You can only write records and events using the Write Records smart service. You cannot use the a!writeRecords function to write records and events at the same time.
If you generate Create or Update record actions, Appian will automatically configure the Write Records node to write events.
If you do not generate your record actions, or you want to write more specific types of events (like Reviewed Order or Shipped Order), you can manually configure the Write Records node to write events.
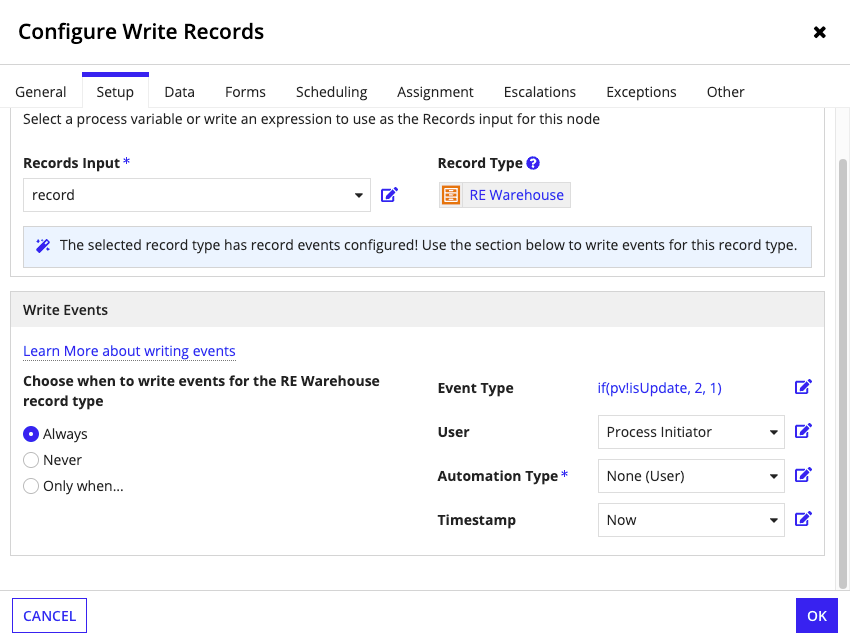
To write events:
Go to the Setup tab.
Tip: If you do not see the Setup tab in your node, replace the current node with a new Write Records node.

![]()
For Records Input, select a process variable or write an expression to specify the records to update. You can write a combined total of 50,000 records, related records, and events per node.
Note: If you include custom record fields in the Records Input, they will be ignored. Custom record fields are defined by and exist only in Appian, so attempting to write values for them will have no effect.
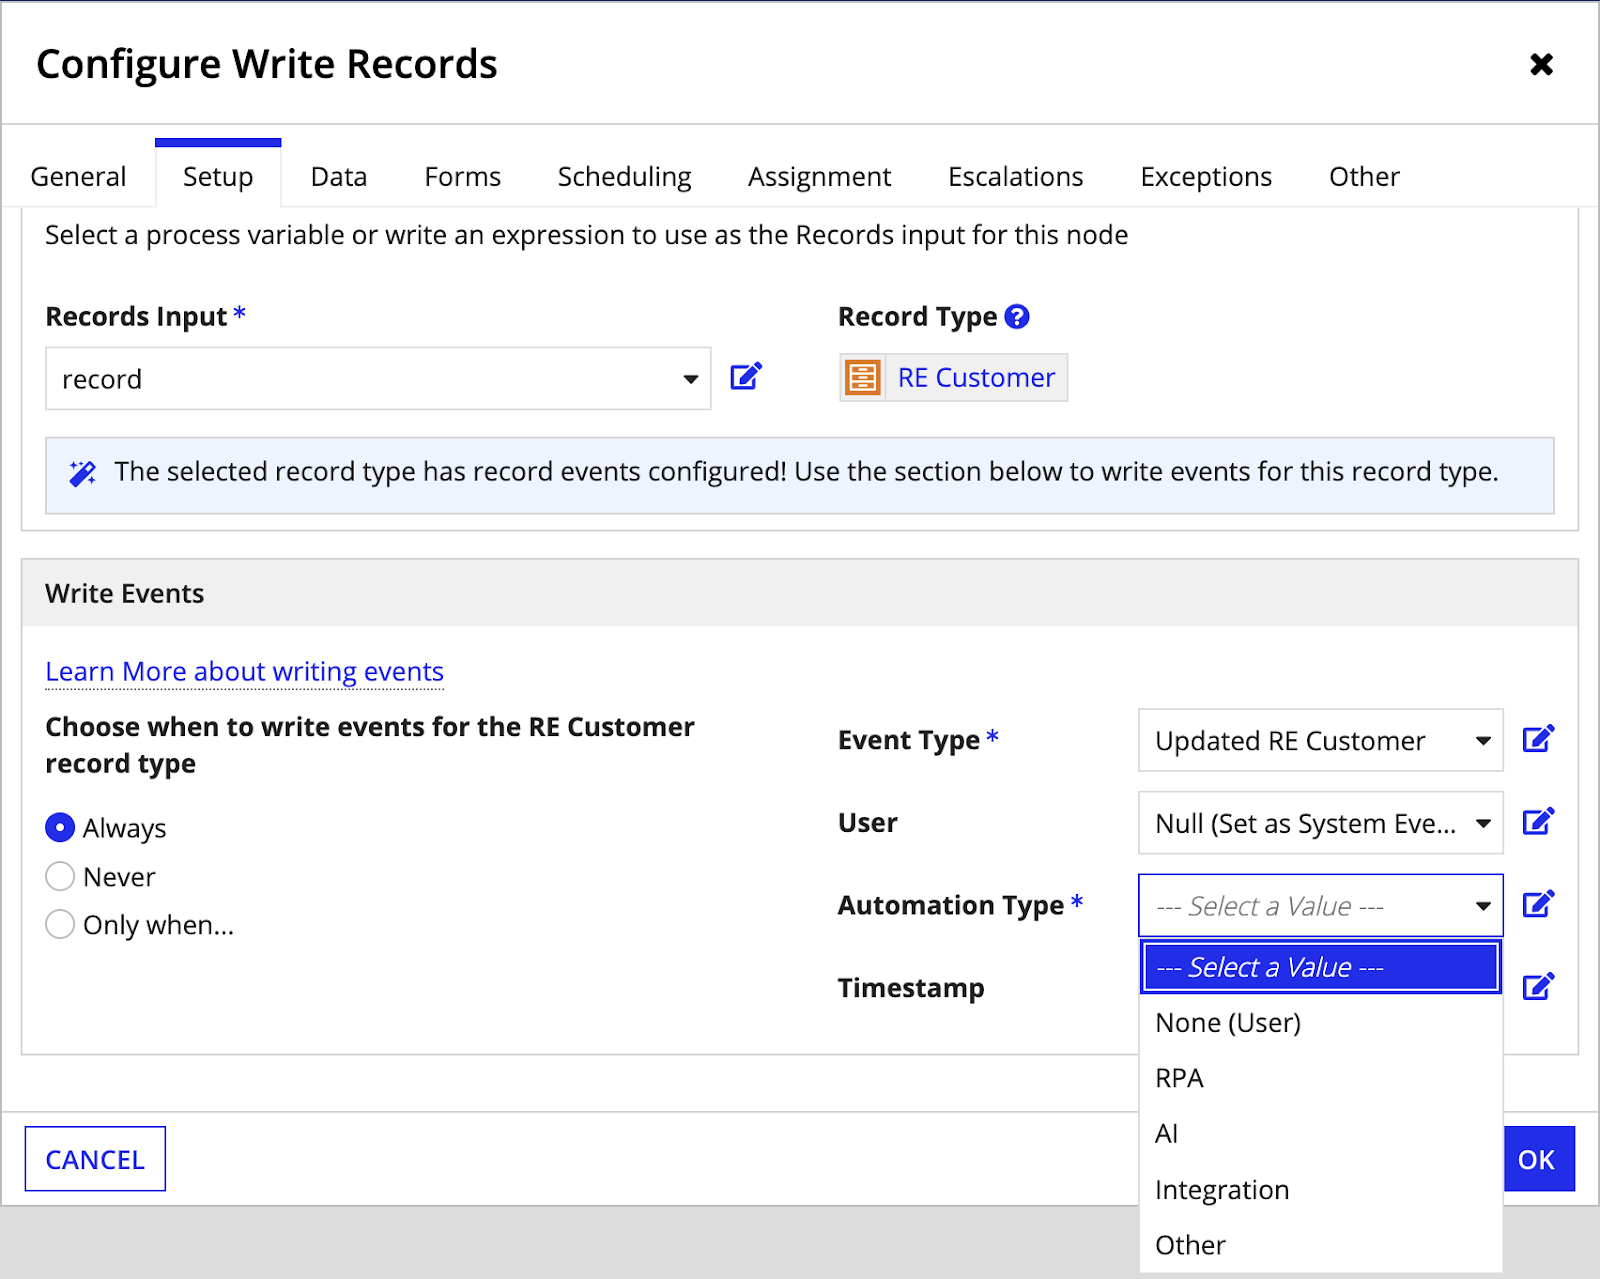
Select the values to write for the event. The field inputs are populated from the related Event History record type. You must map values for the following field inputs:
| Input | Value |
|---|---|
| Event Type | Use the dropdown to select an event type or use an expression to specify the event type. The dropdown list is populated from the values in the Event Type Lookup record type. If you use an expression, you must use the event type identifier to indicate the type of event. Learn more about conditionally choosing event values. |
| User | Use the dropdown to select the Process Initiator or a process variable of type User or Text, or use an expression to specify the user. If the event will be completed by an automated task, set the value to Null (Set as System Event). |
| Automation Type | Use the dropdown to select the type of automation that will complete the event, or use an expression to specify the automation type. If the event isn't automated, set the value to None (User) to indicate it will be completed by a user. Learn more about capturing automation types. |
| Timestamp | Use the dropdown to select Now (the date and time when the node is executed) or a process variable of type Date and Time, or use an expression to specify the date and time. |
The Write Records smart service only writes events for the record type associated with the Records Input value. Event data is not automatically create for any related record data, but it can be created using a separate Write Records node.
Tip: There are some scenarios where you may only want to write events and not records, like when you want to capture events for an automated task or a task escalation. See the Write Records smart service to learn how to write events without writing records.
When you're capturing automation types in your event data, remember to configure your Write Records smart services to write who or what completed each event. Even though a process might involve multiple users or automation types, you want your event data to show the user or automation type that actually completed the task.
In general, use the following guidelines to configure the User and Automation Type properties when writing events:
If the event was completed by a human, set the User property to the appropriate field from the Event History record type. Then, set the Automation Type property to None (User).
If the event was completed by automation, set the User property to Null (Set at System Event). Then, select the appropriate automation type for the Automation Type property.
Appian recommends categorizing automation types according to the following table:
| Automation Type | Identifier | Examples |
|---|---|---|
| None (User) | 1 | User Input Tasks like submitting a form |
| RPA | 2 | Execute Robotic Task smart service, robotic process automation (RPA) plug-ins |
| AI | 3 | AI Skills smart services (Classify Documents, Extract from Document, Classify Emails), AI plug-ins |
| Integration | 4 | Call Integration smart service, Call Web Service smart service, Invoke SAP BAPI smart service |
| Other | 5 | Expression Rules, Decisions, process orchestration, other smart services |
Note: The Write Records node will write the automation type by its corresponding identifier. If you write your own expression to capture the automation type, use a!automationId() to write the automation type's identifier.
When configuring Write Records nodes, consider how the event data you capture can best support your business needs. You can configure the User and Automation Type properties as described above, but you may want to capture more information or introduce more complicated rules for determining the automation type.
For example, one of your processes might send an automated email as the result of a user action. You could capture this as a system event by setting the Automation Type to Other, then also capture the user by setting the User to Process Initiator.
You might also choose to write an expression with conditional rules for which automation type should be captured. For more information, see a!automationId().
Of course, the full picture of how your events are completed can be complicated. You might have more than one type of automation attempting to complete the same task, or your process might require a user to complete a task after automation attempts it. In either case, Appian recommends capturing each attempt in a separate Write Records node to ensure your event data accurately reflects how the event was completed.
In the following example process, the Classify Documents Smart Service attempts to classify documents, but a user can classify them instead if it fails. The process has two Write Records nodes for the same "Classified Docs" event: one that writes event data if the AI skill successfully completes the task (1), and one that writes event data if a user successfully completes the task (2). A third Write Records node writes event data when a user reviews the documents (3).
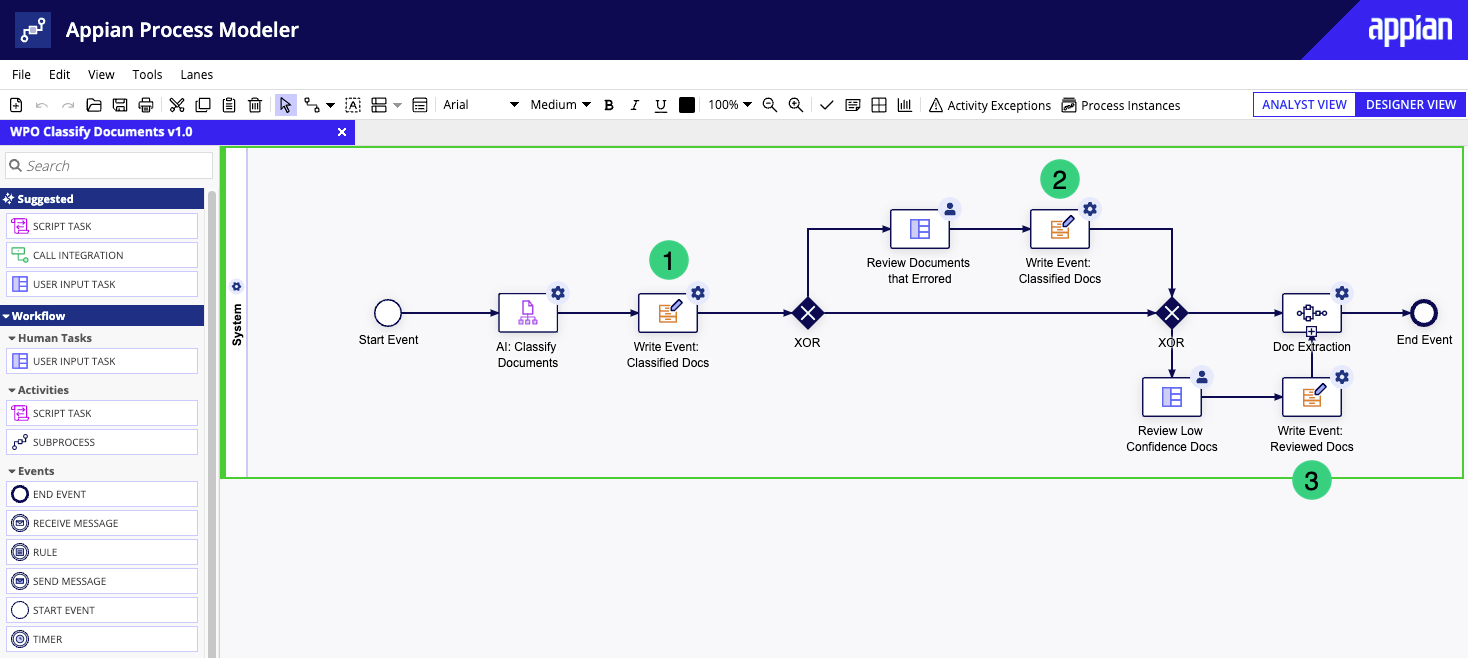
In this example, capture the following automation type for each node:
| # | Automation Type | Purpose |
|---|---|---|
| 1 | AI | Write event data if the AI skill successfully completes the task. |
| 2 | None (User) | Write event data if a user successfully completes the task. |
| 3 | None (User) | Write event data when a user reviews the documents. |
Your processes might also involve multiple automation types working together to complete an event. Whenever this is the case, Appian recommends attributing the event to the most complex automation type.
For example, if you have an event that's completed by integration to an RPA vendor, such as Blue Prism, Appian recommends attributing the event to RPA, even though an integration was part of the process.
The following lists ranks automation types in order of complexity, with 1 being the most complex and 4 being the least complex:
As you collect event data, you can display a history of events in your record views, interfaces, and reports using the Event History List component.
You can display your event history as a timeline or as a list to show a snapshot of your business operations. Use the component to display a history of events for all records, or only display the events for a specific record. This component is automatically added to any generated Summary view so users can quickly see a history of events related to their records.
To take your data a step further, you can mine your event data using Appian's process mining capabilities. Process mining helps you find new ways to optimize your business processes. Since your event data is stored in your record types, it's easy to load the data into Mining Prep and get started.
