
OverviewCopy link to clipboard
Adding, updating, and deleting data are essential parts of any application. Whether it’s creating new orders, updating existing ones, or archiving old ones, these types of data operations are common in every enterprise.
When your business data is managed using Appian Records, you can take advantage of purpose-built smart services—Write Records and Delete Records—to create, update, and delete data. Traditional software often needs complex logic to handle the consequences and side effects of each data change. By contrast, Appian's smart services use the context and information you provide about record types and their relationships to manage all aspects of making changes to your data.
This page provides recipes related to creating, updating, and deleting data. Use these as a reference or follow along by adapting them to use your data.
All of the examples on this page use process models to illustrate the concepts. Similar results may be achieved using the a!writeRecords() or a!deleteRecords() functions.
Adapt recipes for your dataCopy link to clipboard
The recipes below use example record types and data. Record type object references are specific to each environment. If you follow along with recipes, or copy and paste these examples into an expression, they will not evaluate.
Use these recipes as a reference, or replace the record type references to use the record type reference in your environment. If you replace the record type references, you must use a record type with data sync enabled, and that record type must use a database as the source.
Create dataCopy link to clipboard
The recipes in this section use the Write Records smart service to create new data in one or more record types.
Create a recordCopy link to clipboard
Goal: Use the Write Records smart service to make a new record.
No matter what kind of business your app is designed for, creating a new record in a record type is one of the most common data actions. To create a new record, you can build a form that allows users to input information, then pass that information into a process model containing the Write Records smart service.
Tip: The example below illustrates how to manually configure a "Create" action to explain the general workflow of creating a record. In your own application, you can generate a Create record action for faster configuration.
Example
Let's say you need to create a record action that allows users to add new customers in a retail application. The application contains a Customer record type, which stores all customer information. This record type also has record events configured, so you also want to capture an event whenever a new customer is created.
To create this action, you could:
- Create a new form interface that allows users to enter the customer's information.
- Create a rule input called
recordand set the type to the Customer record type. This will allow you to pass customer data to the process model. -
Create a new process model and configure the process model properties to use the new form and pass record data:
- Go to File > Properties.
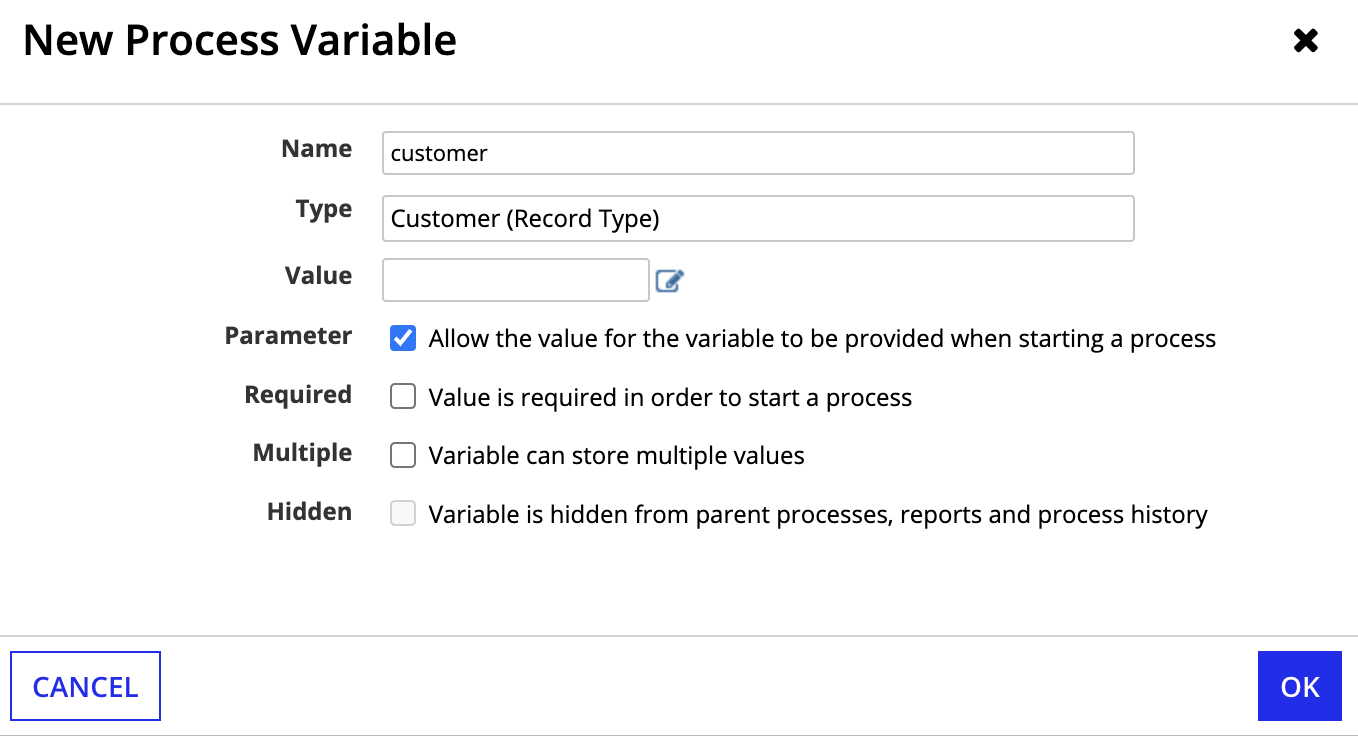
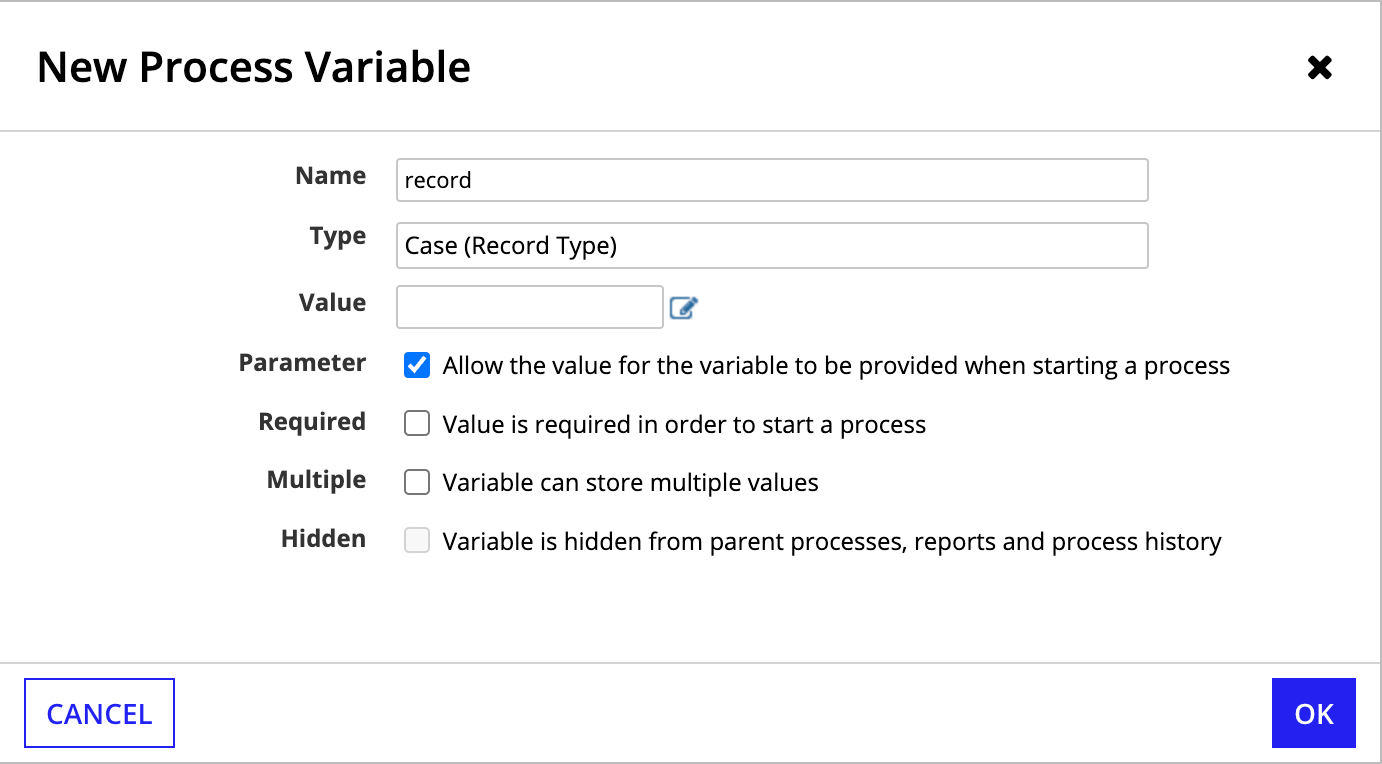
- Go to the Variables tab and create a new process variable called
record. - Set the Type to the Customer record type.
- Select the Parameter checkbox.

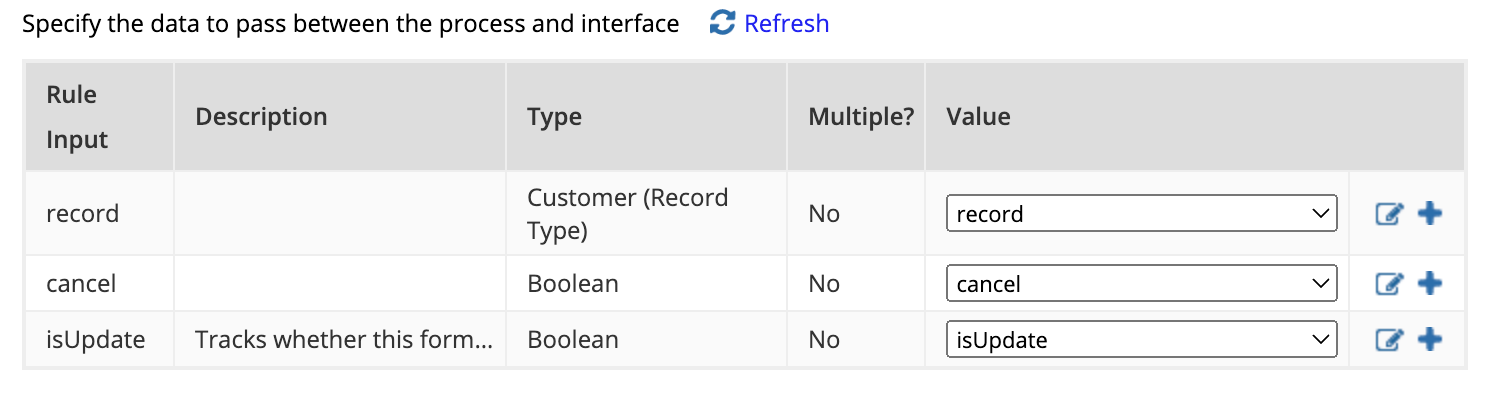
- Go to the Process Start Form tab and select your interface.
- Map your
recordprocess variable to therecordrule input from the interface.
- Drag and drop a Write Records node into your process model.
- Go to the Setup tab.
- For Records Input, select the record process variable. By default, the Record Type input populates with the Customer record type. Since the Customer record type has record events configured, the Write Events section can be set up.
- For Choose when to write events for the Customer record type, leave the default Always. The smart service will always write an event whenever a new customer is created.
- Select the values to write for the event:
- For Event Type, select Created Customer.
- For User, keep the default Process Initiator.
- For Automation Type, select None (User).
- For Timestamp, keep the default Now.
- Click OK.
- (Optional) Configure a cancel flow.
- Save and publish the process model.
- Create a record action that launches the new process model.
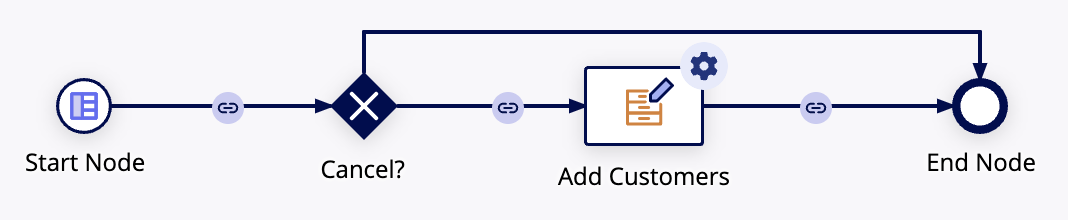
The process model looks something like this:
The node output will return the primary keys of the record and any related records included in the node input.
Create records and related recordsCopy link to clipboard
Goal: Use the Write Records smart service to make a new record and related records.
Creating a record and related records is similar to creating a single record. You can create a form that allows users to update different types of data from different record types, and then pass that information to a process model. The Write Records smart service will automatically write the data to the selected record type and any of its related record types.
You can write records and related records in the same node as long as the relationship configuration allows it and the records share one data source.
Example
For example, let's say you need to create a new record action so users can enter information about support cases opened by customers. Because more than one department may need to take action to resolve the customer's problem, those actions are tracked as separate tasks. The support agent can also choose to add a comment to capture any information about the case that isn't part of the form.
To represent these support cases, your application's data model includes three record types to store the data:
- Case, the base record type with data like
titleanddescriptionandreportedDate. - Task, a related record type for data like
assigneeandtype. - Comment, a related record type with data for
commentTextandauthor.
The Case record type has a one-to-many relationship with the Task record type and the Comment record type, and each relationship allows the Write Records node to write the Case and Task or Comment simultaneously. Case also has record events configured, so you can capture an event whenever a new case is created.
When a support agent submits a case, the process model writes to the base record type, Case, and the related record types in order to add both the new case, the required tasks, and any comments. This is done by passing all of that data as a single record variable to a single Write Records node.
To create this record action, you could:
- Create a new form interface that allows users to enter the case and customer information.
- Create a rule input called
recordand set the type to the Case record type. This will allow you to pass support case data and any related task or comment data to the process model. -
Create a process model and configure the process model properties to use the new form and pass record data:
- Go to File > Properties.
- Go to the Variables tab and create a new process variable called
record. - Set the Type to the Customer record type.
- Select the Parameter checkbox.
- Go to the Process Start Form tab and select your interface.
- Map your
recordprocess variable to therecordrule input from the interface.
- Add a Write Records node to take the data from the form (as
pv!record) and write a new Case record, as well as new Task and Comment data if they are part of the Case. - Drag and drop a Write Records node into your process model.
- Go to the Setup tab.
- For Records Input, select the record process variable. By default, the Record Type input populates with the Case record type. Since the Case record type has record events configured, the Write Events section can be set up.
- For Choose when to write events for the Case record type, leave the default Always. The smart service will always write an event whenever a new case is created.
- Select the values to write for the event:
- For Event Type, select Created Case.
- For User, keep the default Process Initiator.
- For Automation Type, select None (User).
- For Timestamp, keep the default Now.
- Click OK.
- Save and publish the process model.
- Create a record action that launches the new process model.
Duplicate a recordCopy link to clipboard
Goal: Use the Write Records smart service to make a copy of a record.
There are some cases when users may want to duplicate an existing record so they can reuse existing information in a new record. A related action that copies an existing record can save your users a lot of time and effort when working on similar data.
When your process model executes a Write Records node, the node checks for the primary key field on the input record and any related records. When a primary key is included, the smart service updates the record matching that identifier with any changed data passed to the input.
By contrast, if the input record (or related record) does not include a primary key, Appian creates a new record with the data passed to the input. This new record is a duplicate of the original.
We can use this behavior to create a copy of a record with a couple new design objects:
- An new Copy interface similar to one you'd use to update an existing case.
- A process model with a Write Records smart service node. This process will use the Copy interface as its process start form.
Example
Let's say you're working on a case management application. It has a Case record type for managing support case data. The support representatives using your application want to be able to clone support cases and save time by reusing information already available in another case.
To duplicate a record using this example:
- Create a new form interface where users can view and edit an existing support case.
- Create a rule input called
recordand set the value to the Case record type. This will allow you to pass support case data to the process model. -
For the form's submit button, set the following properties on
a!buttonWidget()to save a null value for the primary key field:1 2 3 4 5 6
a!buttonWidget( label: "Copy", submit: true, value: null, saveInto: ri!record[recordType!Case.fields.id] )
CopyNote: Depending on the record type, there are likely other record fields that you may want to set as null or to a default value when cloning. This includes fields like create or start dates and task assignees.
- Create a process model and use the new interface as the process start form.
- Add a Write Records node to take the data from the form (as
pv!record) and write a new Case record. - Save and publish the process model.
- Create a related action that launches the new process model.
Update dataCopy link to clipboard
Goal: Use the Write Records smart service to update an existing record
No matter what type of work your business users are engaged in, at some point they will need to update existing data. These changes are often made with an interface to let users view and edit existing data.
With the Write Records smart service, you can use that interface as the start form of an easy-to-understand process model that writes record data changes. In fact, the smart service is so flexible that, when you generate record actions to create and update data, Appian creates one process model and one interface for both actions.
Example
Let's look at how this generated process changes data in a customer management app.
- The process starts with one data variable called
record. - The Write Records node takes data passed from the process start form and creates or updates the record data based on one factor: whether the
recordincludes a value for the record type's primary key field.- If there is no primary key value included, a new record is created.
- If a value is present, the record identified by that value is updated. For updates, Appian will only write data to the fields you change, so you do not need to include any unmodified fields in the
recordvalue.
- The process ends after the Write Records node is finished writing data.
Delete dataCopy link to clipboard
To a business user, deleted data is that which is no longer accessible. As a developer, you have two options for achieving this result, each with pros and cons.
Hard deleting is a destructive action. With a hard delete, you tell the record type source to permanently remove the data in question. This might be required if your application deals with sensitive data. When your record type has one-to-many or one-to-one relationships, you can choose to hard delete the related records as well. Or you can have Appian set the common field value to null to indicate that the relationship was severed.
Soft deleting makes data unavailable by setting a field like isDeleted or deletedTime. Then, you can use a source filter on the record type to keep these rows from being synced. If your organization has data retention requirements for auditing purposes or you need to maintain referential integrity, soft deleting lets you meet your retention needs while removing the data from your app.
Let's look at how to achieve both of these goals.
Hard delete a recordCopy link to clipboard
Goal: Use the Delete Records smart service to permanently delete a record.
Sometimes data is created by mistake or your business could be required to delete information on customer request. Users will need the ability to remove record data from your application in those types of situations.
Tip: For faster configuration, you can automatically generate a Delete record action. The generated process model for these actions will use the Delete Records smart service to delete the selected record.
Example
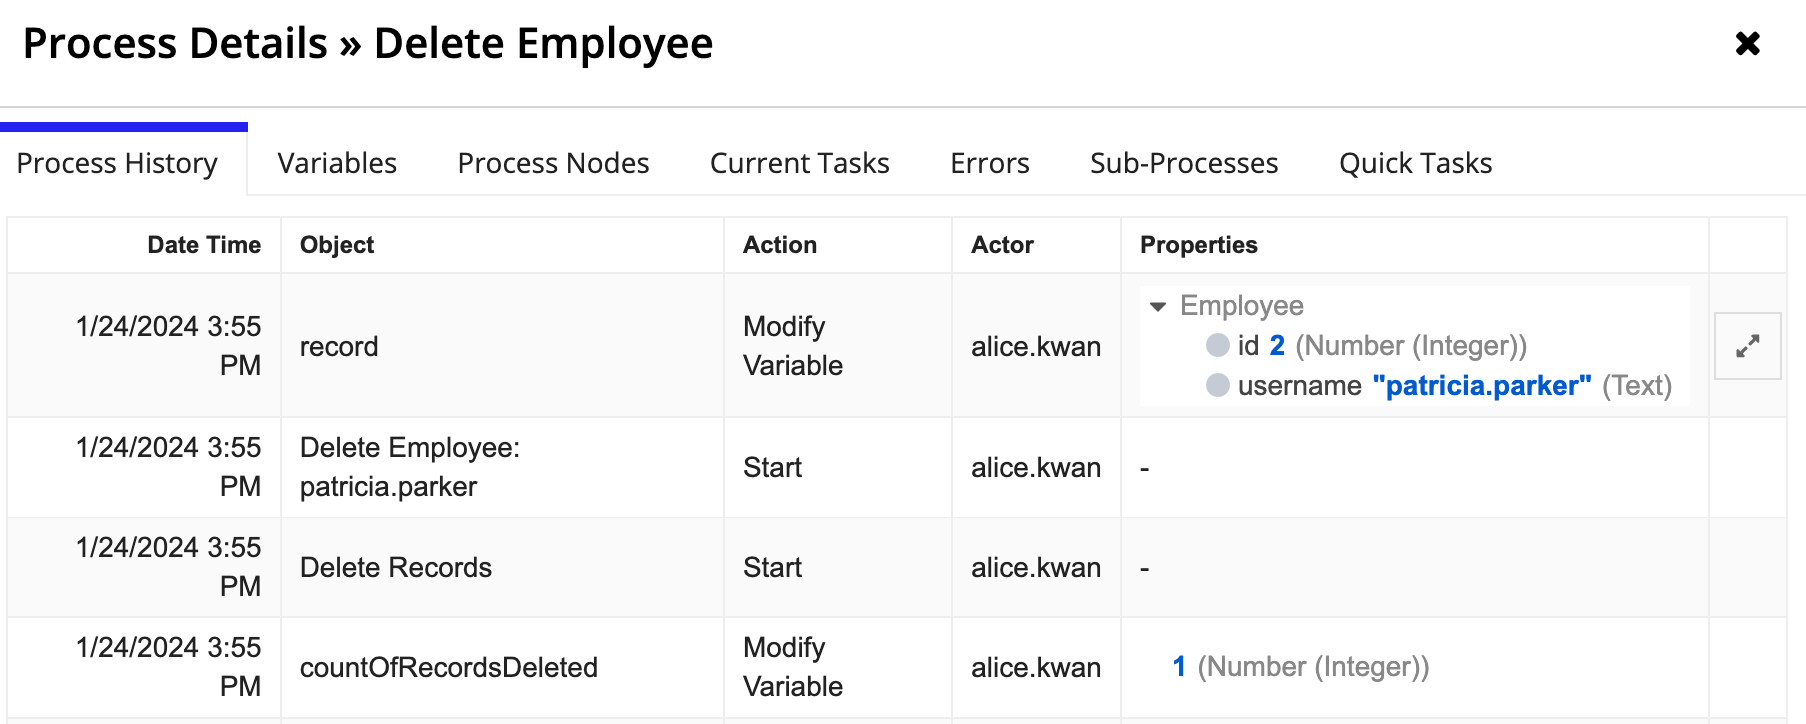
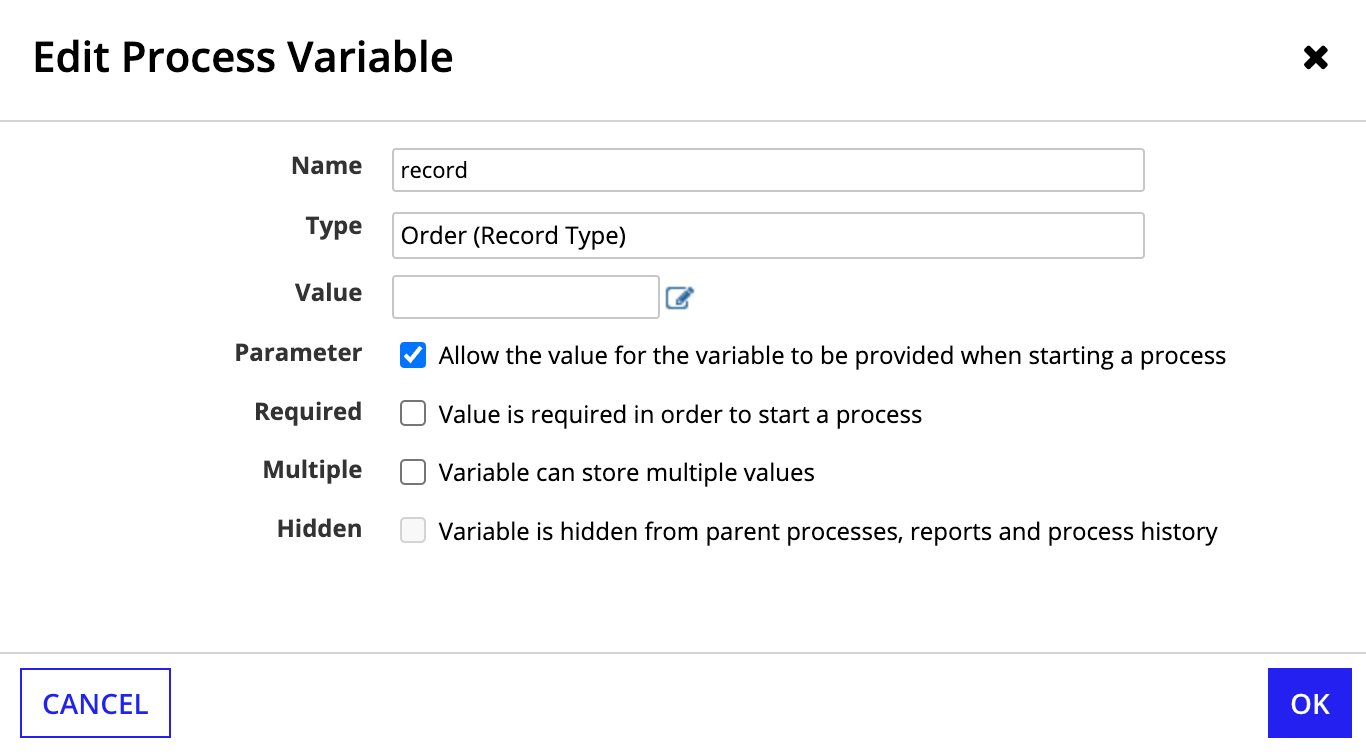
Imagine you need to remove an Employee from the Appian Retail application. You can let users delete record data using a related action connected to a process model. Set a process variable using the record type as the data type to pass the user's selection to the Delete Records smart service.
- Create a new form interface that allows users to review the employee's information and confirm they want to delete the Employee record.
- Create a rule input called
recordand set the type to the Employee record type. This will allow you to pass employee data to the process model. -
Create a new process model and configure the process model properties to use the new form and pass record data:
- Go to File > Properties.
- Go to the Variables tab and create a new process variable called
record. - Set the Type to the Employee record type.
- Select the Parameter checkbox.
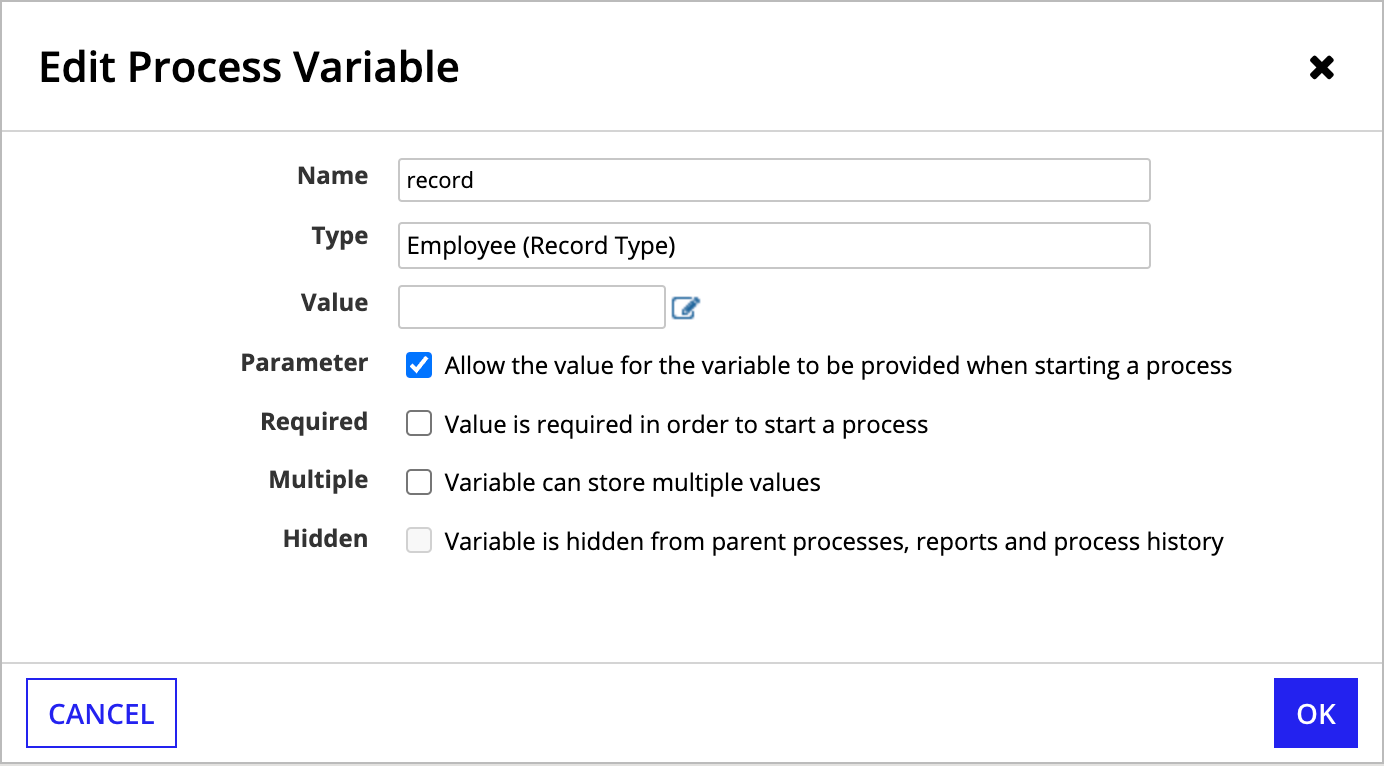
- Go to the Process Start Form tab and select your interface.
- Map your
recordprocess variable to therecordrule input from the interface.
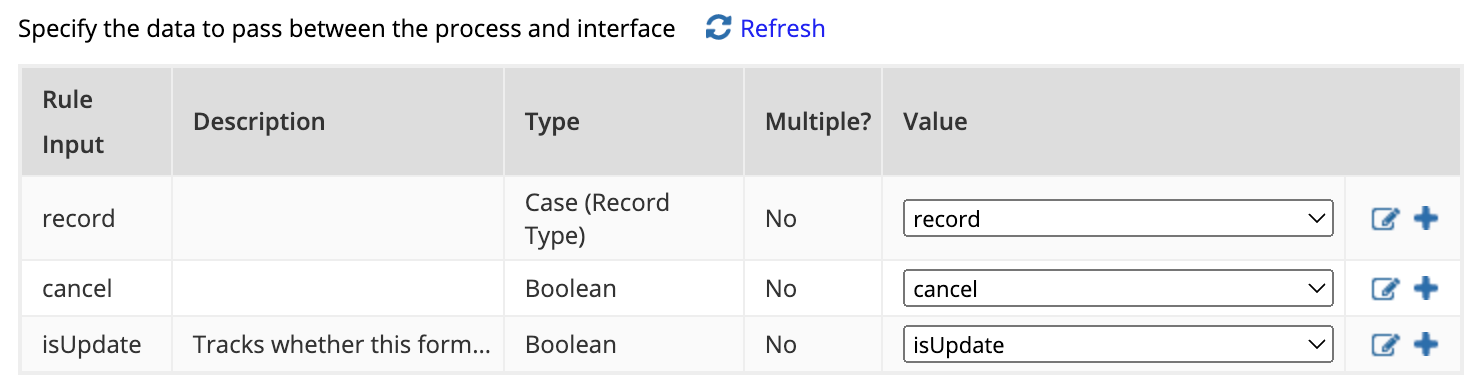
- Drag and drop a Delete Records node into your process model.
- Go to the Data tab.
-
For the Records input, set the record process variable as the Value.
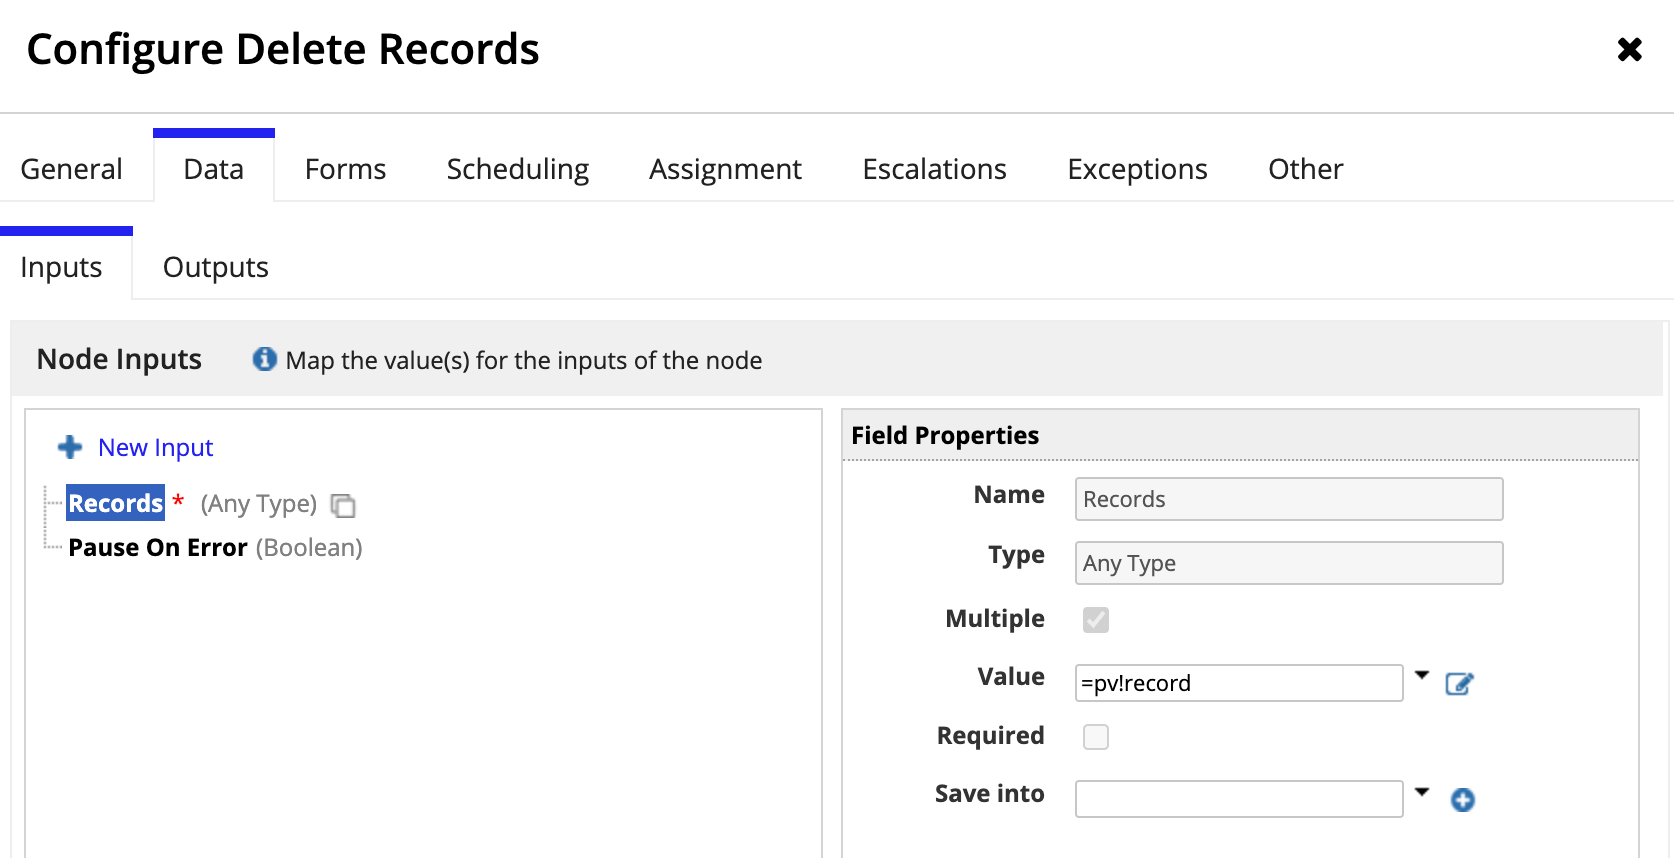
- Click OK.
- (Optional) Configure a cancel flow.
-
Save and publish the process model.

- Create a record action that launches the new process model.
The process node examines the primary key field (in this case, the id field) and deletes that record from the source.
Hard delete a record and its related recordsCopy link to clipboard
Goal: Use the Delete Records smart service to permanently delete a record and its related records.
Sometimes data is created by mistake or your business could be required to delete information on customer request. When the data in question is modeled with a record type and related record types, users will need the ability to remove record data from your application in a seamless way.
Tip: For faster configuration, you can automatically generate a Delete record action. The generated process model for this action will use the Delete Records smart service to delete the selected record and its related records.
Example
Imagine you need to delete an Order from the Appian Retail application. The Order record type has six relationships that you need to consider when building the action to delete these records.
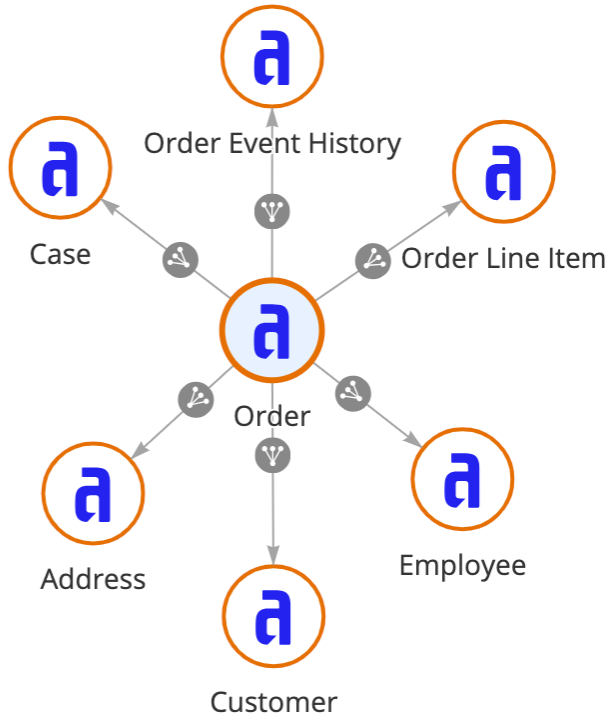
When you delete a record, you want to consider whether or not any related data should also be deleted.
In this example:
- Order Event History and Order Line Item each store supporting data about orders. This means that if an order is deleted, the related order line items and events are no longer needed.
- Case stores data about support cases submitted by customers. You'll want to keep all logged cases even if an order is deleted since support engineers' performance is evaluated based on the number of cases they close.
- Address, Customer, and Employee are not reliant on order information since many orders can belong to the same address, customer, or employee.
Based on how the data is related, you'll want to update the relationship configurations for your record types so certain related data is deleted whenever an order is deleted:
| Record Type | Relationship Configuration |
|---|---|
| Order Event History | Select Write or Delete when modifying Orders. |
| Order Line Item | Select Write or Delete when modifying Orders. |
| Case | Select Do not write or delete. |
You cannot write or delete data from a many-to-one relationship, so you don't need to update the relationships to the Address, Customer, or Employee record types.
Once the relationships are properly configured, you can create a related action to delete a record and any relevant related records.
To create a related action that deletes a record and its related records:
-
Create a new form interface that allows users to review the order information and confirm they want to delete the Order record. Because line items and the event history will also be deleted, the interface should indicate this fact. To do so, you could use one of these options:
- Show the order line items in a grid component and the order event history in an event history list component on the form.
- Warn the user that this related data will be deleted by stating that fact in the confirmation dialog.
- Create a rule input called
recordand set the type to the Order record type. This will allow you to pass order data to the process model. -
Create a new process model and configure the process model properties to use the new form and pass record data:
- Go to File > Properties.
- Go to the Variables tab and create a new process variable called
record. - Set the Type to the Order record type.
- Select the Parameter checkbox.
- Go to the Process Start Form tab and select your interface.
- Map your
recordprocess variable to therecordrule input from the interface.
- Drag and drop a Delete Records node into your process model.
- Go to the Data tab.
-
For the Records input, set the record process variable as the Value.
- Click OK.
- (Optional) Configure a cancel flow.
-
Save and publish the process model.
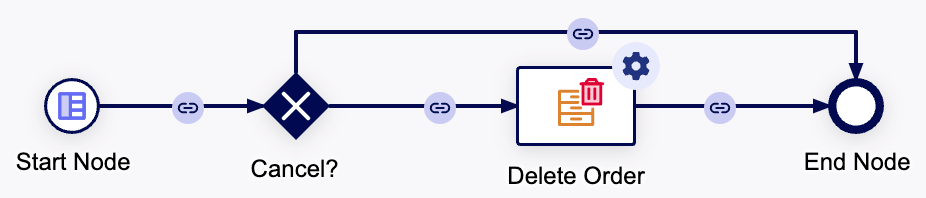
- Create a record action that launches the new process model.
The process node examines the primary key field (in this case, the id field) and deletes that Order record from the source, as well as any Line Item or Event History records associated with that Order. Any Case records with an orderId value matching the Order's id will now show null for orderId.
Soft delete a recordCopy link to clipboard
Goal: Use the Write Records smart service to remove a record from a record type but keep the data available in the source.
Some delete actions need to make the data generally inaccessible in your app, but administrators or other privileged users can retain access in the record type's source (like a database). This type of deleting lets you restore the data if needed.
A related action is a simple way to let users select a record to remove and confirm they want to delete it by clicking a button. This action starts a process model that sets an isDeleted field to true. You can then create a source filter so only records that have an isDeleted field set to false or null are synced in Appian.
Example
Let's say you need a record action that allows users to delete orders from a retail application. You want the Order data to persist in the data source, but it should not be available in Appian.
The application contains an Order record type, which stores all order information. This record type has record events configured with the following event types:
- Created Order
- Updated Order
- Shipped Order
- Delivered Order
- Deleted Order
To ensure this action can be traced back to a specific user, we'll want to capture a Deleted Order event.
Here's one way you could create this action:
- Create an interface that lets users confirm that they want to delete the order.
-
For the form's submit button, update the
valueandsaveIntoproperties so theisDeletedfield is set totrue:1 2 3 4 5 6 7 8 9
a!buttonWidget( label: "Delete", icon: "trash", submit: true, style: "GHOST", color: "NEGATIVE", value: true, saveInto: ri!record[recordType!Order.fields.isDeleted] )
Copy - Create a new process model and configure the process model properties:
- Go to File > Properties.
- Go to the Variables tab and create a new process variable called
record. - Set the Type to the Order record type.
- Go to the Process Start Form tab and select your interface.
- Map your
recordprocess variable to the input from the interface.
- Drag and drop a Write Records node into your process model.
- Go to the Setup tab.
- Add a Write Records node to take the data from the form (as
pv!record) and write the soft delete to the Order record type. - For Records Input, select the order process variable. By default, the Record Type input populates with the Order record type. Since the Order record type has record events configured, the Write Events section can be set up.
- For Choose when to write events for the Order record type, leave the default Always. The smart service will always write an event whenever an order is soft deleted.
- Select the values to write for the event:
- For Event Type, select Soft Deleted Order.
- For User, keep the default Process Initiator.
- For Automation Type, select None (User).
- For Timestamp, keep the default Now.
-
Save and publish the process model.

-
Create a related action that launches the new process model. Use the Order record type in the related action context as
rv!record. -
In the Order record type, add a source filter so only records with an
isDeletedvalue ofnullorfalseare synced. This filter must be created using expression mode because you need to use theORoperator for the two filter conditions.1 2 3 4 5 6 7 8 9 10 11 12 13 14 15
a!queryLogicalExpression( operator: "OR", filters: { a!queryFilter( field: "IS_DELETED", /* The filter matches the source field's name, not the record field */ operator: "is null" ), a!queryFilter( field: "IS_DELETED", operator: "=", value: false() ) }, ignoreFiltersWithEmptyValues: true )
Copy
Soft delete a related recordCopy link to clipboard
Goal: Use the Delete Records smart service to remove a related record but keep the data available in the source.
Some related records, like line items on an order, are managed in the context of a base record. In those situations, your interface may need to allow users to select and delete these related records.
Appian has many interface components for selecting data, including checkboxes and radio buttons. In this example, we'll use a dynamic link to create clickable text that saves a value to a rule input property.
Example
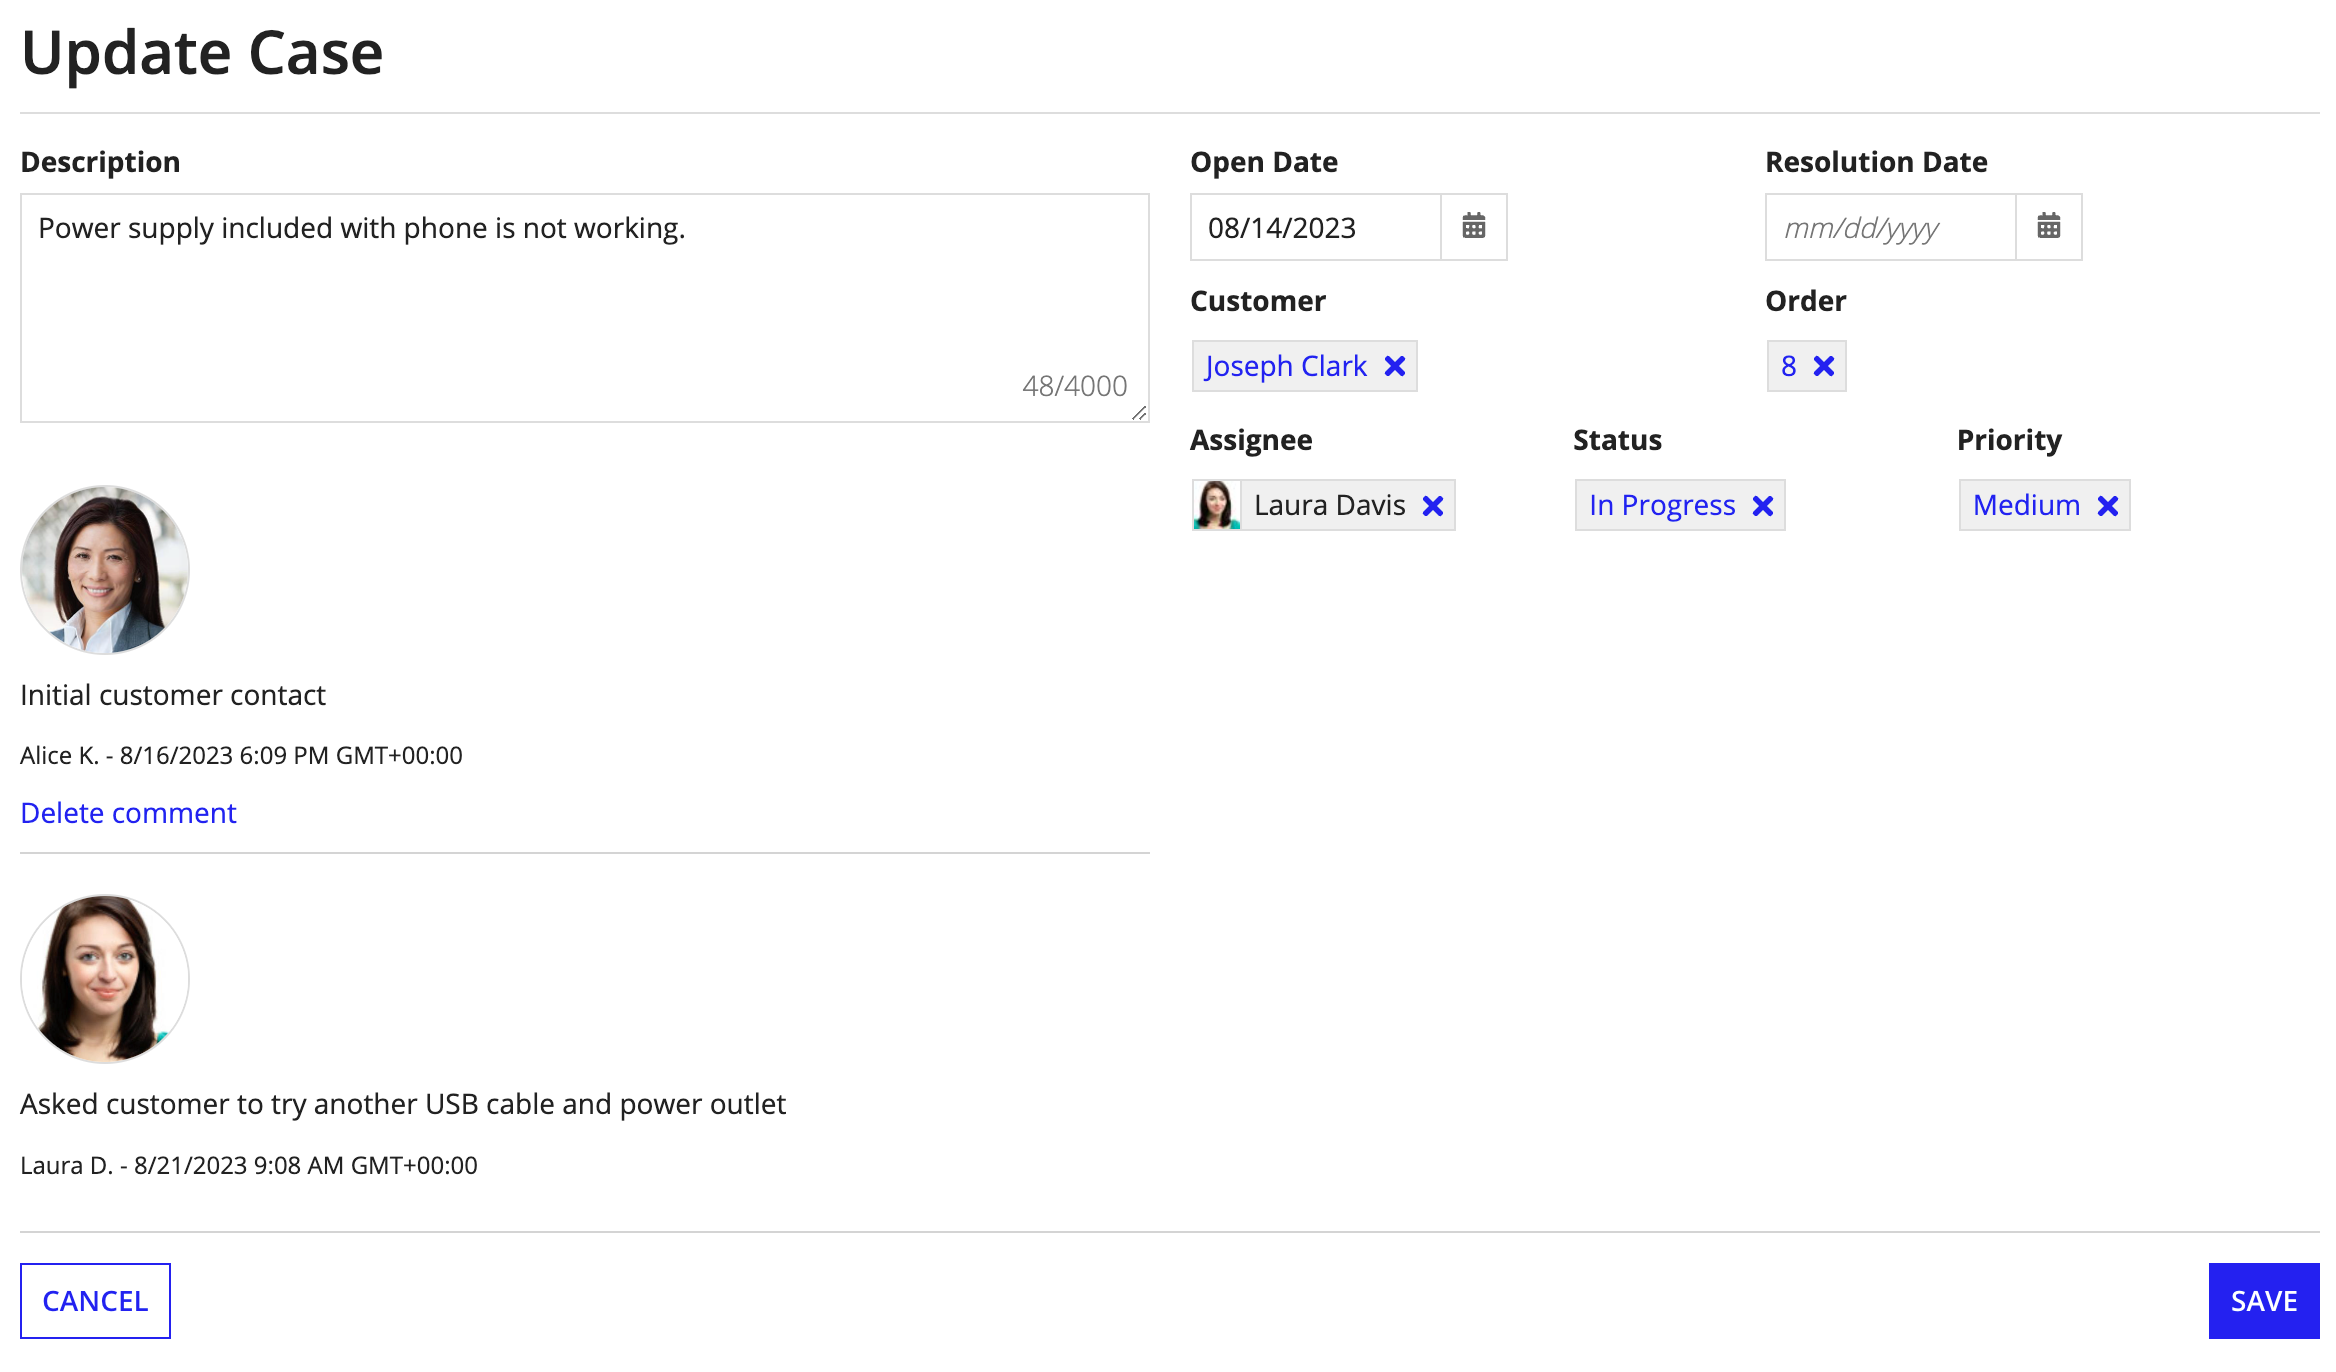
Let's say you need a record action that allows users to update a support case, including any of the comments on the case. Comments are in a separate record type and referenced in the Case through a record type relationship.
In this scenario, we'll mark the comment as deleted and use a source filter to exclude deleted comments from the record type. Since we are soft deleting the comments, they are still available in the source for auditing purposes.
A user should be able to delete comments if they meet either of the following conditions:
- They are the comment's author.
- They are a manager of the support department.
In the following example, if Alice K. views the case, she will only be able to delete her comment.
Since a case can have one or more comments, a reusable interface will let you add multiple instances of these components without unnecessarily repeating code. You can see an example of how to do this in our video explaining the use of a!forEach() in interfaces.
Before you build the record action:
- Create the interface that will display each comment.
- Name the interface
commentBox.
To create this action, you could:
- Create an interface that lets users view the case and select the comments the want to delete. Use the Case record type as a rule input.
- In the interface, add a section layout where you want the case comments to appear.
-
In the section's
contentsparameter, add aa!forEach()loop that uses thecommentBoxinterface to display each comment on the case. Each comment box is followed by a dynamic link that sets theisDeletedfield totruewhen clicked.1 2 3 4 5 6 7 8 9 10 11 12 13 14 15 16 17 18 19 20 21 22 23 24 25 26 27 28 29 30 31 32 33 34 35 36 37 38 39 40 41 42 43 44 45 46
a!forEach( /* The items evaluated for each loop are the Comments related to each case. To loop through them, you must specify the record type relationship here. */ ri!record[recordType!Case.relationships.Comment], { if( fv!isFirst, a!horizontalLine(color: "#ffffff"), a!horizontalLine( showWhen: and( fv!item[recordType!Comment.fields.isDeleted] <> true, count(fv!item) > 1 )) ), if( fv!item[recordType!Comment.fields.isDeleted], a!richTextDisplayField(), rule!commentBox(fv!item), ), a!linkField( labelPosition: "COLLAPSED", links: { a!dynamicLink( label: "Delete comment", value: true(), saveInto: ri!record[recordType!Case.relationships.Comment][fv!index][recordType!Comment.fields.isDeleted], showWhen: { and( fv!item[recordType!Comment.fields.isDeleted] <> true, if( or( loggedInUser() = fv!item[recordType!Comment.fields.createdBy], a!isUserMemberOfGroup(loggedInUser(), "AT Support Managers") ), true(), false() ) ) } ) } ) } )
Copy - Create a new process model and configure the process model properties:
- Go to File > Properties.
- Go to the Variables tab and create a new process variable called
record. - Set the Type to the Case record type.
- Go to the Process Start Form tab and select your interface.
- Map your
recordprocess variable to the input from the interface.
- Drag and drop a Write Records node into your process model.
- Go to the Setup tab.
- Add a Write Records node to take the data from the form (as
pv!record) and write any soft deletes to the Comment record type. - For Records Input, select the record process variable. By default, the Record Type input populates with the Case record type. Since the Case record type has record events configured, the Write Events section can be set up.
- For Choose when to write events for the Case record type, leave the default Always. The smart service will always write an event whenever an case is changed.
- Select the values to write for the event:
- For Event Type, select Updated Case.
- For User, keep the default Process Initiator.
- For Automation Type, select None (User).
- For Timestamp, keep the default Now.
- Save and publish the process model.
- In the Case record type, create a related action that launches the new process model. Use the Case record type in the related action context as
rv!record. -
In the Comments record type, add a source filter so only records with an
isDeletedvalue ofnullorfalseare synced. This filter must be created using expression mode because you need to use theORoperator for the two filter conditions.1 2 3 4 5 6 7 8 9 10 11 12 13 14 15
a!queryLogicalExpression( operator: "OR", filters: { a!queryFilter( field: "IS_DELETED", /* The filter matches the source field's name, not the record field */ operator: "is null" ), a!queryFilter( field: "IS_DELETED", operator: "=", value: false() ) }, ignoreFiltersWithEmptyValues: true )
Copy