
OverviewCopy link to clipboard
An expression rule is a stored expression that can be called from other expressions. Within your expression rules, you can add rule inputs so you can dynamically change the data returned by your expression.
This page explains how to create, edit, and delete expression rules.
For more information on expression rules, see:
PropertiesCopy link to clipboard
Each expression rule has the following properties:
| Property | Description |
|---|---|
| Name | The name that is used when executing the rule. This property is case-insensitive, but we recommend that you follow the naming standard. |
| Description | Supplemental information about the rule that is displayed in the expression editor and in the objects grid of some Designer views. |
| Save In | The folder that the rule is saved into. |
| Rule Inputs | Rule inputs are used to pass data into the expression rule.
|
| Test Cases | A set of test scenarios used to evaluate the expression rule. |
| Rule Definition | The expression that is evaluated when the rule is called. |
Reserved namesCopy link to clipboard
The following names are reserved for process report metrics, and must not be used.
- Completion
- is_process_ontime
- is_process_overdue
- is_task_favorite
- is_task_ontime
- is_task_overdue
- Lag
- NetCompletion
- NetLag
- NetWork
- process_completion_time
- process_deadline
- process_ee_id
- process_start_time
- process_status
- pm_avg_completion
- pm_avg_lag
- pm_avg_work
- task_assignee_owner
- task_assignment_time
- task_attributed_to
- task_avg_completion
- task_avg_lag
- task_avg_work
- task_completion_time
- task_deadline
- task_ee_id
- task_status
- total_completion_time
- total_lag_time
- total_work_time
- Work
CreateCopy link to clipboard
To create an expression rule:
- In your application, go to the Build view.
- Click NEW > Expression Rule.
-
In the Create Expression Rule dialog, configure the expression rule properties.
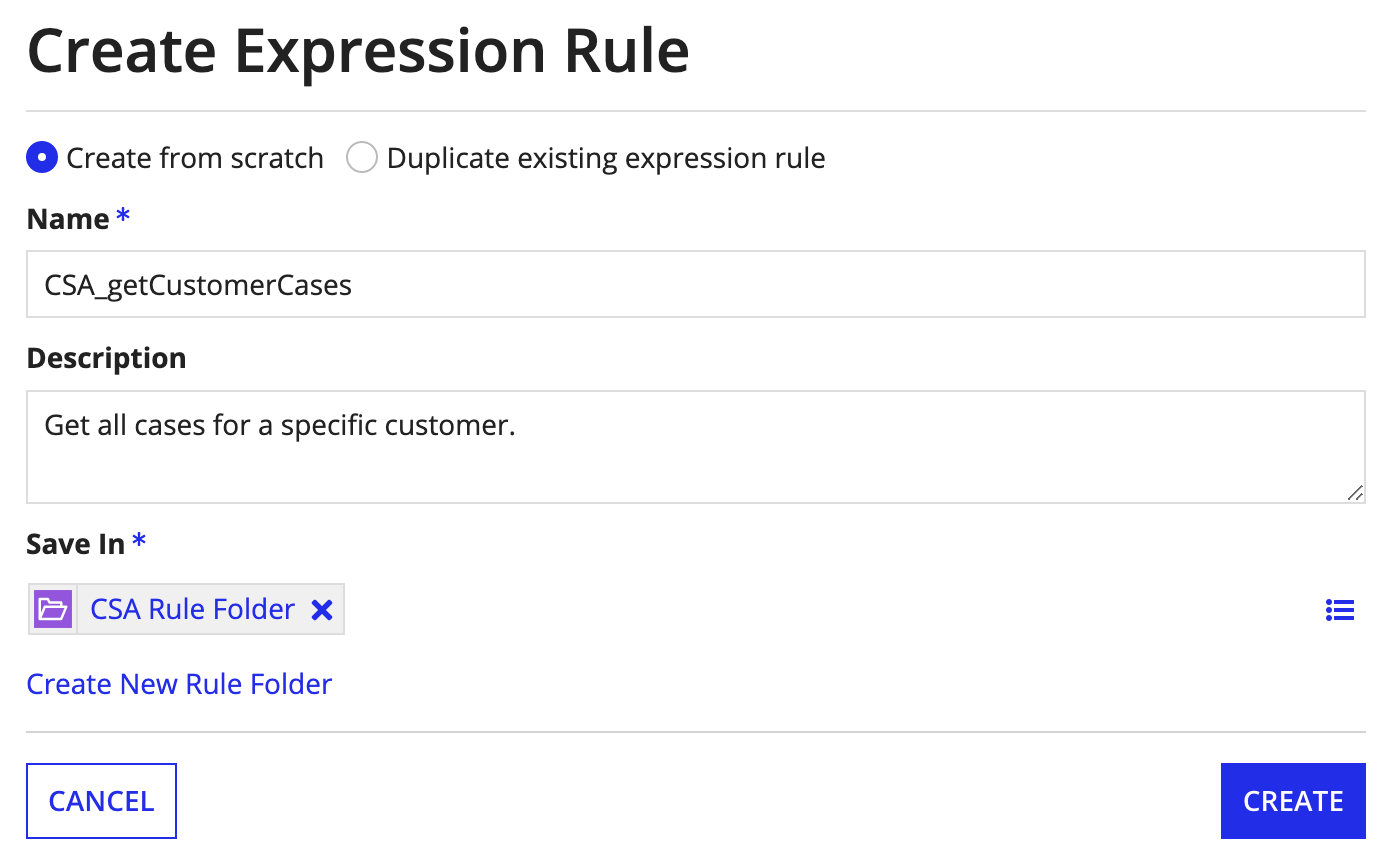
- Click CREATE.
The expression rule opens in a new dialog or window, where you can:
- Add rule inputs.
- Enter an expression to define the rule.
- Test the rule input.
Add rule inputsCopy link to clipboard
Rule inputs allow you to dynamically pass values into your expression.
For example, if you want to return information about a single customer, you could create an expression rule that queries the Customer record type, and use a rule input to filter the query so it only returns data for a specific customer ID.
To create a rule input:
-
In the expression rule, click New Rule Input.
Tip: If you don't see this option, expand the right-hand pane of the expression rule.
-
Configure the following properties for your rule input:
Property Description Name The name of the rule input. This is the name you'll reference in the expression. Description A short description of the rule input. Type The data type of the rule input. Array Whether the rule input should accept an array of values or a single value. -
To reference your rule inputs in an expression, use the ri! domain followed by the rule input name.
Editing rule inputsCopy link to clipboard
As naming conventions and requirements evolve, you may need to update the names of your inputs to certain objects. Over time, rules and interfaces can gather many dependents. This can make manual changes to update any keyword references to rules and interfaces difficult and prone to human error.
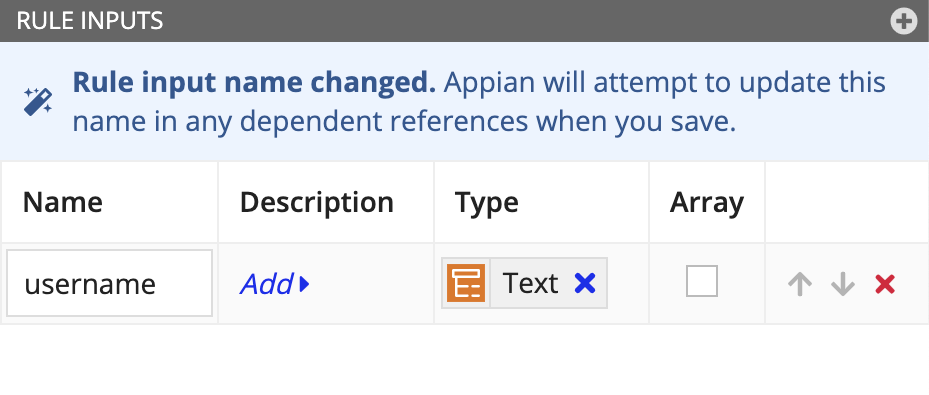
If you update the name of an input while editing an expression rule or interface, Appian will update any keyword references to that rule input in dependent objects.
There are certain cases when Appian cannot update the dependent object(s):
- The design object is locked.
- The design object is not an expression rule or interface.
- The design object does not use keyword syntax.
- There are more than 20 direct dependents.
If there is a blue banner in the rule inputs pane, Appian is going to attempt an automatic update of the keyword references.
After you save your changes, a dialog will appear with a summary of what dependent objects were updated and any that you may need to update manually.
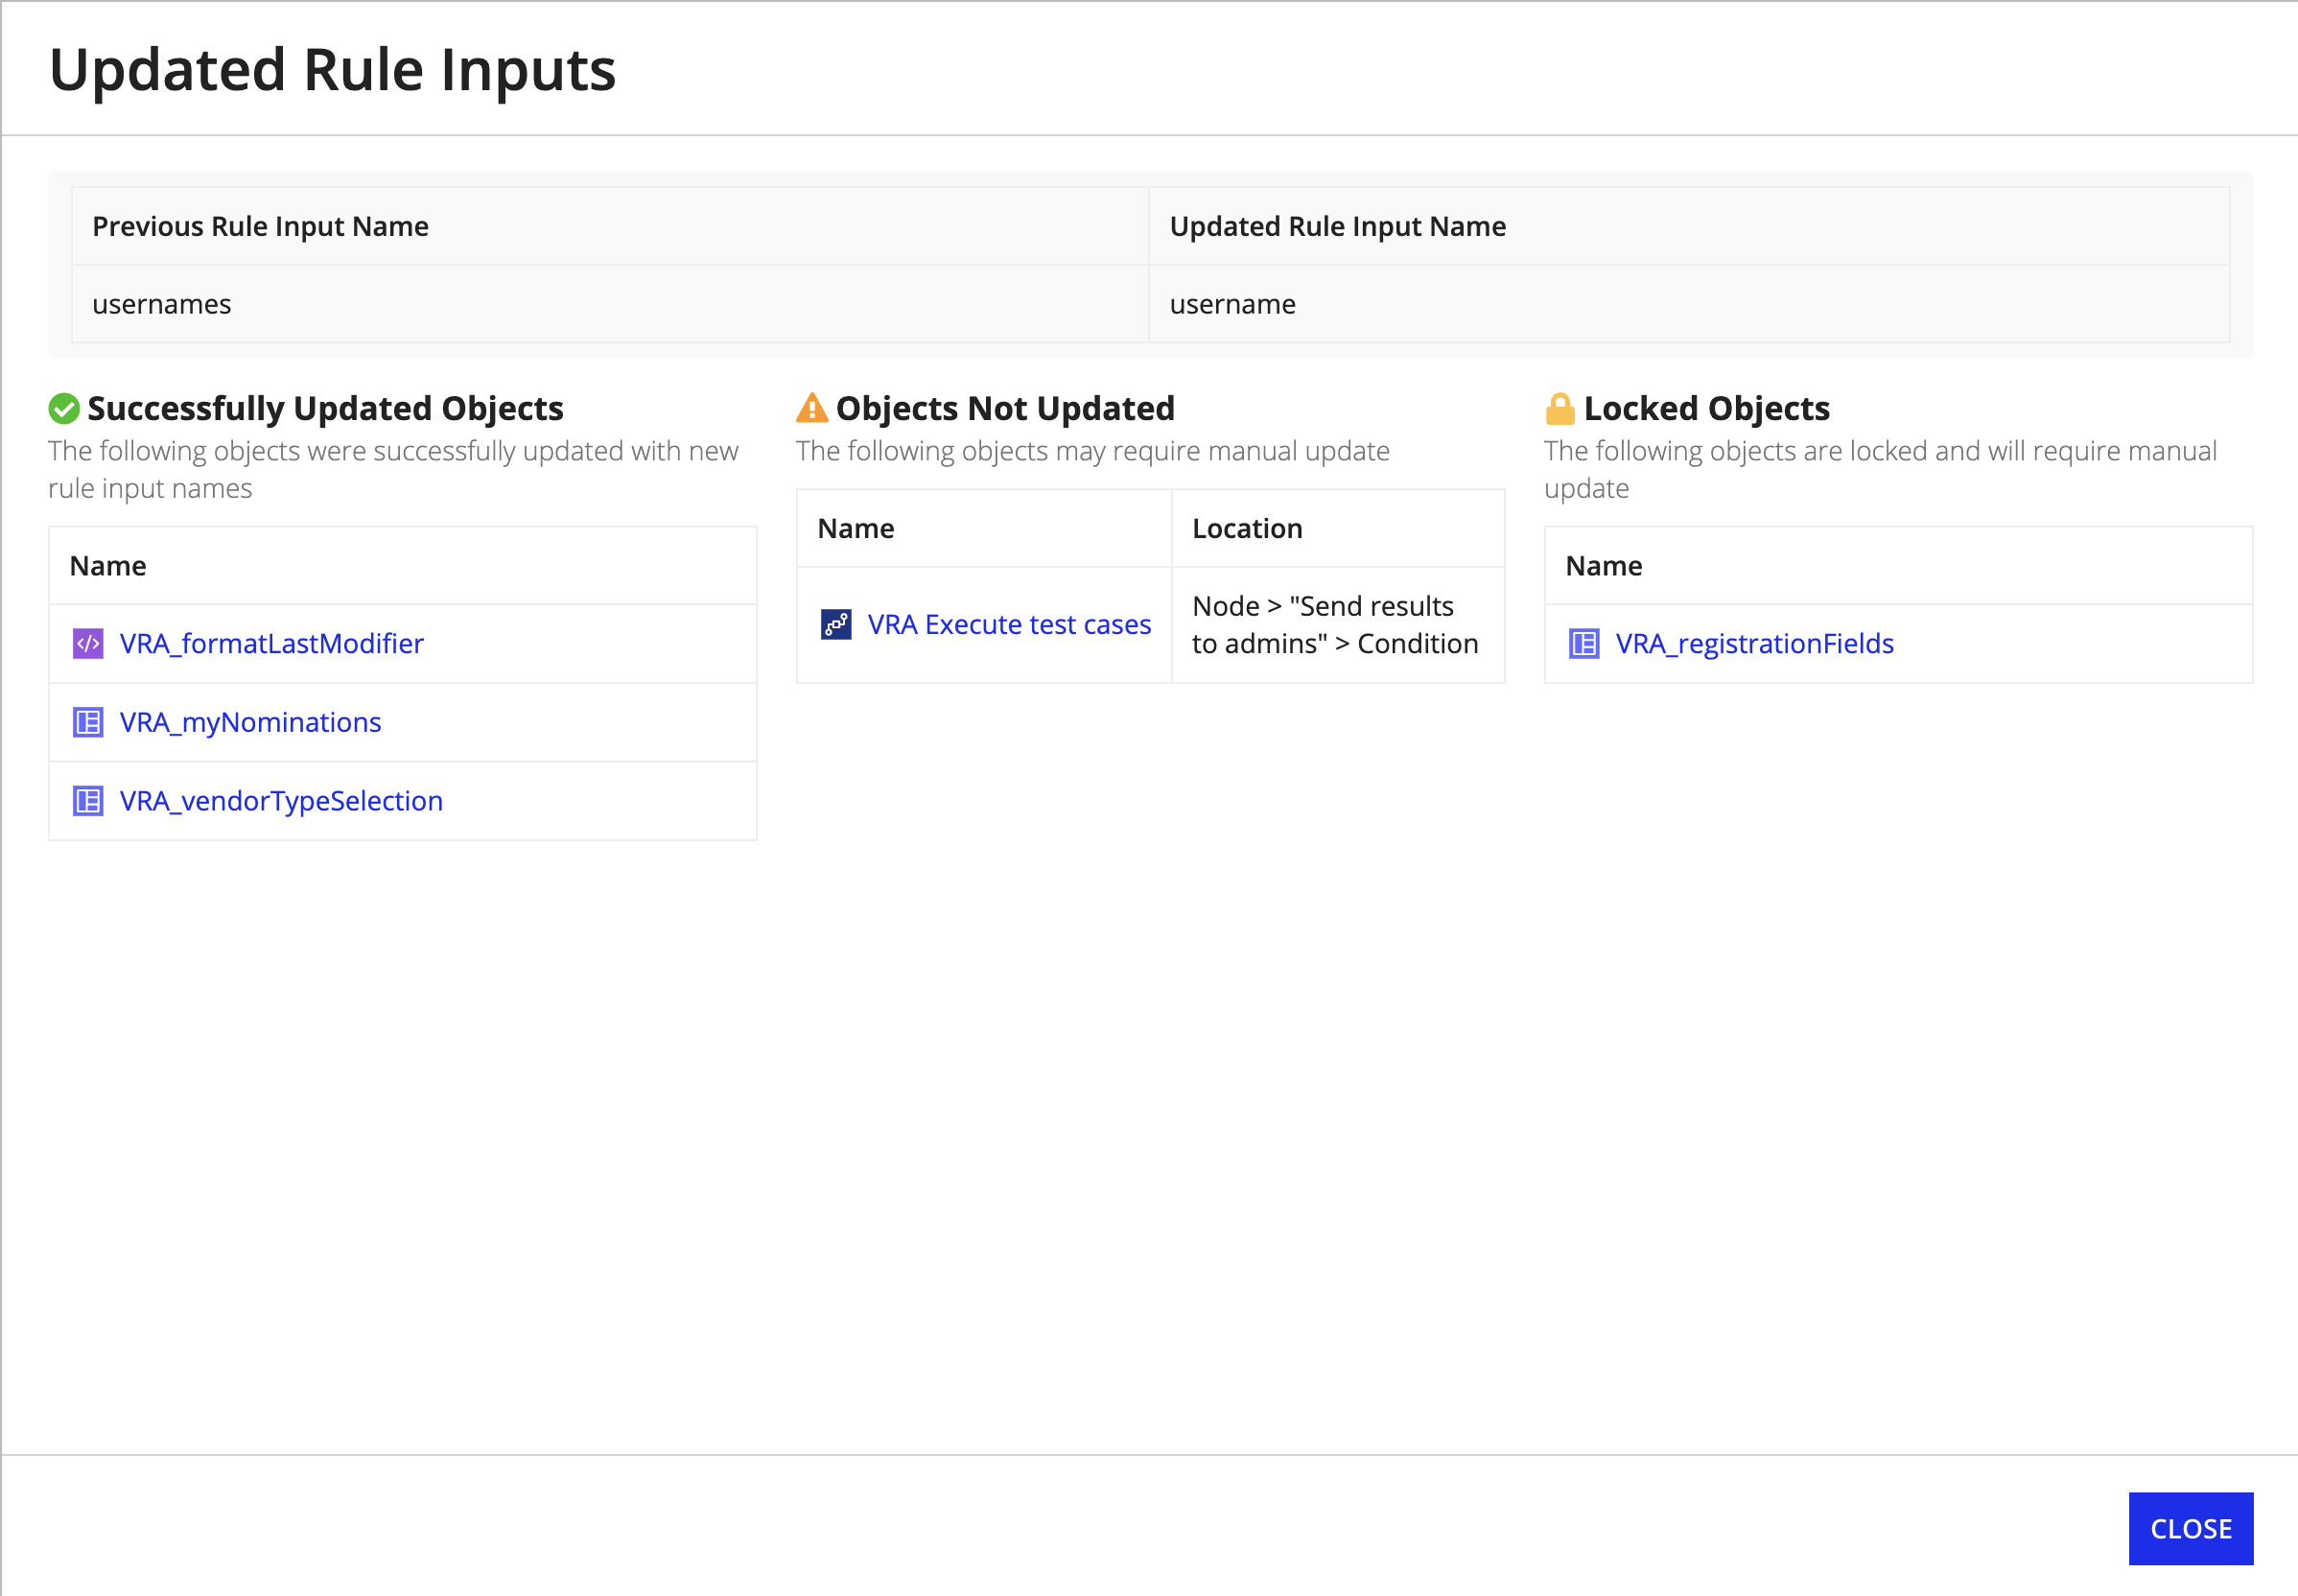

If you accidentally exit the rename dialog before you've completed all manual updates, use design guidance to find the remaining objects to update. Any object using the wrong keyword reference will be flagged with the invalid keyword syntax design guidance on the health dashboard.
All objects that are updated automatically as a result of the rename will show the developer who renamed the input as the last modifier for the dependent objects.
Define the ruleCopy link to clipboard
To define your expression rule:
-
In the left-hand pane of the expression rule, use the expression editor to enter an expression, or use the query editor to populate a query using a guided experience.
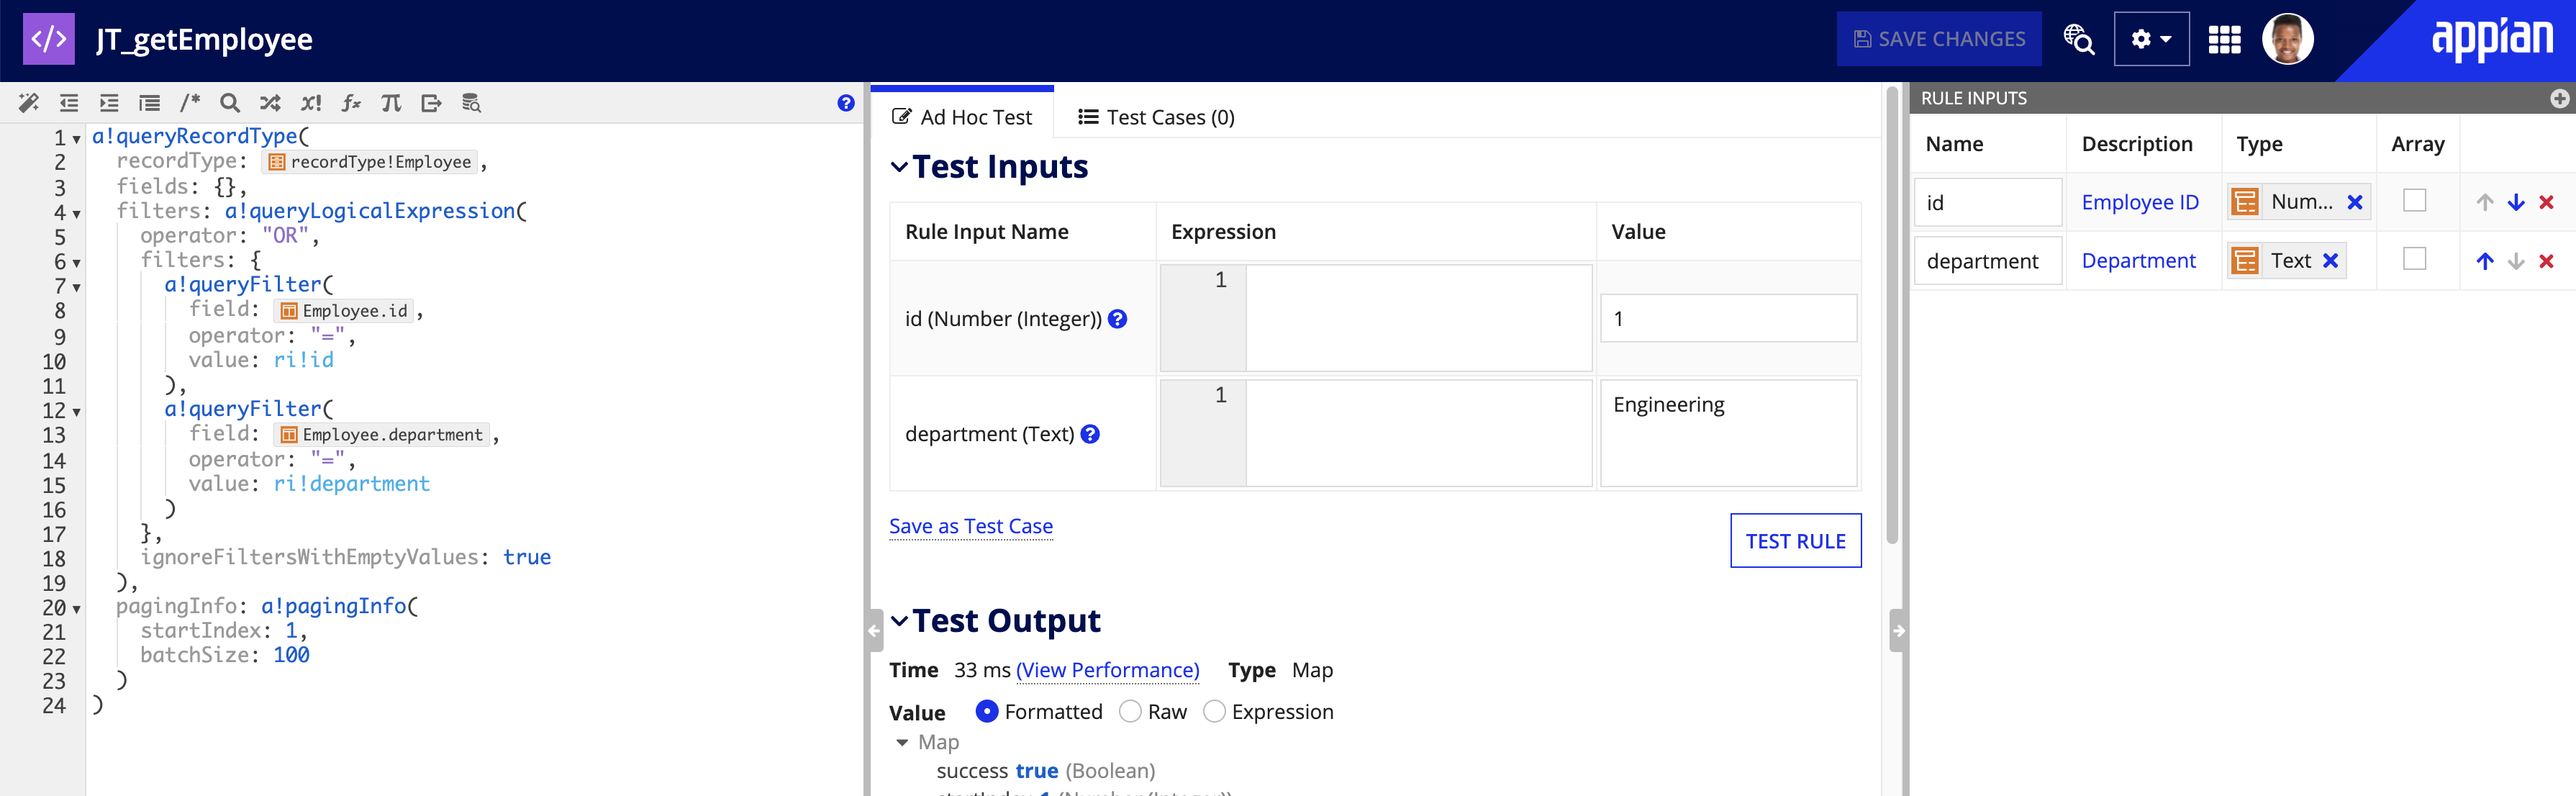
For example, the following expression rule uses an
a!queryRecordType()expression to return all critical cases for a specific customer.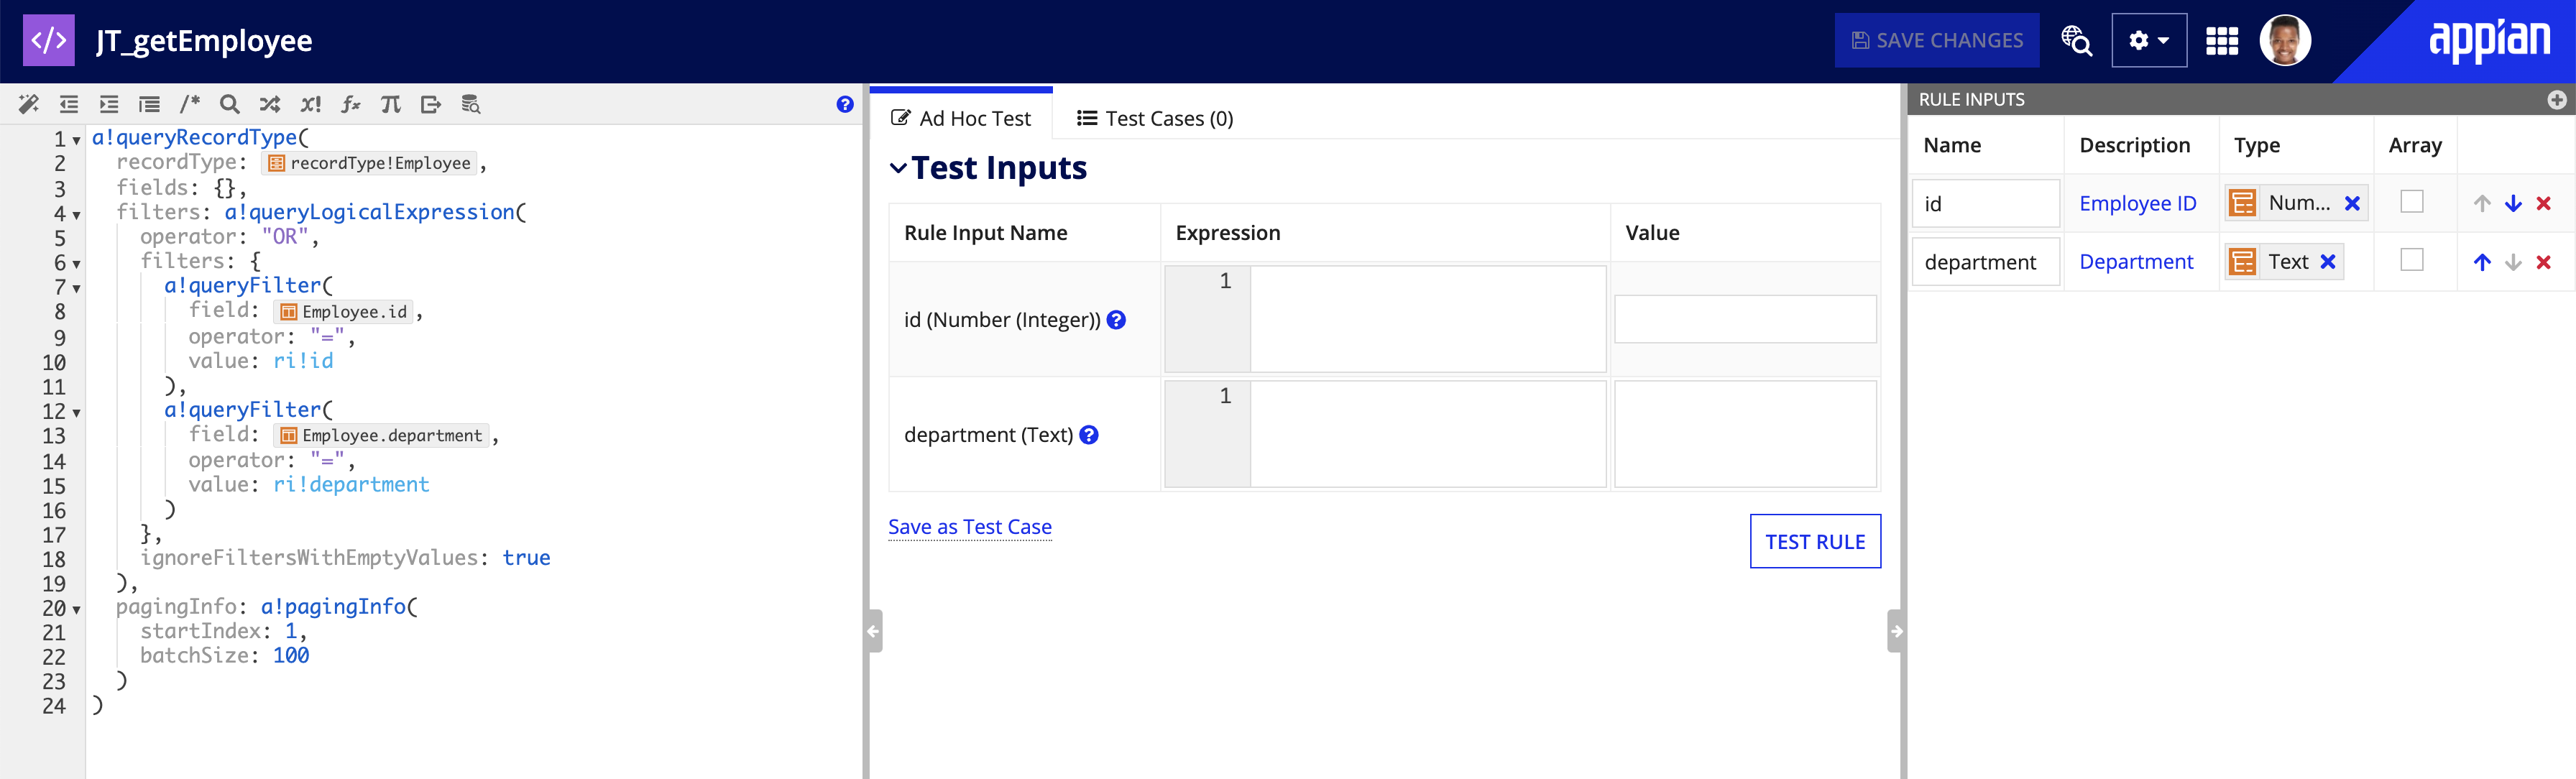
-
Test the expression rule. If you have rule inputs configured, you can add test inputs to test the values returned by your expression.
-
Click SAVE CHANGES.
Test the ruleCopy link to clipboard
Testing your expression rule allows you to see what the expression rule outputs based on a given set of inputs.
There are two ways to test your expression rule: using ad hoc testing and running test cases.
See Expression Rule Testing for more information.
Ad hoc testCopy link to clipboard
By default, the Ad Hoc Test view displays whenever you open an expression rule.
The Ad Hoc Test view allows you to quickly test your expression by providing sample values or expressions for your rule inputs.
This view is made up of three sections:

| Call out letter | Name | Description |
| A | Test Inputs | Enter test values for the rule inputs configured on the expression. You can use an expression, or provide a static value.
|
| B | Local Variables | If you use local variables in your expression, the values of your local variables will be displayed in this section. |
| C | Test Output | The results of your expression rule, and any test inputs configured. You can view your test outputs as a formatted map, a raw list, or as an expression. |
| D | Change indicators | When the test output contains record data, icons are shown next to each record field. A gray circle indicates that the value was unchanged by the expression rule. Yellow arrows mark fields with changed values. In the example, the Case `id` field is unchanged, but the `status` was changed to `"Reopened"`. |
Test casesCopy link to clipboard
Test cases can be created and saved with an expression rule. This allows you to run test scenarios in bulk and review the results for all the tests together.
The Test Cases view displays all test cases. From this view, you can also:
- Create new test cases
- Generate test cases with AI
- See which test case is the default test case
- Edit test cases
- Run all test cases
- Load test cases
- Duplicate test cases
- Update test case assertions in bulk
- Delete test cases

Create a test caseCopy link to clipboard
To create a test case:
- In the expression rule, go to the Test Cases view.
- Click NEW TEST CASE.
- In the Create Test Case dialog, configure the following properties:
Property Action Name Enter a name for the test case. Set as default test case Select to set this test case as the default test case. The test pane will automatically load test rules from the default test case whenever you open an expression rule. Test Inputs Enter test values for the rule inputs configured on the expression. You can use an expression or provide a literal value. All expression or literal text values have a 4,000 character limit. You must have access to all selected users, groups, documents, or folders to create a test case. Assertion Select the assertion that determines whether a test case passes or fails. You can choose any of the following assertions. See Assertion examples and recommendations for more information. - Test will pass when the expression evaluates without errors: This is the default option, and most commonly used.
- Test will pass when the test output matches a user-defined output: A match occurs when output values are exactly the same (including case sensitivity for text) and are of the same type.
- Test will pass when a user-defined expression evaluates to true: Use the
test!outputvariable to access the test output in an expression in order to validate the output information (like its length or the value of a specific field). Reference the values of your test inputs as needed using theri!domain. For example:exact(index(test!output, "status", {}), "IN PROGRESS")
Test Output View the results of your expression rule and any test inputs configured. You can view your test outputs as a formatted map, a raw list, or as an expression. - Click CREATE.
Generate test cases with AICopy link to clipboard
Appian AI Copilot helps to elevate your expression rule testing using AI-created test cases. Perfect for unit testing, this capability automatically generates test cases and proposes new scenarios for you to consider, saving you valuable time. While Appian AI Copilot does not possess the same in-depth understanding of the application as you do, it is designed to identify potential edge cases that may not be immediately obvious. These include scenarios involving null values or unusually large or small data inputs. You can discard suggestions you find irrelevant and refine the rest, just like you would with your own test cases.

How it worksCopy link to clipboard
AI Copilot generates test cases using specific details from your expression rule, including the rule's name, description, full definition with comments, rule inputs, and any existing test cases to prevent duplicates. Using this information, it creates up to 15 preliminary test cases.
You must contact Appian Support to enable this feature. This capability is available only on Appian Cloud.
This feature is available for environments in select regions.
If your Appian environment isn't in a supported region, you can elect to send your data to a supported region. This doesn't change your environment's region. Contact Appian Support to learn more.
Generate test casesCopy link to clipboard
To generate test cases:
- In the expression rule, go to the Test Cases view.
- Click GENERATE TEST CASES.
Result: Appian AI Copilot analyzes your expression rule. Using this information, it creates up to 15 preliminary test cases and presents them on the Generated Test Cases screen. - (Optional) Clear the checkbox next to the any test case that you do not want to keep.
Tip: Take a careful look at the test cases that display a
 or
or  status. These icons signify that the test has identified potential issues in your expression rule that may need attention. They do not necessarily indicate problems with the AI-generated test cases. See Run test cases for more details about these statuses.
 - Click ADD TEST CASES.
Result: The new test cases are automatically added to the existing list and become instantly accessible from the Test Cases tab. Here, you can fine-tune these test cases or enhance them with extra scenarios if needed. You can repeat this process as often as you want. AI Copilot will review any test cases you've already added to see if additional test cases should be included.Tip: If the test cases don't seem to match what your expression rule is supposed to do, here are a few easy changes to help AI Copilot understand better:
- Enhance your rule input descriptions to be more detailed and include examples where possible.
- Add comments to your code to help AI Copilot understand your rules' logic and intentions.
- Improve your object's description. This can also make a difference in the test cases that get generated.
Save ad hoc test values as a test caseCopy link to clipboard
To save sample rule input values as a test case:
- From the Ad Hoc Test pane, under Test Inputs, enter an expression or value for your rule inputs.
- Click Save as Test Case.
- In the Create Test Case dialog, configure the following properties:
Property Action Name Enter a name for the test case. Set as default test case Select to set this test case as the default test case. The test pane will automatically load test rules from the default test case whenever you open an expression rule. Test Inputs Update the values provided in the ad hoc test as needed. You can use an expression or provide a literal value. All expression or literal text values have a 4,000 character limit. You must have access to all selected users, groups, documents, or folders to create a test case. Assertion Select the assertion that determines whether a test case passes or fails. You can choose any of the following assertions. See Assertion examples and recommendations for more information. - Test will pass when the expression evaluates without errors: This is the default option, and most commonly used.
- Test will pass when the test output matches a user-defined output: A match occurs when output values are exactly the same (including case sensitivity for text) and are of the same type.
- Test will pass when a user-defined expression evaluates to true: Use the
test!outputvariable to access the test output in an expression in order to validate the output information (like its length or the value of a specific field). Reference the values of your test inputs as needed using theri!domain. For example:exact(index(test!output, "status", {}), "IN PROGRESS")
Test Output View the results of your expression rule and any test inputs configured. You can view your test outputs as a formatted map, a raw list, or as an expression. - Click CREATE. The new test case appears in the Test Cases view.
To use a test case in the Ad Hoc Test view, select a test case and click LOAD TEST CASE.
Assertion examples and recommendationsCopy link to clipboard
The following examples demonstrate how to use test case assertions to validate that your expression rules are returning the expected results for a variety of scenarios.
Example 1: Expression rules commonly validate that a value is what is expected in a process or interface. Below is an example of test cases for a rule that checks if an email address is valid.
| Test Case Name | Rule Input | Assertion |
|---|---|---|
| Valid email address | karen.jones@example.com | Output: true |
| Invalid email address - missing @ | karen.jonesexample.com | Output: false |
| Invalid email address - missing domain | karen.jones@ | Output: true |
| Null is an invalid email address | null | Output: false |
| List of email addresses still outputs a scalar boolean | {"karen.jones@example.com","bob.smith@example.com"} |
typeof(test!output) = type!Boolean |
Example 2: Another common scenario for expression rules is to manipulate a complex data type or Appian object input which could result in varied outputs. Examples of useful assertion expressions in these scenarios are below.
| Scenario | Assertion |
|---|---|
| The output is not null | not(isnull(test!output)) |
| Specific field in CDT equals some value | exact(index(test!output,"someCDTfield",{}), cons!someConstantValue) |
| List contains certain value(s) | contains(test!output, {"A", "B"}) |
| Has # items in list | count(test!output) = 4 |
| The output is no longer than a max length limited by a Smart Service | len(test!output) < 4000 |
Assertion recommendations:
- Expression rules should have enough test cases to accurately describe the behavior of the rule. This increases confidence that the rule works properly for runtime scenarios and helps with maintenance of the rule as it changes over time.
Note: It is not necessary to have an exhaustive list of all possible permutations for your test cases.
- Avoid using the
and()function to group assertions together when making an assertion expression since this will make debugging the rule's failed tests more difficult. Duplicate test cases and update their assertion expressions when you want to assert multiple things about the same output. - When it is necessary to reference an Appian object in an assertion, use the Output matches the asserted output option to select the object. Objects selected from this option will be identified as precedents to the expression rule. It is also acceptable to create test objects and rules to use in test case assertions when necessary.
Run test casesCopy link to clipboard
Once you create your test cases, you can run a single test case or all test cases to see if they pass or fail.
Test results are not persisted with the expression rule on save, so tests must be run each time the rule is opened to view the results.
Tip: In addition to running test cases for an individual expression rule, tests for multiple rules can be run in bulk to test an entire application or system at once. See the Automated Testing for Expression Rules page for more details.
To run a single test case:
- In the expression rule, go to the Test Cases view.
- Select the checkbox next to the desired test case.
- Click RUN SELECTED.
To run all test cases:
- In the expression rule, go to the Test Cases view.
- Click RUN ALL TESTS.
The results of these tests are displayed in the Test Cases grid, which includes the evaluated output of the rule for each test case and the test's status.
A test case can have one of the following resulting statuses:
 Test passed - the test's assertion passed
- Test failed: test output did not match asserted output - the test output was not identical to the user specified output
- Test failed: assertion expression returned false - the user specified assertion expression did not evaluate to true
- Test failed to run - the test could not be run because either one of its test inputs or the defined assertion failed to evaluate. When the test input failed, an error message is displayed in the cell for the corresponding input.
- Test returned an error - the rule encountered an expression error during evaluation. An error message is displayed in the output column for that test case.
Export and import of test valuesCopy link to clipboard
Test cases are always exported with the expression rule, but can only imported if the destination environment has the Allow Test Values to Be Imported with Design Objects setting enabled.
For more about this configuration, see the Deployment section of the Admin Console.
EditCopy link to clipboard
To edit an expression rule:
- In your application, go to the Build view.
- Select the expression rule name to open it.
- Make any necessary updates.
- Click SAVE CHANGES.
Each time you modify and save an expression rule, a new version is created. All expressions that use the rule use the latest version. All versions are accessible to developers who can view the rule, and a rule can be reverted back to a previous version at any time.
For information on how to manage object versions, see Managing Object Versions.
Design guidanceCopy link to clipboard
While editing your expression rules, you may encounter guidance. Appian design guidance reinforces best practice design patterns that should be implemented in your objects. Design guidance for expression rules is calculated while editing the rule or when a precedent of the rule is updated.
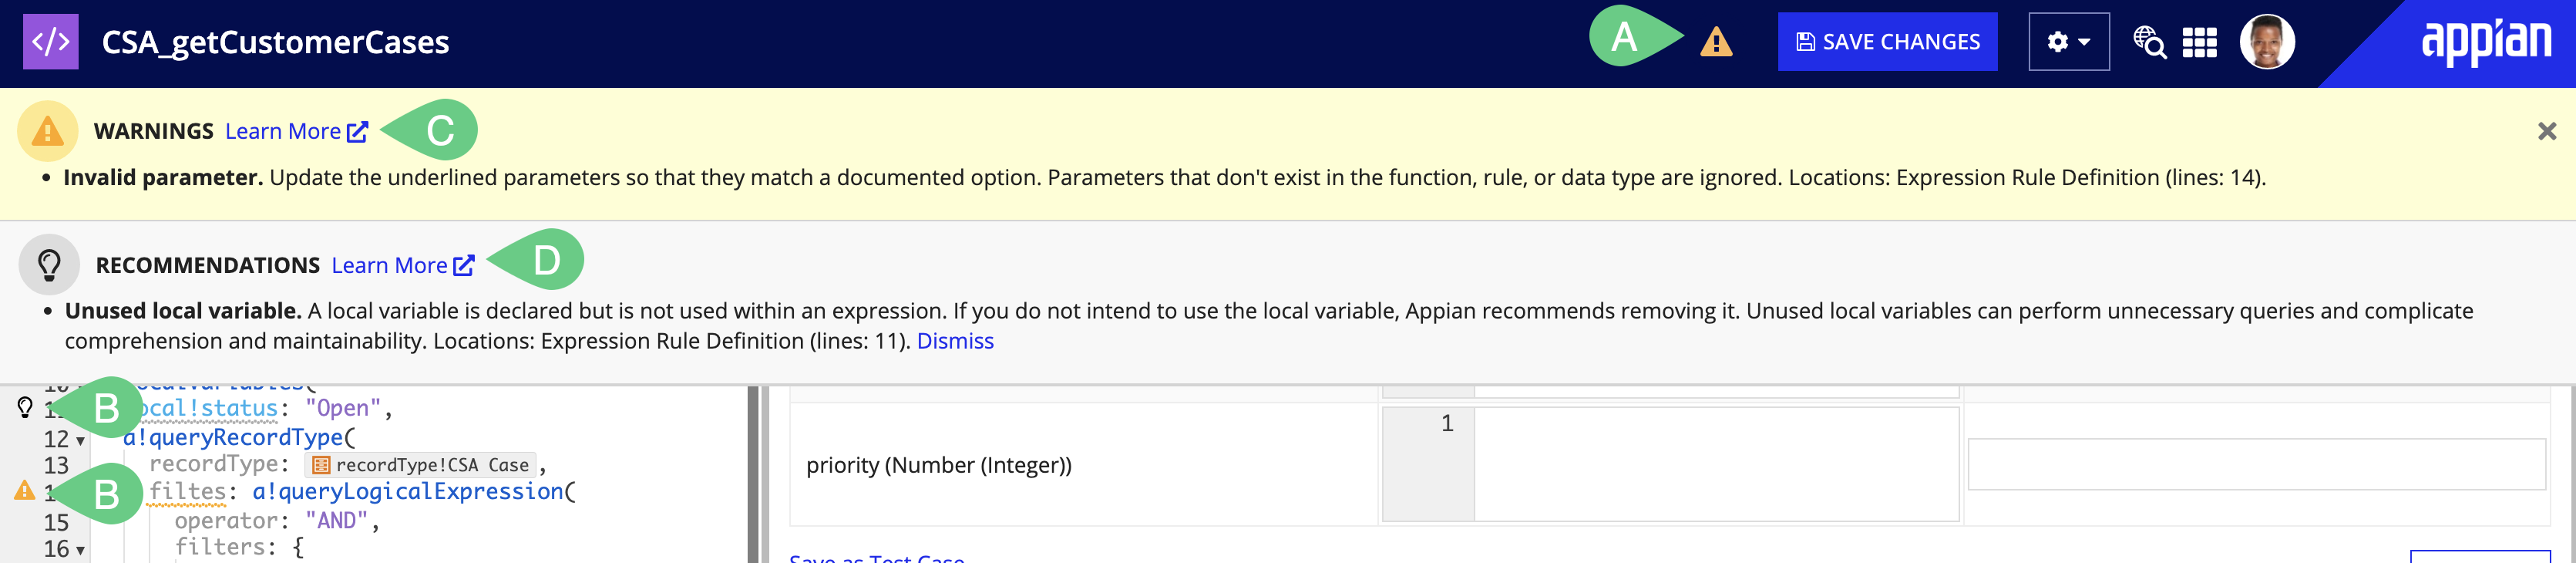
When a recommendation or warning is triggered, you'll see an indicator icon in the header (A) and next to the corresponding line in the expression editor (B).
Click on the icon in the header to learn more about the suggested guidance (C) and how it can be addressed.
If a recommendation is not applicable to your use case, you can Dismiss (D) that individual recommendation for that rule. Learn more about recommendation dismissal. Warnings cannot be dismissed and should always be addressed to avoid complications when the logic in the object is executed.
Expression rule guidance is also visible outside of rules on the Health Dashboard.
MoveCopy link to clipboard
Users with Administrator permission to this object or rule folder can move it to another folder:
- Navigate to the parent folder that the object or folder is in.
- Select the object or folder. You can select more than one.
- Click the Move button on the toolbar. The Move Objects dialog appears.
-
Use the folder picker or browser to select the new parent folder.
Tip: You can also create a new folder in the browser, if you have Editor permissions to its parent folder.
- Click Move.
Note: Any objects that are configured to inherit the security of the parent folder assume the security rights of the target folder.
DuplicateCopy link to clipboard
Developers with Viewer permissions to this object can duplicate it. There are two ways to duplicate an object:
- From any view in an application, you can select the object you wish to duplicate and use the toolbar option to launch the duplication dialog. The duplicated object will be added to the application you're working in. This capability is only available for single object selections from the grid.
- If you are in an interface, expression rule, integration or decision object, you can select Duplicate from the object's settings menu . From there, you can specify the target application for the new object.
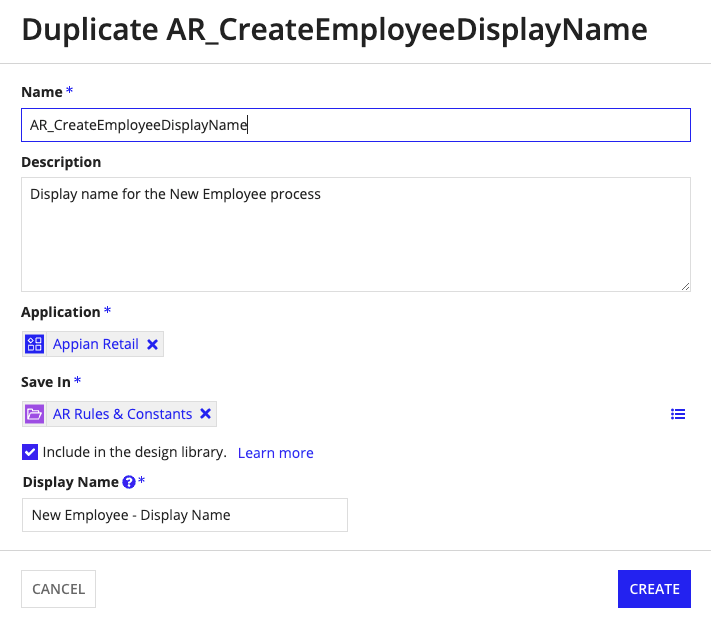
Once you select the Duplicate option, you will see the following dialog:
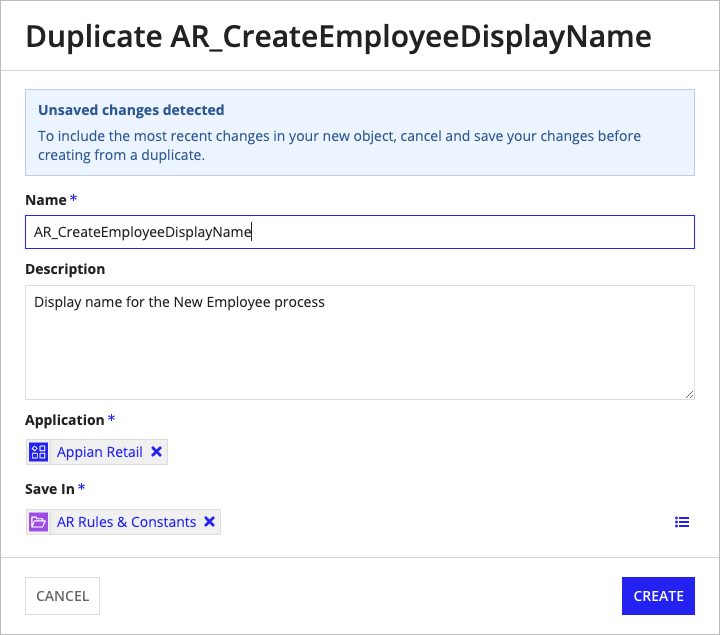
You can only duplicate the most recent version of an object. If you have unsaved changes and attempt to duplicate the object from within the designer, the most recent saved version of the object will be duplicated without the unsaved changes. A banner appears when there are unsaved changes to remind you before duplicating.
DeleteCopy link to clipboard
Deleting an expression rule prevents users from further viewing or editing it. However, the last version of the rule is still available to be used in processes, record views, and reports.
Rules can be deleted by users with Administrator permissions to it. Appian does not recommend deleting rules that are in use because the rule can no longer be exported.
To delete an expression rule:
- In your application, go to the Build view.
- Select the checkbox next to the expression rule you want to delete.
- Click DELETE.
-
In the Delete Expression Rule? dialog, ensure there are no objects that depend on the expression rule.
Note: If there are objects that depend on the expression rule, then deleting the expression rule will cause an error to appear in those objects.
- Click DELETE.
Tip: System administrators have the ability to delete expression rules (and other objects) in bulk by selecting them and clicking Delete in the toolbar.
Call an expression rule from another expressionCopy link to clipboard
Expression rules are called using the rule! domain. When calling a rule, values or variables can be passed to the rule inputs by position or by keyword, as shown below.
1
rule!userDisplayName(pp!initiator)
Copy
SecurityCopy link to clipboard
Tip: Any user can invoke any expression rule that is used by an interface or process they can access.
The security role map of an expression rule controls which developers can see or modify it and its properties.
By default, expression rules inherit the security of the folder that they are saved in. However, after creating the expression rule, you can disable that inheritance and modify the rule's security.
See Editing Object Security to modify an expression rule's security.
The following table outlines the actions that can be completed for each permission level in an expression rule's security role map:
| Actions | Administrator | Editor | Viewer | Deny |
|---|---|---|---|---|
| Evaluate the rule | Yes | Yes | Yes | Yes |
| View the rule definition | Yes | Yes | Yes | No |
| Duplicate the rule | Yes | Yes | Yes | No |
| View and run test cases | Yes | Yes | Yes | No |
| Update the rule definition | Yes | Yes | No | No |
| Create, update, and delete test cases | Yes | Yes | No | No |
| View the security | Yes | Yes | No | No |
| Rename the rule | Yes | Yes | No | No |
| Delete the rule | Yes | No | No | No |
| Update the security | Yes | No | No | No |