
OverviewCopy link to clipboard
The Write Records smart service is a powerful tool that allows you to easily insert or update data in your source system and then automatically sync those changes in Appian.
To write data using this smart service, you must use a record type that meets the following conditions:
- The record type uses a database as its source.
- The record type has data sync enabled.
You can write a combined total of 50,000 records, related records, and events per node.
Permissions neededCopy link to clipboard
The user executing this node must have Viewer permissions to all record types where data is created or updated. If the user does not, the node will fail and pause the process with an exception.
For example, if a user is creating a new Order, they need Viewer permission to the Order record type. When the Order is updated with line items, the user will need to write both the Order and the Order Item, so they will also need permission for the Order Item record type.
PropertiesCopy link to clipboard
- Category: Data Services
- Icon:

- Assignment Options: Automated activity
Configuration optionsCopy link to clipboard
This section contains configuration details specific to this smart service. For more information about common configurations, see the Process Node Properties page.
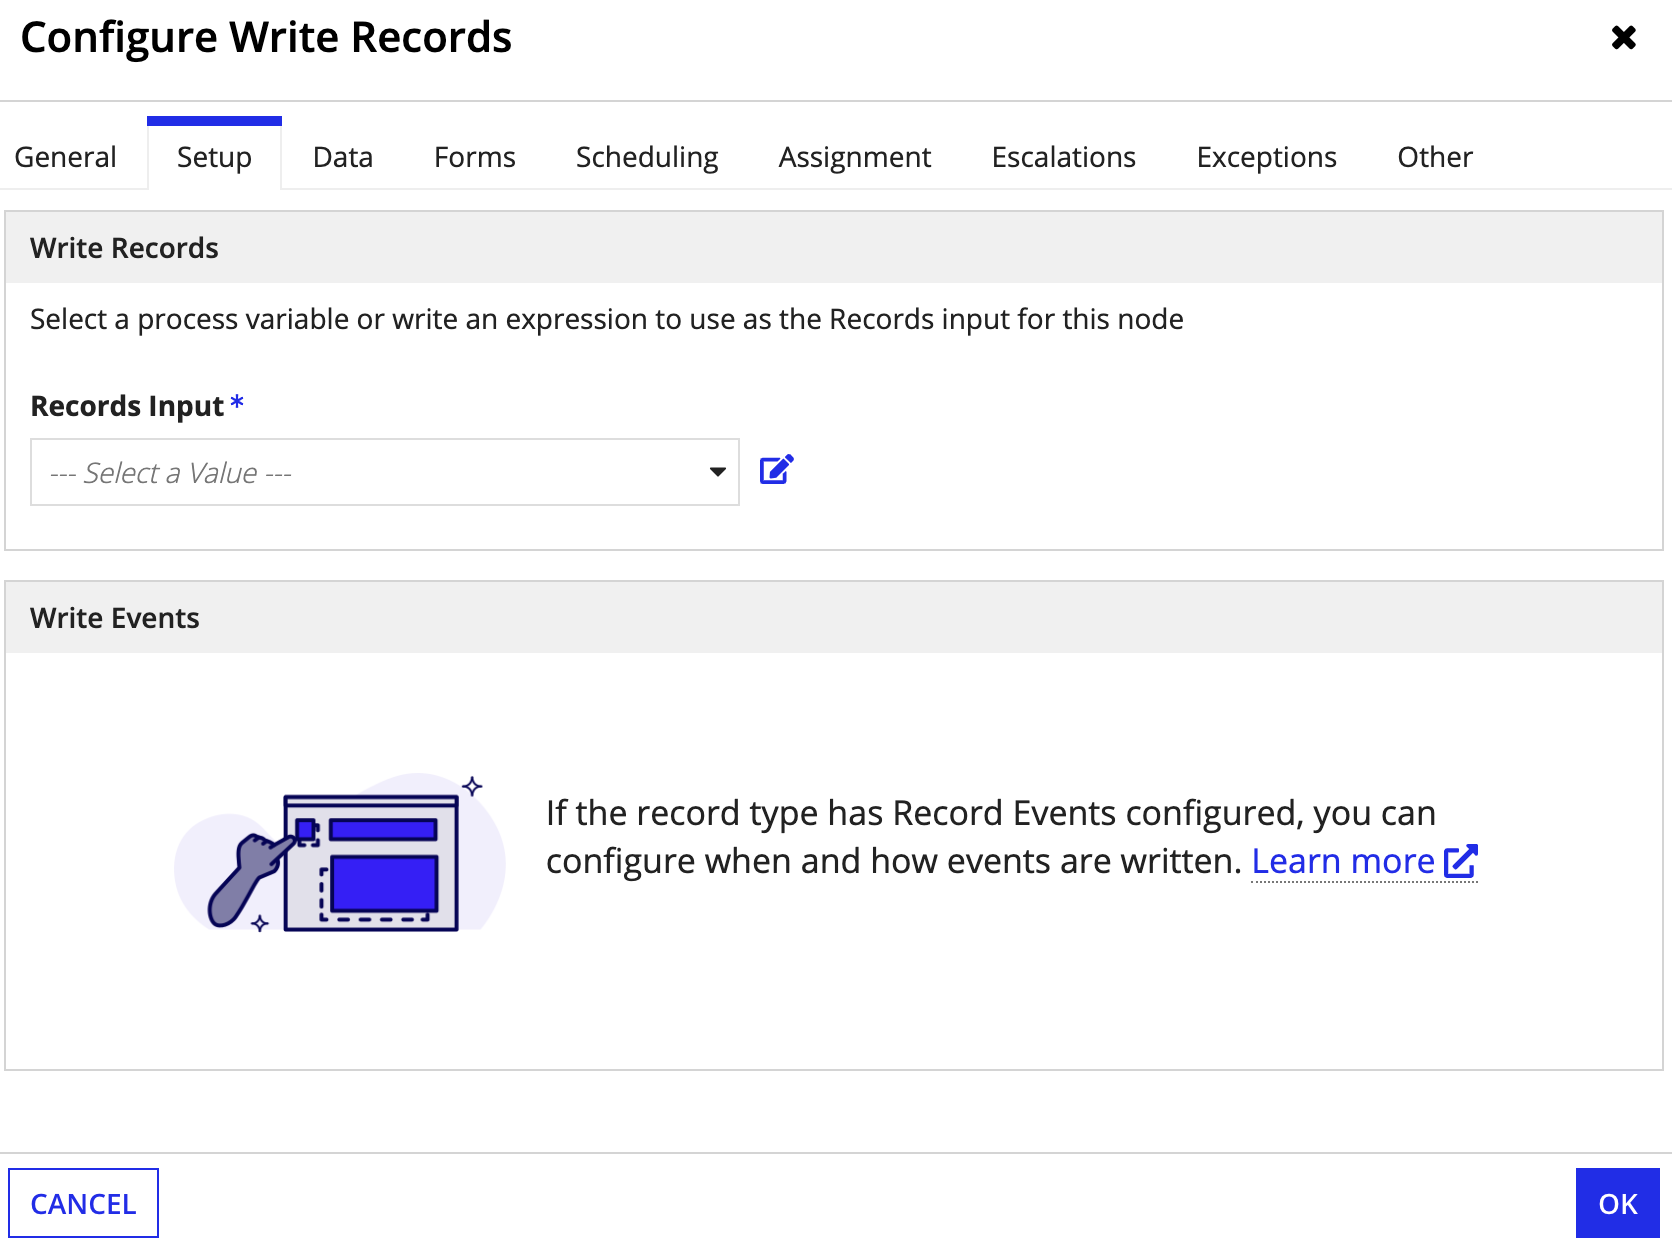
Setup tabCopy link to clipboard
The Setup tab is where you'll configure the records to write, as well as any corresponding record events to write. If your record type does not have record events configured, you will only specify the records to write on this tab.
Note: If you do not see the Setup tab in your node, replace the current node with a new Write Records node.
To configure the Setup tab:
- (Optional) Configure record events for any record types you want to capture events for. You can only write records and events at the same time if the record type has record events configured.
- In your process model, open the Write Records node.
-
Go to the Setup tab.

-
For Records Input, specify the data to write:
To write to... Action Base record type Select a process variable of type Record Type.
This allows you to write data to the record type and any of its one-to-one or one-to-many related record types in a single transaction.Related record types that have the relationship configured to Write or delete… Unrelated record types Select multiple process variables of type Record Type.
This allows you to write to each of those record types in a single transaction.Related record types that have the relationship configured to Do not write or delete… Tip: If you need custom conditions or to update data with static values, you can write an expression with the data to update.
-
If you selected multiple process variables in the Records Input, review the list of record types in Record Type for Events, and remove all except the record type you want to write events for. You can only write events for a single record type per node.
Note: If the record type does not have record events configured or multiple record types are selected, no events will be written.
-
If the record type in Record Type for Events has record events configured, choose when to write events:
Option Description Always Write events whenever the node executes. Never Never write events whenever the node executes. Only when… Specify the condition in which events are written. Click Edit Condition to write an expression defining the specific condition. -
Select the values to write for the event. The field inputs are populated from the related Event History record type.
You must map values for the following field inputs:
Input Description Event Type The type of event that occurred. The dropdown list is populated from the values in the Event Type Lookup record type. If you use an expression, you must use the event type identifier to indicate the type of event. Learn more about conditionally choosing event values. User Who completed the event. If the event will be completed by an automated task, set the value to Null (Set as System Event). Automation Type The type of automation that completed the event. If the event isn't automated, set the value to None (User) to indicate it will be completed by a user. Timestamp The date and time when the event occurred. Select Now to capture the date and time when the node executed. - Click OK.
- Click Save & Publish in the process model.
Data tabCopy link to clipboard
The Data tab allows you to add additional inputs and store the resulting node outputs.
Node inputsCopy link to clipboard
| Name | Data Type | Description | Required | Multiple |
|---|---|---|---|---|
| Pause On Error | Boolean | Determines whether the node should pause by exception if an error occurs writing to the source. Default: true. |
No | No |
Node outputsCopy link to clipboard
| Name | Data Type | Description |
|---|---|---|
| Records Updated | Any Type | A list of records containing the input data, the primary keys of any newly created records, and any new event records (if you chose to write record events). Its data type is a list of all the record types configured on the Setup tab. If you save this output to a process variable, you can examine the results in the Process History. Learn how to use the Records Updated output to work with changed data. |
| Error Occurred | Boolean | Returns true if any write to the source system or Appian fails; returns false if all writes succeed. |
| Error | Text | The error that occurred when writing the records and the list of records that failed to write. This is only returned when the Pause On Error input is false. |
Usage considerationsCopy link to clipboard
| To learn more about… | See… |
| Passing data to and from the smart service. | |
| Writing records and related records. | |
| Writing events. | |
| Automatic behavior. |
Pass data using a record data typeCopy link to clipboard
To pass data into the Write Records smart service or function, you must use a record data type. This means that when you build a start form, you should use record types as your rule inputs or local variable, and any process variables should have a Type of Record Type.
If you're not passing data from a variable, you can use a record type constructor to pass in the record data type and the data to write.
Note: You only need to pass in the data you want to update, not all record fields and their values. This smart service will only update the data you provide. It will not write null values for any fields that are not provided. See Update existing records for an example.
Use the Records Updated output to work with changed dataCopy link to clipboard
When your process needs to use or act on the data written by a Write Records node, you can often complete the process using data provided in the Records Updated output.
This output includes everything from the input plus the primary keys of any newly created records. If the node is configured to write record events, the output also contains any new event records. Returning this combination improves performance of the Write Records node.
You can use the Records Updated output to:
- Store the updated data from a single record type.
- Store the updated data from multiple record types in custom variables.
- Recalculate custom record fields using the latest values updated in the node.
Store updated data from a record typeCopy link to clipboard
If you provided a single process variable in the Records Input, you can store the data updated in that record type, as well as any events updated for the record type.
For example, let's say you provided the process variable pv!customer in the Records Input to update data in the Customer record type. The record type also has record events configured and the node was configured to also write events.
To store the events and the data updated in the Customer record type:
-
Create a process variable with the following properties:
Property Value Name Enter customerUpdatedType Select the Customer record type. - Open the Write Records node.
- Click the Data tab and select the Outputs subtab.
- Select Records Updated and set the Target to customerUpdated to store the updated customer and event data.
- Add the remaining nodes needed for your process model and use the variables customerUpdated to work with the newly written data from the record type.
Store updated data from multiple record types in custom variablesCopy link to clipboard
If you provided multiple process variables in the Records Input, you can store the changed values for each record type in separate custom outputs. This way, you can use the new or updated data from these record types in the rest of your process.
For example, let's say you provided the process variables pv!order and pv!district in the Records Input to update data in the Order record type and the District record type.
To store the output from the Order record type and the District record type:
-
Create a process variable to store the values for each record type. For example:

- Open the Write Records node.
- Click the Data tab and select the Outputs subtab.
- Select Records Updated and set the Target to ordersUpdated to only store data updated in the Order record type.
-
Click + New Custom Output and enter the following properties:
Property Value Expression Enter ac!RecordsUpdatedto call the output.Target Select districtUpdated to only store data updated in the District record type. - Add the remaining nodes needed for your process model and use the variables ordersUpdated and districtUpdated to work with the newly written data from each record type.
Recalculate custom record fields using the values updated in the nodeCopy link to clipboard
If your process is more complex and needs data that is not immediately available in the node output, you can query the record type after a Write Records node.
For example, if a later node uses a custom record field to determine the path of the process and that node is dependent on the data updated in the Write Records node, you must run another query to retrieve its latest value. The value in the Records Updated output will not be refreshed.
If you need to get the latest record data after writing, you can quickly build that query using a Script Task.
To recalculate a custom record field using the values updated in the Write Records node:
-
Create a new process variable with the following properties:
Property Value Name recordsUpdatedType Select the same record type used in the Record Input. - Drag a Script Task node from the palette and drop it on the connector exiting the Write Record node.
- Open the Script Task.
- Click the Data tab and select the Outputs subtab.
-
Click + New Custom Output and enter the following properties:
Property Value Expression Use a!queryRecordType() or a!queryRecordByIdentifier to query for the data you need. Target Select recordsUpdated. - Add the remaining nodes needed for your process and use the
recordsUpdatedas needed to work with your newly written data.
Writing records and related recordsCopy link to clipboard
Create new recordsCopy link to clipboard
A new record will be created when one of the following is true:
- The source table is set to
AUTO_INCREMENTthe primary key column and you omit the primary key field or set it as null. - The record type's primary key field is configured to use a sequence to generate key values and you omit the primary key field or set it as null.
- The source table is not configured to
AUTO_INCREMENTor use a sequence and you provide a primary key value that does not exist.
Update existing recordsCopy link to clipboard
To update existing data, the record must include a primary key value. For example, if you want to update an employee record, you must pass the employee's Id to the Write Records smart service.
When you update an existing record, only the changed data is written. For example, imagine your Employee record type has fields for firstName, lastName, and other personal information, but you only need to update an employee's last name from Anderson to Kwan. You can pass just the record's identifier and the new lastName, and only the changed field will be updated in the source.
In this example, we query the entire Employee record. When we pass the updated data, only lastName is updated in the source; the employee's first name and other data remains unchanged.
1
2
3
4
5
recordType!Employee(
  recordType!Employee.fields.id: 233,
  recordType!Employee.fields.firstName: "Alice",
!  recordType!Employee.fields.lastName: "Kwan"
)
Copy
Create related recordsCopy link to clipboard
You can update records in one record type or you can include related records with a one-to-many or one-to-one relationship to the base record type.
To write data for a base record and related records, the following conditions must be met:
- The relationship must be configured to allow writing related records.
- All records being updated have the same data source. The record types must share one schema (or database if schemas are not supported by your data source).
- For example, say you have Customer and Order record types. If the source tables are in separate People and Sales schemas, you can't update these records in a single Write Records node.
- For a one-to-many relationship, the base record's common field can be the primary key or another unique key.
- For a one-to-one relationship, the base record's primary key must be used as the common field in the relationship configuration. Relationships defined with other unique keys are not supported.
The Write Records node executes all of the writes as a single transaction. This ensures that either all of the input data is written or none of the data is written. This helps avoid incomplete writes (such as where an Order is written, but an Order Line Item is not).
Write Records and the synced row limitCopy link to clipboard
If your record type exceeds the synced row limit after the Write Records smart service executes, the write will be successful and the sync will succeed as long as:
- The record type has Keep data available at high volumes enabled.
- The record type is within 10% of the synced row limit.
Otherwise, the write will succeed but the sync will fail and your record data will be unavailable.
Writing eventsCopy link to clipboard
Write records and eventsCopy link to clipboard
If the record type selected in the Records Input has record events configured, you can write records and events at the same time, in the same node. This means that when the node executes, the record type will be updated, as well as the related Event History record type.
For example, let's say you configure a Write Records node to create a new order. If the Order record type has record events configured, you can specify that when a new order is created, a new event is also created to capture who created the order and when.
If you are updating multiple records in one node, then each new record will have a corresponding event created. For example, if you create order 1, order 2, and order 3, each order will have its own unique event created.
The Write Records smart service can only write events for a single record type, and that record type must be specified in Record Type for Events. Event data is not automatically create for any related record data, but it can be created using a separate Write Records node.
You can also include events for a related record type by adding the data to the process variable. Events will be written for the record and the related record when then node executes. See Write events for multiple record types in one node for an example.
Note: You can only write records and events using the Write Records smart service. You cannot use the a!writeRecords() function to write records and events at the same time.
Capture automation typesCopy link to clipboard
When you're capturing automation types in your event data, you can configure your Write Records nodes to write the type of automation that completed each event. Remember, even though a process might involve multiple users or automation types, you want your event data to show the user or automation type that actually completed the task.
In general, use the following guidelines to configure the User and Automation Type properties when writing events:
-
If the event was completed by a human, set the User property to the appropriate field from the Event History record type. Then, set the Automation Type property to None (User).
-
If the event was completed by automation, set the User property to Null (Set at System Event). Then, select the appropriate automation type for the Automation Type property.
Learn more about capturing automation types.
Conditionally choose event valuesCopy link to clipboard
You can conditionally set the value for any event input, like Event Type, User, Automation Type, or Timestamp. This approach is useful when you use a single Write Records smart service to add and update data, or when you want to write different event values depending on a value in the record.
For example, when you generate Create and Update record actions at the same time, Appian will create a single process model to perform both actions. If you selected the Include Common Event Types option when you generated your event record types, the generated process model is automatically configured to write events correctly. As a result, "Created record" events are only written when a new record is created, and "Updated record" events are only written when a record is updated.
You may also want to write different event types depending on the value of a record. For example, let's say an order is updated to have a status of "Reviewed" so you want write an event called "Reviewed Order" instead of "Updated Order".
To conditionally set the event type for this example:
- In your Write Records smart service, go to the Setup tab.
- Next to Event Type, click Edit as Expression.
-
Write an expression using an if() statement and the order status value. Use the event type identifier to specify the event type. For example:
1
2
3
4
5
6
7
if(
 pv!record[recordType!Order.relationships.status.fields.name] = "Reviewed",
 /* The ID for the "Reviewed Order" event type */
 3,
 /* The ID for the "Updated Order" event type */
 2
)
Copy
Tip: For easier maintenance, use a constant to specify the event type identifier instead of entering a static numerical value.
Write events without writing recordsCopy link to clipboard
There are some scenarios where you may want to write an event without making any changes to the base record type.
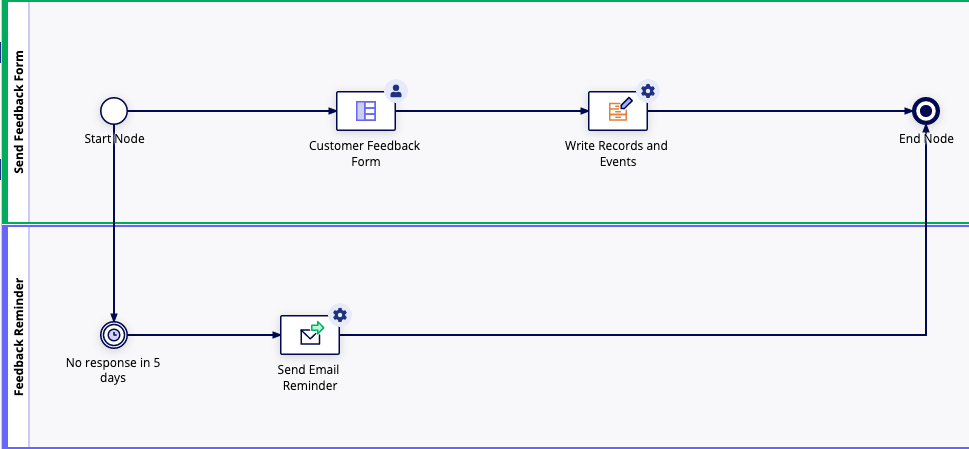
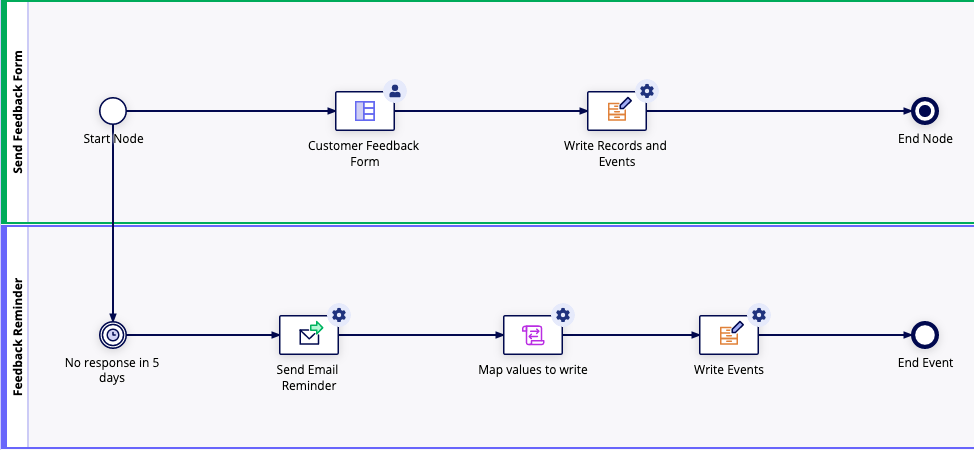
For example, let's say you sent a feedback form to a customer after an order is shipped. If the customer doesn't respond to the form in five days, the process model will automatically send an email reminder.
To capture an event for the automatic email reminder, you can write directly to the Event History record type. To do this:
-
Add a Script Task node and configure it with the data to pass to the Write Records node. Use a record type constructor to specify the event information to write to the Event History record type. For example:
1
2
3
4
5
6
 recordType!Customer Events(
     recordType!Customer Events.fields.recordId: pv!customer[recordType!Customer.fields.recordId],
     recordType!Customer Events.fields.timestamp: now(),
     recordType!Customer Events.fields.user: null,
     recordType!Customer Events.fields.activityId: cons!CUSTOMER_EVENT_EMAIL_REMINDER_ID
 )
Copy
Note: A null
userfield indicates that this is an automated activity, it was not started by a specific user. -
Add a Write Records node and set the Records Input to a process variable or expression that evaluates to the Event History record type.
The updated process would look something like this:
Automatic behaviorCopy link to clipboard
The following behavior automatically occurs when the smart service executes.
Automatically sync writesCopy link to clipboard
Whenever you use this smart service to update your source data, those changes will be automatically synced in the record type. This is called a smart service sync.
If a smart service sync occurs at the same time as a scheduled full sync, all changes from the smart service sync will be immediately synced and available. Then, when the full sync completes, all other changes from the source will also be available.
See also:
- Considerations for using smart services that automatically sync data.
- Usage considerations for writing records and the synced row limit.
Automatic refresh on record viewsCopy link to clipboard
When you use this smart service on a record view, the view will automatically refresh with the latest record data.
This means that when your record view interface has a Record Action component that triggers the Write Records smart service, or a button component that triggers the a!writeRecords() function, the record view data will automatically refresh after the write occurs.
This refresh behavior only applies to data supplied by rv!record. If your record view definition uses rv!identifier or a local variable to supply the record data, the data will not automatically refresh; instead, you will need to configure additional refresh behavior.
Ignore custom record fieldsCopy link to clipboard
If you try to update custom record fields in the Records Input, those changes will be ignored. Custom record fields are defined by and exist only in Appian, so attempting to write values for them will have no effect.
View node output in process historyCopy link to clipboard
When debugging a process, you can see exactly what was written to the source by saving the Records Updated output to a process variable and then examining the results in the Process History.
Normally, the gray icon means that a record field was not modified and the yellow icon means the field was changed or added. The icons have a special meaning when viewing the RecordsUpdated output.
| Icon | Description |
|---|---|
| The field was written successfully. | |
| The field was ignored because of the relationship configuration. |
These indicators can help you understand how data is written, especially when you construct a record variable in the process. Let's look at an example.
Say you have a process that creates placeholder Employee records for open positions. Each Employee is part of a Department, a many-to-one relationship.

If you try to construct this relationship, Write Records will ignore the related data because of the relationship type.

Here's a step-by-step breakdown of how record data changes are shown in the history.
- The
recordvariable is constructed, so all of the fields are shown with the yellow arrow icon because they are new data. - The Employee data is written successfully, so all of the fields are marked with a gray icon.
- The
recordvariable is modified by adding the Department relationship. The related record fieldidis new and shown with a yellow arrow icon. - When the
Records Updatedoutput is saved to therecordvariable, the Department fieldidis still shown with the yellow arrow icon, indicating that data was not written.
In some cases, ignoring the related record data may be expected or wanted, but you can use the information provided by the icons to better understand how data is changed by Write Records. If the related record data should be written, you can revise the relationship configuration or add a Write Records node to write the related data separately.
a!writeRecords()Copy link to clipboard
The Write Records smart service is available as an expression function that can be executed inside a saveInto on a Interface Component or as part of a Web API. When creating a web API, select the Write Records template to generate the object with this function automatically configured.
Note: You cannot use the a!writeRecords() function to write records and events at the same time. You can only write records and events using the Write Records smart service.
SyntaxCopy link to clipboard
a!writeRecords( records, onSuccess, onError )
ParametersCopy link to clipboard
| Keyword | Type | Description |
|---|---|---|
|
|
Any Type |
A list of all the records and related records to update (up to 50,000 records, related records, and events combined). Use the |
|
|
Any Type |
A list of saves or an HTTP response to execute when the smart service writes data successfully. Created with |
|
|
Any Type |
A list of saves or an HTTP response to execute when the smart service does not write data successfully. Created with |
Possible errorsCopy link to clipboard
This section explains some of the common reasons the Write Records smart service might fail.
Configuration errorsCopy link to clipboard
Configuration errors can occur when the node setup or inputs are misconfigured and attempts to write to the source cannot succeed.
Some examples of misconfiguration include:
- Using an unsupported record type (for example, a record type with a non-database source).
- An error in the related Event History record type or Event Type Lookup record type (for example, a field is deleted or the record type is deleted).
- An error in the expression calling the process model or the
a!writeRecords()function. -
Attempting to write related record data when the relationship is not configured to allow updates to related records.
- Using one node to write data to record types with different sources. This could be different databases or schemas, or different data sources (like a database and Salesforce).
Errors writing too much dataCopy link to clipboard
If you have a field of type Extra Long Text and you try to write more than 64,000 characters to this field, the write will fail.
Ensure you configure a character limit on your paragraph or styled text editor components so users don't accidentally write more than the 64,000 character limit.
Errors with the data sourceCopy link to clipboard
Appian is unable to change data in the source in some circumstances.
These situations include:
- Schema mismatches, such as conflicting data types.
- Database connection problems, like timeouts or invalid credentials.
- Database triggers that cause the requested data change to fail. Appian is not aware of any configured triggers, so they may need to be changed or removed for the smart service to work correctly.
If Appian is unable to write to the database, the record data will still remain available even if the smart service fails.
Errors writing to a related record typeCopy link to clipboard
The Write Records node executes all of the writes as a single transaction. This means that if you're updating data in multiple database tables, then data is successfully written to all tables or none of the tables.
For example, let's say a Write Records node is updating data in three different database tables: Orders, Customers, and Employees. If the node is unable to write to the Employees table, then the node will not write to the Orders or Customers table either. This helps avoid incomplete writes (like if an Order is written, but the Customer is not).
Errors syncing data changesCopy link to clipboard
When Appian attempts to sync changes to the source data, the sync will fail when one of the following occurs:
- The record type exceeded the synced row limit.
- A record field contains an invalid value.
- The record type's sync filter is invalid (for example, if the source field is no longer available).
If Appian is unable to sync changes from the source, the record data will be unavailable. For more information on the different types of sync errors and steps to resolve these errors, see Troubleshooting Syncs.
ExamplesCopy link to clipboard
The section walks you through the different ways you can use the Write Records smart service to create or update your record data.
Create a new record using a process modelCopy link to clipboard
Goal: Use the Write Records smart service to make a new record.
No matter what kind of business your app is designed for, creating a new record in a record type is one of the most common data actions. To create a new record, you can build a form that allows users to input information, then pass that information into a process model containing the Write Records smart service.
Tip: The example below illustrates how to manually configure a "Create" action to explain the general workflow of creating a record. In your own application, you can generate a Create record action for faster configuration.
Example
Let's say you need to create a record action that allows users to add new customers in a retail application. The application contains a Customer record type, which stores all customer information. This record type also has record events configured, so you also want to capture an event whenever a new customer is created.
To create this action, you could:
- Create a new form interface that allows users to enter the customer's information.
- Create a rule input called
recordand set the type to the Customer record type. This will allow you to pass customer data to the process model. -
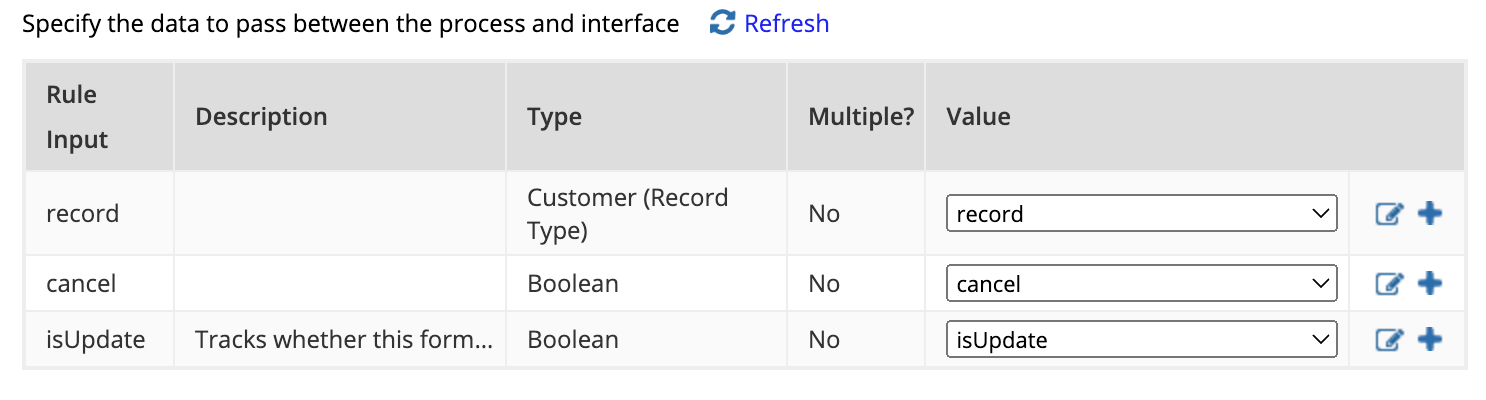
Create a new process model and configure the process model properties to use the new form and pass record data:
- Go to File > Properties.
- Go to the Process Start Form tab and select your interface.
- In the Create Process Parameters dialog, click YES. This will automatically create process variables that map to your rule inputs.
- Drag and drop a Write Records node into your process model.
- Go to the Setup tab.
- For Records Input, select the record process variable. By default, Record Type for Events populates with the Customer record type. Since the Customer record type has record events configured, the Write Events section can be set up.
- For Choose when to write events for the Customer record type, leave the default Always. The smart service will always write an event whenever a new customer is created.
- Select the values to write for the event:
- For Event Type, select Created Customer.
- For User, keep the default Process Initiator.
- For Automation Type, select None (User).
- For Timestamp, keep the default Now.
- Click OK.
- (Optional) Configure a cancel flow.
- Save and publish the process model.
- Create a record action that launches the new process model.
The process model looks something like this:
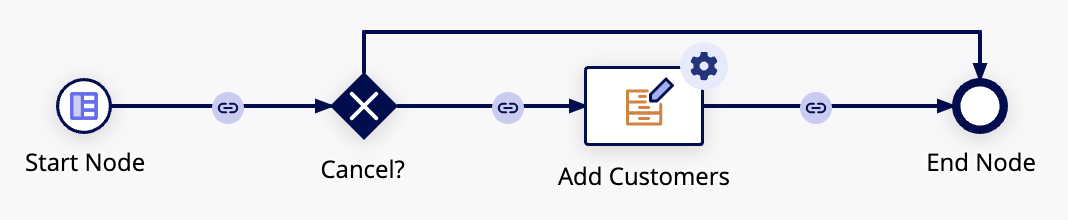
The node output will return the primary keys of the record and any related records included in the node input.
Create records and related records using a process modelCopy link to clipboard
Goal: Use the Write Records smart service to make a new record and related records.
Creating a record and related records is similar to creating a single record. You can create a form that allows users to update different types of data from different record types, and then pass that information to a process model. The Write Records smart service will automatically write the data to the selected record type and any of its related record types.
You can write records and related records in the same node as long as the relationship configuration allows it and the records share one data source.
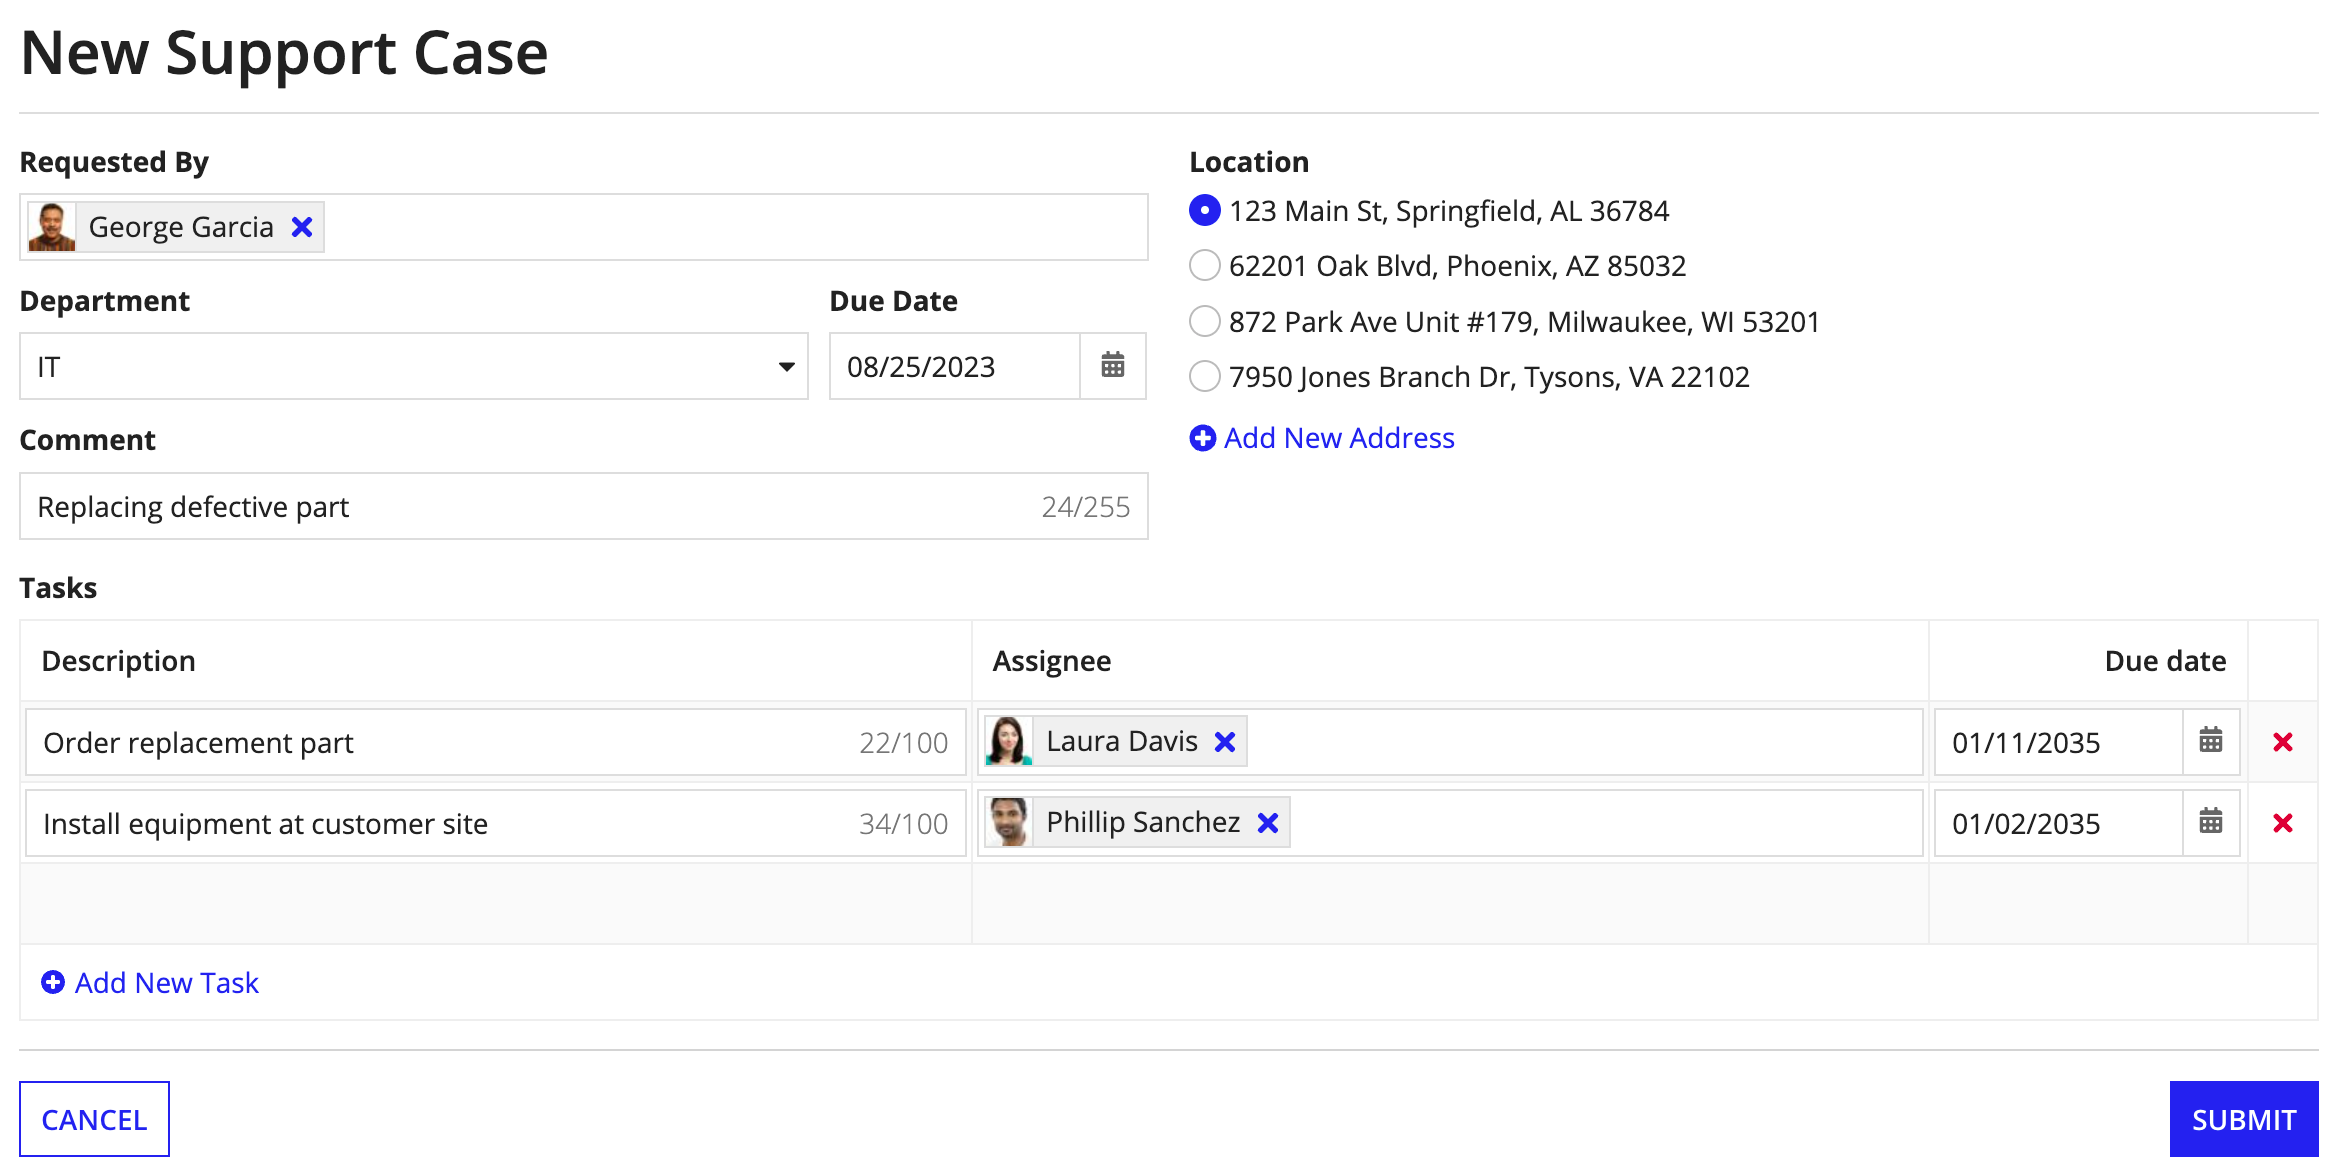
Example
For example, let's say you need to create a new record action so users can enter information about support cases opened by customers. Because more than one department may need to take action to resolve the customer's problem, those actions are tracked as separate tasks. The support agent can also choose to add a comment to capture any information about the case that isn't part of the form.
To represent these support cases, your application's data model includes three record types to store the data:
- Case, the base record type with data like
titleanddescriptionandreportedDate. - Task, a related record type for data like
assigneeandtype. - Comment, a related record type with data for
commentTextandauthor.
The Case record type has a one-to-many relationship with the Task record type and the Comment record type, and each relationship allows the Write Records node to write the Case and Task or Comment simultaneously. Case also has record events configured, so you can capture an event whenever a new case is created.
When a support agent submits a case, the process model writes to the base record type, Case, and the related record types in order to add both the new case, the required tasks, and any comments. This is done by passing all of that data as a single record variable to a single Write Records node.
To create this record action, you could:
- Create a new form interface that allows users to enter the case and customer information.
- Create a rule input called
recordand set the type to the Case record type. This will allow you to pass support case data and any related task or comment data to the process model. -
Create a process model and configure the process model properties to use the new form and pass record data:
- Go to File > Properties.
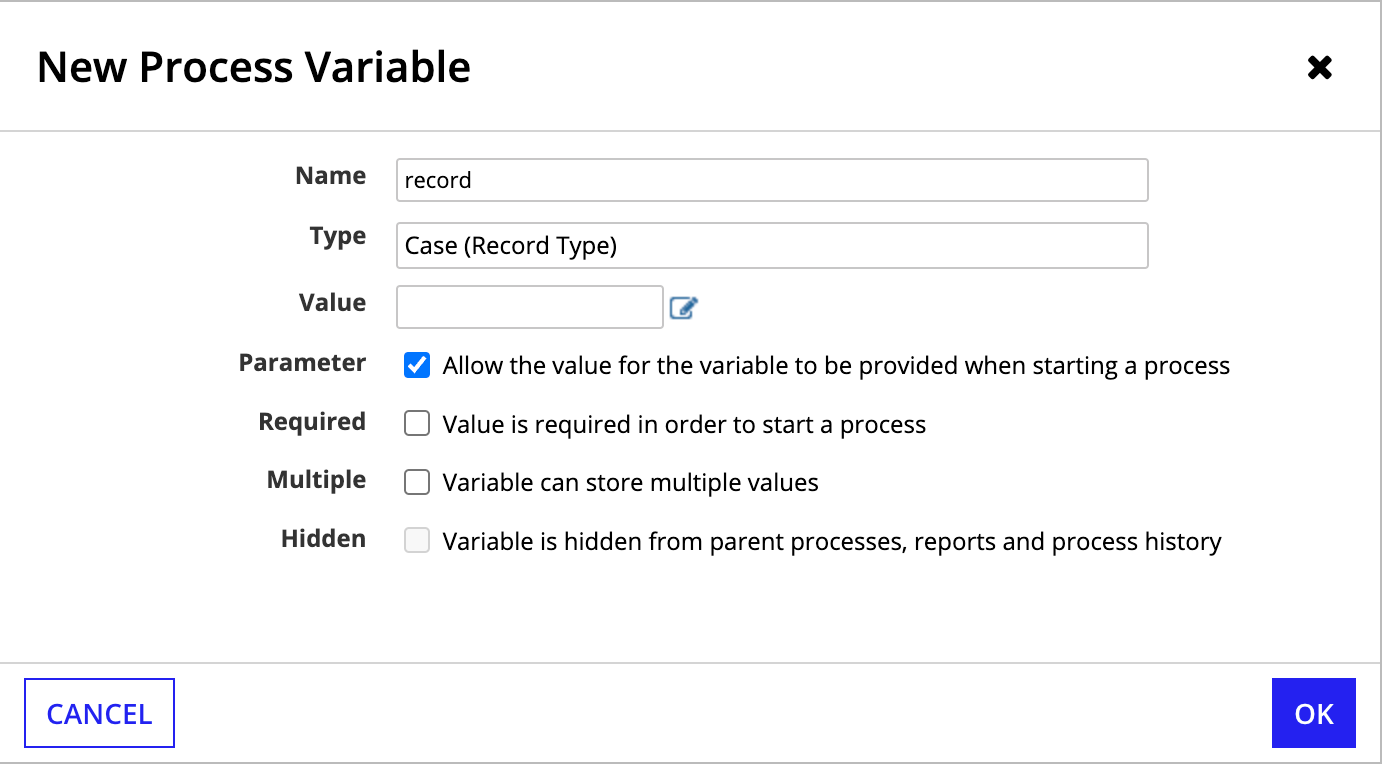
- Go to the Variables tab and create a new process variable called
record. - Set the Type to the Customer record type.
- Select the Parameter checkbox.
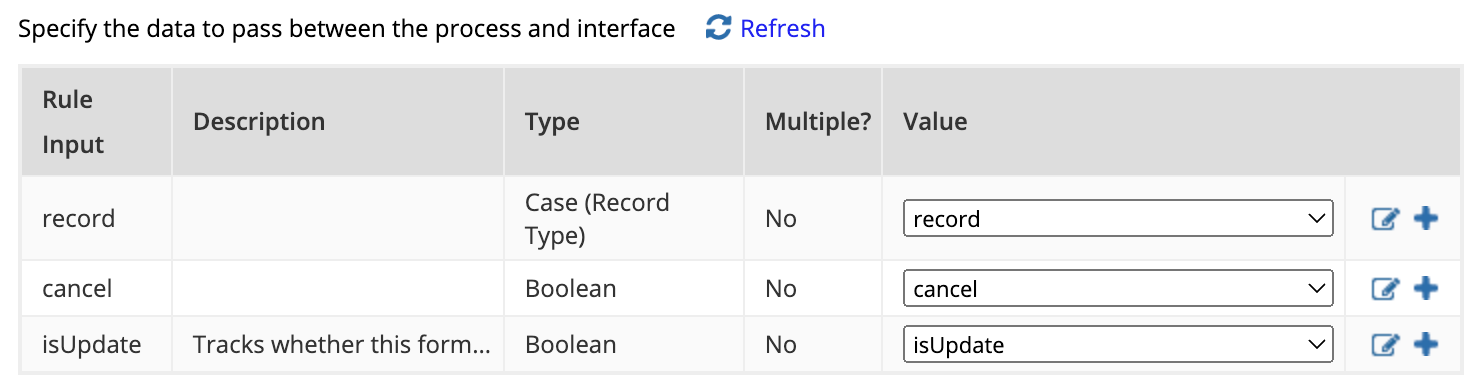
- Go to the Process Start Form tab and select your interface.
- Map your
recordprocess variable to therecordrule input from the interface.
- Add a Write Records node to take the data from the form (as
pv!record) and write a new Case record, as well as new Task and Comment data if they are part of the Case. - Drag and drop a Write Records node into your process model.
- Go to the Setup tab.
- For Records Input, select the record process variable. By default, Record Type for Events populates with the Case record type. Since the Case record type has record events configured, the Write Events section can be set up.
- For Choose when to write events for the Case record type, leave the default Always. The smart service will always write an event whenever a new case is created.
- Select the values to write for the event:
- For Event Type, select Created Case.
- For User, keep the default Process Initiator.
- For Automation Type, select None (User).
- For Timestamp, keep the default Now.
- Click OK.
- Save and publish the process model.
- Create a record action that launches the new process model.
Create a new record using an expressionCopy link to clipboard
Goal: Use the a!writeRecords() function to create a record.
Instead of building an entire process model to update data, you can just build a form and use the a!writeRecords() function in the submit button.
Example
Let's say you want to create a form that updates your Status record type with a new status option for orders. This will automatically write and sync any data provided in the form whenever a user clicks Submit.
To create this form, you could:
- Create a new interface using a form layout.
- Create a local variable called
status. This will store the new status value and pass it to thea!writeRecords()function. - Add components that allow users to add new values. In this example, you could add a Text field to allow users to add a new status label.
- In the primary button of the form, add a saveInto parameter with the following values:
1
2
3
4
5
6
7
8
9
10
11
12
13
14
15
16
17
18
    buttons: a!buttonLayout(
      primaryButtons: {
        a!buttonWidget(
          label: "Submit",
          saveInto: {
            a!writeRecords(
              records: {
                recordType!Status(
                  recordType!Status.fields.label: local!status
                )
              }
            )
          },
          submit: true,
          style: "SOLID"
          )
        },
      )
Copy
Now, whenever a user clicks Submit, a new record will be created in the Status record type.
Write to unrelated record typesCopy link to clipboard
Goal: Write to two unrelated record types in the same transaction.
You can seamlessly write to a record type and its one-to-one or one-to-many related record types in a single transaction when you use a process variable of type Record Type. However, if you need to write to unrelated record types in a single transaction, you specify multiple process variables of type Record Type in the Records Input.
Example
For example, in a retail application, you have a process for updating orders. In this process, customers can choose which address they want to ship their order to, their default address or a new address. As such, the process relies on the Order record type and the Address record type; however, there isn't a direct relationship between orders and customer addresses.

To update the data in these two unrelated record types:
- Create a form layout that allows users to enter their order and address information.
- Create a rule input for each record type: Order and Address. This will allow you to pass the updated data to the process model.
- Create a new process model and configure the process model properties to use the new form and pass record data:
- Go to File > Properties.
- Go to the Process Start Form tab and select your interface.
- In the Create Process Parameters dialog, click YES. This will automatically create process variables that map to your rule inputs.

- Drag and drop a Write Records node into your process model.
- Go to the Setup tab.
- For Records Input, select the address and order process variables.
-
For Record Type for Events, remove the Address record type so you can write events for the order. You can only write events for one record type.

- Configure the Write Events section with the events to capture for orders.
- (Optional) Configure a cancel flow.
- Save and publish the process model.
Now, the Order and Address record types will be updated at the same time if an order and the customer address is changed in the form.
Write events for multiple record types in one nodeCopy link to clipboard
Goal: Create record events for more than one record type using one Write Records node.
Some business processes involve a record type and related record type where it's important to capture events for each of them. When the related record data is an essential part of each base record, we'll use a single Write Records node to write all of the record and related record data at once.
Example
For example, in a retail application, you may have a process for creating a new order that uses two record types:
- Order: Stores information like
date,customerId, andassignee. - Order Line Item: Stores information like the
itemIdandquantityfor each product being ordered.
Using one node ensures that either all of the data is written or none of the data is written. This helps avoid incomplete orders (where an Order is written, but an Order Line Item is not).
Both record types have events configured, and we want to capture the creation event for both. The Setup tab allows you to easily specify the event information to write for the Order record type (the record type selected in the Records Input), but we'll need to specify the event information for the Order Line Item record type separately.
To write events for a related record type in the same Write Records node, you can use one of the following options:
- In the start form, configure the submit button to save the event information for the related record type in the same rule input as the other form data.
- In the process model, use a script task to specify the event information and pass that information into the Write Records node.
Tip: If writing in a single step is not important for your process, you can use separate variables and Write Records nodes. This way, you can configure the events on the Setup tab for each record type.
We'll use the first option in this example. To add the event data when the form is submitted, you can use a list of a!save(), one for each relevant field in the Event History record type (like eventTypeId, user, automationTypeId, and timestamp.)
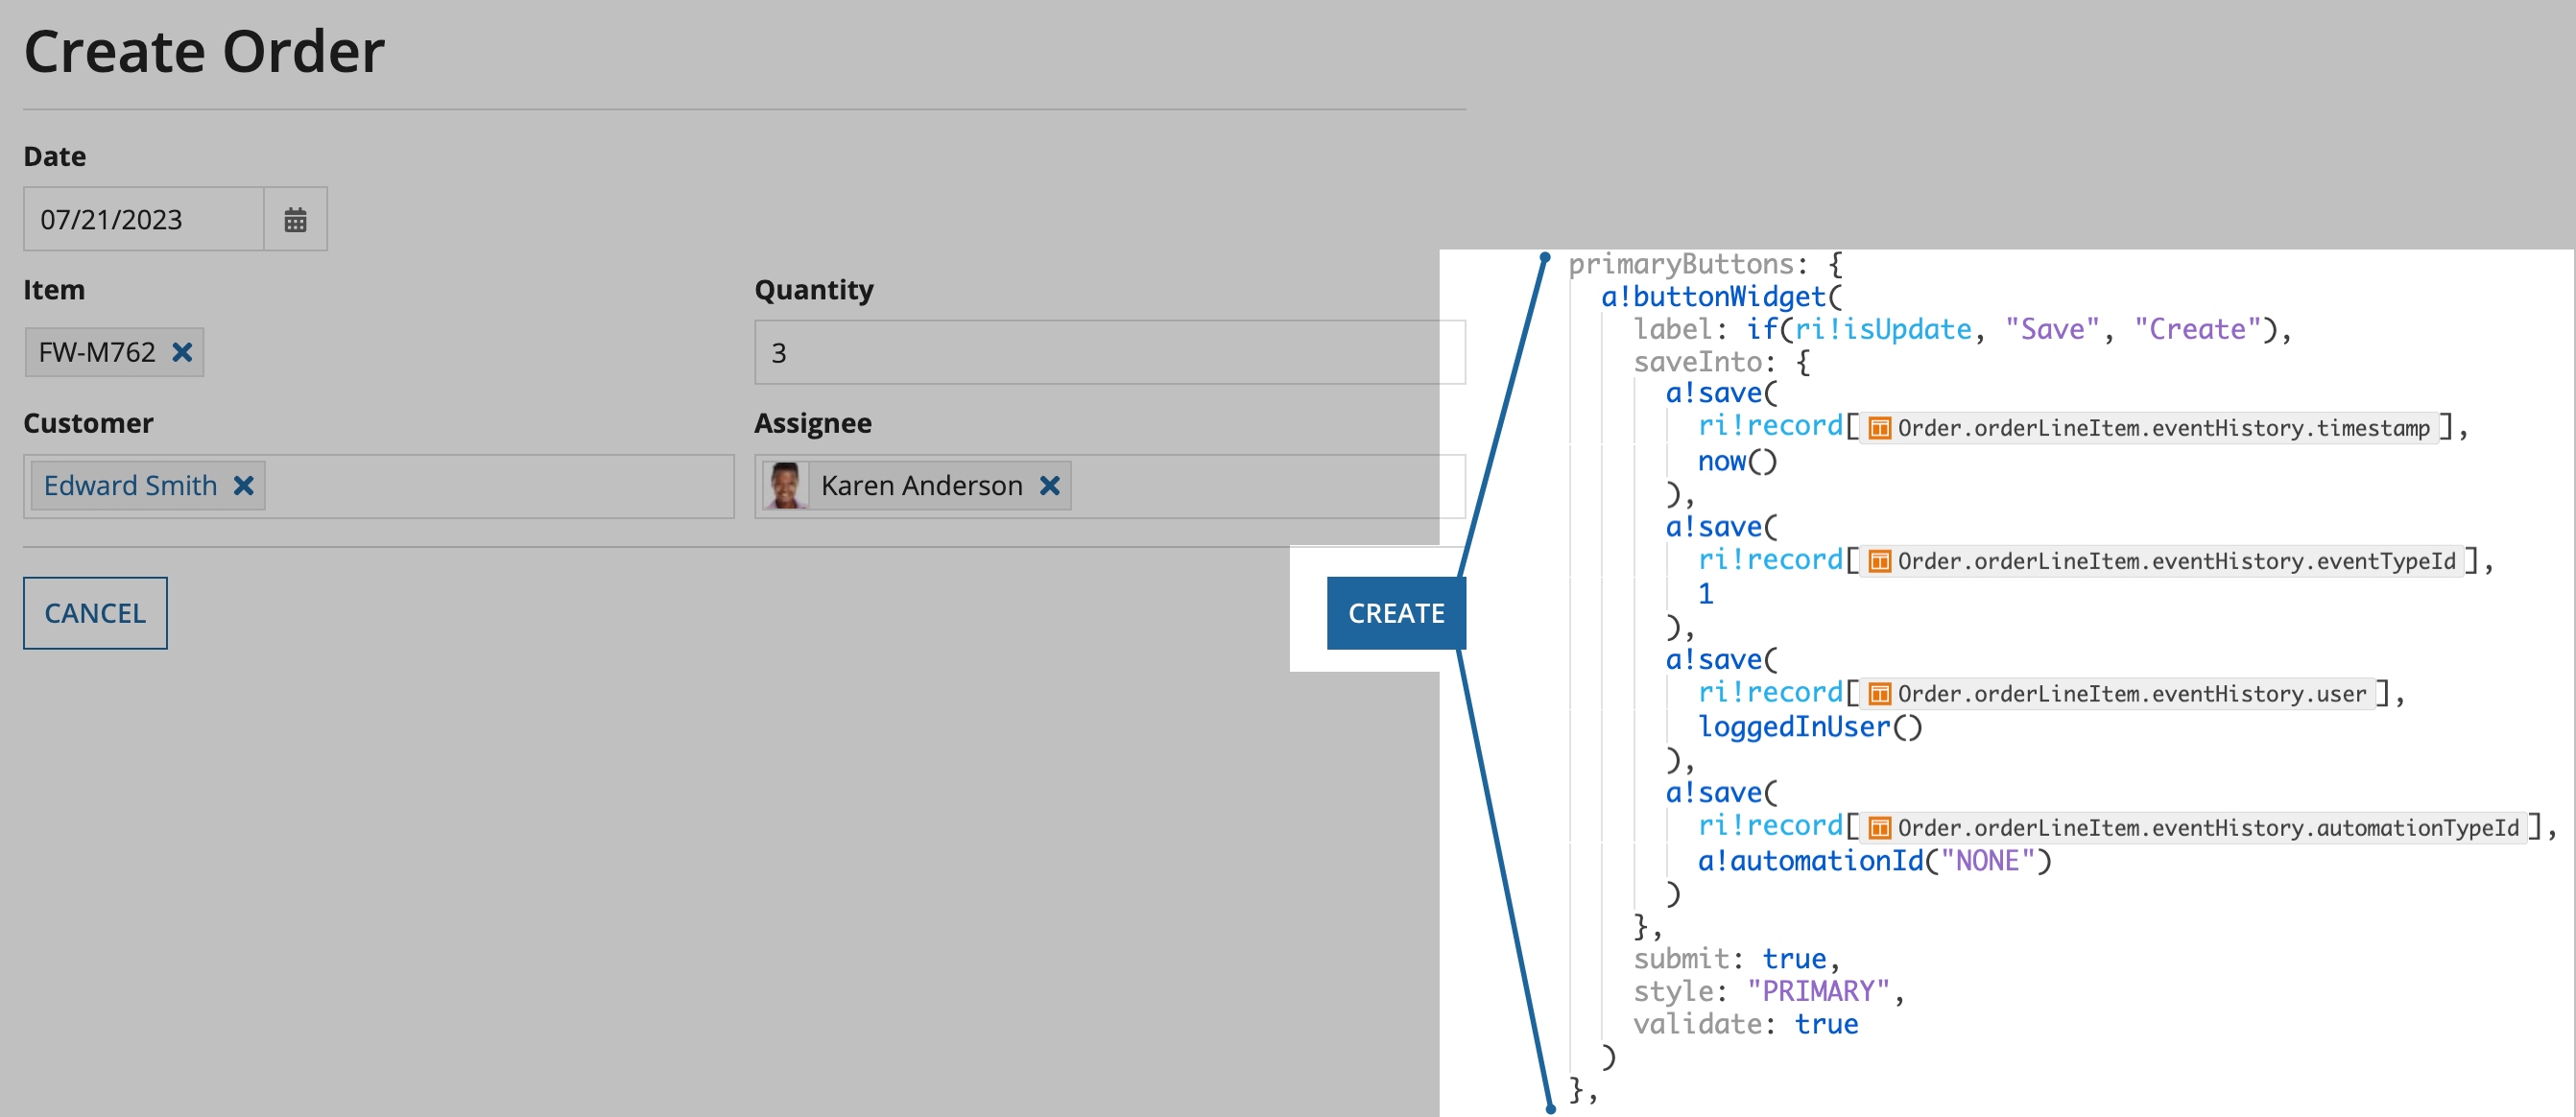
Then, when the rule input is passed to the process model, the process variable used by the Write Records node contains all of the record data, related record data, and event data.

In this example, an eventHistory was created for both the Order and Order Line Item simultaneously. Appian automatically created the event data for the Order using the settings from the Setup tab. The event data for the Order Line Item was created using the data passed into the process:
eventHistory={timestamp=7/21/2023 1:44 PM, user=alice.kwan, automationTypeId=1}
Feature compatibilityCopy link to clipboard
The table below lists this smart service function's compatibility with various features in Appian.
| Feature | Compatibility | Note |
|---|---|---|
| Portals | Partially compatible | Can be used with Appian Portals if it is connected using an integration and web API. |
| Offline Mobile | Incompatible | |
| Sync-Time Custom Record Fields | Incompatible | |
| Real-Time Custom Record Fields | Incompatible | Custom record fields that evaluate in real time must be configured using one or more Custom Field functions. |
| Process Reports | Incompatible | Cannot be used to configure a process report. |
| Process Events | Incompatible | Cannot be used to configure a process event node, such as a start event or timer event. |
| Process Autoscaling | Compatible |
VersionsCopy link to clipboard
A smart service consists of a function and a node. There are some instances when the smart service function is evolved separately from the smart service node. When the function or node is evolved, a new version of the function or node is available.
The following sections detail the different versions of the Write Records function and Write Records node.
Function versions
You can identify the version of a smart service function by looking at the function name to see if there is a version suffix.
If you are using a previous version, be sure to refer to the corresponding documentation from the list below. To use the latest version of the function, replace the old version of the function with the latest version.
| Function Versions | Reason for Update |
|---|---|
| a!writeRecords_23r2 | Allow writing records and related records at the same time. For faster node execution, the |
| a!writeRecords_23r4 | The Records Updated output was changed to return the input data and the primary keys of any newly created records. |
Node versions
You can identify the version of a smart service node by looking at node type and version.
To review a node's type and version:
- In the Process Modeler, click Tools > Generate Documentation.
- In the generated documentation, review the Node Type and Version for the specific node.
If you are using a previous version, be sure to refer to the corresponding documentation from the list below. To use the latest version of the node, replace the old version of the node with a new node.
| Appian Version | Node Type | Node Version | Reason for Update |
|---|---|---|---|
| 22.3 | write_records_to_source | 1 |
Original version of the Write Records node. |
| 23.2 | write_records_with_events_to_source | 1 |
Use the Write Records node to write records and events at the same time, in the same node. |
| 23.3 | write_records_to_source_23r3 | 4 |
Allow writing records and related records at the same time. For faster node execution, the |
| 24.1 | write_records_to_source_23r3 | 5 |
The |
| 24.2 | write_records_to_source_23r3 | 6 (Current) |
When an event field value uses an expression that references a record field, the Write Records node will now use the record-specific value for each event. |