This page explains what record type relationships are and how to take advantage of them.
OverviewCopy link to clipboard
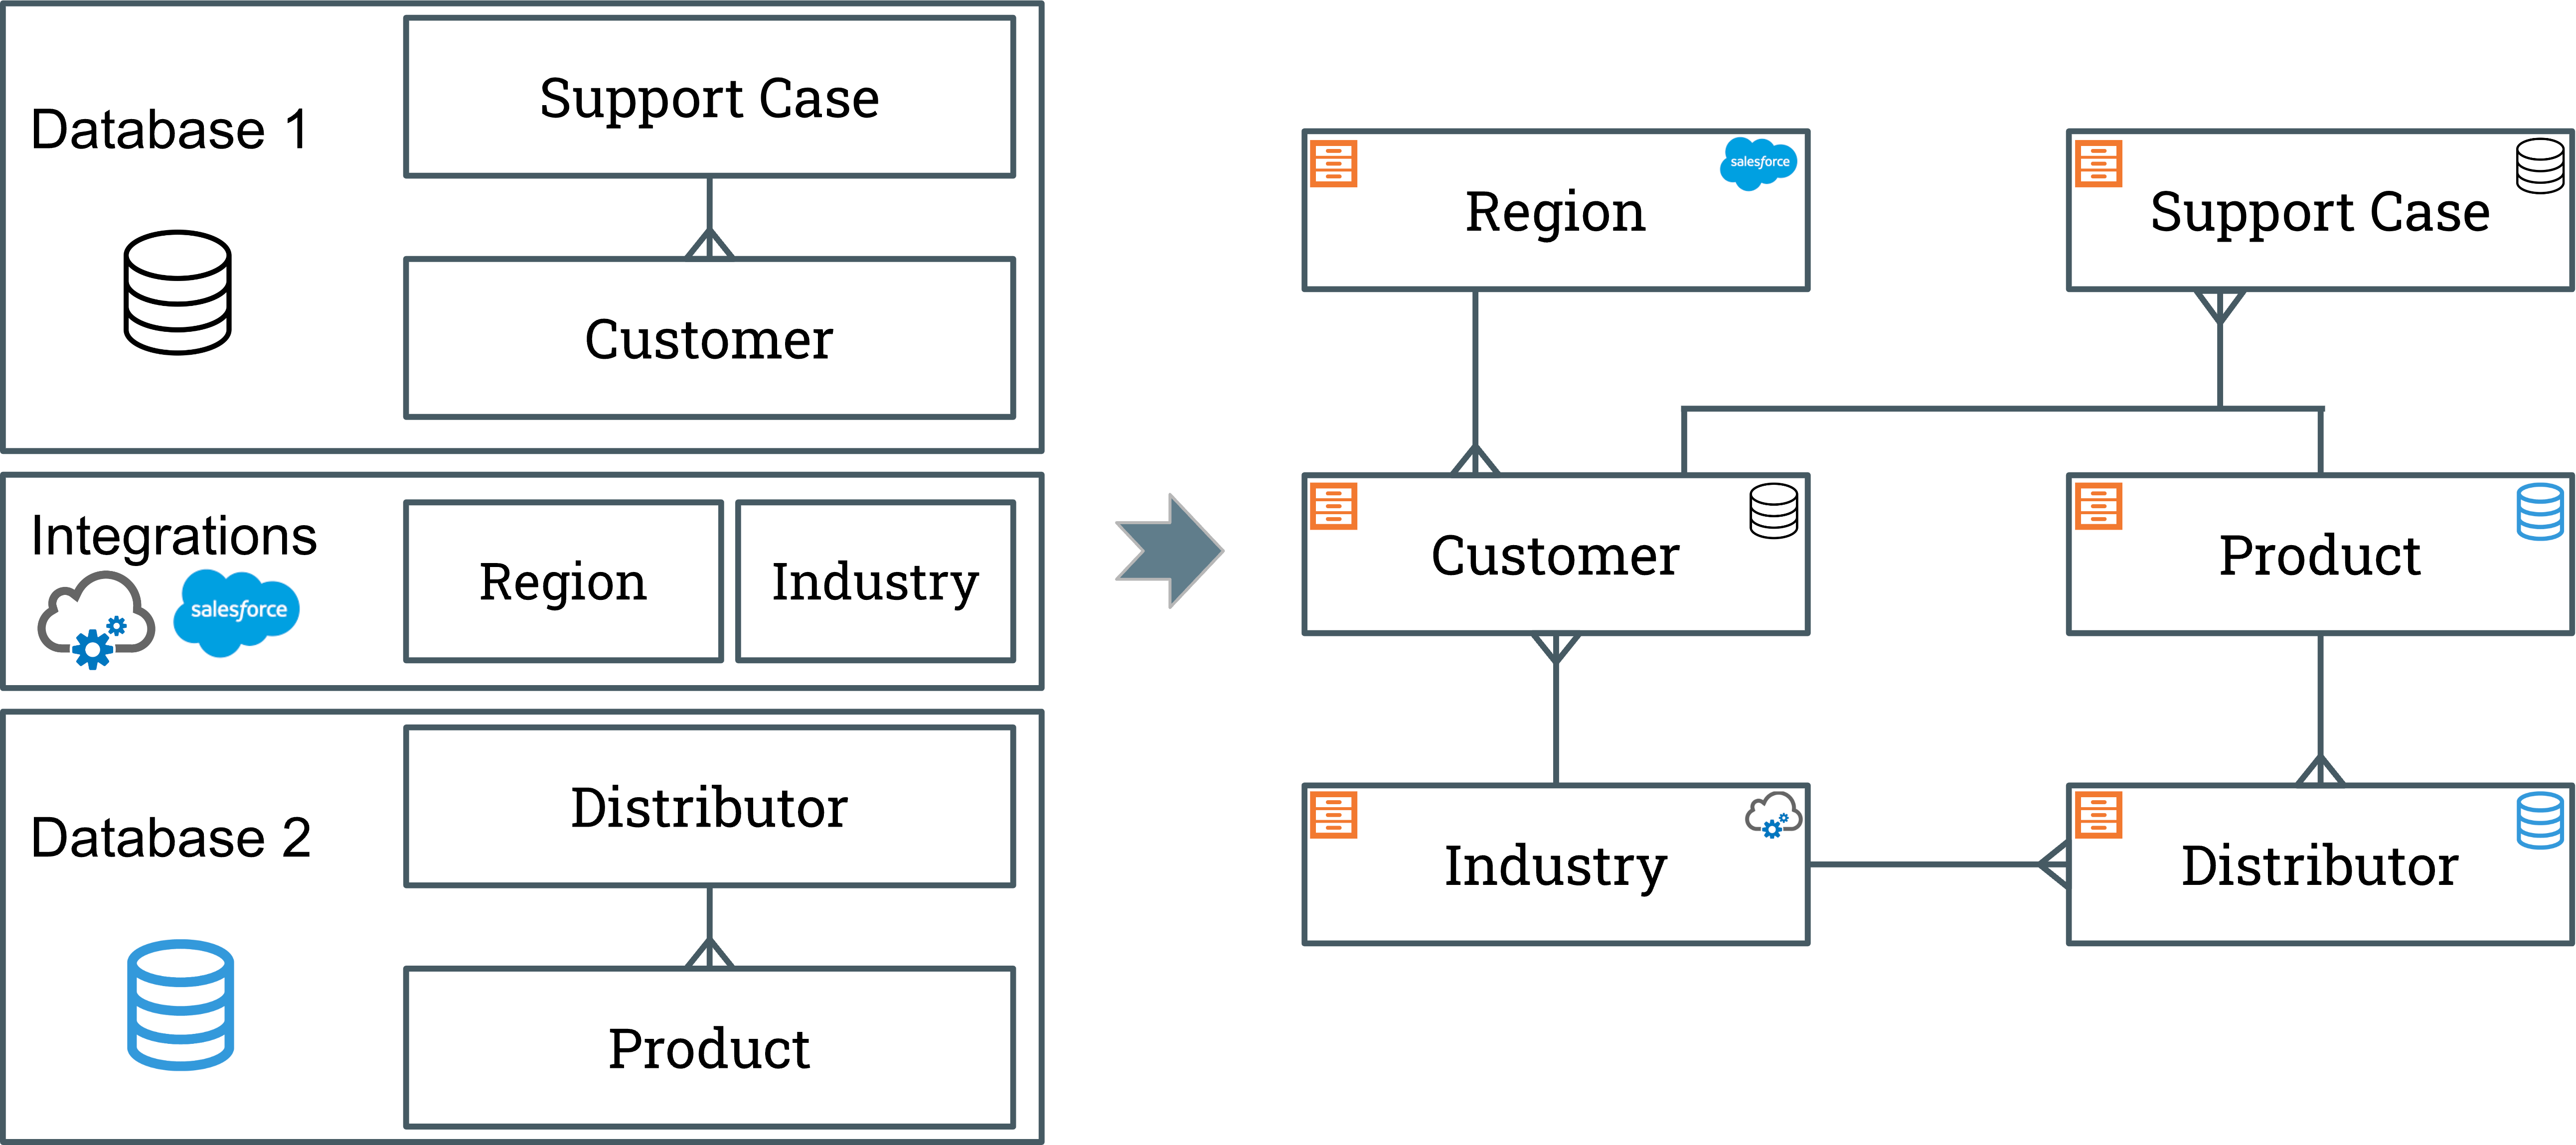
It’s not often that you have one record type to rule them all. Instead, you usually have several record types that work together to create a comprehensive view of your enterprise data. For example, if you work at a Customer Support Center, you may have a Case record type, and a separate record type for Customers who submit cases.
Since there is a business relationship between these data sets, you'll need to query data from each record type to know which cases are associated with each customer, what support level each customer pays for, and more. To make working with this data easier, data experts may create database views to relate the data so developers can build their applications more quickly and simply.
When you sync your data in Appian, you don't need a data expert to relate your data—you can build the relationships yourself. Using record type relationships, you can use a low-code experience to relate your record data so you can start building your applications faster.
About relationshipsCopy link to clipboard
Record type relationships provide a fast and easy way to connect and reference related data. Just as you can reference a record type’s fields, filters, and actions throughout your applications, you can reference its related record data by defining relationships with other record types.
Relationships can be established between record types with data sync enabled. This means you can go beyond the traditional relationships established in a database—you can establish relationships between any record types that have sync enabled, regardless of the source.
So if your enterprise data lives in different database tables and in Salesforce, you can unify this data in Appian without making copies of your data, or migrating your data to have the same source type.

Connect dataCopy link to clipboard
Connecting your enterprise data is easy since relationships are defined directly in the record type. Simply choose which record type to establish a relationship with, and then define the relationship name, the relationship type, and the two common fields shared between the record types that will enforce the relationship type.
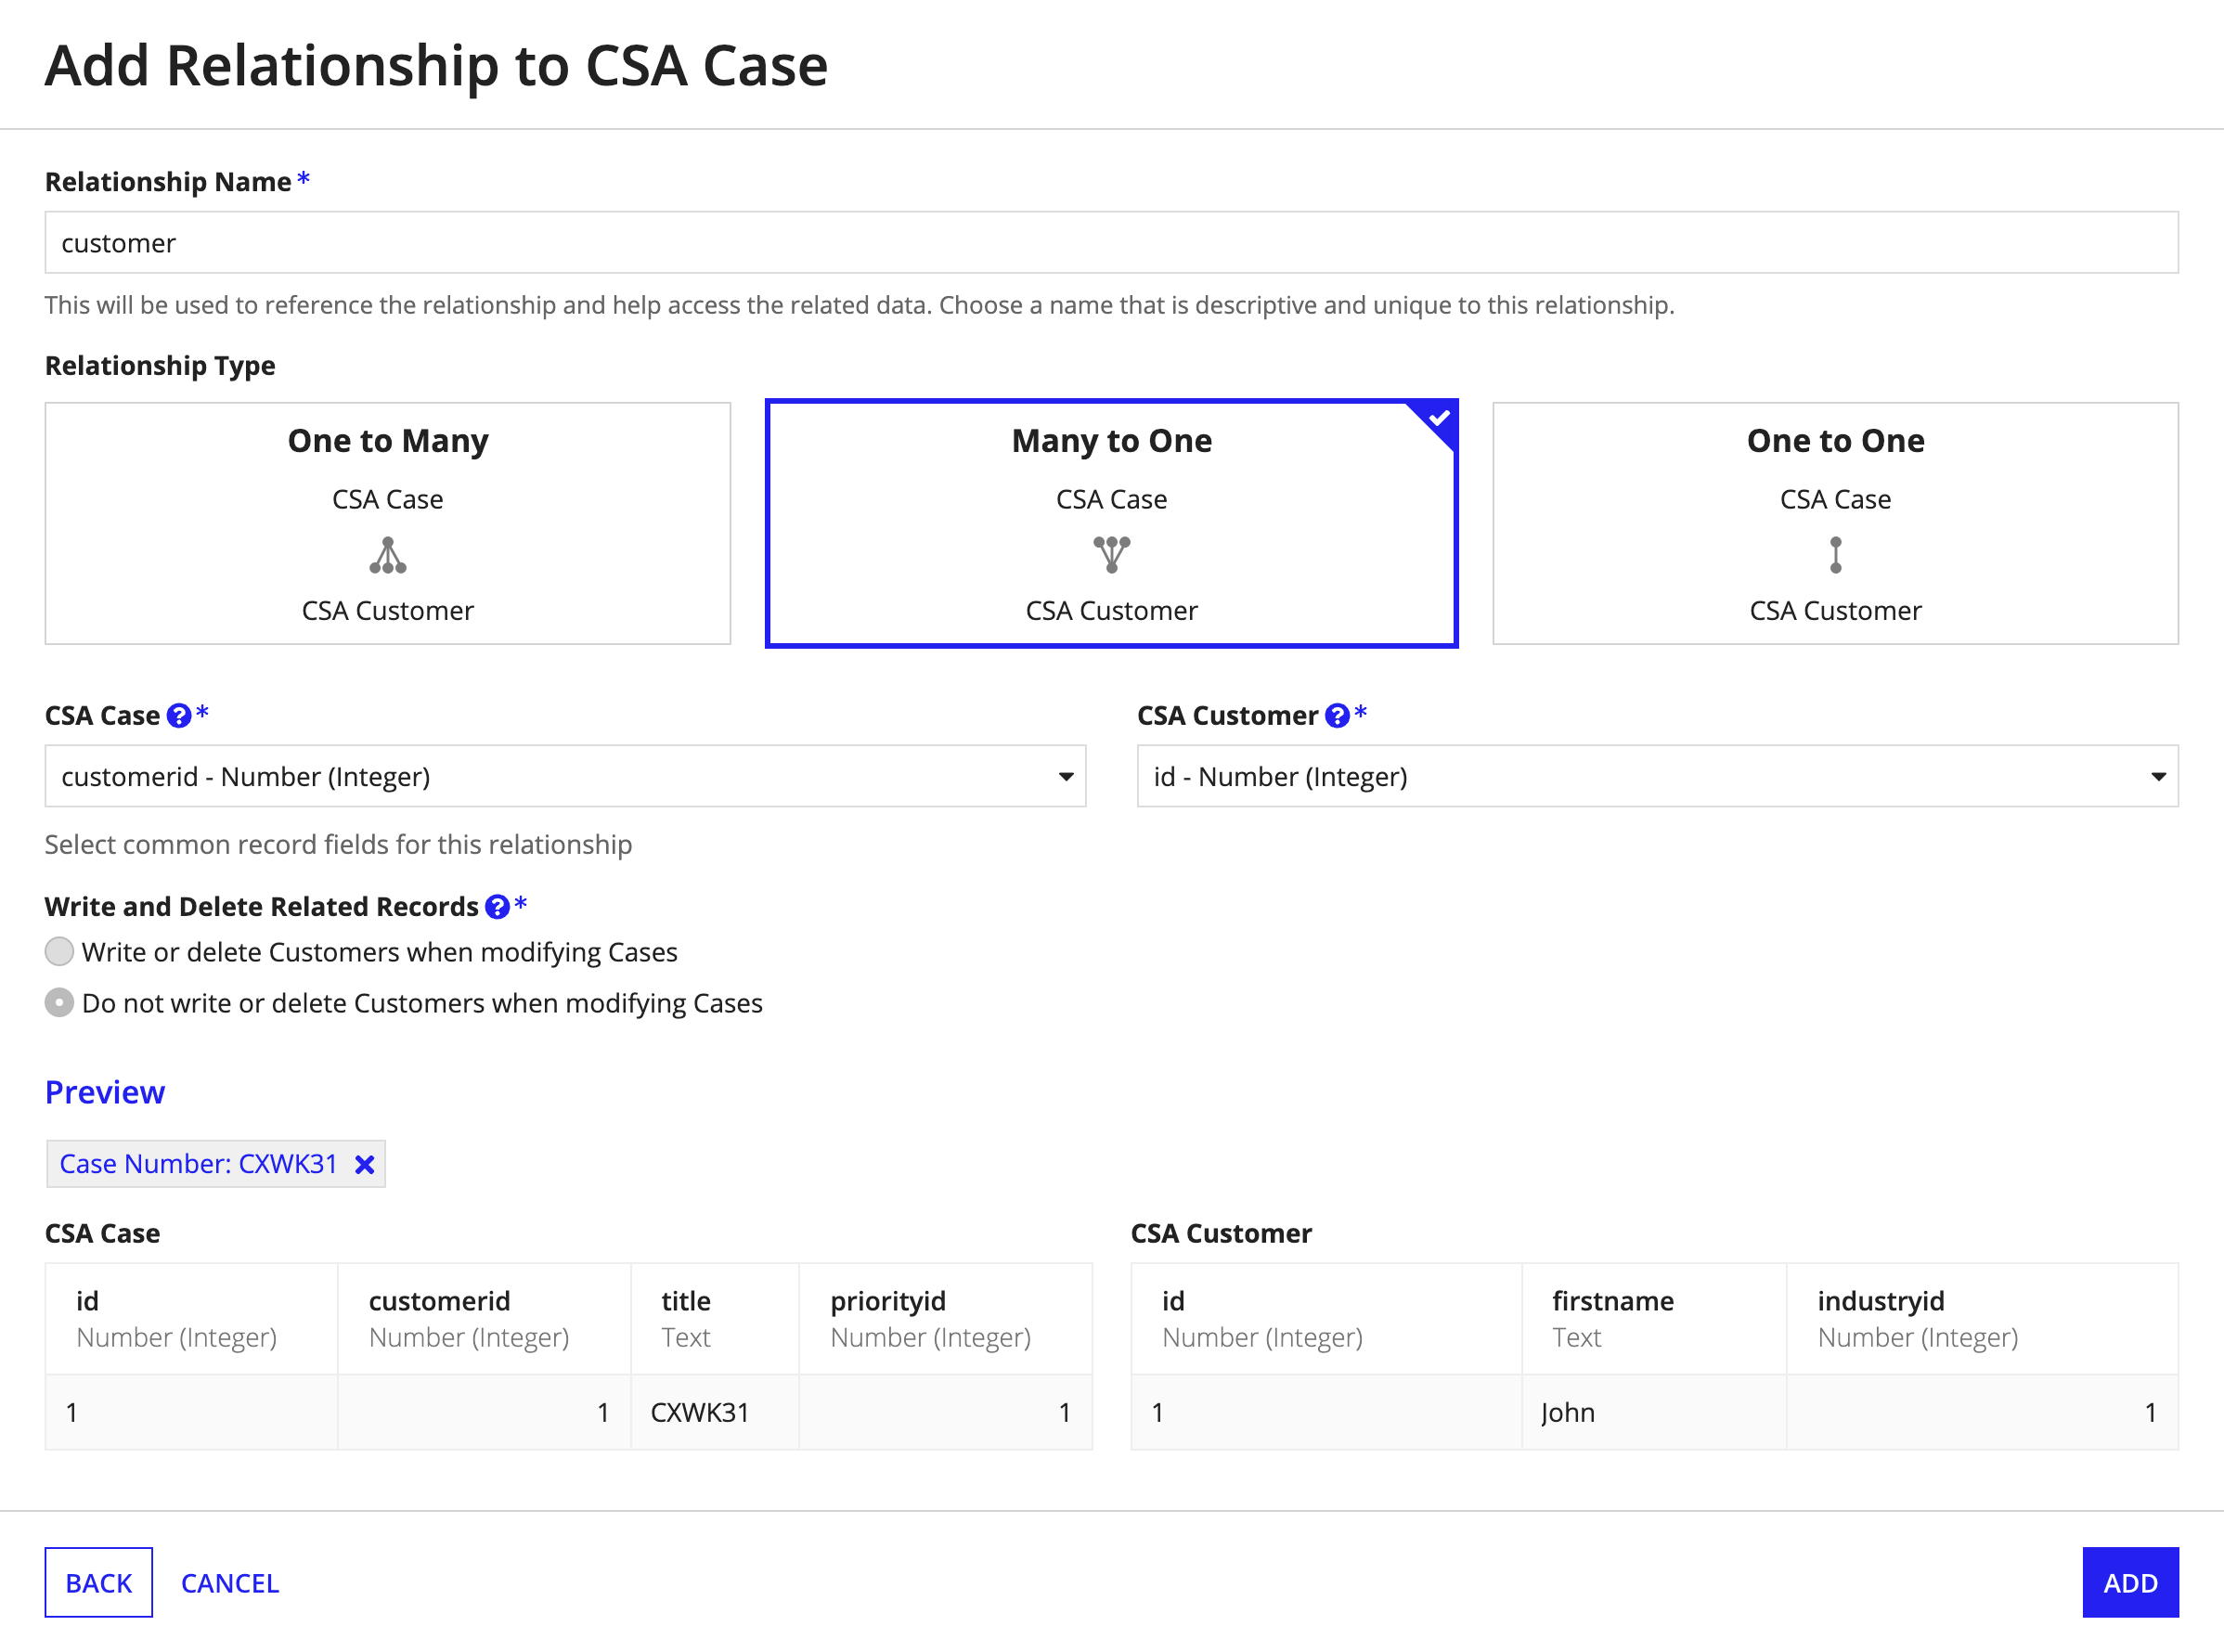
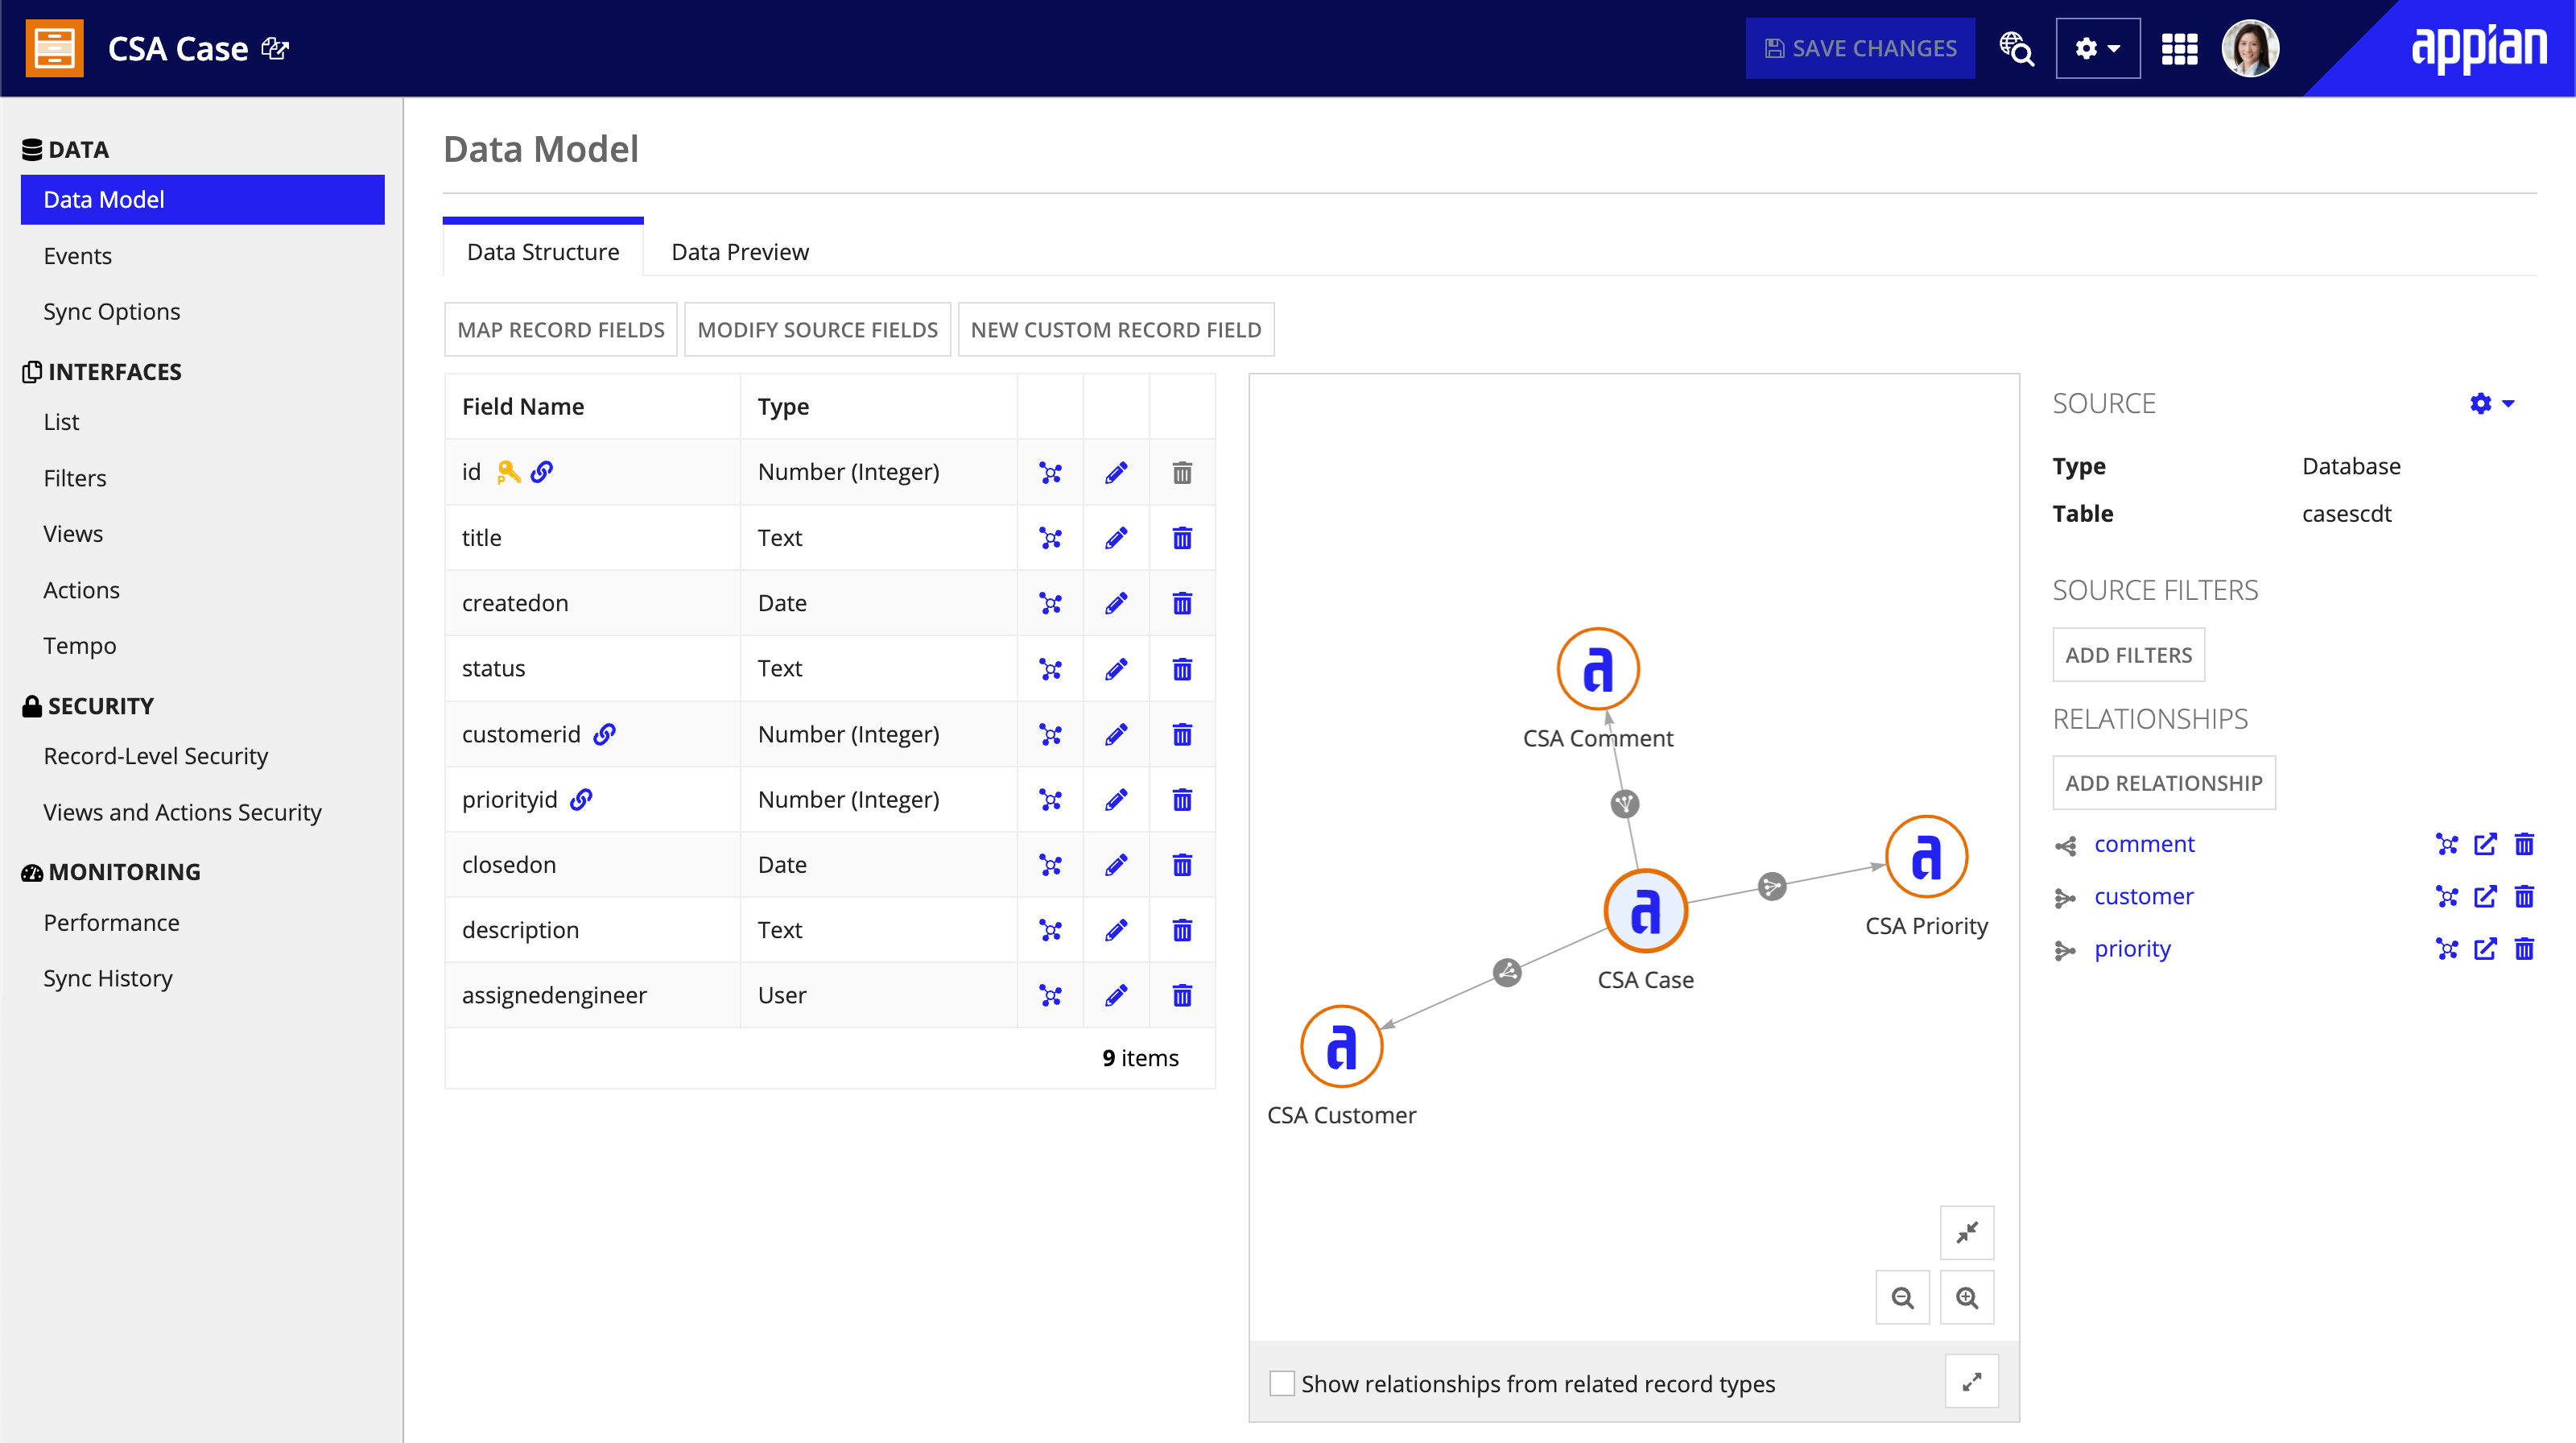
For example, the Case record type contains detailed information about each submitted support case. However, when reviewing a support case, users also want to know about the customer associated with each case. To easily reference and display related customer information, you can add a many-to-one relationship on the Case record type.
To add the relationship, simply choose the Customer record type as the related record type. Then, select Many-to-One as the relationship type, and enforce that relationship using the customerId field from the Case record type, and the id field from the Customer record type.
You can then verify your relationship using the Preview, where you can select a record to see a preview of the related record. In this example, we've selected a Case record, which allows us to preview and verify the related Customer record.
Not only does this make it easy to connect your enterprise data, it makes development more flexible. Rather than having to set up relationships early in a database view, then waiting for change requests to be processed by your data expert, you can add record type relationships at any point in development without affecting other existing relationships.
Build with related dataCopy link to clipboard
Once you define a relationship, you are effectively creating a link from the record type to the related record type. This link is part of the record type's data model. It allows the record type to access the record fields and relationships defined on the related record type, as well as make changes to one-to-many and one-to-one related record data.
This means that the Case record type can now reference the fields and relationships on the Customer record type. Using a simple relationship reference, the Case record type can display the customer name associated with each case, and even create a user filter to filter the list of support cases by customer name.
Relationships are not limited to displaying data though. You can also create forms that allow users to enter Customer data, Case data, or both depending on the situation. The relationship lets Appian know how to manage the data as it flows from an interface through a process.
By adding multiple relationships, you can use a single record type to quickly build advanced records, interfaces, and reports that let you control the entire lifecycle of your enterprise data.
Configuration optionsCopy link to clipboard
This section describes the different configuration options you have set up a record type relationship. It also details the effects of these choices on other features that let you write and delete records.
Supported relationship typesCopy link to clipboard
Record type relationships can be built with the following relationship types:
One-to-many relationships: One record in the record type is related to many records in the related record type.
For example, you want to create a column chart that shows the number of orders associated with each customer. All orders are in the Order record type, and all customer information is in the Customer record type. Since a customer can have one or more orders, you can add a one-to-many relationship on the Customer record type. Now, you can reference the
idfield on the Order record type to count the number of orders associated with each customer.Many-to-one relationships: Many records in the record type are related to one record in the related record type.
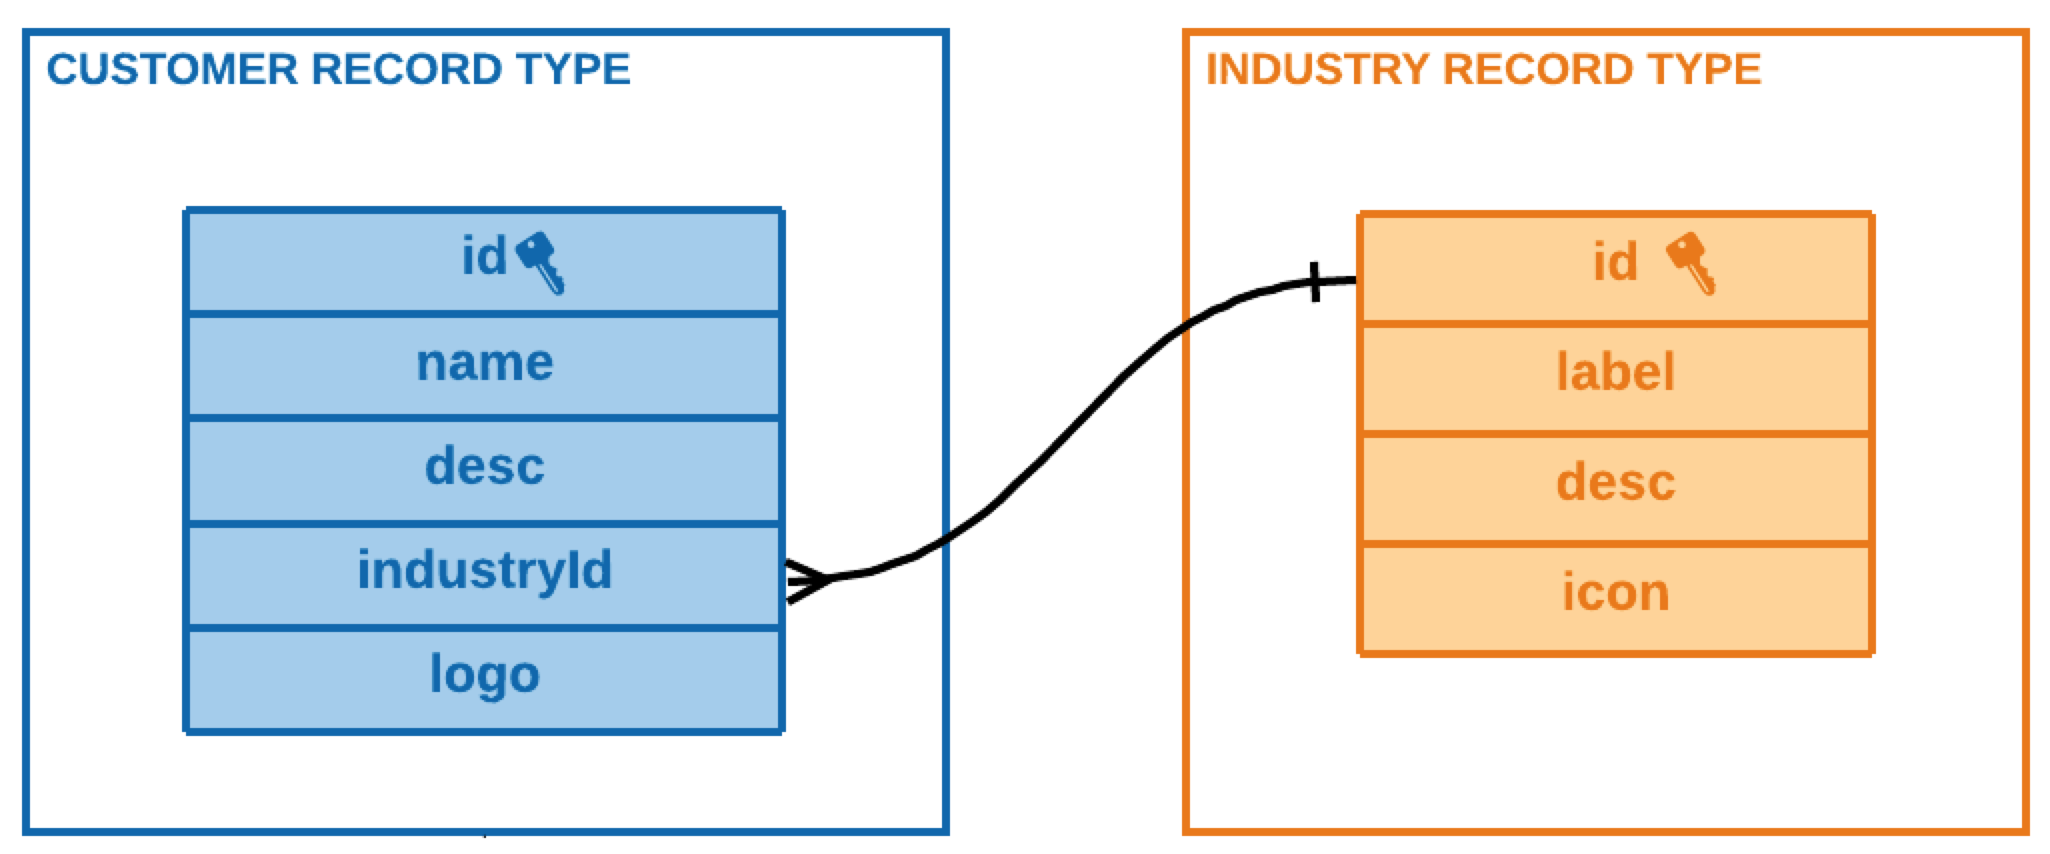
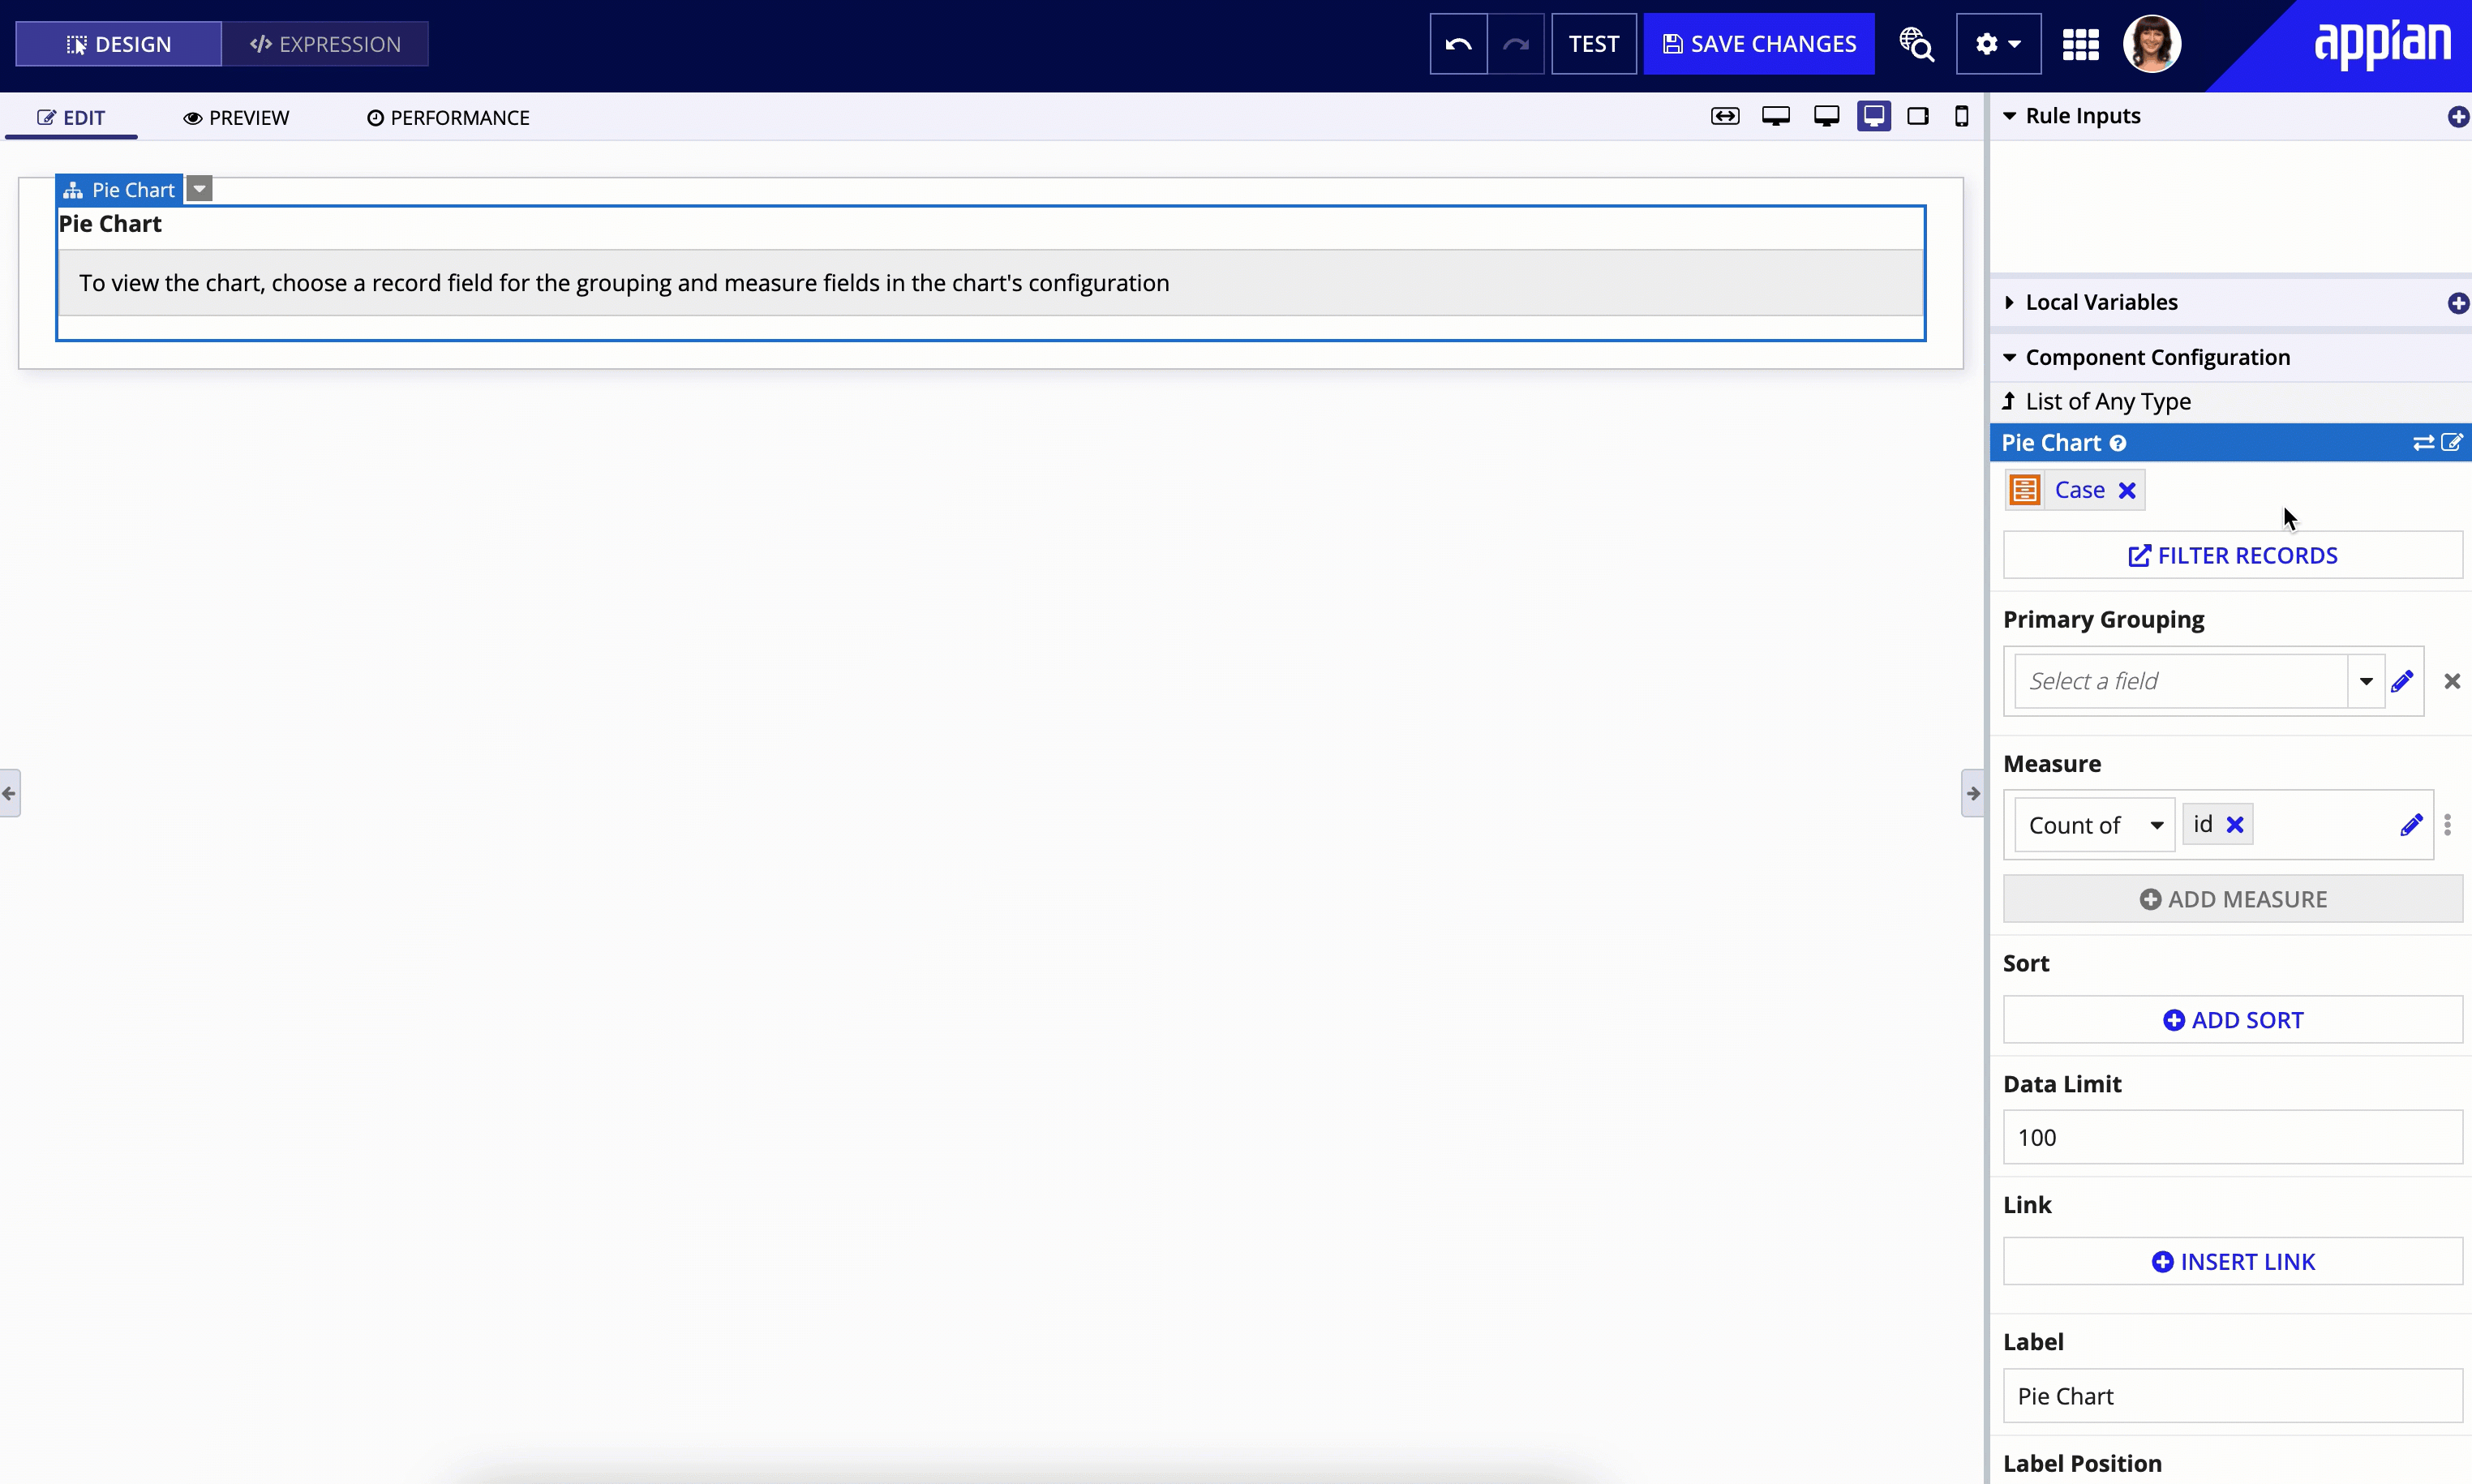
For example, you want to create a pie chart that shows the number of customers per industry, and this information lives in two separate record types: the Customer record type, and the Industry record type. Since many customers belong to the same industry, you can add a many-to-one relationship on the Customer record type so you can reference the
industryLabelfield on the Industry record type to group the number of customers by industry.One-to-one relationships: Each record in the record type relates to exactly one record in the related record type.
For example, you need to display the phone number and address associated with each employee on the Employee record list, but that information lives in a separate record type called Employee Contact Information. Since each employee has their own contact information, you could create a one-to-one relationship on the Employee record type so you can easily reference the
phoneNumberandaddressfields from the Employee Contact Information record type on the Employee record list.
Tip: Although you cannot set up a direct many-to-many relationship between two record types, you can still achieve many-to-many behavior. Learn how.
Common field valuesCopy link to clipboard
Common fields are the two fields shared between the base record type and the related record type. When configuring a relationship, you'll select common fields to enforce the selected relationship type.
For example, in a many-to-one relationship between customers and industries, you could use the industryId field from the Customer record type and the primary key field (id) from the Industry record type as the two common fields. This will tell Appian to use the industryId field to look up the corresponding value of the id field in the Industry record type and return the associated data for that industry.
When configuring your common fields, note the following:
- Supported fields:
- You can select a record field or a sync-time custom record field as the common fields.
- If you use a custom record field as a common field, you cannot allow writes to related records.
- Unique value requirements:
- You must select a field with unique values on the one-side of the relationship. This can be the primary key field or a field with a uniqueness constraint.
- In a one-to-one relationship, both common fields must be unique.
Write and delete related recordsCopy link to clipboard
When configuring one-to-many and one-to-one relationships, you can allow Appian to make changes to your base records and related records simultaneously. When you select the Write or delete… option on a relationship, you can use a single Write Records smart service or Delete Records smart service node to perform these actions.
You should allow changes to related records when the base record type and related record type need to be updated together.
For example, Orders and Order Line Items should almost always be updated together, so the relationship on the Order record type should allow updates to Order Line Items when modifying Orders. When an Order is created, its Order Line Items also need to be created. Likewise, the Order Line Items from a deleted Order are no longer needed, so they should also be deleted at the same time.
Alternatively, Customers and Orders do not need to be updated together—updating a customer's phone number should not impact the order—so you should not allow updates to Orders when modifying Customers. In this case, the Do not write or delete… option should be selected to prevent these updates.
Allow writes and deletesCopy link to clipboard
By default, Appian will allow writes and deletes to related records when you create a new relationship to a record type with the same data source.
For existing relationships, you will need to update the configuration to allow writes and deletes to related records.
To allow Appian to write and delete related records:
- Source requirements:
- The related record type must have the same data source as the base record type.
- Relationship configuration requirements:
- The Write or delete… option must be selected on the relationship.
- Common field requirements:
- Custom record fields cannot be used as the common fields in the relationship configuration.
- For one-to-many relationships, the base record type must use the primary key or another unique key as the common field in the relationship configuration.
- For one-to-one relationships, the base record type must use its primary key as the common field. The common field on the related record type must be a unique key, but it cannot be the primary key.
Do not allow writes and deletesCopy link to clipboard
To prevent Appian from writing and deleting related records, select the Do not write or delete… option on the relationship. This option is automatically selected if your base record type and related record type do not share the same source.
When this option is selected, the base record is deleted; what happens to the related record depends on the data source of the related record type:
- If the related record type is from the same database data source, the common field is set to null.
- If the related record type is from a different database data source, the related record is ignored. For example, say your base record type is from the Appian Cloud database and the related record type is from a Postgres database. These do not share a single data source, so no action is taken on any related records when a base record is deleted.
- If the related record type's data source is a web service, process model, or Salesforce, the node will fail. Your process should update the related record first and then delete the base record using a Delete Records node.
Referential integrityCopy link to clipboard
When data experts relate data by joining database tables into a database view, they rely on the referential integrity of foreign keys: that is, a foreign key will only refer to a valid row in another table, or it will be null. This means that when rows of data are deleted, this integrity can be maintained by also deleting the rows in other tables that refer to the deleted rows, or by failing the delete operation.
When you relate your data using record type relationships, Appian leverages your synced data. This means that the data in these relationships reflect the data and rules enforced by your source. As a result, whenever you add, update, or remove data from the source of your record type, the changes are written directly to your source and then synced in Appian, which means that record type relationships do not inherently enforce referential integrity; instead, any referential integrity enforced on your source data will be reflected in Appian when it's synced.
Tip: Whenever you generate a source or update the source from your record type, Appian will automatically create a foreign key with the common fields used to create a relationship. This will enforce referential integrity between your base record type and related record type.
For example, let's say that the Customer and Order record types are related, and in the database tables that they use, the Order table has a foreign key to Customer which enforces referential integrity.
If you use a process model to delete a Customer from the database table, any Orders referencing that Customer would have an invalid foreign key. Therefore, the database will either cause the delete operation to fail and nothing will be deleted, or it will delete both the Customer and all Orders associated with that Customer. If the delete operation fails, no sync is needed because data has not changed. If it succeeds, Appian will immediately sync the deletions from both record types.
Now, let's say that the Customer record type also has a relationship with the Industry record type, and in this case it's the Customer database table that holds a foreign key to the Industry table, since Industry is just reference information.
When you delete a Customer, there's no need to affect the Industry table because the foreign key itself is being deleted and there's no risk to referential integrity. In this case, Appian will immediately sync the change to the Customer record, but a sync will not occur on the Industry record type.
If you enforce referential integrity on the sources of your related record types, it's recommended to keep these record types on a similar sync schedule. This way, you can be sure that your foreign key relationships are consistently reflected in the synced data, and any changes to the data as a result of referential integrity are synced at the same time.
Note: If you create a relationship between record types with different sources, referential integrity cannot be enforced by any one system.
Add relationshipsCopy link to clipboard
You can add up to 50 relationships on a record type that has data sync enabled. The relationship can be with another record type with data sync enabled, or with itself.
For example, if your Employee record type has a supervisorId and an employeeId, you could create a many-to-one relationship on the Employee record type using those two fields as the common fields. Then you can use the relationship to reference the supervisor's first and last name instead of displaying the supervisorId.
When you add a relationship, the relationship will only exist in the record type that defines the relationship. If you want to establish the inverse relationship on the related record type, use the Suggested Relationships available on the related record type's Data Model page.
To add a record type relationship:
- In a record type, go to Data Model.
- Click ADD RELATIONSHIP.
- Under Related Record Type, enter the name of the record type you want to establish a relationship with.
- Click NEXT.
- Under Relationship Name, enter a name for the relationship. This is how you’ll reference the relationship to access the related record fields.
- Under Relationship Type, select One-to-Many, Many-to-One, or One-to-One.
- Under Common Fields, choose the fields to enforce the relationship type. The common fields can be of type Text, Number (Integer), User, or Group, and the common fields must be the same data type.
Note: You must use the primary key or other unique field on the one-side of any relationship type. For example, you could use the
customerIdfield in a Case record type and theIdfield (the primary key) of the Customer record type as the common fields. - Under Write and Delete Related Records, select the Write or delete… option to enable the Write Records and Delete Records smart services to update the base record and any related records simultaneously. This option is only available for one-to-many and one-to-one relationships.
-
Under Preview, select a record to see a preview of the related record.
- Click ADD.
A link icon will appear next to any fields used as common fields in a relationship.
All relationships defined in the record type will appear in the RELATIONSHIPS section of the Data Model page.
To view all relationships accessible from your record type, select the Show relationships from related record types checkbox under the relationship diagram. To enlarge the diagram and easily view complex relationships, click the Expand relationship diagram in dialog box button.
Add many-to-many relationshipsCopy link to clipboard
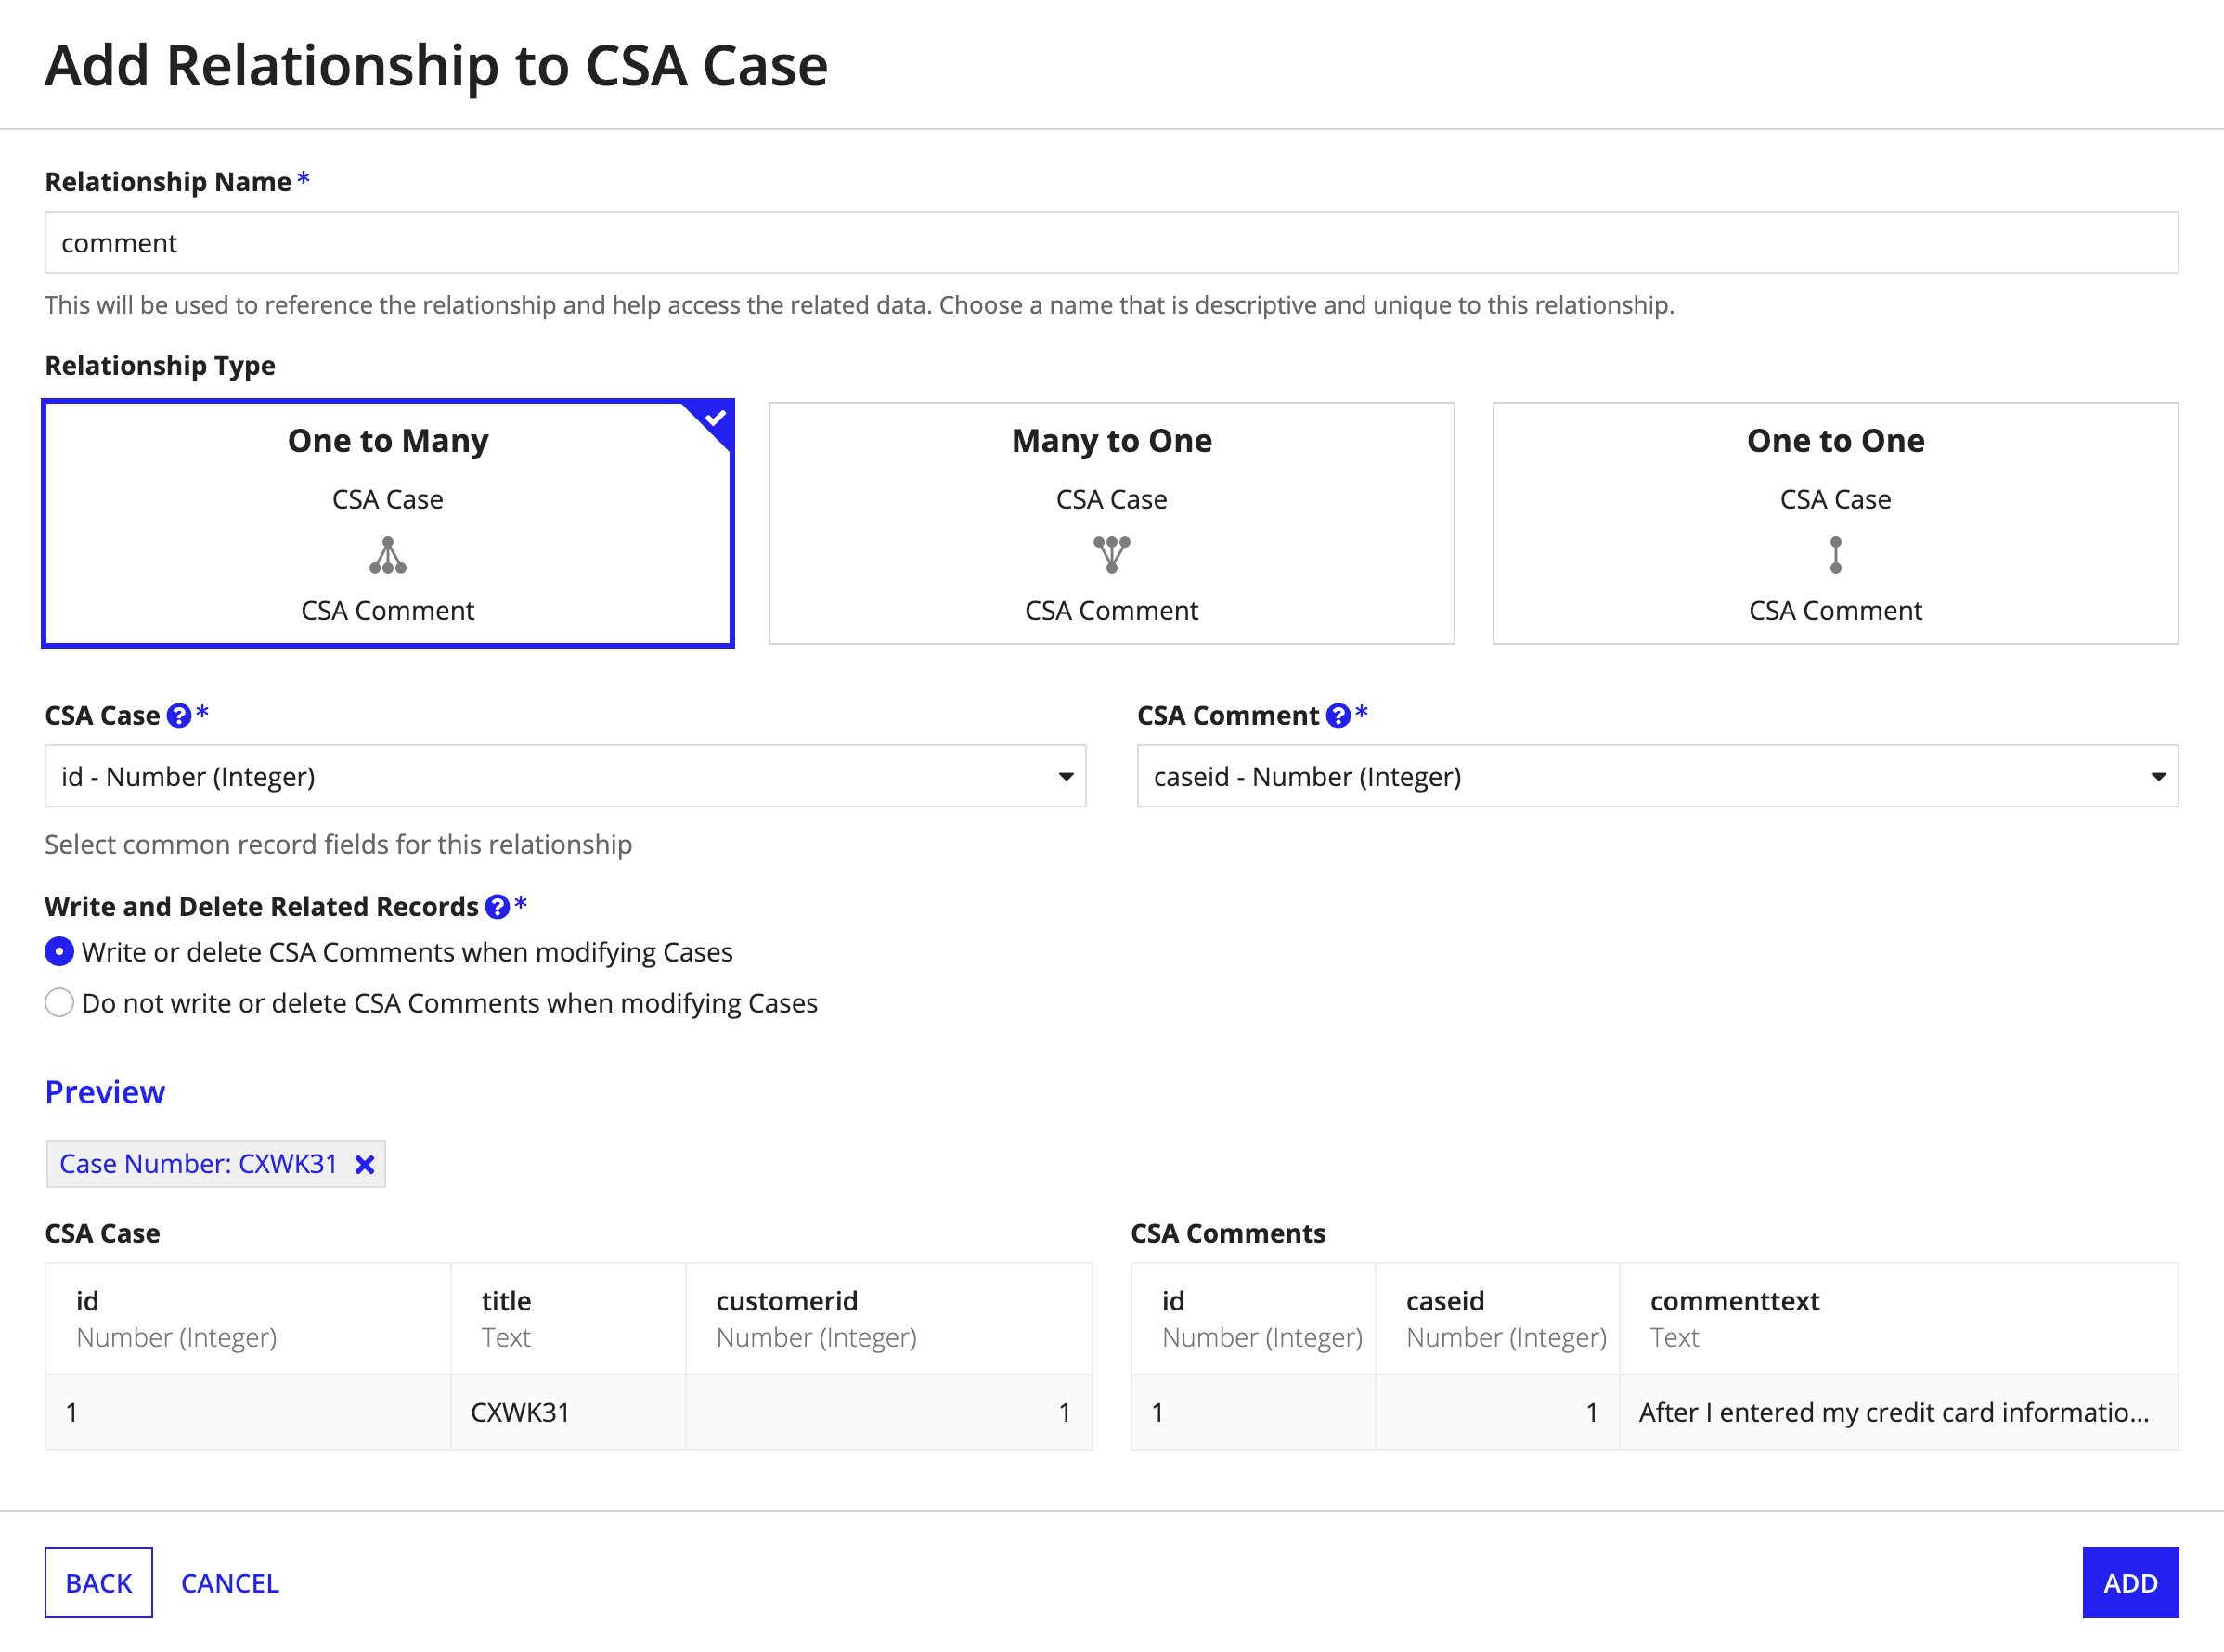
In addition to one-to-many, many-to-one, and one-to-one relationships, it's likely that your enterprise data also contains many-to-many relationships. For example, say you have an Employee record type and a Project record type. Each project has a team of multiple employees, and a given employee can be on more than one project.
Unlike the other relationship types, you can’t implement a direct many-to-many relationship between these two record types in Appian. Instead, you can effectively create a many-to-many relationship by creating a third record type to connect the other two.
This third record type will sit between the two record types of the many-to-many relationship. It should include a primary key field, and two additional fields that references the primary key fields from the other two record types. In a database, this would be your join table. Once you set up the source, you can then connect the three record types using one-to-many and many-to-one relationships.
Let's look at the Employee and Project example.
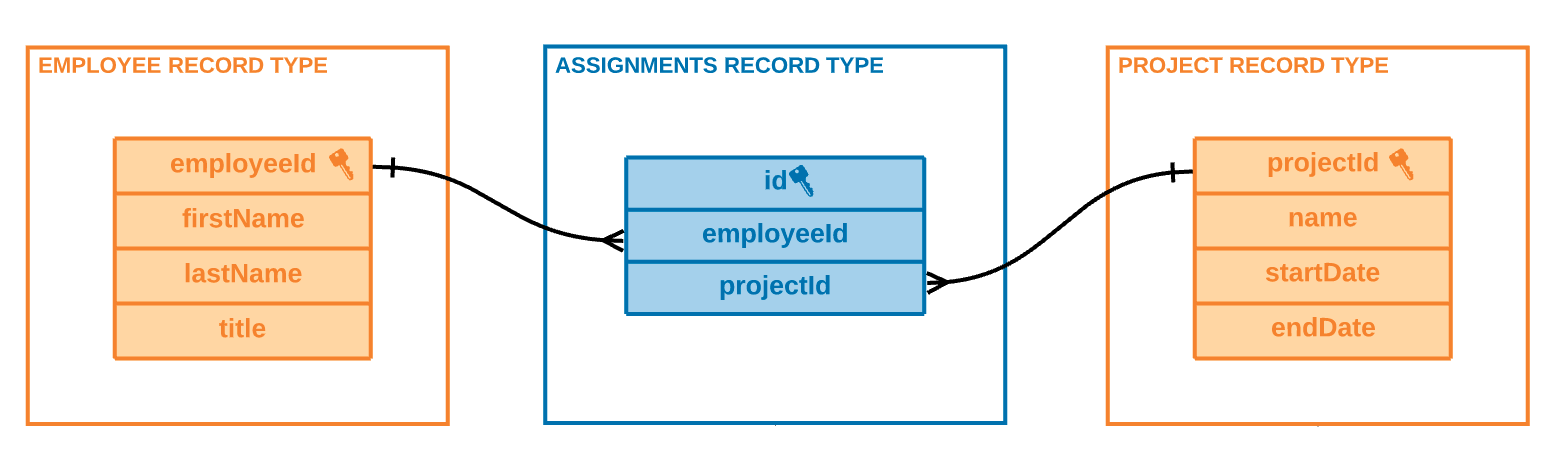
To create a many-to-many relationship between employees and projects:
- Create a new record type. In this example, we'll call it Project Assignments.
-
Set the data source of the record type to a join table. In this example, the Project Assignment record type uses a join table with the fields
Id(primary key),employeeId, andprojectId.Note: In the underlying data source of your third record type, you must have a primary key field. It's also recommended to add foreign keys to the fields that reference the primary keys from the other two record types. This will allow your source to enforce referential integrity. Learn more about referential integrity and record type relationships.
-
From the Project Assignment record type, add a many-to-one relationship with the Employee record type, and a many-to-one relationship with the Project record type.
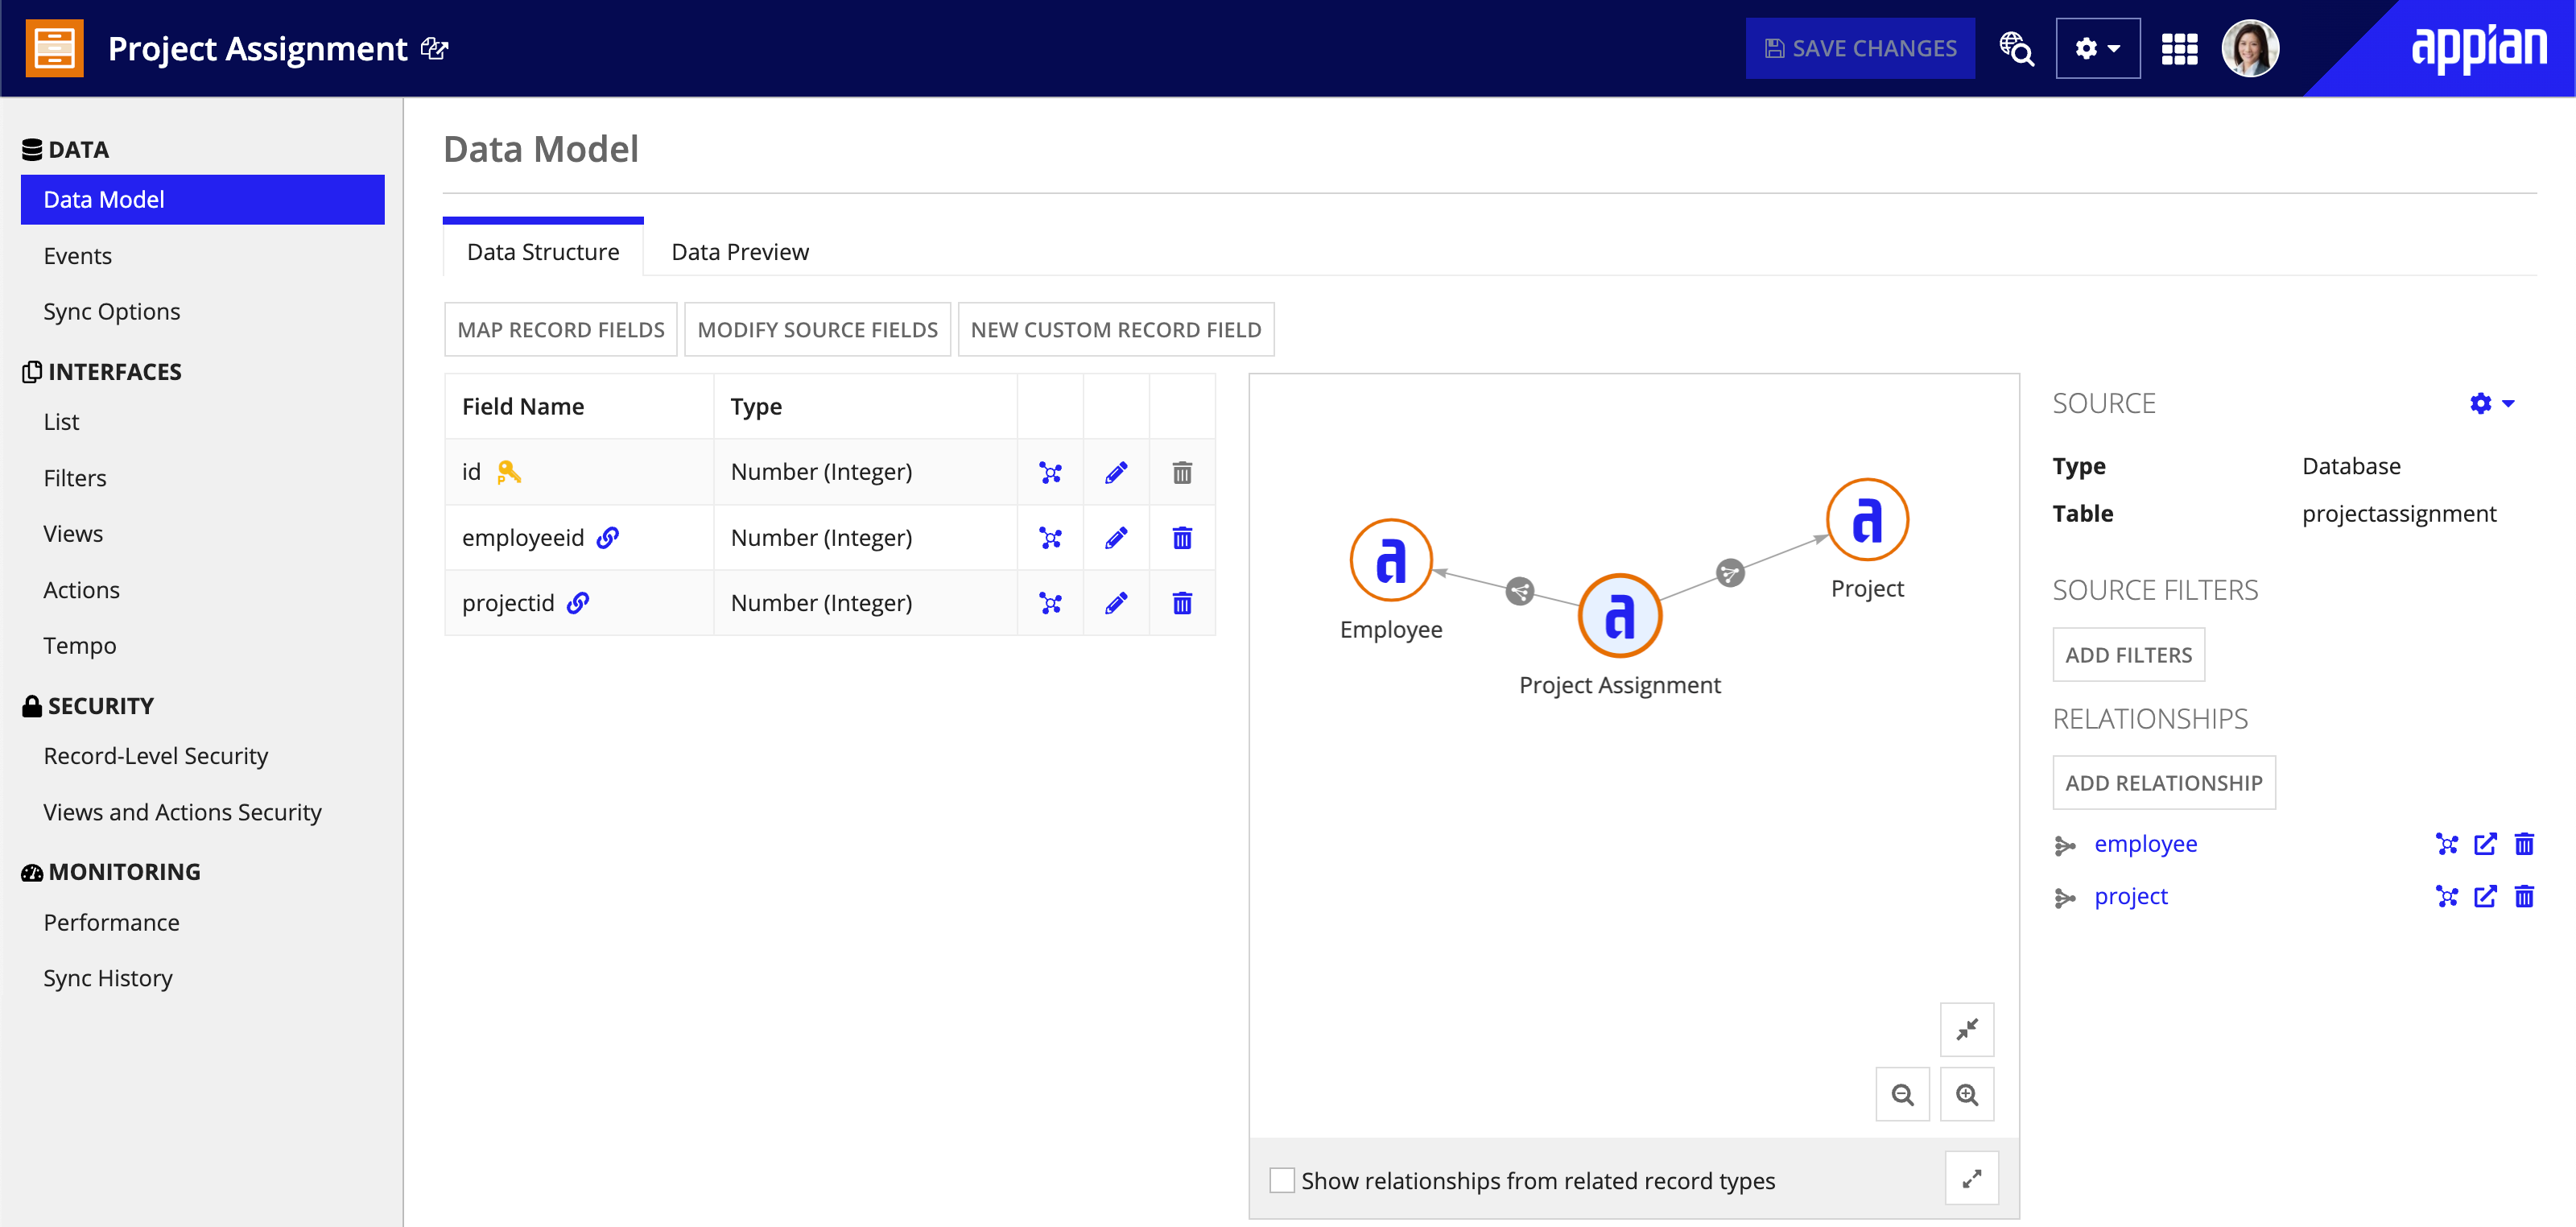
- Click SAVE CHANGES.
- From the Employee record type, add a one-to-many relationship with the Project Assignment record type.
- From the Project record type, add a one-to-many relationship with the Project Assignment record type.
Now, you can use the relationship on the Employee record type to index into the Project Assignment record type, then use the relationship on the Project Assignment record type to index into the Project record type. For example, recordType!Employee.relationships.projectAssignments.relationships.projects.fields.name would return the related project names for a given employee.
Since the Project record type also has a relationship with Project Assignments, you can use the Project record type to return fields from the Employee record type. In this instance, you could use recordType!Project.relationships.projectAssignments.relationships.employees.fields.lastName to return the related employee last names for a given project.
By connecting all three record types, you can easily reference your many-to-many data in your grids, charts, queries, and more.
Manage relationshipsCopy link to clipboard
Once you create a record type relationship in the record type, you can edit it, see all relationship dependencies, or remove the relationship.
Edit relationshipsCopy link to clipboard
To edit a record type relationship:
- In the record type, go to Data Model.
- Under RELATIONSHIPS, click the name of the relationship. The Edit Relationship dialog appears.
- Change the Relationship Name, Relationship Type, or Common Fields as necessary.
- Click OK.
- Click SAVE CHANGES.
View relationship dependentsCopy link to clipboard
To see which objects depend on the record type relationship:
- In the record type, go to Data Model.
- Under RELATIONSHIPS, click
 View objects that reference this relationship next to the relationship name.
A list of relationship dependents will appear.
Delete relationshipsCopy link to clipboard
To delete a record type relationship:
- In the record type, go to Data Model.
-
Under RELATIONSHIPS, click Remove Relationship next the relationship name.
Note: If you remove a relationship, any references to the relationship will break.
- Click SAVE CHANGES.
Reference related dataCopy link to clipboard
Once you configure a record type relationship, you can easily reference related data to build advanced interfaces, reports, queries, and process models.
This section explains how to:
- Reference a related record field in an interface or expression.
- Filter, sort, and limit related records.
- Pass related record fields into a process model.
Note: When you reference related data, Appian automatically enforces the record type object security and any record-level security configured on the related record type. This means you don't need to add any additional configurations to your queries to filter out sensitive or conditionally available information.
Reference a related record fieldCopy link to clipboard
Once you configure a relationship on your record type, you can use the relationships property to reference fields from that relationship or any nested relationships. A nested relationship is a relationship defined on a related record type.
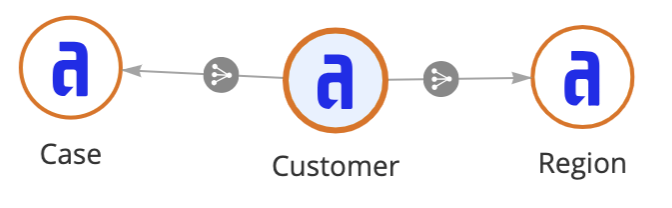
For example, if the Customers record type has a relationship to the District record type, then you can access data from the District record type and any of the record types related to the District record type, like Warehouses.
Depending on the object, you can reference a related record field in design mode or expression mode. Let’s look at examples referencing related record fields in design mode and expression mode within an interface.
In design modeCopy link to clipboard
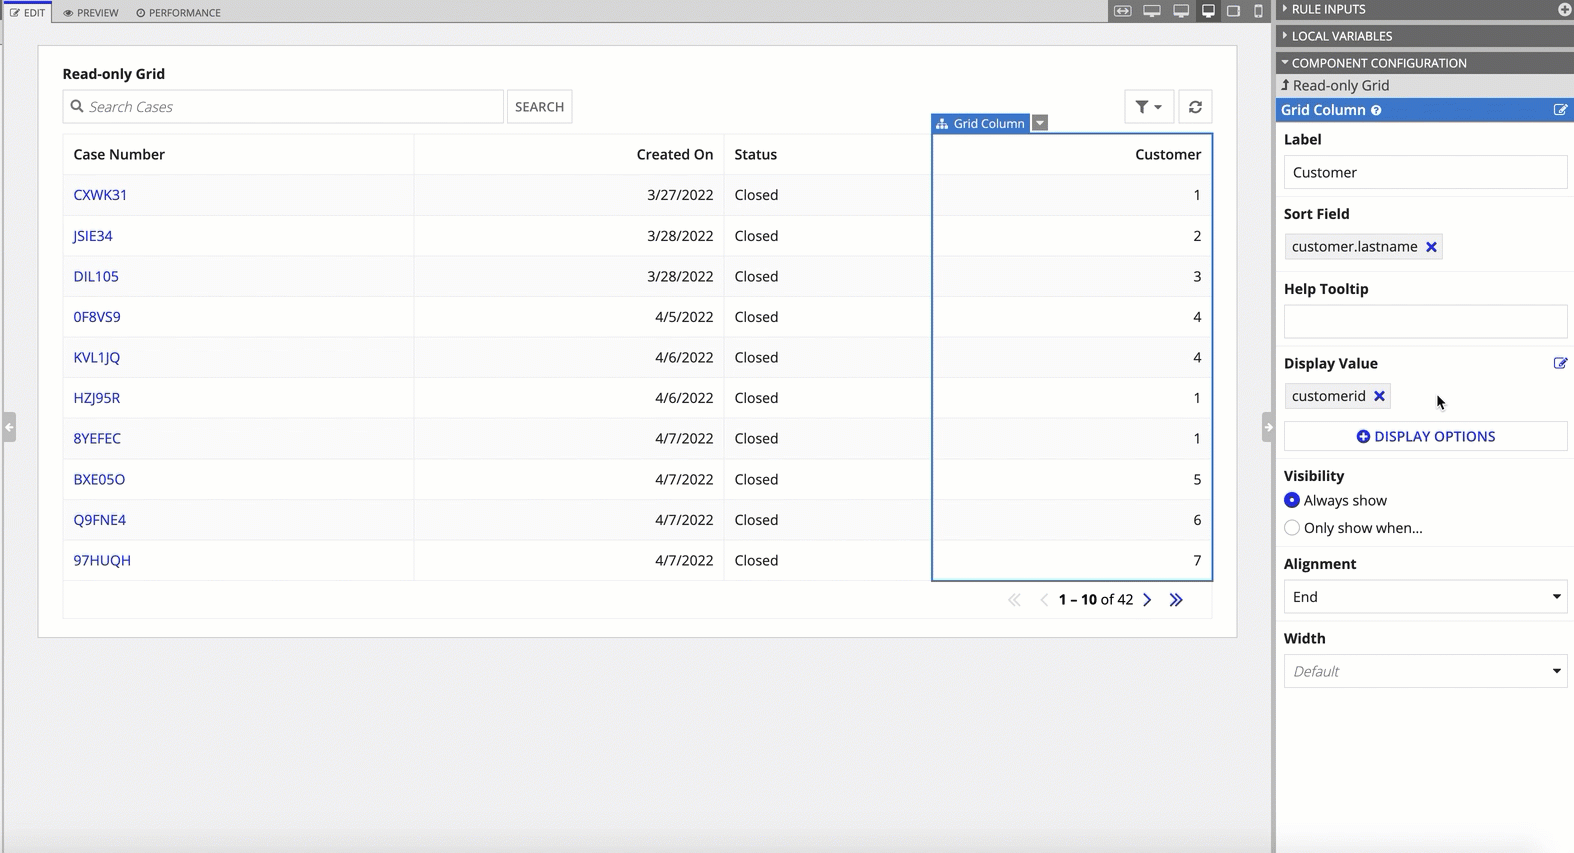
In an interface, you can use design mode to easily reference related record fields in any records-powered component, like a read-only grid or chart.
Whenever you select a field to display in the component, a list of record fields and relationships defined on the record type will appear. To select a related record field, hover over the relationship in the list.
To select a related record field from a nested relationship, hover over a relationship in the list. In the list of fields and relationships configured on the related record type, hover over a relationship.
In expression modeCopy link to clipboard
In expression mode, you can reference a related record field using the recordType! domain followed by . dot notation and the relationships property. A list of relationships configured on the record type will appear, where you can select a relationship. Then, you can use . dot notation and the fields property to select a related record field.

For example, the following expression uses an a!linkField() component to link to the district related to each customer. The label of the link uses recordType!Customer.relationships.district.fields.name to display the Name field from the District record type.
1
2
3
4
5
6
7
8
9
a!linkField(
  links: {
    a!recordLink(
      label: fv!row[recordType!Customer.relationships.district.fields.name],
      recordType: recordType!Customer,
      identifier: fv!row[recordType!Customer.relationships.district.fields.id]
    )
  }
)
Copy
Learn more about the relationship property.
Filter, sort, and limit related record fieldsCopy link to clipboard
When you select the related record fields to display in your interfaces or queries, you may decide that you only need a limited amount or a filtered subset of your related data—especially when you reference data from a one-to-many relationship.
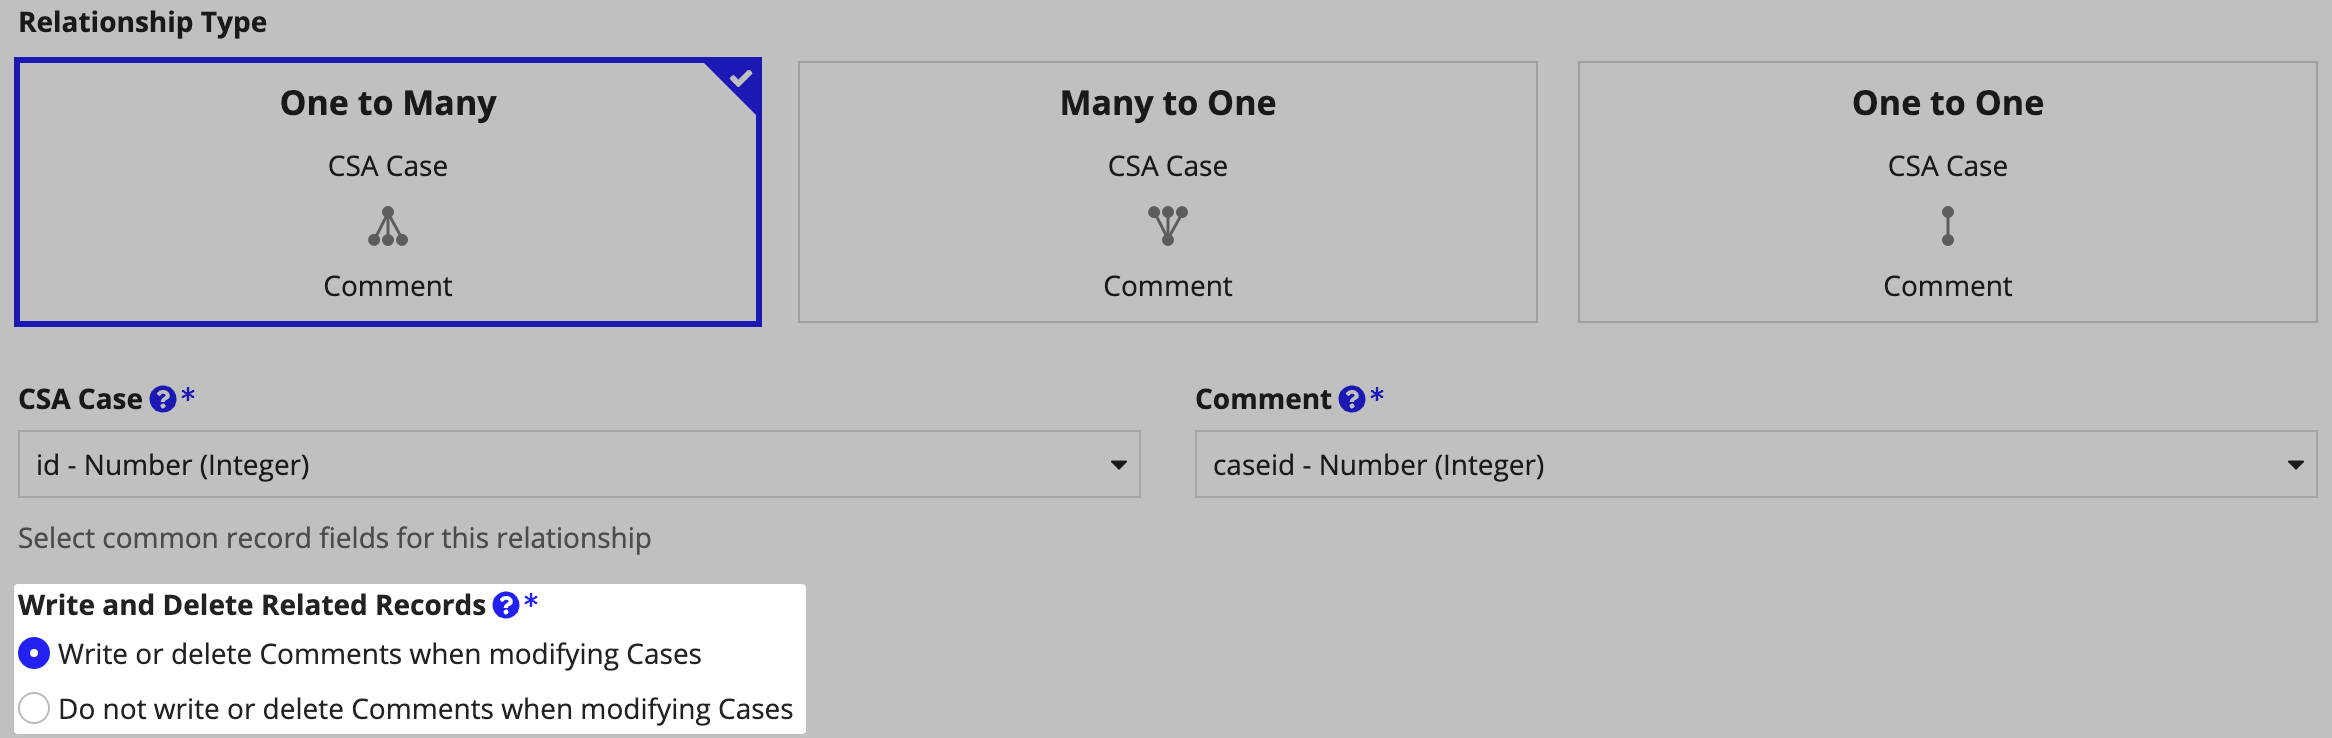
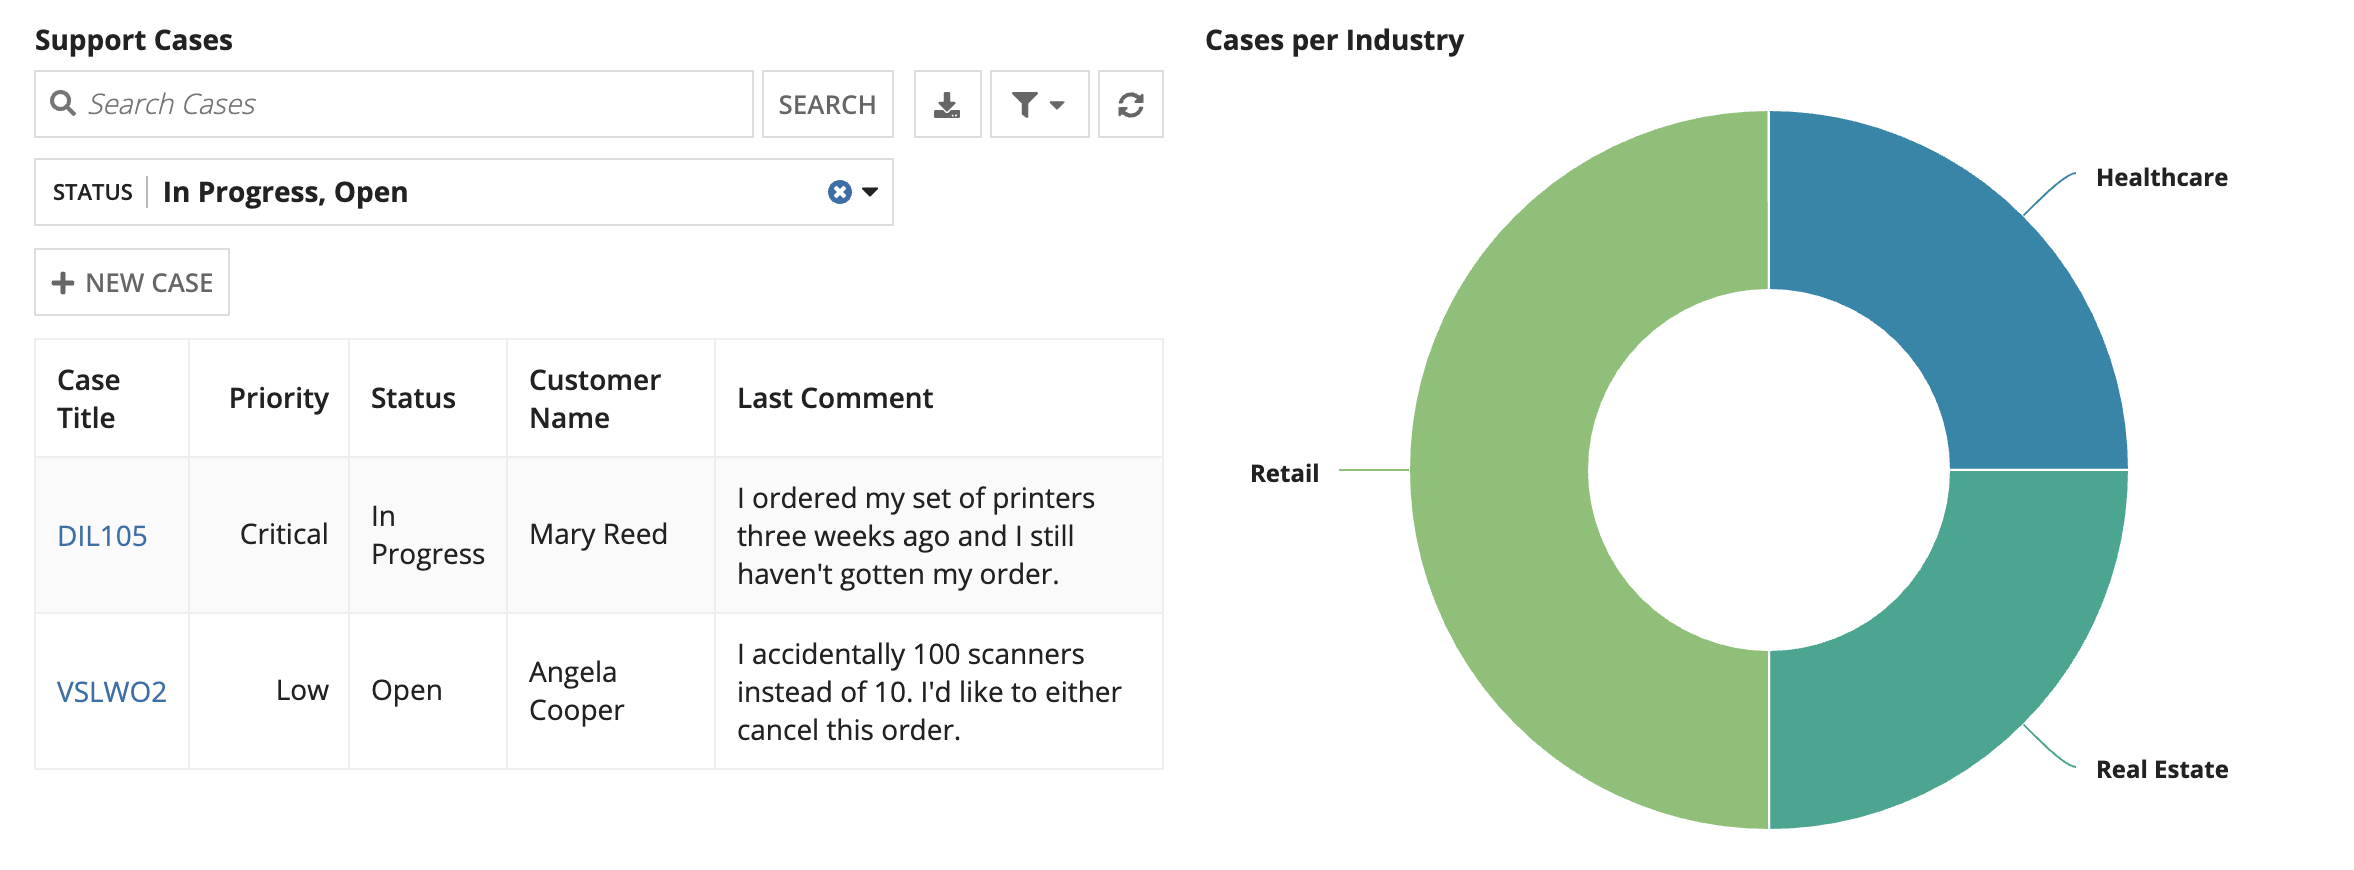
For example, if the Support Case record type has a one-to-many relationship with the Comments record type, you may not want to list every comment left on a case in your read-only grid. Instead, you just want to display the most recent comment left on each case.
To return the exact data you need, you can use a!relatedRecordData() to filter, sort, and limit the related record set returned from a one-to-many relationship. You can use this function in a!queryRecordType(), a!recordData(), or in a read-only grid.
Let's look at an example configuring a!relatedRecordData() in a read-only grid in design mode and expression mode.
In design modeCopy link to clipboard
In design mode, you can easily filter, limit, and sort your related record data in a read-only grid by clicking FILTER RELATED RECORDS.
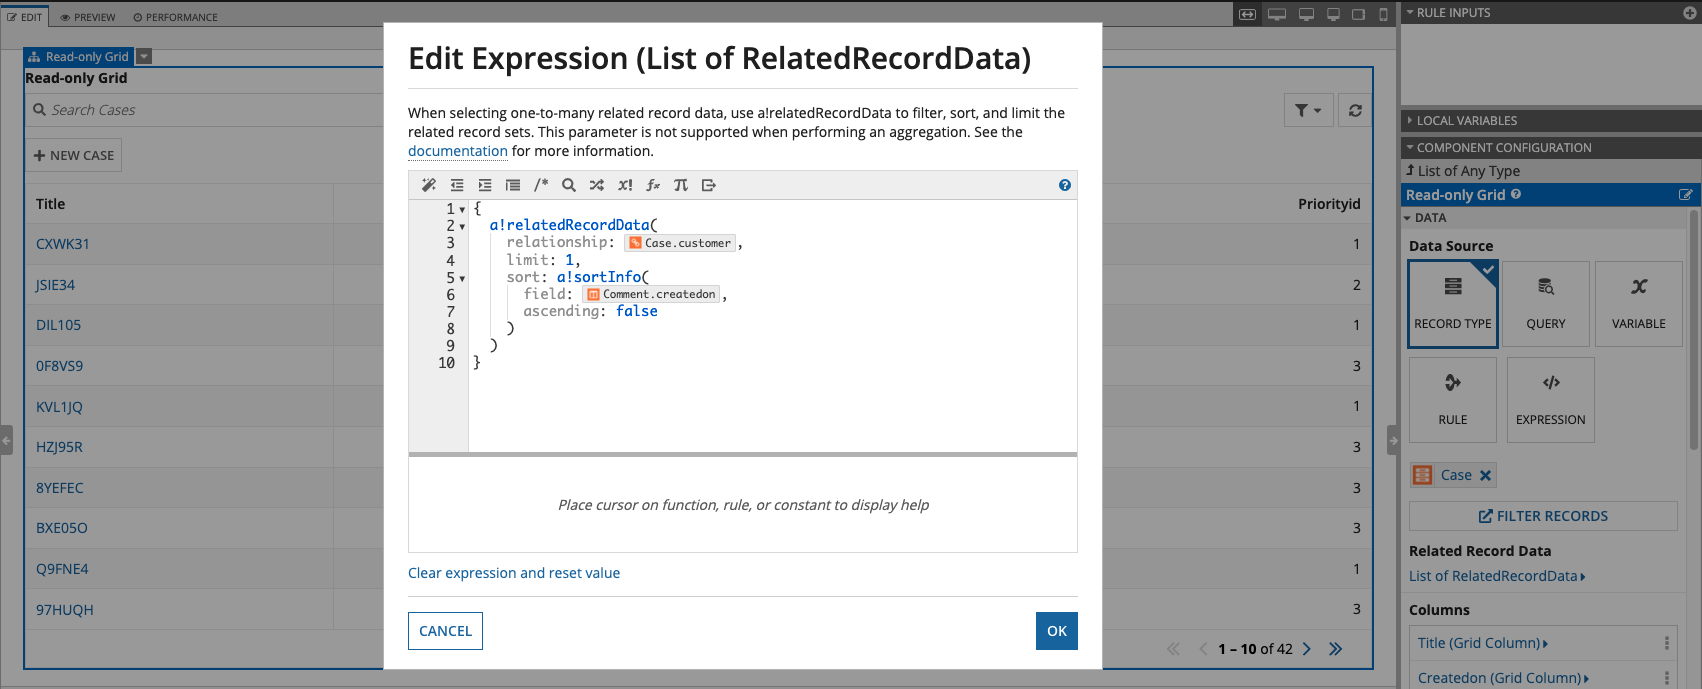
For example, to only display the latest comment for each case, you can limit the number of comments returned to 1 and sort by the latest value in the createdOn field from the Comment record type.
Note: When applying a sort or filter, you must start your record type reference directly from the related record type (recordType!<Related record type name>). See Filtering and sorting the related record set for more information.
In expression modeCopy link to clipboard
In expression mode, you can filter, sort, and limit a related record set using a!relatedRecordData() in the relatedRecordData parameter of a!recordData() or a!queryRecordType().
To return the latest comment left on each case in a read-only grid, the full expression would look like this:
1
2
3
4
5
6
7
8
9
10
11
12
13
14
15
16
a!gridField(
  label: "Support Cases",
  labelPosition: "ABOVE",
  data: a!recordData(
    recordType: recordType!Case,
    relatedRecordData: a!relatedRecordData(
      relationship: recordType!Case.relationships.comment,
      limit: 1,
      sort: a!sortInfo(
        field: recordType!Comment.fields.createOn,
        ascending: false
      ),
    )
  ),
  columns: ...
)
Copy
Both configurations in design mode and Expression Mode would return something like this:
Pass related record fields into a process modelCopy link to clipboard
Record actions to create or update record data often include information stored in a one-to-many or one-to-one related record type. When you set the relationship to allow Appian to write the record and related record data simultaneously, your interface can use a single rule input to pass the data to a process model.
Tip: You can generate common record actions, but you may need to update the generated interface or manually create a record action that write record data and related record data.
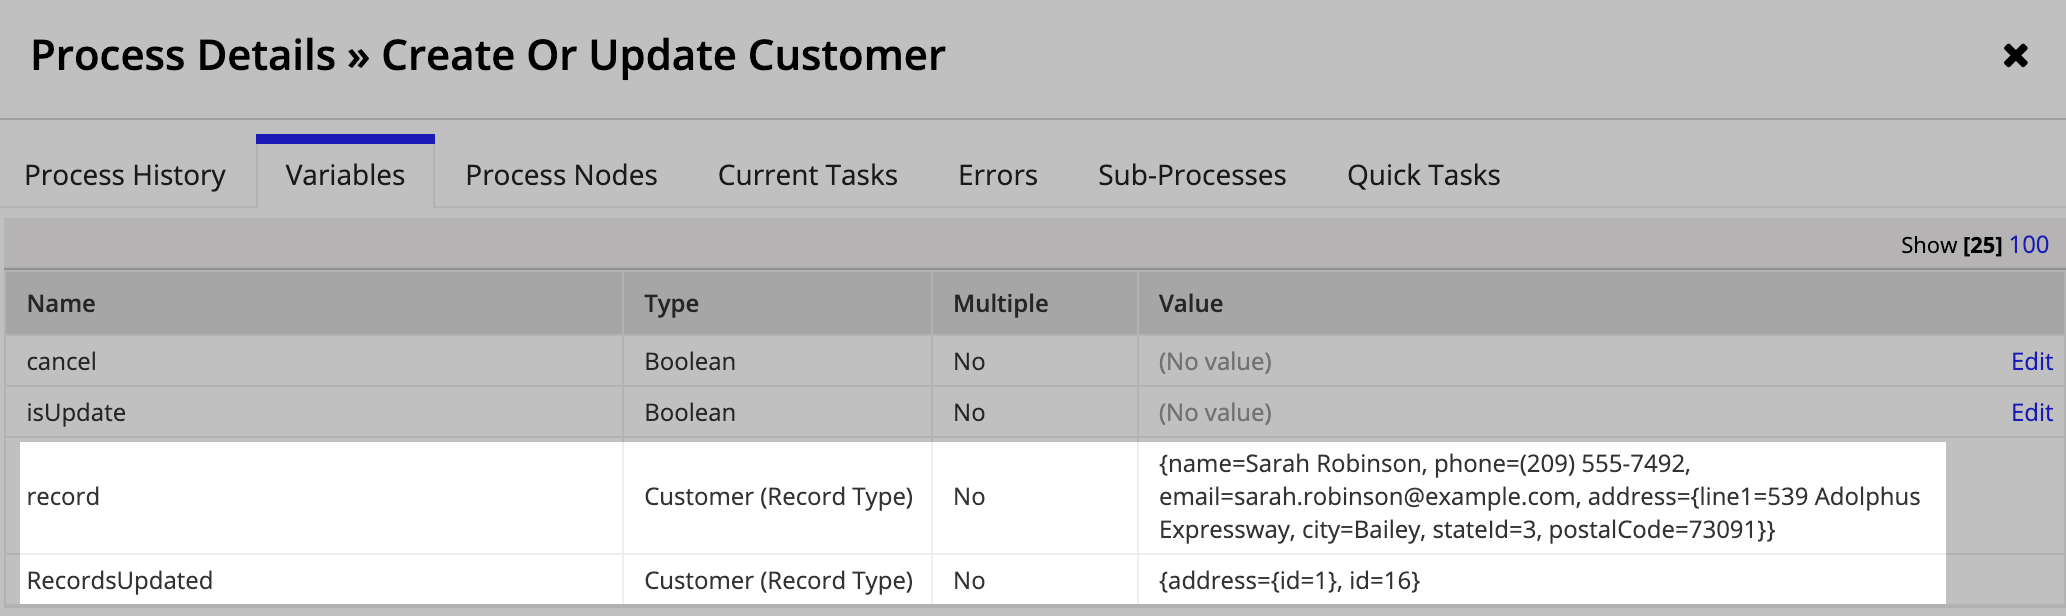
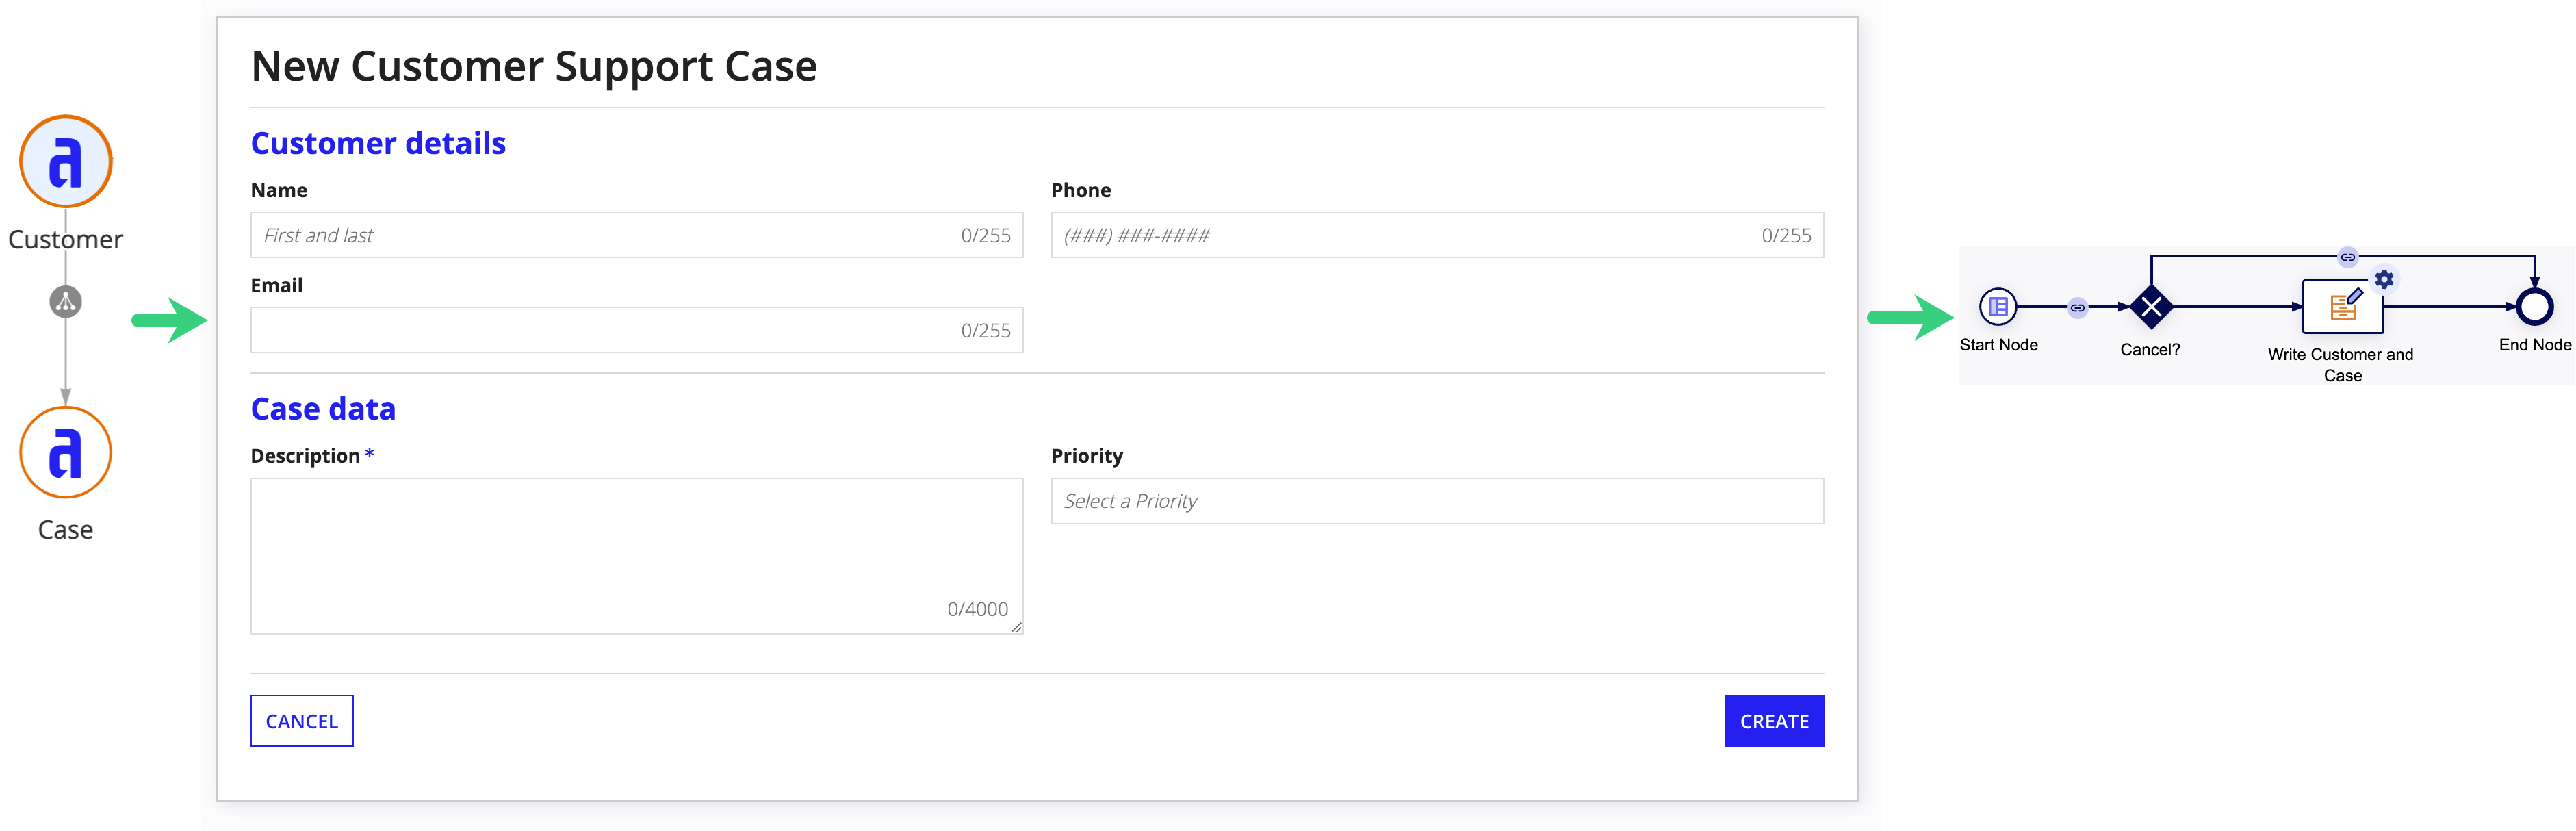
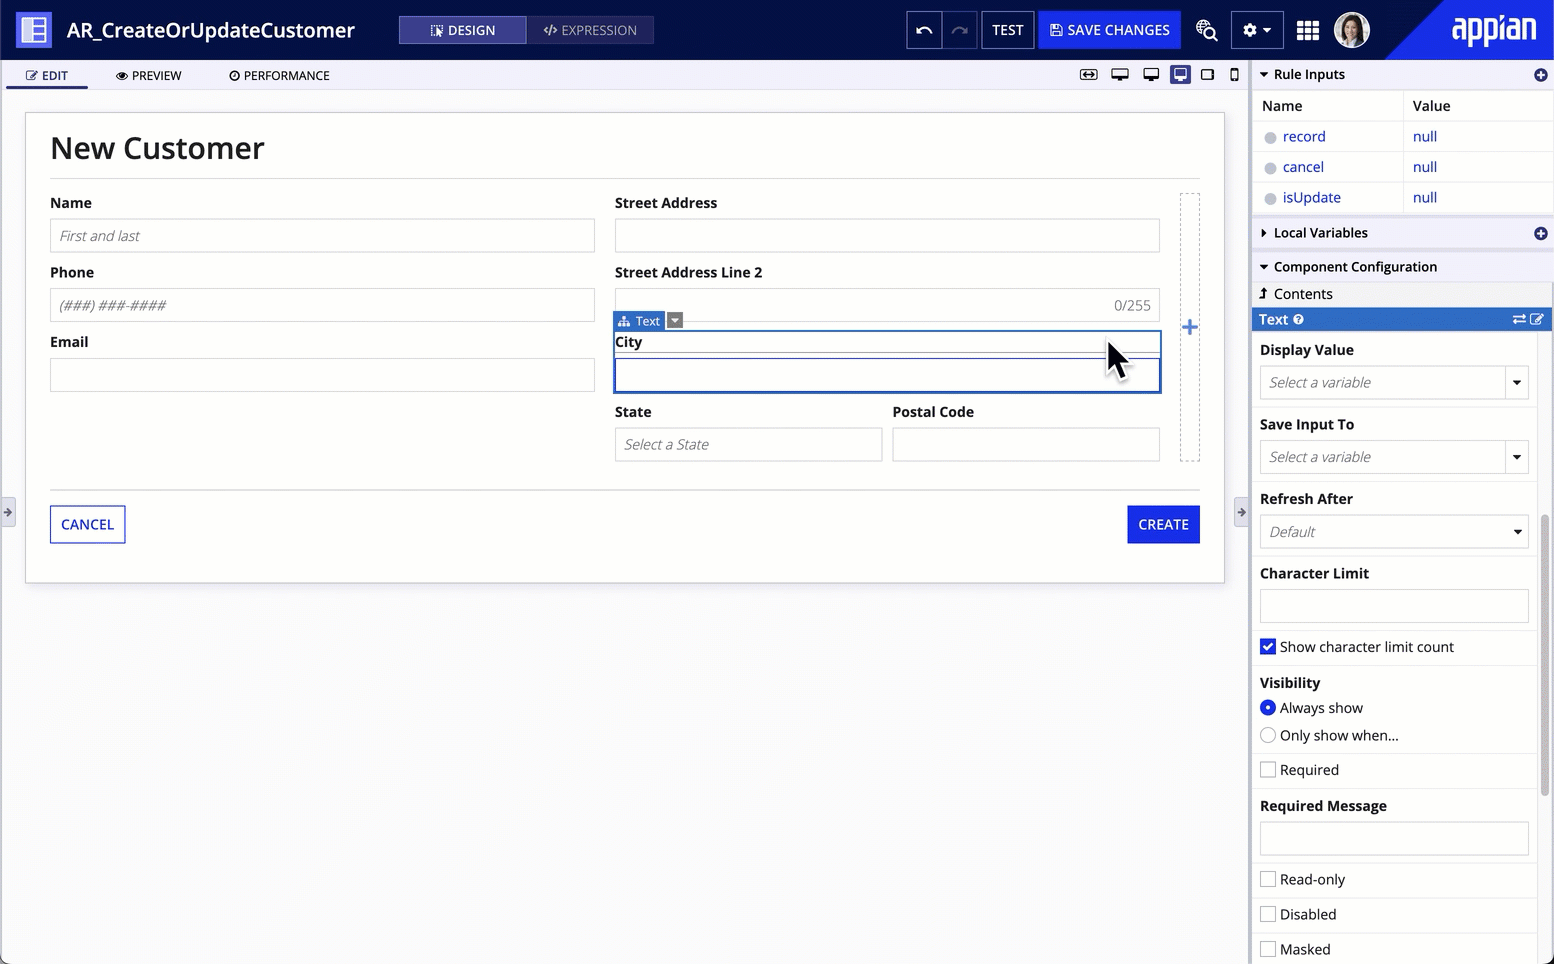
For example, let's say you have a Customer record type and an Address record type, and there is a one-to-many relationship between Customer and Address. You want to add a "Create" action to the Customer record type that also captures the customer's address.
To create a form that can pass data from the Customer record type and the Address record type, you can configure your form components with a single rule input (for example, ri!record) that references the Customer record type. Since the Customer record type has a relationship with the Address record type, and that relationship is configured to allow writes to related records, you can use relationship references to store and pass related record fields in your form.
In design modeCopy link to clipboard
To build the form in this example in design mode:
- In an interface, select an input component.
- In the component, go to the Display Value field.
- From the dropdown, hover over ri!record and then the address relationship. This will display the available fields on the Address record type.
- Select the city field from the Address record type. The related record field will appear appended to the relationship name. In this example, the field appears as address.city.
- For Save Input To, repeat the previous two steps to select the same field.
In expression modeCopy link to clipboard
To build the form in this example in expression mode, you can display and save the related record field value using the value and saveInto parameters of an input component.
The full expression for a component would look like this:
1
2
3
4
5
6
7
8
9
a!pickerFieldRecords(
  label: "State",
  labelPosition: "ABOVE",
  placeholder: "Select a State",
  maxSelections: 1,
  recordType: recordType!Customer,
!  value: ri!record[recordType!Customer.relationships.address.fields.stateId]
!  saveInto: ri!record[recordType!Customer.relationships.address.fields.stateId]
)
Copy
When the form is submitted, the record rule input is passed to the process model as pv!record. When the process completes, pv!RecordsUpdated shows the primary key values of the new Customer and Address.