| The capabilities described on this page are included in Appian's standard capability tier. Usage limits may apply. |
IntroductionCopy link to clipboard
Appian's automation framework is built for speed and flexibility, enabling your application and robots to act on information immediately. To make it even easier, you can integrate and orchestrate your robotic workforce within your application's process model workflows. Assign individual units of work, launch multiple executions at once, assign execution priority, and configure retry behavior in one place. You can build process models to handle exception logic and manage data passing to and from the robotic task to support a sophisticated human-in-the-loop automation practice.
This page recommends patterns for integrating Appian process models and robotic tasks. The low code patterns described below are designed to be fast, scalable, and reliable ways to communicate and process data.
Overall design guidelinesCopy link to clipboard
In order to design robotic tasks efficiently and in low code, it's essential to understand which pieces and steps of the robotic task should be in Appian as process models or expressions and which ones should be within the robotic task definition.
In general:
- Use the robotic task for interacting with third party systems that don't have APIs. This includes sign ins, navigation, and reading and writing data into the third party apps.
- Use Appian expressions and process models for anything else, including running calculations and business logic, interacting with systems that have APIs, and reading and writing to databases.
Tip: If a step or action can be designed in low code in Appian and exposed as expressions or process models, use Appian expressions or process models. Otherwise, use Appian RPA.
Recommended patternsCopy link to clipboard
The patterns below are broken in different categories:
- Patterns for orchestration
- Patterns for robotic task design
Orchestration patternsCopy link to clipboard
Executing a robotic taskCopy link to clipboard
As documented in Ways to Execute a Robotic Task, a robotic task can be started using either the Execute Robotic Task smart service, the Call Integration smart service, or the Execute Robotic Task integration object.
To simplify the robotic task definition, it is recommended to start robotic tasks using the Execute Robotic Task smart service. This smart service executes robotic tasks synchronously and allows designers to save the outputs of the robotic tasks in process variables. Launch a single robotic task execution using this smart service, and use it to retrieve the results in Appian.
Implementation details
In the process modeler, this pattern appears as shown below:

Executing business logic in robotic taskCopy link to clipboard
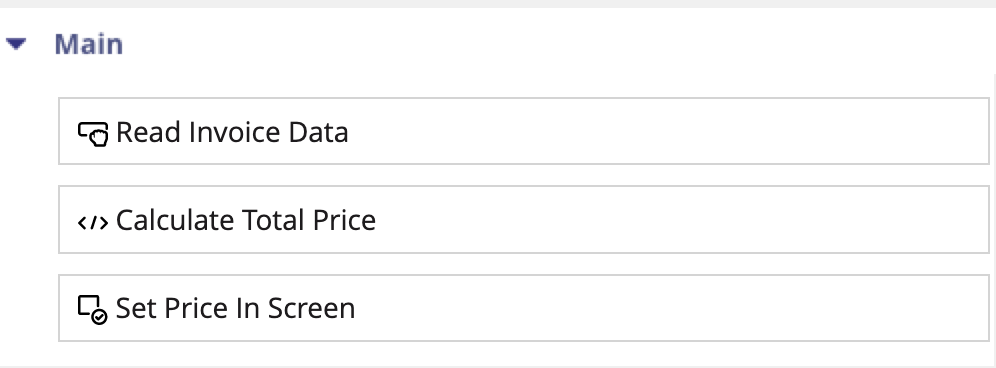
When interacting with external systems, it is common for a robotic task to perform calculations and business logic, such as validating the data being displayed or calculating data to be entered in the next step of the robotic task.
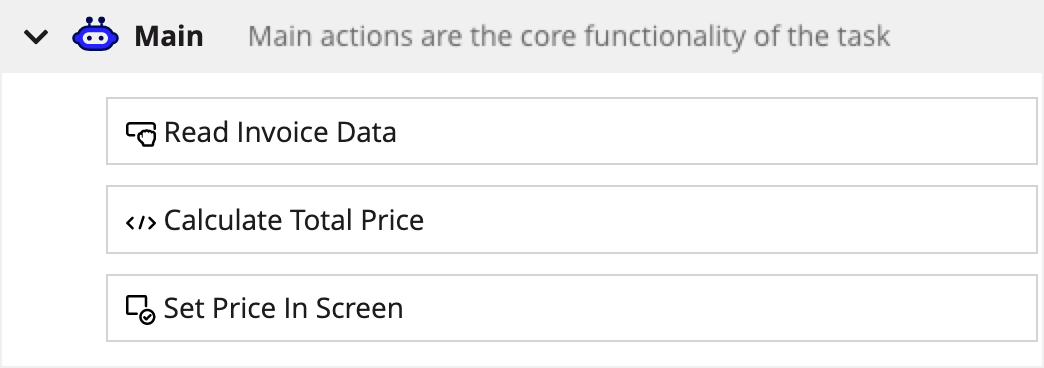
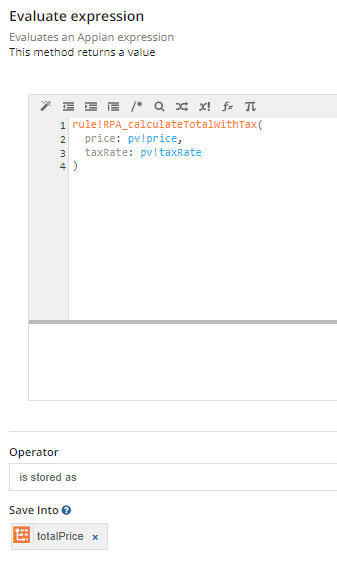
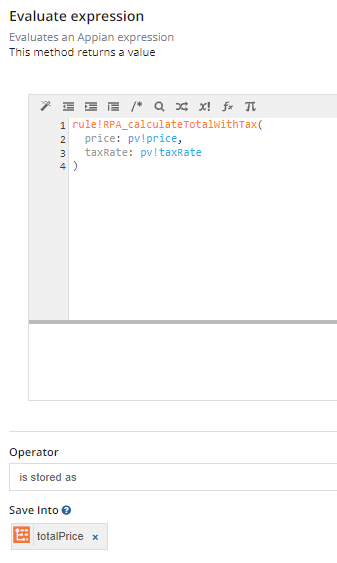
To perform these calculations and logic, use Appian expression rules invoked using the Evaluate expression action in the Appian Services menu.
Creating an expression rule, as opposed to writing the logic directly in the expression field of the Evaluate expression action, provides additional benefits such as reusability and unit testing.
Implementation details
Use the Evaluate expression action to execute an expression rule that was previously created in Appian.
Handling unplanned exceptionsCopy link to clipboard
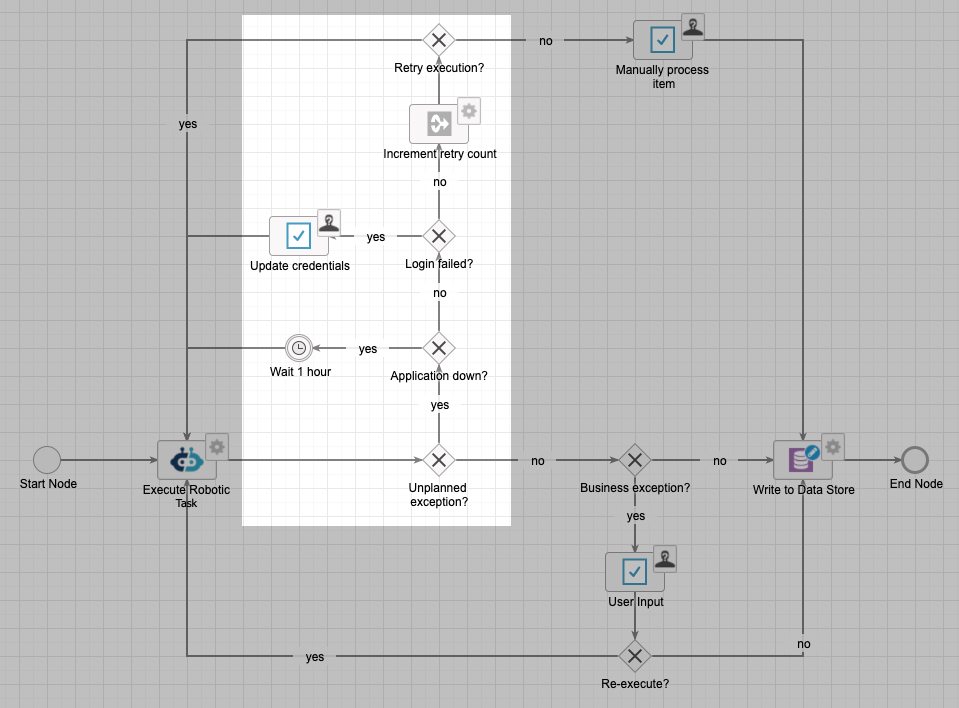
Due to the fragile nature of front-end robotic tasks, it is likely that your robotic tasks will sometimes run into unplanned issues during execution. For example, the target application to interact with may run into intermittent bugs for certain executions. In these circumstances, you can use your process models to orchestrate the exception behavior, retrying the execution or notifying a user of the issue.
To manage unplanned exceptions, the process model must use a variable to record the end result of the RPA execution. The Execute Robotic Task smart service provides a Success output variable by default, which you can use to route the process model workflow based on whether or not the RPA execution was successful. For more granular exception handling, you may find it useful to build additional exception logic based on the part of the robotic task that was unsuccessful. To do this, you'll create a robotic task variable to track each action's success or failure.
Implementation details
In your robotic task, create a robotic task variable:
- An action state (string) to track when actions in the robotic task execution succeed. You can leave the initial value blank.
As you build the robotic task definition and configure actions, store results in this variable. For example, when the robotic task successfully signs into an application, you could update the status to say "login successful". Configure subsequent actions to update the same variable to describe the state as the execution proceeds.
This information can be returned to the Appian process model and used to build exception logic to address when a specific action in the robotic task fails.
For example, if the robotic task isn't able to access a web portal, it might be that the website didn't load in time. Build an exception route in the process model to retry the execution. Alternatively, if the execution fails at a point in the process that requires human intervention, you can build a route in the process model to send a user input task to manually manage the exception.
Handling business exceptionsCopy link to clipboard
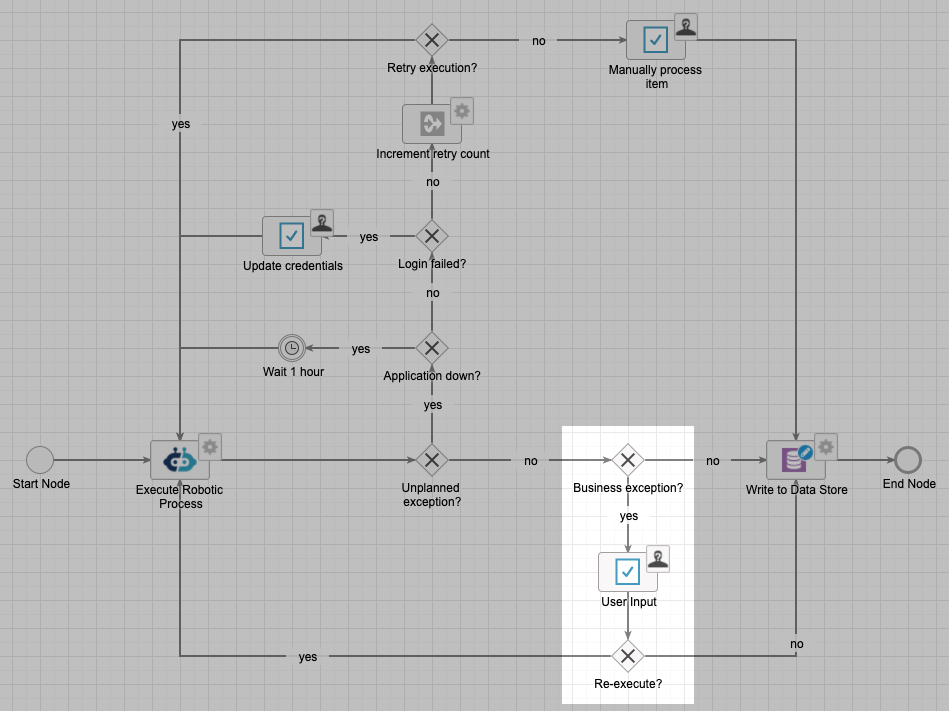
When a robotic task runs into a business exception, such as manual approval is needed or data is missing, the robotic task must terminate and notify a user of the exception.
To do so, the robotic task must return the exception and related data to the Appian process model so that the user is notified with relevant information.
Implementation details
In your robotic task, create two robotic task variables:
- A status flag (boolean) to indicate if a certain business exception has occurred.
- An exception message (text) to provide details on the business exception.
These robotic task variables are the same ones used to manage other exceptions as documented in the previous pattern.
Populate these two robotic task variables before terminating the robotic task to indicate a business exception.
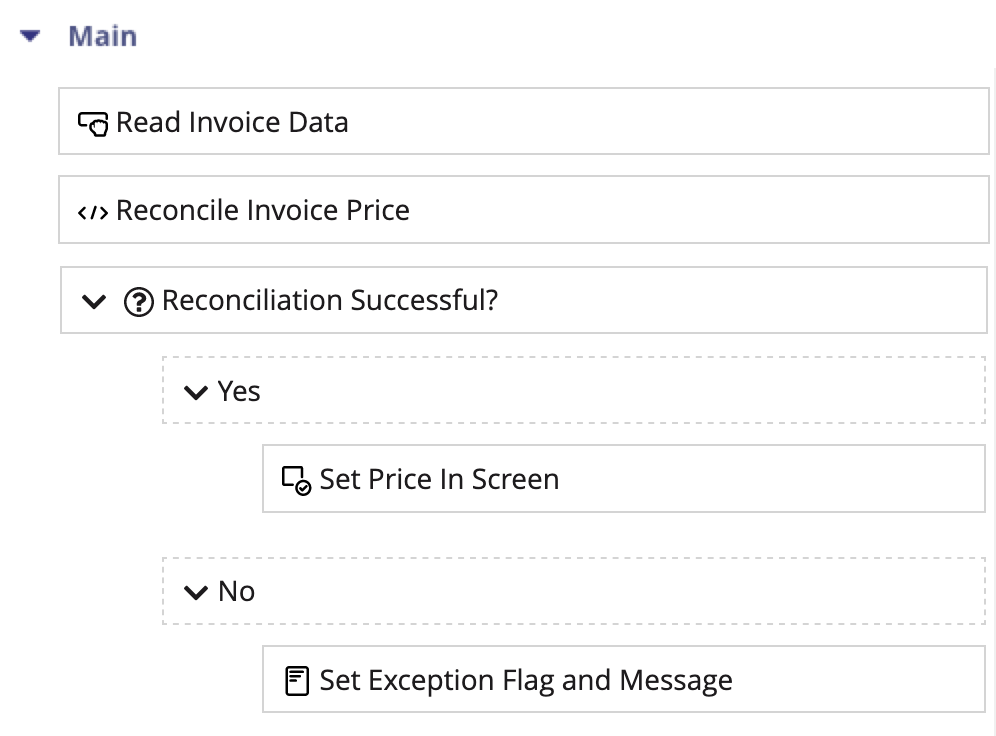
In the Appian process model, use an XOR gateway to evaluate the values of the status flag returned by the robotic task and route the workflow accordingly. Below is an example where a business exception in the robotic task triggers a task to a user for further troubleshooting.
Processing items from a listCopy link to clipboard
Appian's low code data management capabilities extend to robotic tasks that process items from a list. Use an Appian process model to loop through items and use the Execute Robotic Task smart service to start robotic tasks sequentially or in parallel.
Implementation details
Launch individual executions from a process model using the Execute Robotic Task smart service with multi-node instances (MNI), where one robotic task execution = one item processed. Depending on the configuration of MNI, robotic tasks can be started sequentially or in parallel.
When started in parallel, the robotic tasks are queued in Appian RPA until a compatible robot becomes available. The robotic tasks execute based on their assigned priority, which can also be configured in the Execute Robotic Task smart service.
If you have a set of many items to process in parallel, you can design a process model that uses MNI to spawn multiple subtasks once called.
To get started:
- Create a CDT in Appian to represent the items to process, including a field to track the status.
- Create a data store entity from this CDT.
- Build a process model to retrieve the items to process. This can be done using a database query, API, Excel, or another source.
- Create a process variable to store this data within the process model.
- Create a subprocess node in the process model.
- Configure the subprocess node to run as many nodes as there are items in the process variable that holds the items data, defined above. This implementation is referred to as a "multi-node instance" because the subprocess launches multiple parallel robotic tasks. To do this:
- From the Palette on the left, expand the Activities folder.
- Drag the Sub-Process node to the canvas and drop it on top of the existing connector when the connector turns blue. This indicates that you can add the object to the existing flow.
- Double click the Sub-Process node.
- Open the Other tab.
- Check the Automatically run multiple instances of this node box.
- Select Run one instance for each item in and choose the variable you created in step 4.
- Select Run all instances at the same time.
- Click OK.
- In a separate tab of the process modeler, create the subprocess.
- Create an Execute Robotic Task smart service node and configure it to launch the intended robotic task.
- Create a Write to Data Store Entity smart service node and configure it to store the processed data, once returned from the robotic task.
- Back in the parent process model, configure the sub-process node to call this subprocess.
- Save and publish the process model.
The MNI implementation has a 1000-node limit. If you have more than 1000 items to process, we suggest breaking them into increments of 1000 or less and building additional logic in your process model to handle them.
Tip: When launching multiple consecutive robotic tasks, you can use the Skip setup and cleanup for consecutive executions option in the Execution settings to speed up each execution after the initial one.
Robotic task design patternsCopy link to clipboard
Leveraging the low code power of Appian platformCopy link to clipboard
With traditional RPA tools, the robotic task needs to use custom code or custom libraries to perform tasks not strictly related to third party system interaction such as sending emails, invoking web services or other APIs, and generating documents.
With Appian RPA, the robotic task leverages the low-code power of the Appian platform to perform these tasks through the execution of Appian process models or Appian expressions:
- Use an Appian process model to modify data, such as writing to a database or creating documents.
- Use an Appian expression to read data, such as querying a web service or a database, or executing business logic.
Implementation details
To execute a process model from a robotic task, use the Start Process action in the Appian Services menu. After selecting the Process Model to execute, provide the necessary process parameters and save the process instance identifier returned by this action.
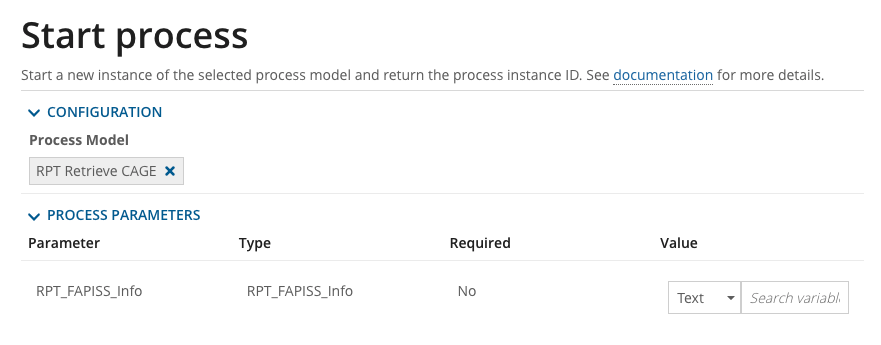
Note that the Appian process is started asynchronously. After launching the Appian process, the robotic task continues to the next step in the robotic task definition.
To execute an Appian expression from a robotic task, use the Evaluate expression action in the Appian Services menu. The action returns the outputs of the expression which can be saved in robotic task variables for future use.
Executing a robotic task on a specific robotCopy link to clipboard
Depending on the third party system to interact with, this interaction may require additional software that is not installed on the host machine such as emulators for mainframe systems or desktop applications. In this scenario, a robotic task must be executed on the correct robot or set of robots in order to work properly.
Implementation details
Use RPA permission tags to pair robotic tasks and robots. A robotic task can only be executed on a robot that shares the same permission tags.
Designing robotic subtasksCopy link to clipboard
Any robotic task you create can also be run as a robotic subtask of another robotic task. Appian recommends using robotic subtasks for any functionality common to your robotic tasks.
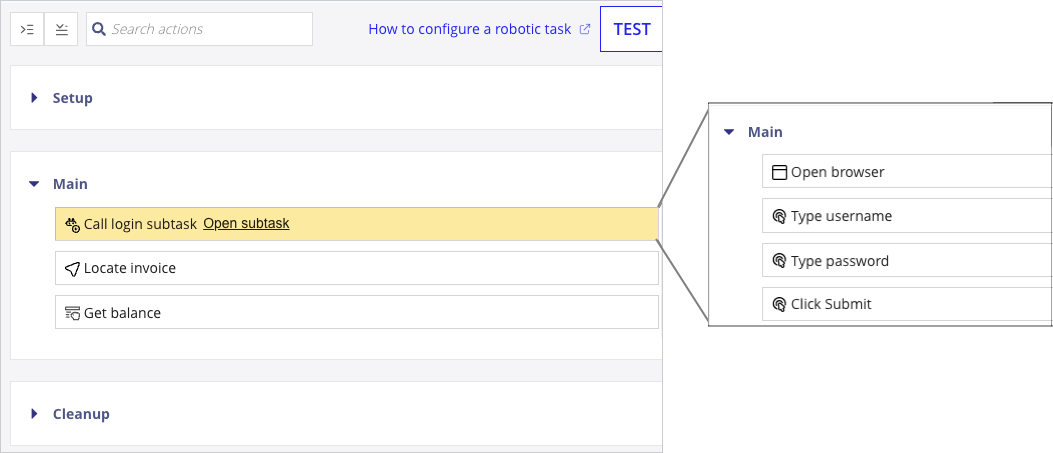
At the start of an automation project, consider if you plan to build robotic tasks that share any actions. If you find there are multiple robotic tasks with the same actions, this might be an opportunity to use a robotic subtask. You can use the robotic subtask in multiple robotic tasks, which makes overall development faster and maintenance easier.
Robotic subtasks are easier to configure, maintain, and troubleshoot. You won't have to run it within the context of the larger overall task as you build and debug. Instead, you can run and debug the robotic task on its own, which saves time. Additionally, robotic subtasks make the overall robotic task easier to maintain. By keeping distinct actions together, you can isolate any issues to find and fix them faster.
Implementation details
To implement a robotic subtask effectively and efficiently, simply build a stand-alone robotic task that includes functionality you expect to use repeatedly across multiple robotic tasks. Be sure to consider what dynamic pieces of information need to be passed in from the parent robotic task, and create appropriate parameters in the robotic subtask accordingly.
For example, consider how many of your robotic tasks start by signing into a website. If you have multiple robotic tasks that interact with the same website using the same credentials, you can create a robotic task that just handles the task of signing in. Then you can call that robotic task within the context of other robotic tasks that proceed to do different things such as filling out a form or downloading documents.
To properly pass the credential information, the parent robotic task needs a robotic task variable to store the credential and the robotic subtask needs a parameter mapped to that credential variable. See how to use credentials in a subtask for further instructions.
Robotic subtask or loop?
Robotic subtasks are similar to looping design patterns because they accomplish the same task multiple times. However, there is a key difference that determines when to use either option:
- Robotic subtasks allow you to perform the same set of actions within the context of multiple robotic tasks.
- Loops allow you to perform the same set of actions multiple times within the context of one robotic task.
