| This content applies solely to Connected Underwriting, which must be purchased separately from the Appian base platform. |
IntroductionCopy link to clipboard
After installing the Authenticated Broker Portal, you need to set it up before using it with your Connected Underwriting P&C 1.5 application. This guide walks you through the required incorporation steps, which include:
- Enable group management.
- Enable messaging.
- Configure broker-based record security.
- Add Broker Portal-specific actions.
- Enable the Broker Portal-specific summary interfaces.
- Show Record actions.
- Show Record views.
- Configure the internal and external user selection.
Step 1: Enable group managementCopy link to clipboard
Before you can start using the Authenticated Broker Portal with your Connected Underwriting P&C solution, you'll need to enable the Brokers groups to be managed from the Connected Underwriting Settings Set.
This section walks you through how to:
Enable ISU Brokers group managementCopy link to clipboard
Append the ISU_BKP_GRP_BROKERS group constant to the array in the ISU_CONS_ROLE_GROUPS expression rule. This allows users to edit the group membership of the ISU Brokers Group from the front end.

Enable Broker Portal group managementCopy link to clipboard
- Open the ISU_userSecurityWrapper interface.
-
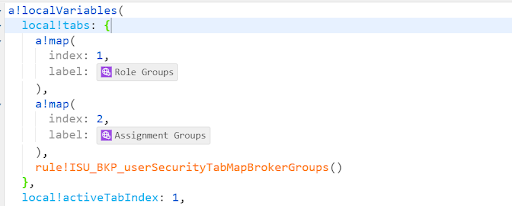
Update the local variable local!tabs with the ISU_BKP_userSecurityTabMapBrokerGroups expression rule as shown.
-
Update the interface again with the ISU_BKP_groupsListBrokerGroups interface as shown.

-
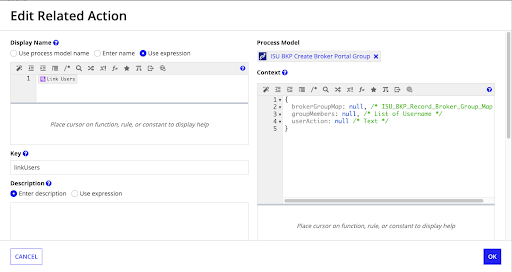
Open the ISU_Record_DynamicContext record and add a new action for Link Users. Configure this action as shown below:
-
From the Icon dropdown menu, select +, then choose the icon size under Dialog Box Size.
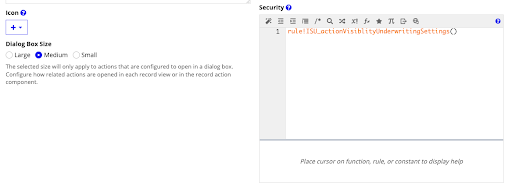
- Set the security of the Link Users action to the ISU_actionVisibilityUnderwritingSettings rule.
-
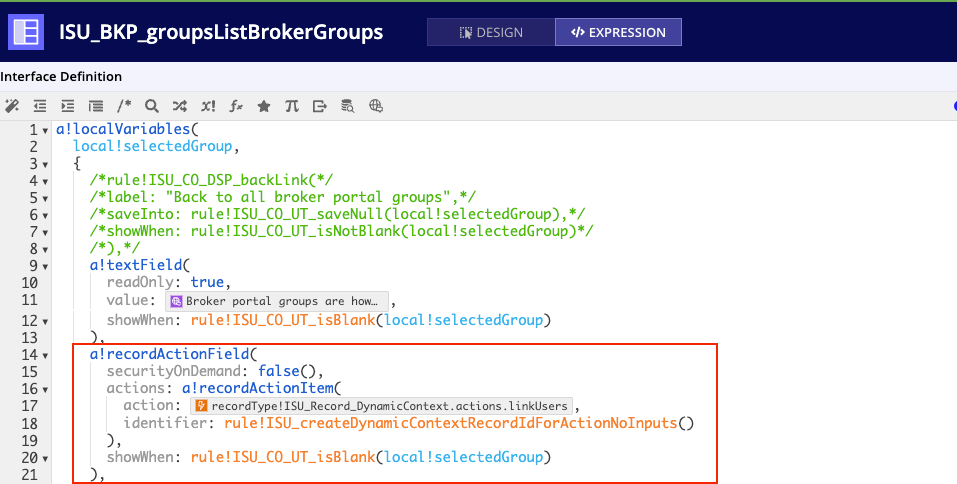
Navigate to the ISU_BKP_groupsListBrokerGroups interface and add the Link Users action as a recordActionItem as shown below:
Step 2: Enable messagingCopy link to clipboard
Next, you will net to set up messaging in the Broker Portal to allow brokers to communicate with insurers and your internal teams.
This section walks you through how to:
- Check group membership when filtering message recipient queries.
- Add the search custom placeholder to the message recipient record.
- Set the Broker group as the thread recipient when applicable.
Check group membership when filtering message recipient queriesCopy link to clipboard
- Open the ISU_returnUserGroupsForMessagingRecipientFilter expression rule.
-
Append an item to the within
touniformstring()array by calling the ISU_BKP_returnUserGroupsForMessagingRecipientFilter expression rule, and pass inri!userfor the user input to this rule: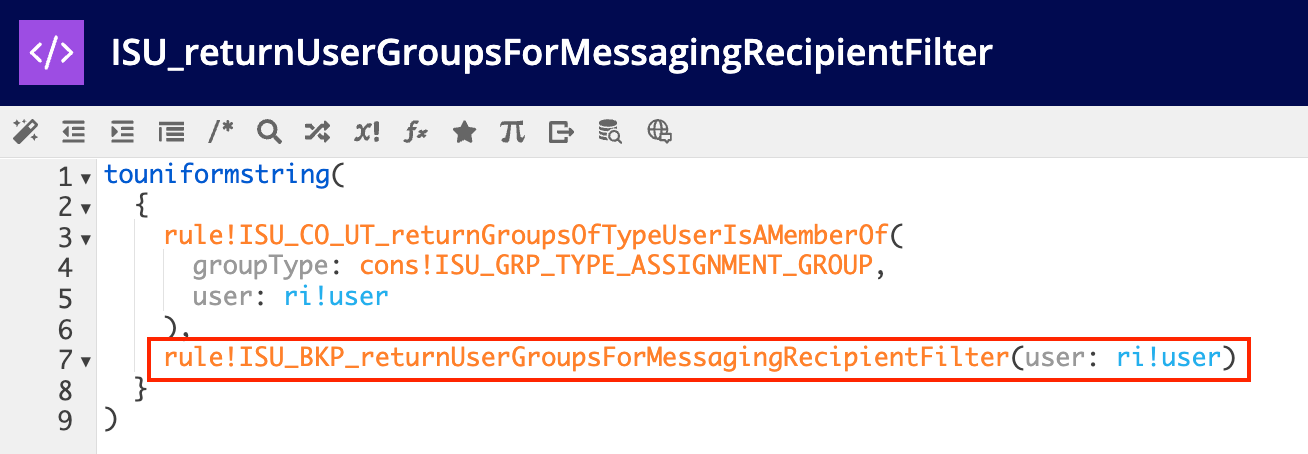
Add the search custom placeholder to the message recipient recordCopy link to clipboard
- Open the ISU_Record_MSG_MessageRecipient record type.
- Navigate to the Filters tab.
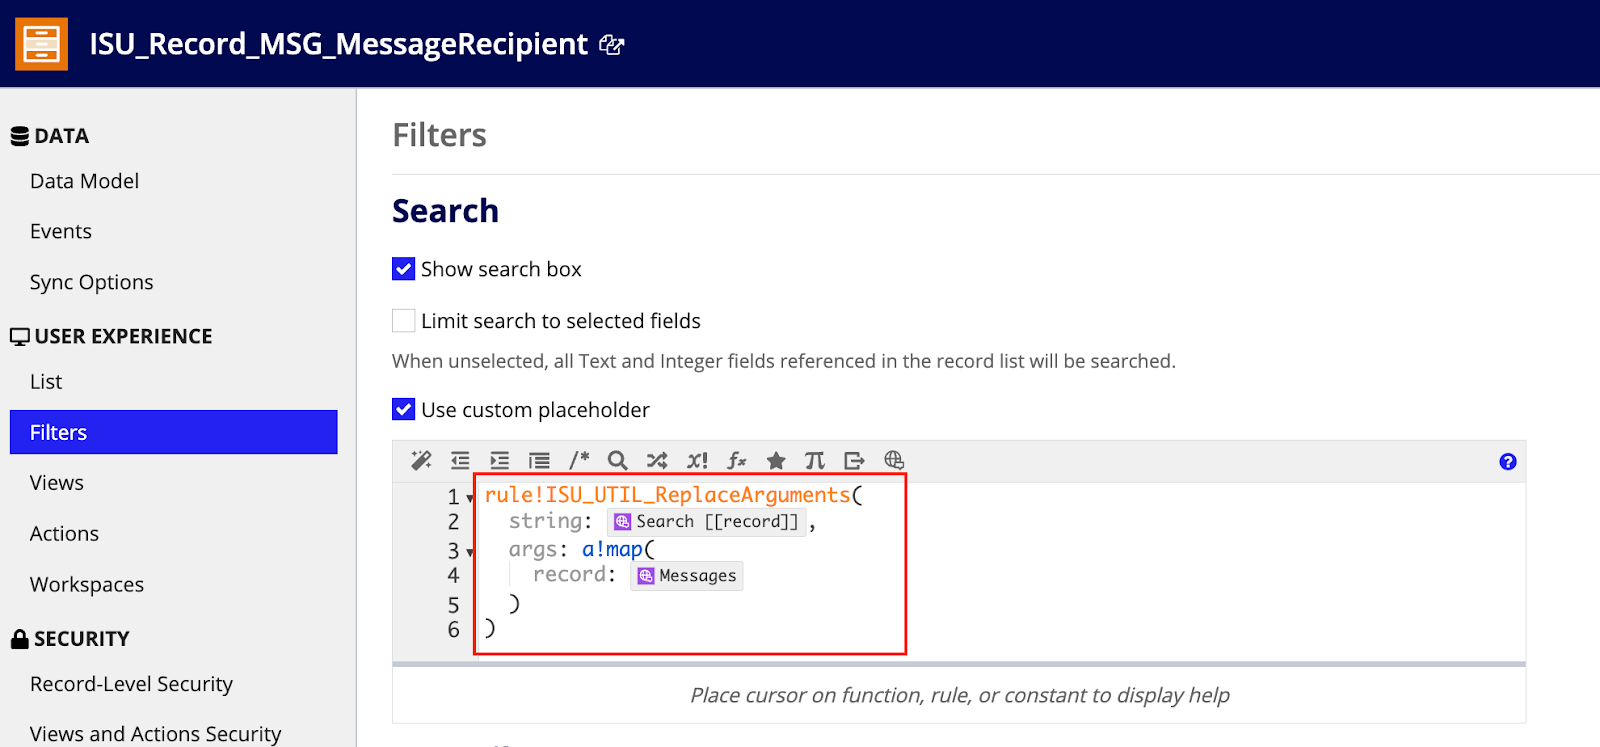
- Check the Use Custom Placeholder checkbox.
-
Use existing translation set strings to set the expression of the custom placeholder as shown:
Set the Broker group as the thread recipient when applicableCopy link to clipboard
- Open the ISU_generateSubmissionThreadRecipients expression rule.
-
Replace rule!SU_returnBrokerThreadRecipientForSubmission with rule!ISU_BKP_returnBrokerThreadRecipient in the
local!brokerEmaillocal variable as shown:
Step 3: Configure broker-based record securityCopy link to clipboard
This section walks you through the steps for configuring record security based on broker groups, including how to:
- Add the Broker-BrokerGroupMap record relationship.
- Update the record-level security on the Broker record.
- Update the record-level security on the Broker Custom Map record.
- Update the record-level security on the Customer Record.
- Update the record-level security on the Submission record.
- Update the record-level security on the Submission Note record.
Add the Broker-BrokerGroupMap record relationshipCopy link to clipboard
- Open the ISU_Record_Broker record type.
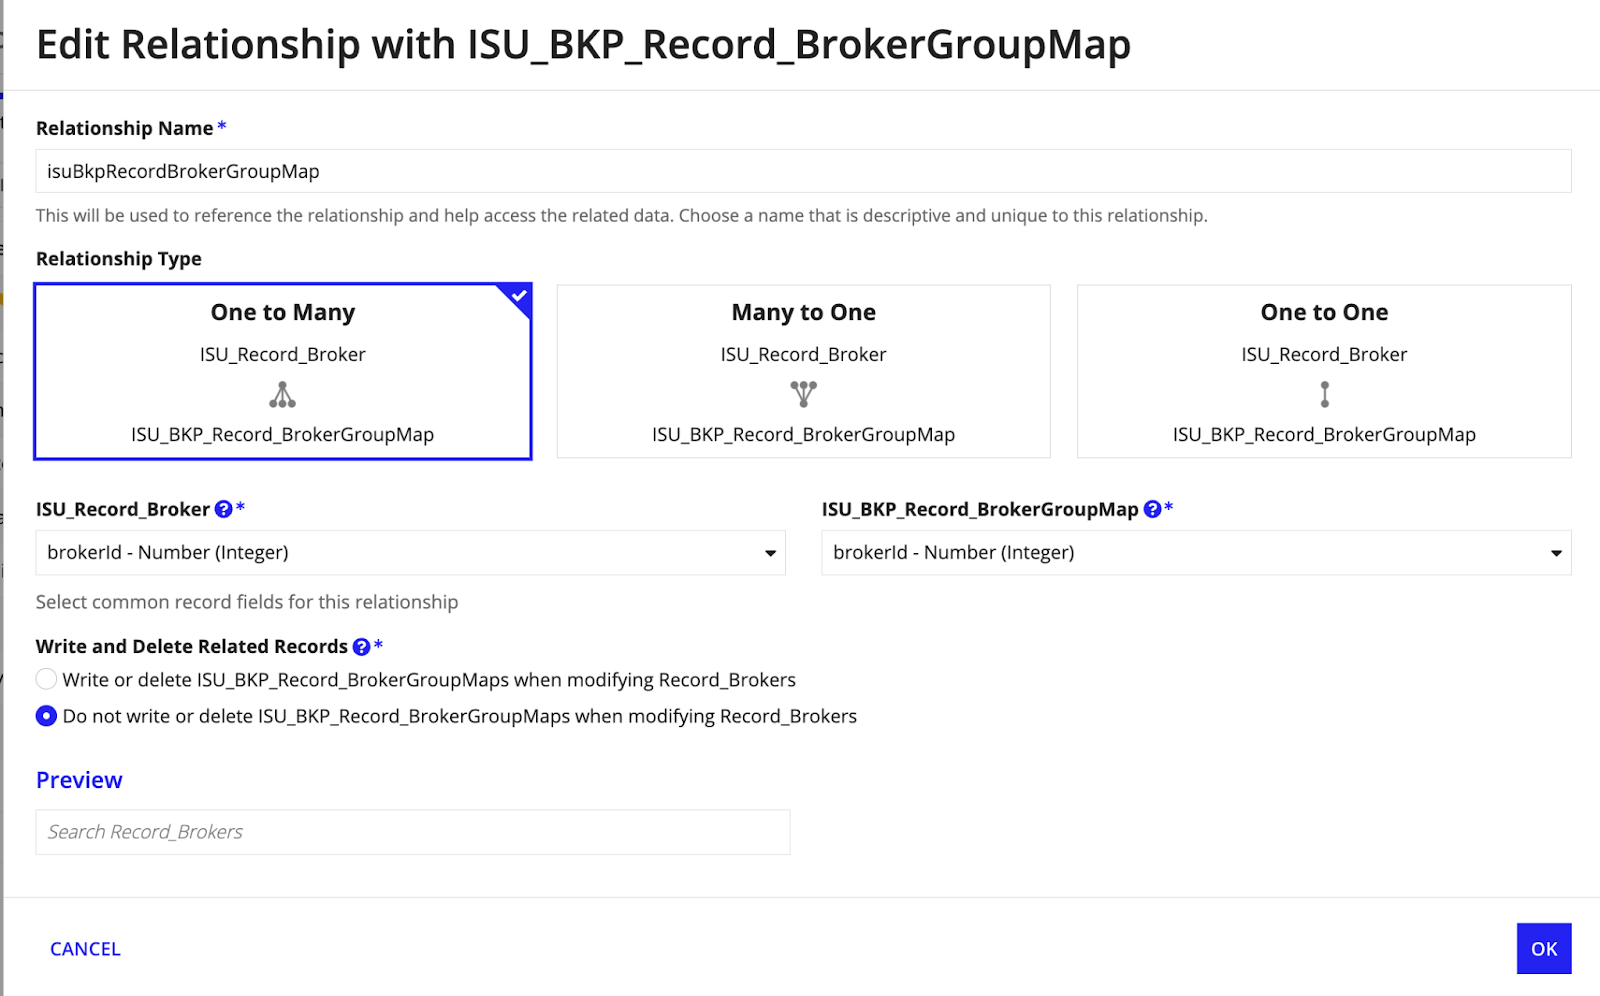
- Add a new 1:M record relationship called isuBkpRecordBrokerGroupMap to the ISU_BKP_Record_BrokerGroupMap record type. Both records should have the brokerId field in common.between both records.
-
Set the Write and Delete Related Records portion as Do not write or delete as shown:
Update the record-level security on the Broker recordCopy link to clipboard
- Open the ISU_Record_Broker record type.
- Navigate to the Record-Level Security tab.
-
Add a new security rule that allows users found in the ISU Internal Users group to view all records:

-
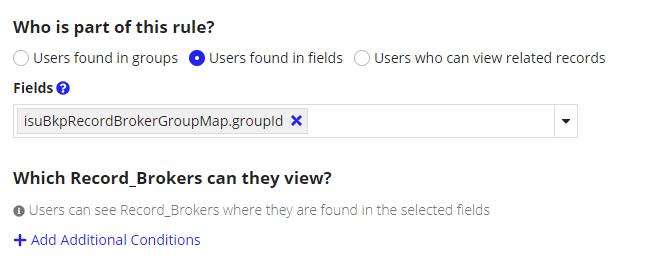
Add another security rule that allows users in the isuBkpRecordBrokerGroupMap.groupId field to view these records:
Update the record-level security on the Broker Customer Map recordCopy link to clipboard
- Open the ISU_Record_BrokerCustomerMap record type.
- Navigate to the Record-Level Security tab.
-
Add a new security rule that allows users found in the ISU Internal Users group to view all records:

-
Add a new security rule that allows users to see ISU_Record_BrokerCustomerMaps if they can see the related records from the broker relationship:

Update the record-level security on the Customer recordCopy link to clipboard
- Open the ISU_Record_Customer record type.
- Navigate to the Record-Level Security tab.
-
Add a new security rule that allows users found in the ISU Internal Users group to view all records:

-
Add a new security rule that allows users to see Customers if they can see at least one of the related records from the isuRecordBrokerCustomerMap relationship:

Update the record-level security on the SubmissionCopy link to clipboard
- Open the ISU_Record_Submission record type.
- Navigate to the Record-Level Security tab.
-
Add a new security rule that allows users found in the ISU Internal Users group to view all records:

-
Add a new security rule that allows users to see ISU_Record_Submission if they can see the related records from the Broker relationship:

Update the record-level security on the Submission NoteCopy link to clipboard
- Open the ISU_Record_SubmissionNote record type.
- Navigate to the Record-Level Security tab.
-
Add a new security rule that allows users found in the ISU Internal Users group to view all records:

-
Add a new security rule that allows users to see ISU_Record_SubmissionNote if they created the note:

Step 4: Add Broker Portal-specific actionsCopy link to clipboard
Follow the steps in this section to add specific actions that you want to allow brokers to perform in the portal, including how to:
- Add the Broker Create Submission action.
- Add the Broker Portal Cancel Submission related action.
- Add the Broker Portal Upload Documents action to the Submission record.
- Replace the Validate Duplicate Customer Name and Duplicate Customer POC Email rules.
- Add the Broker Portal Create Customer action to the Customer record.
Add the Broker Create Submission actionCopy link to clipboard
- Open the ISU_Record_Submission record type.
- Click Actions.
- Add a new List Action using the Create Submission Translation Key in ISU_BKP_Translations.
-
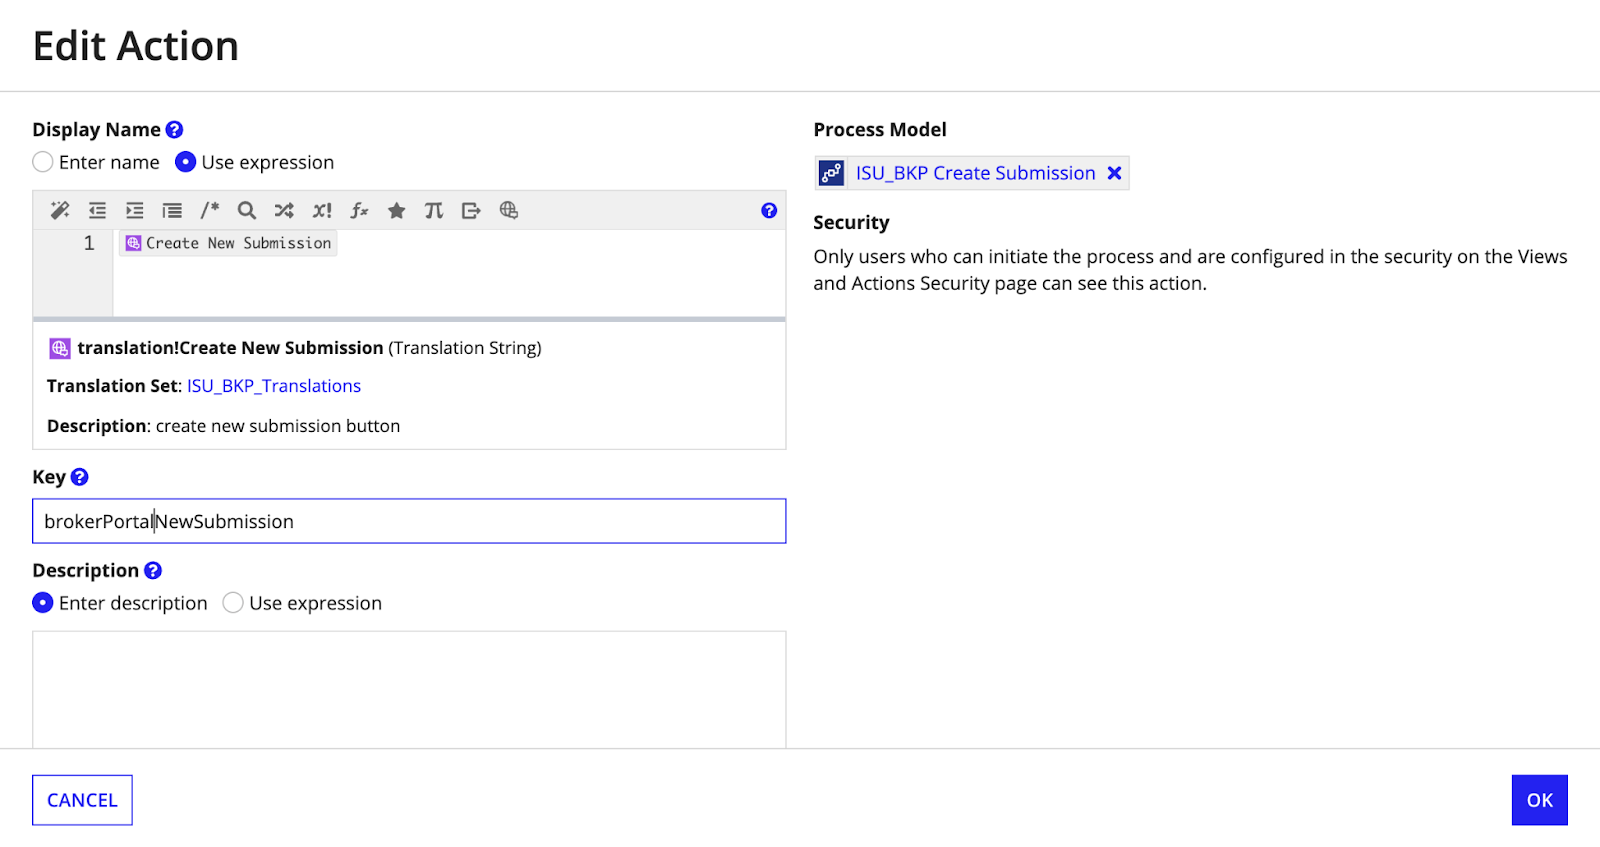
Configure the action as shown:
-
From the Icon dropdown menu, select +, then choose the icon size under Dialog Box Size.

- Navigate to the Views and Actions Security page.
- Locate the Create Submission action security and click the Edit icon.
-
Configure the record action’s security using the following expression:

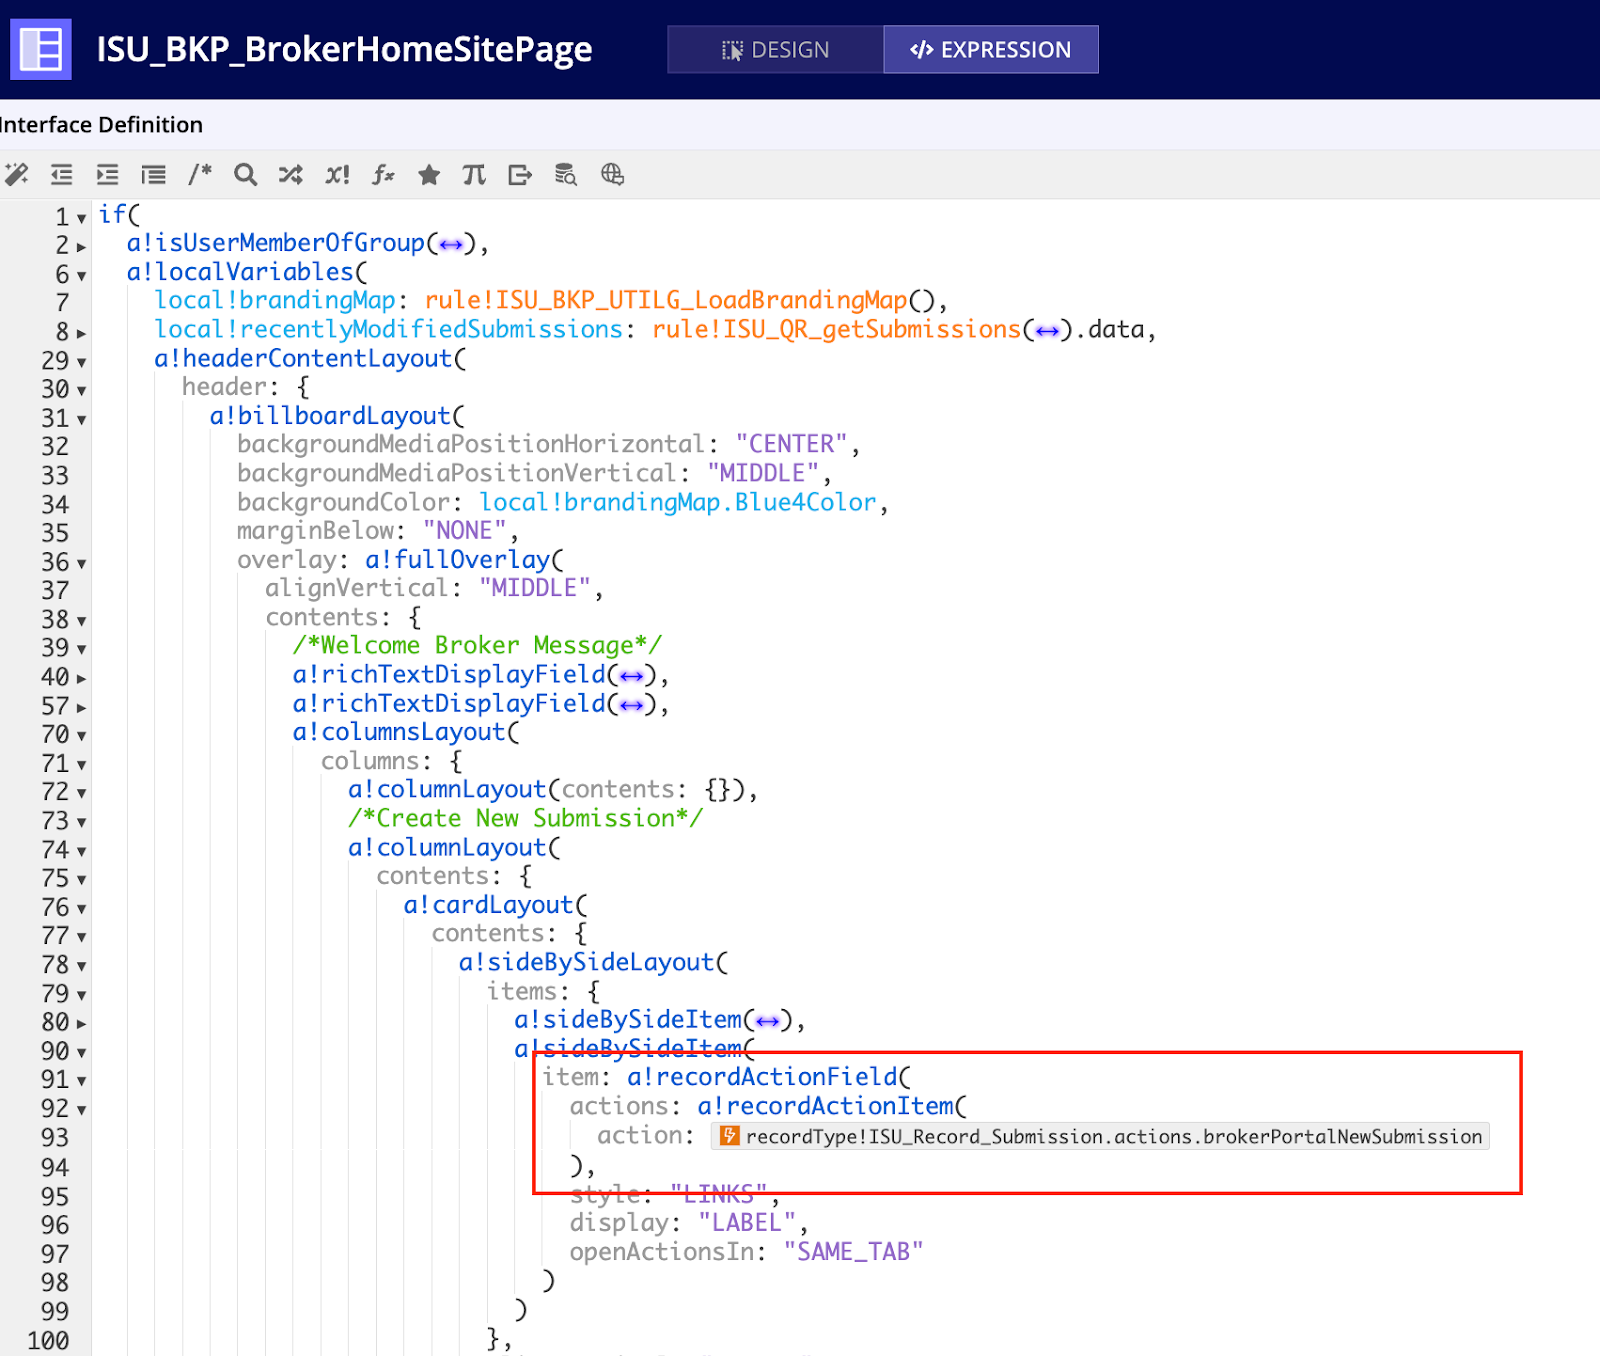
- Open the ISU_BKP_BrokerHomeSitePage interface.
-
In the Billboard section, add this action to the Create Submission card:
- Open the ISU_BKP_MySubmissionsSitePage interface.
-
Add this action as an item in the
headerRecordListActionsinput of the siteTabPageLayout rule as shown:
Add the Broker Portal Cancel Submission related actionCopy link to clipboard
- Open the ISU_Record_Submission record type.
- Navigate to the Actions tab.
- Add a new record action for Cancel Submission.
-
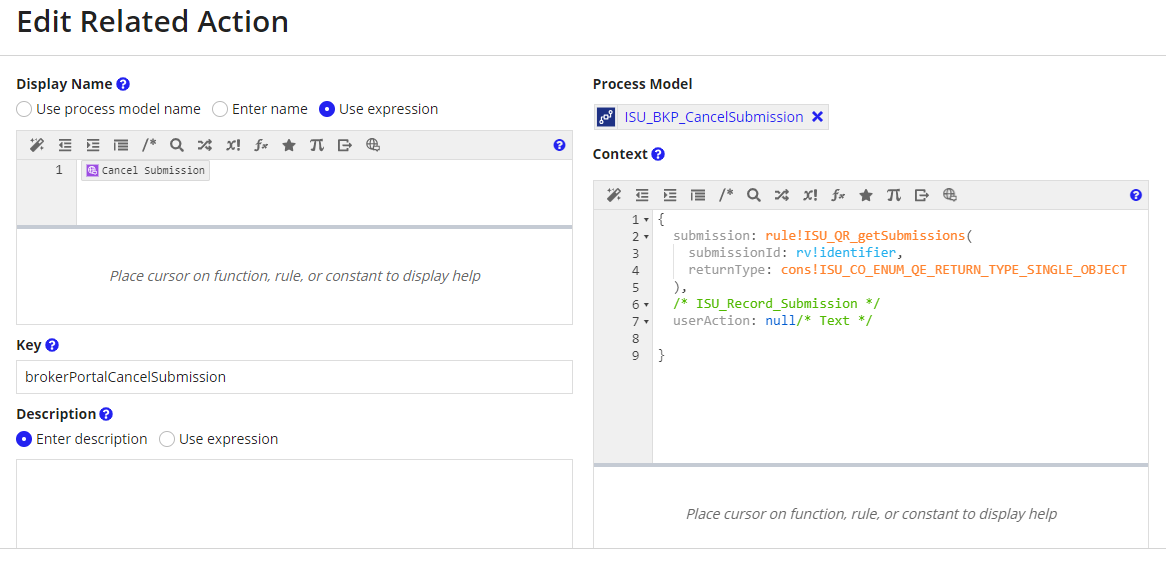
Configure the record action as shown:
-
From the Icon dropdown menu, select x and select Large for the Dialog Box Size.
- Navigate to the Views and Actions Security page.
- Scroll down to the Broker Portal Cancel Submission action security and click the Edit icon.
-
Configure the record action’s security as shown:

- Navigate to the Views page.
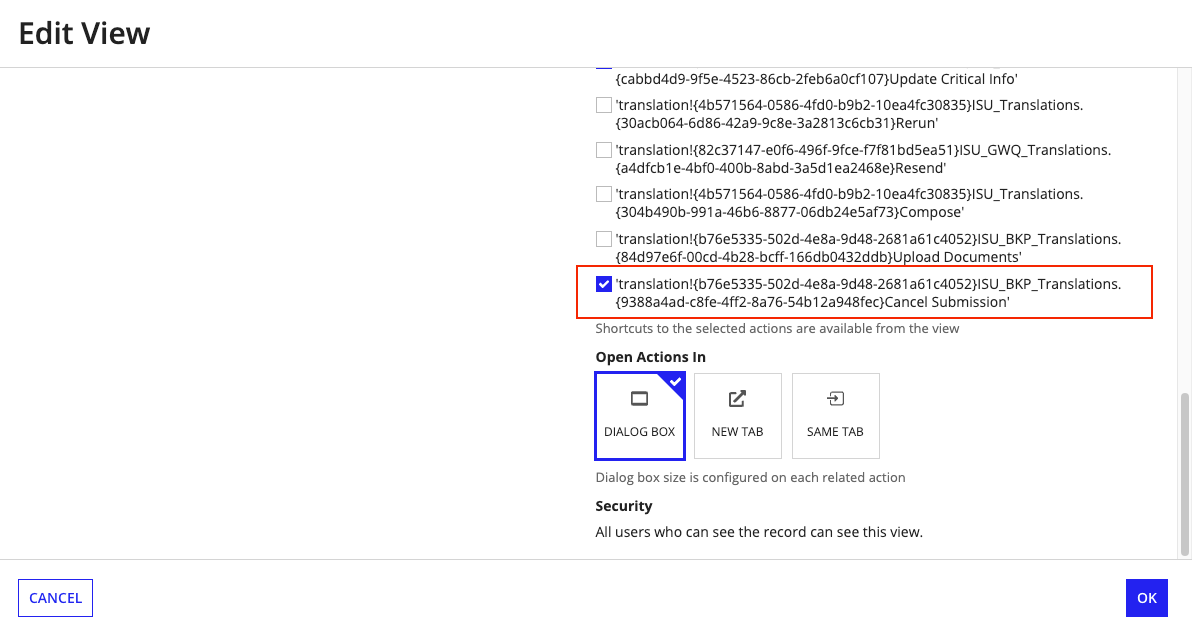
- Click the Edit icon next to the Summary view.
-
Under the Related Actions Shortcuts list, select the Cancel Submission related action created in step 3 as shown:
- Save the record type.
Add the Broker Portal Upload Documents action to the Submission recordCopy link to clipboard
- Open the ISU_Record_Submission record type.
- Navigate to the Actions tab.
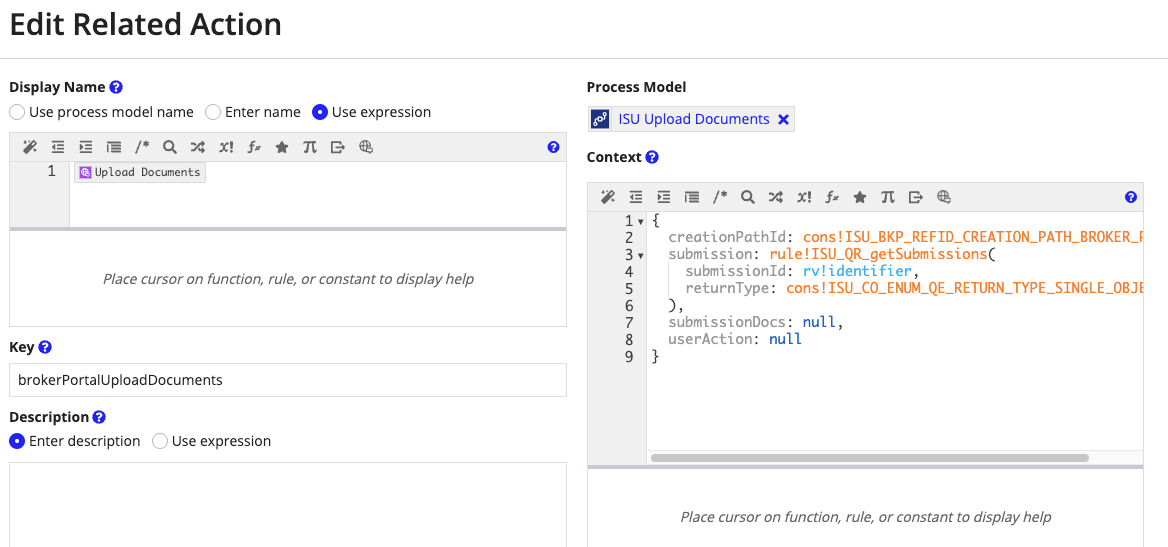
- Add a new record action for Upload Documents. This action will be used on the Broker Portal site.
-
Configure the record action as shown:
-
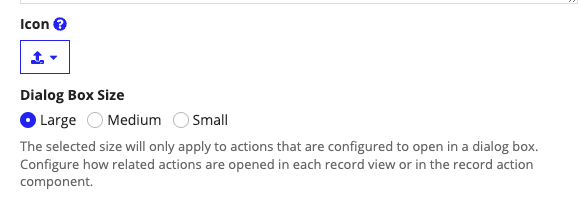
From the Icon dropdown menu, select , then choose the icon size under Dialog Box Size.
-
Note: You can also copy the expression for setting the process model context of the related action:
1 2 3 4 5 6 7 8 9
{ creationPathId: cons!ISU_BKP_REFID_CREATION_PATH_BROKER_PORTAL, submission: rule!ISU_QR_getSubmissions( submissionId: rv!identifier, returnType: cons!ISU_CO_ENUM_QE_RETURN_TYPE_SINGLE_OBJECT ), submissionDocs: null, userAction: null }Copy
-
- Navigate to the Views and Actions Security page.
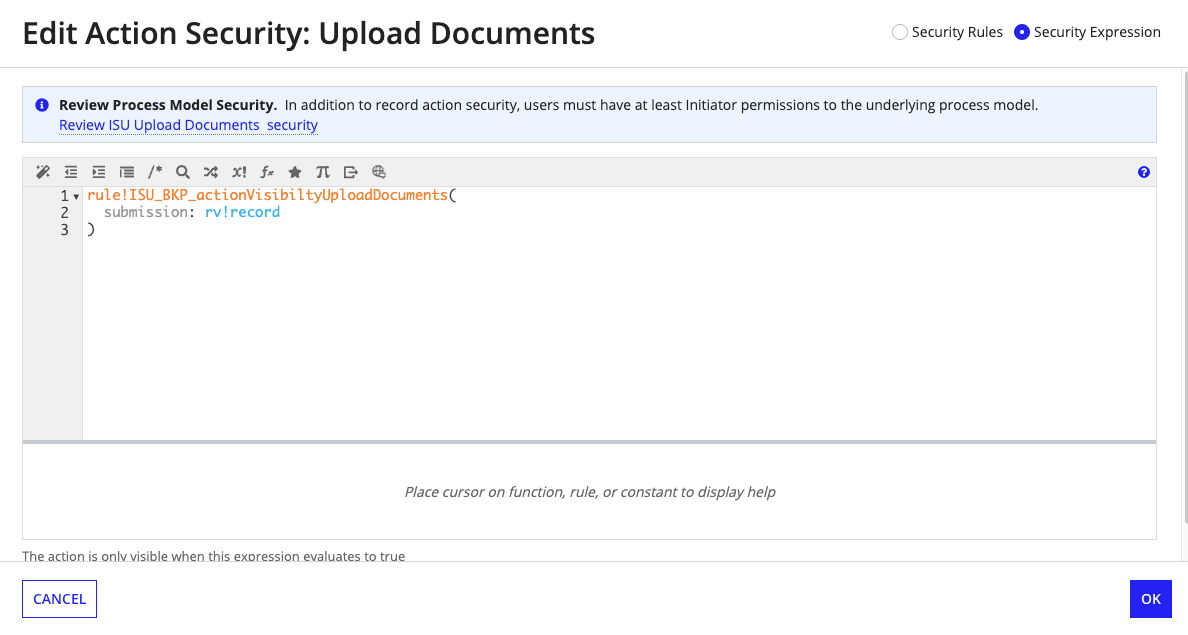
- Locate the Broker Portal Upload Documents action security and click the Edit icon.
-
Configure the record action’s security as shown:
- Save changes to the record type.
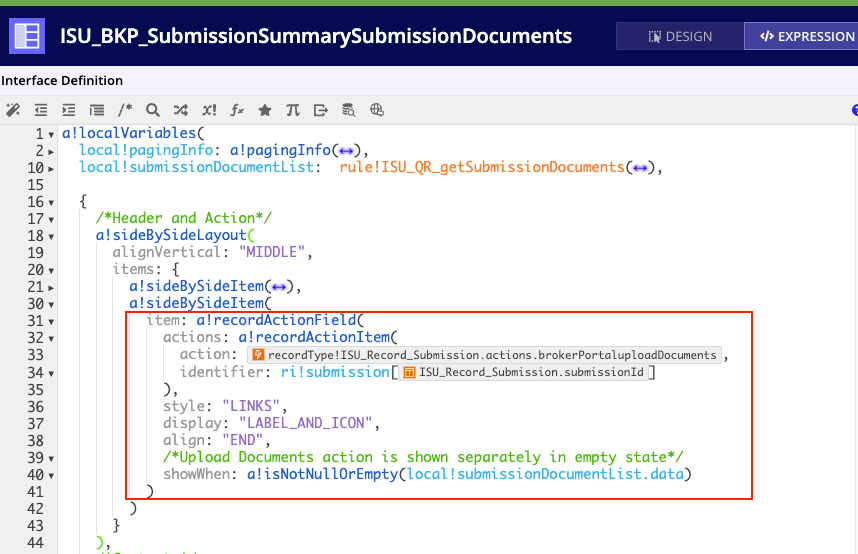
- Open the ISU_BKP_SubmissionSummarySubmissionDocuments interface object.
-
Add the action you created in step 7 as a recordActionField as shown:
Replace the Validate Duplicate Customer Name and Duplicate Customer POC email rulesCopy link to clipboard
-
Find and replace dependents of the ISU_validateDuplicateCustomerName expression rule with ISU_BKP_validateDuplicateCustomerName. This includes the following objects:
- ISU_submissionCustomerInformation
- ISU_editCustomerGeneralInformation
-
Find and replace dependents of the ISU_validateDuplicateCustomerPOCEmail expression rule with ISU_BKP_validateDuplicatePOCEmail. This includes the following objects:
- ISU_submissionCustomerInformation
- ISU_editCustomerPointOfContactInformation
Note: This will ensure that all customers, not just those the user has access to, are searched when conducting these validations.
Add the Broker Portal Create Customer action to Customer recordCopy link to clipboard
- Open the ISU_Record_Customer record type.
- Navigate to the Actions tab.
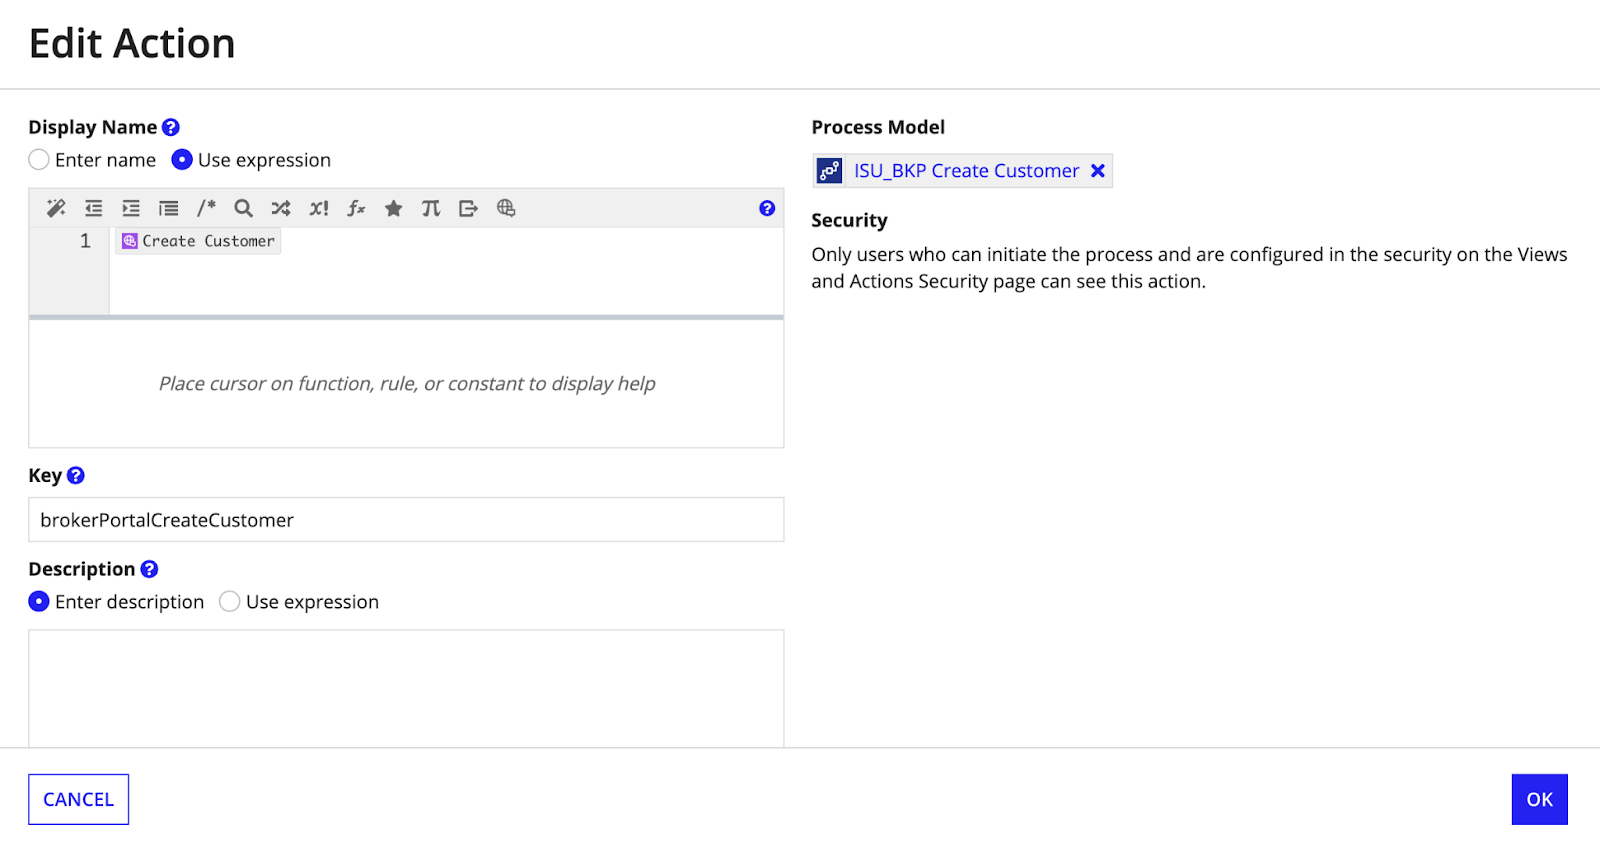
- Add a new list record action for Create Customer. This action will be used on the Broker Portal site.
-
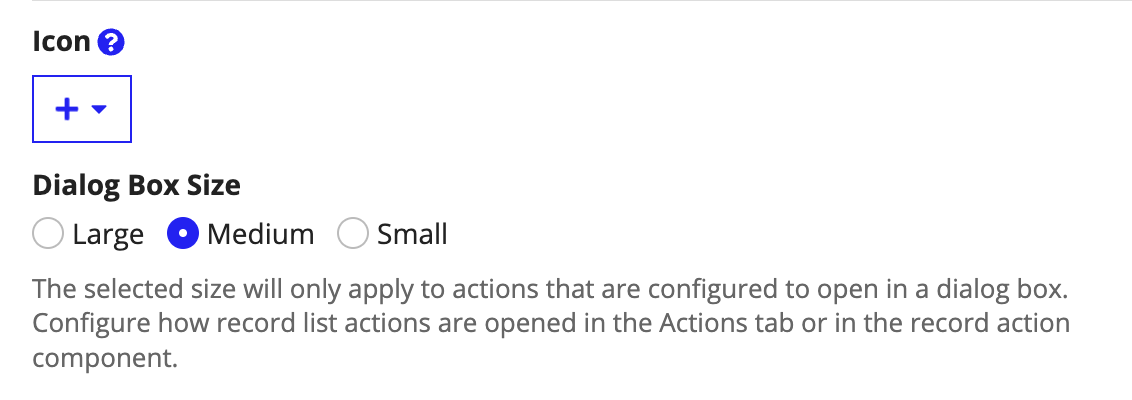
Configure the record action as shown:
- Navigate to the Views and Actions Security page.
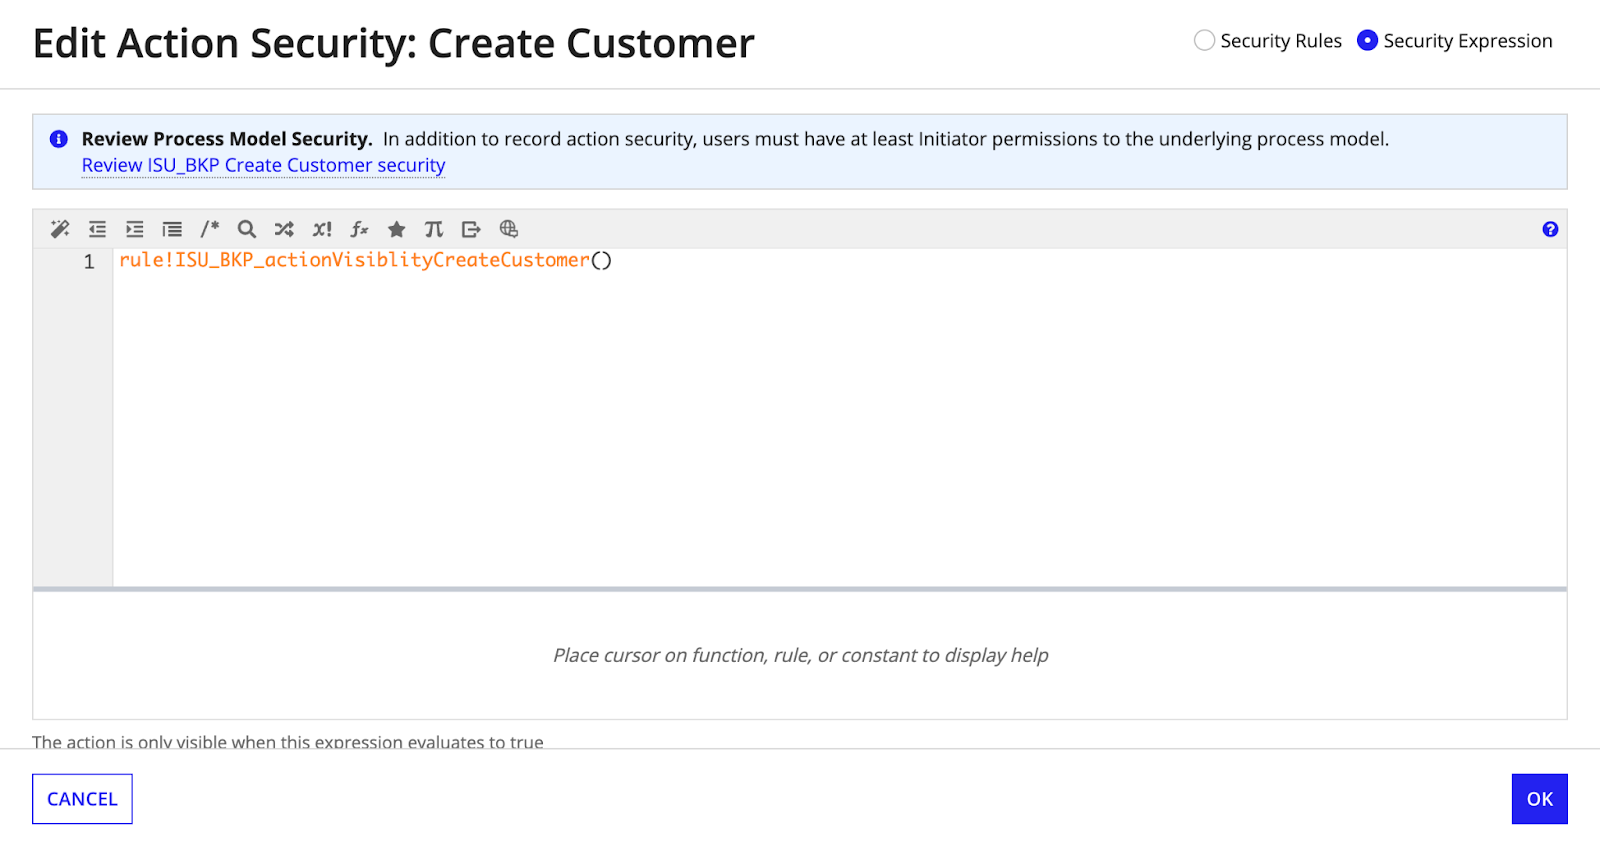
- Locate the Broker Portal Create Customer action security and click the Edit icon.
-
Configure the record action’s security as shown:
- Save changes to the record type.
- Open the ISU_BKP_CustomerSitePage interface object.
-
Add the Create Customer record action created in step 3 under the headerRecordListActions key of the ISU_siteTabPageLayout rule as shown:

Step 5: Enable Broker Portal-specific summary interfacesCopy link to clipboard
Follow the steps in this section to enable the summary interfaces that you want to allow brokers to view, including how to:
- Add the Broker Portal Summary page to the Submission Summary record view.
- Add the Broker Portal Summary page to the Customer Summary record view.
Add the Broker Portal Summary page to the Submission Summary record viewCopy link to clipboard
- Open the ISU_Record_Submission record type.
- Click Views.
- Click the Edit icon next to the Summary record view.
-
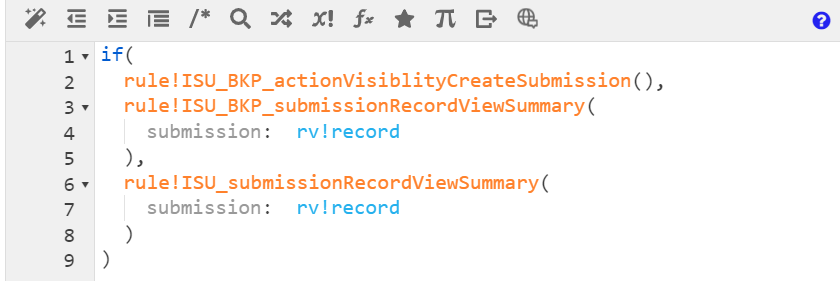
Modify the Interface section of the Summary view to match the expression shown:
- Save changes to the record type.
Add the Broker Portal Summary page to the Customer Summary record viewCopy link to clipboard
- Open the ISU_Record_Customer record type.
- Click Views.
- Click the Edit icon next to the Summary record view.
-
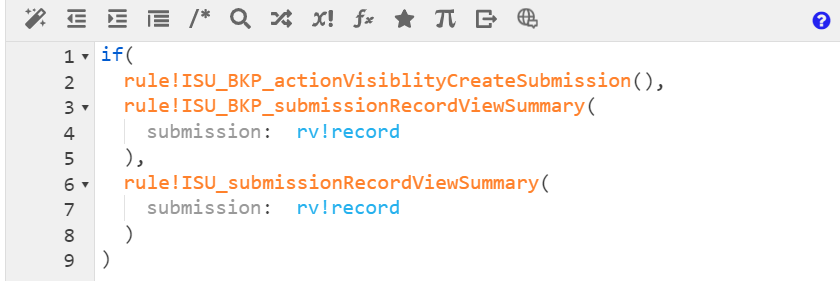
Modify the Interface section of the Summary view to match the expression shown:
Step 6: Show record actionsCopy link to clipboard
Follow the steps in this section to enable specific record actions to show in the broker portal, including how to:
- Show the Resolve Task action.
- Show the Add Note Action.
- Show the Delete Note action.
- Show the Edit Note Aaction.
- Show the Compose Message on Submission action.
- Show the Compose Message action.
- Show the Reply to Thread action.
- Show the Mark Thread as Read action.
- Show the Preview Message Attachment action.
Show the Resolve Task actionCopy link to clipboard
- Open the ISU_actionVisibilityResolveTask expression rule.
-
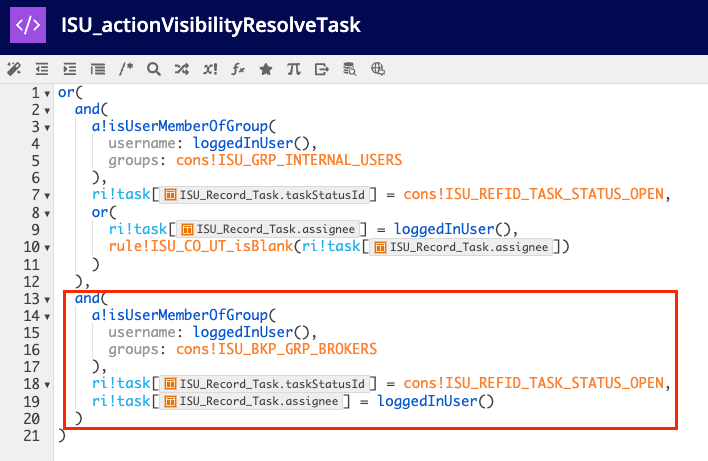
Within the or() statement that wraps this rule, add another and() condition that checks that the logged-in user is a member of the Brokers group, the task status is Open, and the task is assigned to the logged in user:
Show the Add Note actionCopy link to clipboard
- Open the ISU_actionVisiblityAddNotes expression rule.
-
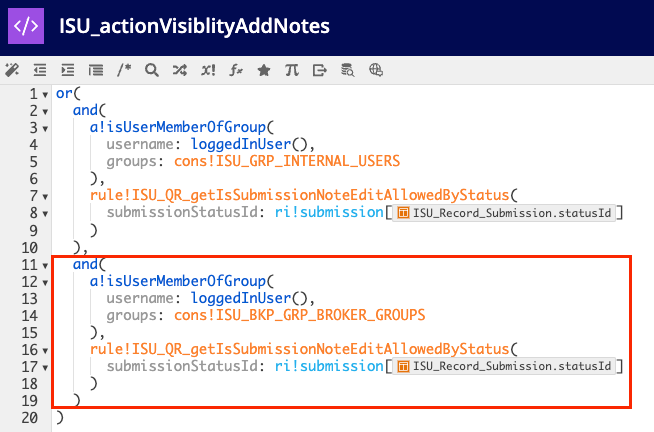
Within the or() statement that wraps this rule, add another and() condition that checks that the logged in user is a member of the Brokers group and that editing the Submission Note is allowed by status:
Show the Delete Note actionCopy link to clipboard
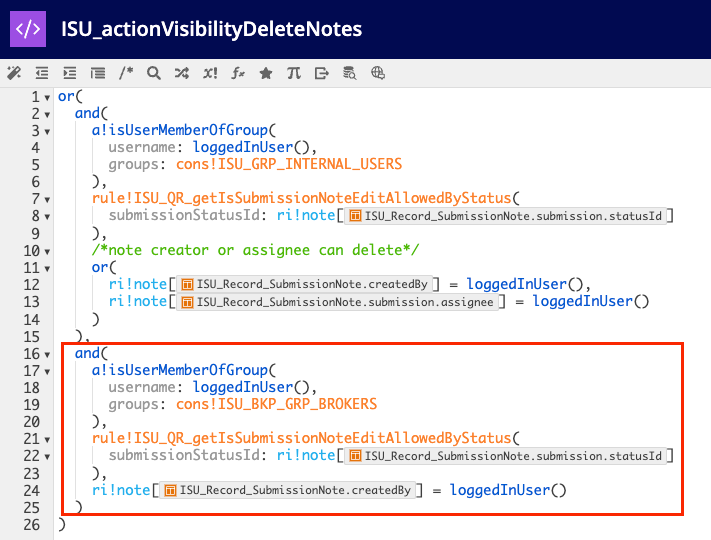
- Open the ISU_actionVisibilityDeleteNotes expression rule.
-
Within the or() statement that wraps this rule, add another and() condition that checks that the logged in user is a member of the Brokers group, that editing the Submission Note is allowed by status, and that the logged in user created the note:
Show the Edit Note actionCopy link to clipboard
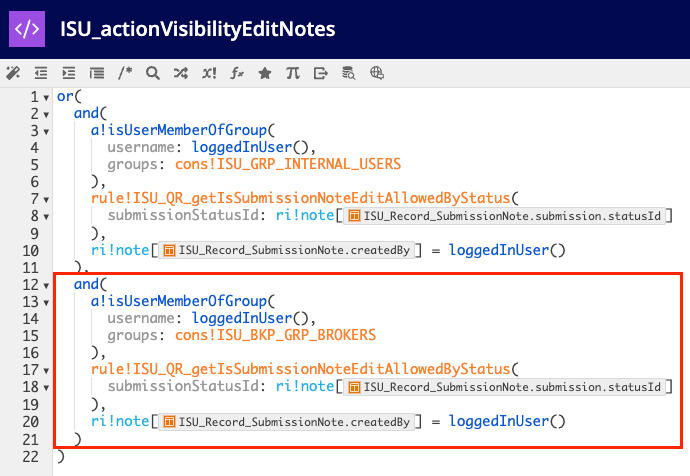
- Open the ISU_actionVisibilityEditNotes expression rule.
-
Within the or() statement that wraps this rule, add another and() condition that checks that the logged in user is a member of the Brokers group, that editing the Submission Note is allowed by status, and that the logged in user created the note:
Show the Compose Message on Submission actionCopy link to clipboard
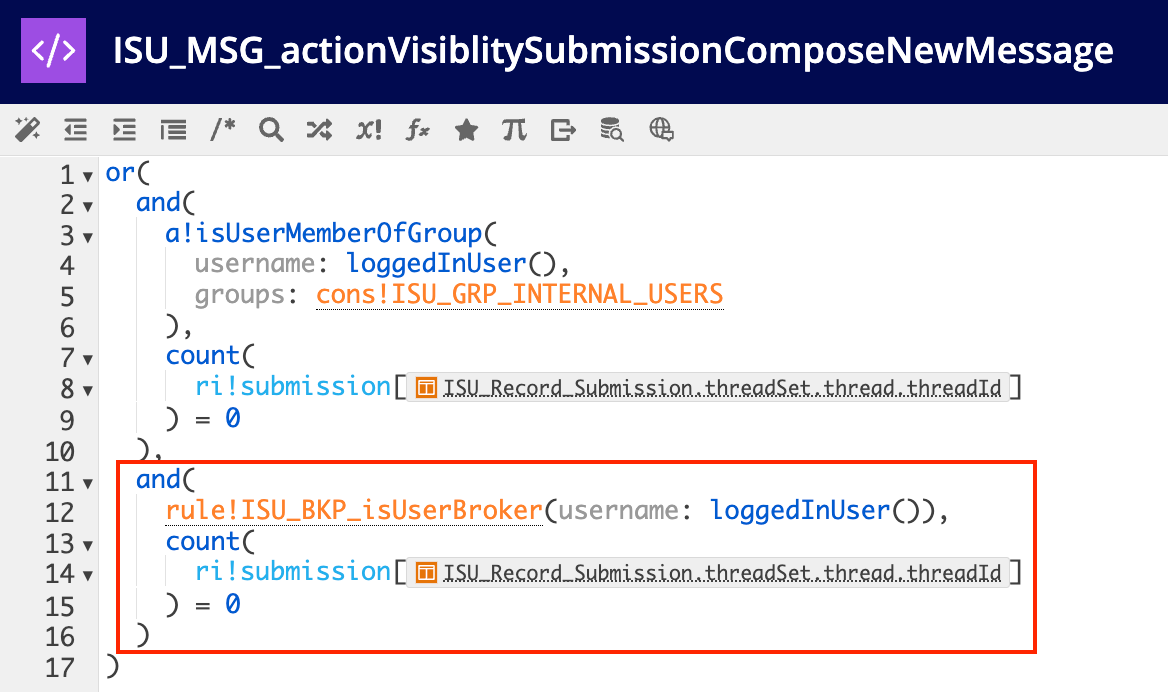
- Open the ISU_MSG_actionVisiblitySubmissionComposeNewMessage expression rule.
-
Within the or() statement that wraps this rule, add another and() condition that checks that the logged in user is a member of the Brokers group using the ISU_BKP_isUserBroker rule and that no threads exist for the Submission:
Show the Compose Message actionCopy link to clipboard
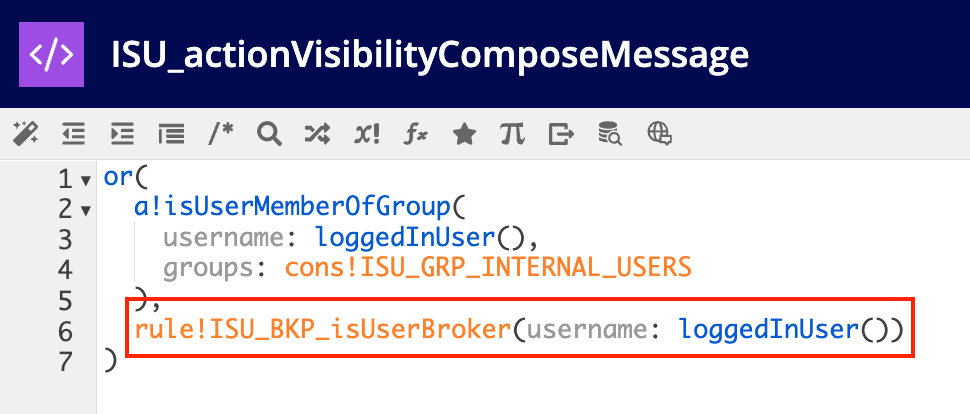
- Open the ISU_actionVisibilityComposeMessage expression rule.
-
Within the or() statement that wraps this rule, add another and() condition that checks that the logged in user is a member of the Brokers group using the ISU_BKP_isUserBroker rule:
Show the Reply to Thread actionCopy link to clipboard
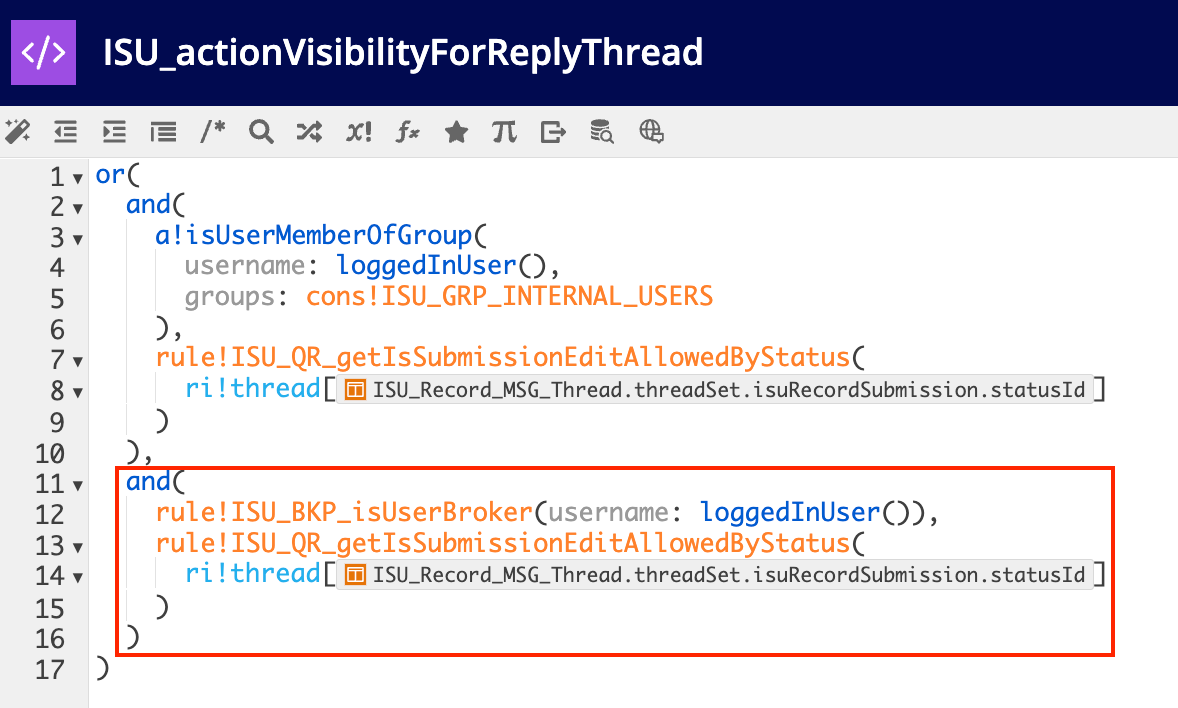
- Open the ISU_actionVisibilityForReplyThread expression rule.
-
Within the or() statement that wraps this rule, add another and() condition that checks that the logged in user is a member of the Brokers group using the ISU_BKP_isUserBroker rule and that a submission edit is allowed for the inputted submission’s status:
Show the Mark Thread as Read actionCopy link to clipboard
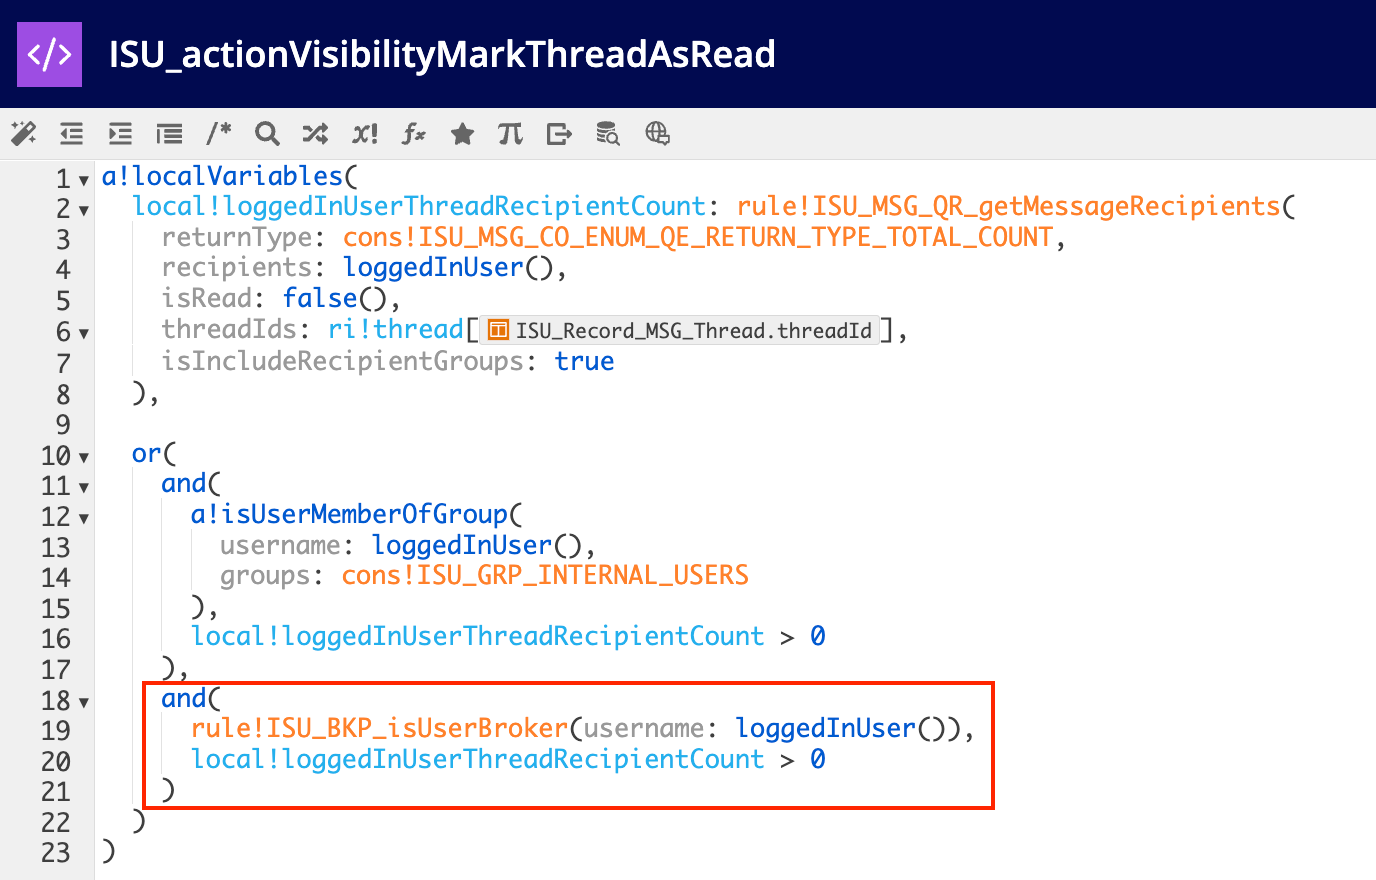
- Open the ISU_actionVisibilityMarkThreadAsRead expression rule.
-
Within the or() statement that wraps this rule, add another and() condition that checks that the logged in user is a member of the Brokers group using the ISU_BKP_isUserBroker rule and that the user has not already read the thread:
Show the Preview Message Attachment actionCopy link to clipboard
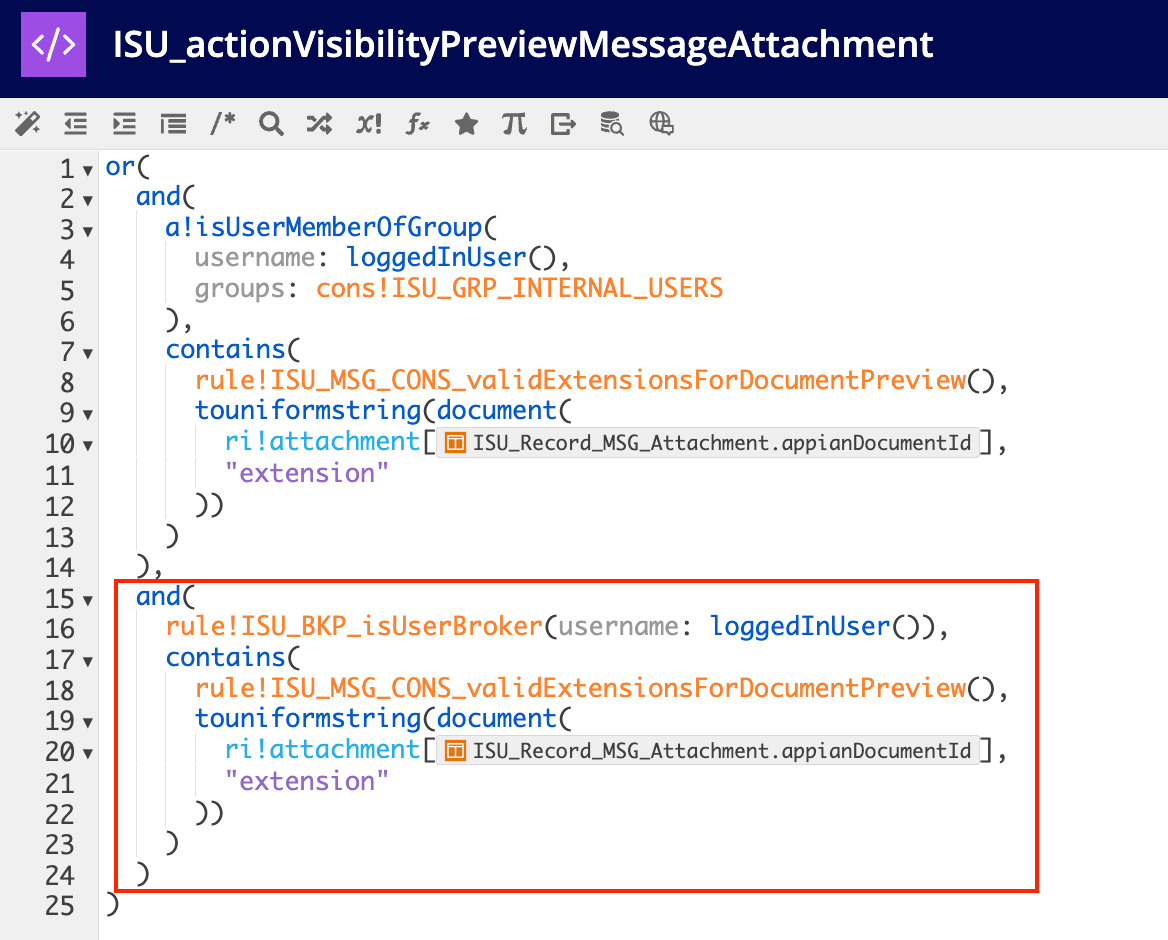
- Open the ISU_actionVisibilityPreviewMessageAttachment expression rule.
-
Within the or() statement that wraps this rule, add another and() condition that checks that the logged in user is a member of the Brokers group using the ISU_BKP_isUserBroker rule and that the attachment extension can be previewed by copying the existing code already contained in this rule:
Step 7: Show Record viewsCopy link to clipboard
Follow the steps in this section to enable visibility on the review views you want brokers to view, including how to:
Show the Submission Risk Details record viewCopy link to clipboard
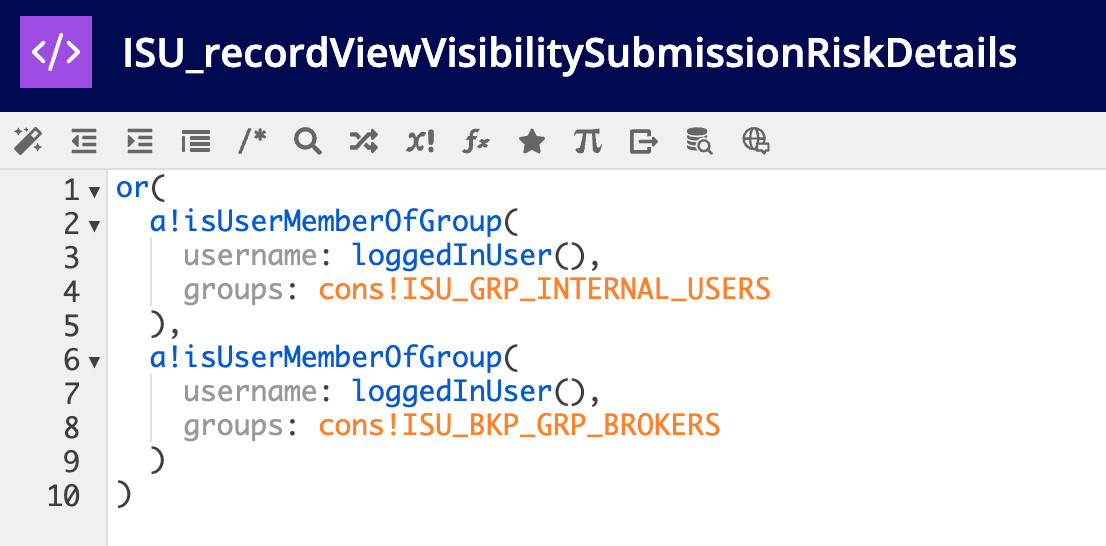
- Open the ISU_recordViewVisibilitySubmissionRiskDetails expression rule.
-
Add a statement to the or() logical statement to check whether the logged in user is a member of the ISU Brokers group as shown:
Show the Submission Messages record viewCopy link to clipboard
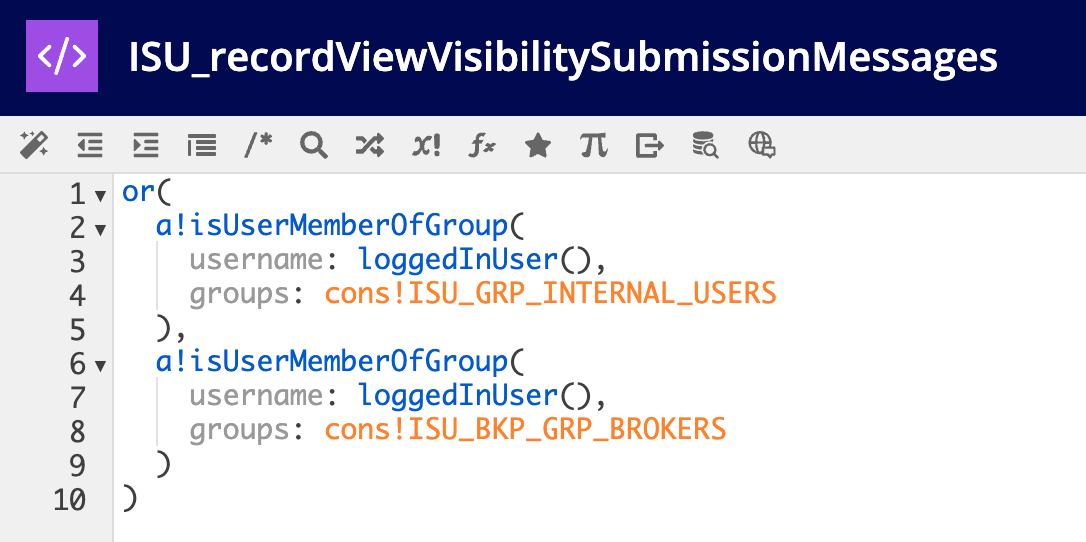
- Open the ISU_recordViewVisibilitySubmissionMessages expression rule.
-
Add a statement to the or() logical statement to check whether the logged in user is a member of the ISU Brokers group as shown:
Step 8: Configure internal and external user selectionCopy link to clipboard
Finally, you will need to configure the open tasking assignment for internal and external users.
To open tasking assignment to brokers:
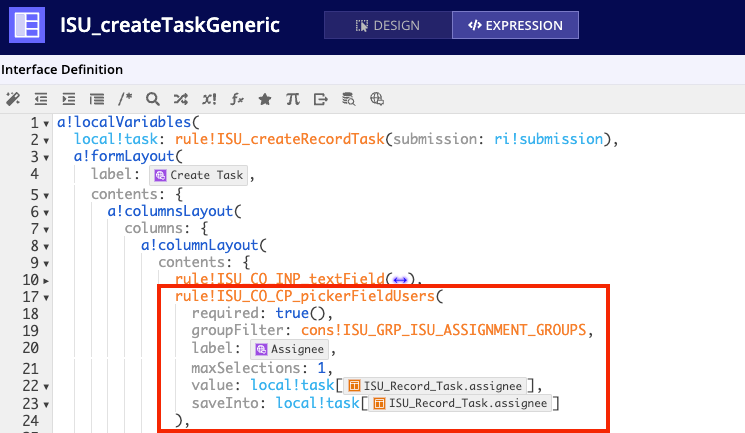
- Open the ISU_createTaskGeneric interface.
-
Remove the existing Assignee field by deleting the block of code shown:
-
In place of the Assignee field you removed, call ISU_BKP_taskAssigneeField and pass in
local!taskfor the task input as shown: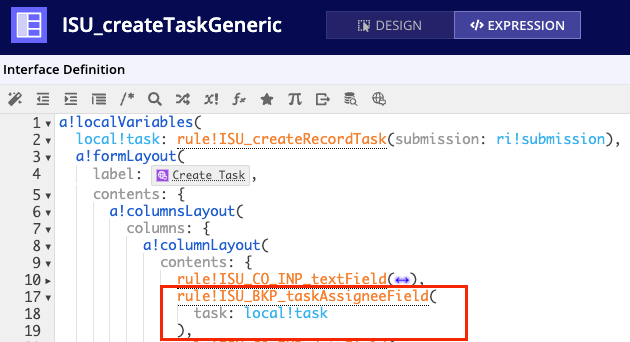
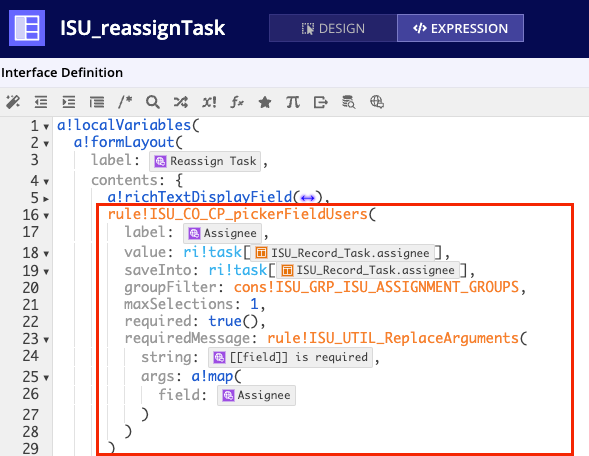
- Open the ISU_reassignTask interface.
-
Remove the existing Assignee field by deleting the block of code shown:
-
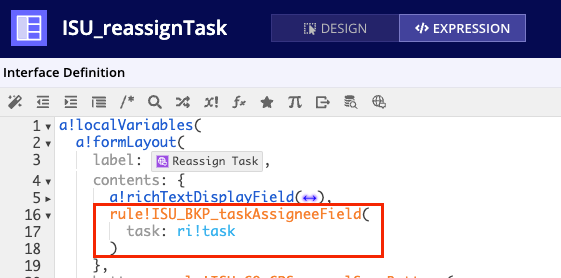
In place of the Assignee field you removed, call ISU_BKP_taskAssigneeField and pass in
ri!taskfor the task input, as shown: