Your enterprise data may be spread across a number of different systems. If your data sources provide access with a REST API, you can bring all of your data together by creating a service-backed record type, which is a record type that uses a web service as its data source.
This tutorial guides you through the steps for creating a service-backed record type that powers a fictional SpaceX Launch application that manages rocket launch data. We'll use the r/SpaceX API as the data source of our record type. To enable Appian's powerful data modeling features, we'll also enable data sync for the record type.
Most APIs require applications to send authentication credentials with each request. The r/SpaceX API is a free, public, open-source API that doesn't require authentication. This makes it ideal for this tutorial because we don't need credentials in order to connect to it. Specifically, we will use the Launches resource of the r/SpaceX API that supports paging, searching, and filtering.
Note: Appian is not a maintainer of the r/SpaceX API, and the API is used in this tutorial for example purposes only. In the event the API changes, is deprecated, or is made unavailable, this tutorial will continue to be available as a reference, but there is no guarantee that the tutorial can be used to create working application code.
You'll learn how to use a web service integration to create a record type. Although this tutorial focuses more on the specifics of configuring the record type's data source and record list view, you'll also have an opportunity to create other Appian design objects required to build the record type and SpaceX Launch application.
You'll create the following design objects:
After you complete this tutorial, you will understand how to use your own API to create a service-backed record type. The final configurations of your record type will change based on the field names and data types of your source.
Note: Record type field references are specific to each record type and environment. This means that you need to reference the record type fields from your own environment whenever you copy and paste a record type reference from outside the application.
To successfully complete this tutorial, you need to have basic familiarity with building applications and interfaces, as well as an understanding of REST APIs and how to use them. To gain practice designing Appian interfaces, walk through the Interface Tutorial and Process-Backed and Entity-Backed Record Tutorial.
Before we create the record type, we need to set up our application and user groups.
Let's start by creating our SpaceX Launch application:
In the Create New Application dialog, configure the following properties:
| Property | Description |
|---|---|
| Name | Enter SpaceX Launch. |
| Prefix | Replace the default prefix with SpaceX. This prefix departs a bit from the recommended naming standard, but it's within the character limits allowed, it meets our needs for this tutorial, and it's more fun. We'll be using this short, unique prefix whenever we name an object in this application. |
| Description | Enter Container for components of the SpaceX Launch application. |
| Generate groups and folders to secure and organize objects | Keep this checkbox selected, so that Appian will automatically generate standard groups and folders and assign default security groups for this application. |
Click SAVE.
Tip: The security of the application object is unrelated to the security of each of the objects contained within the application. This means that you will need to set security permissions for every object in an application in addition to the application object itself. For more information about security permissions for the application object, see Application Security.
Now let's create and configure our new record type.
We will create and configure the record type in steps. We'll start with creating the data source objects, followed by setting up filters and configuring the integrations and expressions, and finally creating the record list view and record type's Summary view.
To begin:
SpaceX Launch. Launches will automatically populate in the Plural Name field.Record type for the SpaceX Launch application.When the SpaceX Launch record type opens in a new tab, the Data Model page opens by default. From this page, we'll select our data source as the first step in configuring the record type.
Now, we'll set up an HTTP connected system for the r/SpaceX API and the expression rule that calls that integration. This will allow us to use an integration to call the external data into the record type. The configuration wizard will guide us through the process of creating the Appian design objects you need to configure the record data source.
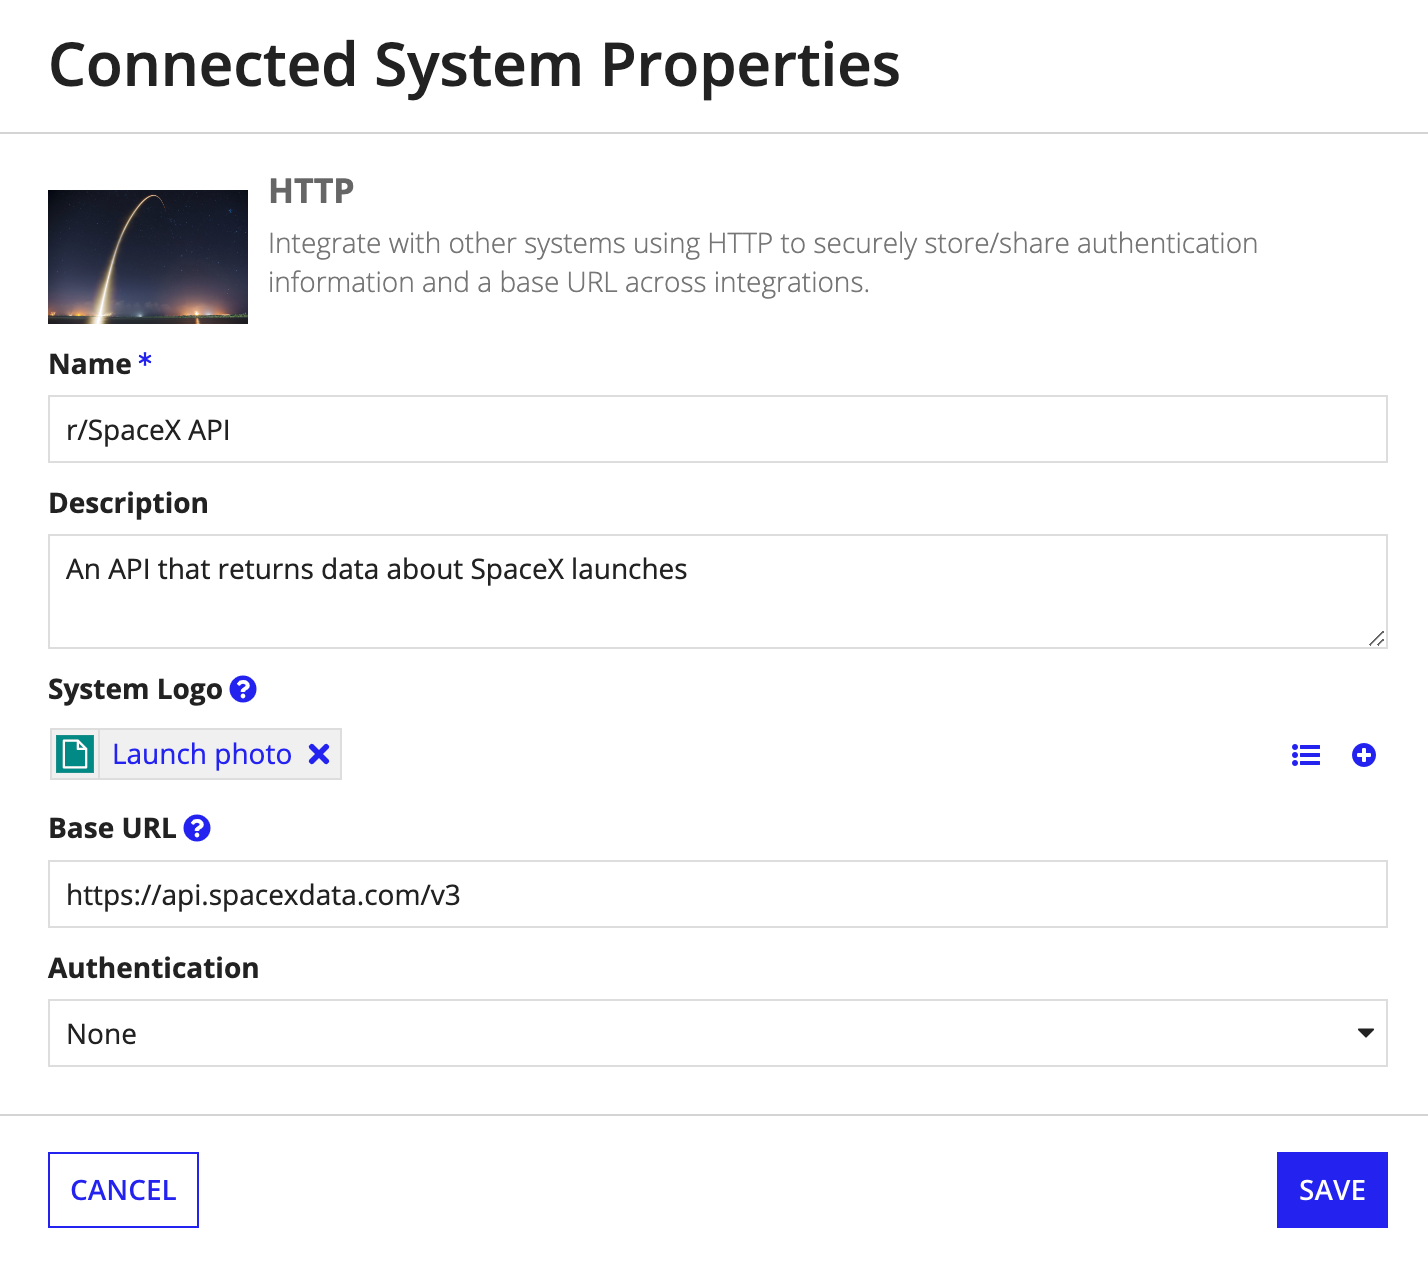
To create an HTTP connected system:
Tip: For more information about a specific connected system option, including a detailed description, hover over the connected system button to access the tool tip.
r/SpaceX API.An API that returns data about SpaceX launches.https://api.spacexdata.com/v3.None selected since this is an unauthenticated API.Click CREATE. The new object is created and appears as the Connected System in the Create Record Data Source dialog.
Now we'll create an integration that connects to the r/SpaceX API connected system and calls the external data for the record type.
SpaceX_getAllLaunches.Integration that gets all launch data for the SpaceX Launch record type.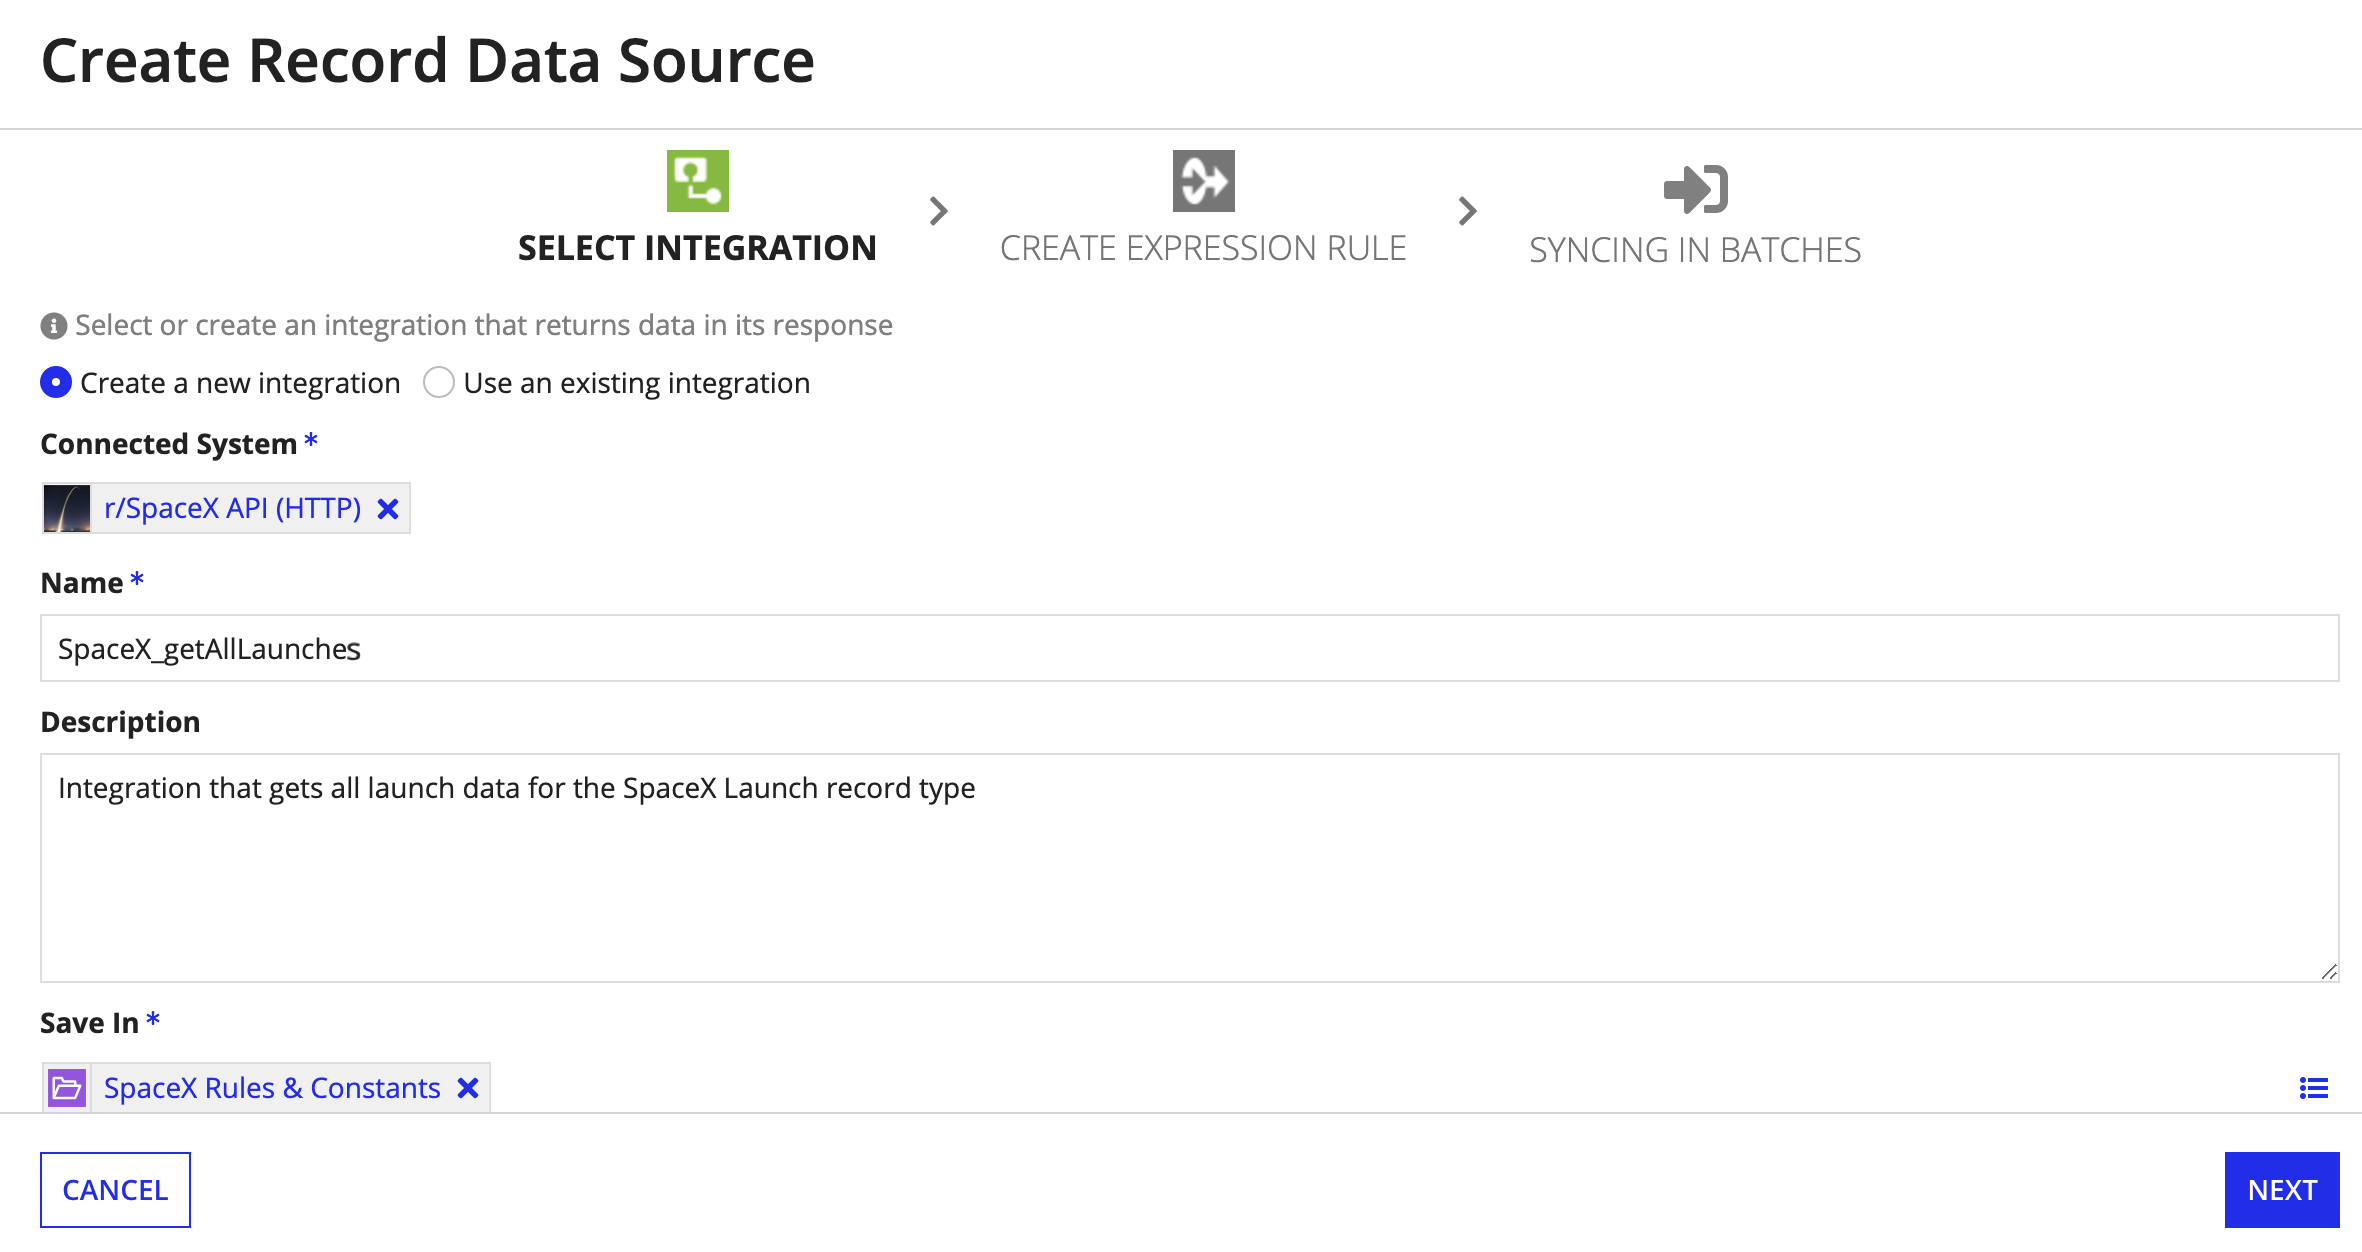

Next, we'll create the record data source expression.
The record data source expression connects the integration to the record type, calls the integration, and returns the requested data. After we create the integration for the record data source, the configuration wizard automatically defines the property fields for our expression rule.
In the CREATE EXPRESSION RULE step, verify that the following information is automatically populated in each field below:
SpaceX_getAllLaunches_recordDataSourceThe Record Data Source for the SpaceX Launch Record TypeSpaceX LaunchSpaceX Rules & ConstantsClick NEXT to continue on to configuring syncing in batches.
In the last step of the wizard, you'll specify whether you want to sync your record data in batches.
The record data source can return a maximum of 1,000 records with each integration call, so Appian provides the option to sync larger datasets in batches. The complete set of launch data is fewer than 200 records, so we don't need to make multiple calls to retrieve everything.
To disable syncing in batches:
Two generated objects are listed on the confirmation page: the record data source expression and the integration to get all launch data.
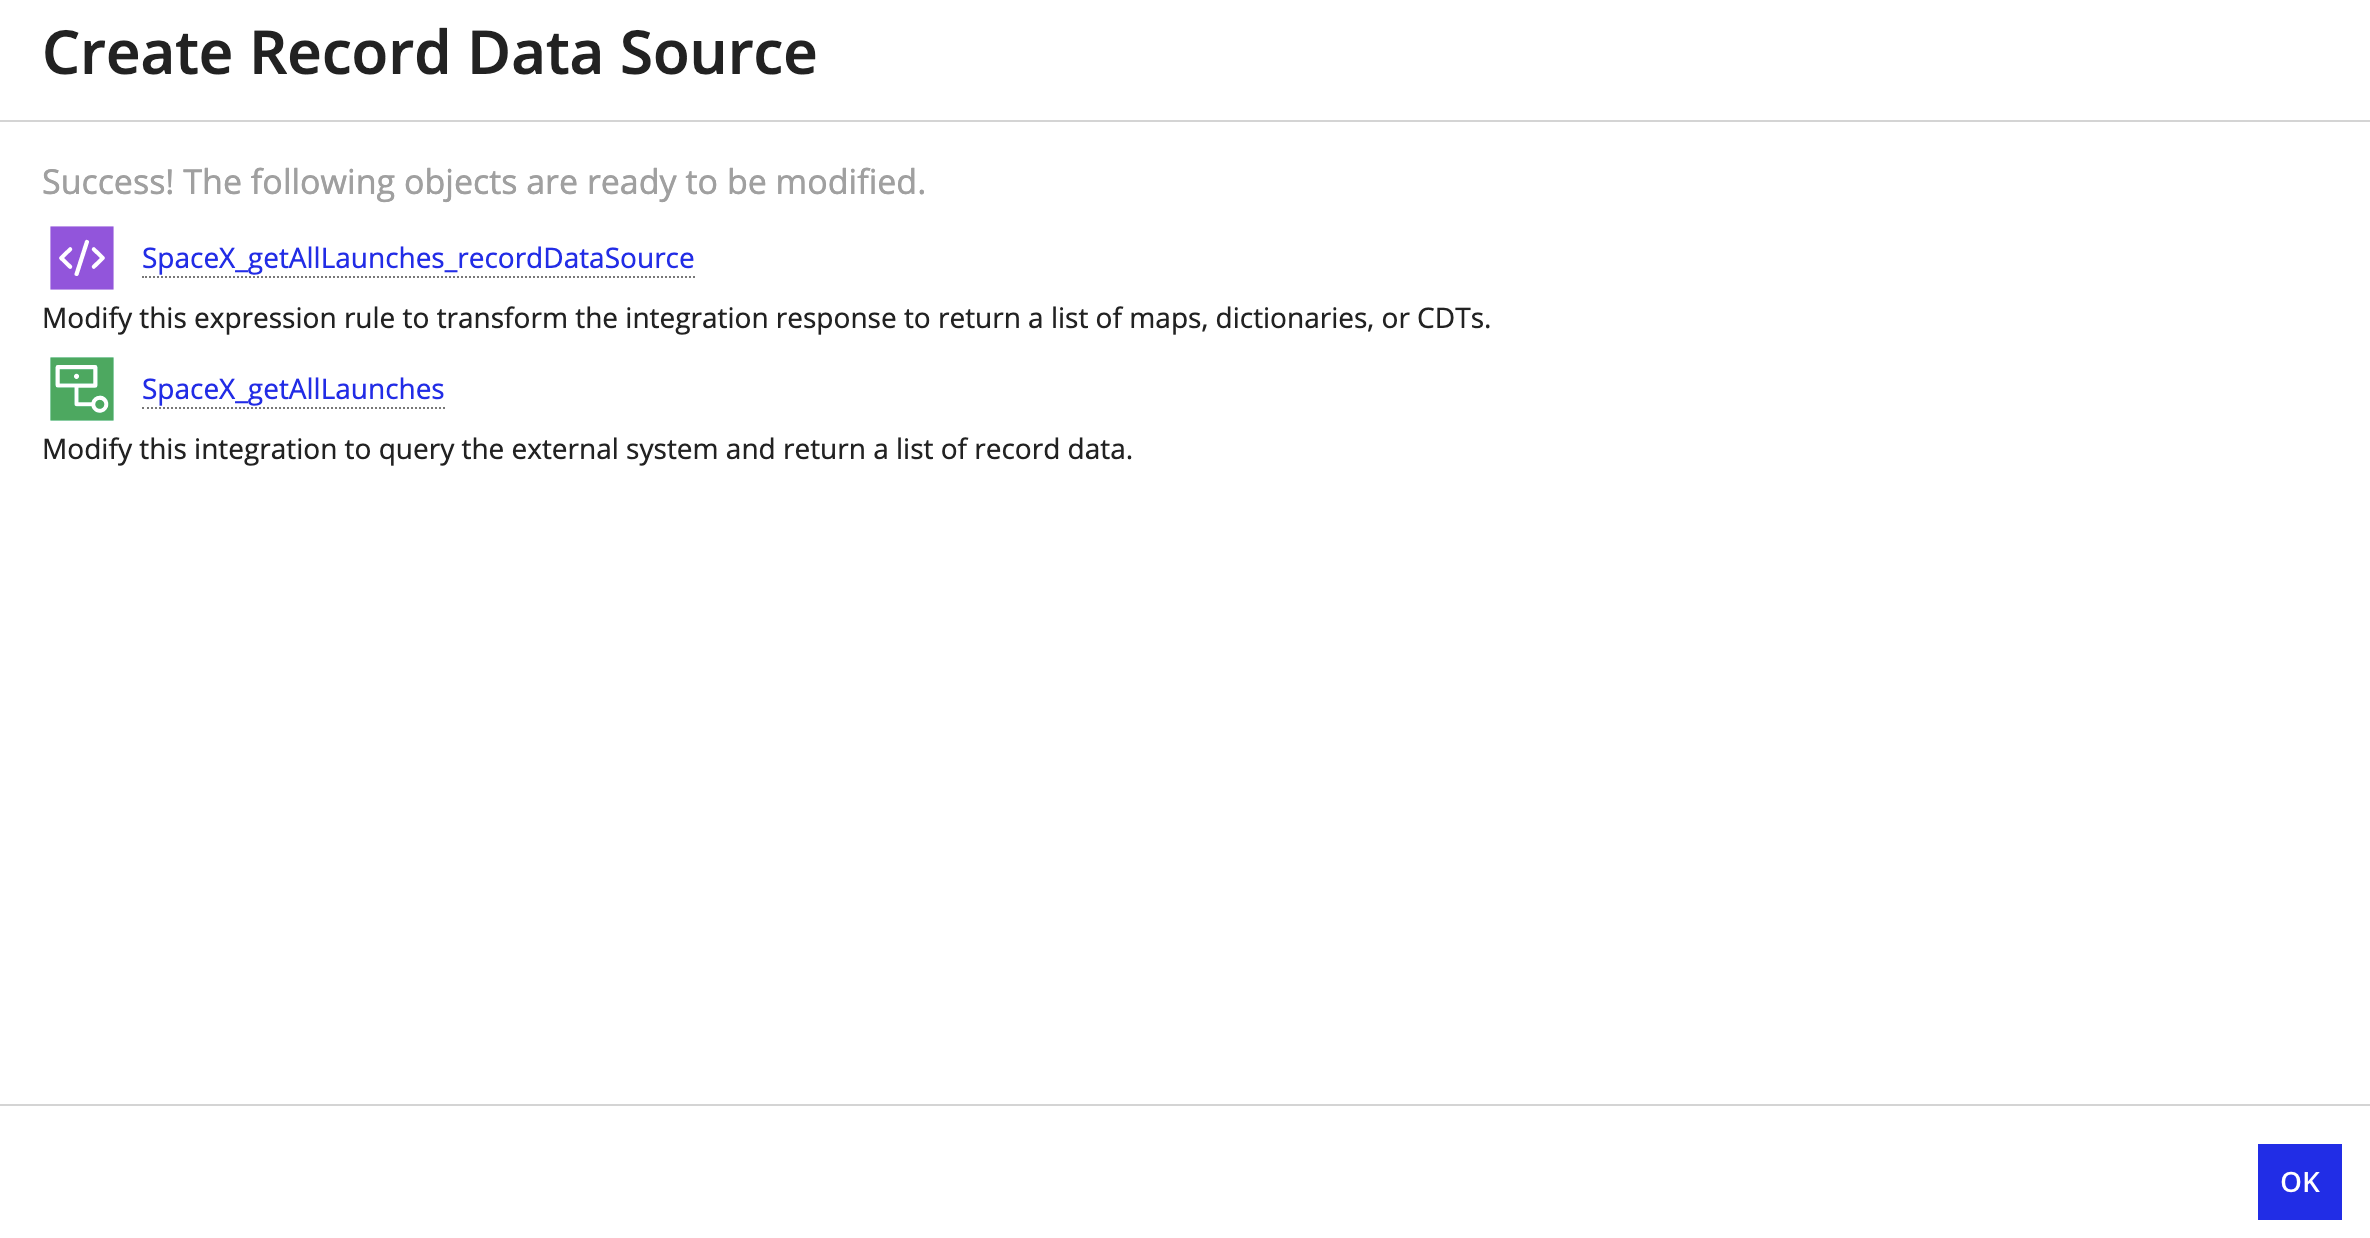
Before you close the Create Record Data Source wizard, we need to edit the generated objects so they return data in the correct format. If you click OK now, you will see an error on the Choose Record Data Source dialog.
First, we'll set the integration object's relative path.
The relative path is appended to the base URL of the connected system to form a URL exposed by the API as an endpoint. The data returned by the endpoint allows the integration to populate the record list and return a list of the objects that will map to the record type. We'll use the launches endpoint to return an array of SpaceX launches. The rule inputs for this integration will be passed into the corresponding expression rule for the record data source.
For Relative Path, enter /launches. This will be appended to the Base URL of the connected system to form a URL of https://api.spacexdata.com/v3/launches.
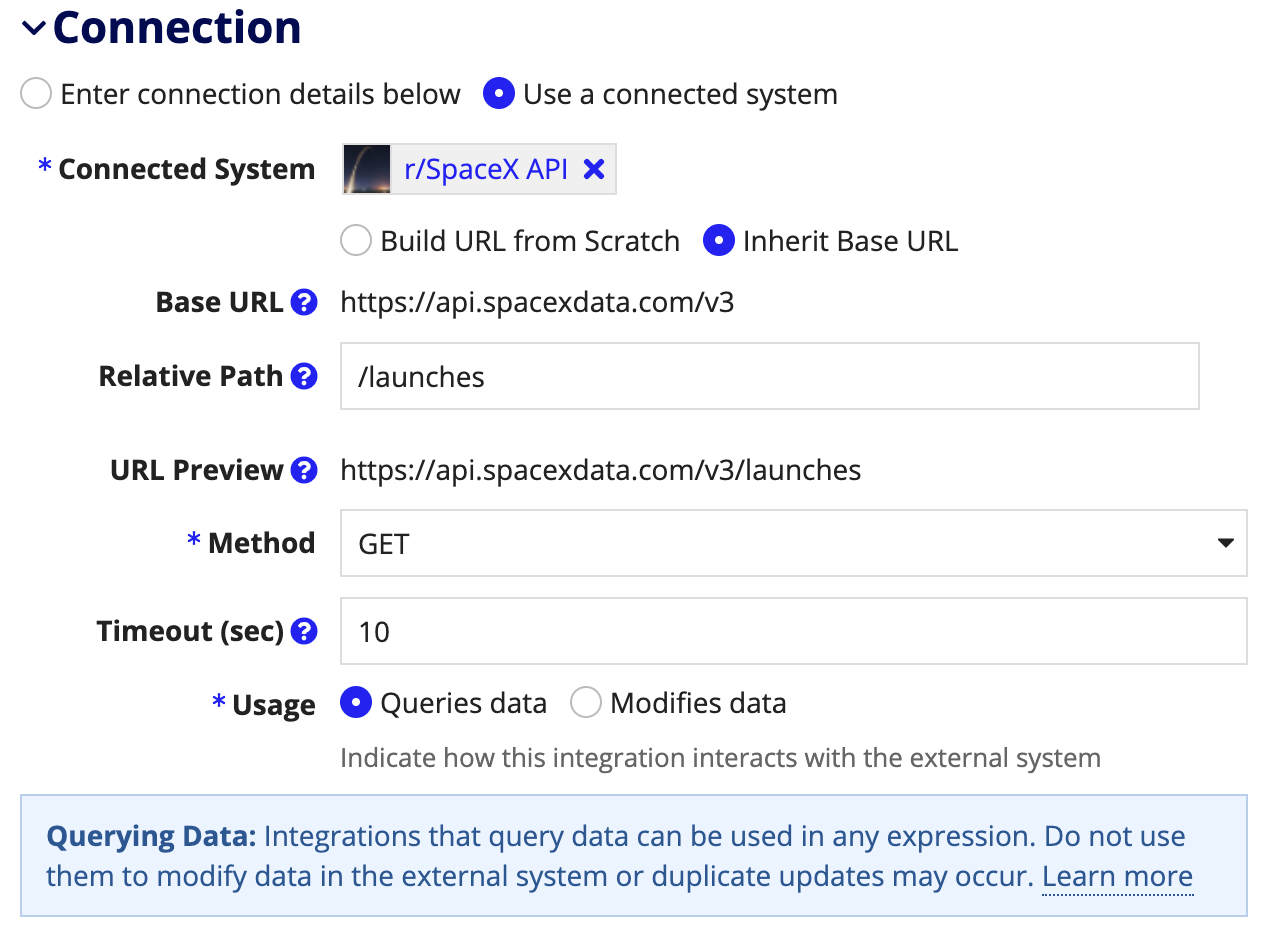
Click TEST REQUEST. This should return a success message:
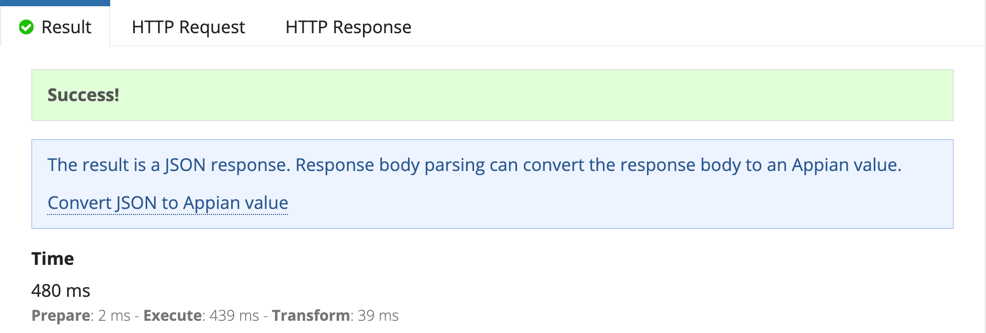
limit.100.result.body contains 100 items.By default, the integration's response includes a result.body that is a generic List of Dictionary with many properties describing each launch. Because we only need a few of the returned data points for our application, we will map the needed data to fields that will make up the record type.
Let's update the Record Data Source expression with these changes:
local!integrationResponse.result.body with the following expression:
1
2
3
4
5
6
7
8
9
10
11
a!forEach(local!integrationResponse.result.body,
  a!map(
    flight_number: fv!item.flight_number,
    details: fv!item.details,
    launch_date_utc: fv!item.launch_date_utc,
    launch_success: fv!item.launch_success,
    launch_year: fv!item.launch_year,
    mission_name: fv!item.mission_name,
    rocket_name: fv!item.rocket.rocket_name
  )
),
a!map() of the expression.Once you've configured the integration, you can confirm that the record data source expression is working by examining the data preview shown on the Configure Data Source dialog. After you've verified the preview data, click Next.
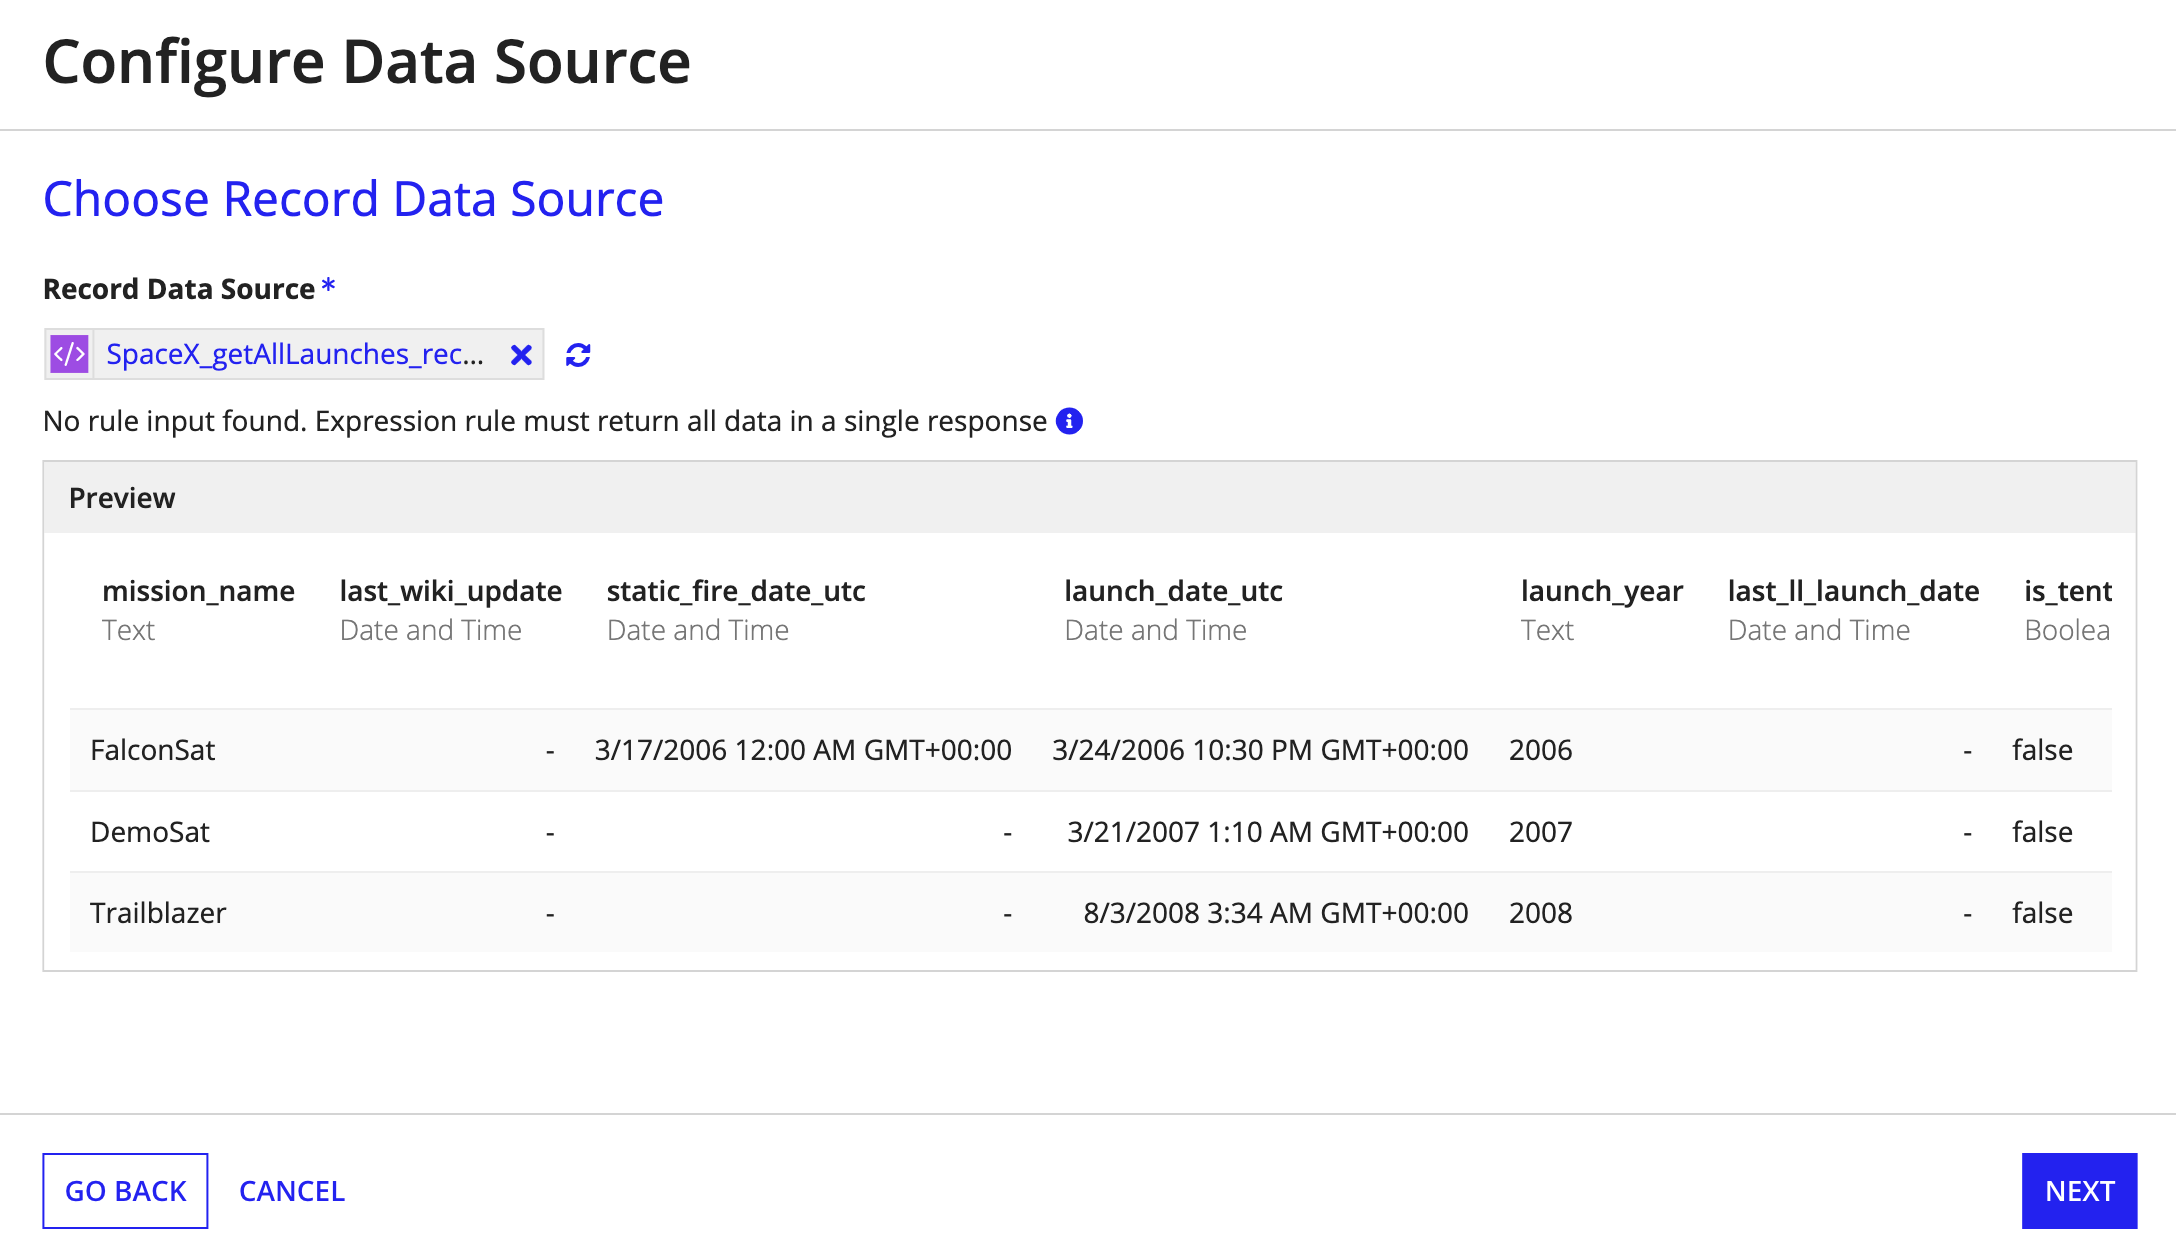
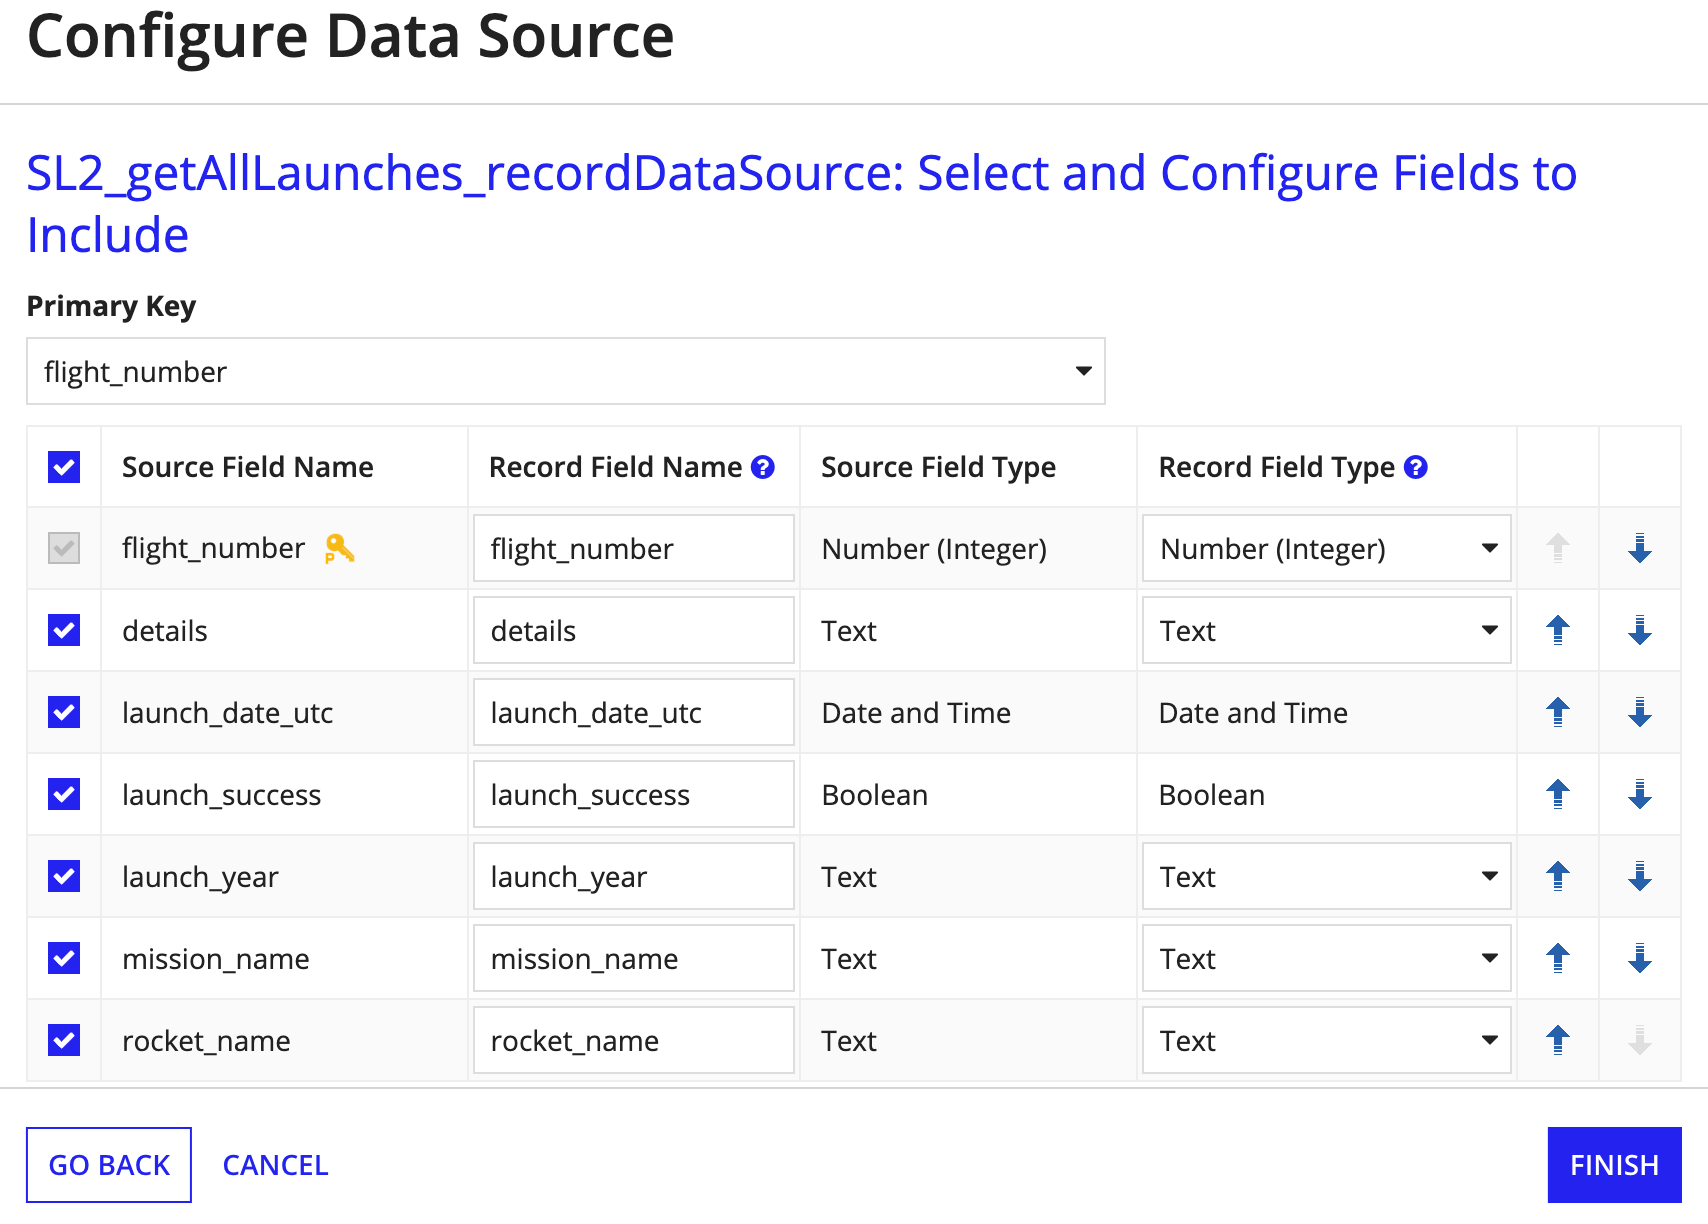
Appian automatically maps your source data fields to record fields and then lets you pick a primary key field and order the fields as you want.
To select and configure the record type fields:
Click Finish.
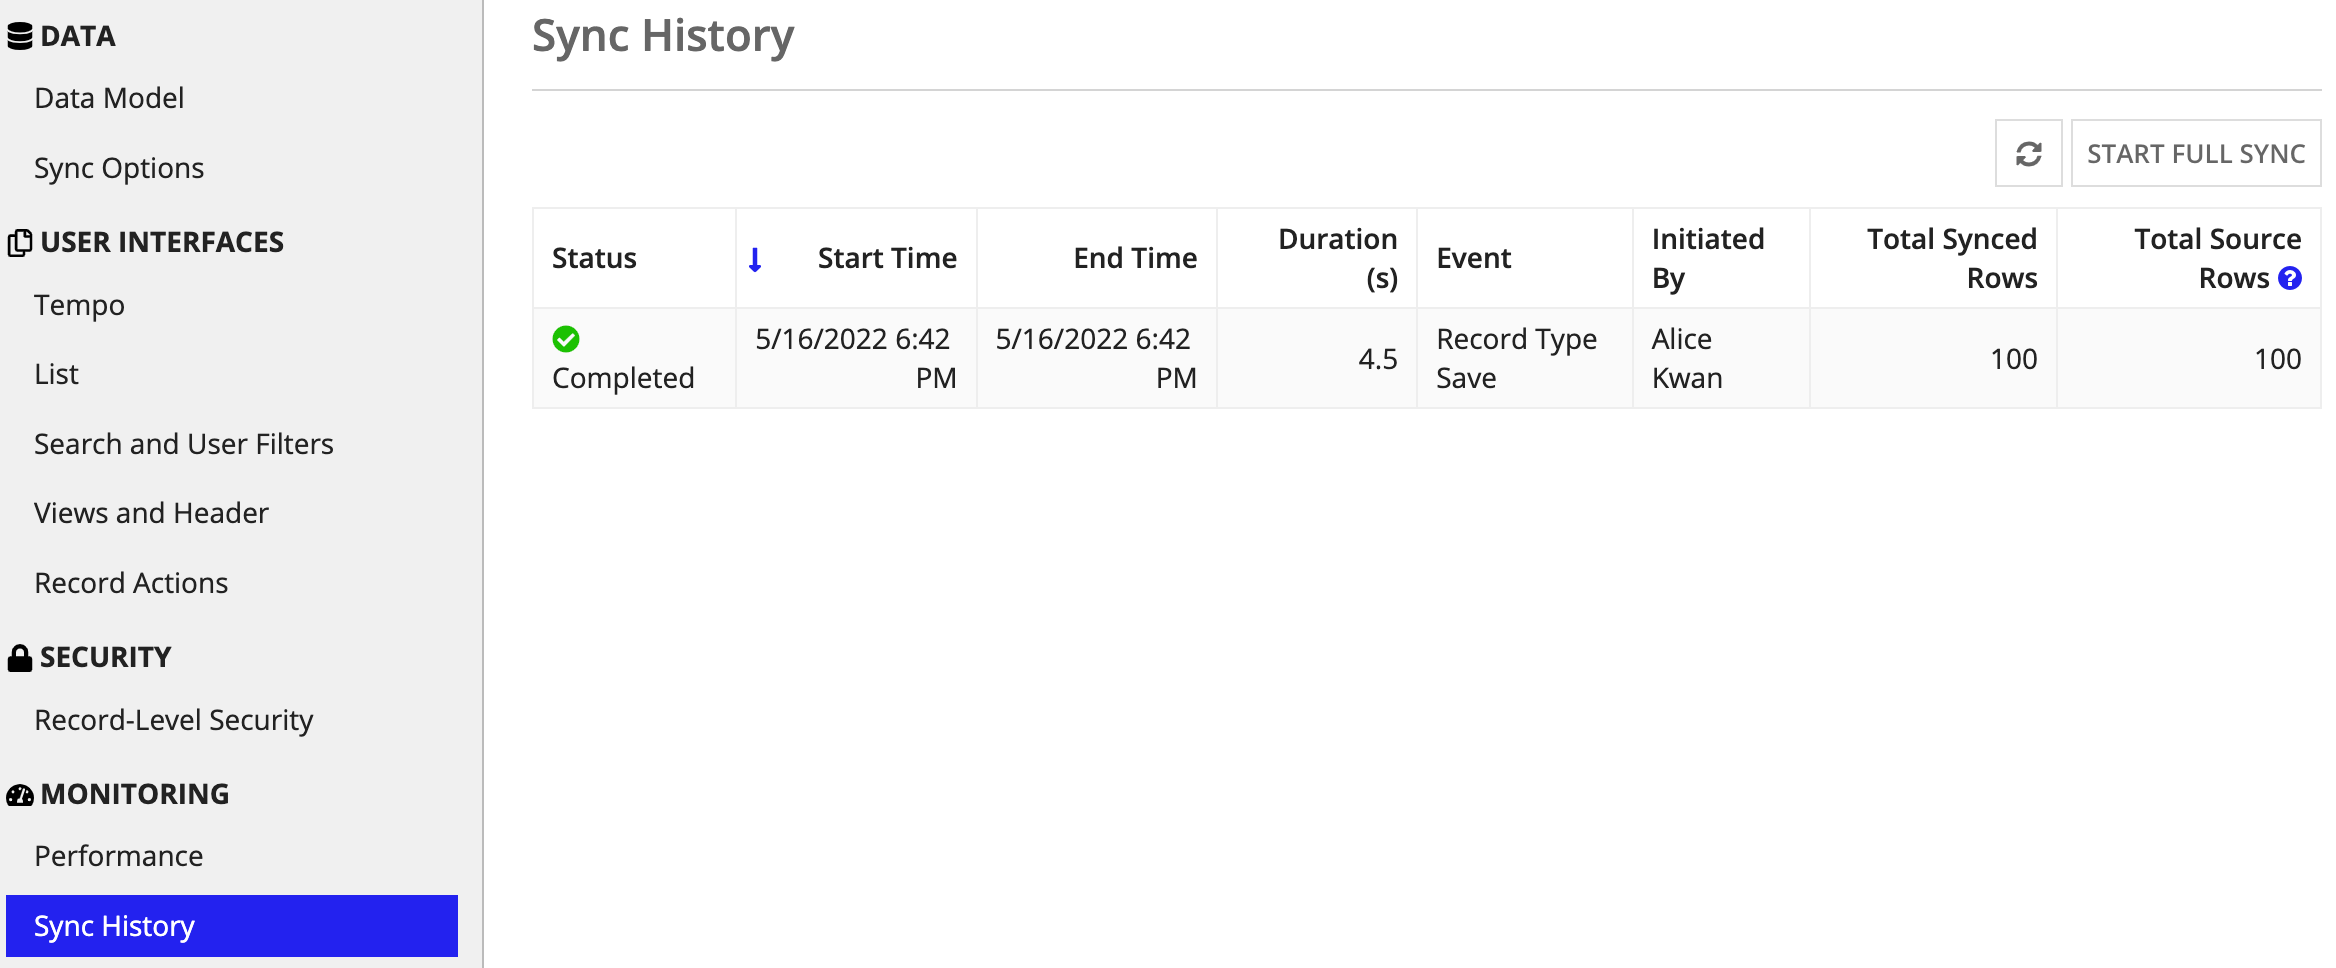
Saving the record type starts a full sync of your record data. Click Sync Options to see details of the sync operation and confirm that it completed successfully.
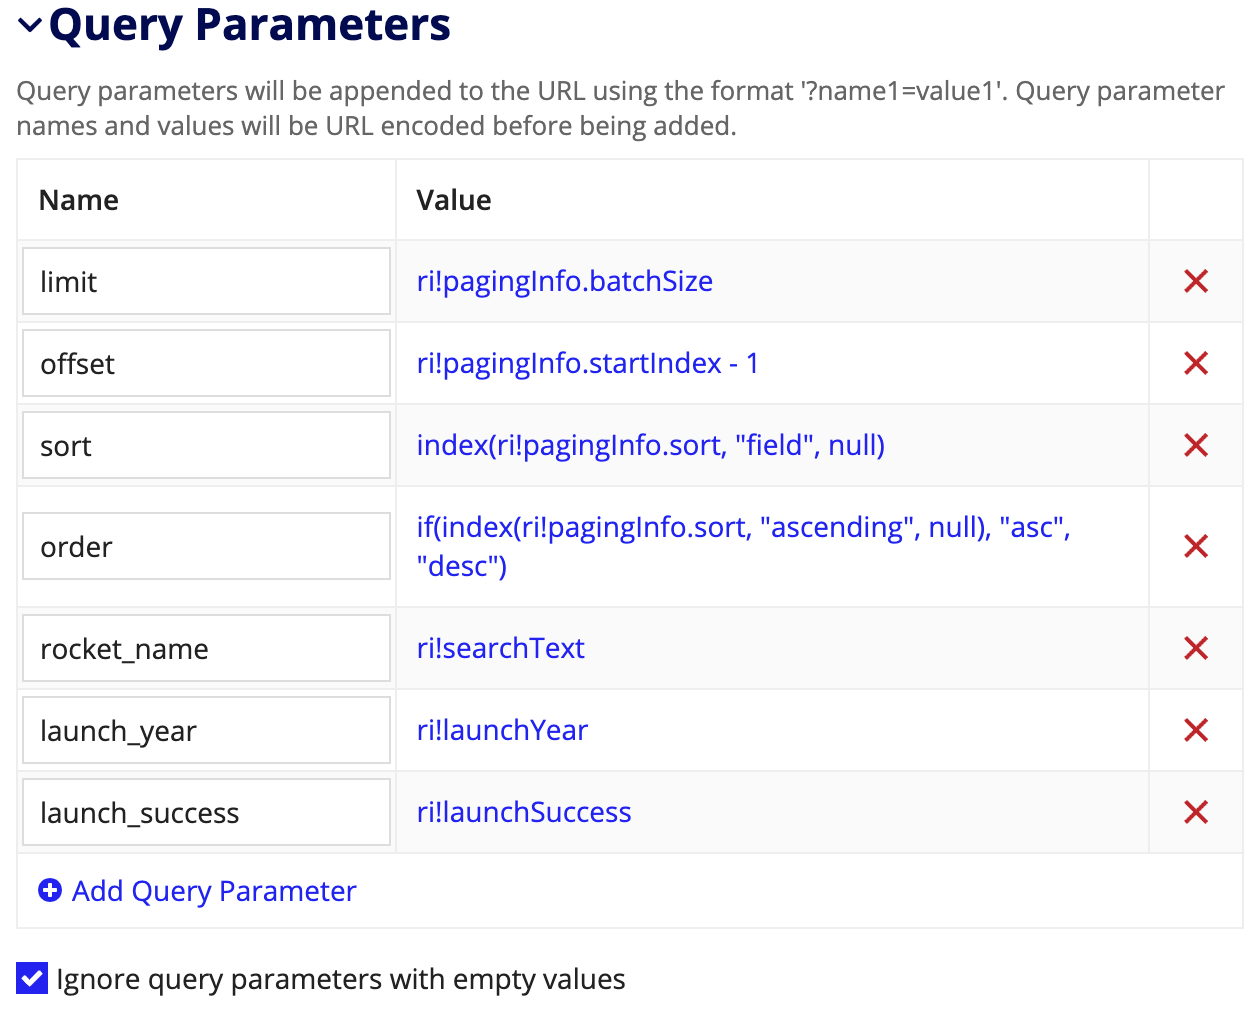
Next, we'll copy the data source integration and modify the copy to enable searching and filtering with query parameters. Specifically, we'll set up offset, limit, sort, and order query parameters to enable searching, filtering, and paging.
Paging is often the most complicated parameter to configure. This is because REST APIs don't understand Appian's PagingInfo data type, and different APIs handle paging in different ways. See the r/SpaceX API documentation for details on its pagination parameters.
We'll also configure the rocket_name, launch_year, and launch_success parameters to enable filtering by rocket, the launch year, and whether the launch was successful. All of these query parameters have dynamic values and should be configured as expressions. We will populate their values using rule inputs.
Let's begin:
SpaceX_getFilteredLaunches.Integration that gets user-specified launch data for the SpaceX Launch record type.ri!pagingInfo.batchSize as the parameter value.ri!pagingInfo.startIndex - 1 as the parameter value.index(ri!pagingInfo.sort, "field", null) as the parameter value.if(index(ri!pagingInfo.sort, "ascending", null), "asc", "desc") as the parameter value.ri!searchText as the parameter value.ri!launchYear as the parameter value.Add the launch_success parameter to enable filtering by launch success and use the expression editor to enter ri!launchSuccess as the parameter value.
pagingInfo rule input.
1
2
3
4
5
6
7
8
a!pagingInfo(
  batchSize: 10,
  startIndex: 12,
  sort: a!sortInfo(
    field: "flight_number",
    ascending: false
  )
)
"Falcon 1".2008.Note: ri!searchText and any rule inputs being used for filtering can have null values. However, a configured service-backed record type will never have a null value for startIndex or batchSize. Therefore, you should test your expression with non-null values for ri!pagingInfo.startIndex and ri!pagingInfo.batchSize.
The record data source expression calls the SpaceX_getAllLaunches integration to populate the record type with data. Since we enabled the filtering and sorting on the SpaceX_getFilteredLaunches integration, we need to create an expression rule with matching rule inputs and pass the rule input values as parameters to the integration.
We'll build an expression rule for the data source that will let users search for specific data. This expression rule will return the integration response data for the record list view. The rule inputs for this expression rule are taken from the filtered data source's integration rule inputs.
We've made this process easy for you by providing a SAIL template in the expression rule object. To build the expression rule, follow the instructions and comments provided in the template along with the steps below. Note that some sections of the SAIL code are preconfigured for you. As you go through each step in the template, verify that the preconfigured code matches the configurations defined in the steps below.
Let's begin:
SpaceX_getFilteredLaunches_recordDataSource.Filtered Data Source for the SpaceX_Rocket Record Type.local!integrationResponse to rule!SpaceX_getFilteredLaunches().rule!SpaceX_getFilteredLaunches, add the following parameters:
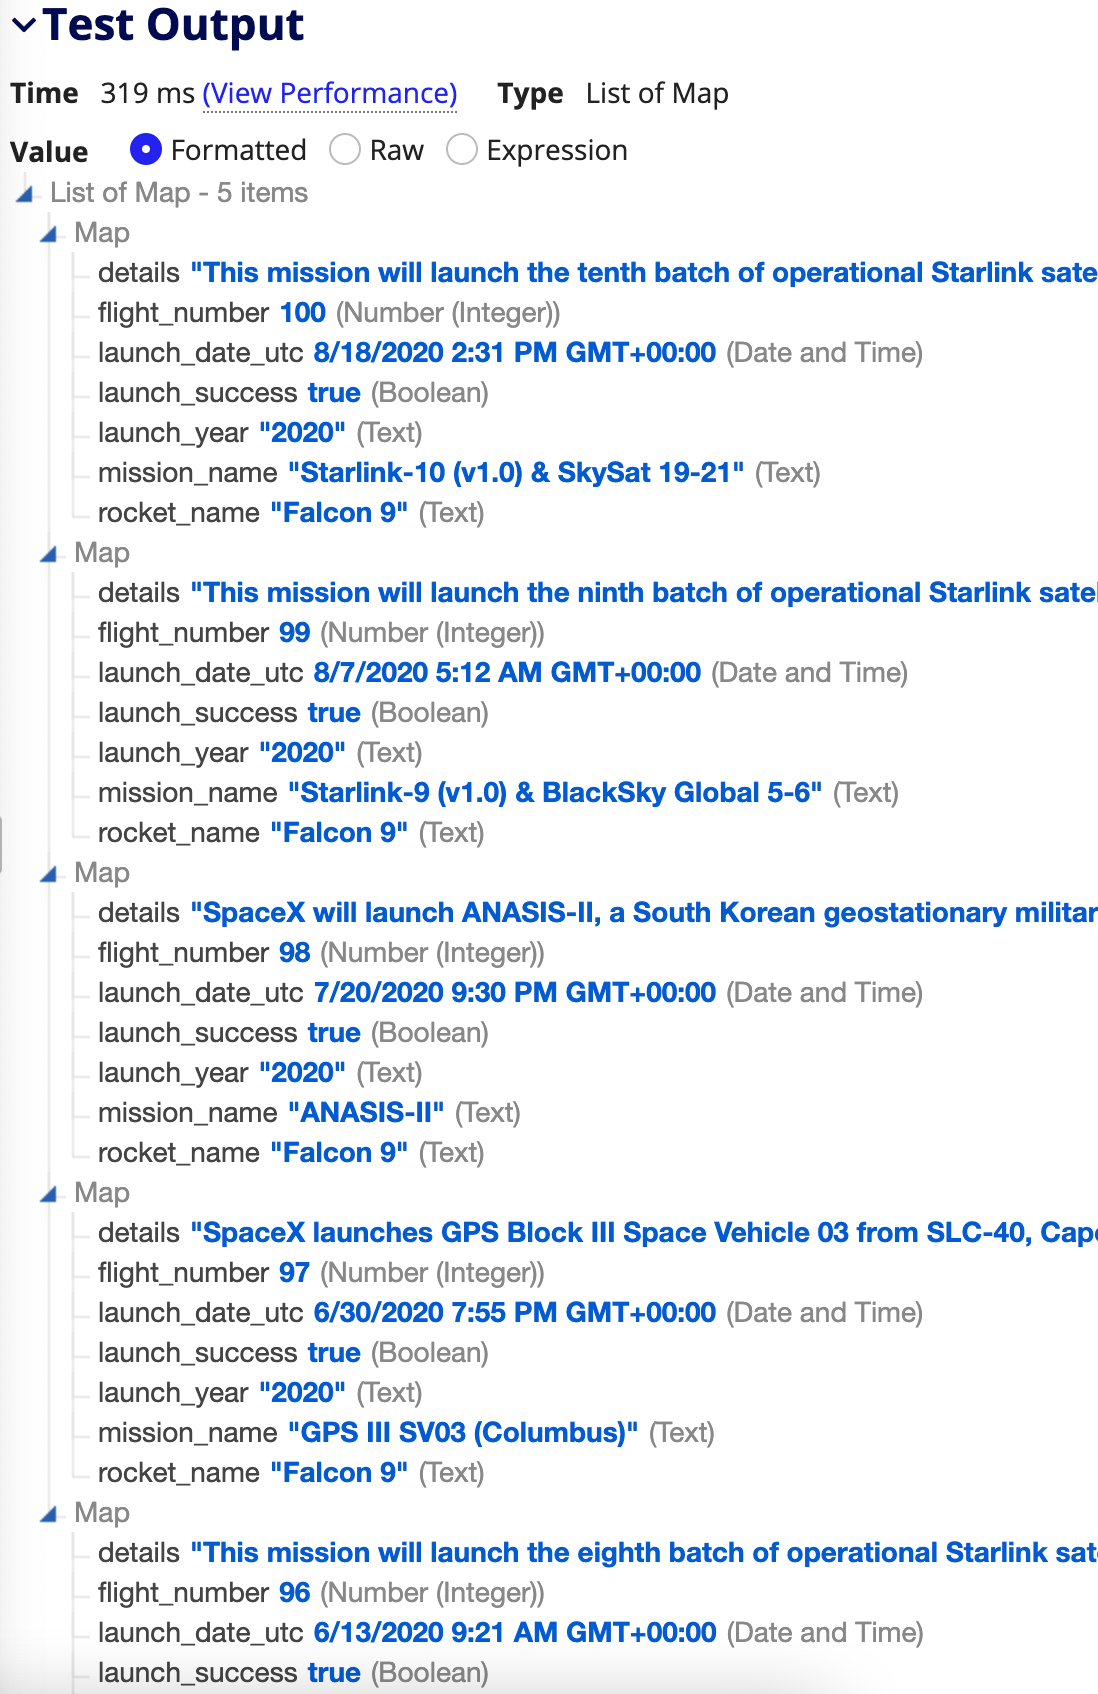
pagingInfo parameter value to ri!pagingInfo.searchText parameter value to ri!searchText.launchYear parameter value to ri!launchYear.launchSuccess parameter value to ri!launchSuccess.12 and a batch size of 5 as expected.
a!pagingInfo(12,5) in the expression value field for the pagingInfo rule input.Click TEST RULE. The test output should be five Maps starting with flight number 100 and descending to flight number 96.
1
2
3
4
5
6
7
8
9
10
11
12
13
14
15
16
17
18
19
20
21
22
23
24
25
26
27
28
29
30
31
32
33
34
35
36
37
38
39
40
41
42
a!localVariables(
  /* Call the integration and store the response in a local variable */
  local!integrationResponse: rule!SpaceX_getFilteredLaunches(
    pagingInfo: ri!pagingInfo,
    searchText: ri!searchText,
    launchYear: ri!launchYear,
    launchSuccess: ri!launchSuccess
  ),
  if(
    /* This will return true if the integration succeeds */
    local!integrationResponse.success,
    /* If needed, modify the expression below to return a list of maps, dictionaries, or CDTs that map to your record data */
    a!forEach(
      local!integrationResponse.result.body,
      a!map(
        details: fv!item.details,
        flight_number: fv!item.flight_number,
        launch_date_utc: fv!item.launch_date_utc,
        launch_success: fv!item.launch_success,
        launch_year: fv!item.launch_year,
        mission_name: fv!item.mission_name,
        rocket_name: fv!item.rocket.rocket_name
      )
    ),
    /* If the integration is unsuccessful, handle accordingly */
    if(
      /* Note: handling of out of bounds exceptions varies by web service */
      tointeger(
        index(
          local!integrationResponse.result,
          "statusCode",
          0
        )
      ) = 416,
      /* If this is an out of bounds error, return an empty list to finish syncing */
      {},
      /* If this is a different error, return the integration error. */
      /* If you need additional logic to determine the error, use a!integrationError() in the integration to format the error displayed in the sync monitor */
      local!integrationResponse.error
    )
  )
)
Now that we've configured the data sources, let's verify that the data returned for your data source expression matches the fields in our data type.
Once you save the record type, a full sync occurs to sync your data in Appian. When the sync is successful, that means that your Record Data Source expression is working correctly.
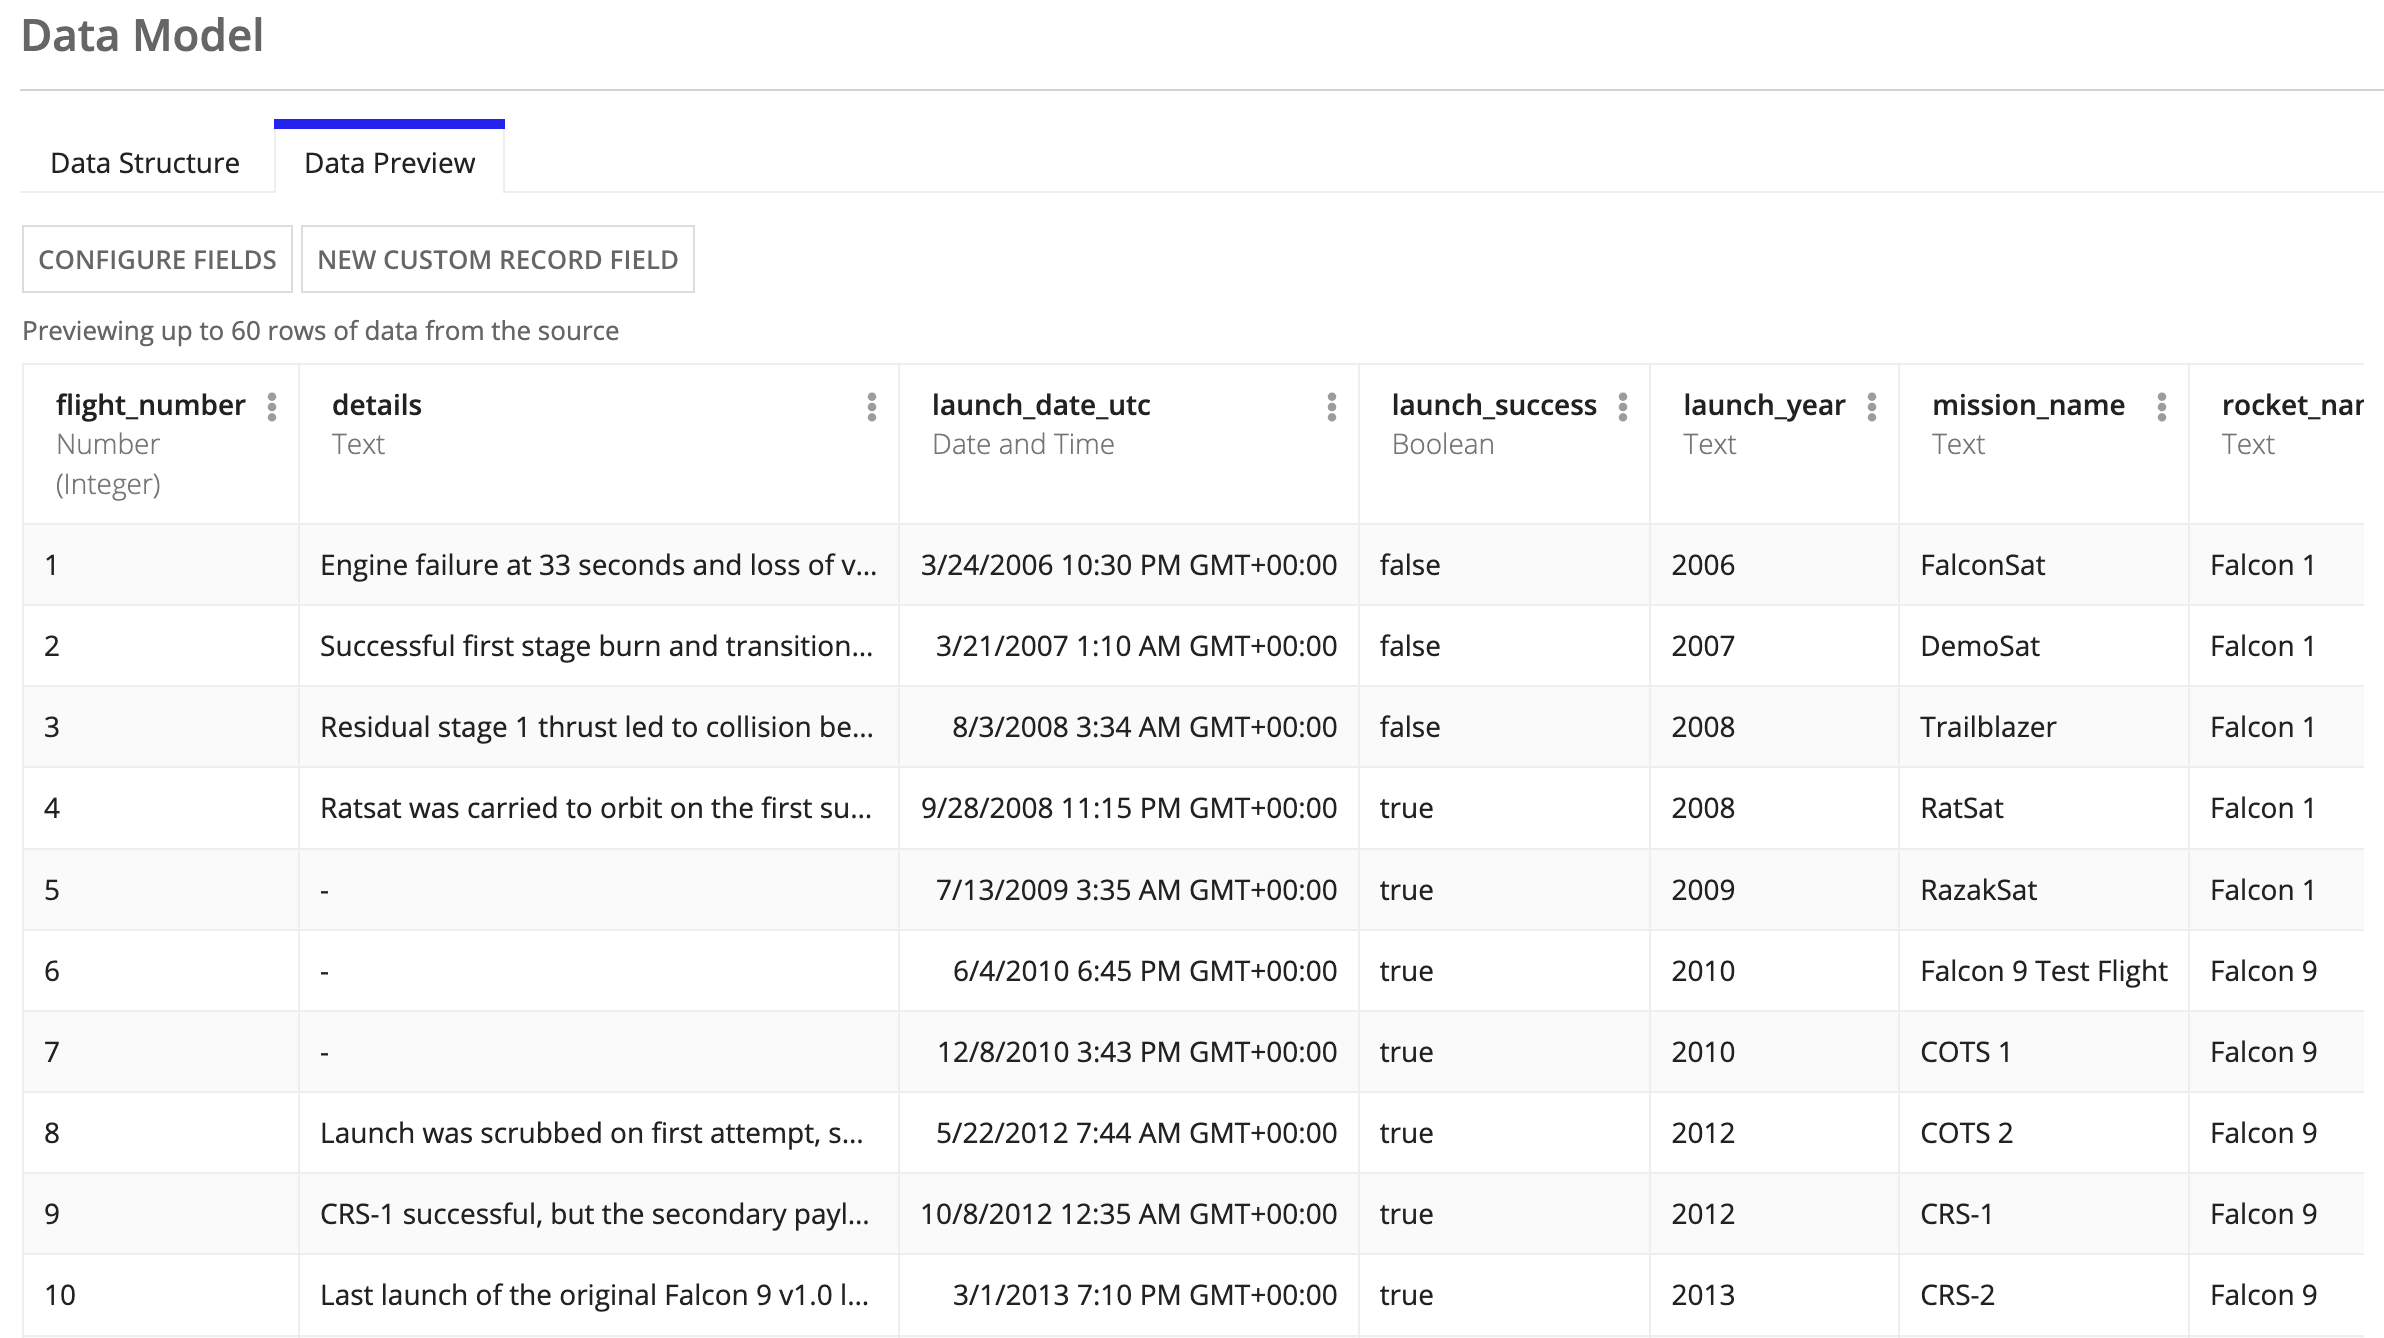
Now you can see a preview of your synced data by going to the Data Preview tab on the Data Model page.
Let's verify that the data results returned for our record data source expression matches the data we expect for the record type.
Click the Data Preview tab.
Tip: If you want to capture changes made to data exposed by the web service, you could configure a Sync Expression in order to leverage the Sync Records smart service. Learn more about syncing data changed by other systems.
Now let's populate our record list with more meaningful data.
No launches exist with this criteria..5. This controls the batchSize that is passed into the Paging Info input for your single record source.1
2
3
4
5
6
7
8
9
a!linkField(
links: {
a!recordLink(
label: fv!row[recordType!SpaceX Launch.fields.mission_name],
recordType: recordType!SpaceX Launch,
identifier: fv!identifier
)
}
)
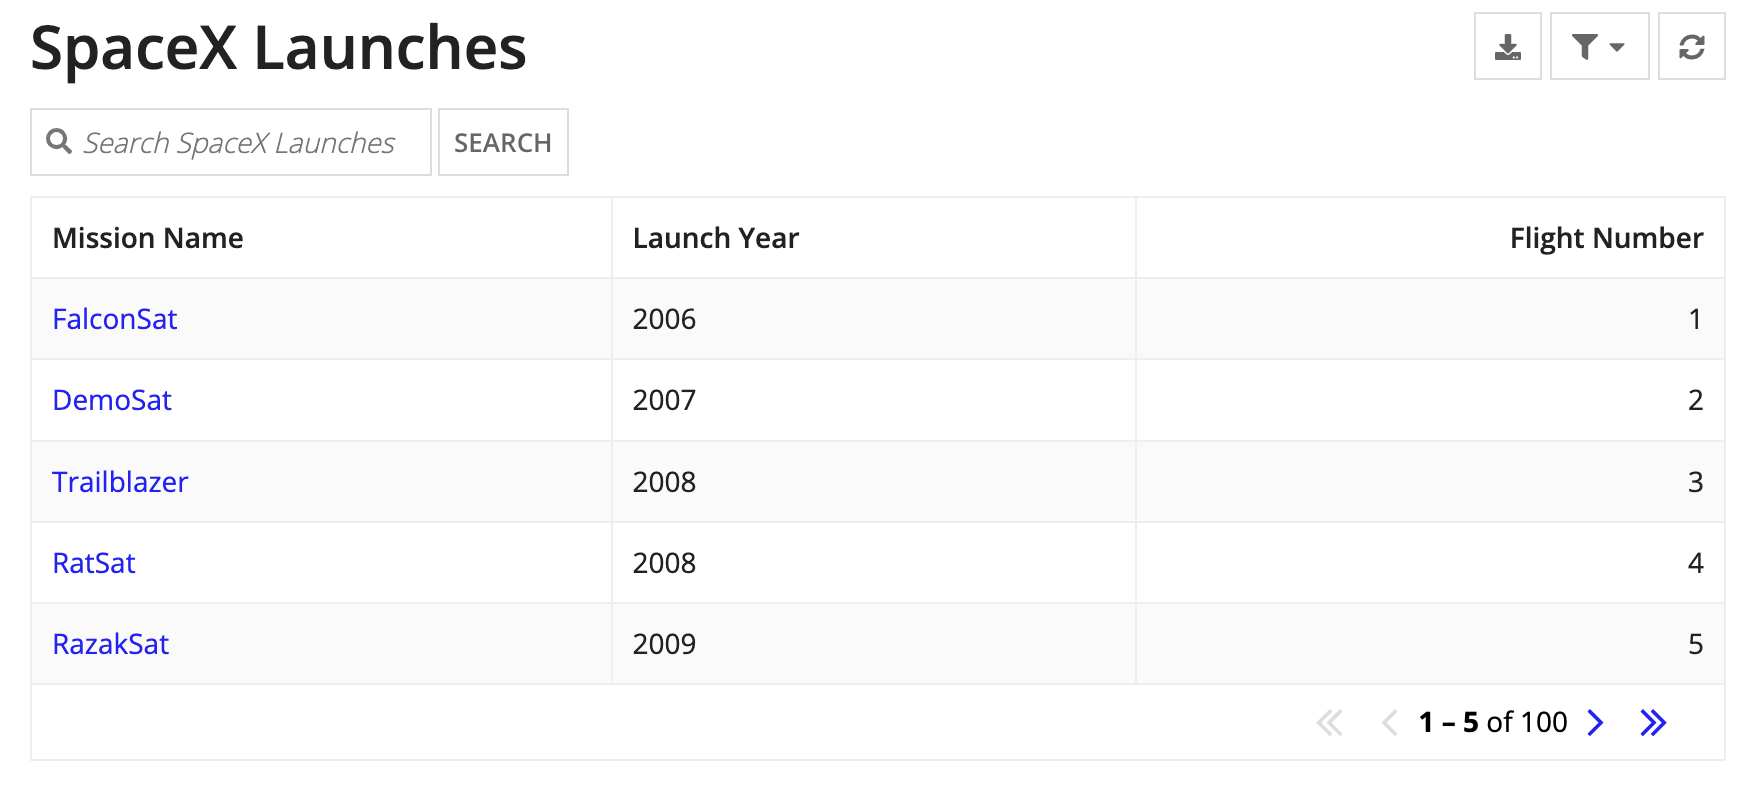
To test your record list configuration, click the link under URL.
You should end up with a list view that looks like this:
To make it easier for users to find information about specific launches, we can build user filters that compare user selections with the values of record fields and return the records that match. In this case, we'll create an expression-backed user filter that uses the launch_year field to see data for a selected calendar year.
To create a user filter:
Launch year.1
2
3
4
5
6
7
8
9
10
11
12
13
14
15
16
17
18
19
20
21
22
23
24
25
26
27
28
29
30
31
a!localVariables(
local!year: a!queryRecordType(
recordType: recordType!SpaceX Launch,
fields: a!aggregationFields(
groupings: a!grouping(
field: recordType!SpaceX Launch.fields.launch_year,
alias: "year"
)
),
pagingInfo: a!pagingInfo(
startIndex: 1,
batchSize: 100
)
),
a!recordFilterList(
name: "Launch year",
allowMultipleSelections: true,
options: a!forEach(
items: local!year.data,
expression: a!recordFilterListOption(
id: fv!index,
name: fv!item.year,
filter: a!queryFilter(
field: recordType!SpaceX Launch.fields.launch_year,
operator: "=",
value: fv!item.year
)
)
)
)
)
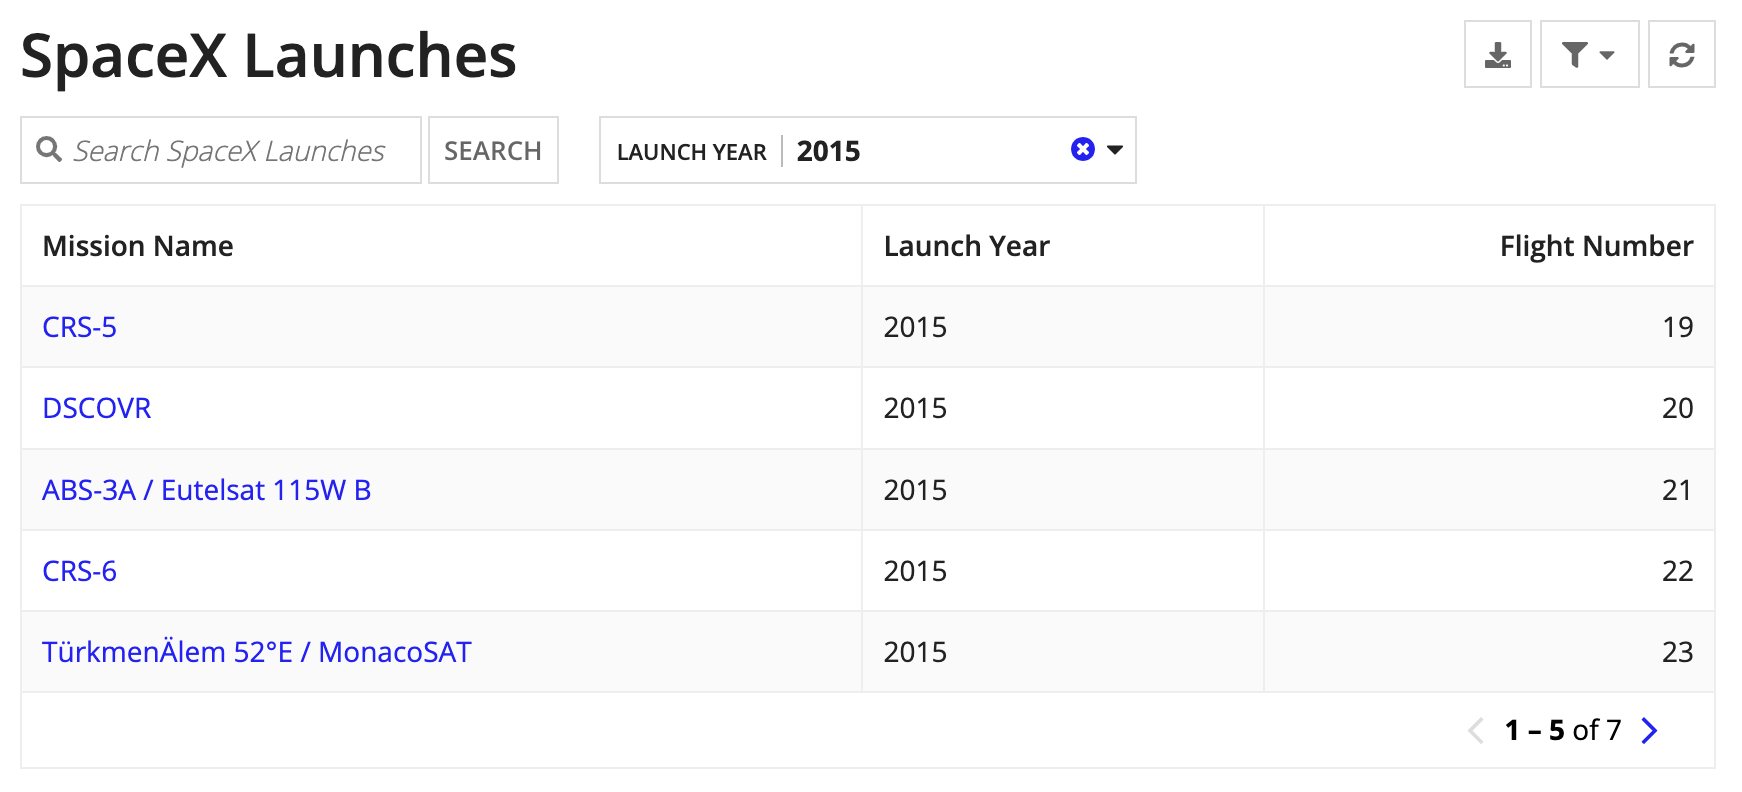
Select 2015 from the LAUNCH YEAR dropdown and verify that the grid shows only the seven launches from 2015.
Note: For more practice, configure a second User Filter for the launch_success parameter using the ri!launch_success rule input
The last step of this tutorial is to create the Summary view, a task made easier by using the record view generator. Structurally, a Summary view for a service-backed record type is no different from a Summary view for any other record type. What may be different, however, is how you acquire the data.
Summary and then click NEXT.Next, we'll customize our new Summary view with meaningful labels displayed on each record.
1
2
3
4
5
6
7
8
9
10
11
12
13
14
15
16
17
18
19
20
21
22
23
24
25
26
27
28
29
30
31
32
33
34
35
36
37
38
39
40
41
42
43
44
45
46
47
48
49
50
51
52
53
54
55
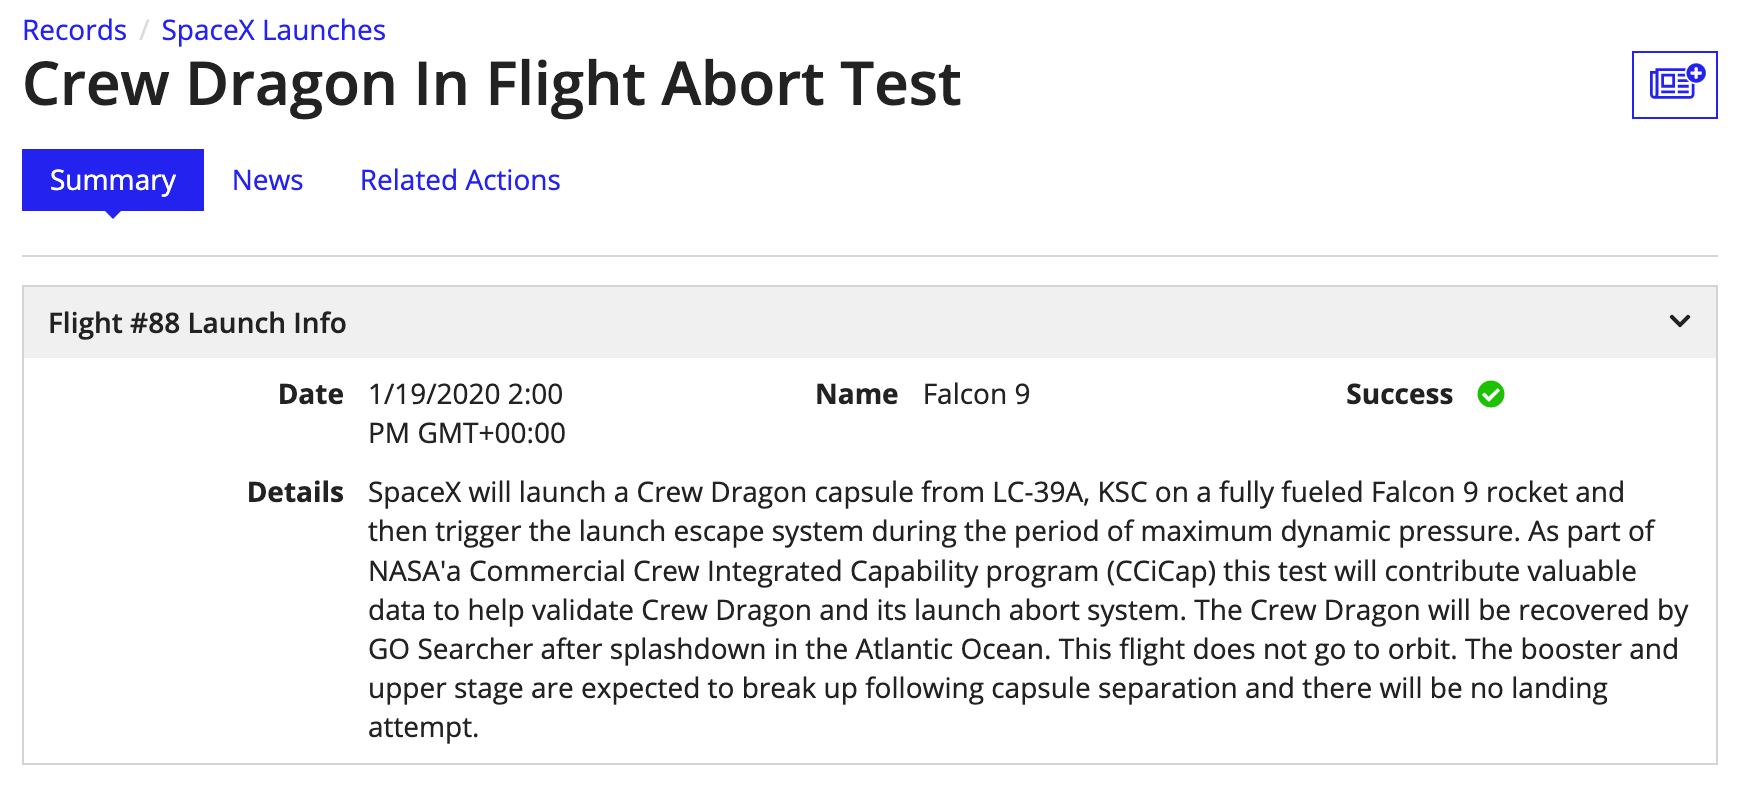
a!boxLayout(
label: "Flight #" & ri!record[recordType!SpaceX Launch.fields.flight_number] & " Launch Info",
contents: {
a!sideBySideLayout(
items: {
a!sideBySideItem(
item: a!textField(
label: "Date",
labelPosition: "ADJACENT",
value: ri!record[recordType!SpaceX Launch.fields.launch_date_utc],
readOnly: true
)
),
a!sideBySideItem(
item: a!textField(
label: "Name",
labelPosition: "ADJACENT",
value: ri!record[recordType!SpaceX Launch.fields.rocket_name],
readOnly: true
)
),
a!sideBySideItem(
item: a!richTextDisplayField(
label: "Success",
labelPosition: "ADJACENT",
value: a!richTextIcon(
icon: if(
ri!record[recordType!SpaceX Launch.fields.launch_success],
"check-circle",
"times-circle"
),
color: if(
ri!record[recordType!SpaceX Launch.fields.launch_success],
"POSITIVE",
"NEGATIVE"
)
)
)
)
}
),
a!textField(
label: "Details",
labelPosition: "ADJACENT",
value: ri!record[recordType!SpaceX Launch.fields.details],
showWhen: not(
isnull(
ri!record[recordType!SpaceX Launch.fields.details]
)
),
readOnly: true
)
},
iscollapsible: true
)
The last step is to configure the record's title.
Congratulations! You've configured your own service-backed record type. Check out the Records Tutorial to learn how to configure a database-backed record type.
Service-Backed Record Type Tutorial
