This page describes how to customize the out-of-the-box record list search and how to create user filters.
When you configure the record list, you are providing users with a list of records from a record type, and allowing them to add new records to the list using record list actions. Now that they can see and interact with the list of records, users should also be able to search and filter the records in the list.
To allow users to search for records, you can display a search box on the record list. The search is fully configured out-of-the-box to allow users to search for records based on the fields in the record list. To make your search more precise, you can specify which fields users can search on.
In addition to the search box, you can allow users to filter the record list by creating user filters. User filters allow end users to filter the list of records based on a selection in a list or date range. Users can even save their filter combinations so they can quickly view the information they need each time they return to the list.
For example, let’s say account managers use the Case record list to review the number of open cases. You could create a user filter on the caseStatus field so users can filter the records by "Open," "In Progress," or "Closed." Then, account managers can filter by “Open” cases and save their user filter configuration for later use. You can even add additional user filters to see all open critical cases, or all cases associated with a specific customer.

Once you configure the search and create user filters in the record type, you can use them in the record list and in records-powered grids—saving you precious development time, and allowing your end users to quickly find the information they need.
Tip: If you are working with an existing record type created in 20.2 or earlier, update the record type to use new record type object components, features, and functions.
By default, each record type has a fully configured search box that allows users to search for records based on the Text and Number fields referenced in the record list.
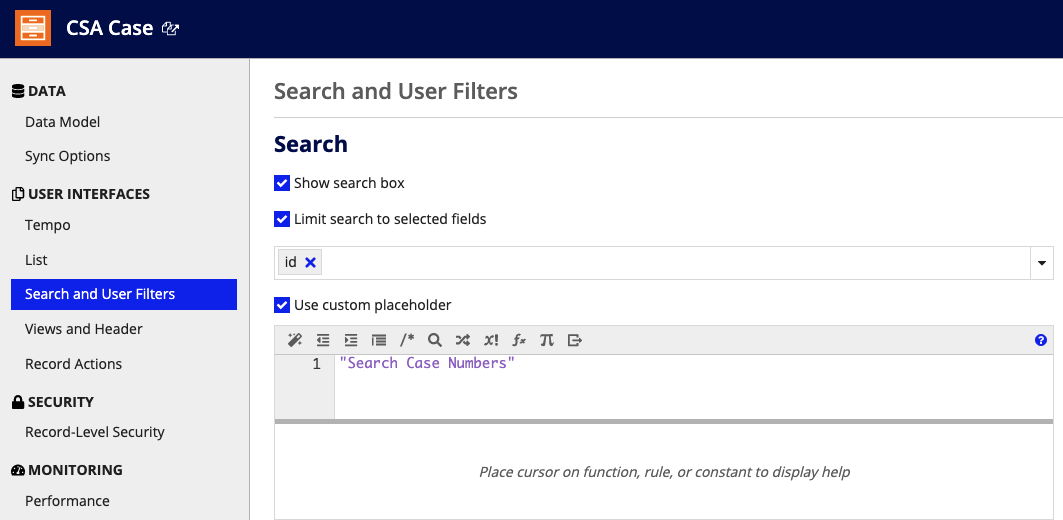
When working with large sets of records, or a record list with numerous columns, you can improve the search performance and precision by limiting the search to certain fields. You can also customize the search’s placeholder text to match your use case.
For example, in a Case record type, you could limit your search to only the caseId field, and change the placeholder text to say, “Search Case Number”. Now, this search configuration will appear on your record list and any read-only grids that use the record type as the source.
Alternatively, if you're working with a small number of records, you have the option to hide the search box on the record list. If you hide the search box on the record list, you can still show the search box on a read-only grid that uses the record type as the source. To show the search box on a records-powered grid, select the Show search box checkbox in the read-only grid's configuration.
When you hide search on the record list, the search box on the grid will use the default search behavior, searching across all fields referenced in the grid. The search box will also use the default placeholder text of "<Plural record type name>".
To configure the search box on the record list:
Select the Limit search to selected fields checkbox to choose the fields to search on. You can select record fields or related record fields of type Text, Number (Integer), User, or Group, with a maximum of 10 selected fields. Selecting related record fields from a one-to-many relationship may slow performance.
Note: This option is not available on unsynced record types that use a Salesforce object or other web service as the source.
User filters allow end users to filter the record list by selecting options in a list or using a date range filter. You can configure multiple user filters on a record list, including user filters on related record fields.
For example, say the Support Case record type has a relationship with the Customer record type. Using the relationship, you can reference the related record field customerName in the Support Case record list. Then, you can create a user filter to filter the record list by customer names retrieved from the Customer record type—all without creating expression rules or complex queries.
To speed up your design experience, Appian will automatically generate a user filter whenever you define a new many-to-one relationship. This user filter is created on the related record field used to define the relationship (the common field), and uses the first Text field listed after the primary key field on the related record type as filter options.
To configure your own user filter, you can use a guided configuration or an expression:
Note: If your record type uses a web service as the data source, the user filter configuration is slightly different. For more information, see User filters for record types that use a web service.
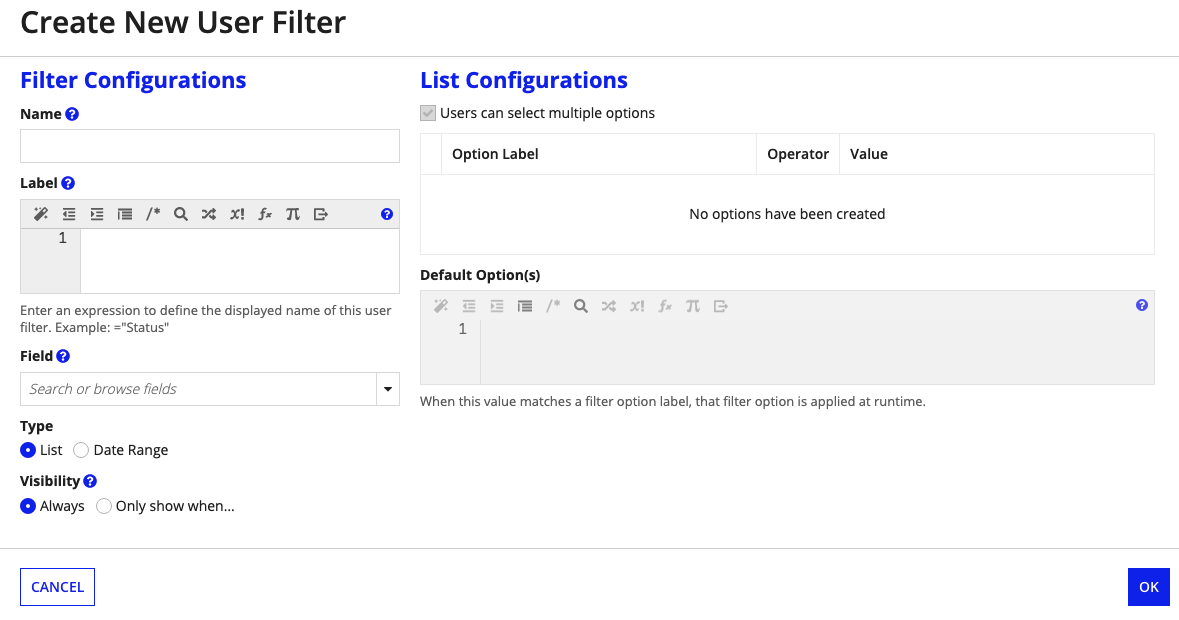
List style user filters can have one or more filter options. For example, a filter named Region might contain five options:
Each filter option will display in a filter dropdown at the top of the record list. When there are more than 11 filter options, the filter includes a search box to help users find filter options.
Depending on the filter configuration, users can select one or more of the filter options to view records that meet the filter criteria. By default, multiple filter options can be selected at a time from a single user filter, and all records that match at least one of the selected options will be returned.
To create a list user filter:
Under Type, select List.
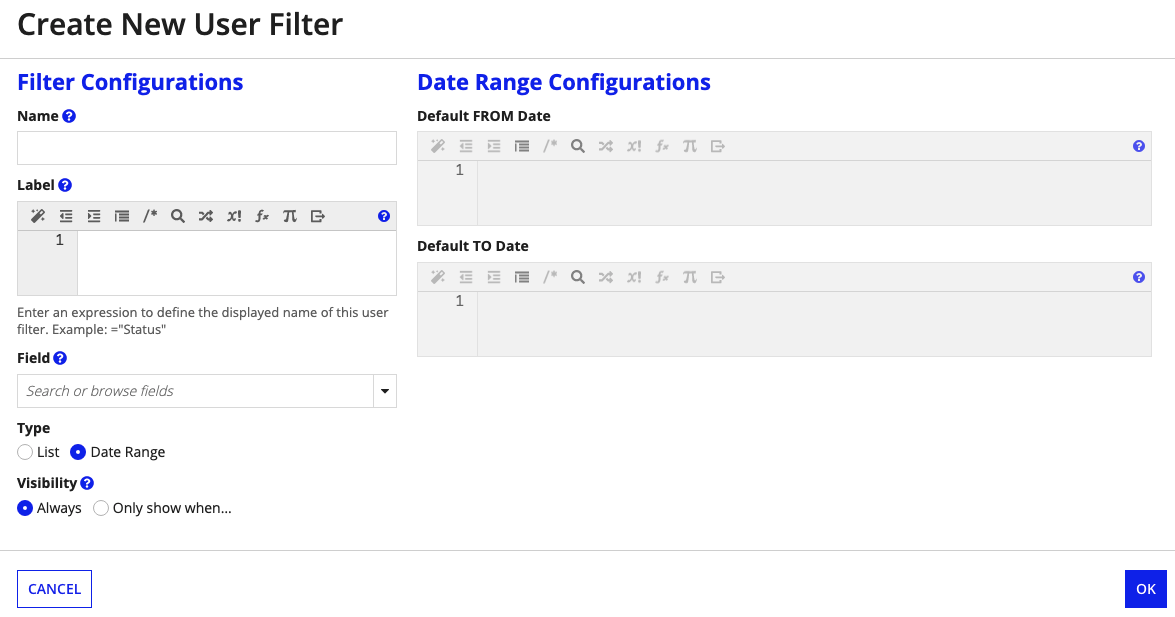
You can also add date range filters, which allow precise record filtering between two dates or an open-ended range where only a start date or end date is provided.
When multiple user filters are present on the record list, users can select filter options for each of the defined user filters. The records returned are based on the records that meet the criteria of all the user filters combined.
For example, a Customer Support Case record list may have both a Status and Submitted Date filter. The Status filter has the "Open" and "In Progress" options selected. The Submitted Date filter has a date range of "1/1/2019 - 12/31/2020" selected. The records returned will be the support cases that have a status of "Open" OR "In Progress" AND fall between "1/1/2019 - 12/31/2020".
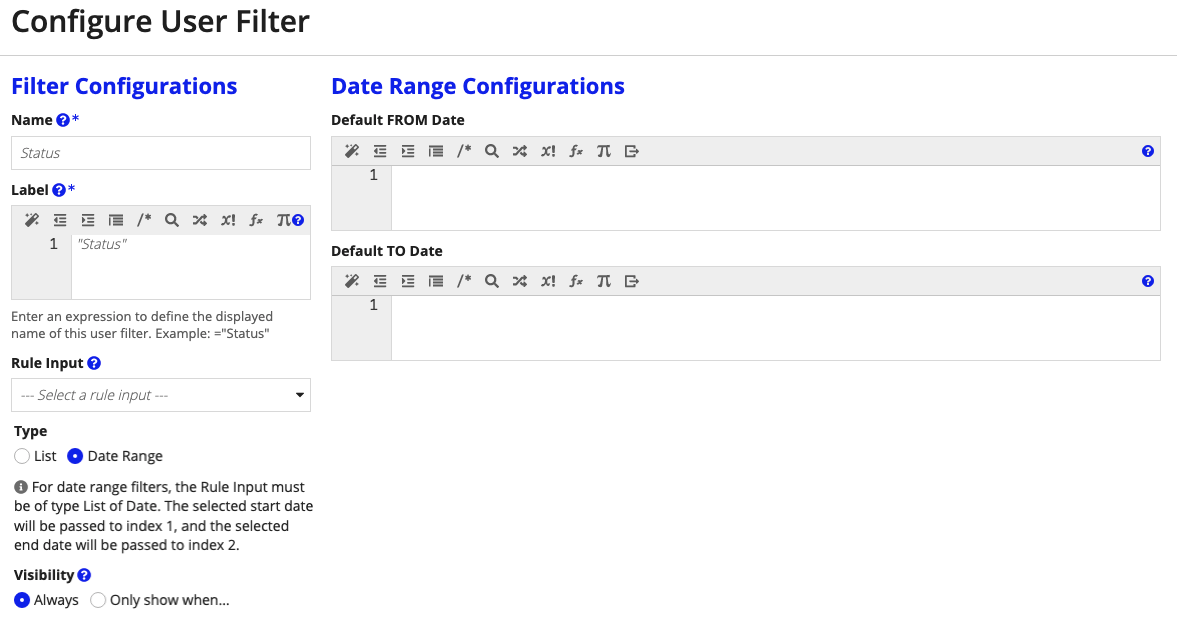
To create a date range user filter:
Under Type, select Date Range.
In addition to the guided configuration, you can use an expression to construct a user filter. Simply use the a!recordFilterList() or a!recordFilterDateRange() function.
The best use for expression-based user filters is generating filter options from data stored in a constant, variable, or data store entity instead of manually creating and maintaining each one.
To create a user filter based on an expression:
Select Expression.
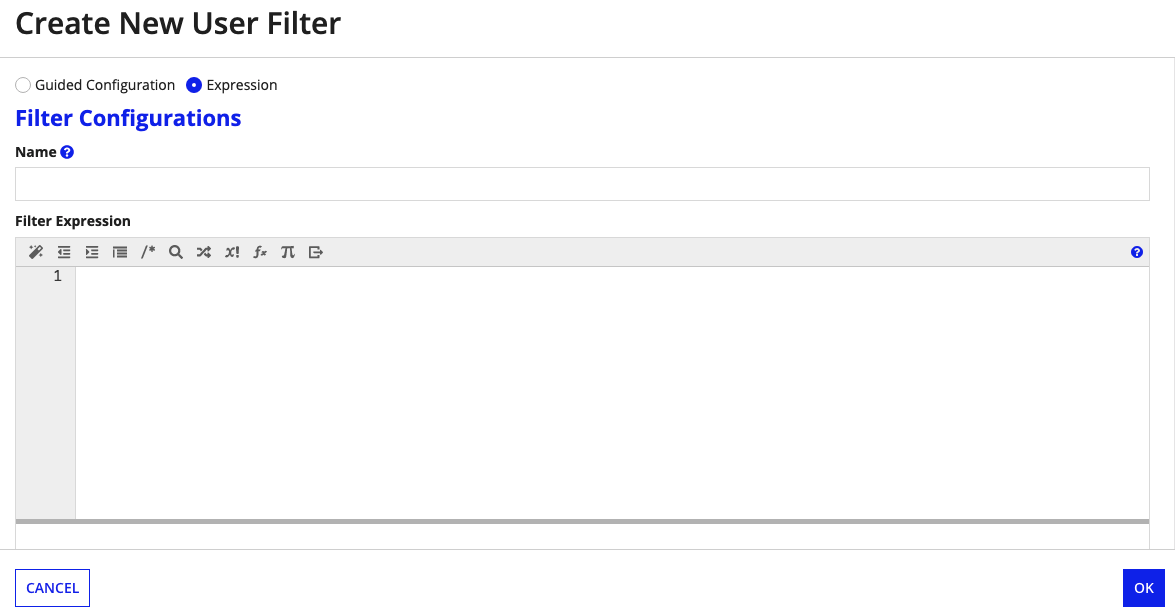
The following section provides examples of user filters created from an expression.
Tip: When using a dynamic user filter, Appian recommends defining the user filter expression in a rule for version control and testing purposes, and calling that rule in the User Filters field.
Let's say you have an employee management system, and you want to filter the list of employees by the employee's department.
Every employee has a Department dropdown that refers to a constant (cons!EMPLOYEE_DEPARTMENT), which has the following values:
In the example below, we have a user filter called "Department". Instead of manually creating an option for each status, we will use the a!forEach() function to write those options for us based on the constant (cons!EMPLOYEE_DEPARTMENTS).
The a!forEach() function will take an array of values and pass them to an expression one at a time, creating the a!recordFilterListOption function for each item in the array.
1
2
3
4
5
6
7
8
9
10
11
12
13
14
15
a!recordFilterList(
  name: "Department",
  options: a!forEach(
    items: cons!AT_DEPARTMENT_LIST,
    expression: a!recordFilterListOption(
      id: fv!index,
      name: fv!item,
      filter: a!queryFilter(
        field: recordType!Employee.fields.department,
        operator: "=",
        value: fv!item
      )
    )
  )
)
As you can see, in the options parameter we're using the a!forEach function for every value in the status constant. In order to give each one an ID, we use the a!forEach function value index (fv!index), which keeps track of which value should appear in the array.
The array of department values in cons!EMPLOYEE_DEPARTMENT is passed into the function, one at a time, which will result in three recordFilterListOption functions, one for each status.
Although this works, if your Employee record type has data sync enabled, you could create another record type called Department that contains the id, label, and description of each department.
By establishing a many-to-one relationship with the Department record type, you could then easily create a user filter on the departmentId field of the Employee record type and use the related record field label as the filter options—all from the Guided Configuration.
In this case, you have a user group and you want to create a filter option for every member of that group. For this, we'll be using the a!forEach() function to write our options for us, as we did in the previous example.
To get the list of users for the a!forEach function, we'll use getdistinctusers(), which returns a list of every user within a group.
In the example below, you'll notice that instead of passing the group ID to the getdistinctusers() function, we referenced a constant that points to the group object.
1
2
3
4
5
6
7
8
9
10
11
12
13
14
15
16
17
18
a!localVariables(
   local!acctExecs: getdistinctusers(cons!ACCOUNT_OWNERS),
   a!recordFilterList(
     name: "Account Executives",
     options: a!forEach(
       items: local!acctExecs,
       expression: a!recordFilterListOption(
         id: fv!index,
         name: user(fv!item, "firstName") & " " & user(fv!item, "lastName"),
         filter: a!queryFilter(
           field: recordType!Customer.fields.AccountOwner,
           operator: "=",
           value: fv!item
         )
       )
     )
   )
 )
This expression will be added to the options parameter of the recordFilterList function for each user in the list.
In this case, you have a lookup table of issue statuses in your database, and you want to create a filter option for each status. For this, we'll be using the a!forEach() function to write our options for us, as we did in the first example.
In the example below, rule!getIssueStatuses() is a query that returns the contents of a lookup table of issue statuses. Instead of fv!index being used as the ID for filter option, we are assuming that fv!item.id is the primary key value of the lookup table.
1
2
3
4
5
6
7
8
9
10
11
12
13
14
15
16
17
18
a!localVariables(
  local!statuses: rule!getIssueStatuses(),
  a!recordFilterList(
    name: "Status",
    options: a!forEach(
      items: local!statuses,
      expression: a!recordFilterListOption(
        id: fv!item.id,
        name: fv!item.status,
        filter: a!queryFilter(
          field: recordType!Issues.fields.status.id,
          operator: "=",
          value: fv!item.id
        )
      )
    )
  )
)
Although you can use an expression to build this user filter, there is an easier way to create this filter. When you want to query data from a lookup table, we recommend using that lookup table as the source of a new record type. Then, you can establish a many-to-one relationship between your record type and the lookup table record type, which will automatically generate a user filter for you.
For example, say you have a lookup table containing the possible statuses for each support case. We'd recommend creating a new record type called Issue Status using the lookup table as the source. Then, you can easily create a many-to-one relationship between the Support Case record type and the Issue Status record type. When you define the many-to-one relationship, Appian will automatically generate a user filter on the Support Case record type that lets users filter by status.
Learn more about automatically generating filters.
In this case, you have a table of data and you want to create a filter option for each unique value in a specific field in that table. For this, we'll be using the a!forEach() function to write our options for us, as we did in the first example.
Note: This method may perform poorly with large data sets. We recommend that you create a lookup table and use the method described in the previous example when possible.
1
2
3
4
5
6
7
8
9
10
11
12
13
14
15
16
17
18
19
20
21
22
23
24
25
26
27
28
29
30
31
32
33
34
35
36
37
38
39
40
a!localVariables(
  local!employeeTitles: a!queryRecordType(
    recordType: recordType!Employee,
    fields: a!aggregationFields(
      groupings: {
        a!grouping(
          field: recordType!Employee.fields.title,
          alias: "title"
        )
      },
      measures: {
        a!measure(
          field: recordType!Employee.fields.id,
          function: "COUNT",
          alias: "count"
        )
      }
    ),
    pagingInfo: a!pagingInfo(
      startIndex: 1,
      batchSize: 5000
    )
  ),
  a!recordFilterList(
    name: "Title",
    options: a!forEach(
      items: local!employeeTitles.data,
      expression: a!recordFilterListOption(
        id: fv!index,
        name: fv!item.title,
        filter: a!queryFilter(
          field: recordType!Employee.fields.title,
          operator: "=",
          value: fv!item.title
        ),
        dataCount: fv!item.count
      )
    )
  )
)
Date range filters are easy to configure. They simply require a name and field to filter your data on. You can also optionally add a starting and ending default configuration.
When using date range filters you have the flexibility of being able to filter on fields that are type date or date and time. The date and time type is acceptable as the filter's field type or as either default value. In both cases, the date and time values are interpreted as dates.
In the example below, the default filter values are configured to filter for matching dates within the last year.
1
2
3
4
5
6
7
a!recordFilterDateRange(
  name: "Start Date",
  field: recordType!Employee.fields.startDate,
  defaultFrom: "today() - 365",
  defaultTo: "today()",
  isVisible: true
)
When you configure a user filter for a record type that uses a Salesforce object or other web service as the source without data sync enabled, you will have a slightly different guided configuration experience when creating list and date range user filters.
Although configuration is slightly different, the same filter behavior for list and date range filters still apply.
Note: This section does not apply to record types that use a Salesforce object or other web service and have data sync enabled. Record types with sync enabled will have the same guided configuration experience listed above in the List user filter and Date range user filter sections.
List style user filters can have one or more filter options.
To create a list user filter:
In the Rule Input dropdown, select a rule input from the Record Data Source expression rule to pass filter selections to the integration.
Tip: If you don't see any rule inputs in the dropdown, enable filtering by adding rule inputs to the Record Data Source expression rule. See Enable paging, search, and filtering for more information.
Under Choices, enter an expression using a!recordFilterChoices to define the user filter choices. These choices will display under the filter dropdown at the top of the record list.

Date range filters allow precise record filtering between two dates or an open-ended range where only a start date or end date is provided.
The rule input associated with the date range filter must be of type List of Date. The value for the user filter will always be a list of two values. If there is a start and end date, the user filter value would be {startDate, endDate}, where the start date is passed to index 1, and the end date is passed to index 2.
When there is no selection for the start or end date, the value of the associated index will be null. For example, if you enter a startDate but leave the endDate blank, the user filter value would be {startDate, null}.
To create a date range user filter:
Under Filter Type, select Date Range.
In the Rule Input dropdown, select a rule input from the Record Data Source expression rule to pass filter selections to the integration.
Tip: If you don't see any rule inputs in the dropdown, enable filtering by adding rule inputs to the Record Data Source expression rule. See Enable paging, search, and filtering for more information.
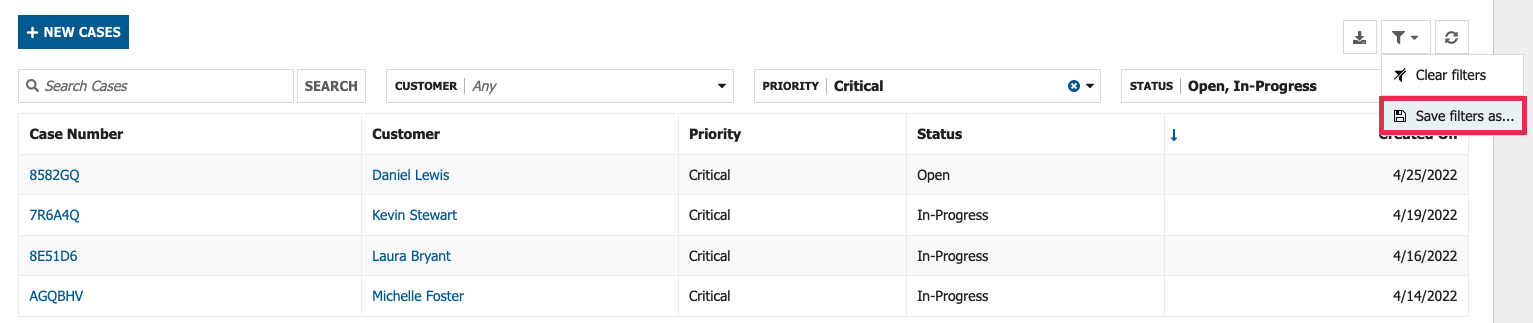
Once you create user filters for the record list, users can save and manage their own user filter selections. Users can save their filters by first choosing values from the existing user filters, then selecting Save filters as… from the Filters menu.
The Filters menu allows each user to name their filters and choose which filter they want to load by default when they navigate to the record list or the grid that uses the record type as a data source.

The Filters menu also allows users to view, remove, or rename their saved filters by selecting Manage my filters….
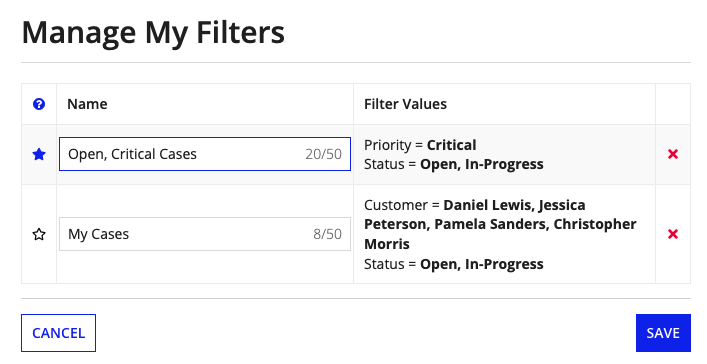
Each saved filter will display with a shortcut at the top of the page next to My Filters. When a record type is used to power a read-only grid, the saved filter set will appear on grids that use the same combination of user filters as the record list. Read-only grids that use different combinations of user filters can save different filter selections on the grid.
Users can save values for any filters visible on the record list. However, some changes to the record type may affect user-saved selections. If you deploy any of the following changes to the record type, the corresponding saved filter will be affected:
In all of these cases, users may need to update the saved values. A warning message will display to describe what happened.
Search and Filter the Record List
