Appian allows you to view and create four types of folders:
This page explains how to create and manage these types of folders (as well as documents in document folders) within your applications.
Note: To appear as precedents and dependents in an application, documents, folders, and knowledge centers must be either in the application or referenced by objects in the application.
In Appian, you can create, update, and delete folders and their contents in Appian Designer or in the Build view of your application. Additionally, knowledge centers and document folders can be managed through a variety of Document Management smart services.
Tip: Appian can generate certain folders automatically during application creation. These generated folders can be managed the same way you'd manage a folder you create manually. Learn more about generated folders.
To create a new folder of any type:
Configure the following properties:
| Property | Description |
|---|---|
| Type | Select the type of folder you want to create: |
| Folder Name | Enter a name that follows the recommended naming standard. |
| Folder Description | (Optional) Enter a description for the folder. |
| Parent Folder | (Required for document folders) Select a parent folder. By default, child folders inherit security from the parent folder. |
Note: It can take up to two minutes for the folder or knowledge center you just created to be visible in any analysis of precedents and dependents.
Folders can be deleted by users with Administrator permission to them.
However, depending on the User role, there may be certain limitations:
To delete a folder:
In the Delete? dialog, ensure there are no objects that depend on the folder.
Note: If there are objects that depend on the folder, then deleting the folder will cause an error to appear in those objects.
In the Build or Objects views, you can search or filter for folders. Another quick way to find a top-level folder is to switch the grid to the hierarchical view  .
.
In the Build view of your application, you can search or filter for folders.
To view and modify the contents of a folder, click on the folder name. The folder appears with the following configuration options:


| Call out letter | Name | Description |
| A | Breadcrumbs | Display the folder hierarchy (including all parent folders of the current folder) and allow developers to navigate between folders and subfolders. Click on any folder name within the breadcrumbs to navigate to it. |
| B | Folder settings | Provides developers with relevant actions that can be taken on the current folder, including viewing and editing the folder's Properties, Security, or location. |
| C | Toolbar | Allows developers to take actions on selected objects located within the current folder.
|
Folder security determines which groups can access and modify a folder, its properties, and any objects within it that inherit security.
Developers can set and edit folder security in either of the following ways:
 , then select Security in the dropdown list.
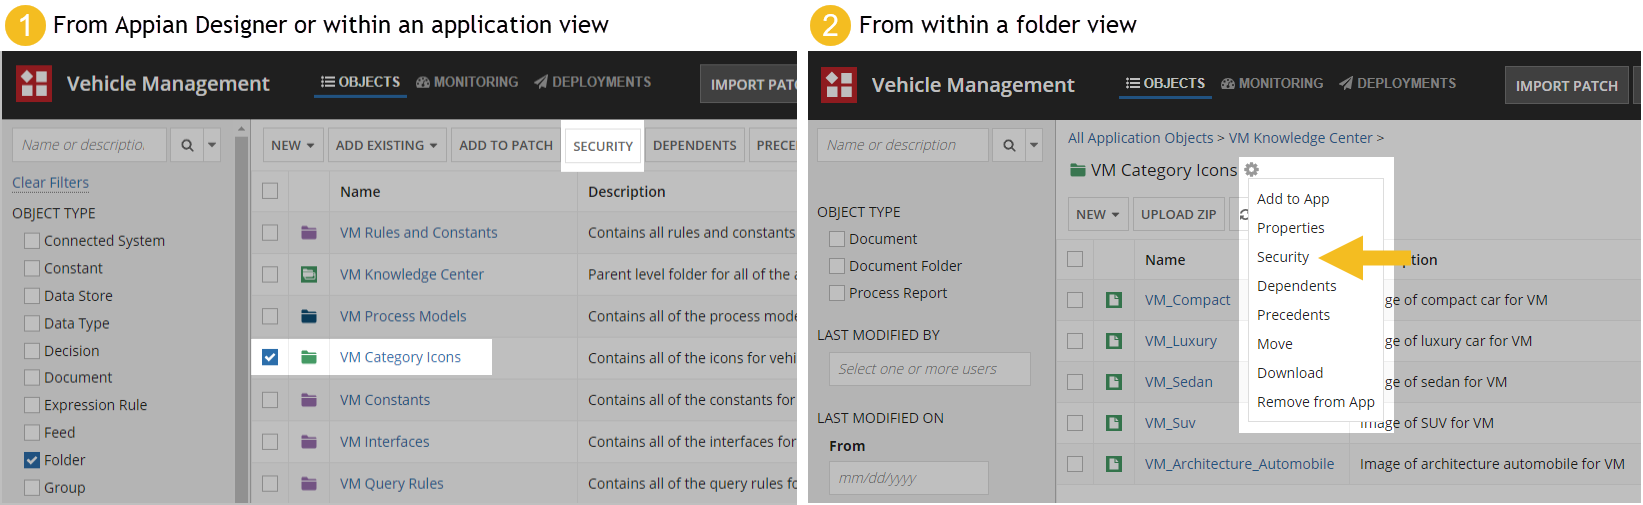
To modify security on a folder:
Learn more about the different security settings for each folder type in the following sections:
Rule folders can only contain the following object types:
Note: During application creation, Appian can automatically generate a rule folder named prefix Rules & Constants. Learn more about generated folders.
Tip: Rule folders always inherit security from their parent rule folder if they have one. Security can be set on a rule folder, as well as set on each object located within that rule folder. By default, a rule folder's security is inherited by all objects located within it.
The security role map of a rule folder controls which users can see or modify it, its properties, and its contents that inherit security.
If default security groups are configured for your application, the default security groups pre-populate the role map when you create a rule folder. If default security groups are not configured for your application, you are automatically assigned Administrator permissions for any rule folder you create. System administrators can always access a rule folder, regardless of object-level permissions.
See Editing Object Security to modify a rule folder's security.
The following table outlines the actions that can be completed for each permission level in a rule folder's security role map. This table assumes that objects within the rule folder inherit security (default). If an object does not inherit the folder's security, then the object's individual security role map applies.
| Actions | Administrator | Editor | Viewer | Deny |
|---|---|---|---|---|
| View the rule folder | Yes | Yes | Yes | No |
| Create objects in the rule folder | Yes | Yes | No | No |
| View the security | Yes | Yes | No | No |
| Update the security | Yes | No | No | No |
| Delete the rule folder | Yes | No | No | No |
Process model folders can only contain process models and process model subfolders.
Note: During application creation, Appian can automatically generate a process model folder named prefix Process Models. Learn more about generated folders.
Tip: Process model folder security is not inherited by the process models or process model subfolders located within them. Security must be set on each process model and process model subfolder individually.
The security role map of a process model folder controls which users can see or modify it and its properties.
If default security groups are configured for your application, the default security groups pre-populate the role map when you create a process model folder. If default security groups are not configured for your application, you are automatically assigned Administrator permissions for any process model folder you create. System administrators can always access a process model folder, regardless of object-level permissions.
See Editing Object Security to modify a process model folder's security.
The following table outlines the actions that can be completed for each permission level in a process model folder's security role map. This table only applies to the security of process model folders. Process models within the folder have individual security role maps.
| Actions | Administrator | Editor | Viewer | Deny |
|---|---|---|---|---|
| View the process model folder | Yes | Yes | Yes | No |
| Create objects in the process model folder | Yes | Yes | No | No |
| View the security | Yes | No | No | No |
| Update the security | Yes | No | No | No |
| Delete the process model folder | Yes | No | No | No |
Knowledge centers are containers for folders and their files. They can only contain document folders and documents.
The System Knowledge Center and Temporary Documents Knowledge Centers are available by default in Appian Designer.
Note: During application creation, Appian can automatically generate a knowledge center named prefix Knowledge Center. Learn more about generated folders.
The System Knowledge Center is used to store system documents, including:
By default, all users have Viewer permission to this knowledge center.
The Temporary Documents Knowledge Center is used to store system and process objects in transition. Files that are uploaded using the file upload component are temporarily stored in this knowledge center, but they cannot be accessed or viewed from the user interface.
By default, all users have Editor permission to this knowledge center.
The security role map of a knowledge center controls which users can see or modify it, its properties, and its contents.
If a knowledge center has a parent community (a deprecated folder object), it inherits the community's security. If the security of the community and the knowledge center conflict, the community's security takes precedence.
For all other knowledge centers, you can configure the security for the knowledge center during creation and any time after that. If default security groups are configured for your application, the default security groups pre-populate the role map when you create a knowledge center. If default security groups are not configured for your application, you are automatically assigned Administrator permissions for any knowledge center you create. System administrators can always access a knowledge center, regardless of object-level permissions.
See Editing Object Security to modify a knowledge center's security.
The following table outlines the actions that can be completed for each permission level in a knowledge center's security role map. This table assumes that objects within the knowledge center inherit security (default). If an object does not inherit the knowledge center's security, then the object's individual security role map applies.
| Actions | Administrator | Editor | Viewer | Deny |
|---|---|---|---|---|
| View the knowledge center | Yes | Yes | Yes | No |
| Create new documents or move documents into a subfolder under the knowledge center (must have at least Editor permissions to the subfolder) | Yes | Yes | Yes | No |
| Create new subfolders in the knowledge center | Yes | Yes | No | No |
| View the security | Yes | Yes | No | No |
| Update the security | Yes | No | No | No |
| Move and delete subfolders | Yes | No | No | No |
| Move and delete the knowledge center | Yes | No | No | No |
Knowledge center security can also be updated using the Modify KC Security Smart Service. Note that the security permission levels Author and Reader in the smart service correspond to Editor and Viewer respectively.
Document folders can contain subfolders and documents, and must reside in a parent folder or knowledge center.
Note: During application creation, Appian can automatically generate two document folders, prefix Artifacts and prefix Application Documentation. Learn more about generated folders.
The security role map of a document folder controls which users can see or modify it, its properties, and its contents.
By default, document folders inherit security from their parent knowledge center. However, after creating the document folder, you can disable that inheritance and modify the folder's security. See Editing Object Security to modify a document folder's security.
The following table outlines the actions that can be completed for each permission level in a document folder's security role map.
| Actions | Administrator | Editor | Viewer | Deny |
|---|---|---|---|---|
| View the document folder | Yes | Yes | Yes | No |
| View and download documents that reside in the document folder | Yes | Yes | Yes | No |
| Update documents that reside in the document folder | Yes | Yes | No | No |
| Create new subfolders and documents in the document folder * | Yes | Yes | No | No |
| View the security | Yes | Yes | No | No |
| Update the security | Yes | No | No | No |
| Move subfolders or documents into the document folder * | Yes | No | No | No |
| View download metrics for documents that reside in the document folder | Yes | No | No | No |
| Move documents out of the document folder | Yes | No | No | No |
| Move and delete the document folder | Yes | No | No | No |
Note: To create new folders and documents within a document folder, you must have at least Viewer permissions to all of the folders and knowledge centers that the document folder resides in. This also applies when moving folders and documents into a document folder.
A document object is any file of any file type that you upload to Appian. All documents must be saved in document folders. They cannot be saved directly into knowledge centers.
Documents can be managed in Appian Designer and through a variety of Document Management smart services. This section focuses on managing documents within Appian Designer.
There are multiple ways to create new documents, including:
In Appian Designer, you can create new documents (up to 25 at a time) or upload zip files.
To create a new document:
Configure the following properties:
| Property | Description |
|---|---|
| Name | For each file you uploaded, enter a name that follows the recommended naming standard. |
| Description | (Optional) For each file you uploaded, enter a brief description of the file. |
| Create constants for these documents | Select the checkbox to enable this option. When enabled, Appian will create one constant per file. Constants will be added to your current application and its corresponding rule folder. If your application does not contain a rule folder, Appian will automatically create a rule folder and add the constants to it. |
| Save In | Browse to and select an existing folder or create a new folder to store the document object. |
Note: It can take up to two minutes for the document you just created to be visible in any analysis of precedents and dependents.
Documents always inherit security from their parent folder.
See document folder security to learn more about the permission levels required for creating, editing, and downloading documents.
Once a document has been created, new versions of it can be uploaded at any time. See Managing Object Versions to learn more about viewing and comparing document versions.
To upload a new version of a document:
Note: The file extension of the newly uploaded document must match the file extension of the originally uploaded file.
Note: If the document is locked, a warning banner on the Upload New Version dialog will appear. Proceeding with the upload will break the other user's lock on the document.
To view a document's properties you must have at least Viewer permissions to the document and its parent folder.
To edit a document's properties you must have at least Editor permissions to the document and its parent folder.
To view or edit a document's properties:
In the Document Properties dialog, view or update any document properties.
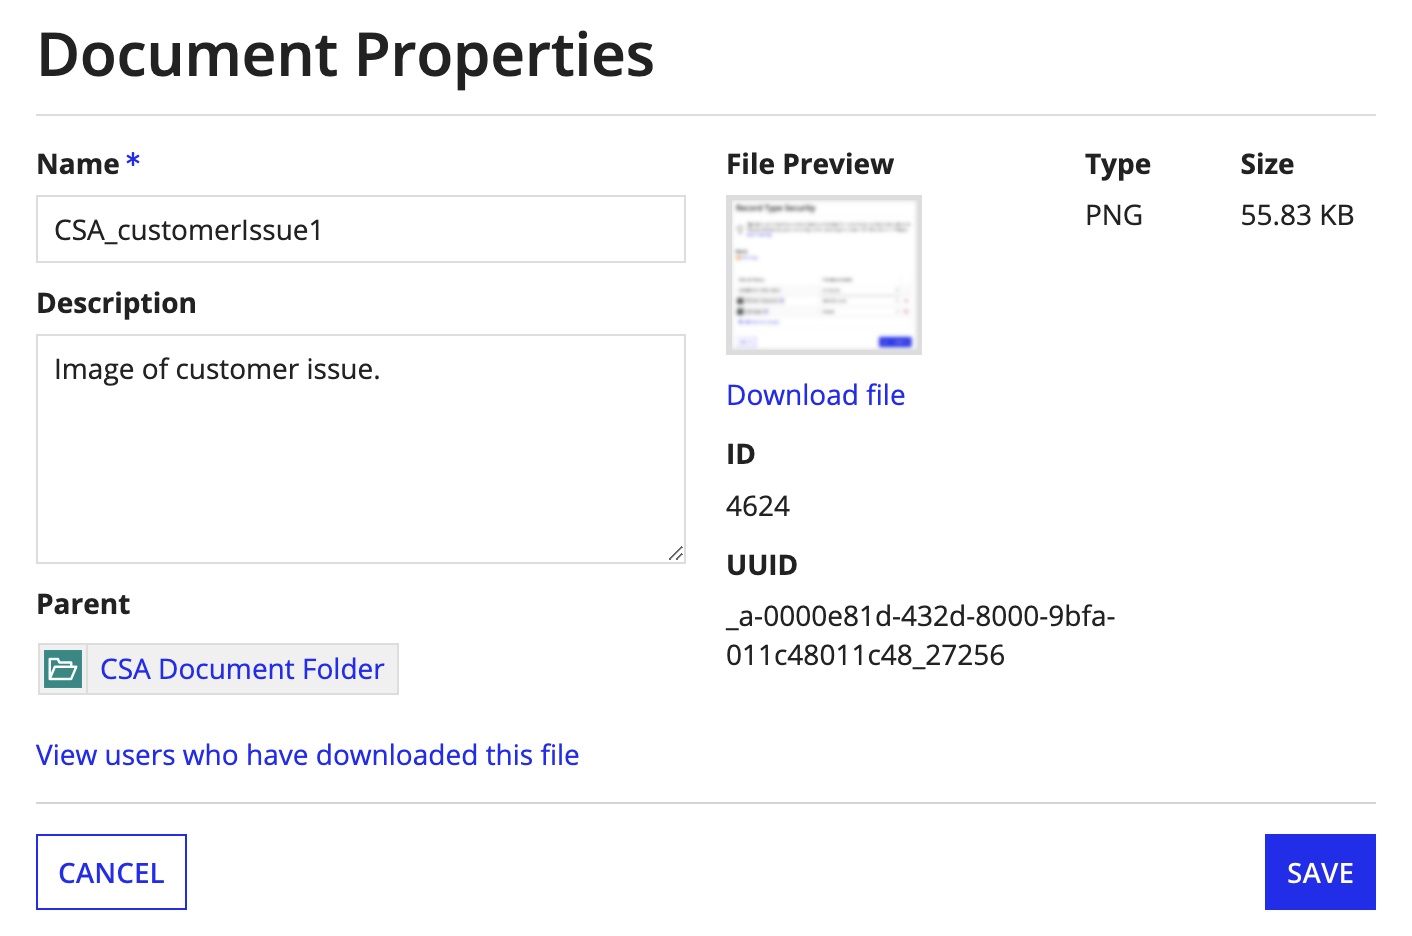
Note: The View users who have downloaded this file link displays a list of the users who have downloaded the document. You must have Administrator permissions to the document in order to access this link.
A user must have Administrator permissions to the document and its folder in order to delete it. Deleting a document removes the specific file and all of its previous versions.
To delete a document:
You can move folders or documents within knowledge centers or other folders if you have Administrator permissions to the source parent folder and at least Editor permissions to the destination parent folder or knowledge center.
To move a folder or document:
Note: When you move a folder or document, Appian retains the history of previous versions.
You can download the contents of entire knowledge centers and folders if you have at least Viewer permissions to them.
To download document hierarchies:
Note: The files and folders selected for download are packaged in a ZIP file and retain the hierarchy they had in Appian.
The document folder view in Appian Designer allows you to upload a ZIP file of a document hierarchy. Uploading this zip will create document folders and documents in Appian in the exact structure as the folders and files are inside the ZIP. This is useful when you need to create many documents at once or have a folder structure you want to bring into Appian.
You must have at least Editor permissions to the document folder in order to upload a ZIP. You must also have at least Viewer permissions to all of the folders and knowledge centers that the document folder resides in.
To upload a document hierarchy:
Note: Any special characters used in filenames by files in your ZIP archive are replaced with hyphen (-) characters upon upload.
Process reports are stored as documents in Appian, as Appian Report Files (.arf). They can be created, edited, and moved between document folders just like document objects.
Appian stores application documentation as document objects. You can manage your newly uploaded document directly from within the Application Documentation dialog (accessible from the Build and Explore views) or in the objects grid of the Build view.
You must remove the document object from the documentation list before you try to delete the document object or remove the document object from the application. Otherwise, Appian will block the action.
Folder and Document Management
