
Estimated time to complete this tutorial: 1 hour
User experience level: Beginner
OverviewCopy link to clipboard
In this tutorial, you'll build an Appian process that:
- takes a document as input,
- uses an AI skill to extract data from that document,
- sends a task to someone to reconcile the extracted data, and
- save the reconciled data as a new record.
This process model relies on a series of nodes that leverage artificial intelligence (AI) to map fields from a document to fields in a record type. Once the data is extracted, users can confirm or correct the results using a simple task interface. As you test your process model and reconcile results, the extraction will become smarter and more accurate over time.
This page will walk you through how to create your own document extraction process in three parts:
- Create a document extraction AI skill and define your document structure.
- Create record types and other design objects to map and save your extraction results.
- Configure a basic document extraction process model.
Tip: Check out the Document Classification Tutorial to build a process that classifies documents in addition to extraction.
ScenarioCopy link to clipboard
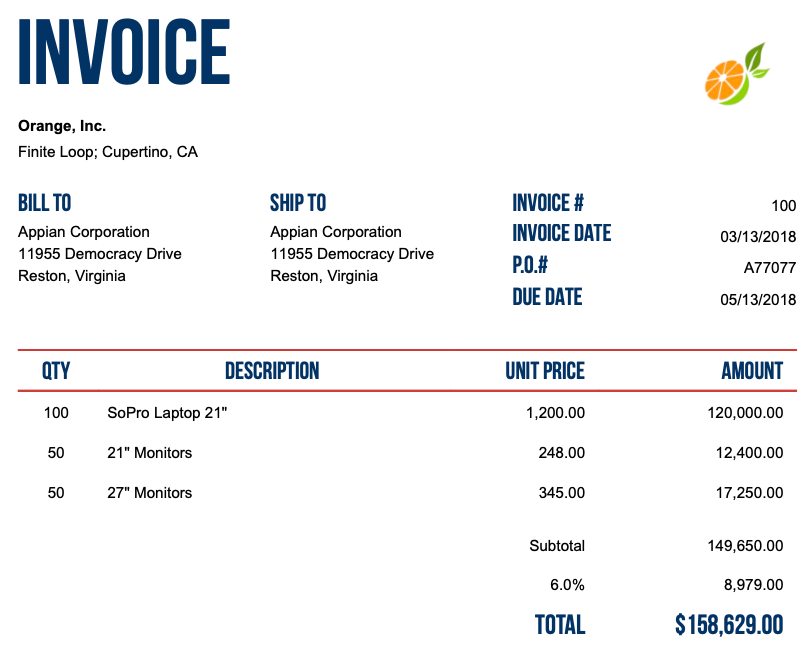
Acme Logistics is a shipping and receiving company that manages inventory for its customers. In addition to physical items, Acme has to manage and act on documents such as invoices. Acme wants to create an Appian process to extract data from invoices, which customers and vendors submit through Acme's website. Acme also wants to save this data as records.
Before you build the process, you'll build all of the supporting design objects, starting with the AI skill.
SetupCopy link to clipboard
This tutorial assumes you have an Appian application created already. We'll walk you through creating each of the design objects you need to automate document classification.
Tip: Objects in this tutorial use the AL prefix. If you're creating objects in an application that uses a different prefix, use your application's prefix in new object names.
Gather example documentsCopy link to clipboard
Before the AI skill can serve its purpose, it needs to learn a lot about the documents your business encounters. One of your first steps should be to build a complete and representative dataset to train the model. The model can only learn from the documents you provide to it, so it's important to have a large number and variety of realistic examples.
We've provided sample Invoices for you to use in this tutorial. Download these files to your computer, since you'll use them to setup and train the AI skill. Unzip the compressed folders, as you'll need to upload the documents individually and not as a ZIP file.
System requirementsCopy link to clipboard
This tutorial is designed to be used with Appian 23.2 and later.
Part 1: Create AI skillCopy link to clipboard
The Document Extraction AI Skill takes a document as input and uses machine learning to extract data from that document.
To create the AI Skill:
- In your application, go to the Build view.
- In the application toolbar, click NEW > AI Skill.
- On the Create AI Skill page, in the Extraction section, choose Document.
- Choose Semi or Highly Structured.
-
Configure the following properties:
Property Value Name AL_ExtractInvoiceDescription (Optional) AI skill to extract data from invoices Acme receives - Click CREATE. The Review AI Skill Security window displays.
- Select Viewer permissions for the AL Users group and Administrator permissions for the AL Administrators group.
- Click SAVE.
Create a model and add documentsCopy link to clipboard
To get started, you'll create a model and add examples of a typical invoice.
- In your new AI skill, click CREATE FIRST MODEL.
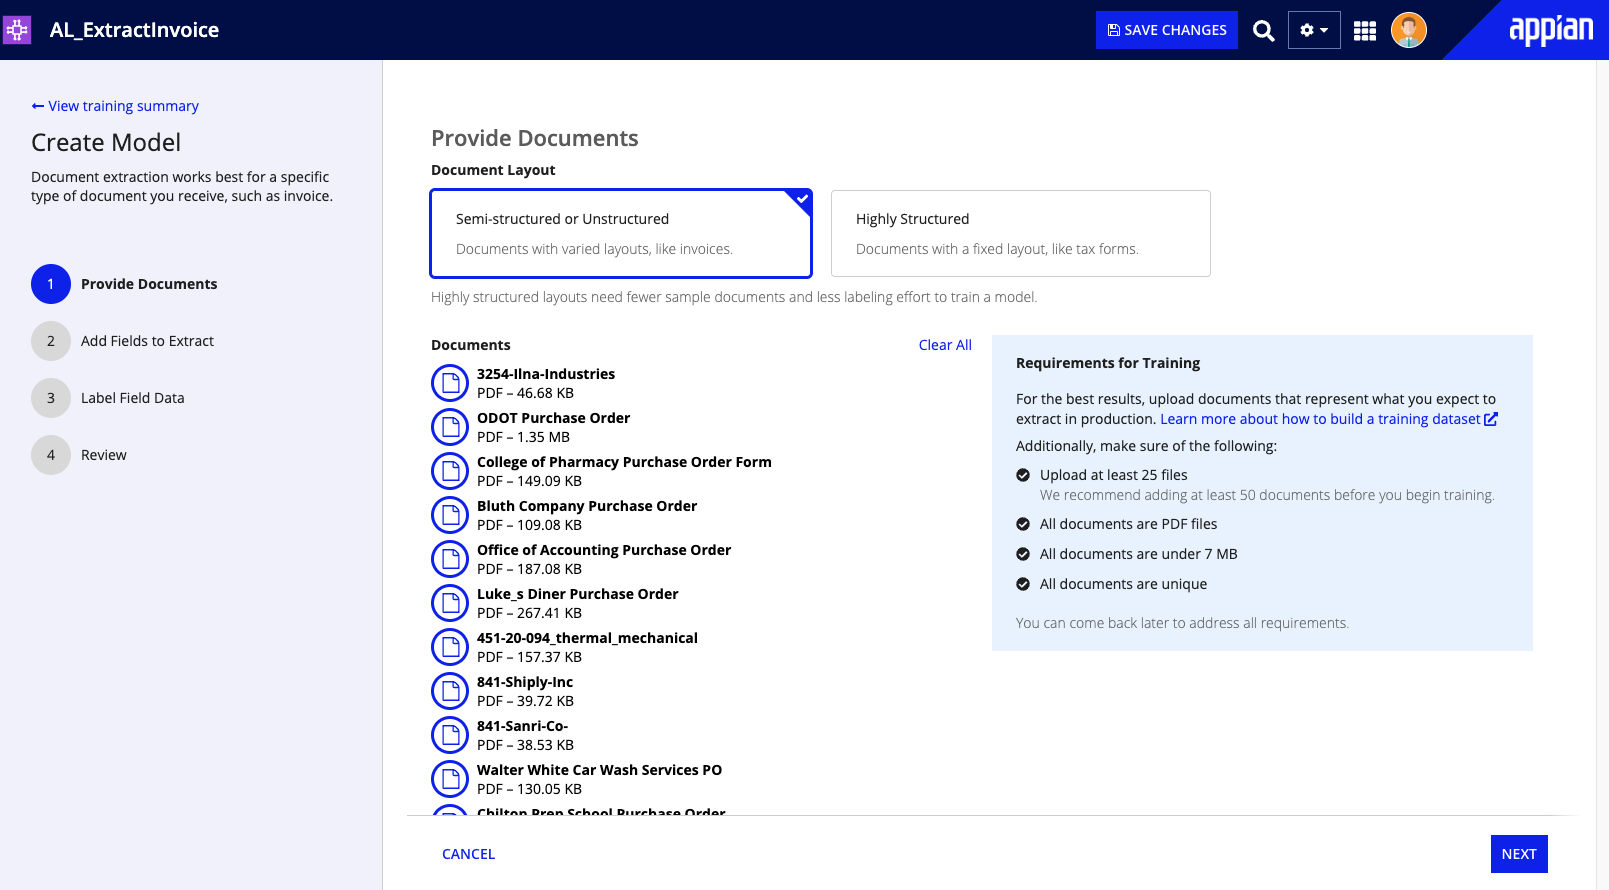
- In Step 1: Provide Documents, choose Semi-structured for the Document Layout.
- Click UPLOAD to add training documents.
- Browse for and select invoices.
- After the documents finish uploading, click NEXT.

Define the invoice structureCopy link to clipboard
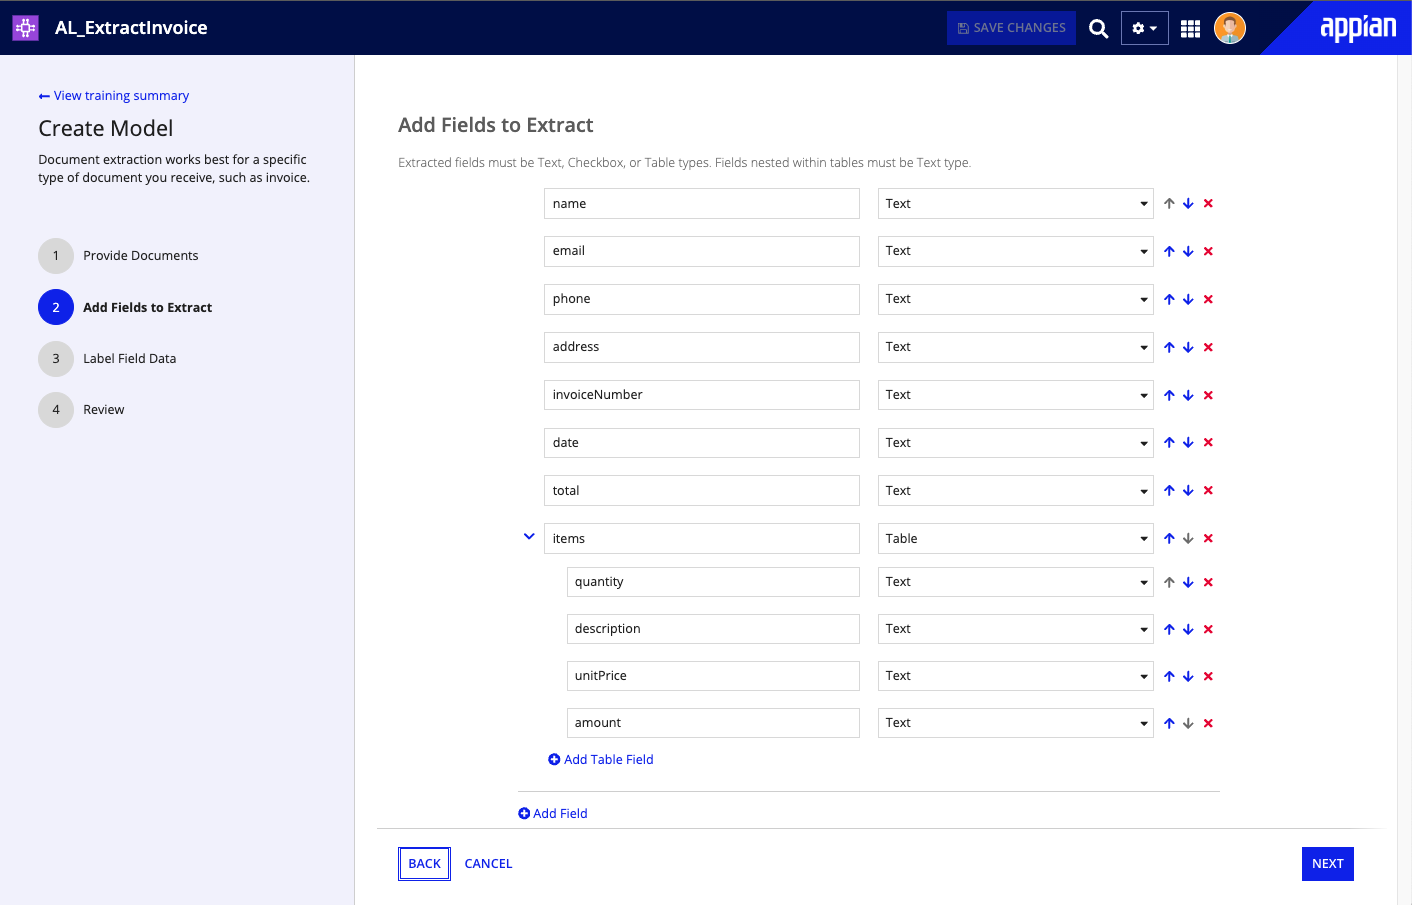
- In Step 2: Add Fields to Extract, enter the names of the fields that appear on most invoices. Start with
name. - Click Add Field six more times, so you have a total of seven fields. Use the default data type of
Textfor all seven fields. - Enter the following field names:
emailphoneaddressinvoiceNumberdatetotal
- Add another field. Name this field
itemsand select typeTable. - In the nested table fields that appear below
items, add four fields with the default data type ofText. - Enter the following four field names:
quantitydescriptionunitPriceamount
- Click NEXT.
Label field dataCopy link to clipboard
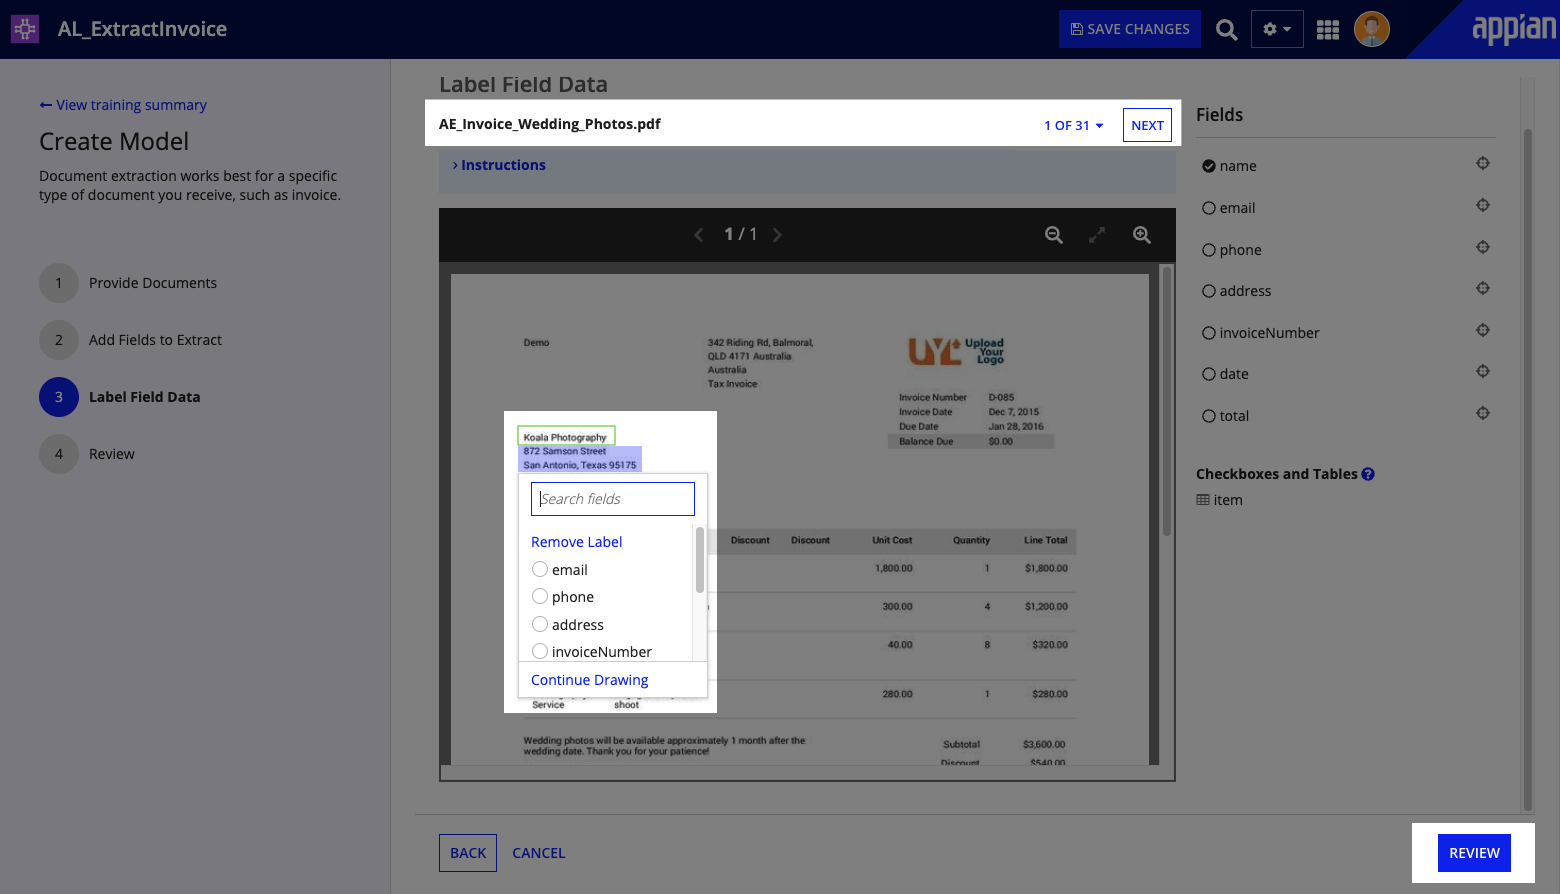
Once you define your document structure, you'll indicate where those fields appear in the sample documents. This process is called labeling and it helps the model learn more about where these fields appear in your documents.
- In the document preview, click and drag your mouse around the company name to create a selection box.
- In the dropdown that appears, click the
namefield. -
Repeat steps 1 and 2 until you've labeled values for all fields in your invoice structure. You won't label the fields in the
itemstable, but that information will still be extracted.Tip: Regularly click SAVE CHANGES to save your progress.
- Above the document preview, click NEXT to view the other sample documents and label additional fields.
- Click REVIEW to see a summary of how many labels appear for each field.
Review labeled fields and train the modelCopy link to clipboard
The final step of creating a document extraction AI skill asks you to review the fields you've labeled in the sample documents. The more fields you label, the more the model can learn about your fields. This is what makes the model smarter and better at extracting data of interest.
Each field will need labels in at least half of the documents you uploaded. If you haven't labeled enough fields in the set of documents you uploaded, you'll see a message encouraging you to add more files and fields.
After your review, click TRAIN MODEL. Training may take a few minutes. While you wait, proceed to create the additional design objects in your process.
Part 2: Create additional design objectsCopy link to clipboard
When extracting data, Appian will identify key-value pairs from the document and map them to the fields of your desired data object (a CDT or record type). Your data object should be constructed to reflect the data available in your document. Therefore, it's important that your fields match the data that will be extracted from your document.
If your document contains field names and a table, like an invoice document that contains a table of items, you'll ultimately create two data objects: one that represents the document, and one that represents the table.
In this step, you're creating two record types to store the extracted data: one record type for the invoice data, and one record type for the data contained in the items tables commonly found in invoices Acme receives.
Create a record type for a documentCopy link to clipboard
To create a record type for your document, you'll want to create all the form fields as fields in your record type.
- In your application, go to the Build view.
- Click NEW > Record Type.
-
In Create Record Type, configure the following properties:
Property Value Name AL InvoiceDisplay Name (Plural) AL InvoicesDescription A record type to store data on invoices sent to Acme Logistics. - Click CREATE. The Review Record Type Security window displays.
- Select Viewer permissions for the AL Users group and Administrator permissions for the AL Administrators group.
- Click SAVE. The record type opens in a new tab.
- Click TELL US ABOUT YOUR DATA.
- On the Configure Data Source page, click I want to start from scratch.
- Click NEXT.
- Choose your Data Source where you'd like to create the data.
- Click NEXT.
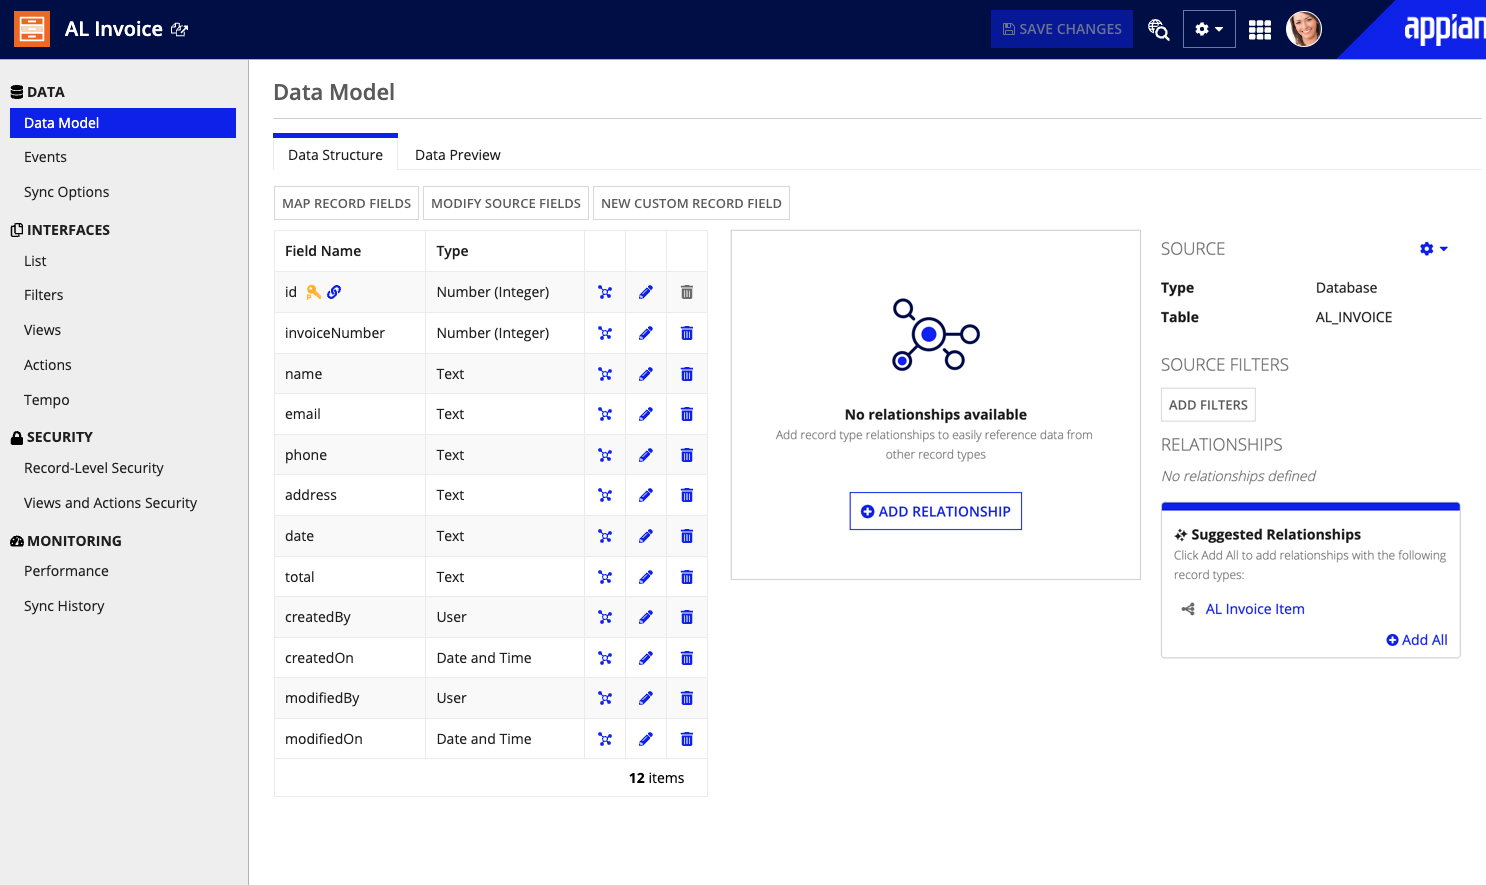
-
On the Create Data Model page, keep the default settings for the following fields:
Field Type idNumber (Integer)createdByUsercreatedOnDate and TimemodifiedByUsermodifiedOnDate and Time - Click NEXT twice to skip adding record type relationships for now. You'll do this in a later step. You can keep any suggested relationships, such as relationships with User records.
-
Click NEW FIELD to create seven new fields in the data model:
Field Type invoiceNumberNumber (Integer)nameTextemailTextphoneTextaddressTextdateTexttotalTextTip: Notice that these fields match the top-level fields in the AI skill you created earlier.
- Keep the Create Table checkbox checked and click SAVE CHANGES.
- Click FINISH.
Create a record type for a tableCopy link to clipboard
To extract and save table data from your document, you need to create a separate record type to represent the table. After, you will create a relationship to reference this new record type from the record type representing the document.
To create a record type for the table:
- In your application, go to the Build view.
- Click NEW > Record Type.
-
In Create Record Type, configure the following properties:
Property Value Name AL Invoice ItemDisplay Name (Plural) Invoice ItemsDescription A record type to store table data on invoices sent to Acme Logistics. - Click CREATE. The Review Record Type Security window displays.
- Select Viewer permissions for the AL Users group and Administrator permissions for the AL Administrators group.
- Click SAVE. The record type opens in a new tab.
- Click TELL US ABOUT YOUR DATA.
- On the Configure Data Source page, click I want to start from scratch.
- Click NEXT.
- Choose your Data Source where you'd like to create the data.
- Click NEXT.
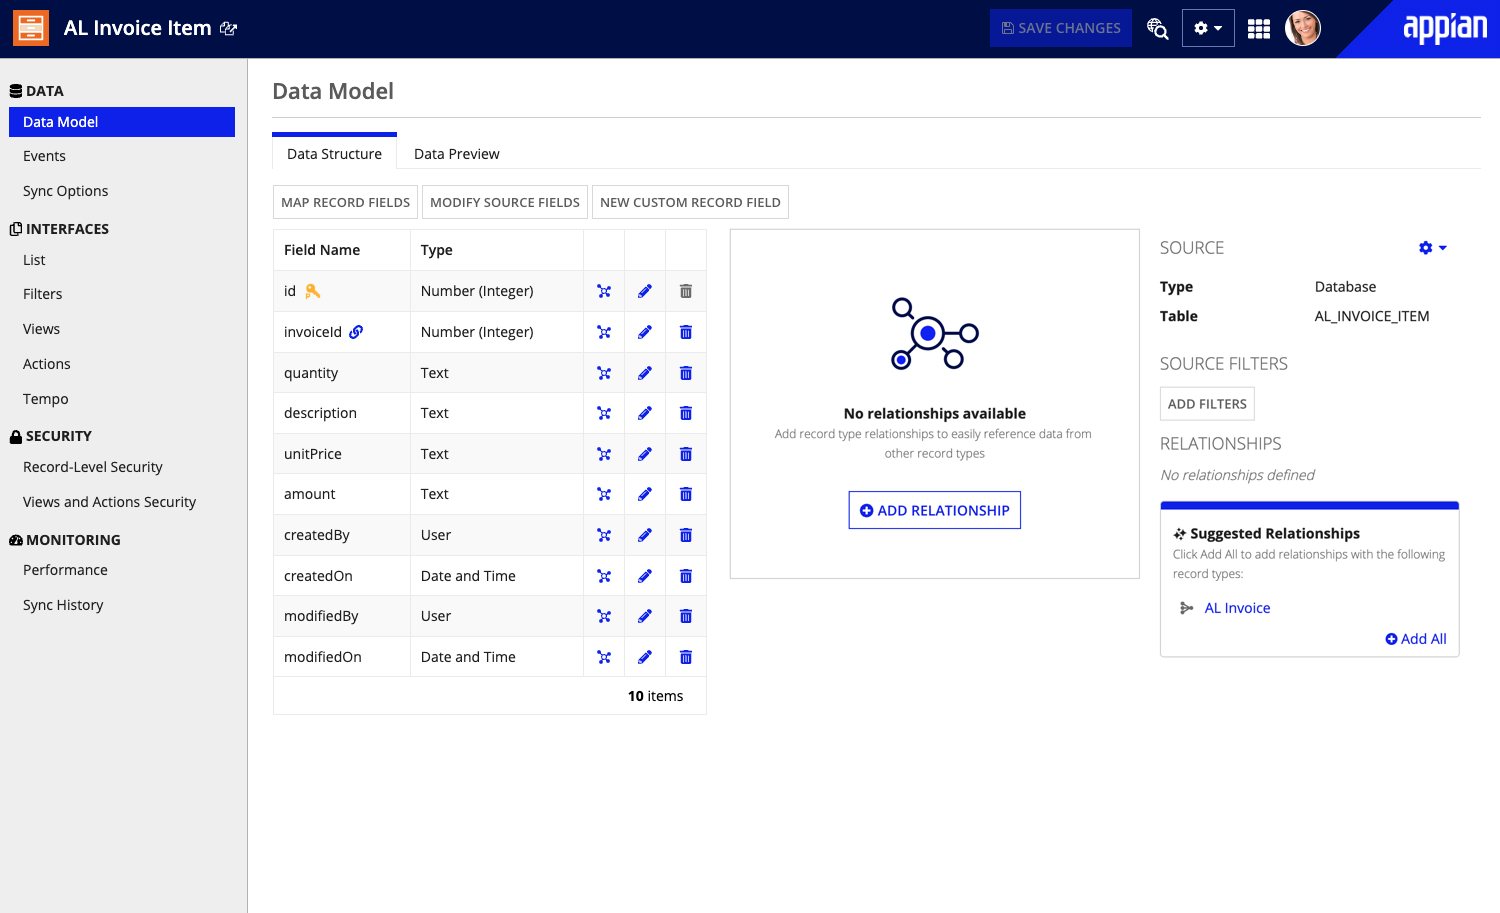
-
On the Create Data Model page, keep the default settings for the following fields:
Field Type idNumber (Integer)createdByUsercreatedOnDate and TimemodifiedByUsermodifiedOnDate and Time - Click NEXT twice to skip adding record type relationships for now.
-
Click NEW FIELD to create five new fields in the data model:
Field Type invoiceIdNumber (Integer)quantityTextdescriptionTextunitPriceTextamountTextTip: Notice that these fields match the table fields in the AI skill you created earlier.
invoiceIdis a separate field from theidfield generated automatically by the record type wizard. - Keep the Create Table checkbox checked and click SAVE CHANGES.
- Click FINISH.
Add record type relationshipsCopy link to clipboard
Now that you've set up a record type for both the invoice and the table, you'll need to add record type relationships to associate them. For document extraction data to write to both records, you'll need to set up relationships in both record types.
- In your application, go to the Build view.
- In the list of design objects, open the
AL Invoicerecord type. - Click ADD RELATIONSHIP.
- In the Related Record Type field, select
AL Invoice Item. - Click NEXT.
- For the Relationship Name, enter
items. Note that this matches the table field you added in the AI skill document structure. - For the Relationship Type, choose One to Many.
-
For Common Fields, select the following:
Record Type Field AL Invoice id - Number (Integer)AL Invoice Item invoiceId - Number (Integer)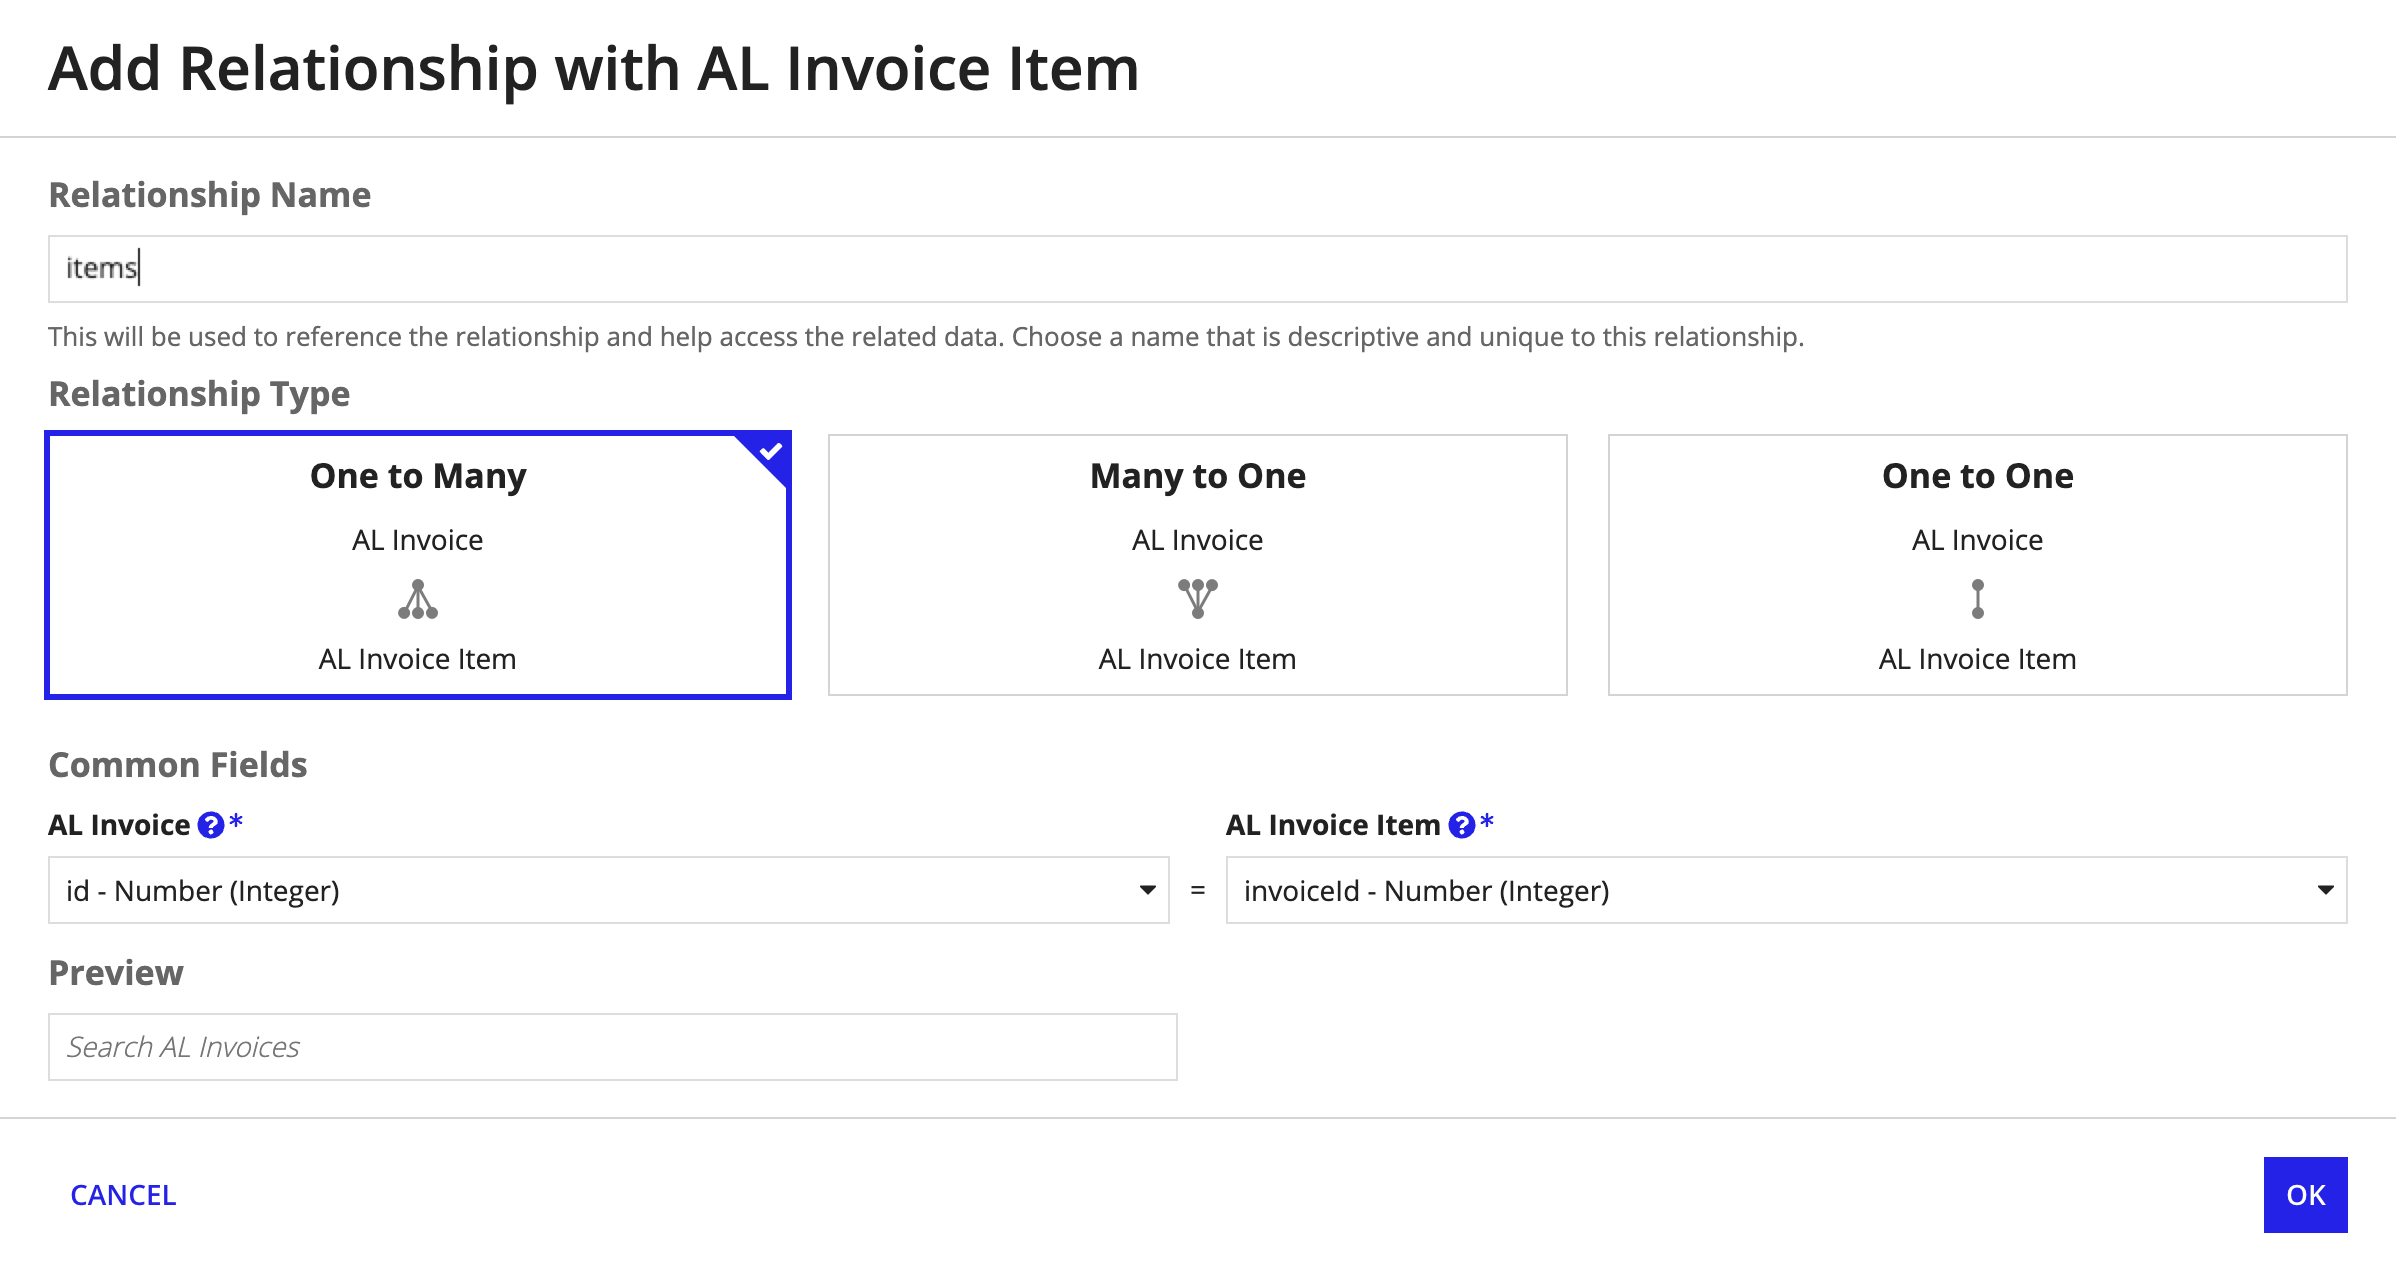
- Click ADD.
- Click SAVE CHANGES.
Repeat the process in the AL Invoice Item record type:
- In your application, go to the Build view.
- In the list of design objects, open the
AL Invoice Itemrecord type. - Click ADD RELATIONSHIP.
- In the Related Record Type field, select
AL Invoice. - Click NEXT.
- For the Relationship Type, choose Many to One.
-
For Common Fields, select the following:
Record Type Field AL Invoice Item invoiceId - Number (Integer)AL Invoice id - Number (Integer)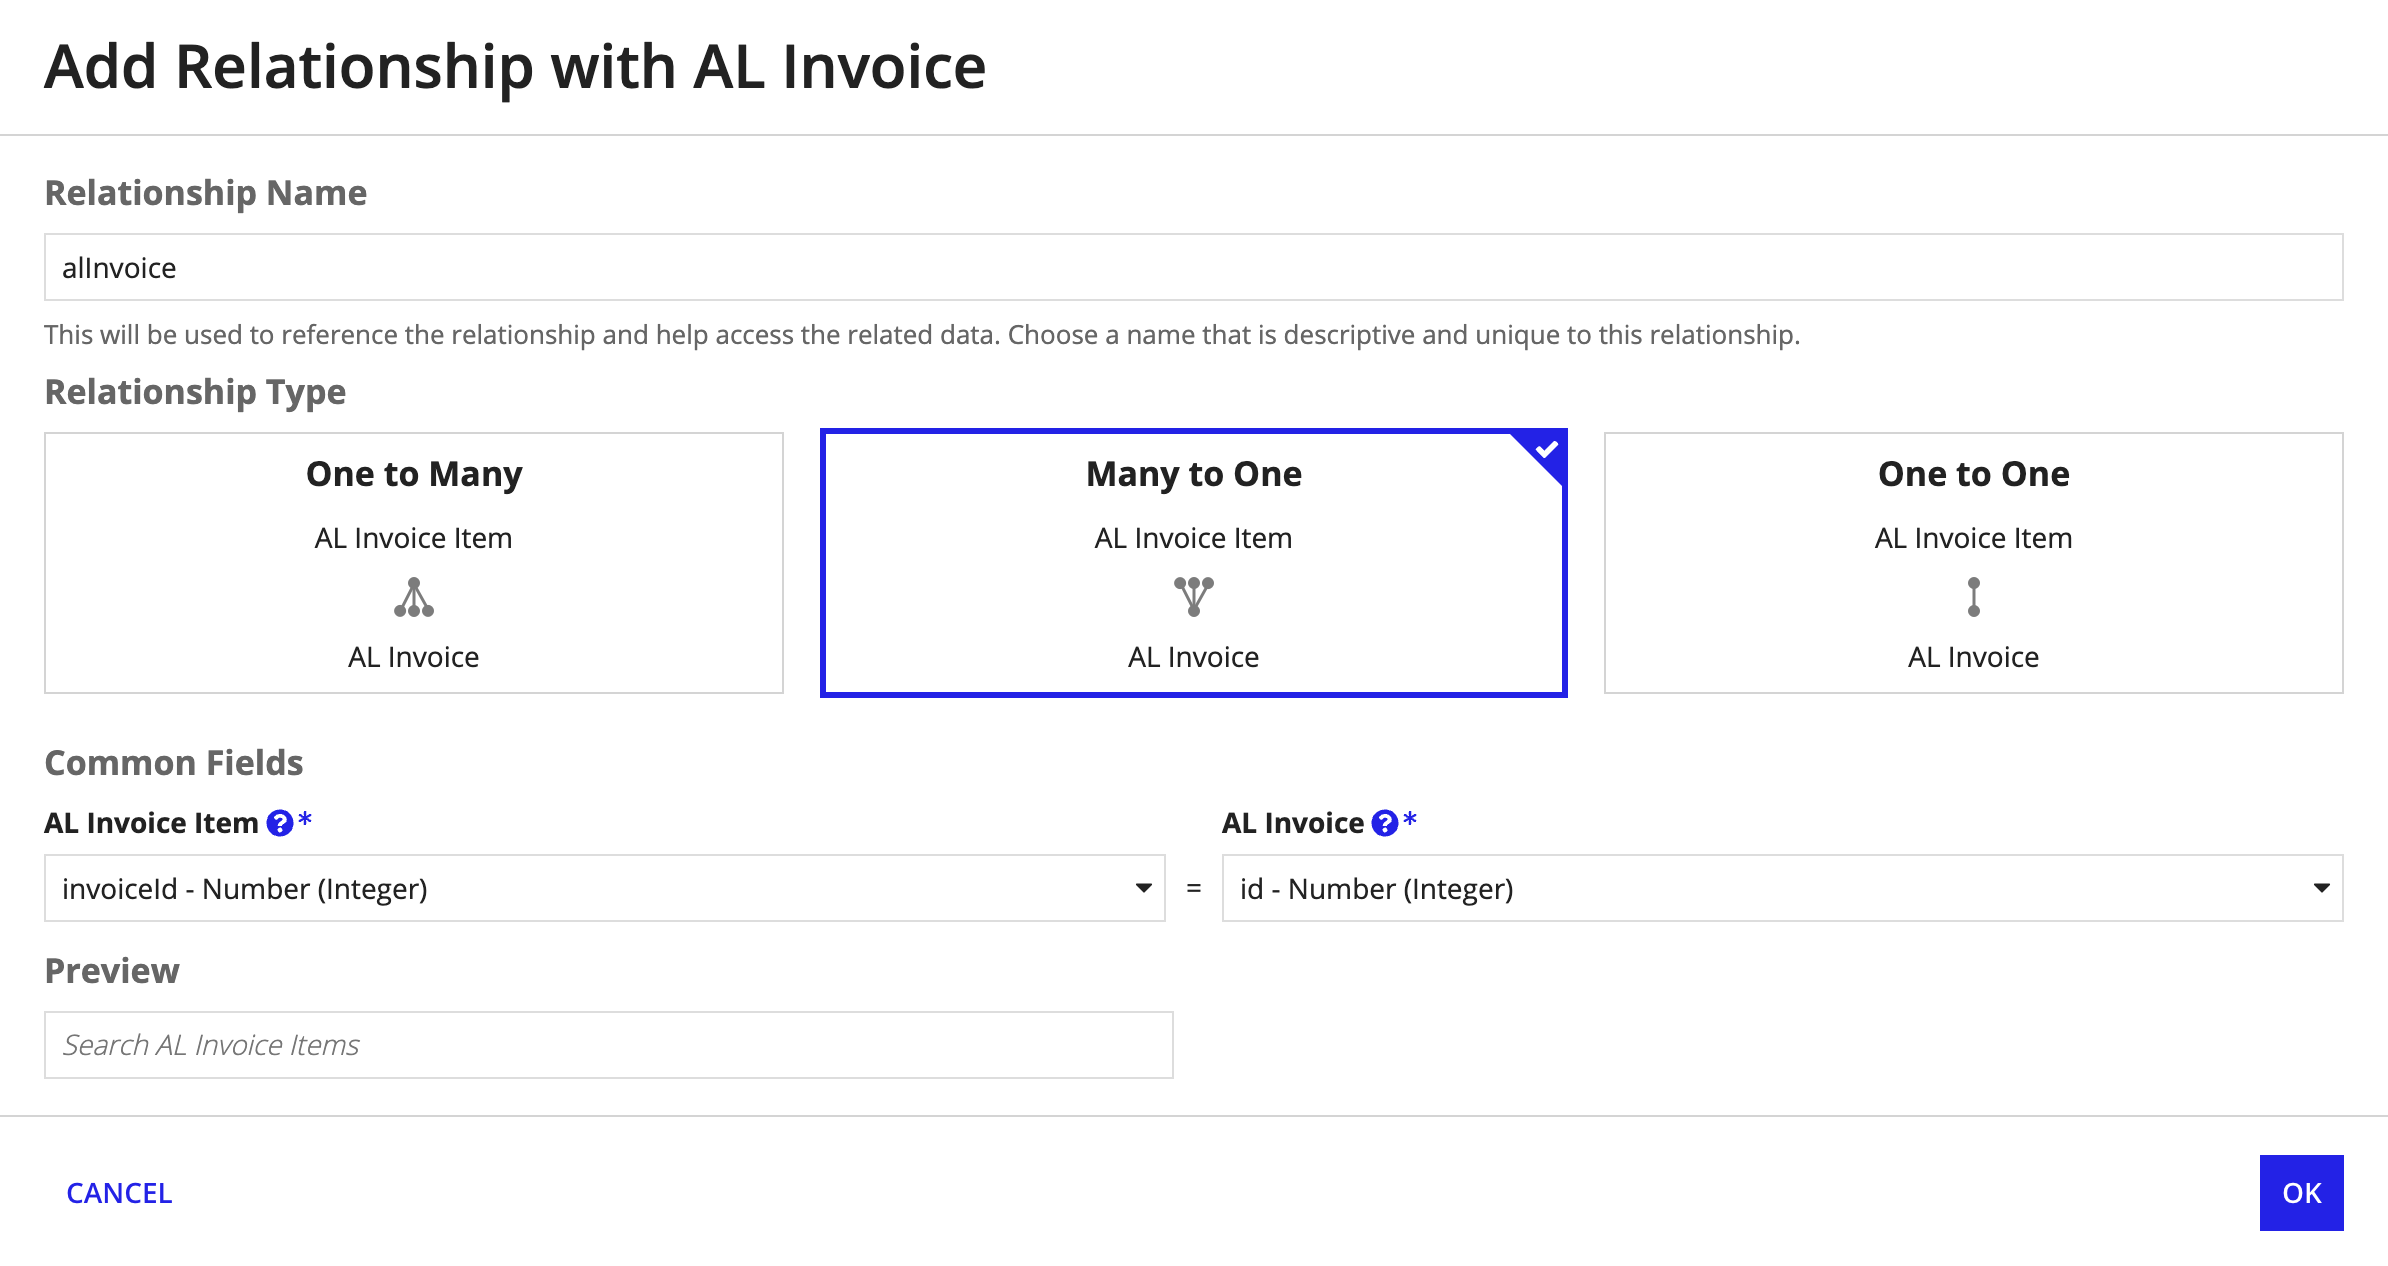
- Click ADD.
- Click SAVE CHANGES.
Create a document folderCopy link to clipboard
To keep things organized as users upload invoices, create a folder in your application to store the document files.
- In your application, go to the Build view.
-
Click NEW > Folder.
Property Value Type Document Folder Name AL Uploaded DocumentsDescription Folder containing documents submitted via Acme's website.Parent Folder AL Knowledge Center - Click CREATE.
Create a constant for the document folderCopy link to clipboard
To reference the folder in your interface, you'll need to create a constant.
- In your application, go to the Build view.
-
Click NEW > Constant.
Property Value Name AL_UPLOADED_DOCUMENTSDescription Constant referencing the AL Uploaded Documents folder.Type FolderValue AL Uploaded Documents - Click CREATE.
Add a start formCopy link to clipboard
Acme's customers submit a form with invoices attached. You can create an interface to collect and save all of the necessary information, including documents.
- In your application, go to the Build view.
- Click NEW > Interface.
-
Configure the following fields:
Property Value Name AL_IntakeFormDescription (Optional) Interface to allow vendors to upload documents.Save In Select the Rules & Interfaces folder in your application. - Click CREATE.
-
In the Rule Inputs pane, click New Rule Input and configure the following parameters:
Property Value Name documentType Document (Appian data type) - Click CREATE.
- In the templates panel, find the FORMS section.
- Click One Column Form.
- Double-click the title.
- Enter Submit to Acme Logistics.
- In the top Section Layout component in the editor, drag and drop a TEXT field from the component palette.
- Click the Text component.
-
In the COMPONENT CONFIGURATION, configure the following:
Parameter Value Label Position Hidden Display Value Click Edit as Expression and enter: "Thank you for contacting Acme! Upload your document and we'll be in touch."Read-only Selected - Click the bottom Section layout.
- In the COMPONENT CONFIGURATION, delete the default text in the Label field.
- In the bottom Section Layout component in the editor, drag and drop a FILE UPLOAD field from the component palette.
- Click the File Upload.
-
In the COMPONENT CONFIGURATION, configure the following:
Parameter Value Target Folder AL_UPLOADED_DOCUMENTSSelected Files ri!documentSave Files To ri!document - Click OK.
- Click SAVE CHANGES.
Create a constant for the analystCopy link to clipboard
Later, you'll add a node in the process model for the analyst to reconcile the extracted data. To assign that task, you'll first need to create a constant referencing the analyst.
- In your application, go to the Build view.
- Click NEW > Constant.
-
In Create Constant, configure the following properties:
Property Value Create from scratch Leave selected Name AL_ANALYSTDescription Constant pointing to the analyst at Acme Logistics.Type UserValue Select your username. - Click CREATE.
Part 3: Build the document extraction processCopy link to clipboard
With your record types and AI skill in place, you can now start building your end-to-end process.
The following instructions walk you through how to configure your process model and the three key nodes of a document extraction process.
As you build your process, you have the flexibility to incorporate other design objects and decisions that fit your specific business needs. See some additional process configuration options you can add to your own process model.
Create a process modelCopy link to clipboard
To easily pass data throughout your process, you'll want to create process variables that represent your document, extraction ID, and extracted data:
- In the application toolbar, click NEW > Process Model.
-
Configure the following properties:
Property Value Name AL Invoice ExtractionDescription Process to extract invoice data from Acme vendors. - Click CREATE.
- Configure security and click SAVE.
- From the File menu, click Properties.
- In the Process Model Properties dialog, go to the Variables tab.
-
Create the following process variables:
Name Type Value Parameter? Required? Multiple? cancelBoolean Blank Yes No No documentDocument Blank Yes No Yes docExtractionIdText Blank No No No recordAL Invoice (Record Type)Blank No No No 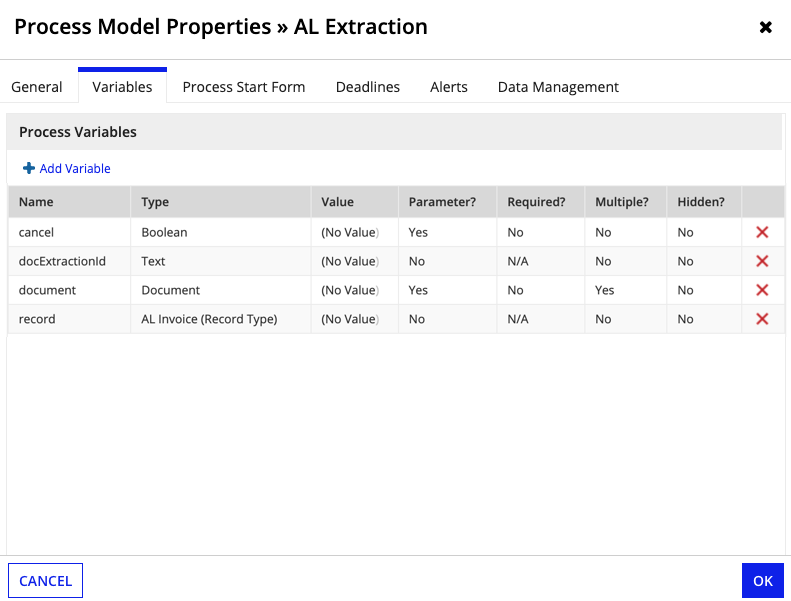
- Click OK.
Configure the Start FormCopy link to clipboard
The process kicks off when a user submits the start form. Configure the Start node to use the form you created:
- In the Appian Process Modeler page, click File > Properties in the menu bar. The process model properties window displays. By default, the General tab is active.
- Go to the Process Start Form tab.
- In the Interface text box, enter
AL. - Select
AL_IntakeFormwhen it displays in the dropdown list. - Click Yes to create process variables based on rule inputs from the submission form, even though you created all of the variables in the previous step.
- Click OK to return to the process model.
- In the menu bar, click File > Save & Publish.
Configure the Extract from Document Smart ServiceCopy link to clipboard
After defining your process variables, the first node to add to the process is the Extract from Document smart service. This smart service takes a document as input, extracts data using a machine learning model, and returns the extracted data as output.
To configure the smart service:
- From the Palette, drag in a Extract from Document smart service.
- Open the Extract from Document smart service.
- Select the Setup tab.
- Under Select AI Skill, select the
AL_ExtractInvoiceskill you created earlier. - Select the Data tab.
-
On the Inputs tab, configure the inputs with the following values:
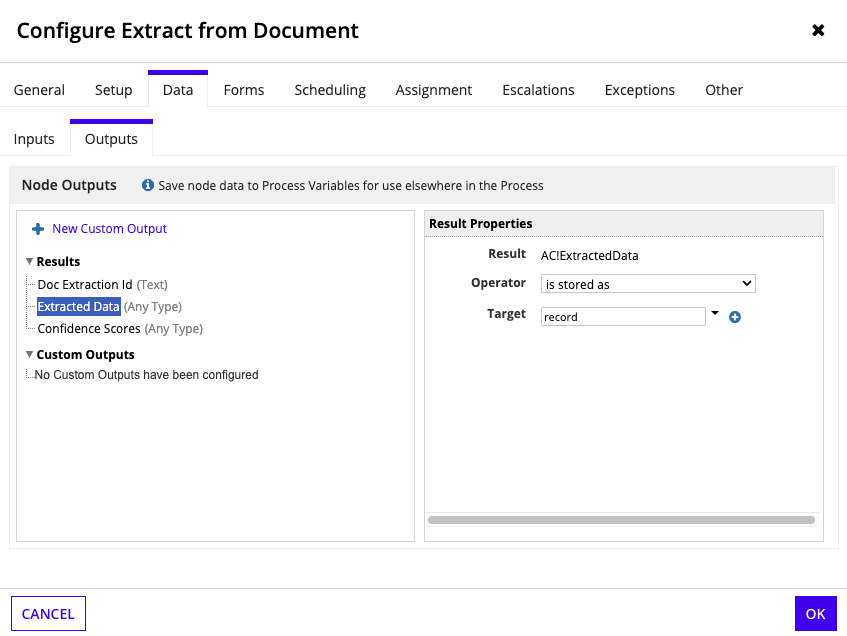
Input Value Document pv!documentConfidence Threshold 80 -
On the Outputs tab, configure the outputs with the following values:
Output Value Doc Extraction Id Choose the docExtractionIdprocess variable.Extracted Data Choose the recordprocess variable.Confidence Scores Leave blank. - Click OK.
Configure the Reconcile Doc Extraction Smart ServiceCopy link to clipboard
The next node you will configure is the Reconcile Doc Extraction Smart Service. This smart service will assign a reconciliation task to a user to confirm or correct the extracted results.
To configure the smart service:
- Drag in a Reconcile Doc Extraction Smart Service node.
- Open the Reconcile Doc Extraction Smart Service.
- Select the Data tab.
-
On the Inputs tab, configure the default inputs with the following values:
Input Value Doc Extraction Id Choose the docExtractionIdprocess variable. -
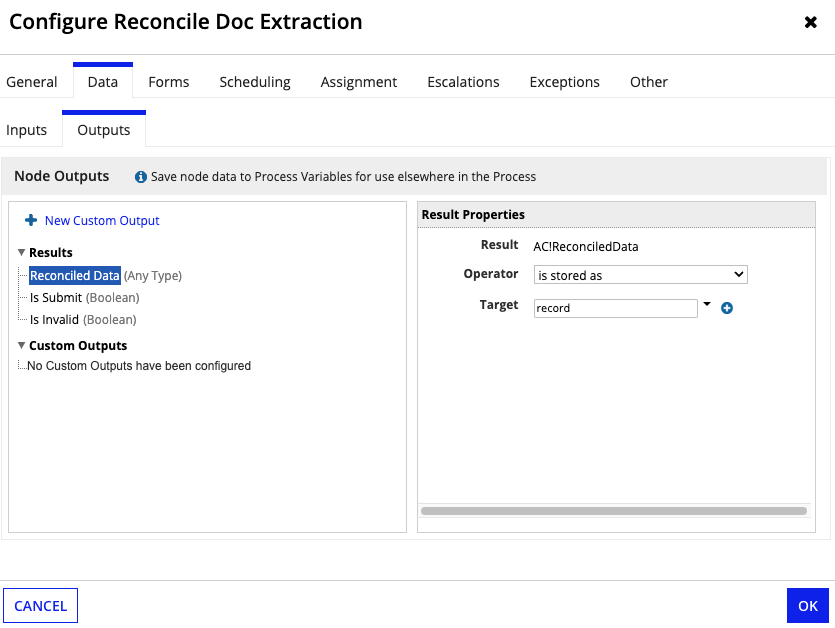
On the Outputs tab, configure the outputs with the following values:
Output Value Reconciled Data Choose the recordprocess variable. - Select the Assignment tab.
- Open the expression editor next to the the Assign to the following: field.
- In the Expression window, enter
cons!AL_analyst. - Click SAVE AND CLOSE.
- Click OK.
Update the invoice record with reconciled dataCopy link to clipboard
Finally, you'll add another node to write records for the reconciled data.
- In the Smart Service Search bar, search for Write Records. You can also find this in Automation Smart Services > Data Services.
- Click and drag from the search results to the flow connector between the Reconcile Doc Extraction and End nodes.
- Double-click the Write Records node.
- Go to the Setup tab.
- In the Record Input field, select the
recordprocess variable. - In the Record Type field,
AL Invoicewill be automatically selected. - Go to the Data tab.
- Click the Outputs tab.
- Click the Records Updated output.
- In the Result Properties pane, select
recordfor the Target. - Click OK.
Add a cancel flowCopy link to clipboard
It's a best practice to include a pathway in your process model in case the user clicks Cancel on the start form.
To add a cancel flow:
- In the Smart Service palette, locate the XOR gateway.
- Click and drag the XOR gateway to the flow connector between the Start Node and Extract from Document.
- Add a connector from the XOR gateway to the End Node.
- Double-click the XOR gateway to configure it.
- On the General tab, enter
Cancel?in the Name field. - Go to the Decision tab.
- Click NEW CONDITION.
- Click Open the Expression Editor next to the Condition field.
- Expand the list of Process Variables.
- Click cancel.
- Click SAVE AND CLOSE.
- In the Result field, select End Node.
- Click OK.
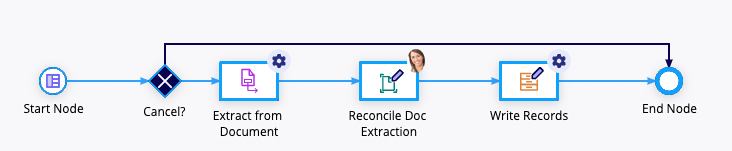
That's it! Your process is set up to extract data. It should look like this, but it may contain additional nodes based on how you customized it:

Test your processCopy link to clipboard
After creating your process model, run it with a few samples to test the extraction and to see how your auto-extracted results change.
To test the document extraction process created above:
- Go to your process model.
- From the File menu, click Start Process for Debugging.
- Use the form to upload an invoice document.
- After the Extract from Document node completes, you should receive a task to reconcile the extracted data.
- Return to the process model monitoring view to observe the results.
As you test, Appian will use the field names from the data type to find a match. Over time, Appian learns how to map your data to your data type fields from the user interactions with the reconcile interface.
Appian will delete document extraction runs after 30 days, or when the total amount of data surpasses 10 GB. If you attempt to access a run that has been deleted, you will see an error. Appian will not delete the documents you uploaded. Learn more about your document's security.
Additional process configuration optionsCopy link to clipboard
The process model detailed above provides the basic nodes needed to create an extraction process, but you aren't bound to this model. In fact, the major benefit of creating your own document extraction process is the flexibility to add additional rules or decisions that are specific to your business needs.
There a few ways you can enhance or modify this process, for example:
- Dynamically skip reconciliation: After the Extract from Document smart service, you can use a Script Task to evaluate the extracted data. For example, you may want to validate that all fields were extracted, or that the extracted data meets your business validations. If your validations are met, you can use an XOR node to skip the Reconcile Doc Extraction smart service and write the extracted data directly to your record type, without any human review.
- Use the two optional outputs in the Reconcile Doc Extraction Smart Service to route the process model after reconciliation:
isSubmitistruewhen the user selects the Submit button on the reconciliation task. Add logic after this smart service to useisSubmit=true()to trigger an email notification or a confirmation dialog.isExceptionistruewhen the user selects the Mark as Invalid button on the reconciliation task. Add logic after this smart service to useisException=true()to route to a chained user input task, where the user provides more information.
- Add conditionality to the Reconcile Doc Extraction Smart Service to determine who should be assigned the reconciliation task based on certain business criteria or rules.