When you run through your document extraction process, most of the work occurs in the background. It's only after the Start Doc Extraction Smart Service or Extract from Document smart service extracts data from a document that the Reconcile Doc Extraction Smart Service generates a task for a user to validate the data.
The reconciliation task plays an important role in making auto-mappings smarter. As you complete reconciliation tasks, Appian learns how to map the data in your documents to the proper fields in your data type. Over time, this will make auto-extraction more accurate and reconciliation easier and less frequent.
Learn more:
Note: Learned mappings are dependent on the data type's fields. If you change the fields or make a new data type, it will not use the learned mappings.
Complete the reconciliation taskCopy link to clipboard
The reconciliation task is auto-generated by the Reconcile Doc Extraction Smart Service.
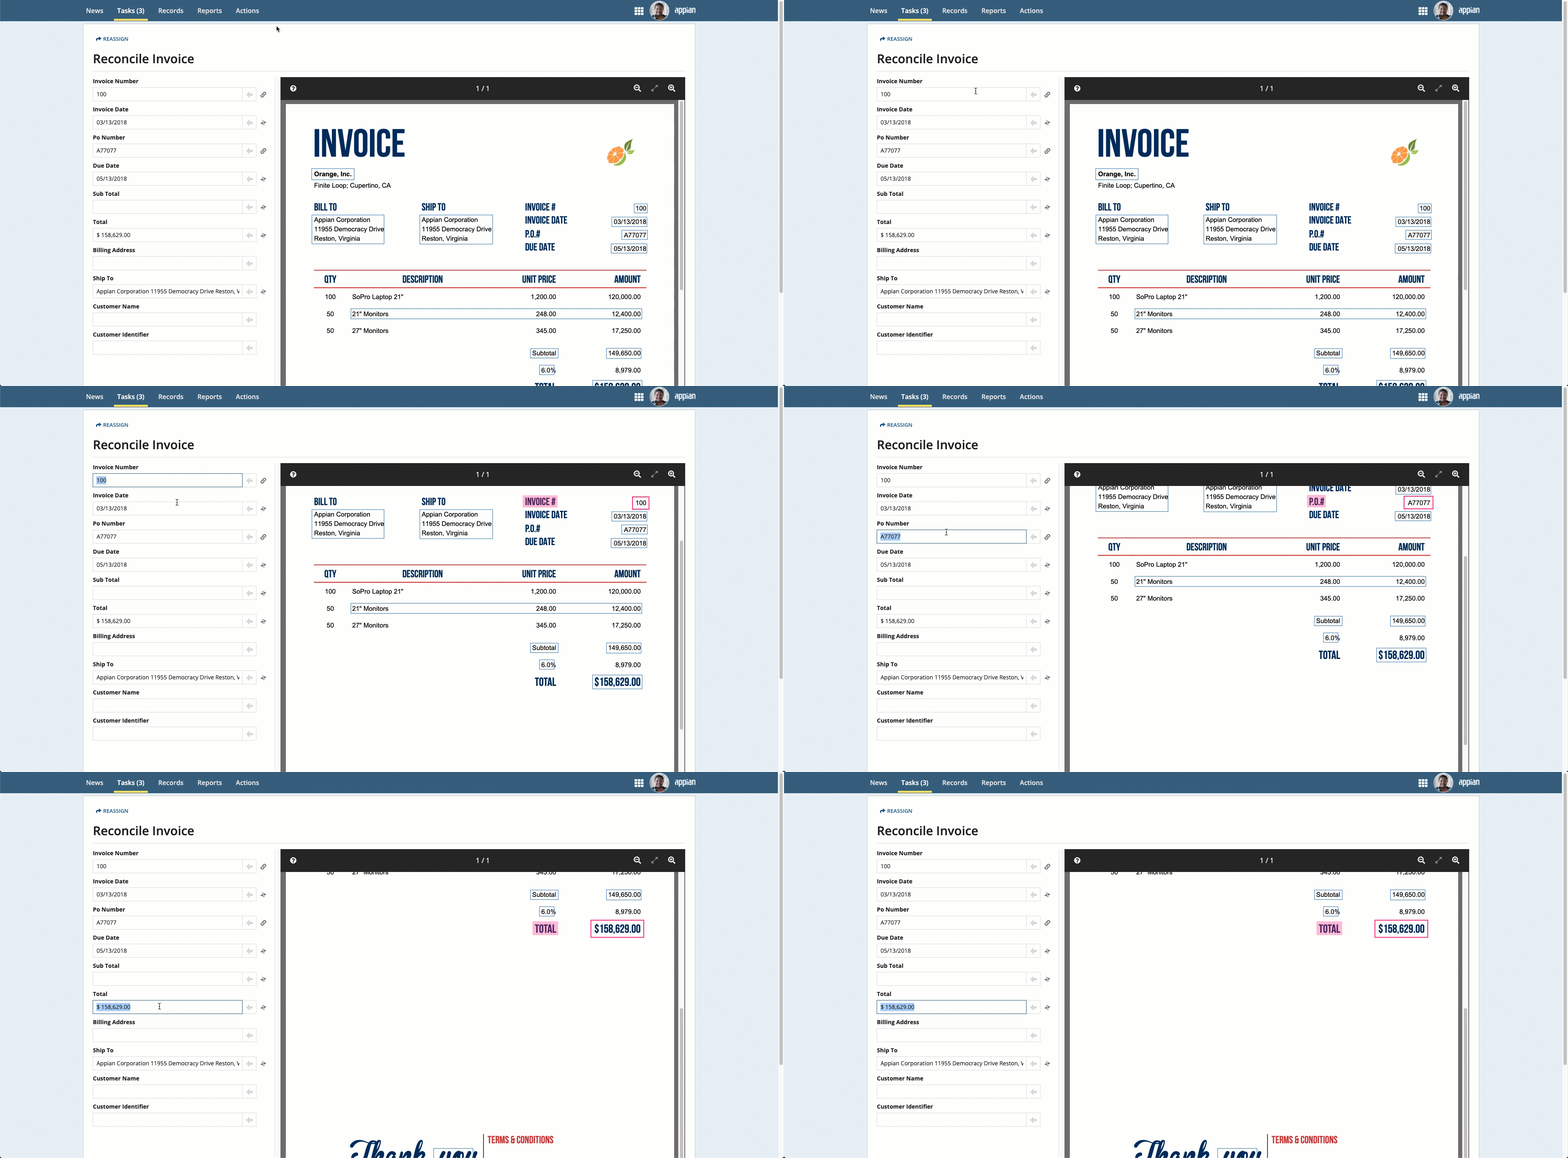
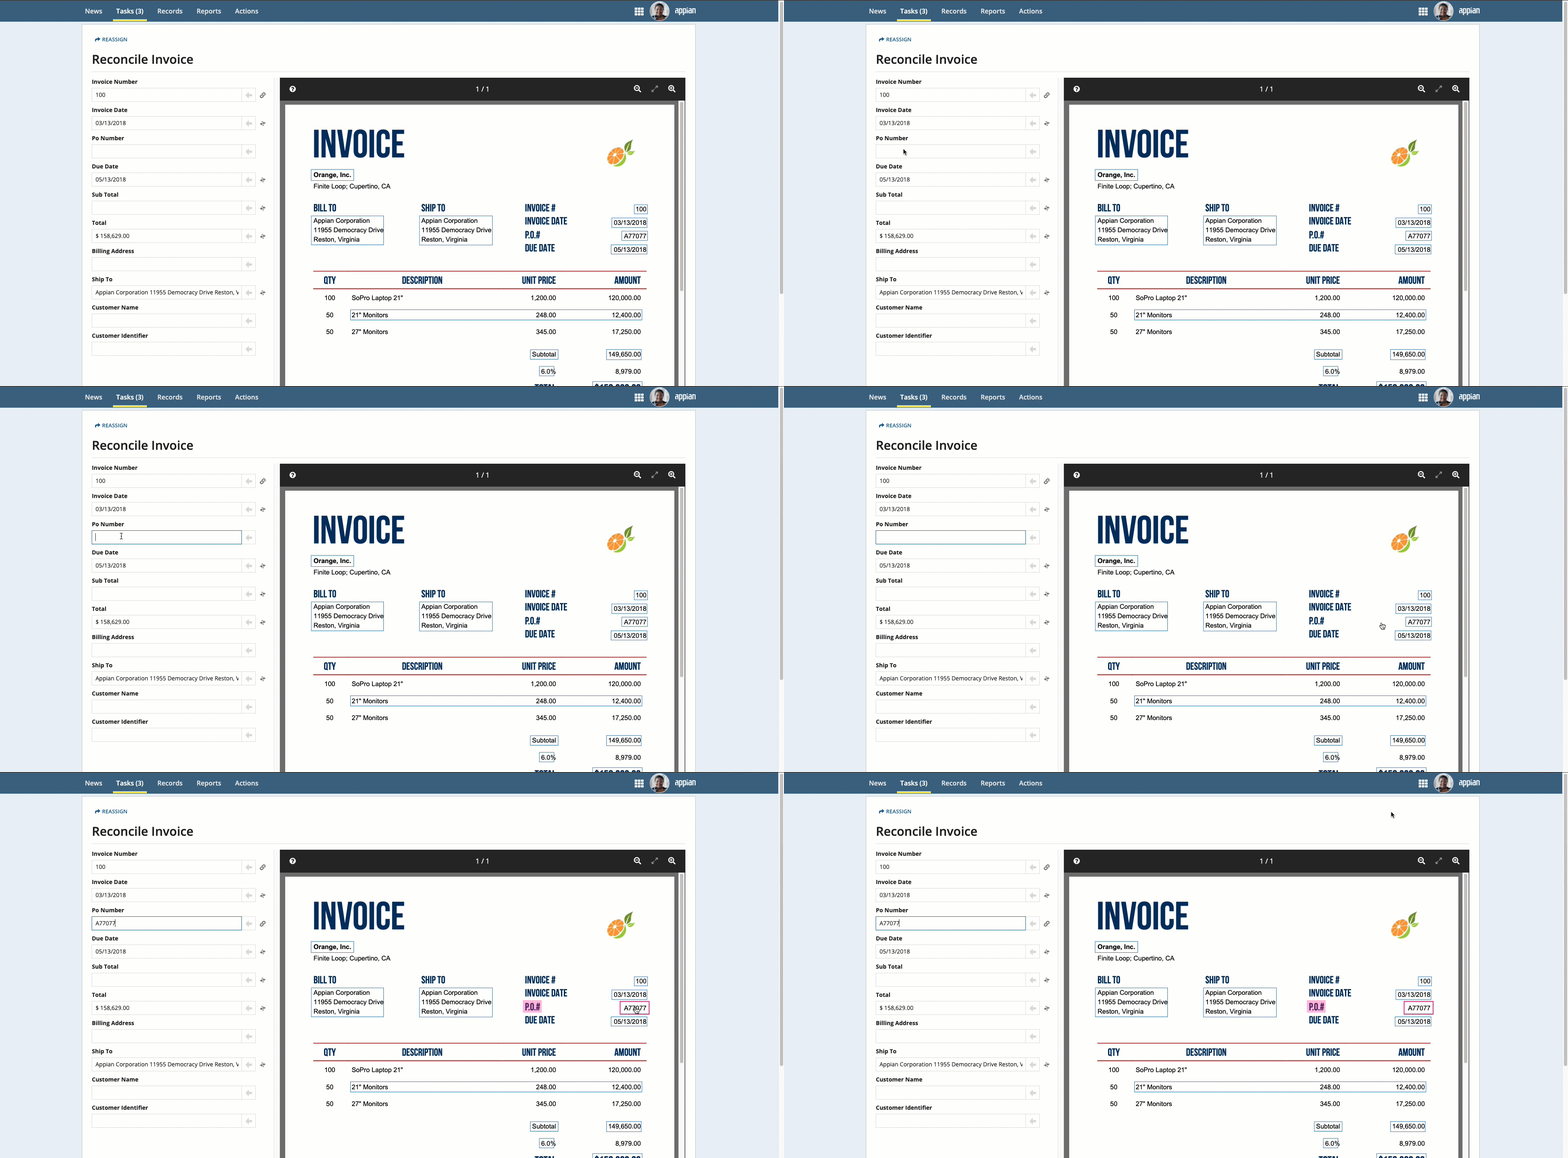
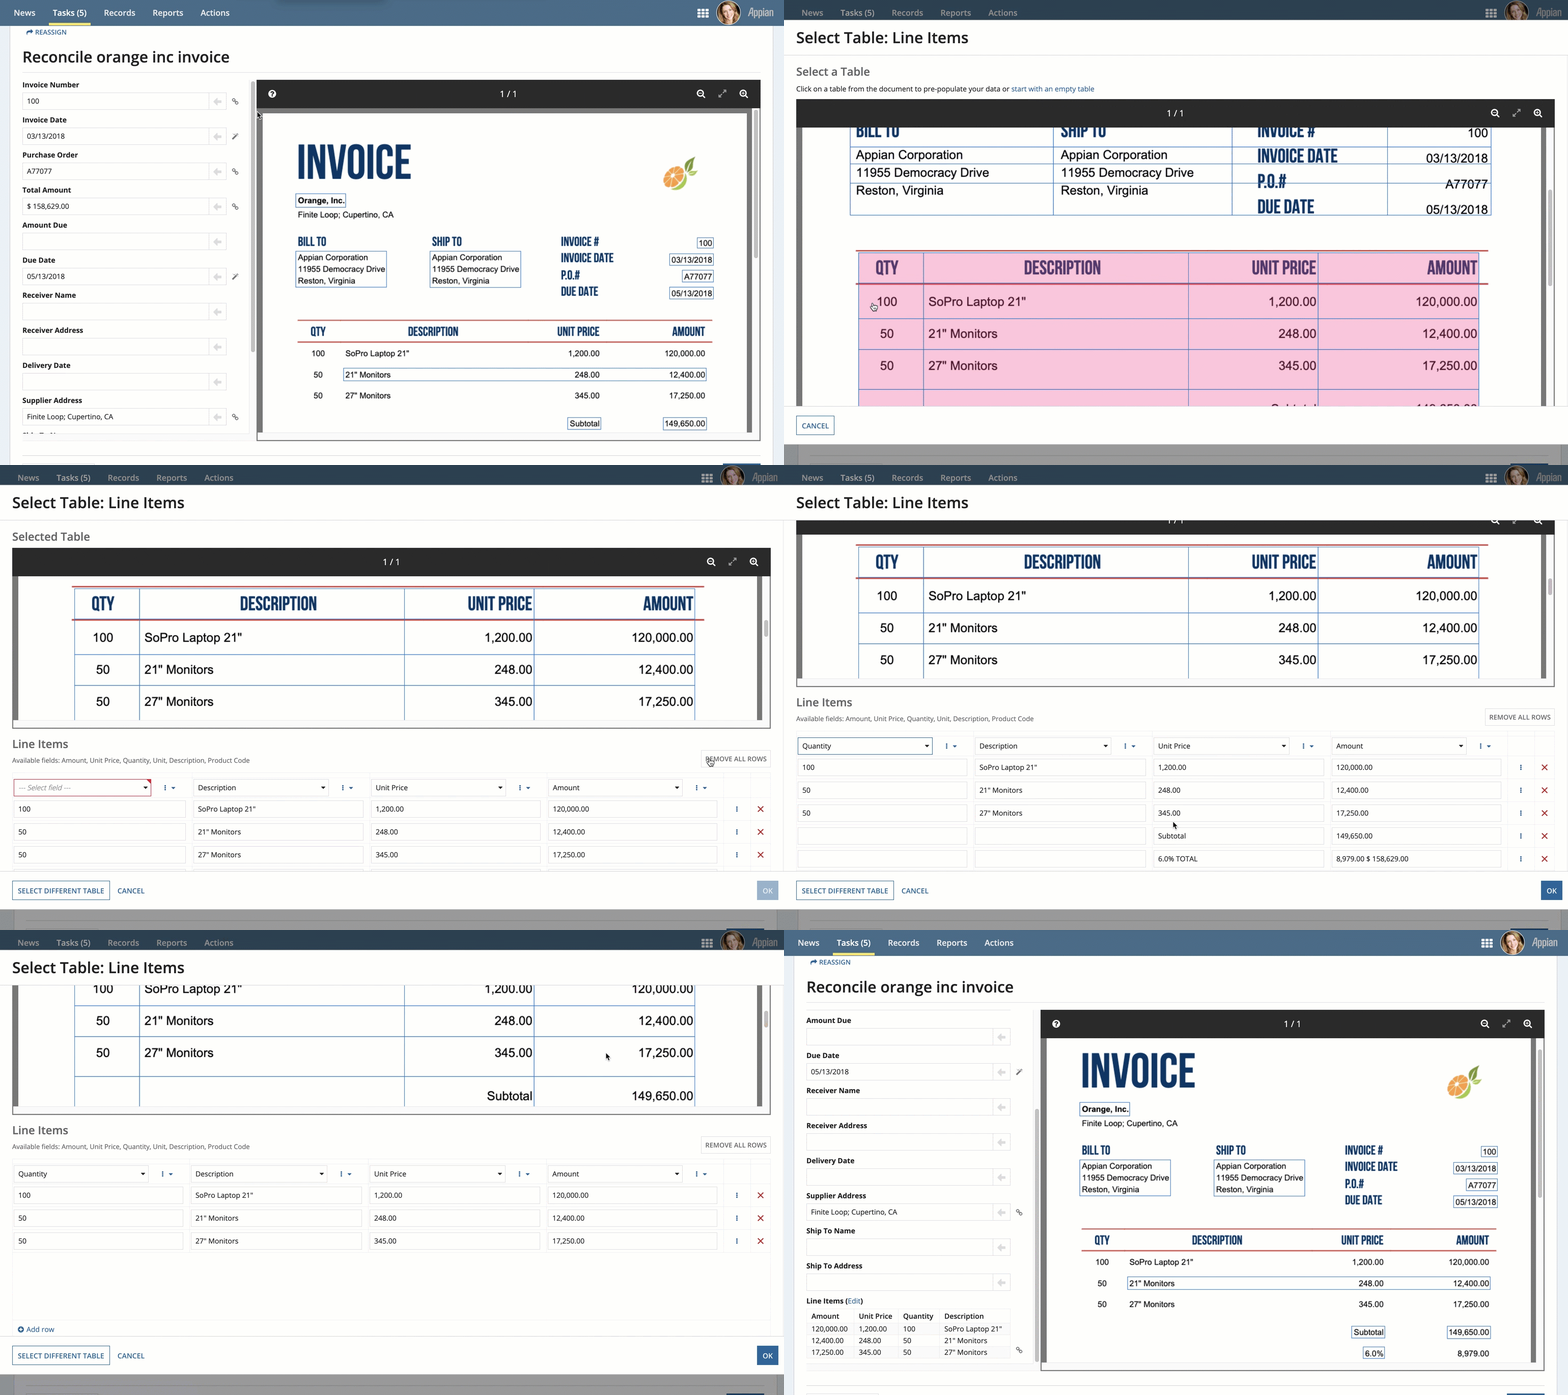
To complete the reconciliation task, users will compare the data that was extracted to an image of the uploaded document. They can use the information that displays in the document preview to update any incorrect or missing information.
To complete the reconciliation task:
- On the left side of the page, review the information in the fields. Use the document preview on the right to verify the accuracy of the data.
-
If any information is missing, you can populate the information in three ways:
Tip: Values selected from the document preview will improve data extraction results. Values entered manually will not. For example, if you select the value for a PO number from the document preview in two different documents, it can learn that PO No. and PO # both mean PO Number. If you have the option, you should select correctly labeled values from the document preview instead of entering them manually.
-
Place your cursor in the field, then click the box that surrounds the desired value.
-
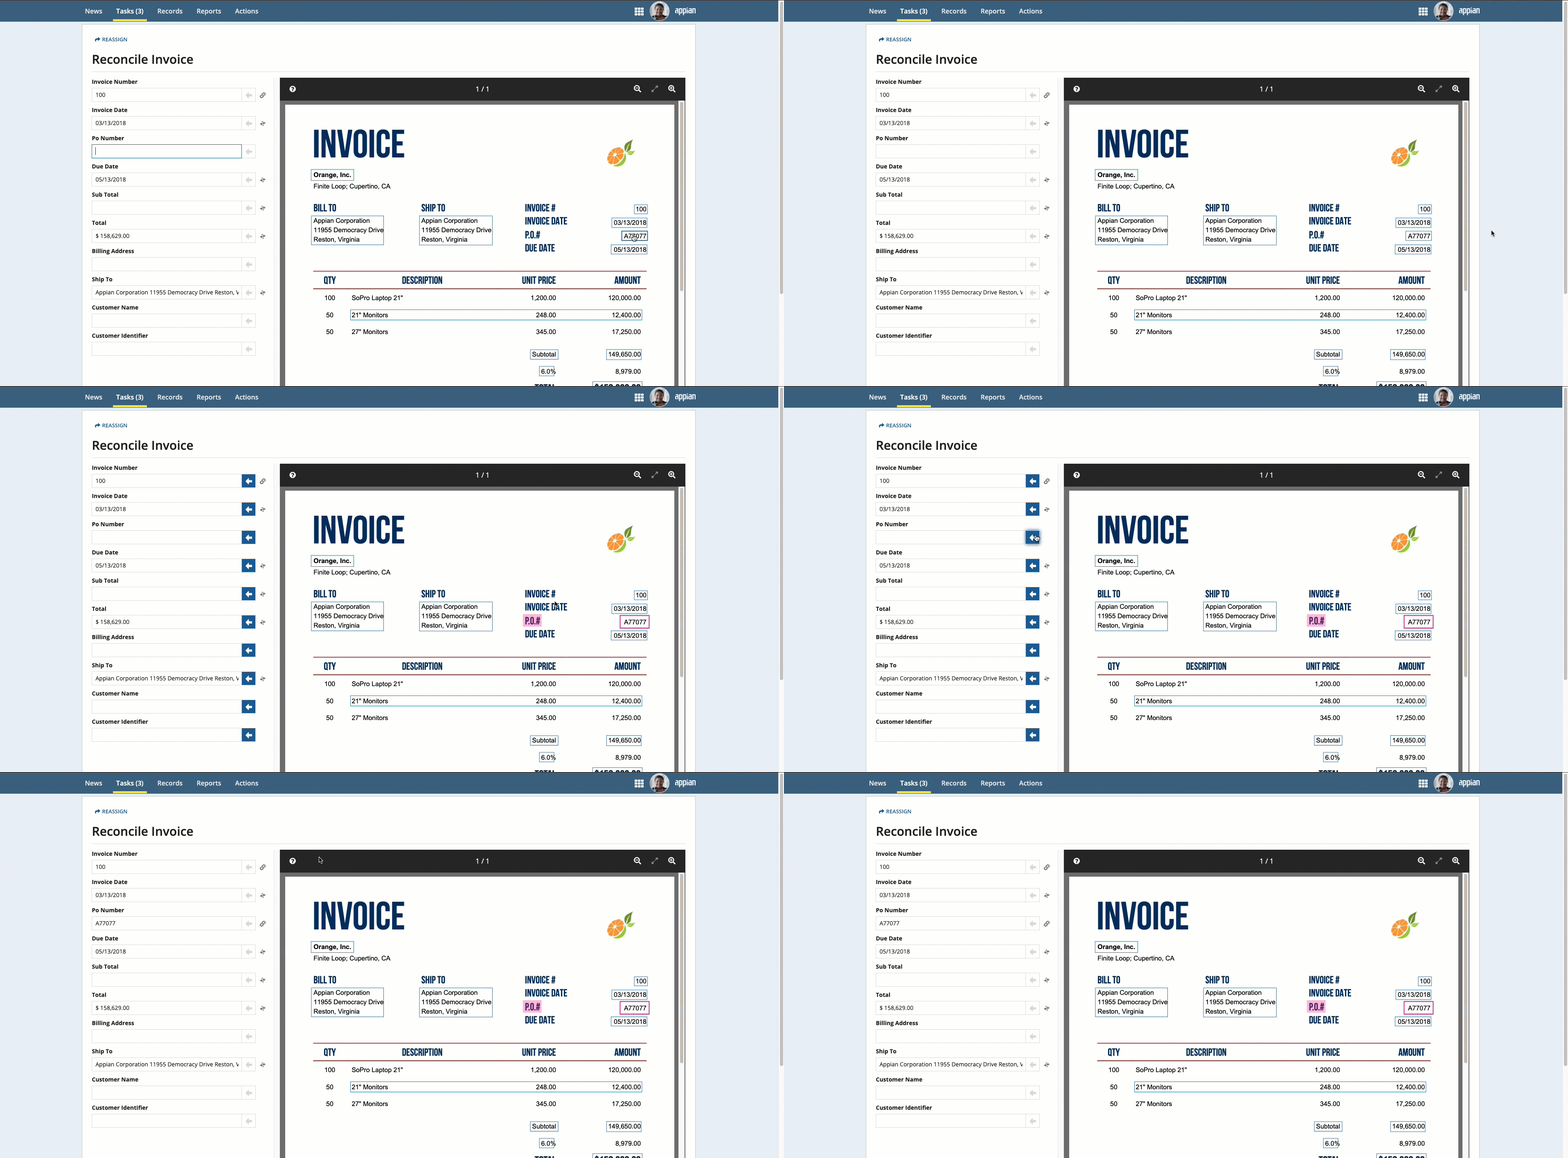
Click the box that surrounds the desired value in the document preview on the right, then click the arrow next to the field to populate the field.
-
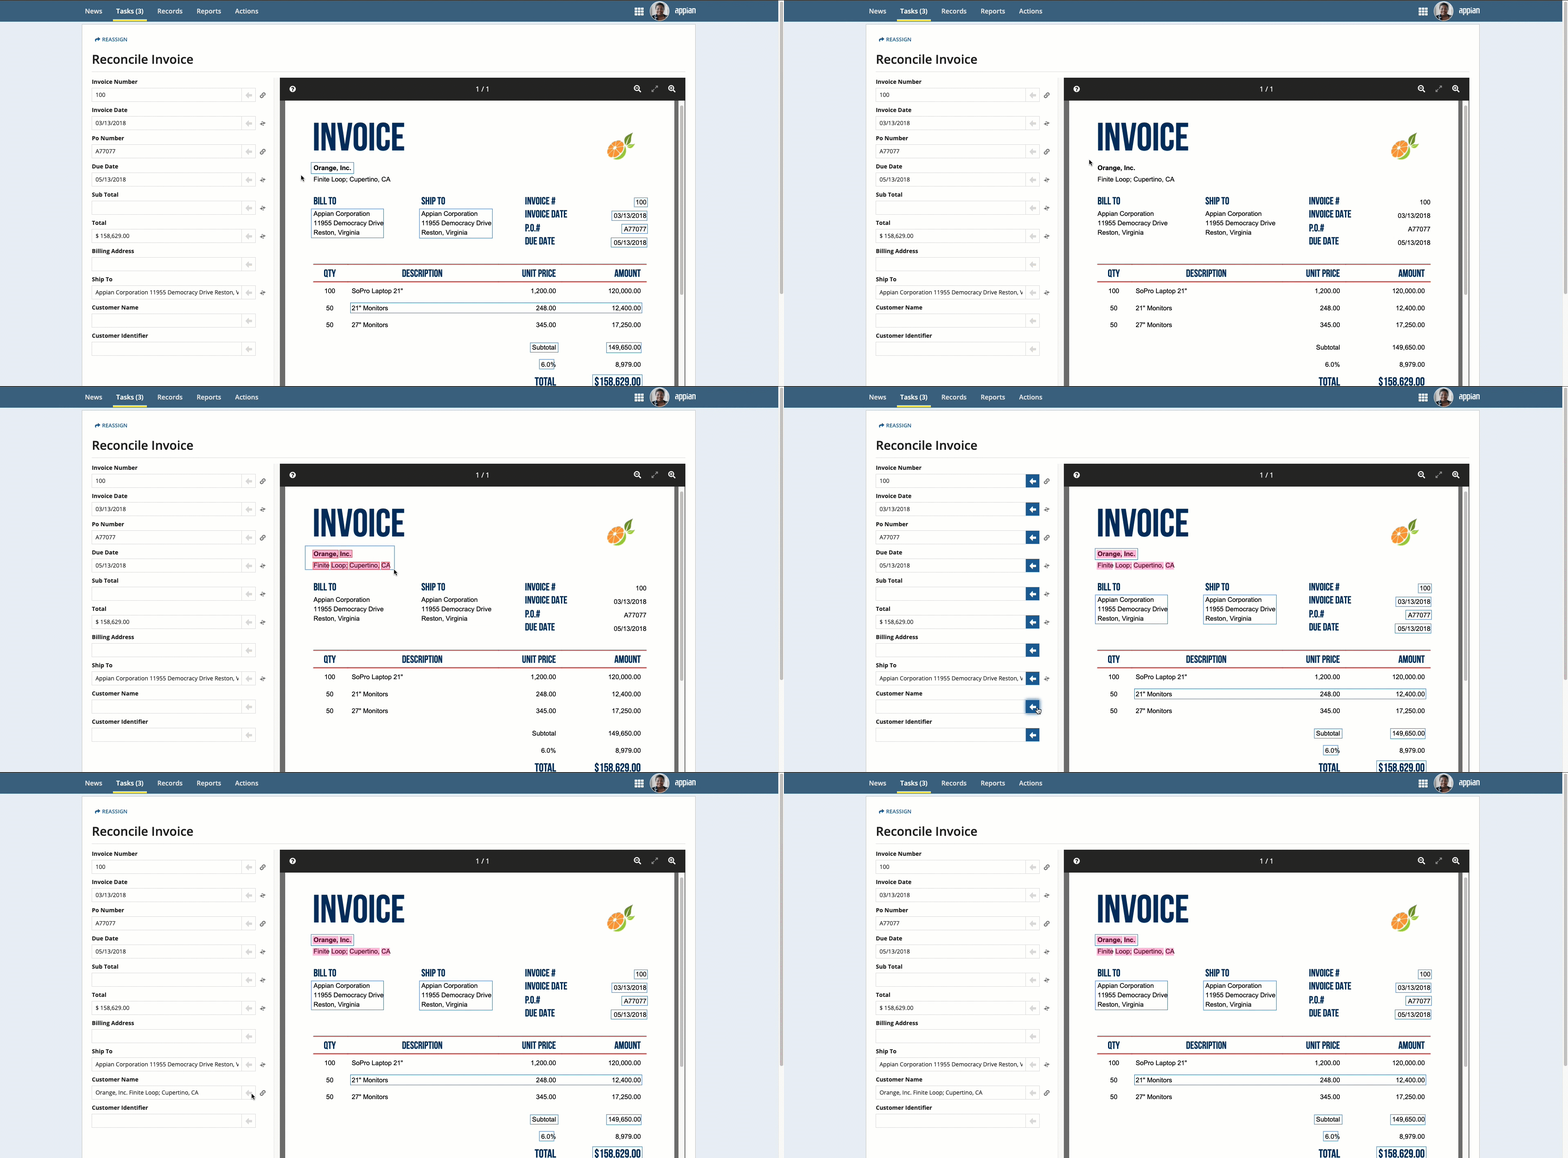
To select text that was not automatically extracted, press and hold the Shift key while dragging the mouse.
-
-
Perform additional reconciliation for tables, if they appear in the document preview.
- After all fields are verified and populated, click RECONCILE.
While you are reconciling the data, icons indicate how the information was entered for each field:
- No icon: Value was entered manually
- Magic wand icon : Value was entered automatically during data extraction.
- Link icon : Value was selected from the document preview.
![]()
Reconcile table dataCopy link to clipboard
Many document types include tables to organize information. Appian can extract this information efficiently and present it in a reconciliation task to confirm it did so properly. If a user finds that the table was incorrectly detected, they can now manually draw the boundaries to extract the information as intended.
This page describes how to reconcile data extracted from tables, as well as the steps to draw a table boundary for extraction in case the service doesn't parse the data in the table correctly.
You'll reconcile table data as part of the overall doc extraction reconciliation task.
- Under the relevant field in the left-pane, click Select Table.
- Select your table and identify the header row.
- Choose which field in each column header corresponds to the column in the table.
- Remove rows that don't contain actual table data, described below.
- Verify your data is correct.
- Click OK.
Tip: As users submit document extraction tasks, Appian will learn the aliases for your tables' column headers. It can then use the learnings to automatically extract table values, reducing the need for human reconciliation.
Table actionsCopy link to clipboard
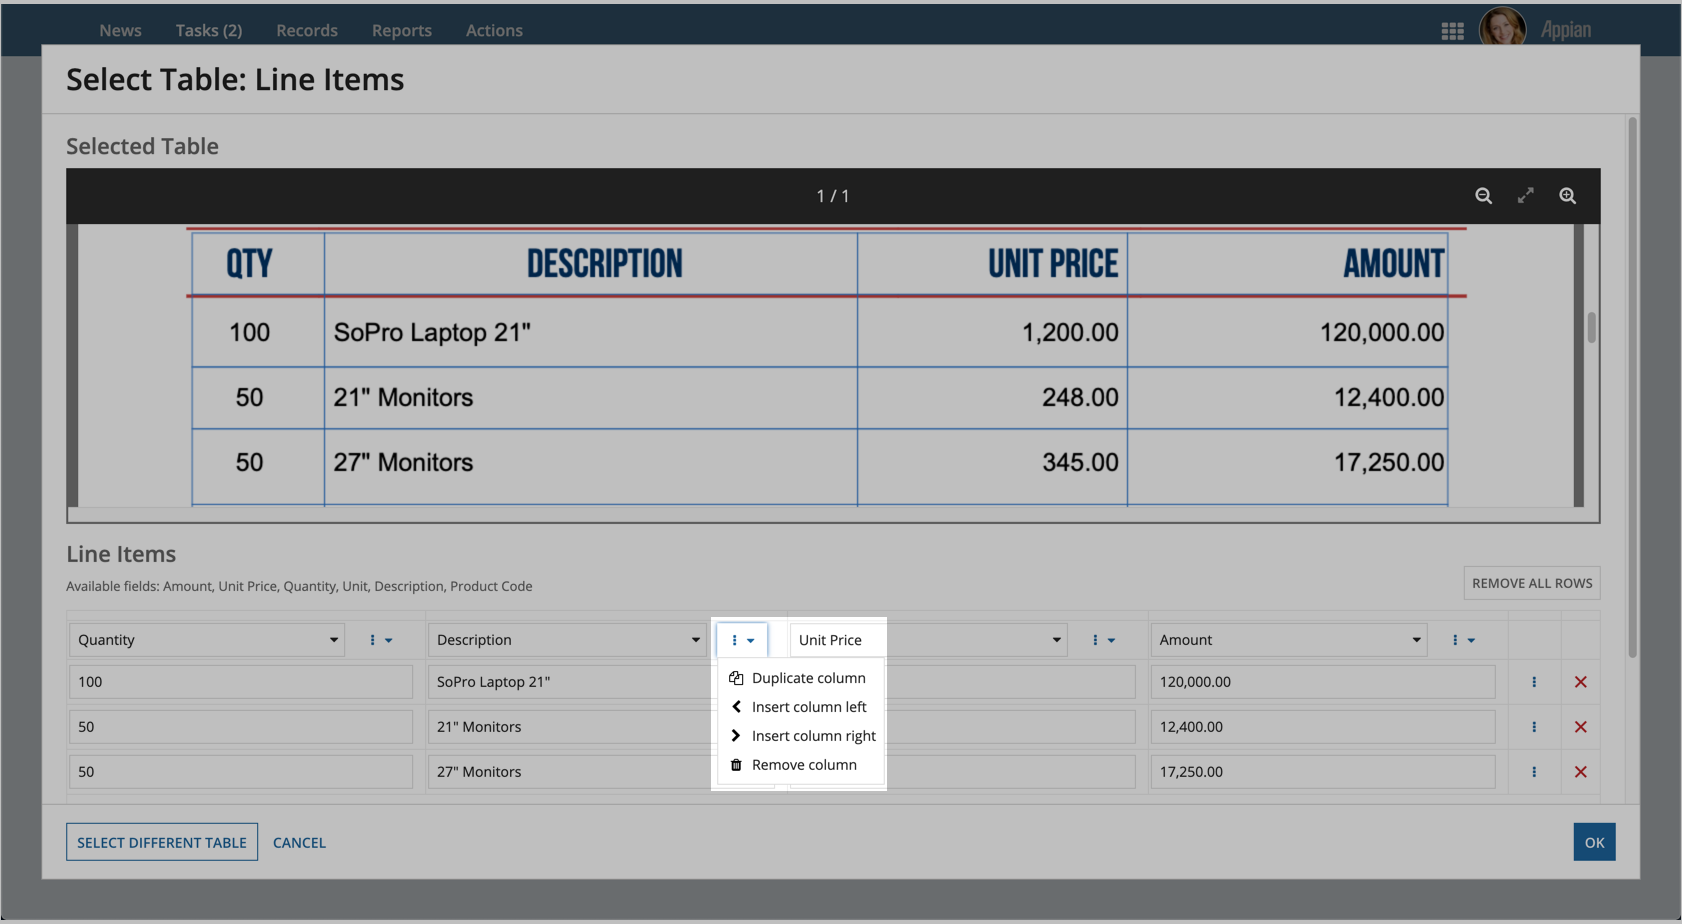
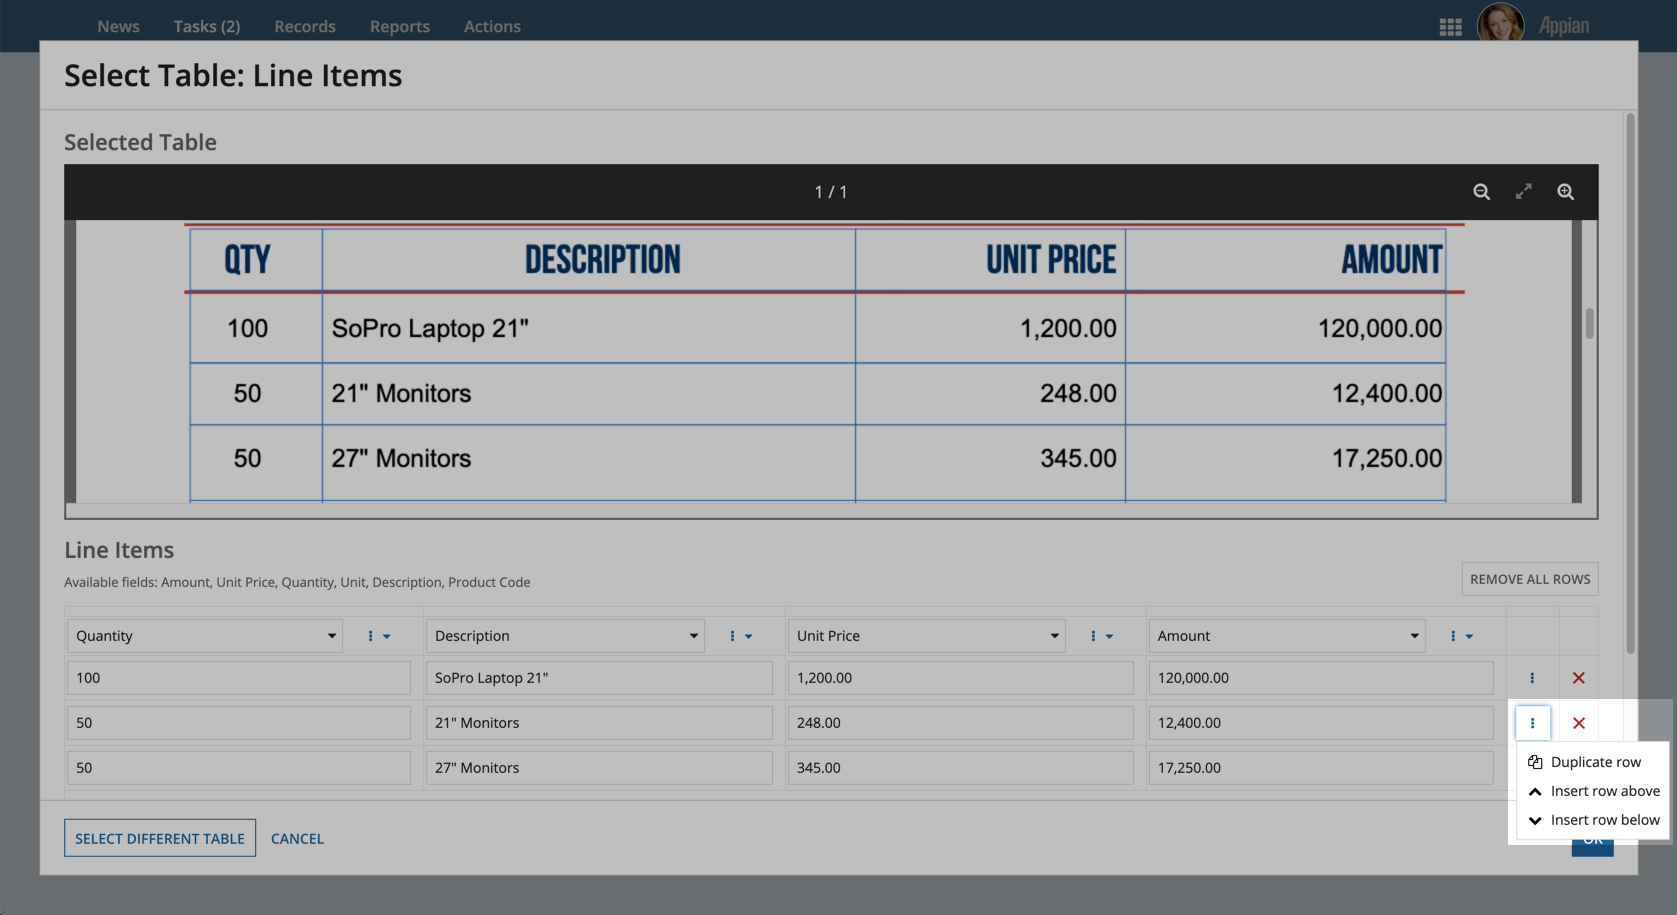
When manually extracting table data, users can take a variety of actions by clicking on the menu icon next to a column or row.
For columns, users can:
- Duplicate a column
- Insert a column to the left
- Insert a column to the right
- Remove a column
For rows, users can:
- Duplicate a row
- Insert a row above
- Insert a row below
Users can also remove individual rows by clicking the close icon on the right side of each row
Create a table manuallyCopy link to clipboard
When extracting data from documents, you may find that some tables aren't correctly identified. Or, when the table is identified correctly, the table's columns or rows were split incorrectly. When this happens, Appian has trouble automatically extracting the information and presenting it in a reconciliation task.
Rather than manually fixing this data field by field, Appian lets you draw the boundaries of a table for more precise data extraction. After you draw the table boundaries, Appian will extract data from the selected location. The table reconciliation task shows a more accurate picture of the data.
Note: You'll need to manually draw these tables in each document where they aren't correctly identified.
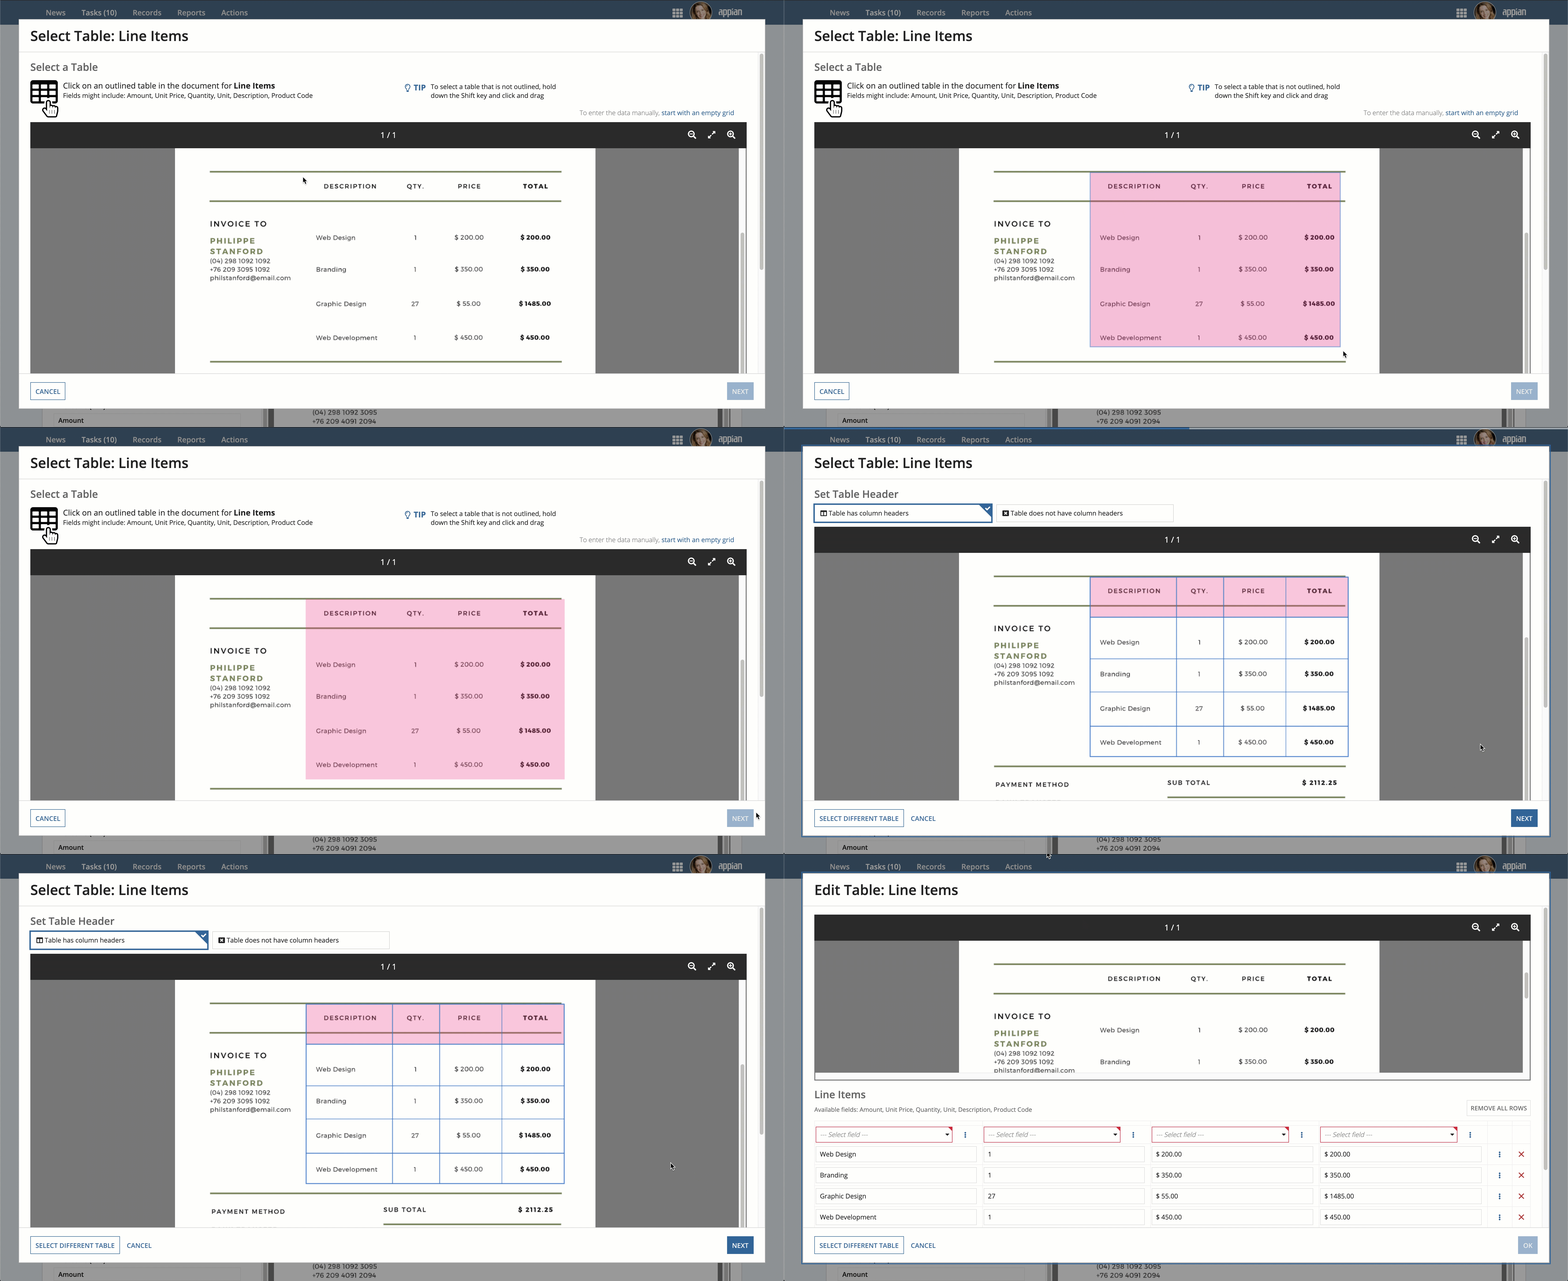
To draw table boundaries in a reconciliation task:
- Under the relevant field in the left-pane, click Select Table.
- In the Select Table Data window, review the table to determine if the document extraction service identified it correctly.
- If the table, its rows, or its columns weren't correctly identified, move your cursor to the top left boundary of the table.
- Press and hold the Shift key and click and drag your cursor across the table to cover the entire table area.
- When you reach the lower right boundary of the table area, release your mouse and the Shift key.
- Click NEXT. If you can't click the NEXT button, a valid table wasn't detected. Try re-selecting the table area.
Review the updated data:
- Select whether the Table has column headers or the Table does not have headers.
- Confirm the data extracted from the table is correct. If it's not, choose which field in each column header corresponds to the column in the table.
- Remove rows that don't contain actual table data.
- Verify your data is correct.
- Click OK.
Learned mappings across environmentsCopy link to clipboard
Whenever you complete a reconciliation task, Appian learns more about how extracted data maps to your data types. Depending on how you use document extraction in Appian, this learning may be deployed alongside design objects or you may need to complete reconciliation tasks in the target environment for Appian to learn about that data separately.
If you use the document extraction AI skill to extract data from documents, extraction mappings are associated with the AI skill object. When you deploy the AI skill to other environments, the learned mappings go with it. This means that you can complete reconciliation tasks in lower environments, and Appian is able to use that learning when you deploy the AI skill to production.
If you use document extraction functions and smart services, learning happens independently in each environment. When deploying your application to another environment, you may see different behavior for auto-extraction depending on which documents have been processed and how they have been reconciled by users.

