
| Beginning with Appian 25.4, all new versions of Appian will require containers managed by Kubernetes to run in a self-managed environment. Review the 24.4 release notes and frequently asked questions to learn more. |
OverviewCopy link to clipboard
This page provides instructions on how to set up a recommended, high-availability (HA) system for Appian self-managing customers. Cloud customers should see High Availability for Appian Cloud.
Setup scenarios covered include:
- Setting up HA on a new environment.
- Converting a standalone environment to HA.
- Converting an HA environment to standalone.
Since high availability is a configuration of distributed Appian systems, you should be familiar with the concepts and caveats of distributing Appian first. See High Availability and Distributed Systems.
RequirementsCopy link to clipboard
- Linux operating systems: High availability is not available for Windows operating systems.
- Required ports: All of the servers should be able to connect to each other over the required ports.
- Shared file storage: All servers involved in a high availability configuration need to be able to read and write the same files.
Architectural overviewCopy link to clipboard
These instructions provide the necessary steps to set up or convert a highly-available system with the recommended levels of redundancy. The below diagram represents the HA configuration used in the instructions.

The Standalone configuration referenced in the instructions assumes using one web server and one machine running all Appian components.
While the following instructions are specific to running a copy of all of Appian's components on every server, you can modify the instructions where necessary to match your actual desired configuration so long as all major components of your Appian system are replicated in structure and content in the redundant systems. If your Appian system is distributed among multiple servers, you will need to recreate that configuration for your redundant systems as well. This means if you have Appian distributed across two different servers, each redundant system will need two servers to mirror that distribution (for a total of six servers).
Setting up HA on a new environmentCopy link to clipboard
The following steps will set up HA Appian on a new environment.
1. Install AppianCopy link to clipboard
Install Appian on three Linux servers.
Note: Be sure to install the same version of Appian on all three servers, including any hotfixes for that version.
2. Update topologyCopy link to clipboard
On one server, update <APPIAN_HOME>/conf/appian-topology.xml to include the other servers using the example below, replacing the listed machine names with the hostnames of your servers.
1
2
3
4
5
6
7
8
9
10
11
12
13
14
15
16
17
18
19
20
21
22
23
24
25
26
27
28
29
30
31
32
33
34
35
36
37
38
39
40
41
42
43
44
45
46
47
48
49
50
51
52
53
54
55
56
57
58
59
60
61
62
63
64
65
66
67
68
69
70
71
72
73
<topology port="5000">
  <server host="machine1.example.com">
    <engine name="forums"/>
    <engine name="notify"/>
    <engine name="notify-email"/>
    <engine name="channels"/>
    <engine name="content"/>
    <engine name="collaboration-statistics"/>
    <engine name="personalization"/>
    <engine name="portal"/>
    <engine name="process-design"/>
    <engine name="process-analytics0"/>
    <engine name="process-analytics1"/>
    <engine name="process-analytics2"/>
    <engine name="process-execution0"/>
    <engine name="process-execution1"/>
    <engine name="process-execution2"/>
  </server>
  <server host="machine2.example.com">
    <engine name="forums"/>
    <engine name="notify"/>
    <engine name="notify-email"/>
    <engine name="channels"/>
    <engine name="content"/>
    <engine name="collaboration-statistics"/>
    <engine name="personalization"/>
    <engine name="portal"/>
    <engine name="process-design"/>
    <engine name="process-analytics0"/>
    <engine name="process-analytics1"/>
    <engine name="process-analytics2"/>
    <engine name="process-execution0"/>
    <engine name="process-execution1"/>
    <engine name="process-execution2"/>
  </server>
  <server host="machine3.example.com">
    <engine name="forums"/>
    <engine name="notify"/>
    <engine name="notify-email"/>
    <engine name="channels"/>
    <engine name="content"/>
    <engine name="collaboration-statistics"/>
    <engine name="personalization"/>
    <engine name="portal"/>
    <engine name="process-design"/>
    <engine name="process-analytics0"/>
    <engine name="process-analytics1"/>
    <engine name="process-analytics2"/>
    <engine name="process-execution0"/>
    <engine name="process-execution1"/>
    <engine name="process-execution2"/>
  </server>
  <search-cluster>
    <search-server host="machine1.example.com"/>
    <search-server host="machine2.example.com"/>
    <search-server host="machine3.example.com"/>
  </search-cluster>
  <data-server-cluster>
    <data-server host="machine1.example.com" port="5400" rts-count="2"/>
    <data-server host="machine2.example.com" port="5400" rts-count="2"/>
    <data-server host="machine3.example.com" port="5400" rts-count="2"/>
  </data-server-cluster>
  <kafkaCluster>
    <broker host="machine1.example.com" port="9092"/>
    <broker host="machine2.example.com" port="9092"/>
    <broker host="machine3.example.com" port="9092"/>
  </kafkaCluster>
  <zookeeperCluster>
    <zookeeper host="machine1.example.com" port="2181"/>
    <zookeeper host="machine2.example.com" port="2181"/>
    <zookeeper host="machine3.example.com" port="2181"/>
  </zookeeperCluster>
</topology>
Copy
Once updated, copy <APPIAN_HOME>/conf/appian-topology.xml into both <APPIAN_HOME>/data-server/conf/appian-topology.xml and <APPIAN_HOME>/search-server/conf/appian-topology.xml locations on the same server.
Copy the appian-topology.xml files into the same locations on the other two HA servers.
<APPIAN_HOME>/conf/appian-topology.xml<APPIAN_HOME>/search-server/conf/appian-topology.xml
Note: <APPIAN_HOME>/data-server/conf/appian-topology.xml will be copied to the other two HA servers with its entire directory in a later step.
The topology files must be identical across all servers in all locations.
When changing the number of Kafka brokers on a site, as you are here, you must also delete the data stored in <APPIAN_HOME>/services/data/zookeeper/ on every server.
3. Remove checkpoint scheduling changesCopy link to clipboard
Remove any checkpointing scheduling configurations you might have made in custom.properties. In a high availability configuration, the default checkpointing configurations are recommended.
4. Set up shared files and foldersCopy link to clipboard
- On one server, make sure the following files are identical in their different locations on the server (if not, you may have to copy one into another).
-
<APPIAN_HOME>/conf/custom.propertiesshould be identical to<APPIAN_HOME>/search-server/conf/custom.properties -
<APPIAN_HOME>/conf/data-server-sec.propertiesshould be identical to<APPIAN_HOME>/data-server/conf/data-server-sec.properties
-
- In the server in the above step, copy the following files to the same location on the two other servers. These files must be the same across all servers.
<APPIAN_HOME>/conf/appian.sec<APPIAN_HOME>/conf/appian-topology.xml(covered in previous step)<APPIAN_HOME>/conf/data-server-sec.properties<APPIAN_HOME>/conf/tomcatResources.xml<APPIAN_HOME>/conf/custom.properties<APPIAN_HOME>/services/conf/service_manager.conf<APPIAN_HOME>/search-server/conf/appian-topology.xml(covered in previous step)<APPIAN_HOME>/search-server/conf/custom.properties
- Share the following directories across all servers.
<APPIAN_HOME>/_admin/accdocs1/<APPIAN_HOME>/_admin/accdocs2/<APPIAN_HOME>/_admin/accdocs3/<APPIAN_HOME>/_admin/mini/<APPIAN_HOME>/_admin/models/<APPIAN_HOME>/_admin/plugins/<APPIAN_HOME>/_admin/process_notes/<APPIAN_HOME>/_admin/shared/<APPIAN_HOME>/server/archived-process/<APPIAN_HOME>/server/channels/gw1/<APPIAN_HOME>/server/collaboration/gw1/<APPIAN_HOME>/server/forums/gw1/<APPIAN_HOME>/server/msg/<APPIAN_HOME>/server/notifications/gw1/<APPIAN_HOME>/server/personalization/gw1/<APPIAN_HOME>/server/portal/gw1/<APPIAN_HOME>/server/process/analytics/0000/gw1/<APPIAN_HOME>/server/process/analytics/0001/gw1/<APPIAN_HOME>/server/process/analytics/0002/gw1/<APPIAN_HOME>/server/process/design/gw1/<APPIAN_HOME>/server/process/exec/00/gw1/<APPIAN_HOME>/server/process/exec/01/gw1/<APPIAN_HOME>/server/process/exec/02/gw1/
- Create the following directories on network storage shared by all of the servers, replacing the listed machine names with the hostnames of your servers.
<APPIAN_HOME>/shared-logs/machine1.example.com/<APPIAN_HOME>/shared-logs/machine2.example.com/<APPIAN_HOME>/shared-logs/machine3.example.com/
-
On each server, link the
<APPIAN_HOME>/logs/directory to the corresponding network storage directory from the previous step. - On each server, create the following directories and link them to corresponding network storage directories from the previous steps.
<APPIAN_HOME>/shared-logs/machine1.example.com/<APPIAN_HOME>/shared-logs/machine2.example.com/<APPIAN_HOME>/shared-logs/machine3.example.com/
5. Set up load balancing on ApacheCopy link to clipboard
Configure load balancing on Apache to use the HA nodes. Update http.conf based on the configuration outlined in Load Balancing Multiple Application Servers to distribute requests across the three new nodes.
6. Configure Tomcat clusteringCopy link to clipboard
For each HA node, use the configure script to configure Tomcat clustering for the purpose of load balancing from Apache.
7. Start AppianCopy link to clipboard
Following the directions in Starting and Stopping Appian, start each instance of a component before moving onto the next component.
7.1 Start Appian servicesCopy link to clipboard
- Execute
<APPIAN_HOME>/services/bin/start.sh -p <password> -s allon Server #1 - Execute
<APPIAN_HOME>/services/bin/start.sh -p <password> -s allon Server #2 - Execute
<APPIAN_HOME>/services/bin/start.sh -p <password> -s allon Server #3
Do not wait for the start script to complete on the first server before running it on servers 2 and 3. The first script will not finish until at least two servers have been started.
7.2 Start the data serviceCopy link to clipboard
- Execute
<APPIAN_HOME>/data-server/bin/start.shon Server #1 - Execute
<APPIAN_HOME>/data-server/bin/start.shon Server #2 - Execute
<APPIAN_HOME>/data-server/bin/start.shon Server #3
7.3 Start the search serverCopy link to clipboard
- Execute
<APPIAN_HOME>/search-server/bin/start.shon Server #1 - Execute
<APPIAN_HOME>/search-server/bin/start.shon Server #2 - Execute
<APPIAN_HOME>/search-server/bin/start.shon Server #3
7.4 Start the application serverCopy link to clipboard
- Execute
<APPIAN_HOME>/tomcat/apache-tomcat/bin/start-appserver.shon Server #1 - Execute
<APPIAN_HOME>/tomcat/apache-tomcat/bin/start-appserver.shon Server #2 - Execute
<APPIAN_HOME>/tomcat/apache-tomcat/bin/start-appserver.shon Server #3
Converting a standalone environment to HACopy link to clipboard
These instructions will convert an existing standalone environment (one machine running all Appian components) to a new HA environment.
Caution: It is best practice to have a lower environment that matches production to test these steps on before doing them in production.
1. Set up Appian on the new HA environmentCopy link to clipboard
Follow all the steps in Setting up HA on a new environment to create a new HA setup.
Note: Be sure that each new server is using the same Appian Primary database in its config (<APPIAN_HOME>/conf/tomcatResources.xml).
2. Bring down Appian on the HA and standalone environmentsCopy link to clipboard
On both the HA and standalone environments, bring down Appian using the stopping instructions.
3. Bring down Apache on the HA and standalone environmentsCopy link to clipboard
Bring down Apache on both HA and standalone environments.
4. Take full backups on the standalone envCopy link to clipboard
In case reverting to a backup is needed, take a full backup of Appian on the standalone environment using the Full System Backup Procedure.
5. Copy the services dataCopy link to clipboard
Clear the services logs for Kafka and Zookeeper in <APPIAN_HOME>/services/data on all three HA nodes.
Copy the Kafka and Zookeeper logs in <APPIAN_HOME>/services/data from the standalone server to the primary HA node. The primary HA node uses the same Kafka broker host name and Zookeeper host name that were used on the standalone server. We will rely on replication between the nodes for these latest transaction logs.
Take a note of the specific HA node that the logs were copied to.
Note: Copying Kafka logs over to all three nodes gives the potential for Kafka to get confused when it sees data for topics or partitions it wasn't previously assigned by Zookeeper.
6. Copy the data service dataCopy link to clipboard
Clear the data service directory <APPIAN_HOME>/data-server/data on all 3 HA nodes.
Delete the <APPIAN_HOME>/ae/data-server/node/election directory from all 3 HA nodes, if it's present.
Copy the data service directory <APPIAN_HOME>/data-server/data from the standalone server to all three of the HA nodes to ensure each starts with the correct data.
7. Copy the search server dataCopy link to clipboard
Clear the search server directory <APPIAN_HOME>/search-server/data on all 3 HA nodes.
Copy the search server directory <APPIAN_HOME>/search-server/data from the standalone server to all three of the HA nodes to ensure each starts with the correct data.
Delete the _state directory from the search server data on all three nodes of the HA site at <APPIAN_HOME>/search-server/data/_state
Note: In Appian version 24.3, the Elasticsearch server has been upgraded from version 7 to version 8. To ensure a proper upgrade, do not make any site topology changes while upgrading your site. Topology changes should be made before or after the major Appian version upgrade.
8. Copy the admin and kdbs (mirrored data)Copy link to clipboard
Copy all files in the shared admin console and engine data directories from the single node site to the corresponding shared drive directories for the HA site:
<APPIAN_HOME>/_admin/accdocs1/<APPIAN_HOME>/_admin/accdocs2/<APPIAN_HOME>/_admin/accdocs3/<APPIAN_HOME>/_admin/mini/<APPIAN_HOME>/_admin/models/<APPIAN_HOME>/_admin/plugins/<APPIAN_HOME>/_admin/process_notes/<APPIAN_HOME>/_admin/shared/<APPIAN_HOME>/server/archived-process/<APPIAN_HOME>/server/channels/gw1/<APPIAN_HOME>/server/collaboration/gw1/<APPIAN_HOME>/server/forums/gw1/<APPIAN_HOME>/server/msg/<APPIAN_HOME>/server/notifications/gw1/<APPIAN_HOME>/server/personalization/gw1/<APPIAN_HOME>/server/portal/gw1/<APPIAN_HOME>/server/process/analytics/0000/gw1/<APPIAN_HOME>/server/process/analytics/0001/gw1/<APPIAN_HOME>/server/process/analytics/0002/gw1/<APPIAN_HOME>/server/process/design/gw1/<APPIAN_HOME>/server/process/exec/00/gw1/<APPIAN_HOME>/server/process/exec/01/gw1/<APPIAN_HOME>/server/process/exec/02/gw1/
9. Start Appian on the HA environmentCopy link to clipboard
9.1 Start Appian servicesCopy link to clipboard
- Execute
<APPIAN_HOME>/services/bin/start.sh -p <password> -s allon server #1 - Execute
<APPIAN_HOME>/services/bin/start.sh -p <password> -s allon server #2 - Execute
<APPIAN_HOME>/services/bin/start.sh -p <password> -s allon server #3
Do not wait for the start script to complete on the first server before running it on servers 2 and 3. The first script will not finish until at least two servers have been started.
9.2 Run rebalance cluster scriptCopy link to clipboard
Since we are moving from a single node to HA, run the rebalance cluster script on the single node where the Kafka and Zookeeper data was copied to.
<APPIAN_HOME>/services/lib/scripts/rebalanceCluster.sh
9.3 Start data serviceCopy link to clipboard
- Execute
<APPIAN_HOME>/data-server/bin/start.shon server #1 - Execute
<APPIAN_HOME>/data-server/bin/start.shon server #2 - Execute
<APPIAN_HOME>/data-server/bin/start.shon server #3
9.4 Start search serverCopy link to clipboard
- Execute
<APPIAN_HOME>/search-server/bin/start.shon server #1 - Execute
<APPIAN_HOME>/search-server/bin/start.shon server #2 - Execute
<APPIAN_HOME>/search-server/bin/start.shon server #3
9.5 Change the number of replicas for each indexCopy link to clipboard
-
Bash alias for
curlshould be defined before proceeding with the example commands below.AUTHHEADER="Authorization: Basic $(awk '/^conf.search-server.user.appian.password=/ { match($0, /conf.search-server.user.appian.password=(.*)/, arr); print arr[1] }' /usr/local/appian/ae/search-server/conf/custom.properties | awk '{print "appian:"$1}' | xargs echo -n | base64 -w0)" alias curl='curl --header "$AUTHHEADER"' -
Check that search-server has started and the cluster is up and green.
curl localhost:9200/_cluster/health?pretty -
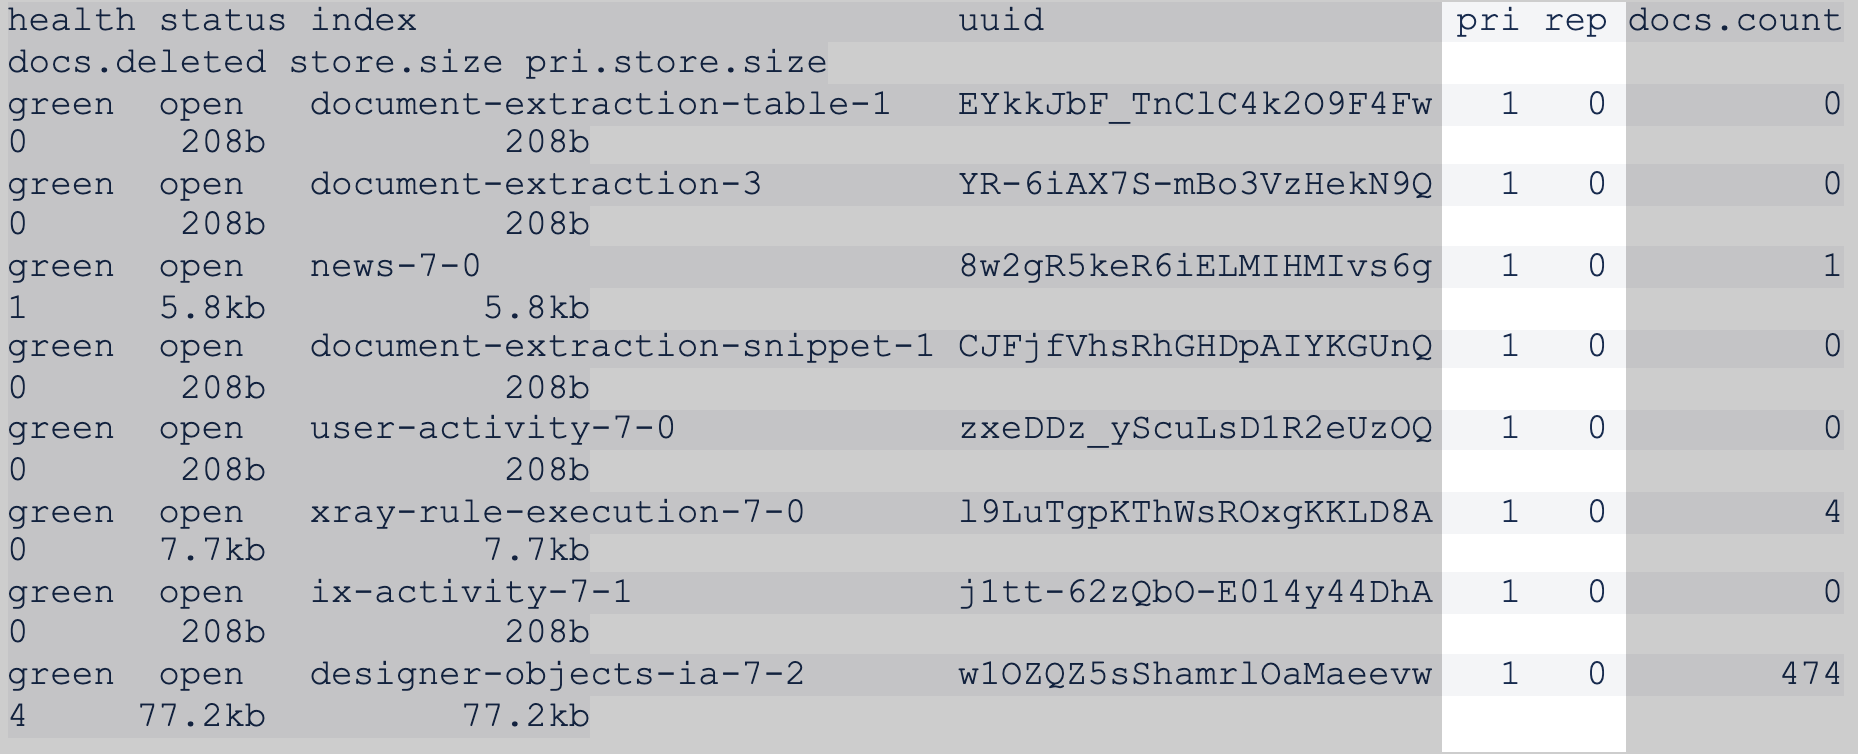
Observe the indices on one of the HA nodes.
curl localhost:9200/_cat/indices?vThere should be 1 primary shard and 0 replicas for each index (approximately eight indices, though it depends on the Appian version).
-
On one of the nodes, change the number of replicas to 2 for each index.
Generic Example:
curl -X PUT -H "Content-Type: application/json" -d '{"index":{"number_of_replicas": 2 }}' localhost:9200/<INDEX>/_settingsSpecific Example:
curl -X PUT -H "Content-Type: application/json" -d '{"index":{"number_of_replicas": 2 }}' localhost:9200/document-extraction-table-1/_settingsNote: You have to do this for all indices (~8), but only on a single node, since Elasticsearch will replicate the change within the cluster.
-
Now, the replicas ("rep" column) for all of the indices should be 2.
curl localhost:9200/_cat/indices?v
9.6 Start application serverCopy link to clipboard
- Execute
<APPIAN_HOME>/tomcat/apache-tomcat/bin/start-appserver.shon server #1 - Execute
<APPIAN_HOME>/tomcat/apache-tomcat/bin/start-appserver.shon server #2 - Execute
<APPIAN_HOME>/tomcat/apache-tomcat/bin/start-appserver.shon server #3
9.7 Start ApacheCopy link to clipboard
Start Apache on the HA server.
Converting an HA environment to standaloneCopy link to clipboard
These instructions we will convert an existing HA environment to a new standalone environment.
Caution: It is best practice to have a lower environment that matches production to test these steps on before doing them in production.
1. Install Appian on the new standalone environmentCopy link to clipboard
Install Appian on the standalone environment.
2. Bring down Appian on both HA and standalone environmentsCopy link to clipboard
On both the HA and standalone environments, bring down Appian using the stopping instructions.
3. Bring down Apache on both HA and standalone environmentsCopy link to clipboard
Bring down Apache on both HA and standalone environments.
4. Take full backups on the HA environmentCopy link to clipboard
If reverting to a backup is needed, take a full backup of the HA environment using the Full System Backup Procedure.
5. Reduce Kafka and Zookeeper brokersCopy link to clipboard
-
In the HA environment, bring up Kafka and Zookeeper.
<APPIAN_HOME>/services/bin/start.sh -p password -s kafka,zookeeper -
Check the current brokers.
<APPIAN_HOME>/services/kafka_<VERSION_INFO>/bin/kafka-topics.sh --describe --bootstrap-server <KAFKA-HOST>:<KAFKA-PORT> -
Since we are moving from HA to a single node, run the decrease broker count script.
<APPIAN_HOME>/services/lib/scripts/decreaseBrokerCount.sh -e <NODE_2_MACHINE NAME>:<KAFKA_PORT>,<NODE_3_MACHINE_NAME>:<KAFKA_PORT>Note: On older versions of Appian this is located at
<APPIAN_HOME>/services/bin/decreaseBrokerCount.sh -
Verify the brokers are removed.
<APPIAN_HOME>/services/kafka_<VERSION_INFO>/bin/kafka-topics.sh --describe --bootstrap-server <KAFKA-HOST>:<KAFKA-PORT> -
Stop Kafka on all servers.
<APPIAN_HOME>/services/stop.sh -p <password> -s kafka -
Once all Kafka brokers have stopped, stop Zookeeper on all servers.
<APPIAN_HOME>/services/stop.sh -p <password> -s zookeeper -
Check the status of Services in the HA environment to make sure they are stopped.
<APPIAN_HOME>/services/bin/status.sh -p password -c
6. Copy the services dataCopy link to clipboard
Clear the services logs for Kafka and Zookeeper in <APPIAN_HOME>/services/data on the standalone server.
Copy the Kafka and Zookeeper logs in <APPIAN_HOME>/services/data from one HA node to the standalone server.
7. Copy the data service dataCopy link to clipboard
Clear the data service directory <APPIAN_HOME>/data-server/data on the standalone server.
Delete the <APPIAN_HOME>/ae/data-server/node/election directory from the standalone server, if it's present.
Copy the data service directory <APPIAN_HOME>/data-server/data from one of the HA nodes to the standalone server.
8. Copy the search server dataCopy link to clipboard
Clear the search server directory <APPIAN_HOME>/search-server/data on the standalone server.
Copy the search server directory <APPIAN_HOME>/search-server/data from one of the HA nodes to the standalone server.
Delete the _state directory from the search server data on the standalone server at <APPIAN_HOME>/search-server/data/_state
Note: In Appian version 24.3, the Elasticsearch server has been upgraded from version 7 to version 8. To ensure a proper upgrade, do not make any site topology changes while upgrading your site. Topology changes should be made before or after the major Appian version upgrade.
9. Start Appian in the standalone environmentCopy link to clipboard
9.1 Start Appian servicesCopy link to clipboard
Bring up services in the standalone environment.
<APPIAN_HOME>/services/bin/start.sh -p password -s all
Check the status of services.
<APPIAN_HOME>/services/bin/status.sh -p password
9.2 Start Appian data serviceCopy link to clipboard
Bring up data service in the standalone environment.
<APPIAN_HOME>/data-server/bin/start.sh
9.3 Start Appian search serverCopy link to clipboard
Bring up search server in the standalone environment.
<APPIAN_HOME>/search-server/bin/start.sh
9.4 Change the number of replicas for each indexCopy link to clipboard
-
Bash alias for
curlshould be defined before proceeding with the example commands below.AUTHHEADER="Authorization: Basic $(awk '/^conf.search-server.user.appian.password=/ { match($0, /conf.search-server.user.appian.password=(.*)/, arr); print arr[1] }' /usr/local/appian/ae/search-server/conf/custom.properties | awk '{print "appian:"$1}' | xargs echo -n | base64 -w0)" alias curl='curl --header "$AUTHHEADER"' -
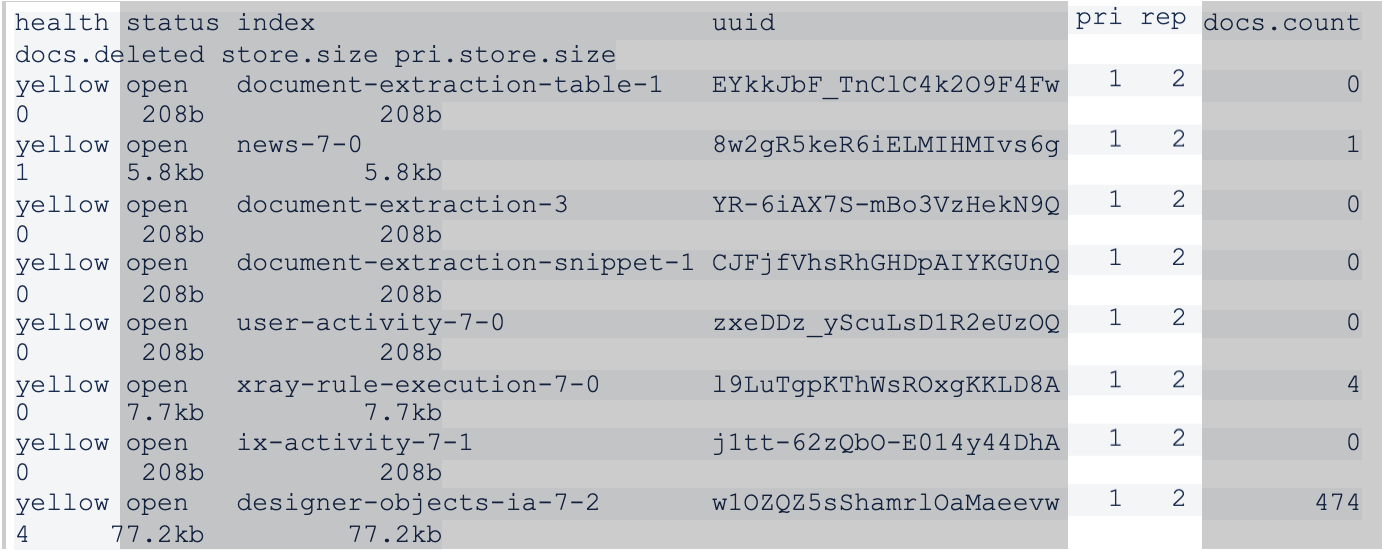
View details of the indices in the standalone environment.
curl localhost:9200/_cat/indices?vThe health of each index should be yellow and the replicas ("rep" column) should be 2.
-
For each index (~8, but depends on Appian version), set the number_of_replicas to 0.
Generic Example:
curl -X PUT -H "Content-Type: application/json" -d '{"index":{"number_of_replicas": 0 }}' localhost:9200/<INDEX>/_settingsSpecific Example:
curl -X PUT -H "Content-Type: application/json" -d '{"index":{"number_of_replicas": 0 }}' localhost:9200/document-extraction-table-1/_settings -
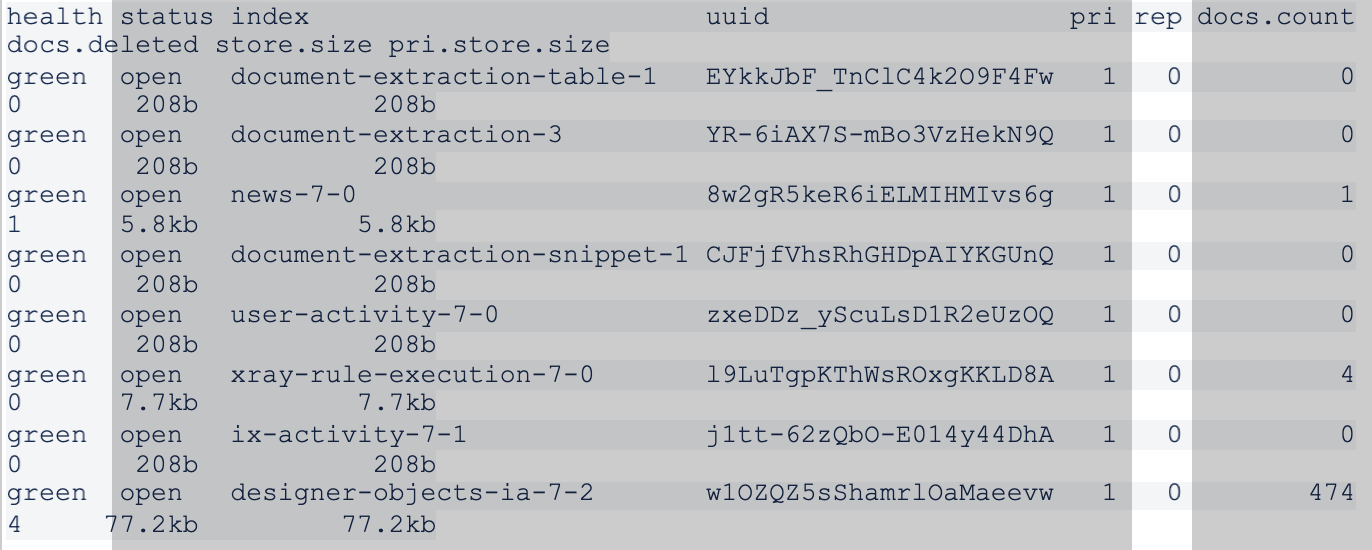
Check the status of the indices again.
curl localhost:9200/_cat/indices?vVerify that the health of each index is now green and the rep column is 0.
9.5 Start Appian application serverCopy link to clipboard
Bring up the application server in the standalone environment.
<APPIAN_HOME>/tomcat/apache-tomcat/bin/start-appserver.sh
9.6 Start ApacheCopy link to clipboard
Bring up Apache in the standalone environment.