This page outlines the various methods to deploy a package from one environment to another, and which method is best for each type of environment.
When you deploy a package, changes are taken from the source environment and moved to the target environment. Some common deployment paths include:
| Source Environment | Target Environment |
|---|---|
| Development | Test |
| Development 1 | Development 2 |
| Break Fix / Hotfix | Development |
| Test | Production |
The optimal approach depends on the security considerations of your source and target environments, as well as the type of changes you have. Whether you are deploying one or more applications, packages, environment specific data, Admin Console settings, or a mix of these can impact how you decide to deploy.
There are three methods for deploying a package in Appian:
Additional logic can be run after direct or external deployments by configuring a post-deployment process.
For auditing purposes, you can always find all changes introduced to an application in the Deploy view.
Note: If you're an Appian RPA customer, remember you'll need to package and deploy robotic processes separately from applications. Learn how to deploy robotic processes and apps.
Before you begin your deployment, we recommend the following actions.
If you're unsure about what you should deploy, check the table below to see which best matches your use case.
| Deployment Contents | When to Use | More Information |
|---|---|---|
| Entire application | Deploy your application configurations and all related design objects. Use if the application does not exist in your target environment. | You can include database scripts and plug-ins with your application deployment. |
| Package | Create a package or select an existing package to deploy a set of changes to your target environment. Learn how to create a package. | You can add application configurations, database scripts, and plug-ins to a package during development and when you deploy your package. |
| ONLY database scripts or plug-ins | If your application already exists in your target environment and you only need to deploy plug-ins or make changes to the environment's database via scripts, you can deploy these changes without objects. Database scripts and plug-ins can only be deployed to a target environment using compare and deploy if you are an application administrator. | To deploy database scripts and plug-ins without other objects, the application must already exist in your target environment. |
| Admin Console Settings | If you need to change Admin Console settings, you can export specific settings from your source environment and import them into the target environment. You can import an application or package along with Admin Console settings via the Admin Console. | Certain settings that are specific to a given environment cannot be deployed, such as API keys or certificates. |
| Import customization files (ICF) | Use to change or configure the values of certain objects or settings during deployment. Primarily, ICFs specify values that vary between environments or that are not exported for security reasons, such as passwords. You can also use an ICF to dictate specific import behaviors such as forcing an update of unchanged objects or triggering a manual data sync for record types in the target environment. | Appian generates a template import customization file, which you download, edit, and upload for deployment. |
Note: To deploy database scripts and plug-ins directly to a target environment, the Allow deployments with plug-ins and Allow deployments with database scripts settings must be enabled for the target environment. Learn more about deployment settings in the Admin Console.
Check that your deployment contents are prepared and ready to be sent to your target environment. If you're deploying a package, make sure that you've properly prepared it for deployment.
For production environments, we recommend performing any deployment activities, including inspections, during off-peak hours. If necessary, a maintenance window can be scheduled in the Admin Console. Also, consider adding a post-deployment process to your application to automate tasks and make your development lifecycle more efficient.
If you are moving complete applications from a staging environment to a production environment, take standard precautions to ensure continuity by creating a backup of your production objects. If the deployment should fail for any reason, this allows you to restore the previous state of the application.
To create a backup of your production objects, export all of the existing objects associated with your application.
Compare and deploy is the easiest and recommended method of deployment. If your DevOps infrastructure is set up, you can enable these connected environments to interact and directly deploy changes from one to another without manually downloading and uploading ZIP files. For deployments to higher environments such as Production, you can require a review process by enabling it in the Admin Console
The compare and deploy feature guides you through a few straightforward steps:
In the first step of compare and deploy, you'll select the environment where you want to deploy your application or package.
To start compare and deploy:
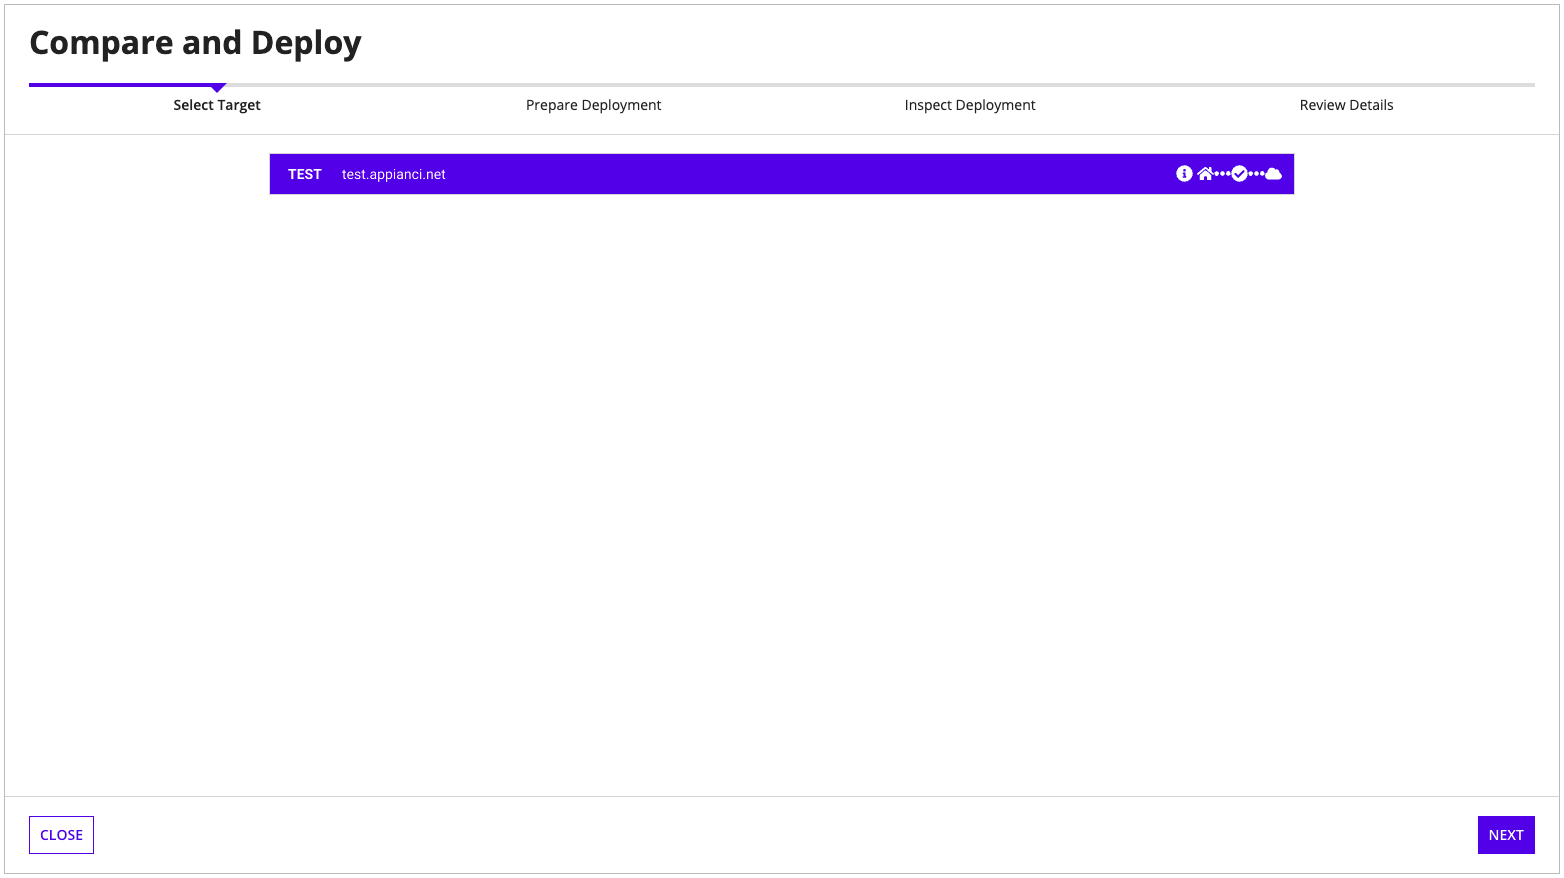
If you don't see any connected environments available, see DevOps infrastructure to learn more about setting up connected environments for deployments.
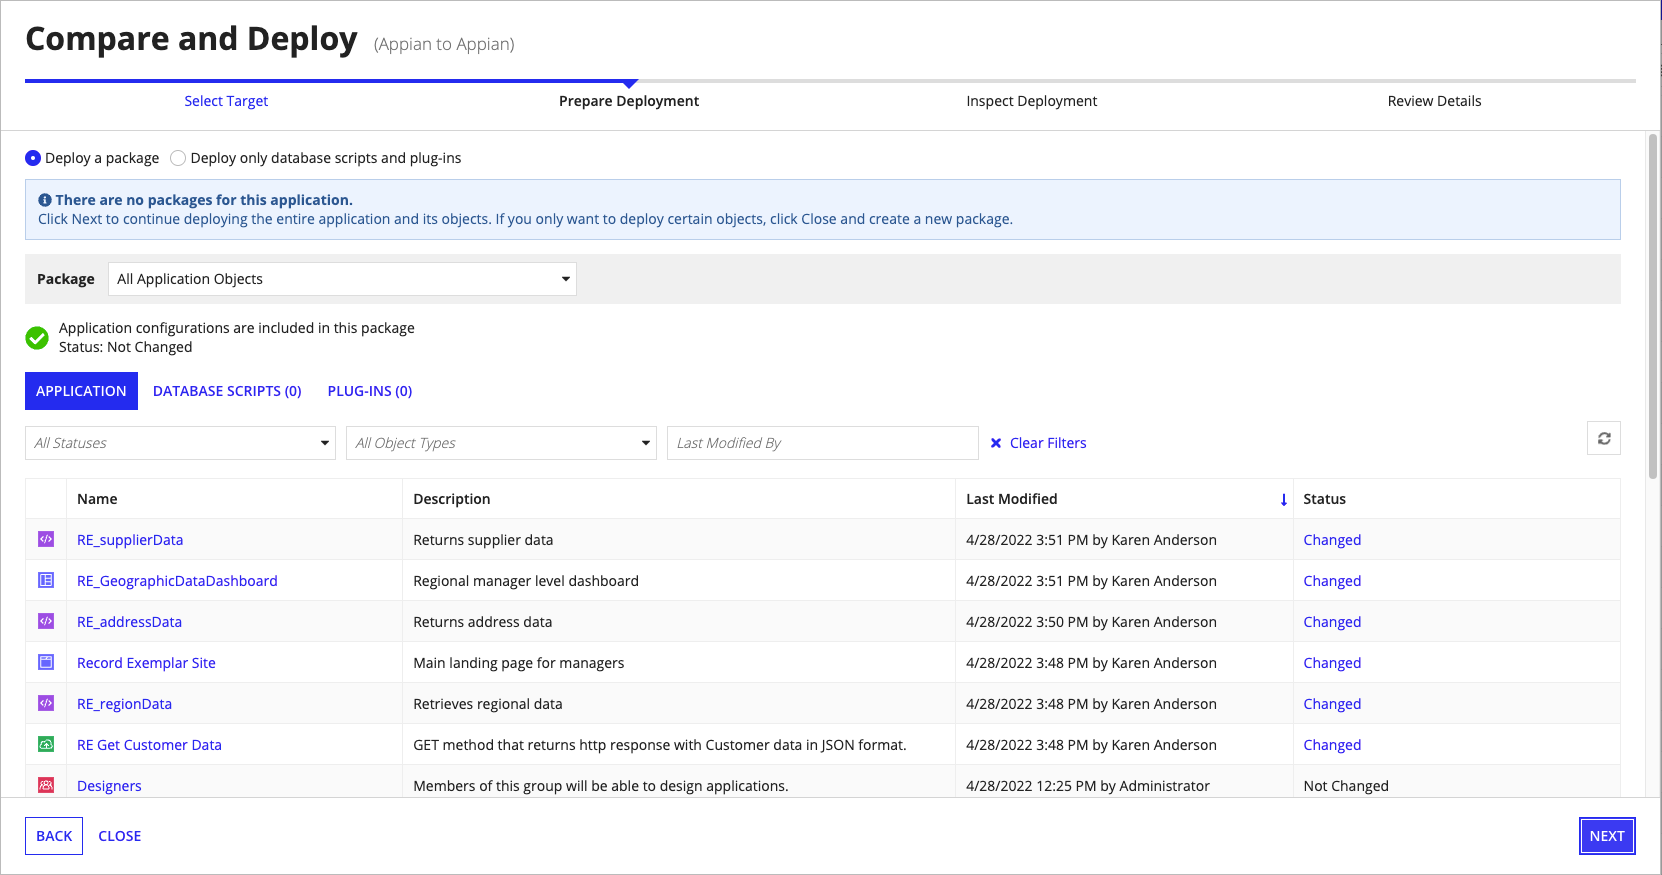
The Prepare Deployment step helps you get all the objects, application configurations, database scripts, and plug-ins together for deployment and review any changes that have been made to objects.
In the Prepare Deployment step, you can:
The Prepare Deployment step compares the objects in the application in your current environment to the target environment. Learn more about package comparison.
Your Prepare Deployment workflow depends on what you want to deploy:
If your application is new to the target environment, you can either deploy the entire application or deploy a package. This initial deployment will always include the application configurations needed to ensure a smooth deployment to your target.
If your application already exists in the target environment, select the corresponding option to continue:
| Option | Description |
|---|---|
| Deploy a package | Select this option to deploy the entire application or deploy a package. With this option you can deploy a package with objects, application configurations, database scripts, and/or plug-ins. A package can contain any or all of the contents listed. |
| Deploy only database scripts and plugins | Select this option to deploy database scripts or plug-ins without a package. With this option, you can add database scripts and plugins to the deployment. This functionality is only available through the compare and deploy workflow. |
Note: You can deploy only an import customization file without any objects. To do so, select Deploy a package at this point, then complete the steps described in Shortcut: Deploy only import customization.
Deployment of an entire application always includes the application configurations.
To prepare an entire application for deployment:
Note: If you experience a time out or a 504 error when you click Next, your application may be too large. Try deploying as a smaller package containing fewer objects.
Learn how to create a package.
To prepare a package for deployment:
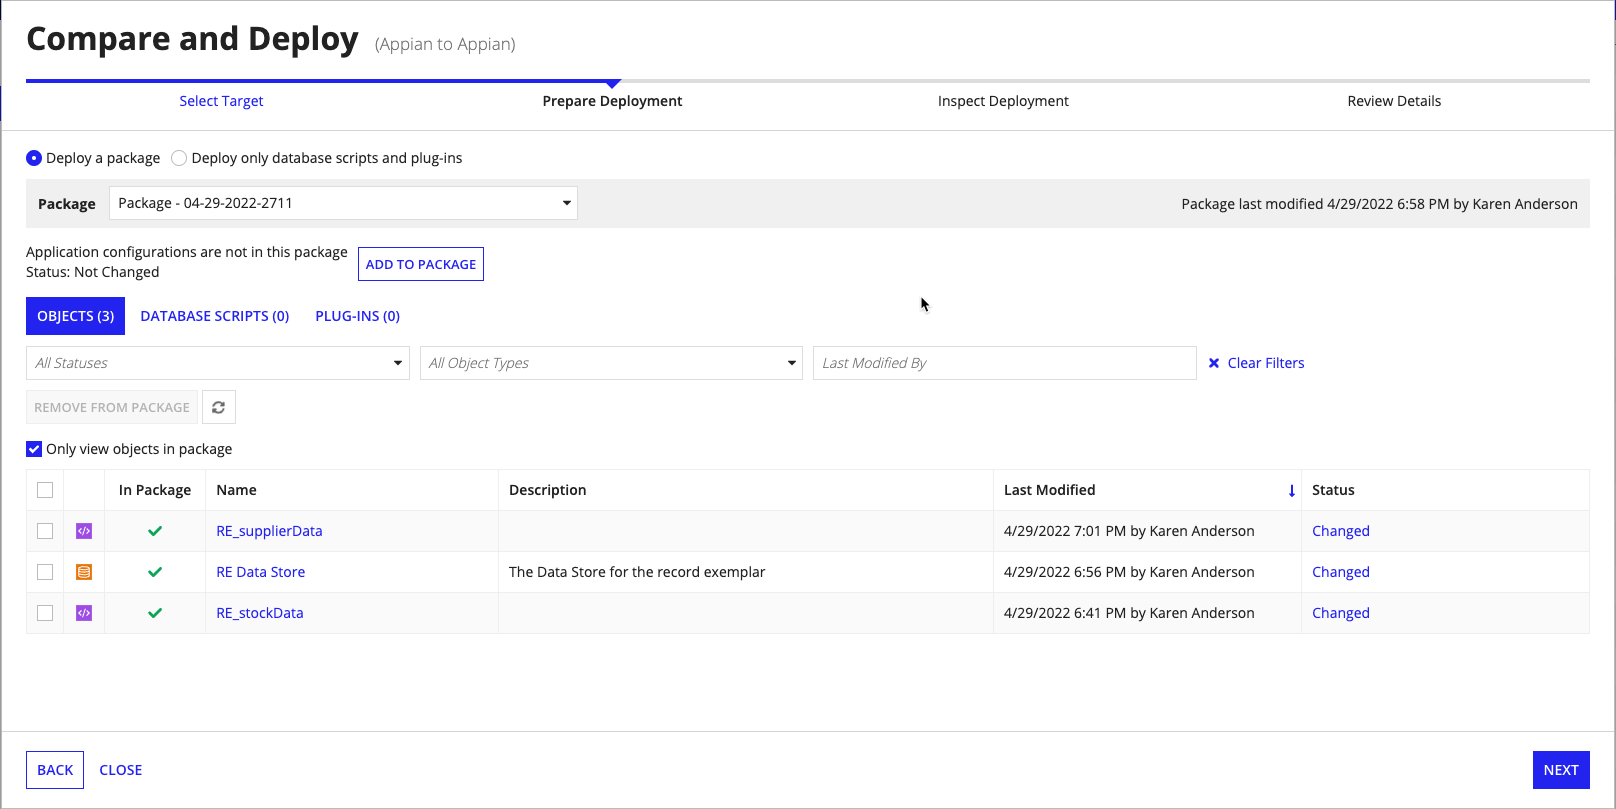
Note: When you add items to, or remove items from, a package during the Prepare Deployment step, Appian saves those changes to the original package.
Note: If you experience a time out or a 504 error when you click Next, your package may be too large. Try again with a package containing fewer objects.
Application configurations are a category of settings that apply to the application on a global level. These configurations are not design objects, but may rely on design objects to function. Learn more about application configurations.
The deployed package always includes application configurations that you cannot remove during compare and deploy if either of the following is true:
However, if you're deploying a package for an application that already exists in the target environment, you can do any of the following during compare and deploy:
Note: When you add or remove application configurations from a package during compare and deploy, Appian saves those changes to the original package.

If you're done working with application configurations, click NEXT to continue to the Inspect Deployment step.
Database scripts can be deployed on their own or included within the deployment of an application or package.
Database scripts are not exported along with packages and application objects, so skip this step if you do not have permission to deploy directly to the target environment.
Tip: Learn how to add database scripts to a package during development.
To deploy database scripts:
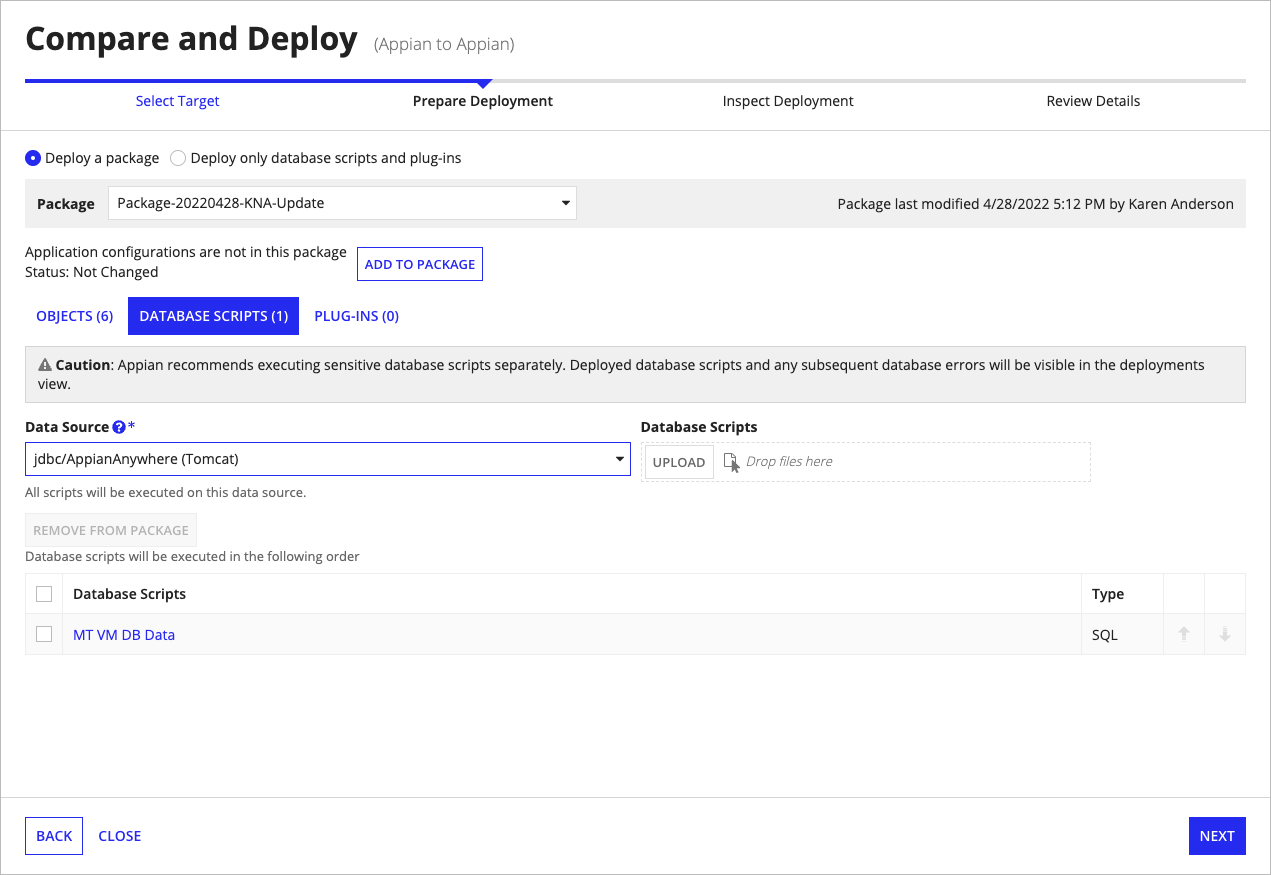
Tip: Any database scripts you added to the package during development will be present in this list.
Note: When you add or remove database scripts during the Prepare Deployment step, Appian saves those changes to the original package.
If you're deploying a database script that changes a database related to a record type with sync enabled, the deployment may require an import customization file to trigger a sync after deployment of the script in the target environment. Learn more about triggering a sync in the target environment.
Appian must be able to successfully run the scripts before it can attempt to deploy the objects. If an error occurs during script execution, the deployment will stop. To resolve script errors, refer to the deployment log for further details.
Plug-ins can be deployed on their own or included within the deployment of an application or package.
Deploying plug-ins with a package is only necessary under specific conditions. Learn more about these conditions before continuing.
Plug-ins are not exported along with packages and application objects, so skip this step if you do not have permission to deploy directly to the target environment.
Tip: Learn how to add plug-ins to a package during development.
To deploy plug-ins:

Before you can review any inspect results you may encounter deployment errors. If present, these errors interrupt inspection and block it from continuing until they are resolved. A deployment error represents a breaking issue in an object definition that, if not resolved, will result in an incomplete deployment. Address the issues in the grid before continuing your inspection.
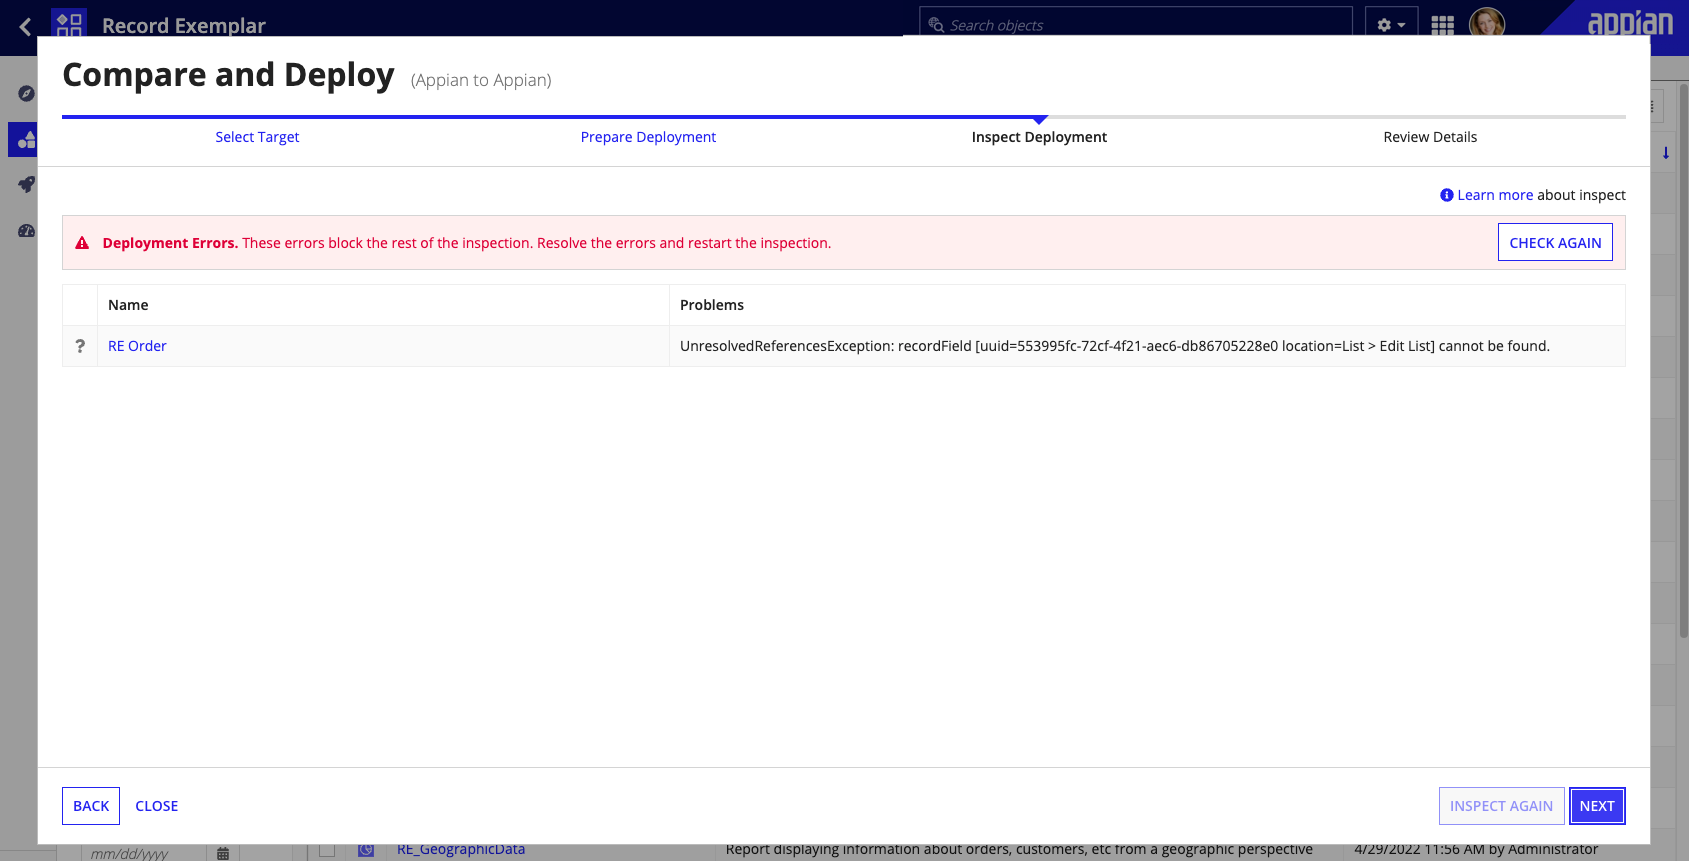
During inspection, Appian checks the items of your package for security warnings, failing test cases, and missing precedents. This step eliminates most manual checks and helps you to identify and resolve issues with the objects in your package.
Inspection only applies to Appian objects, application configurations, and the import customization file. Database scripts and plug-ins should be reviewed separately before deployment. Note that if a database script or plug-in fails during deployment, Appian will attempt to rollback changes. For more information on resolving problems with your deployment, see the deployment log.
To inspect your package for deployment:
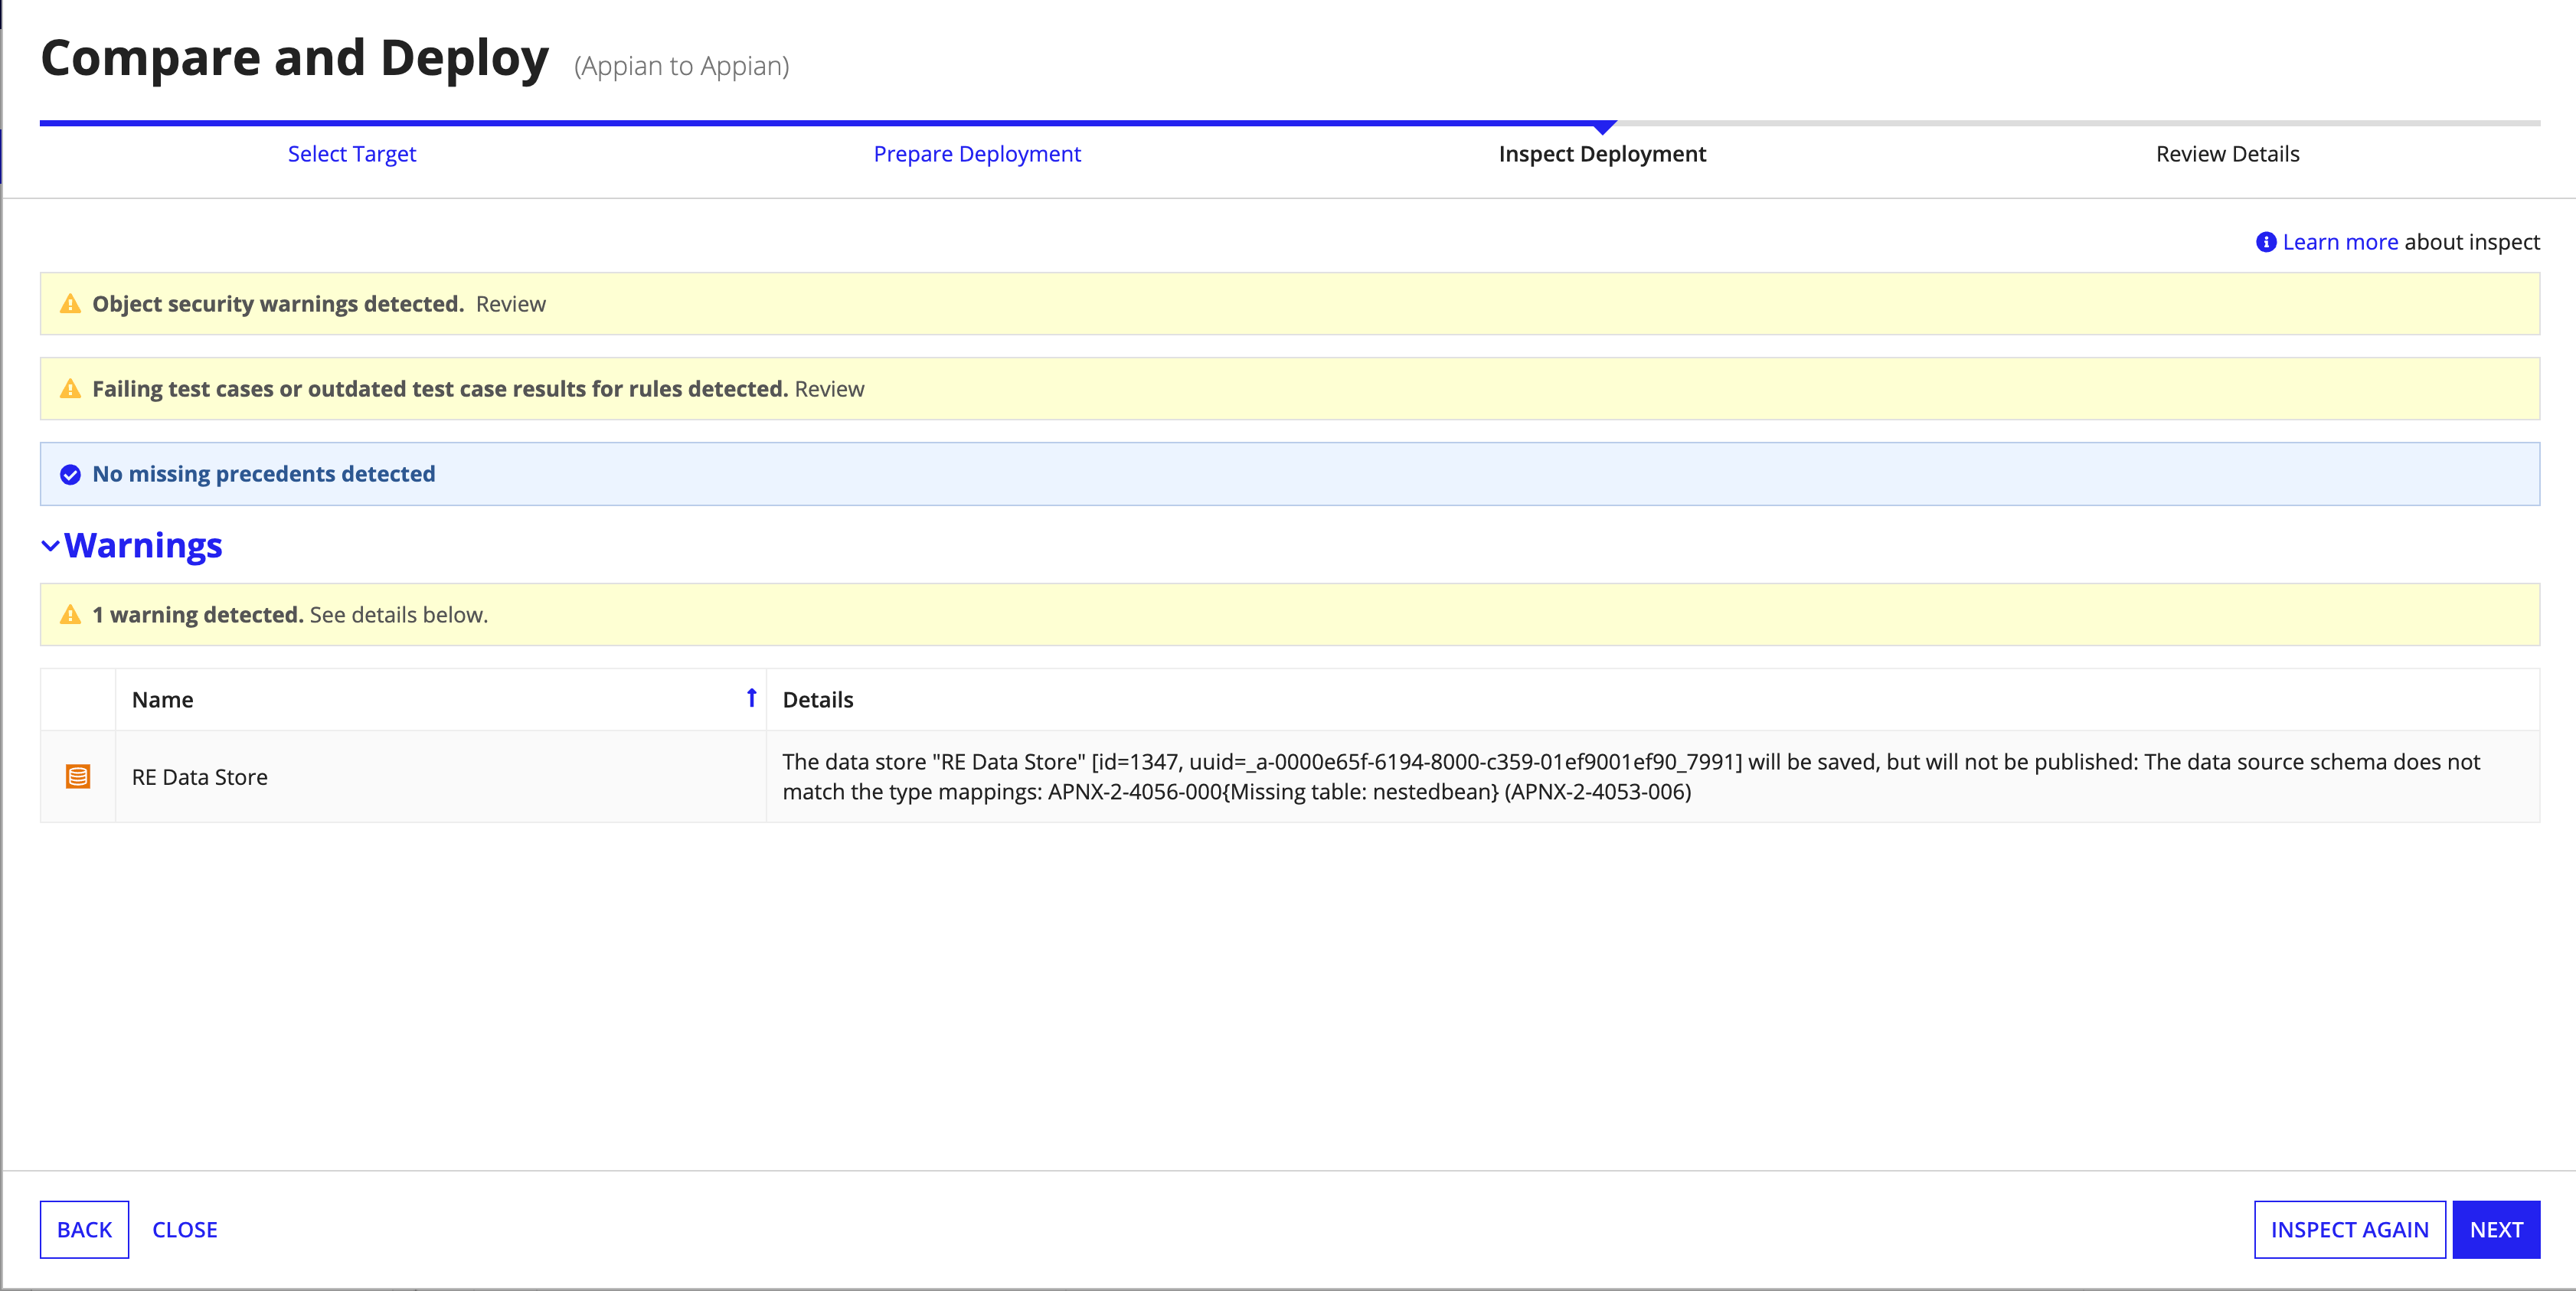
Note: Warnings are informational and are simply meant to call attention to potential issues before deployment. Warnings will not block your deployment.
Your deployment is almost ready to go. All that's left is to review a few high-level details for the Deploy view and, if needed, to add an import customization file.

In this review step, you can modify the following properties:
Property |
Description |
|---|---|
Name |
The name of the deployment as it will appear in the Deploy view. Also, the name of the deployed package you can download. |
Description |
A brief description of the deployment as it will appear in the Deploy view. |
Delete package after deployment |
Select this checkbox to delete the deployed package once deployment is complete. If the deployment is successful, this option also deletes the prepared package you might have used as a source for the deployment. |
Import Customization File |
The import customization file you want to include in this deployment. If the package you selected for this deployment contains an import customization file, the file you added displays in this pane. You can do the following in this pane:
|
At this point, your workflow depends on your security and infrastructure:
To complete your direct deployment:
(Optional) Click Download Package to download the deployed package.
Note: The downloaded package contains any design objects and application configurations that you selected for deployment. The download does not include any database scripts or plug-ins that you associated with the deployment.
A confirmation dialog will appear once the deployment has been sent to the target environment.
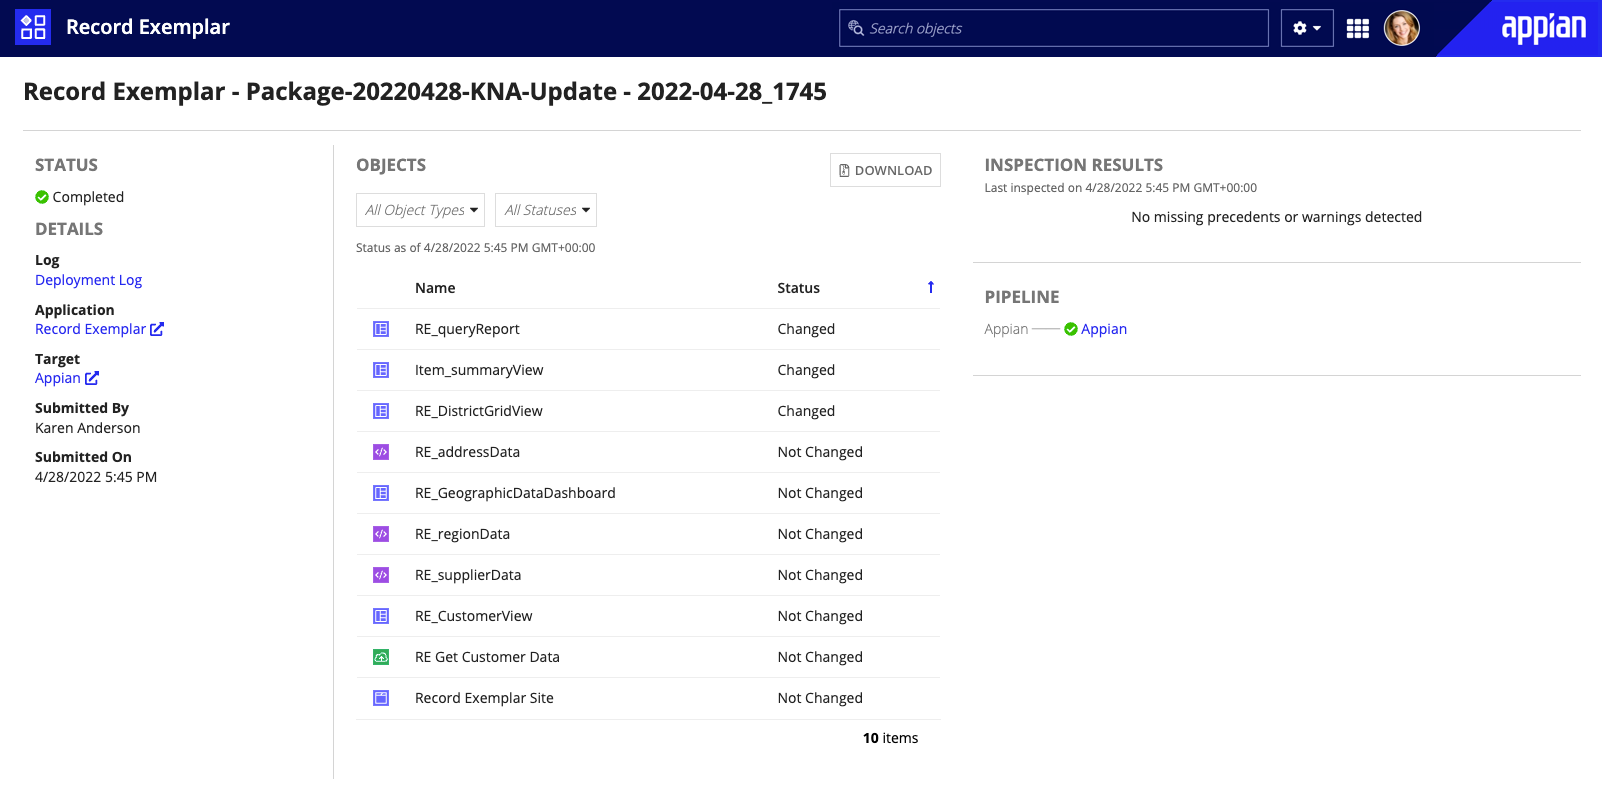
Once your deployment is in progress, the deployment details will be available on the Deploy view of both the source and target environments. Deployment details are only visible to system administrators and users with Administrator permissions for the application (application administrators).
If your deployment requires review, application administrators and users in the reviewer group will receive an email about the pending deployment. They can approve or reject deployments in the deployments details view.
To export the design objects and application configurations you selected and evaluated for deployment:
Click Download Package.
Note: The exported package contains only design objects and application configurations selected for deployment. The export does not include the database scripts or plug-ins associated with the deployment.
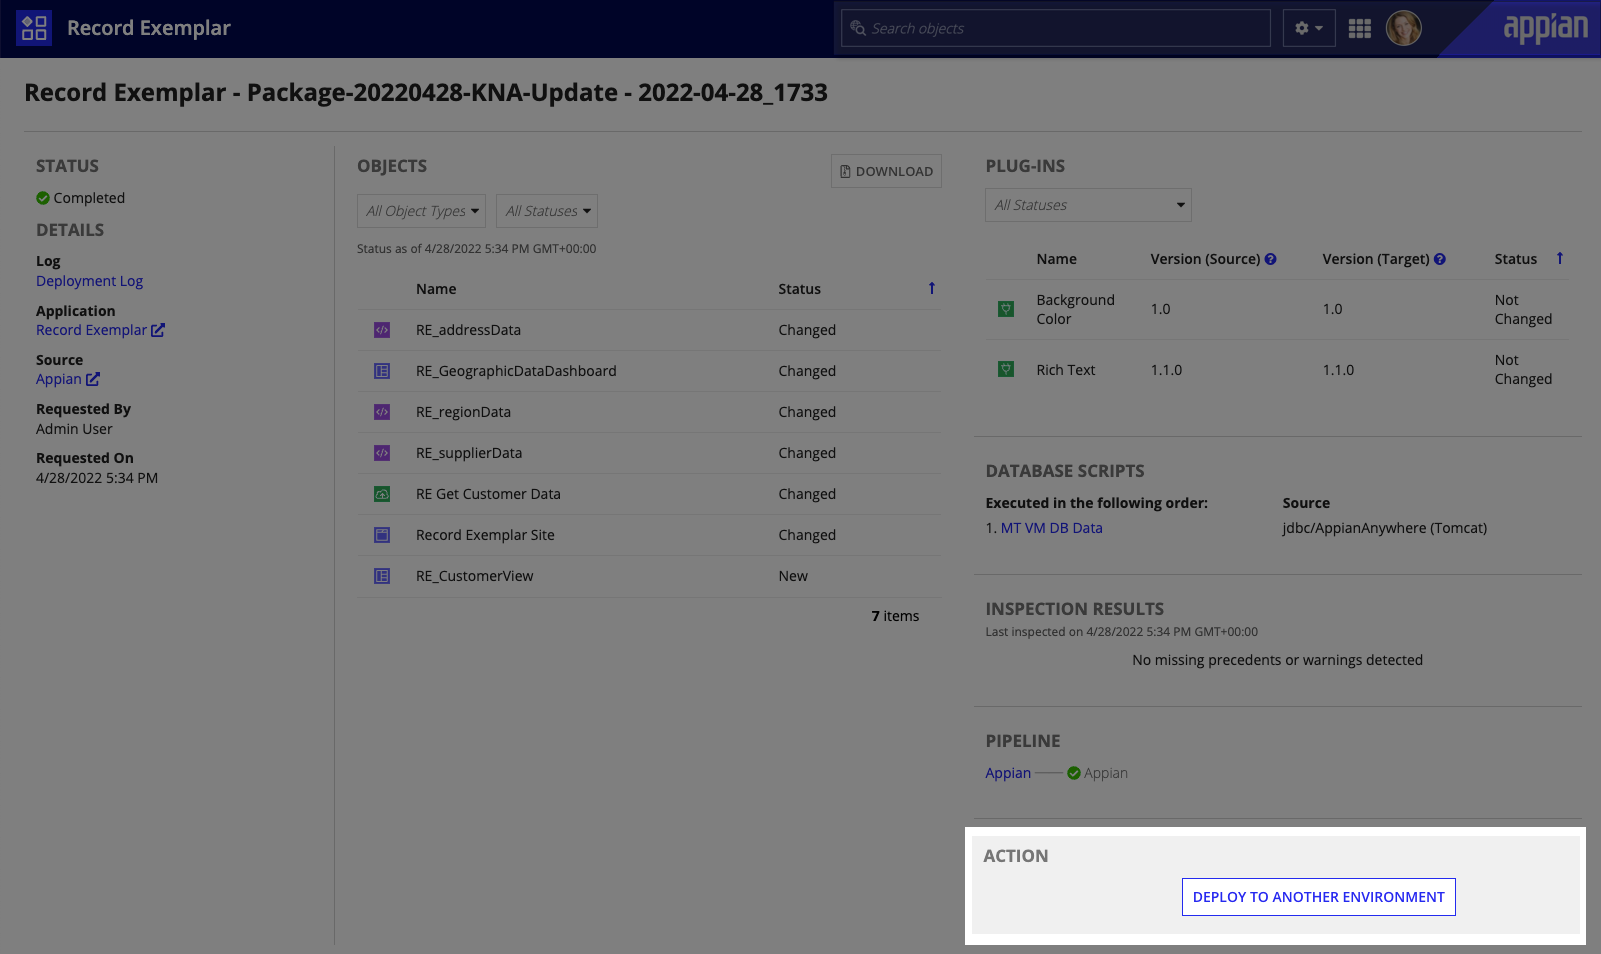
Once a package has been successfully deployed, you can reuse it for another environment. This is helpful for deploying packages to higher environments after testing your changes in a lower environment. The same set of changes will be applied to ensure that you are making consistent updates across all of your environments.
This option is available to system administrators and application administrators for any completed, incoming deployments. The same objects and database scripts (in the same order) that were originally deployed will be used for the new deployment, but you can update the import customization file.
To reuse a successfully-deployed package:
Under ACTION, click DEPLOY TO ANOTHER ENVIRONMENT.
Note: Inspection of a reused package checks the objects and application configurations in your package for missing precedents only.
Upload an import customization file if appropriate.
Note: Because values in an import customization file are specific to an individual environment, we do not automatically reuse the file from the previous environment where the package successfully deployed. This approach allows you to specify the values for the new target environment with an appropriate import customization file. You can always download the import customization file from the previous deployment in the Deploy view.
Click DEPLOY. A confirmation dialog will display once the deployment has been sent to the target environment.
For system administrators and application administrators, deployment details will be available on the Deploy view of both the source and target environments. To access the view quickly, click View Deployment Details in the confirmation dialog.
If your deployment requires review, reviewers will receive an email about the pending deployment
To deploy only an import customization file:
Appian has native deployment APIs that can be called from external tools, such as Jenkins. There are five endpoints that allow you to inspect and deploy packages, import customization files, and database scripts.
Deployment APIs allow you to integrate your Appian release into an automated pipeline that you can set up once and run the exact same way for all future deployments, saving time and avoiding manual errors.
To learn about programmatically deploying Admin Console settings and tightly integrating with a version control system to store and retrieve package files, see the Deployment Automation section of Appian MAX.
You can manually export a package from the source environment and then import it into the target environment. Import and export details are available in the Deploy view of every environment.
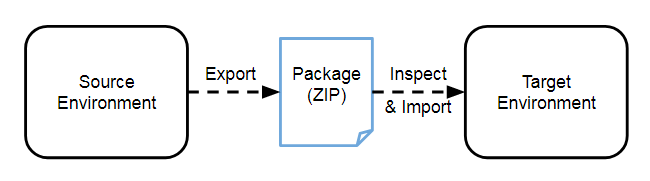
Appian recommends using manual export and import if you do not have connected environments added to your infrastructure.
The successful import of your package can depend on managing certain additional files and settings. For example, you may need to add an import customization file during import. Be sure to evaluate and manage these package dependencies for each import.
All manual imports occur asynchronously. This means that Appian queues your import as a background process, allowing you to continue development in Appian Designer while the system processes the import. You can review the status of your import from the Deploy view and an email will be sent when the import completes.
Once you've checked your application for missing precedents, you're ready to export your package.
When you export an application, the exported package includes application configurations and all associated objects. In addition to the package, you can optionally download an import customization file.
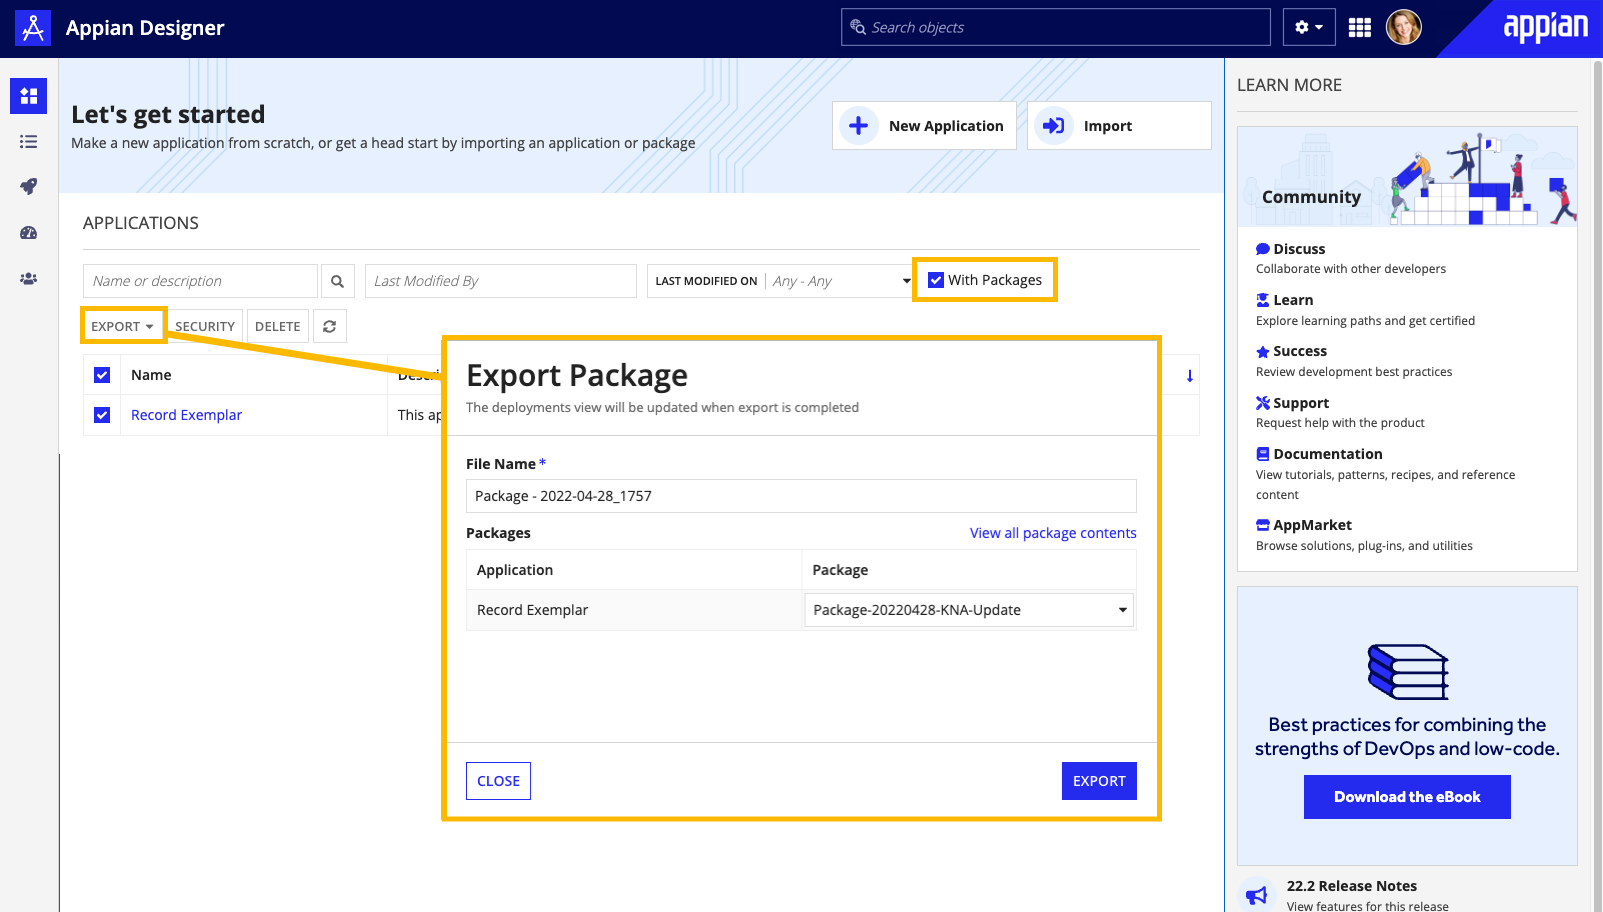
To export an application:
Tip: You can also export an application by selecting EXPORT APP in the deployment actions bar of the Build view for the application.
Note: An exported package can contain any design objects or application configurations you've added to the package. However, the exported package doesn't include database scripts or plug-ins you've added to the package.
To export a package:
 next to objects you want to remove.
Tip: Exported packages will be automatically deleted after 30 days and will no longer be available for download as attachments. You can change the number of days before export package cleanup in the Admin Console Settings.
Since you can't undo an import, you should always inspect a package before completing the import to check for warnings or missing precedents. At the same time as inspecting the package, you can also review the status of package items compared to those items in the target environment.
Importing a package at the environment level adds the objects to the specific application.
Importing an application into another application will add objects to that specific application. You can remove them by selecting the imported objects and clicking REMOVE FROM APP in the toolbar.
If the package you're importing includes design objects or application configurations that already exist in the target environment, the imported version overwrites the existing version.
To inspect and import a package:
Note: An exported package contains design objects and application configurations only. The export doesn't include database scripts or plug-ins you've added to the package during development.
To export packages from different applications:
If your application contains objects with environment-specific or sensitive values, click Download Import Customization File.
Note: The template import customization file contains all properties needed by objects in the selected packages. This template file does not reflect any import customization files you may have added to individual packages, so you'll likely want to reconcile this template file with the files you've added to the packages.
The IMPORT option in the Applications view handles packages with multiple applications. When your import contains multiple packages, Appian adds the corresponding objects and application configurations to the appropriate applications in the target environment.
Developers with viewer access to an application and objects are able to create, compare, and inspect packages across environments, and manually export them. Application administrators and system administrators on the source environment are the only roles able to directly deploy to the target using compare and deploy.
Before using compare and deploy, a system administrator account must be specified when setting up deployment configuration in the Admin Console. The Deploy As account must be in the service account role.
When manually importing a package, you must ensure that you can administer the application and the objects that it contains:
The Last Modified By field displays the user who most recently modified the object and the time at which it happened. If the object supports versioning, the Last Modified By information of previous versions are not affected.
Best Practice: Regardless of deployment method, we recommend using a group for each application called <Application_Name>_Administrators.
<Application_Name>_Administrators group, as needed.When objects are deployed to another Appian environment, the deployed objects contain a reference to the users and groups listed in their rolemaps. For example, an exported Knowledge Center contains the list of users and groups with rights to the Knowledge Center.
Rolemap deployment rules:
If an object already exists on the target environment (an object exists there with the same UUID), then:
Because objects in a deployment aren't updated simultaneously, users may see some inconsistencies in their application behavior as objects are updated. For example, during a lengthy deployment, a constant may be updated but the process model that references the constant has not been updated yet.
During deployments that include a record type with sync enabled, the record type must successfully sync in that environment before it will be available. This may mean that your record type will be unavailable to users, processes, or APIs until the import is complete. For more information on record types with sync enabled, see Data Sync in Appian Records.
Deploy to Target Environments
