This page provides instructions for setting up automated testing with a Jenkins project that can run a test of all expression rules in an Appian system ("system test"), or select Appian applications ("application test"). For information on how automated testing works in Appian, see Automated Testing for Expression Rules.
Appian provides a series of smart services and functions to execute tests on expression rules for specific applications or an entire Appian system.
In order to use these smart services and functions from outside of Appian, you can create web APIs and call them from other systems such as Jenkins to integrate testing of Appian into your overall testing strategy.
This document will walk you through a series of steps to set up automated testing of expression rules using Jenkins as a Continuous Integration (CI) system.
Tip: Although this article describes Appian testing with Jenkins. You can follow similar steps to integrate it with the continuous integration tool of your choice, such as Bamboo and TeamCity.
Follow the instructions in the Installing Jenkinspage on Jenkins’ official site. Instructions are maintained and updated by this vendor on a regular basis.
If you are using Windows OS, you can find the installer here.
Once Jenkins is installed, you will need to download and install Gradle, as well as a few Jenkins plugins.
You will need the following Jenkins plugins:
Success message for the plugin on the Installing Plugins/Upgrades page, click Manage Plugins from the left-hand pane.Gradle is an open source build automation system. It uses a Groovy-based domain-specific language (DSL) used in one of the scripts in this article.
Gradle 2.10 (or latest available version) in the Gradle name field.In order to execute an applications or system test, you need to configure a new Freestyle Project in Jenkins. This project will call a Gradle script that performs the following actions:
testRunResult CDT containing the results of the test run.SystemTest or ApplicationTest (whichever is appropriate) in the Item Name field.TestRunResult CDT into JUnit formatBefore you can create a Groovy script that calls web services in Appian, you need to create a few web APIs first.
Appian provides the following smart services and functions so you can use them from interfaces, process models, or web APIs:
In this article, you will create a new application titled "Continuous_Integration," which will contain four new web APIs to (1) start a test on all expression rules in the system, (2) start a test on expression rules in selected applications, (3) check the status of a test run, and (4) fetch the results of a test run.
Continuous_Integration in the Name field.Now you will create a writeable API that will start a test run on all expression rules in an Appian system. To do so, open the Continuous_Integration application we created in a previous section (if it's not already open), and follow these steps:
ciStartRuleTestsAll in the Name field.startRuleTestsAll in the Endpoint field.Enter the following expression in the editor:
1
2
3
4
5
6
7
8
9
10
a!startRuleTestsAll(
   onSuccess: a!httpResponse(
    statusCode: 200,
    body: fv!testRunId
  ),
  onError: a!httpResponse(
    statusCode: 500,
    body: "An error occurred when calling a!startRuleTestsAll"
  )
)
You have now created a web API to create a new test run for all expression rules in a system. You should now be able to use the following Web API from your Jenkins script: https://[Appian Site]/suite/webapi/startRuleTestsAll
Where [Appian Site] is the name of your site. A test-run ID will be returned when calling the startRuleTestsAll web API. You can use this test-run ID when querying the status of a test run, or when fetching the results of a test run.
In order to create this API, you will first need to define the applications that you want to test and create a new constant of type Application. To do so, open the Continuous_Integration application we created in a previous section (if it's not already open), and follow these steps:
APPLICATIONS_TO_TEST as the name of the constant.Application.Once the application constant is created, follow these instructions to create a writeable API, that will start a test on all expression rules in selected applications:
ciStartRuleTestsApplications in the Name field.startRuleTestsApplications in the Endpoint field.Enter the following expression in the editor. Notice that we are using the APPLICATIONS_TO_TEST constant to specify the application(s) that should be tested:
1
2
3
4
5
6
7
8
9
10
11
a!startRuleTestsApplications(
   applications: cons!APPLICATIONS_TO_TEST,
   onSuccess: a!httpResponse(
    statusCode: 200,
      body: fv!testRunId
  ),
  onError: a!httpResponse(
    statusCode: 500,
    body: concat("Error message: " , fv!error)
  )
)
You have now created a web API to start a new test run for all expression rules in the selected application(s). You should now be able to use the following Web API from your Jenkins script: https://[Appian Site]/suite/webapi/startRuleTestsApplications
Where [Appian Site] is the name of your site. A test-run ID will be returned when calling the startRuleTestsApplications web API. You can use this test-run ID when querying the status of a test run, or when fetching the results of a test run.
ciTestRunStatusForId in the Name field.testRunStatusForId in the Endpoint dialog.body parameter from "Hello World" to: a!testRunStatusForId(http!request.queryParameters.id)
You have now created a Web API to query the status of a test execution. You should now be able to use the following Web API from your Jenkins script: https://[Appian Site]/suite/webapi/testRunStatusForId?id=[testRunId]
Where [Appian Site] is the name of your site, and [testRunId] is the id returned by the startRuleTestsAll or the startRuleTestsApplications web APIs.
ciTestRunResultForIdin the Name field.testRunResultForId in the Endpoint dialog.Update the value of the body parameter from "Hello World" to:
1
2
3
toxml(
    a!testRunResultForId(http!request.queryParameters.id)
)
You have now created a Web API to retrieve test results in XML format. You should now be able to use the following web API from your Jenkins script: https://[Appian Site]/suite/webapi/testRunResultForId?id=[testRunId]
Where [Appian Site] is the name of your site, and [testRunId] is the id returned by the startRuleTestsAll or the startRuleTestsApplications web APIs.
The web APIs created in previous sections fall in two different categories.
1) Using the POST HTTP Method:
startRuleTestsAllstartRuleTestsApplications2) Using the GET HTTP Method:
testRunStatusForIdtestRunResultForIdTo test web APIs with the POST method from a terminal, try the following cURL command:
curl - X POST -u [username]:[password] https://[Appian Site]/suite/webapi/[startTest API]
Where:
startRuleTestsAll, or startRuleTestsApplicationsTo test web APIs with the GET method from a terminal, try the following cURL command: curl -u [username]:[password] https://[Appian Site]/suite/webapi/[Get Web API]?id=[testRunId]
Where:
testRunStatusForId, or testRunResultForIdstartRuleTestsAll, or startRuleTestsApplications web APIs.In this section you will create a new XSLT file in the Jenkins workspace created in the Create a New Jenkins Job to Start an Application or System Test section. The XSLT file will transform the XML representation of the TestRunResult CDT into a JUnit format.
Make sure the OS account you use is the same that Jenkins uses so there are no security or permission issues when you execute your script.
cd /var/lib/jenkins/jobs/SystemTest/workspace/jenkins\workspace\SystemTestsudo -u jenkins -svi convertToJunit.xslCopy the following XSL definition to your text editor.
1
2
3
4
5
6
7
8
9
10
11
12
13
14
15
16
17
18
19
20
21
22
23
24
25
26
27
28
29
30
31
32
33
34
35
36
37
38
39
40
41
42
43
44
45
46
47
48
49
50
51
52
53
54
55
56
57
58
59
60
61
62
63
64
65
66
67
68
69
70
71
72
73
74
75
76
77
78
79
80
81
82
83
84
85
86
87
88
89
90
91
92
93
94
95
96
97
98
99
100
101
102
103
104
105
106
107
108
109
110
111
112
113
114
115
116
117
118
119
120
121
122
123
124
125
126
127
128
129
130
131
132
133
134
135
136
137
138
139
140
141
142
143
144
145
<?xml version="1.0" encoding="UTF-8"?>
<xsl:stylesheet xmlns:xsl="http://www.w3.org/1999/XSL/Transform" xmlns:a="http://www.appian.com/ae/types/2009" version="1.0" exclude-result-prefixes="a">
<xsl:template match="/">
<testsuites>
<xsl:attribute name="name">
<xsl:value-of select="/a:TestRunResult/a:type" />
</xsl:attribute>
<xsl:attribute name="failures">
<xsl:value-of select="/a:TestRunResult/a:failureCount" />
</xsl:attribute>
<xsl:attribute name="errors">
<xsl:value-of select="/a:TestRunResult/a:errorCount" />
</xsl:attribute>
<xsl:attribute name="tests">
<xsl:value-of select="/a:TestRunResult/a:testCount" />
</xsl:attribute>
<xsl:attribute name="time">
<xsl:value-of select="/a:TestRunResult/a:totalElapsedTime" />
</xsl:attribute>
<xsl:apply-templates />
</testsuites>
</xsl:template>
<xsl:template match="a:type" />
<xsl:template match="a:failureCount" />
<xsl:template match="a:errorCount" />
<xsl:template match="a:name" />
<xsl:template match="a:testCount" />
<xsl:template match="a:totalExecutionTime" />
<xsl:template match="a:totalElapsedTime" />
<xsl:template match="a:passCount" />
<xsl:template match="a:id" />
<xsl:template match="a:executedBy" />
<xsl:template match="a:queueTime" />
<xsl:template match="a:startTime" />
<xsl:template match="a:endTime" />
<xsl:template match="a:status" />
<xsl:template match="a:applicationTestResults">
<testsuite>
<xsl:attribute name="name">
<xsl:value-of select="a:name" />
</xsl:attribute>
<xsl:attribute name="tests">
<xsl:value-of select="a:testCount" />
</xsl:attribute>
<xsl:attribute name="errors">
<xsl:value-of select="a:errorCount" />
</xsl:attribute>
<xsl:attribute name="failures">
<xsl:value-of select="a:failureCount" />
</xsl:attribute>
<xsl:attribute name="time">
<xsl:value-of select="a:totalExecutionTime" />
</xsl:attribute>
<xsl:choose>
<xsl:when test="a:errorMessage!=''">
<system-err>
<xsl:value-of select="a:errorMessage" />
</system-err>
</xsl:when>
<xsl:otherwise>
<xsl:for-each select="a:problemObjectsTestResult">
<xsl:for-each select="a:testCasesResult">
<xsl:if test="a:name!=''">
<testcase>
<xsl:attribute name="classname">
<xsl:value-of select="../a:name" />
</xsl:attribute>
<xsl:choose>
<xsl:when test="a:name!=''">
<xsl:attribute name="name">
<xsl:value-of select="a:name" />
</xsl:attribute>
</xsl:when>
<xsl:otherwise>
<xsl:attribute name="name">NO_NAME</xsl:attribute>
</xsl:otherwise>
</xsl:choose>
<xsl:attribute name="time">
<xsl:value-of select="a:executionTime" />
</xsl:attribute>
<xsl:attribute name="status">
<xsl:value-of select="a:status" />
</xsl:attribute>
<xsl:choose>
<xsl:when test="a:status='ERROR' or a:status='TIMEOUT'">
<error>
<xsl:text disable-output-escaping="yes"><![CDATA[</xsl:text>
<xsl:value-of select="a:errorMessage" />
<xsl:text />
<xsl:text>
</xsl:text>
<xsl:text>Expression Rule:</xsl:text>
<xsl:text> </xsl:text>
<xsl:value-of select="../a:url" />
<xsl:text disable-output-escaping="yes">]]></xsl:text>
</error>
</xsl:when>
<xsl:when test="a:status='FAIL'">
<failure>
<xsl:text disable-output-escaping="yes"><![CDATA[</xsl:text>
<xsl:value-of select="a:failureMessage" />
<xsl:text />
<xsl:text>
</xsl:text>
<xsl:text>Expression Rule:</xsl:text>
<xsl:text />
<xsl:value-of select="../a:url" />
<xsl:text disable-output-escaping="yes">]]></xsl:text>
</failure>
</xsl:when>
</xsl:choose>
</testcase>
</xsl:if>
</xsl:for-each>
</xsl:for-each>
<xsl:for-each select="a:passObjectsTestResult">
<xsl:for-each select="a:testCasesResult">
<xsl:if test="a:name!=''">
<testcase>
<xsl:attribute name="classname">
<xsl:value-of select="../a:name" />
</xsl:attribute>
<xsl:choose>
<xsl:when test="a:name!=''">
<xsl:attribute name="name">
<xsl:value-of select="a:name" />
</xsl:attribute>
</xsl:when>
<xsl:otherwise>
<xsl:attribute name="name">NO_NAME</xsl:attribute>
</xsl:otherwise>
</xsl:choose>
<xsl:attribute name="time">
<xsl:value-of select="a:executionTime" />
</xsl:attribute>
<xsl:attribute name="status">
<xsl:value-of select="a:status" />
</xsl:attribute>
</testcase>
</xsl:if>
</xsl:for-each>
</xsl:for-each>
</xsl:otherwise>
</xsl:choose>
</testsuite>
</xsl:template>
</xsl:stylesheet>
For more details on reading test results, see Parsing Batch Test Results for Expression Rules.
File names are case-sensitive so make sure to use the same name consistently throughout your setup.
This file will contain the credentials needed to sign in to your Appian system.
The username (appianUserName) is in plain text, whereas the password (appianPasswordEncoded) is encoded to add an additional layer of security:
/var/lib/jenkins/jobs/SystemTest/workspace/[Jenkins Folder]\workspace\SystemTestCopy the following snippet inside the gradle.properties file.
1
2
appianUserName: [username]
appianPasswordEncoded: [password]
The next step is to create a Gradle script that pulls of the pieces together by:
The following instructions describe how to create a Gradle script from a Linux environment. However, the steps are similar for a Windows system:
/var/lib/jenkins/jobs/SystemTest/workspace/[Jenkins Folder]\workspace\SystemTesttouch build.gradlevim build.gradleFor a system test:
1
2
3
4
5
6
7
8
9
10
11
12
13
14
15
16
17
18
19
20
21
22
23
24
25
26
27
28
29
30
31
32
33
34
35
36
37
38
39
40
41
42
43
44
45
46
47
48
49
50
51
52
53
54
55
56
57
58
59
60
61
62
63
64
65
66
67
68
69
70
71
72
73
74
75
76
 buildscript {
    repositories {
       jcenter()
    }
    dependencies {
      classpath 'org.codehaus.groovy.modules.http-builder:http-builder:0.7.2'
    }
 }

 import groovyx.net.http.RESTClient
 import groovyx.net.http.HTTPBuilder
 import groovyx.net.http.EncoderRegistry
 import static groovyx.net.http.ContentType.TEXT
 import static groovyx.net.http.ContentType.URLENC
 import org.apache.http.client.methods.HttpGet
 import org.apache.http.HttpRequestInterceptor
 import org.apache.http.protocol.HttpContext
 import org.apache.http.HttpRequest
 import org.apache.http.HttpResponse
 import javax.xml.transform.*
 import javax.xml.transform.stream.*
 import org.apache.commons.codec.binary.Base64

 task runSystemTest << {
     // Define appianPasswordEncoded in gradle.properties
     // as a base64-encoded string
     def appianPassword = new String(appianPasswordEncoded.decodeBase64())
     // The URL passed in by Jenkins
     def baseURL = "$systemURL"

     def startSystemURL = "/suite/webapi/startRuleTestsAll"
     def testStatusURL = "/suite/webapi/testRunStatusForId"
     def fetchTestResultsURL =  "/suite/webapi/testRunResultForId"

     def restClient = new RESTClient(baseURL)
     restClient.client.addRequestInterceptor(new HttpRequestInterceptor() {
       void process(HttpRequest httpRequest, HttpContext httpContext) {
         httpRequest.addHeader('Authorization',
             'Basic ' + (appianUserName + ':'
     +appianPassword).bytes.encodeBase64().toString())
       }
     })


     // --- Start System Test ---
     println "Start System Test"
     def response = restClient.post(path: startSystemURL)

     if (response.status == 200) {
       def testRunId = response.data.text
       println "Test-run ID: " + testRunId

       //--- Check test run status evsery minute ---
       while(restClient.get(path: testStatusURL, query: [id:testRunId]).data.text == 'IN PROGRESS') {
         sleep(60000)
         println "Waiting for test results..."
       }

       // Fetch test results
       response = restClient.get(path: fetchTestResultsURL, query: [id: testRunId])
       def testRunResults = response.data.text

       //get a reference to our xslt
       def xslt= file("convertToJunit.xsl").text

      // Create transformer
       def transformer = TransformerFactory.newInstance().newTransformer(new StreamSource(new StringReader(xslt)))

       // Set output file
       def finalXML = new FileOutputStream("testResult" + System.currentTimeMillis() + ".xml")

       // Perform transformation
       transformer.transform(new StreamSource(new StringReader(testRunResults)), new StreamResult(finalXML))
     }
     println "System Test Completed"
 }
For an application(s) test:
1
2
3
4
5
6
7
8
9
10
11
12
13
14
15
16
17
18
19
20
21
22
23
24
25
26
27
28
29
30
31
32
33
34
35
36
37
38
39
40
41
42
43
44
45
46
47
48
49
50
51
52
53
54
55
56
57
58
59
60
61
62
63
64
65
66
67
68
69
70
71
72
73
74
75
76
 buildscript {
    repositories {
       jcenter()
    }
    dependencies {
      classpath 'org.codehaus.groovy.modules.http-builder:http-builder:0.7.2'
    }
 }

 import groovyx.net.http.RESTClient
 import groovyx.net.http.HTTPBuilder
 import groovyx.net.http.EncoderRegistry
 import static groovyx.net.http.ContentType.TEXT
 import static groovyx.net.http.ContentType.URLENC
 import org.apache.http.client.methods.HttpGet
 import org.apache.http.HttpRequestInterceptor
 import org.apache.http.protocol.HttpContext
 import org.apache.http.HttpRequest
 import org.apache.http.HttpResponse
 import javax.xml.transform.*
 import javax.xml.transform.stream.*
 import org.apache.commons.codec.binary.Base64

 task runApplicationTest << {
     // Define appianPasswordEncoded in gradle.properties
     // as a base64-encoded string
     def appianPassword = new String(appianPasswordEncoded.decodeBase64())
     // The URL passed in by Jenkins
     def baseURL = "$siteUrl"

     def startAppURL = "/suite/webapi/startRuleTestsApplications"
     def testStatusURL = "/suite/webapi/testRunStatusForId"
     def fetchTestResultsURL =  "/suite/webapi/testRunResultForId"

     def restClient = new RESTClient(baseURL)
     restClient.client.addRequestInterceptor(new HttpRequestInterceptor() {
       void process(HttpRequest httpRequest, HttpContext httpContext) {
         httpRequest.addHeader('Authorization',
             'Basic ' + (appianUserName + ':'
     +appianPassword).bytes.encodeBase64().toString())
       }
     })


     // --- Start Application Test ---
     println "Start System Test"
     def response = restClient.post(path: startAppURL)

     if (response.status == 200) {
       def testRunId = response.data.text
       println "Test-run ID: " + testRunId

       //--- Check test run status every minute ---
       while(restClient.get(path: testStatusURL, query: [id:testRunId]).data.text == 'IN PROGRESS') {
         sleep(60000)
         println "Waiting for test results..."
       }

       // Fetch test results
       response = restClient.get(path: fetchTestResultsURL, query: [id: testRunId])
       def testRunResults = response.data.text

       //get a reference to our xslt
       def xslt= file("convertToJunit.xsl").text

      // Create transformer
       def transformer = TransformerFactory.newInstance().newTransformer(new StreamSource(new StringReader(xslt)))

       // Set output file
       def finalXML = new FileOutputStream("testResult" + System.currentTimeMillis() + ".xml")

       // Perform transformation
       transformer.transform(new StreamSource(new StringReader(testRunResults)), new StreamResult(finalXML))
     }
     println "System Test Completed"
 }
Gradle 2.10 from the dropdown list.
runSystemTest -PsystemURL=[Appian Site]runApplicationTest -PsiteUrl=[Appian Site][Appian Site] with the name of your site. For example: runApplicationTest -PsiteURL=https://acme.appian.com*.xml.
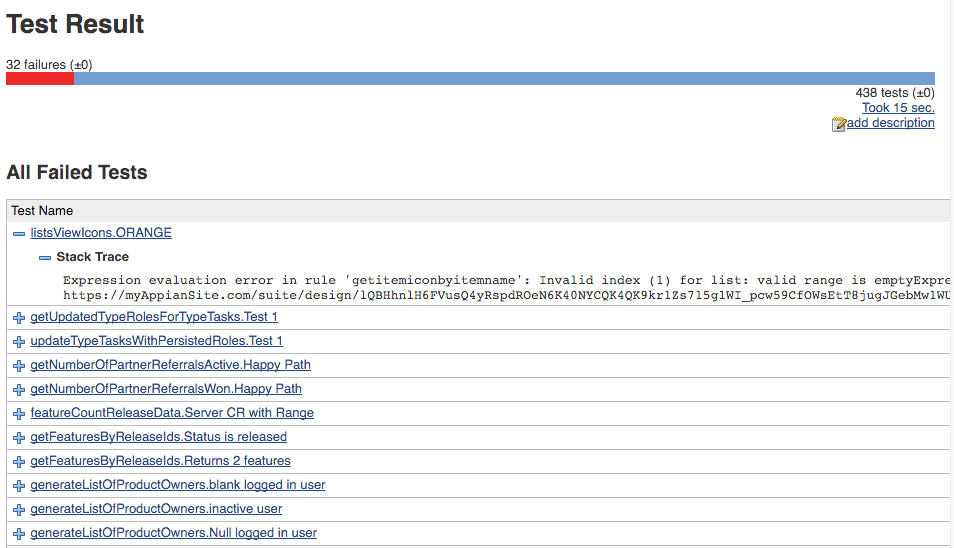
Once the gradle script is in place, you should be looking either at the Project SystemTest or ApplicationTest page after saving your changes.
You should see a screenshot similar to the one below, which shows the results of a test run in Jenkins.
In this example, there are 438 test cases (see top right corner) , out of which there are 32 test failures (see red bar on the top left and the message above it).
The test cases which failed to execute are displayed in the All Failed Tests section.
If you are unfamiliar with Jenkins, you may find it difficult to troubleshoot some of the problems associated to configuring it.
To access the console output follow these steps:
Error Description |
Possible Cause and Solution |
|---|---|
|
Replace the [svcacct_username] placeholder with the actual username in the build.gradle file. Note: If you receive a similar error for |
|
The Jenkins account doesn’t have execute privileges on the build.gradle file. Make sure execute privileges are granted in the file. Alternatively, the convertToJunit.xsl file may have a syntax error and thus it can’t be used to parse the TestRunResult XML being passed in. Inspect the file to correct the error, or replace the contents with the existing file. |
|
The convertToJunit.xsl file doesn’t exist. Make sure the name of your file matches this name. Remember name files are case-sensitive in Linux. |
|
Possible reasons:
Note: Strings are case-sensitive. |
Running Automated Tests on Expression Rules with Jenkins
