This page is about post-deployment processes in Appian and how to configure them for two common use cases.
A post-deployment process can be specified to automatically run after one of the following supported types of deployments has finished on an environment. From this process, you'll be able to access key information about the relevant deployment.
| Type of Deployment | Runs Post-Deployment Process |
|---|---|
| Compare and Deploy (Direct) | Yes |
| Programmatic via native APIs (External) | Yes |
| Export and import (Manual) | No |
Note: The Automated Deployment Manager plug-in, available on the AppMarket, does not run the post-deployment process.
Post-deployment processes provide flexibility, which allows you to automate tasks, leverage third-party tools, and customize your workflow. Automating your post-deployment steps helps you reduce manual tasks and errors.
Within each application, Appian allows you to add a process model in the Deploy view that will run after an incoming deployment is completed. You can configure your workflow to trigger actions based on deployment properties. Appian will pass the deployment UUID to the process model which can then be used with a!deployment() to retrieve deployment properties. Once you add a process model as a post-deployment process for an application, that specific application will become a dependent of the process model. When you import the specific application to a new environment, the process setting is imported as well.

Below are two examples of common use cases for adding post-deployment processes:
These use cases will demonstrate how to access your deployment information from the process model and build your workflow.
Appian recommends running expression rule test cases before and after you deploy changes to your application. A post-deployment process will automate this task every time so that you don’t need to manually run them.
To run test cases after an incoming deployment is finished, we will create a simple process model that kicks off test cases for all expression rules in the corresponding application. The process will use a!deployment() to retrieve deployment information and the Start Rule Tests (Applications) smart service to run test cases for expression rules.
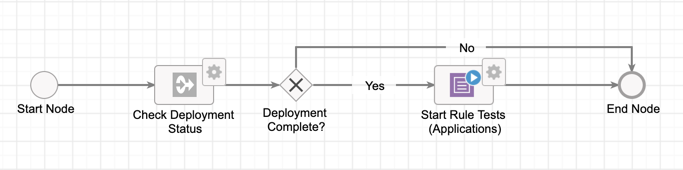
pv!deploymentUUID, pv!status, pv!applications. These variables will store deployment and application information. In the process model toolbar, click the Properties button and select the Variables tab.
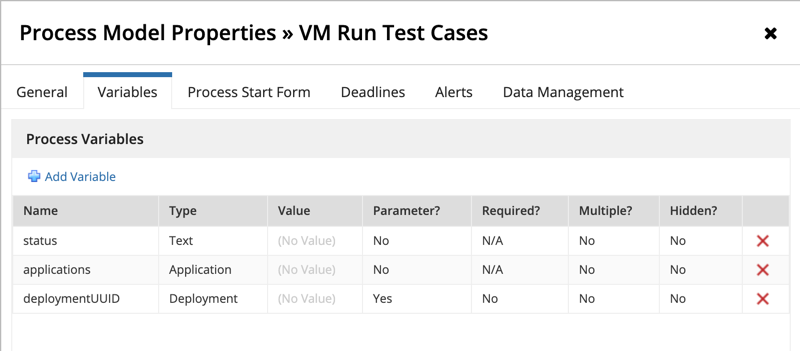
deploymentUUID and set it as type Deployment. This variable will represent the UUID of a deployment.status with the type as Text. This variable will represent the status of a deployment. We will use this variable in our script task later on.applications with the type as Application and click OK. We will use this variable in the Start Rule Tests smart service later on.Check Deployment Status. In this process, we need to check that the deployment has been completed before running the expression rule test cases.status and in the expression editor, enter a!deployment(pv!deploymentUUID, “status”). We are using a!deployment() to retrieve the deployment status. pv!deploymentUUID represents the deployment UUID, which will be populated after the deployment is finished.pv!status. This process variable will store the status of the deployment so we can use it to determine whether the process should continue or end.=a!deployment(pv!deploymentUUID, “applications”) in the expression editor. This expression retrieves the applications associated with the deployment.pv!applications and click OK. Using a process variable instead of using the specific application name allows this process to be dynamic. You can reuse the process for any application and deployment.Deployment Completed?.pv!status= “Completed”. “Completed” is the deployment status and indicates that all objects in the package have been successfully imported. Partial deployments are represented by the status Completed with Errors.After creating our process model, we are ready to add it as a post deployment process:

pv!deploymentUUID.Once your process model has been added to the Deploy view, you can kick off the post deployment process by deploying a package to the target environment. After the process is complete, you can view your test case results in the Manage Test Cases dialog. You can also monitor your process in the Monitor View > Process Activity.
The post-deployment process also provides a connection point to the rest of your infrastructure and can be used to integrate with your existing third-party tools. For instance, you can use Jenkins to trigger a job that will automate activities, such as running FitNesse or other functional test scripts after a deployment.
In our example below, we will create a simple process model, along with a connected system and integration object to connect to Jenkins. The process will use a!deployment() to retrieve deployment information and the Call Integration smart service to utilize the Jenkins integration. Keep in mind this example can also be easily tailored to work with any other third-party tool by modifying the configurations of the connected system and integration objects.
In this section, we’ll go through the steps to create a new Jenkins job, enable it to be triggered remotely, and set up a user account to do so with an API key. If you already have this configured, you can skip to Create a connected system and integration for Jenkins.
If you don’t already have Jenkins set up, install and configure Jenkins before following the instructions below.
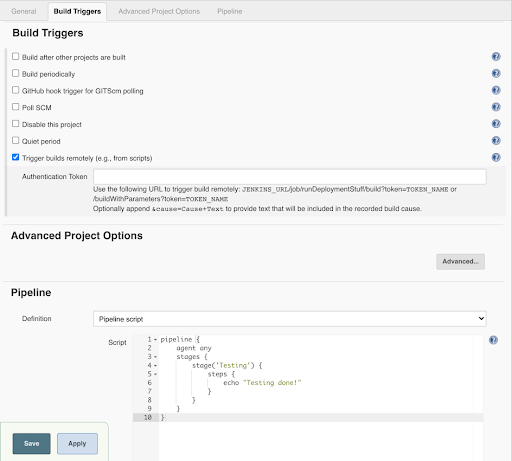

If you do not have a Jenkins user account configured which can build jobs remotely, follow the instructions below. We will create and use an account that isn’t linked to an actual human user.
You now have a Jenkins job that’s ready to be triggered remotely and a user account that can do so!
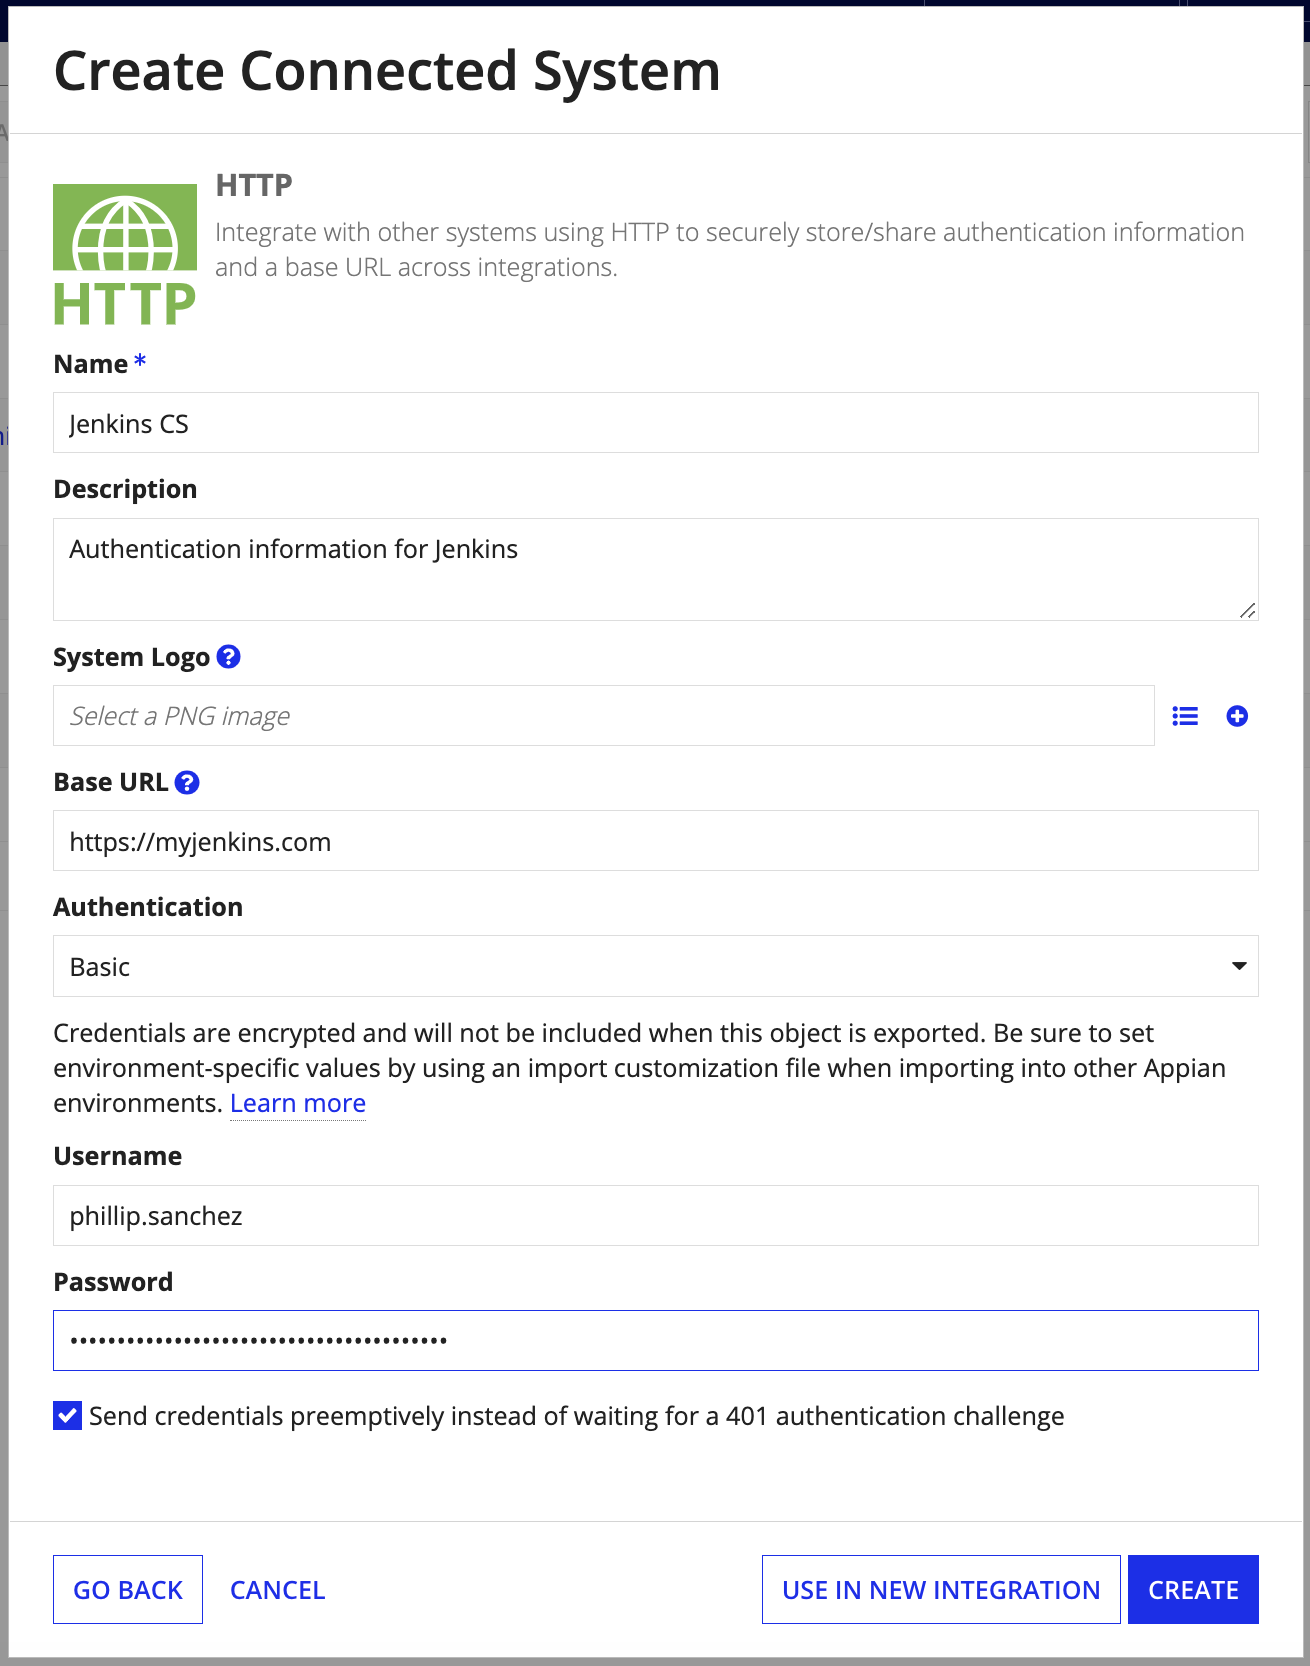
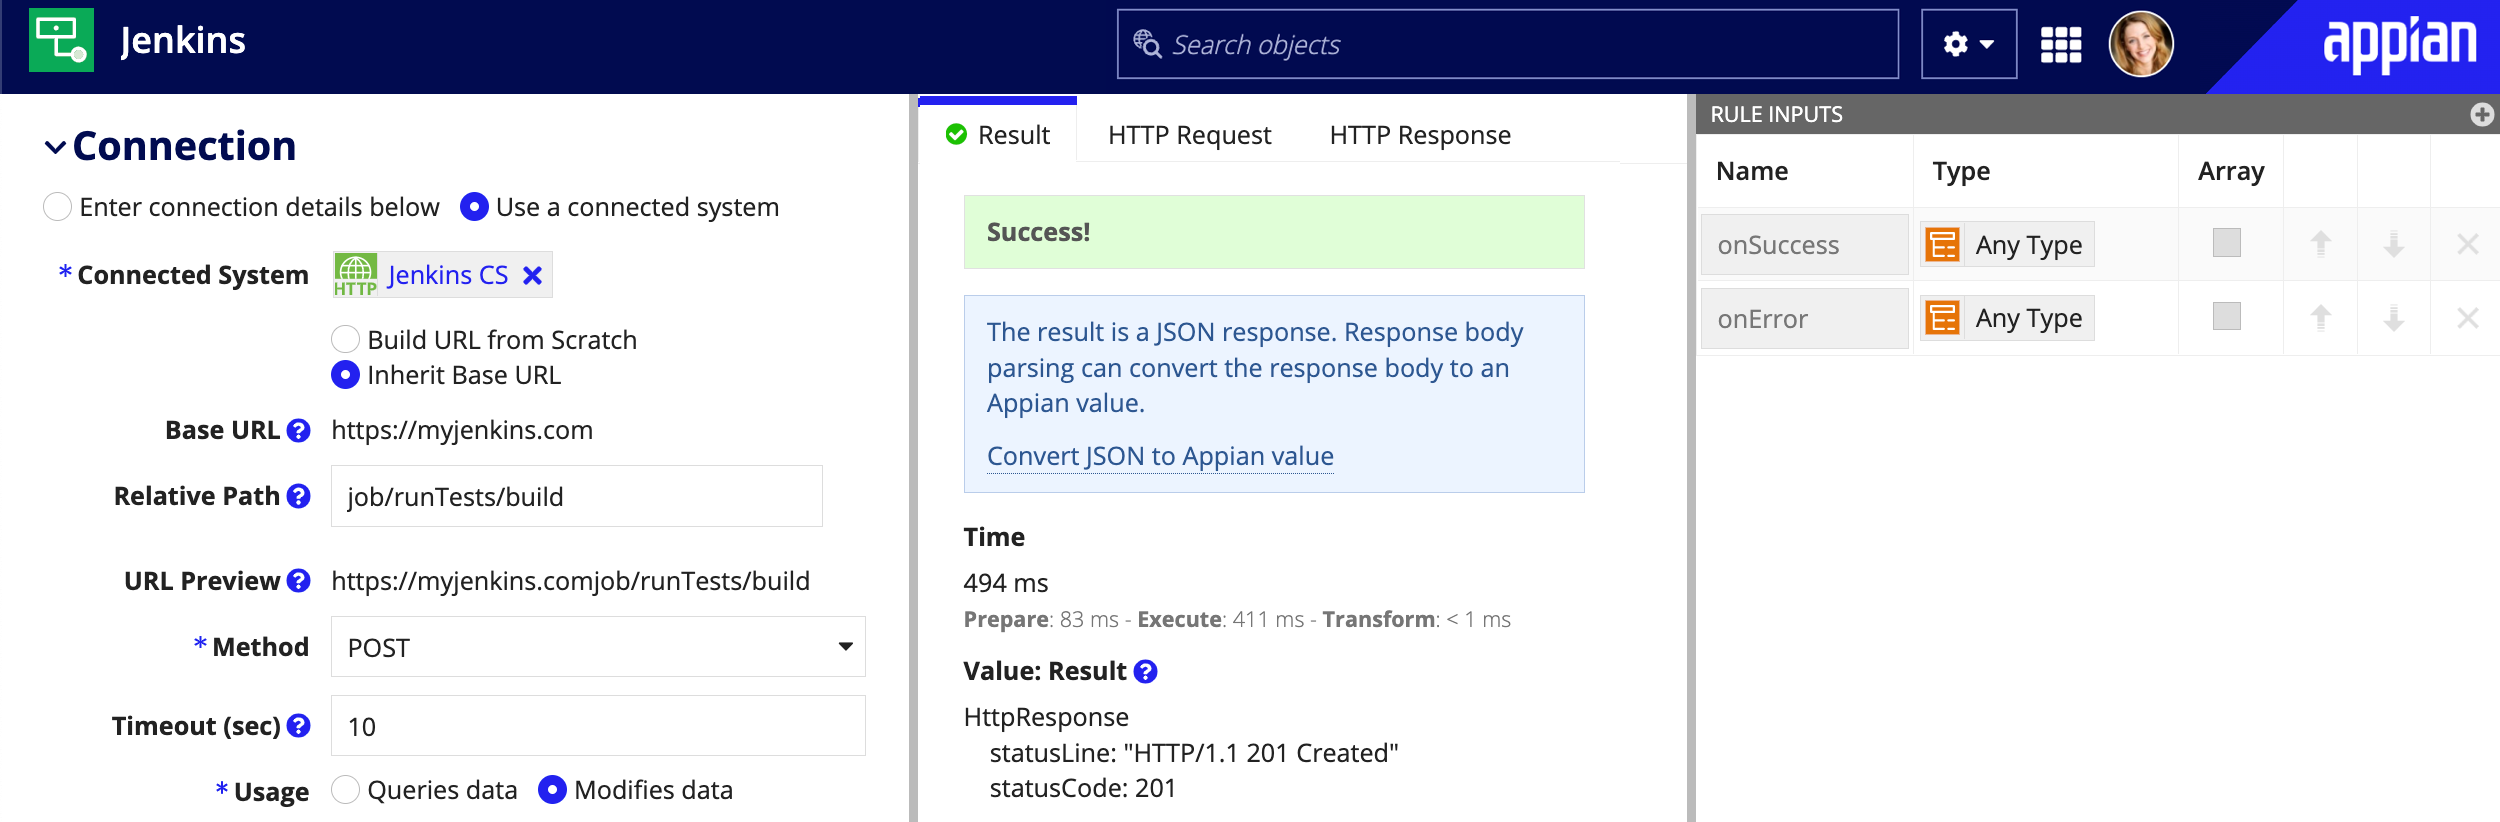
In this section, we’ll go through the steps to create an HTTP connected system and integration object to trigger the Jenkins job with the user account and API key you configured above. Then we’ll create a post-deployment process model that uses this integration.
“job/[the name of your job]/build”.In the Method dropdown, select POST. This automatically updates the Usage radio button to Modifies data.
On your Jenkins dashboard, you will also see that a new build for this job has been triggered. Clicking into that build and clicking Console Output will display the results of the pipeline script that you entered.
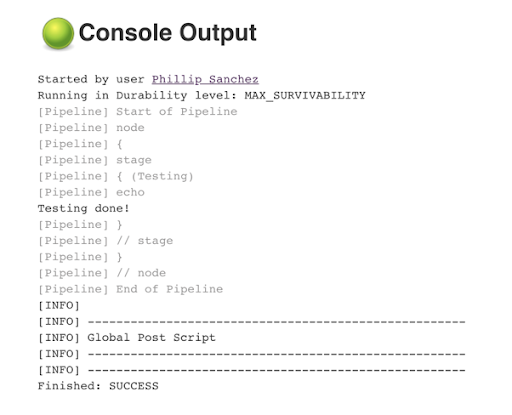
Appian is now able to trigger your Jenkins job remotely.
Now that we have created a connected system and integration, we will create a process model that will trigger a Jenkins job after a deployment has completed.

pv!deploymentUUID and pv!status. Appian will automatically populate pv!deploymentUUID with the deployment identifier, and you can use this to query for its status. In the process model toolbar, click the Properties button and select the Variables tab.deploymentUUID and set it as type Deployment. This variable will represent the UUID of a deployment.status with the type as Text. This variable will represent the status of a deployment. We will use this variable in our script task later on.Check Deployment Status. In this process, we need to check that the deployment has been completed before triggering the Jenkins job.a!deployment(pv!deploymentUUID, “status”). We are using a!deployment() to retrieve the deployment status. pv!deploymentUUID represents the deployment UUID, which will be populated after the deployment is finished.pv!status. This process variable will store the status of the deployment so we can use it to determine whether the process should continue or end.Deployment Completed? Add a connector from the XOR node to the End Node. This XOR node will route the process to the next node or the end node depending on if the deployment has been completed successfully.Build Jenkins Job.pv!status= “Completed”. “Completed” is the deployment status that indicates a deployment was successful; other statuses may be used depending on the workflow you want to achieve.Now that we have a process model that will call the Jenkins integration and build a job, we are ready to add it as the post-deployment process for our application.
pv!deploymentUUID.Once your process model has been configured from the Deploy view, you can kick off the post-deployment process by using compare and deploy to push changes to the target environment. After the process is complete, you can view the corresponding process instance in the Monitor view > PROCESS ACTIVITY in Appian Designer to check the status of the job itself in Jenkins.

Configure a Post-Deployment Process
