This page provides step-by-step guidance on creating a record type object to display employee information.
If you are new to Appian and unfamiliar with Appian design objects and concepts, check out Appian Academy Online.
Appian Records enable you to do more with your data. Regardless of where your data lives, Appian allows you to organize your data into actionable records that allow users to access and update the information that they need.
For example, think about an employee record. What information about the employee would you want to see? You'd probably want to have the employee's name, title, department, and start date readily available. What might you want to do? At some point you would likely have to update the employee's information. You might also need to add a new employee. These common actions can be directly added to your record type and can be referenced in other interfaces and processes.
This tutorial will take about an hour and will walk you through the steps to create an Employee record type with data sync enabled. This tutorial contains three parts: (1) creating the record type, (2) configuring your record list, and (3) creating your record views and actions.
In the first part, we will bring together our data and record type to begin connecting our users with the data. To do this, we will:
After successfully completing this tutorial, you will be ready to create your own record types.

Ensure you are familiar with the different design objects that will be referenced throughout this tutorial:
Before we can create our record type, we need to create an application. We'll take advantage of Appian's automatic group and folder generation during application creation, so we'll automatically have our initial application infrastructure. We'll also add a group specific to this tutorial, then add the data for our record type.
Tip: The Appian Tutorial application is used throughout Appian tutorials. Skip the steps in this section if you've already created this application in another tutorial.
To begin with, we need to create an application to contain our design objects.
We will be creating the Appian Tutorial application for this tutorial. All of Appian's tutorials use the Appian Tutorial application as the reference application. After completing this tutorial, you can reuse this application as you work through other Appian tutorials.
To create the Appian Tutorial application:
In the Create New Application dialog, configure the following properties:
| Property | Description |
|---|---|
| Name | Enter Appian Tutorial. |
| Prefix | Keep the default prefix, AT, which Appian constructs using the initial characters of each word you entered in the Name parameter. We'll be following the recommended naming standard, and using this short, unique prefix whenever we name an object in this application. |
| Description | Leave blank. It's normally a best practice to add descriptions to all design objects. However, to save a little time during this tutorial, we'll skip adding descriptions unless the description displays to the end user. |
| Generate groups and folders to secure and organize objects | Keep this checkbox selected, so that Appian will automatically generate standard groups and folders and assign default security groups for this application. |
In the Review Application Security dialog, keep the default security settings. Because we selected the Generate groups and folders option in the previous step, Appian automatically uses the AT Users and AT Administrator groups it generated to set our application security appropriately.
Tip: The security of the application object is unrelated to the security of each of the objects contained within the application. This means that you will need to set security permissions for every object in an application in addition to the application object itself. For more information about security permissions for the application object, see Application Security.
Click SAVE. The Explore view appears.
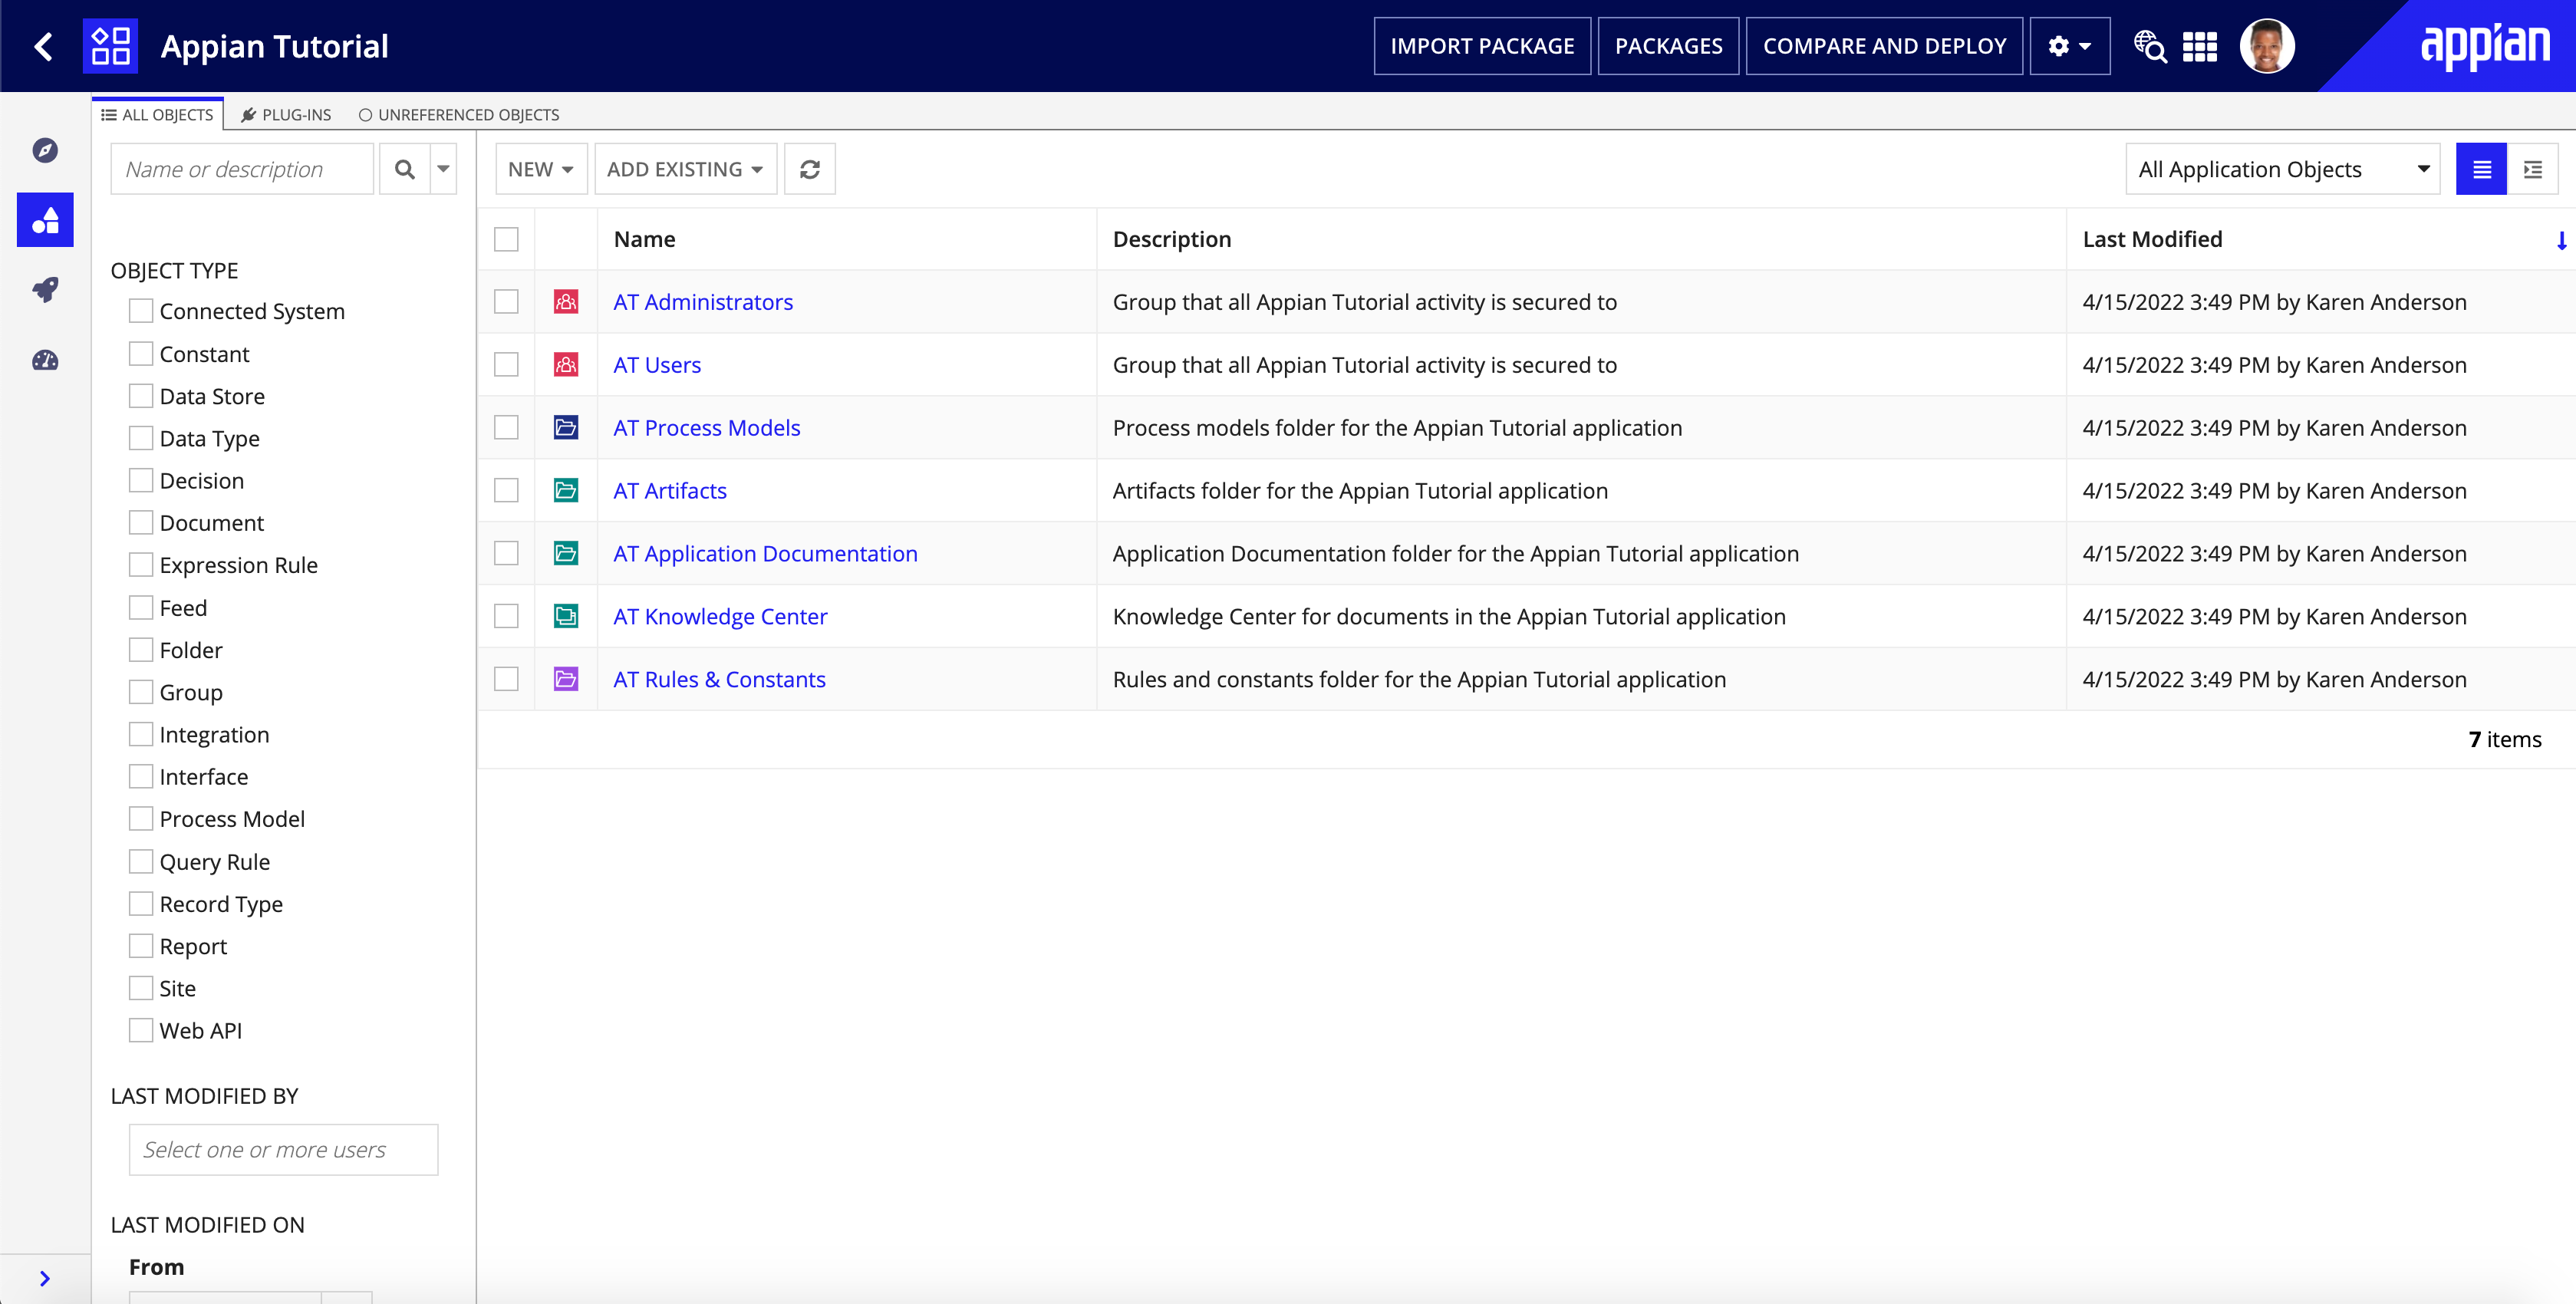
Right now, the application contains the folders and groups Appian generated automatically. To see these, click Build in the navigation pane. Each design object that you create during the course of this tutorial will appear in this list in the Build view and be associated with the tutorial application.
Because we selected the Generate groups and folders to secure and organize objects option while creating the object, Appian generates standard groups and folders for the application, as well as assigns the generated groups as the default security groups for the application.
In this tutorial, we'll be using the following generated groups and folders:
For each object we now create in this tutorial, Appian will pre-populate the AT Administrators and AT Users groups in the object role maps. Most of the time, we'll be able to keep those pre-populated values. The rest of the time, we'll be assigning permissions to an application-specific managers group, which we'll create now.
Managers will have a specific part to play in our new application, so let's add a new group for AT Managers.
To add a managers group:
Configure the following properties:
| Property | Description |
|---|---|
| Name | Enter: AT Managers |
| Parent Group | Enter AT Users, so that users in this group inherit Viewer permissions for the application. |
| Group Members | Enter your user name. |
In the last part of the setup, you'll need to create the employee data that we'll use throughout this tutorial.
To create this data, you must complete the Use the Write to Data Store Entity Smart Service Function with an Interface pattern.
This pattern will create the custom data type (CDT), data store, and data store entity (DSE) we'll use for the record type. As you walk through this pattern, it's recommended to use the application prefix when naming your objects. For example, when creating the employee custom data type, name it AT_Employee since it's in the Appian Tutorial application.
Now that we have a data source for the application, we want to connect that data to a record type. We'll create the Employee record type and enable data sync so that Appian can more quickly query the source data, and so you can use sync-enabled features.
To leverage Appian Records functionality, it all starts with a record type object.
We'll use the record type to configure how the data is displayed in the record list, how users interact with the data through record views, and make the data actionable for users through record actions.
To create a record type:
For Name, enter AT Employee.
Note: Notice that when you click away from the Name field, the Plural Name field is automatically filled with Employees. This is the name that your users will see when they view the record type from Tempo.
Employees for the Appian Tutorial application. This description displays on the record type list in Tempo.Now, we need to tell the record type where the data lives and how we want to access the data.
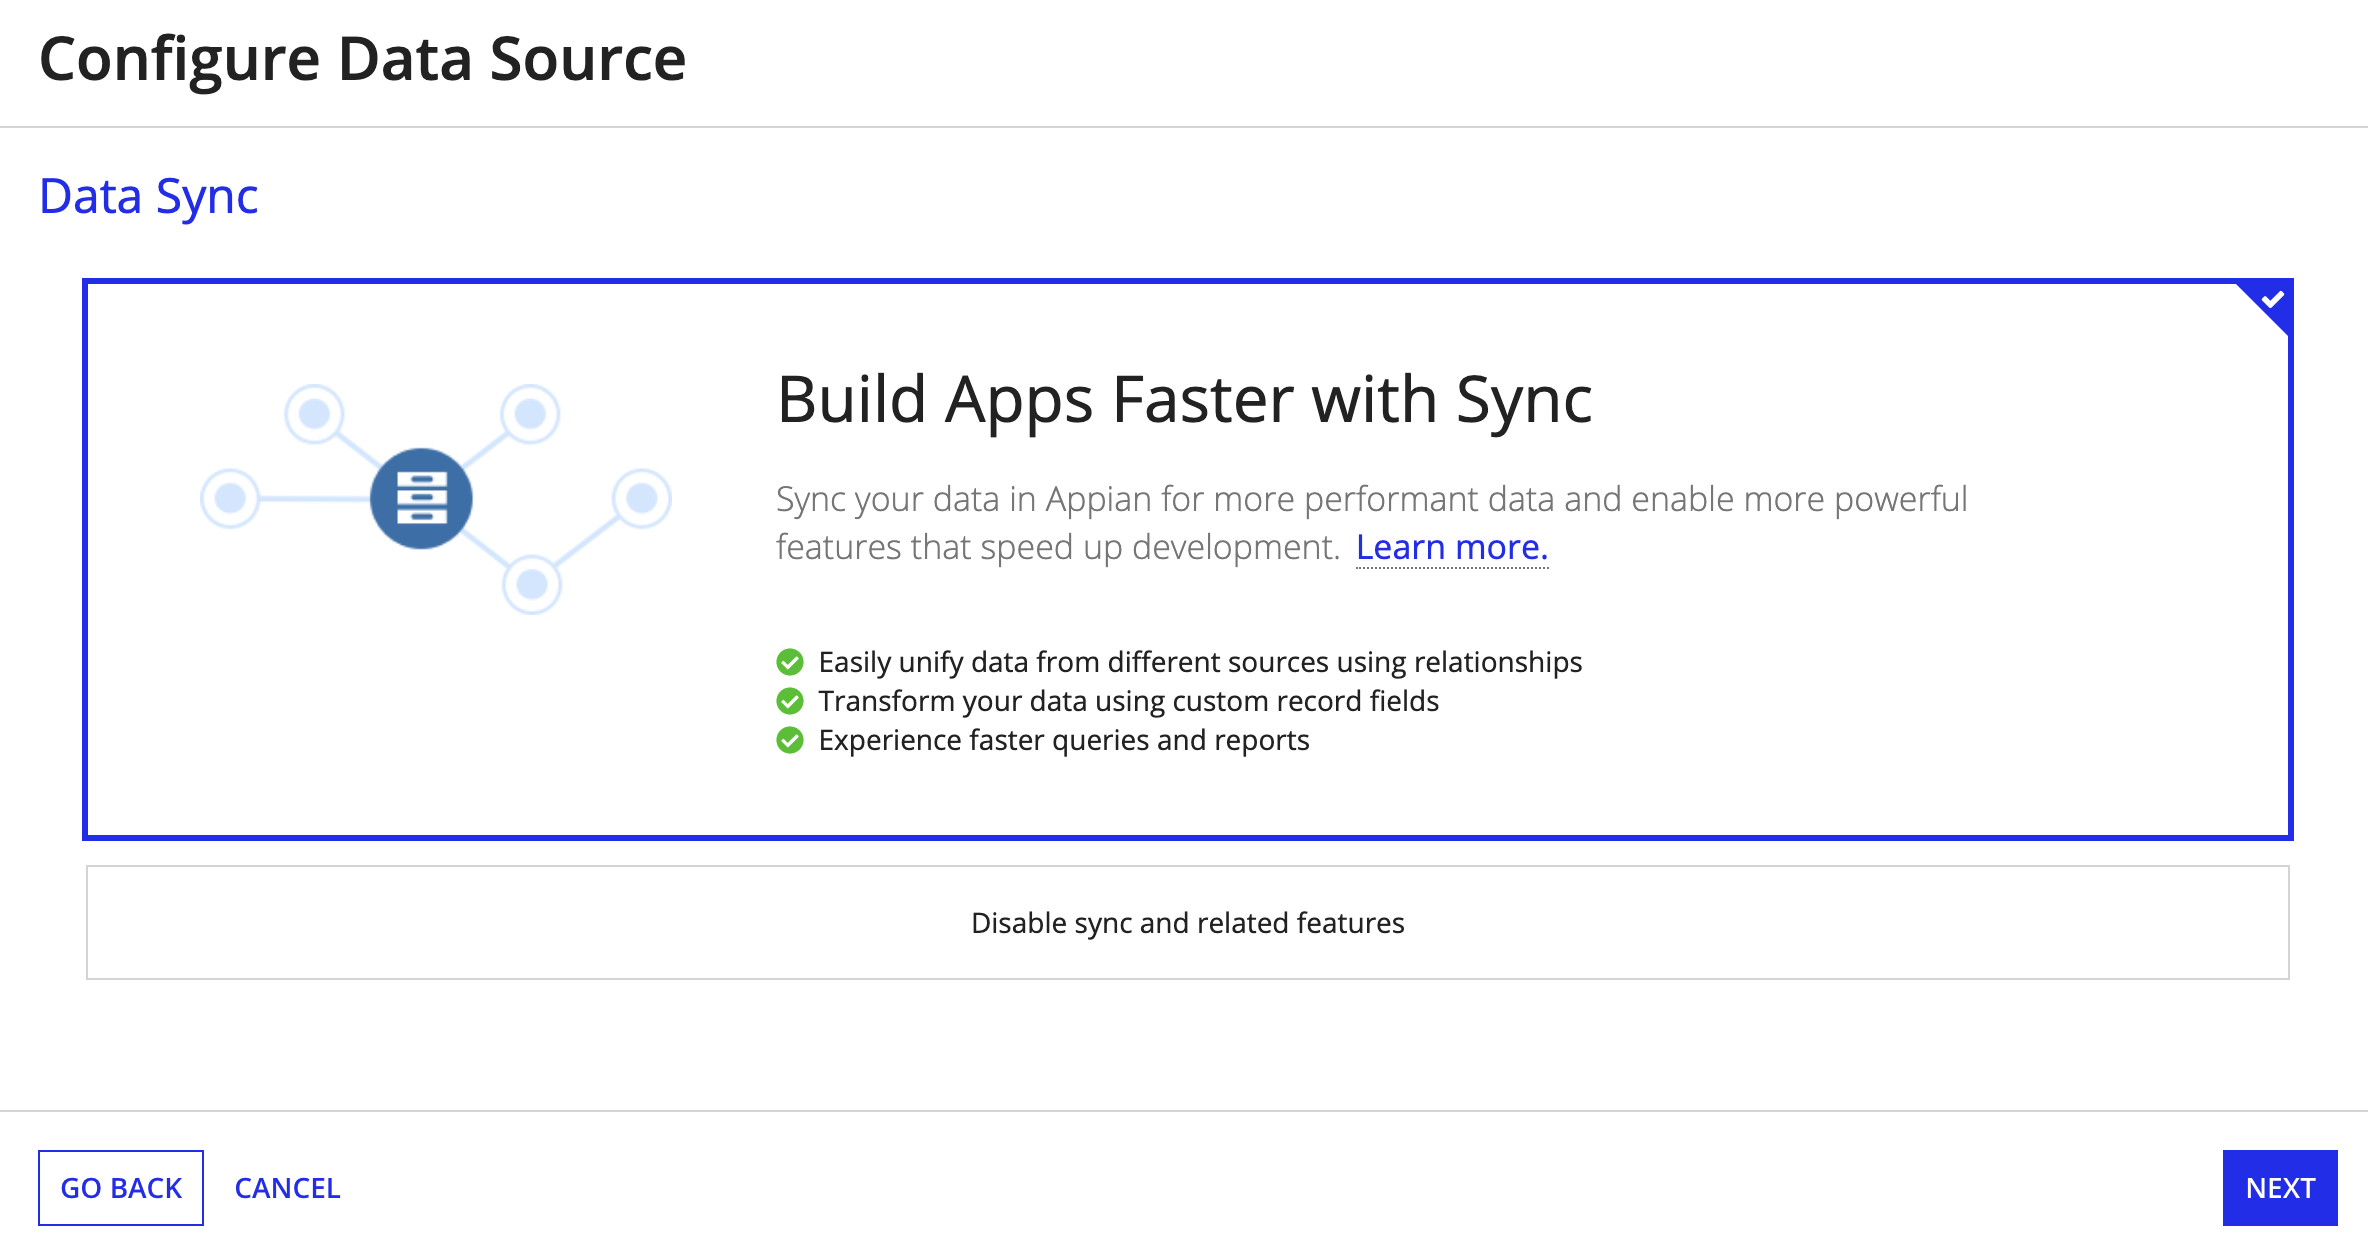
We're going to use a database table as the source of the record type, and we'll sync the data in Appian for faster queries and sync-enabled features that can help speed up development.
To configure the data source for your record type:
For Choose Source Type, keep the default source type Database.
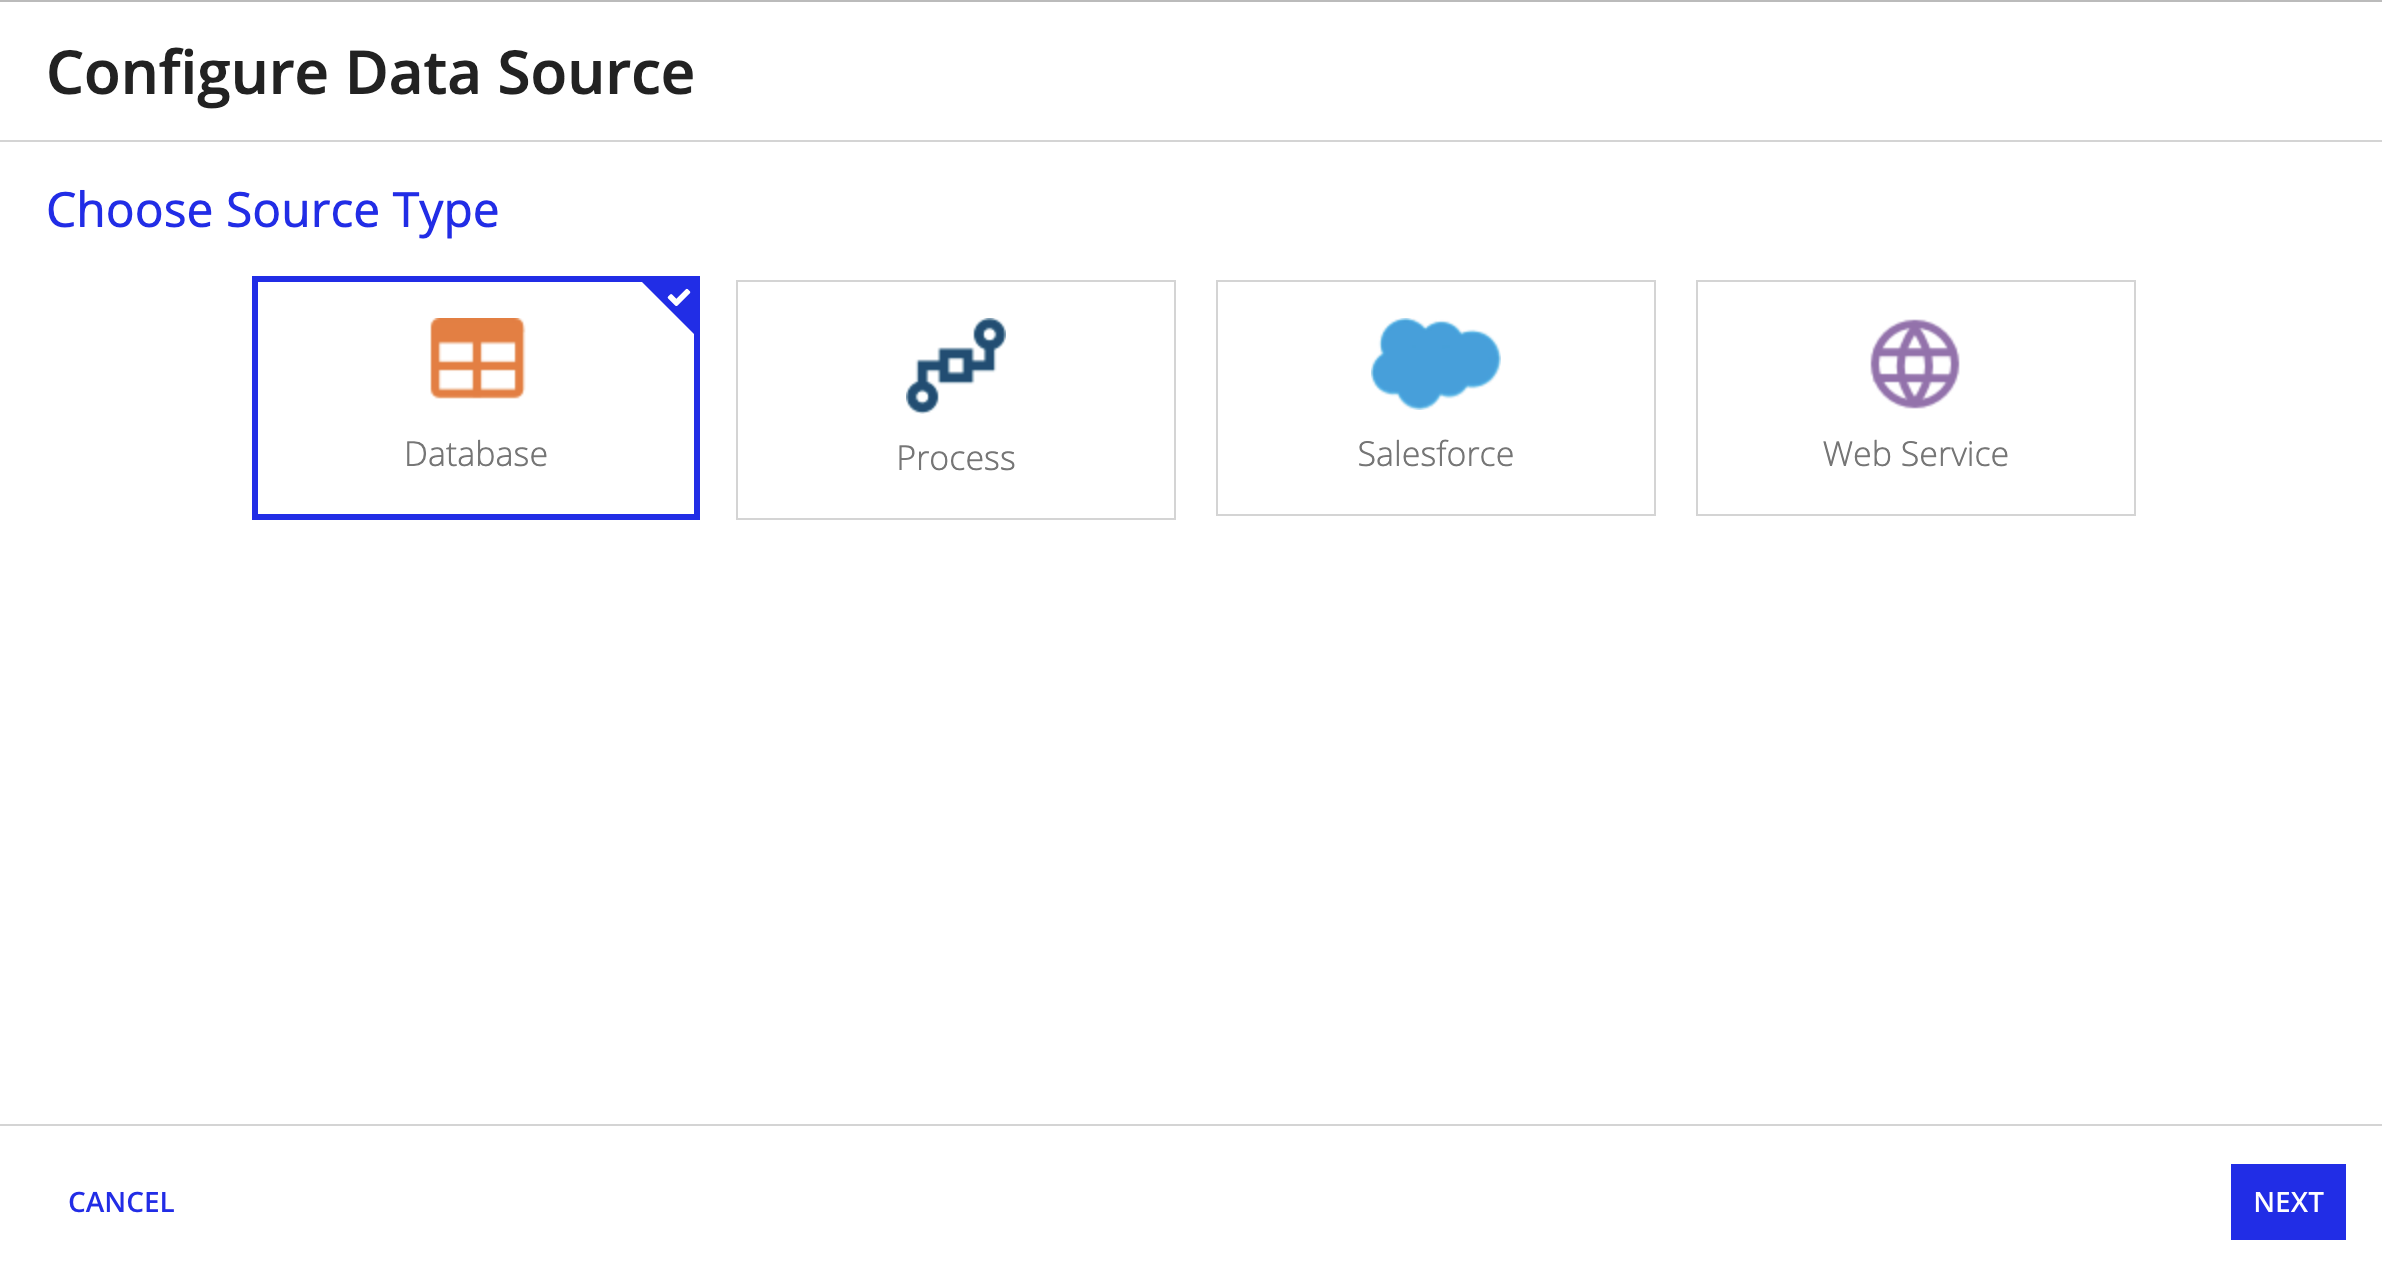
For Data Sync, keep the default option Build Apps Faster with Sync.
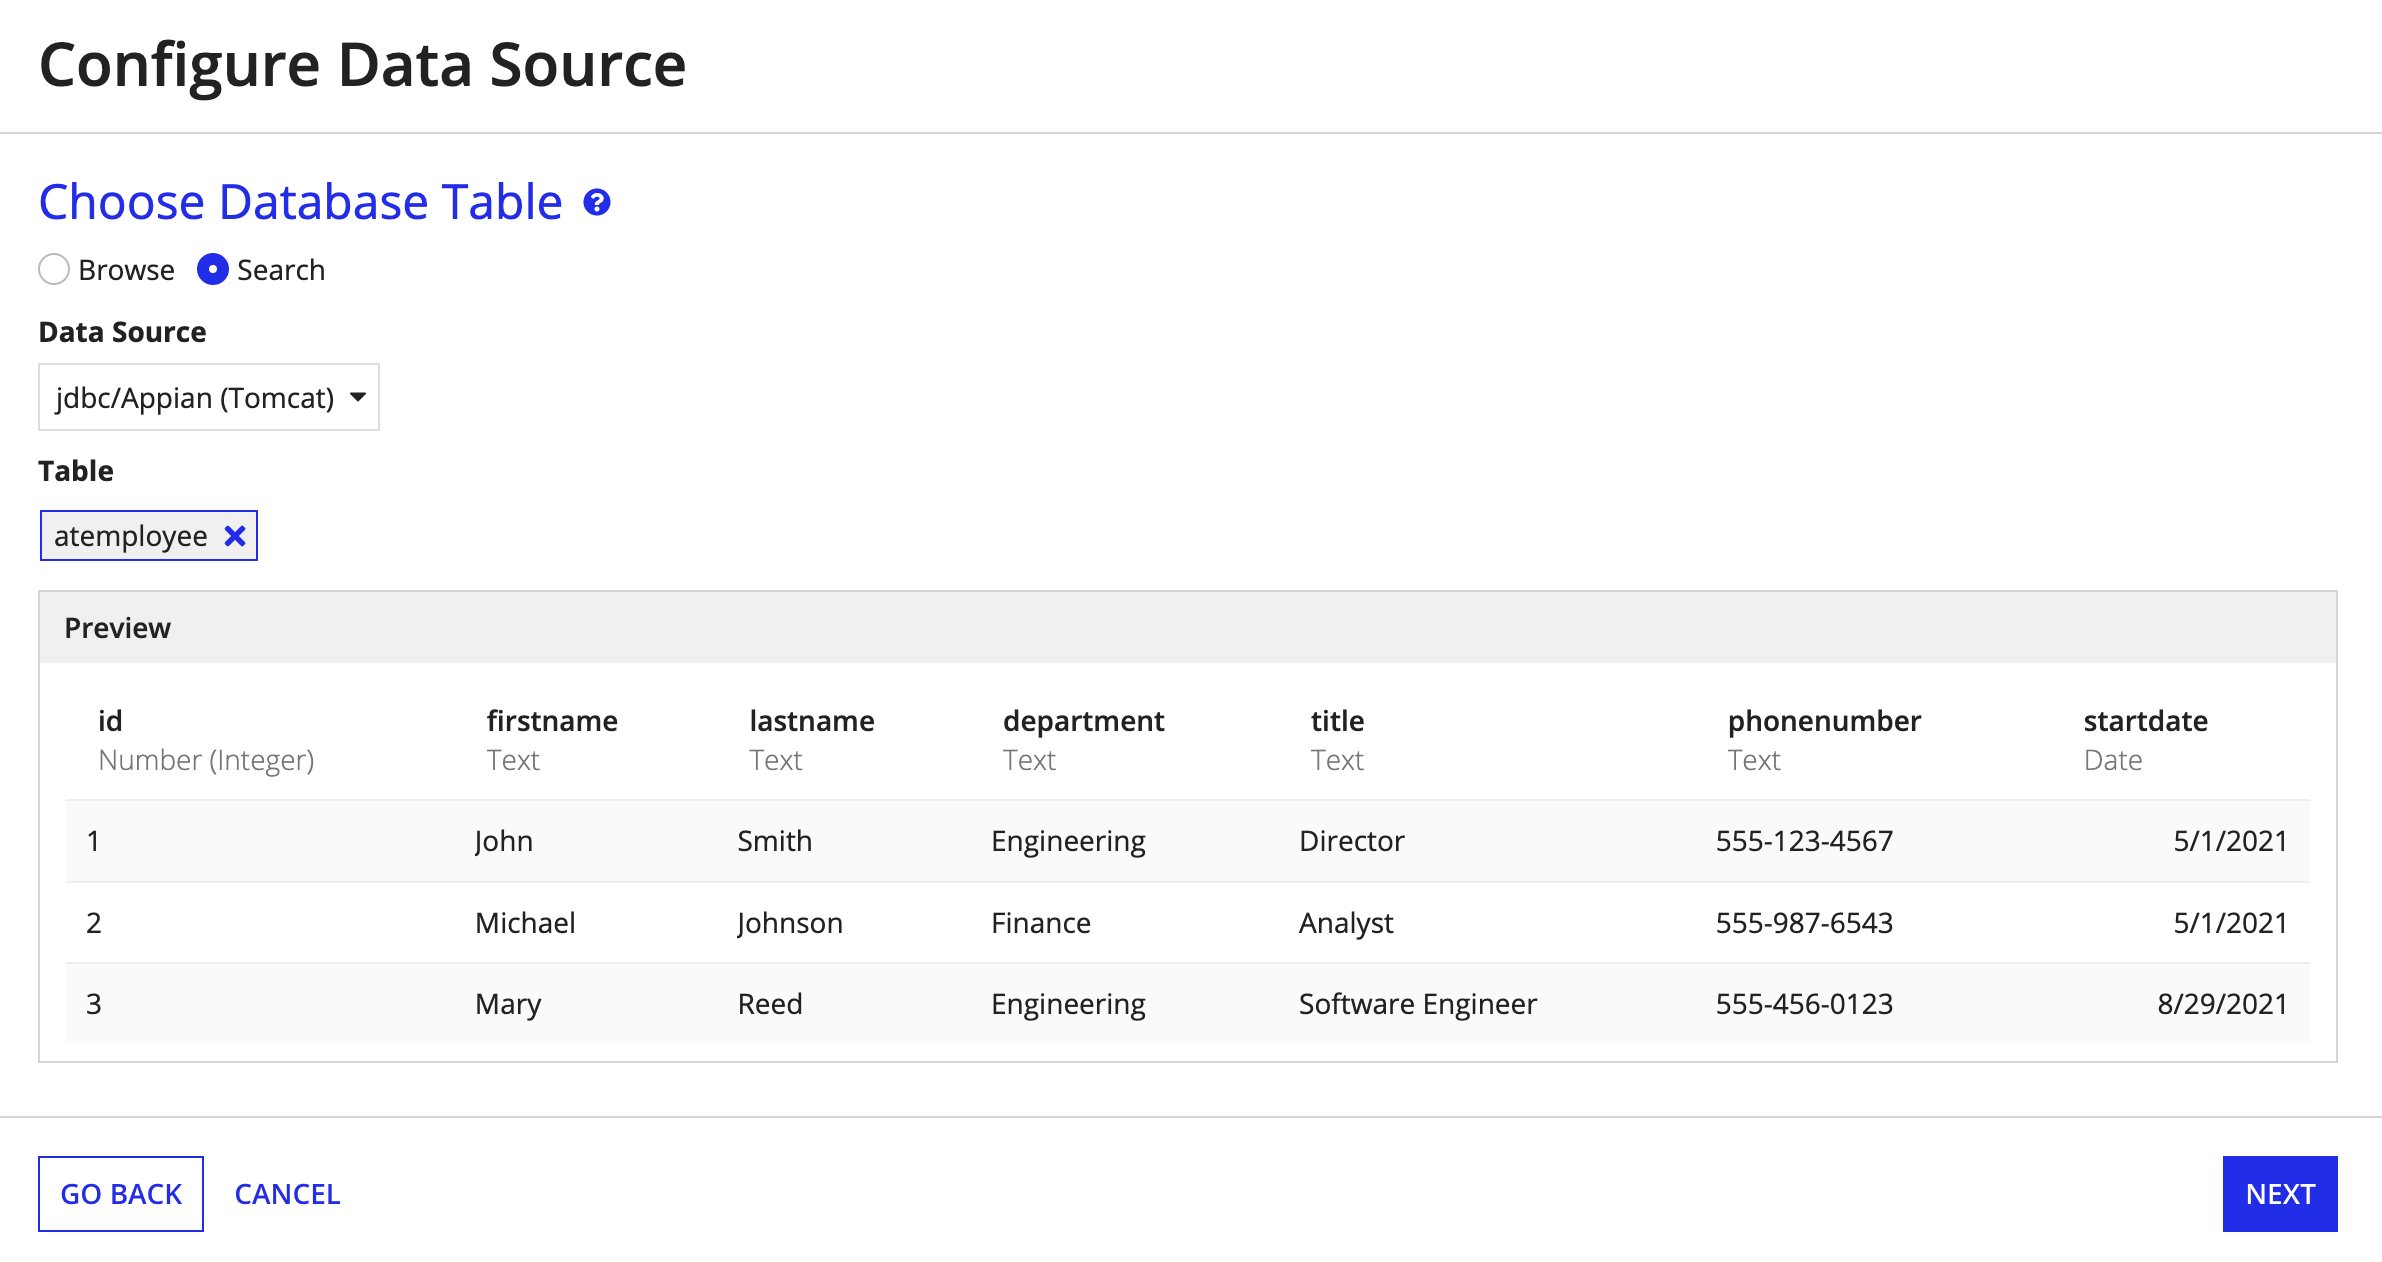
For Choose Database Table, select atemployee, the data entity that you created during set up.
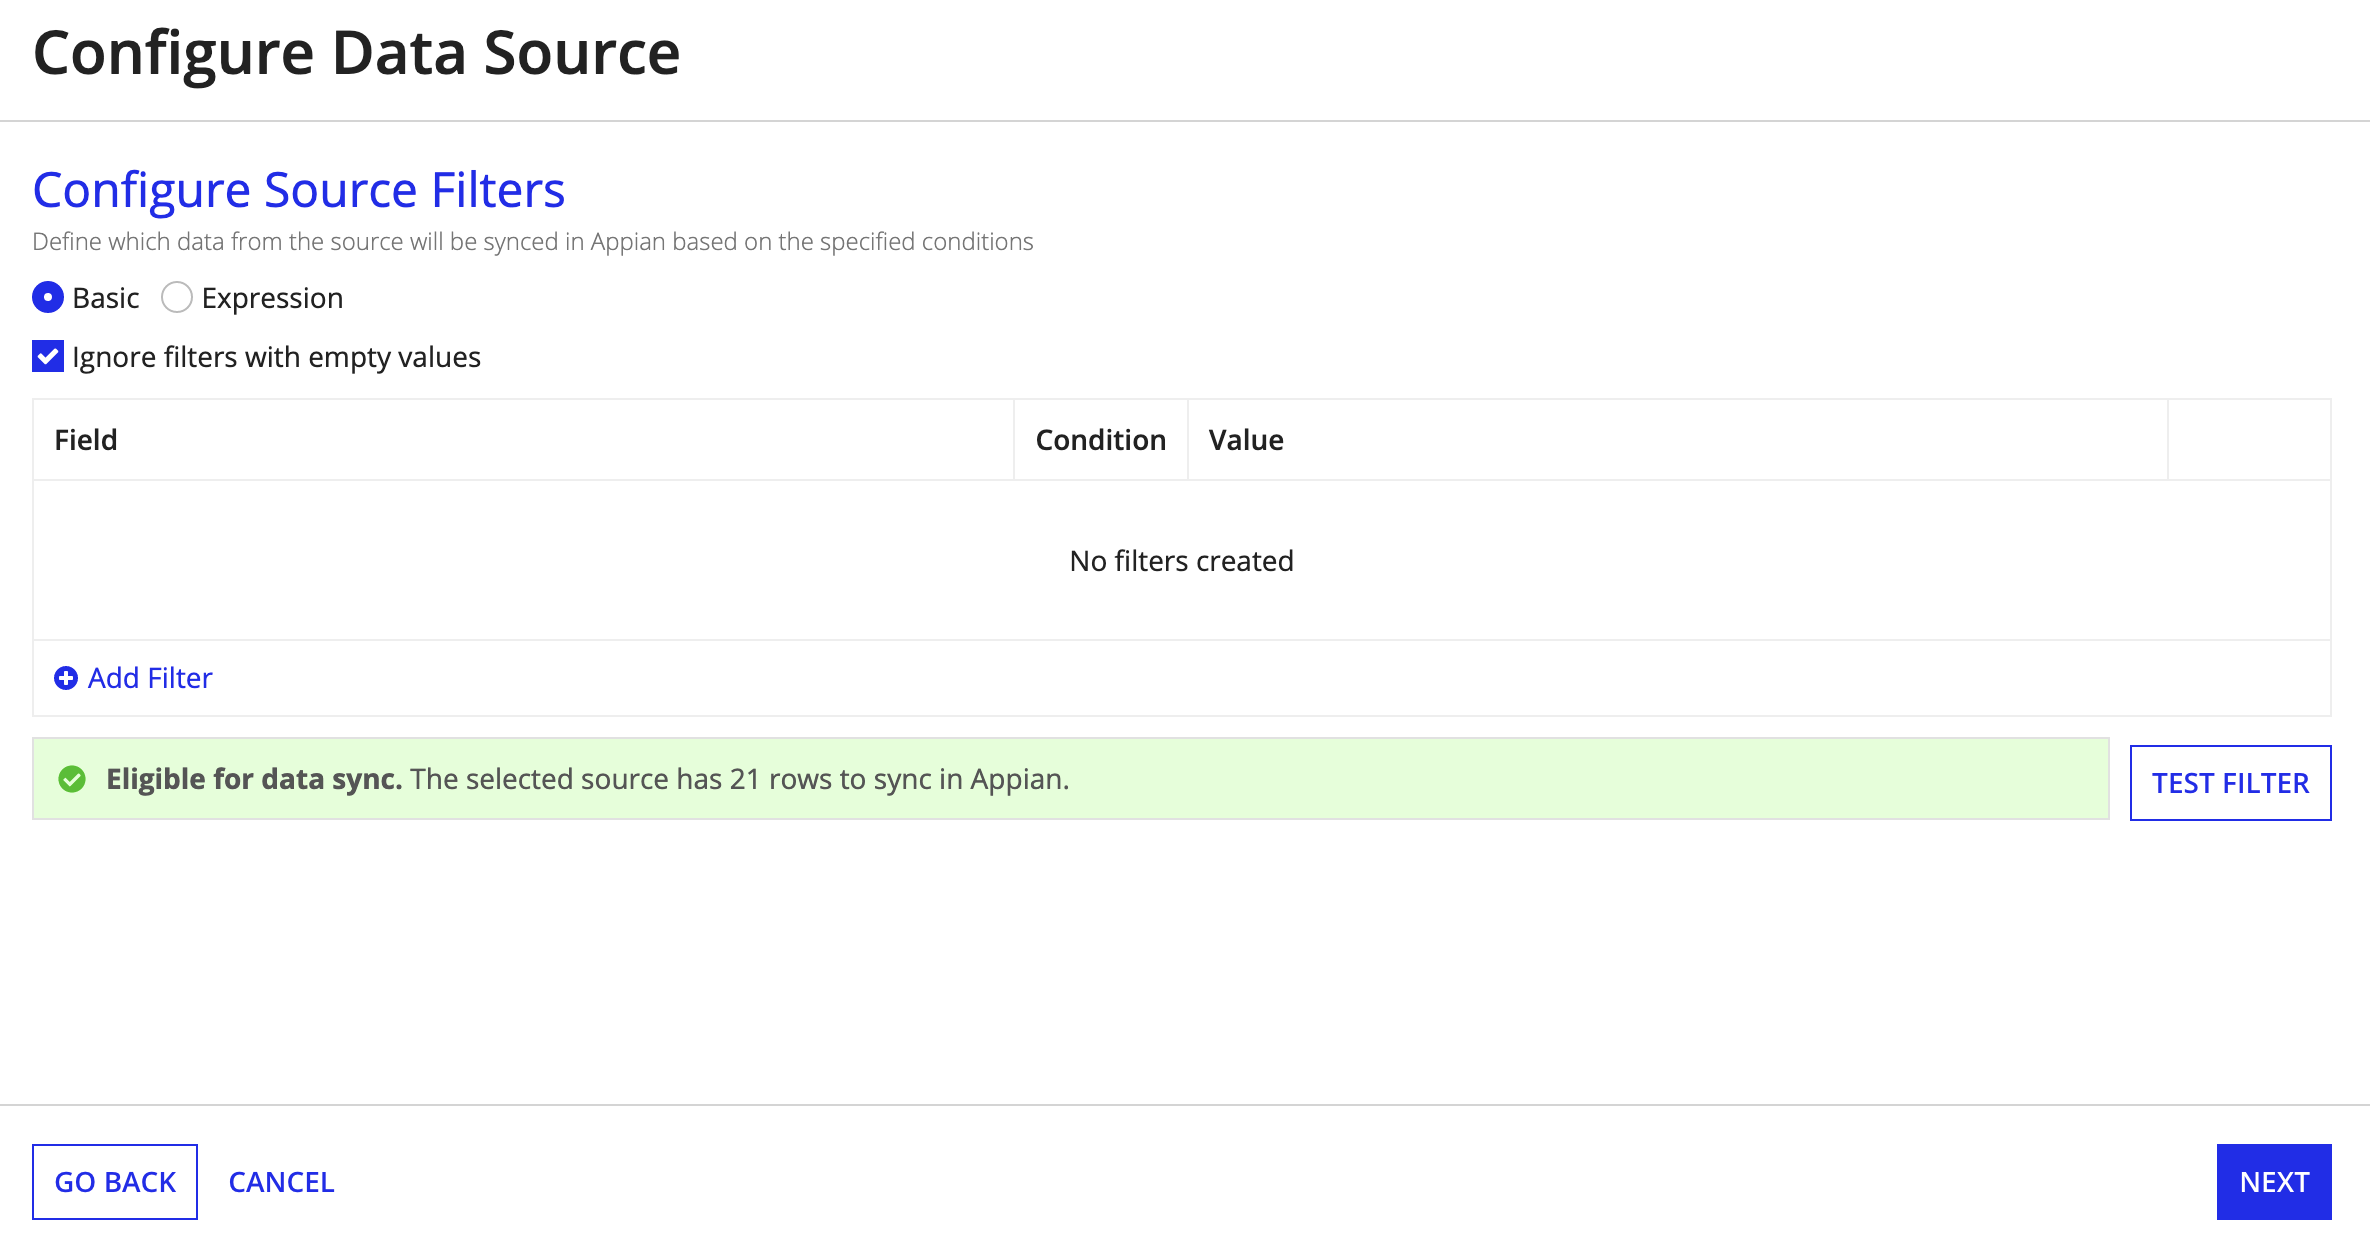
For Configure Source Filters, keep the default settings. We won't add source filters in this tutorial since we want to sync all rows of data in Appian.
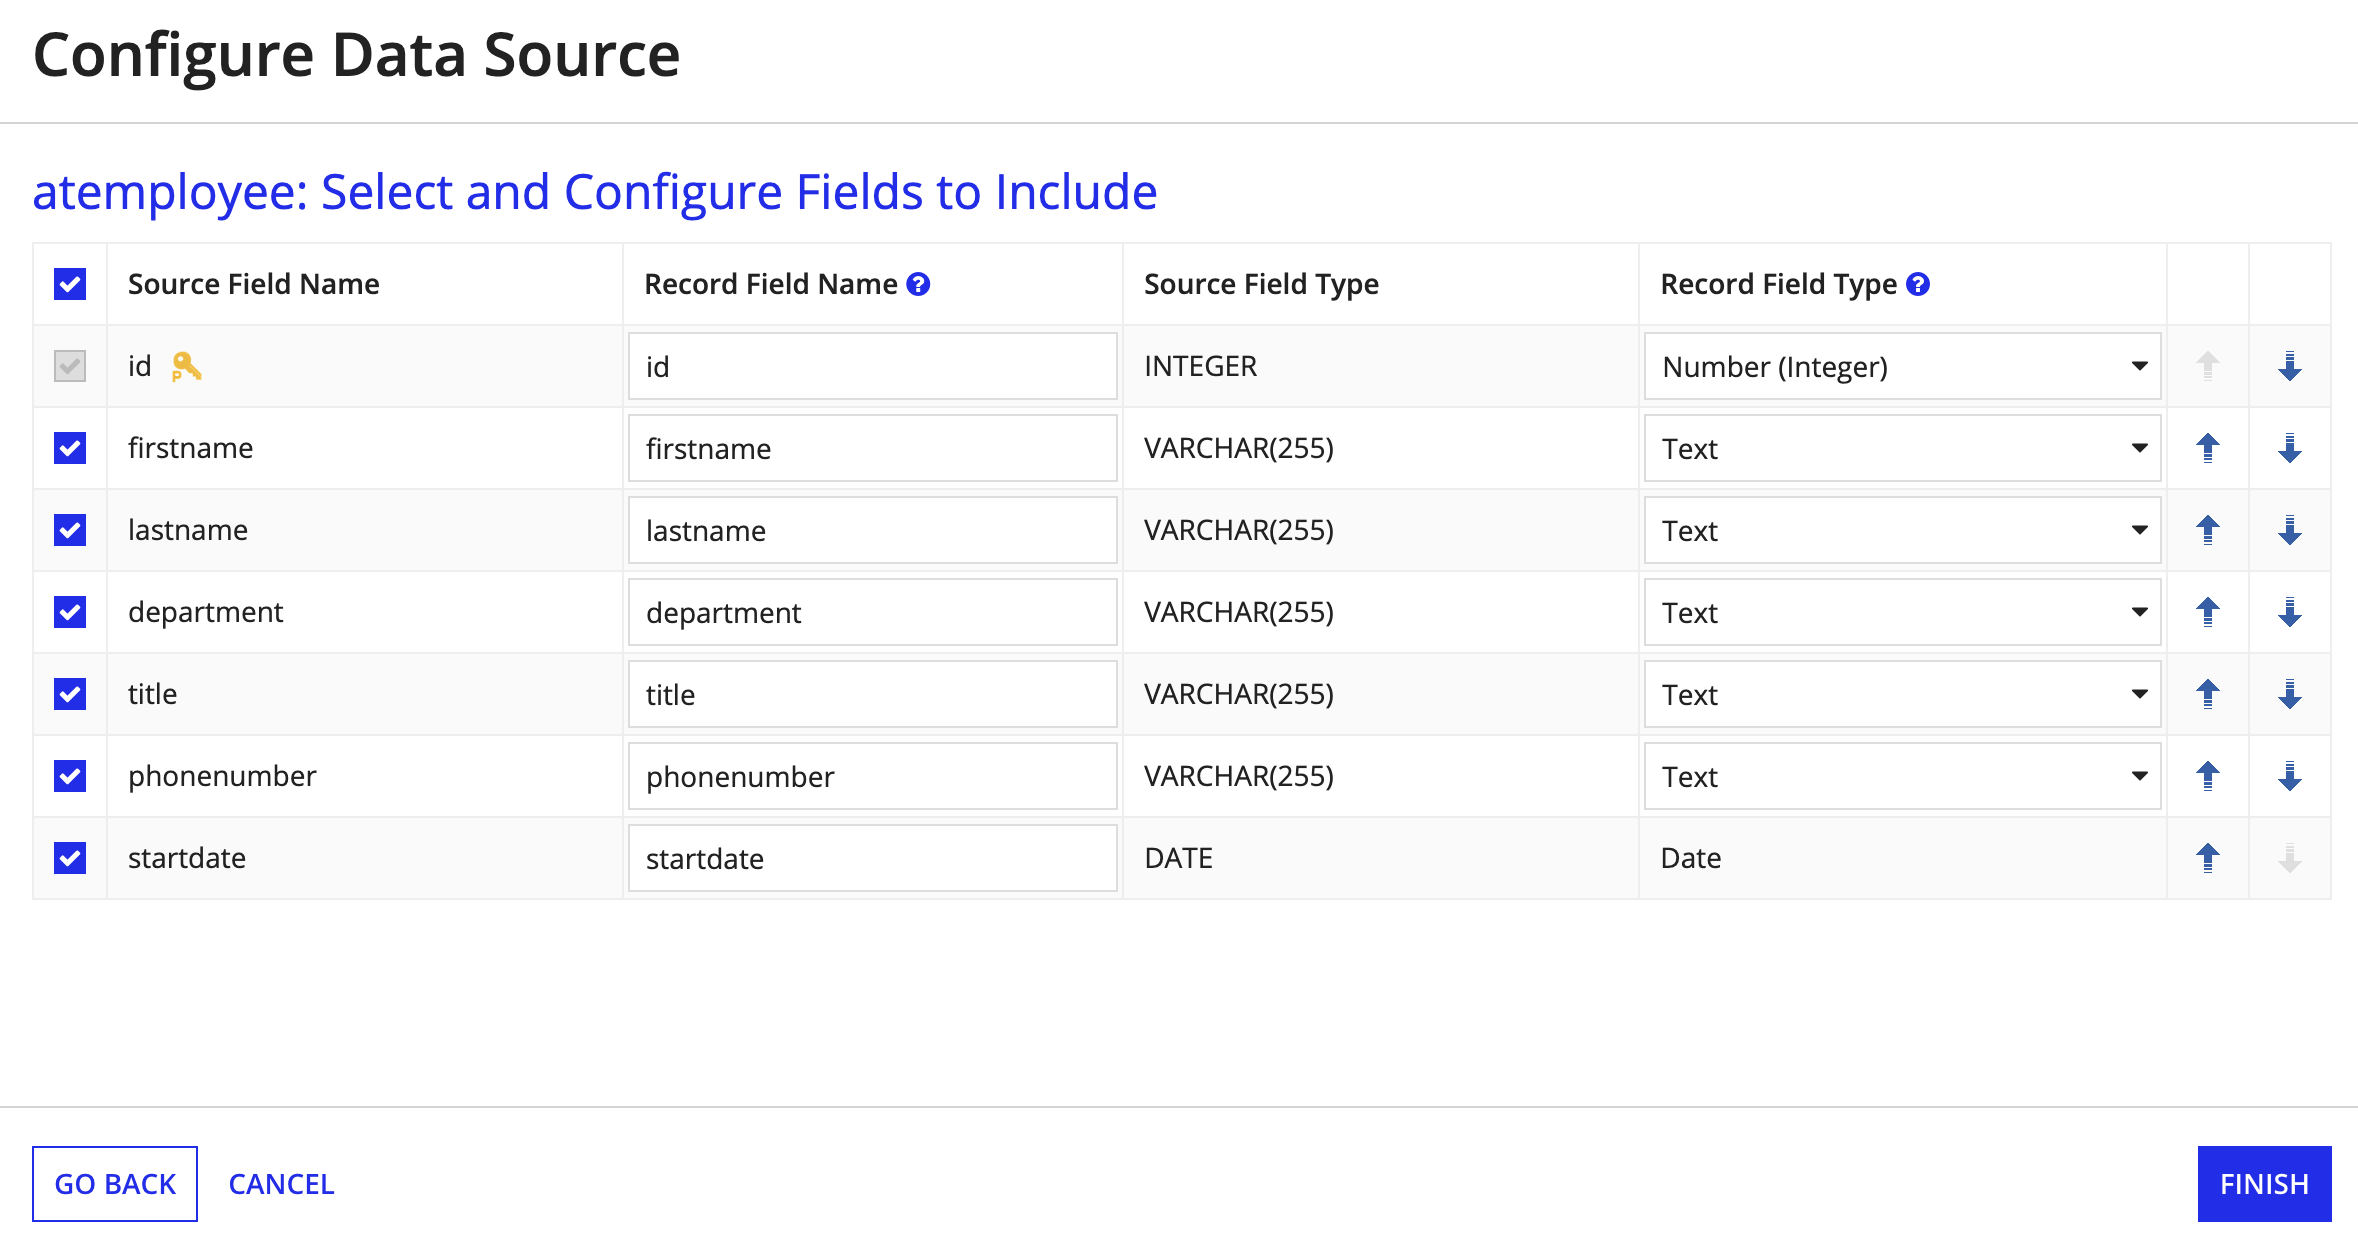
Under Select and Configure Fields to Include, ensure all checkboxes are selected. This will create a set of record fields from the selected source fields.

In this tutorial, Appian is the only source writing to the Employee database table. As a result, any changes written by Appian will be automatically synced and reflected in your record type.
If other systems besides Appian were updating your source data, you would need to configure additional sync options.
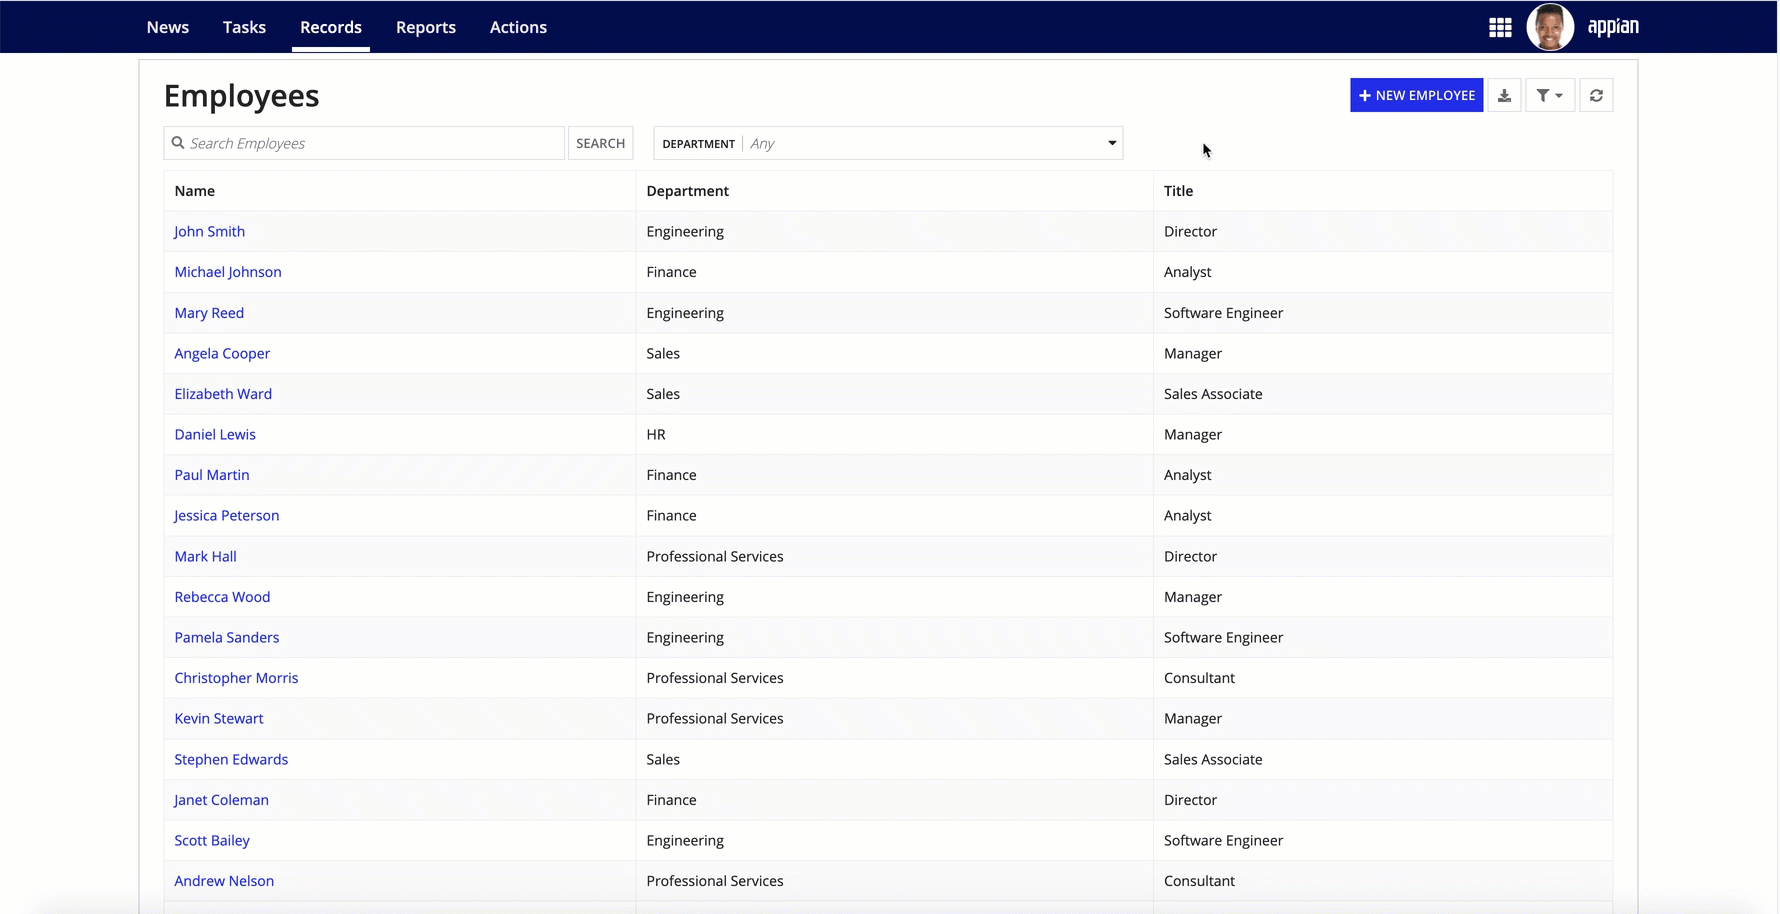
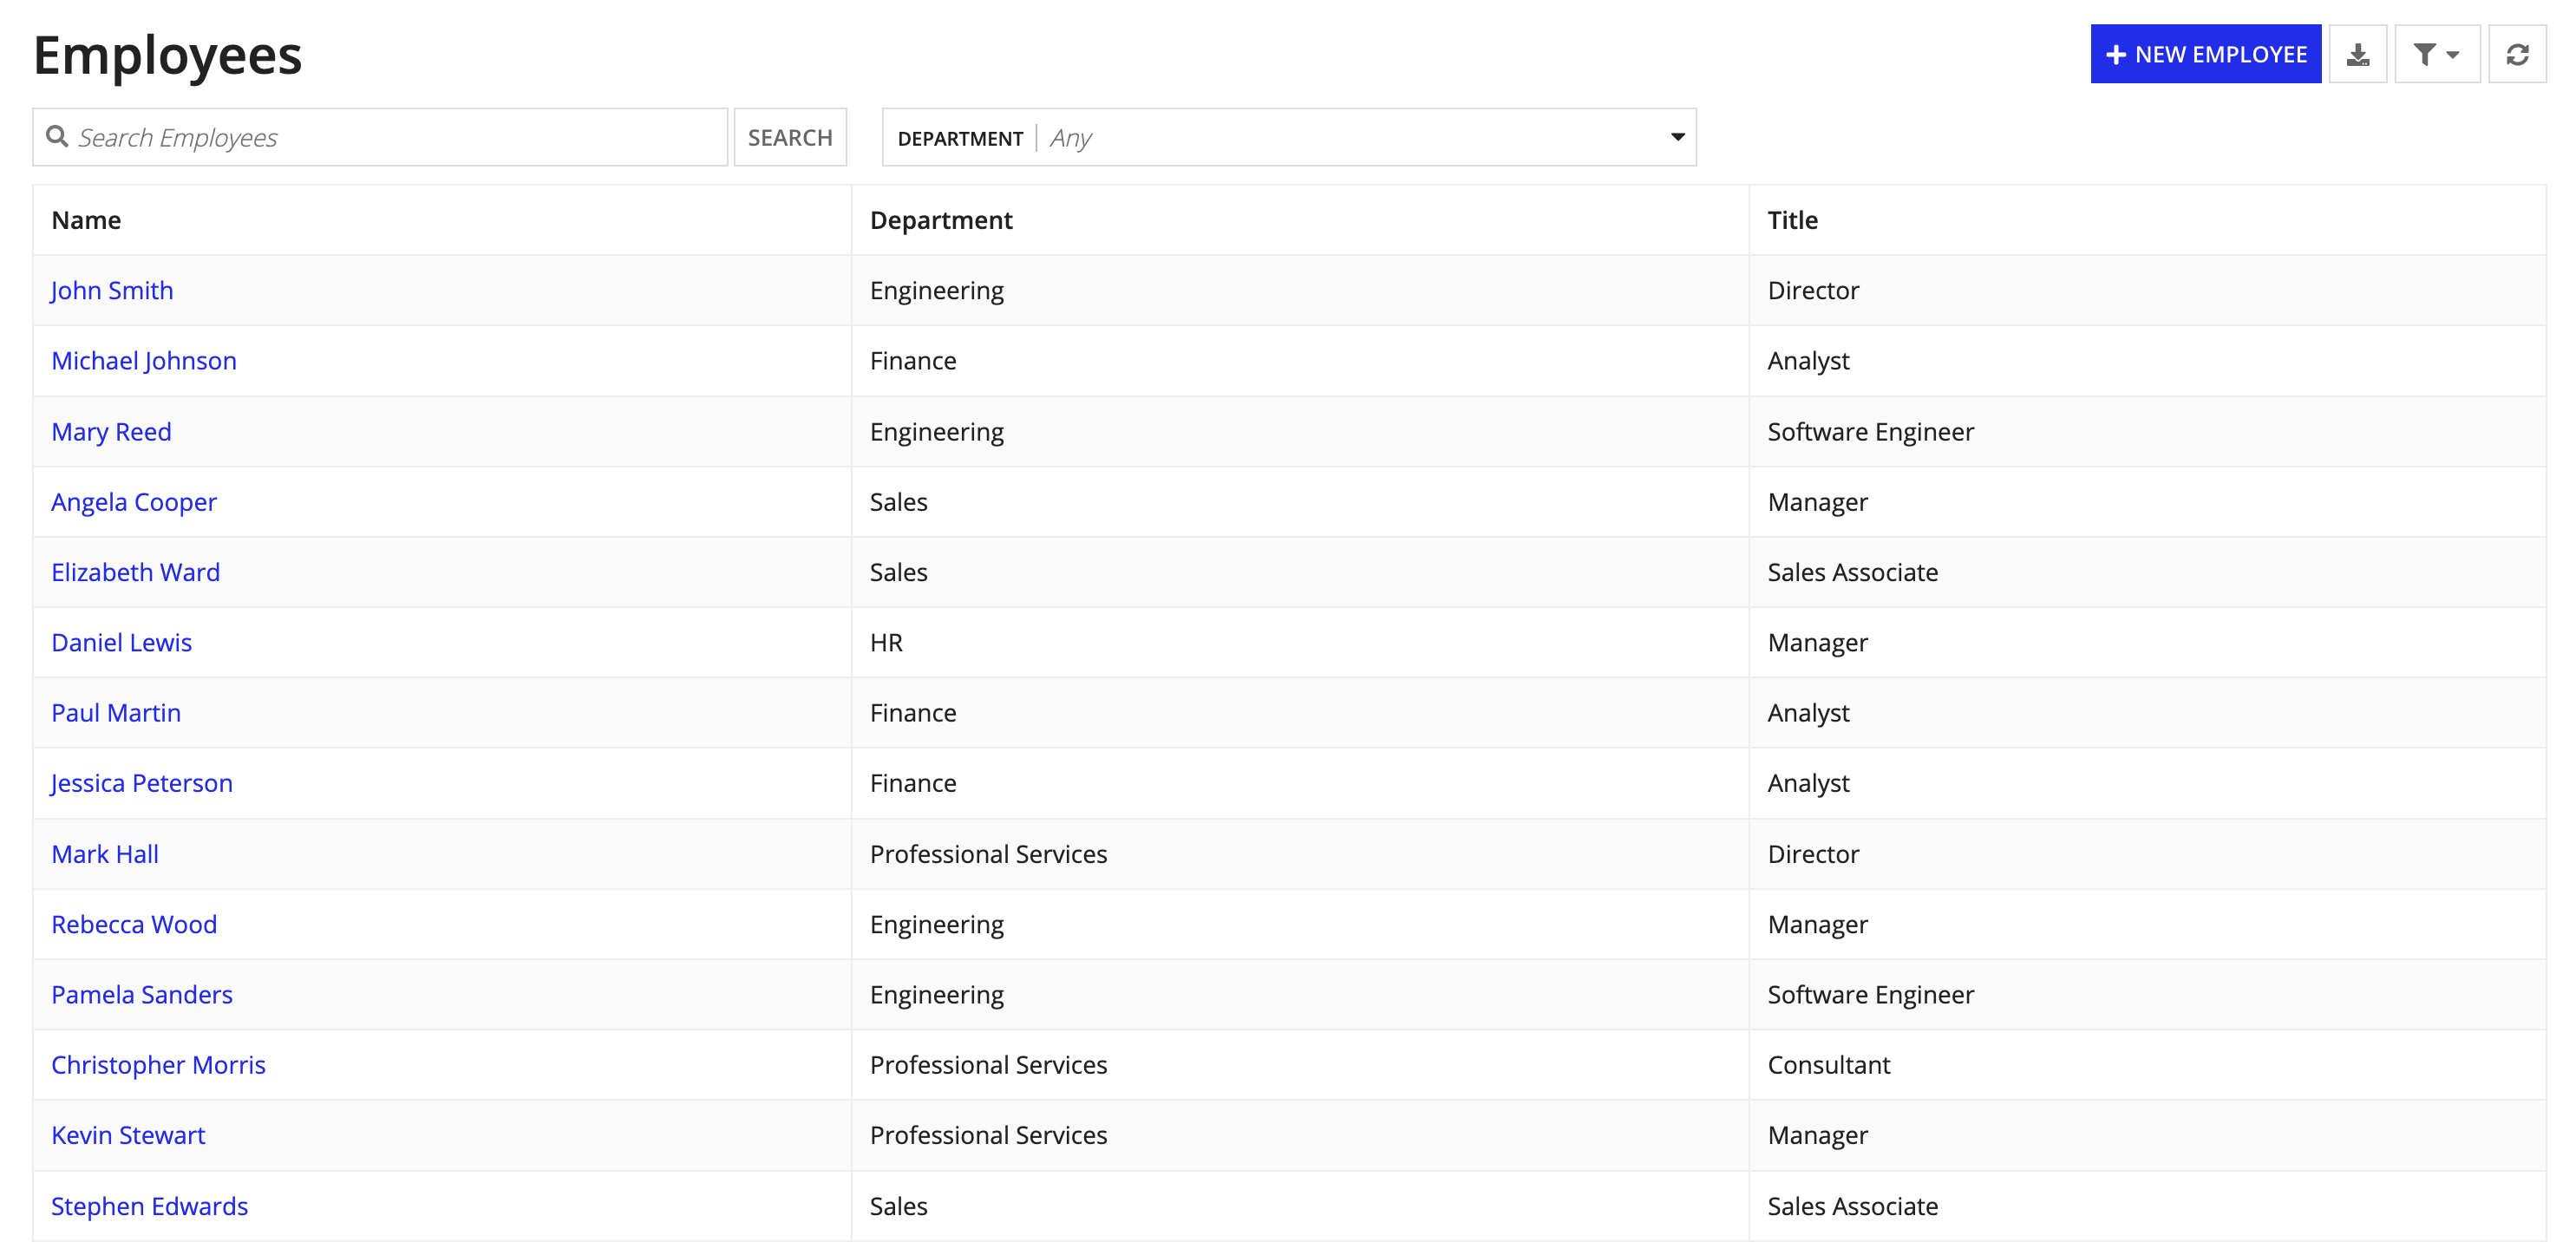
Now that we have our record data, let's configure the record list so users can find the records they need. Once we've configured the record list, we're going to add a user filter so users can filter the list by department.
We'll start by configuring the fields displayed in the record list. We only want to display select fields since this data is meant to be viewed at a glance before users drill into each record.
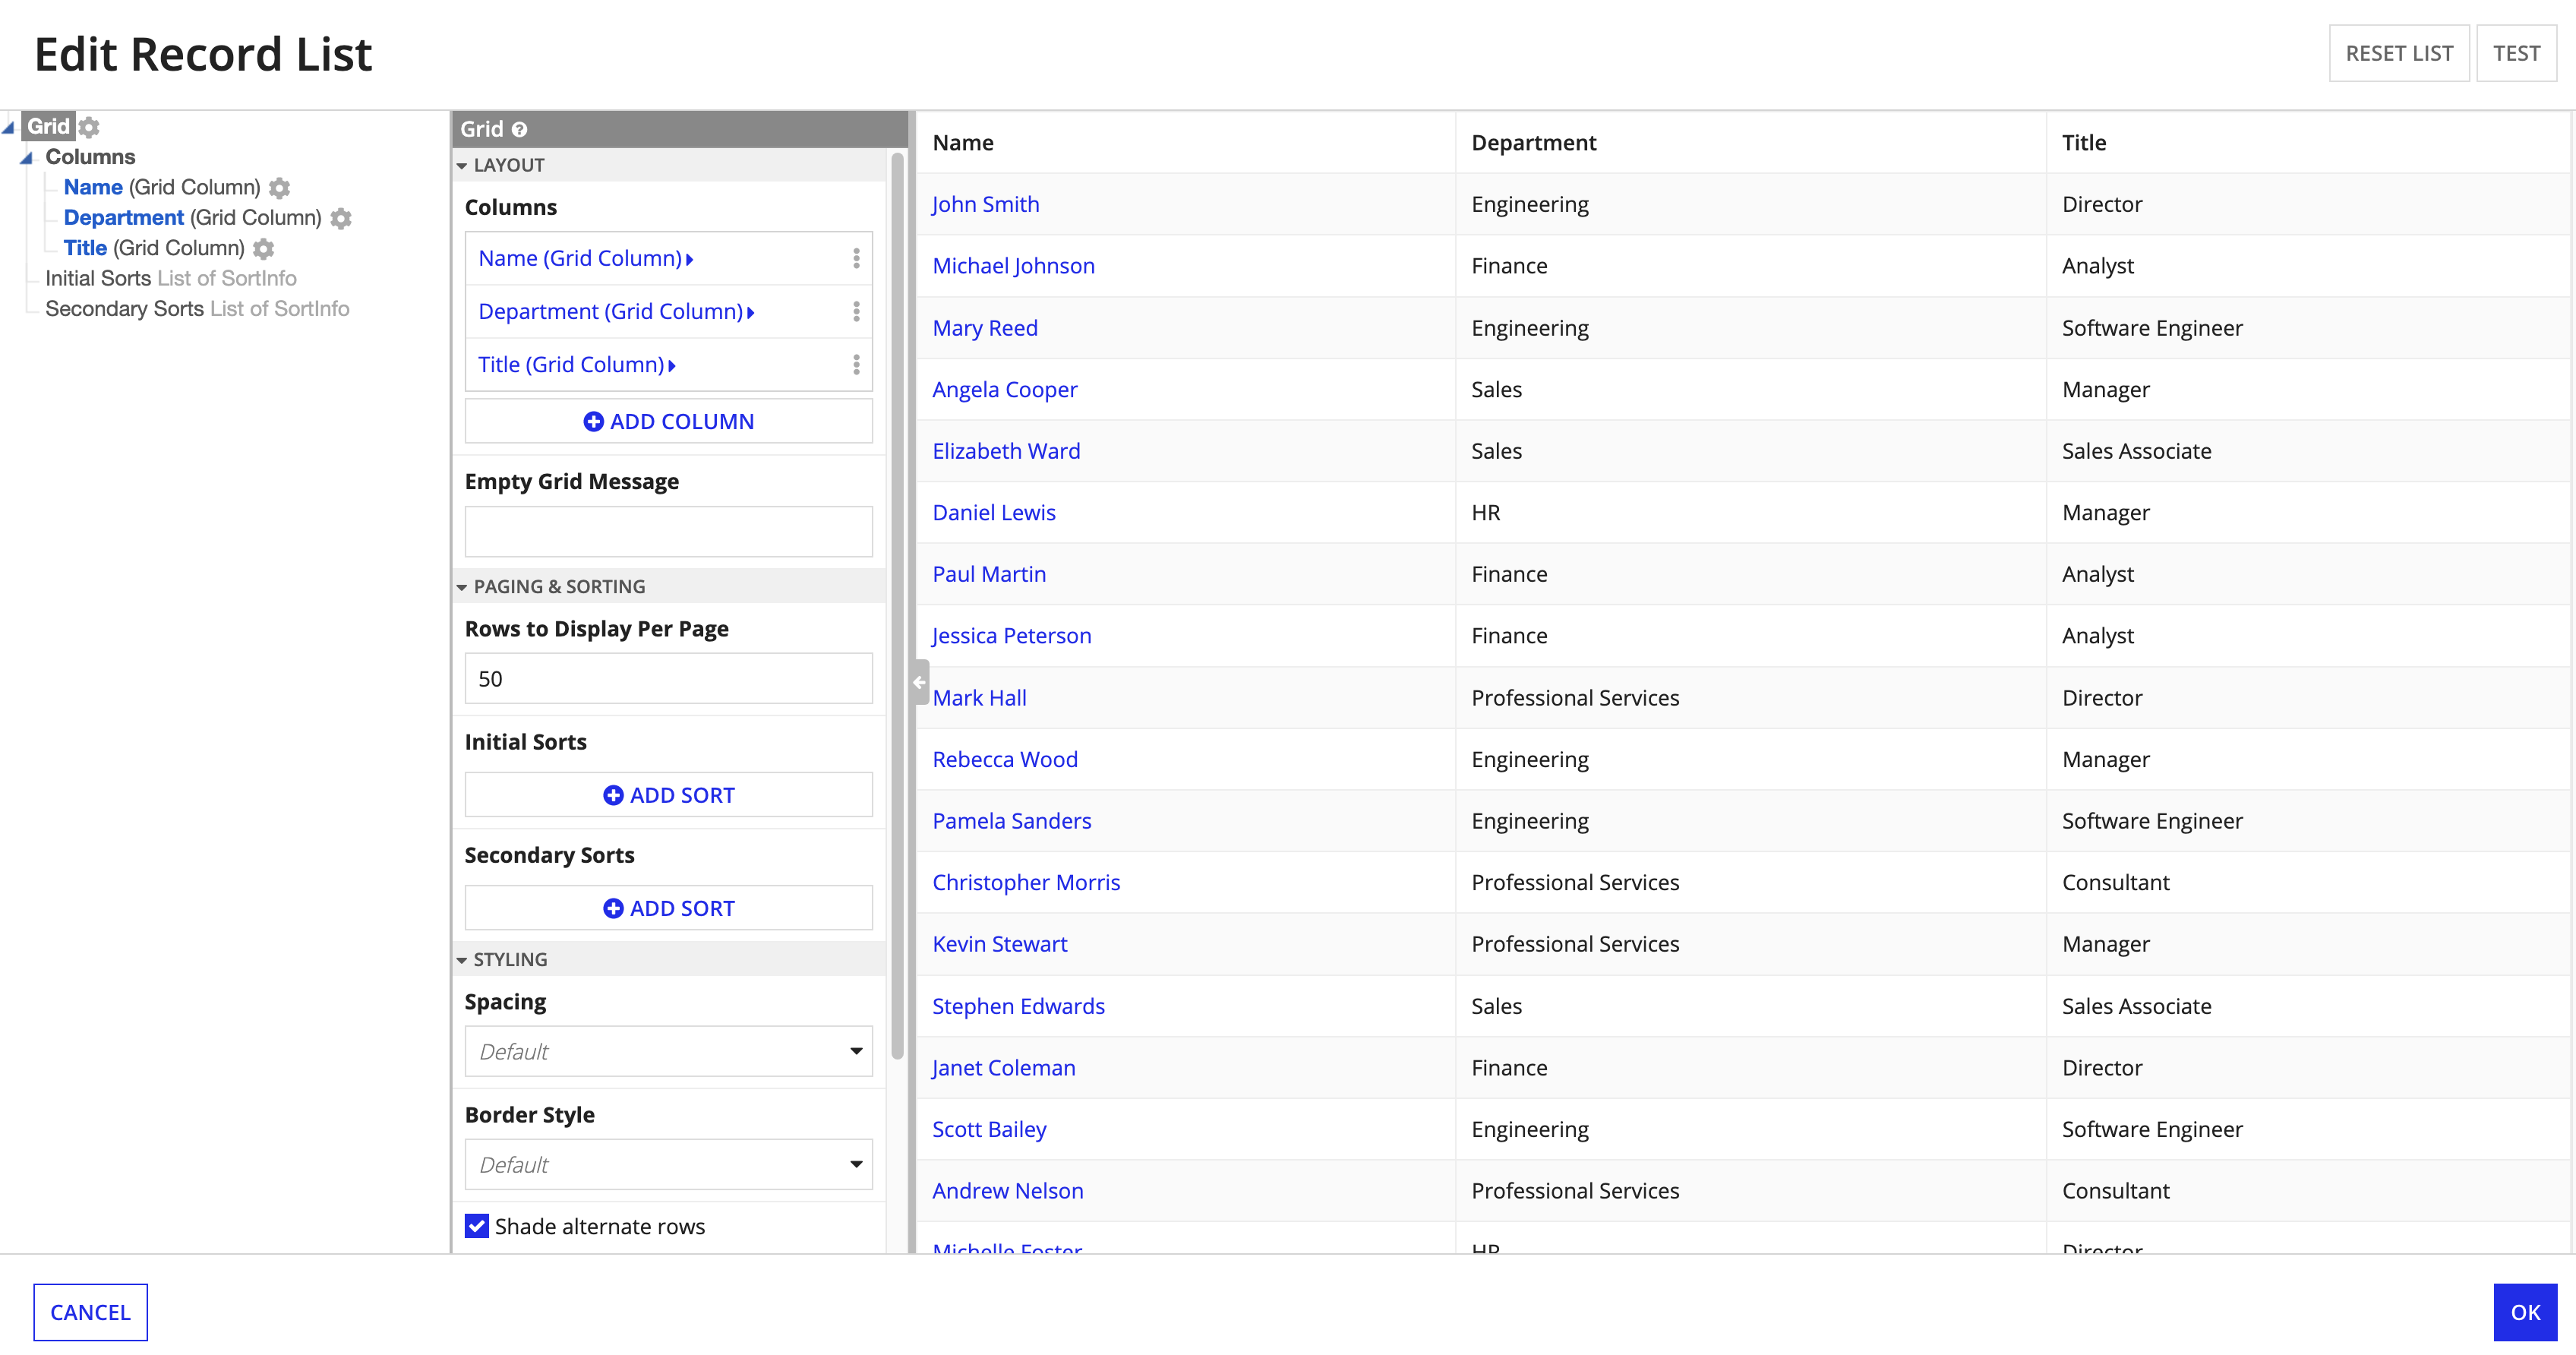
When looking at a list of employees, we really only want to see their name, title, and department. To configure the record list to show only these columns, we are going to remove the ID, phone number, and start date columns, and combine the first and last name columns into one.
To remove unnecessary fields:
In the Columns section of the Grid configuration, delete the Id column by hovering over and clicking .
Note: We don't need to show the Id column in the record list, because the record field is primarily used by the database to identify records and not used by users.
Next, we will combine the first and last name columns into one Name column. We will also add sorting to allow users to easily sort data in a column, and set the display value to let the column know which record field to show.
To create the Name column:
Name.To concatenate the first and last names to show both values in the same field, copy and paste the following expression:
fv!row[recordType!ATEmployee.fields.firstname] & " " & fv!row[recordType!ATEmployee.fields.lastname]
recordType!, then select your AT Employee record type from the context menu.. after recordType!AT Employee, and select fields from the first context menu and lastname from the second context menu.Note: Record type field references are specific to each record type and environment. This means that you need to reference the record type fields from your own environment whenever you copy and paste a record type reference from outside the application.
Click OK to close the expression editor.
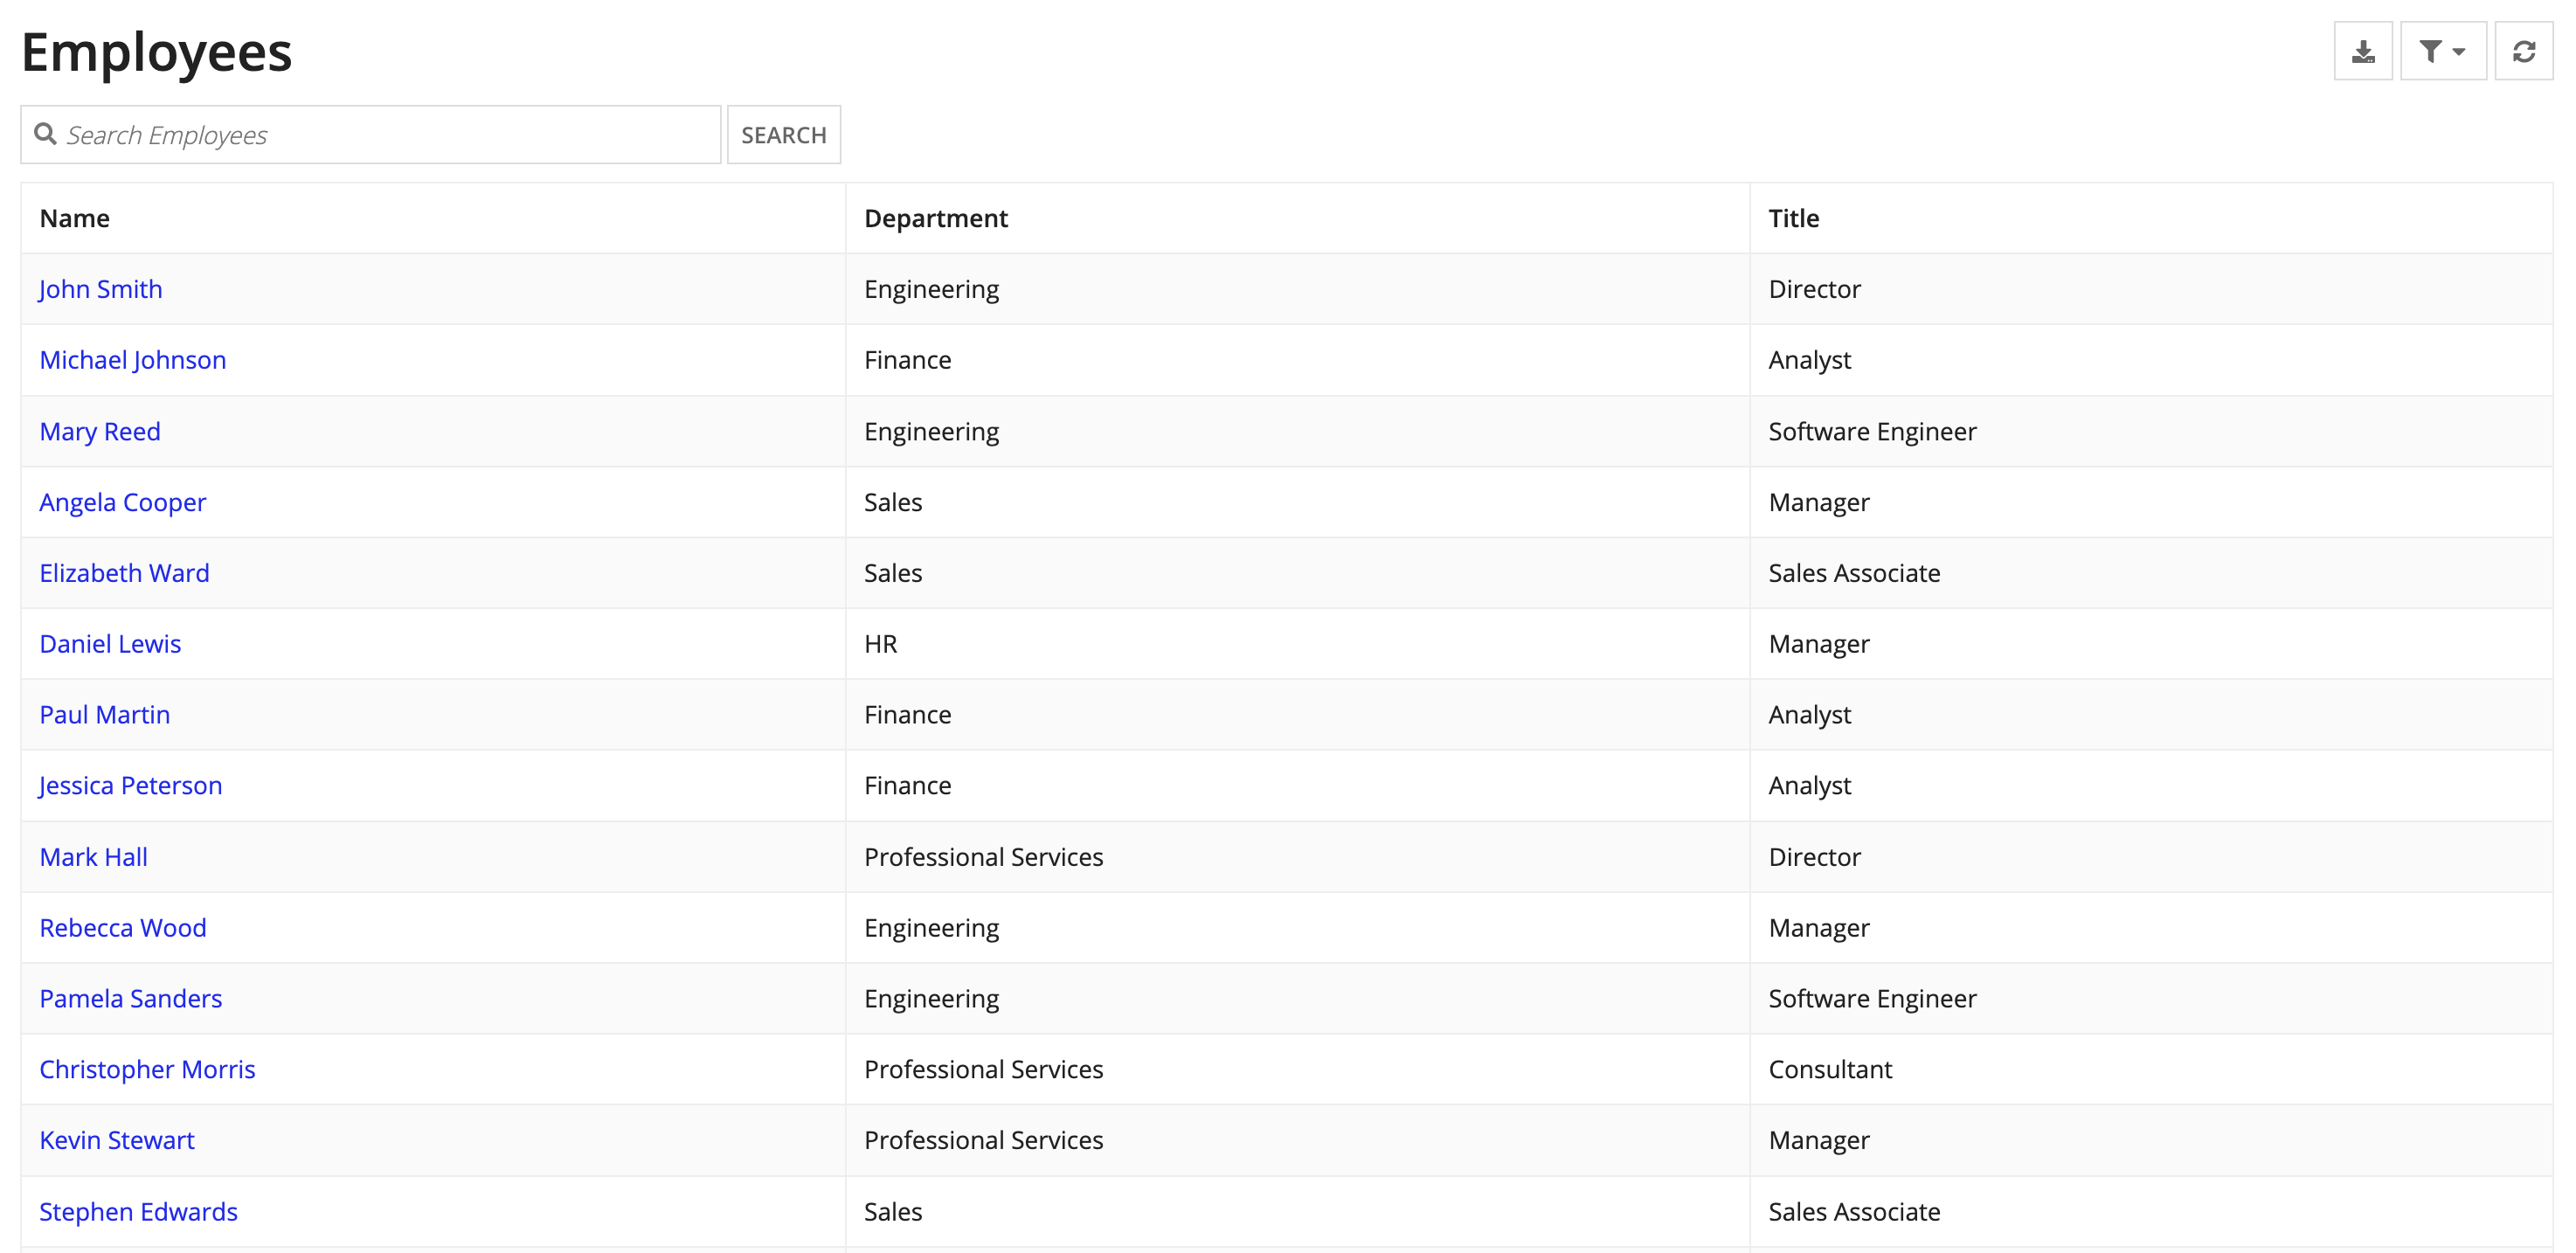
To test the record list, open the link under URL. The record list will open in Tempo.
Now that we've configured the record list columns, we can add a user filter. Let's enable users to easily filter the record list by department. We'll use a department constant along with the a!forEach() function to make creating and maintaining our user filter easier.
To add a new user filter:
Department.AT_DEPARTMENT_LIST.For Value, enter the department options. Separate each department by a line break, but do not include spaces, commas, or quotations:
1
2
3
4
5
Engineering
Finance
Sales
Human Resources
Professional Services
Appian Tutorial.AT Rules & Constants.In the Filter Expression field, replace the new constant reference with the following expression:
1
2
3
4
5
6
7
8
9
10
11
12
13
14
15
a!recordFilterList(
    name: "Department",
    options: a!forEach(
    items: cons!AT_DEPARTMENT_LIST,
    expression: a!recordFilterListOption(
        id: fv!index,
        name: fv!item,
        filter: a!queryFilter(
        field: recordType!ATEmployee.fields.department,
        operator: "=",
        value: fv!item
        )
    )
    )
)
recordType!AT Employee.fields.department to use the record type reference in your environment.
Note: Record type field references are specific to each record type and environment. This means that you need to reference the record type fields from your own environment whenever you copy and paste a record type reference from outside the application.
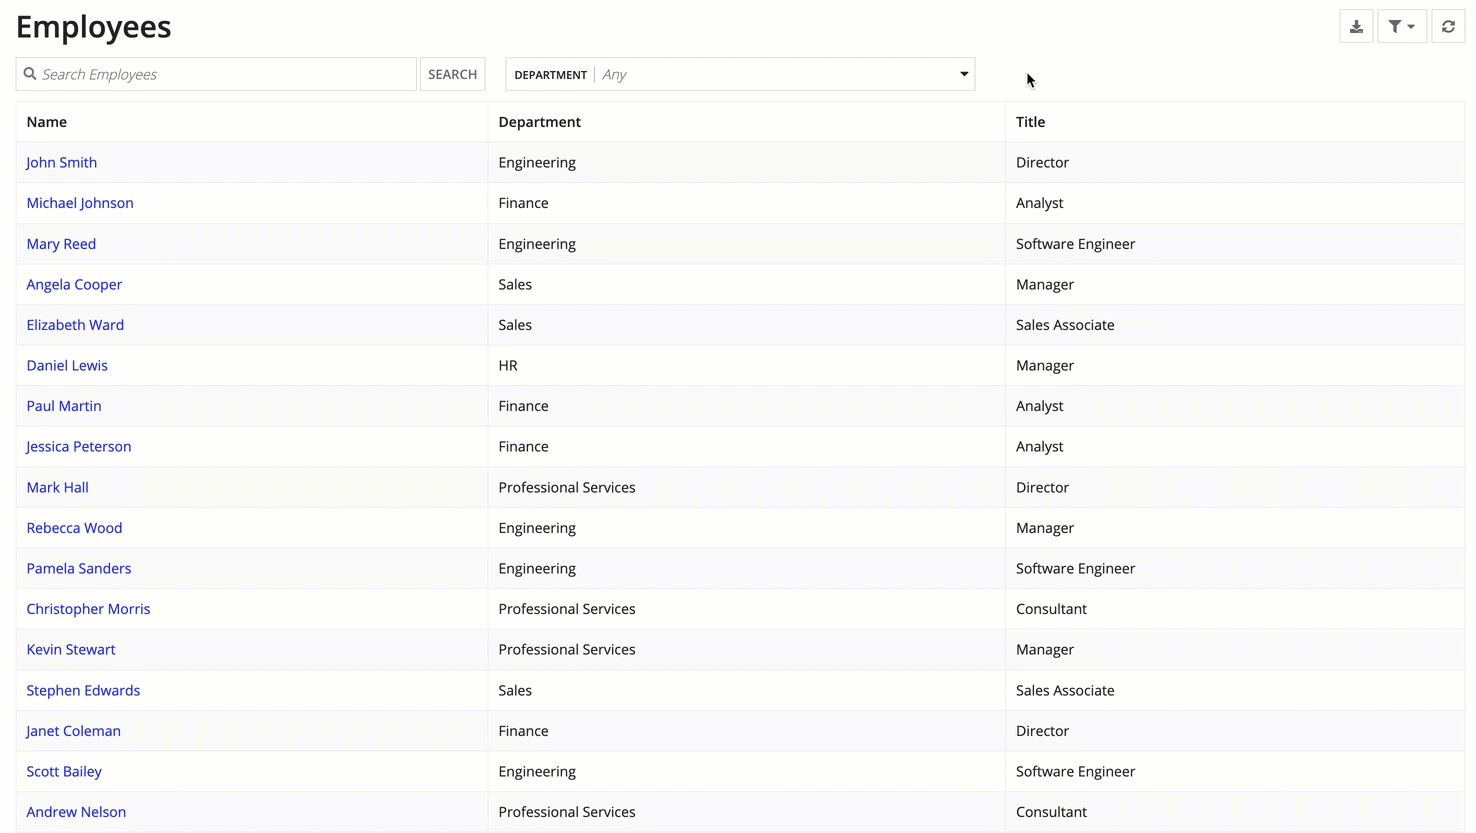
To test the user filter, go to List in the record type and open the link under URL. The record list will open in Tempo and automatically display the new user filter.
In the final part of this tutorial, we will configure the records in the record type by creating a Summary view and a related action. The Summary view displays information for a single record, and the related action will allow users to update the information about an employee directly from the record.
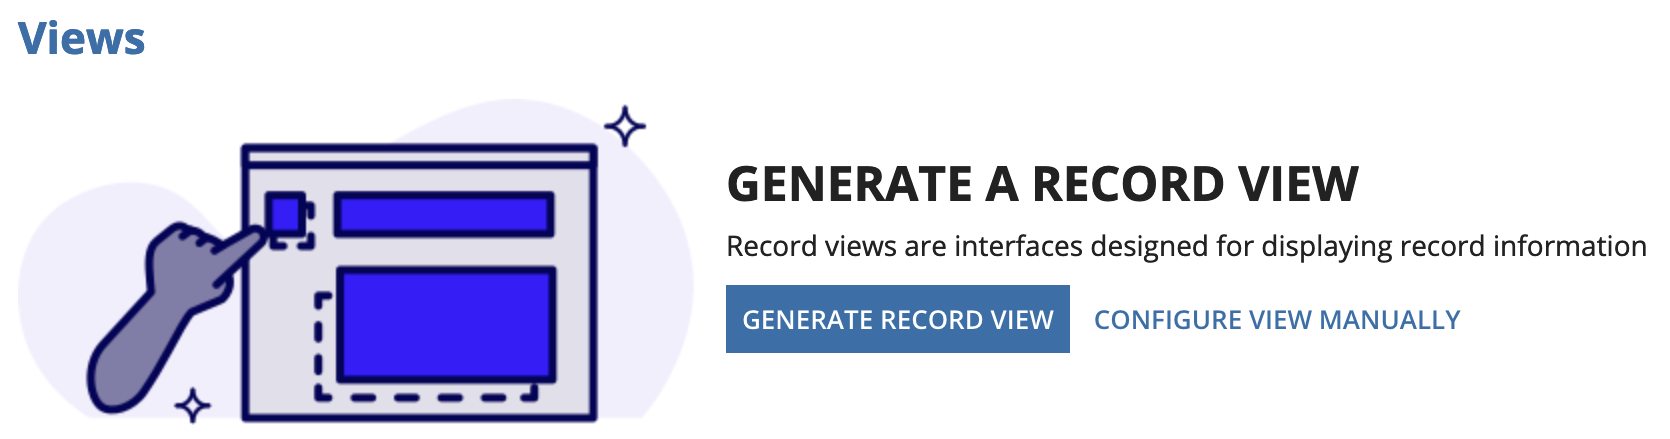
In this step, we will generate a Summary view. By generating this view, Appian will create the interface and configure the view for us. Then, we will configure the record header background color and the record title with the employee's name.
Because the Employee record type has data sync enabled, you can quickly generate the Summary view interface, as follows:
Click GENERATE RECORD VIEW.
For Record View Name and Application, leave the default configurations:
| Property | Value |
|---|---|
| View Name | Summary |
| Application | Appian Tutorial |
Review the objects that Appian will use for your new record view:
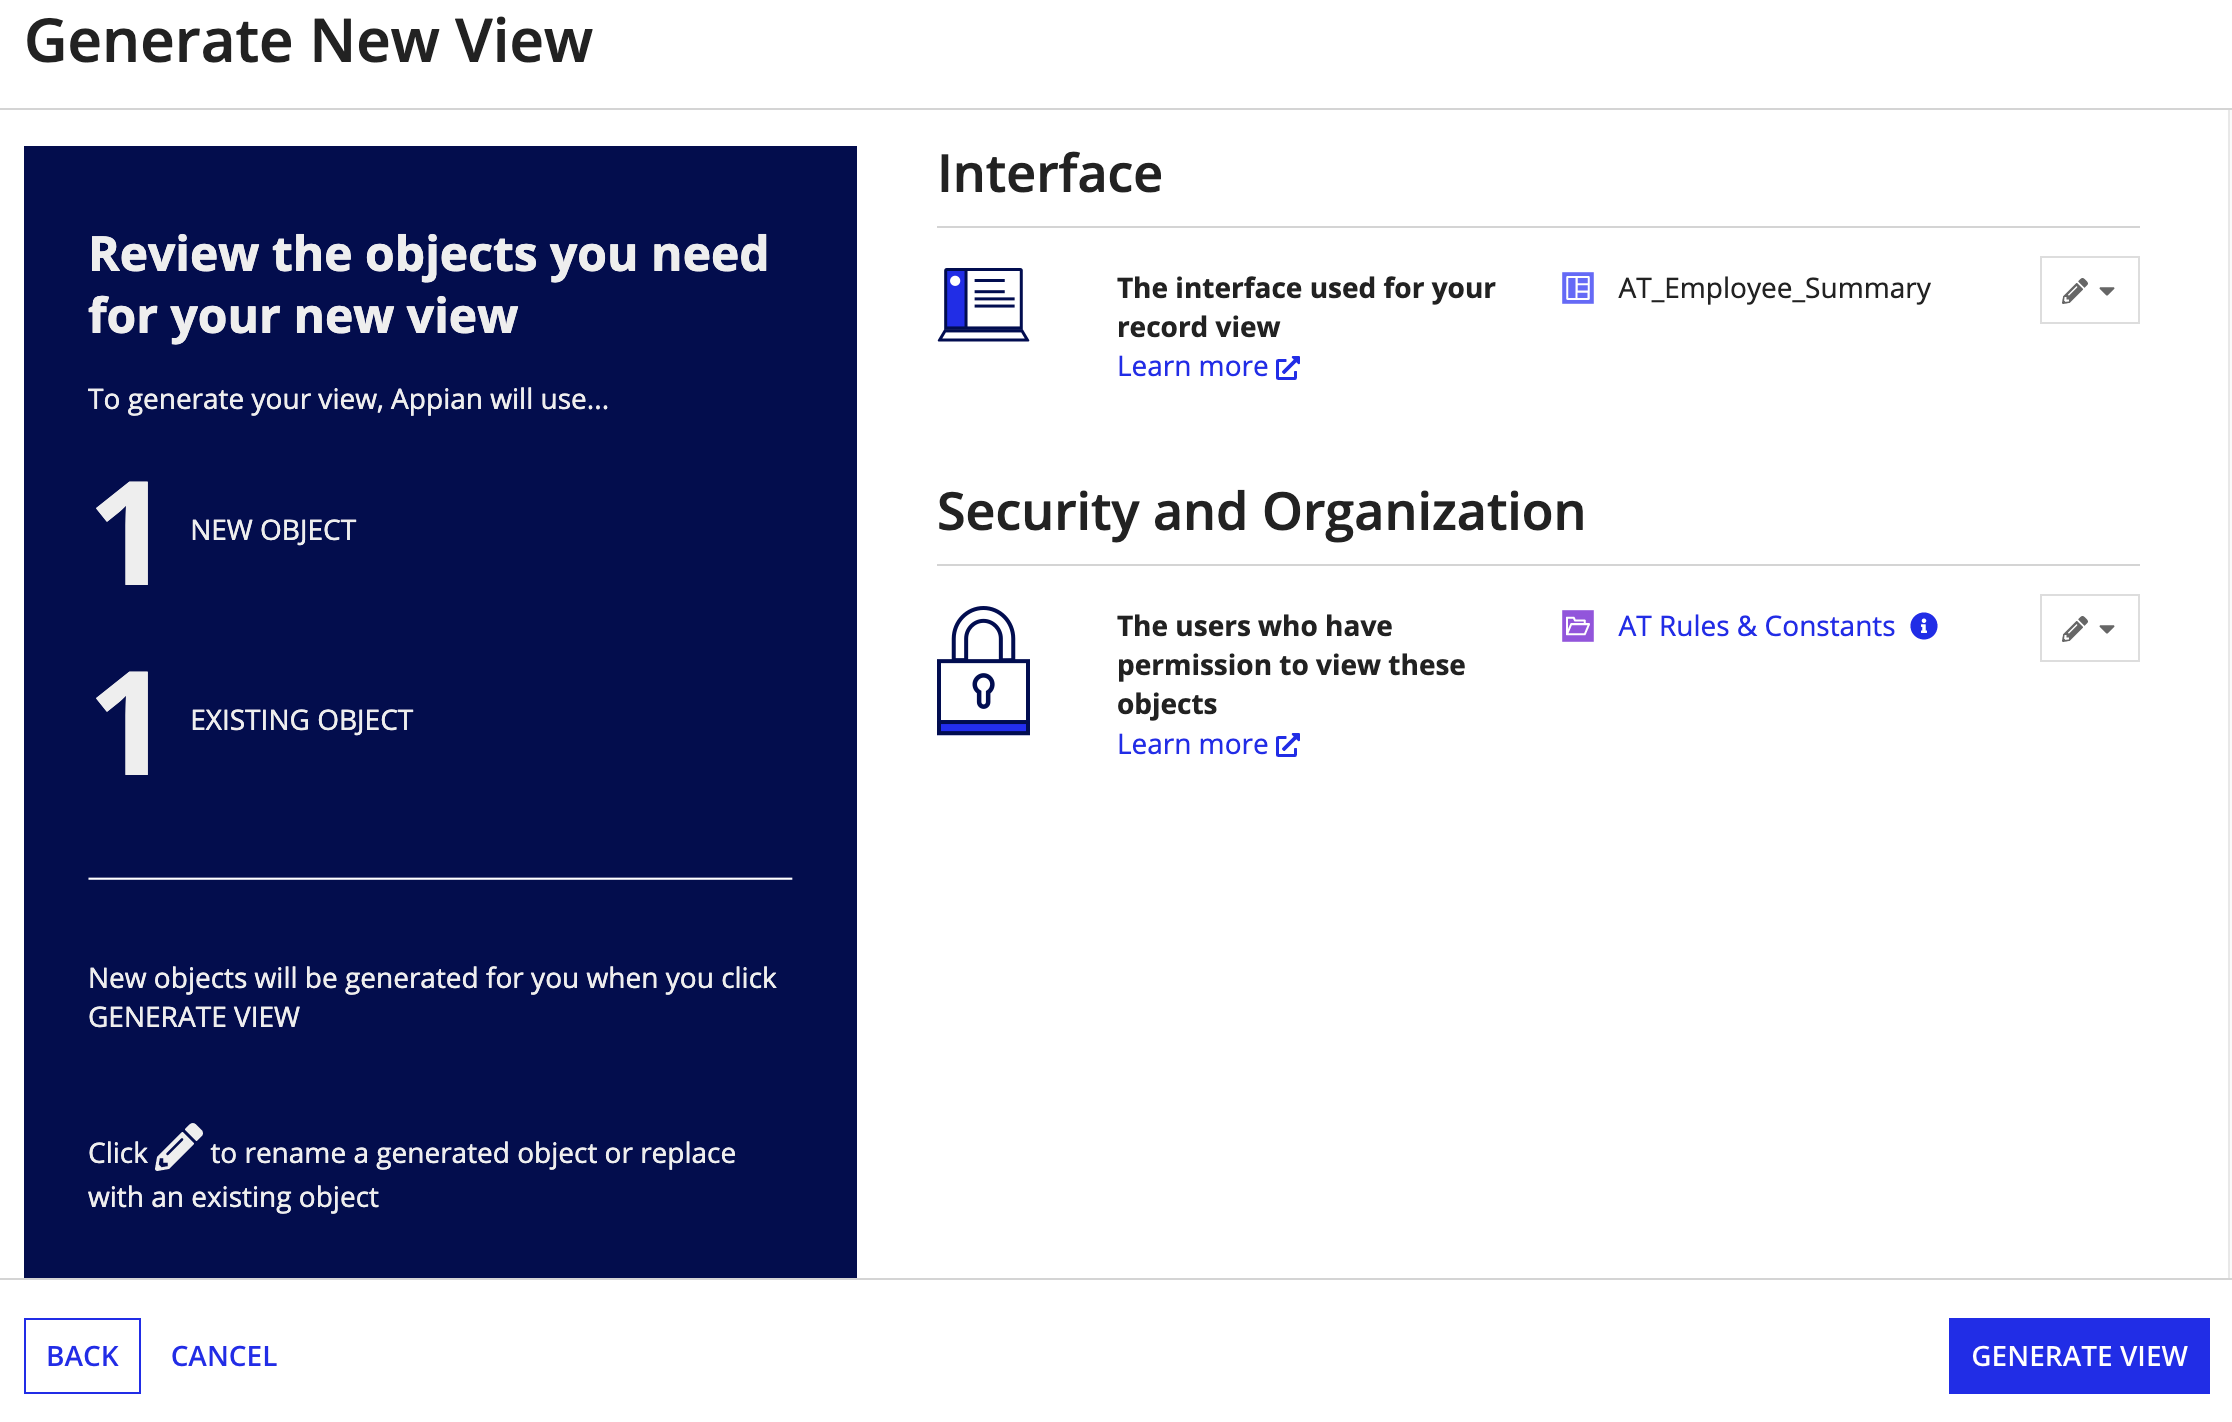
Note: If an existing Rules and Constants folder is being used, Groups will be hidden since they have already been configured for the folder.
Click CLOSE. Your new Summary view displays in the Record Views table.
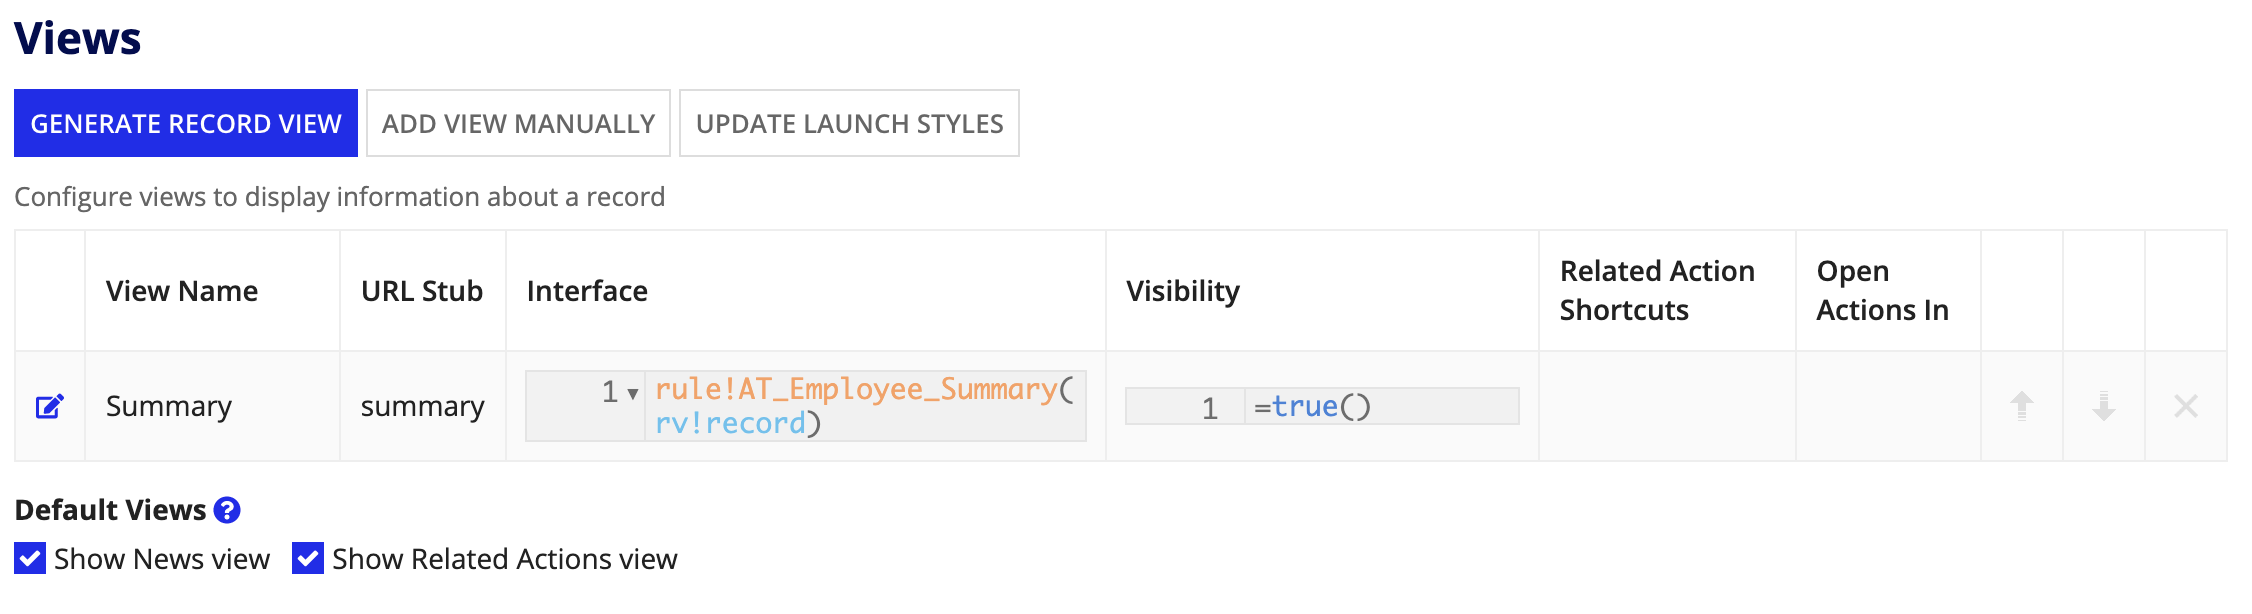
Since we generated the Summary view, Appian automatically added the interface as the Summary view for the record type. All we need to do now is save it.
The generated interface is fully configured, so all we need to do is make some small formatting adjustments.
To update the generated interface:
In the Build view, open the AT_Employee_Summary interface.
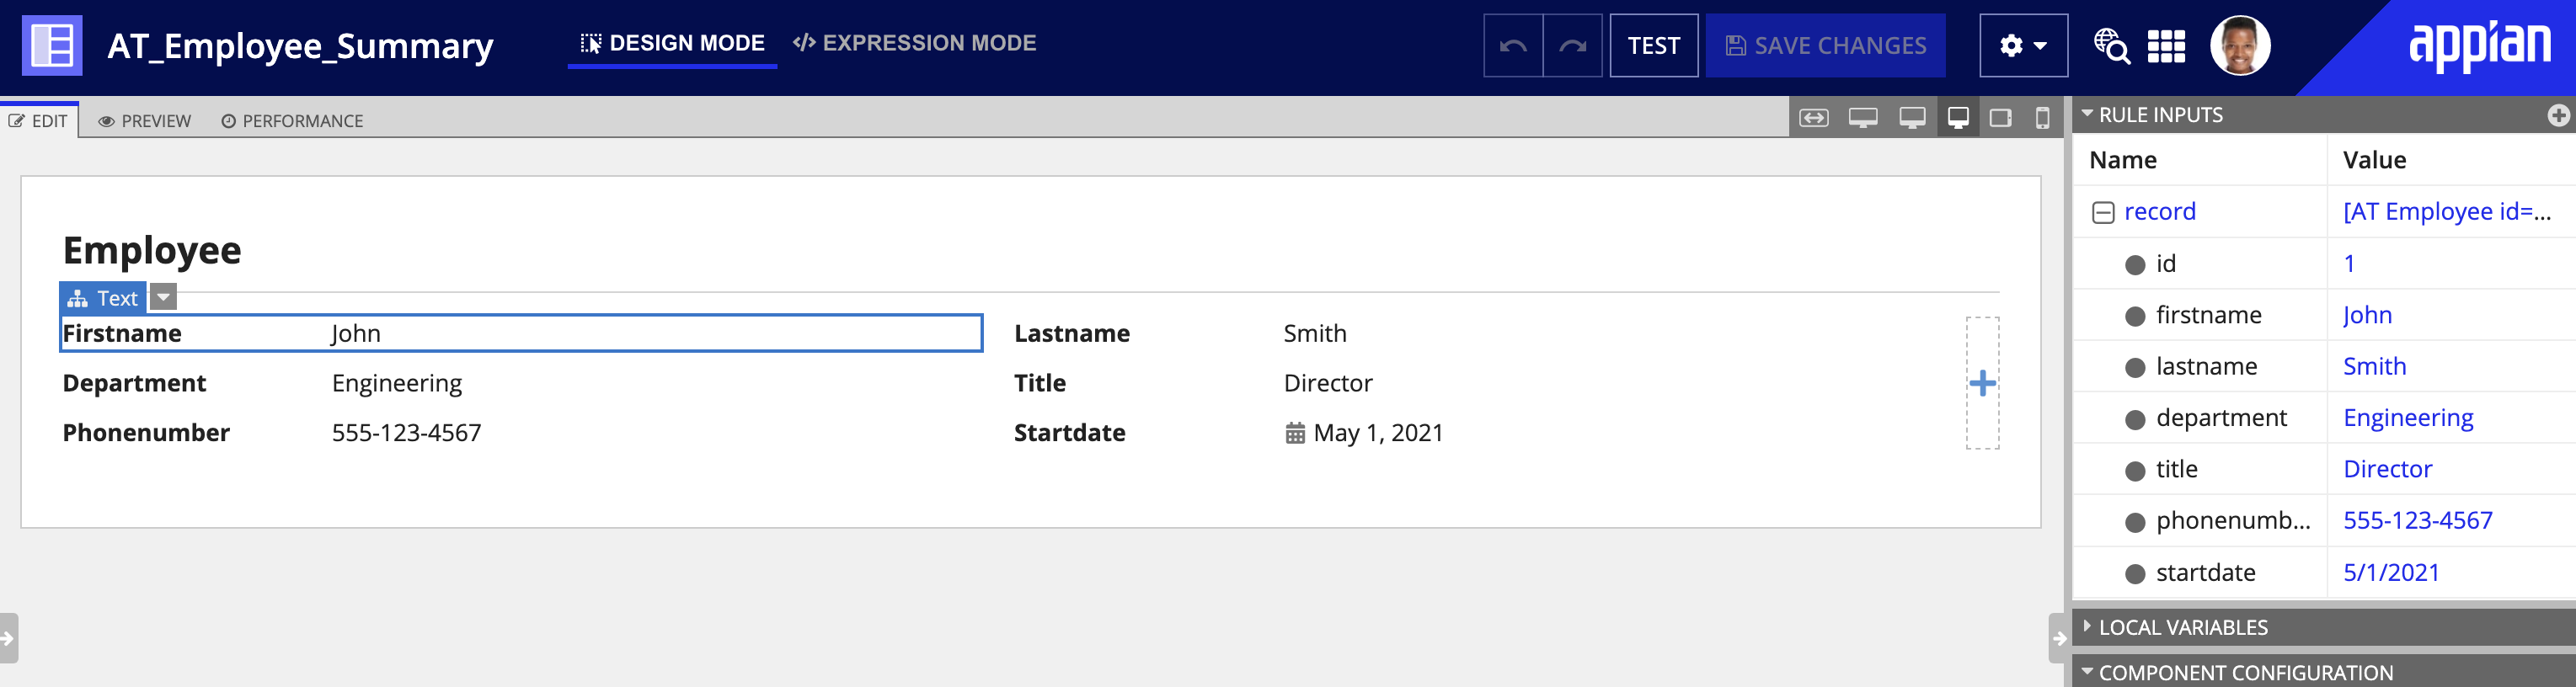
First Name.Click SAVE CHANGES. Your interface should look like this:

Now that the interface is ready, let's return to the Views and Header page in the AT Employee record type, so we can configure a record header background. The record header background contains the title, breadcrumbs, and related actions on every record view of your record.
You can opt for no background or you can set an image or color. We are going to configure a gray background:
#F3F9FF to select a light blue color.Now, we'll configure the record title so that it will show the employee's first and last name. We are adding the employee's name as a record title so that a user landing on this page will understand what they are looking at without having to navigate to the record list.
Since our record type has data sync enabled, Appian automatically configures the record title to use the first Text field after the primary key field in the record type. In this tutorial, that field is the employee's first name. We want the title to be the employee's first and last name, so we'll configure an expression that concatenates the firstName and lastName record fields.
In the expression editor, copy and paste the following expression:
1
 rv!record[recordType!AT Employee.fields.firstName] & " " & rv!record[recordType!AT Employee.fields.lastName]
Note: Record type field references are specific to each record type and environment. This means that you need to reference the record type fields from your own environment whenever you copy and paste a record type reference from outside the application.
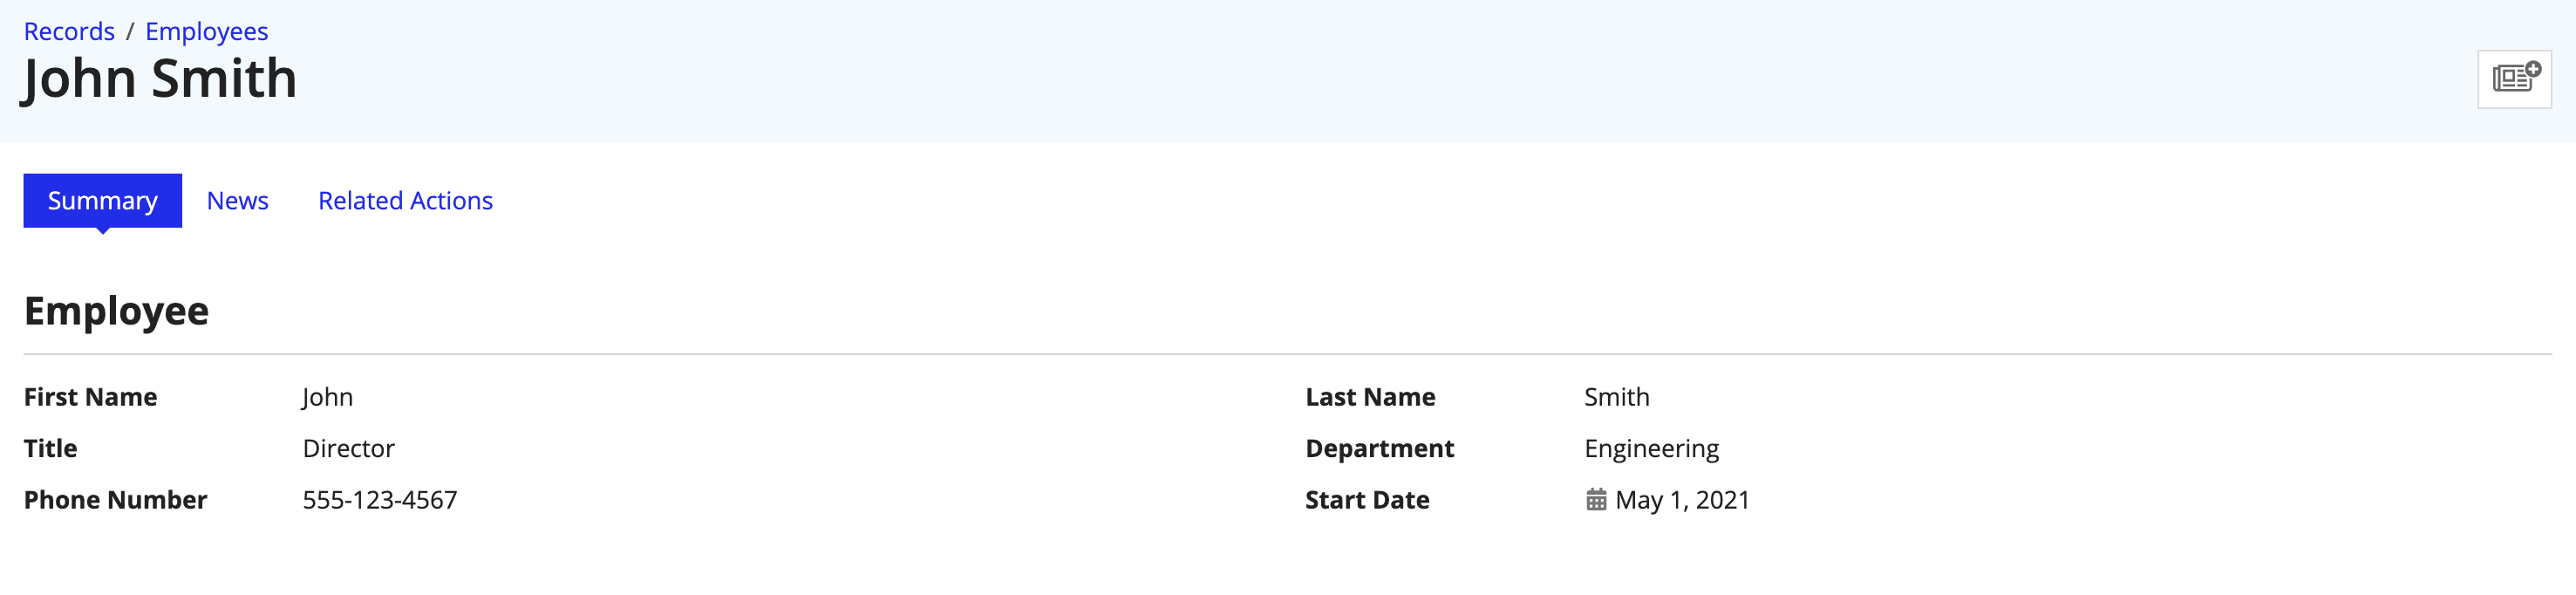
From the record list, select an employee to view their Summary view. Notice that the employee's full name appears in the record title.
With the Summary view set up to view employee information, the last thing we'll do is add a related action so users can update a record.
We will create a related action for managers to update employee information from the Summary view. We will create the related action in two steps. In the first, we will create an expression rule and a reusable interface. In the second, we'll create a process model.
Tip: In your own application, you can skip creating these objects when you generate a record action.
If you use a database table with data sync enabled as the source of your record type, Appian can generate common record actions for that record type using basic information you provide. To use this feature, your underlying data source must include the proper JPA annotations.
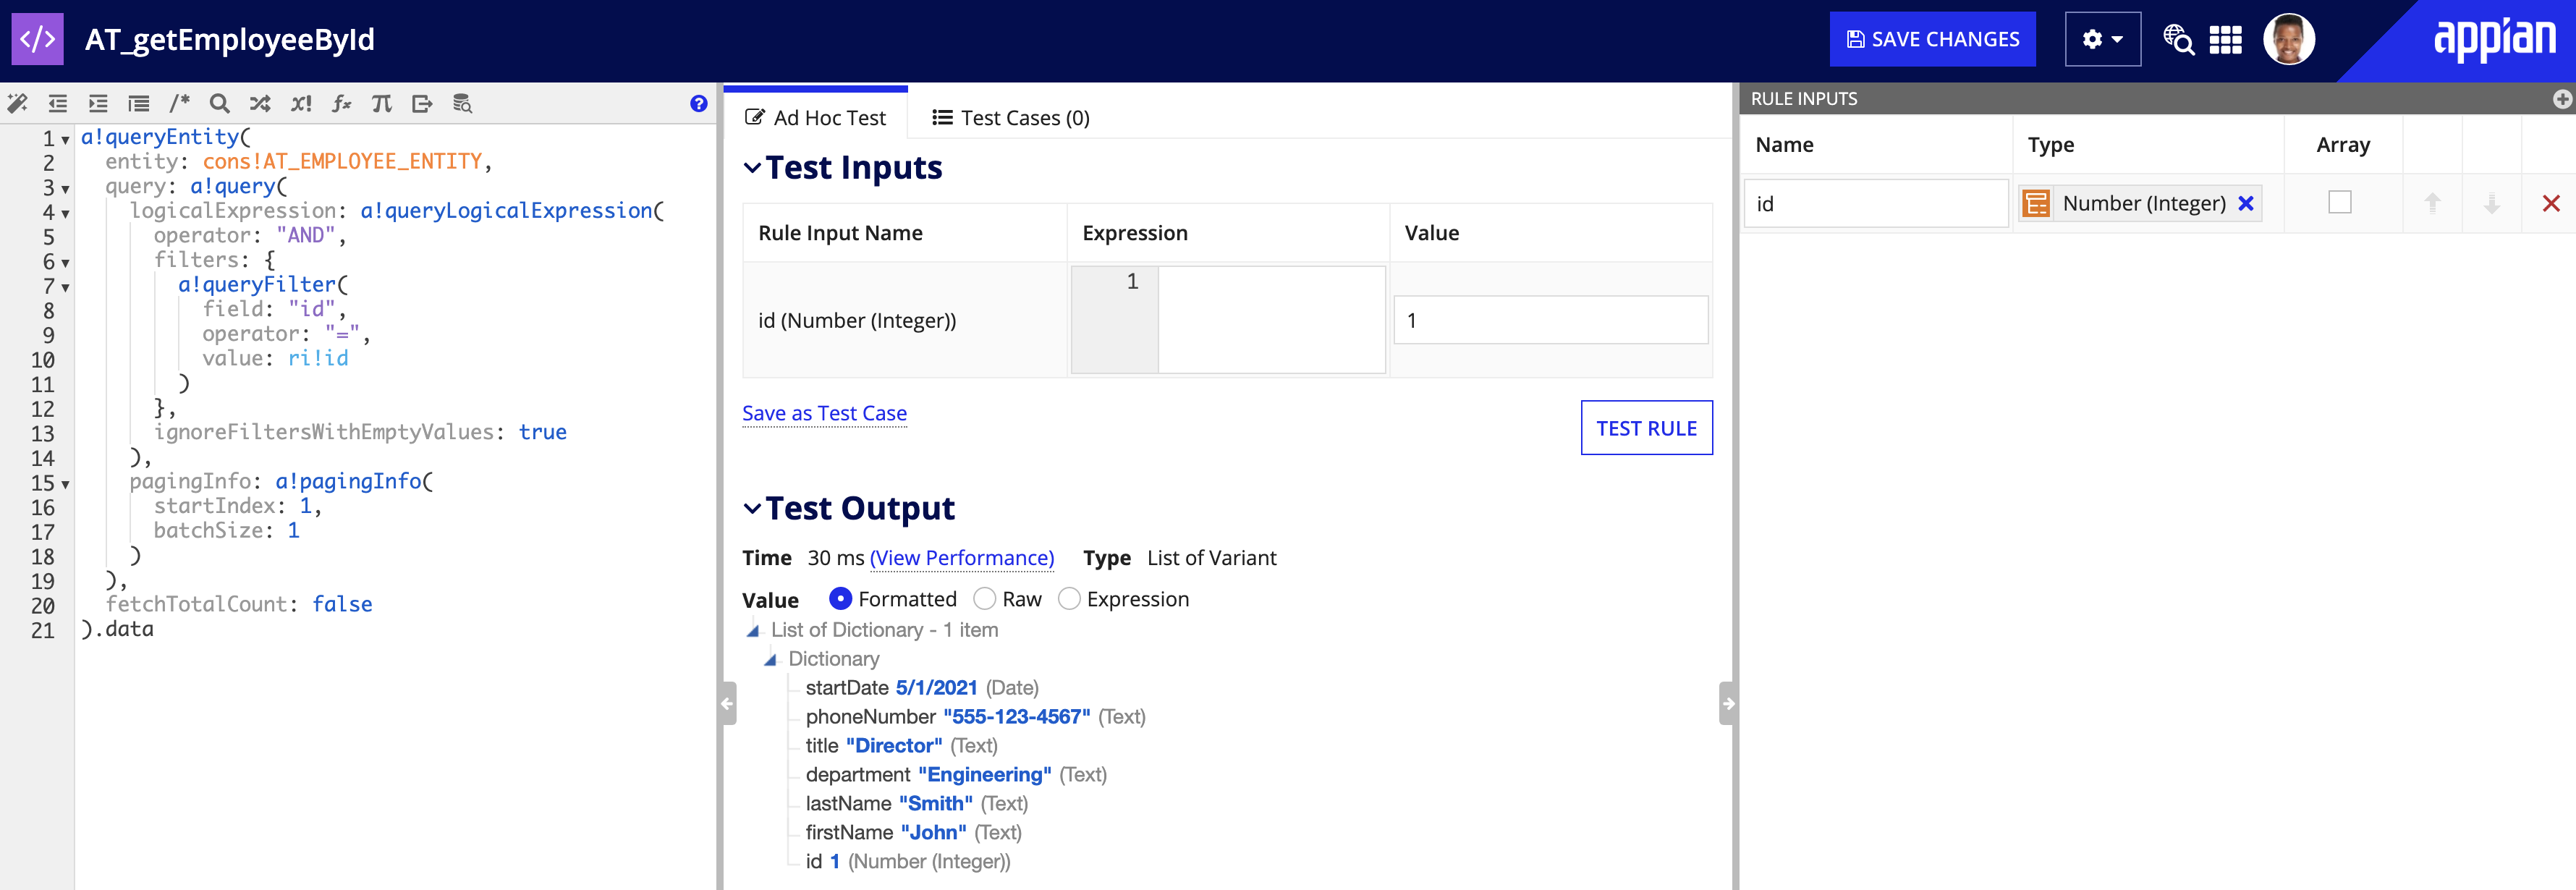
First, we will create an expression rule that queries the DSE to get employee information by the record ID.
In the next few steps, we will use this expression rule to help us test our reusable interface, pull in employee data to work with the logical expressions in that interface, and pass in the correct employee data to the process models that we'll be creating.
To create our expression rule:
AT_getEmployeeByIdAT Rules & Constants.id.In the expression editor panel, copy and paste the following expression:
1
2
3
4
5
6
7
8
9
10
11
12
13
14
15
16
17
18
19
20
21
a!queryEntity(
  entity: cons!AT_EMPLOYEE_ENTITY,
  query: a!query(
    logicalExpression: a!queryLogicalExpression(
      operator: "AND",
      filters: {
        a!queryFilter(
          field: "id",
          operator: "=",
          value: ri!id
        )
      },
      ignoreFiltersWithEmptyValues: true
     ),
    pagingInfo: a!pagingInfo(
      startIndex: 1,
      batchSize: 1
    )
  ),
  fetchTotalCount: false
 ).data
1 throughout the tutorial.Click TEST RULE. You will see the employee information displayed in the Test Output section.
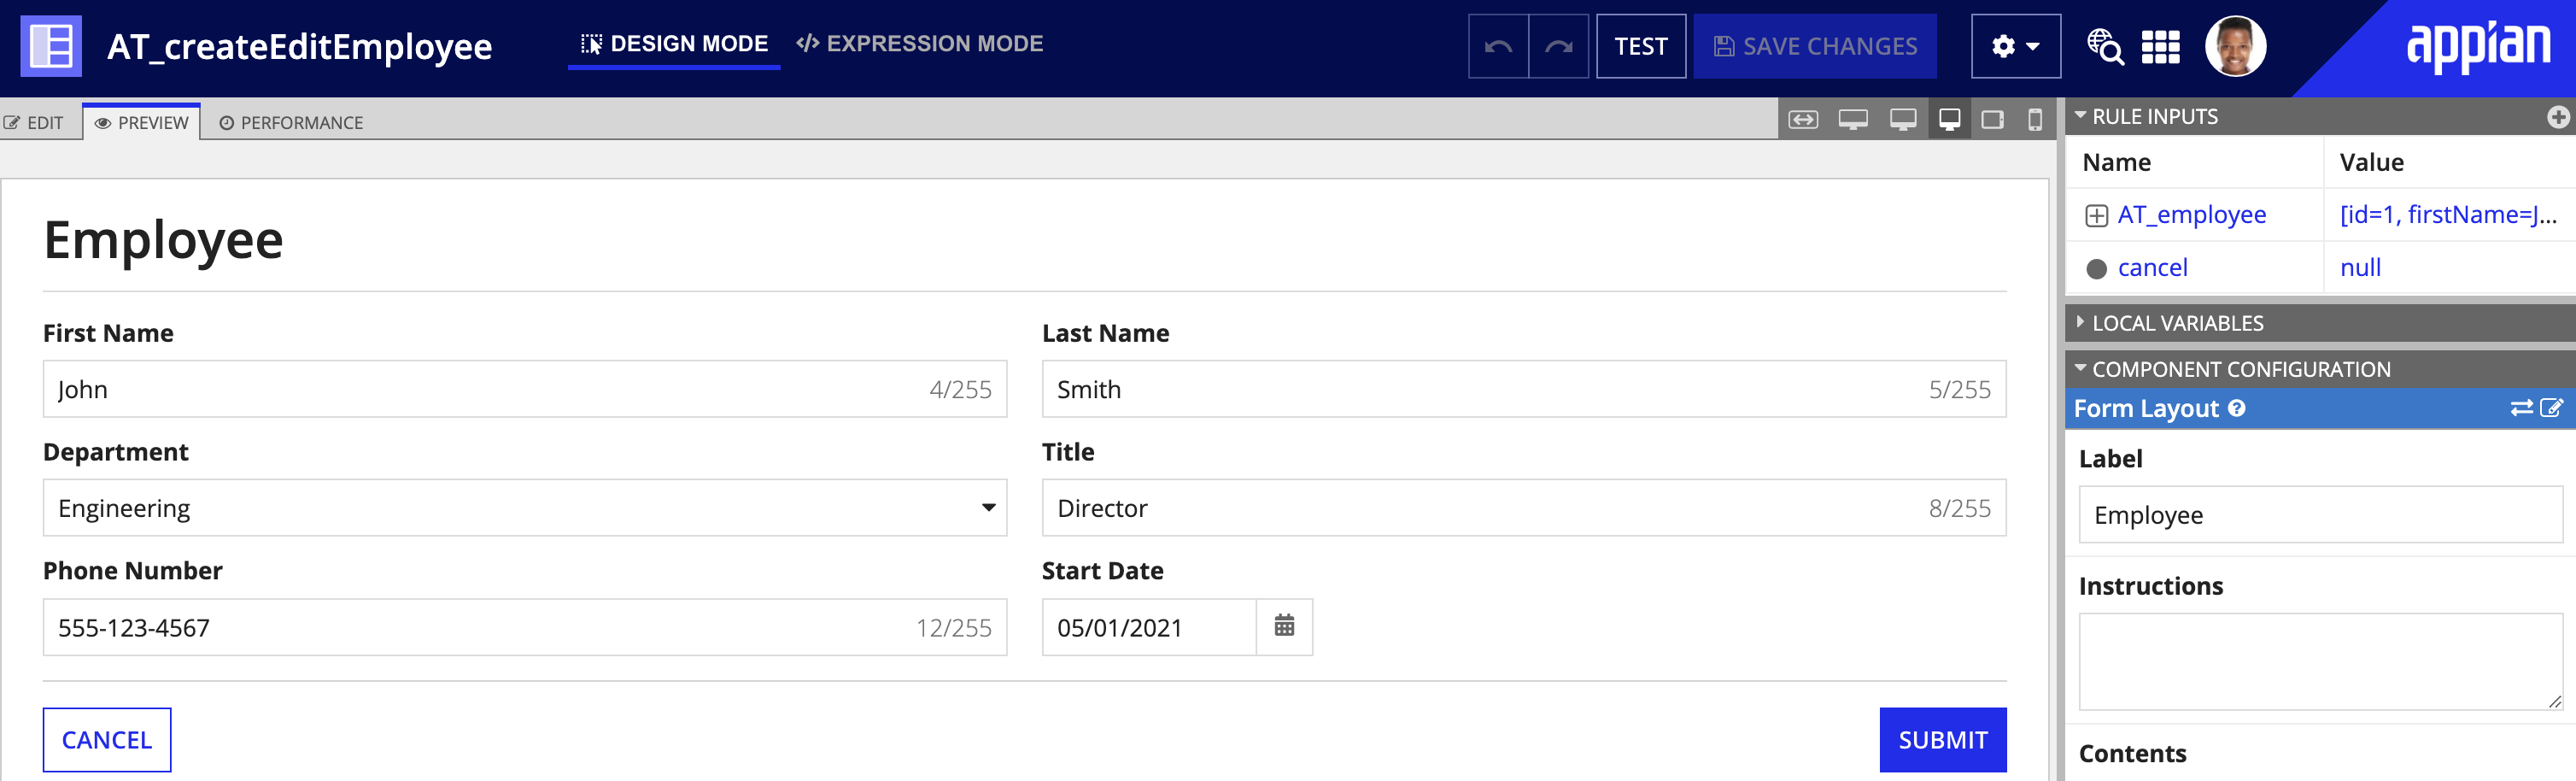
Now let's make a reusable interface. Reusable interfaces allow us to use the same interface multiple times instead of having to create multiple similar interfaces.
We'll use this interface for our related action and, later on, in our record list action. The reusable interface will show the same employee information as the Summary view, but the fields will be editable.
To make this interface functional for both the related and list actions, we will write two conditional expressions: one will show the different form labels, and the other will make components editable depending on the action.
To make a reusable employee interface:
AT_createEditEmployeeAT Rules & Constants.For Data Type, select the AT_Employee custom data type created during setup.
Note: We're using the employee CDT here, instead of the Employee record type, because we want to pass data from this interface into a process model. You should only use record data types as rule inputs if the interface is read-only.
Now that our editable interface is created, let's replace the Department text field with a dropdown component. This will allow users to select from a pre-defined list of departments when updating the employee information, instead of entering a department in a field every time or entering a department name incorrectly.
To replace the Department text field with a dropdown component:
In the COMPONENT CONFIGURATION panel for the new dropdown component, configure the following properties:
| Property | Value |
|---|---|
| Label | Enter Department. |
| Placeholder Label | Enter ---Select a Department---. |
| Choice Labels | Click Edit as Expression , replace the existing expression with cons!AT_DEPARTMENT_LIST, then click OK. |
| Choice Values | Click Edit as Expression , replace the existing expression with cons!AT_DEPARTMENT_LIST, then click OK. |
Tip: After you change the Choice Label to use the constant, an error will appear. This is expected since the Choice Label and Choice Values fields currently have different values. The error will resolve itself when you change the Choice Values field to use the same constant.
Next, we're going to add our expression rule to the interface as a test value. We'll use the record ID 1 to pass the record data into the interface so that we can see the fields populated with employee data. This will allow us to verify our conditional logic in the next few steps.
To add a test value:
rule!AT_getEmployeeById(1).Click TEST INTERFACE. You will now see the employee's information in the fields.
Now we are going to configure two expressions for our form label and the start date field so that this form will work with our related action and record list action.
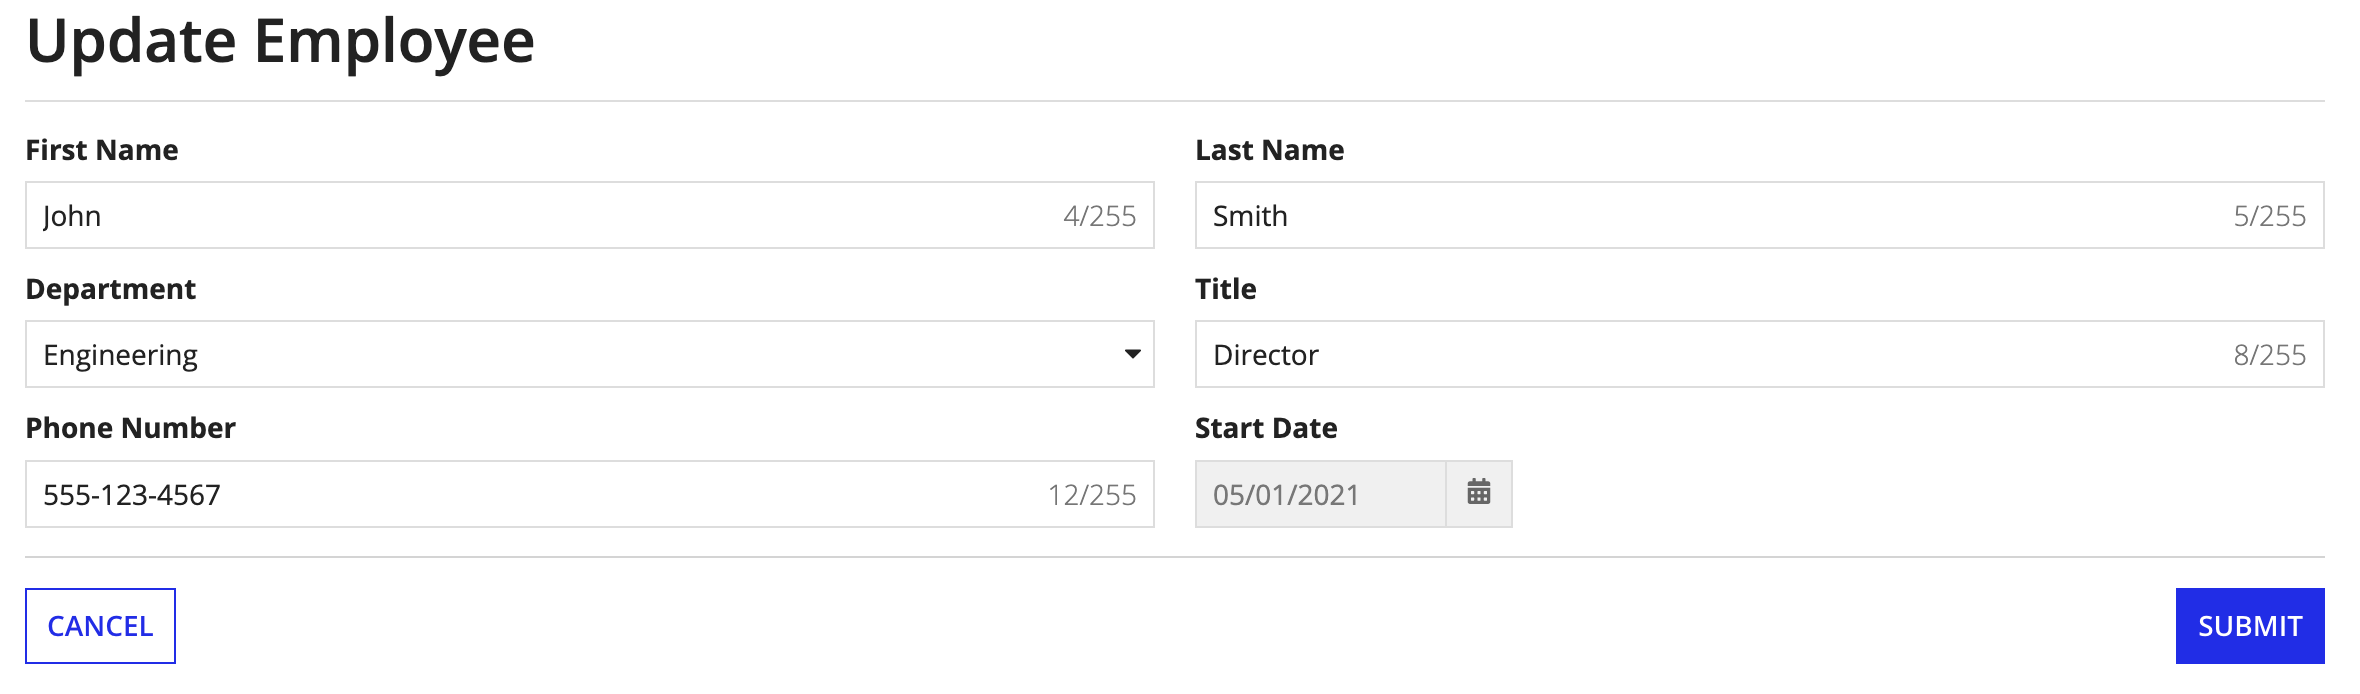
First, we will add an expression in our form label so that it will show "Update Employee" when managers are using the related action, or "Add New Employee" when managers are adding an employee record.
In configure the form label:
Replace the current value with the following expression:
1
if(ri!AT_Employee.id, "Update Employee", "Add New Employee")
This expression says that if the Id rule input field is null, the label will read "Add New Employee". If the Id rule input field is not null, then the label will read "Update Employee".
We'll do something similar for the Start Date field.
When managers are updating the employee information, they won't need to change the start date of the employee since that is a static value. So we'll add an expression using not() and isnull() to make the Start Date field appear as read-only when managers are using the related action, and editable when they are adding a new employee record.
To configure the Start Date field:
Enter the following expression:
1
not(isnull(ri!AT_Employee.id))
The not() function returns either true or false. This means that if the id rule input field is not null, the field is disabled. If the rule input Id field is null, the field is not disabled and you can edit it.
Click SAVE CHANGES.
Now that you have set up your reusable interface, we can move on to creating a process model to update the employee's information.
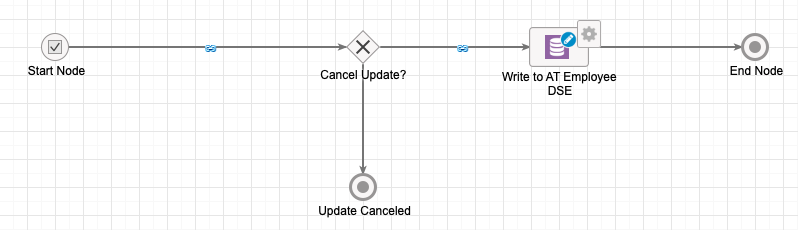
The process model will use our reusable interface as a start form. The workflow will also include a cancel flow to end the process if the user cancels the action, and a write to data store entity smart service to save the updated employee information to our employee DSE. Then, we will add the process model as a related action to our record type and make it available from the Summary view.
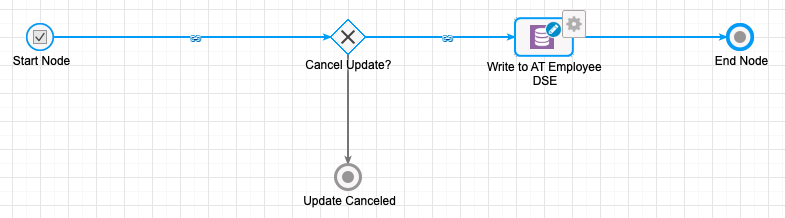
When we are finished, we will have a process model that looks like this:
Tip: If you need more information or if you haven't created a process model before, check out the Process Model Tutorial or Appian Academy online course for help.
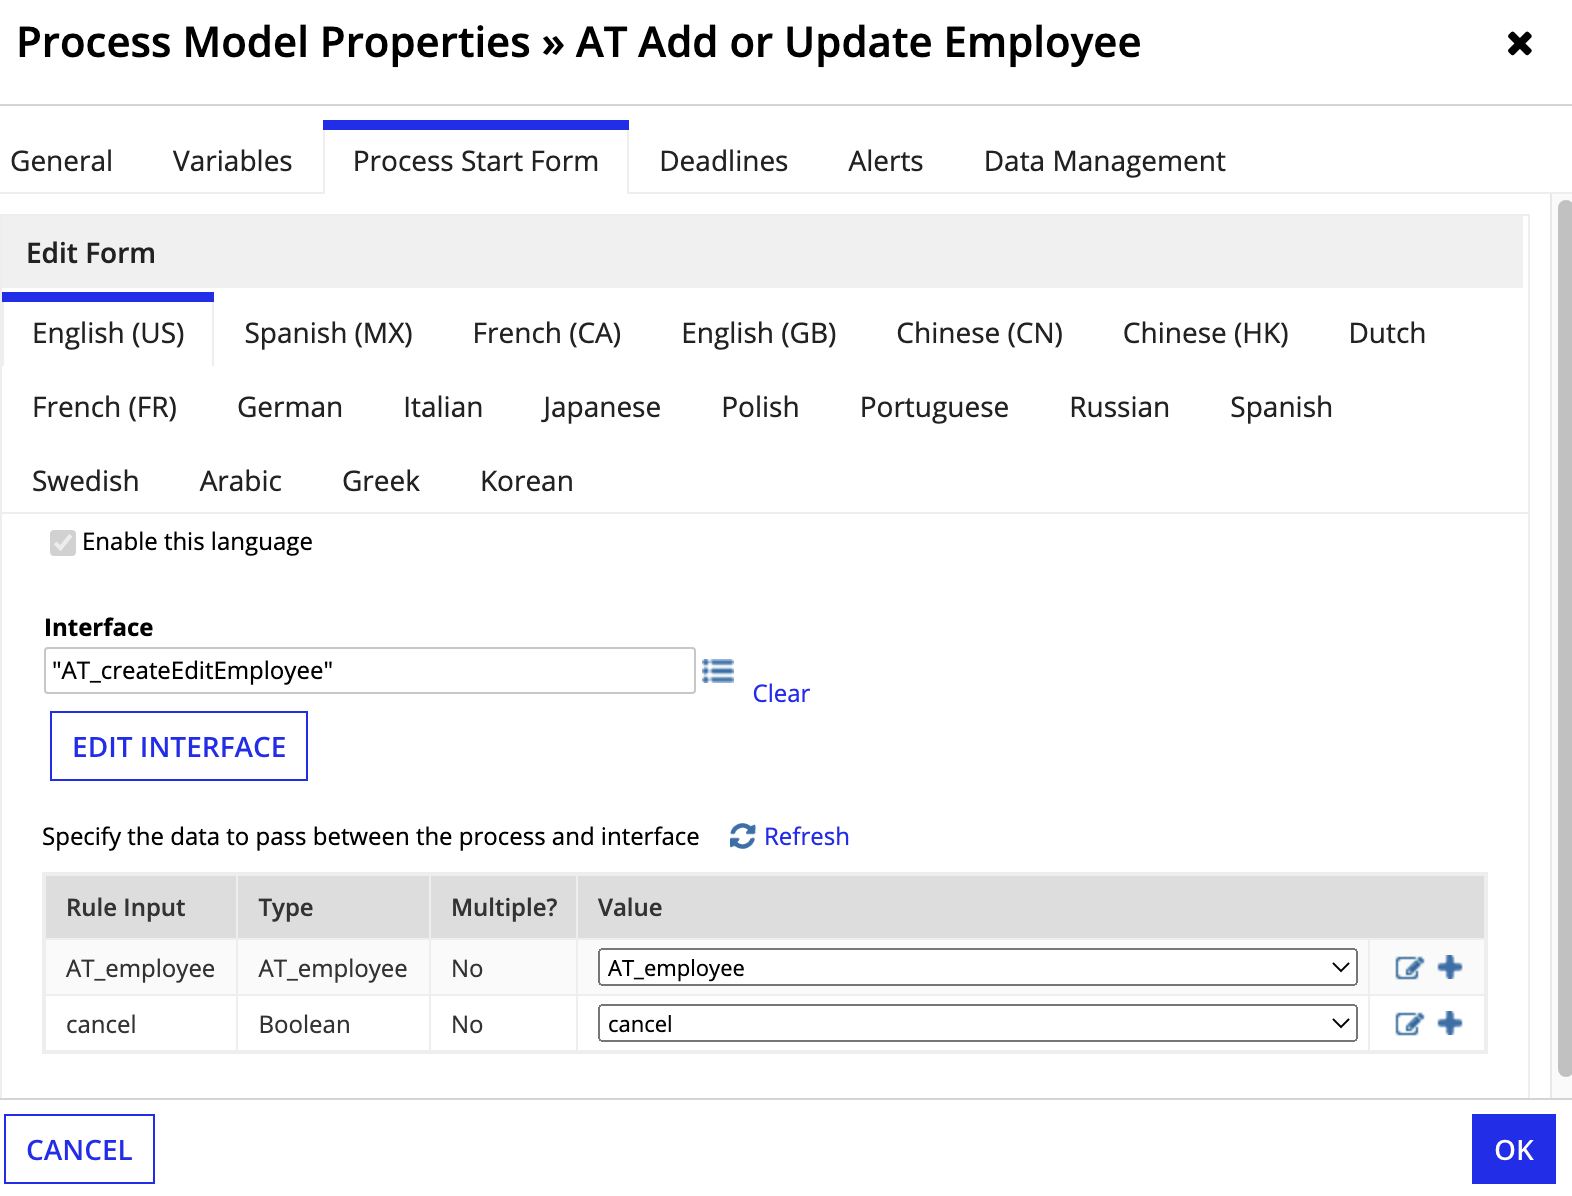
To create a process model and set a start form:
AT Add or Update Employee.AT Models.AT Managers.Once inside the Process Modeler:
AT_createEditEmployeeWhen asked if you want to Create Process Parameters to match your interface's inputs, click YES. This adds the rule inputs from our interface into the process model.
Creating a cancel flow is a best practice because cancel and submit buttons are configured in the same way. This means that without a cancel flow, the information in the form will be submitted and written to the DSE even if the user wanted to cancel the action.
To create a cancel flow:
Update Canceled.Cancel Update?pv!cancel to reference the process variable cancel.For the Else if no rules are TRUE condition, select End Node.
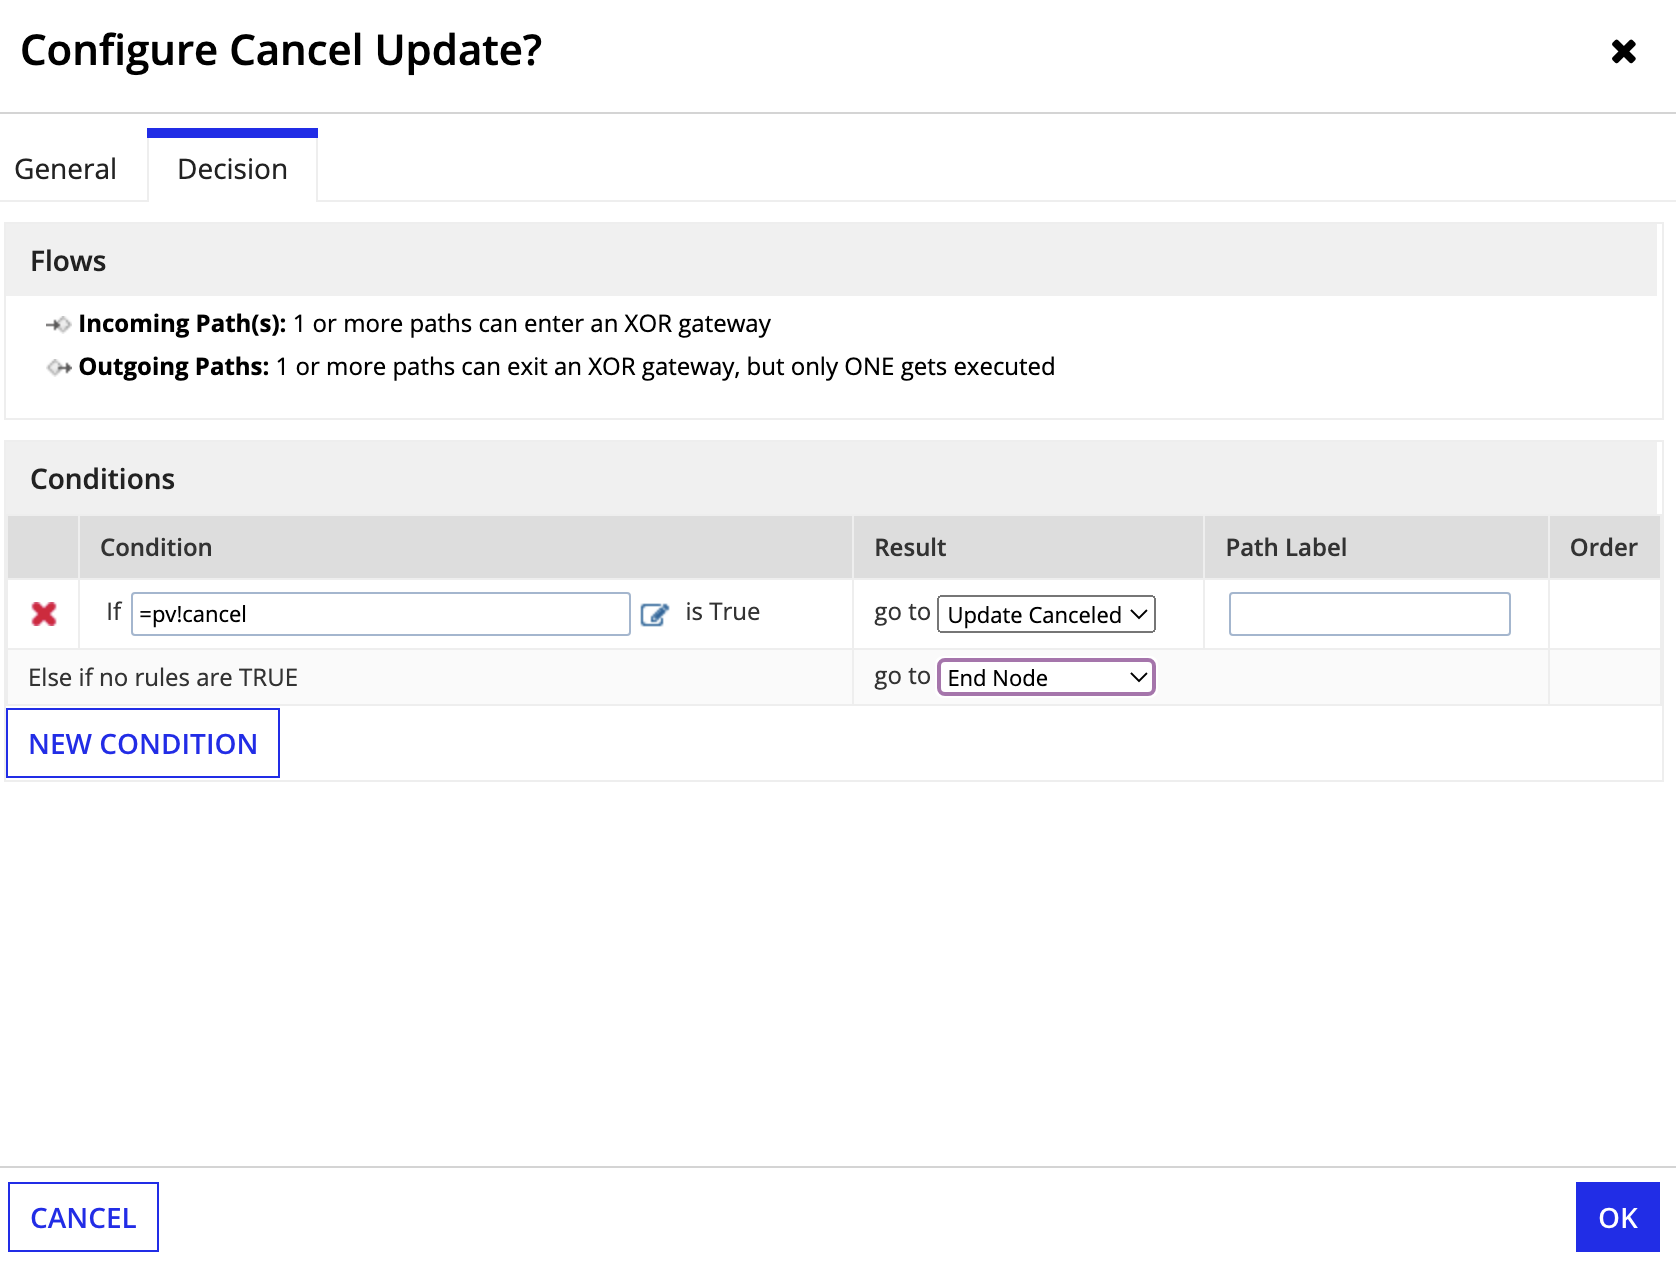
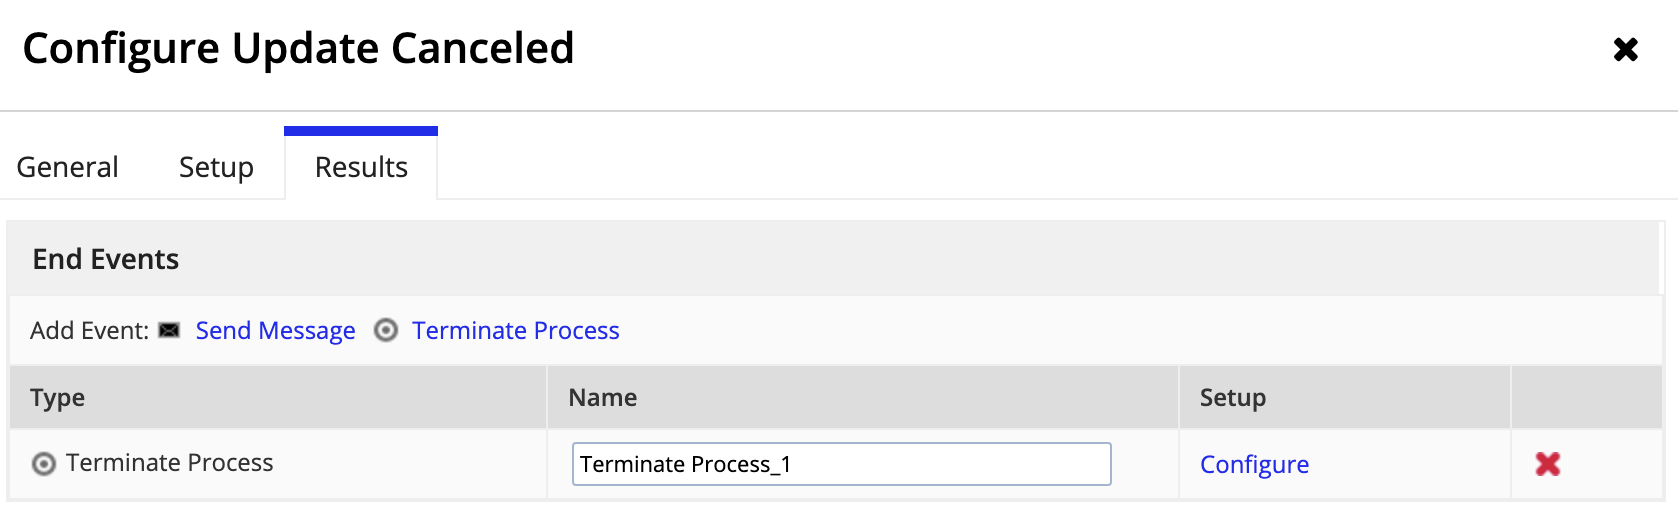
When a process has multiple end nodes, the different branches of a process remain active until each active path reaches one of the multiple end nodes. To stop all branches of a process, even those that have not yet reached an end node, you can add a Terminate Process event to each end node.
To add a terminate process event:
Click the Terminate Process link. A Terminate Process row is added to the End Events list.
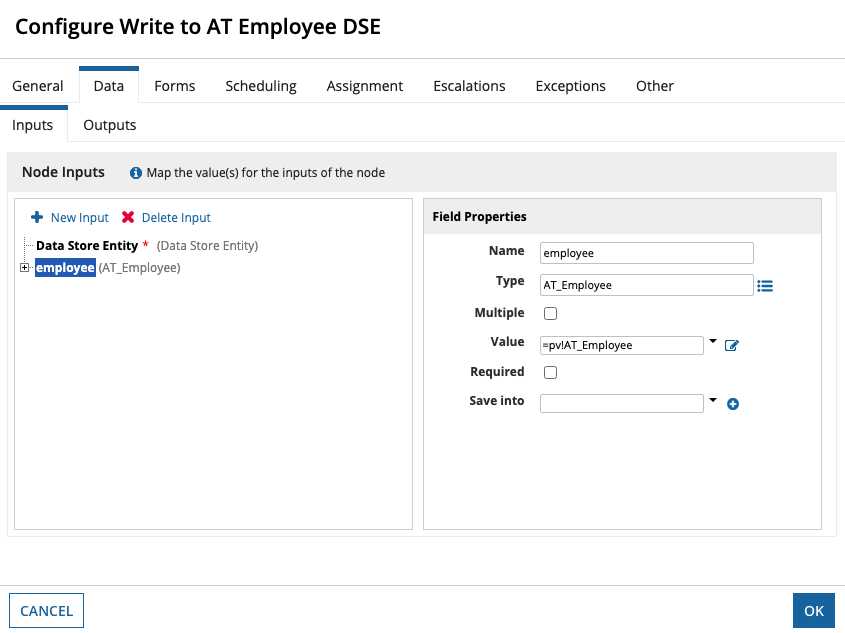
To add our data in the first few steps in this tutorial, we used the Write to Data Store Entity smart service as a function in an interface. Here, we are using the same Write to Data Store Entity smart service as a node in the process model to save our data to the DSE from the start form.
To add and configure a Write to Data Store Entity smart service node:
Write to AT Employee DSE.employee.For Value, select pv!AT_Employee.
Now that we have our process model almost complete, we are going to add activity chaining.
Activity chaining allows the process to move quicker between nodes by chaining them together. We are going to add activity chaining between the start form and the Write to Data Store Entity node so that after updating the employee information on the Summary view, the fields will be updated without having to refresh the page.
Tip: Activity chaining is usually used between multiple user input tasks and between user input tasks and write to data store entity nodes. Overusing activity chaining outside of these cases could slow down process performance.
To add activity chaining:
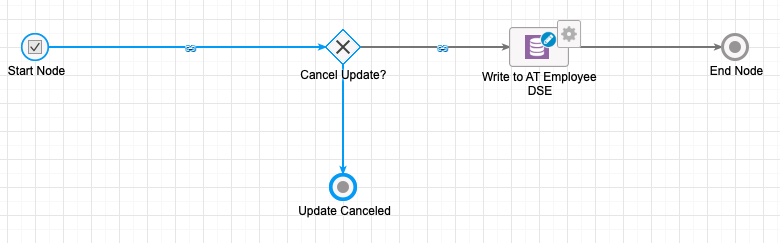
You are now ready to save, publish, and test your process model.
To save and test your process:
Click the Refresh icon in the process model toolbar to see each step of the process model complete.
Click CANCEL on the form. The Monitoring view of the process appears.
Now that we have the interface and process model working, we will return to the record type to set up the related action.
To add your process model as a related action:
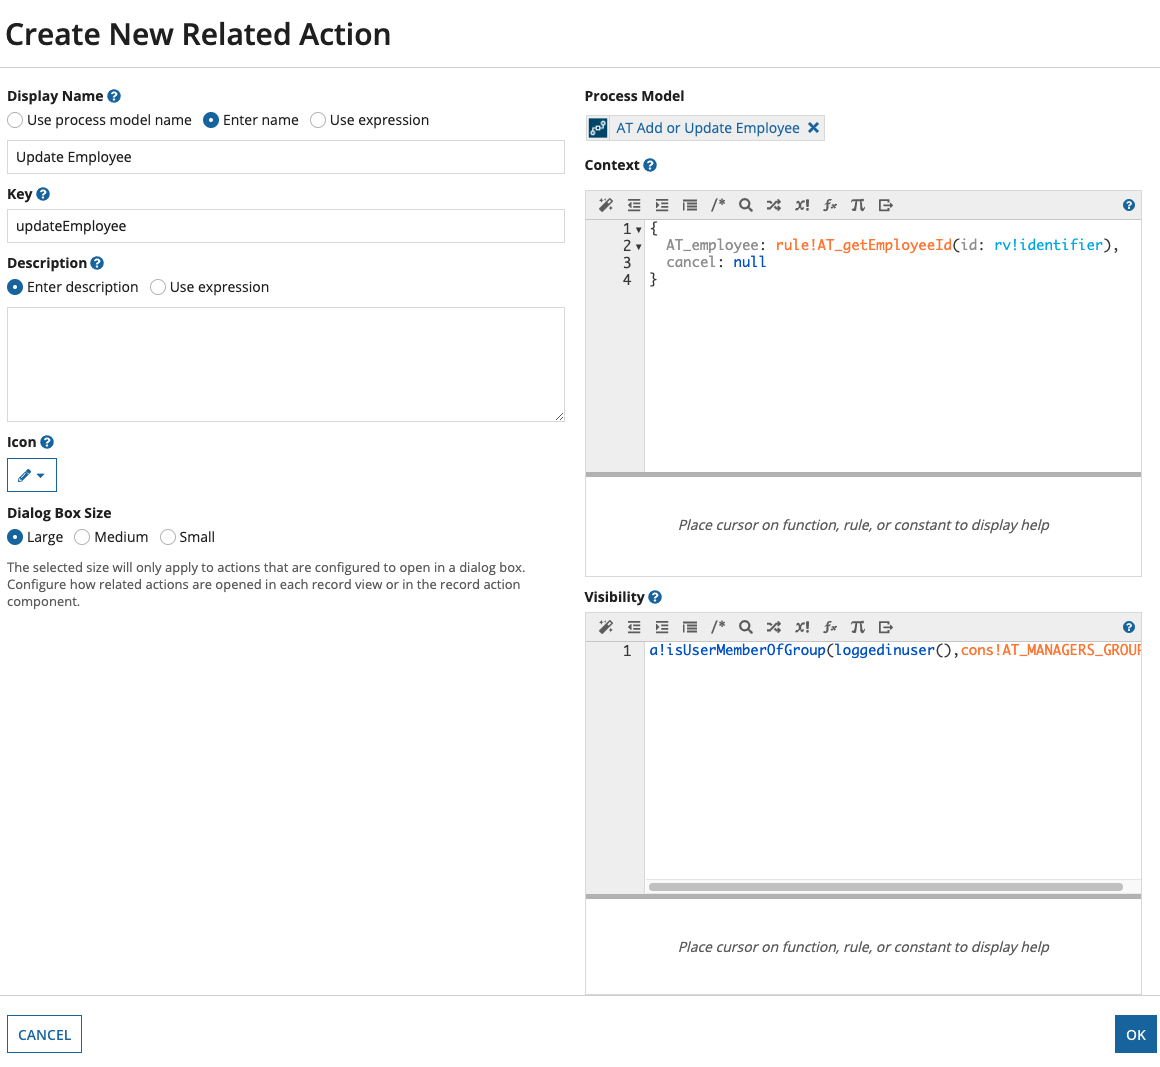
Update Employee.pencil icon.AT Add or Update Employee. The process parameters will automatically populate in the Context expression editor.rule!AT_getEmployeeById(id: rv!identifier) in place of null.null.Since we don't want everyone to be able to update the employee information, we are going to make sure that only those in the manager group are able to access this related action. To only allow the managers group to view the action, we'll create a constant to point to that group and use that in our visibility expression.
To set visibility for the related action:
AT_MANAGERS_GROUP.AT Managers group.Appian Tutorial.AT Rules & Constants.In the Visibility expression field, replace the existing expression with the following expression:
a!isUserMemberOfGroup(loggedinuser(),cons!AT_MANAGERS_GROUP)
The combination of these two functions with the group constant checks to make sure that the logged in user that is trying to access the related action is a member of the managers group.
The fully configured related action will look like this:
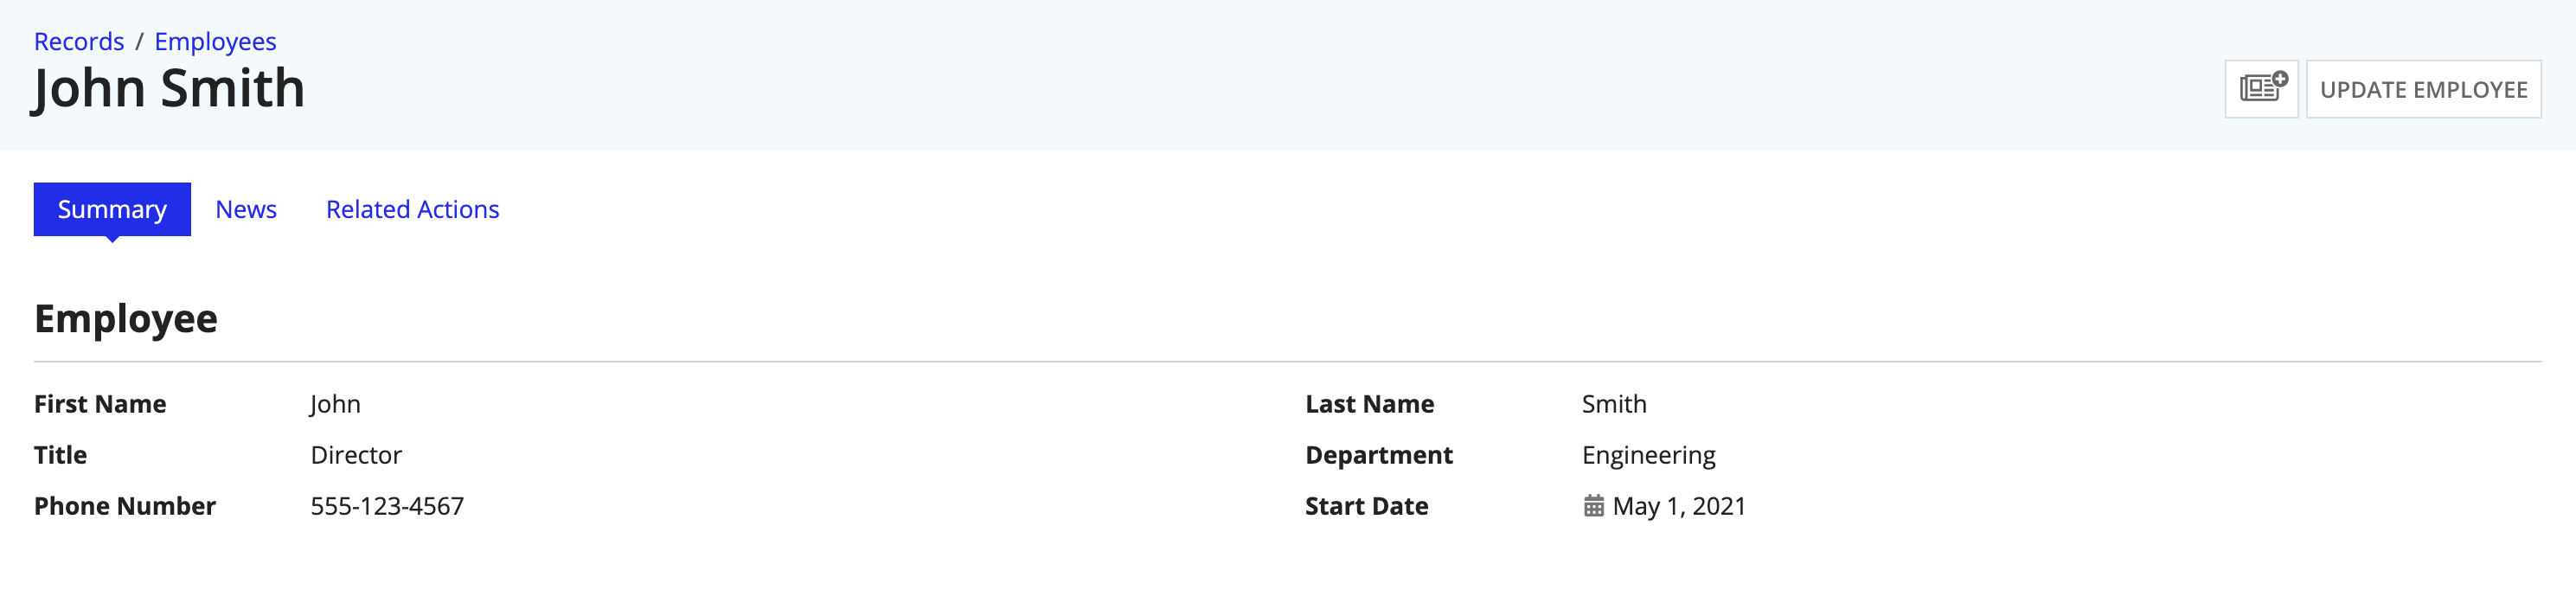
Now we will add our related action to the Summary view so that users can update employee information while viewing the employee summary.
To add the related action to the Summary view:
From the record list, select an employee to view their Summary view.
You have successfully completed all the steps to create a record type! The next step is optional and it walks you through how to add a record list action to your record type.
This step will show you how to connect a process model to your record type as a record list action. Record list actions are used to create new records and are accessible from the record list.
We will use the process model that we just created for our related action as our list action. We can use this process model to add new employees because the reusable AT_createEditEmployee interface is our start form. The interface will evaluate whether or not there is an existing record and determine if the process needs to update a record or add a new one to the employee record type.
To add a record list action:
New Employee.plus icon.AT Add or Update Employee.For Visibility, replace the existing expression with the following:
a!isUserMemberOfGroup(loggedinuser(),cons!AT_MANAGERS_GROUP)
To preview the record list action, go to List in the record type and open the link under URL. The record list will open in Tempo.
You did it! You made it through all of the parts and steps to successfully create a fully functioning record type with a Summary view, record actions, and a user filter. You are now ready to create record types that enable your own unique business data to do more all on your own!
