To view and configure application-level settings, open the settings menu in the application header bar.
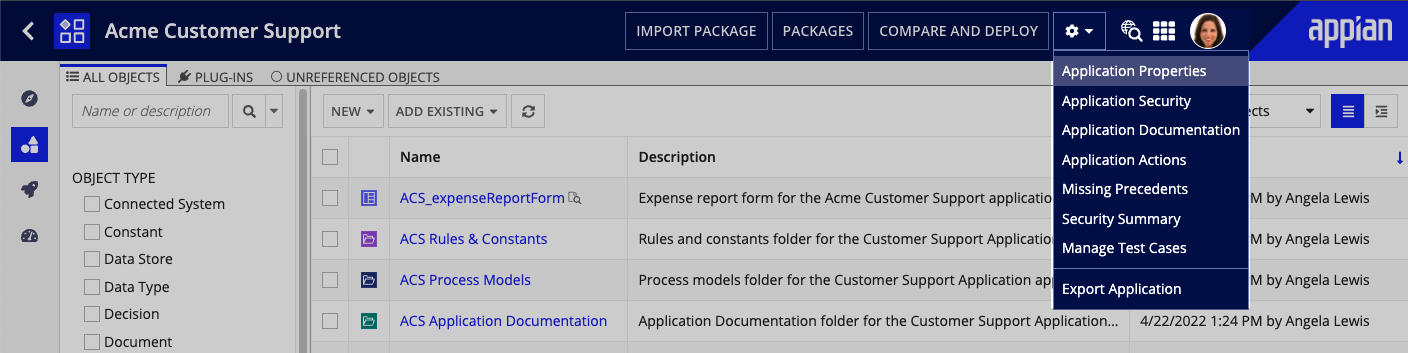

This menu allows you to:
Note: To configure a post-deployment process for the application, go to the Deploy view.
To configure properties for the application, select Application Properties in the settings menu .
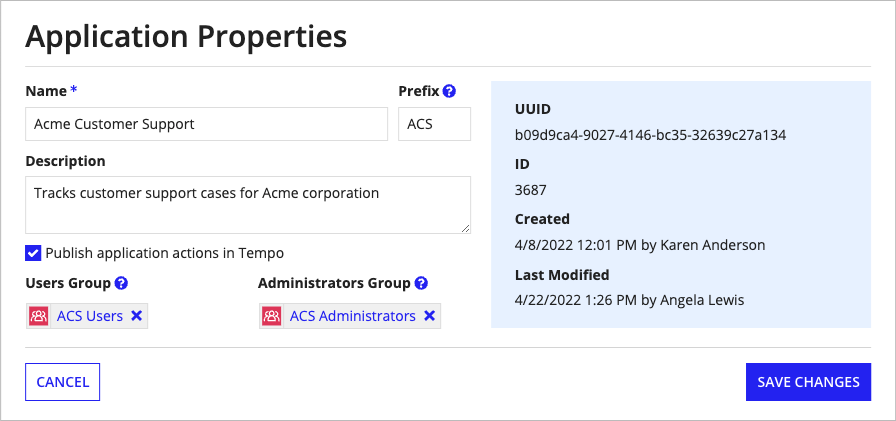
These properties include the following:
| Property | Description | Can Be Edited |
|---|---|---|
| Name | The name of the application. Follow the recommended naming standard when creating this name. The maximum length of the name is 255 characters. When the application is published, this name is visible to users in Tempo in the Actions tab and from the user profile menu under Settings > News. | Yes |
| Prefix | The short, unique prefix recommended for use in all object names related to the application. Follow the recommended naming standard when creating this name. For more information, see Creating Applications. | Yes |
| Description | The maximum length of the description is 2,000 characters. Application descriptions are not visible to users in Tempo. | Yes |
| Publish application actions in Tempo | Specifies whether to show or hide application features, including application actions, in Tempo. If this property is selected, the application will appear as a filter under Applications on the Actions tab of Tempo. This property is not selected by default. Selecting this option has no effect on actions used in sites or embedded interfaces. | Yes |
| Users Group | The group that Appian pre-populates with Viewer permissions when you create new objects in this application. Learn more about default security groups. If you change this property after creating objects in an application, you cannot bulk update existing role maps with the new group. You must manually configure the role map for each existing object. |
Yes |
| Administrators Group | The group that Appian pre-populates with Administrator permissions when you create new objects in this application. Learn more about default security groups. If you change this property after creating objects in an application, you cannot bulk update existing role maps with the new group. You must manually configure the role map for each existing object. |
Yes |
| UUID | The unique universal identifier (UUID) of the application. This value is generated by the system. | No |
| ID | The ID of the application. This value is generated by the system. | No |
| Created | The date on which the application was created. | No |
| Last Modified | The date on which the application was last modified. Updating the objects associated with an application does not change this timestamp, though adding or removing objects does. | No |
Note: Users must have at least Viewer permissions to a published application in order to view its feeds and actions.
Application security determines which users can view and interact with the application and its contents.
If Appian generates groups during application creation, the default security groups pre-populate the application role map with Viewer and Administrator permissions.
If Appian does not generate groups during application creation, you are automatically assigned Administrator permissions for any application you create. System administrators can always access an application, regardless of application-level permissions.
See Editing Object Security to modify an application's security.
The following table outlines the actions that can be completed for each permission level in an application's security role map:
| Actions | Administrator | Editor | Viewer | Deny |
|---|---|---|---|---|
| See application feeds or actions in Tempo | Yes | Yes | Yes | No |
| Export the application | Yes | Yes | Yes | No |
| View and filter missing precedents | Yes | Yes | Yes | No |
| View application properties and contents | Yes | Yes | Yes | No |
| Create packages | Yes | Yes | Yes | No |
| Edit package details | Yes | Yes | Yes* | No |
| View package contents | Yes | Yes | Yes | No |
| Update package contents | Yes | Yes | Yes* | No |
| Delete packages | Yes | Yes | Yes* | No |
| Export a package | Yes | Yes | Yes | No |
| Import a package | Yes | Yes | No | No |
| Update filters in missing precedents | Yes | Yes | No | No |
| Update application properties and contents | Yes | Yes | No | No |
| Update application properties and contents via import | Yes | Yes | No | No |
| View application security | Yes | Yes | No | No |
| Delete the application | Yes | Yes | No | No |
| Update application security | Yes | No | No | No |
| Update application security via import | Yes | No | No | No |
*Only applicable to packages created by the user
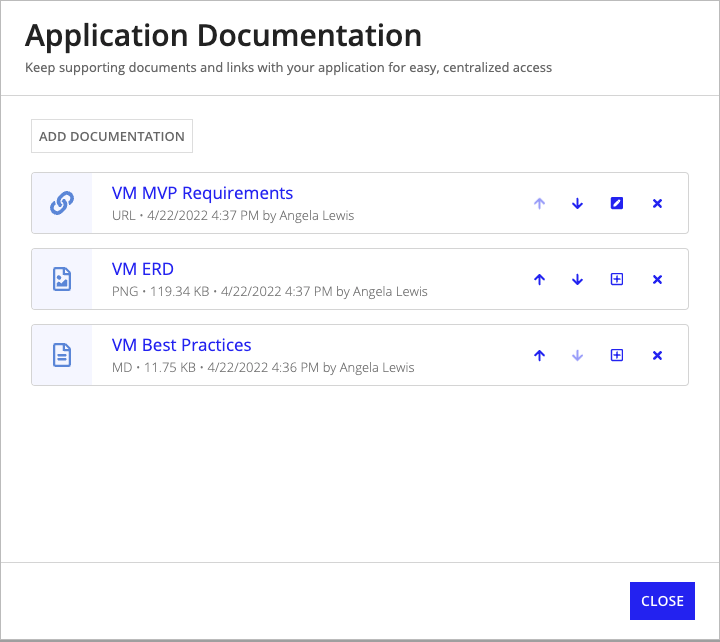
As you're developing an application, you naturally create documentation that supports the application. For example, you might document the application's architecture and design, the project's requirements, and development best practices. This documentation lets your teams:
In Appian, the Application Documentation feature gives your teams a central place to access this documentation in the application itself. The Application Documentation dialog allows you to upload documents to your application or store links to external documents. You can add a maximum of 10 total documents or links.
Security to the Application Documentation dialog matches the application's security. Users with Viewer permissions to the application can view the documentation list and download documents. Users with Editor or Administrator permissions to the application can view and edit the documentation list, and download documents.
When you upload a document to Application Documentation, Appian stores it as a document object. You can modify this document, and refer to it in your applications in the same way as you can with all document objects. Similarly, the document's security will be inherited from its parent folder. You can manage your newly uploaded document directly from within the Application Documentation dialog or in the objects grid of the Build view.
You can include application documentation in any package you deploy to a new environment. If you do, document objects defined as application documentation will be included in the missing precedents analysis for the package. Learn how to include application documentation in your package.
In the Explore view, you can view your application documentation in the Learn More pane.
In any view of your application, you can view your application documentation by opening the settings menu , then selecting Application Documentation.
In the Application Documentation dialog, you can add existing document objects as documentation, or you can create new document objects, then add them as documentation.
To add a document to Application Documentation:
Tip: If Appian generated groups and folders during application creation, you can skip this step and use the generated Document folder named prefix Application Documentation to store your application documentation.
Tip: If you select the wrong file, you can remove that file by hovering over it, then clicking the X that appears.
In addition to documents, you can also add relevant links in the Application Documentation dialog. For example, if your application work is being tracked in JIRA, you could include a link to the JIRA board so application builders can see new and completed work.
To add a link to Application Documentation:
Tip: When selecting a documentation link, keep in mind any permissions or access issues that might block future users when the application is deployed to new environments.
To update a document in Application Documentation:
To update a link in Application Documentation:
To manage your documentation list in the Application Documentation dialog:
Note: Removing a document from the documentation list doesn't remove the document object from the application or delete the object itself. You must remove the document from the documentation list, then remove or delete the object from the application.
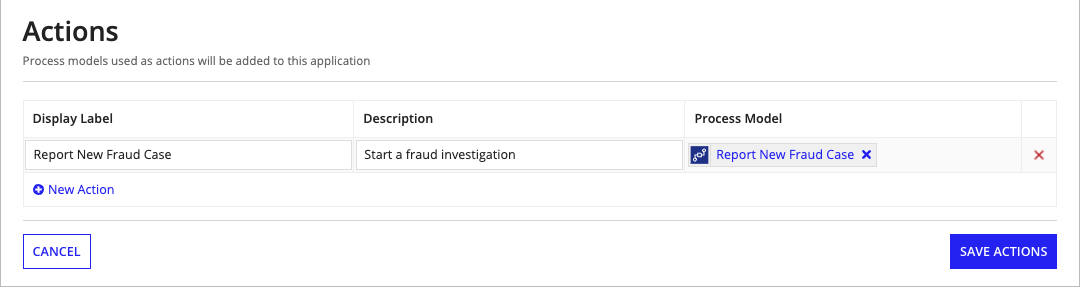
Application actions allow you to expose process models in end user interfaces. You can use application actions in Tempo, or as a page in a site.
Tip: You can also create record actions to expose process models to users in your reports, interfaces, and records. This allows you to add multiple actions on a single interface, and allows users to start actions from the context of their data. Learn how easy it is to create a record action.
Application actions only appear in Tempo if the Publish application actions in Tempo property is enabled.
To view application actions, users must have at least View access to the application.
Application actions are visible under the Actions tab of Tempo and allow users to start process models related to your application. For example, in a Vehicle Management application, you may have an application action called Loan Vehicle which kicks off a process model with a start form that allows users to start the loaning process. Application actions will always appear in alphabetical order in Tempo.
To create an application action:
Create a process model that contains either a start form, user input task, or some other attended node that allows a user to interact with the process.
Note: Make sure to set appropriate security on your process model so that users will be able to start it. Appian recommends adding an Administrator group and at least one Initiator, Viewer, Manager or Editor group to the process model's security dialog.
Configure the following properties:
| Property | Description |
|---|---|
| Display Label | The name of the action as it should appear in Tempo. |
| Description | The description of the action as it should appear in Tempo. |
| Process Model | Select the process model you created earlier. |
For example:
Tip: You can also create an application action in an interface.
A precedent is any object that a design object or application configuration relies on to function properly. For deployment to another environment to be successful, all object or configuration precedents must either be exported with the application, or already be present on the target environment.
The Missing Precedents dialog allows you to scan the application for referenced objects that are used by the application, but not associated with the application. An initial scan is performed when the dialog is first opened. From the list of missing precedents, developers can add objects to the application, and run another scan. The Referenced By column in the grid displays the object or objects that require each of the missing precedents, so that developers can tell why the missing precedent appears on the list.
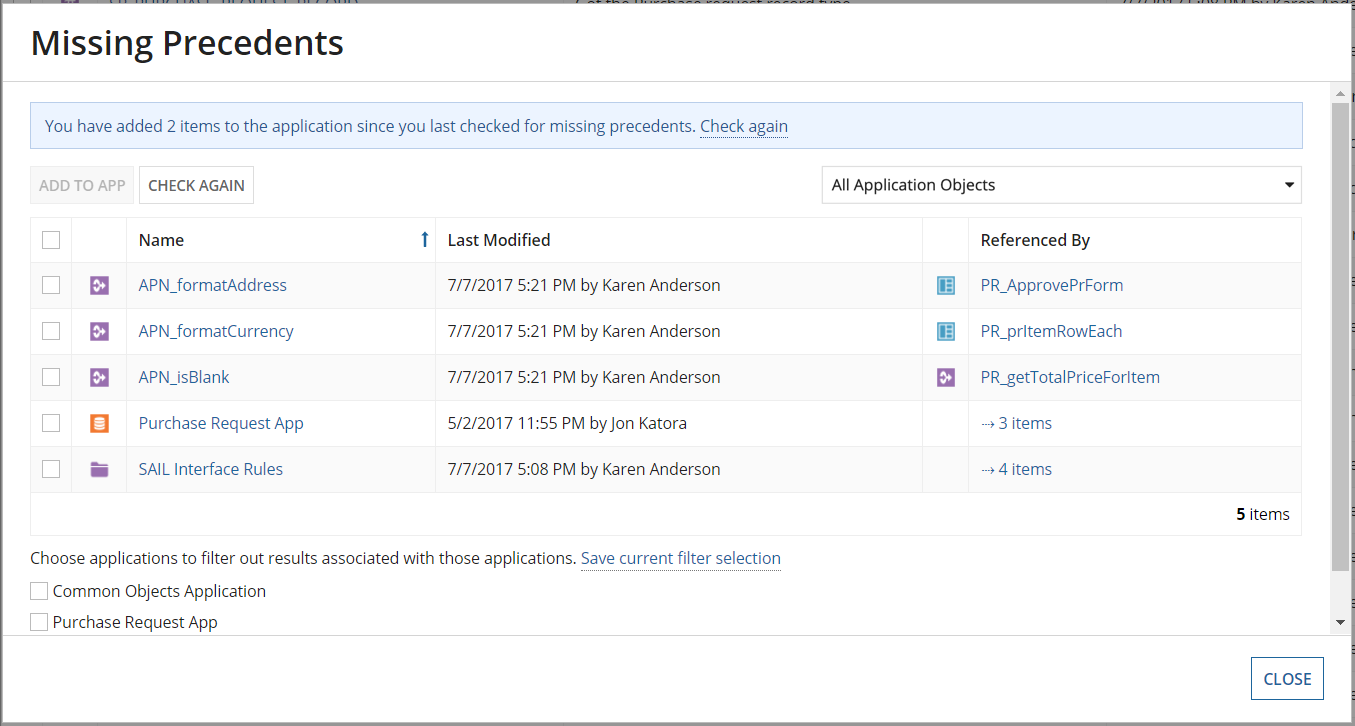
When in a package view, the option to check for missing precedents in the settings menu will automatically be limited to missing precedents of your package.
Not all missing precedents need to be added to the application or package. Objects in related applications are deployed with those applications, and do not need to be added even though they are precedents of objects in this application.
To narrow the list to only precedents that need to be added, use the filter options below the grid:
Below the grid, click Hide missing precedents in selected applications.
Note: If none of the missing precedents in the list are associated with any other application, this link is not present.
A list of applications displays. This list includes all the applications to which one or more of the missing precedents belong.
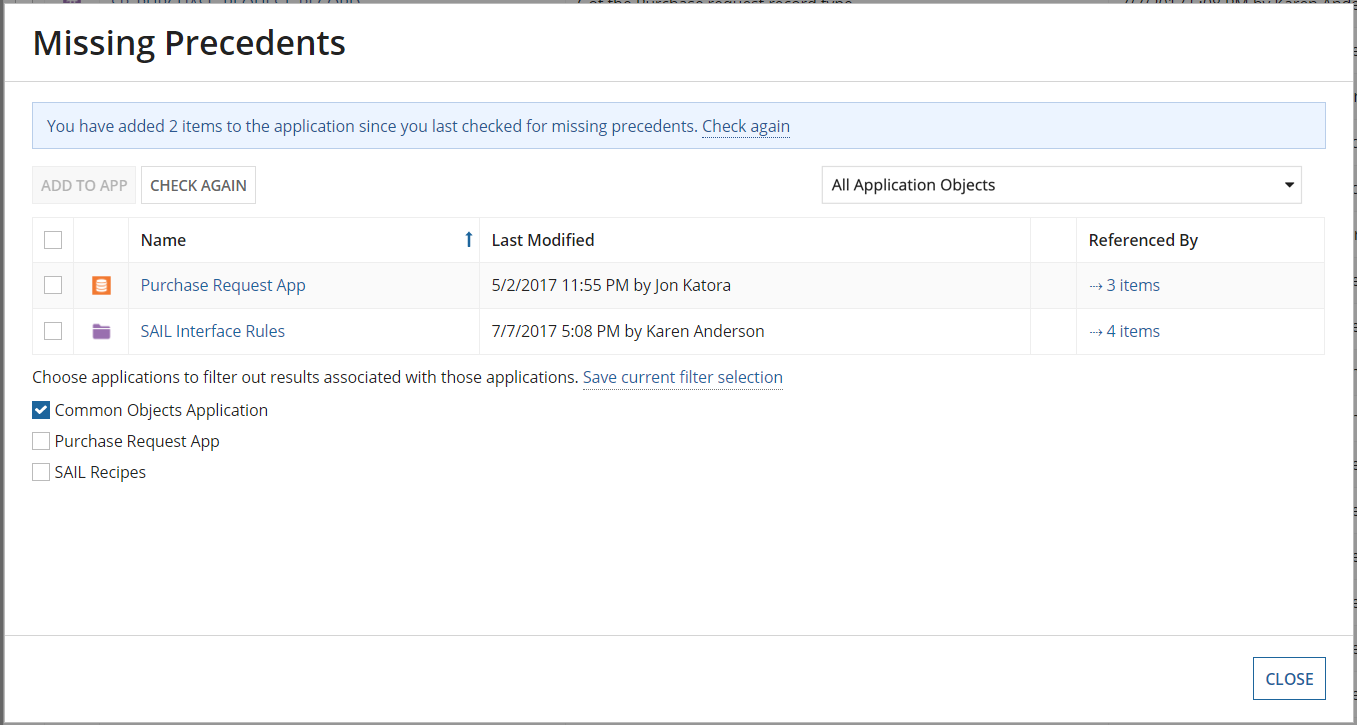
Only save a filter option when the corresponding application will be kept up to date in all environments. For example, any missing precedents from your Common Objects Application should not be added to this application, as the Common Objects Application is intended as a library that other applications can use. Saving that application as a missing precedents filter ensures that you do not accidentally add its objects to your applications.
Selecting all the applications in the list shows only missing precedents that are in no applications. These should always be added to your application, or moved to another application. Setting up these filters correctly allows a developer to confidently add all remaining missing precedents to the application.
The following items are not identified as missing precedents during a scan of your application. Make sure to add these manually.
The Security Summary allows you to view the security of all objects within an application in a single place. It also allows you to edit the security of objects in bulk. Learn more about the Security Summary.
In the application, you can manage your test cases by clicking the Settings > Manage Test Cases. The Manage Test Cases dialog allows you to view the overall health of unit tests for all expression rules within your application. You can check for which rules do not have test coverage and run the test cases and review results for any number of expression rules in one place. Learn more about test case management.
To export your application, select EXPORT APPLICATION from the settings menu .
Learn more about manual export.
