The Delete Records smart service is a powerful tool that allows you to easily delete data from the source system and then automatically sync the changes in Appian. The service lets you delete one or more records at a time per node.
To use this smart service, the record type you want to affect must meet the following conditions:
Related records can also be deleted when you delete a base record. See the specific usage considerations for deleting related records.
The user executing this activity must have Viewer permissions for the selected record type in order to delete information. If the user does not, the node will fail and pause the process with an exception.
Note: Since the Delete Records Smart Service works directly with your record type's source, read the recommendations in Data Modeling with Appian Records before implementing this smart service.
This section contains configuration details specific to this smart service. For more information about common configurations, see the Process Node Properties page.
| Name | Data Type | Description | Required | Multiple |
|---|---|---|---|---|
| Records | List of Any Type | A list of records to be deleted identified by their primary key. The smart service can delete 50,000 records per node. This limit includes the base records and any related records affected by the delete operation. | Yes | Yes |
| Pause On Error | Boolean | Determines whether the node should pause by exception if an error occurs deleting data in the source. Default: true. |
No | No |
See also: Record Type
| Name | Data Type | Description |
|---|---|---|
| Count of Records Deleted | Number (Integer) | The number of base records deleted from the source |
| Error Occurred | Boolean | Returns true if any write to the source system or Appian fails; returns false if all writes succeed |
| Errors | List of Any Type | The error that occurred when writing the records and the list of records that failed to write. This is only returned when the Pause On Error input is false. |
This smart service can be used to power a related action that lets the user review some data and then confirm that it should be deleted. This can be done with a simple process model like the one shown in the following example.


To perform the delete operation, you'll need to pass data from the start form interface to the process model. First, you should create a process variable that will take the record data from your interface and move it through the process. Since this is a related action, the variable will also be used in the following places:
The interface needs a rule input that uses the same record type as its data type. When the user submits the form, the data saved to rule input will include the primary key of any base records to be deleted.
See Hard delete a record using a process model for an example. Learn more about passing data between objects on our YouTube channel.
Tip: For faster configuration, Appian can automatically generate a Delete record action.
The Delete Records smart service permanently removes data from the source (that is, it performs a hard deletion). If your app or database design requires data to be soft deleted for auditing or to maintain referential integrity, you can use the Write Records smart service to mark a record as deleted according to your schema. For example, your data source may have a field like isDeleted or deletedTime. You could configure a source filter so rows that are marked as deleted are no longer synced in Appian.
You can use a single Delete Records smart service to delete a record and its related records at the same time, or you can use multiple Delete Records smart services to delete records from different record types in a sequence.
When you delete records in a base record type, related records from a one-to-many or one-to-one relationship to the base are also deleted.
For Appian to delete data for a base record and related records, the following conditions must be met:
The Delete Records node executes all of the deletes as a single transaction. This ensures that either all of the input data is deleted or none of the data is deleted. This helps avoid incomplete deletes (such as where an Order is written, but an Order Line Item is not).
The smart service takes one of two actions depending on how the record type relationship is configured.
| Configuration option | Delete behavior |
|---|---|
| Allow writing or deleting | Related records are deleted from the data source. |
| Do not allow writing or deleting | The related record's foreign key field referencing the base record is set to null. |
If foreign keys are used in your source table, you should ensure the correct delete behavior is set for the foreign key constraint.
| Configuration option | Delete behavior setting |
|---|---|
| Allow writing or deleting | CASCADE |
| Do not allow writing or deleting | SET NULL |
If the record types do not share a single source schema or database, the smart service deletes the base record and makes no change to the related record.
If you want to delete records one record type at a time, you can delete related records and the base record in separate Delete Records nodes. For example, you may have a Customer record type that has a one-to-many relationship with a Payment Type record type storing credit card data. If you delete a customer record, you also want to delete any payment data associated with the customer. A process model of this workflow would look similar to the following example:

The Delete Records smart service is available as an expression function that can be executed inside a saveInto on a Interface Component or as part of a Web API. When creating a web API, select the Delete Records template to generate the object with this function automatically configured.
a!deleteRecords( records, onSuccess, onError )
| Keyword | Type | Description |
|---|---|---|
|
|
Any Type |
A list of records to be deleted (up to a maximum of 1,000 records). Each item in the list must include the primary key for the record. Use the |
|
|
Any Type |
A list of saves or an HTTP response to execute after the smart service successfully deletes rows. Created with |
|
|
Any Type |
A list of saves or an HTTP response to execute when the smart service fails to delete records. Created with |
When you use this smart service on a record view, the view will automatically refresh with the latest record data.
This means that when your record view interface has a Record Action component that triggers the Delete Records smart service, or a button component that triggers the a!deleteRecords() function, the record view data will automatically refresh after the delete occurs.
This refresh behavior only applies to data supplied by rv!record. If your record view definition uses rv!identifier or a local variable to supply the record data, the data will not automatically refresh; instead, you will need to configure additional refresh behavior.
This section explains some of the common reasons the Delete Records smart service might fail.
Configuration errors can occur when the node setup or inputs are misconfigured and attempts to write to the source cannot succeed. Some examples of misconfiguration include:
a!deleteRecords() function.Appian is unable to change data in the source in some circumstances. These situations include:
If Appian is unable to write to the database, the record data will still remain available even if the smart service fails.
When Appian attempts to sync changes to the source data, the sync will fail when one of the following occurs:
If Appian is unable to sync changes from the source, the record data will be unavailable. For more information on the different types of sync errors and steps to resolve these errors, see Troubleshooting Syncs.
The following examples show the different ways you can use the a!deleteRecords() function to delete your record data.
The following example data is from the Appian Retail application, available for free in Appian Community Edition. To try the example code yourself, sign in to Appian Community to request the latest Appian Community Edition site.
Goal: Use the Delete Records smart service to permanently delete a record.
Sometimes data is created by mistake or your business could be required to delete information on customer request. Users will need the ability to remove record data from your application in those types of situations.
Tip: For faster configuration, you can automatically generate a Delete record action. The generated process model for these actions will use the Delete Records smart service to delete the selected record.
Example
Imagine you need to remove an Employee from the Appian Retail application. You can let users delete record data using a related action connected to a process model. Set a process variable using the record type as the data type to pass the user's selection to the Delete Records smart service.
record and set the type to the Employee record type. This will allow you to pass employee data to the process model.Create a new process model and configure the process model properties to use the new form and pass record data:
record.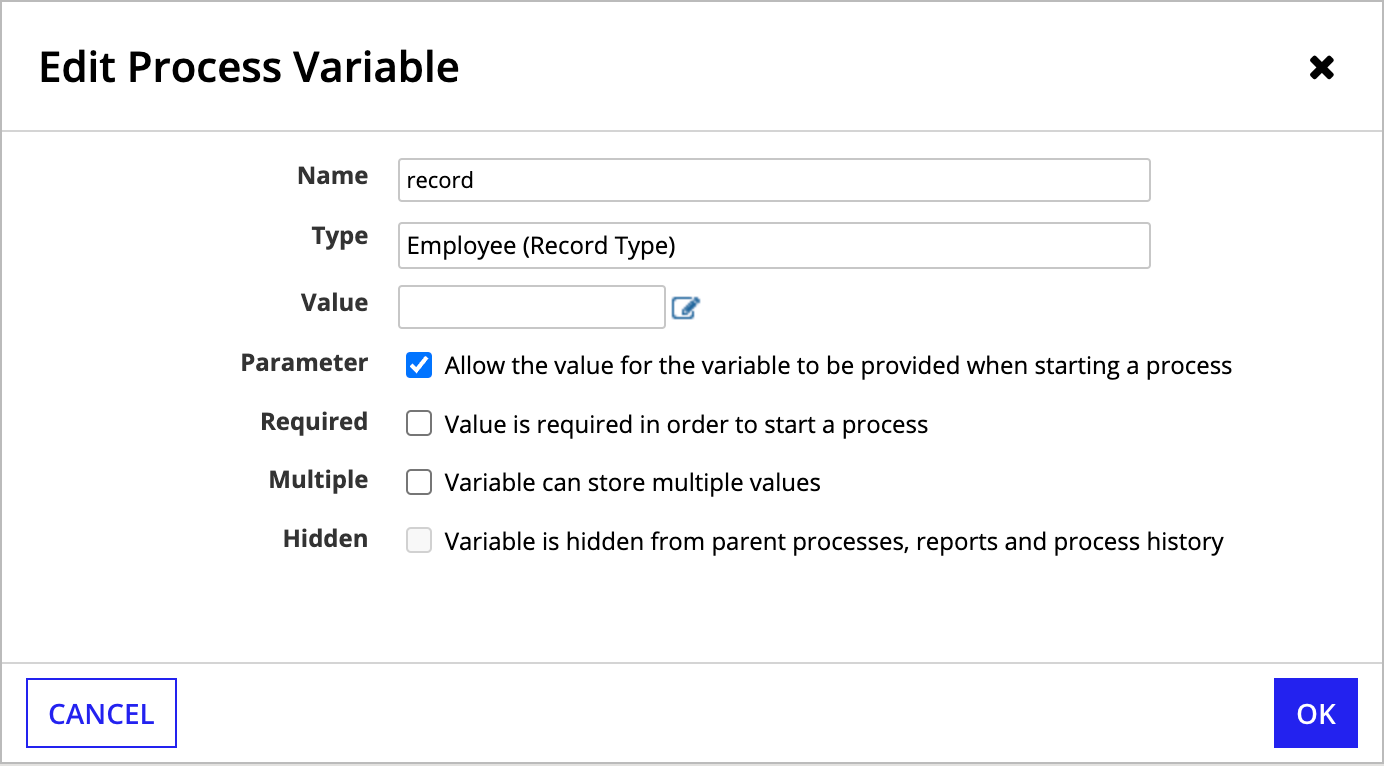
record process variable to the record rule input from the interface.For the Records input, set the record process variable as the Value.

Save and publish the process model.

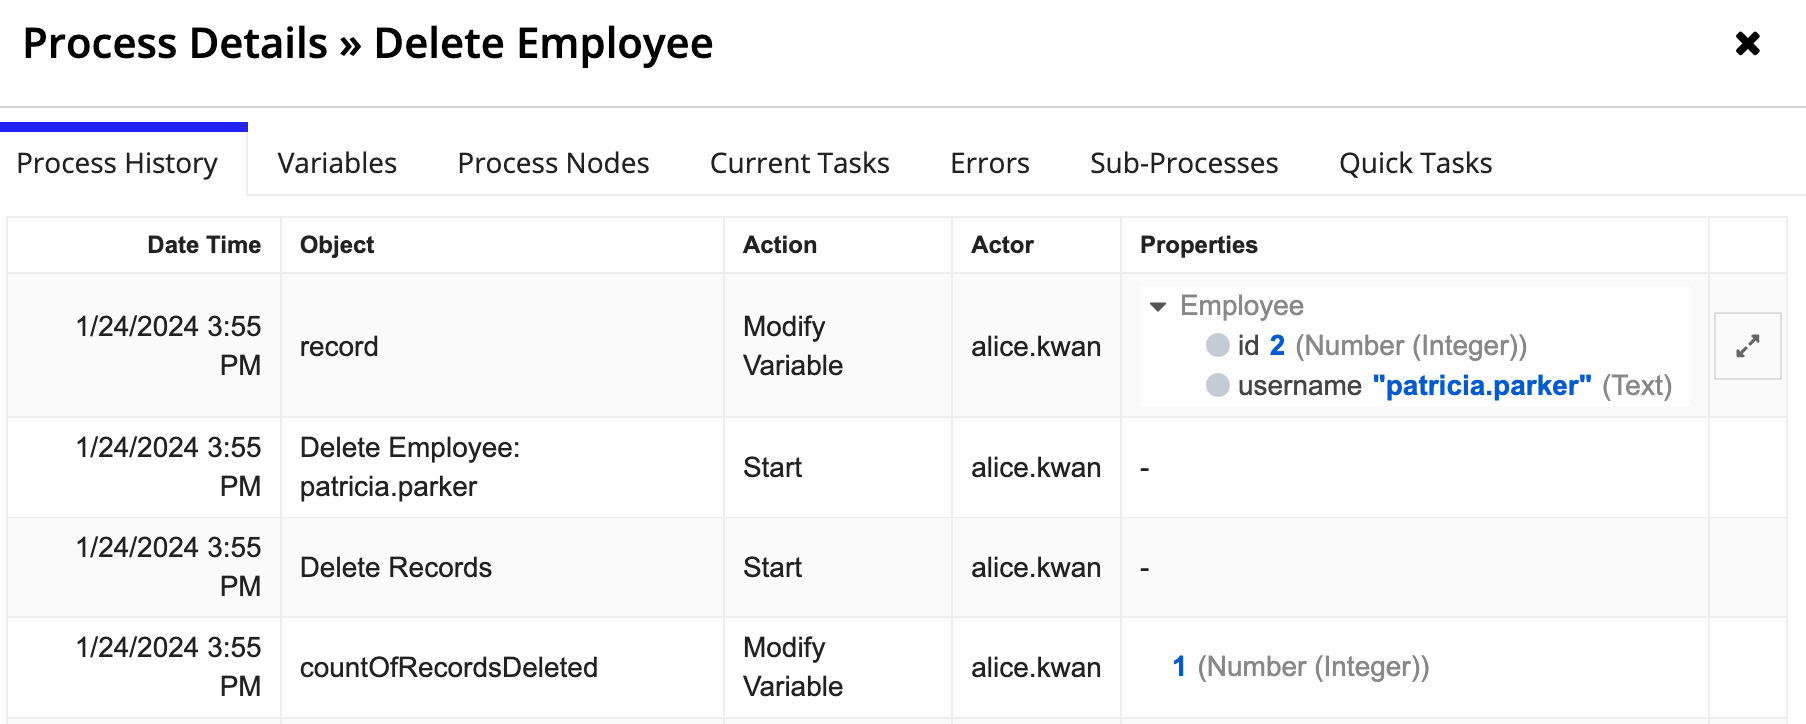
The process node examines the primary key field (in this case, the id field) and deletes that record from the source.
Goal: Use the Delete Records smart service to permanently delete a record and its related records.
Sometimes data is created by mistake or your business could be required to delete information on customer request. When the data in question is modeled with a record type and related record types, users will need the ability to remove record data from your application in a seamless way.
Tip: For faster configuration, you can automatically generate a Delete record action. The generated process model for this action will use the Delete Records smart service to delete the selected record and its related records.
Example
Imagine you need to delete an Order from the Appian Retail application. The Order record type has six relationships that you need to consider when building the action to delete these records.
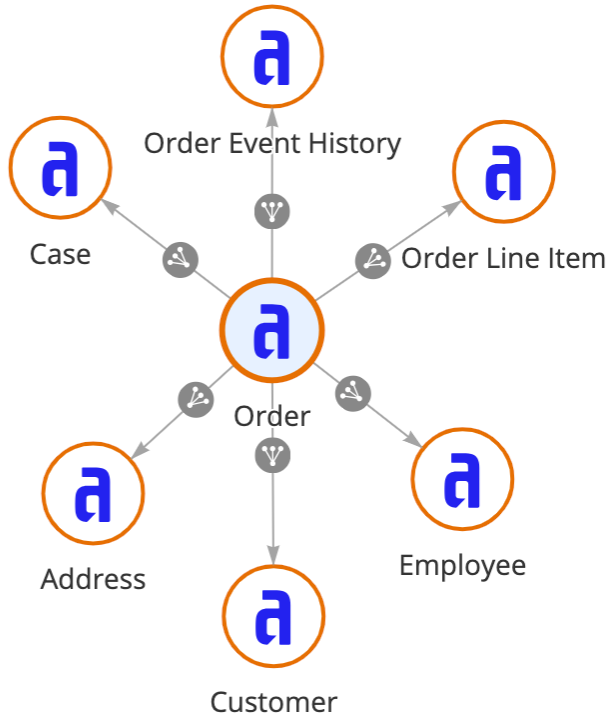
When you delete a record, you want to consider whether or not any related data should also be deleted.
In this example:
Based on how the data is related, you'll want to update the relationship configurations for your record types so certain related data is deleted whenever an order is deleted:
| Record Type | Relationship Configuration |
|---|---|
| Order Event History | Select Write or Delete when modifying Orders. |
| Order Line Item | Select Write or Delete when modifying Orders. |
| Case | Select Do not write or delete. |
You cannot write or delete data from a many-to-one relationship, so you don't need to update the relationships to the Address, Customer, or Employee record types.
Once the relationships are properly configured, you can create a related action to delete a record and any relevant related records.
To create a related action that deletes a record and its related records:
Create a new form interface that allows users to review the order information and confirm they want to delete the Order record. Because line items and the event history will also be deleted, the interface should indicate this fact. To do so, you could use one of these options:
record and set the type to the Order record type. This will allow you to pass order data to the process model.Create a new process model and configure the process model properties to use the new form and pass record data:
record.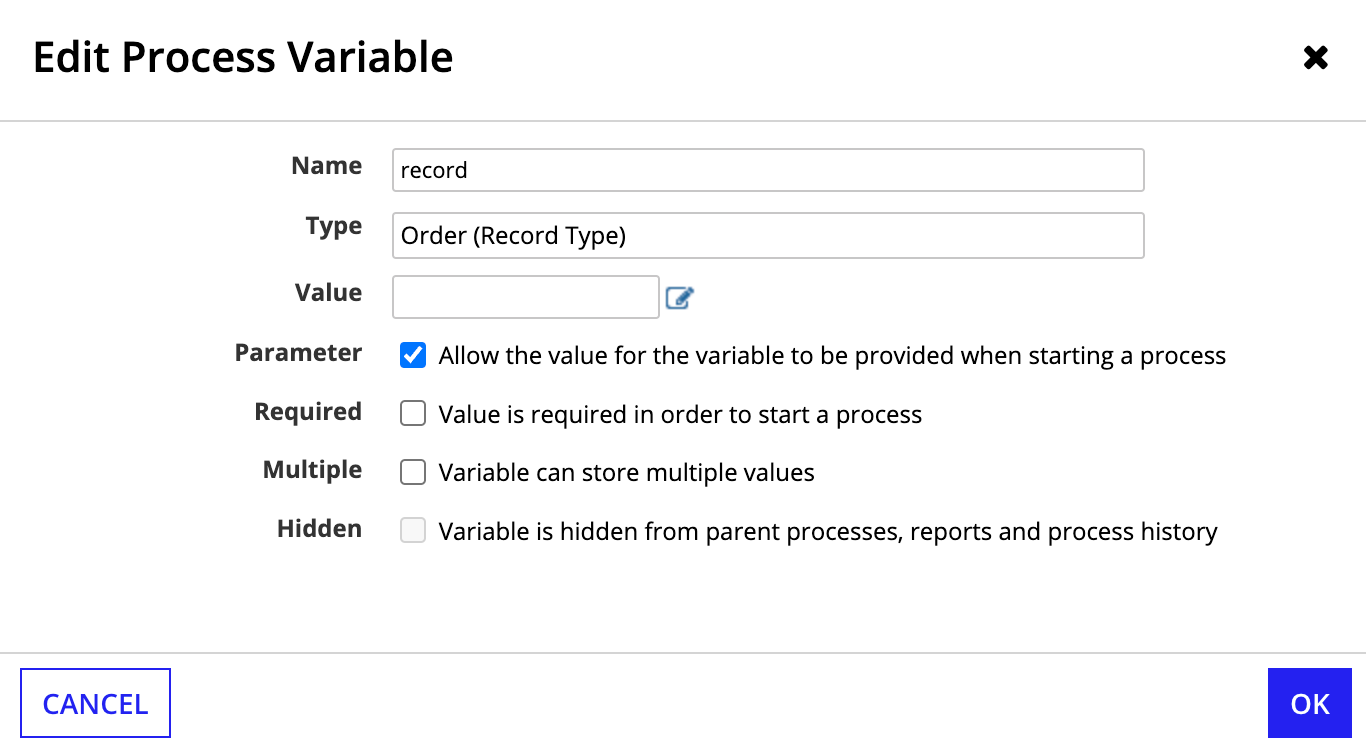
record process variable to the record rule input from the interface.For the Records input, set the record process variable as the Value.
Save and publish the process model.
The process node examines the primary key field (in this case, the id field) and deletes that Order record from the source, as well as any Line Item or Event History records associated with that Order. Any Case records with an orderId value matching the Order's id will now show null for orderId.
Goal: Use the Write Records smart service to remove a record from a record type but keep the data available in the source.
Some delete actions need to make the data generally inaccessible in your app, but administrators or other privileged users can retain access in the record type's source (like a database). This type of deleting lets you restore the data if needed.
A related action is a simple way to let users select a record to remove and confirm they want to delete it by clicking a button. This action starts a process model that sets an isDeleted field to true. You can then create a source filter so only records that have an isDeleted field set to false or null are synced in Appian.
Example
Let's say you need a record action that allows users to delete orders from a retail application. You want the Order data to persist in the data source, but it should not be available in Appian.
The application contains an Order record type, which stores all order information. This record type has record events configured with the following event types:
To ensure this action can be traced back to a specific user, we'll want to capture a Deleted Order event.
Here's one way you could create this action:
For the form's submit button, update the value and saveInto properties so the isDeleted field is set to true:
1
2
3
4
5
6
7
8
9
a!buttonWidget(
   label: "Delete",
   icon: "trash",
   submit: true,
   style: "GHOST",
   color: "NEGATIVE",
   value: true,
   saveInto: ri!record[recordType!Order.fields.isDeleted]
)
record.record process variable to the input from the interface.pv!record) and write the soft delete to the Order record type.Save and publish the process model.

Create a related action that launches the new process model. Use the Order record type in the related action context as rv!record.
In the Order record type, add a source filter so only records with an isDeleted value of null or false are synced. This filter must be created using expression mode because you need to use the OR operator for the two filter conditions.
1
2
3
4
5
6
7
8
9
10
11
12
13
14
15
a!queryLogicalExpression(
  operator: "OR",
  filters: {
    a!queryFilter(
      field: "IS_DELETED", /* The filter matches the source field's name, not the record field */
      operator: "is null"
    ),
    a!queryFilter(
      field: "IS_DELETED",
      operator: "=",
      value: false()
    )
  },
  ignoreFiltersWithEmptyValues: true
)
Goal: Use the Delete Records smart service to remove a related record but keep the data available in the source.
Some related records, like line items on an order, are managed in the context of a base record. In those situations, your interface may need to allow users to select and delete these related records.
Appian has many interface components for selecting data, including checkboxes and radio buttons. In this example, we'll use a dynamic link to create clickable text that saves a value to a rule input property.
Example
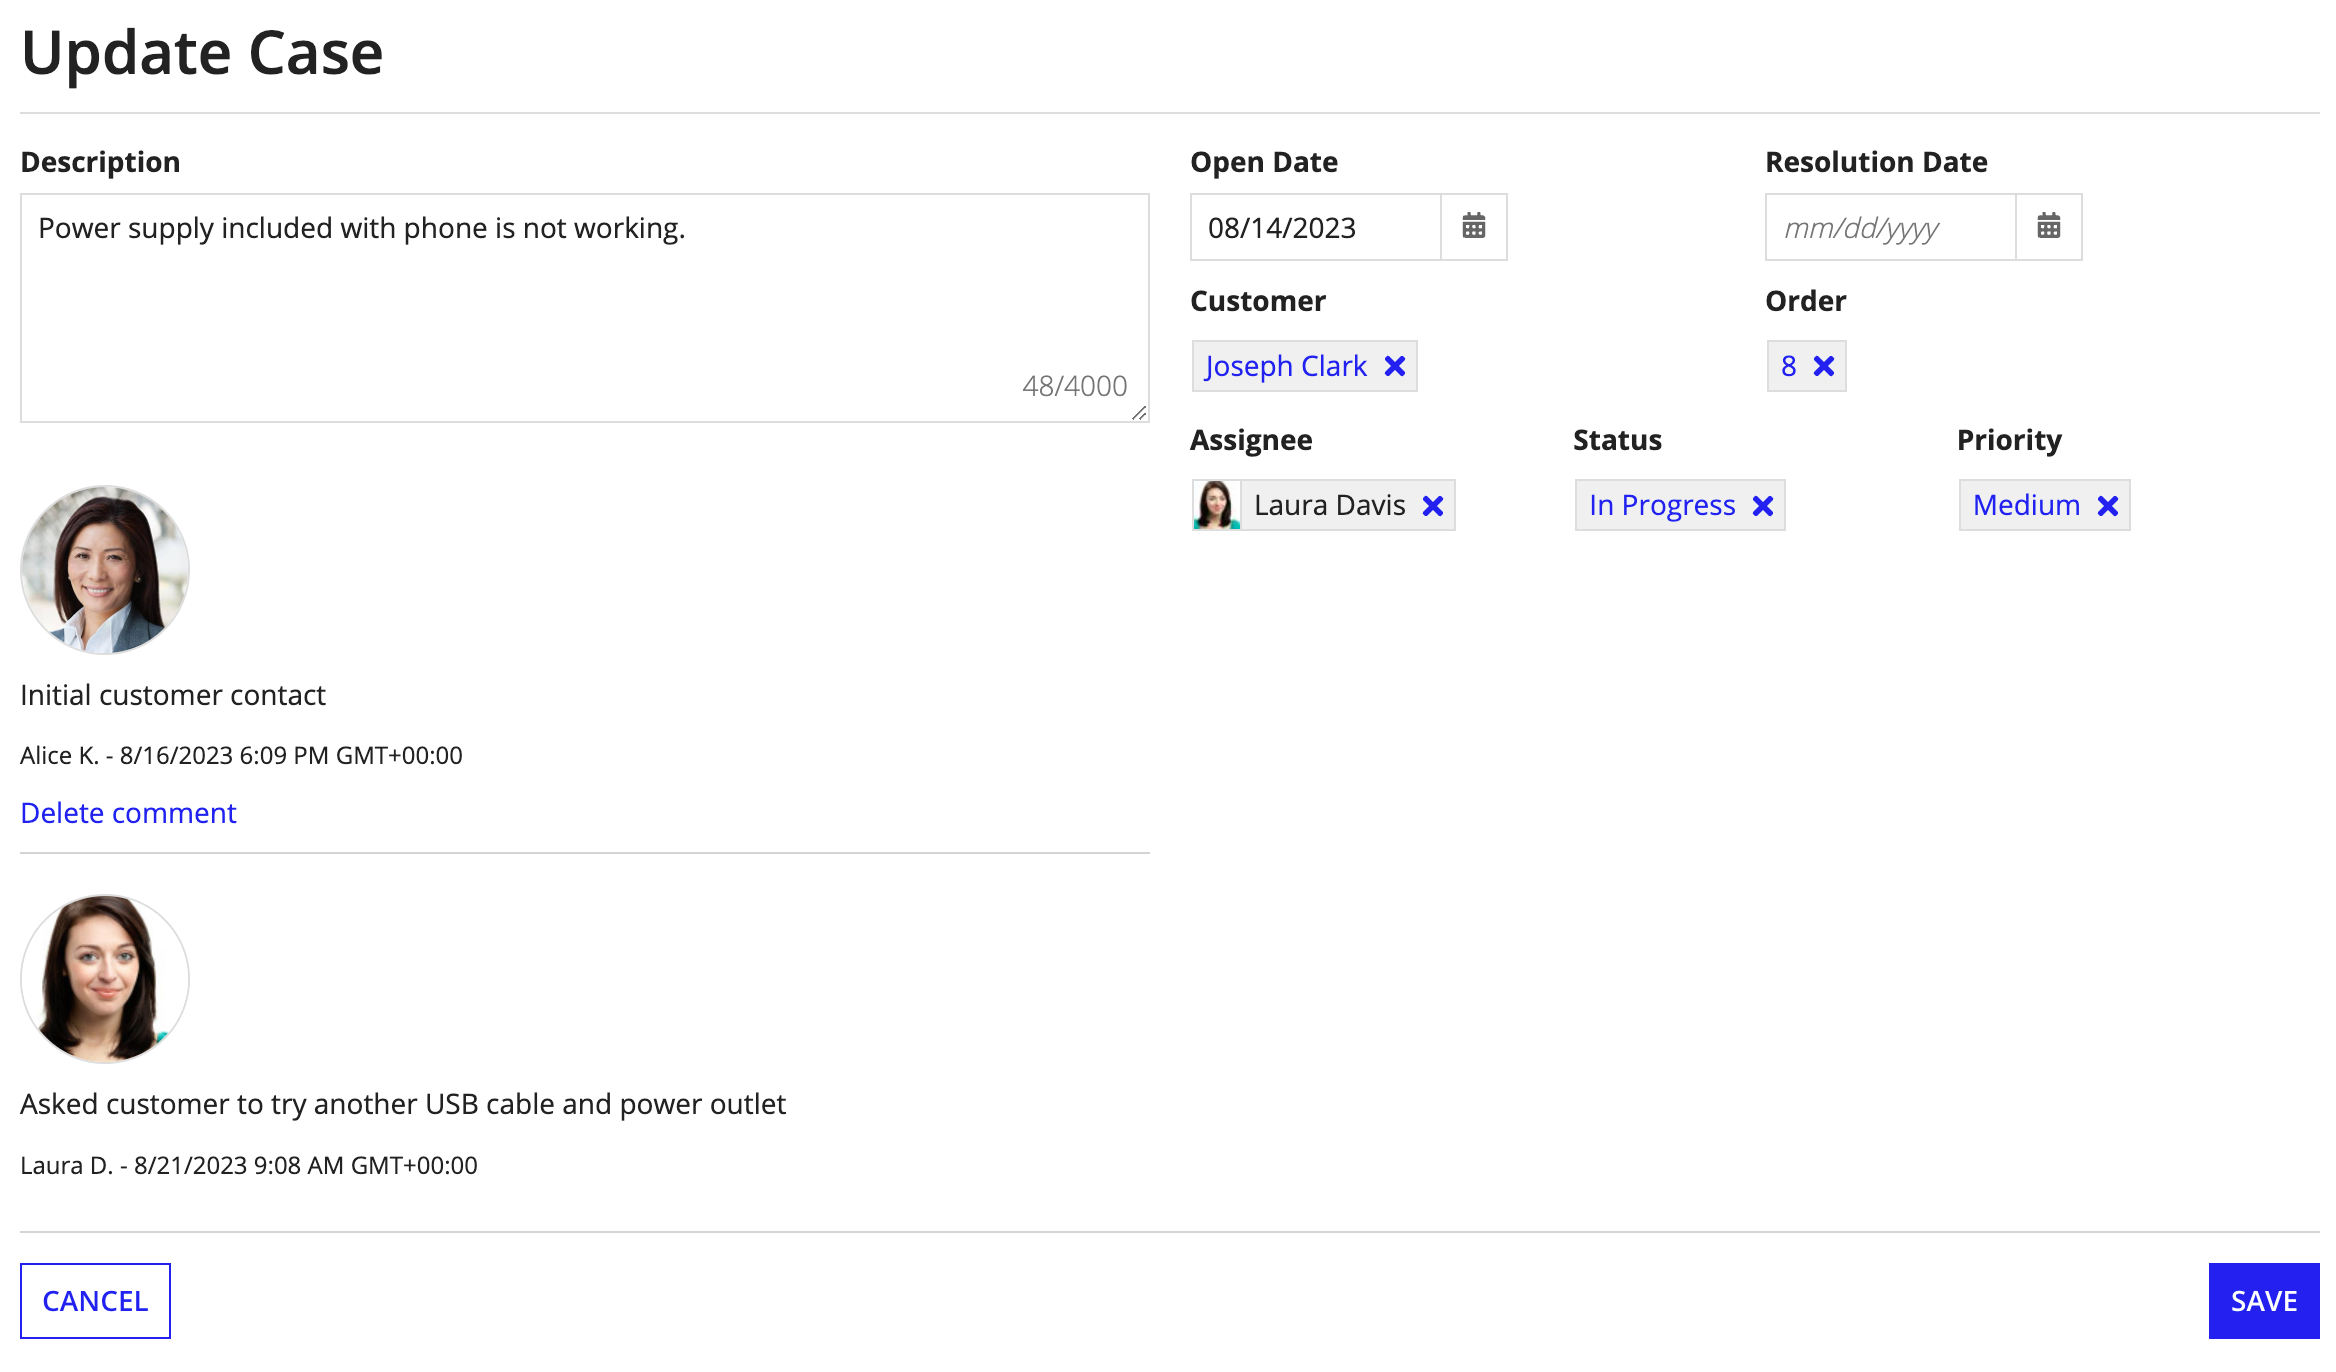
Let's say you need a record action that allows users to update a support case, including any of the comments on the case. Comments are in a separate record type and referenced in the Case through a record type relationship.
In this scenario, we'll mark the comment as deleted and use a source filter to exclude deleted comments from the record type. Since we are soft deleting the comments, they are still available in the source for auditing purposes.
A user should be able to delete comments if they meet either of the following conditions:
In the following example, if Alice K. views the case, she will only be able to delete her comment.
Since a case can have one or more comments, a reusable interface will let you add multiple instances of these components without unnecessarily repeating code. You can see an example of how to do this in our video explaining the use of a!forEach() in interfaces.
Before you build the record action:
commentBox.To create this action, you could:
In the section's contents parameter, add a a!forEach() loop that uses the commentBox interface to display each comment on the case. Each comment box is followed by a dynamic link that sets the isDeleted field to true when clicked.
1
2
3
4
5
6
7
8
9
10
11
12
13
14
15
16
17
18
19
20
21
22
23
24
25
26
27
28
29
30
31
32
33
34
35
36
37
38
39
40
41
42
43
44
45
46
a!forEach(
 /*
 The items evaluated for each loop are the Comments related to each case.
 To loop through them, you must specify the record type relationship here.
 */
 ri!record[recordType!Case.relationships.Comment],
  {
    if(
      fv!isFirst,
      a!horizontalLine(color: "#ffffff"),
      a!horizontalLine(
        showWhen: and(
        fv!item[recordType!Comment.fields.isDeleted] <> true,
        count(fv!item) > 1
      ))
    ),
    if(
      fv!item[recordType!Comment.fields.isDeleted],
      a!richTextDisplayField(),
      rule!commentBox(fv!item),
    ),
    a!linkField(
      labelPosition: "COLLAPSED",
      links: {
        a!dynamicLink(
          label: "Delete comment",
          value: true(),
          saveInto: ri!record[recordType!Case.relationships.Comment][fv!index][recordType!Comment.fields.isDeleted],
          showWhen: {
            and(
              fv!item[recordType!Comment.fields.isDeleted] <> true,
              if(
                or(
                  loggedInUser() = fv!item[recordType!Comment.fields.createdBy],
                  a!isUserMemberOfGroup(loggedInUser(), "AT Support Managers")
                ),
                true(),
                false()
              )
            )
          }
        )
      }
    )
   }
)
record.record process variable to the input from the interface.pv!record) and write any soft deletes to the Comment record type.rv!record.In the Comments record type, add a source filter so only records with an isDeleted value of null or false are synced. This filter must be created using expression mode because you need to use the OR operator for the two filter conditions.
1
2
3
4
5
6
7
8
9
10
11
12
13
14
15
a!queryLogicalExpression(
  operator: "OR",
  filters: {
    a!queryFilter(
      field: "IS_DELETED", /* The filter matches the source field's name, not the record field */
      operator: "is null"
    ),
    a!queryFilter(
      field: "IS_DELETED",
      operator: "=",
      value: false()
    )
  },
  ignoreFiltersWithEmptyValues: true
)
Goal: Use the a!deleteRecords() function to delete a record.
Instead of building an entire process model to delete data, you can use the a!deleteRecords() function to let users delete data directly from an interface.
Example
For example, in a retail application, you could create an editable grid that lets users add, update, and delete inventory data.
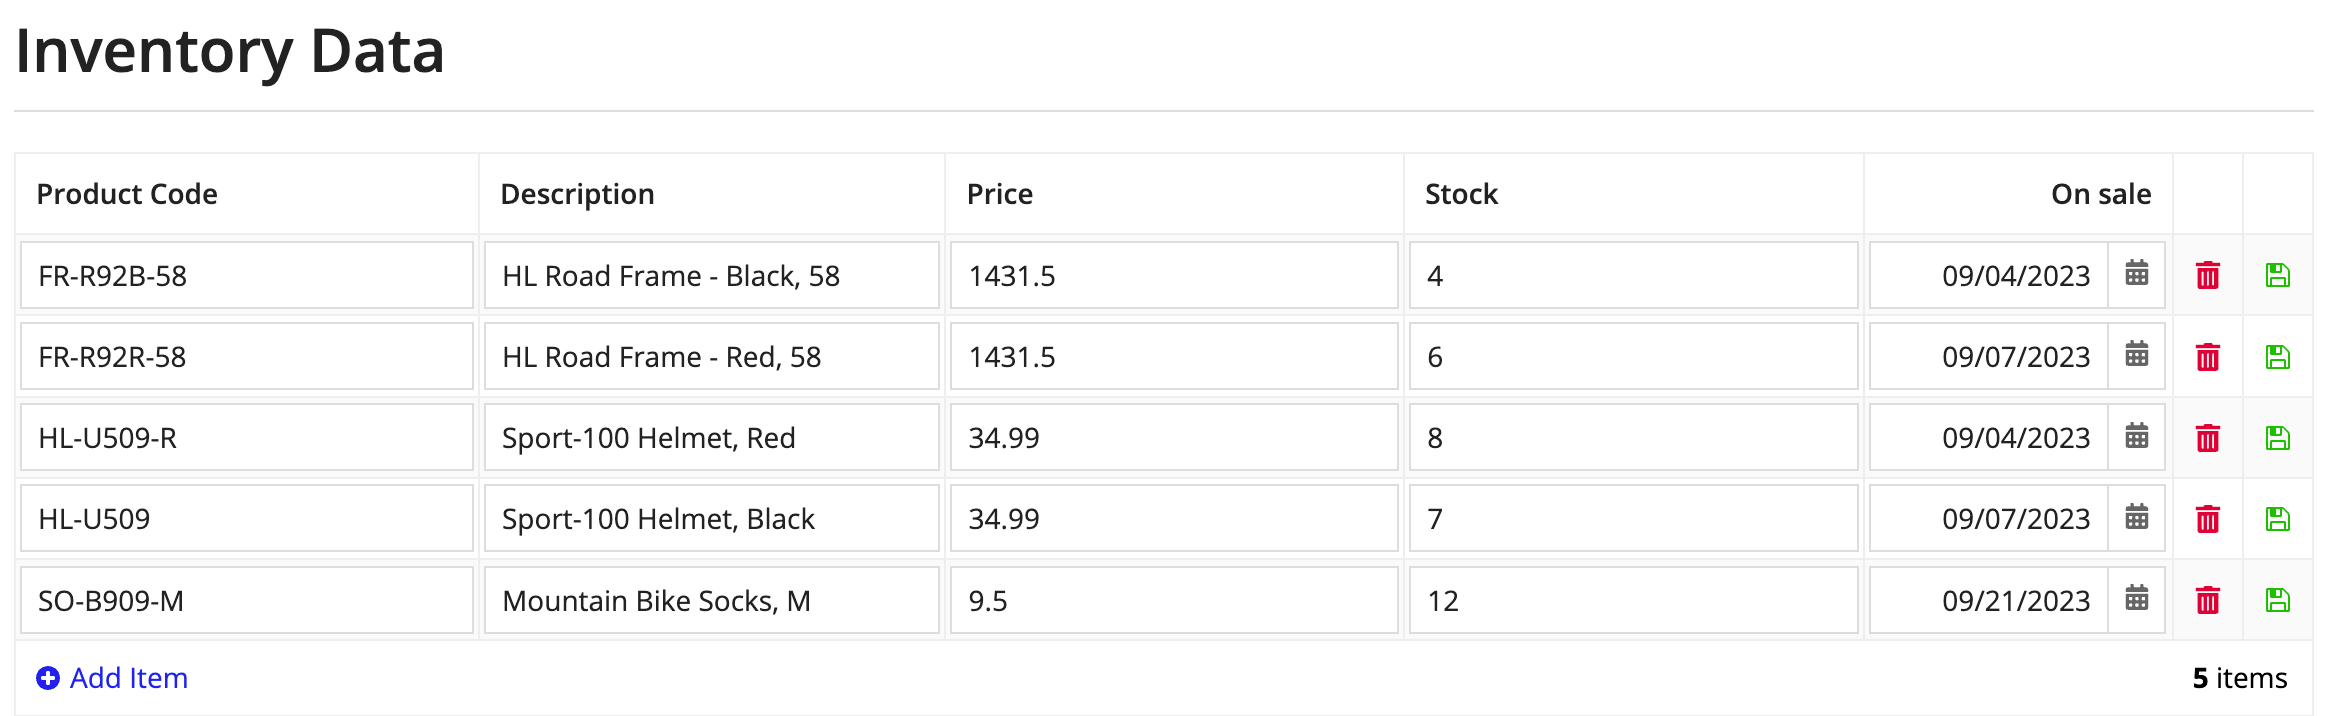
In one of the columns, we'll display a rich text icon and set its link parameter so the icon is clickable. When the user clicks the icon, the saveInto deletes the current row's record data using a!deleteRecords(). To remove it from the grid, you should also use the onSuccess parameter to remove the now-deleted record from the local variable storing the data.
1
2
3
4
5
6
7
8
9
10
11
12
13
14
15
16
17
18
19
20
a!richTextDisplayField(
  value: a!richTextIcon(
    icon: "trash",
    altText: "delete " & fv!index,
    caption: "Delete " & fv!item[recordType!Item.fields.name],
    link: a!dynamicLink(
      value: fv!index,
      saveInto: {
        a!deleteRecords(
          records: fv!item,
          onSuccess: {
            a!save(local!items, remove(local!items, save!value)),
            }
        )
      }
    ),
    linkStyle: "STANDALONE",
    color: "NEGATIVE"
  )
),
| Feature | Compatibility | Note |
|---|---|---|
| Portals | Partially compatible | Can be used with Appian Portals if it is connected using an integration and web API. |
| Offline Mobile | Incompatible | |
| Sync-Time Custom Record Fields | Incompatible | |
| Real-Time Custom Record Fields | Incompatible | Custom record fields that evaluate in real time must be configured using one or more Custom Field functions. |
| Process Reports | Incompatible | Cannot be used to configure a process report. |
| Process Events | Incompatible | Cannot be used to configure a process event node, such as a start event or timer event. |
There are older versions of this smart service. You can identify older versions by looking at the name to see if there is a version suffix. If you are using an old version, be sure to refer to the corresponding documentation from the list below.
| Old Versions | Reason for Update |
|---|---|
| a!deleteRecords_23r3 | Allow deleting records and related records at the same time. |
To use the latest version of the smart service node:
To learn more about how Appian handles this kind of versioning, see the Function and Component Versions page.
