FunctionCopy link to clipboard
a!hierarchyBrowserFieldTree( label, labelPosition, instructions, helpTooltip, pathValue, pathSaveInto, nodeConfigs, nextLevelValues, accessibilityText, showWhen )
Displays hierarchical data in the form of drillable tree.
The Tree Browser Component allows users to vertically navigate hierarchical business objects, each presented as a node with a large image, three lines of metadata, and an optional link.
ParametersCopy link to clipboard
| Name | Keyword | Types | Description |
|---|---|---|---|
|
Label |
|
Text |
Text to display as the field label. |
|
Label Position |
|
Text |
Determines where the label appears. Valid values:
|
|
Instructions |
|
Text |
Supplemental text about this field. |
|
Help Tooltip |
|
Text |
Displays a help icon with the specified text as a tooltip. The tooltip displays a maximum of 500 characters. The help icon does not show when the label position is |
|
Navigation Path |
|
List of Variant |
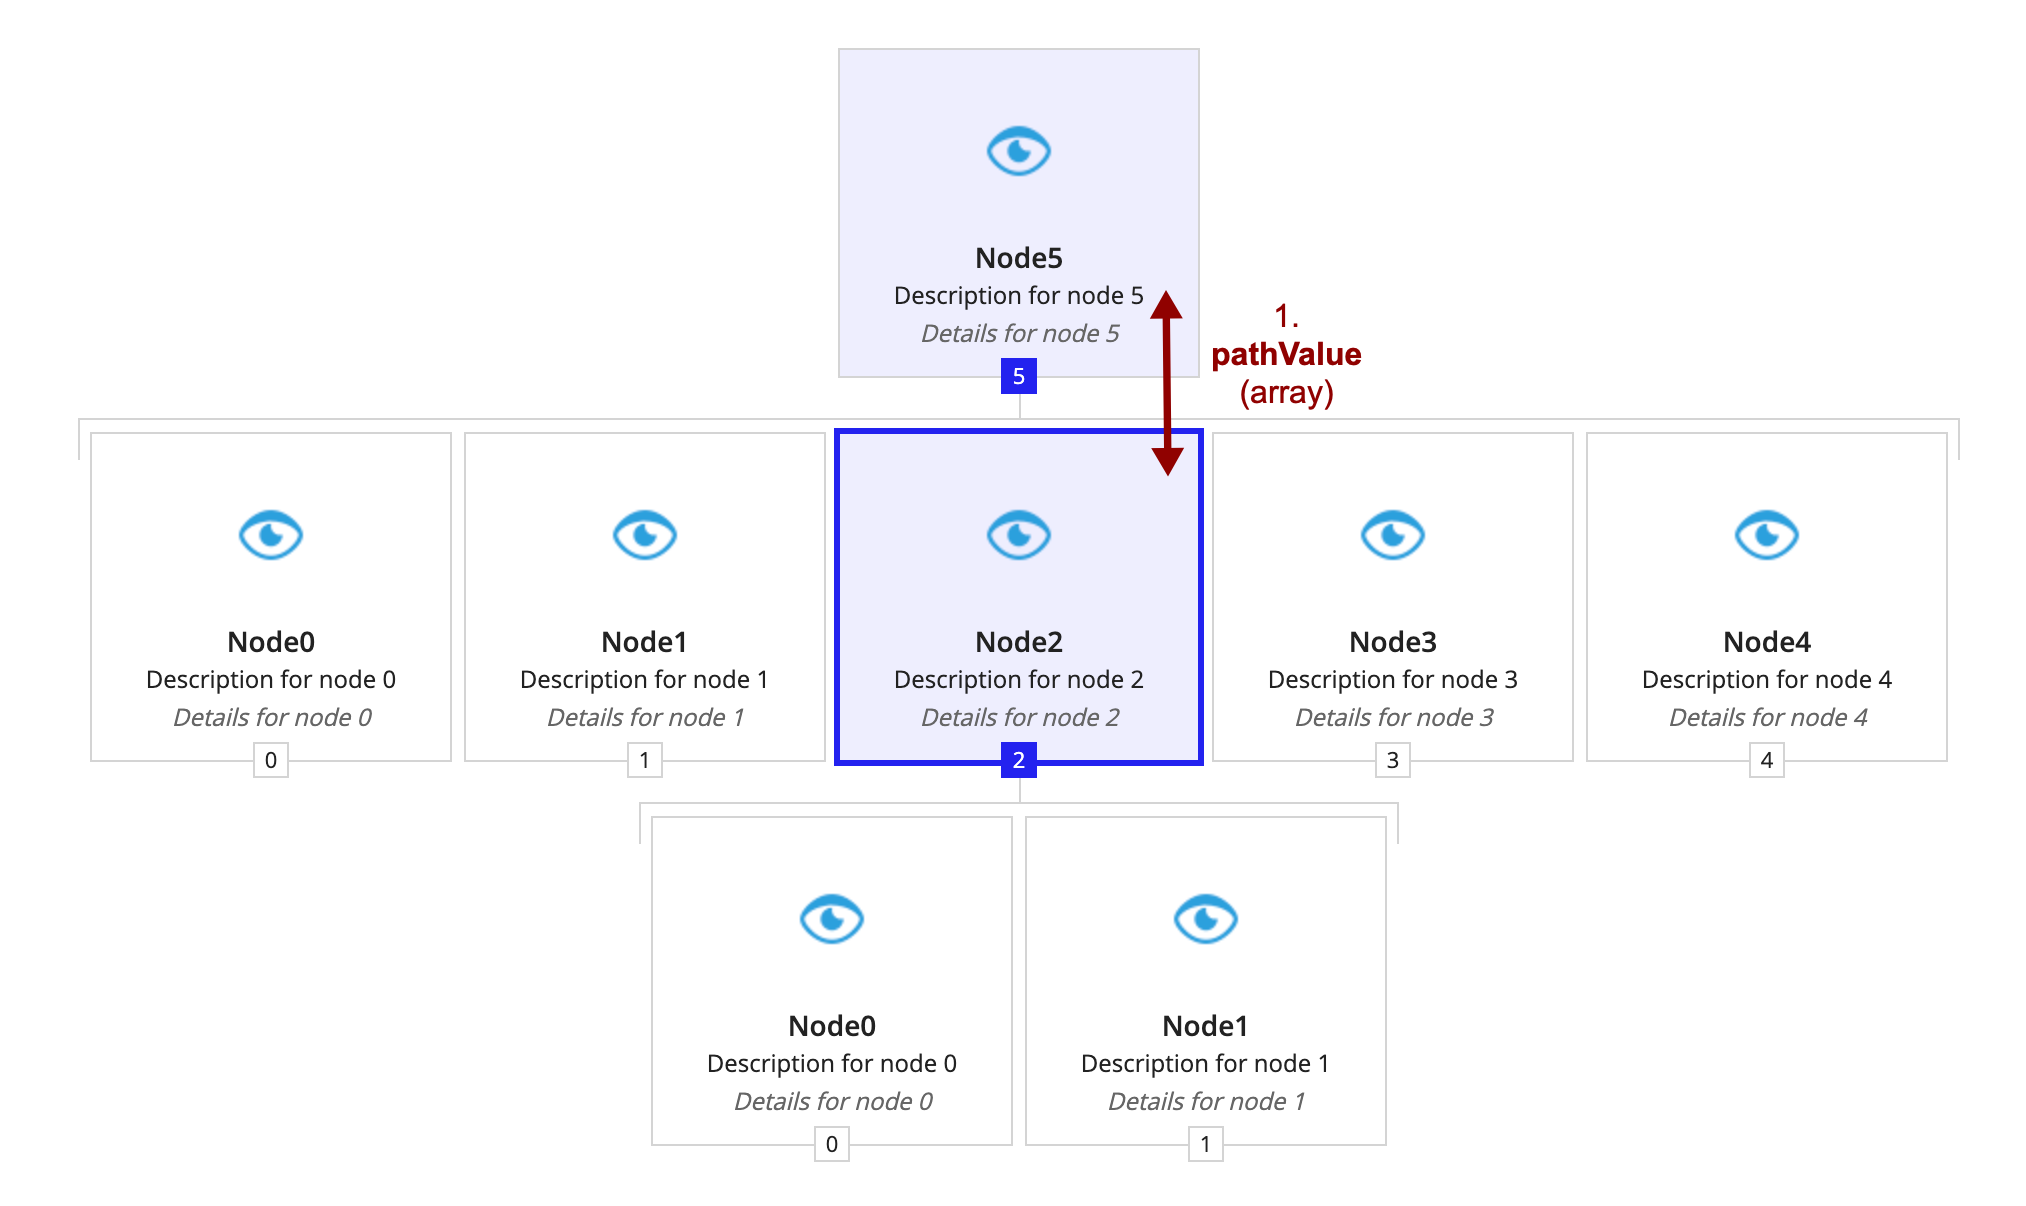
The first value in the pathValue array appears in the uppermost level of the tree and is the root of the visible hierarchy. As the user clicks through the browser, clicked nodes become highlighted. These clicked nodes' values are in the pathValue. They should be stored in a variable, for example local!path. A clicked node's value is used to determine the next level, generated by nextLevelValues. The pathValue must have a default value. |
|
Save Navigation To |
|
List of Save |
Variable or list of variables to update when a user clicks on a drillable node, as determined by the node configurations. For example, local!path. Use a!save() to save a modified or alternative value to a variable. |
|
Node Configurations |
|
HierarchyBrowserFieldTreeNode |
Describe how to display a value as a node using a!hierarchyBrowserFieldTreeNode() and fv!nodeValue. This rule or expression is evaluated for each value where fv!nodeValue is any node value. |
|
Next Level Values |
|
List of Variant |
Given a node value, describe how to get the next level’s values using the variable fv!nodeValue. For example, rule!CRM_getCustomerUsersBySupervisor(customer: fv!nodeValue, isActive: true). This rule or expression is evaluated for each value in pathValue where fv!nodeValue refers any value in pathValue. |
|
Accessibility Text |
|
Text |
Additional text to be announced by screen readers. Used only for accessibility; produces no visible change. |
|
Visibility |
|
Boolean |
Determines whether the component is displayed on the interface. When set to false, the component is hidden and is not evaluated. Default: true. |
Usage considerationsCopy link to clipboard
Hierarchy browsers overviewCopy link to clipboard
The hierarchy browser tree is a generalized version of the org chart in the same way that the custom picker is a generalized version of the user and group pickers. The designer has control over what data is shown, how it is retrieved, and how it is displayed, making the component a flexible means of presenting hierarchical business data to users.
For more information on how the hierarchy browser tree works, see the detailed explanation.
Using the pathValue and nodeConfigs parametersCopy link to clipboard
- If a pathValue is not specified, only the label, tooltip, and instructions will display.
- All nodes, including non-drillable nodes, can be clicked and saved to the pathValue. Non-drillable nodes do not, however, show as having any values in the next level.
- Each value in the pathValue past the first must be included in the Next Level Values generated by the previous value in the pathValue. For example, if Navigation Path is
{1, 10, 100}, then10must be present in the nextLevelValues generated by1and100in the nextLevelValues generated by10. - The function variable
fv!nodeValueis available when configuring the hierarchy browser tree. It is only available in the nodeConfigs and nextLevelValues parameters.
ExamplesCopy link to clipboard
To experiment with examples, copy and paste the expression into an interface object.
Tree browserCopy link to clipboard
1
2
3
4
5
6
7
8
9
10
11
12
13
14
15
16
17
18
19
20
21
22
23
24
25
26
27
28
29
30
31
32
33
34
35
36
37
38
39
40
41
42
43
44
45
46
47
48
49
50
51
52
53
54
55
56
57
58
59
60
61
62
63
a!localVariables(
  local!path: {
    {
      id: 6,
      name: "Node 6",
      description:"Description for node 6",
      details: "I have 6 child nodes",
      type: "AIRPLANE",
      numberOfChildren: 6,
      isDrillable: true
    }
  },
  a!hierarchyBrowserFieldTree(
    nodeConfigs: a!hierarchyBrowserFieldTreeNode(
      id: fv!nodeValue.id,
      label: fv!nodeValue.name,
      description: fv!nodeValue.description,
      details: fv!nodeValue.details,
      image: a!documentImage(
        document: if(
          fv!nodeValue.type = "AIRPLANE",
          a!iconNewsEvent("PAPER_AIRPLANE"),
          a!iconNewsEvent("FOUNTAIN_PEN")
        )
      ),
      nextLevelCount: fv!nodeValue.numberOfChildren,
      isDrillable: fv!nodeValue.isDrillable
    ),
    pathValue: local!path,
    pathSaveInto: local!path,
    nextLevelValues: a!foreach(
      /* Make a number of values in the next level equal to the number of children */
      enumerate(fv!nodeValue.numberOfChildren),
      a!localVariables(
        /* Give the new node a random number of children between 0 and 10 */
        local!numberOfChilren: tointeger(rand() * 10),
        /* Make only even nodes drillable */
        local!isDrillable: mod(fv!item, 2) = 0,
        {
          id: fv!item,
          name: "Node " & fv!item,
          description: "Description for node " & fv!item,
          details: if(
            local!isDrillable,
            if(
              local!numberOfChilren = 1,
              "I have 1 child node",
              "I have " & local!numberOfChilren & " child nodes"
            ),
            "I am not drillable"
          ),
          type: if(
            fv!nodeValue.type = "AIRPLANE",
            "FOUNTAIN_PEN",
            "AIRPLANE"
          ),
          numberOfChildren: local!numberOfChilren,
          isDrillable: local!isDrillable
        }
      )
    )
  )
)
Copy
Hierarchy browser tree example breakdown and explanationCopy link to clipboard
If you want more information on how the hierarchy browser tree's inputs produce the rendered component, read through this section. This section provides a step-by-step breakdown of how the values provided to the component generate the component's data and guide its display. The interface in this section can be created by clicking EXPRESSION and pasting the following expression into the Interface Definition.
1
2
3
4
5
6
7
8
9
10
11
12
13
14
15
16
a!localVariables(
  local!path: {5,2},
  a!hierarchyBrowserFieldTree(
    nodeConfigs: a!hierarchyBrowserFieldTreeNode(
      id: fv!nodeValue,
      label: "Node" & fv!nodeValue,
      description: "Description for node " & fv!nodeValue,
      details: "Details for node " & fv!nodeValue,
      image: a!documentImage(document: a!iconIndicator("PREVIEW")),
      nextLevelCount: fv!nodeValue
    ),
    pathValue: local!path,
    pathSaveInto: local!path,
    nextLevelValues: enumerate(fv!nodeValue)
  )
)
Copy
To configure the tree browser details:
- The first step in building the browser is generating the "trunk" of the tree, or path nodes. You provide these values to the component through pathValue.

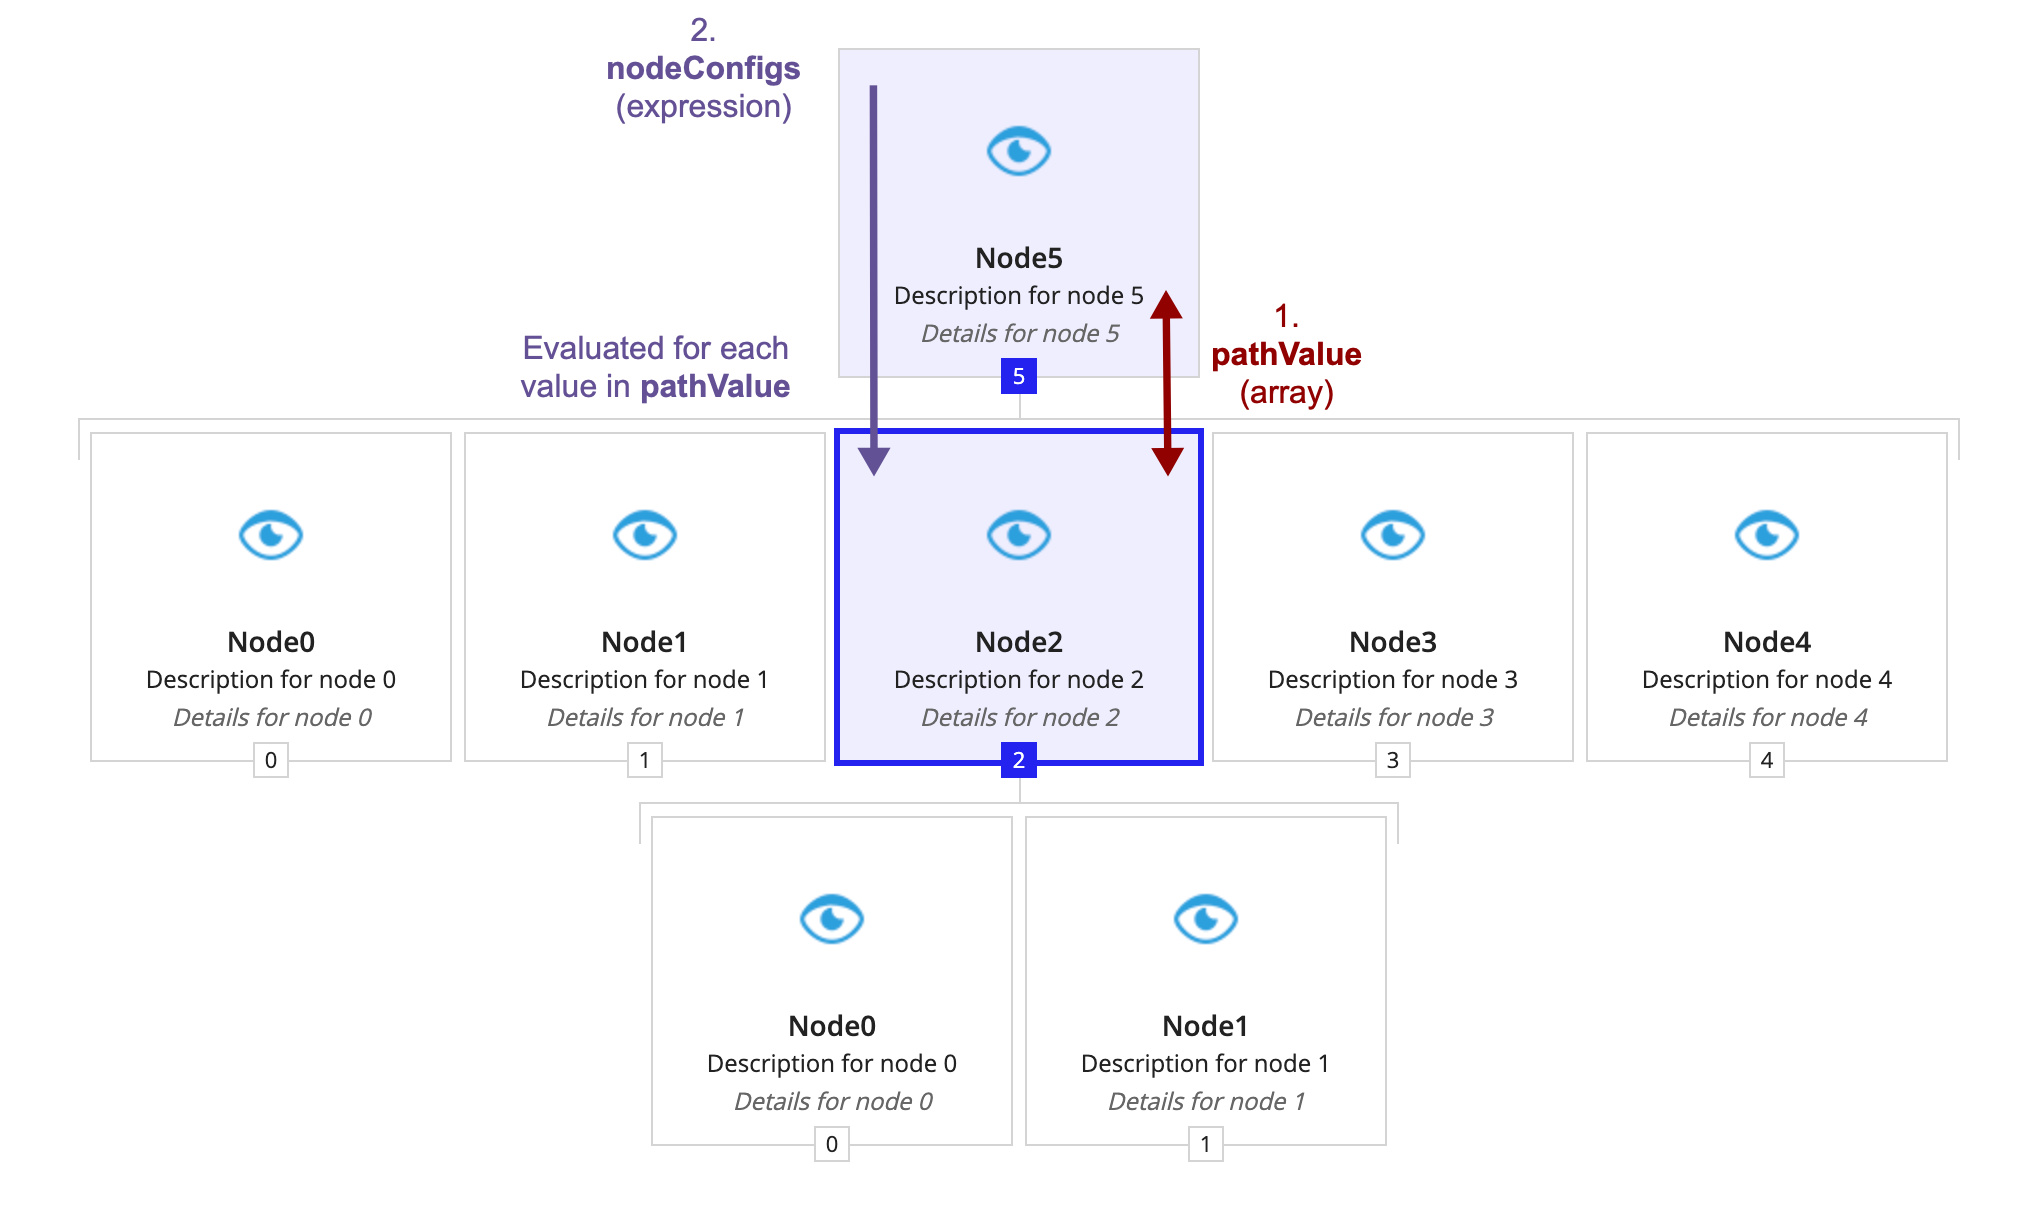
- Next, the component must know how to display these values as nodes. The component gets the display information from nodeConfigs.

- As the purple text (number two) shows, the display information for the path nodes comes from evaluating nodeConfigs for each value in pathValue. Each evaluation of nodeConfigs needs to produce a hierarchy browser tree node. In this example, the first value in pathValue is 5. Therefore, the first node, or the root, comes from evaluating nodeConfigs with
fv!nodeValueset to 5.
- As the purple text (number two) shows, the display information for the path nodes comes from evaluating nodeConfigs for each value in pathValue. Each evaluation of nodeConfigs needs to produce a hierarchy browser tree node. In this example, the first value in pathValue is 5. Therefore, the first node, or the root, comes from evaluating nodeConfigs with
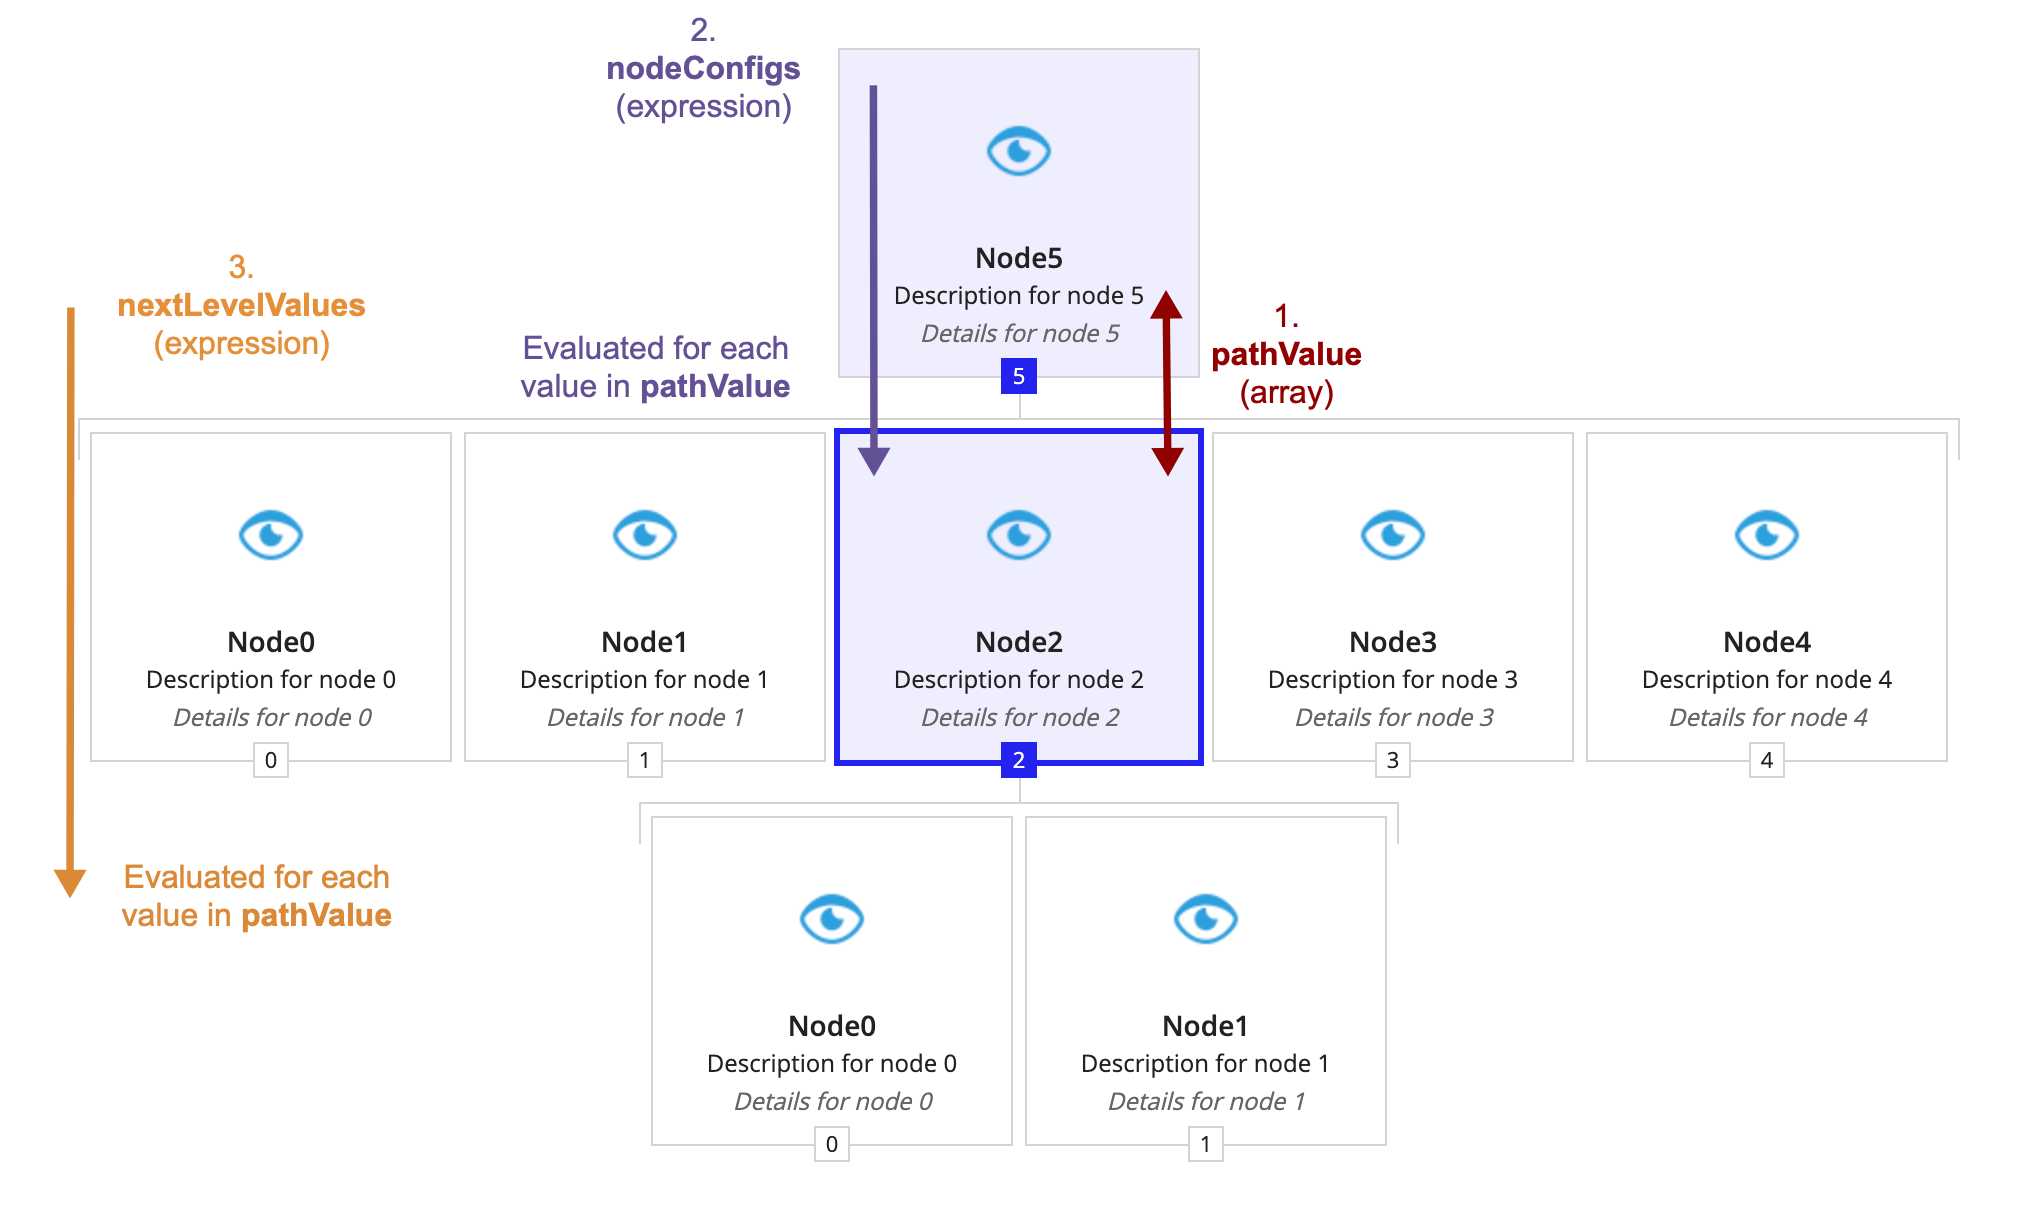
- The component creates a level of nodes for each node in pathValue.</li>

- The orange text (number three) shows that the second and third levels' values are generated by evaluating nextLevelValues for the first and second values in pathValue, respectively. In this example, the first value in pathValue is 5. The component uses this value to generate the second level's values by evaluating nextColumnValues with
fv!nodeValueset to 5. The evaluation produced 5 values: 0, 1, 2, 3, 4.
- The orange text (number three) shows that the second and third levels' values are generated by evaluating nextLevelValues for the first and second values in pathValue, respectively. In this example, the first value in pathValue is 5. The component uses this value to generate the second level's values by evaluating nextColumnValues with
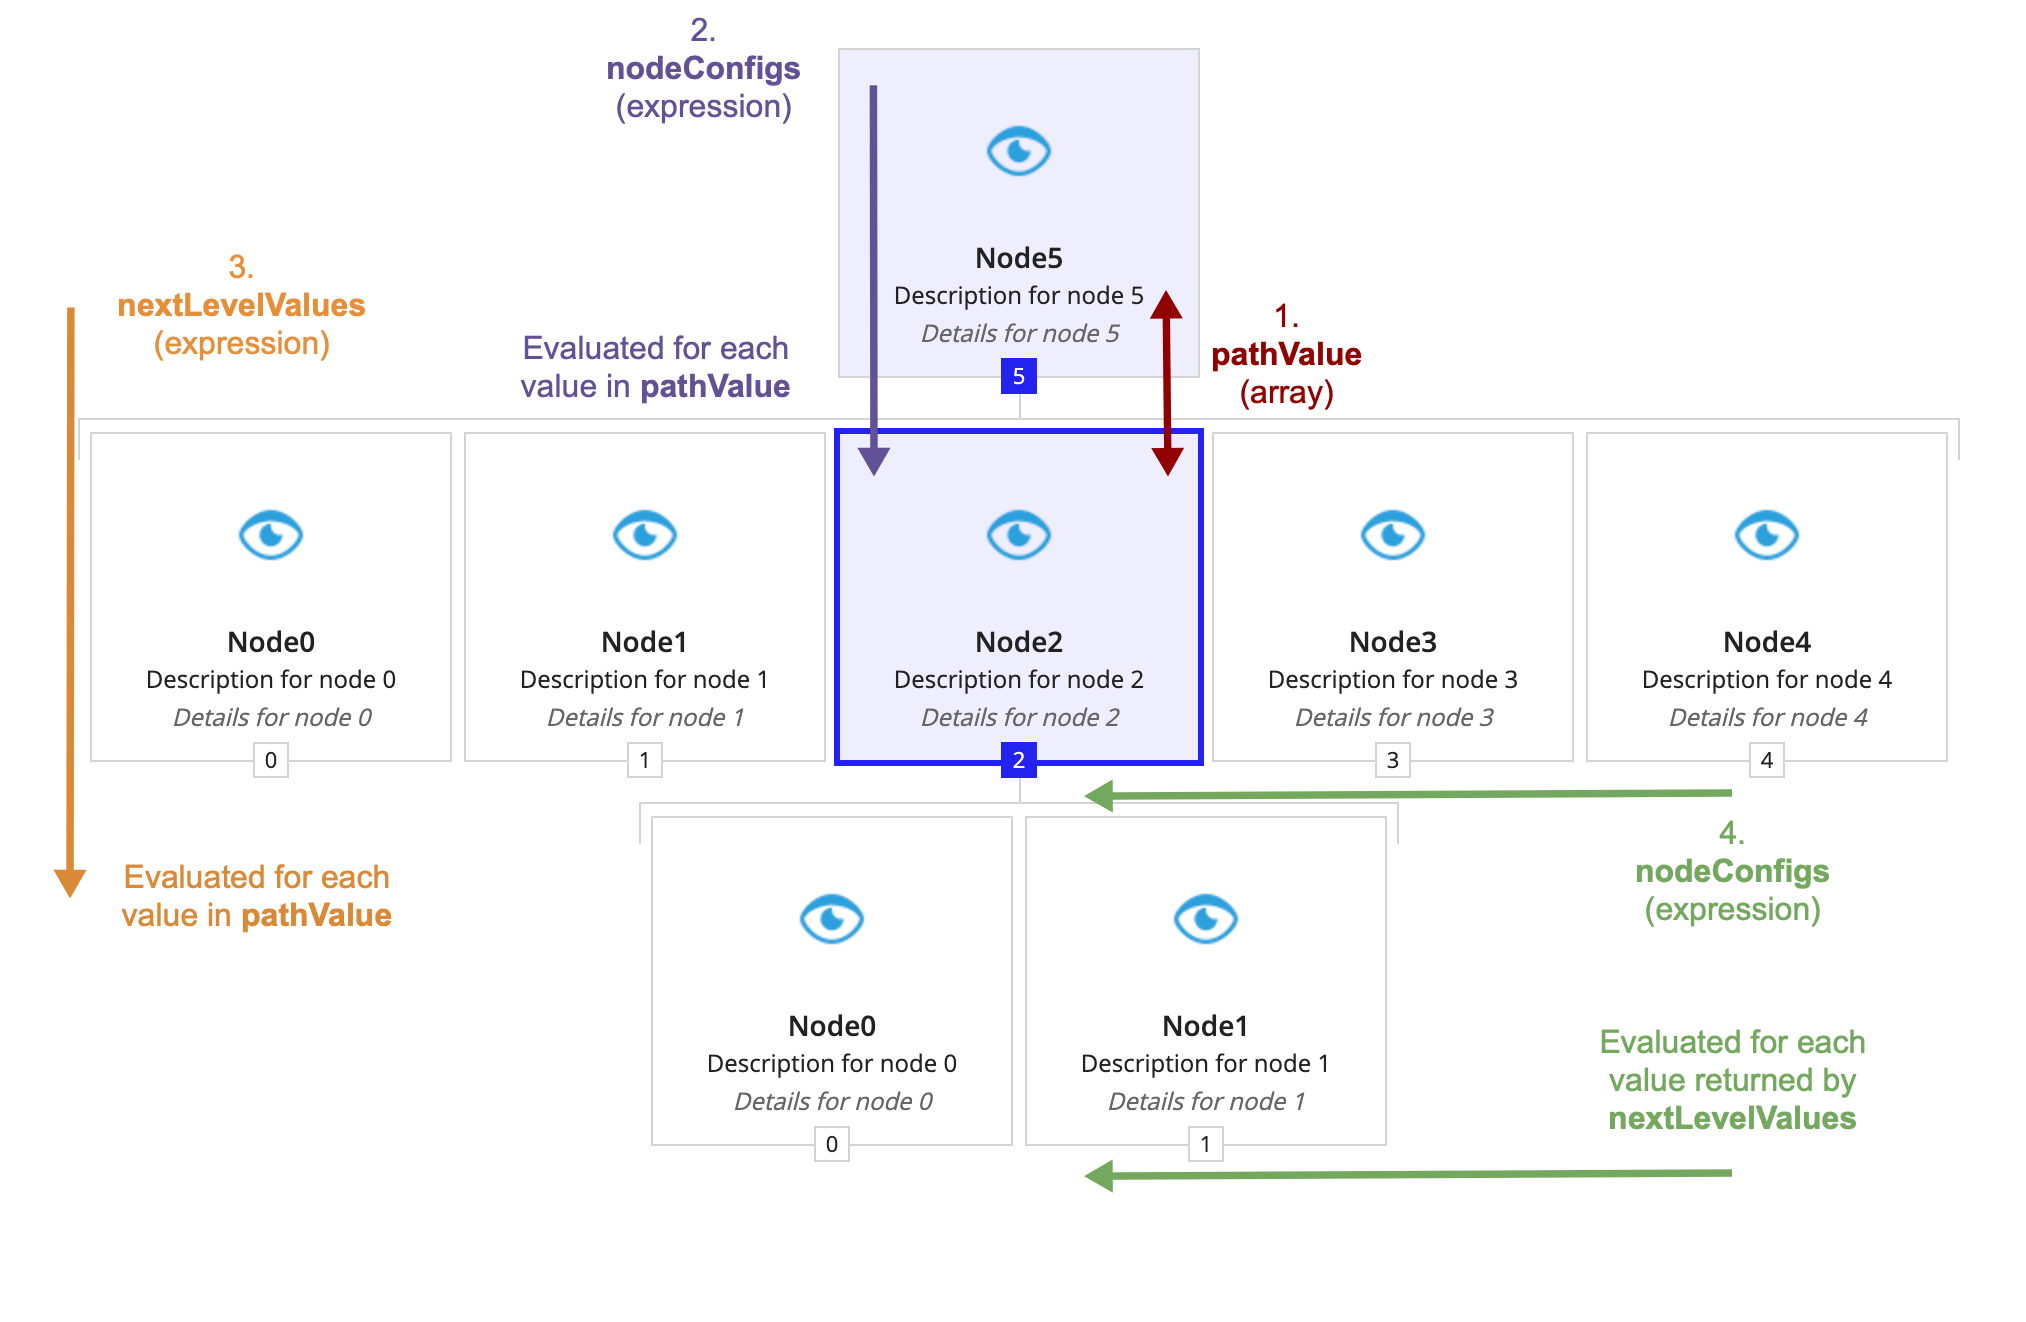
- Finally, the component determines how to display the values produced in step three as nodes using nodeConfigs.

- The green text (number four) shows that the component evaluates nodeConfigs for each value generated by nextLevelValues.
Feature compatibilityCopy link to clipboard
The table below lists this component's compatibility with various features in Appian.
| Feature | Compatibility | Note |
|---|---|---|
| Portals | Compatible | |
| Offline Mobile | Incompatible | |
| Sync-Time Custom Record Fields | Incompatible | |
| Real-Time Custom Record Fields | Incompatible | Custom record fields that evaluate in real time must be configured using one or more Custom Field functions. |
| Process Reports | Incompatible | Cannot be used to configure a process report. |
| Process Events | Incompatible | Cannot be used to configure a process event node, such as a start event or timer event. |
| Process Autoscaling | Compatible |
