| The capabilities described on this page are included in Appian's advanced and premium capability tiers. Usage limits may apply. |
IntroductionCopy link to clipboard
Case Management Studio allows you to design workflows tailored to your needs, without relying on pre-built templates. These workflows can represent an entire case management process, which may feel complex and overwhelming at first. To help you get started with confidence, we've created this tutorial to guide you through setting up a workflow step by step. You'll set up tasks and task blocks, identify milestones, and configure all the parts that make up a complete workflow.
By the end of this tutorial, you'll be able to create a workflow that integrates input from multiple teams, tracks progress, and ensures tasks are completed efficiently—no technical expertise required.
Note: This tutorial is designed for use with Case Management Studio version 1.5.0 or later.
What is a workflow?Copy link to clipboard
Workflows help organize and streamline tasks by breaking down complex processes into clear, actionable steps. They ensure that the right people are involved at the right time, helping teams collaborate efficiently and meet deadlines. Workflows are a critical part of managing cases, as they help track progress and ensure nothing falls through the cracks.
Basic workflow exampleCopy link to clipboard
Think of a workflow like your morning routine—a series of tasks you complete to get your day started. Each step in the routine depends on what came before and prepares you for the next. For example:
- Wake up: This starts the process. It signals the rest of your tasks to begin.
- Make coffee: A key step that happens early in the routine. It helps you wake up and get energized.
- Check your calendar: You need to know what's coming up for the day. This step gives you the information you need to prioritize the rest of your tasks.
- Get dressed: Once you know your schedule, you can pick an outfit that fits your day.
- Head out the door: With everything done, you're ready to leave and start your day.
A workflow in Case Management Studio works in the same way. It organizes tasks and steps in a sequence, so each one is completed in the right order. Just like your morning routine, some tasks might be dependent on others, and some might run in parallel. Workflows make sure that everyone involved knows what to do and when to do it, ensuring that the process moves smoothly from start to finish.
Common workflow use casesCopy link to clipboard
Common use cases for using workflows in Case Management Studio typically revolve around managing and automating complex processes where multiple stakeholders, tasks, or decisions are involved. Some of the common use cases include:
- Customer service case resolution: Automatically assign customer service tickets, track progress, and escalate issues to the right departments. Workflows ensure that cases are handled efficiently, providing real-time status updates and allowing for collaboration across teams.
- Claims processing: Automate the processing of insurance claims by orchestrating steps like document submission, review, and approval. Case Management Studio workflows streamline handoffs between departments, ensuring faster and more consistent claims resolution.
- Assessment of proposed construction plans: Manage the review and approval process for construction or development proposals, ensuring they comply with local zoning regulations, land use policies, and community guidelines.
- Procurement and vendor management: Streamline procurement processes by managing the review and approval of purchase orders, vendor agreements, and contract negotiations. Workflows can trigger approvals, track contract renewals, and ensure compliance with procurement policies.
If you're interested in reading more about some common use cases, head over to the Studio Workflow Examples page for complete details. For this tutorial, we'll be using the Dispute process use case.
About this tutorial's workflowCopy link to clipboard
In this tutorial, you'll set up a basicautomated clearing house (ACH) dispute process. By the end, you'll have a workflow that manages disputes efficiently from submission to resolution, ensuring all parties are informed and the case is properly closed.
This workflow makes use of tasks and milestones.
Before you beginCopy link to clipboard
Make sure you've set up a category and a case type. If a case type hasn't been set up, create a new Category called Financial Transactions and a case type named ACH Disputes.
Step-by-step guide: Configuring a basic ACH dispute workflowCopy link to clipboard
To configure a basic ACH dispute workflow, complete the following steps:
Step 1. Create tasksCopy link to clipboard
Tasks drive activity within case management applications by representing the work case workers perform. A workflow is a sequence of these tasks.
To create tasks directly from the Tasks page:
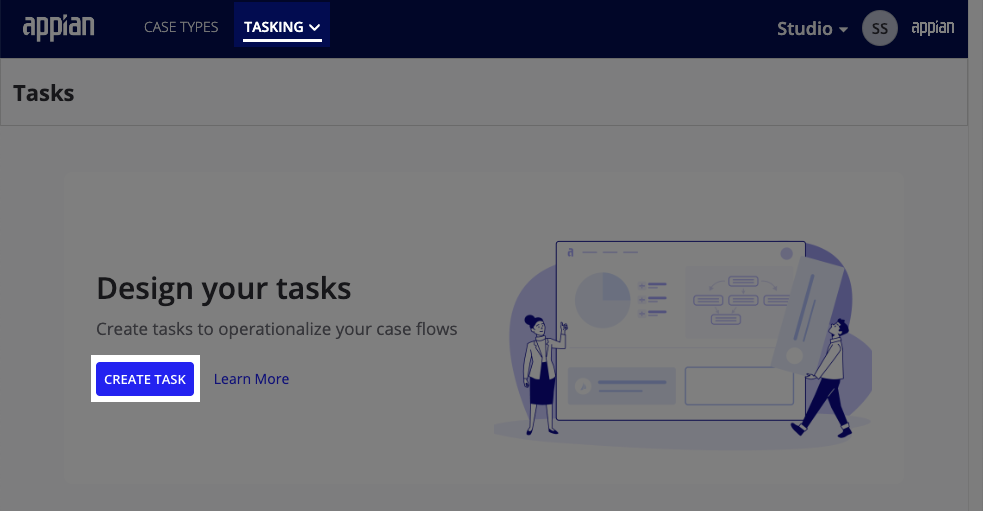
- In the Tasks page, click TASKING > CREATE TASKS.
Result: The Create Task dialog displays. -
In the Create Task dialog, configure the following task properties.
Property Description Name The name of the task. Task Type The kind of activity the task represents. There are three task types available out-of-the-box: confirmation, decision, and document upload. Default Assigned Group The group that is initially assigned this task, unless otherwise specified. Default SLA The service level agreement to apply to the task, calculated in business (working) days. Question The question for your users to answer. Questions are required for the Decision task type. Response Options The optional responses for your users to choose from. Response options are required for the Decision task type. Description Description of the task. This text box contains many text formatting options, so you can write the best description of the task, including instructions, for your users. - When you're done configuring the task, click CREATE.
To begin setting up your workflow, repeat these setup steps for each task detailed in the following tables. You will need all of these tasks for the ACH dispute workflow.
Intake review tasksCopy link to clipboard
| Task Name | Default Group | Task Type | Description |
|---|---|---|---|
| Intake Review | Case Workers | Confirmation | Ensure incoming applications for completeness and initial compliance to ensure a smooth processing workflow. Responsibilities include verifying required documents, data entry, and communicating with applicants for missing or erroneous information. |
| Dispute Validity | Case Workers | Decision | Ensure the incoming dispute request aligns with specific technical or regulatory requirements for it to be a valid dispute request. |
ACH decision tasksCopy link to clipboard
| Task Name | Default Group | Task Type | Description |
|---|---|---|---|
| Dispute Rejected | Case Managers | Confirmation | The dispute is invalid and was rejected. The customer will be notified of this decision. |
| ACH Dispute Decision | Case Managers | Decision | The issuer decides if the case is clearly won by the customer or the merchant. |
| Customer Wins Dispute | Case Managers | Confirmation | The customer who filed the dispute has won. The funds will be taken from the merchant, routed through the card network, and returned to the customer. |
| Merchant Wins Dispute | Case Managers | Confirmation | The merchant has won the dispute. The customer will not receive a refund of the disputed funds. |
ACH processing tasksCopy link to clipboard
| Task Name | Default Group | Task Type | Description |
|---|---|---|---|
| ACH Network Validity | Case Workers | Decision | Ensure the ACH dispute that was filed is handled within the ACH Network system. |
| Inform ACH Network | ACH Operators | Confirmation | Send the dispute updates to all relevant parties: the ACH Network, the Originating Depository Financial Institution (ODFI), the Receiving Depository Financial Institution (RDFI), and the merchant. |
Closure taskCopy link to clipboard
| Task Name | Default Group | Task Type | Description |
|---|---|---|---|
| Notify Customer | Case Workers | Confirmation | Email the customer about the dispute's outcome. |
Note: Once you're comfortable using Studio, you can also create tasks from the Workflow tab in case types.
Step 2. Configure the workflowCopy link to clipboard
Now that your tasks are in place, let's transform them into a streamlined workflow.
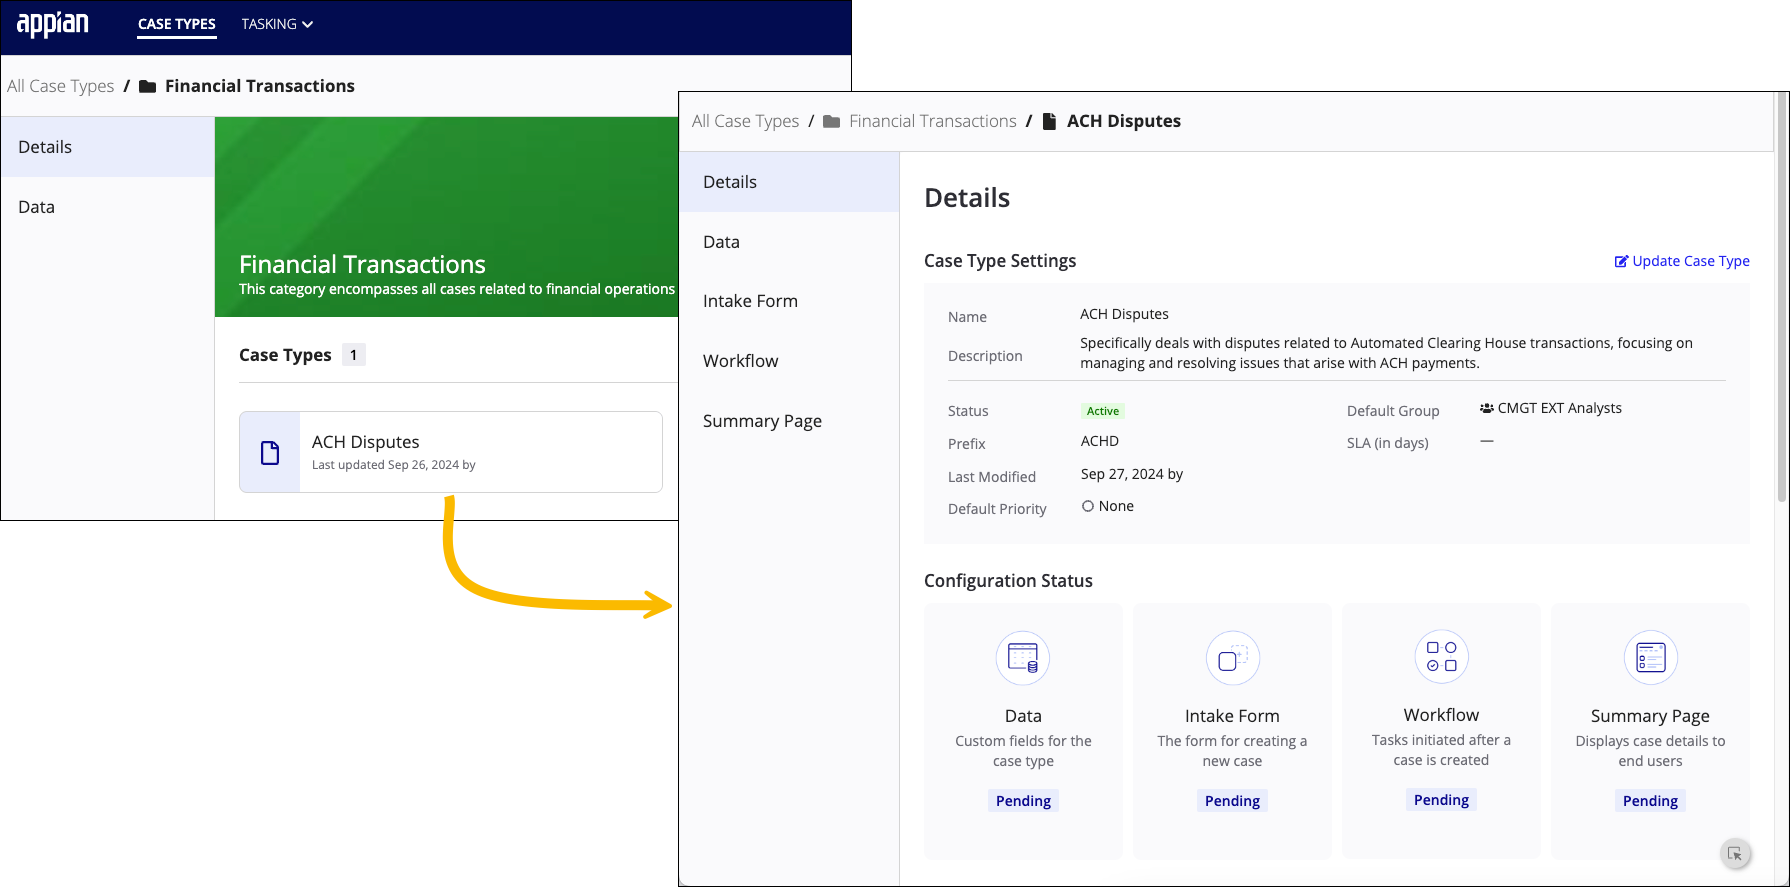
- From the Details tab of a case category, click the case type to which you want to add a workflow.
Result: The Details tab for the case type displays.
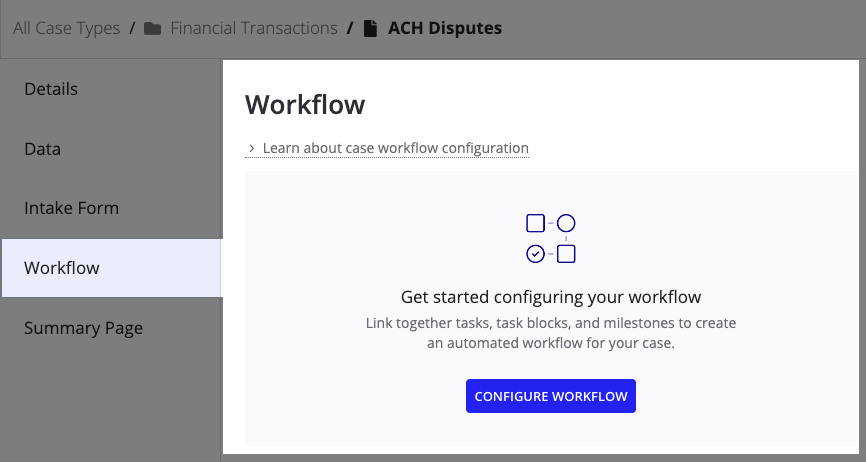
- Click the Workflow tab.
Result: The Workflow tab displays.
- Click CONFIGURE WORKFLOW.
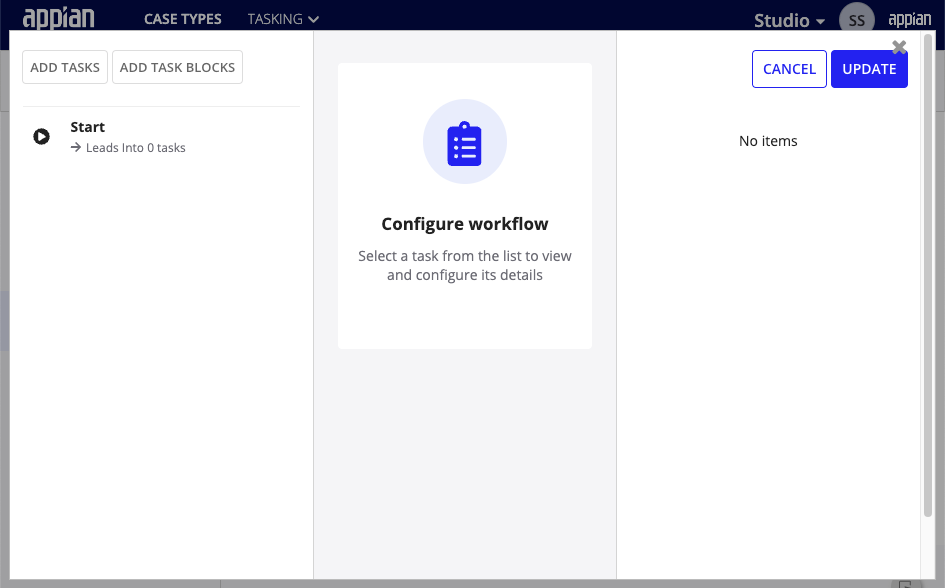
Result: The Configure workflow window displays.
- Click ADD TASKS.
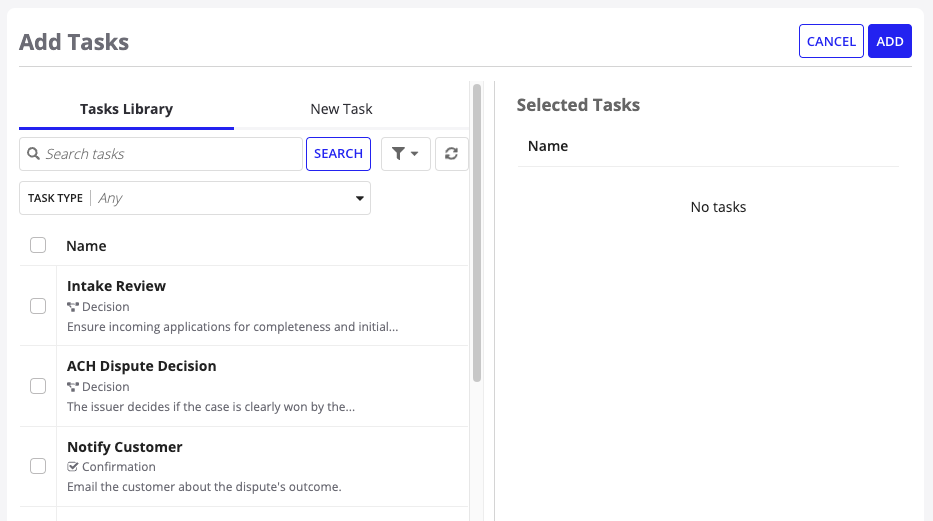
Result: The Add Tasks window displays. The Add Tasks window is divided into two main sections:
- Tasks Library: This section allows you to browse or search for predefined tasks. You can use the search bar to quickly find specific tasks or filter tasks by type using the dropdown menu.
- Selected Tasks: This pane displays the tasks you have chosen to add to your workflow. As you select tasks from the Tasks Library, they will appear in this area, providing a clear overview of what you have included before finalizing your choices.
- Tasks Library: This section allows you to browse or search for predefined tasks. You can use the search bar to quickly find specific tasks or filter tasks by type using the dropdown menu.
- Select the checkboxes next to all of the tasks you created in Step 1. Create tasks then click ADD.
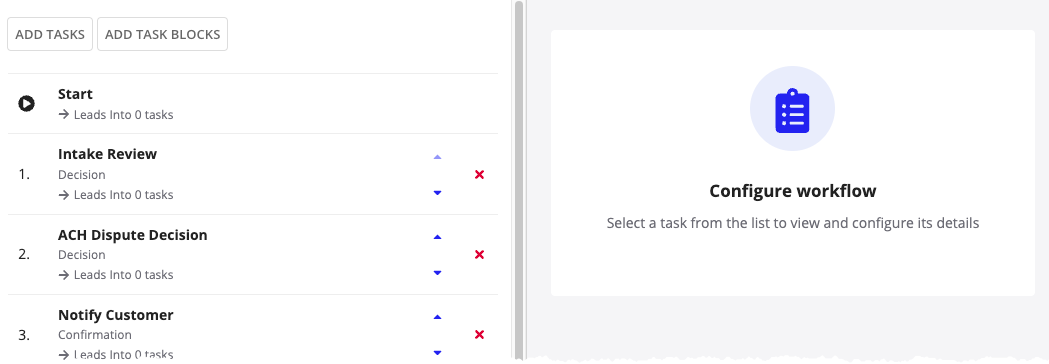
Result: The Configure workflow window displays again with all of the tasks that you added displaying in the left panel. -
Select a task from the list to see and configure its details. Refer to the configuration information provided in this table:
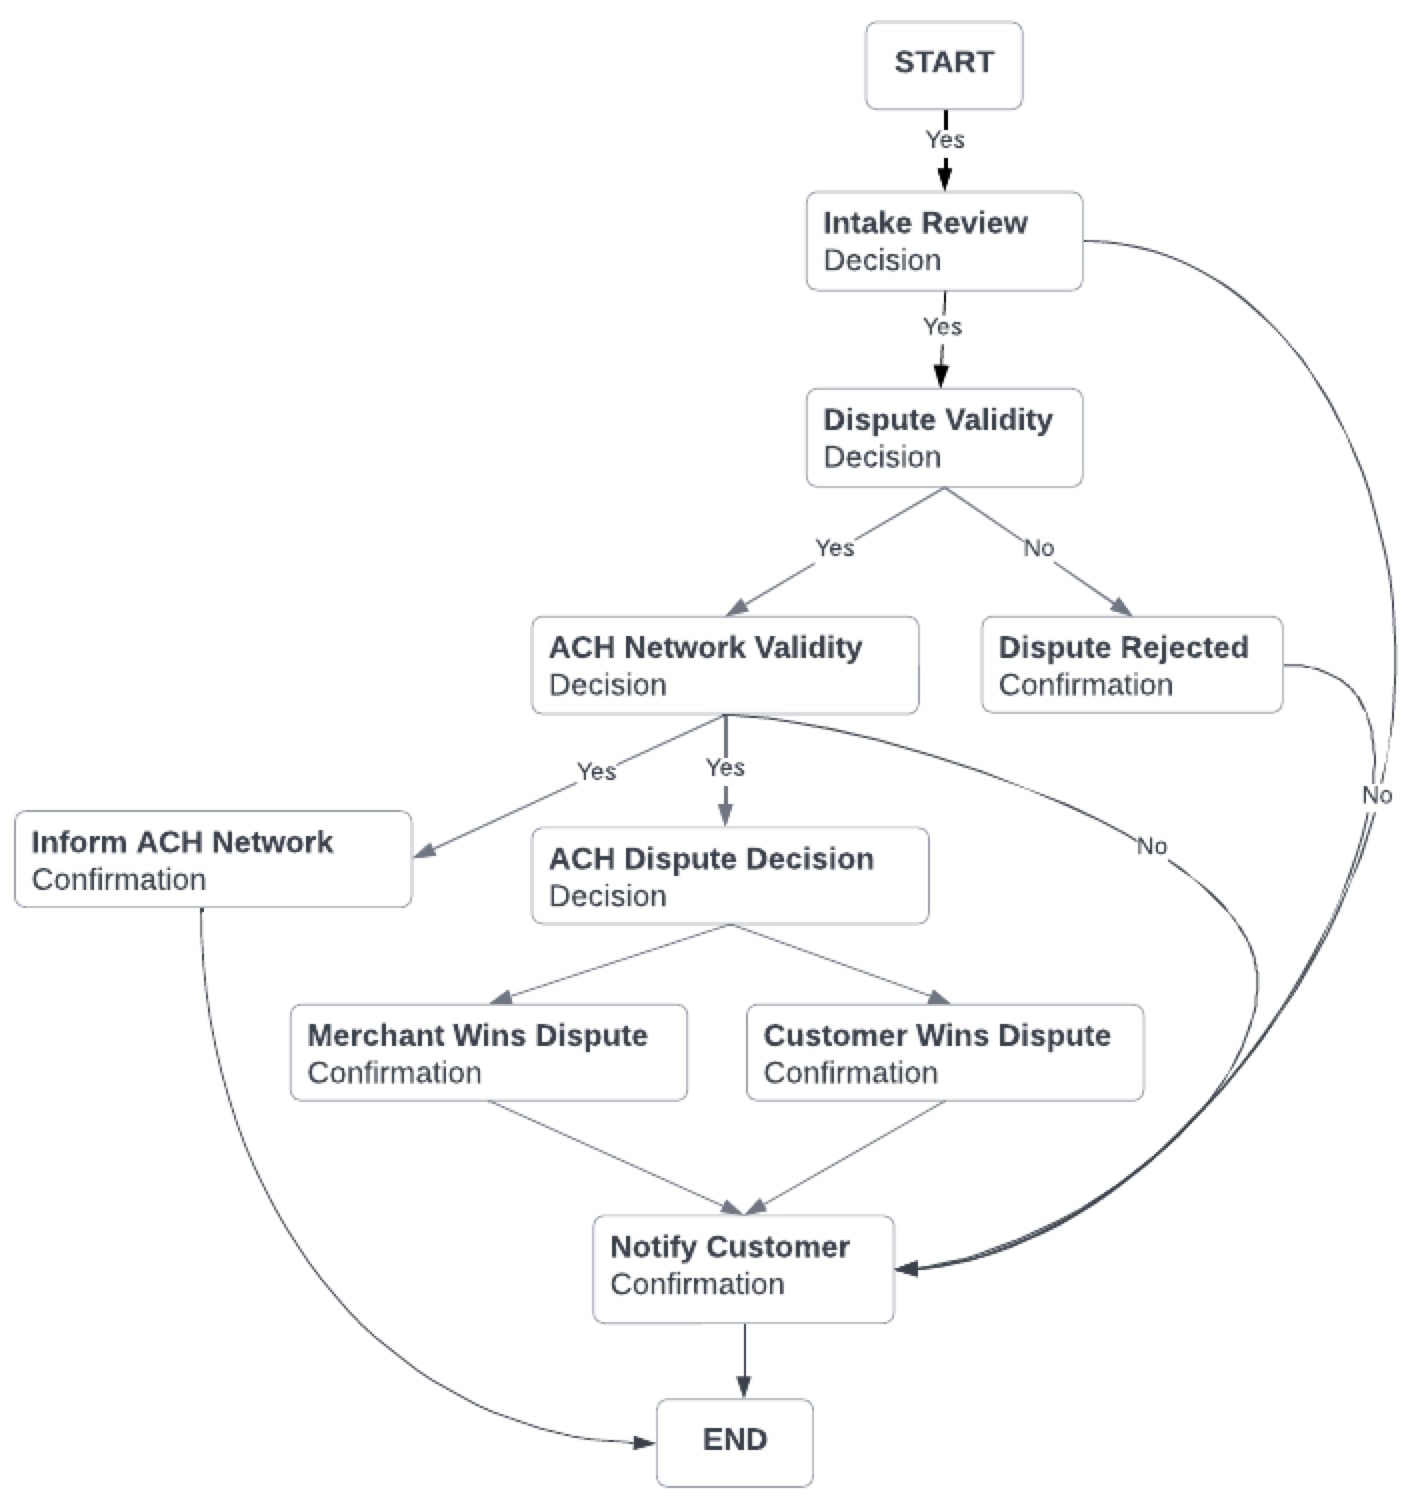
Task Details Start Click ADD DEPENDENT and select Intake Review Intake Review In the Workflow Settings, select:
- Dispute Validity (Yes Response)
- Notify Customer (No Response)
Dispute Validity In the Workflow Settings, select: - ACH Network Validity (Yes Response)
- Dispute Rejected (No Response)
ACH Network Validity In the Workflow Settings, select: - ACH Dispute Decision (Yes Response)
- Inform ACH Network (Yes Response)
- A No Response automatically leads to End
ACH Dispute Decision In the Workflow Settings, select: - Customer Wins Dispute (Yes, customer won)
- Merchant Wins Dispute (Yes, merchant won)
Customer Wins Dispute Click ADD DEPENDENT and select Notify Customer Merchant Wins Dispute Click ADD DEPENDENT and select Notify Customer Dispute Rejected Click ADD DEPENDENT and select Notify Customer Inform ACH Network Click ADD DEPENDENT and select End - Click UPDATE.
When you're complete, the workflow should look similar to this:
Congratulations! You've just set up your first workflow. If you're ready to fine-tune your workflow, check out the next section for some advanced configuration options.
Advanced configurationCopy link to clipboard
In this section, we'll show you how to enhance your workflow by adding some additional tasks, creating milestones, and using task blocks. These additions can help you manage more complex scenarios, like handling dispute challenges and tracking ongoing cases, while organizing key stages of your workflow. Task blocks, which group tasks into sequences, add even more efficiency since they can be used as a template when configuring new case workflows.
Add additional dispute tasks to your workflowCopy link to clipboard
In this tutorial, we've kept things simple to make it easy to follow and learn. However, you'll probably want to add more advanced tasks to handle dispute challenges, upload documents, and track ongoing dispute statuses. Here are some tasks that we recommend adding when you're ready:
| Task Name | Default Group | Task Type | Description |
|---|---|---|---|
| Merchant Dispute Challenge | ACH Operators | Decision | Merchants can choose to challenge the disputes when they feel the disputes are wrongly raised. |
| Re-evaluate Dispute | ACH Operators | Document Upload | Allows merchants to upload supporting documents to defend their case against the dispute. |
| Dispute Ongoing? | Case Managers | Decision | Verifies whether a dispute is still valid or has been revoked/rejected by any party. |
After adding these tasks, your workflow will be more flexible and ready to handle complex situations. The extra decision points and document handling features will help your team manage disputes involving merchant challenges and multiple reviews more smoothly.
Add milestonesCopy link to clipboard
Milestones, which are color-coded and labeled, help you organize tasks visually. They are specific to each case type and can be managed exclusively within the Workflow page of that particular case type.
The following milestones each represent a crucial phase in the ACH dispute process. While we didn't set up milestones immediately, you can add them as part of the setup process when you're adding your tasks.
| Milestone | Description |
|---|---|
| Intake review | This milestone marks the beginning of the dispute process, where disputes are initially submitted and assessed for validity. It includes gathering necessary information from the customer through an intake form and initial verification of the details against ACH network criteria. |
| ACH decision | At this milestone, the workflow focuses on making key decisions based on the information gathered. This includes determining whether the dispute should be escalated for further processing or resolved based on existing data, and may involve reevaluating the initial information if new details emerge. |
| ACH processing | This milestone handles the core processing of the dispute, involving more detailed investigation and interactions with other parties, such as merchants. Tasks may include ongoing reviews, merchant challenges, and final decisions on the dispute, depending on the complexity and nature of the case. |
| Closure | The final milestone in the workflow where the dispute is formally resolved. This includes notifying all parties involved of the outcome and closing out the case in the system. It ensures that all necessary documentation is completed and that the resolution is recorded for future reference. |
To add milestones to your workflow, complete the following steps:
- On the Workflow tab, click Update next to the Milestone heading.
Result: The Milestone screen displays.
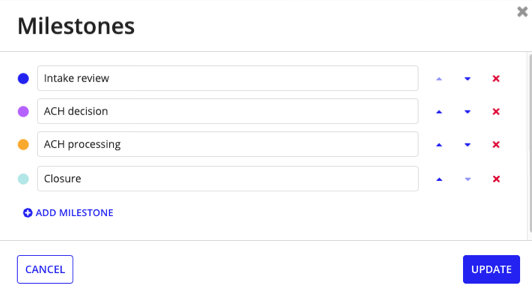
- Add the following milestones by clicking ADD MILESTONE for each new row.
- Intake review
- ACH decision
- ACH processing
- Closure
- Click Update.
- Click Update next to the Tasks heading.
Result: The Configure Workflow screen displays. -
Select a task from the list to see and configure its details. Refer to the milestone information provided in this table:
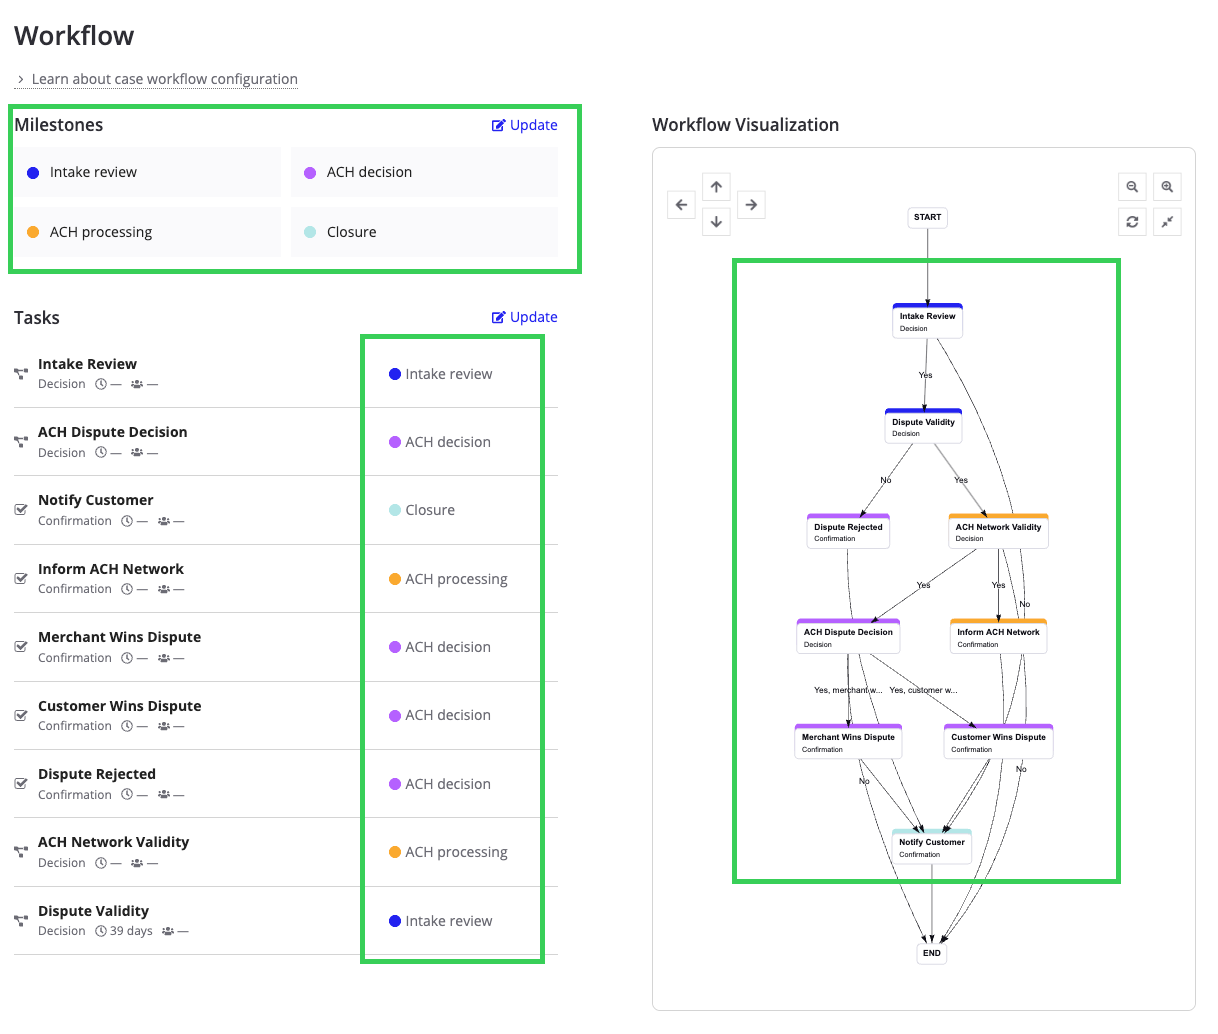
Task Milestone Intake Review Intake review Dispute Validity Intake review ACH Network Validity ACH processing ACH Dispute Decision ACH decision Customer Wins Dispute ACH decision Merchant Wins Dispute ACH decision Dispute Rejected ACH decision Inform ACH Network ACH processing Notify Customer Closure - Click Update.
Your milestones are now set and show up in the Milestones section, linked to their respective tasks. The workflow visualization updates automatically, giving you a clear view of how everything fits together.
Task blocksCopy link to clipboard
Task blocks are groups of tasks that are chained together in a sequence to create flexible pathways within a workflow. Task blocks aren't specific to a case type.
To create a task block:
- In the TASK BLOCKS page, click CREATE TASK BLOCK.
- Enter a name and description. Click NEXT.
- Click Add Tasks.
- Select the tasks you want to include in the task block.
- (Optional) Re-order the sequence of tasks in your task block using the up and down arrows in each block.
- Click ADD DEPENDENT to add dependents to each task. This sets the chronological order in which the tasks are done by selecting the task that should directly follow the current task.
- Click CREATE.
Note that task blocks can only be created and edited from the TASK BLOCKS page.
Congratulations!Copy link to clipboard
Congratulations on completing the tutorial! You've learned how to build a robust ACH dispute workflow from start to finish.
If you're ready to take your knowledge further, dive into task forms or learn how to configure attended and unattended tasks to save even more time by automating repetitive steps in your workflows.


