OverviewCopy link to clipboard
This page provides guidance for deploying a configured or customized Case Management Studio application from a source environment such as development to a target environment. If Case Management Studio is not configured or customized, follow the standard Case Management Studio installation steps.
These guidelines include procedures for deploying your Case Management Studio application. The guidelines may vary based on your Case Management Studio configurations, customizations, or your organization's deployment practices.
There are 7 steps in the deployment process.
- Prepare the platform
- Set up service accounts and API keys
- Run database scripts
- Prepare Appian applications
- Deploy Appian applications
- Adjust environment-specific IDs
- Complete public portal configuration
Step 1: Prepare the target environment and verify pluginsCopy link to clipboard
- Make sure the target environment meets the minimum platform version specified in the Case Management Studio installation guide and any deployed modules. If it doesn't, contact Appian Support to upgrade the platform.
- Ensure the target environment has the necessary plugins, as specified in the Case Management Studio installation guide and any modules you are deploying.
- Confirm with Appian Support that your platform version is correctly configured for your needs.
Step 2: Set up service accounts and API keysCopy link to clipboard
Deploying the public portal for the first timeCopy link to clipboard
- Set up the service account and API Key in the target environment by creating the API Key and a new service account in the Admin Console.
- Use the username:
portalServiceAccount. - Add the
portalServiceAccountservice account to theService Accountsgroup.
- Use the username:
- Save the API Key and copy its value for use later in the import customization file (ICF) for both the CMGT Portal connected system and CMGT CB Portal connected system. You'll modify the ICF later when you deploy your application.
Deploying the Public Self-Registration module for the first timeCopy link to clipboard
- Set up the service account and API Key in the target environment by creating the API Key and a new service account in the Admin Console.
- Use the username:
claimCase - Add the
claimCaseservice account to theCMGT Service AccountsandService Accountsgroups.
- Use the username:
- Save the API Key and copy the value for use later in the import customization file (ICF) for the LA connected system. You'll modify the ICF later when you deploy your application.
Step 3: Run database scriptsCopy link to clipboard
Create a combined SQL script with the following components and execute it in the target environment to set up and migrate the database with the required data and structure.
- Initial Database Scripts: Use these scripts only for first-time deployments. They are included with the base application and module applications in the original download package.
- Customization SQL Scripts: Include these scripts in every deployment. Ensure they are re-runnable so you can resolve any issues that might arise after deployment.
- Studio configuration SQL Scripts: Use these scripts to migrate Studio configurations (e.g., case types, tasks, task blocks, workflow, studio custom fields). You can export the structure and data of these scripts from
phpMyAdmin. Make sure to include the necessary key constraints and ensure these scripts are re-runnable in case you need to re-deploy the package to resolve issues.
Script types and namesCopy link to clipboard
Note: The actual set of scripts will vary depending on the case types, categories, and choice fields configured in your environment.
Replace {Specific_Category_Tables} and {Specific_Case_Tables} with the appropriate table names relevant to your configuration.
| Script Type | Scripts |
|---|---|
| INSERT table | CMGT_WFL_CFG_CASE_TYPE_WORKFLOW_TASK CMGT_WFL_CFG_CASE_TYPE_WORKFLOW_TASK_BRANCH CMGT_WFL_CFG_REFERENCE_MILESTONE CMGT_WFL_CFG_REFERENCE_TASK CMGT_WFL_CFG_TASK_BLOCK CMGT_WFL_CFG_TASK_BLOCK_TASK CMGT_WFL_CFG_TASK_RESPONSE_OPTION CMGT_CFG_CASE_TYPE |
| CREATE table | CMGT_CATEGORY__{Specific_Category_Tables} CMGT_CFG_CATEGORY__{Specific_Category_Tables} CMGT_CFG_CB_ALL_CASES_DATA_{Specific_Case_Tables} |
| ALTER table | CMGT_CB_CASE_LEVEL_DATA |
| INSERT scripts for tables | CMGT_CB_CASE_LEVEL_DATA CMGT_CATEGORY_{Specific_Category_Tables} CMGT_CFG_CATEGORY_{Specific_Category_Tables} CMGT_CFG_CB_ALL_CASES_DATA_{Specific_Category_Tables} |
Step 4: Prepare Appian applicationsCopy link to clipboard
- Ensure the applications include all configurations from the source environment that you want to deploy to the target environment.
- Add any case category images to the CMGT Studio Generated Objects application before deployment. These images won't appear in the missing precedents check because they are only referenced by an ID entry in the database.
- Ensure the Case Management Custom Objects application contains the branding files and corresponding images uploaded via the Solutions Hub.
Step 5: Deploy Appian applicationsCopy link to clipboard
Deploy the following Appian applications to your target environment:
- CMGT Case Management Studio Base
- CMGT Studio Generated Objects (CMGT)
- CMGT Studio Module (CMGT_WFL)
- CMGT Portal Module (CMGT)
- Case Management Custom Objects
- Solutions Hub (Only required for first time deployment)
- Any other modules you intend to deploy
You can deploy applications manually or use compare and deploy.
Manually deploy an applicationCopy link to clipboard
To manually deploy an application:
- Manually export the application as a combined zip file.
- Download the zip file, as well as the provided ICF and API keys.
- Modify the ICF to include the correct base URLs and API keys that you saved from the previous step.
- Check for errors and missing precedents, then import the combined zip file and the modified ICF into the target environment.
Deploy an application using compare and deployCopy link to clipboard
To deploy using compare and deploy:
-
(Only for first-time application deployments) Create a deployment package for each application without any objects and deploy each application using compare and deploy.
Note: This step is required because the combined application approach does not deploy individual applications (such as CMGT Case Management Studio Base). Once all applications are in the target environment, proceed with the next steps to create and deploy the combined application that contains all application objects.
- Create a new application with the following properties:
- Name:
CMGT Combined Application - Description: Contains all of the objects for CMGT in one application for ease of deployment with Compare & Deploy. Base application + modules + studio generated objects
- Prefix: Leave blank. This application is only for deployment, not for development; so, no prefix is needed.
- Generate groups and folders to secure and organize objects: Uncheck this checkbox.
- Name:
-
Configure security for the application:
Group Permission Level Administrators Administrator Users Viewer - Click View Packages and select CMGT Combined Application.
You'll notice the contents view for the package is empty right now. - Click ADD EXISTING > APPLICATION CONTENTS.
The Add Application Contents window displays. - Add the following applications:
- CMGT Case Management Studio Base
- CMGT Studio Module (CMGT_WFL)
- CMGT Studio Generated Objects (CMGT)
- Any modules you plan to deploy
- Case Management Custom Objects
- Solutions Hub (Only required for first time deployment)
- Identify and add any missing precedents.
- Click COMPARE AND DEPLOY.
- Select your target environment then click NEXT.
- Click DATABASE SCRIPTS and upload all of the following required database scripts in the following order:
- 01.CaseManagementStudioBasevn.n.n
- 01.StudioModulevn.n.n
- 01.PortalModulevn.n.n (any module scripts)
- Any scripts for table alterations or new tables
- Any scripts for transferring Studio configuration data
- In the IMPORT CUSTOMIZATION FILE pane, upload a combined import configuration file to update any configurations across the applications and modules being deployed. Include the base URLs and the API keys as configurations for the Portal Connected System, CB Portal Connected System, and the LA Connected System (if applicable).
Now your package is ready to deploy!
Step 6. Adjust environment-specific IDsCopy link to clipboard
The following Case Management Studio configuration tables contain environment-specific values that can vary, such as group, folder, and document IDs. Update these values post-deployment to match the target environment. After updating the database tables, re-sync the corresponding record types to reflect the changes.
| Table | Column(s) | Appian object ID it represents |
|---|---|---|
| CMGT_WFL_CFG_CASE_TYPE_WORKFLOW_TASK | DEFAULT_GROUP_ASSIGNEE | Group ID |
| CMGT_WFL_CFG_REFERENCE_TASK | DEFAULT_GROUP_ASSIGNEE | Group ID |
| CMGT_WFL_CFG_TASK_BLOCK_TASK | DEFAULT_GROUP_ASSIGNEE | Group ID |
| CMGT_CFG_CASE_TYPE | APPIAN_IMAGE_ID | Document ID |
| CMGT_CFG_CASE_TYPE | DEFAULT_GROUP_ASSIGNEE | Group ID |
Step 7. Complete public portal configurationCopy link to clipboard
In this step, you'll finalize the setup of the public portal.
Add the service accountCopy link to clipboard
- Open the Object View in the target environment.
- Find and open the
CMGT Service Accountsgroup. - Add the
portalServiceAccountservice account to theCMGT Service Accountsgroup.
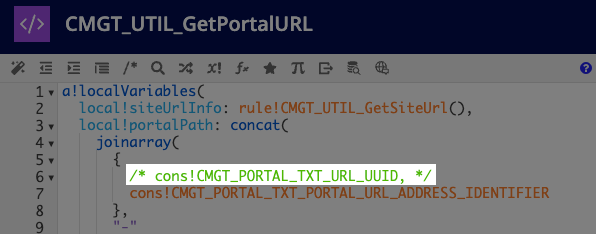
Adjust portal URLCopy link to clipboard
If you are deploying the Case Management Studio portal to an environment that doesn't use UUIDs for portal URLs:
- Open the
CMGT_UTIL_GetPortalURLexpression rule in the target environment. - Comment out the
cons!CMGT_PORTAL_TXT_URL_UUIDline. - Click SAVE.
- Republish the Case Management Studio portal.