Appian Requirements Management Overview
Requirement Management Support and Release History
Requirements Management 1.5 Release Notes
What is Appian Requirements Management?
Installing Requirements Management
Setting Up Inline Editing for Office 365
Overview
Solutions Hub Installation Guide
Solutions Hub User Guide
Home Page Overview
Creating a New Requirement
Accessing RM Reports
Accessing Requirement Management Settings Site
Configuring Questionnaires
Configuring Categories
Configuring Checklist Items
Configuring Checklists
Configuring Checklist Recommendations
Configuring Requirement Reviews
Configuring Document Review
Modifying Dropdown Lists
Modifying Document Templates
Modifying Contract File Folder Structure and Intelligent Filing
Migrating Data
Configuring Intelligent Requirement Codes
Groups Reference Page
Data Relationships
Reference Data Tables
Setting Up Inline Editing for Office 365
Share
This content applies solely to Requirements Management, which must be purchased separately from the Appian base platform. This content was written for Appian 21.4 and may not reflect the interfaces or functionality of other Appian versions.
Introduction
RM comes with one integration to a third-party system. In order to utilize this integration, you will need to set up your Microsoft Azure environment, create an API key for the connected system object, and configure the application to turn on inline editing. Inline editing allows end users to open documents in Microsoft Office 365 and collaborate with team members until documents are complete. This page provides instructions for setting up Microsoft Azure , Microsoft Office Document Folder and configuring the RM solution .
Set up Microsoft Azure
In order to use in-line editing, the solution will need a location in your Microsoft Azure environment to store the documents when editing is occurring.
To set up a location in Microsoft Azure:
Access your Azure environment .
In the search bar, search for App Registrations .
Select +New Registration .
Fill out application registration, enter an application name such as Requirements Management or RM, and define who can access the application.
Click Register to complete registration of the application.
Select API Permissions .
Select +Add a permission .
From Microsoft APIs, select Microsoft Graph .
Select Application Permissions .
Expand files section, select Files.ReadWrite.All .
Click Add Permissions .
On the API permissions page, select Grant Admin Consent for Appian . A global admin may be required to do this .
In the Manage section on the left side of the screen, select Certificates & Secrets .
In the Client Secrets section, select +New Client Secret .
Add a Description of the client secret.
Select a timeframe for Expires .
Click Add under expires timeframe.
Copy and Save Value for your records.
Set up Microsoft Office Document Folder
After setting up the Azure environment, establish a folder on Sharepoint or OneDrive to store the documents Appian is opening for in-line editing.
Create a folder that can be associated easily with the RM solution.
Find the Folder ID for the folder you just created.
Get the Site ID for the site where the drive for the folder resides.
Get the Drive ID of the drive storing your documents using the Site ID retrieved in the previous step.
Get the Folder ID of the folder established in step one.
Set the constant AS_RM_BOL_OFFICE_365 as true to use Office 365. The default value is false.
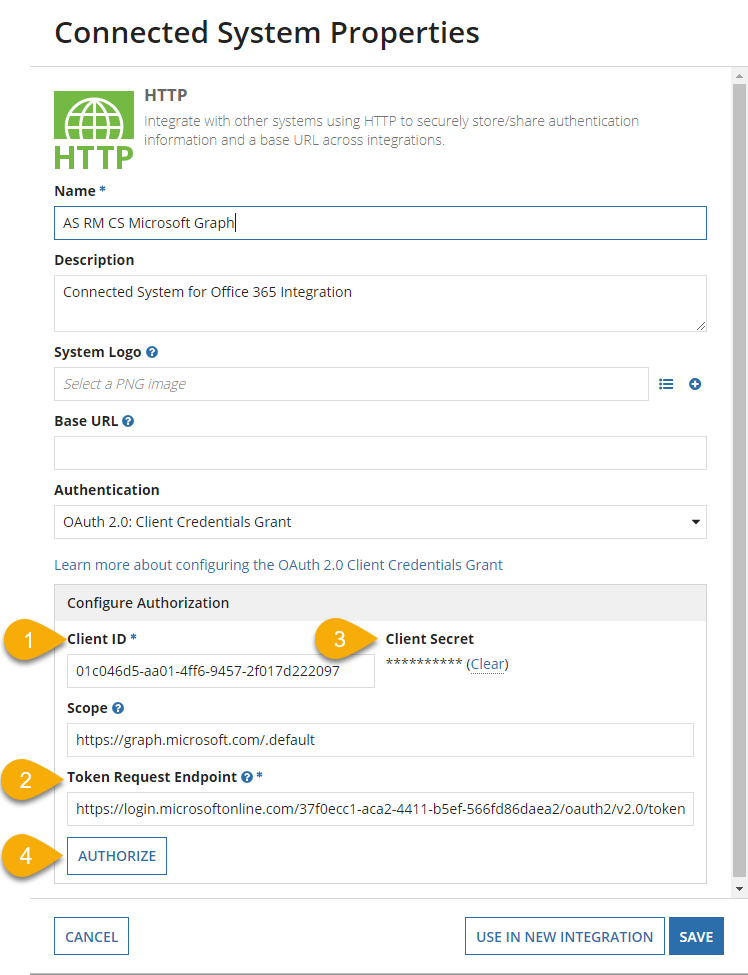
Within the RM application, open AS RM CS Microsoft Graph connected system.
Update the Client ID field with the Client ID of the Application created in Microsoft Azure setup step.
Update the Token Request Endpoint with the Tenant ID found on the Azure Application overview from Microsoft Azure setup step.
Enter the Client Secret saved during the Microsoft Azure setup step.
Click Authorize to confirm successful authorization.
Update AS_RM_SHAREPOINT_DRIVE_ID constant with Drive ID from Microsoft Office Document setup.
Update AS_RM_SHAREPOINT_FOLDER_ID constant with Folder id from Microsoft Office Document setup.