| The capabilities described on this page are included in Appian's standard capability tier. Usage limits may apply. |
There are times when you want to provide initial values for a site or portal page. For example, you may want give users a way to open a dashboard with filters already applied. Rule inputs allow you to pass data into an interface to set these initial values. URL parameters allow you to pass data into these rule inputs through links.
This page provides the following information about URL parameters:
See also:
URL parameters allow you to pass information to a web page. They can be used to tell a web page what to display or how to behave.
URL parameters typically follow a question mark (?) in a URL. For example, if you search https://careers.appian.com/jobs/ for jobs with the keyword software in Mclean, Virginia, the link updates to:
1
https://careers.appian.com/jobs/`?search=software&location=McLean%2C+Virginia`
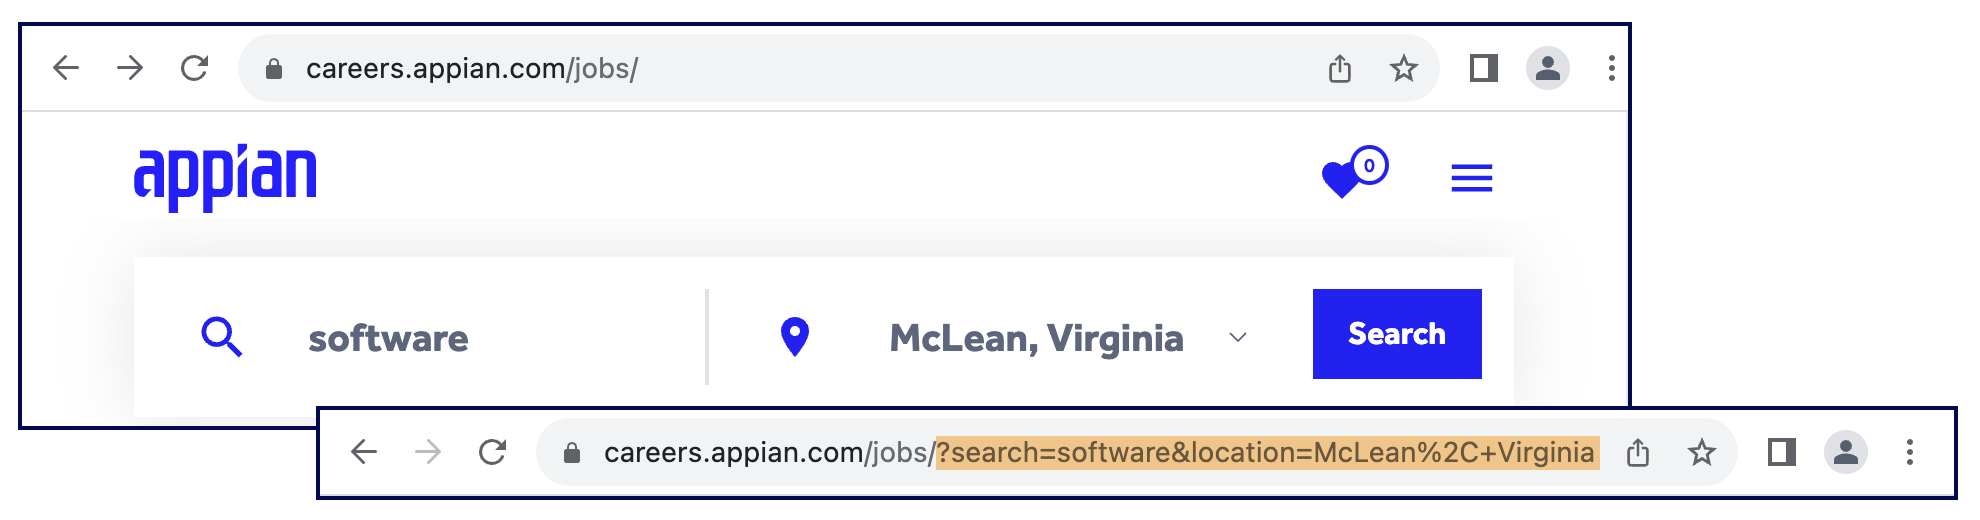
You could send this link to someone else and when they click it, the results will only display software jobs in McLean.
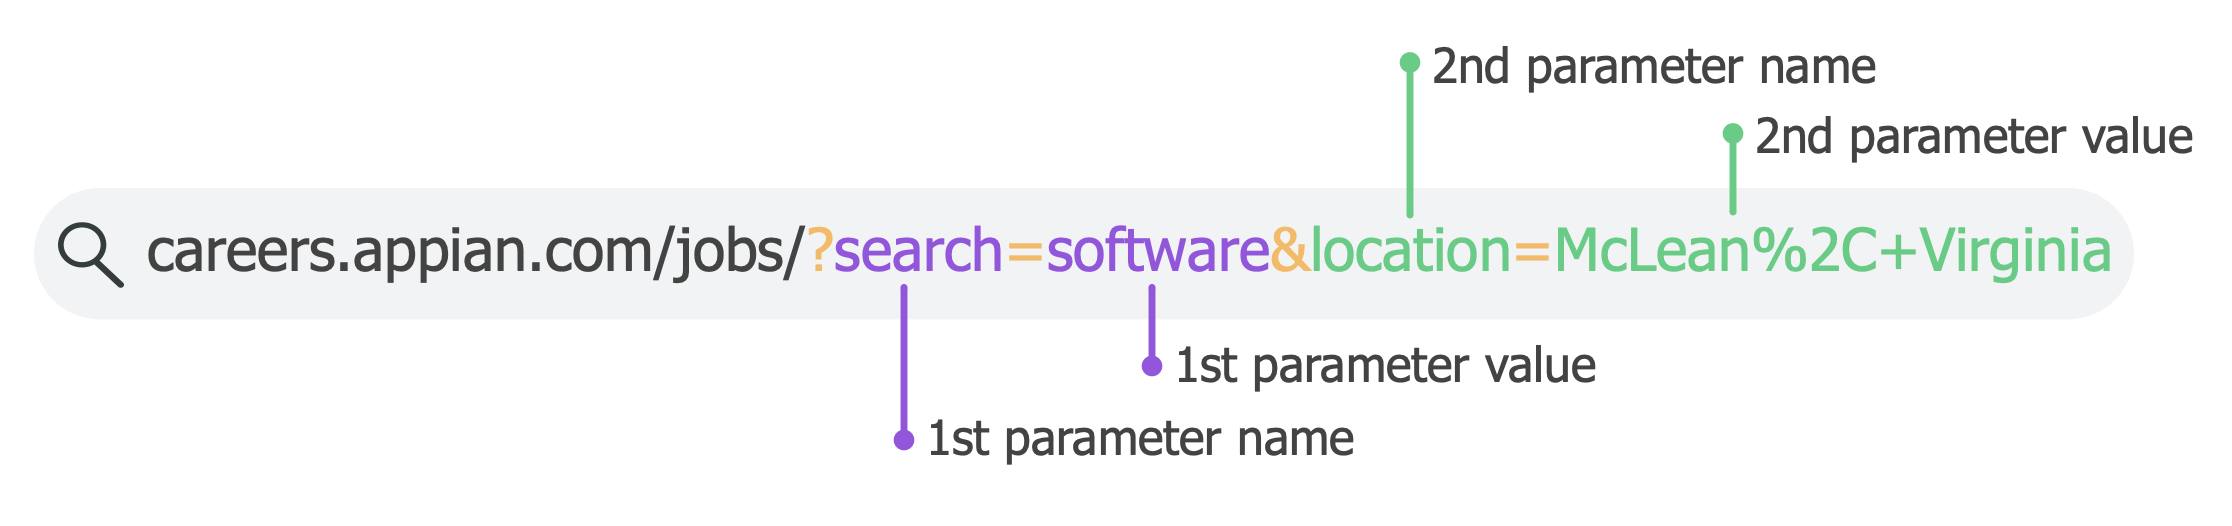
In this example, the first URL parameter is search=software and the second URL parameter is location=McLean%2C+Virginia. Note that %2C replaces the comma.
URL parameters can also work with site and portal pages. They are just web pages after all.
Rule inputs allow you to pass data to an object. For example, you can use a rule input in an interface to determine what information displays when it first loads. This is how values are passed from a process model into an interface.
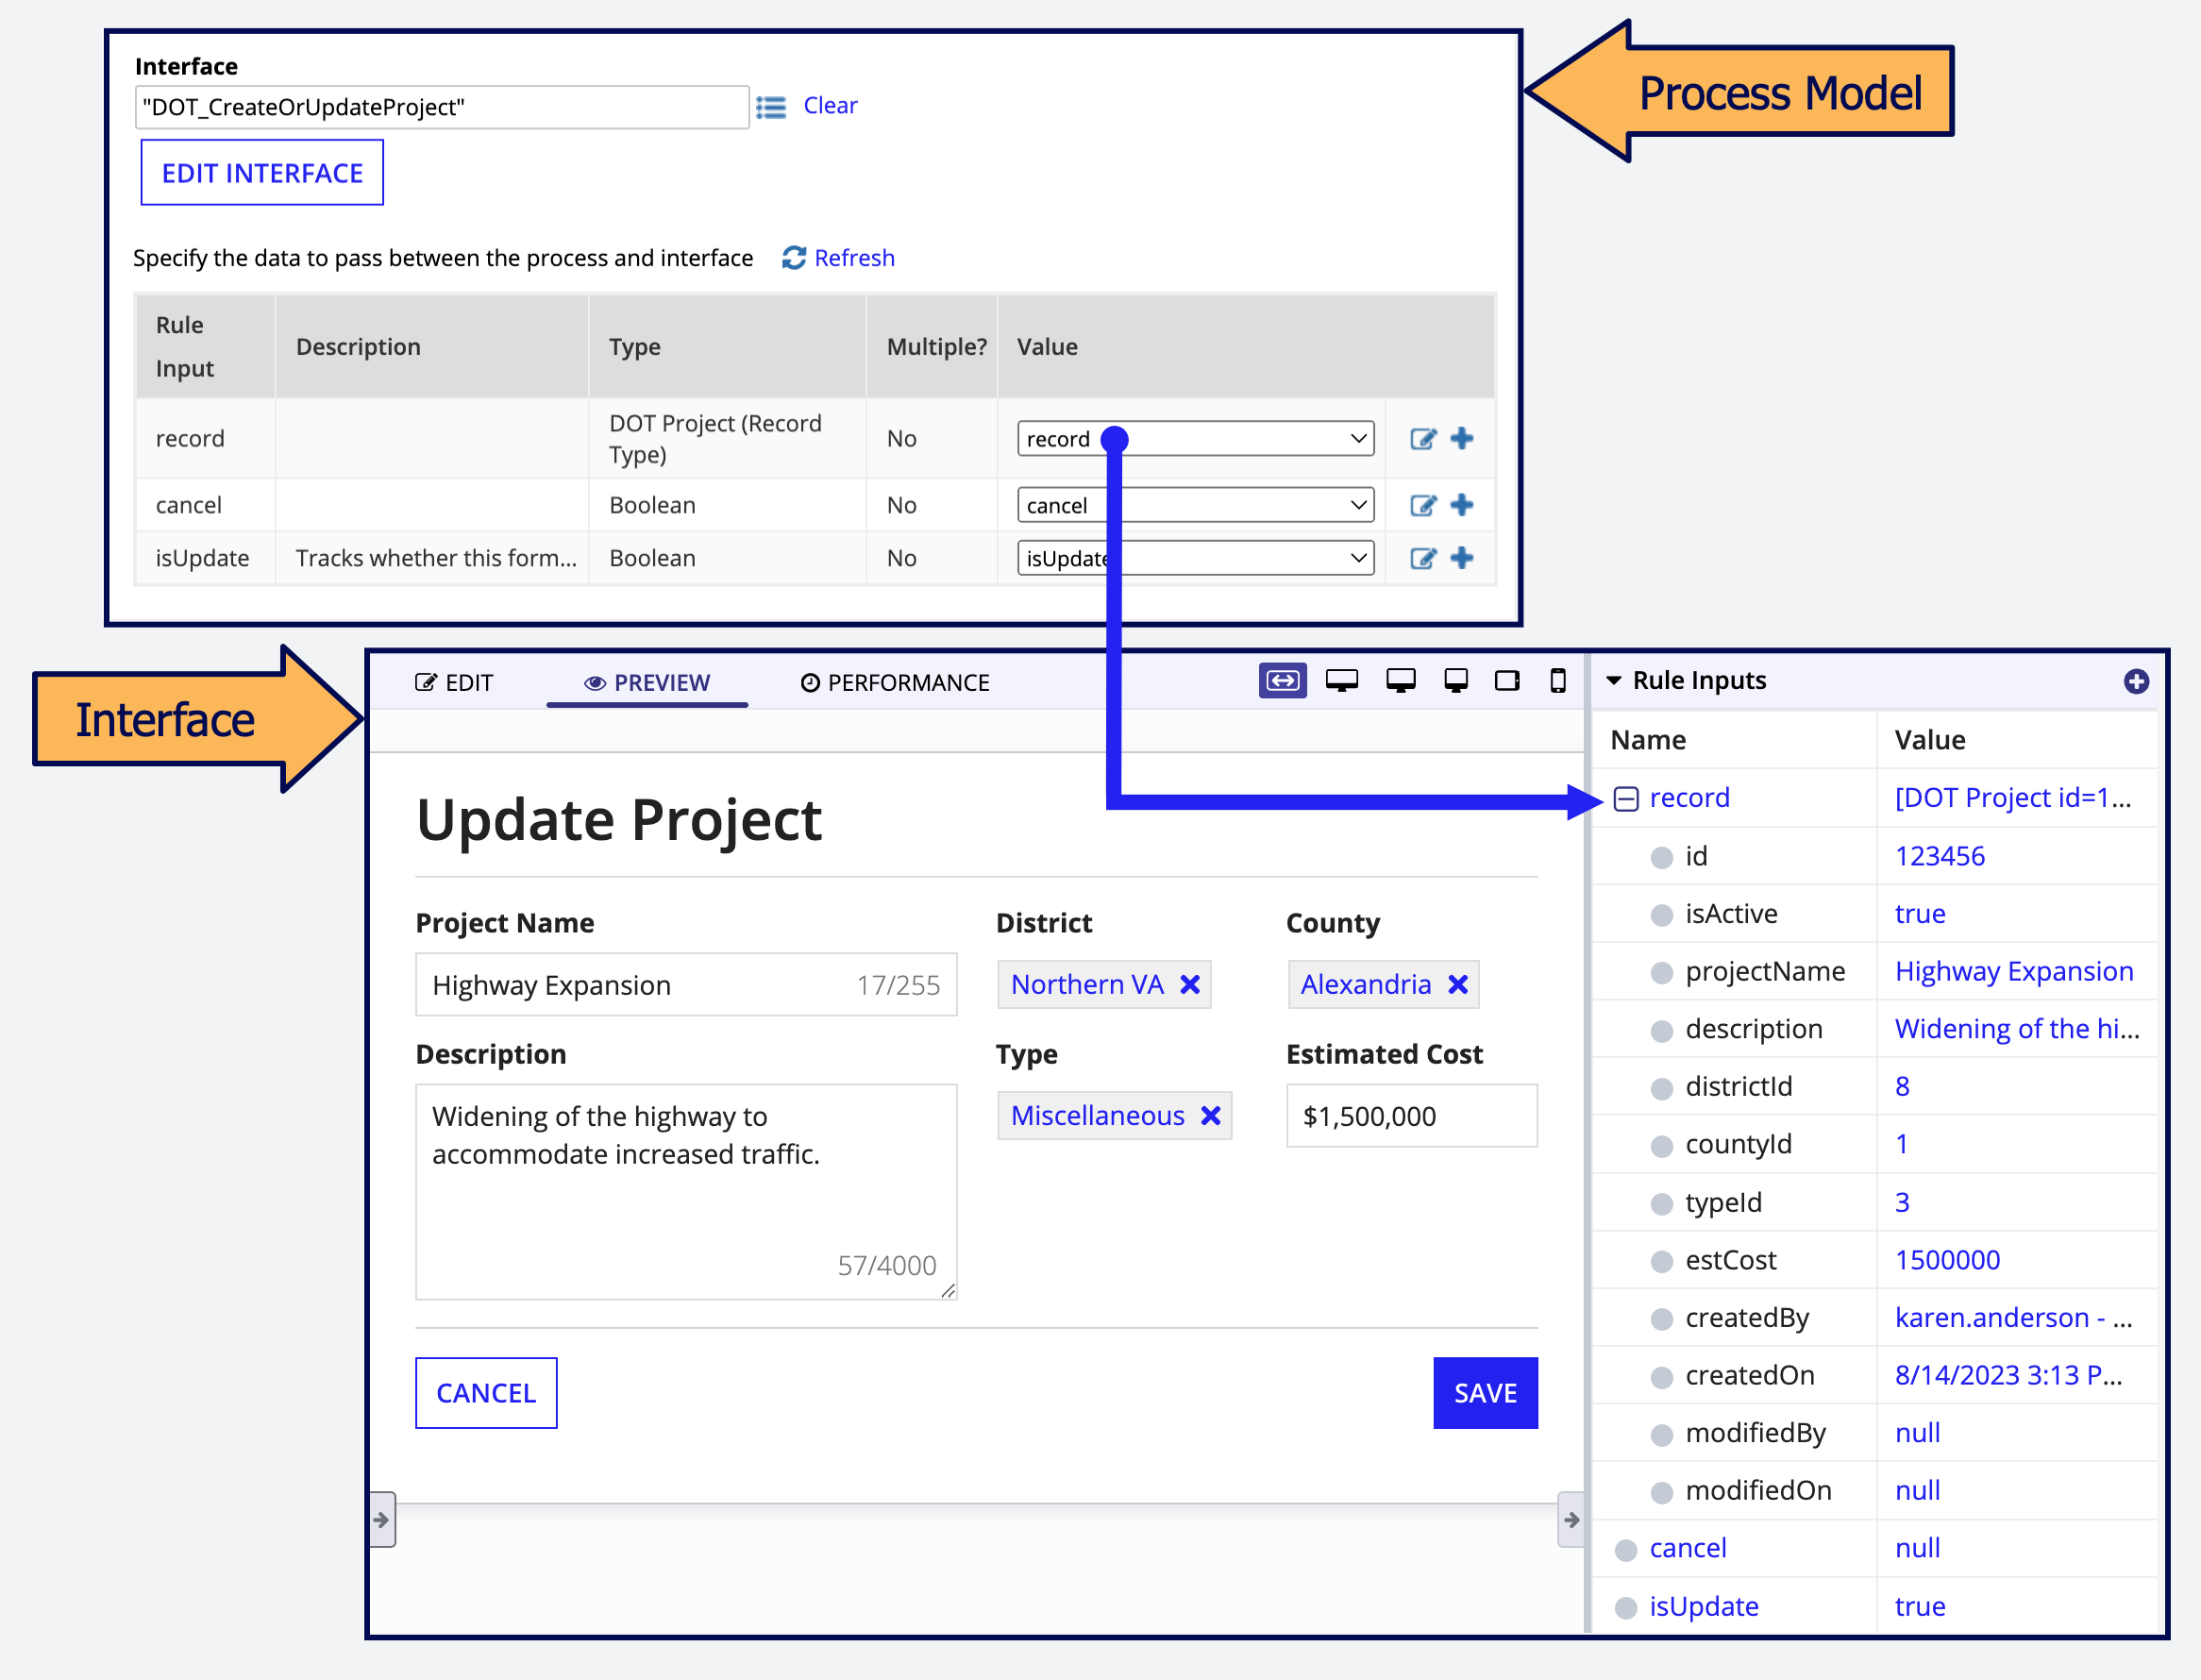

When you use an interface with a rule input as a site or portal page, you can set the value of the rule input using a link with URL parameters.
For example, imagine you have an interface with a rule input that is used for a grid filter. You can create a link that will use a URL parameter to set the value of the rule input using a!urlForSite() or a!urlForPortal(). Whenever a user clicks the link, the grid loads and is automatically filtered using the value of the URL parameter. For an in-depth walkthrough, see Using URL parameters to link to a page.
When you're configuring rule inputs for a page, you can choose to set a default value for each rule input.
You may want to use a default value to:
The rule input will use the default value when:
If the default value isn't configured and a URL parameter doesn't provide the value, the rule input value is null.
Tip: If the URL has the URL parameter name without a value, such as dot.appianportals.com/dot/page/projects?county=, the rule input value will be null, not the default value.
You can use URL parameters whenever you want a site or portal page to load specific information. For example, you can use them to:
This section covers several scenarios that URL parameters are especially useful for. To help you visualize how these could work in a real-world scenario, we'll use a Department of Transportation (DOT) portal as a fictional example.
Tip: Keep in mind that for sites, there may be other options for linking that don't require URL parameters. For example, you can send a process task link in an email to allow a user to perform the next step in a process. And if you want to link to information about a specific record, you could always link to a record view using a record link component.
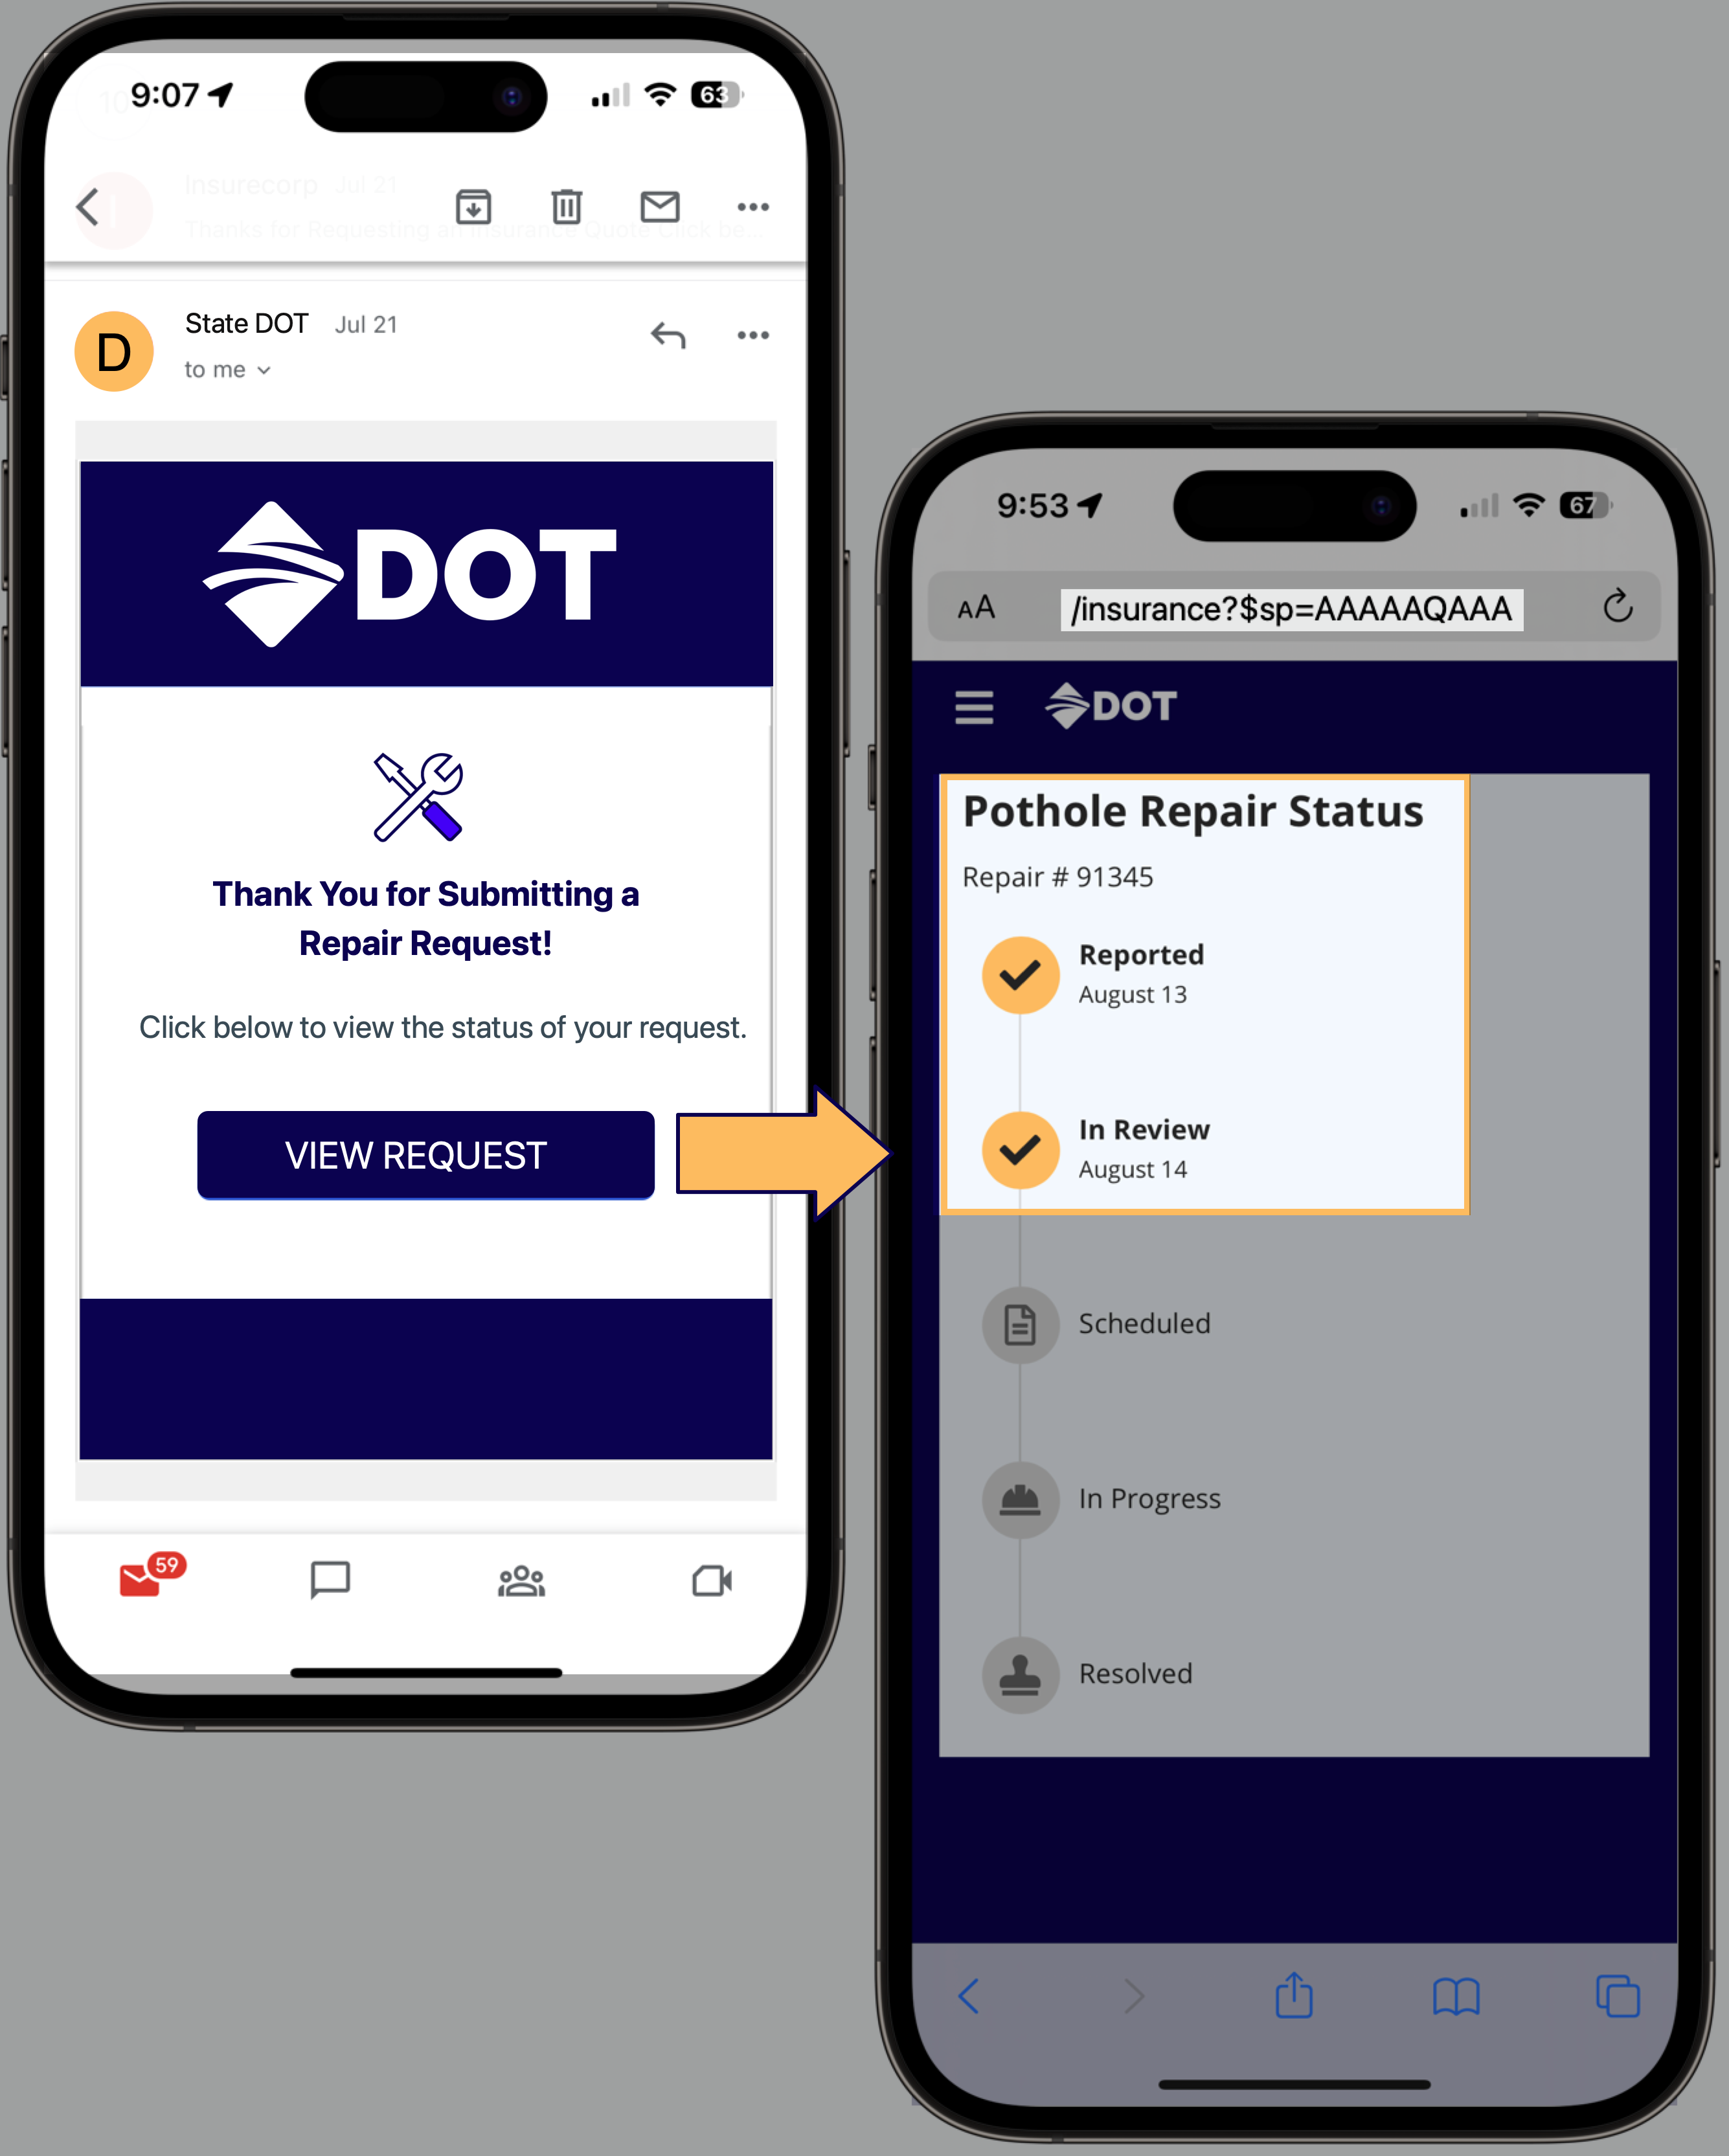
In some scenarios, you may want users to see the results of a submitted form so they can track the status of their submission or follow up on it. With URL parameters, you can create a link that allows a user to view information they submitted.
Note: Don't create portals that allow users to update information in a form they already submitted. If users need to update information they submitted, they should have an Appian account and update the information through a site rather than a portal.
After a user completes a request to fix a pothole, the DOT portal sends them an email with a link to their request so they can view its status.
After attending a defensive driving class, a user receives an email with a link to a survey asking them to evaluate the course. The link is unique to the user and is automatically associated with the course they attended.
You can use URL parameters to create a link to a grid or report that automatically filters the content so users can quickly view the most relevant information.
When a user clicks a link for project information for their county, a project grid opens that is automatically filtered by their county.

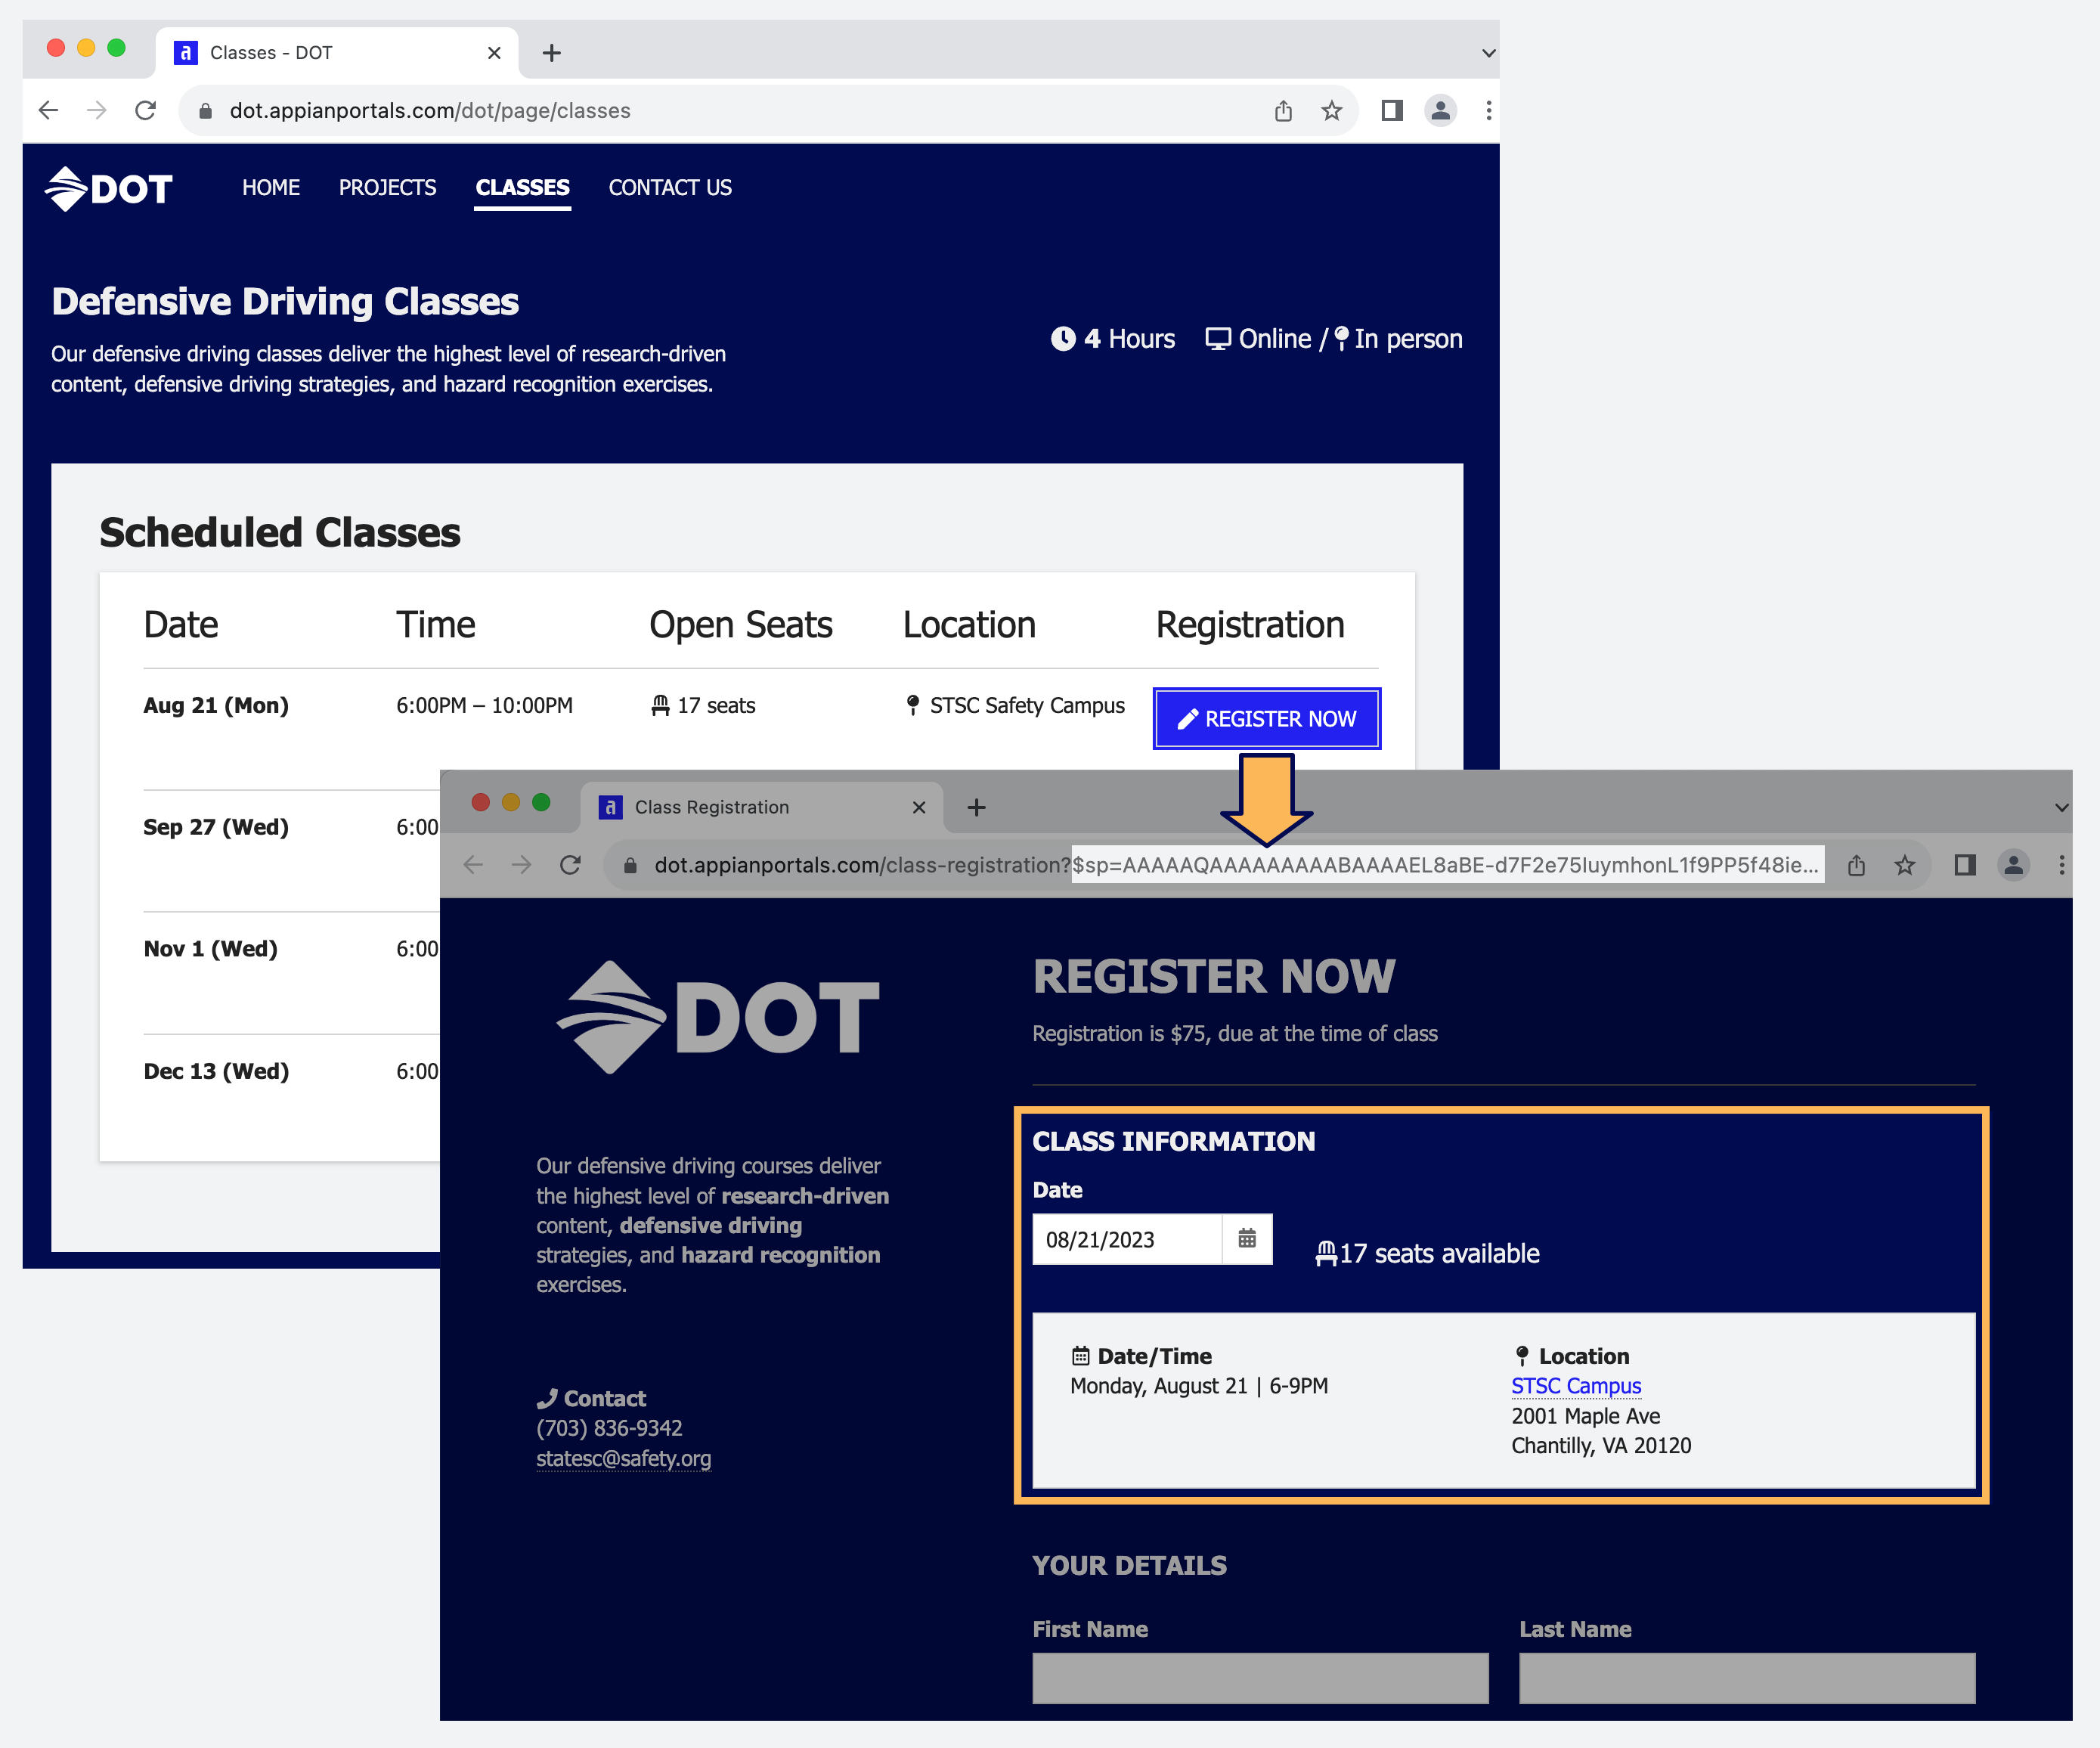
You can use URL parameters to create a form that is pre-populated with information about the request.
Note: In portals, don't use this method to pre-populate user-specific information on a form. Portals are intended for unauthenticated users to fill out generic forms.
When a user clicks a link to sign up for a specific driver safety class, the form automatically populates with information about the class, including date, time, and location.
You can use URL parameters to link to sites and portals using a!urlForSite() and a!urlForPortal(). These instructions walk you through:
a!urlForSite() or a!urlForPortal().Before you can use a URL parameter in a!urlForSite() or a!urlForPortal(), you need to set up the rule input that the URL parameter value will be passed to.
First, you will add rule inputs to the interface. Then, you will configure the rule inputs on the site or portal page.
For portals, you will also need to add a service account (if using encrypted URL parameters), then publish the portal.
The sections below walk you through each step.
To link to a site or portal using URL parameters, your interface must first have rule inputs configured.
Only certain rule inputs can be used to link to a page using URL parameters. See Rule inputs that can be used to set initial values for the requirements.
To add rule inputs to the interface you'll use as a site or portal page:
Configure the rule input properties:
| Property | Value |
|---|---|
| Name | The name of the rule input. |
| Description | (Optional) A description of the rule input's purpose. |
| Type | Use a supported data type:
|
| Array (multiple values) | Leave deselected |
For example, you could create a grid filter that can use a rule input to set the value of the filter, which would look something like the following.
This example uses data from the Appian Retail application, available for free in Appian Community Edition. To follow along with this example, go to Appian Community to request the latest Appian Community Edition site.
1
2
3
4
5
6
7
8
9
10
11
12
13
14
15
16
17
18
19
20
21
22
23
24
25
26
27
28
29
30
31
32
33
34
35
36
37
38
39
40
41
42
43
44
45
46
47
48
49
50
a!localVariables(
  local!subcategory: a!queryRecordType(
    recordType: 'recordType!{ef54f217-d426-4f2b-9955-3859c9919525}Product Subcategory',
    pagingInfo: a!pagingInfo(startIndex: 1, batchSize: 30)
  ).data,
  /*Create a rule input in your interface of type Number (Integer). Using the rule input as the value of the local variable allows you to pass a value into the interface*/
  local!selectedCategory: ri!category,
  {
    /*Use a dropdown instead of a user filter to filter the grid*/
    a!dropdownField(
      choiceLabels: local!subcategory['recordType!{ef54f217-d426-4f2b-9955-3859c9919525}Product Subcategory.fields.{6f4fce8f-2487-4997-a365-985b895f90d8}name'],
      choiceValues: local!subcategory['recordType!{ef54f217-d426-4f2b-9955-3859c9919525}Product Subcategory.fields.{b0f94c2f-cba6-4565-ae39-fa81da69b1d5}productSubcategoryId'],
      label: "SUBCATEGORY",
      placeholder: "Select a county",
      value: local!selectedCategory,
      saveInto: local!selectedCategory
    ),
    a!gridField(
      labelPosition: "COLLAPSED",
      data: a!recordData(
        recordType: 'recordType!{dee327a7-3854-45e5-a952-d3d7d3edcc82}Product',
        filters: a!queryLogicalExpression(
          operator: "AND",
          filters: {
            /*The query filter is used with the dropdown field to update the data in the grid based on the value of local!selectedCategory*/
            a!queryFilter(
              field: 'recordType!{dee327a7-3854-45e5-a952-d3d7d3edcc82}Product.relationships.{d3a62d4a-3268-48dc-9563-3b99c33715d1}productSubcategory.fields.{b0f94c2f-cba6-4565-ae39-fa81da69b1d5}productSubcategoryId',
              operator: "=",
              value: local!selectedCategory
            )
          },
          ignoreFiltersWithEmptyValues: true
        )
      ),
      columns: {
        a!gridColumn(
          label: "Product Name",
          sortField: 'recordType!{dee327a7-3854-45e5-a952-d3d7d3edcc82}Product.fields.{afc5b005-2317-4c13-a132-62714c994bc9}name',
          value: fv!row['recordType!{dee327a7-3854-45e5-a952-d3d7d3edcc82}Product.fields.{afc5b005-2317-4c13-a132-62714c994bc9}name']
        ),
        a!gridColumn(
          label: "Product Subcategory",
          sortField: 'recordType!{dee327a7-3854-45e5-a952-d3d7d3edcc82}Product.relationships.{d3a62d4a-3268-48dc-9563-3b99c33715d1}productSubcategory.fields.{6f4fce8f-2487-4997-a365-985b895f90d8}name',
          value: fv!row['recordType!{dee327a7-3854-45e5-a952-d3d7d3edcc82}Product.relationships.{d3a62d4a-3268-48dc-9563-3b99c33715d1}productSubcategory.fields.{6f4fce8f-2487-4997-a365-985b895f90d8}name'],
          align: "START"
        )
      }
    )
  }
)
Next, you need to configure the rule inputs on the site or portal page.
To add a new page using an interface with rule inputs:
If you are editing a site, for Type select Interface.
Note: URL parameters can only be used to link to site pages of type Interface.
Tip: Hover over the tooltip next to the rule input name to view the rule input description.
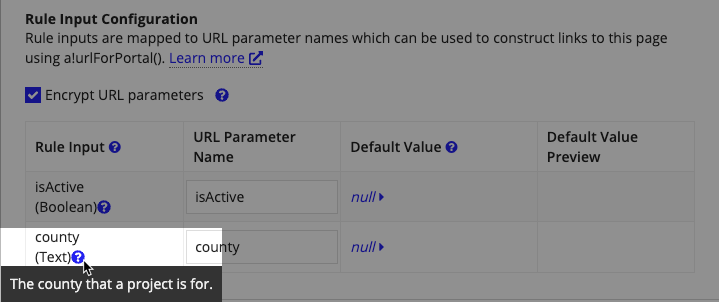
Configure the Rule Input Configuration properties. If you don't make any modifications to these properties, the defaults will be used.
| Property | Description | Default |
|---|---|---|
| Encrypt URL parameters | Determines whether to use encrypted or plaintext URL parameters. To help keep data secure, URL parameters are encrypted by default. See Using URL parameters securely for more information about when to use encrypted versus plaintext URL parameters. | Selected |
| Rule Input | The rule inputs from the selected interface. Only rule inputs that can be used to set initial values will appear. | Read only |
| Enable in URLs | This only appears when Encrypt URL parameters is deselected. It allows you to opt in to using only the URL parameters that are safe to display in plaintext. To help keep your data secure, only enable the rule inputs that you need to use with URL parameters. | Toggled off |
| URL Parameter Name | The name used when constructing links to the page. You can change this from the default if you want to make sure existing links don't break, or if you just want to make the name shorter or more clear. |
Rule input name |
| Default Value (optional) | The value to use whenever the URL doesn't provide a value. See Using default values for more information. The evaluated default value can only be 100 characters or less. Otherwise, the default value will be ignored. | Null |
If Encrypt URL parameters is selected for any portal page, the portal object must have a service account. Additionally, portals have to be published before you can link to them.
To add a service account to the portal and publish it:
Now that you've configured your interface and site or portal page, you can link to the page using URL parameters.
There are several places you can link to a site or portal from, including:
a!urlForPortal(), must have a service account configured.a!urlForSite() function is partially compatible with portals. To link to a site from a portal, use a custom integration.You can link to site and portal pages using a!urlForSite() or a!urlForPortal(). These functions allow Appian to encrypt URL parameters and allow you to keep your links up to date if the URL ever changes. This can happen if you change the web address identifiers for the site or portal, or if you rename the rule inputs.
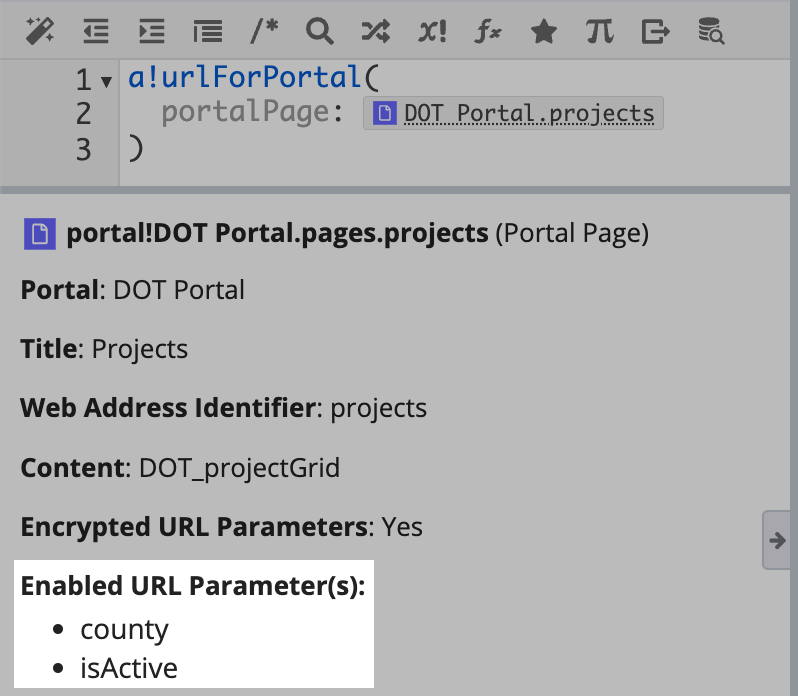
To use a!urlForPortal() to link to a portal page:
a!urlForPortal().portal! domain.
portal! to see a list of portals. Select a portal from the list..) to see a list of portal pages. Select a page from the list.a!map(key1: value1, key2: value2).
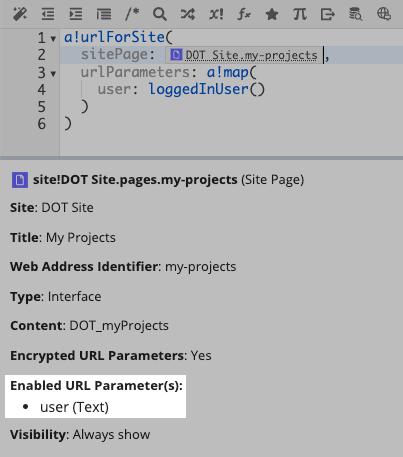
Tip: Click the portal reference to view the URL parameter names. They are listed in the expression documentation pane under Enabled URL Parameter(s).
To use a!urlForSite() to link to a Site page:
a!urlForSite().site! domain.
site! to see a list of sites. Select a site from the list..) to see a list of site pages. Select a page from the list.a!map(key1: value1, key2: value2).
Tip: Click the site reference to view the URL parameter names. They are listed in the expression documentation pane under Enabled URL Parameter(s).
If the following example used plaintext URL parameters, it would return something like:
https://statedot.appianportals.com/projectportal/page/projects?county=Fairfax&active=true.

If the page was within a page group, the URL would display as:
https://statedot.appianportals.com/projectportal/group/transportation/page/projects?county=Fairfax&active=true
Note: If your site or portal has only one page, /page/[page web address ID won't display in the URL. However, if you manually add /page/ followed by the web address identifier, the link will still work.
1
2
3
4
5
6
7
a!urlForPortal(
  portalPage: portal!DOT Project Portal.pages.projects,
  urlParameters: a!map(
    county: "Fairfax",
    active: true
  )
)
This example is for illustrative purposes only. It won't work if you copy and paste it into your environment.
If you add, rename, or delete rule inputs from an interface used as a site or portal page, you will need to edit the page to update the rule input configurations. For portals, you will also need to republish the portal.
This helps ensure that:
Tip: This doesn't affect rule inputs that aren't supported for URL parameters or default values, which don't appear in the Rule Input Configuration grid for a page.
This section provides instructions for adding, renaming, and deleting rule inputs in interfaces that are being used as a site or portal page.
After you add a new rule input to an interface that is being used in a site or portal page, you won't be able to use it with a URL parameter until after you edit the page. For portals, you will also need to make sure the portal republishes.
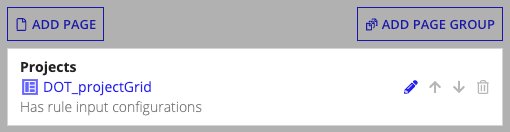
To add a new rule input to be used on a site or portal page:
Click to edit the page.
| Property | Description | Default |
|---|---|---|
| Encrypt URL parameters | Determines whether to use encrypted or plaintext URL parameters. To help keep data secure, URL parameters are encrypted by default. See Using URL parameters securely for more information about when to use encrypted versus plaintext URL parameters. | Selected |
| Rule Input | The rule inputs from the selected interface. Only rule inputs that can be used to set initial values will appear. | Read only |
| Enable in URLs | This only appears when Encrypt URL parameters is deselected. It allows you to opt in to using only the URL parameters that are safe to display in plaintext. To help keep your data secure, only enable the rule inputs that you need to use with URL parameters. | Toggled off |
| URL Parameter Name | The name used when constructing links to the page. You can change this from the default if you want to make sure existing links don't break, or if you just want to make the name shorter or more clear. |
Rule input name |
| Default Value (optional) | The value to use whenever the URL doesn't provide a value. See Using default values for more information. The evaluated default value can only be 100 characters or less. Otherwise, the default value will be ignored. | Null |
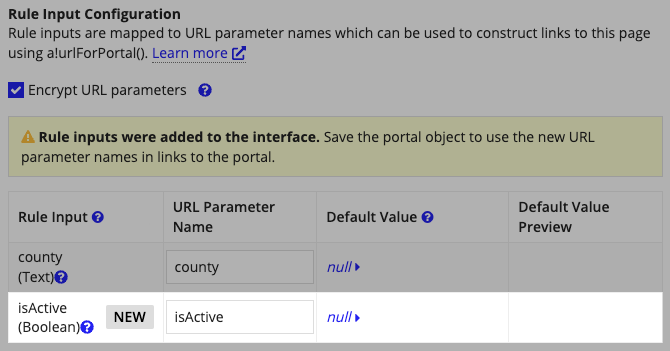
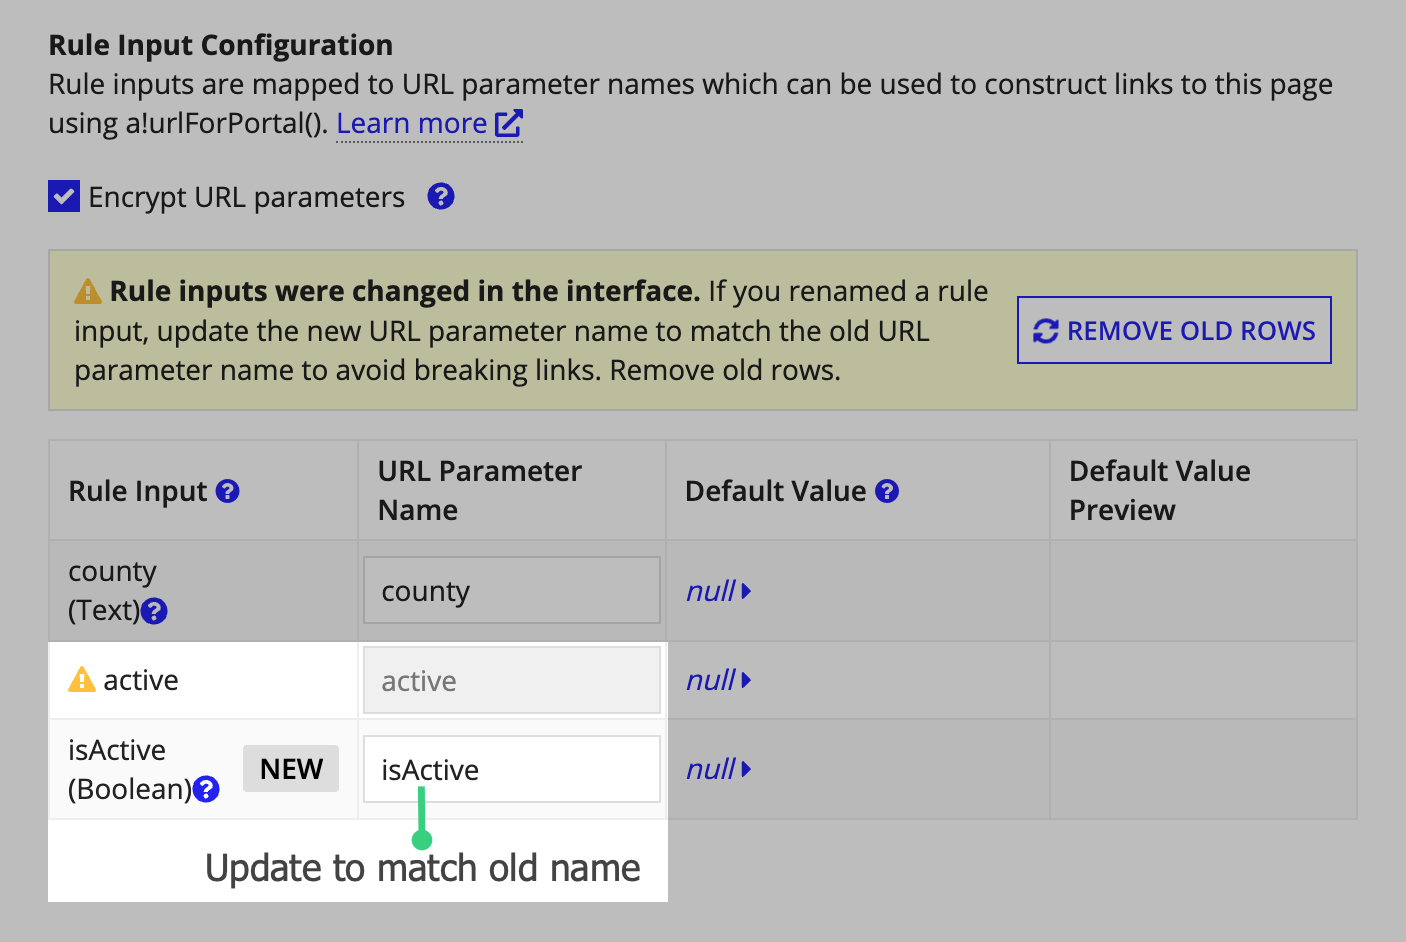
If you rename a rule input in an interface that is being used in a site or portal page, the Rule Input Configuration grid will add a new rule input and ask you to remove the old rule input.
Since rule inputs are mapped to URL parameter names, you can update the URL parameter name of the new rule input to match the old URL parameter name. This makes sure existing links will continue to work. If you don't update it, the URL parameter will be ignored in any links that use the old URL parameter name.
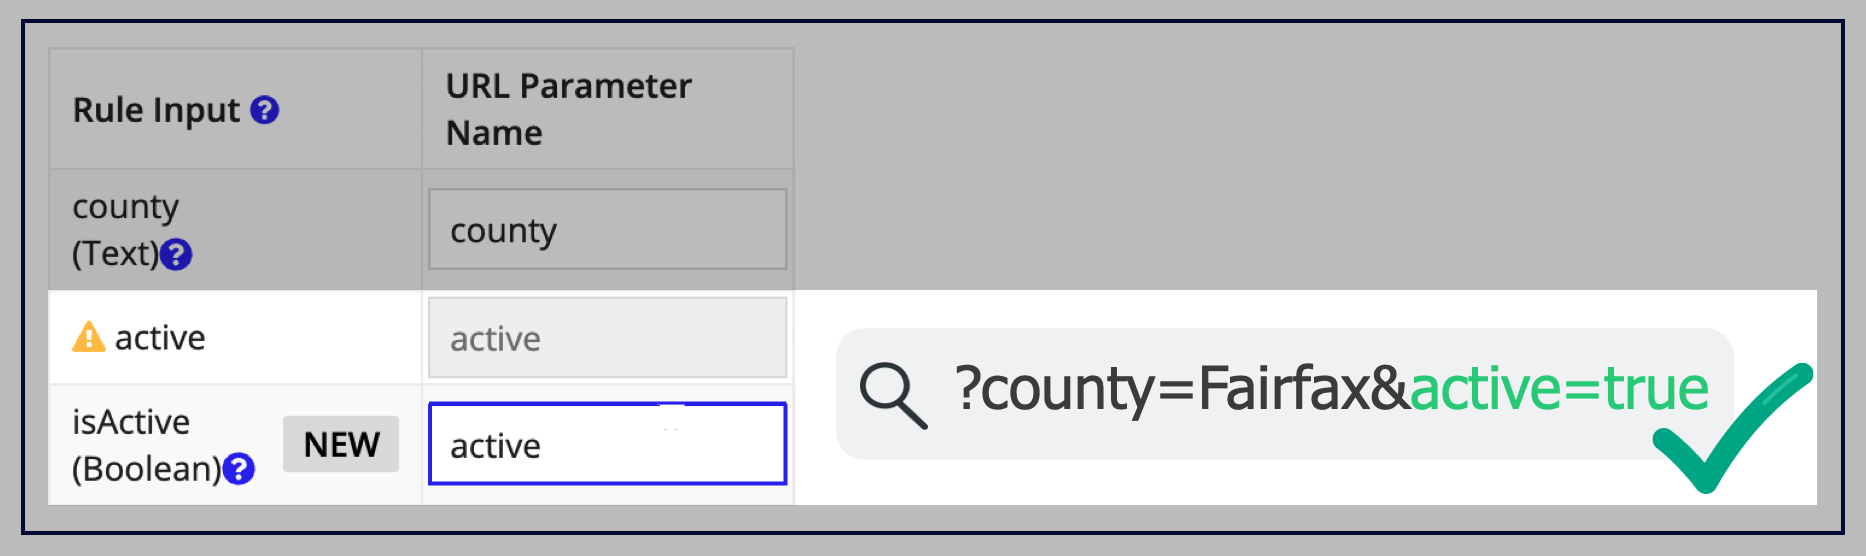
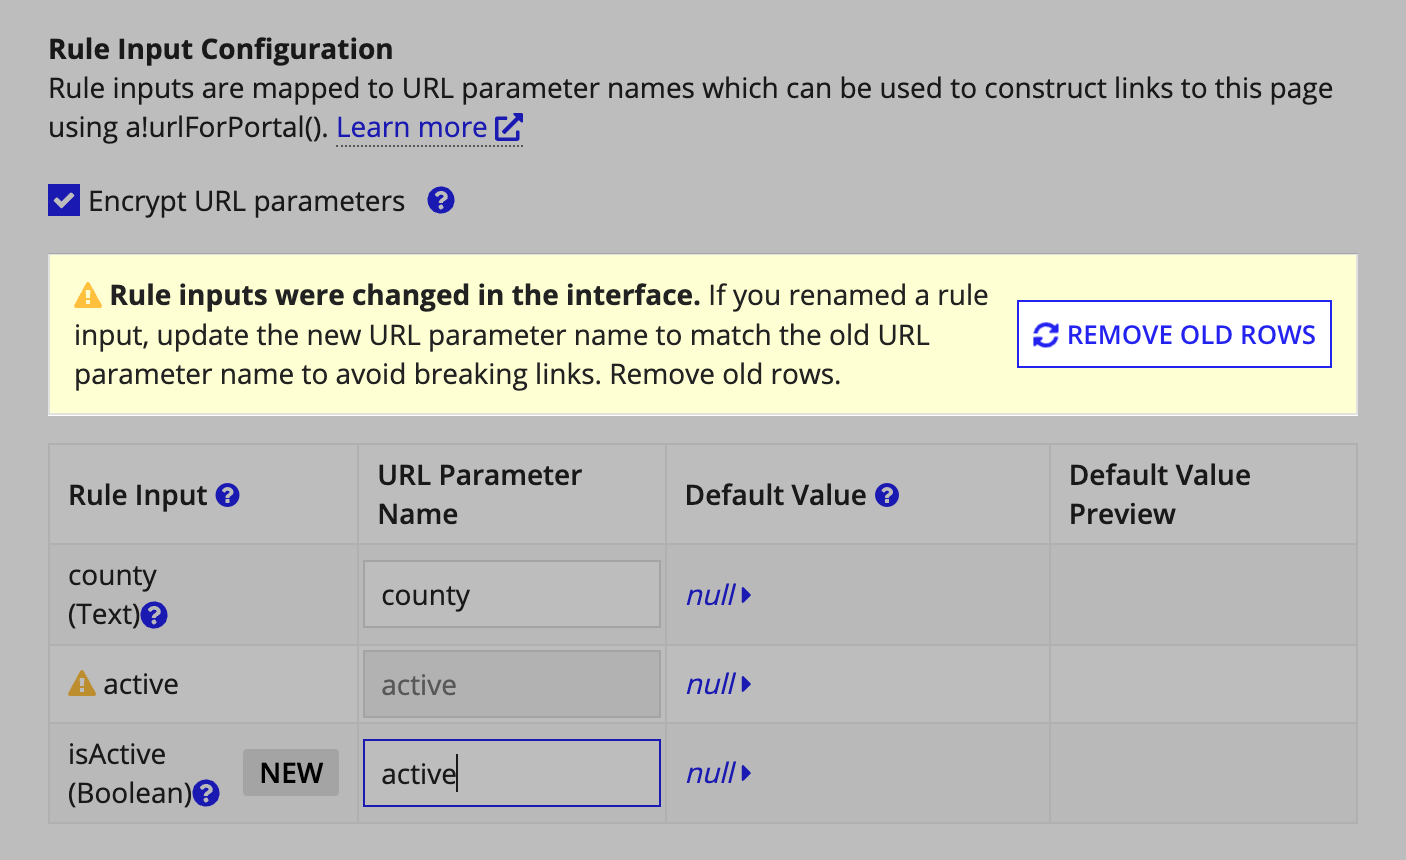
For example, let's say you have a rule input and URL parameter both named active. If you update the rule input name to isActive, a new rule input will appear in the Rule Input Configuration grid. To ensure existing links to the page continue to work, you can update the URL parameter name for the new isActive rule input to active.
To rename a rule input that is configured on a site or portal page:
Click the site or portal object name to open it so you can update the URL parameter name.
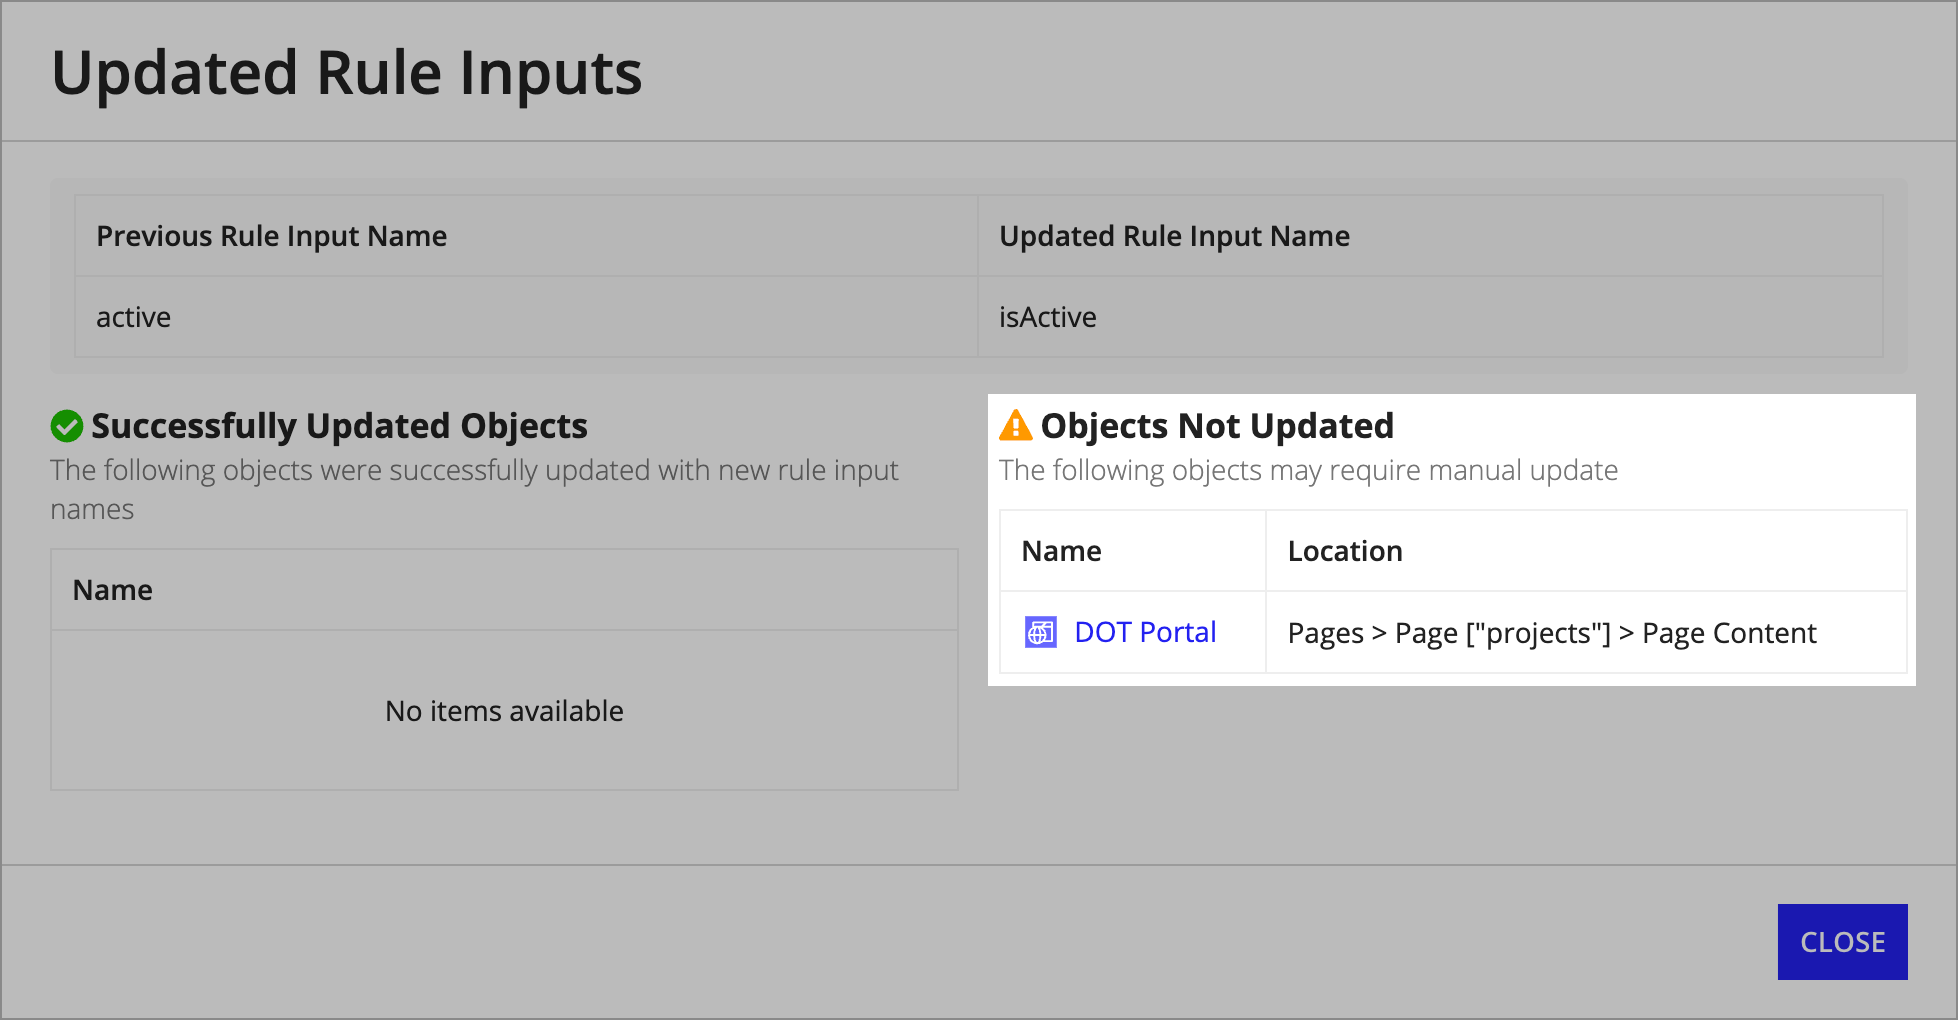
In the Rule inputs were changed in the interface message, click REMOVE OLD RULE INPUTS.
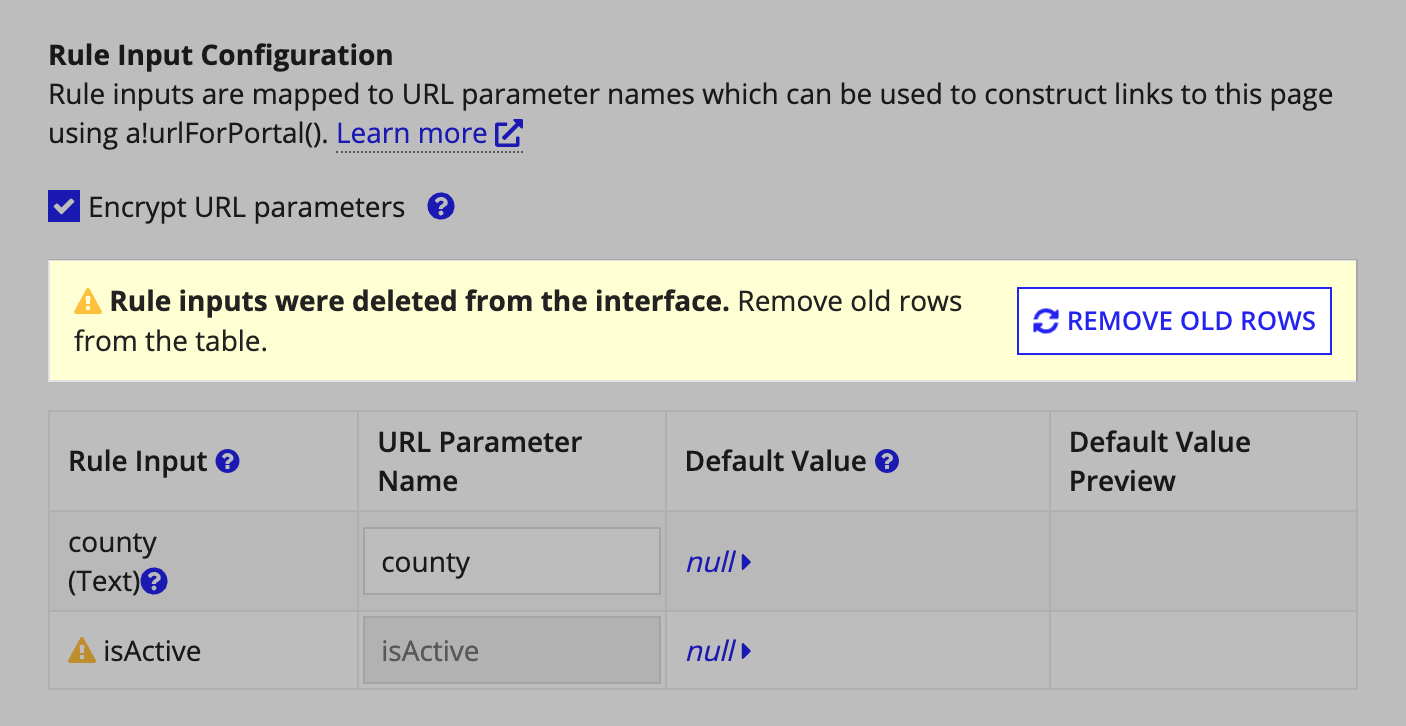
If you delete a rule input from an interface that is being used in a site or portal page, you need to delete the rule input from the page too.
If there are existing links that use the URL parameter that was mapped to the deleted rule input, the URL parameter will be ignored.
To delete a rule input that is configured on a site or portal page:
You can add any rule input type to interfaces added as a site or portal page. However, not all rule inputs can be used to set initial values for pages through URL parameters and default values. Rule inputs that aren't supported won't display in a page's Rule Input Configuration grid.
There are a few basic considerations to determine if a rule input can be used with URL parameters and default values:
To help keep your data secure, URL parameters are encrypted by default. You have the option to enable plaintext URL parameters, which you should only do if absolutely necessary. Read on to understand the difference between encrypted and plaintext URL parameters and when to use each.
When Encrypt URL parameters is selected, humans cannot read or manipulate the URL parameters. This prevents the average user from manipulating the URL to inadvertently or nefariously expose data not intended for them.
URL parameters should be encrypted unless they absolutely need to be plaintext. This is particularly important when passing in identifying information, such as an access code.
When Encrypt URL parameters is selected, links to the page can only be constructed using a!urlForSite() or a!urlForPortal(). This means encrypted URL parameters can't be used to link directly to a site or portal page from an external website. See Linking from an external website for guidance.
When Encrypt URL parameters is deselected, all URL parameters use plaintext. This means that users can read and manipulate the parameters, which could expose data that isn't intended for them.
Don't enable plaintext for URL parameters that have values that could be manipulated to expose sensitive data that isn't intended for the user. For example, values that are predictable, like sequential record IDs.
If you disable Encrypt URL parameters, you must opt in to using URL parameters for each rule input on the page. Only turn on Enable in URLs for rule inputs that you need to use with URL parameters.
You might want to use plaintext URL parameters when:
The following outlines how links to site and portal pages can change and how we help you keep them up to date. As you can see, using a!urlForSite() and a!urlForPortal() offer a few different ways to keep your links up to date. Because of this, we recommend using these functions whenever possible and avoid constructing links manually, even when using plaintext.
| How links change | How they are kept up to date |
|---|---|
| Changing the web address identifier for a site or portal, including a site or portal page. | Referencing a page using the site! or portal! domain automatically uses the most recent web address identifier. |
| Turning URL parameter encryption on or off for a site or portal page. | Using a!urlForSite() and a!urlForPortal() automatically takes care of switching between encrypted and plaintext parameters when the Encrypt URL Parameter setting is changed for a page. |
| Renaming a rule input that is used with URL parameters. | Updating the new rule input's URL parameter name to match the old rule input's URL parameter name. See Renaming a rule input for instructions. |
We also automatically republish portals that link to other portals in certain situations to make sure that these links are kept up to date when the linked portal is updated.
Using encrypted URL parameters to link to a site or portal page from an external website isn't as straightforward as using plaintext URL parameters.
Encrypted URL parameters must be constructed using a!urlForSite() or a!urlForPortal(). Because this encryption is specific to an environment, you can't construct a link in a development environment and modify it to be used in a production environment. You need to use a!urlForSite() or a!urlForPortal() in a production environment to get an encrypted link for a production site or portal.
Because of this, if you need to use URL parameters to link to a site or portal page from an external website, we recommend using plaintext URL parameters, as long as you can use them securely.
If you must use encrypted parameters, you can use a web API that uses a!urlForSite() or a!urlForPortal() to construct the link and invoke the web API from your external website.
Use URL Parameters to Link to a Site or Portal
