
| The capabilities described on this page are included in Appian's standard capability tier. Usage limits may apply. |
OverviewCopy link to clipboard
Every portal needs at least a portal object and an interface, but a portal can contain that and so much more. This page walks you through creating a portal, from the very beginning of development through deployment.
For more information on creating, publishing, and deploying portals see the Portal Object and Manage a Portal pages.
Tip: This walk-through uses record types to seamlessly connect your Appian data to your portal. This is the recommended way to work with data in a portal.
However, you can also write and query data using CDTs if necessary. And, if you have a publicly-available external database, you can directly write to or query from that database.
Step 1: Create a portal objectCopy link to clipboard
The portal object contains the settings that are used to publish a portal. When a portal is published, Appian bundles up the portal object and all the precedents of the portal object to create the portal.
To create a portal object:
- In your application, go to the Build view.
- Click NEW > Portal.
- Enter the portal properties:
- Enter a Name for your portal object.
- Enter a Display Name to identify your portal in the browser tab. This name can also be displayed in the navigation bar.
- The Web Address Identifier automatically populates based on the display name. You can update it if necessary.
- Optionally, add a Description.
- Click CREATE.
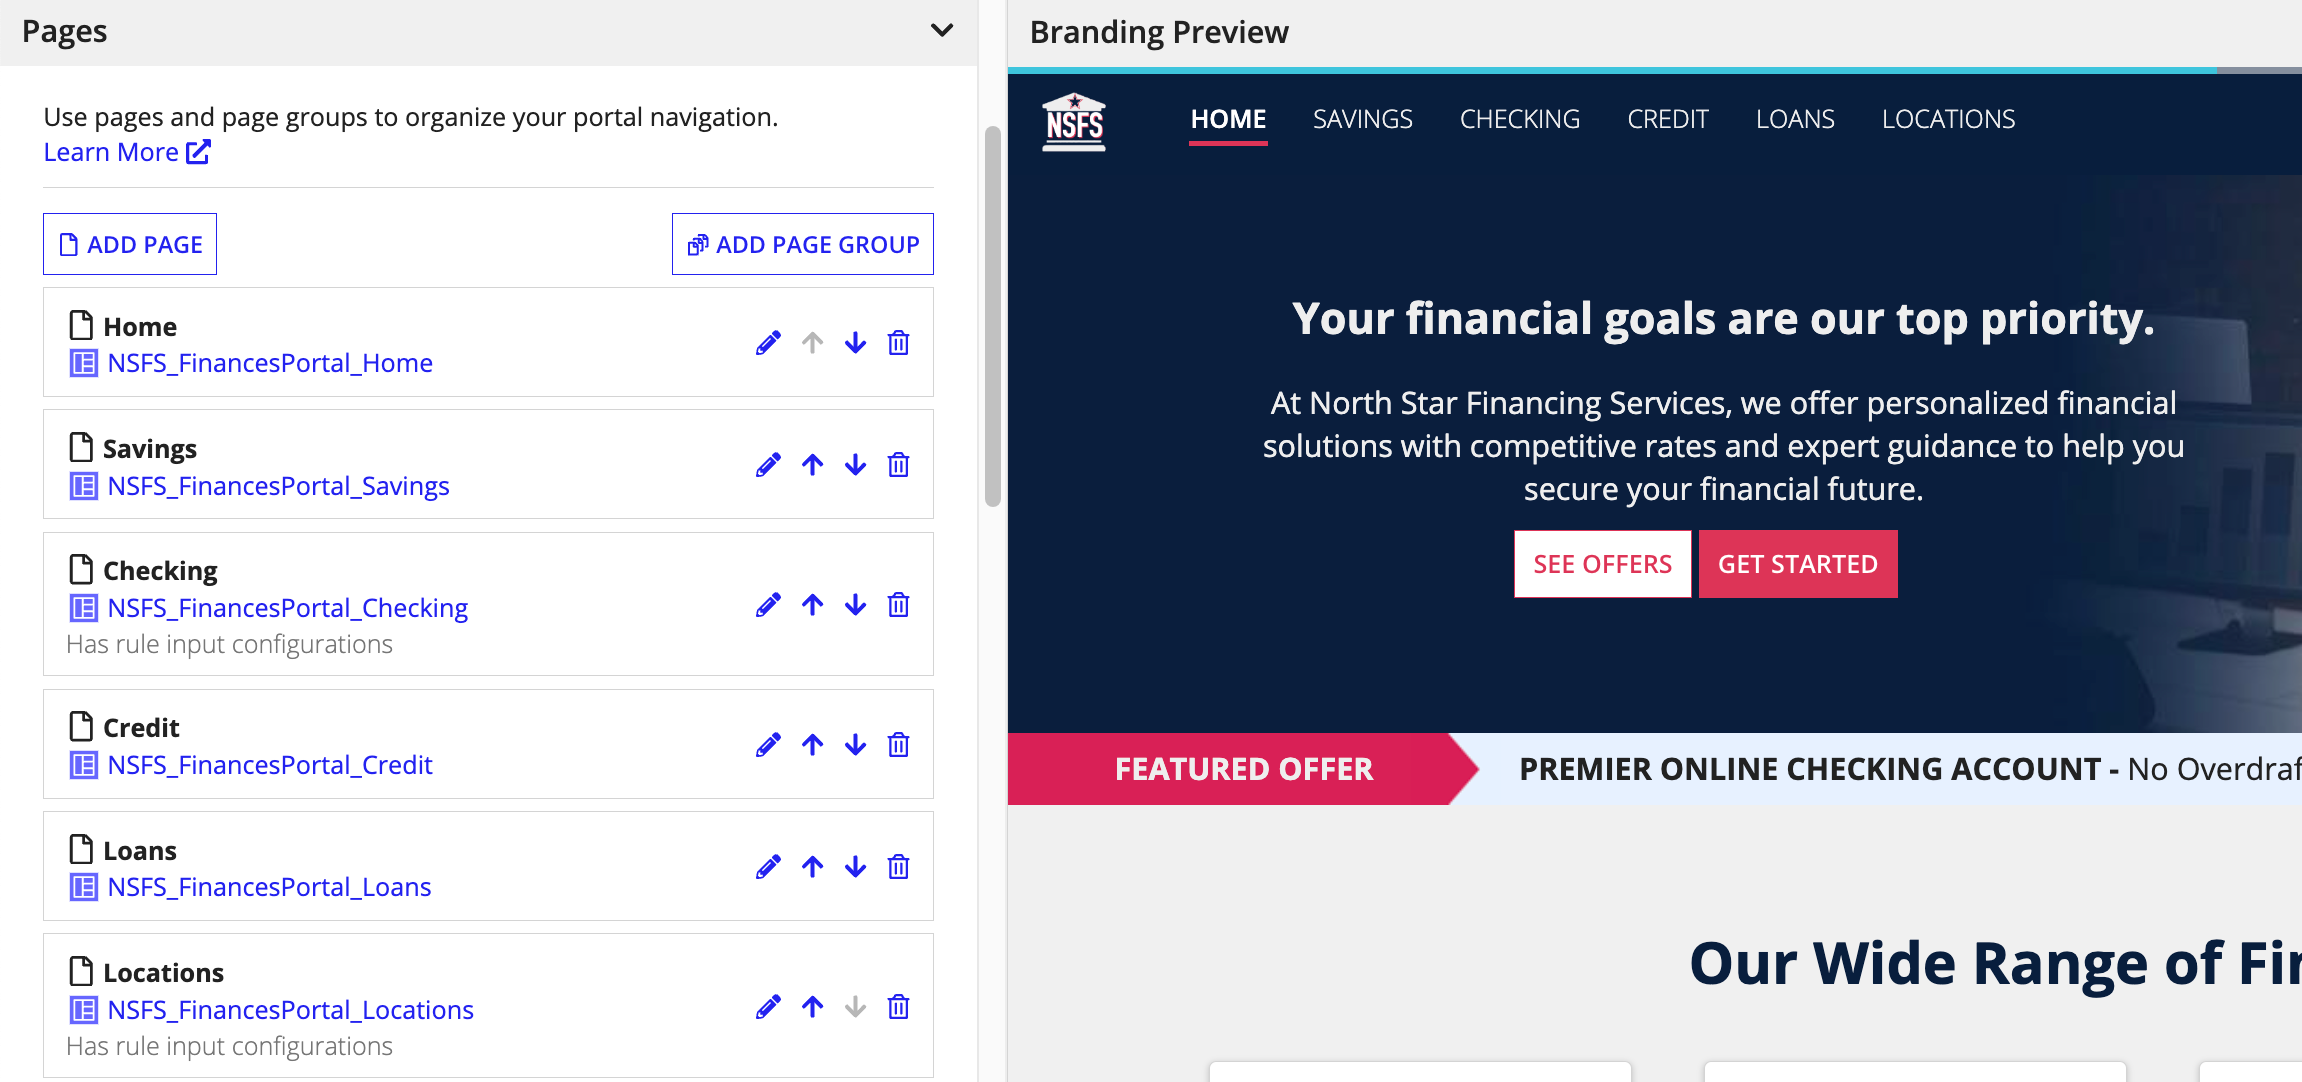
Step 2: Add a page to your portalCopy link to clipboard
Pages are the interfaces that display to your portal users. You can have up to 10 pages or page groups in a portal and can choose one interface object to display on each page. If you have more than one page, they display in a navigation bar.

Make sure that you aren't using any incompatible functions or components in your interface. For more information about the functional design considerations to keep in mind when creating a portal, see Portal Best Practices.
To add a page:
- In the portal object, go to the Pages section.
- Click ADD PAGE.
- Enter the page properties:
- Enter a page Title. When a portal has more than one page, this displays in the navigation bar.
- The Web Address Identifier automatically populates based on the title. You can update it if necessary.
- Select an Icon to display with the page title in the navigation bar when using a SIDEBAR layout. Icons will not display in HEADER BAR layouts. The file-o icon is selected by default.
- Select an interface, or click to create a new interface.
- If the interface has rule inputs that can be used to set initial values, you can optionally configure the rule inputs.
- Click ADD.
- Repeat these steps to add up to ten pages. Use the and arrows to reorder the pages.
Step 2a: (Optional) Add a page group to your portalCopy link to clipboard
Page groups allow you to create a nested menu of pages under a page group title in your portals's navigation bar for an additional level of navigation. Each page group can have up to ten pages.
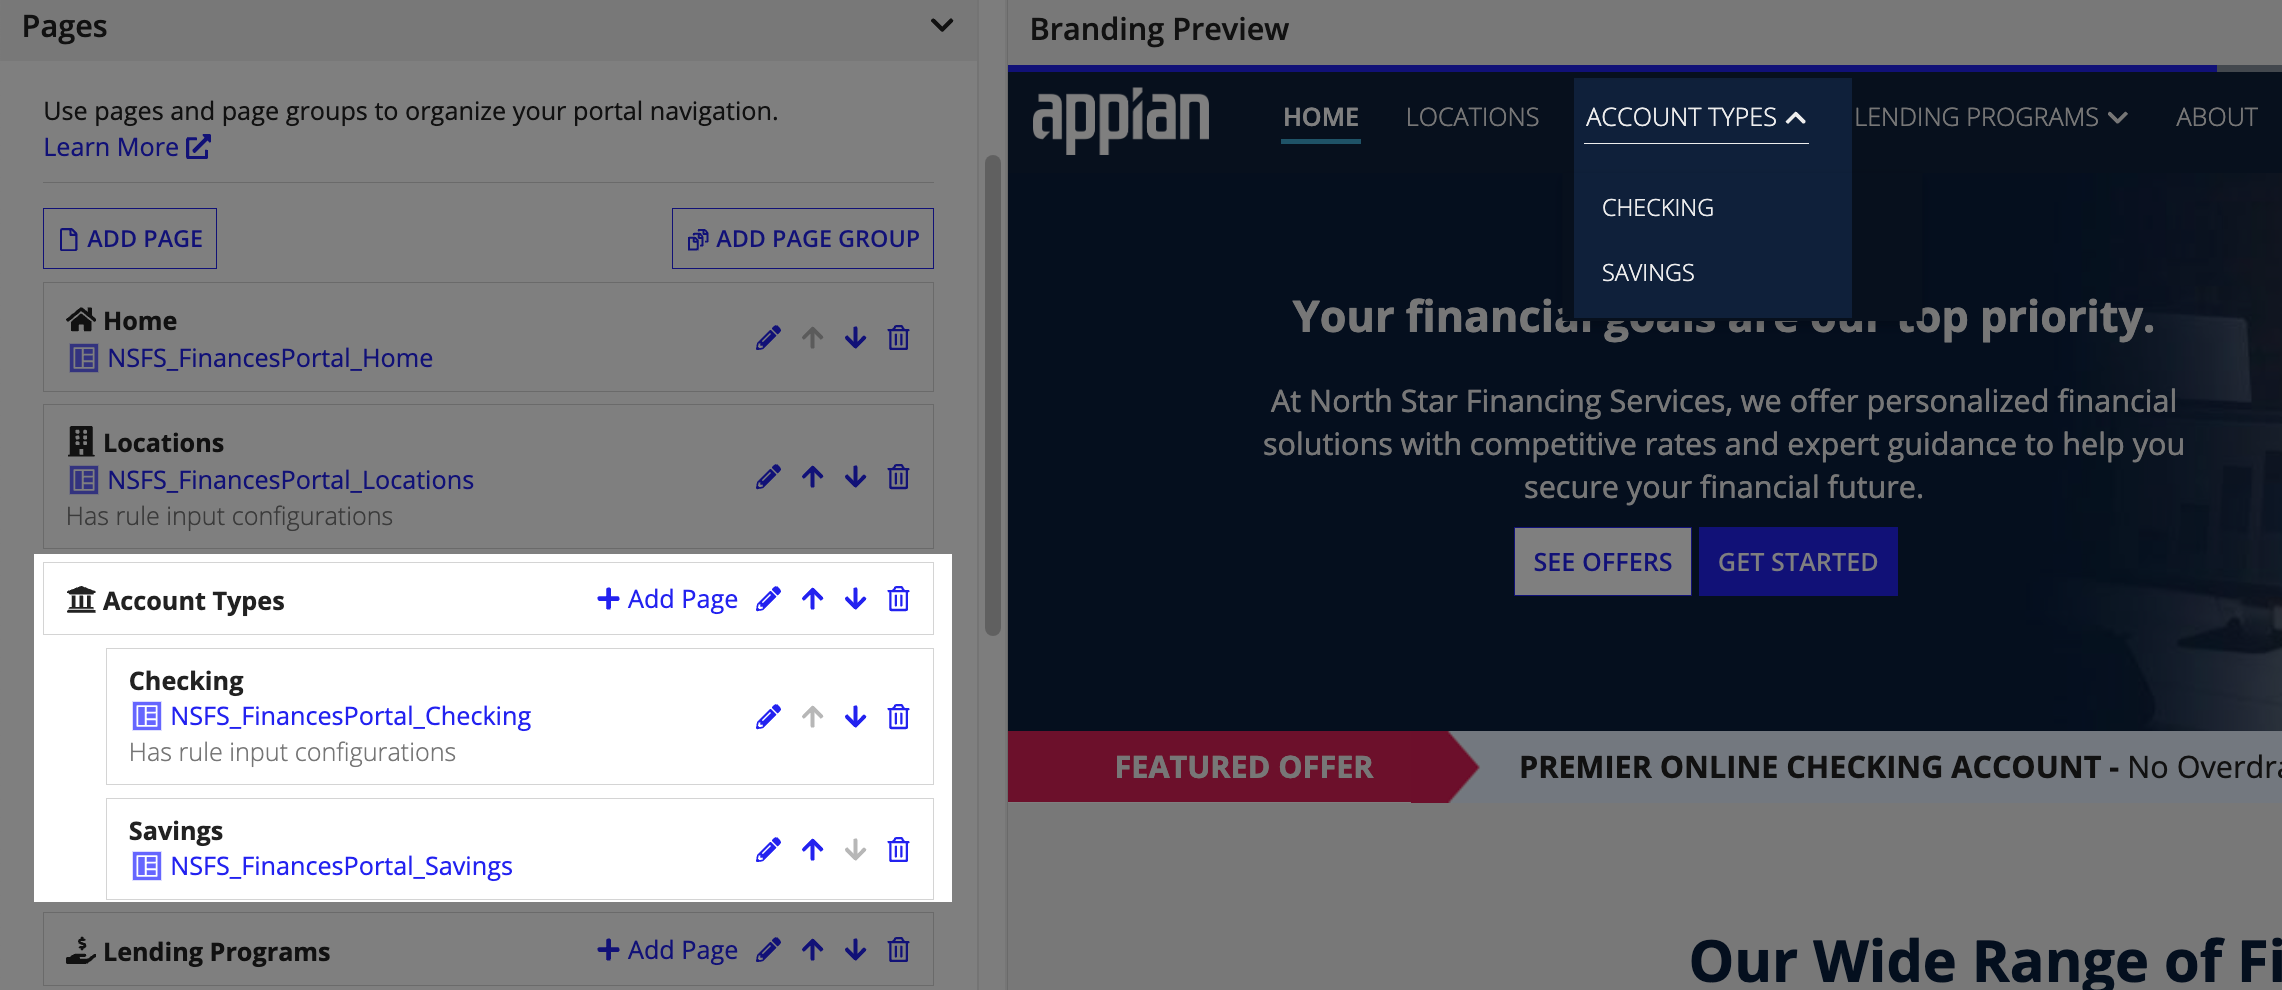
Before you can start adding and configuring page groups, you must add at least one page to your portal.
To add a page group:
- Click ADD PAGE GROUP in the page section after you add at least one page to your portal.
- Configure the page group properties:
- Enter a page group Title. This displays in the navigation bar bar.
- The Web Address Identifier automatically populates based on the title. You can update it if necessary.
- Select an Icon to display with the page group title in the navigation bar when using a SIDEBAR layout. Icons will not display in HEADER BAR layouts. The file-o icon is selected by default.
- Click ADD.
To add pages to a page group:
- Click Add Page in the page group card.
- Follow the steps to add a page.
- Repeat as necessary.
Step 3: Configure a navigation bar and brandingCopy link to clipboard
If you add more than one page to your portal, the navigation bar is automatically enabled. If your portal has only one page, the navigation bar is optional. Showing a navigation bar in your portal allows you to choose a color and logo to display in the navigation bar to help your users recognize that the portal belongs to your brand.
When the navigation bar is enabled, you also have the option to choose between two different layout options: HEADER BAR and SIDEBAR.

Additionally, you can make changes to any of the default branding configurations, such as input and button shape, to fit your organization's branding guidelines.
To configure the navigation bar and branding:
- In the portal object, go to the Navigation Bar section.
- Show navigation bar is automatically selected. You can choose to deselect it, but if you only have more than one page, the additional pages will be removed from the portal.
- For the navigation bar Layout, select HEADER BAR or SIDEBAR options. This determines where the navigation bar displays.
- Configure the rest of the navigation bar settings.
- Show portal display name in navigation bar is automatically selected. You can deselect it if you don't want the display name from the configurations section to display.
- Go to the Branding section and configure the branding settings. The changes you make display in the Branding Preview.
Step 4: Add a service account and set permissionsCopy link to clipboard
Service accounts are used in portals to give access to certain objects. Instead of an Appian user being granted access to objects in a site, the service account is given access to objects in a portal so it can act on behalf of users that aren't logged in. The records, processes, and documents stored in Appian won't be available in your portal until you give your service account access to them. This helps keep your Appian environment secure and ensures your portal users can still connect to the information and processes that are important to them.
System administrators can create a service account directly from the portal object.
To add a service account:
- In the portal object, go to the Service Access section.
- Next to the Service Account picker, click to create a new service account. Optionally, you can select an existing service account.
- If you don't see , contact a system administrator to create a service account for you.
- Enter a unique username for your service account.
- Select the group(s) to which you want to add this service account.
- To have permission to portal objects, your service account must be granted access to the object or folder, or be in a group that has access to the object.
- Remember to give the group the required permissions to the objects used in your portal.
- Click CREATE.
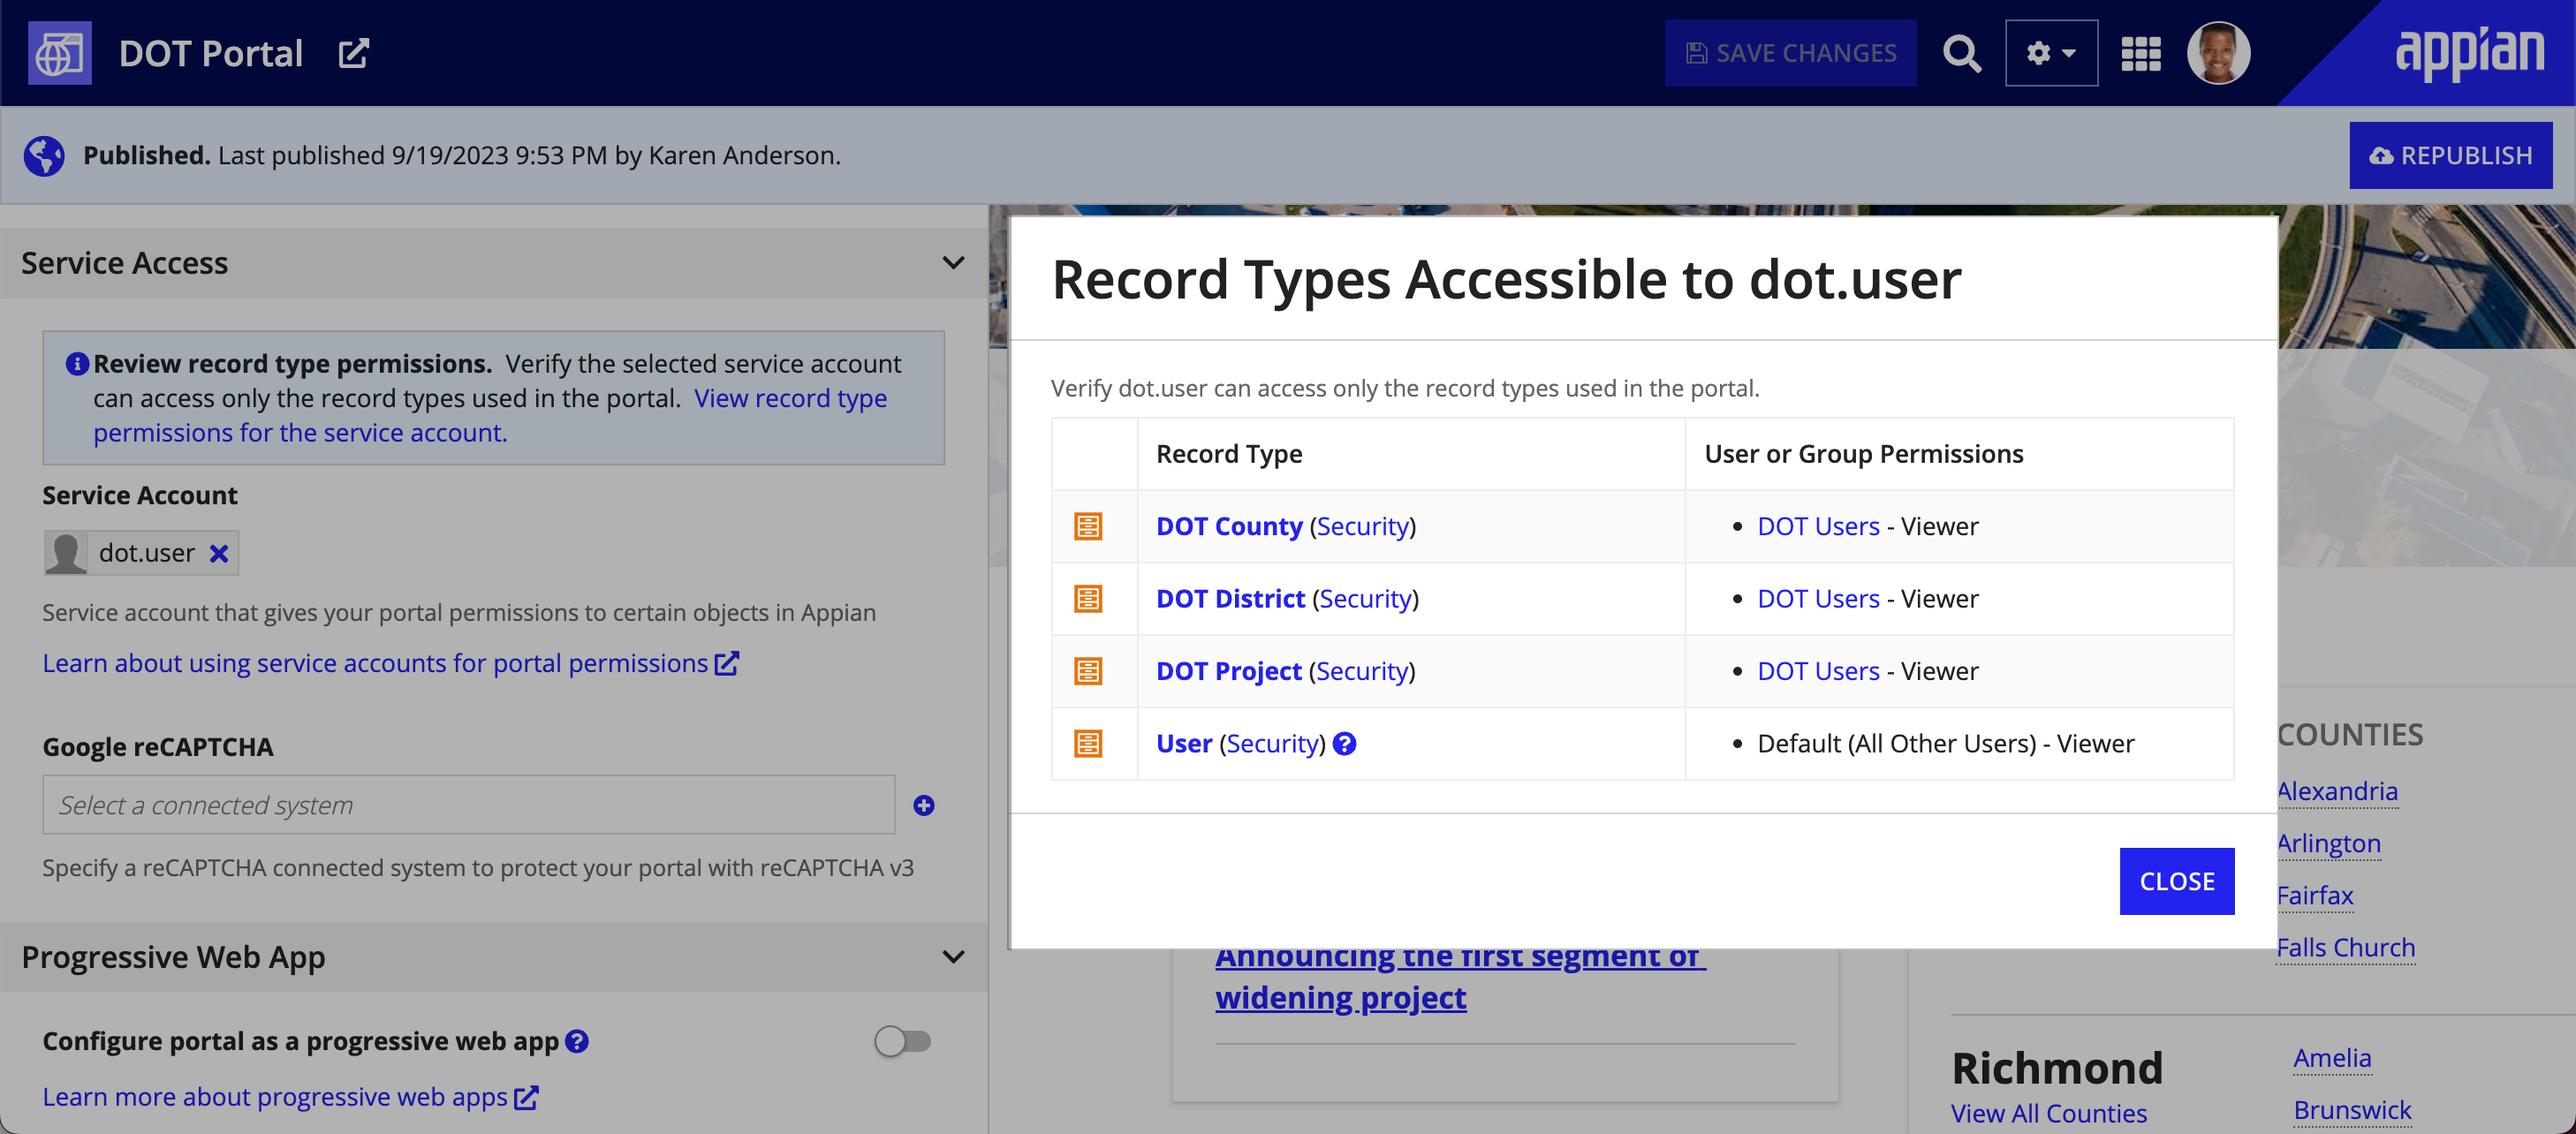
- Click View record type permissions for the service account to see which record types the service account can access. Make sure the service account doesn't have access to record types that aren't used in your portal.
- To remove permissions for a record type, click Security next to the record type name. See Required permissions for portal service accounts for more information on the appropriate permissions for service accounts.
Step 5: (Optional) Add a Google reCAPTCHA connected systemCopy link to clipboard
Optionally, you can add Google reCAPTCHA to your portal to help you monitor your portal for spam or potentially malicious activity. Not every portal needs Google reCAPTCHA, but we recommend using it if your portal is high profile, highly publicized, or if you have had issues with spam messages in your portal.
To add a reCAPTCHA connected system:
- In the portal object, go to the Service Access section.
- Next to the Google reCAPTCHA picker, click to create a new Google reCAPTCHA connected system. Optionally, you can select an existing Google reCAPTCHA connected system.
- Enter a Name and optional Description.
-
Enter the Google reCAPTCHA credentials.
Connected System Field Google Cloud Name (and Location)* Description reCAPTCHA Project ID Project ID
(Project Dashboard)Project ID for the Google Cloud project. To create a project, see the Google documentation. reCAPTCHA Site Key Key ID
(Security > reCAPTCHA Enterprise)The key ID configured for your portal, also known as the site key. To create a key ID, see the Google documentation.
When creating the key:
- For platform type, choose Website.
- Add your portal's domain to the Domain list.
After you create the key, simply copy it and add it to the connected system. No additional set up is required.reCAPTCHA API Key API Key
(APIs & Services > Credentials)Sensitive. An API key with reCAPTCHA Enterprise API enabled. To create a reCAPTCHA Enterprise-enabled API key, see the Google documentation. *Information from Google is subject to change.
- Click Test Connection to test that your credentials are valid for getting a reCAPTCHA score.
- Click CREATE.
See step 7 for more information on how to use reCAPTCHA in your portal interface.
Step 6: (Optional) Configure your portal as a progressive web appCopy link to clipboard
You can configure your portal to be a Progressive Web App (PWA). A PWA looks and behaves like a native application and allows your users to install the portal on their device for easy and frequent access.
See the portal object page for more information about PWAs.
To configure your portal as a PWA:
- In the portal object, go to the Progressive Web App section.
- Select Configure portal as a progressive web app.
- Configure the Progressive Web App settings.
Step 7: Create the rest of your portalCopy link to clipboard
This step will depend on your portal use case. This table lists common capabilities of portals along with the high-level steps to accomplish them.
If you want your portal to ... |
Then... |
|---|---|
Query data. |
|
Query a single record and its related data. |
|
Use record-powered grids, charts, and card choices components. |
|
Allow portal users to upload files. |
|
Allow portal users to download or view files. |
|
Add, update, or delete record data. |
|
Create a user, update data using a CDT, send an email, or start another Appian process. |
|
Use reCAPTCHA to determine what to do if a bot is likely trying to use your portal. |
|
Step 8: Publish your portal objectCopy link to clipboard
With your supporting objects and portal object all created and configured, your portal object is now ready for publishing!
To publish your portal object:
- In the portal object, go to the Configurations section and turn on Published.
- Click SAVE CHANGES. The portal won't be published until you save.
- After the portal status updates to Published, click the URL under Web Address to see your published portal.
For more information on publishing, see Manage a Portal.
Step 9: Test your published portalCopy link to clipboard
Now that your portal is published, it's time to test it. It's important to test both your individual objects and the published portal as a whole with production-level usage. Some connections can't be tested until after publishing.
Navigate to the published portal using the URL under Web Address and test your portal as a user would interact with it.
To make sure that everything is functioning correctly, fully test all of the objects and connections that are precedents of your portal, including the following:
- Interface components, including:
- Input and selection components.
- File upload and signature components using the
a!submitUploadedFiles()function. - Document download link components.
- Document viewer and document image components.
- Web content field components.
- Google reCAPTCHA connection on your interface.
- Expression rules.
- Constants.
- All other objects and connections.
- Web API, connected system, and integration objects, as well as any connections to them in interfaces.
- Data source connected systems for external databases and connections to them in interfaces.
Be sure to fill out all of the fields, whether they are required or not, and go through all of the steps in your portal. If you run into any issues while testing, check out the Portal Server Logs in your portal object.
As you test and interact with your portals during development, use the Portal Monitoring tab in the Monitor view of Appian Designer to view key metrics related to portal interactions. These metrics will help you optimize performance and response times, ensure availability, and deliver a pleasant user experience.
For more information about testing and to learn about who can see your portal during testing, see Manage a Portal.
Making changes to your published portalCopy link to clipboard
If you found any problems with your portal during testing, go ahead and make the necessary changes to your objects. When you save changes to your portal object or portal object precedents, the portal automatically republishes to stay up-to-date with the latest changes.
For more information on automatic republishing, see Manage a Portal.
Step 10: Deploy your portalCopy link to clipboard
When you are ready to publish your portal for production use, you can prepare to have it automatically publish in your production environment through a deployment.
When you deploy a published portal to another environment, Appian will attempt to publish the portal in the target environment.
In order for the portal to publish successfully, before deploying your portal for the first time, you will need to set up the following in your target environment:
- Create a service account in the target environment.
- Give the service account the same permissions in both environments.
- If you are using plug-ins in the portal, make sure the plug-ins are in your target environment before deploying the portal.
After the portal publishes successfully in the target environment for the first time, whenever you deploy the portal or its precedents from your source environment, it will update and republish the portal in your target environment. See Manage a Portal for more information about publishing and deploying portals.
Follow the steps below to set up your portal to publish successfully in another environment.
Step 10a: Deploy groups and plug-insCopy link to clipboard
- In your source environment, open the the portal object and make sure that the portal is successfully published with your latest changes.
- Deploy all groups that you are using to grant access to your portal to the target environment.
- If there are any plug-ins you are using in the portal that aren't in your target environment, include the plug-ins in the deployment.
- Note: If you aren't using compare and deploy, an administrator will need to add the plug-ins to the environment manually.
Step 10b: Set up the service accountCopy link to clipboard
- In your target environment, create a service account with the same username as the portal service account.
- Note: Only administrators can add service accounts to an environment.
- Add the service account to the groups you deployed from the source environment.
Step 10c: Deploy and publish the portalCopy link to clipboard
- Deploy the portal and all its precedents to the target environment. If necessary, include an import customization file.
- Check the deployment details to make sure there are no publishing errors.
Step 11: Share your portal and celebrate!Copy link to clipboard
Congratulations! You created a nice and shiny new portal!
After a successful deployment to your production environment, you can now share your portal with your users at the web address specified in the portal object and celebrate.
Once users start interacting with your portal, don't forget to monitor those interactions using the Portal Monitoring tab in the Monitor view of Appian Designer. This tab alerts you to any potential issues with response times or availability so you can avoid serving slow or inaccessible portals to your users.