
Tip: If you're new to configuring security on your record type, see Overview of Security to learn how the different security configurations impact a user's ability to see your enterprise data.
OverviewCopy link to clipboard
Securing your enterprise data is a critical and often difficult experience, especially when you need to control who can see which rows of your data. Configuring this type of row-level security often requires technical leads and data experts to implement and maintain your security logic—but that's not the case with record types. We make it easy to secure your enterprise data at this granular level using record-level security.
This page explains record-level security and how to configure it on your record types with data sync enabled.
About record-level securityCopy link to clipboard
By default, any user with Viewer permission to the record type can see all available records. However, your organization may have more strict guidelines around who can see which data.
Record-level security allows you to determine who can see which records, so you can configure more granular access control.
Configuration is simple: you can specify your security requirements using plain language or using familiar functions and expressions. Once you configure your security requirements, Appian will automatically enforce your record-level security throughout your applications—ensuring that only the right users can see the right data.
For example, in a support case application, administrators should be able to see all cases, but support engineers should only see their assigned cases, and account managers should only see cases related to their customers.
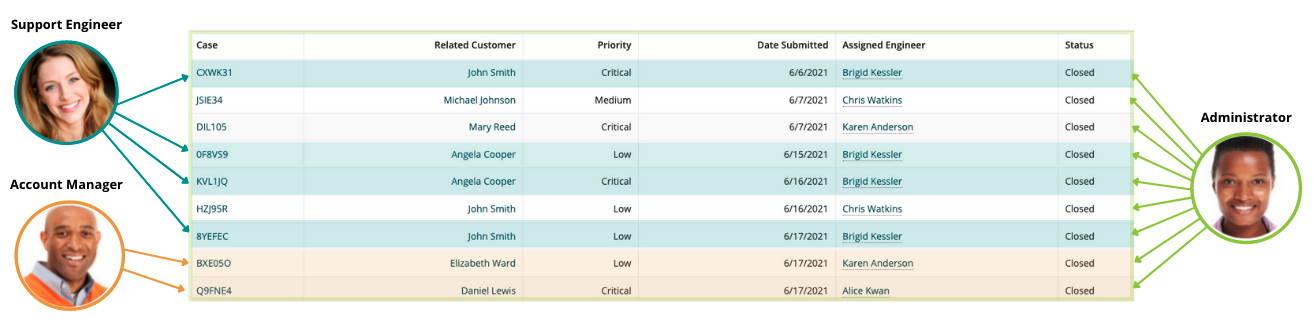

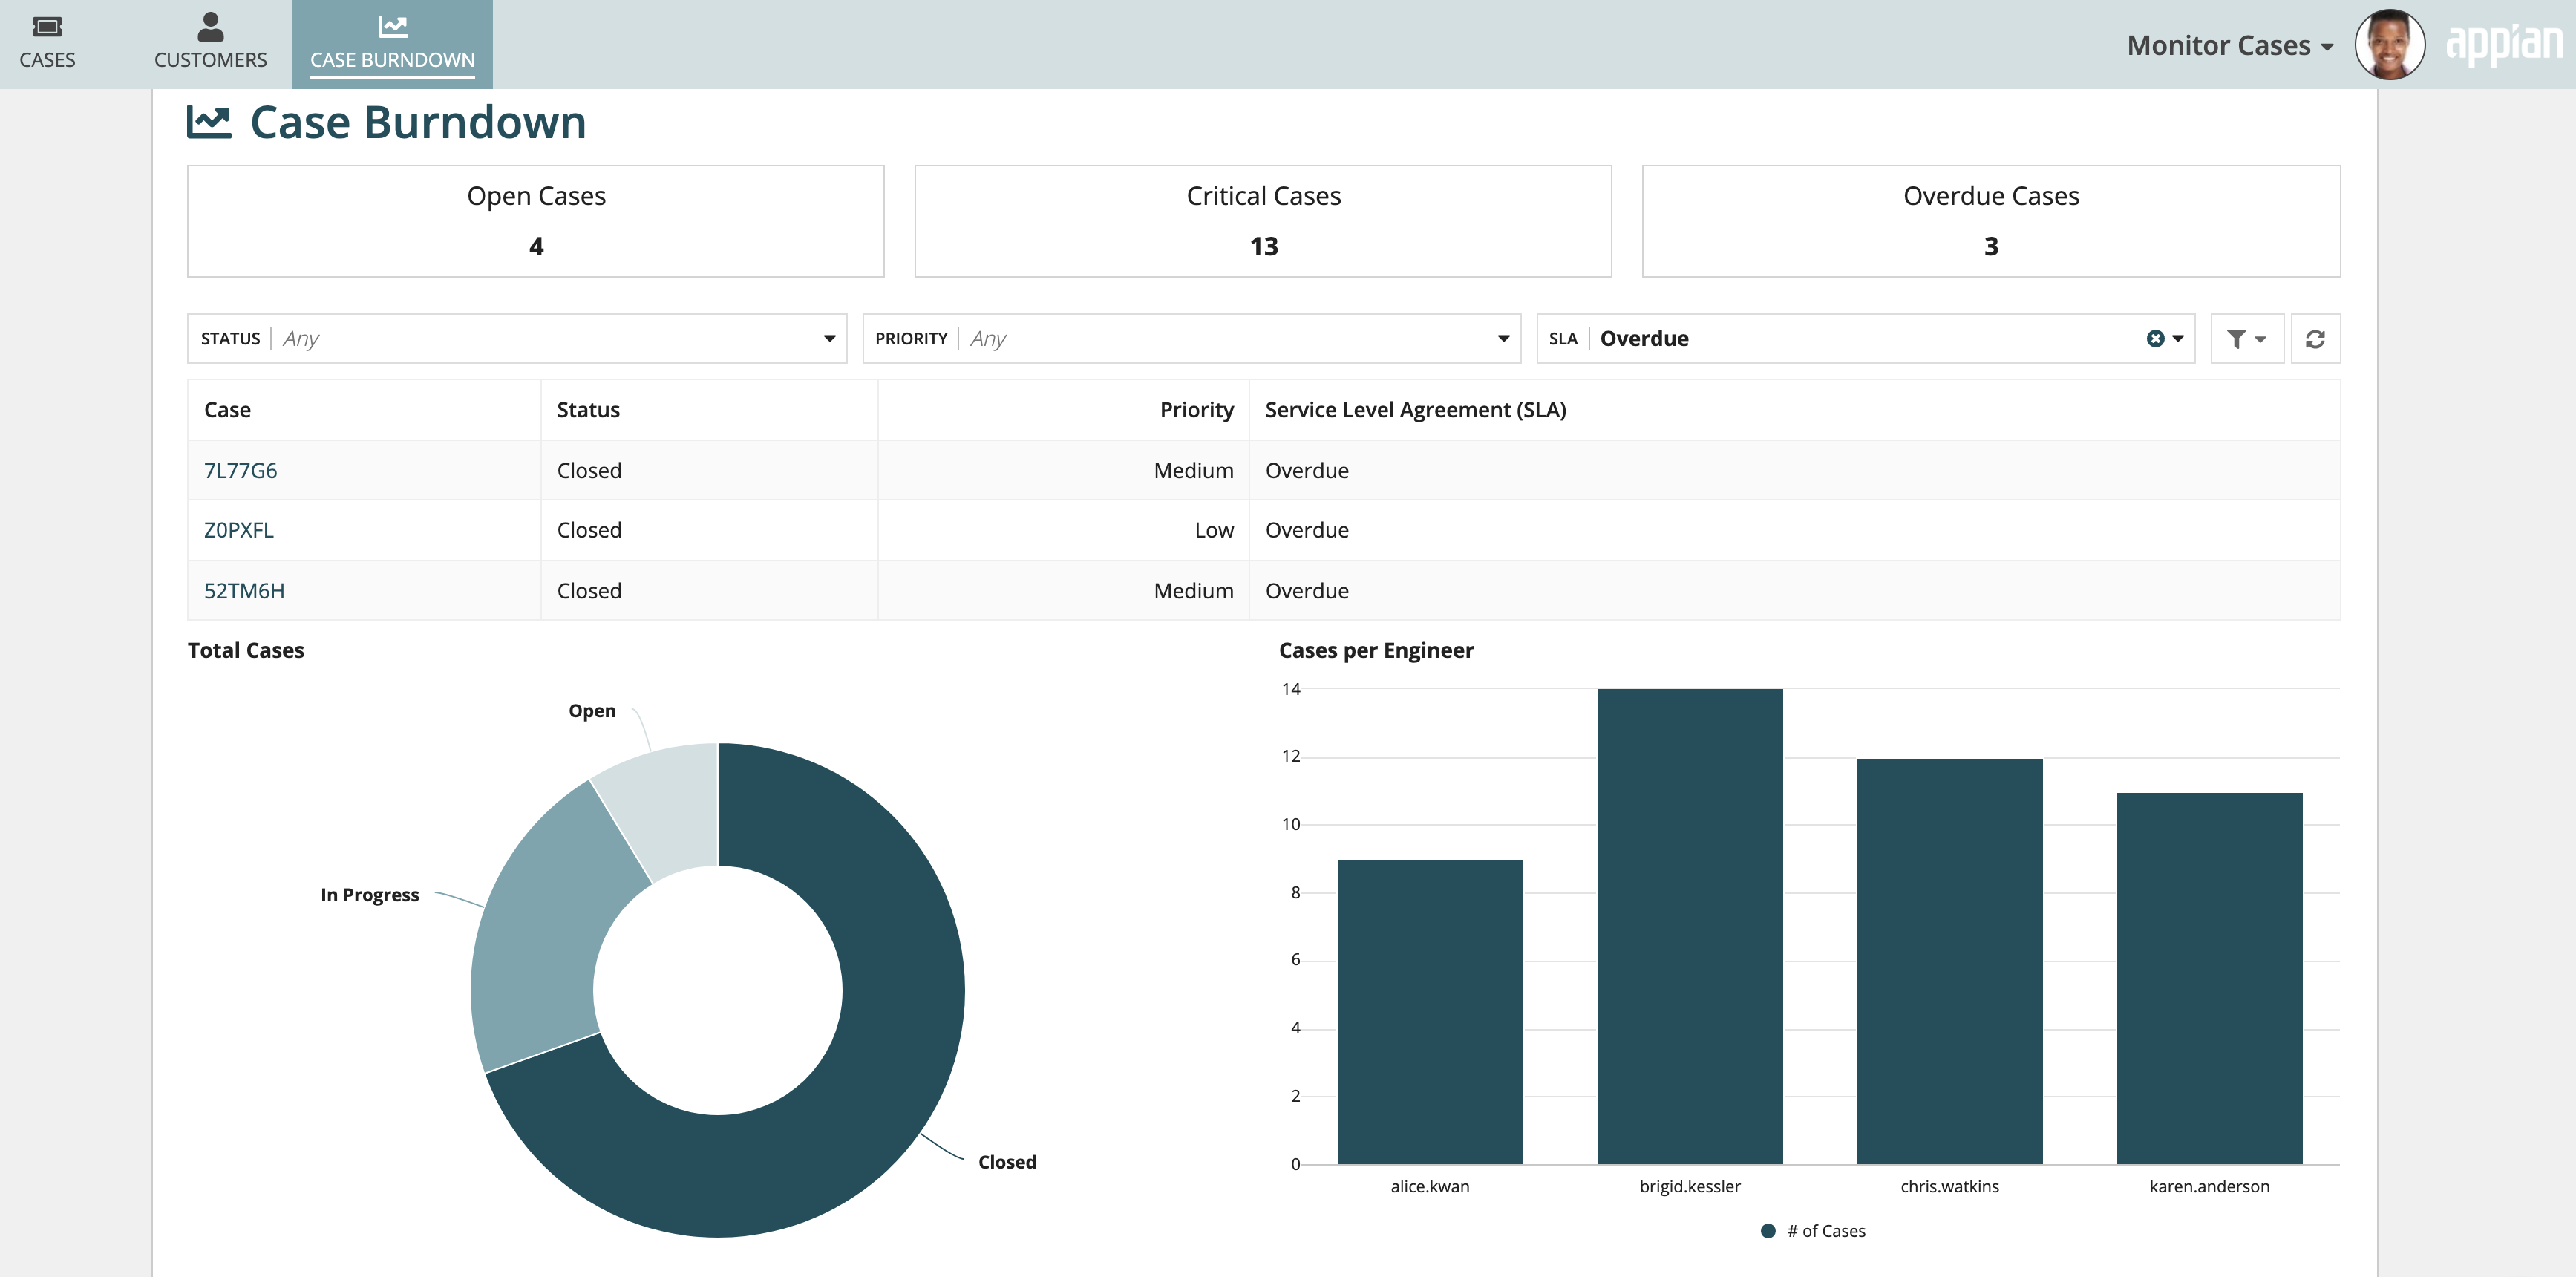
By applying record-level security on the Support Case record type, you can control which data is available to each of these groups. For example, the image below shows how administrators and support engineers would see different records when looking at the same Case Burndown report.
Note: Record-level security is automatically applied everywhere, except in the Process Insights page of Process HQ. Process insights aggregates row data from multiple record types to provide users with a complete picture of how their business process operates, so data security is controlled instead by access to the process itself. Learn more about configuring security for process insights.
Configure record-level securityCopy link to clipboard
You can configure record-level security on any record type with data sync enabled.
To configure record-level security, use one of the following options:
- Security rules: Allows you to configure even your most complex security requirements using a simple and easy-to-maintain experience.
- Security expression: Allows you to configure an expression using a series of filter conditions to define who can see which records.
Note: In the latest version of Appian, existing Default Filters are now called Security Expressions on record types with data sync enabled.
The table below outlines the key differences between these two options:
| Security Rules | Security Expression | |
|---|---|---|
| Configuration | Use a guided experience to specify who can see which records. | Create an expression to specify who should see which records. |
| Inherit security from related record types | You can inherit security rules from related record types, so you only need to maintain the security logic in one place. | You must configure a security expression on each record type. |
| Testing | You can easily test security rules during record type configuration, disabling and enabling rules to see how each configuration impacts the user. | You must log out of your current user, then log in as a different user to test the expression. |
| Performance | Performance is automatically handled by Appian. | You must consider performance when creating your expression. |
Security rulesCopy link to clipboard
Security rules allow you to translate your complex security requirements into plain language by answering two questions: who is a part of this rule? and which records can they view?
Who is a part of this rule?Copy link to clipboard
The first element of a security rule is defining who is a part of your rule.
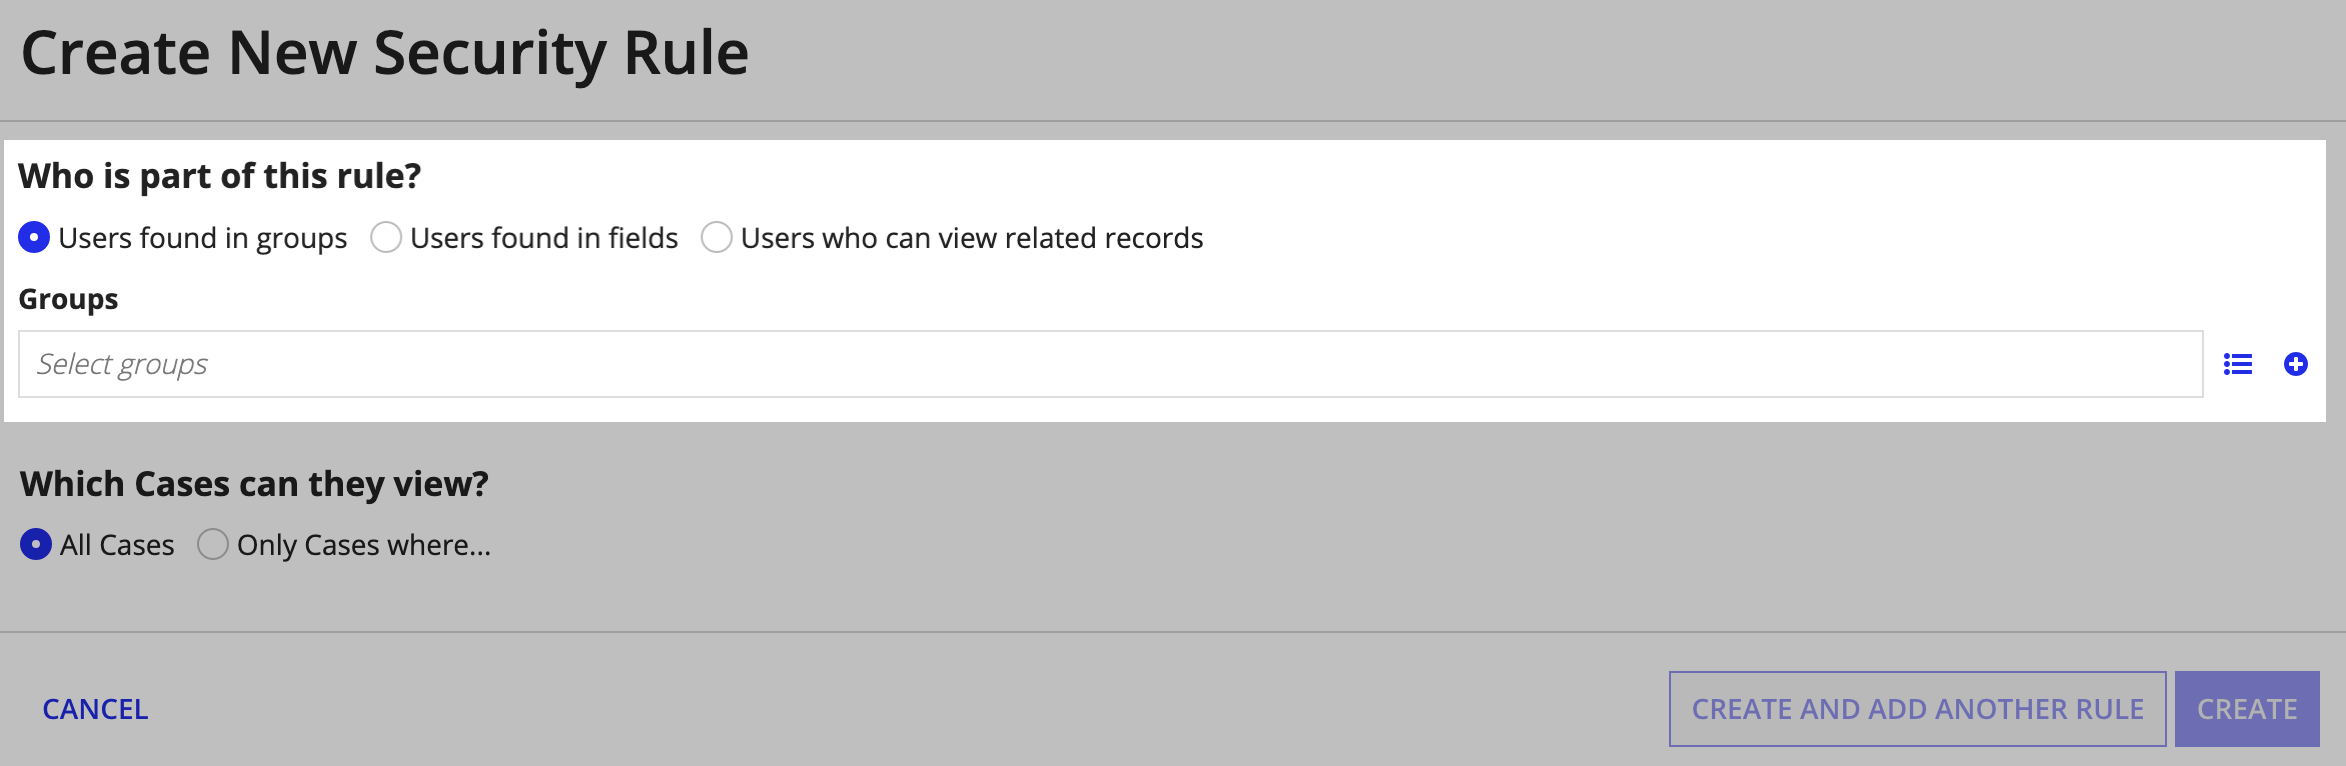
In this section, you can specify the users assigned to a security rule by selecting one of the three options:
Let's look at some examples of when you'd use one membership option versus another.
Users found in groupsCopy link to clipboard
The Users found in groups option allows you to assign users found in one or more groups to your security rule. When you select more than one group, the security rule will be applied to any user who belongs to any of the selected groups.
Consider using this option when you want to assign multiple users to a security rule.
For example, in a support application, you want administrators and executives to be able to see all cases in the Case record type. To configure this security requirement, you can create a security rule that specifies that any users found in the Administrators group or the Executives group can see all cases.

Any time you add new users to your groups, they will be automatically assigned to the security rule.
Tip: If you need more complex group membership conditions (like a user needs to be part of the Administrators and Executives groups), consider using a security expression.
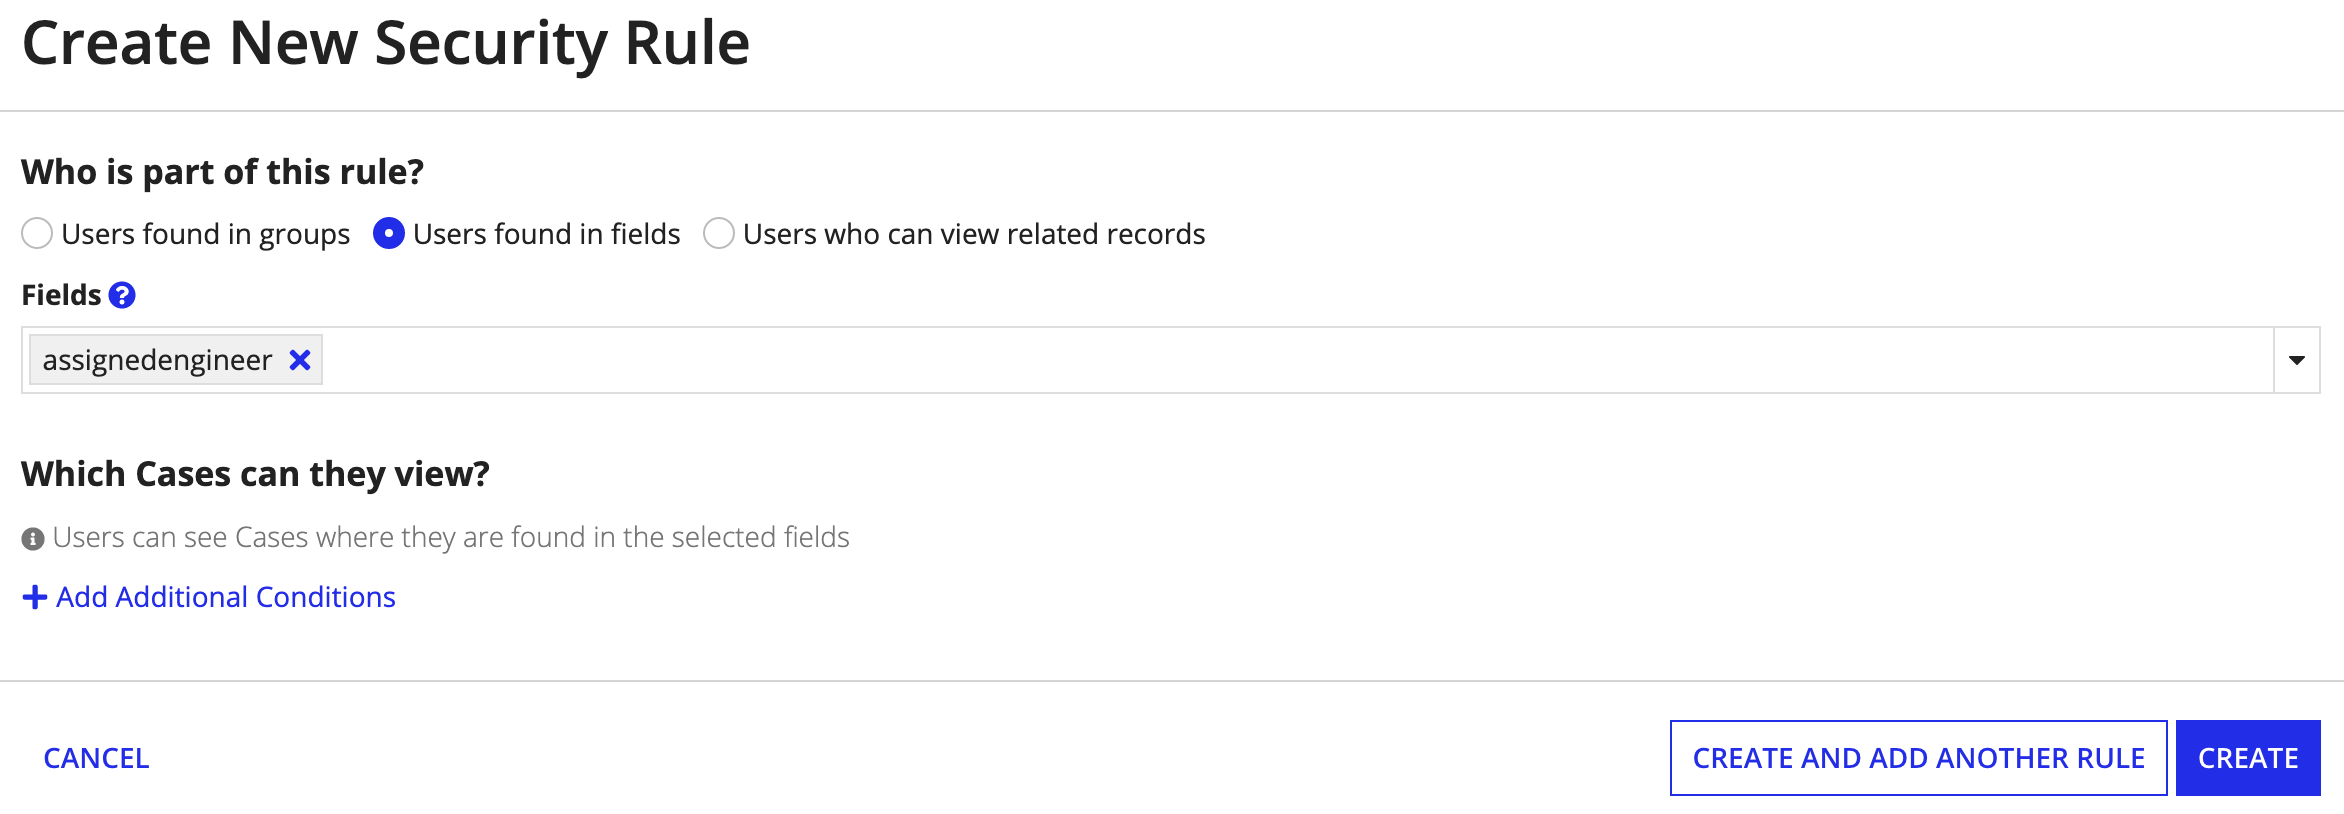
Users found in fieldsCopy link to clipboard
The Users found in fields option assigns any users found in a User or Group field to your security rule.
This provides a more dynamic configuration option since your security requirements are defined by your data. You can select record fields or related record fields in your configuration.
For example, in a support case application, you only want support engineers to view cases that they're assigned to. In the Case record type, you can add a new security rule that specifies that if a user is found in the assignedEngineer field (which is type User), then they can see the case.
With this configuration, support engineers will only ever see their assigned cases. If the data changes, and a support engineer is no longer assigned to a support case, the security rule will automatically reflect your data change so they can no longer see the case.
To learn how to configure a record field as type User or Group, see Change record field names and data types.
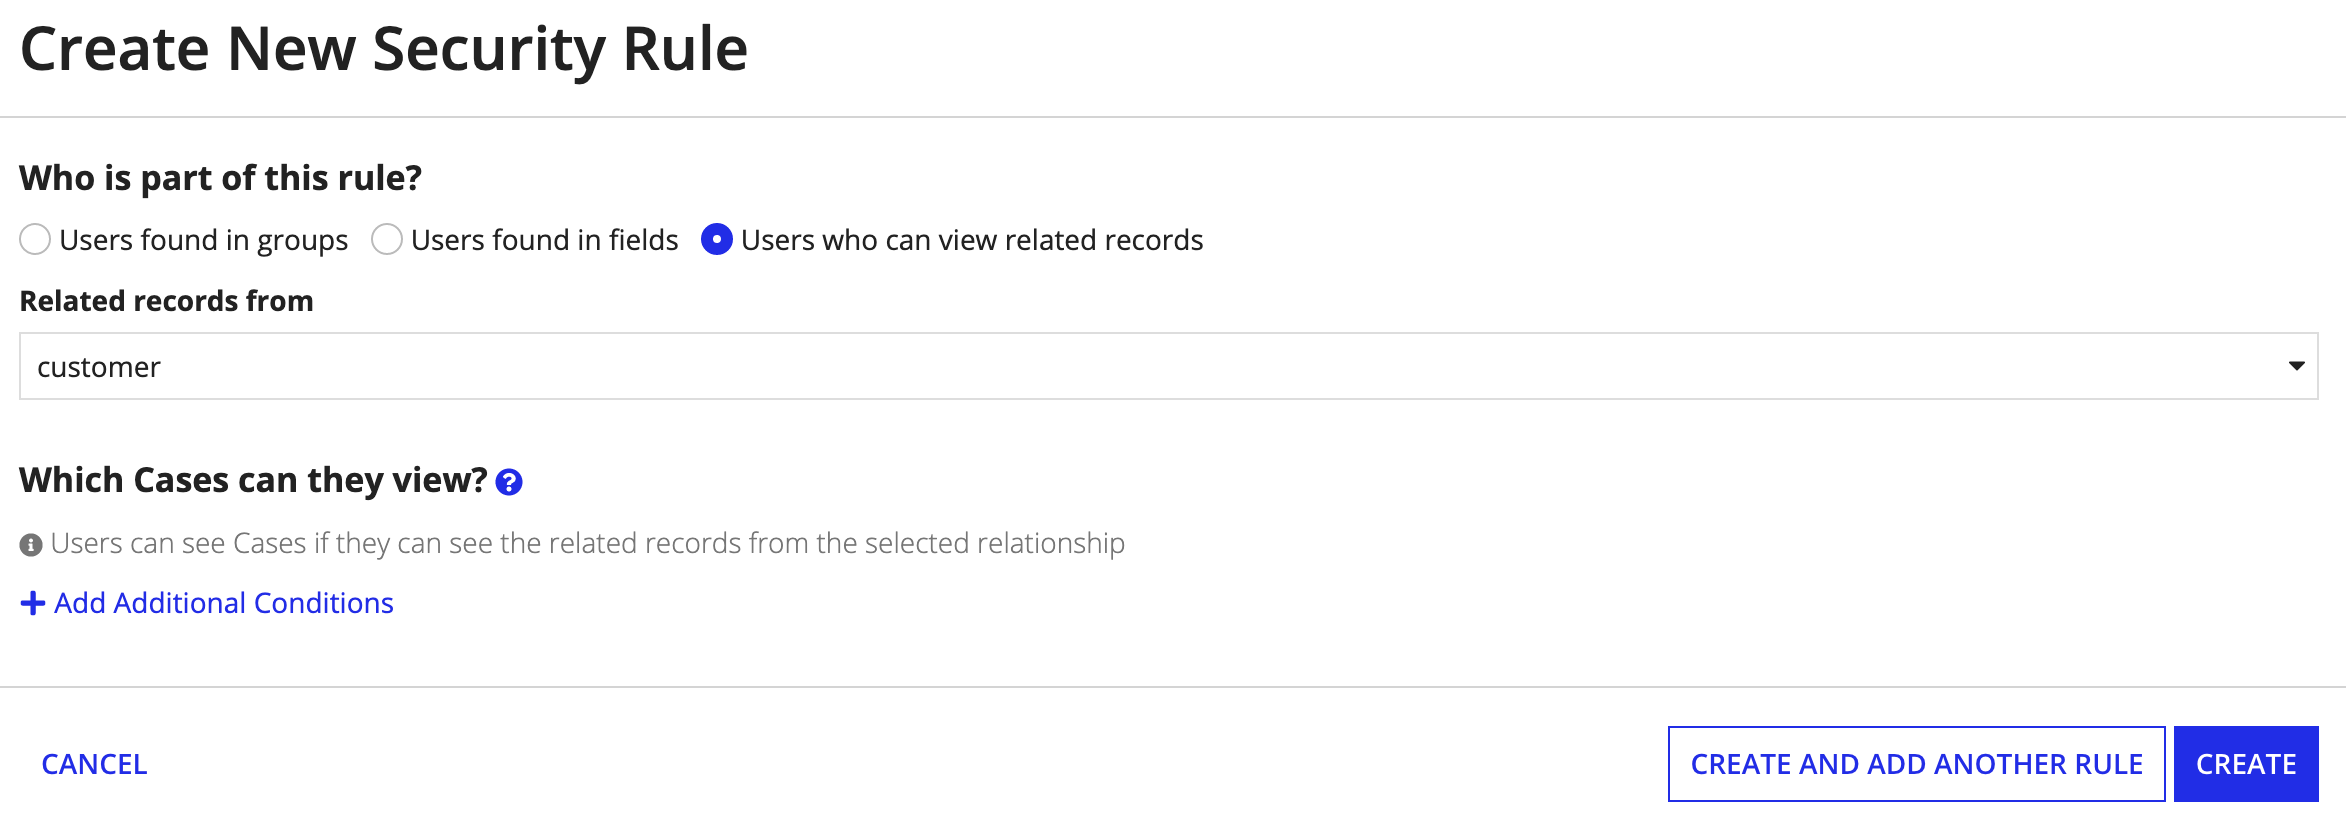
Users who can view related recordsCopy link to clipboard
The Users who can view related records option assigns any users who can see related records to the security rule. This option leverages your record type relationships so you can extend the existing security rules on a related record type to the base record type.
For example, in a support case application, let's say you only want account managers to view cases related to their customers. The security rules on the Customer record type define which account managers can see which customers. If you select this option on the Case record type, then select the customer relationship, you can extend the Customer security rules to the Case record type.
Now, any user who can view a customer can also see that customer's cases.
If you select a one-to-many relationship in your security rule, then users who can see at least one related record can also see the base record.
For example, let's say you need to extend security rules from the Case record type to the Customer record type. On the Customer record type, you can use this option and select the case relationship so any users who can see at least one case can also see the customer.
With this option, you can avoid recreating security rules across numerous record types by simply inheriting the security rules from a related record type.
Which records can they view?Copy link to clipboard
Once you've assigned users to the security rule, you can add security conditions to define which records they can view.
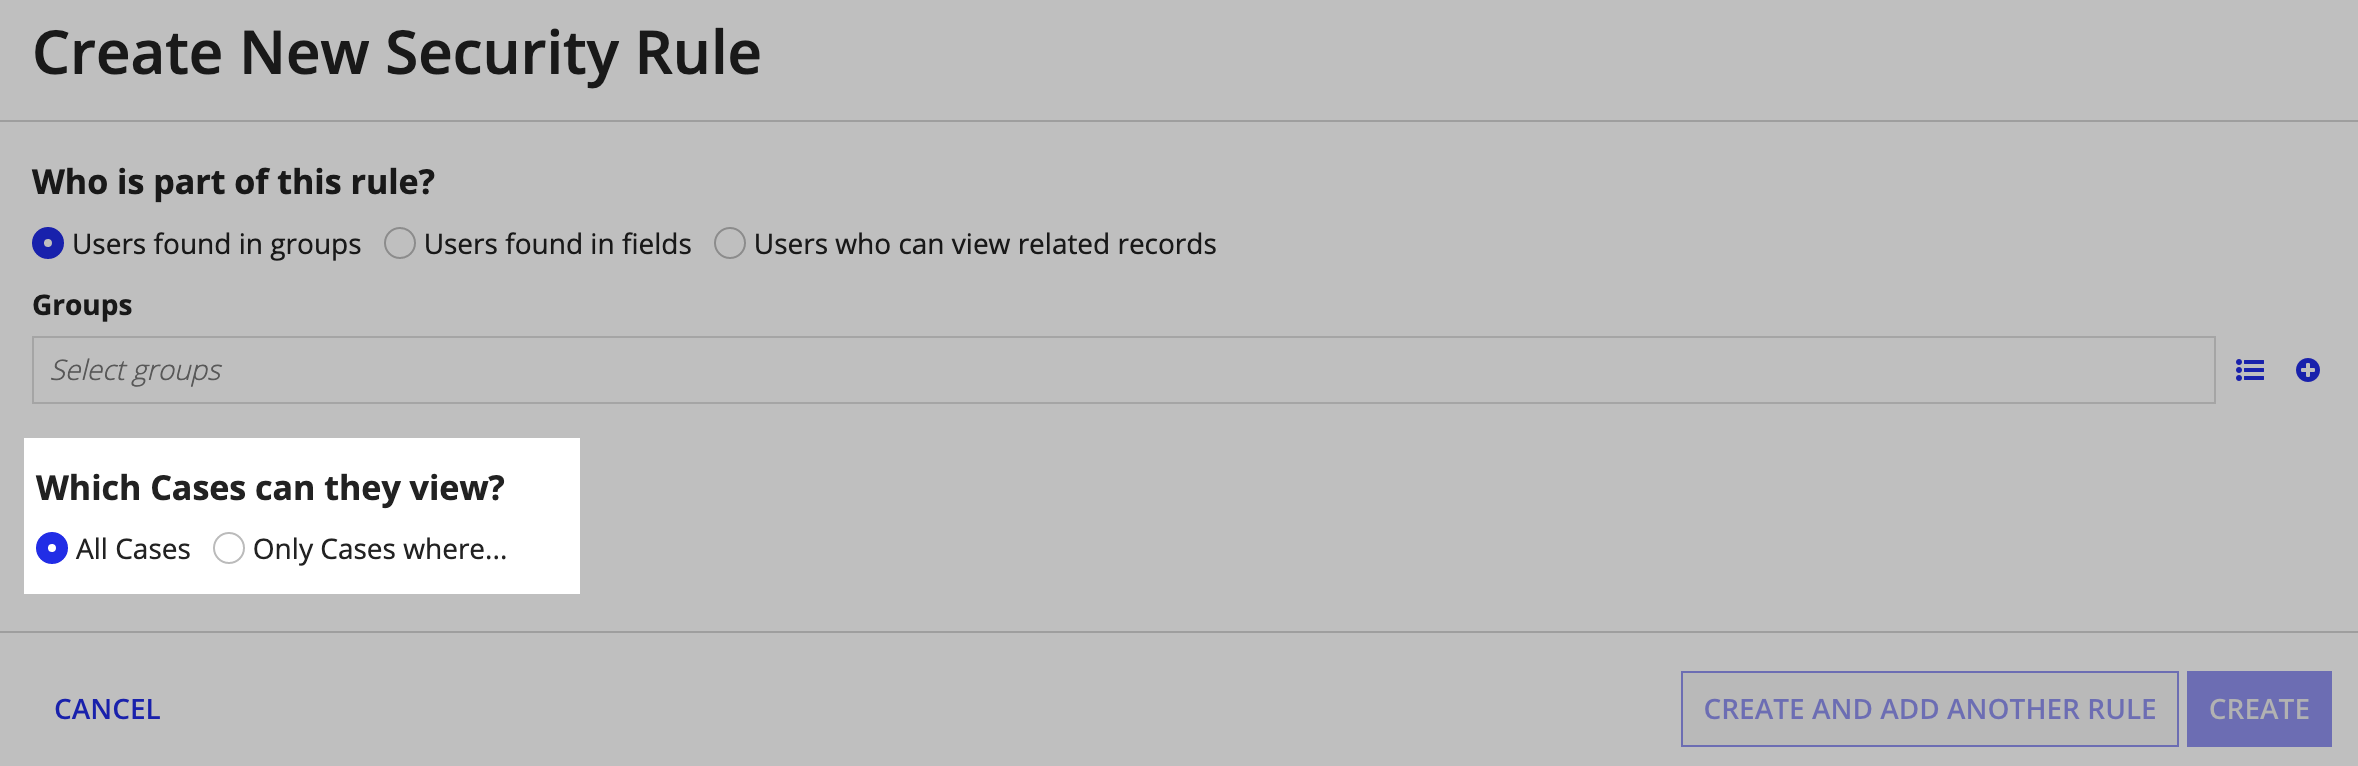
Depending on how you assigned users to the security rule, Appian applies certain default security conditions:
| Option | Default Security Condition |
|---|---|
| Users found in groups | None. |
| Users found in fields | Users can only see records where they are found in the specified fields. |
| Users who can view related records | Users can only see records if they have access to view the related records. |
These default conditions are automatically applied and cannot be modified. You can, however, add additional conditions as necessary.
For example, let's say you only want account managers to view customer cases created in the last month.
To configure this security requirement, you would first select the Users who can view related records option so any user who can view a customer can also see their cases. Then, you can add an additional security condition so that those users can only see cases greater than or equal to the beginning of last month.
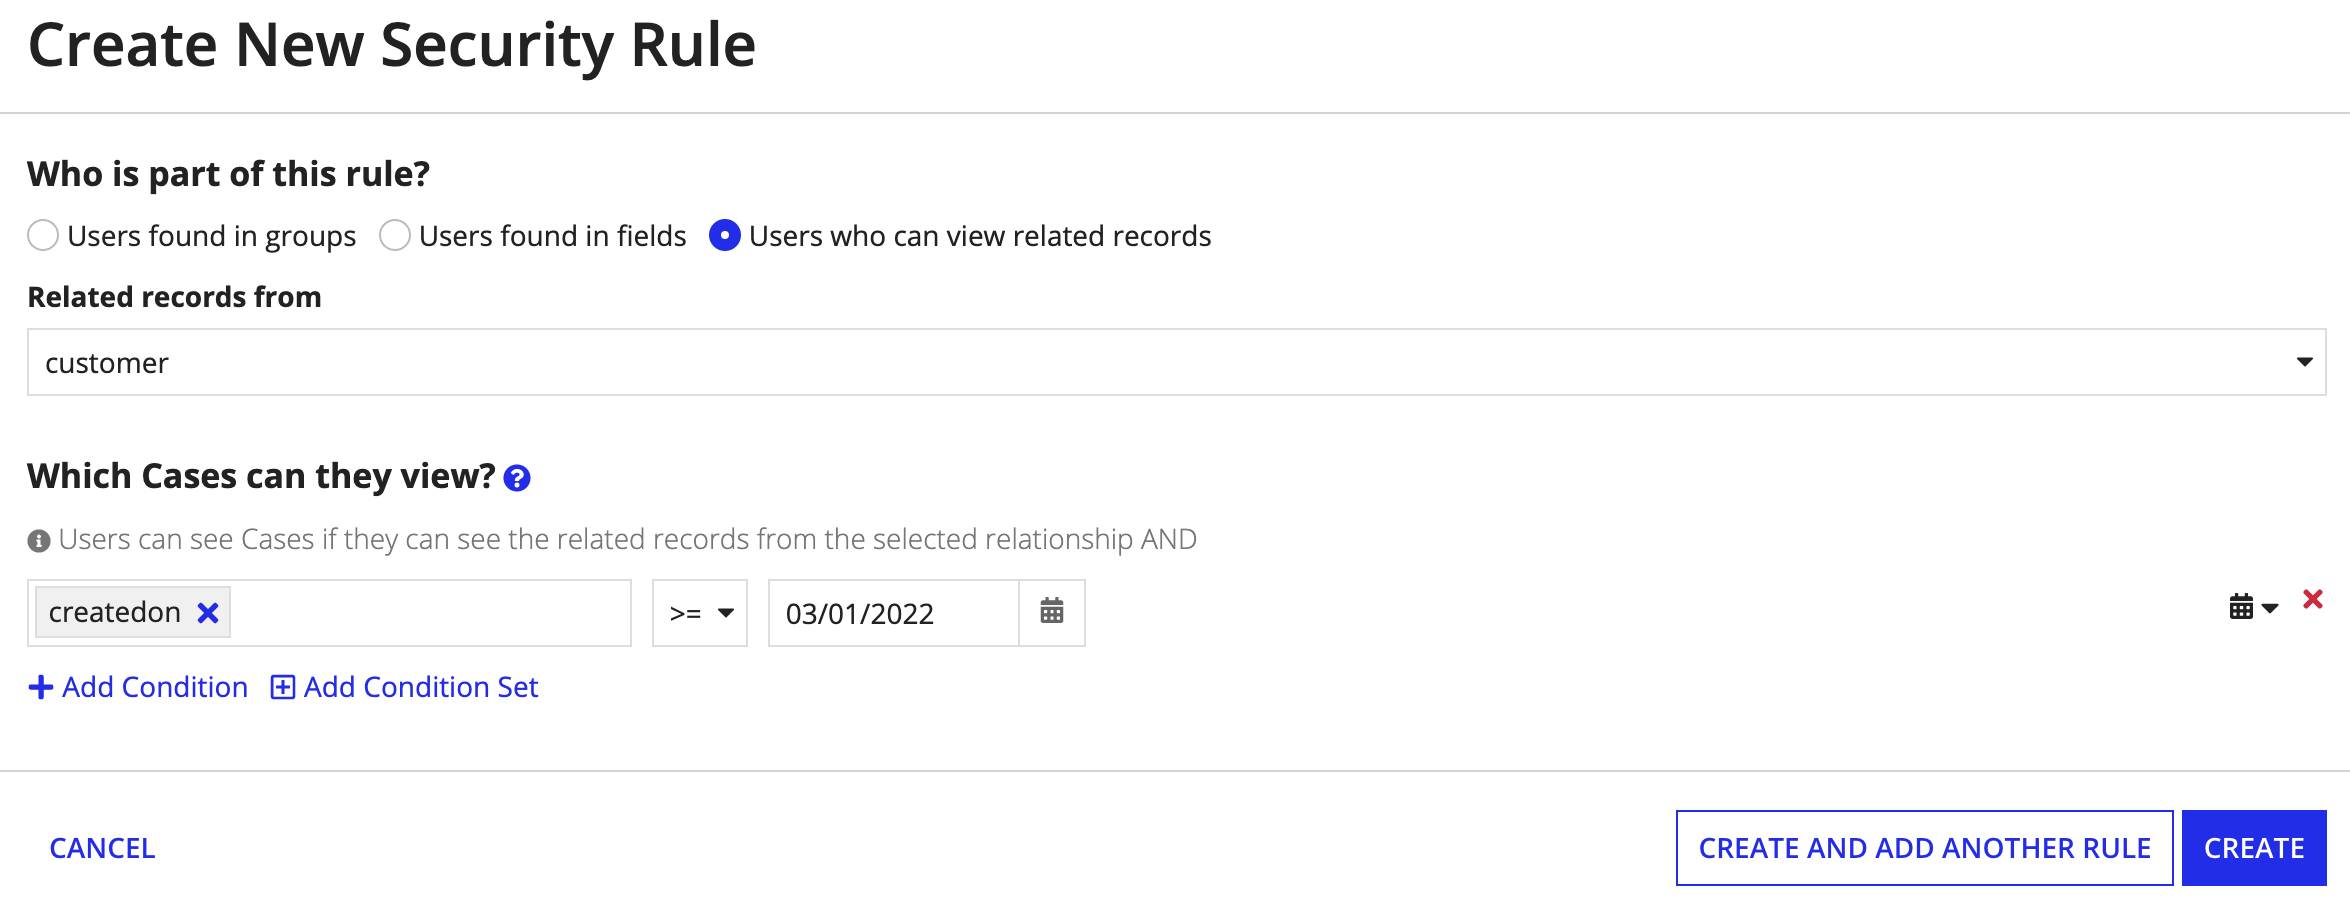
As shown in the image above, security conditions are made up of fields, operators, and values. Depending on the selected field, your operator and value options will change.
FieldsCopy link to clipboard
The field picker contains all record fields and relationships defined in the record type. However, depending on how you assigned users to the security rule, the fields available for selection will vary:
| Option | Available fields |
|---|---|
| Users found in groups | All record fields and relationships available from the base record type. |
| Users found in fields | All record fields and relationships available from the base record type. |
| Users who can view related records | Only record fields available on the base record type. |
Note: You cannot use real-time custom record fields that were created with the Aggregate Related Record Fields template or that use the following functions: today(), now(), rand(), timezoneid(), timezone(), or local().
If you create multiple conditions against fields from the same one-to-many relationship, then Appian will combine those filters using the AND_ALL operator.
For example, let's say you only want support engineers to view a customer if they are assigned to an active case for that customer and that case has a service-level agreement (SLA) status of "On Time."
The security rule configuration would look something like this:
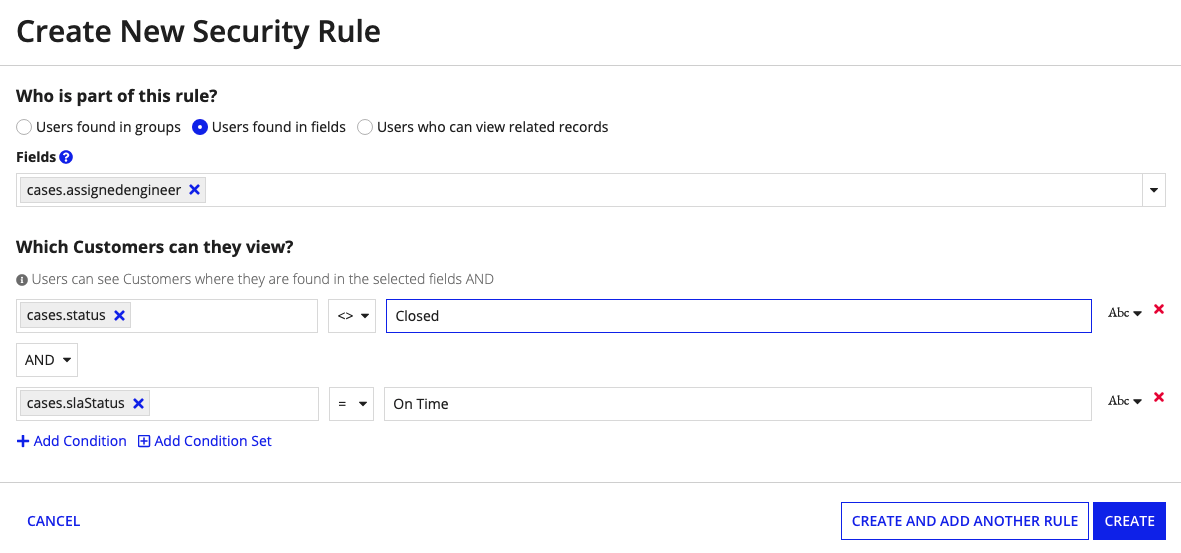
Since the security conditions reference fields from the same one-to-many relationship, the AND_ALL operator will be applied so that only users who meet all of the security conditions can see the record.
OperatorsCopy link to clipboard
The operator list displays all of the operators that can be applied to the selected field. Only operators that are compatible with the data type of the selected field display.
The following tables explains the behavior of each available operator:
| Operator | Description | Applies to Data Types |
|---|---|---|
= |
Equal to | Text, Integer, Float, Time, Date, Date and Time, Boolean |
<> |
Not equal to | Text, Integer, Float, Time, Date, Date and Time, Boolean |
< |
Less than | Integer, Float, Time, Date, Date and Time |
> |
Greater than | Integer, Float, Time, Date, Date and Time |
<= |
Less than or equal | Integer, Float, Time, Date, Date and Time |
>= |
Greater than or equal | Integer, Float, Time, Date, Date and Time |
in |
Matches a value in a list of values. Only available when using constants. | Text, Integer, Float, Time, Date, Date and Time, Boolean |
not in |
Does not match a value in a list of values. Only available when using constants. | Text, Integer, Float, Time, Date, Date and Time, Boolean |
is null |
Is empty or null | Text, Integer, Float, Time, Date, Date and Time, Boolean |
not null |
Is not empty or null | Text, Integer, Float, Time, Date, Date and Time, Boolean |
ValuesCopy link to clipboard
You can select how you want to pass in the condition value using the value context menu. The options in the context menu change based on the data type of the selected field. You can enter a static text value, or use a constant to determine the value the field must evaluate to in order for users to view the record.
Add security rulesCopy link to clipboard
You must have at least Editor permissions for the record type to add or update security rules.
To add a security rule:
- In the record type, go to Record-Level Security.
- Click NEW SECURITY RULE. The Create New Security Rule dialog opens.
- Choose Who is a part of the rule:
-
Determine Which records can they view by adding one or more security conditions. Depending on the members you assigned to the security rule, your configuration may differ:
If you selected… Then… Users found in groups Select Only records where… to configure a security condition. Users found in fields A default security condition is applied where users can only see records where they are listed as the user or group in that field. To add more conditions, click + Add Additional Conditions. Users who can view related records A default security condition is applied where users can only see records if they can see the related record in the related record type. To add more conditions, click + Add Additional Conditions. - To configure a security condition:
- Use the field picker to choose a record field or related record field.
- Select an operator to apply to the selected field.
- Enter a static text value, or use a constant to determine the value the field must evaluate to in order for users to view the record.
- Click + Add Condition to add additional security conditions. Use the OR/AND operator to determine how the security conditions are evaluated.
- Click Add Condition Set to compare a set of conditions against another set of conditions.
-
Click CREATE.
Tip: If you want to add another security rule immediately after creating one, click CREATE AND ADD ANOTHER RULE instead.
- Click NEW SECURITY RULE to add additional security rules.
- Drag and drop a security rule to reorder the list of security rules.
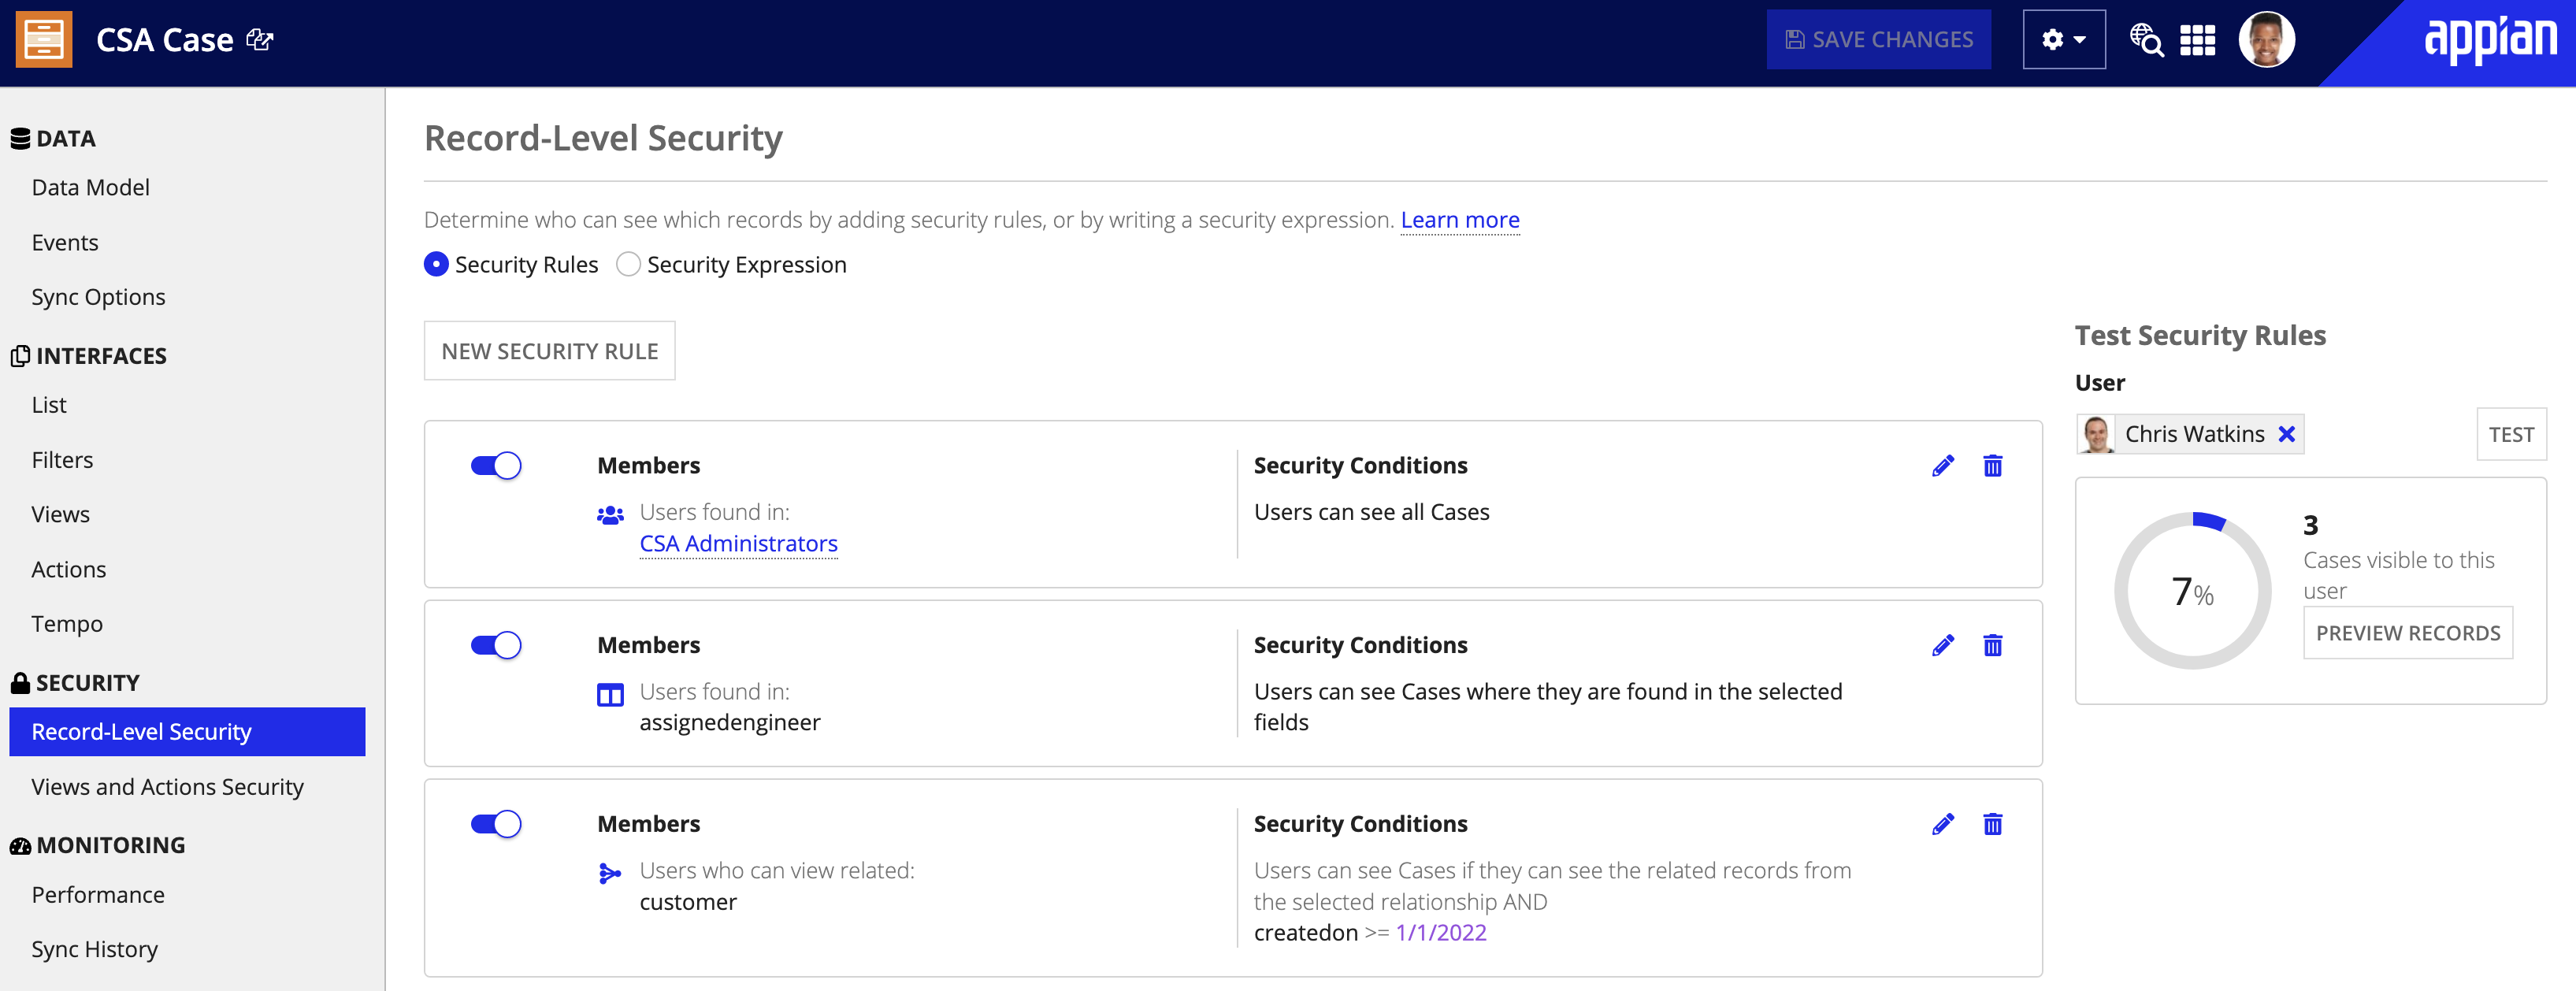
- In Test Security Rules, enter the name of a user in your environment.
- Click TEST to see the number of records visible to the selected user.
-
Click PREVIEW RECORDS to see a list of records visible to the selected user.
Note: When previewing record data, you can only see records that both you and the selected user have access to view.
- Click SAVE CHANGES to save and apply your security rules.
Manage security rulesCopy link to clipboard
Once you create a security rule, you can:
- Edit security rules.
- Copy security rules.
- Reorder security rules.
- Disable security rules.
- Delete security rules.
Edit security rulesCopy link to clipboard
To edit a security rule:
- In the record type, go to Record-Level Security.
- Next to the security rule, click the icon.
- Update any necessary configurations.
- Click OK.
- Click SAVE CHANGES to save and apply your updated security rule.
Copy security rulesCopy link to clipboard
To copy a security rule:
- In the record type, go to Record-Level Security.
- Next to the security rule, click the icon.
- Update the existing configurations as necessary.
- Click CREATE.
- Click SAVE CHANGES to save and apply your new security rule.
Reorder security rulesCopy link to clipboard
To reorder a security rule:
- In the record type, go to Record-Level Security.
- Drag and drop a security rule to the appropriate location.
- Click SAVE CHANGES to save and apply your updated security rule order.
Disable security rulesCopy link to clipboard
To disable or enable a security rule:
- In the record type, go to Record-Level Security.
- Use the toggle next to a security rule to disable and enable the security rule.
When a security rule is disabled, it will not be evaluated when testing the rules or anywhere throughout the application. If you disable all security rules, any user with Viewer permissions for the record type can view all records.
Delete security rulesCopy link to clipboard
To delete a security rule:
- In the record type, go to Record-Level Security.
- Next to the security rule, click the icon.
- Click DELETE.
- Click SAVE CHANGES to update your record-level security.
If you delete all security rules, any user with Viewer permission for the record type can view all records.
Security expressionCopy link to clipboard
Although security rules allow you to configure the majority of use cases, you may choose to configure a security expression if you need to create more complex conditions.
Security expressions allow you to create a series of filter conditions using a!queryFilter() or a!queryLogicalExpression() to define which records are available to users based on the conditions you specify.
Each filter defines a condition that must be true for a record to appear in queries to the record type. If you have multiple conditions, the record must meet all conditions in order to appear.
For example, in a support case application, let’s say you only want users to see all unassigned cases if they are a member of the Support group, and are not currently assigned to a case. Since the membership conditions are more complex, you could configure a security expression on the Case record type that looks something like this:
1
2
3
4
5
6
7
8
9
10
11
12
13
14
15
if(
    and(
        a!isUserMemberOfGroup(loggedInUser(), cons!CSA_SUPPORT_GROUP),
        not(recordType!Case.fields.assignedEngineer)
    ),
    a!queryFilter(
        field: recordType!Case.fields.assignedEngineer,
        operator: "is null"
    ),
    a!queryFilter(
        field: recordType!Case.fields.assignedEngineer,
        operator: "=",
        value: loggedInUser()
    )
)
Copy
However, there are two limitations to using a security expression:
- You cannot also configure security rules in the record type.
- Related record types cannot inherit this security like they can with security rules.
This means that you would need to expand your security expression to include all possible users, like account managers and administrators, so they only see the appropriate records. Additionally, related record types like the Customer record type, cannot inherit the security expression.
For easy maintenance, we recommend using security rules on your record types.
Add a security expressionCopy link to clipboard
Note: You must have at least Editor permissions for the record type to add or update security rules.
To add a security expression:
- In the record type, go to Record-Level Security.
- Click Configure a security expression.
- In the expression editor, enter an expression that returns a list of
queryFilterorqueryLogicalExpression. - Click CREATE.
- Click SAVE CHANGES to save and apply your security expression to the record type.
Edit the security expressionCopy link to clipboard
Once you define your security expression, you can edit it at any time.
To edit the security expression:
- In the record type, go to Record-Level Security.
- In the Expression, make any necessary updates to your security expression.
- Click SAVE CHANGES to save and apply your updated security expression.
Replace a security expression with security rulesCopy link to clipboard
If you decide that you'd rather maintain your record-level security using security rules, you can remove the security expression and use security rules instead.
To replace a security expression with security rules:
- In the record type, go to Record-Level Security.
- Select the Security Rules radio button at the top of the page. A banner will appear that mentions your security expression will be removed and replaced by security rules.
- Add a new security rule.
- Click SAVE CHANGES to save and apply your security rules.