IntroductionCopy link to clipboard
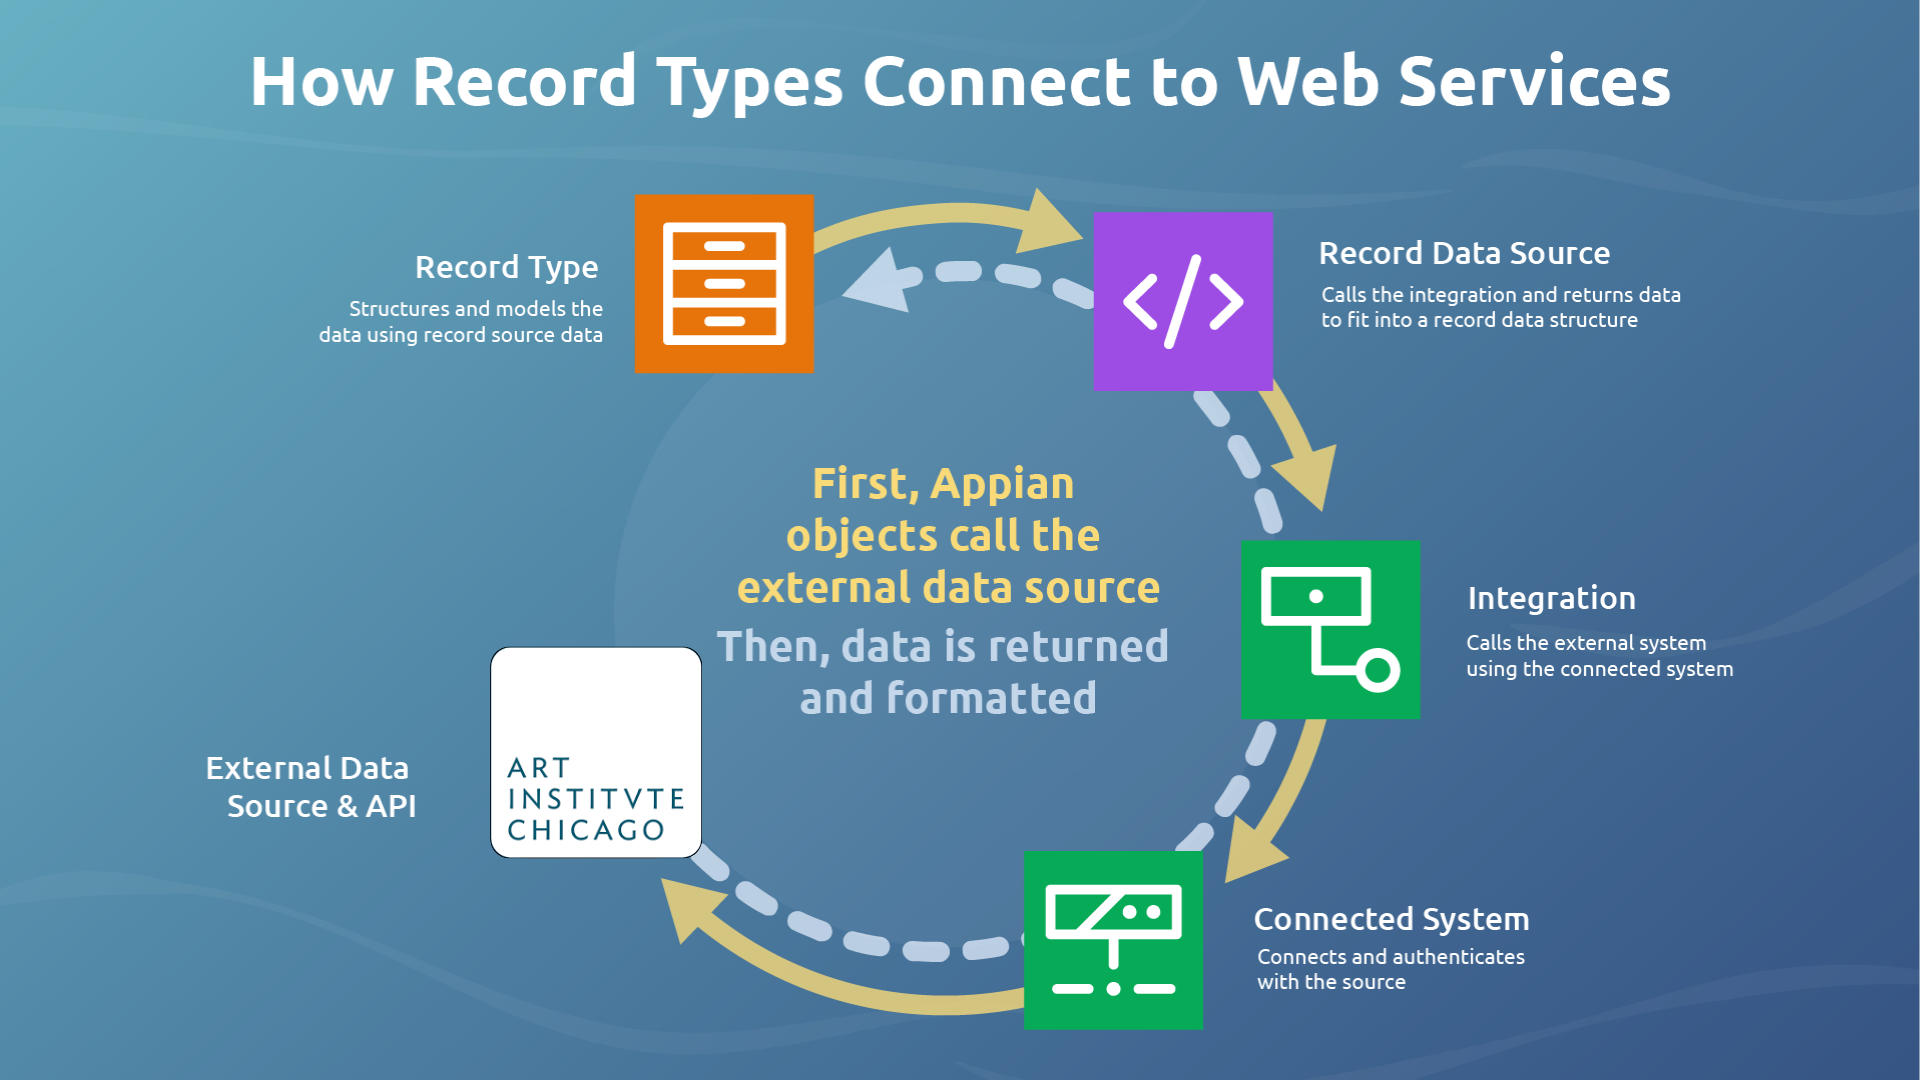
Your enterprise data may be spread across a number of different systems. If your data sources provide access with a REST API, you can easily bring that data together in Appian by creating a record type that connects to a web service, otherwise known as a service-backed record type.
This tutorial guides you through the steps for creating a record type that uses the Art Institute of Chicago API as the data source.
Most APIs require applications to send authentication credentials with each request. The Art Institute of Chicago's API is a free, public, open-source API that doesn't require authentication. This makes it ideal for this tutorial because we don't need credentials in order to connect to it.
Note: Appian is not a maintainer of this API, and the API is used in this tutorial for example purposes only. In the event the API changes, is deprecated, or is made unavailable, this tutorial will continue to be available as a reference, but there is no guarantee that the tutorial can be used to create working application code.
ObjectivesCopy link to clipboard
You'll learn how to create a record type that connects to an external data source using the following design objects:
- Connected system: Stores the connection information to the external system.
- Integration: Uses the connected system to access and call the external system.
- Expression rule: Calls the integration and formats the returned data so it can be used in the record type. This expression is used as the source of the record type.
You'll enable data sync on the record type to leverage powerful data fabric features, and learn how to configure a record list and a Summary view.
After you complete this tutorial, you will understand how to use your own API to create a service-backed record type.
RequirementsCopy link to clipboard
-
To follow along with this tutorial, you'll need an environment. If you don't have one available, you can use an environment from Appian Community Edition.
-
Ensure you are familiar with REST APIs and how to use them.
Create the Appian Tutorial applicationCopy link to clipboard
Tip: The Appian Tutorial application is used throughout Appian tutorials. Skip the steps in this section if you've already created this application in another tutorial.
To begin, we need to create an application to contain our design objects.
We will be creating the Appian Tutorial application for this tutorial. All of Appian's tutorials use the Appian Tutorial application as the reference application. After completing this tutorial, you can reuse this application as you work through other Appian tutorials.
To create the Appian Tutorial application:
- Log in to Appian Designer.
- In the Applications view, click + New Application.
-
In the Create New Application dialog, configure the following properties:
Property Description Name Enter Appian Tutorial.Prefix Keep the default prefix, AT, which Appian constructs using the initial characters of each word you entered in the Name parameter. We'll be following the recommended naming standard, and using this short, unique prefix whenever we name an object in this application.Description Leave blank. It's normally a best practice to add descriptions to all design objects. However, to save a little time during this tutorial, we'll skip adding descriptions unless the description displays to the end user. Generate groups and folders to secure and organize objects Keep this checkbox selected, so that Appian will automatically generate standard groups and folders and assign default security groups for this application. - Click CREATE.
-
In the Review Application Security dialog, keep the default security settings. Because we selected the Generate groups and folders option in the previous step, Appian automatically uses the AT Users and AT Administrator groups it generated to set our application security appropriately.
Tip: The security of the application object is unrelated to the security of each of the objects contained within the application. This means that you will need to set security permissions for every object in an application in addition to the application object itself. For more information about security permissions for the application object, see Application Security.
-
Click SAVE.

- Click X to close the What do you want to build first? dialog.
Right now, the application contains the folders and groups Appian generated automatically. To see these, click Build in the navigation pane.
Each design object that you create during the course of this tutorial will appear in this list in the Build view and be associated with the tutorial application.

Because we selected the Generate groups and folders to secure and organize objects option while creating the object, Appian generates standard groups and folders for the application, as well as assigns the generated groups as the default security groups for the application.
In this tutorial, we'll be using the following generated groups and folders:
- AT Administrators group to contain all administrators of the Appian Tutorial application.
- AT Users group to contain all users of the Appian Tutorial application.
- AT Rules & Constants folder to contain all our expression rules, constants, and interfaces in this folder throughout the tutorial.
- AT Process Models folder to contain all our process models throughout the tutorial.
For each object we create in this tutorial, Appian will prepopulate the AT Administrators and AT Users groups in the object role maps. For this tutorial, we won't need to make changes to those prepopulated values.
Now, let's create and configure our new record type.
Create the record typeCopy link to clipboard
First, we'll create a record type to store and reference the exhibitions from the Art Institute of Chicago.
To create the record type:
- In the Build view of the Appian Tutorial application, click NEW > Record type.
-
Configure the following properties:
Property Action Name Keep the application prefix that prepopulates this property, and add Exhibition, so that the name isAT Exhibition.Display Name (Plural) Keep the generated value of Exhibitions.Description Enter Exhibitions at the Art Institute of Chicago. - Click CREATE.
- In the Review Record Type Security dialog, keep the default settings. AT Administrators group should be assigned Administrator permissions for the group.
- Click SAVE.
Configure the record data sourceCopy link to clipboard
Now, we'll configure the record type to connect to a web service. To do this, we must have a record data source expression. This is an expression rule that structures and formats data returned from a REST API through an integration object so it can be used in Appian.
Since we don't have an existing record data source expression, we'll create one while we configure the source of the record type.
To configure the record data source:
- On the Data Model page, click TELL US ABOUT YOUR DATA.
- For Choose Source Type, click Web Service.
- Click NEXT.
- For Data Sync, keep the default selection Build Apps Faster with Sync.
- Click NEXT.
- For Choose Record Data Source, click Create Record Data Source.
Set up the connected systemCopy link to clipboard
To create our record data source, we'll start by creating a connected system to store the base URL used to connect the Art Institute of Chicago API.
To create the connected system:
- Keep the default option, Create a new integration, selected.
- Next to the Connected System field, click Create Connected System.
- In the Create Connected System dialog, select HTTP.
- For Name, enter
AT Art Institute of Chicago. - For Description, enter
API that returns data from the Art Institute of Chicago. - For System Logo, upload a logo image for the Art Institute of Chicago.
- For Base URL, enter
https://api.artic.edu/api/v1/. -
For Authentication, keep the default
Noneselected since this is an unauthenticated API.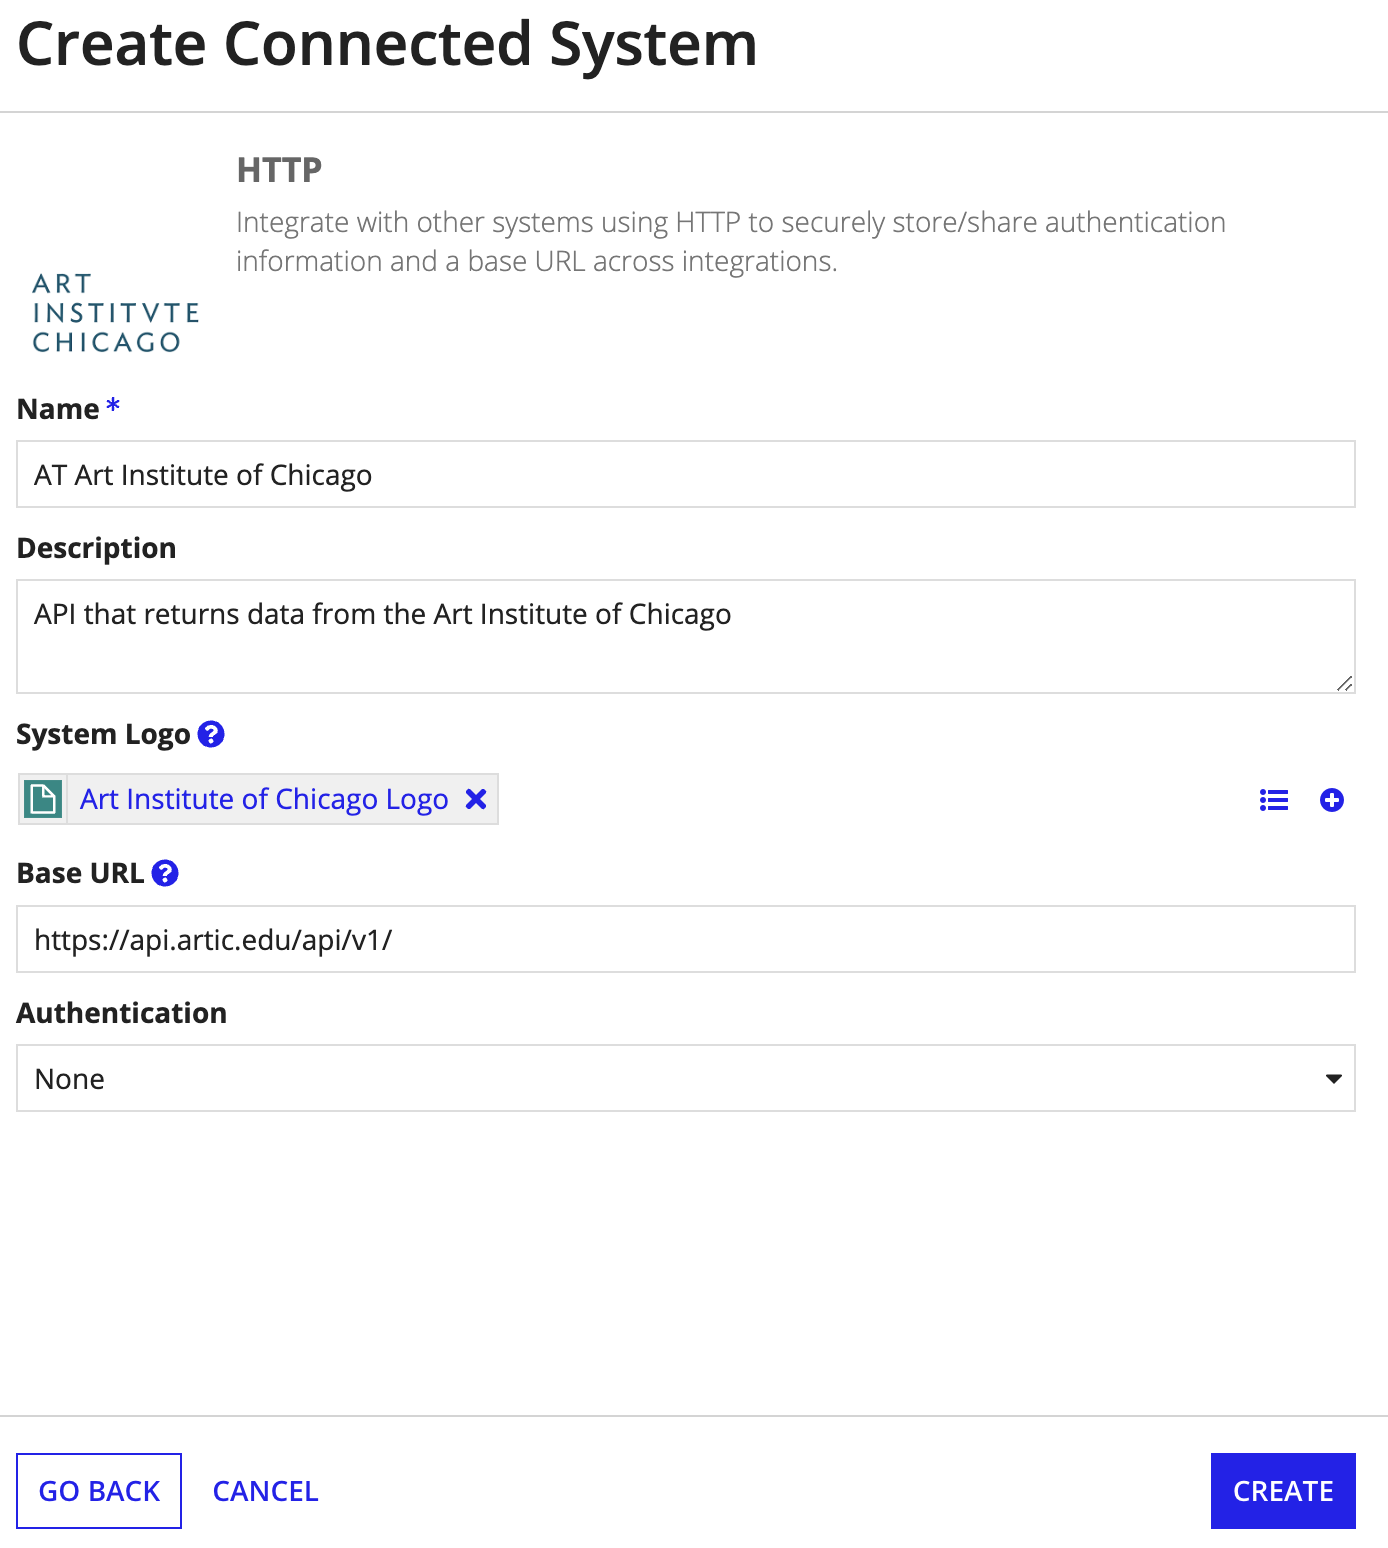
- Click CREATE.
The new object is created and appears as the Connected System in the Create Record Data Source dialog.
Create the integrationCopy link to clipboard
Next, we'll create an integration that uses the connected system to call the Art Institute of Chicago API.
To create the integration:
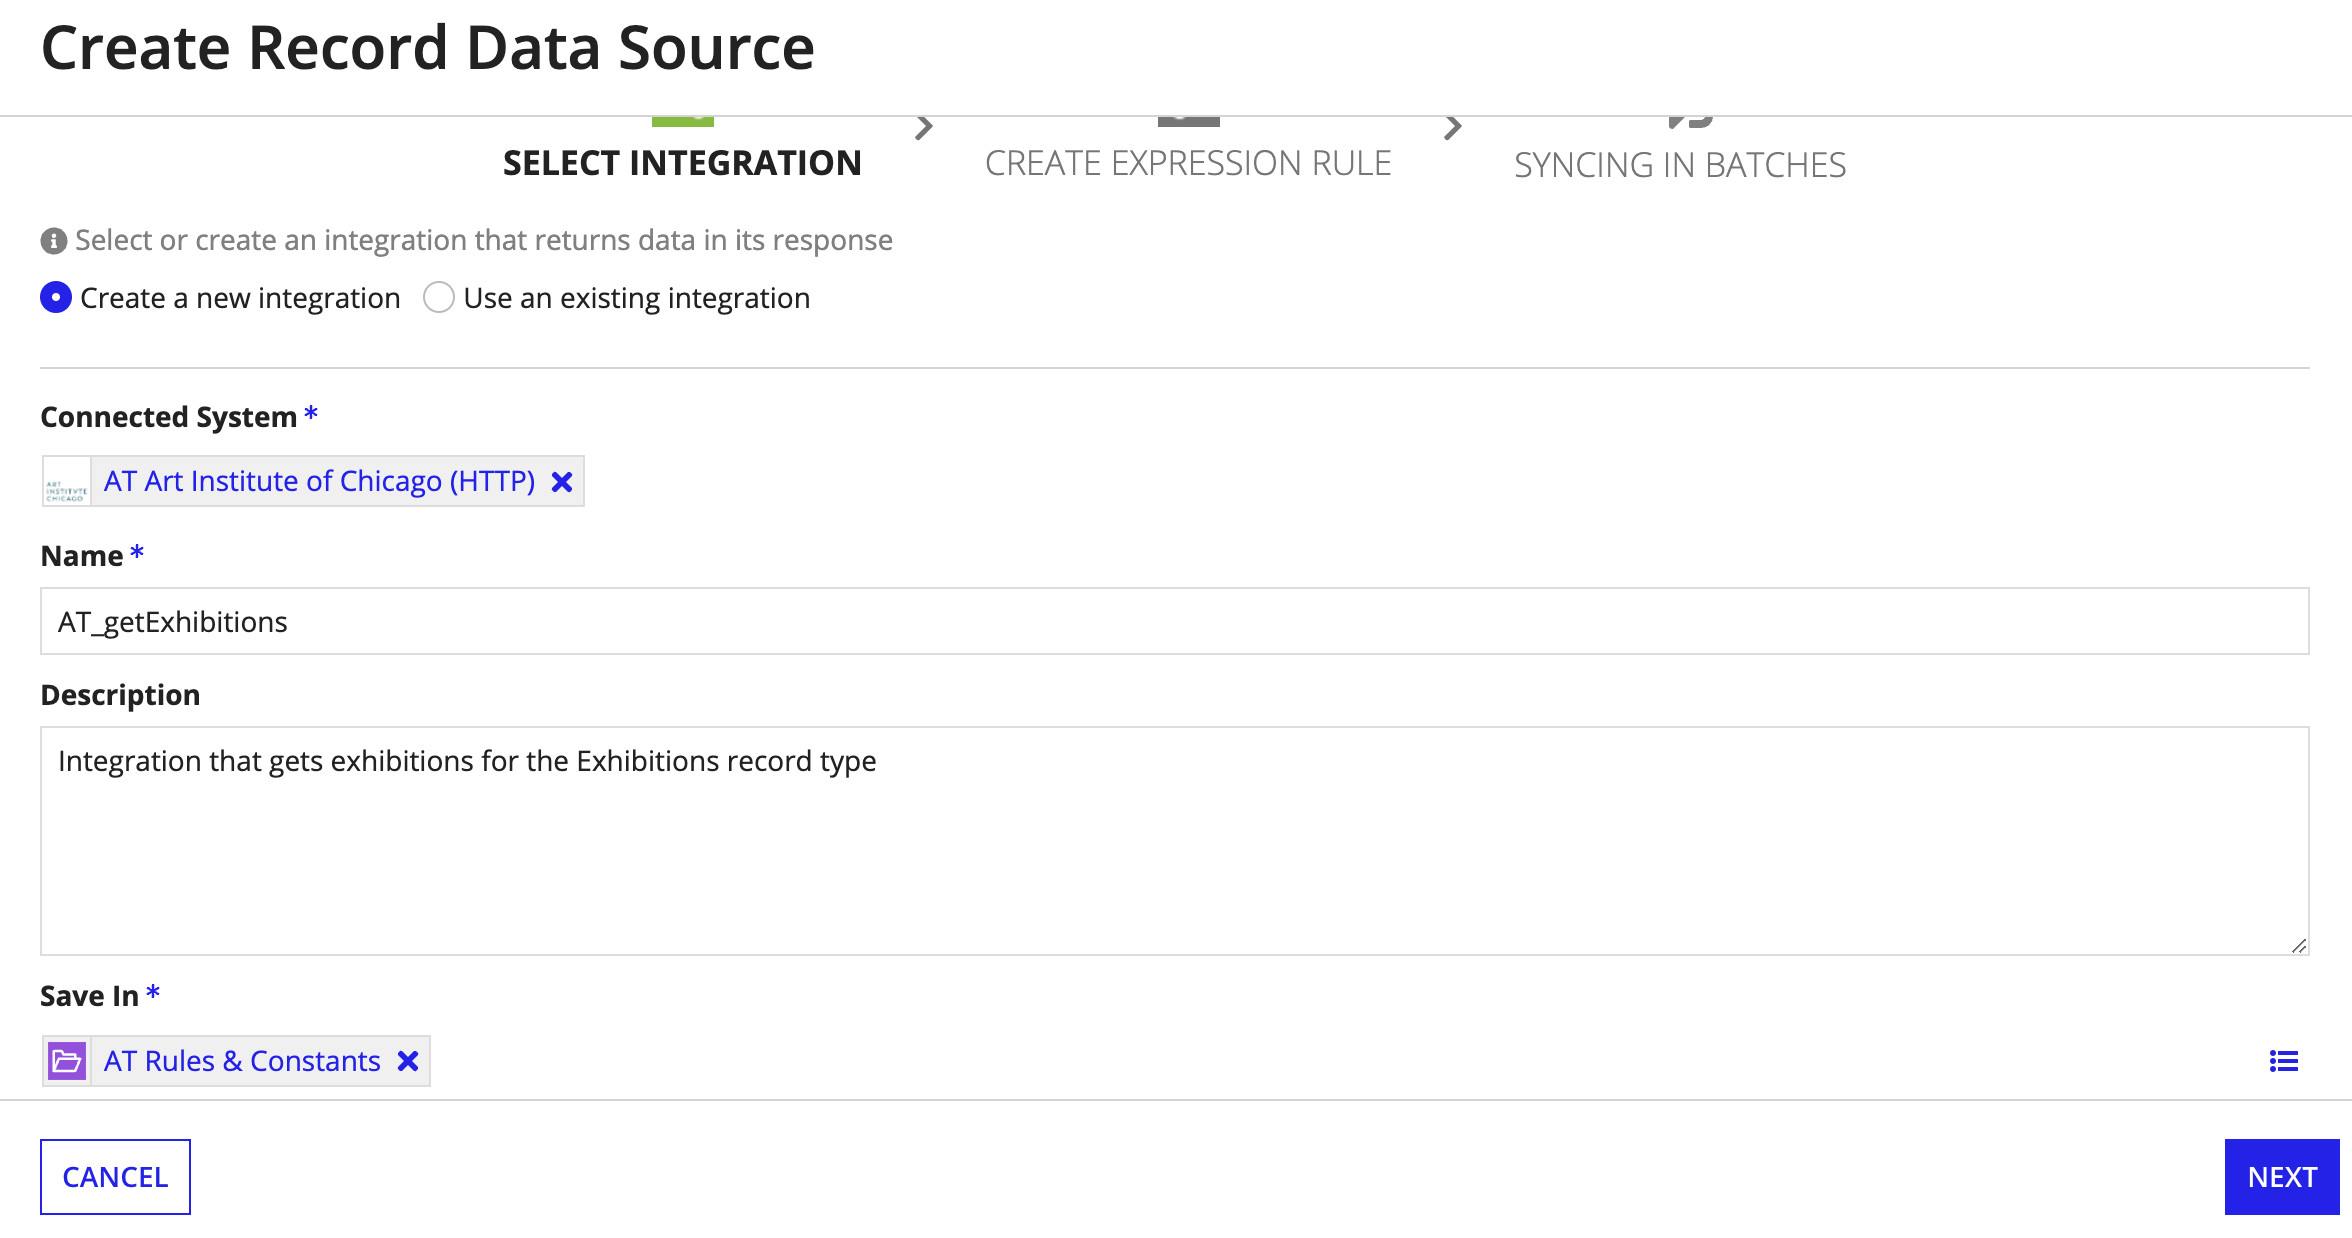
- For Name, enter
AT_getExhibitions. - For Description, enter
Integration that gets exhibitions for the Exhibitions record type. -
For Save In, select the AT Rules & Constants folder.
- Click NEXT.
Create the record data source expressionCopy link to clipboard
Next, we'll create the record data source expression. After creating the integration for the record data source, the configuration wizard automatically defines the properties for our expression rule.
Verify that the following information is automatically populated in each property below:
| Property | Value |
|---|---|
| Name | AT_getExhibitions_recordDataSource |
| Description | The Record Data Source for the AT Exhibition Record Type |
| Application | Appian Tutorial |
| Save In | AT Rules & Constants |
Click NEXT.
Configure syncing in batchesCopy link to clipboard
In the last step of the Create Record Data Source wizard, you'll specify whether you want to sync your data in batches.
The record data source can return a maximum of 1,000 rows with each integration call, so Appian provides the option to sync larger datasets in batches. We want to sync more than 1,000 rows in the record type, so we'll enable batching.
Tip: To determine how to batch data, review the documentation for your API. In this tutorial, the documentation indicates that pagination is controlled by the page parameter. Since this is a number-based property, we will batch by sequential values.
To batch by sequential values:
- Select Batch by Sequential Values. A rule input of type Number (Integer) will be automatically configured on the record data source expression and the integration object.
- Click CREATE.
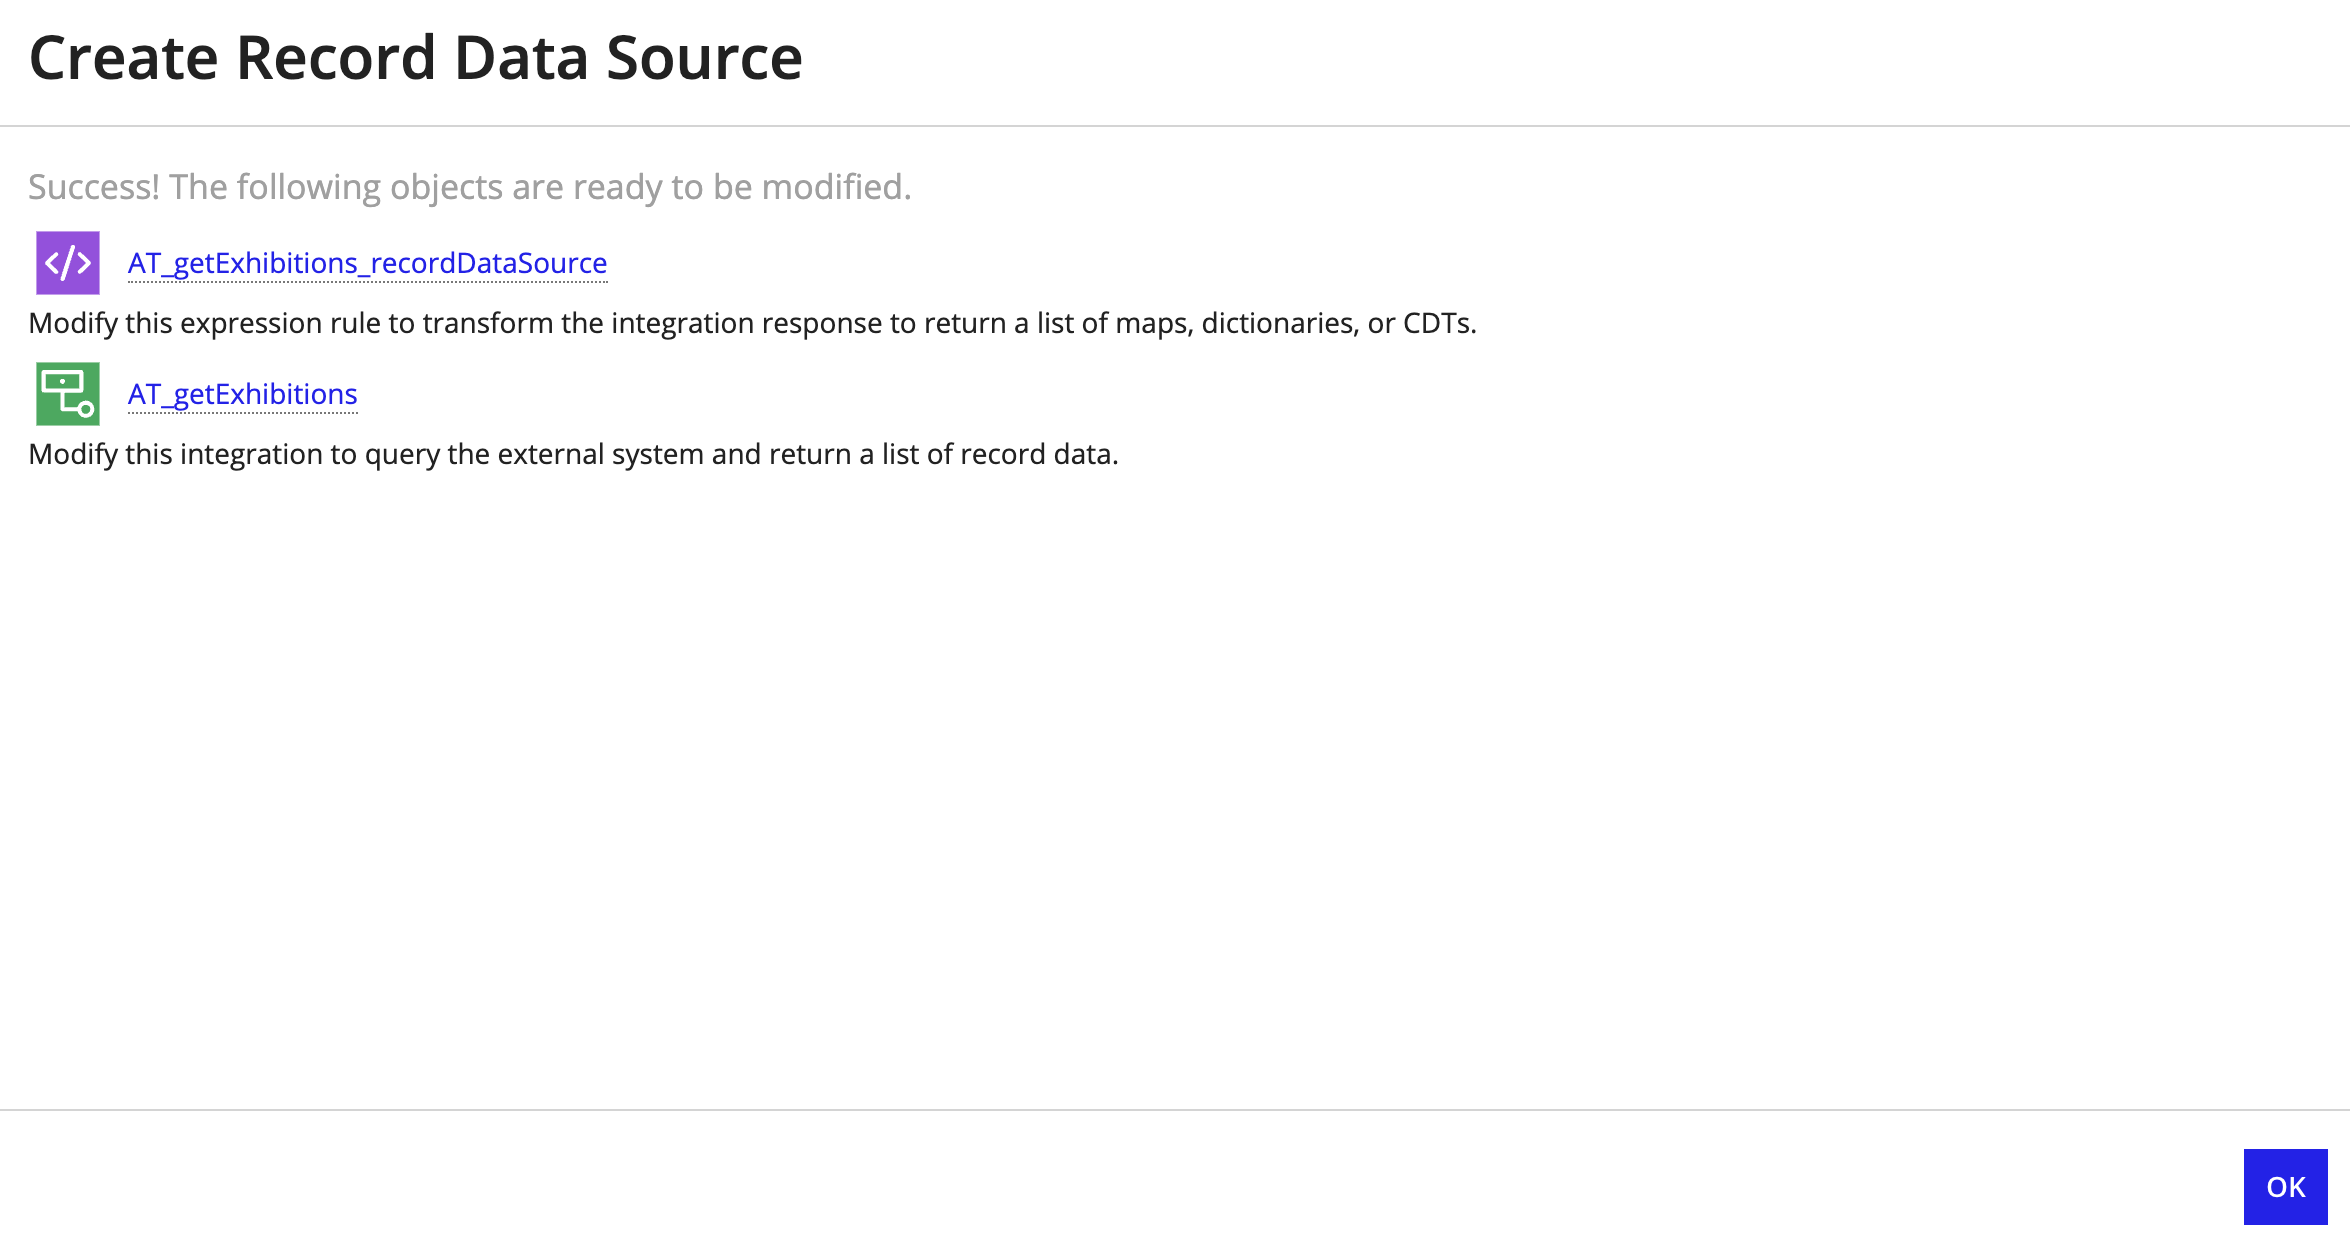
Two generated objects are listed on the confirmation page. Before you close the Create Record Data Source wizard, we need to edit the generated objects so they return the right data in the right format.
Caution: If you click OK now, you will see an error on the Choose Record Data Source dialog.
Configure the integration pathCopy link to clipboard
First, we'll edit the generated integration object AT_getExibitions. We need to add two things:
- A relative path.
- A query parameter for batching.
The relative path is appended to the base URL of the connected system to form a URL exposed by the API as an endpoint. The data returned by the endpoint will be used to populate the record type. Based on the API's documentation, we'll use exhibitions as the relative path.
To ensure the integration returns each page of results from the API, we also need to create a query parameter to pass the batch number to the URL.
To configure the relative path and batching:
- On the Create Record Data Source dialog, click the AT_getExhibitions integration object to open it.
-
For Relative Path, enter
exhibitions.This will be appended to the Base URL of the connected system to form a URL of
https://api.artic.edu/api/v1/exhibitions.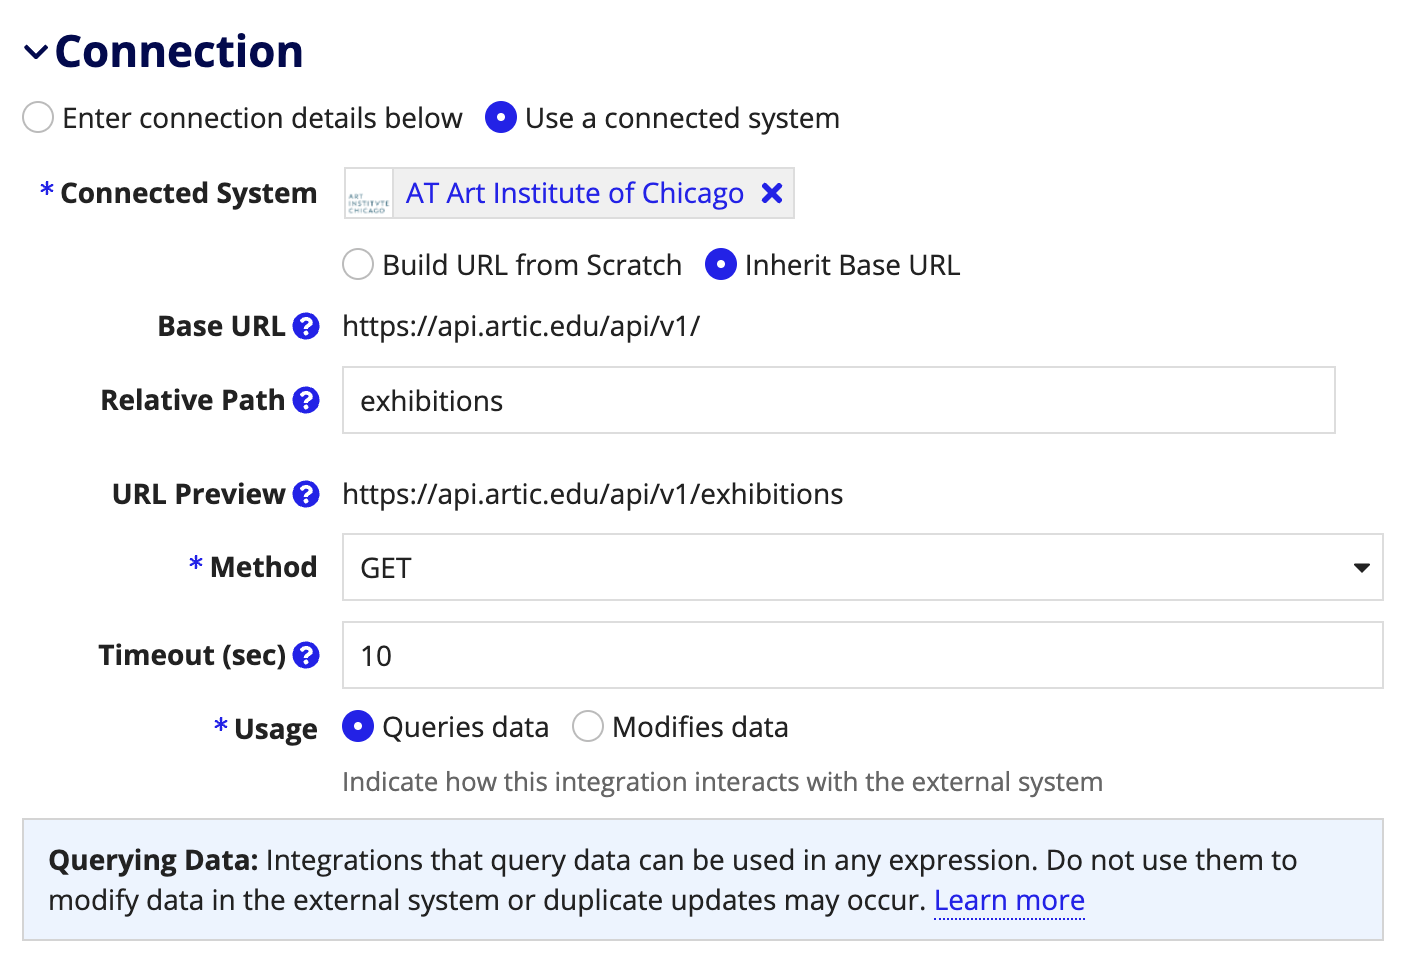
-
Click TEST REQUEST. This should return a success message:

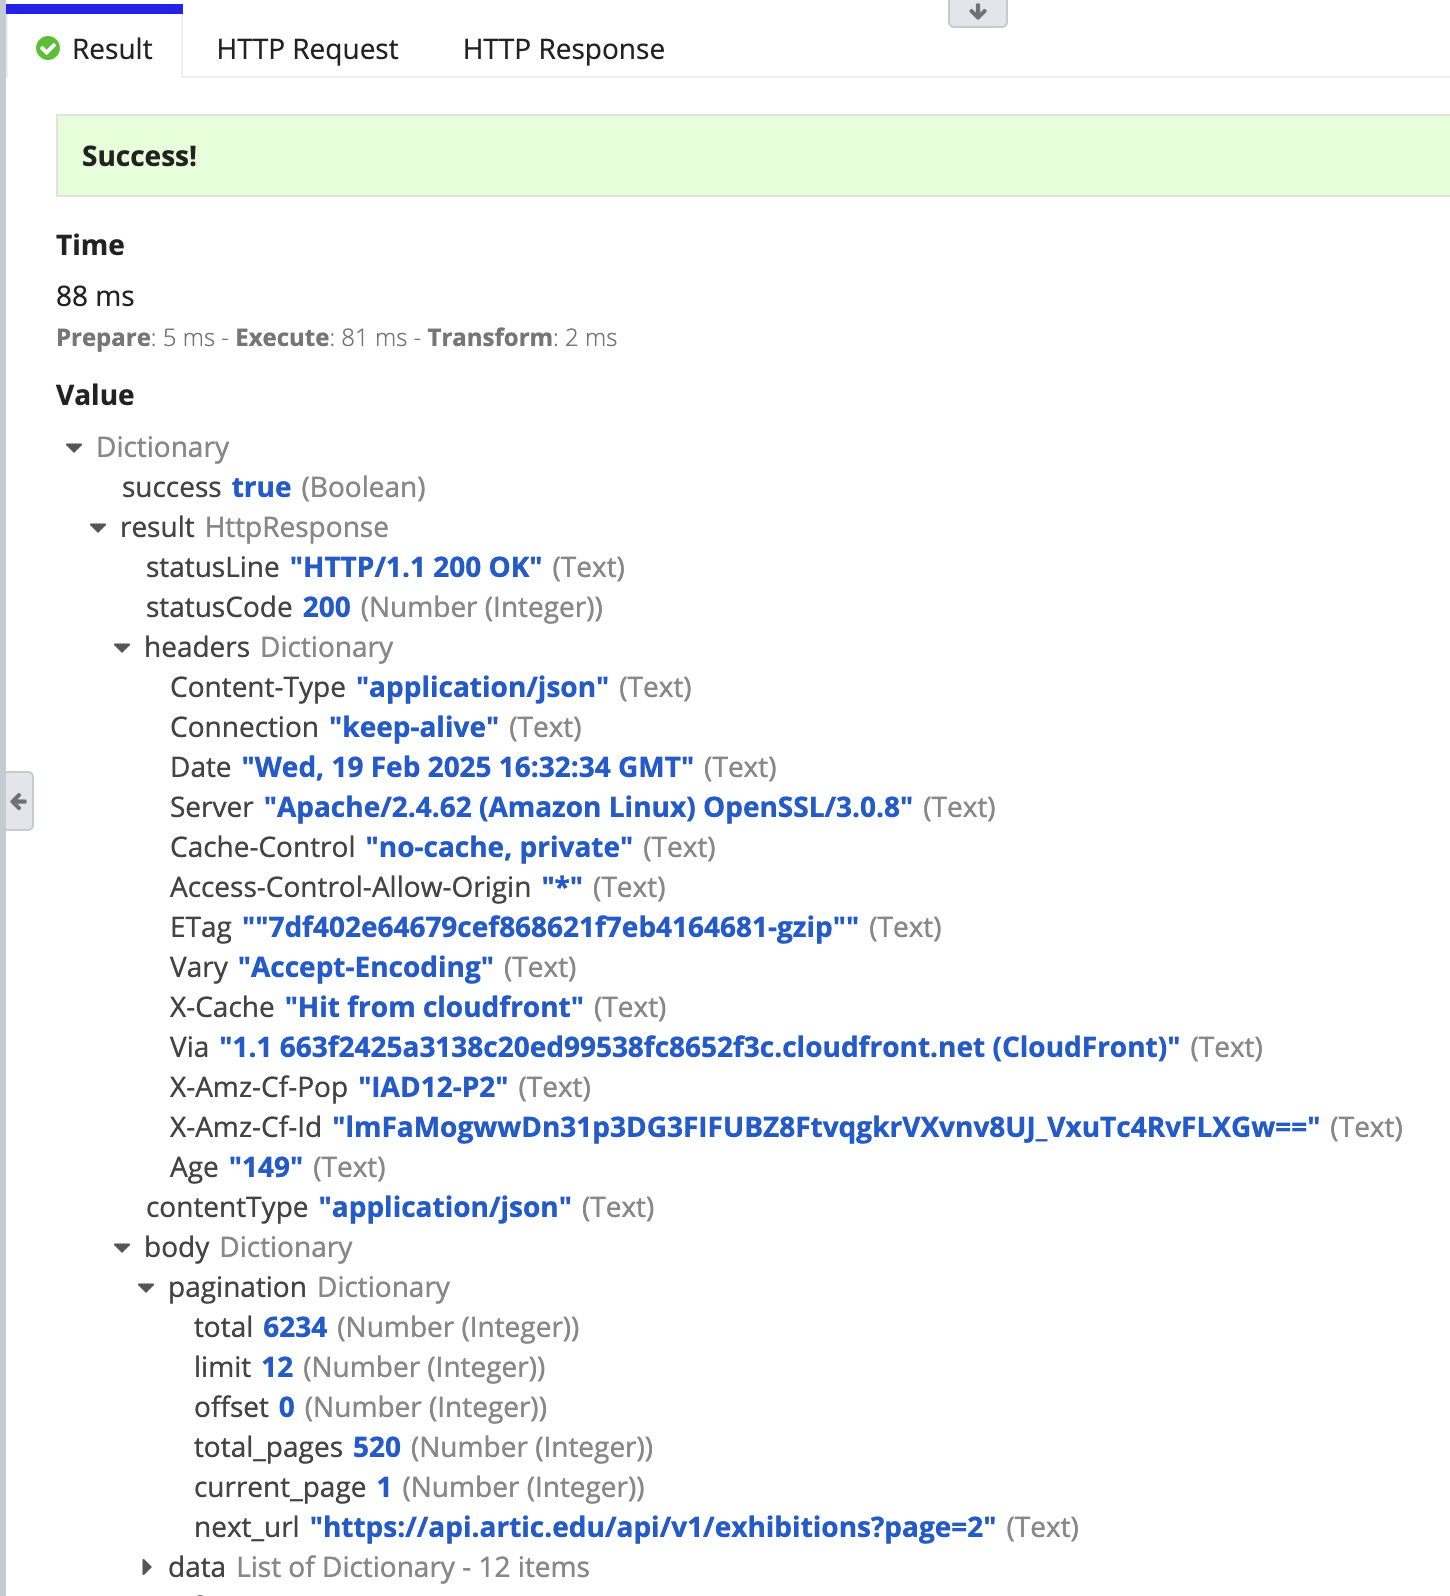
- Under the success message, click Convert JSON to Appian value.
-
Click TEST REQUEST. The results should be converted from JSON to an Appian dictionary.
For example:
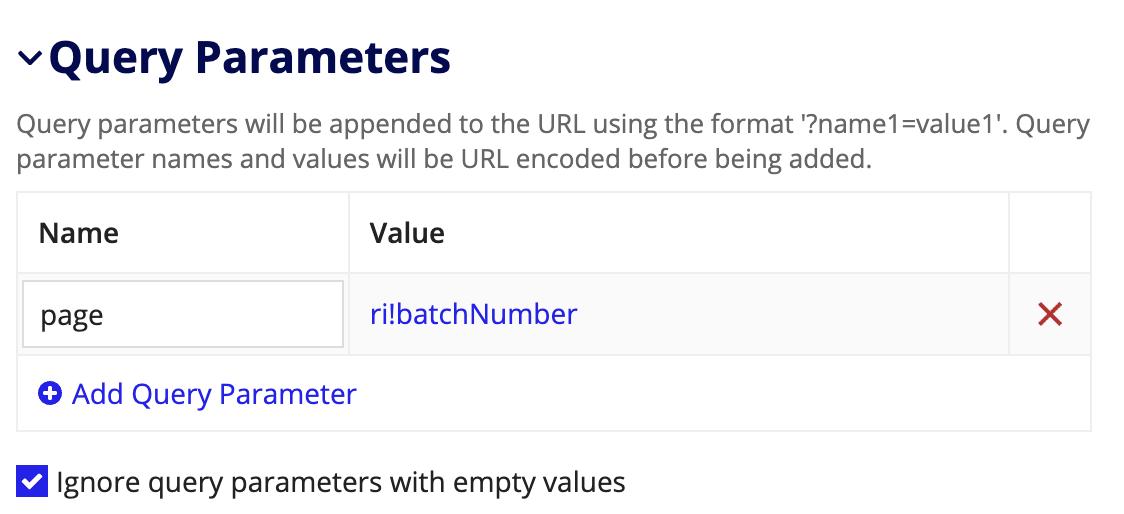
- Expand the Query Parameters section of the integration.
- Click Add Query Parameter.
- For Name, enter
page. - For Value, hover over the input field and click Edit as Expression.
- Enter
ri!batchNumberin the expression box. -
Click OK.
- Click TEST REQUEST. The
result.bodyshould contain 12 items since we did not change the default limit on the API. - Click SAVE CHANGES.
Specify fields returned in the integrationCopy link to clipboard
Right now, the integration returns several fields that we won't need to use in our application. While we will map specific fields to the record type in a later step, removing unnecessary fields from the integration response can enable better performance.
According to the API's documentation, we can use a fields parameter to specify which fields to return.
To specify the fields to return in the integration:
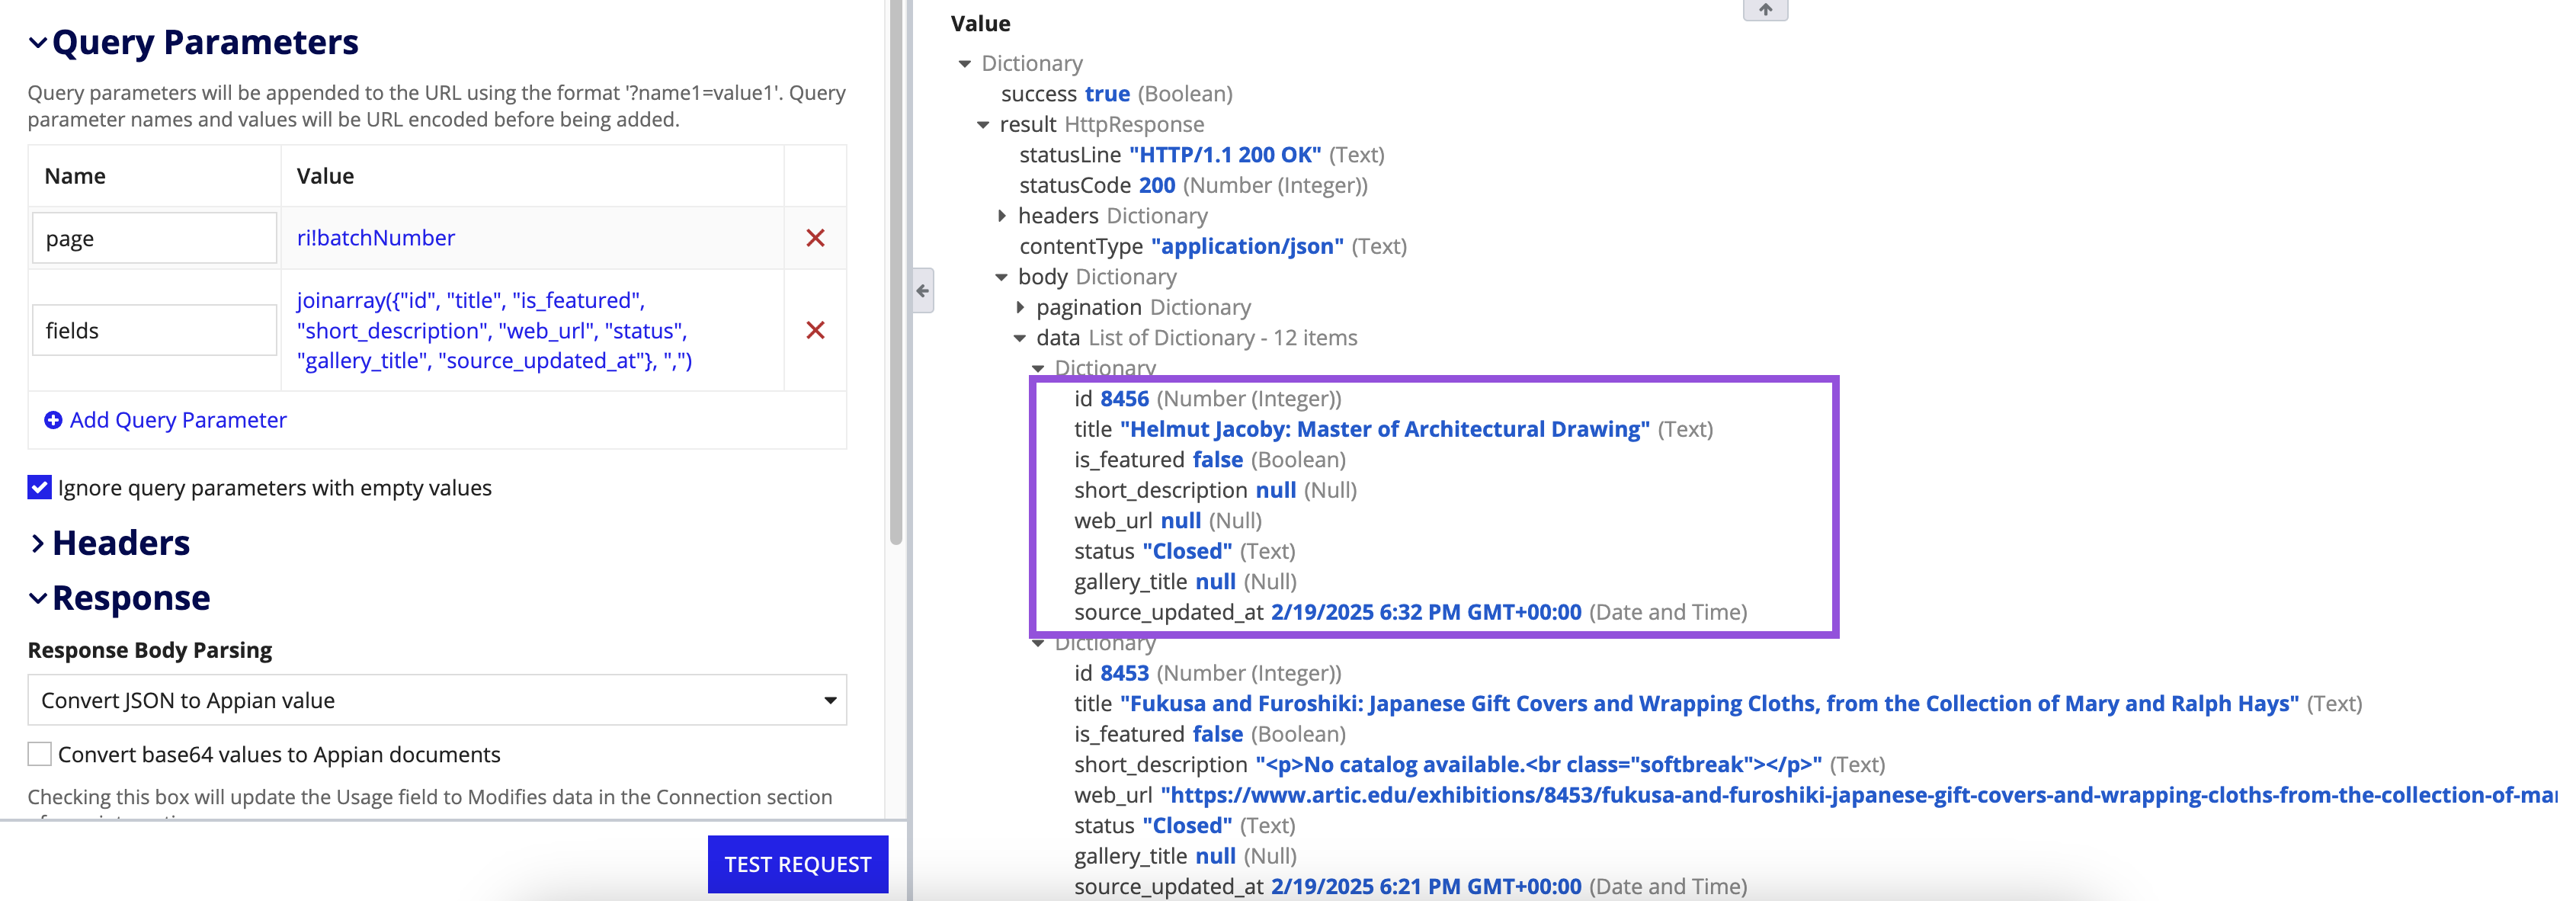
- In the Query Parameters section, click Add Query Parameter.
- For Name, enter
fields. - For Value, hover over the input field and click Edit as Expression.
-
Enter the following expression:
1
joinarray({"id", "title", "is_featured", "short_description", "web_url", "status", "gallery_title", "source_updated_at"}, ",")
Copy - Click OK.
-
Click TEST REQUEST and verify that only the desired fields are included in the results.
- Click SAVE CHANGES and close the integration tab.
Configure the record data source expressionCopy link to clipboard
Next, we'll edit the generated record data source expression. We need to ensure that the expression returns the data we need in the format we need.
By default, the expression returns data in the pagination, data, info, and config headings. However, we only need the information nested under the data heading, so we'll index into this heading to only return that information.
To configure the record data source expression:
- Return to the record type.
- In the Create Record Data Source dialog, click the AT_getExhibitions_recordDataSource expression rule.
-
On line 18, replace the default value of
local!integrationResponse.result.body,with the following:1
index(local!integrationResponse.result.body, "data", {}),
Copy -
Click TEST RULE. The output should return a List of Dictionary with 12 items. For example:
- Click SAVE CHANGES and close the expression rule tab.
Preview the record data sourceCopy link to clipboard
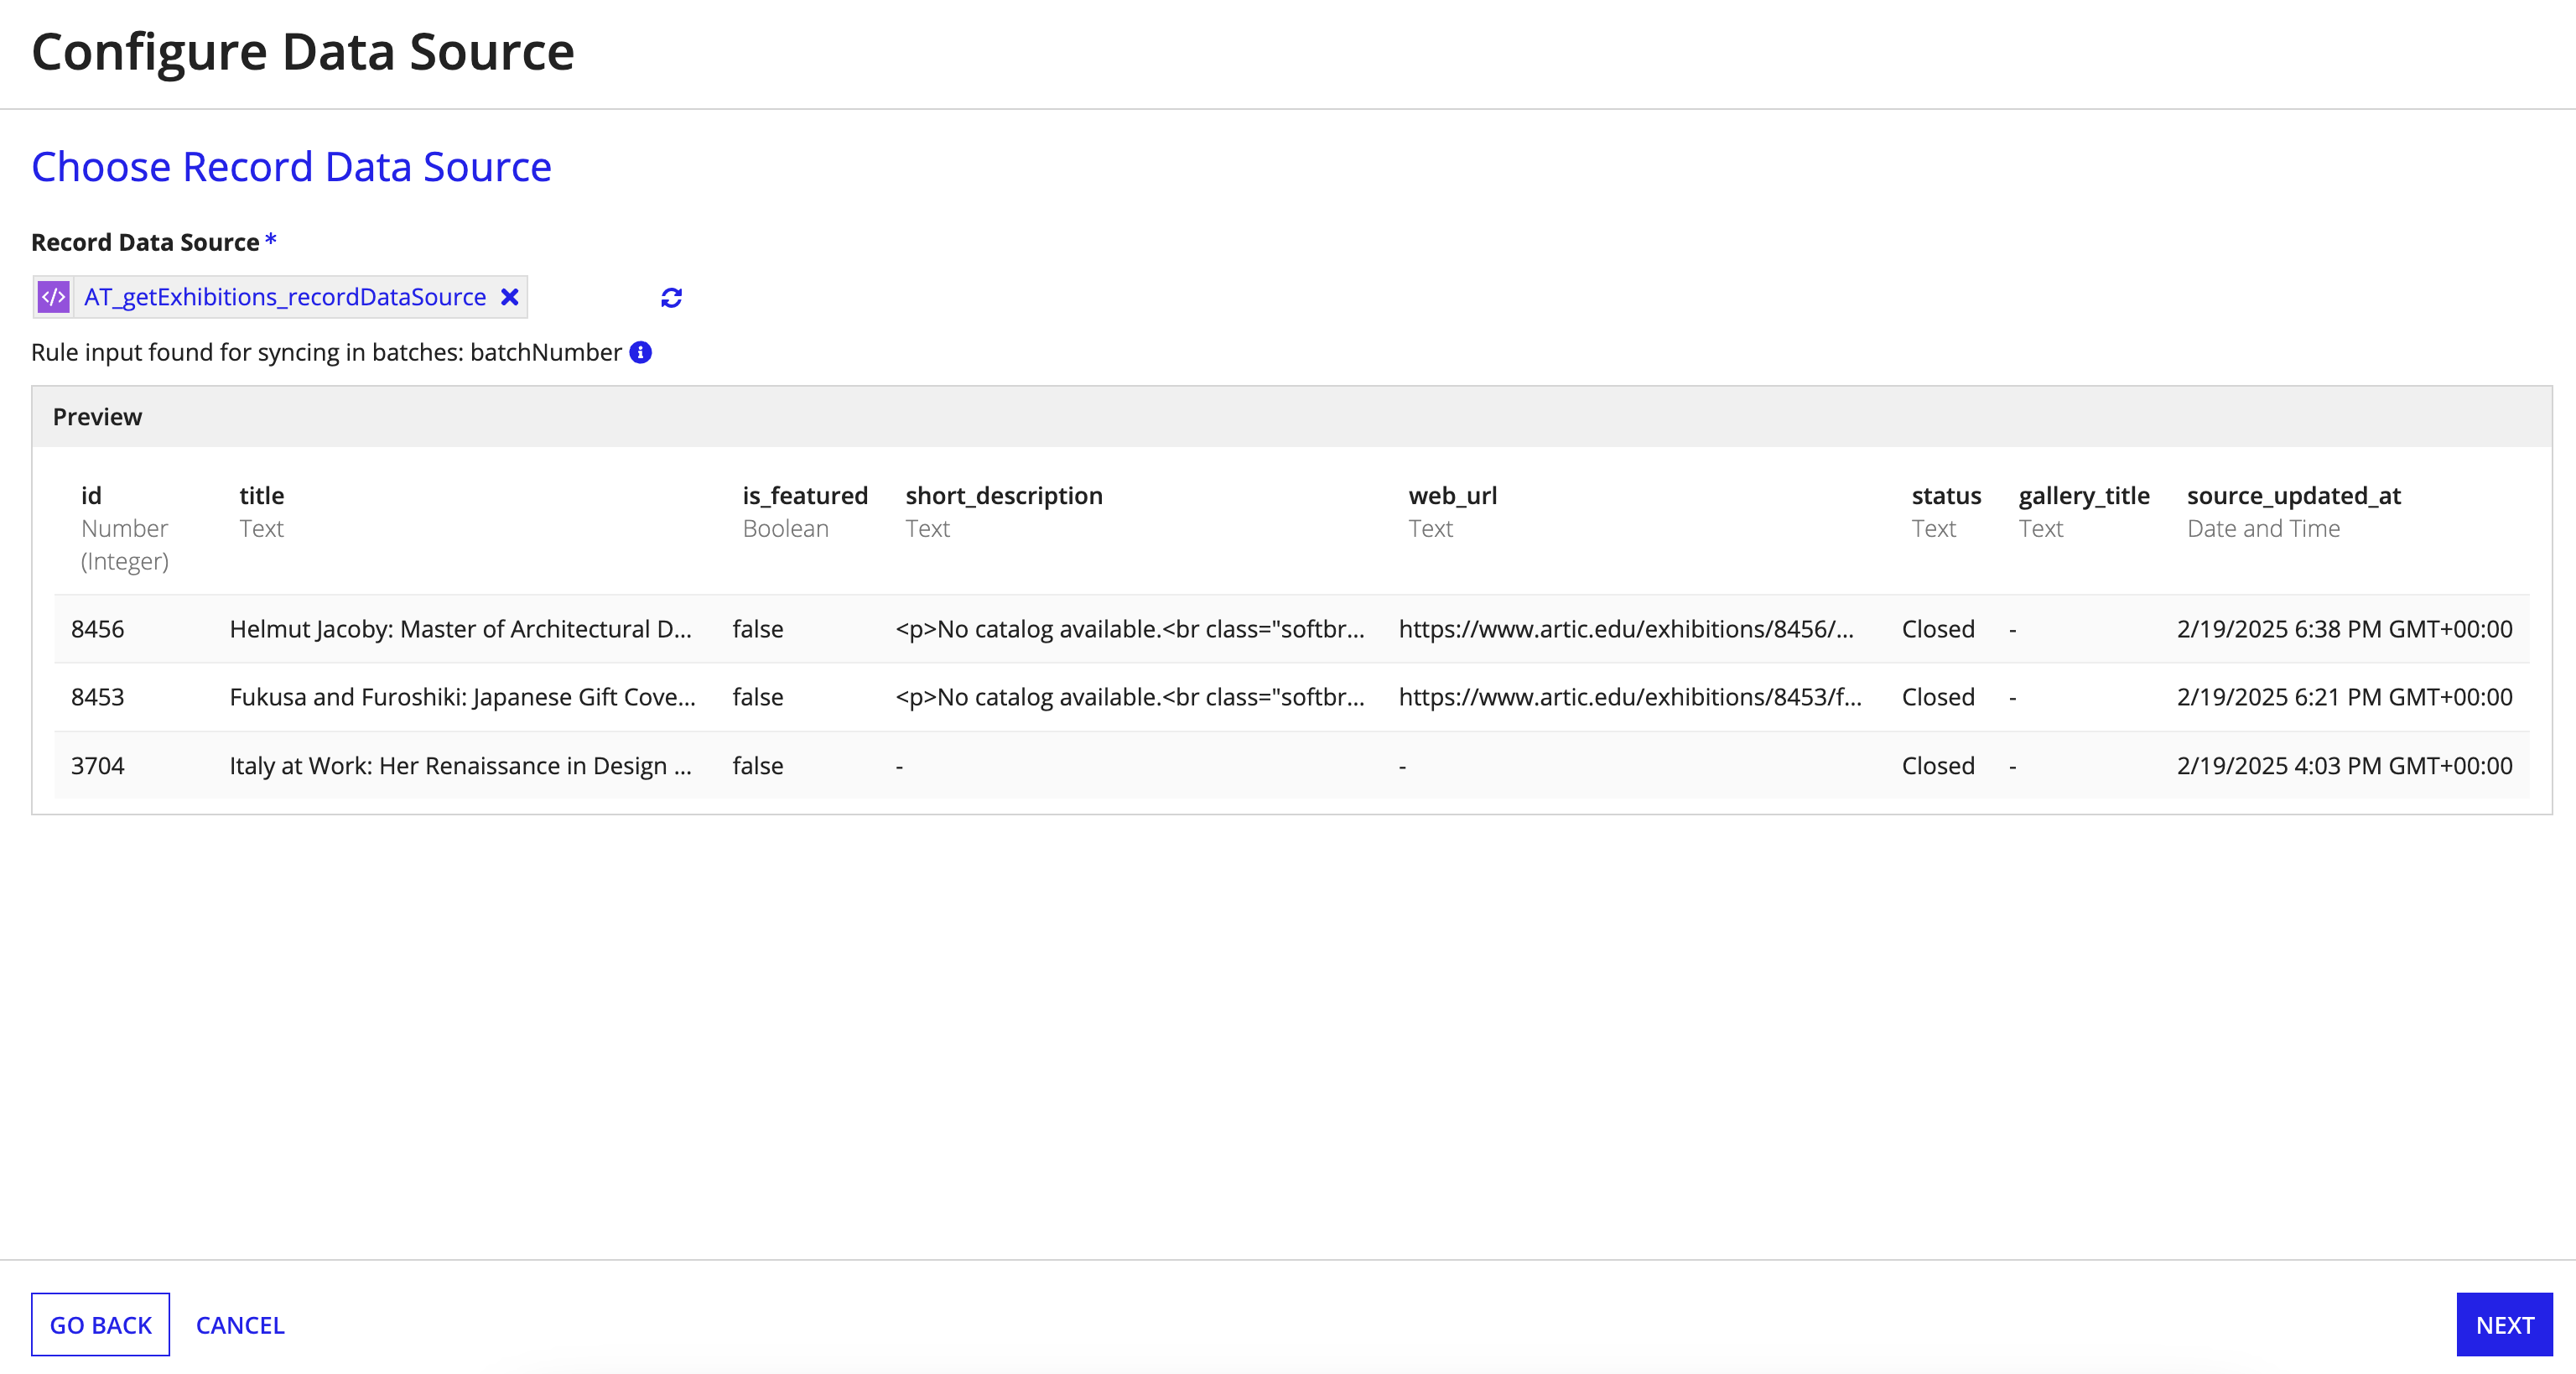
Now that the integration and expression rule are properly configured, we can return to the record type to see a preview of the record data source.
To preview the record data source:
- Return to the record type.
-
On the Create Record Data Source dialog, click OK.
A data preview of the record data source expression appears in the Configure Data Source dialog.
- Click NEXT.
Configure record type fieldsCopy link to clipboard
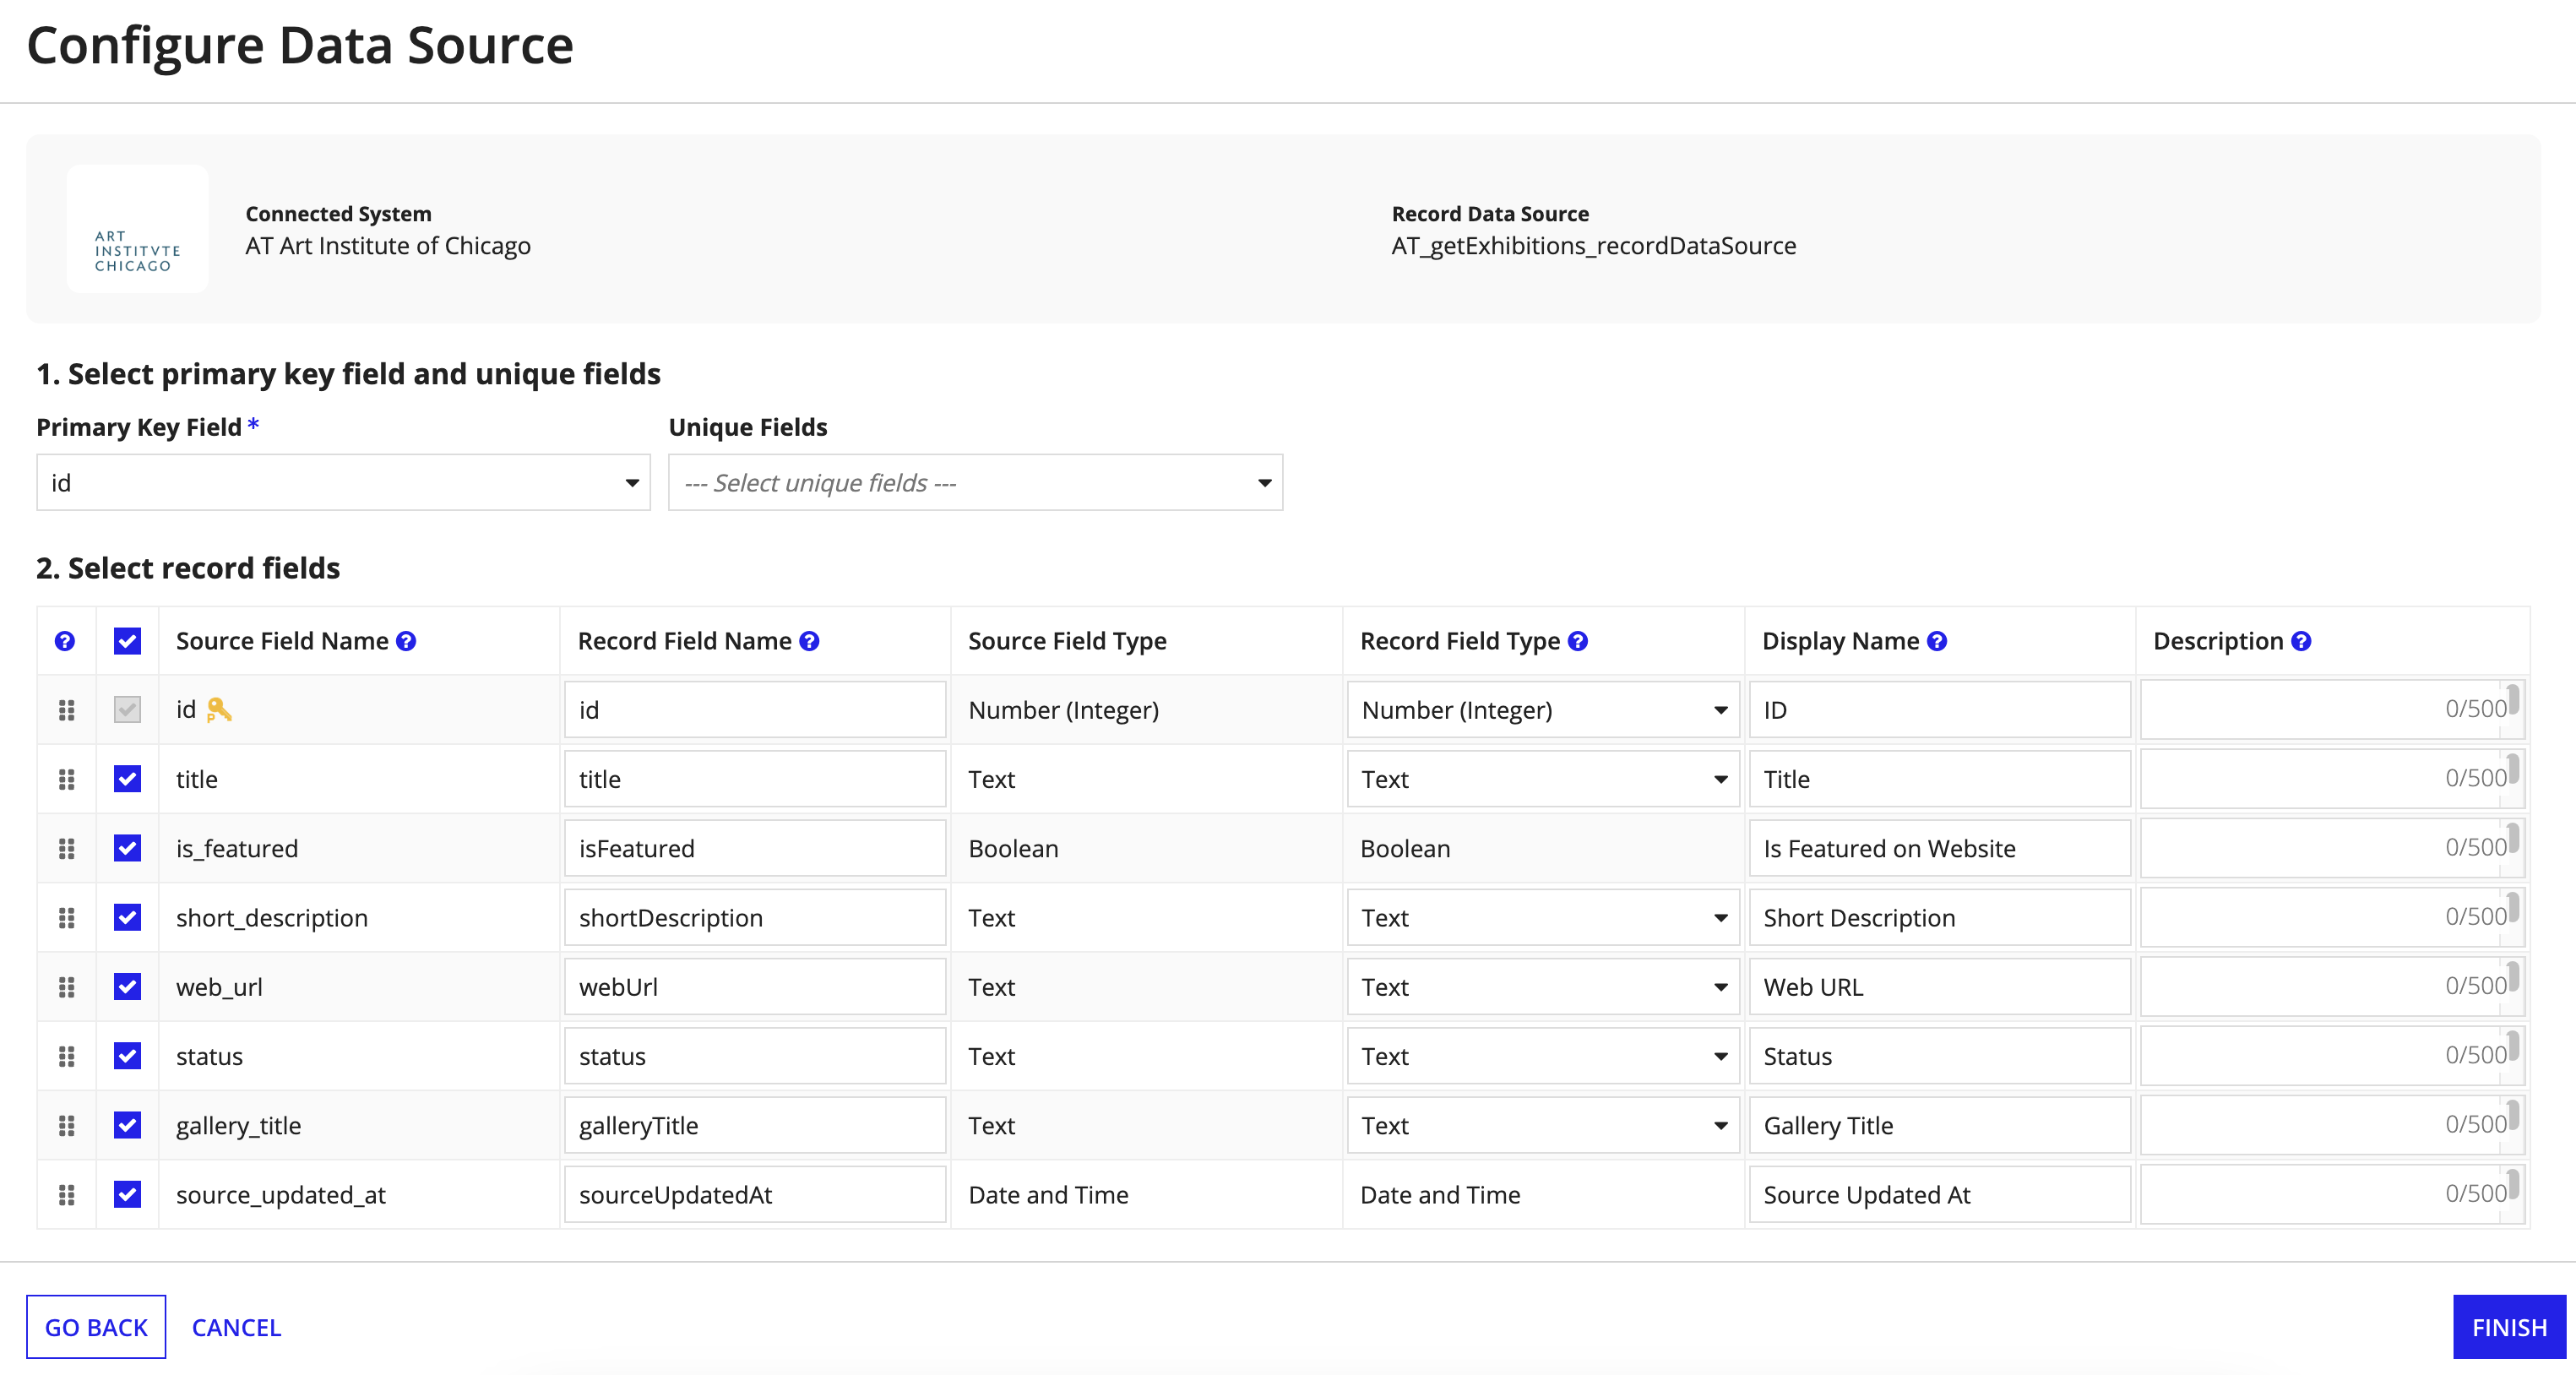
Appian automatically maps the source fields to record fields and then lets you pick a primary key field and any unique fields.
We will keep all the fields selected, but we'll clean up some of the record field names to use camel casing instead of underscores. We'll also choose which field will be the primary key field.
To configure the record type fields:
- For Primary Key, select id.
- Leave Unique Fields blank. We don't have any other fields that require unique values.
-
Rename the following fields:
Original Record Field Name Updated Record Field Name is_featuredisFeaturedshort_descriptionshortDescriptionweb_urlwebUrlgallery_titlegalleryTitlesource_updated_atsourceUpdatedAt -
(Optional) Update the Display Name for the following fields so they're more descriptive:
Original Display Name Updated Display Name IdIDIs FeaturedIs Featured on WebsiteWeb UrlWeb URL -
Click FINISH.
- Click SAVE CHANGES.
Saving the record type starts a full sync of your record data. It may take a few minutes to sync all the necessary data. You can track the status of your sync by going to the Sync History page in the record type.
Configure sync optionsCopy link to clipboard
To ensure the record type continues to get any new or changed data from the API, we'll configure a scheduled full sync to occur once each day.
To configure a scheduled full sync:
- In the record type, go to Sync Options.
- Select the Schedule full sync checkbox.
-
Keep the default configuration of 3:00 AM GMT.
Tip: As a best practice, scheduled full syncs should take place outside of peak traffic or working hours.
- Click SAVE CHANGES.
Configure the list viewCopy link to clipboard
Now that the record data is synced and readily available, let's configure the record list to show meaningful data.
By default, the record list displays all fields configured on the record type. However, we only want to display select fields since this data is meant to be viewed at a glance before users drill into each record.
To configure the record list:
- In the record type, go to List.
- Leave the default Style option as Grid.
- Click EDIT LIST.
- For Empty Grid Message, enter
No exhibitions exist with this criteria. - For Rows to Display Per Page, enter
20. - For Initial Sort, click ADD SORT and configure sorting:
- Click Sort Info.
- For Field, select title.
- For Order, select Ascending.
- Click Grid to return to the grid configurations.
- In the Columns section, delete the following columns by hovering over and clicking :
- Id
- Short Description
- Web Url
- Source Updated At
- In the Columns section, click Title. The grid configuration pane will show details about that column.
- Click DISPLAY OPTIONS.
- Click RECORD LINK.
- For Display Value, click Edit as Expression.
-
Enter the following expression:
1
2
3
4
5
6
7
8
9
 a!linkField(
  links: {
   a!recordLink(
     label: fv!row[recordType!AT Exhibition.fields.title],
     recordType: recordType!AT Exhibition,
     identifier: fv!identifier
    )
  }
 )
Copy
Note: Record field references are specific to each record type and environment. This means that you need to reference the record fields from the record type in your own environment whenever you copy and paste a record field reference from outside the application.
- Click OK to close the expression editor.
- Click OK to close the list editor.
- Click SAVE CHANGES.
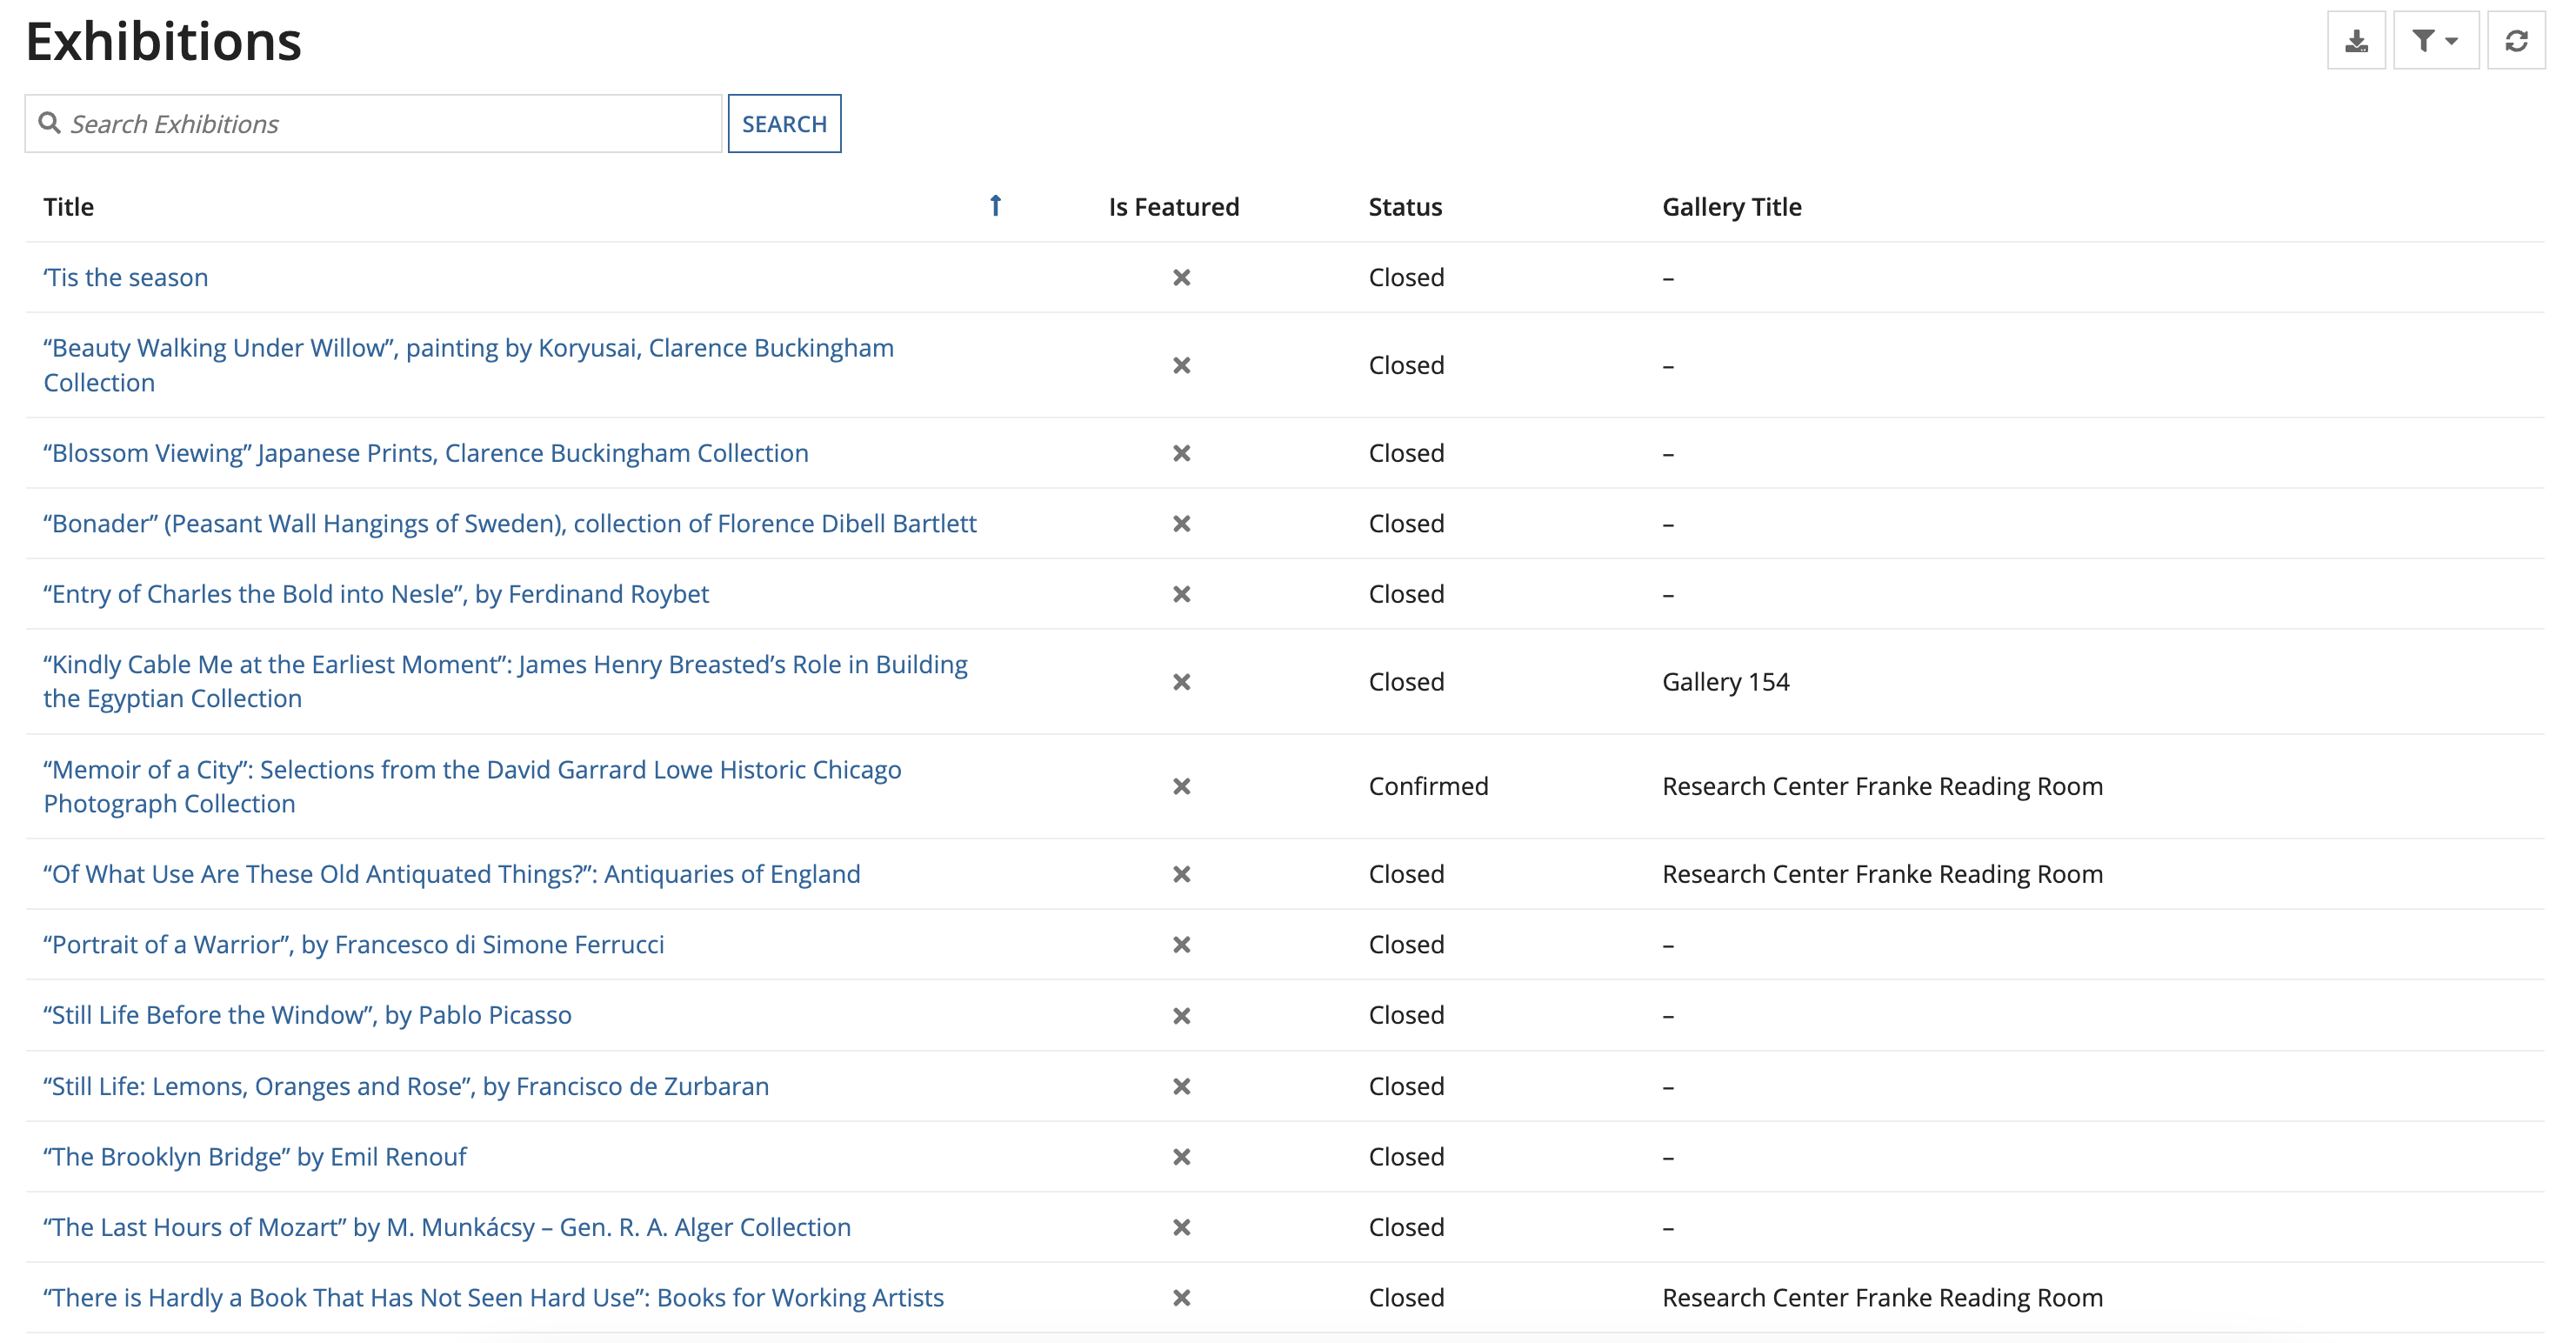
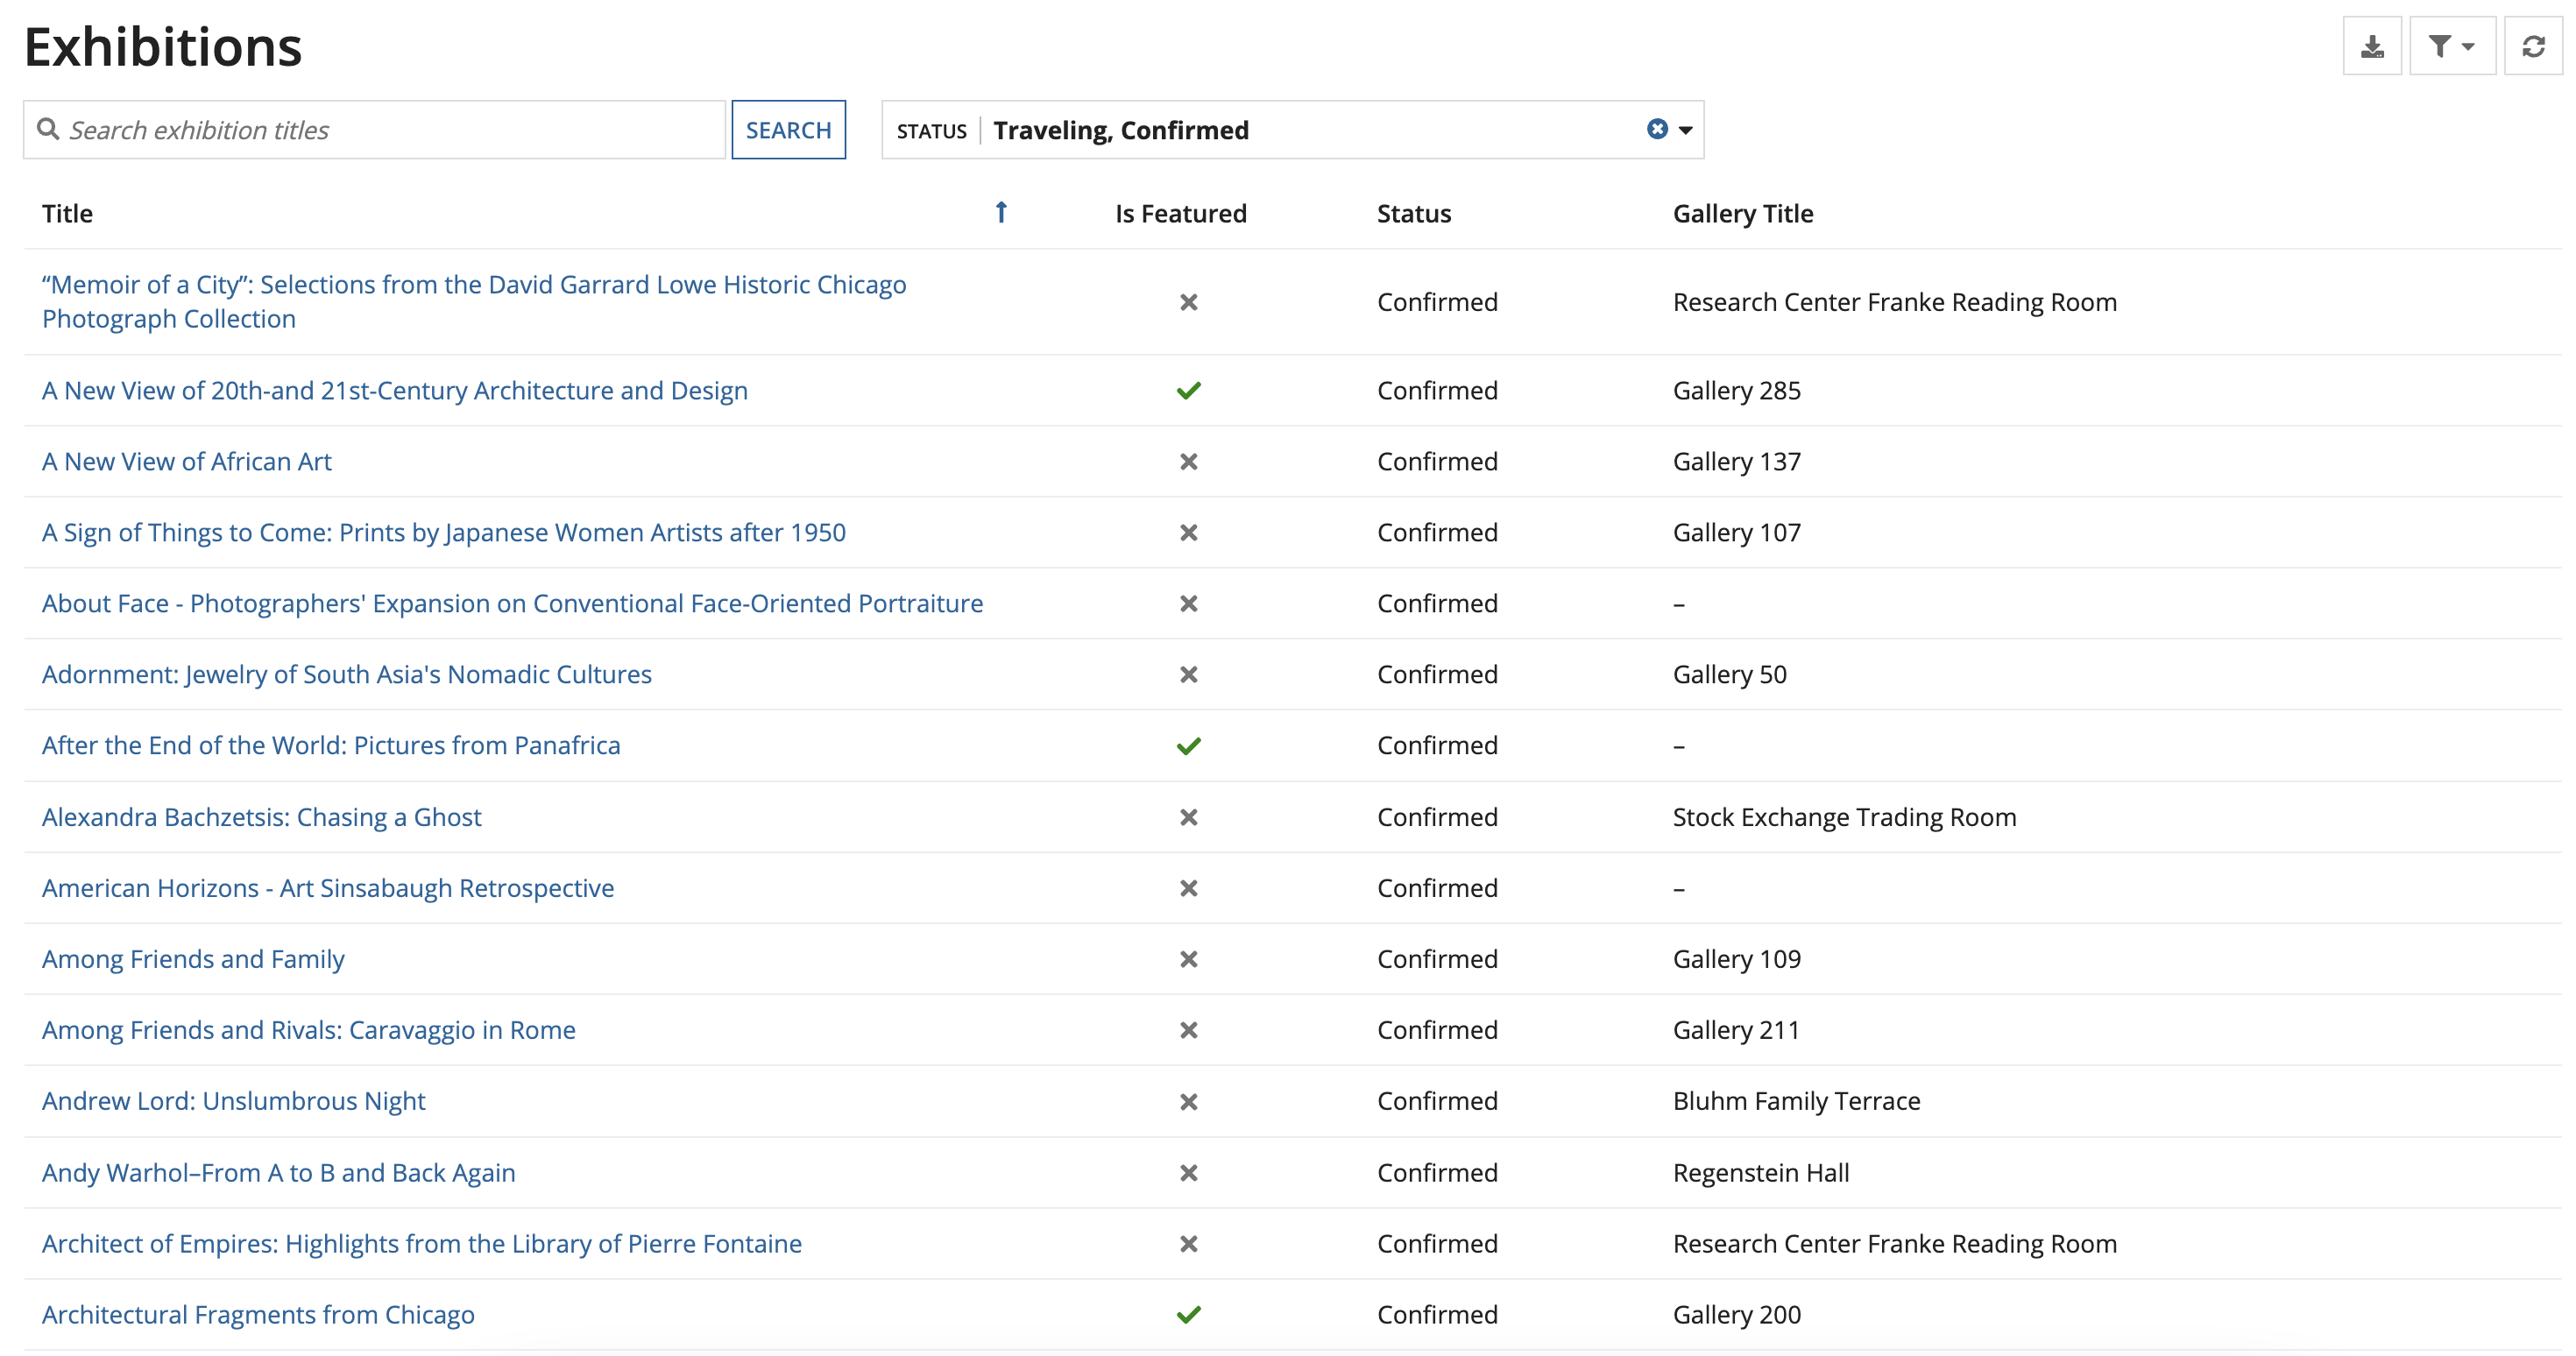
- To test your record list configuration, click the link under URL.
You should end up with a list that looks like this:
Create a user filterCopy link to clipboard
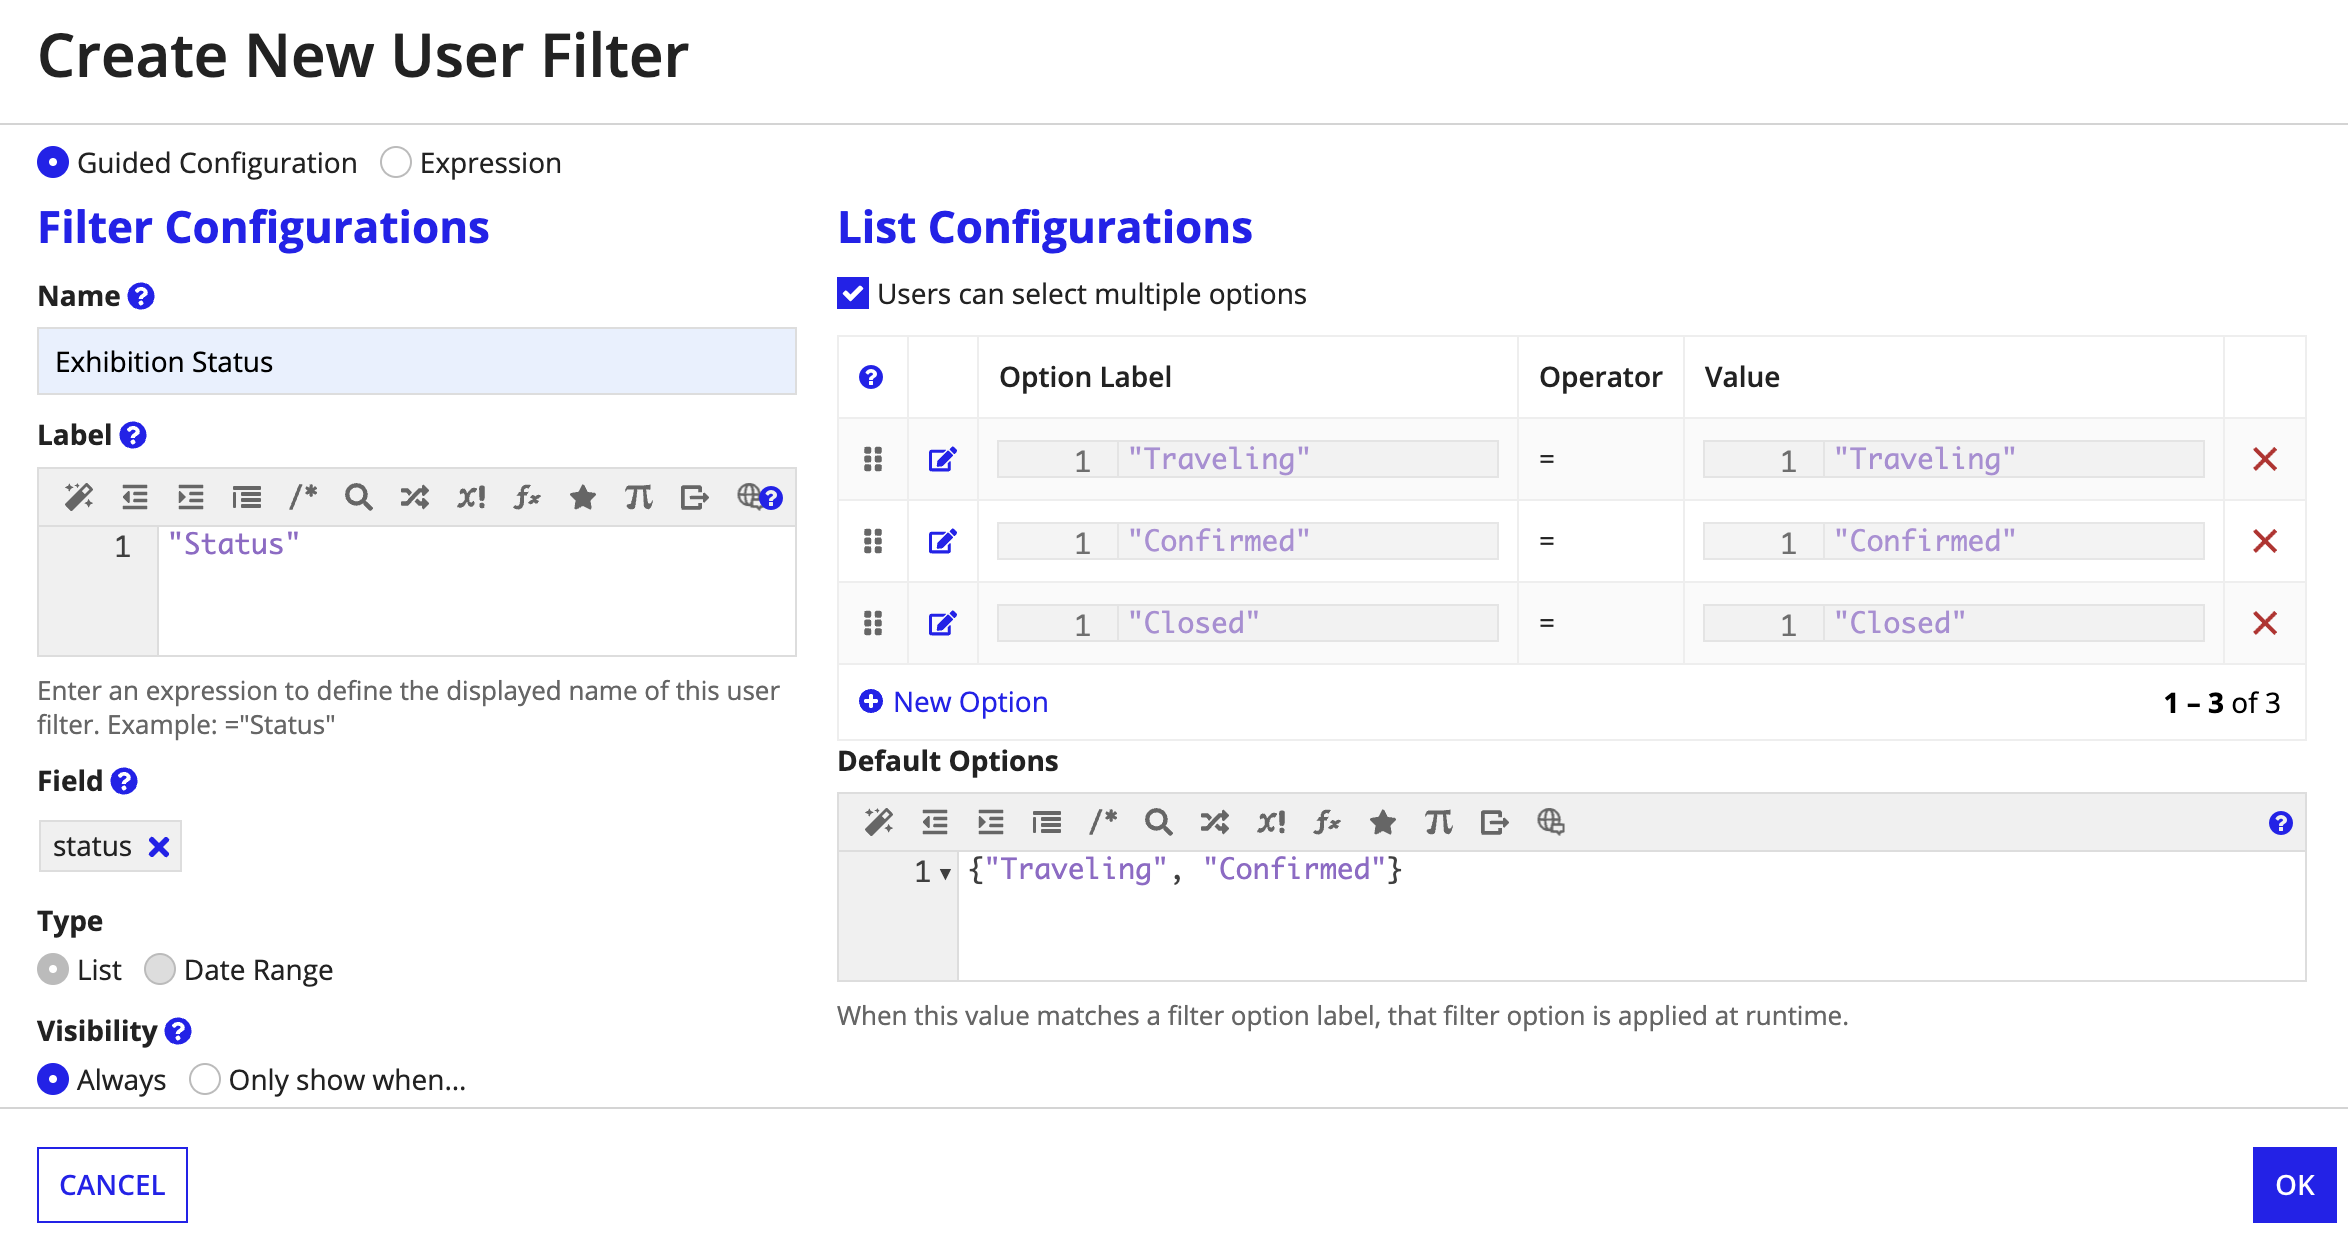
To make it easier for users to find information about specific exhibitions, we'll build a user filter so users can filter by exhibition status—Traveling, Confirmed, or Closed.
To create a user filter:
- In the record type, go to Filters.
- Click New User Filter.
-
For Filter Configurations, do the following:
Property Action Name Enter Exhibition Status.Label Enter "Status".Field Select the status field. Type Keep List selected. Visibility Keep Always selected. - For List Configurations, keep Users can select multiple options selected.
-
Click New Option and enter the following:
Property Value Option Label "Traveling"Operator =Value "Traveling" - Click SAVE FILTER OPTION.
-
Click New Option again and enter the following:
Property Value Option Label "Confirmed"Operator =Value "Confirmed" - Click SAVE FILTER OPTION.
-
Click New Option again and enter the following:
Property Value Option Label "Closed"Operator =Value "Closed" - Click SAVE FILTER OPTION.
-
For Default Options, enter the following expression to default the filter to these two statuses:
1
{"Traveling", "Confirmed"}
Copy -
Click OK.
Customize the record list searchCopy link to clipboard
We can also narrow the record list search so it only searches by exhibition title, which can make the search overall more performant.
To customize the search to only exhibition titles:
- Select the Limit search to selected fields checkbox.
- Select the title field.
- Select the Use custom placeholder checkbox.
-
Enter the following expression:
1
"Search exhibition titles"Copy - Click SAVE CHANGES.
- Test the user filter and search configurations:
- In the record type, go to List.
- Click the link under URL.
The Status user filter should have Traveling and Confirmed selected to filter the list.
Generate a Summary viewCopy link to clipboard
The last step of this tutorial is to create the Summary view. Since the record type has data sync enabled, we can quickly create and configure this view using the record view generator.
To generate a Summary view:
- In the record type, go to Views.
-
Click GENERATE RECORD VIEW.

- For Data Included in Your Record View, keep the Exhibition record type selected. This will display all fields from the record type in the view.
- Click NEXT.
-
For Record View Name and Application, leave the default configurations:
Property Value View Name SummaryApplication Appian Tutorial - Click NEXT.
-
Review the objects that Appian will use for your new Summary view:
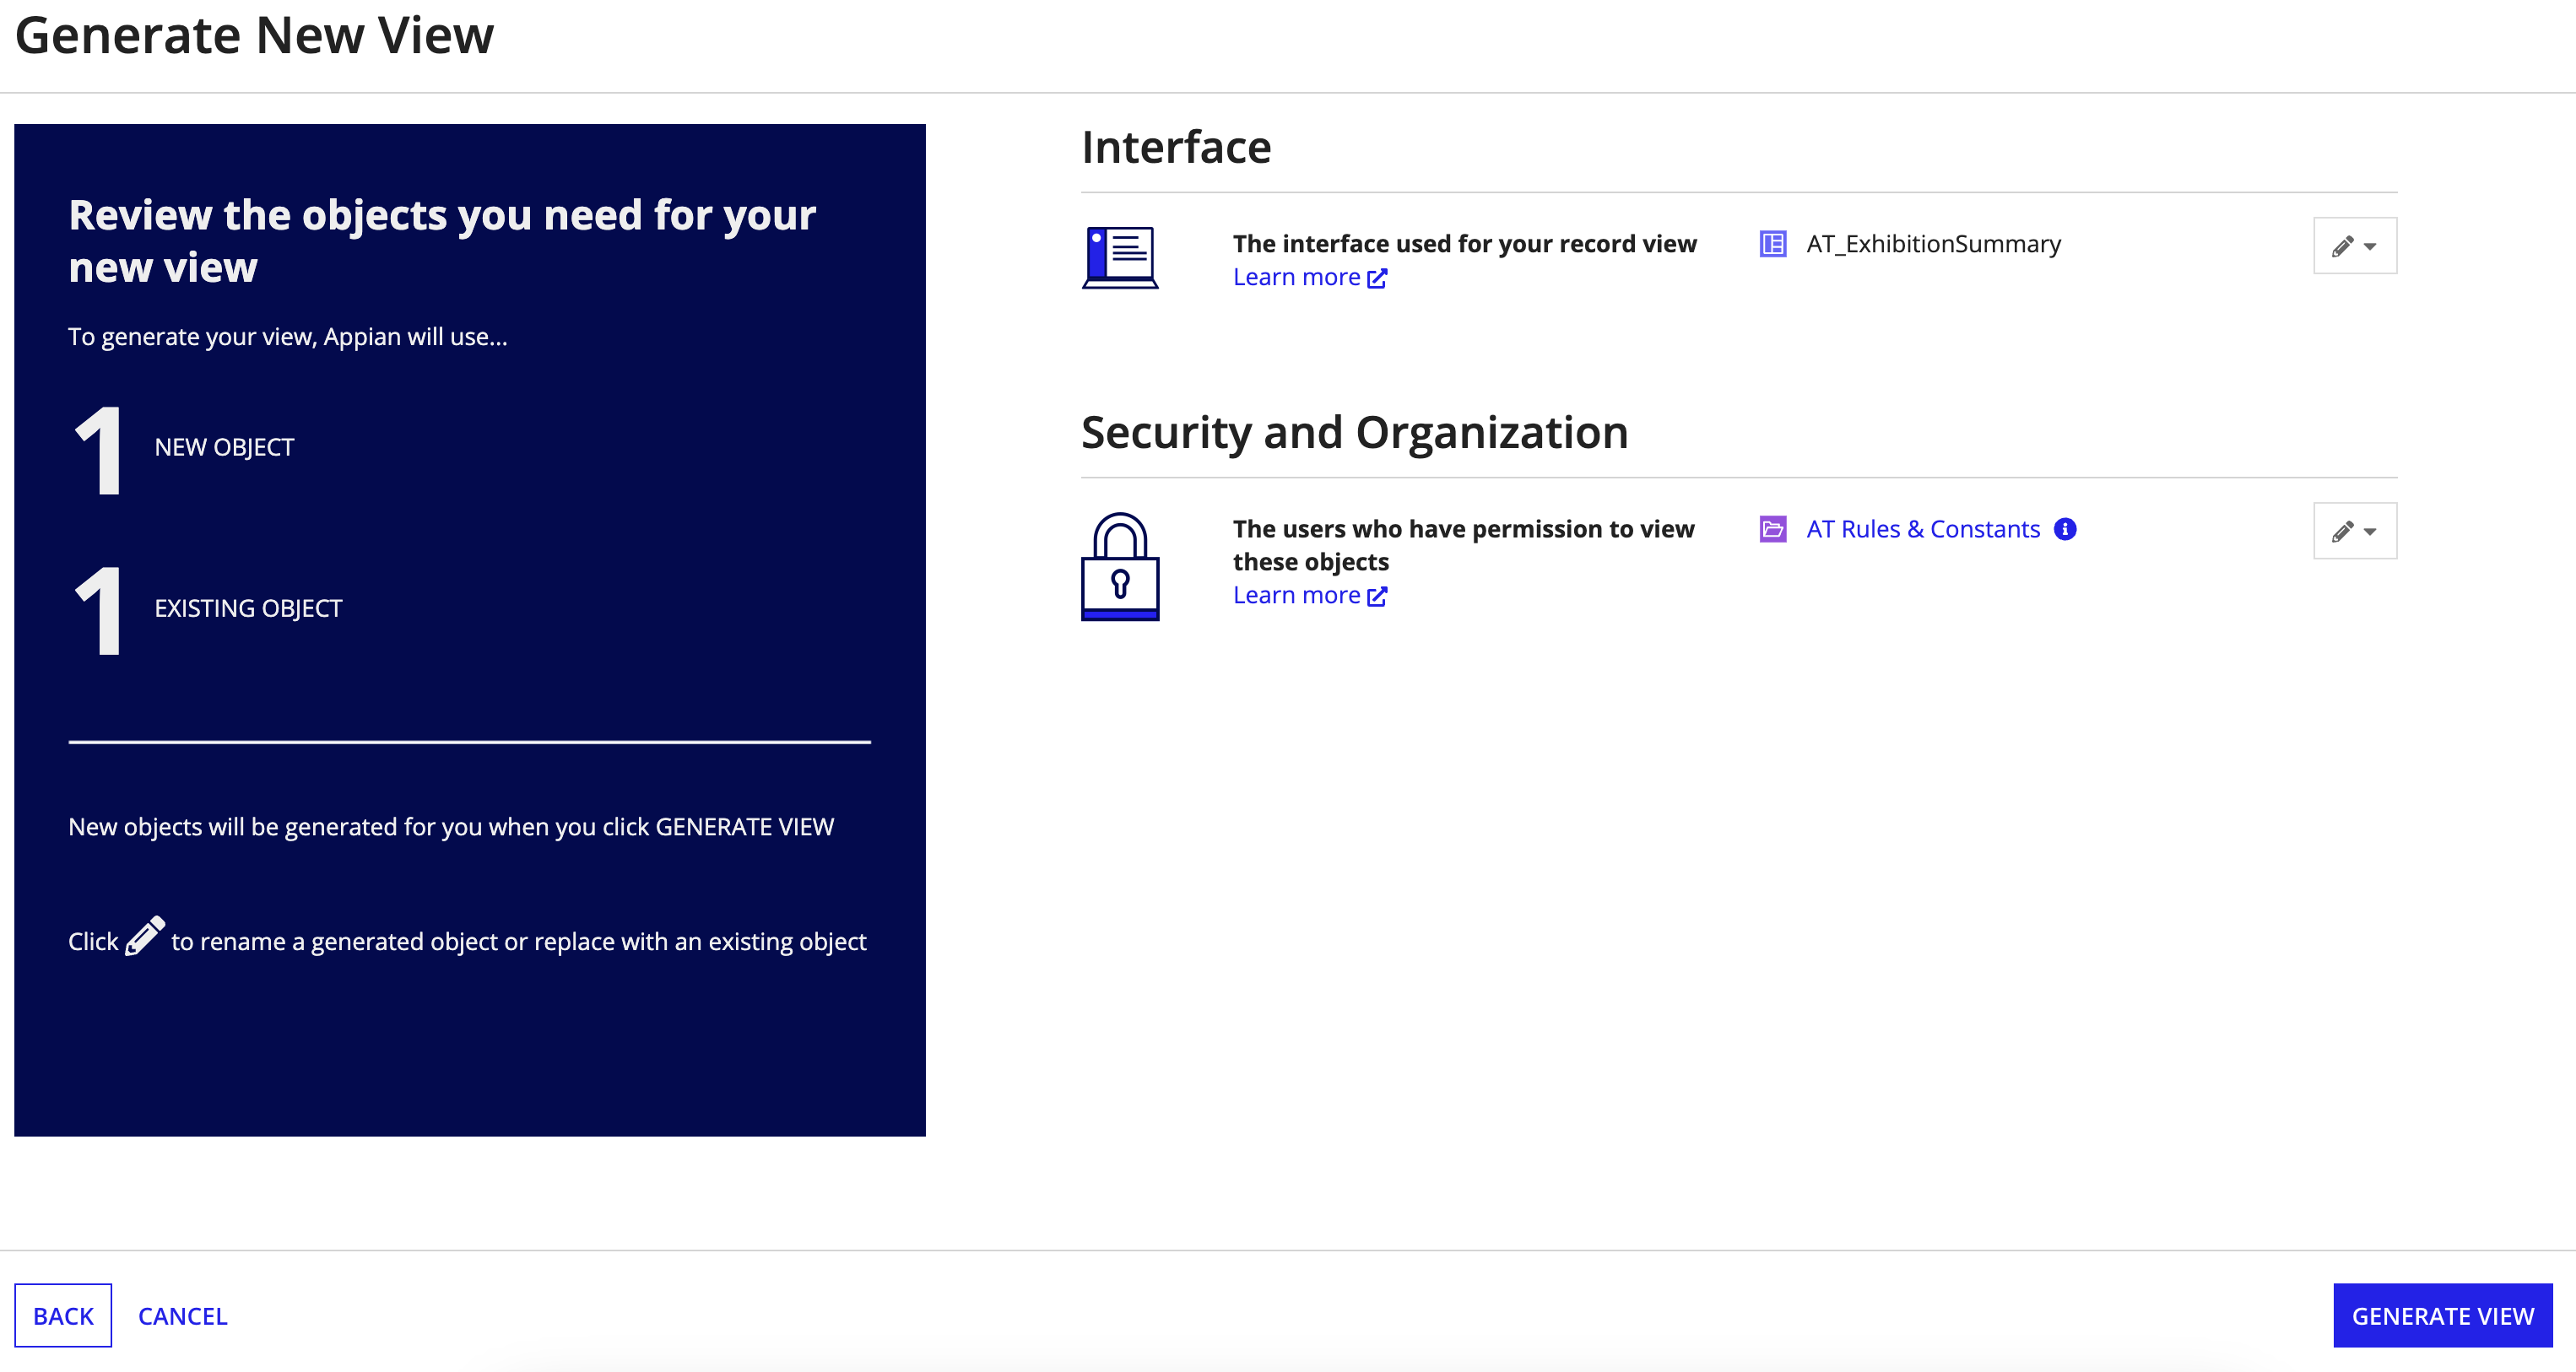
- Click GENERATE VIEW.
- Click CLOSE. Your new Summary view displays in the Record Views table.
- Click SAVE CHANGES.
- Test the Summary view configuration:
- In the record type, go to List.
- Click the link under URL.
- Select an exhibition title to view the Summary view.
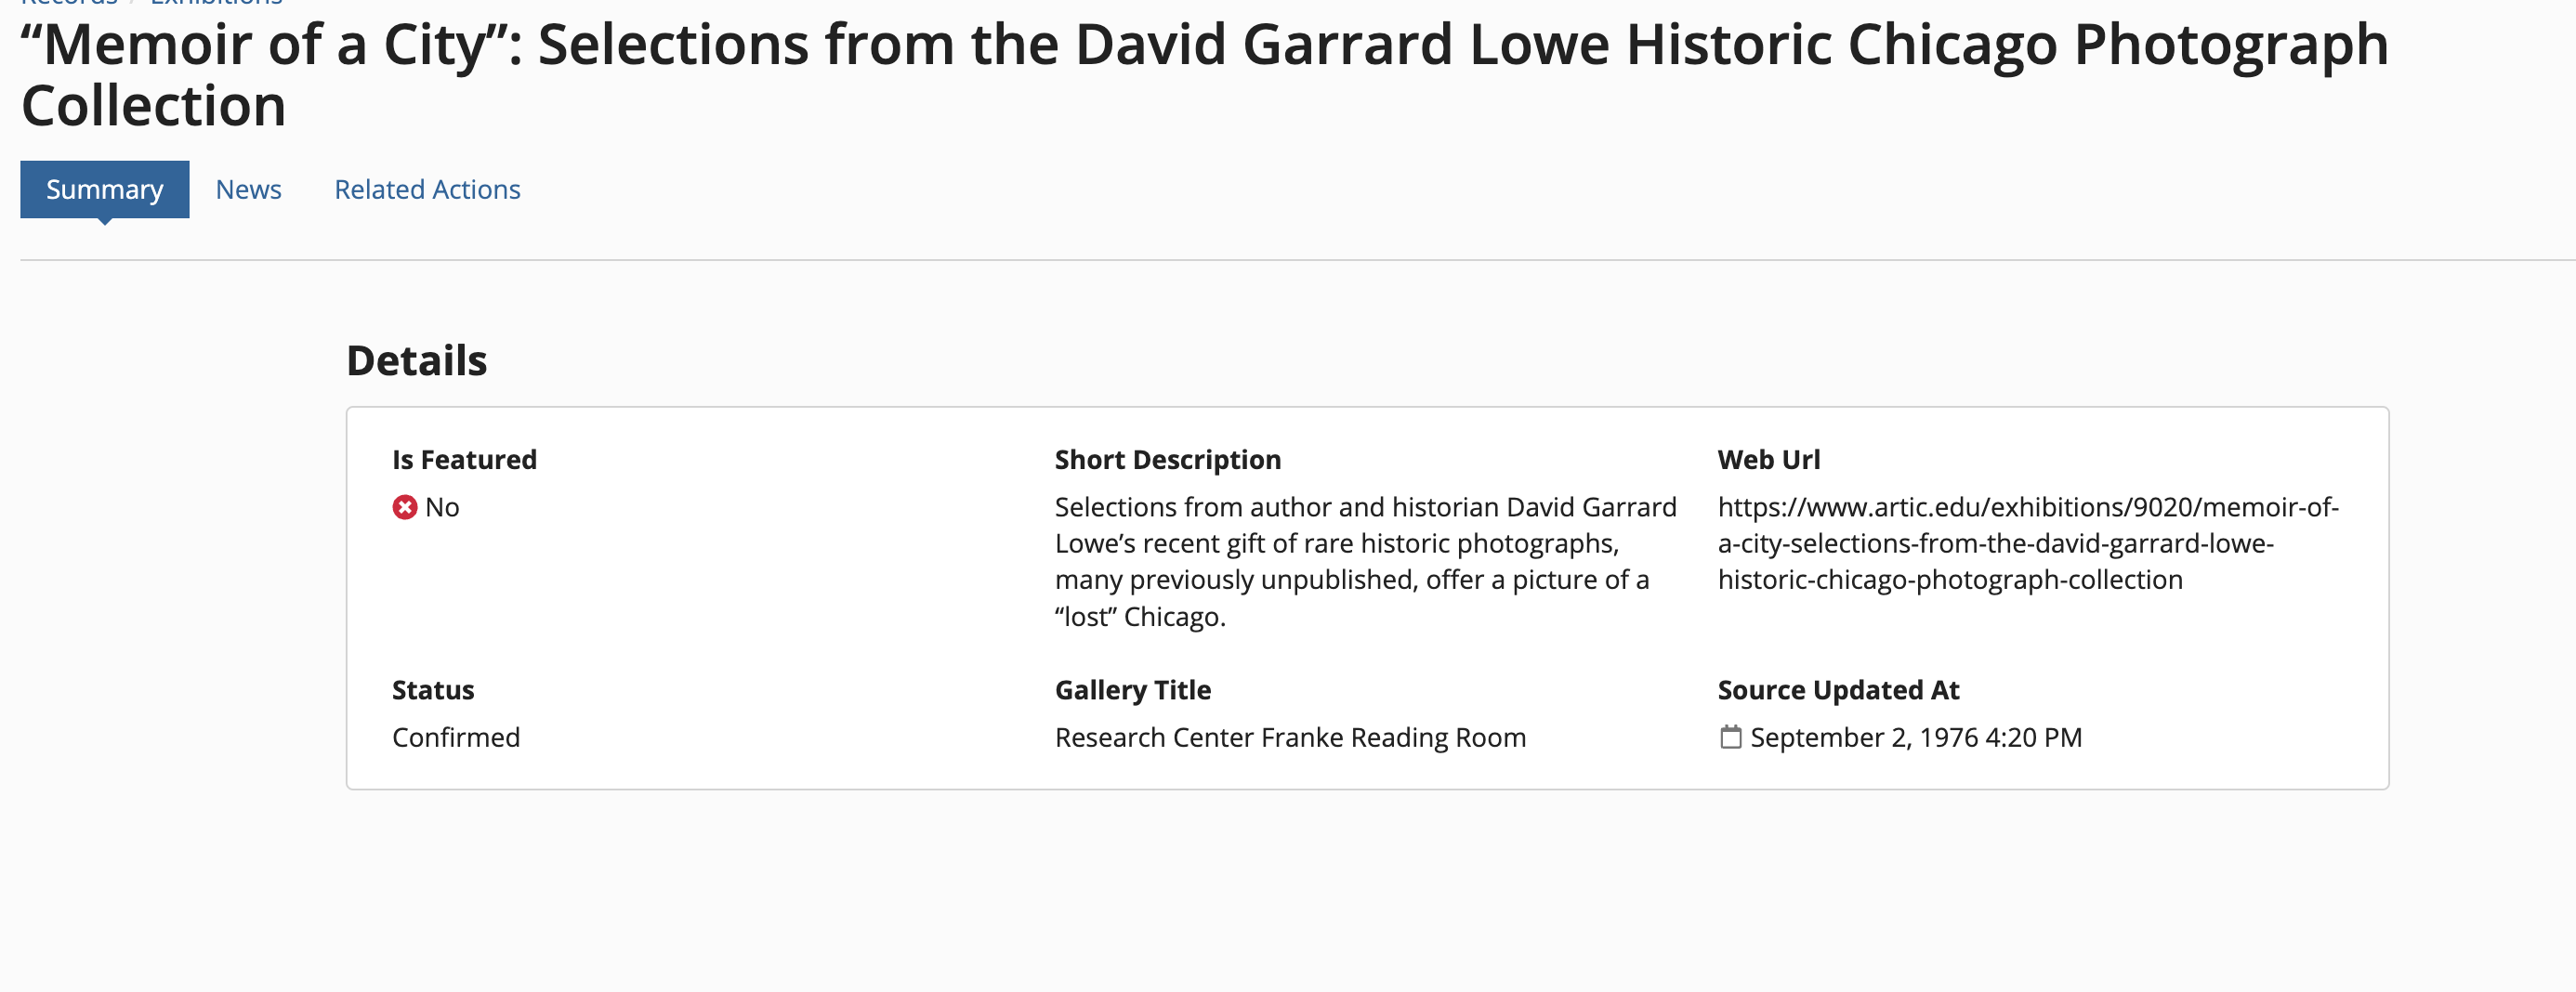
Congratulations! You've configured a service-backed record type. Check out the Database-Backed Record Type Tutorial to learn how to configure a database-backed record type.

