
| This content applies solely to Connected Underwriting Life, which must be purchased separately from the Appian base platform. |
IntroductionCopy link to clipboard
After installing the Auto Assignment add-on module, you need to incorporate it with your CU Life Workbench solution to utilize the module's full functionality. This guide walks you through the required and optional incorporation steps.
Configuring Auto Assignment rulesCopy link to clipboard
- In the target environment, log in.
- Navigate to the Appian Designer.
- Open the Insurance Life Underwriting application package.
- Search for and open the following interface object: ISL_SitePage_AdminSettings.
-
In expression mode, add an additional map item to
local!navBarSections, as seen below:
-
In the
match()statement in the second column layout (the column that displays the left sidebar navigation), add a condition for displaying the assignment rules page, as seen below: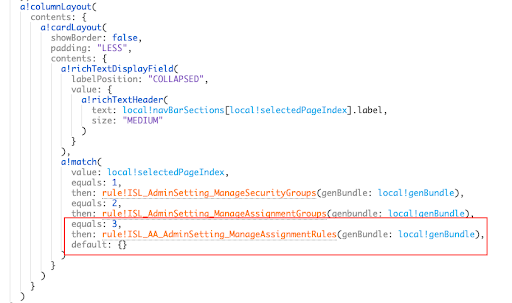
- Save the interface.
Disabling default and manual selection of the assigned group and underwriterCopy link to clipboard
- Search for and open the ISL_API_CreateCase_ConstructCaseFromRequestBody expression rule.
- Delete or comment out the initialization of the role-related record.
- Click SAVE.
- Search for and open the ISL_Case_Sub_UpdateMiscellaneous interface object.
- In expression mode, where
ISL_Role_Sub_Manageis called, pass in false for the showAssignees expression rule input instead of true. - Click SAVE.
Incorporating the Auto Assignment logic in the case creation processCopy link to clipboard
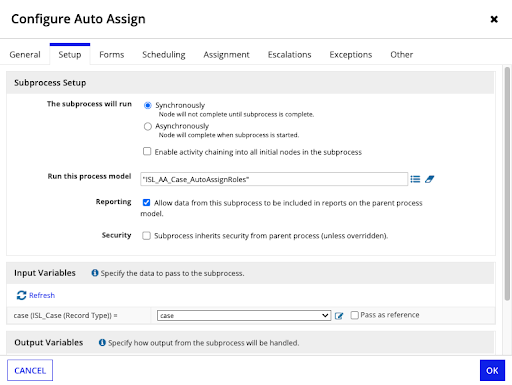
- Search for and open the ISL_Case_Create process model.
- Just before the end event, add a synchronous subprocess node labeled Auto Assign. Set up the node as seen below:
placeholder
-
Save and publish the process model.
Optional incorporationCopy link to clipboard
The following steps are optional to utilize the full functionality of the Auto-Assignment add-on module.
Adding new fields to drive the Auto Assignment rulesCopy link to clipboard
The following steps are optional and allow you to add additional fields in the auto-assignment logic.
- Identify which additional fields on the case record type, or on its nested record types, you want to include in auto-assignment logic.
- Example: Coverage Purpose.
- Navigate to the Appian Designer and open the ISL Auto-Assignment of Cases application package.
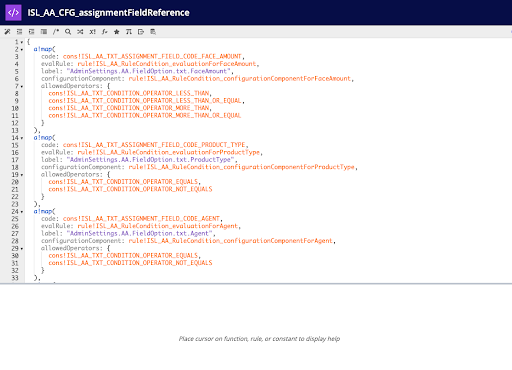
- Search for and open the ISL_AA_CFG_assignmentFieldReference expression rule.
-
Note: This rule stores the configurations for each field that is able to be used in the auto-assignment logic. Take some time to review the design paradigm. Each field has its own map item that contains a reference to its evaluation rule, a reference to its configuration interface, allowed operators, etc.
-
- Create an evaluation rule for your new field by duplicating an existing evaluation rule and following the same design approach.
- Note: Choose an existing evaluation rule to duplicate that is most similar to your new field evaluation. For example, since a coverage purpose rule condition will have similar evaluation logic to a product type rule condition, duplicate ISL_AA_RuleCondition_evaluationForProductType.
- Example: ISL_AA_RuleCondition_evaluationForCoveragePurpose
- Required rule inputs:
- ruleCondition:
ISL_AA_CFG_RuleCondition - case:
ISL_Case
- ruleCondition:
- Note: The rule should contain a
match()statement where each possible operator for the field has its own expression to evaluate.
- Note: Choose an existing evaluation rule to duplicate that is most similar to your new field evaluation. For example, since a coverage purpose rule condition will have similar evaluation logic to a product type rule condition, duplicate ISL_AA_RuleCondition_evaluationForProductType.
- Ensure that the new rule is added to the ISL Auto-Assignment of Cases application package.
- Create a configuration interface for your new field by duplicating an existing configuration interface and following the same design approach.
- Note: Choose an existing configuration interface to duplicate that is most similar to your new field configuration. For example, since coverage purpose will be configured in a similar way to product type (selecting a value from a dropdown of options from a reference table), duplicate
ISL_AA_RuleCondition_configurationComponentForProductType.- Example:
ISL_AA_RuleCondition_configurationComponentForCoveragePurpose- Required rule inputs:
- currentRuleCondition:
ISL_AA_CFG_RuleCondition - genBundle: Any Type
- conditionMap: Map
- isLabelCollapsed: Boolean
- accessibilityText: Text
- currentRuleCondition:
- Required rule inputs:
- Example:
- Note: Choose an existing configuration interface to duplicate that is most similar to your new field configuration. For example, since coverage purpose will be configured in a similar way to product type (selecting a value from a dropdown of options from a reference table), duplicate
- Ensure that the new interface is added to the ISL Auto-Assignment of Cases application package.
- Add a map item to
ISL_AA_CFG_assignmentFieldReference.- code: Create a constant for the code that you want to use to represent this field, and call the constant here.
- evalRule: Rule reference to the evaluation rule you just created.
- label: Create a key-value pair in the ISL_AA bundles for the label that will display when configuring this type of rule condition (i.e., “Coverage Purpose”), and call the key here.
- configurationComponent: Interface reference to the configuration interface you just created.
- allowedOperators: List of allowed operators using the available constants (same as the operators used in the
match()statement of the evaluation rule).{cons!ISL_AA_TXT_CONDITION_OPERATOR_EQUALS, cons!ISL_AA_TXT_CONDITION_OPERATOR_NOT_EQUALS}
- Search for the existing operator constants by searching for ISL_AA_TXT_CONDITION_OPERATOR_.
- Repeat steps 8-9 for each desired additional field.
- Save ISL_AA_CFG_assignmentFieldReference.
- Test the new rule condition types by creating and applying assignment rules using them.