
IntroductionCopy link to clipboard
Case Management Studio is a suite of applications with pre-built functionality, including a case workspace, case, entity, task records, configurable workflows, conditional tasking, workflow visualization, auditing and reporting, and so much more.
Case Management Studio is built on the Appian low-code platform with a modular design, with both in-app and extendable design frameworks to ensure that it meets your needs. Case Management Studio ships with modules that include pre-built features that are easily configurable and allow you to quickly expand your app functionality.
Case Management Studio is available out-of-the-box with the Appian platform for Appian Cloud and self-managed customers. Case Management Studio comes pre-installed in new cloud sites with English (US) as the primary locale, and can be installed by Support upon request in existing cloud sites for first time installs. For Appian Cloud customers with Case Management Studio already installed, the steps on this page are not needed.
For self-managed customers on 24.1 and higher, Case Management Studio must be installed manually using the following steps:
- Downloading the software package.
- Deploying the application plug-ins.
- Creating the database objects.
- Importing the application.
- Setting up groups.
This page also provides instructions on extending Case Management Studio with modules by incorporating one or more of the modules that ship with it.
Before proceeding with the installation steps outlined in this guide, be sure to review the System Requirements to ensure your system environment meets all minimum requirements.
Before you beginCopy link to clipboard
Before you being downloading and installing Case Management Studio, be sure to check the system requirements and verify your Appian version and database type. Self-managed customers also need to enable two custom properties and restart the app server.
System requirementsCopy link to clipboard
- Appian platform running version 24.1 or higher.
- A supported version of MariaDB as a business data source.
- Note: Instructions below are for MariaDB databases. For use with other databases, the SQL script used in Step 3 will need to be modified.
- A supported web browser.
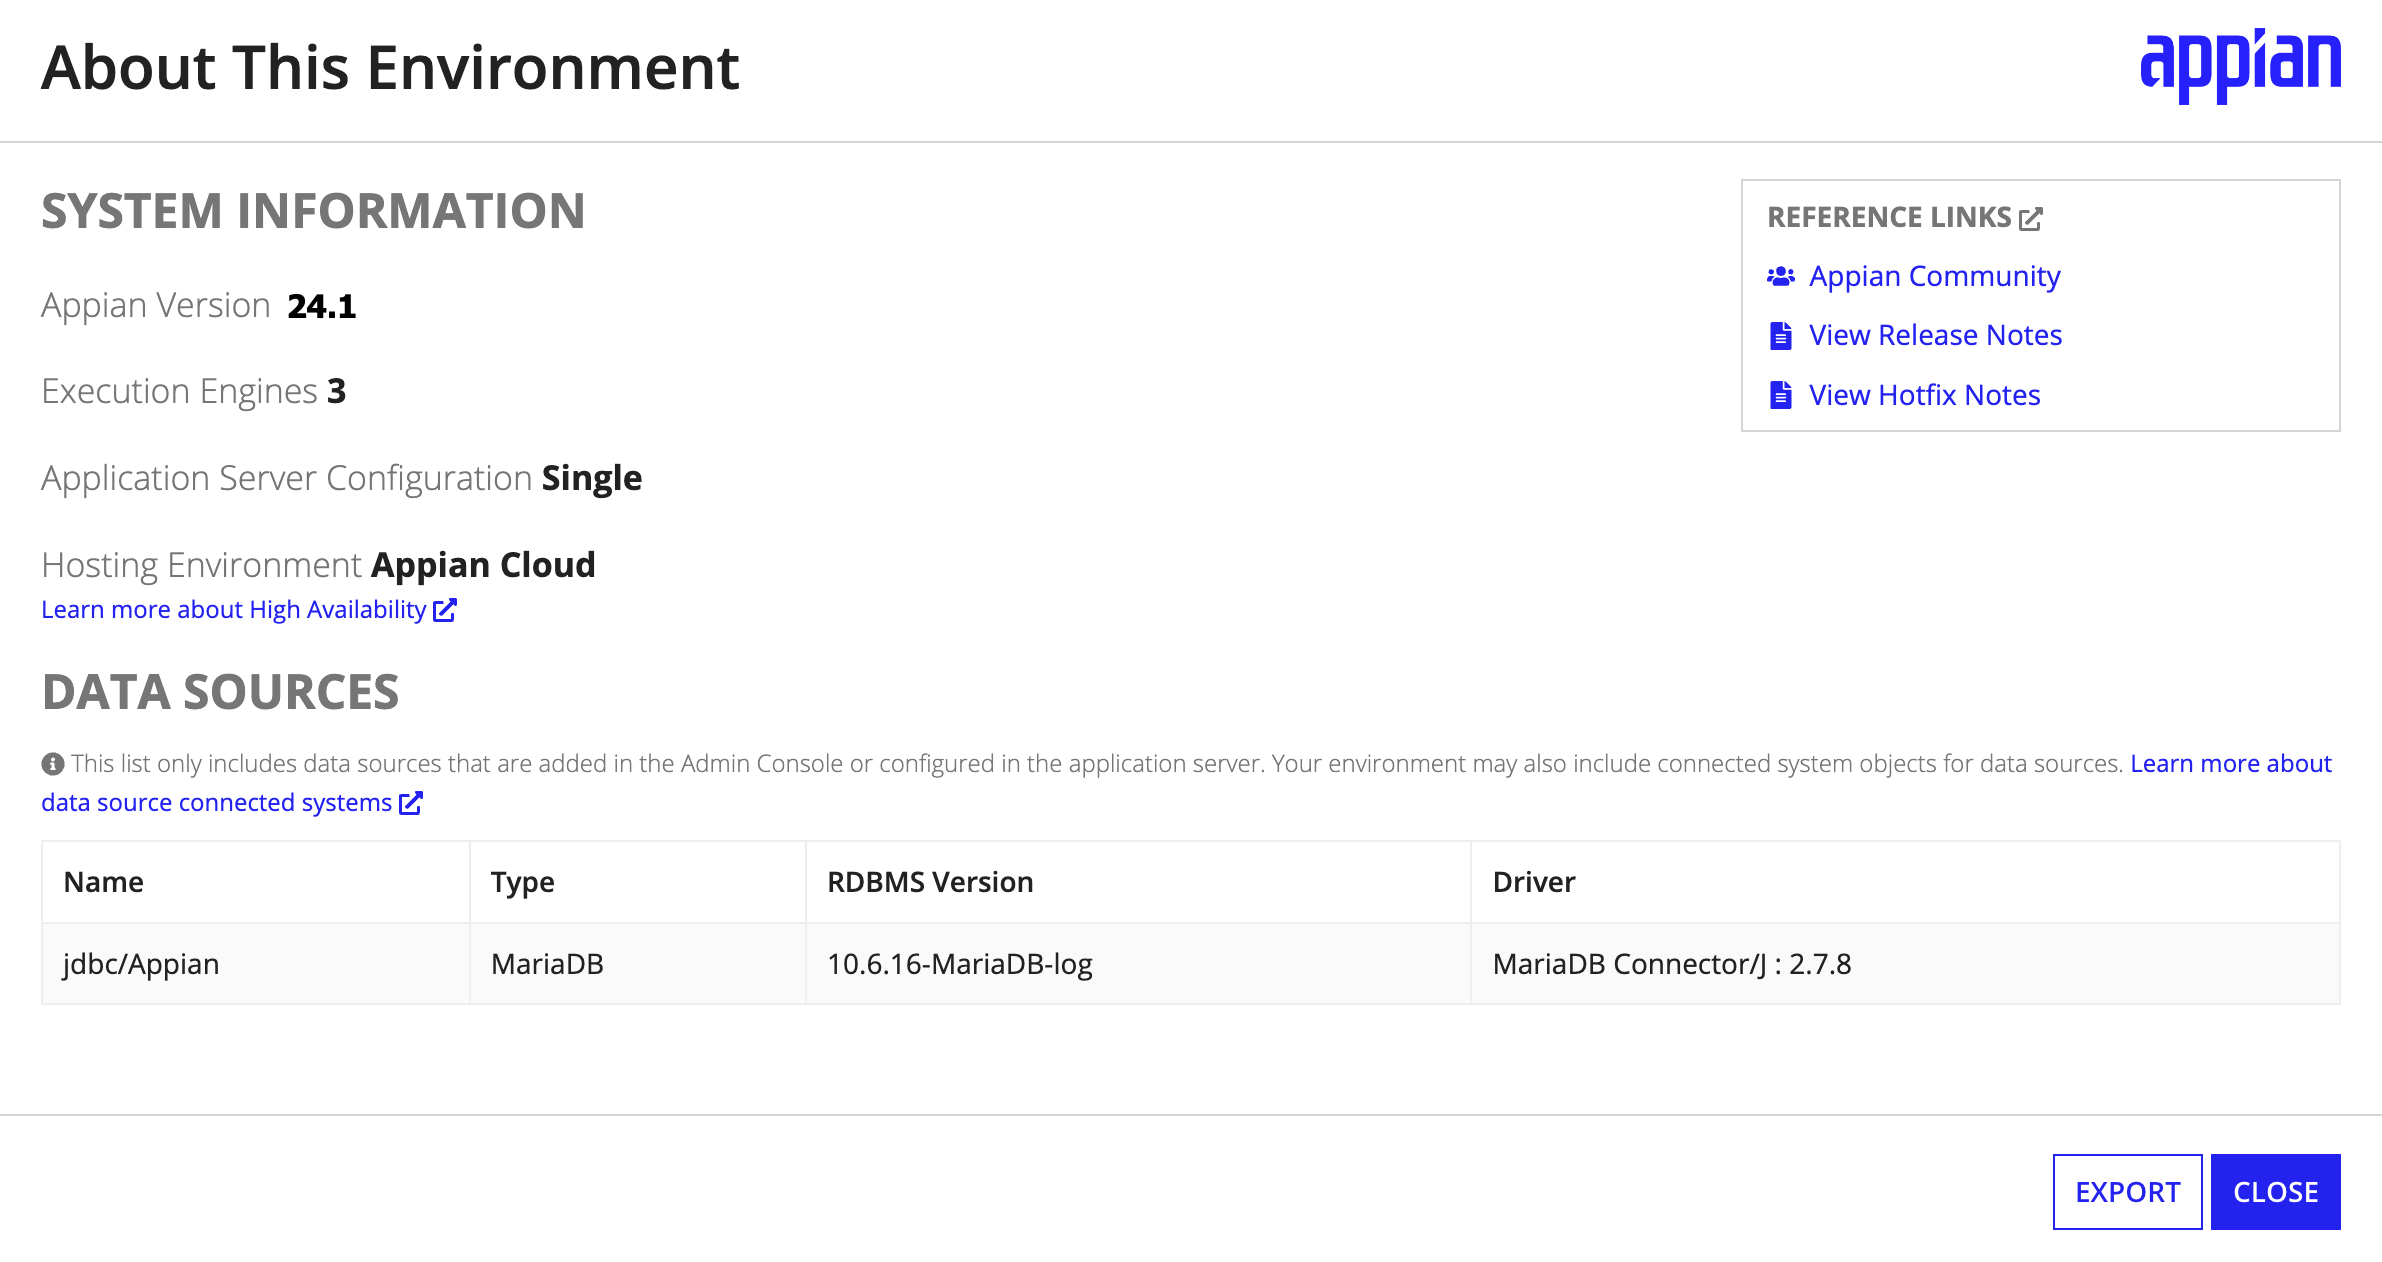
Verify the Appian version and database typeCopy link to clipboard
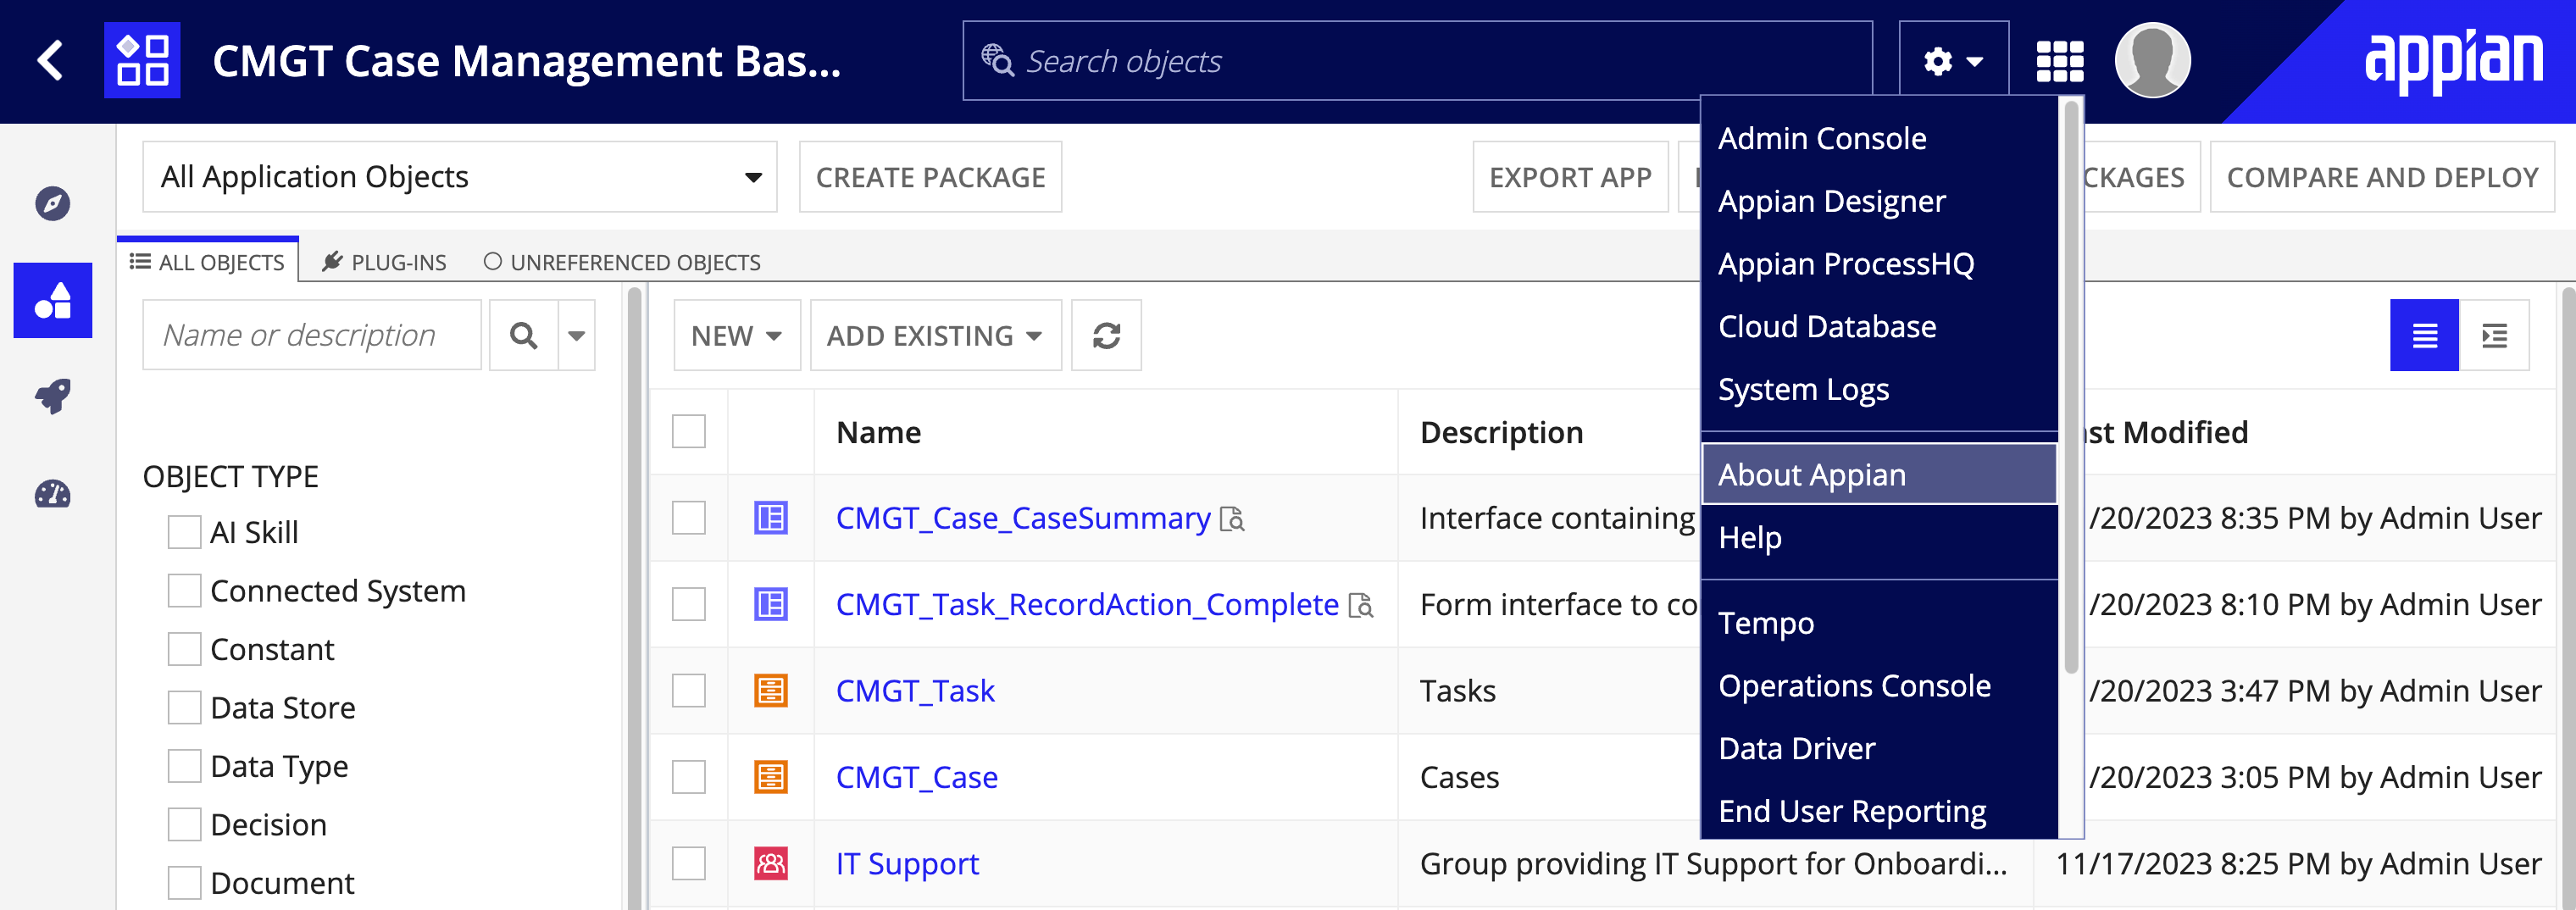
To check the platform version and database, click About Appian from the navigation bar.
Enable custom propertiesCopy link to clipboard
Before installing Case Management Studio, self-managed customers need to enable two custom properties in the custom properties file before restarting the app server.
To do this:
- Open the custom properties file located at
<APPIAN_HOME>/conf/. - Set the value of the
appian.feature.solutions-api.enabledproperty totrue.- For example:
appian.feature.solutions-api.enabled=true.
- For example:
- Set the value of the
appian.feature.solutions-api.cmStudio.enabledproperty totrue.- For example:
appian.feature.solutions-api.cmStudio.enabled=true.
- For example:
Once you've enabled these properties, restart the app server. For instructions on restarting the app server, see Starting and Stopping Appian. While the server is restarting, go ahead and start your installation process.
Step 1: Download the software packageCopy link to clipboard
To download the software package if the primary locale for your environment is not English (US):
- Open MyAppian.
- Click SUPPORT.
- Click DOWNLOADS.
- Click SOLUTIONS.
- Under Available Solutions, select Case Management Studio.
- Under Downloads, click Case Management Studio (Base + Studio + Report Builder) and agree to the License Agreement.
- Select the appropriate primary locale for your environment.
- Click Case Management Studio (Base + Studio + Report Builder) to download and finish.
- Unzip the studio zip file to access the installation files.
- Continue on with step 2.
The first step in installing Case Management Studio is to download the Case Management Studio (Base + Studio + Report Builder) software package that contains the following files. These files will be used in the remaining setup steps.
01.CaseManagementStudiov1.3.0.sql: SQL script for creating the database objects needed for the Appian Case Management Base application.02.CaseManagementStudiov1.3.0.sql: SQL script for creating the database objects needed for the Studio application.03.CaseManagementStudiov1.3.0.sql: SQL script for creating the database objects needed for the Report Builder application.CaseManagementStudiov1.3.0.zip: Application package to import into Appian.CaseManagementStudiov1.3.0.properties: Import customization file needed for the Report Builder application.
To download the software package if the primary locale for your environment is English (US):
- In MyAppian, navigate to the Support tab.
- Select DOWNLOADS and then SOLUTIONS.
- In the grid, click Appian Case Management Studio.
- Under Downloads, click Case Management Studio (Base + Studio + Report Builder) and agree to the License Agreement.
- Click Case Management Studio to download the ZIP file.
- Unzip
CaseManagementStudiov1.3.0.zipto access the installation files
Step 2: Deploy plug-insCopy link to clipboard
The steps for deploying plug-ins differ depending on whether you have an Appian Cloud or a self-managed environment. Before importing the Case Management Studio for Public Sector application files, you must deploy and configure the plug-ins required for your environment in the target system.
To download the necessary plug-ins and deploy them to your environments, follow the steps that match your environment setup.
Appian Cloud environmentsCopy link to clipboard
To deploy the plug-ins for an Appian Cloud environment:
- In the target environment, log in as the deployment user.
- Navigate to the Admin Console.
- On the left side of the console, click Plug-ins.
- Click ADD PLUG-INS.
- Search for and click Appian Solutions.
- Click DEPLOY.
-
Repeat the above steps for each of the following plug-ins:
Appian Solutions Component Plugins 1.1.0+Appian Solutions Plugin 1.35.1+Content Tools - 1.1.11+Rich Text Editor Component Plug-In 1.12.1+Appian Regular Expression FunctionsDate and Time UtilitiesText CacheZip File Utilities
Self-managed environmentsCopy link to clipboard
To deploy the plug-ins for a self-managed environment:
- Download the following plug-ins directly from the Appian AppMarket:
- Follow the Deploying Plug-ins instructions above to deploy the plug-ins.
Step 3: Create database objectsCopy link to clipboard
To create the structure for the database tables, views, and other objects that are a part of Case Management Studio, you need to run the following DDL scripts in your database.
To create the database objects:
-
In your MariaDB business database, import and run the following files downloaded in Step 1:
01.CaseManagementStudiov1.3.0.sql02.CaseManagementStudiov1.3.0.sql03.CaseManagementStudiov1.3.0.sql
Step 4: Import the applicationCopy link to clipboard
Next, you need to import Case Management Studio into the target environment.
To import it:
- In the target environment, log in as the deployment user.
- Navigate to the Appian Designer.
- Click IMPORT.
- Click UPLOAD and choose the application
CaseManagementStudiov1.3.0file downloaded in Step 1. - Click the Include related import customization file checkbox and click UPLOAD. Select the
CaseManagementStudiov1.3.0.propertiesfile that was downloaded in Step 1. - Click INSPECT to ensure that there will be no complications on import.
- Note: The inspection could take several minutes to complete and may time out. If this occurs, the import will continue in the background.
- Click IMPORT.
- Note: The import may time out due to file size, but the import will continue in the background.
- Review the import results to confirm the following Case Management Studio application containers were imported:
CMGT Case Management Studio Base (CMGT)CMGT Studio Module (CMGT_WFL)CMGT Studio Generated Objects (CMGT)
Step 5: Set Up GroupsCopy link to clipboard
Security in Case Management Studio is defined by two main role groups: Caseworkers and Case Managers. Functionally, these groups have the same access rights to the Workspace application, with the expectation that you may alter group security to meet the needs of specific use cases.
To allow users to access the Case Management Workspace, complete the following steps:
- From Appian Designer, find the CMGT Case Workers or CMGT Case Managers group.
- Click Add Members.
- In the Search field, start entering the usernames you want to select and add in the Users to Add field.
- After locating all users, click Add.
Next, you need to set up business level groups, which are used for assigning cases and tasks. Because these groups are defined by use case, there are no business groups shipped with the application.
To create new business groups, complete the following steps:
- From Appian Designer, find the group CMGT Business Groups.
- Click New Group.
- Enter name for new business group (For example, Finance).
- Add group members.
- Set group Visibility to Public.
- Click Create.
- Repeat these steps until you create all the business groups you need.
Finally, as an optional step, you can add users to the following security groups with access to the Studio site out of the box.
- CMGT Design Administrators
- CMGT Case Managers
Step 6: Extending Case Management StudioCopy link to clipboard
Now that you've successfully installed Case Management Studio, you can extend its feature capabilities by installing the Report Builder Module.